Computers and Structures, Inc.
Berkeley, California, USA
January 2002Version 8ETABS
®
Integrated Building Design Software
Copyright Computers and Structures, Inc., 1978-2002. The CSI Logo is a trademark of Computers and Structures, Inc. ETABS is a trademark of Computers and Structures, Inc. Windows is a registered trademark of Microsoft Corporation. Adobe and Acrobat are registered trademarks of Adobe Systems Incorporated
Copyright
The computer program ETABS and all associated documentation are proprietary and
copyrighted products. Worldwide rights of ownership rest with Computers and
Structures, Inc. Unlicensed use of the program or reproduction of the documentation in
any form, without prior written authorization from Computers and Structures, Inc., is
explicitly prohibited.
Further information and copies of this documentation may be obtained from:
Computers and Structures, Inc.
1995 University Avenue
Berkeley, California 94704 USA
Phone: (510) 845-2177
FAX: (510) 845-4096
e-mail: [email protected] (for general questions)
e-mail: [email protected] (for technical support questions)
DISCLAIMER
CONSIDERABLE TIME, EFFORT AND EXPENSE HAVE GONE INTO THE
DEVELOPMENT AND DOCUMENTATION OF ETABS. THE PROGRAM HAS
BEEN THOROUGHLY TESTED AND USED. IN USING THE PROGRAM,
HOWEVER, THE USER ACCEPTS AND UNDERSTANDS THAT NO WARRANTY
IS EXPRESSED OR IMPLIED BY THE DEVELOPERS OR THE DISTRIBUTORS
ON THE ACCURACY OR THE RELIABILITY OF THE PROGRAM.
THIS PROGRAM IS A VERY PRACTICAL TOOL FOR THE DESIGN/CHECK OF
CONCRETE STRUCTURES. HOWEVER, THE USER MUST THOROUGHLY READ
THE MANUAL AND CLEARLY RECOGNIZE THE ASPECTS OF CONCRETE
DESIGN THAT THE PROGRAM ALGORITHMS DO NOT ADDRESS.
i
©COMPUTERS AND STRUCTURES, INC., BERKELEY, CALIFORNIA DECEMBER 2001CONCRETE FRAME DESIGN
Contents
General Concrete Frame Design Information
1 General Design Information
Design Codes 1-1
Units 1-1
Overwriting the Frame Design Procedure for a Con-crete Frame
1-1
Design Load Combinations 1-2
Design of Beams 1-2
Design of Columns 1-3
Beam/Column Flexural Capacity Ratios 1-4
Second Order P-Delta Effects 1-4
Element Unsupported Lengths 1-6
Analysis Sections and Design Sections 1-7
2 Concrete Frame Design Process
Concrete Frame Design Procedure 2-1
3 Interactive Concrete Frame Design
General 3-1
Concrete Design Information Form 3-1
4 Output Data Plotted Directly on the Model
Overview 4-1
Using the Print Design Tables Form 4-1
Design Input 4-2
Concrete Frame Design Manual
ii
Concrete Frame Design Specific to UBC97
5 General and Notation
Introduction to the UBC 97 Series of Technical Notes 5-1
Notation 5-2
6 Preferences
General 6-1
Using the Preferences Form 6-1
Preferences 6-2
7 Overwrites
General 7-1
Overwrites 7-1
Making Changes in the Overwrites Form 7-3 Resetting Concrete Frame Overwrites to Default
Values
7-4
8 Design Load Combinations
9 Strength Reduction Factors
10 Column Design
Overview 10-1
Generation of Biaxial Interaction Surfaces 10-2
Calculate Column Capacity Ratio 10-5
Determine Factored Moments and Forces 10-6 Determine Moment Magnification Factors 10-6
Determine Capacity Ratio 10-8
Required Reinforcing Area 10-10
Design Column Shear Reinforcement 10-10 Determine Required Shear Reinforcement 10-14
Reference 10-15
11 Beam Design
Overview 11-1
Design Beam Flexural Reinforcement 11-1
Determine Factored Moments 11-2
Contents
iii
Design Beam Shear Reinforcement 11-10
12 Joint Design
Overview 12-1
Determine the Panel Zone Shear Force 12-1 Determine the Effective Area of Joint 12-5
Check Panel Zone Shear Stress 12-5
Beam/Column Flexural Capacity Ratios 12-6
13 Input Data
Input data 13-1
Using the Print Design Tables Form 13-3
14 Output Details
Using the Print Design Tables Form 14-3
Concrete Frame Design Specific to ACI-318-99
15 General and Notation
Introduction to the ACI318-99 Series of Technical Notes
15-1
Notation 15-2
16 Preferences
General 16-1
Using the Preferences Form 16-1
Preferences 16-2
17 Overwrites
General 17-1
Overwrites 17-1
Making Changes in the Overwrites Form 17-3 Resetting Concrete Frame Overwrites to Default
Values
17-4
18 Design Load Combinations
Concrete Frame Design Manual
iv
20 Column Design
Overview 20-1
Generation of Biaxial Interaction Surfaces 20-2
Calculate Column Capacity Ratio 20-5
Determine Factored Moments and Forces 20-6 Determine Moment Magnification Factors 20-6
Determine Capacity Ratio 20-9
Required Reinforcing Area 20-10
Design Column Shear Reinforcement 20-10
Determine Section Forces 20-11
Determine Concrete Shear Capacity 20-12 Determine Required Shear Reinforcement 20-13
References 20-15
21 Beam Design
Overview 21-1
Design Beam Flexural Reinforcement 21-1
Determine Factored Moments 21-2
Determine Required Flexural Reinforcement 21-2
Design for T-Beam 21-5
Minimum Tensile Reinforcement 21-8 Special Consideration for Seismic Design 21-8
Design Beam Shear Reinforcement 21-9
Determine Shear Force and Moment 21-11 Determine Concrete Shear Capacity 21-12 Determine Required Shear Reinforcement 21-13
22 Joint Design
Overview 22-1
Determine the Panel Zone Shear Force 22-1 Determine the Effective Area of Joint 22-4 Check Panel Zone Shear Stress 22-4 Beam/Column Flexural Capacity Ratios 22-6
23 Input Data
Input Data 23-1
Contents
v
24 Output DetailsDesign Codes Technical Note 1 - 1 ©COMPUTERS AND STRUCTURES, INC., BERKELEY, CALIFORNIA JANUARY 2002
CONCRETE FRAME DESIGN
Technical Note 1
General Design Information
This Technical Note presents some basic information and concepts helpful when performing concrete frame design using this program.
Design Codes
The design code is set using the Options menu > Preferences > Concrete Frame Design command. You can choose to design for any one design code in any one design run. You cannot design some elements for one code and others for a different code in the same design run. You can, however, perform different design runs using different design codes without rerunning the analysis.
Units
For concrete frame design in this program, any set of consistent units can be used for input. You can change the system of units at any time. Typically, de-sign codes are based on one specific set of units.
Overwriting the Frame Design Procedure for a Concrete
Frame
The two design procedures possible for concrete beam design are:
Concrete frame design No design
General Design Information Concrete Frame Design
Technical Note 1 - 2 Design Load Combinations
Change the default design procedure used for concrete frame elements by selecting the element(s) and clicking Design menu > Overwrite Frame Design Procedure. This change is only successful if the design procedure assigned to an element is valid for that element. For example, if you select a concrete element and attempt to change the design procedure to Steel Frame Design, the program will not allow the change because a concrete element cannot be changed to a steel frame element.
Design Load Combinations
The program creates a number of default design load combinations for con-crete frame design. You can add in your own design load combinations. You can also modify or delete the program default load combinations. An unlim-ited number of design load combinations can be specified.
To define a design load combination, simply specify one or more load cases, each with its own scale factor. For more information see Concrete Frame De-sign UBC97 Technical Note 8 DeDe-sign Load Combination and Concrete Frame Design ACI 318-99 Technical Note 18 Design Load Combination.
Design of Beams
The program designs all concrete frame elements designated as beam sec-tions in their Frame Section Properties as beams (see Define menu >Frame Sections command and click the Reinforcement button). In the design of concrete beams, in general, the program calculates and reports the required areas of steel for flexure and shear based on the beam moments, shears, load combination factors, and other criteria, which are described in detail in Con-crete Frame UBC97 Technical Note Beam Design 11 and ConCon-crete Frame ACI 318-99 Technical Note 21 Beam Design. The reinforcement requirements are calculated at each output station along the beam span.
All the beams are designed for major direction flexure and shear only. Effects resulting from any axial forces, minor direction bending, and torsion that may exist in the beams must be investigated independ-ently by the user.
Concrete Frame Design General Design Information
Design of Beams Technical Note 1 - 3
The beam section is designed for the maximum positive and maximum nega-tive factored moment envelopes obtained from all of the load combinations. Negative beam moments produce top steel. In such cases, the beam is al-ways designed as a rectangular section. Positive beam moments produce bottom steel. In such cases, the beam may be designed as a rectangular- or T-beam. For the design of flexural reinforcement, the beam is first designed as a singly reinforced beam. If the beam section is not adequate, the required compression reinforcement is calculated.
In designing the shear reinforcement for a particular beam for a particular set of loading combinations at a particular station resulting from the beam major shear, the steps involve the determination of the factored shear force, the determination of the shear force that can be resisted by concrete, and the determination of the reinforcement steel required to carry the balance.
Design of Columns
The program designs all concrete frame elements designated as column sec-tions in their Frame Section Properties as columns (see Define menu >Frame Sections command and click the Reinforcement button). In the design of the columns, the program calculates the required longitudinal steel, or if the longitudinal steel is specified, the column stress condition is reported in terms of a column capacity ratio. The capacity ratio is a factor that gives an indication of the stress condition of the column with respect to the capacity of the column. The design procedure for reinforced concrete columns involves the following steps:
Generate axial force-biaxial moment interaction surfaces for all of the dif-ferent concrete section types of the model.
Check the capacity of each column for the factored axial force and bending moments obtained from each load combination at each end of the column. This step is also used to calculate the required reinforcement (if none was specified) that will produce a capacity ratio of 1.0.
Design the column shear reinforcement.
General Design Information Concrete Frame Design
Technical Note 1 - 4 Second Order P-Delta Effects
Column Design and Concrete Frame ACI 318-99 Technical Note 20 Column Design for more information.
Beam/Column Flexural Capacity Ratios
When the ACI 318-99 or UBC97 code is selected, the program calculates the ratio of the sum of the beam moment capacities to the sum of the column moment capacities at a particular joint for a particular column direction, ma-jor or minor. The capacities are calculated with no reinforcing overstrength factor, α, and including ϕ factors. The beam capacities are calculated for re-versed situations and the maximum summation obtained is used.
The moment capacities of beams that frame into the joint in a direction that is not parallel to the major or minor direction of the column are resolved along the direction that is being investigated and the resolved components are added to the summation.
The column capacity summation includes the column above and the column below the joint. For each load combination, the axial force, Pu, in each of the columns is calculated from the program analysis load combinations. For each load combination, the moment capacity of each column under the influence of the corresponding axial load Pu is then determined separately for the major and minor directions of the column, using the uniaxial column interaction dia-gram. The moment capacities of the two columns are added to give the pacity summation for the corresponding load combination. The maximum ca-pacity summations obtained from all of the load combinations is used for the beam/column capacity ratio.
The beam/column flexural capacity ratios are only reported for Special Mo-ment-Resisting Frames involving seismic design load combinations.
See Beam/Column Flexural Capacity Ratios in Concrete Frame UBC97 Techni-cal Note 12 Joint Design or in Concrete Frame ACI 318-99 TechniTechni-cal Note 22 Joint Design for more information.
Second Order P-Delta Effects
Concrete Frame Design General Design Information
Second Order P-Delta Effects Technical Note 1 - 5
Consider the frame element shown in Figure 1, which is extracted from a story level of a larger structure. The overall global translation of this frame element is indicated by ∆. The local deformation of the element is shown as δ. The total second order P-Delta effects on this frame element are those caused by both ∆ and δ.
The program has an option to consider P-Delta effects in the analysis. Con-trols for considering this effect are found using the Analyze menu > Set Analysis Options command and then clicking the Set P-Delta Parameters button. When you consider P-Delta effects in the analysis, the program does a good job of capturing the effect due to the ∆ deformation shown in Figure 1, but it does not typically capture the effect of the δ deformation (unless, in the model, the frame element is broken into multiple pieces over its length). In design codes, consideration of the second order P-Delta effects is generally achieved by computing the flexural design capacity using a formula similar to that shown in Equation. 1.
MCAP = aMnt + bMlt Eqn. 1
where,
MCAP = Flexural design capacity
∆
δ
Original position of frameelement shown by vertical line
Position of frame element as a result of global lateral translation, ∆, shown by dashed line
Final deflected position of frame element that includes the global lateral translation, ∆, and the local deformation of the element, δ
General Design Information Concrete Frame Design
Technical Note 1 - 6 Element Unsupported Lengths
Mnt = Required flexural capacity of the member assuming there is no translation of the frame (i.e., associated with the δ defor-mation in Figure 1)
Mlt = Required flexural capacity of the member as a result of lateral translation of the frame only (i.e., associated with the ∆ de-formation in Figure 1)
a = Unitless factor multiplying Mnt
b = Unitless factor multiplying Mlt (assumed equal to 1 by the program; see below)
When the program performs concrete frame design, it assumes that the factor b is equal to 1 and it uses code-specific formulas to calculate the factor a. That b = 1 assumes that you have considered P-Delta effects in the analysis, as previously described. Thus, in general, if you are performing concrete frame design in this program, you should consider P-Delta effects in the analysis before running the design.
Element Unsupported Lengths
The column unsupported lengths are required to account for column slender-ness effects. The program automatically determines these unsupported lengths. They can also be overwritten by the user on an element-by-element basis, if desired, using the Design menu > Concrete Frame Design > View/Revise Overwrites command.
There are two unsupported lengths to consider. They are L33 and L22, as shown in Figure 2. These are the lengths between support points of the ele-ment in the corresponding directions. The length L33 corresponds to instability about the 3-3 axis (major axis), and L22 corresponds to instability about the 2-2 axis (minor axis). The length L22 is also used for lateral-torsional buckling caused by major direction bending (i.e., about the 3-3 axis).
Concrete Frame Design General Design Information
Analysis Sections and Design Sections Technical Note 1 - 7
Figure 2: Major and Minor Axes of Bending
It is possible for the unsupported length of a frame element to be evaluated by the program as greater than the corresponding element length. For exam-ple, assume a column has a beam framing into it in one direction, but not the other, at a floor level. In this case, the column is assumed to be supported in one direction only at that story level, and its unsupported length in the other direction will exceed the story height.
Analysis Sections and Design Sections
Analysis sections are those section properties used to analyze the model when you click the Analyze menu > Run Analysis command. The design section is whatever section has most currently been designed and thus desig-nated the current design section.
Tip:
General Design Information Concrete Frame Design
Technical Note 1 - 8 Analysis Sections and Design Sections It is possible for the last used analysis section and the current design section to be different. For example, you may have run your analysis using a W18X35 beam and then found in the design that a W16X31 beam worked. In that case, the last used analysis section is the W18X35 and the current design section is the W16X31. Before you complete the design process, verify that the last used analysis section and the current design section are the same. The Design menu > Concrete Frame Design > Verify Analysis vs De-sign Section command is useful for this task.
The program keeps track of the analysis section and the design section separately. Note the following about analysis and design sections:
Assigning a beam a frame section property using the Assign menu > Frame/Line > Frame Section command assigns the section as both the analysis section and the design section.
Running an analysis using the Analyze menu > Run Analysis command (or its associated toolbar button) always sets the analysis section to be the same as the current design section.
Assigning an auto select list to a frame section using the Assign menu > Frame/Line > Frame Section command initially sets the design section to be the beam with the median weight in the auto select list.
Unlocking a model deletes the design results, but it does not delete or change the design section.
Using the Design menu > Concrete Frame Design > Select Design Combo command to change a design load combination deletes the design results, but it does not delete or change the design section.
Using the Define menu > Load Combinations command to change a de-sign load combination deletes the dede-sign results, but it does not delete or change the design section.
Using the Options menu > Preferences > Concrete Frame Design command to change any of the composite beam design preferences deletes the design results, but it does not delete or change the design section. Deleting the static nonlinear analysis results also deletes the design results
Concrete Frame Design General Design Information
Analysis Sections and Design Sections Technical Note 1 - 9 static nonlinear analysis and design results are deleted when one of the following actions is taken:
9 Use the Define menu > Frame Nonlinear Hinge Properties com-mand to redefine existing or define new hinges.
9 Use the Define menu > Static Nonlinear/Pushover Cases com-mand to redefine existing or define new static nonlinear load cases. 9 Use the Assign menu > Frame/Line > Frame Nonlinear Hinges
command to add or delete hinges.
Concrete Frame Design Procedure Technical Note 2 - 1 ©COMPUTERS AND STRUCTURES, INC., BERKELEY, CALIFORNIA DECEMBER 2001
CONCRETE FRAME DESIGN
Technical Note 2
Concrete Frame Design Process
This Technical Note describes a basic concrete frame design process using this program. Although the exact steps you follow may vary, the basic design process should be similar to that described herein. Other Technical Notes in the Concrete Frame Design series provide additional information, including the distinction between analysis sections and design sections (see Analysis Sections and Design Sections in Concrete Frame Design Technical Note 1 General Design Information).
The concrete frame design postprocessor can design or check concrete col-umns and can design concrete beams.
Important note: A concrete frame element is designed as a beam or a col-umn, depending on how its frame section property was designated when it was defined using the Define menu > Frame Sections command. Note that when using this command, after you have specified that a section has a con-crete material property, you can click on the Reinforcement button and specify whether it is a beam or a column.
Concrete Frame Design Procedure
The following sequence describes a typical concrete frame design process for a new building. Note that although the sequence of steps you follow may vary, the basic process probably will be essentially the same.
Concrete Frame Design Process Concrete Frame Design
Technical Note 2 - 2 Concrete Frame Design Procedure 2. Create the building model.
3. Run the building analysis using the Analyze menu > Run Analysis command.
4. Assign concrete frame overwrites, if needed, using the Design menu > Concrete Frame Design > View/Revise Overwrites command. Note that you must select frame elements before using this command. Also note that default values are provided for all concrete frame design over-writes, so it is unnecessary to define any overwrites unless you want to change some of the default values. Note that the overwrites can be as-signed before or after the analysis is run. See Concrete Frame Design UBC97 Technical Note 7 Overwrites and Concrete Frame Design ACI 318-99 Technical Note 17 Overwrites for more information.
5. To use any design load combinations other than the defaults created by the program for your concrete frame design, click the Design menu > Concrete Frame Design > Select Design Combo command. Note that you must have already created your own design combos by clicking the Define menu > Load Combinations command. See Concrete Frame Design UBC97 Technical Note 8 Design Load Combinations and Concrete Frame Design ACI 318-99 Technical Note 18 Design Load Combinations for more information.
6. Click the Design menu > Concrete Frame Design > Start De-sign/Check of Structure command to run the concrete frame design.
7. Review the concrete frame design results by doing one of the following:
a. Click the Design menu > Concrete Frame Design > Display De-sign Info command to display deDe-sign input and output information on the model. See Concrete Frame Design Technical Note 4 Output Data Plotted Directly on the Model for more information.
Concrete Frame Design Concrete Frame Design Process
Concrete Frame Design Procedure Technical Note 2 - 3 If design results are not currently displayed (and the design has been run), click the Design menu > Concrete Frame Design > Interac-tive Concrete Frame Design command and then right click a frame element to enter the interactive design mode for that element.
8. Use the File menu > Print Tables > Concrete Frame Design com-mand to print concrete frame design data. If you select frame elements before using this command, data is printed only for the selected ele-ments. See Concrete Frame Design UBC97 Technical Note 14 Output Details and Concrete Frame Design ACI 318-99 Technical Note 24 Out-put Details for more information.
9. Use the Design menu > Concrete Frame Design > Change Design Section command to change the design section properties for selected frame elements.
10. Click the Design menu > Concrete Frame Design > Start De-sign/Check of Structure command to rerun the concrete frame design with the new section properties. Review the results using the procedures described in Item 7.
11. Rerun the building analysis using the Analyze menu > Run Analysis command. Note that the section properties used for the analysis are the last specified design section properties.
12. Click the Design menu > Concrete Frame Design > Start De-sign/Check of Structure command to rerun the concrete frame design with the new analysis results and new section properties. Review the re-sults using the procedures described above.
13. Again use the Design menu > Concrete Frame Design > Change Design Section command to change the design section properties for selected frame elements, if necessary.
14. Repeat the processes in steps 10, 11 and 12 as many times as neces-sary.
Concrete Frame Design Process Concrete Frame Design
Technical Note 2 - 4 Concrete Frame Design Procedure Note:
Concrete frame design is an iterative process. Typically, the analysis and design will be rerun multiple times to complete a design.
16. Click the Design menu > Concrete Frame Design > Start De-sign/Check of Structure command to rerun the concrete frame design with the new section properties. Review the results using the procedures described in Item 7.
17. Click the Design menu > Concrete Frame Design > Verify Analysis vs Design Section command to verify that all of the final design sec-tions are the same as the last used analysis secsec-tions.
18. Use the File menu > Print Tables > Concrete Frame Design com-mand to print selected concrete frame design results, if desired.
General Technical Note 3 - 1 ©COMPUTERS AND STRUCTURES, INC., BERKELEY, CALIFORNIA DECEMBER 2001
CONCRETE FRAME DESIGN
Technical Note 3
Interactive Concrete Frame Design
This Technical Note describes interactive concrete frame design and review, which is a powerful mode that allows the user to review the design results for any concrete frame design and interactively revise the design assumptions and immediately review the revised results.
General
Note that a design must have been run for the interactive design mode to be available. To run a design, click the Design menu > Concrete Frame De-sign > Start DeDe-sign/Check of Structure command.
Right click on a frame element while the design results are displayed on it to enter the interactive design mode and interactively design the element in the Concrete Design Information form. If design results are not currently dis-played (and a design has been run), click the Design menu > Concrete Frame Design > Interactive Concrete Frame Design command and then right click a frame element to enter the interactive design mode for that ele-ment.
Important note: A concrete frame element is designed as a beam or a
col-umn, depending on how its frame section property was designated when it was defined using the Define menu > Frame Sections command and the Reinforcement button, which is only available if it is a concrete section.
Concrete Design Information Form
Interactive Concrete Frame Design Concrete Frame Design
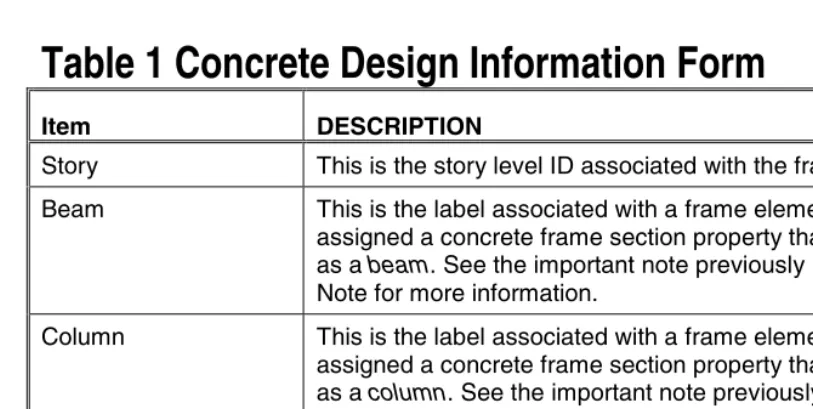
Technical Note 3 - 2 Table 1 Concrete Design Information Form
Table 1 Concrete Design Information Form
Item DESCRIPTION
Story This is the story level ID associated with the frame element.
Beam This is the label associated with a frame element that has been assigned a concrete frame section property that is designated as a beam. See the important note previously in this Technical Note for more information.
Column This is the label associated with a frame element that has been assigned a concrete frame section property that is designated as a column. See the important note previously in this Techni-cal Note for more information.
Section Name This is the label associated with a frame element that has been assigned a concrete frame section property.
Reinforcement Information
The reinforcement information table on the Concrete Design Information form shows the output information obtained for each design load combination at each output station along the frame element. For columns that are designed by this program, the item with the largest required amount of longitudinal reinforcing is initially highlighted. For columns that are checked by this program, the item with the largest capacity ratio is initially high-lighted. For beams, the item with the largest required amount of bottom steel is initially highlighted. Following are the possible headings in the table:
Combo ID This is the name of the design load combination considered.
Station location This is the location of the station considered, measured from the i-end of the frame element.
Longitudinal reinforcement
This item applies to columns only. It also only applies to col-umns for which the program designs the longitudinal reinforc-ing. It is the total required area of longitudinal reinforcing steel.
Concrete Frame Design Interactive Concrete Frame Design
Table 1 Concrete Design Information Form Technical Note 3 - 3
Table 1 Concrete Design Information Form
Item DESCRIPTION
The capacity ratio is determined by first extending a line from the origin of the PMM interaction surface to the point repre-senting the P, M2 and M3 values for the designated load com-bination. Assume the length of this first line is designated L1. Next, a second line is extended from the origin of the PMM in-teraction surface through the point representing the P, M2 and M3 values for the designated load combination until it intersects the interaction surface. Assume the length of this line from the origin to the interaction surface is designated L2. The capacity ratio is equal to L1/L2.
Major shear reinforcement
This item applies to columns only. It is the total required area of shear reinforcing per unit length for shear acting in the column major direction.
Minor shear reinforcement
This item applies to columns only. It is the total required area of shear reinforcing per unit length for shear acting in the column minor direction.
Top steel This item applies to beams only. It is the total required area of longitudinal top steel at the specified station.
Bottom steel This item applies to beams only. It is the total required area of longitudinal bottom steel at the specified station.
Shear steel This item applies to beams only. It is the total required area of shear reinforcing per unit length at the specified station for loads acting in the local 2-axis direction of the beam.
Overwrites Button Click this button to access and make revisions to the concrete frame overwrites and then immediately see the new design re-sults. If you modify some overwrites in this mode and you exit both the Concrete Frame Design Overwrites form and the Con-crete Design Information form by clicking their respective OK buttons, the changes to the overwrites are saved permanently.
Interactive Concrete Frame Design Concrete Frame Design
Technical Note 3 - 4 Table 1 Concrete Design Information Form
Table 1 Concrete Design Information Form
Item DESCRIPTION
Details Button Clicking this button displays design details for the frame ele-ment. Print this information by selecting Print from the File menu that appears at the top of the window displaying the de-sign details.
Overview Technical Note 4 - 1 ©COMPUTERS AND STRUCTURES, INC., BERKELEY, CALIFORNIA DECEMBER 2001
C
ONCRETEF
RAMED
ESIGNTechnical Note 4
Output Data Plotted Directly on the Model
This Technical Note describes the input and output data that can be plotted directly on the model.
Overview
Use the Design menu > Concrete Frame Design > Display Design Info command to display on-screen output plotted directly on the program model. If desired, the screen graphics can then be printed using the File menu > Print Graphics command. The on-screen display data presents input and output data.
Using the Print Design Tables Form
To print the concrete frame input summary directly to a printer, use the File menu > Print Tables > Concrete Frame Design command and click the check box on the Print Design Tables form. Click the OK button to send the print to your printer. Click the Cancel button rather than the OK button to cancel the print. Use the File menu > Print Setup command and the Setup>> button to change printers, if necessary.
To print the concrete frame input summary to a file, click the Print to File check box on the Print Design Tables form. Click the Filename>> button to change the path or filename. Use the appropriate file extension for the de-sired format (e.g., .txt, .xls, .doc). Click the OK buttons on the Open File for Printing Tables form and the Print Design Tables form to complete the re-quest.
Note:
The File menu > Display Input/Output Text Files command is useful for displaying out-put that is printed to a text file.
Output Data Plotted Directly on the Model Concrete Frame Design
Technical Note 4 - 2 Design Input
button to locate another file, and when the Open File for Printing Tables cau-tion box appears, click Yes to replace the existing file.
If you select a specific concrete frame element(s) before using the File menu > Print Tables > concrete Frame Design command, the Selection Only check box will be checked. The print will be for the selected steel frame ele-ment(s) only.
Design Input
The following types of data can be displayed directly on the model by select-ing the data type (shown in bold type) from the drop-down list on the Display Design Results form. Display this form by selecting he Design menu > Con-crete Frame Design > Display Design Info command.
Design Sections
Design Type
Live Load Red Factors
Unbraced L_Ratios
Eff Length K-Factors
Cm Factors
DNS Factors
DS Factors
Each of these items is described in the code-specific Concrete Frame Design UBC97 Technical Note 13 Input Data and Concrete Frame Design ACI 318-99 Technical Note 23 Input Data.
Design Output
Concrete Frame Design Output Data Plotted Directly on the Model
Design Output Technical Note 4 - 3
Longitudinal Reinforcing
Shear Reinforcing
Column Capacity Ratios
Joint Shear Capacity Ratios
Beam/Column Capacity Ratios
General and Notation Technical Note 5 - 1
©COMPUTERS AND STRUCTURES, INC., BERKELEY, CALIFORNIA DECEMBER 2001
C
ONCRETEF
RAMED
ESIGNUBC97
Technical Note 5
General and Notation
Introduction to the UBC97 Series of Technical Notes
The Concrete Frame Design UBC97 series of Technical Notes describes in de-tail the various aspects of the concrete design procedure that is used by this program when the user selects the UBC97 Design Code (ICBO 1997). The various notations used in this series are listed herein.
The design is based on user-specified loading combinations. The program provides a set of default load combinations that should satisfy requirements for the design of most building type structures. See Concrete Frame Design UBC97 Technical Note 8 Design Load Combinations for more information.
When using the UBC 97 option, a frame is assigned to one of the following five Seismic Zones (UBC 2213, 2214):
Zone 0
Zone 1
Zone 2
Zone 3
Zone 4
By default the Seismic Zone is taken as Zone 4 in the program. However, the Seismic Zone can be overwritten in the Preference form to change the de-fault. See Concrete Frame Design UBC97 Technical Note 6 Preferences for more information.
When using the UBC 97 option, the following Framing Systems are recognized and designed according to the UBC design provisions (UBC 1627, 1921):
General and Notation Concrete Frame Design UBC97
Technical Note 5 - 2 General and Notation
Intermediate Moment-Resisting Frame (IMRF)
Special Moment-Resisting Frame (SMRF)
The Ordinary Moment-Resisting Frame (OMF) is appropriate in minimal seis-mic risk areas, especially in Seisseis-mic Zones 0 and 1. The Intermediate Mo-ment-Resisting Frame (IMRF) is appropriate in moderate seismic risk areas, specially in Seismic Zone 2. The Special Moment-Resisting Frame (SMRF) is appropriate in high seismic risk areas, specially in Seismic Zones 3 and 4. The UBC seismic design provisions are considered in the program. The details of the design criteria used for the different framing systems are described in Concrete Frame Design UBC97 Technical Note 9 Strength Reduction Factors, Concrete Frame Design UBC97 Technical Note 10 Column Design, Concrete Frame Design UBC97 Technical Note 11 Beam Design, and Concrete Frame Design UBC97 Technical Note 12 Joint Design.
By default the frame type is taken in the program as OMRF in Seismic Zone 0 and 1, as IMRF in Seismic Zone 2, and as SMRF in Seismic Zone 3 and 4. However, the frame type can be overwritten in the Overwrites form on a member-by-member basis. See Concrete Frame Design UBC97 Technical Note 7 Overwrites for more information. If any member is assigned with a frame type, the change of the Seismic Zone in the Preferences will not modify the frame type of an individual member that has been assigned a frame type.
The program also provides input and output data summaries, which are de-scribed in Concrete Frame Design UBC97 Technical Note 13 Input Data and Concrete Frame Design UBC97 Technical Note 14 Output Details.
English as well as SI and MKS metric units can be used for input. The code is based on Inch-Pound-Second units. For simplicity, all equations and descrip-tions presented in this Technical Note correspond to Inch-Pound-Second units unless otherwise noted.
Notation
Acv Area of concrete used to determine shear stress, sq-in
Ag Gross area of concrete, sq-in
Concrete Frame Design UBC97 General and Notation
General and Notation Technical Note 5 - 3
'
s
A Area of compression reinforcement, sq-in
As(required) Area of steel required for tension reinforcement, sq-in
Ast Total area of column longitudinal reinforcement, sq-in
Av Area of shear reinforcement, sq-in
Cm Coefficient, dependent upon column curvature, used to calculate
moment magnification factor
D' Diameter of hoop, in
Ec Modulus of elasticity of concrete, psi
Es Modulus of elasticity of reinforcement, assumed as 29,000,000 psi
(UBC 1980.5.2)
Ig Moment of inertia of gross concrete section about centroidal axis,
neglecting reinforcement, in4
Ise Moment of inertia of reinforcement about centroidal axis of
mem-ber cross section, in4
L Clear unsupported length, in
M1 Smaller factored end moment in a column, lb-in
M2 Larger factored end moment in a column, lb-in
Mc Factored moment to be used in design, lb-in
Mns Nonsway component of factored end moment, lb-in
Ms Sway component of factored end moment, lb-in
Mu Factored moment at section, lb-in
Mux Factored moment at section about X-axis, lb-in
Muy Factored moment at section about Y-axis, lb-in
General and Notation Concrete Frame Design UBC97
Technical Note 5 - 4 General and Notation
Pc Critical buckling strength of column, lb
Pmax Maximum axial load strength allowed, lb
P0 Acial load capacity at zero eccentricity, lb
Pu Factored axial load at section, lb
Vc Shear resisted by concrete, lb
VE Shear force caused by earthquake loads, lb
VD+L Shear force from span loading, lb
Vu Factored shear force at a section, lb
Vp Shear force computed from probable moment capacity, lb
a Depth of compression block, in
ab Depth of compression block at balanced condition, in
b Width of member, in
bf Effective width of flange (T-Beam section), in
bw Width of web (T-Beam section), in
c Depth to neutral axis, in
cb Depth to neutral axis at balanced conditions, in
d Distance from compression face to tension reinforcement, in
d' Concrete cover to center of reinforcing, in
ds Thickness of slab (T-Beam section), in
'
c
f Specified compressive strength of concrete, psi
fy Specified yield strength of flexural reinforcement, psi
Concrete Frame Design UBC97 General and Notation
General and Notation Technical Note 5 - 5
fys Specified yield strength of flexural reinforcement, psi
h Dimension of column, in
k Effective length factor
r Radius of gyration of column section, in
α Reinforcing steel overstrength factor
β1 Factor for obtaining depth of compression block in concrete
βd Absolute value of ratio of maximum factored axial dead load to
maximum factored axial total load
δs Moment magnification factor for sway moments
δns Moment magnification factor for nonsway moments
εc Strain in concrete
εs Strain in reinforcing steel
General Technical Note 6 - 1 ©COMPUTERS AND STRUCTURES, INC., BERKELEY, CALIFORNIA DECEMBER 2001
C
ONCRETEF
RAMED
ESIGNUBC97
Technical Note 6
Preferences
This Technical Note describes the items in the Preferences form.
General
The concrete frame design preferences in this program are basic assignments that apply to all concrete frame elements. Use the Options menu > Prefer-ences > Concrete Frame Design command to access the Preferences form where you can view and revise the concrete frame design preferences.
Default values are provided for all concrete frame design preference items. Thus, it is not required that you specify or change any of the preferences. You should, however, at least review the default values for the preference items to make sure they are acceptable to you.
Using the Preferences Form
To view preferences, select the Options menu > Preferences > Concrete Frame Design. The Preferences form will display. The preference options are displayed in a two-column spreadsheet. The left column of the spread-sheet displays the preference item name. The right column of the spreadspread-sheet displays the preference item value.
To change a preference item, left click the desired preference item in either the left or right column of the spreadsheet. This activates a drop-down box or highlights the current preference value. If the drop-down box appears, select a new value. If the cell is highlighted, type in the desired value. The prefer-ence value will update accordingly. You cannot overwrite values in the drop-down boxes.
Preferences Concrete Frame Design UBC97
Technical Note 6 - 2 Preferences
the form, any changes made to the preferences are ignored and the form is closed.
Preferences
For purposes of explanation in this Technical Note, the preference items are presented in Table 1. The column headings in the table are described as fol-lows:
Item: The name of the preference item as it appears in the cells at the left side of the Preferences form.
Possible Values: The possible values that the associated preference item can have.
Default Value: The built-in default value that the program assumes for the associated preference item.
Description: A description of the associated preference item.
Table 1: Concrete Frame Preferences
Item
Possible Values
Default
Value Description
Design Code Any code in the program
UBC97 Design code used for design of concrete frame elements.
Phi Bending Tension
>0 0.9 Unitless strength reduction factor per UBC 1909.
Phi Compres-sion Tied
>0 0.7 Unitless strength reduction factor per UBC 1909.
Phi Compres-sion Spiral
>0 0.75 Unitless strength reduction factor per UBC 1909.
Phi Shear >0 0.85 Unitless strength reduction factor per UBC 1909.
Number
Inter-action Curves ≥
Concrete Frame Design UBC97 Preferences
Preferences Technical Note 6 - 3
Table 1: Concrete Frame Preferences
Item
Possible Values
Default
Value Description
Number Inter-action Points
Any odd value ≥1.0
11 Number of points used for defining a single curve in a concrete frame interaction surface (this item should be odd).
Time History Design
Envelopes or Step-by-Step
Envelopes Toggle for design load combinations that include a time history designed for the envelope of the time history, or designed step-by-step for the entire time history. If a single design load combination has more than one time
Overwrites Technical Note 7 - 1
©COMPUTERS AND STRUCTURES, INC., BERKELEY, CALIFORNIA DECEMBER 2001
C
ONCRETEF
RAMED
ESIGNUBC97
Technical Note 7
Overwrites
General
The concrete frame design overwrites are basic assignments that apply only to those elements to which they are assigned. This Technical Note describes concrete frame design overwrites for UBC97. To access the overwrites, select an element and click the Design menu > Concrete Frame Design > View/Revise Overwrites command.
Default values are provided for all overwrite items. Thus, you do not need to specify or change any of the overwrites. However, at least review the default values for the overwrite items to make sure they are acceptable. When changes are made to overwrite items, the program applies the changes only to the elements to which they are specifically assigned; that is, to the ele-ments that are selected when the overwrites are changed.
Overwrites
For explanation purposes in this Technical Note, the overwrites are presented in Table 1. The column headings in the table are described as follows.
Item: The name of the overwrite item as it appears in the program. To save space in the formes, these names are generally short.
Possible Values: The possible values that the associated overwrite item can have.
Default Value: The default value that the program assumes for the asso-ciated overwrite item.
Description: A description of the associated overwrite item.
Overwrites Concrete Frame Design UBC97
Technical Note 7 - 2 Overwrites
Table 1 Concrete Frame Design Overwrites
Item
Sway Special Frame type; see UBC 1910.11 to 1910.13.
1. Used to reduce the live load contribu-tion to the factored loading.
Horizontal
1 See UBC 1910.12.1. Effective
Length Factor (K Minor)
>0
≤1.0
1 See UBC 1910.12.1. Moment
Coefficient (Cm Major)
>0
≤1.0
1 See UBC 1910.12.3.1 relates actual moment diagram to an equivalent uni-form moment diagram.
1 See UBC 1910.12.3.1 relates actual moment diagram to an equivalent uni-form moment diagram.
Concrete Frame Design UBC97 Overwrites
Overwrites Technical Note 7 - 3
Table 1 Concrete Frame Design Overwrites
Item
1 See UBC 1910.12. Sway Moment
Factor (Ds Major)
1 See UBC 1910.12. Sway Moment
Factor (Ds Minor)
1 See UBC 1910.12.
Making Changes in the Overwrites Form
To access the concrete frame overwrites, select an element and click the De-sign menu > Concrete Frame DeDe-sign > View/Revise Overwrites com-mand.
The overwrites are displayed in the form with a column of check boxes and a two-column spreadsheet. The left column of the spreadsheet contains the name of the overwrite item. The right column of the spreadsheet contains the overwrites values.
Initially, the check boxes in the Concrete Frame Design Overwrites form are all unchecked and all of the cells in the spreadsheet have a gray background to indicate that they are inactive and the items in the cells cannot be changed. The names of the overwrite items are displayed in the first column of the spreadsheet. The values of the overwrite items are visible in the second column of the spreadsheet if only one element was selected before the over-writes form was accessed. If multiple elements were selected, no values show for the overwrite items in the second column of the spreadsheet.
Overwrites Concrete Frame Design UBC97
Technical Note 7 - 4 Overwrites
the box. If the cell contents is highlighted, type in the desired value. The overwrite will reflect the change. You cannot change the values of the drop-down boxes.
When changes to the overwrites have been completed, click the OK button to close the form. The program then changes all of the overwrite items whose associated check boxes are checked for the selected members. You must click the OK button for the changes to be accepted by the program. If you click the Cancel button to exit the form, any changes made to the overwrites are ig-nored and the form is closed.
Resetting Concrete Frame Overwrites to Default Values
Use the Design menu > Concrete Frame Design > Reset All Overwrites command to reset all of the steel frame overwrites. All current design results will be deleted when this command is executed.Design Load Combinations Technical Note 8 - 1 ©COMPUTERS AND STRUCTURES, INC., BERKELEY, CALIFORNIA DECEMBER 2001
C
ONCRETEF
RAMED
ESIGNUBC97
Technical Note 8
Design Load Combinations
The design load combinations are the various combinations of the prescribed load cases for which the structure needs to be checked. For the UBC 97 code, if a structure is subjected to dead load (DL) and live load (LL) only, the stress check may need only one load combination, namely 1.4 DL + 1.7 LL (UBC 1909.2.1). However, in addition to the dead and live loads, if the structure is subjected to wind (WL) and earthquake (EL) loads, and considering that wind and earthquake forces are reversible, the following load combinations may need to be considered (UBC 1909.2).
1.4 DL (UBC 1909.2.1)
1.4 DL + 1.7 LL (UBC 1909.2.1)
0.9 DL ± 1.3 WL (UBC 1909.2.2)
0.75 (1.4 DL + 1.7 LL ± 1.7 WL) (UBC 1909.2.2)
0.9 DL ± 1.0 EL (UBC 1909.2.3, 1612.2.1)
1.2 DL + 0.5 LL ± 1.0 EL) (UBC 1909.2.3, 1612.2.1)
These are also the default design load combinations in the program whenever the UBC97 code is used.
Strength Reduction Factors Technical Note 9 - 1 ©COMPUTERS AND STRUCTURES, INC., BERKELEY, CALIFORNIA DECEMBER 2001
CONCRETE FRAME DESIGN UBC97
Technical Note 9
Strength Reduction Factors
The strength reduction factors, ϕ, are applied on the nominal strength to ob-tain the design strength provided by a member. The ϕ factors for flexure, ax-ial force, shear, and torsion are as follows:
ϕ = 0.90 for flexure (UBC 1909.3.2.1)
ϕ = 0.90 for axial tension (UBC 1909.3.2.2)
ϕ = 0.90 for axial tension and flexure (UBC 1909.3.2.2)
ϕ = 0.75 for axial compression, and axial compression
and flexure (spirally reinforced column) (UBC 1909.3.2.2)
ϕ = 0.70 for axial compression, and axial compression
and flexure (tied column) (UBC 1909.3.2.2)
ϕ = 0.85 for shear and torsion (non-seismic design) (UBC 1909.3.2.3)
Overview Technical Note 10 - 1 ©COMPUTERS AND STRUCTURES, INC., BERKELEY, CALIFORNIA DECEMBER 2001
C
ONCRETEF
RAMED
ESIGNUBC97
Technical Note 10
Column Design
This Technical Note describes how the program checks column capacity or de-signs reinforced concrete columns when the UBC97 code is selected.
Overview
The program can be used to check column capacity or to design columns. If you define the geometry of the reinforcing bar configuration of each concrete column section, the program will check the column capacity. Alternatively, the program can calculate the amount of reinforcing required to design the col-umn. The design procedure for the reinforced concrete columns of the struc-ture involves the following steps:
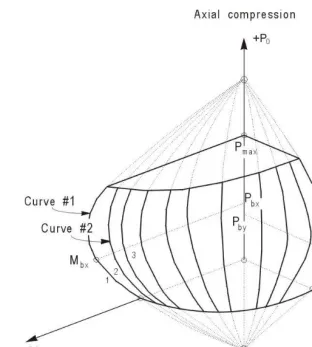
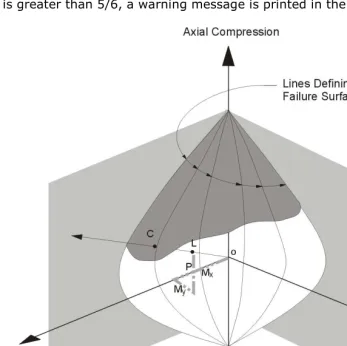
Generate axial force/biaxial moment interaction surfaces for all of the dif-ferent concrete section types of the model. A typical biaxial interaction surface is shown in Figure 1. When the steel is undefined, the program generates the interaction surfaces for the range of allowable reinforce-ment1 to 8 percent for Ordinary and Intermediate moment resisting frames (UBC 1910.9.1) and 1 to 6 percent for Special moment resisting frames (UBC 1921.4.3.1).
Calculate the capacity ratio or the required reinforcing area for the fac-tored axial force and biaxial (or uniaxial) bending moments obtained from each loading combination at each station of the column. The target capac-ity ratio is taken as 1 when calculating the required reinforcing area.
Design the column shear reinforcement.
Column Design Concrete Frame Design UBC97
Technical Note 10 - 2 Generation of Biaxial Interaction Surfaces
Figure 1 A Typical Column Interaction Surface
Generation of Biaxial Interaction Surfaces
Concrete Frame Design UBC97 Column Design
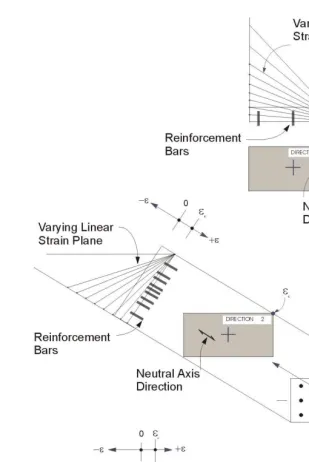
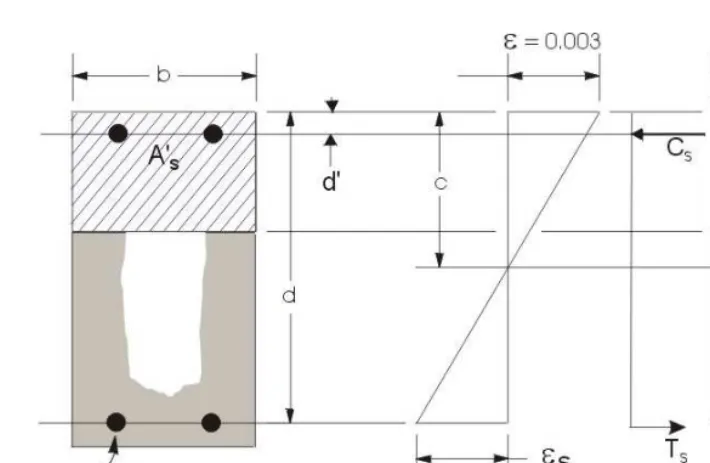
Generation of Biaxial Interaction Surfaces Technical Note 10 - 3 The coordinates of these points are determined by rotating a plane of linear strain in three dimensions on the section of the column. See Figure 2. The linear strain diagram limits the maximum concrete strain, εc, at the extremity
of the section, to 0.003 (UBC 1910.2.3).
The formulation is based consistently upon the general principles of ultimate strength design (UBC 1910.3), and allows for any doubly symmetric rectan-gular, square, or circular column section.
The stress in the steel is given by the product of the steel strain and the steel modulus of elasticity, εsEs, and is limited to the yield stress of the steel, fy
(UBC 1910.2.4). The area associated with each reinforcing bar is assumed to be placed at the actual location of the center of the bar and the algorithm does not assume any further simplifications with respect to distributing the area of steel over the cross section of the column, such as an equivalent steel tube or cylinder. See Figure 3.
The concrete compression stress block is assumed to be rectangular, with a stress value of 0.85fc' (UBC 1910.2.7.1). See Figure 3. The interaction
algo-rithm provides correction to account for the concrete area that is displaced by the reinforcement in the compression zone.
The effects of the strength reduction factor, ϕ, are included in the generation of the interaction surfaces. The maximum compressive axial load is limited to
ϕPn(max), where
ϕPn(max) = 0.85ϕ[0.85fc'(Ag-Ast)+fyAst] (spiral) (UBC 1910.3.5.1)
ϕPn(max) = 0.85ϕ[0.85fc'(Ag-Ast)+fyAst] (tied) (UBC 1910.3.5.2)
ϕ = 0.70 for tied columns (UBC 1909.3.2.2)
ϕ = 0.75 for spirally reinforced columns (UBC 1909.3.2.2)
The value of ϕ used in the interaction diagram varies from ϕmin to 0.9 based
on the axial load. For low values of axial load, ϕ is increased linearly from ϕmin
to 0.9 as the nominal capacity ϕPn decreases from the smaller of ϕPb or
0.1f Ac' g to zero, where Pb is the axial force at the balanced condition. In
Column Design Concrete Frame Design UBC97
Concrete Frame Design UBC97 Column Design
Calculate Column Capacity Ratio Technical Note 10 - 5
Figure 3 Idealization of Stress and Strain Distribution in a Column Section
Calculate Column Capacity Ratio
The column capacity ratio is calculated for each loading combination at each output station of each column. The following steps are involved in calculating the capacity ratio of a particular column for a particular loading combination at a particular location:
Determine the factored moments and forces from the analysis load cases and the specified load combination factors to give Pu, Mux, and Muy.
Determine the moment magnification factors for the column moments.
Apply the moment magnification factors to the factored moments. Deter-mine whether the point, defined by the resulting axial load and biaxial moment set, lies within the interaction volume.
Column Design Concrete Frame Design UBC97
Technical Note 10 - 6 Calculate Column Capacity Ratio
The following three sections describe in detail the algorithms associated with this process.
Determine Factored Moments and Forces
The factored loads for a particular load combination are obtained by applying the corresponding load factors to all the load cases, giving Pu, Mux, and Muy.
The factored moments are further increased for non-sway columns, if re-quired, to obtain minimum eccentricities of (0.6 + 0.03h) inches, where h is the dimension of the column in the corresponding direction (UBC 1910.12.3.2).
Determine Moment Magnification Factors
The moment magnification factors are calculated separately for sway (overall stability effect), δs, and for non-sway (individual column stability effect), δns.
Also the moment magnification factors in the major and minor directions are in general different.
The program assumes that it performs a P-delta analysis and, therefore, mo-ment magnification factors for momo-ments causing sidesway are taken as unity (UBC 1910.10.2). For the P-delta analysis, the load should correspond to a load combination of 0.75 (1.4 dead load + 1.7 live load)/ϕ if wind load gov-erns, or (1.2 dead load + 0.50 live load)/ϕ if seismic load governs, where ϕ is the understrength factor for stability, which is taken as 0.75 (UBC 1910.12.3). See also White and Hajjar (1991).
The moment obtained from analysis is separated into two components: the sway (Ms) and the non-sway (Ms) components. The non-sway components
which are identified by “ns” subscripts are predominantly caused by gravity load. The sway components are identified by the “s” subscripts. The sway moments are predominantly caused by lateral loads, and are related to the cause of side-sway.
For individual columns or column-members in a floor, the magnified moments about two axes at any station of a column can be obtained as
M = Mns + δsMs. (UBC 1910.13.3)
The factor δs is the moment magnification factor for moments causing side
sway. The moment magnification factors for sway moments, δs, is taken as 1
because the component moments Ms and Mns are obtained from a “second
Concrete Frame Design UBC97 Column Design
Calculate Column Capacity Ratio Technical Note 10 - 7
The computed moments are further amplified for individual column stability effect (UBC 1910.12.3, 1910.13.5) by the nonsway moment magnification factor, δns, as follows:
Mc = δnsM2 , where (UBC 1910.12.3)
Mc is the factored moment to be used in design, and
M2 is the larger factored and amplified end moment.
The non-sway moment magnification factor, δns, associated with the major or
minor direction of the column is given by (UBC 1910.12.3)
δns =
k is conservatively taken as 1; however, the program allows the user to override this value.
EI is associated with a particular column direction given by:
EI =
maximum factored axial dead load
βd = maximum factored axial total load and (UBC 1910.12.3)
for double curvature bending. The above expression of Cm is valid if there is
no transverse load applied between the supports. If transverse load is present on the span, or the length is overwritten, Cm = 1. Cm can be overwritten by
Column Design Concrete Frame Design UBC97
Technical Note 10 - 8 Calculate Column Capacity Ratio
The magnification factor, δns, must be a positive number and greater than 1.
Therefore, Pu must be less than 0.75Pc. If Pu is found to be greater than or
equal to 0.75Pc, a failure condition is declared.
The above calculations use the unsupported length of the column. The two unsupported lengths are l22 and l33, corresponding to instability in the minor
and major directions of the element, respectively. See Figure 4. These are the lengths between the support points of the element in the corresponding di-rections.
Figure 4 Axes of Bending and Unsupported Length
If the program assumptions are not satisfactory for a particular member, the user can explicitly specify values of δs and δns.
Determine Capacity Ratio
Concrete Frame Design UBC97 Column Design
Calculate Column Capacity Ratio Technical Note 10 - 9
of the stress condition of the column with respect to the capacity of the col-umn.
Before entering the interaction diagram to check the column capacity, the moment magnification factors are applied to the factored loads to obtain Pu,
Mux, and Muy. The point (Pu, Mux, Muy.) is then placed in the interaction space
shown as point L in Figure 5. If the point lies within the interaction volume, the column capacity is adequate; however, if the point lies outside the inter-action volume, the column is overstressed.
Figure 5 Geometric Representation of Column Capacity Ratios
Column Design Concrete Frame Design UBC97
Technical Note 10 - 10 Required Reinforcing Area
failure surface. See Figure 5. The capacity ratio, CR, is given by the ratio
OC OL .
If OL = OC (or CR=1), the point lies on the interaction surface and the column is stressed to capacity.
If OL < OC (or CR<1), the point lies within the interaction volume and the column capacity is adequate.
If OL > OC (or CR>1), the point lies outside the interaction volume and the column is overstressed.
The maximum of all the values of CR calculated from each load combination is reported for each check station of the column, along with the controlling Pu,
Mux, and Muy set and associated load combination number.
Required Reinforcing Area
If the reinforcing area is not defined, the program computes the reinforce-ment that will give a column capacity ratio of one, calculated as described in the previous section entitled "Calculate Column Capacity Ratio."
Design Column Shear Reinforcement
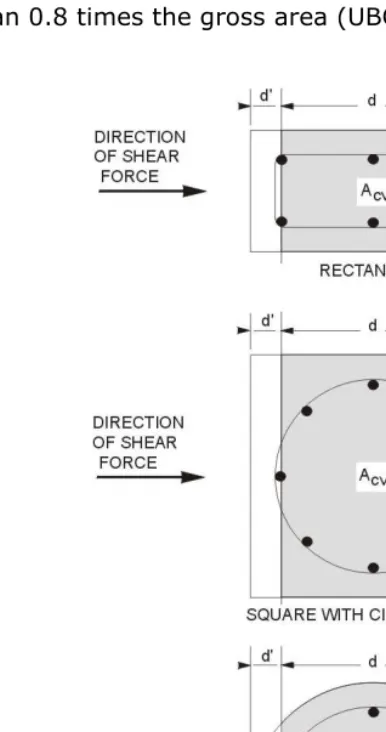
The shear reinforcement is designed for each loading combination in the ma-jor and minor directions of the column. The following steps are involved in designing the shear reinforcing for a particular column for a particular load combination caused by shear forces in a particular direction:
Determine the factored forces acting on the section, Pu and Vu. Note that
Pu is needed for the calculation of Vc.
Determine the shear force, Vc, that can be resisted by concrete alone.
Calculate the reinforcement steel required to carry the balance.
Concrete Frame Design UBC97 Column Design
Design Column Shear Reinforcement Technical Note 10 - 11 moments. Effects of the axial forces on the column moment capacities are included in the formulation.
The following three sections describe in detail the algorithms associated with this process.
Determine Section Forces
In the design of the column shear reinforcement of an Ordinary moment resisting concrete frame, the forces for a particular load combination, namely, the column axial force, Pu, and the column shear force, Vu, in a
particular direction are obtained by factoring the program analysis load cases with the corresponding load combination factors.
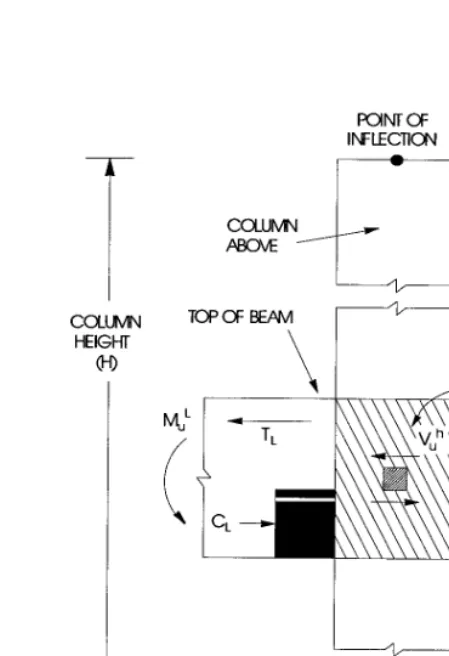
In the shear design of Special moment resisting frames (i.e., seismic design) the column is checked for capacity-shear in addition to the re-quirement for the Ordinary moment resisting frames. The capacity-shear force in a column, Vp, in a particular direction is calculated from the
prob-able moment capacities of the column associated with the factored axial force acting on the column.
For each load combination, the factored axial load, Pu, is calculated. Then,
the positive and negative moment capacities, Mu+ and Mu−, of the column in a particular direction under the influence of the axial force Pu is
calcu-lated using the uniaxial interaction diagram in the corresponding direction. The design shear force, Vu, is then given by (UBC 1921.4.5.1)
Vu = Vp + VD+L (UBC 1921.4.5.1)
where, Vp is the capacity-shear force obtained by applying the calculated
Column Design Concrete Frame Design UBC97
Technical Note 10 - 12 Design Column Shear Reinforcement
− +
I
I M
M , , = Positive and negative moment capacities at end I of the
column using a steel yield stress value of αfy and no ϕ
M , , = Positive and negative moment capacities at end J of the
column using a steel yield stress value of αfy and no ϕ
factors (ϕ = 1.0), and
L = Clear span of column.
For Special moment resisting frames, α is taken as 1.25 (UBC 1921.0). VD+L is the contribution of shear force from the in-span distribution of
gravity loads. For most of the columns, it is zero.
For Intermediate moment resisting frames, the shear capacity of the column is also checked for the capacity-shear based on the nominal mo-ment capacities at the ends and the factored gravity loads, in addition to the check required for Ordinary moment resisting frames. The design shear force is taken to be the minimum of that based on the nominal (ϕ = 1.0) moment capacity and factored shear force. The procedure for calcu-lating nominal moment capacity is the same as that for computing the probable moment capacity for special moment resisting frames, except that α is taken equal to 1 rather than 1.25 (UBC 1921.0, 1921.8.3). The factored shear forces are based on the specified load factors, except the earthquake load factors are doubled (UBC 1921.8.3).
Determine Concrete Shear Capacity
Given the design force set Pu and Vu, the shear force carried by the concrete,
Vc, is calculated as follows:
If the column is subjected to axial compression, i.e., Pu is positive,