The Tutorial
1
Basic Editing
2
Editing a Little Faster
3
Searching
4
Text Blocks and Multiple Files
5
Windows
6
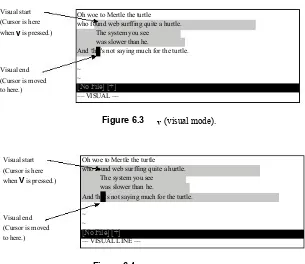
Basic Visual Mode
7
Commands for Programmers
8
Basic Abbreviations, Keyboard Mapping, and Initialization Files
9
Basic Command-Mode Commands
10
Basic GUI Usage
11
Dealing with Text Files
12
Automatic Completion
13
Autocommands
14
File Recovery and Command-Line Arguments
15
Miscellaneous Commands
16
Cookbook
Basic Editing
T
HE VIM EDITOR IS ONE OF THE MOST powerful text editors around. It is alsoextremely efficient, enabling the user to edit files with a minimum of keystrokes.This power and functionality comes at a cost, however:When getting started, users face a steep learning curve.
This chapter teaches you the basic set of 10Vim commands you need to get started editing. In this chapter, you learn the following:
n The four basic movement commands n How to insert and delete text
n How to get help (very important) n Exiting the editor
After you get these commands down pat, you can learn the more advanced editing commands.
Before You Start
4 Chapter 1 Basic Editing
If you are running on UNIX, execute the following command: $ touch ~/.vimrc
By creating a~/.vimrc, you tellVim that you want to use it inVim mode. If this file is not present, Vim runs inVi-compatibility mode and you lose access to many of the advancedVimfeatures. However, you can enable the advanced features from within Vim at any time with this command: :set nocompatible<Enter>.
If you are running on Microsoft Windows, the installation process creates the Microsoft Windows version of this file, _vimrc, for you.
Running
Vim
for the First Time
To startVim, enter this command: $ gvim file.txt
Note that the$ is the default UNIX command prompt.Your prompt might differ. If you are running Microsoft Windows, open an MS-DOS prompt window and enter this command:
C:> gvim file.txt
(Again, your prompt may differ.)
In either case, Vim starts editing a file calledfile.txt. Because this is a new file, you get a blank window. Figure 1.1 shows what your screen will look like.
The tilde (~) lines indicate lines not in the file. In other words, whenVim runs out of file to display, it displays tilde lines. At the bottom of a screen, a message line indi-cates the file is namedfile.txt and shows that you are creating a new file.The mes-sage information is temporary and other information overwrites it when you type the first character.
~ ~ ~ ~ ~ ~ ~ ~
“file.txt” [New File]
5
Editing for the First Time
The
vim
Command
The gvim command causes the editor to create a new window for editing. If you use
the commandvim, the editing occurs inside your command window. In other words, if
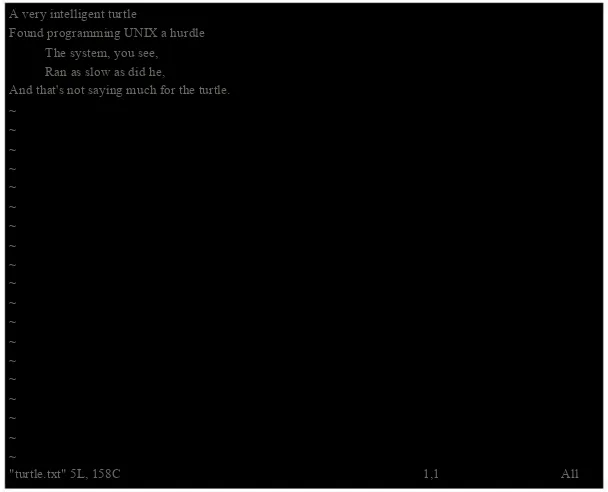
you are running inside anxterm, the editor uses yourxterm window. If you are using an MS-DOS command prompt window under Microsoft Windows, the editing occurs inside the window. Figure 1.2 shows a typical MS-DOS command prompt window.
A very intelligent turtle
Found programming UNIX a hurdle The system, you see, Ran as slow as did he, And that's not saying much for the turtle. ~
~ ~ ~ ~ ~ ~ ~ ~ ~ ~ ~ ~ ~ ~ ~ ~ ~ ~
"turtle.txt" 5L, 158C 1,1 All
Figure 1.2 Editing with thevim command in an MS-DOS window.
Modes
TheVim editor is a modal editor.That means that the editor behaves differently,
depending on which mode you are in. If the bottom of the screen displays the file-name or is blank, you are in normal mode. If you are in insert mode, the indicator dis-plays--INSERT--; and if you are in visual mode, the indicator shows--VISUAL--.
Editing for the First Time
The next few sections show you how to edit your first file. During this process, you learn the basic commands that you have to know to useVim. At the end of this lesson, you will know how to edit—not fast, not efficiently, but enough to get the job done.
Inserting Text
To enter text, you need to be in insert mode.Typei, and notice that the lower left of
6 Chapter 1 Basic Editing
Now type some text. It will be inserted into the file. Do not worry if you make mistakes; you can correct them later. Enter the following programmer’s limerick:
A very intelligent turtle
Found programming UNIX a hurdle The system, you see,
Ran as slow as did he,
And that’s not saying much for the turtle.
After you have finished inserting, press the<Esc> key.The--INSERT-- indicator goes away and you return to command mode.
Your screen should now look something like Figure 1.3.
Note
You can also move the cursor by using the arrow keys. If you do, however, you greatly slow down your editing—because to press the arrow keys, you must move your hand from the text keys to the arrow keys.
Considering that you might be doing it hundreds of times an hour, this can take a significant amount of
time. If you want to edit efficiently, useh,j,k, andl.
Also, there are keyboards which do not have arrow keys, or which locate them in unusual places; therefore, knowing the use of these keys helps in those situations.
A very intelligent turtle
Found programming UNIX a hurdle The system, you see, Ran as slow as did he,
And that's not saying much for the turtle.
~ ~ ~ ~
Figure 1.3 Screen after the text has been inserted.
Getting Out of Trouble
One of the problems forVim novices is mode confusion, which is caused by forgetting which mode you are in or by accidentally typing a command that switches modes.To get back to normal mode, no matter what mode you are in, press the<Esc> key.
Moving Around
After you return to command mode, you can move around by using these keys: h
(left), j (down), k (up), andl (right). At first, it may appear that these commands were
chosen at random. After all, who ever heard of usingl for right? But actually, there is a
7
Editing for the First Time
One way to remember these commands is thath is on the left, l is on the right, j is a
hook down, andk points up. Another good way to remember the commands is to
copy this information on a Post-It Note and put it on the edge of your monitor until you get used to these commands.
Note
Vim is a text editor. By default, it does not wrap text. You must end each line by pressing the <Enter>
key. If you don’t and just keep typing when you reach the right margin, all you will do is insert a very
long line into the editor. You will not automatically go to the next line. To do so, you need to press the <Enter> key. (This is the default mode of operation. You can configure theVim editor to word wrap, how-ever, as discussed in Chapter 11, “Dealing with Text Files.”)
intelligent turtle
Found programming UNIX a hurdle The system, you see, Ran as slow as did he,
And that's not saying much for the turtle. ~
~ ~ ~
Figure 1.4 Screen after delete (xxxxxxxx).
A young intelligent turtle Found programming UNIX a hurdle The system, you see, Ran as slow as did he,
And that's not saying much for the turtle. ~
~ ~ ~
Figure 1.5 Result of the insert.
h
k
l
j
Deleting Characters
To delete a character, move the cursor over it and typex. (This is a throwback to the old days of the typewriter, when you deleted things by typing xxxx over them.)
Move the cursor to the beginning of the first line, for example, and typexxxxxxx
(eightx’s) to delete the first eight characters on the line. Figure 1.4 shows the result. To enter a correction, typeiA young <Esc>.This begins an insert (thei), inserts the
wordsA young, and then exits insert mode (the final<Esc>). Figure 1.5 shows the
8 Chapter 1 Basic Editing
Undo and Redo
Suppose you delete too much.Well, you could type it in again, but an easier way exists.Theu command undoes the last edit.
Take a look at this in action. Move the cursor to the
A
in the first line. Now type xxxxxxx to deleteA young.The result is as follows:intelligent turtle
Typeu to undo the last delete.That delete removed theg, so the undo restores the
character. g intelligent turtle
The nextu command restores the next-to-last character deleted: ng intelligent turtle
The nextu command gives you theu, and so on: ung intelligent turtle
oung intelligent turtle young intelligent turtle young intelligent turtle A young intelligent turtle
If you undo too many times, you can pressCTRL-R (redo) to reverse the preceding command. In other words, it undoes the undo.
To see this in action, pressCTRL-R twice.The character
A
and the space after it disappear.young intelligent turtle
There’s a special version of the undo command, theU (undo line) command.The undo line command undoes all the changes made on the last line that was edited. Typing this command twice cancels the precedingU.
Note
If you are an oldVi user, note that the multilevel undo ofVim differs significantly from the single level available to aVi user.
Note
9
Other Editing Commands
A very intelligent turtle
xxxx Delete very A intelligent turtle
xxxxxx Delete turtle A intelligent
Restore line with U A very intelligent turtle
A intelligent Second U undoes the preceding U
Getting Out
To exit, use theZZ command.This command writes the file and exits.
Unlike many other editors, Vim does not automatically make a backup file. If you typeZZ, your changes are committed and there’s no turning back. (You can configure
theVim editor to produce backup files, as discussed in Chapter 14,“File Recovery and Command-Line Arguments.”)
Discarding Changes
Sometimes you will make a set of changes and suddenly realize you were better off before you started. Don’t worry; Vim has a “quit-and-throw-things-away” command. It is:q!.
For those of you interested in the details, the three parts of this command are the colon (:), which enters command mode; theq command, which tells the editor to
quit; and the override command modifier (!).The override command modifier is needed becauseVim is reluctant to throw away changes. Because this is a command mode command, you need to type<Enter> to finish it. (All command mode
com-mands have<Enter> at the end.This is not shown in the text.)
If you were to just type:q, Vim would display an error message and refuse to exit: No write since last change (use ! to override)
By specifying the override, you are in effect tellingVim, “I know that what I’m doing looks stupid, but I’m a big boy and really want to do this.”
Other Editing Commands
Now that you have gone through a few simple commands, it is time to move on to some slightly more complex operations.
Inserting Characters at the End of a Line
The i command inserts a characterbefore the character under the cursor.That works
10 Chapter 1 Basic Editing
For example, to change the line and that’s not saying much for the turtle.
to
and that’s not saying much for the turtle!!!
move the cursor over to the dot at the end of the line.Then typex to delete the
period.The cursor is now positioned at the end of the line on thee in turtle: and that’s not saying much for the turtle
Now typea!!!<Esc> to append three exclamation points after thee in turtle: and that’s not saying much for the turtle!!!
Deleting a Line
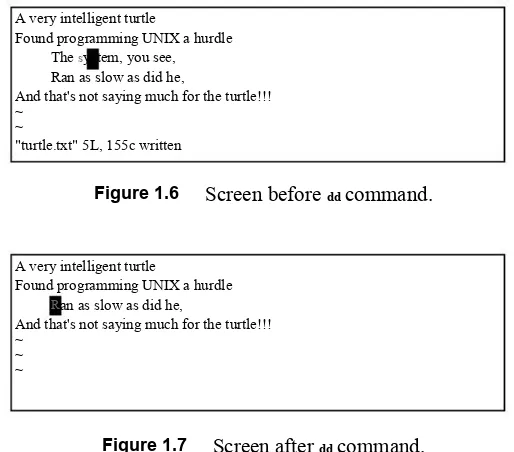
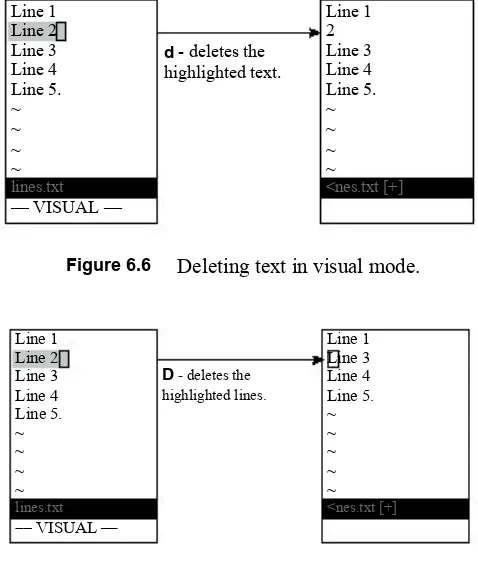
To delete a line, use thedd command, which deletes the line on which the cursor is
positioned.To delete the middle line of this example, for instance, position the cursor anywhere on the lineThe system, you see, as shown in Figure 1.6.
Now typedd. Figure 1.7 shows the results.
Opening Up New Lines
To add a new line, use theo command to open up a new linebelow the cursor.The editor is then placed in insert mode.
A very intelligent turtle
Found programming UNIX a hurdle Thesystem, you see, Ran as slow as did he,
And that's not saying much for the turtle!!! ~
~
"turtle.txt" 5L, 155c written
Figure 1.6 Screen beforedd command.
A very intelligent turtle
Found programming UNIX a hurdle Ran as slow as did he,
And that's not saying much for the turtle!!! ~
~ ~
11
Other Editing Commands
Suppose, for example, that you want to add a line to the sample text just below the third line. Start by leaving the cursor on theRan as slow. . . line, as seen in Figure 1.7.
Now typeo to open up a new line. Enter the text for the line and then press<Esc>
to end insert mode. Figure 1.8 shows the results.
If you want to open a line above the cursor, use theO (uppercase) command.
A very intelligent turtle
Found programming UNIX a hurdle Ran as slow as did he, and that was very slow.
And that's not saying much for the turtle. ~
~ ~ ~
Figure 1.8 Screen after using theo command.
k h l
j *help.txt* For Vim version 5.7. Last change: 2000 Jan 01
VIM - main help file
Move around: Use the cursor keys, or "h" to go left, "j" to go down, "k" to go up, "l" to go right. Close this window: Use ":q<Enter>".
Get out of Vim: Use ":qa!<Enter>" (careful, all changes are lost!).
Jump to a subject: Position the cursor on a tag between|bars|and hit CTRL-]. With the mouse: ":set mouse=a" to enable the mouse (in xterm or GUI).
Double-click the left mouse button on a tag between|bars|. jump back: Type CTRL-T or CTRL-O.
Get specific help: It is possible to go directly to whatever you want help
on, by giving an argument to the ":help" command|:help|. It is possible to further specify the context:
WHAT PREPEND EXAMPLE
Normal mode commands (nothing) :help x
Visual mode commands v_ :help v_u
Insert mode commands i_ :help i_<Esc>
Command-line commands : :help :quit
help.txt [help][RO]
[No File]
"help.txt" [readonly] 1297L, 61009C
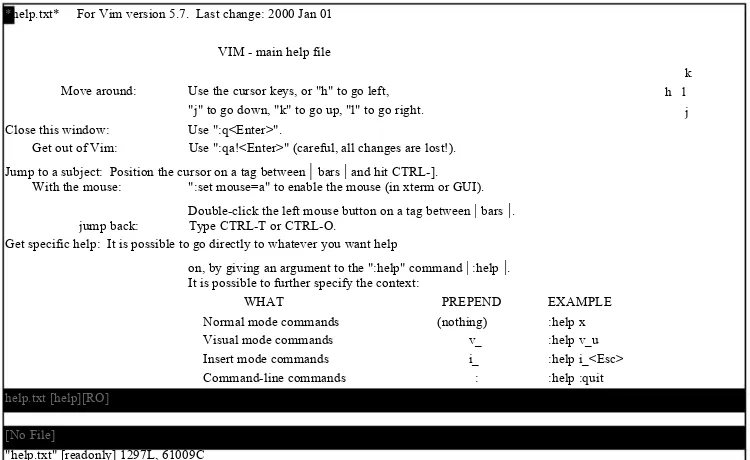
Figure 1.9 Help screen.
Help
Finally, there’s one more important command, the help command.To get help, enter the following:
:help
(Remember the implied<Enter> for command-mode commands.) This displays a
12 Chapter 1 Basic Editing
If you don’t supply a subject, :help displays the general help window.The creators of
Vimdid something very clever (or very lazy) with the help system.They made the help window a normal editing window.You can use all the normalVim commands to move through the help information.Thereforeh, k, j, and l move left, up, down,
right, and so on.
To get out of the help system, use the same command you use to get out of the editor: ZZ.
As you read the help text, you will notice some text enclosed in vertical bars (for example, |:help|).This indicates a hyperlink. If you position the cursor anywhere between the bars and pressCTRL+] (jump to tag), the help system takes you to the
indicated subject. (For reasons not discussed here, theVim terminology for a hyperlink is tag. SoCTRL+] jumps to the location of the tag given by the word under the cursor.)
After a few jumps, you might want to go back. CTRL+T (pop tag) takes you back to
the preceding screen. Or inVim terms, it “pops a tag off the tag stack.”
At the top of this screen, there is the notation*help.txt*.This is used by the help system to define a tag (hyperlink destination). Chapter 7, “Commands for Programmers,” explains tags in detail.
To get help on a given subject, use the following command: :help subject
To get help on thex command, for example, enter the following:
:help x
To find out how to delete text, use this command: :help deleting
To get a complete index of what is available, use the following command: :help index
When you need to get help for a control character command (for example, CTRL-A,
you need to spell it with the prefix CTRL-. :help CTRL-A
TheVim editor has many different modes. By default, the help system displays the normal-mode commands. For example, the following command displays help for
the normal-modeCTRL-H command:
:help CTRL-H
To identify other modes, use a mode prefix.
If you want the help for the insert-mode version of this command, prefix the key withi_.This gives you the following command:
:help i_CTRL-H
13
Using a Count to Edit Faster
When you start theVim editor, you can use several command-line options.These all begin with a dash (-).To find what the-t command-line option does, for example, use the command
:help -t
TheVim editor has a number of options that enable you to configure and customize the editor. If you want help for an option, you need to enclose it in single quotation marks.To find out what thenumber option does, for example, use the following command:
:help ‘number’
The following table summarizes the special prefixes.
Table 1.1 Help Prefixes
What Prefix Example
Normal-mode commands (nothing) :help x
Control character CTRL- :help CTRL-u
Visual-mode commands v :help v_u
Insert-mode commands i :help i_<Esc>
ex-mode commands : :help :quit
Command-line editing c :help c_<Del>
Vim command arguments - :help -r
Options ‘ (both ends) :help ‘textwidth’
Special keys are enclosed in angle brackets.To find help on the up-arrow key, for instance, use this command:
:help <Up>
Appendix B, “The <> Key Names,” provides a complete list of the key names.
Other Ways to Get Help
You can get to the help screen by pressing the <F1> key.This displays the general help screen, and you can navigate from there. If your keyboard has a <Help> key, you can use it as well.
Using a Count to Edit Faster
Suppose you want to move up nine lines.You can typekkkkkkkkk or you can enter
the command9k.
In fact, you can precede all the movement commands with a number. Earlier in this chapter, for instance, you added three exclamation points to the end of a line by typ-inga!!!<Esc>. Another way to do this is to use the command3a!<Esc>.The count of 3 tells thea command to insert what follows (!) three times.
14 Chapter 1 Basic Editing
The
Vim
Tutorial
The UNIX version of theVim editor comes with an interactive tutorial. Lesson 1 covers many of the commands described in this chapter.
To invoke the tutorial on UNIX, use the following command: $ vimtutor
The tutorial starts by explaining the movement commands so that you can move through the tutorial. After that it gradually introduces more complex commands.
If you are on a non-Unix system, execute the command :help tutor
for information on how to get theVim tutorial working on your system (it isn’t difficult).
Summary
Editing a Little Faster
T
HE BASIC COMMANDS COVERED IN CHAPTER 1,“Basic Editing,”enable you to edittext.This chapter covers some additional commands that enable you to edit more effi-ciently.These commands include the following:
n Additional movement commands n Quick searches along a single line n Additional delete and change commands n The repeat command
n Keyboard macros (how to record and play back commands) n Digraphs
One of the things I noticed as I wrote this chapter is the amazing number of different ways you can move through a file. Although I have been usingVi and nowVim as my main editor for the past 15 years, I have never bothered to learn all of them. I get by with the 10% I like.
16 Chapter 2 Editing a Little Faster
Word Movement
Let’s start with movement.To move the cursor forward one word, use thew command.
The b command moves backward one word. Like mostVim commands, you can use a
numeric prefix to move past multiple words. For example, 4b moves back four words.
Figure 2.1 shows how these commands work.
Figure 2.1 Word movement.
Moving to the Start or End of a Line
The $ command moves the cursor to the end of a line. Actually, a bunch of keys
map to the “end-of-line” command.TheVim names for these keys are$, <End>,
and <kEnd>. (The<kEnd> key isVim’s name for the keypad End key.)
The$ command takes a numeric argument as well. If present, it causes the editor to move to the end of the next line. For example, 1$ moves you to the end of the first
line (the one you’re on), 2$ to the end of the next line, and so on. Figure 2.2 illustrates
how this command works.
The^ command moves to the first nonblank character of the line.The<Home> or <kHome> key moves to the first character of the line, as seen in Figure 2.3. (The0
[zero] command does the same thing.)
Like every other command previously discussed, these three commands can take a numeric argument.They do not do anything with it, but you can specify it if you want to.
Now is the time for all good men to come to
w w 2w 3w
4b b
ACHTUNG1 ALLES LOOKENSPEEPERS! Das computermachine ist nicht fuer gefingerpoken und mittengrabben. Ist easy schnappen der springenwerk, blowenfusen und poppencorken mit spitzensparken. Ist nicht fuer gewerken bei das dumpkopfen. Das rubbernecken sichtseeren keepen das cotten-pickenen hans in das pockets muss; relaxen und watchen das blinkenlichten.
2$ 3$
4$ $
17
Searching Along a Single Line
Searching Along a Single Line
Moving is the most common editing activity you do. One of the most useful move-ment commands is the single-character search command.The commandfx (forward
search) searches the line for the single character
x
.Suppose, for example, that you are at the beginning of the following line: To err is human. To really foul up you need a computer.
Suppose you want to go to theh ofhuman. Just execute the commandfh and the
cur-sor will be positioned over the h:
To err ishuman. To really foul up you need a computer.
To go to the end of the wordreally, use the commandfy.You can specify a count;
therefore, you can space forward five words by using the command5f<Space>:. Note:
this only moves fivespace characters, not five words. If there are multiple spaces between words, this willnot move five words!
To err is human. To really foul up you need a computer.
The F command searches to the left. Figure 2
.
4 shows the effect of thef andFcommands.
The tx (search ‘til) command works like thefx command, except it stops one
char-acter before the indicated charchar-acter.The backward version of this command isTx.
Figure 2.5 shows how these commands work.
ACHTUNG1 ALLES LOOKENSPEEPERS!
command
<Home> or <kHome>
Figure 2.3 The^ and<Home> commands.
To err is human, To really foul up you need a computer.
fi f, 2fo 3fe
2Fa Fy
Figure 2.4 Operations of thef andF commands.
To err is human, To really foul up you need a computer.
ti t, 2to 3te
2Ta Ty
18 Chapter 2 Editing a Little Faster
Sometimes you will start a search, only to realize that you have typed the wrong com-mand.You typef to search backward, for example, only to realize that you really
meantF.To abort a search, press<Esc> as the search key. Sof<Esc> is an aborted
for-ward search. (Note: <Esc> cancels most operations, not just searches.)
Moving to a Specific Line
If you are a C or C++ programmer, you are familiar with error messages such as the following:
prog.c:3: ’j’ undeclared (first use in this function)
This tells you that you might want to fix something on line 3. So how do you find line 3?
One way is to do a9999k to go to the top of the file and a2j to go down two
lines. It is not a good way, but it works.
A much better way of doing things is to use theG command.With an argument, this command positions you at the given line number. For example, 3G puts you on
line 3. (Likewise, use the1G command to go to the top of the file rather than9999k.)
With no argument, it positions you at the end of the file.
(For a better way of going through a compiler’s error list, see Chapter 7, “Commands for Programmers,” for information on the:make and:clist related
commands.)
Telling Where You Are in a File
How do you really know where you are in a file? You can do so in several ways.The first is to turn on line numbering with the following command (see Figure 2.6):
:set number
1176 1177 1178 1179 1180 1181 1182 1183 1184 1185 1186 1187 1188 1189 :set number
Ode to a maintenance programmer ===============================
Once more I travel that lone dark road into someone else's impossible code Through "if" and "switch" and "do" and "while" that twist and turn for mile and mile Clever code full of traps and tricks and you must discover how it ticks And then I emerge to ask anew, "What the heck does this program do?"
****
19
Telling Where You Are in a File
TheVim editor is highly configurable and has a huge number of options.You can use the:set command in many different ways, which are described in Chapter 28,
“Customizing the Appearance and Behavior of the Editor.”
The number option is a Boolean option, meaning that it can be on or off.To turn it on, use this command:
:set number
To turn it off, use this command: :set nonumber
Note
These line numbers are for your information only; they are not written into the file when you exit. Once more I travel that lone dark road
into someone else's impossible code Through "if" and "switch" and "do" and "while" that twist and turn for mile and mile Clever code full of traps and tricks and you must discover how it ticks And then I emerge to ask anew, "What the heck does this program do?"
****
:set nonumber
Ode to a maintenance programmer ===============================
Figure 2.7 Results of:set nonumber.
Figure 2.7 shows the results of this command.
Where Am I?
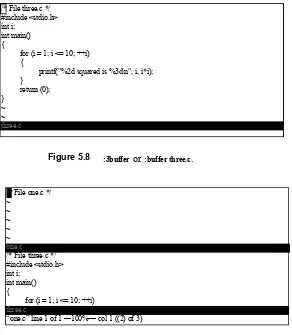
The CTRL-G command displays a status line that indicates where you are in the file. For example:
“c02.txt” [Modified] line 81 of 153 —52%— col 1
20 Chapter 2 Editing a Little Faster
Figure 2.8 TheCTRL-G command.
Sometimes you will see a split column number (for example, col 2–9).This indi-cates that the cursor is positioned on character 2. But because character one is a tab, the screen column is 9. Figure 2.8 shows the results of a typicalCTRL-G command.
Scrolling Up and Down
The CTRL-U command scrolls up half a screen of text. (Up in this case is backward in
the file; the text moves down on the screen. Don’t worry if you have a little trouble remembering which end is up. Most programmers have the same problem.)
TheCTRL-D command scrolls you down half a screen.
Figure 2.9 shows how these two commands work. to open up the packing crate and find the manual. (What did they think
we were reading anyway?) <H1>Dumb programmer stories
Ode to a maintenance programmer Once more I travel that lone dark road into someone else's impossible code
Through "if" and "switch" and "do" and "while" that twist and turn for mile and mile
"sun-o.txt" [Modified] line 186 of 1119 --16%-- col 2-9
Figure 2.9 Results of theCTRL-U andCTRL-D commands.
Deleting Text
As you learned in Chapter 1, thedd command deletes a line.Thedw command deletes
a word.You may recognize thew command as the move word command. In fact, thed
command may be followed by any motion command, and it deletes from the current CTRL-U
CTRL-D A dozen, a gross, and a score,
Plus three times the square root of four Divided by seven, Plus five time eleven, Equals nine squared plus zero, no more.
---A computer, to print out a fact, Will divide, multiply, and subtract.
A dozen, a gross, and a score, Plus three times the square root of four Divided by seven, Plus five time eleven, Equals nine squared plus zero, no more.
---A computer, to print out a fact, Will divide, multiply, and subtract.
If buckets of bits
Take one down, short it to ground FE buckets of bits on the bus
---A dozen, a gross, and a score, Plus three times the square root of four Divided by seven, Plus five time eleven, Equals nine squared plus zero, no more.
Equals nine squared plus zero, no more,
-
---A computer, to print out a fact, Will divide, multiply, and subtract. But this output can be No more than debris, If the input was short of exact.
---21
Changing Text
location to the place where the cursor winds up. (Therefore, we say the syntax of thed command isdmotion.)
The3w command, for example, moves the cursor over three words.Thed3w com-mand deletes three words, as seen in Figure 2.10. (You can write it asd3w or3dw
;
both versions work the same.)To err is human, To really foul up you need a computer. d3w
(three words) To err is human, To realyou need a computer.
Figure 2.10 Thed3w command.
The$ command moves to the end of a line.Thed$ command deletes from the cursor to the end of the line, as seen in Figure 2.11. A shortcut for this is theD command.
Figure 2.11 Thed$ command.
Where to Put the Count (
3dw
or
d3w
)
The commands3dw andd3w delete three words. If you want to get really picky about things, the first command, 3dw, deletes one word three times; the commandd3w deletes three words once.This is a difference without a distinction.
You can actually put in two counts, however (for example, 3d2w).This command deletes two words, repeated three times, for a total of six words.
Changing Text
The c command changes text. It acts just like thed command, except it leaves you in insert mode. For example, cw changes a word. Or more specifically, it deletes a word and then puts you in insert mode. Figure 2.12 illustrates how this command works.
There is a saying that for every problem there is an answer that’s simple, clear, and wrong.That is the case with the example used here for thecw command.Thecmotion command works just like thedmotion command, with one exception: thecw anddw commands.Whereascw deletes the text up to the space following the word (and then enters insert mode), thedw command deletes the word and the space following it.
To err is human, To really foul up you need a computer. d$
22 Chapter 2 Editing a Little Faster
Thecc command works on the entire line.That is, it deletes the line and then goes
into insert mode. In other words, cc works on the current line just likedd. Likewise, c$ orC change from the cursor to the end of the line.
The . Command
The. command is one of the most simple yet powerful commands inVim. It repeats
the last delete or change command. For instance, suppose you are editing an HTML file and want to delete all the <B> tags.You position the cursor on the first < and delete the <B> with the commanddf>.You then go to the < of the next </B> and
kill it using the. command.The. command executes the last change command (in
this case, df>).To delete another tag, position the cursor on the < and press the.
command. Figure 2.13 illustrates how this can work. To err is human, To really foul up you need a computer.
a word(w) Changed word (screw<blank>)
cwscrew<Esc>
c—Change command w—Change one word
screw—The word we are inserting <Esc>—Ends insert mode
To err is human, To really foul up you need a computer.
Figure 2.12 Howcw works.
<P>
To <B>generate</B> a table of contents all the C <B>program</B> files in your current working directory, use the <B>command</B>:
<PRE>
$<B> ctags *.c</B> </PRE>
j —down a line —start of line f< —find “<” of <B> df>—delete to “>” f< —find “<” of “<B>”
. —repeat last change (df>)
j> —down, start of line f> —find “<” of <B> . —repeat last change
(df>)
f< —find “<” of “<B>”
. —repeat last change (df>)
23
Replacing Characters
Joining Lines
The J command joins the current line with the next one. A space is added to the end
of the first line to separate the two pieces that are joined, as illustrated by Figure 2.14. If a count is specified, the count lines are joined (minimum of two).
Note
Ther command treats<Enter> in a special way. No matter how big the count is, only one<Enter> is inserted. Therefore,5ra insertsfivea characters, whereas5r<Enter> replacesfive characters with one
<Enter>.
J
3J
This is a test with two lines This is a test
This is a test
This is a test with two lines
Figure 2.14 TheJ command.
rs
This is a test. This iza test.
Figure 2.15 The replace (r) command.
5ra
aaaaais a test.
This is a test.
Figure 2.16 Replace (r) command with count.
Replacing Characters
The rx command replaces the character under the cursor with
x.
Figure 2.15 shows how you can use ther command to replace az
with ans.Ther command can be preceded with a count, indicating the number of
charac-ters to be replaced. In Figure 2.16, we go to the beginning of line (the^ command)
24 Chapter 2 Editing a Little Faster
Be careful where you place the count.The5rx command replaces five characters with
the character
x
, whereasr5x replaces the character under the cursor with5
(r5) andthen deletes a character (x).
Changing Case
The ~ command changes a character’s case. It changes uppercase to lowercase and vice
versa. If a count is specified, the count characters are changed. Figure 2.17 contains examples.
“14~”
Now is THE time.. . . NOW IS the TIME. . . . “~”
now is the time. . . .
Now is the time. . . .
Figure 2.17 Use of the~ command.
Keyboard Macros
The . command repeats the preceding change. But what if you want to do something
more complex than a single change? That’s where the keyboard macros come in.The
qcharacter command records keystrokes into the register named character. (The
char-acter must be betweena and
z
.)To finish recording, just type aq command.You can now execute the macro by
typing the@character command. (This can be preceded by a count, which will cause
the macro to be executed that number of times.)
Take a look at how to use these commands in practice.You have a list of filenames that look like this:
stdio.h fcntl.h unistd.h stdlib.h
And what you want is the following: #include “stdio.h”
#include “fcntl.h” #include “unistd.h” #include “stdlib.h”
You start by moving to the first character of the first line. Next you execute the fol-lowing commands:
qa Start recording a macro in register a.
^ Move to the beginning of the line.
i#include “<Esc> Insert the string#include " at the beginning of the line.
25
Digraphs
a”<Esc> Append the character double quotation mark (“) to the end of the line.
j Go to the next line.
q Stop recording the macro.
Now that you have done the work once, you can repeat the change by typing the command@a. Alternatively, because you have three lines to go, you can change them using the command3@a.
Figure 2.18 shows how to define and then execute a macro.
Warning
The digraphs are set up assuming that you have a standard ISO-646 character set. Although this is an international standard, your particular display or printing system might not use it.
stdio.h fcntl.h unistd.h stdlib.h
#include “stdio.h” fcntl.h
unistd.h stdlib.h
#include “stdio.h” #include “fcntl.h” unistd.h stdlib.h
#include “stdio.h” #include “fcntl.h” #include “unistd.h” #include “stdlib.h”
Start
qa-Record into register a -Go to the geginning of a line i#include ‘<Esc>-Insert text a“<Esc>-Insert more text j-Go to the next line q-Stop macro
@a-Execute macro “a”
2@a-Execute macro “a” twice
2.18 Defining and using a macro.
Digraphs
Some characters are not on the keyboard—for example, the copyright character (©). To type these letters inVim, you use digraphs, where two characters represent one.To enter a ©, for example, you typeCTRL-Kc0.
To find out what digraphs are available, use the following command: :digraphs
26 Chapter 2 Editing a Little Faster
~ :digraphs ~! ¡ 161
| | | 166
–, ¬ 172 222 178 ,, ¸ 184 343/
4 190
A" Ä 196 E´ É 201 I" I 207 O~ Õ 213 U´ Ú 218 a` à 224 aa å 229 e" ë 235 n~ ñ 241 :- ÷ 247 u" ü 252
c| ¢ 162 pa § 167 –– – 173 333 179 111 185 ~? ¿ 191 A@ Å 197 E^ Ê 202 D- D 208 O" Ö 214 U^ Û 219 a´ á 225 ae æ 230 i` ì 236 o` ò 242 oe ÷ 247 y´ y 253
$$ £ 163 "" ¯¯ 168 rO ® 174 ´´ ´ 180 o– º 186 A` À 192 AA Å 197 E" Ë 203 N~ Ñ 209 /\ × 215 U" Ü 220 a^ â 226 c, ç 231 i´ í 237 o´ ó 243 o/ ø 248 ip p 254
ox ¤ 164 cO © 169 –= ¯ 175 ju µ 181 >> » 187 A´ Á 193 AE Æ 198 I` Ì 204 O` Ò 210 OE× 215 Y´ Y 221 a~ ã 227 e` è 232 i^ î 238 o^ ô 244 u` ù 249 y" ÿ 255
e= ¤ 164 a- ª 170 ~o ° 176 pp ¶ 182 141/
4 188
A^ Â 194 C, Ç 199 I´ I 205 O´ Ó 211 O/ Ø 216 Ip p 222 a" ä 228 e´ é 233 i" ï 239 o~ õ 245 u´ ú 250
Y– ¥ 165 << « 171 +– ± 177 ~. • 183 121/
2 189
A~ Ã 195 E` È 200 I^ I 206 O^ Ô 212 U` Ù 217 ss ß 223 a@ å 229 e^ ê 234 d- ∂ 240 o" ö 246 u^ û 251 Press RETURN or enter command to continue
´ ¨
´
´ ˆ
Searching
T
HIS CHAPTER INTRODUCES YOU TO THE VARIOUS Vim search commands.The basic search commands inVim are rather simple, which means that you can get started with searching fairly easily.In this chapter, you learn about the following:
n Simple forward searches n Search options
n Incremental searches n Changing directions n Basic regular expressions
Simple Searches
To search for a string, use the/string command.To find the wordinclude, for exam-ple, use the command/include. An<Enter> is implied at the end of this command.
(Any time the cursor jumps to the bottom of the screen and you type something, you must end it with<Enter>.)
Note:The characters.*[]ˆ%/\?~$ have special meaning. If you want to use them in a search you must put a \ in front of them. Example: to find . use the search string\..
28 Chapter 3 Searching
Figure 3.1 Searching for include.
To find the next include, use the command/<Enter>.The cursor now moves to the
next occurrence of the string, as shown by Figure 3.2.
/******************************************************** * cd-speed
* Report the speed of a cd-rom
* (Also works on hard drives and other * devices)
* * Usage:
* cd-speed <device> *
********************************************************/ #include <iostream.h>
#include <iomanip.h> /include * * * * * * * * * * * * * * * * /******************************************************** * cd-speed
* Report the speed of a cd-rom
* (Also works on hard drives and other * devices)
* * Usage:
* cd-speed <device> *
********************************************************/ #include <iostream.h>
#include <iomanip.h> /include
Figure 3.2 Search again, forward (/<Enter>).
Another way to find the next match is with then command.This command does the
same thing as/<Enter>, but does it with one less keystroke. Figure 3.3 shows the result
of this search.
* cd-speed
* Report the speed of a cd-rom
* (Also works on hard drives and other * devices)
* * Usage:
* cd-speed <device> *
********************************************************/ #include <iostream.h>
#include <iomanip.h> #include <unistd.h>
* * * * * * * *
Figure 3.3 Search again (n).
Both the/<Enter> andn commands can have a count specified. If there is a count, the
command searches for the count number of matches from the current location.
Search History
The search command has a history feature. Suppose, for example, that you do three searches:
29
Searching Options
Now let’s start searching by typing a simple/ without pressing<Enter>. If you press <Up>,Vim puts/three on the prompt line. Pressing<Enter> at this point searches for three. If you do not press<Enter>, but press<Up> instead, Vim changes the prompt to /two. Another<Up> command moves you to/one.
In other words, after you do a number of searches, you can use the<Up> and<Down> keys to select one of your recent searches.
Searching Options
Many different options control the way you perform a search.This section discusses a few of them.
Highlighting
The following command causesVim to highlight any strings found matching the search pattern:
:set hlsearch
If you turn on this option and then search forinclude, for example, the results in all the include strings are highlighted, as seen in Figure 3.4.
To turn off search highlighting, use this command: :set nohlsearch
To clear the current highlighting, use the following command: :nohlsearch
Search highlighting is now turned off; matched text will not be highlighted. However, the highlighting will return when you use a search command.
Incremental Searches
By default, Vim uses the traditional search method:You specify the string, and then Vim performs the search.When you use the following command, the editor performs incremental searches:
:set incsearch
* devices) *
* Usage:
* cd-speed <device> *
********************************************************/ #include <iostream.h>
#include <iomanip.h> #include <unistd.h> #include <stdlib.h> #include <stdio.h> #include <sys/ioctl.h>
* * * * *
30 Chapter 3 Searching
The editor starts searching as soon as you type the first character of the string. Each additional character further refines the search.
Suppose, for example, that you want to search forioctl.h, but this time you want to use an incremental search. First, you turn on incremental searching.
Next, you start the search by typing the/i command. Figure 3.5 shows how the
editor searches for the firsti and positions the cursor on it.
* * * * Usage:
* cd-speed <device> * ********************************************************/ #include <iostream.h> #include <iomanip.h> #include <unistd.h> #include <stdlib.h> #include <stdio.h> #include <sys/ioctl.h> #include <sys/types.h> #include <sys/mtio.h> /i
Figure 3.5 Results after/i.
You continue the search by typing ano.Your search now is/io, so the editor finds
the first io, as seen in Figure 3.6.
This is still not the place you want, so you add ac to the search, resulting in the /ioc command.TheVim editor advances, as illustrated in Figure 3.7, to the first match
ofioc.
This is what you want to find, so you press<Enter>, and you’re there.
To turn off incremental searches, use the following command: :set noincsearch
* * * * Usage:
* cd-speed <device> *
********************************************************/ #include <iostream.h>
#include <iomanip.h> #include <unistd.h> #include <stdlib.h> #include <stdio.h> #include <sys/ioctl.h> #include <sys/types.h> #include <sys/mtio.h> /io
Figure 3.6 Incremental search after/io.
* * * * Usage:
* cd-speed <device> * ********************************************************/ #include <iostream.h> #include <iomanip.h> #include <unistd.h> #include <stdlib.h> #include <stdio.h> #include <sys/ioctl.h> #include <sys/types.h> #include <sys/mtio.h> /ioc
31
Changing Direction
Searching Backward
The reverse search command (?) searches backward.Then command repeats the last
search. If a reverse search was the last one used, then command searches in the reverse
direction. If the last search was a forward search, then command searches forward.
Figure 3.8 shows how the? andn commands can work together.
2)n
1)?unsigned
Start
3)n
#include <sys/fcntl.h> #include <sys/time.h> #include <errno.h> // Read at most 10MB
const unsigned int MAX_READ = (10 * 1024 * 1024);
// Size of a buffer
const unsigned int BUF_SIZE = (62 * 1024); // Buffer to be written
static unsigned char buffer [BUF_SIZE];
Figure 3.8 ? andn commands.
Changing Direction
Suppose you start a forward search for unsigned using the/unsigned command.You
can turn around and search in the reverse direction by using the? command.Then
command repeats the search in the same direction.TheN command reverses the
direc-tion on the search and repeats it.
To make things a little clearer, line numbering has been turned on using the following command:
:set number
In this example, we use the following search commands:
Command Meaning Result
/unsigned Forward search Line 24
for unsigned
n Repeat search in Line 26
the same (forward) direction
n Search again Line 29
? Reverse search Line 26
for the preceding string (unsigned)
N Reverse direction Line 29
32 Chapter 3 Searching
Figure 3.9 shows the/unsigned command used to perform a search.Then command
was used twice to go the next occurrences of the string.Then we reversed course with a? command (which always goes backward.) Finally, we reverse course again with the N command. Figure 3.9 shows this tortured path.
19 #include <sys/fcntl.h> 20 #include <sys/time.h> 21 #include <errno.h> 22
23 // Read at most 10MB
24 const unsigned int MAX_READ = (10 25 // Size of a buffer
26 const unsigned int BUF_SIZE = (62 27
28 // Buffer to be written 29 static unsigned char buffer[BUF_S
:set number /unsigned
n
n
?
N
Figure 3.9 Different kinds of search commands.
Basic Regular Expressions
The Vim editor uses regular expressions to specify what to search for. Regular expressions are an extremely powerful and compact way to specify a search pattern. Unfortunately, this power comes at a price because regular expressions are a bit tricky to specify.
Let’s start with the simple stuff. In a regular expression, the normal letters match themselves. So the regular expressionSteve will matchSteve.
The Beginning (^) and End ($) of a Line
The^ character matches the beginning of a line. (It is no coincidence that this is also
the command to move to the beginning of the line.) The expressioninclude matches
the wordinclude anywhere on the line. But the expression^include matches the word
include only if it is at the beginning of a line.
The$ character matches the end of a line.Therefore, was$ finds the wordwas only
if it is at the end of a line. Figure 3.10, for example, shows a search for the patternthe with highlighting enabled.
<Hl> Dumb user tricks
At one universitythe computer center was experience trouble with a new type of computer terminal. Seems that the professors loved to put papers on top of the equipment, covering the ventilation holes. Many terminals broke down because they became so hot that the solder holding one of the chips melted and the chip fell out.
The student technicians were used to this problem. One day a technician took the back off a terminal /the
33
Basic Regular Expressions
Next you see what happens when searching for the regular expression^the.The
results, as seen in Figure 3.11, show that only two occurrences, both of which begin lines, are highlighted.
Finally a search forthe$. As you can see from Figure 3.12, only onethe ends a line.
If you want to search for a line consisting of just the wordthe, use the regular
expression^the$.To search for empty lines, use the regular expression^$.
<Hl>Dumb user tricks
At one university the computer center was experience trouble with a new type of computer terminal. Seems that the professors loved to put papers on top of
the equipment, covering the ventilation holes. Many terminals broke down because they became so hot that the solder holding one of the chips melted and the chip fell out.
The student technicians were used to this problem. One day a technician took the back off a terminal /^the
Figure 3.11 Searching for^the.
<Hl>Dumb user tricks
At one university the computer center was experience trouble with a new type of computer terminal. Seems that the professors loved to put papers on top of the equipment, covering the ventilation holes. Many terminals broke down because they became so hot that the solder holding one of the chips melted andthe chip fell out.
The student technicians were used to this problem. One day a technician took the back off a terminal /the$
Figure 3.12 Searching forthe$.
Match Any Single Character (
.
)
The character. matches any single character. For example, the expressionc.m matches
a string whose first character is ac, whose second character is anything, and whose the
third character ism. Figure 3.13 shows that the pattern matched thecom ofcomputer
and thecam ofbecame.
At one university thecomputer center was experience trouble with a new type of computer terminal. Seems that the professors loved to put papers on top of the equipment, covering the ventilation holes. Many terminals broke down because they became so hot that the solder holding one of the chips melted and the chip fell out.
The student technicians were used to this problem. One day a technician took the back off a terminal expecting to find a loose chip and instead found a /c.m
34 Chapter 3 Searching
Matching Special Characters
Most symbols have a special meaning inside a regular expression.To match these spe-cial symbols, you need to precede them with a backslash (\).To findthe. (period), for
example, use the stringthe\..
Regular Expression Summary
The following list assumes that the‘magic’ option is on (the default).
x The literal character x
^ Start of line
$ End of line
. A single character
\character Turns off the special meaning of many characters, gives special
Text Blocks and
Multiple Files
T
HIS CHAPTER SHOWS YOU HOW TO DEALwith larger text blocks.This includes the
commands that enable you to define a large text block as well as perform cut, paste,
and copy operations.
With most editors, you can just cut and paste. However, the
Vimeditor has the
concept of a register.This enables you to hold data for multiple cut, copy, or paste
operations. Most other editors are limited to a single cut/paste clipboard.With the
Vim
registers you get more than 26 clipboards.
One of the strengths of UNIX is the number of text manipulation commands it
provides.This chapter shows you how to use the filter command to take advantage of
this power to use UNIX filters to edit text from within
Vim.
Up until now, you have worked with single files in this book.You will now start
using multiple files.This will enable you to perform the same edits on a series of fi
les,and to cut and paste between fi
les.This chapter discusses the following topics:
n
Simple cut-and-paste operations (in
Vimterms, delete and put)
nMarking locations within the text
n
Copying text into a register using the yank commands
nFiltering text
36 Chapter 4 Text Blocks and Multiple Files
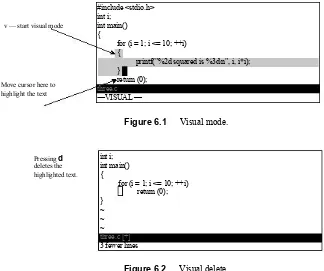
Cut, Paste, and Copy
When you delete something with thed, x, or another command, the text is saved.You
can paste it back by using thep command. (The technical name for this is aput).
Take a look at how this works. First you will delete an entire line with thedd
com-mand, by putting the cursor on the line you want to delete and pressingdd. Now you
move the cursor to where you want to place the line and use thep (put) command.
The line is inserted on the line following the cursor. Figure 4.1 shows the operation of these commands.
Because you deleted an entire line, thep command placed the text on the line after
the cursor.
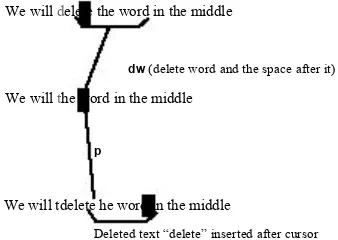
If you delete part of a line (a word with thedw command, for instance), thep
com-mand puts it just after the character under the cursor (see Figure 4.2).
We willthe word in the middle
dw(delete word and the space after it)
p
We will tdelete he word in the middle
Deleted text “delete” inserted after cursor
We willdelete the word in the middle
Figure 4.2 Deleting a word and putting back again. Line 1
Line2 Line 3 ~ ~
<, 21C written
Line 1 Line 3 ~ ~ ~
Line 1 Line 3 Line 2 ~ ~ dd
(Deletes line)
p
(Paste after cursor.)
37
Marks
Character Twiddling
Frequently when you are typing, your fingers get ahead of your brain.The result is a typo such as
teh
forthe
.TheVim editor makes it easy to correct such problems. Just put the cursor on thee ofteh and execute the commandxp. Figure 4.3 illustrates thiscommand.This works as follows:
x Deletes the character ‘e’ and places it in a register. p Puts the text after the cursor, which is on the ‘h’.
teh
th
the
x—delete the character
p—paste character after the cursor
Figure 4.3 Character twiddling with xp.
More on “Putting”
You can execute thep command multiple times. Each time, it inserts another copy of
the text into the file.
Thep command places the text after the cursor.TheP command places the text
before the cursor. A count can be used with both commands and, if specified, the text
will be insertedcount times.
Marks
The
Vim
editor enables you to place marks in your text.The commandma marks theplace under the cursor as mark
a
.You can place 26 marks (a
throughz
) in your text. (You can use a number of other marks as well.)To go to a mark, use the command`mark, wheremark is the mark letter (and` is the backtick or open single-quote character).
The command‘mark (single quotation mark, or apostrophe) moves you to the beginning of the line containing the mark.This differs from the`mark command, which moves you to the marked line and column.
The‘mark command can be very useful when deleting a long series of lines.To delete a long series of lines, follow these steps:
1. Move the cursor to the beginning of the text you want to delete. 2. Mark it using the commandma. (This marks it with marka.)
3. Go to the end of the text to be removed. Delete to marka using the command
d’a.
Note:There is nothing special about using thea mark. Any mark froma to
z
38 Chapter 4 Text Blocks and Multiple Files
There is nothing special about doing the beginning first followed by the end.You could just as easily have marked the end, moved the cursor to the beginning, and deleted to the mark.
One nice thing about marks is that they stay with the text even if the text moves (because you inserted or deleted text above the mark. Of course, if you delete the text containing the mark, the mark disappears.
Where Are the Marks?
To list all the marks, use the following command: :marks
Figure 4.4 shows the typical results of such a command.
The display shows the location of the marksa throughd as well as the special marks: ‘, “, [, and].
Marksa throughd are located at lines 1, 8, 14, and 25 in the file. The special marks are as follows:
' The last place the cursor was at line 67 of the current file " Line 1 (we were at the top of the file when last closed it) [ The start of the last insert (line 128)
] The end of the insert (line 129) To view specific marks, use this command:
:marks args
Replaceargs with the characters representing the marks you want to view.
* the data from an input * (.c) file.
*/
struct in_file_struct { :marks
mark line col file/text
´ 67 0 *^I^I^I into the "bad" list^I^I*
a 1 0 #undef USE_CC^I/* Use Sun's CC com
b 8 1 * Usage:^I^I^I^I^I^I*
c 14 1 *^I^I^I (default = proto_db)^I^I
d 25 1 *^I––quote^I^I^I^I^I^I*
" 1 0 #undef USE_CC^I/* Use Sun's CC com [ 128 42 * in_file_struct –– structure that ] 129 12 * the data from an input Press RETURN or enter command to continue
Figure 4.4 :marks.
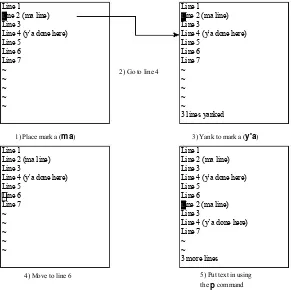
Yanking
For years, I used a simple method for copying a block of text from one place to another. I deleted it using thed command, restored the deleted text with thep command, and
39
Yanking
There is a better way. They command “yanks” text into a register (without remov-ing it from the file).The general form of they command isymotion. It works just like the delete (d) command except the text is not deleted. And the shorthandyy yanks the current line into the buffer.
(Note: Most other editors call this a “copy” operation.)
Take a look at how you can use this command to duplicate a block of text. First go to the top of the text to be copied and mark it withma.Then go to the bottom and do ay’a (yank to marka).
Now go to where the copied text is to be inserted and put it there using thep command.
Figure 4.5 shows these commands in action.
Yanking Lines
The Y command yanks a single line. If preceded by a count, it yanks that number of lines into the register.You might have expectedY to yank until the end of the line, like D andC, but it really yanks the whole line.
Figure 4.5 Yank (copy) and put (paste).
Line 1
Line 2 (ma line) Line 3
Line 4 (y'a done here) Line 5 Line 6 Line 7 ~ ~ ~ ~ ~
2) Go to line 4
1) Place mark a (ma)
Line 1
Line 2 (ma line) Line 3
Line 4 (y'a done here) Line 5 Line 6 Line 7 ~ ~ ~ ~ ~
3 lines yanked
Line 1 Line 2 (ma line) Line 3
Line 4 (y'a done here) Line 5
Line 6
Line 2 (ma line) Line 3
Line 4 (y’a done here) Line 7
~ ~ 3 more lines Line 1
Line 2 (ma line) Line 3
Line 4 (y'a done here) Line 5 Line 6 Line 7 ~ ~ ~ ~ ~
3) Yank to mark a (y'a)
4) Move to line 6 5) Put text in using
40 Chapter 4 Text Blocks and Multiple Files
Filtering
The !motion command takes a block of text and filters it through another program. In other words, it runs the system command represented bycommand, giving it the block of text represented bymotion as input.The output of this command then replaces the selected block.
Because this summarizes badly if you are unfamiliar with UNIX filters, take a look at an example.Thesort command sorts a file. If you execute the following command,
the unsorted fileinput.txt will be sorted and written tooutput.txt. (This works on both UNIX and Microsoft Windows.)
$ sort <input.txt >output.txt
Now do the same thing inVim. You want to sort lines 1 through 10 of a file.You start by putting the cursor on line 1. Next you execute the following command:
!10G
The! tellsVimthat you are performing a filter operation.TheVimeditor expects a
motion command to follow indicating which part of the file to filter.The10G
com-mand tellsVimto go to line 10, so it now knows that it is to filter lines 1 (the current line) through 10 (10G).
In anticipation of the filtering, the cursor drops to the bottom of the screen and a!
prompt displays.You can now type in the name of the filter program, in this casesort.
Therefore, your full command is as follows: !10Gsort<Enter>
The result is that thesort program is run on the first 10 lines.The output of the
pro-gram replaces these lines.
The!! command runs the current line through a filter. (I have found this a good
way to get the output of system commands into a file.)
I’m editing areadme.txt file, for example, and want to include in it a list of the files in the current directory. I position the cursor on a blank line and type the following:
!!ls
This puts the output of thels command into my file. (Microsoft Windows users
would usedir.)
Another trick is to time stamp a change.To get the current date time (on UNIX), I use the following command:
!!date
This proves extremely useful for change histories and such.
Note
41
Dealing With Multiple Files
Editing Another File
Suppose that you have finished editing one file and want to edit another file.The sim-ple way to switch to the other file is to exitVim and start it up again on the other file.
Another way to do so is to execute the following command: :vi file
This command automatically closes the current file and opens the new one. If the cur-rent file has unsaved changes, however, Vim displays a warning message and aborts the command:
No write since last change (use ! to override)
At this point, you have a number of options.You can write the file using this command:
:write
Or you can forceVim to discard your changes and edit the new file using the force (!) option, as follows:
:vi! file.txt
Note
The:e command can be used in place of:vi. The fact that these commands are equivalent has led to a flame war between Steve Oualline, who prefers:vi and Bram Moolenaar, who prefers:e. (Okay, it was
limited to three slightly discordant emails, but it’s hard to introduce real drama in a book like this.)
The
:view
Command
The following command works just like the:vi command, except the new file is opened in read-only mode:
:view file
If you attempt to change a read-only file, you receive a warning.You can still make the changes; you just can’t save them.When you attempt to save a changed read-only file, Vim issues an error message and refuses to save the file. (You can force the write with the:write! command, as described later in this chapter.)
Dealing with Multiple Files
So far the examples in this book have dealt with commands that edit a single file.This section introduces you to some commands that can edit multiple files.
Consider the initialVim command, for example.You can specify multiple files on the command line, as follows:
42 Chapter 4 Text Blocks and Multiple Files
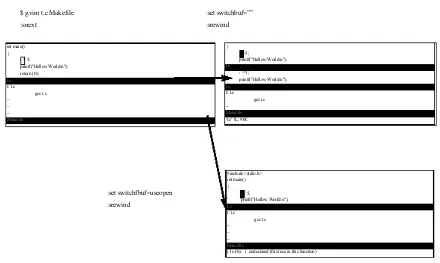
This command startsVim and tells it that you will be editing three files. By default, Vim displays just the first file (see Figure 4.6).
To edit the next file, you need to change files using the:next command.
Figure 4.7 shows the results. Note that if you have unsaved changes in the current file and you try to do a:next, you will get a warning message and the:next will not
work.
You can solve this problem in many different ways.The first is to save the file using the following command:
:write
In other words, you can perform a:write followed by a:next.
TheVim editor has a shorthand command for this.The following command per-forms both operations:
:wnext
/* File one.c */ ~
~ ~ ~
Figure 4.6 Editing the first of multiple files.
/* File two.c */ ~
~ ~ ~
“two.c” 1L, 17C
Figure 4.7 :next.
Or, you can forceVim to go the next file using the force (!) option. If you use the
following command and your current file has changes, you will lose those changes: :next!
Finally, there is the‘autowrite’ option. If this option is set, Vim will not issue anyNo write... messages. Instead, it just writes the file for you and goes on.To turn this option on, use the following command:
:set autowrite
43
Which File Am I On?
You can continue to go through the file list using the following command until you reach the last file:
:next
Also, the:next command can take a repeat count. For example, if you execute the
command :2 next
(or:2next), Vim acts like you issued a:next twice.
Which File Am I On?
Suppose you are editing a number of files and want to see which one you are on.The following command displays the list of the files currently being edited:
:args
The one that you are working on now is enclosed in square brackets. Figure 4.8 shows the output of the command.
/* File two.c */ ~
~ ~ ~
one.c [two.c] three.c
Figure 4.8 Output of:args.
This figure shows three files being edited: one.c, two.c, andthree.c.The file currently being editing istwo.c.
Going Back a File
To go back a file, you can execute either of the following commands: :previous
or :Next
These commands act just like the:next command, except that they go backward
rather than forward.
If you want to write the current file and go to the previous one, use either of the following commands: