Digital Lighting & Rendering, Second Edition
By Jeremy Birn
... Publisher: New Riders
Pub Date: April 27, 2006
Print ISBN-10: 0-321-31631-2
Print ISBN-13: 978-0-321-31631-8
Pages: 432
Table of Contents | Index
Crafting a perfect rendering in 3D software means nailing all the details. And no matter what software you use, your success in creating realistic-looking illumination, shadows and textures depends on your professional lighting and rendering techniques. In this lavishly illustrated new edition, Pixar's Jeremy Birn shows you how to:
Master Hollywood lighting techniques to produce professional results in any 3D application
Convincingly composite 3D models into real-world environments
Apply advanced rendering techniques using subsurface scattering, global illumination, caustics, occlusion, and high dynamic range images
Design realistic materials and paint detailed texture maps
Mimic real-life camera properties such as f-stops, exposure times, depth-of-field, and natural color temperatures for photorealistic renderings
Render in multiple passes for greater efficiency and creative control
Understand production pipelines at visual effects and animation studios
Digital Lighting & Rendering, Second Edition
By Jeremy Birn
... Publisher: New Riders
Pub Date: April 27, 2006
Print ISBN-10: 0-321-31631-2
Print ISBN-13: 978-0-321-31631-8
Pages: 432
Table of Contents | Index Copyright
Foreword
Chapter One. Fundamentals of Lighting Design
Motivation
Chapter Two. Lighting Basics and Good Practices
Starting Points
Types of Lights
Controls and Options
Lighting in Production
Exercises
Chapter Three. Shadows and Occlusion
Conclusions
Exercises
Chapter Four. Lighting Environments and Architecture
Daylight
Chapter Five. Lighting Creatures, Characters, and Animation
Modeling with Light
Three-Point Lighting
Functions of Lights
Issues in Lighting Character Animation
Exercises
Chapter Seven. Composition and Staging
Types of Shots
Shading Surfaces
GPU-Accelerated and Hardware Rendering
Exercises
Chapter Ten. Designing and Assigning Textures
Types of Texture Mapping
Chapter Eleven. Rendering Passes and Compositing
Rendering in Layers
Alpha Channel Issues
Rendering in Passes
Lighting in the Composite
Matching Live-Action Background Plates
Exercises
Chapter Twelve. Production Pipelines and Professional Practices
Production Pipelines
Getting Work Approved
Copyright
Digital Lighting and Rendering, Second Edition
Jeremy Birn
Find us on the Web at: www.newriders.com
To report errors, please send a note to [email protected]
New Riders is an imprint of Peachpit, a division of Pearson Education
Copyright © 2006 by New Riders
Project Editors: Davina Baum, Kristin Kalning Development Editor: Davina Baum
Production Editor: Andrei Pasternak Copyeditor: Emily Wolman
Tech Editor: Jesse Brophy
Compositor: Maureen Forys, Happenstance Type-O-Rama Proofreader: Corbin Collins
Indexer: Joy Dean Lee Cover design: Aren Howell
Interior design: Maureen Forys, Happenstance Type-O-Rama
The information in this book is distributed on an "As Is" basis without warranty. While every precaution has been taken in the preparation of the book, neither the author nor Peachpit shall have any liability to any person or entity with respect to any loss or damage caused or alleged to be caused directly or indirectly by the instructions contained in this book or by the computer software and hardware products described in it.
Trademarks
Many of the designations used by manufacturers and sellers to distinguish their products are claimed as trademarks. Where those designations appear in this book, and Peachpit was aware of a trademark claim, the designations appear as requested by the owner of the trademark. All other product names and
services identified throughout this book are used in editorial fashion only and for the benefit of such companies with no
intention of infringement of the trademark. No such use, or the use of any trade name, is intended to convey endorsement or other affiliation with this book.
9 8 7 6 5 4 3 2 1
Printed and bound in the United States of America
Notice of Rights
All rights reserved. No part of this book may be reproduced or transmitted in any form by any means, electronic, mechanical, photocopying, recording, or otherwise, without the prior written permission of the publisher. For information on getting
permission for reprints and excerpts, contact [email protected].
Holger Schömann, Andrzej Sykut, and Florian Wild. All rights reserved.
The model used in Figures 2.16 and 2.19, pages 31 and 36, used courtesy of Rini Sugianto. All rights reserved.
Chapter 4 opening spread image, page 84, used courtesy of Amilton Diesel. All rights reserved.
Figure 4.27, page 111, used courtesy of Jason Lee. All rights reserved.
Figure 4.28, page 111, used courtesy of Geoff Packer. All rights reserved.
Chapter 5 opening spread image, page 124, used courtesy of Kim Hyung Jun. All rights reserved.
Figure 6.5, "Circus Maximum Irritans," page 162, used courtesy of Péter Fendrik. All rights reserved.
Figure 7.2, page 188, and Figure 8.8, page 221, used courtesy of Jorge R. Gutierrez. All rights reserved.
Figure 7.7, page 195, by Andrew Hickinbottom, © 2006 Andrew Hickinbottom. All rights reserved.
Figure 8.12, page 226, used courtesy of Vaclav Cizkovsky. All rights reserved.
Figure 10.13, "Venetian Boat Song," page 293, by Gladys Leung © 2006 (http://runtoglad.com). All rights reserved.
Foreword
To help you make better 3D renderings, this book fuses information from several fields. In these pages you will find concepts and techniques from professional cinematography, design principles from traditional visual arts, practical advice based on professional film production experience, and plain-English explanations of the latest science behind the scenes.
Who Should Read This Book?
You should read this book when you have at least a working knowledge of how to use a 3D package, and are interested in taking your 3D rendering further.
For professional users of 3D rendering software, this book is designed to help with real-world production challenges and contribute to the ongoing growth of your work.
For students of computer graphics, this book will help you develop more professional rendering skills.
For dedicated 3D hobbyists, this book can help you improve the artistic quality of your 3D renderings and learn more about professional approaches to graphics production.
Software Requirements
This book covers techniques and concepts that are applicable to work in almost any 3D rendering software. 2D Paint and
compositing software is also recommended.
3D Software
No single program is going to support every feature, function, and rendering algorithm described in this book. Hopefully you won't mind learning about a few functions that aren't in your particular software yet. However, most sections show several alternate approaches or work-arounds so that you can achieve any effect that is described, no matter which program you use.
Being non-software-specific doesn't mean that this book doesn't discuss particular software, though. If there's a noteworthy
feature in Renderman, Mental Ray, 3D Studio Max, Maya, Softimage, Lightwave, or any other program, it will be mentioned when it comes up.
This book is dedicated to the idea that, with an awareness of the art and computer graphics principles that go into a
rendering, and a little bit of creative problem solving, you can accomplish great work in almost any rendering package.
2D Software
Any good 3D system should be complemented with 2D software to create and manipulate texture maps, and to composite
together layers and render passes. Ideally you should have a paint program such as Adobe Photoshop (used in many texture-creation examples in this book), Paint Shop Pro, or Fractal
also work just fine. A dedicated compositing program, such as Shake, Digital Fusion, or After Effects, is useful when
compositing together render passes, although you could also do basic compositing of still images in your paint program.
About This Edition
This is the second edition of the popular book [Digital] Lighting & Rendering. The first edition became the standard text on the art of 3D lighting and rendering, and introduced many artists to the field. Since it was published in 2000, it has met with great critical and commercial success. I am sincerely grateful to each teacher who has chosen to assign my book to students,
everyone on the Internet who has posted a recommendation, and every artist who has shown my book to a friend or
colleague.
This new edition has advanced along with changes in
technology, in software, and in the industry. To keep up with an evolving field, every chapter has grown with new techniques and concepts. Issues such as occlusion and global illumination, which had been relegated to single sections in the first edition, are now woven throughout the book, in discussions of different issues from architectural rendering to render passes. A new chapter has also been added on understanding studio
production pipelineshow professionals work together in different positions to create feature-film visual effects and computer
animated features.
In computer graphics, we say our work is never really completed, only abandoned. Shots always could be better, always could be tweaked and revised a little more by
Chapter One. Fundamentals of Lighting
Design
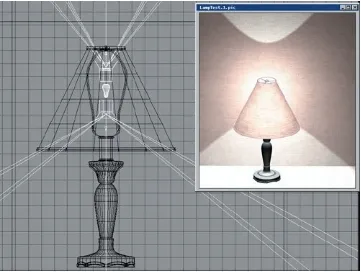
Fruit Bowl images by Donal Khosrowi (top) and Andrzej Sykut (lower).
Motivation
Before you add a light to your scene, you should know its
motivation. Motivation is the cause or original source for each light in your scene.
You probably wouldn't begin to animate a character without knowing what the character was doing or trying to do, or paint a texture map without knowing what material you were trying to createand yet many people add lights to their scenes in just this sort of random manner, without thinking about what kind of light they are trying to depict.
Motivation should inform every decision you make in adjusting your lights. Once you know a light's motivation, you know what qualities of real light you are trying to depict, and what kind of light sources you should study or think about when creating an appearance in 3D.
Off-Screen Space
Off-screen space is the area that isn't visible in your shot, such as the space above the camera. The illumination, shadows, and reflections you see in a photograph are often motivated by off-screen sources, rather than by light sources that are visible within the frame. An important part of your job in designing lighting for any scene is to imagine what exists in off-screen space, so that you can light your scene with lights that appear to be motivated by real light sources.
taken.
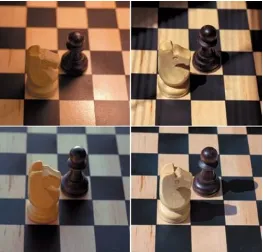
Figure 1.1. You can recognize a scene lit by a
lamp (upper left), by light through a window
(upper right), under a cloudy sky (lower left),
and in direct sun (lower right).
If the light coming from off-screen space in a photograph can provide this much information, how do we make the lighting in our 3D scenes appear just as distinctive to communicate the same things? The answer starts with studying the visible qualities of light from each kind of light source.
Qualities of Light
qualities of light they add to the scene. The main qualities of light that we notice in a picture are color, brightness, softness, throw pattern, and angle.
Every type of light source has a distinctive color
temperature, which, when combined with the white balance of the camera, determines the color of the light. Chapter 8, "The Art and Science of Color," has charts of real light
sources' color temperatures.
Brightness, like color, is all relative to how the camera is adjustedthis time based on the exposure settings of the camera. Chapter 6, "Cameras and Exposure," describes a real camera's exposure process, and how to make sure your own renderings are exposed properly.
Softness is a function of several settings on a light. The penumbra of a spotlight sets the softness of the edge of its cone. The decay or drop-off of a light sets how it fades away with distance. Most importantly, soft shadows create the impression of soft, diffused light while crisply defined shadows indicate hard light. Figure 1.1 showed the hard-edged shadows of the chess pieces lit by direct sun, and the much softer shadows cast by the cloudy sky. Chapter 3, "Shadows and Occlusion," discusses several approaches to rendering hard and soft shadows.
Throw pattern, or the shape of a light, is another noticeable quality of light. Figure 1.1 showed the pattern of the light filtered through Venetian blinds as the throw pattern of sunlight that has passed through a window. Chapter 2, "Lighting Basics and Good Practices," discusses projecting cookies from your lights to simulate different throw
patterns.
example, a late afternoon sun will come from a lower angle than light in the middle of the day. To a lighting designer, angle also helps determine the visual function of a light, such as whether it functions as a key light, a kicker, or a rim. Aiming lights at the correct angle to achieve different visual functions is described in Chapter 5, "Lighting
Creatures, Characters, and Animation."
Almost any adjective you use to describe light could be
considered a quality of light. I sometimes consider animation, such as whether a light is flickering or consistent, to be a
quality of light. I have heard other people describe the level of contrast as a quality of light, although I consider the amount of contrast in an image to be a function of the brightness and softness of the lights in the scene.
The one thing that ties all of these qualities of light together is that you can study them in real life, and work to imitate them with the lights in your 3D scene. Knowing which kinds of light you want to study in real life starts with imagining what kinds of light sources are motivating your scene's illumination.
Direct and Indirect Light
Direct light shines directly from an original source, such as a lightbulb or the sun, to an object that it illuminates. Indirect light is light that has reflected or bounced off one surface already, before it indirectly illuminates other objects. For
example, if a floor lamp aims light at the ceiling, then the circle of light on the ceiling is direct light. The light that has reflected off the ceiling to softly illuminate the rest of the room is indirect light.
for light that can fill in or illuminate parts of your scene.
Cheating
Cheating is an intentional departure from what's motivated, done in a way designed not to appear noticeably wrong to the audience.
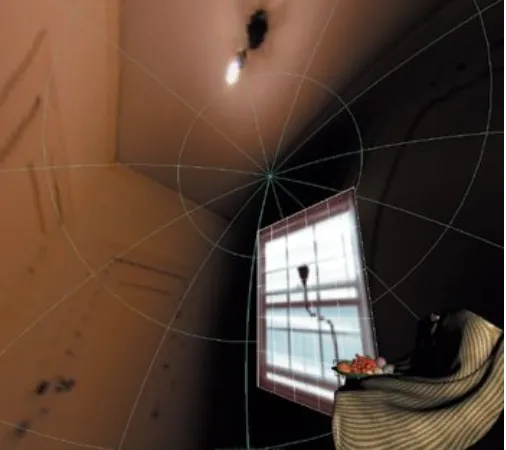
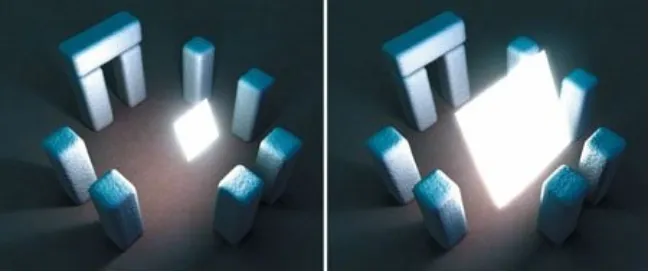
As a simple example of cheating, Figure 1.2 shows the environment that I built to represent the off-screen space
surrounding the fruit bowl on the cover of this book. It contains the window that will be reflected on the surface of the fruits. That window in the reflection is also the motivation for the key light (the main, brightest illumination) illuminating the left side of the fruits in the scene.
Figure 1.2. A textured environment surrounds the
fruit bowl in the lower right.
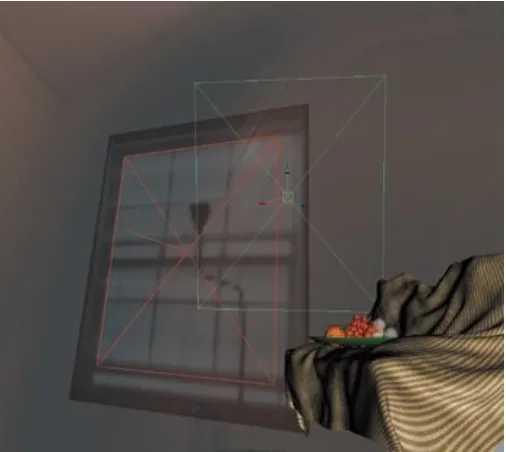
motivated, then the key light would be positioned exactly where the window is, so that the illumination on the fruit came from the same angle as the reflection of the window. However, doing this would light the fruit too frontally, which would appear to flatten out the round forms. The shape of the fruit will be better defined by light that comes more from the side instead of the front. To accomplish this, the position of the light is cheated away from the window that motivates it, as shown in Figure 1.3.
Figure 1.3. The motivated position for the key
light (orange) would match the reflection, but the
new key light position is cheated away from the
window (green).
Figure 1.4. Illumination from the original angle
(left) doesn't shape all of the fruit as well as light
from the cheated position (right).
Cheating is performed, to some extent, on almost every project done in 3D. Shadows cast from one character to another are moved or removed if they are distracting. Light on a character that appears to come from a lamp may actually come from a position far away from the lamp if it lights a character better. Rims of light perfectly outline forms, even if there was no light in exactly the right place to motivate the rim.
Cheating in Live Action
Knowing how to cheat and fake things is a crucial part of
creating 3D graphics, but it is also an established part of the art of live-action cinematography.
independently from other walls.
Visual Goals of Lighting Design
There is more to lighting a scene than simply running a
simulation of real-world parameters. Lighting is also designed to achieve certain visual goals that help a viewer better appreciate a scene. How well a lighting artist accomplishes these goals
determines how the lighting will enhance or detract from a shot.
Making Things Read
Much like photography, cinematography, and painting, 3D rendering is a process of producing two-dimensional images that depict three-dimensional scenes. To give your renderings solidity and presence, and to fully communicate the three-dimensional form of an object or character to an audience, you need to define your models with careful lighting. Some people call this process modeling with light, because it is your lighting that lets the viewer perceive an object's 3D form. Defining a character with light is one of the main focuses of Chapter 5.
Making Things Believable
Computer graphics can be rendered in many different visual styles. Some projects require photorealism (images that can be mistaken for a photograph), while other projects are stylized in different ways or designed to create more illustrated or cartoon-like looks. However, whether or not the visual style you adopt is photorealistic, your lighting still needs to be believable to the audience.
example, if there is a beam of direct sunlight entering a room, the viewer expects the sunlight to be brighter than the light of a table lamp. Even in a cartoon, basic expectations of weight and balance still exist, and sometimes getting small details right in your lighting can even help "sell" a scene that otherwise would be impossible to believe.
Often the key to creating believable lighting is studying real life. Before beginning a project, try to study how light behaves in situations similar to what you will be rendering. In visual effects work, studying the live-action footage (the images filmed with a real camera) can show you a great deal about how a subject should appear in an environment. For projects created entirely in 3D graphics, collect reference images that you can study to see how color and light would appear in a real scene. Whether you photograph the reference images yourself, find them on a photography website, or grab still frames from rented DVDs, your collection of reference images can be useful throughout your project to compare with your renderings as you design and adjust your lighting.
It is a poor artist who blames his tools for his work. Part of making a scene believable is compensating for the failures, flaws, and limitations inherent in your rendering software. Almost every physical effect discussed in this book, from indirect light bouncing off walls to the translucency in human skin, can be simulated through careful texturing, lighting, and compositing, even when your software doesn't fully or
automatically simulate everything for you. When someone sees the picture or animation that you have lit, they want to see a complete, believable picture, not to hear excuses about which program you used.
Enhancing Shaders and Effects
to a scene to help communicate the identity of different
surfaces and materials. For example, you might create a light that adds highlights to a character's eyes to make them look wetter, or puts a glint of light onto an aluminum can to make it look more metallic. Many effects that, in theory, could be
created exclusively though developing and adjusting surfaces and textures on 3D objects are often helped along during production by careful lighting designed to bring out the
surface's best attributes. No matter how carefully developed and tested the shaders on a surface were before you started to light, it's ultimately the lighting artist's responsibility to make sure all that is supposed to be gold actually glitters.
Visual effects such as explosions, fire, water, smoke, and clouds also need a good deal of attention from lighting, usually
including special dedicated lights. For example, if a fire is supposed to appear to be glowing and illuminating objects around it, or if raindrops are supposed to have highlights making them visible against a dark sky, then lights must be added in close coordination with these effects elements.
Maintaining Continuity
Working on longer projects in which many people are involved in lighting different shots, maintaining continuity is a key
concern. All the shots must come together to maintain a seamless experience for the audience. Many tactics are employed to maintain continuity, from comparing images of different shots to your own while you light, to different lighting artists sharing lighting rigs for sets and characters, to
screenings of sequences focused on continuity where any errors or discrepancies might be found.
move behind a cloud while filming one shot, and be brighter or have moved in the sky when another shot is filmed. While
integrating a creature or spaceship with the lighting from the background plate may be the key to making your shot
believable, the continuity of the sequence as a whole is just as high a priority, and sometimes you need to adjust your shot's lighting to match the lighting in adjacent shots as well.
Directing the Viewer's Eye
In a well-lit scene, your lighting should draw the viewer's eye to areas that are important to the story, animation, or key parts of the shot. Chapter 7, "Composition and Staging," will cover more about what makes a part of the frame attract the viewer's eye or command attention.
Besides making the intended center of interest visible, good lighting avoids distracting the audience with anything else. In viewing an animated film, the moment something unintended catches your eyewhether it's a strange flicker or artifact, a highlight where it doesn't belong, or a shadow that pops or changes suddenlyyour eye has been pulled away from the action and, worse than that, your attention has been pulled away from following the story. Good lighting can add a lot to a film, but first and foremost you must do no harm to the
experience of watching the animation.
Emotional Impact
visual goal of cinematic lighting design.
One of the main focuses of Chapter 8 is the different moods and associations created by simple things such as the color scheme chosen for a shot. While staying within what is motivated and believable, you can think about what kind of look or mood you are trying to achieve in lighting a scene. Is it very starkly lit, with high contrast and harsh shadows? Is it softly lit, with
subtle lighting and soft shadows? Is the scene very colorful with lots of saturated tones, or gloomy and desaturated? Is there a point in the scene when there should be a shift in tone,
something changing? Knowing the story and, of course,
discussing the main points of the scene with the film's director are the keys to planning the type of mood you will try to
achieve.
Achieving the visual goals of good lighting design is an artistic process, grounded in the tradition of cinematography, which in turn borrows a great deal from painting. Technology may
change some aspects of the process of 3D lighting. This book covers a number of the key technologies that are speeding up or changing the process of lighting, from hardware acceleration to image-based lighting and global illumination. However,
mastering the craft of lighting a 3D scene is, at its heart, a
Lighting Challenges
Most of the time spent on lighting is not spent setting up lights in your scene. More time is actually spent on adjusting your lighting, getting feedback on your work, and revising things, than on the initial set-up. Re-rendering scenes with better and better lighting, while getting feedback on your versions, is essential to perfecting your lighting skills.
To help you get more practice with lighting, and to get feedback on your scenes as you light them, you can browse through an ever-expanding set of "Lighting Challenge" scenes, which are available to download from this book's companion website,
www.3dRender.com, in a variety of file formats. On the Lighting Challenges discussion forum, you can see how other artists have lit each scene; see breakdowns of the lights, the render passes, and other elements of people's work; and, most
important, post versions of your own work to get feedback. I'll be there too, to give you feedback on your work and post
suggestions.
There's no resource more valuable than the Internet in learning about 3D rendering, from researching the latest and most
esoteric of plug-in shaders for your renderer, to getting critiques and feedback on your work. I'm on the Web almost every day, often while waiting for frames to render. In fact, an ideal time for you to read this book is while waiting for frames to render, running your own tests and trying the Lighting Challenge scenes as you read these chapters.
The plan is that Lighting Challenge scenes will be added about once a month, including indoor and outdoor environments, characters, products, and scenes that present specific
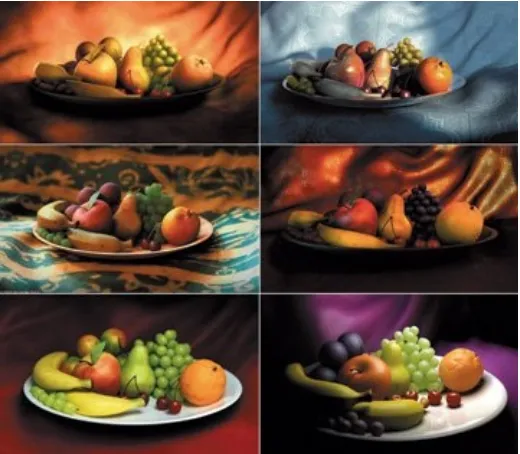
image was rendered from one of the challenge scenes. Figure 1.5 shows several of the other entries by different artists in the fruit bowl Lighting Challenge scene. Feel free to download the scene and take a stab at lighting it yourself.
Figure 1.5. The Fruit Bowl Lighting Challenge, as
lit by Angel Camacho (upper left), Lazhar Rekik
(upper right), Florian Wild (middle left), Yohann
Your Workspace
Before you start work on lighting your 3D scene, pay some attention to the lighting in your own office or the area around your computer.
Working in a room with sunlight coming in through a window, or too bright a light from the ceiling lights or lamps, can limit your perception of the scene you are trying to light. Before you begin lighting a scene, turn your office lights down or off, and make sure there is no screen glare or reflections visible on your monitor.
As a general rule, conventional CRT monitors are capable of a greater range of contrast and more accurate colors than a flat LCD monitor. However, monitors do not last forever; if you have a monitor that is more than five years old and has had daily use, it is not likely to be as bright as it once was, and it will not perform as well as a new monitor. A new flat-panel monitor can easily outperform an old, worn-out CRT.
In terms of proceeding with this book, you shouldn't need new hardware, but take a moment to check that your current
monitor is adjusted well. As a simple approach to calibrating your monitor, visit www.3dRender.com and view the image
shown in Figure 1.6 on your screen. Make sure you can read all of the gray numbers at the top and bottom of the image; if any are unreadable, you are missing a part of the dynamic range of your images. Check both the controls on your monitor as well as the software control panel to make sure you don't have the brightness or contrast adjusted to a level that hides bright or dark tones from you.
along the top and bottom.
If you are ever creating printed output, then the most accurate way to calibrate your monitor is to print a test image first, and then adjust your monitor to match the printer's output. The calibration will never be completely perfect for every color, but you should be able to get a reasonably good preview of what you will get if you adjust the monitor side by side with printed output.
Even a well-calibrated monitor may shift its appearance during the first hour or two after being turned on. At many studios, monitors are left on continuously instead of being turned off over night, so that the calibration will not be lost in the
Creative Control
You probably learned this lesson in dining at seafood restaurants: If it smells like fish, it is not good fish.
A similar principle applies in computer graphics: If it looks like computer graphics, it is not good computer graphics. When an image is well lit and well rendered, the technology behind the image does not call attention to itself. Viewers will notice only a compelling image, a realistic scene, or an innovative new visual style. When viewing a great rendering, the fact that a computer was used in creating the image will not be the first thing that strikes a viewer's mind.
When you, the artist, are truly in control of your 3D rendering, then it is your hand that the viewer will see in your work, rather than the impression that a computer has made the picture.
The goal of this book is to help you take control over the lighting and rendering process, so that every aspect of your rendering is the result of your own deliberate and well informed decisions. Every chapter deals with an issue or aspect of
Chapter Two. Lighting Basics and Good
Practices
Starting Points
Where does the lighting process start? The answer varies widely between companies and projects. Sometimes, especially at
smaller companies or on smaller projects, it is as simple as having a conversation with the client or director. He may tell you that the scene is set at night outside the theater at a movie premiere, and he wants a blue or purple gradient for the sky, camera flashes illuminating the characters from all directions, and spotlights sweeping through the sky in the background. From that verbal description, you can sit down and develop some test images to show the director the next day.
If your lighting begins with a conversation, you should start adding, collecting, and discussing reference images as soon as possible. Gather images from the Internet, frames from rented movies that contain similar scenes, and books, magazines, and stock photography catalogs. The sooner you can put some
images in front of the director and agree on what your project is supposed to look like, the sooner you can be sure that your
work is headed in the right direction.
If you are working on visual effects shots, lighting creatures or vehicles that will be composited into a live-action movie, then you will be given the background plates (the digitized frames that were filmed as a part of the movie.) Usually you will also get some reference images of a sphere or other simple objects held in front of the camera from which you can attempt to match the lighting of the shooting location. Your background plate will be your bible in lighting your visual effects shots, and you'll observe every detail you can in it, such as the angle and sharpness of the shadows, and the colors, tones, and level of contrast in the scene, then incorporate your observations into your lighting. Matching the lighting from real locations is
If you are working on an animated production, the art
department will have started working on the look of the scenes long before you begin to light them. There are likely to be
Types of Lights
You begin setting up lighting in a 3D scene by choosing which types of lights to add. The actual lights that you can use in a 3D program are roughly based on real-world types of light sources. Each has its own uses and advantages, so it pays to know your tools and choose them carefully for each project.
Point Lights
Point lights, also known as omni or omnidirectional lights, are the simplest light sources to use in 3D. As shown in Figure 2.1, a point light emits light uniformly in all directions.
Figure 2.1. A point light emits light uniformly in
all directions, casting shadows that radiate out
from the light's position.
hanging in the middle of a roomas shown in Figure 2.2, some programs even represent point lights with a lightbulb icon. Yet unlike a real light bulb, a point light is infinitely small, so all of the light emitted from it comes from exactly the same point in space.
Figure 2.2. Icons for a point light in Lightwave 3d,
a Radial light in Electric Image, a point light in
Maya, and a point light in Softimage. All perform
similar functions.
When point lights are set to cast shadows and you model a light fixture around them, the shadow of the light fixture will limit and shape where the light can shine, as shown in Figure 2.3. However, most lighting artists prefer to use spotlights for this kind of effect, because spotlights provide more control over exactly where the light is aiming.
Figure 2.3. When positioned within a light fixture
and set to cast shadows, a point light can appear
Spotlights
Spotlights (also called spots) are the most popular type of light in lighting design for computer graphics, because they can be controlled and adjusted so completely. Just like a point light, a spotlight simulates light radiating from an infinitely small point. However, instead of aiming in all directions, it is limited to a specified cone or beam of light in a certain direction, as shown in Figure 2.4. The spotlight's rotation can determine where the beam is aimed, or a target or interest may be linked to the light so that the light is always aimed toward the target.
You could do almost all of your lighting with spotlights; even when light needs to be aimed in different directions, you can use several spotlights together, as shown in Figure 2.5.
Figure 2.5. Multiple spotlights can be aimed in
different directions, giving the appearance of an
omnidirectional light while allowing more control
over where the lights are aimed.
Spotlights have handy controls that you can adjust to shape exactly where light will fall. The cone angle determines the width of the spotlight's beam, while the penumbra angle (also called falloff or spread angle) determines the softness of the edge around the spotlight's beam. At a penumbra of 0, the
beam will have a perfectly sharp edge, as shown on the left side of Figure 2.6. As you increase the penumbra, the spotlight
beams will gain a soft edge, as shown in the center of the
figure. With a very soft beam, you no longer notice the shape of the spotlight at all. As shown on the right side of Figure 2.6, spotlights can add subtle illumination to a scene, with each light gently brightening the area where it is aimed, but all of the
spotlights blending together seamlessly. Chapter 4, "Lighting Environments and Architecture," describes how to place lights as shown in this figure.
see every spotlight cone distinctly. As the
penumbra angle is increased (center), the lights
begin to merge; when the lights are soft enough
(right), they merge together so that you cannot
distinguish between the individual sources.
Spotlights also have an option called barn doors. In real life, barn doors are metal flaps mounted in front of a spotlight, as shown in Figure 2.7, which can be folded in front of the light to crop it horizontally or vertically. Barn doors in 3D graphics give you the same kind of creative control, enabling you to crop out a square or rectangle of light.
Figure 2.7. Besides having control over aiming a
light, barn doors also allow a cinematographer to
Spotlights are also popular in computer graphics because they work efficiently with some kinds of shadows. In Chapter 3, "Shadows and Occlusion," I will discuss why spotlights are usually the most efficient kind of light when rendering depth map or shadow map shadows.
Directional Lights
A directional light, which is particularly useful for simulating direct sunlight, is also known as a distant, direct, infinite, or sun light in different programs; the different icons are indicated in Figure 2.8.
Figure 2.8. A 3D Studio Max target direct light,
directional lights in Alias Power Animator and
Maya, and an Infinite light in Softimage, all serve
A directional light illuminates every object from the same angle, no matter where the object is located relative to the light. In Figure 2.9, the directional light aims down and to the left, causing every object to be illuminated as if it were being lit from the upper left.
Figure 2.9. A directional light creates parallel
shadows and illumination that strikes each object
from the same angle.
which is something you normally would only see in shadows from a very distant light source such as the sun. Contrast these shadows with the shadows cast by point lights and spotlights, where the shadows diverge away from the light at different angles.
Area Lights
An area light is a type of light that simulates the size of a
physical light source in real life. With point, spot, and directional lights, scaling up the light in your scene only scales up the icon, and doesn't change the illumination. As you scale up an area light, however, it will accurately simulate illumination from a larger panel of light. If an area light is scaled very small, its illumination will appear similar to a point light. As shown on the right in Figure 2.10, illumination from a larger area light will appear softer, creating softer shadows and emitting illumination that can wrap around nearby subjects.
Figure 2.10. An area light creates softer
illumination and shadows as it is scaled larger.
spherical area lights, rectangles, discs, and linear lights. If you have a choice, use the shape that best fits the type of light source you are trying to simulate. For example, a linear light can be perfect for simulating a fluorescent tube.
The quality of light and shadows achievable with area lights can make them an excellent choice for some realistic renderings. However, soft shadows from an area light are slower and more complex to render than shadows from a point light or spotlight. This is because the renderer needs to scatter multiple rays to sample whether different parts of the area are causing a partial shadow, versus tracing rays to just one point. Many artists
avoid using area lights for larger animated projects simply because they can take so long to render. See Chapter 3 for more information about soft-shadow rendering options.
Models Serving as Lights
In some programs, any 3D model in your scene can be
designated to function as a light source. With this feature, even nontraditional shapes of light, such as a neon sign, can be used as a true light source, as shown in Figure 2.11.
Figure 2.11. Using an object as a light allows for
odd shapes such as fluorescent rings or neon
Any renderer that supports global illumination (the simulation of indirect light bouncing from one object to another, discussed in Chapters 3 and 4) will allow objects to illuminate other objects. When rendering with global illumination, applying a high
incandescence or a bright ambient color to an object will allow it to work as a light source.
While using arbitrarily shaped models as light sources is becoming possible in many programs, it is not a common or efficient solution for most professional lighting work. In most cases, professionals avoid it because it makes rendering too slow. You can usually fake something similar by putting some point lights inside your model and assigning a bright or glowing shader to the surface.
Environment Spheres
An environment sphere (also called a sky dome) is a special light source that surrounds and provides illumination from all around your scene. Environment spheres are perfect for
main light source. Figure 2.12 is lit entirely by an environment sphere, with no other light sources added.
Figure 2.12. An environment sphere surrounds
the scene and lights objects based on the colors
mapped to the sphere.
When you map environment spheres with an image, the colors from that image are used to determine the brightness and color of the illumination from each angle. This technique, called
image based lighting (IBL), is covered in Chapter 4.
Ambient Light
In real life, ambient light means the light that is all around you. It includes light from the sky, light that has reflected back up at you from the ground or floor, and light from any other light
In computer graphics, many programs have an ambient light (sometimes called global ambience) that uniformly brightens your objects in an unrealistic way. It makes every side of every surface the same color, robbing your scene of shading and
diversity. The general rule with this kind of ambient light is this: Don't use it. Figure 2.13 shows the flat, unrealistic shading that comes from using ambient light as a fill light.
Figure 2.13. Ambient light flattens the scene and
robs it of richness and shading.
If your scene needs to be brighter, you can add any kind of light discussed above to fill in the illumination where it is getting too dark. Any other type of light will make better fill lights than a flat, uniform ambience.
A variation on ambient light that makes it less uniform is an
You should always start lighting in complete darkness, so that when you add your first spotlight and test-render your scene, you see no illumination except that light. Getting rid of any
Controls and Options
After you've added a light to your scene, the next step is to solo
the light so that you can adjust it more precisely. To solo a light means to hide all the other lights in the scene, and render the scene illuminated by just one light. By isolating each light, you know exactly how it contributes to the lighting and shadows in the scene, and you can accurately adjust the controls and
options on the light.
Decay
Decay (also called attenuation or distance falloff) controls how the intensity of a light decreases with distance. The image on the left side of Figure 2.14 is an example of a light with no decay: It lights the farthest rock as brightly as the near ones. The right side of Figure 2.14 shows a light with an inverse square (also called quadratic) decayit lights the rocks near it much more brightly than the distant rocks.
Figure 2.14. Without decay (left), objects far from
the light are illuminated as brightly as nearby
objects, while inverse square decay (right) makes
Some software offers a multiple-choice setting between three or four specific types of decay. Another way to adjust decay is by using a numeric value, usually labeled decay or exponent. The numeric approach is more flexible, because you are not limited to whole numbers. For example, if you wanted less than a
decay of 2 (inverse square), but more than 1 (linear), you could type a number such as 1.8. Your main choices are shown in Table 2.1.
Table 2.1. Decay Rates
Numeric Value Type Of Decay
0 None
1 Linear (inverse)
2 Quadratic (inverse square)
3 Cubic
An inverse square decay (also called quadratic or a decay rate of 2) is the most physically correct setting; this is the type of decay seen in real light sources. In real life, decay is a function of light rays geometrically spreading out over space, not of the rays decreasing in energy. Real rays of light can travel huge distancesthey can keep traveling for light yearswithout wearing out or growing dimmer. However, as they travel farther away from their source, rays spread out geometrically so that they are more and more scarce.
Figure 2.15 shows how a plane moving twice as far from a source gets half as many rays of light over its height. This also happens across the width of a surface, so that it will become one-quarter as bright every time you double the distance
between the surface and the light. The geometric spreading-out of photons is simulated by using an inverse square decay on your lights.
Figure 2.15. Six rays of light hit a nearby surface,
while half as many hit a surface at twice the
distance. This difference over the height and
width of a surface makes an object twice as far
If a light source is visible in your shot, as in Figure 2.16 where a character has just lit a match, or you have modeled a lamp on a table and it is turned on, then it is a good idea to use an
inverse square decay. Also, when working with global
illumination, inverse square decay is a geometric property of how indirect light is bounced between surfaces, so using it on your primary lights can add to the consistency and realism of the rendering.
Figure 2.16. An inverse square decay is useful
when a light source (such as this match) is visible
within a scene. Character by Rini Sugianto.
Using No Decay
nearby surfaces. A light with no decay, however, can be easily adjusted to light a large space consistently.
If you are simulating a very distant light source, like the sun, then using no decay can sometimes look the most realistic. For example, the sunbeam entering the room in Figure 2.17 would not get dimmer between the table and the floor. Real sunlight, which had just traveled millions of miles to reach the earth,
would not suddenly decay during the last few feet of its journey.
Figure 2.17. A sunbeam entering a room is an
example of light that does not need any decay.
Other Decay Settings
A decay of 1 (linear) can be a useful compromise between full inverse square and no decay at all. If you have simulated light bouncing up from the ground, you'll want some decay. However, since inverse square might be too much, using a linear decay may work well.
In addition to different decay settings, many programs also let you set specific distances at which your light will decay or
attenuate. For example, you could set a light to begin growing dimmer at 50 units, and disappear completely at 100 units from the light. This might not be physically correct, but it is certainly convenient. If you know that a light should not reach a certain object, setting it to cut off by a specific distance is a more reliable way to limit it than just using inverse square by itself.
Diffuse and Specular
In real life, diffuse and specular are two ways that light can be reflected off a surface. In diffuse reflection, light rays are
scattered in all directions. Think of light hitting a plaster wall or a piece of fabric, or anything that is not glossy or shinythat is diffuse light reflectance. Specular reflection occurs when rays of light are not scattered at all, but instead are reflected in
parallel, creating a perfectly focused image. A mirror, or
anything with a mirror-like reflection, shows you specular light reflectance.
When 3D surfaces are rendered, they can reflect the
illumination from your light source in both diffuse and specular ways, as shown in Figure 2.18. The diffuse illumination is the primary shading, covering the side of the surface that faces the light, while the specular highlight simulates a reflection of the light source itself. In the case of point lights or spotlights, which are infinitely small points in space, an accurate specular
highlight size to each surface, simulating a reflection of an area bigger than the tiny point.
Figure 2.18. A light can emit diffuse illumination
(left), specular illumination (center), or both
(right).
You can control whether each light emits diffuse or specular illumination, and often you will want a light that emits one or the other, but not both. If you wanted to add highlights to your character's eyes, but didn't want to over-light the whole
eyeball, then you could set a light to emit specular only. If you added lights to simulate illumination bouncing up from the ground (which would be a very soft source of illumination
without a concentrated source), then you could set those lights to emit diffuse only, so that there wouldn't be unmotivated highlights on the bottom of a shiny surface.
Some renderers, like Pixar's RenderMan, allow you to set
different levels for a light's diffuse and specular light emission. In such programs, you might give the sun a specular level of 1.0 to 1.2, fill lights representing the sky specular levels between 0.3 and 0.5, and lights representing illumination reflected back from the ground levels between 0 and 0.25.
lightsone for diffuse and one for specularand adjust their colors and intensities separately.
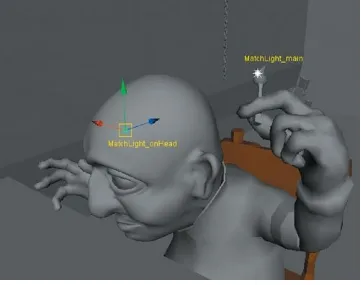
Light Linking
If you have a light that you only want for a specific purpose, such as adding highlights to a character's eyes, then you can use light linking (also called selective lighting), which allows you to associate specific lights with specific objects. You could
create a point light, set it to emit only specular illumination, and then link the light to the character's eyeballs. If this light is kept reasonably close to the camera position, you're guaranteed that the character's eyes will always have highlights when it looks toward the camera. And because of light linking, you'd know those highlights won't affect anything else in the scene.
You can also use light linking to gain more precise control over how different objects are lit. If you have a light illuminating many objects in your scene, you might find that it looks good on most of the objects, but somehow appears to light other objects with the wrong intensity, color, or angle. Instead of settling for a compromise, you can make a second copy of your light, and link it to the objects that weren't well lit. Once you unlink the old light from those objects, you can adjust the second light in however you want.
In Softimage|XSI, there are two selective lighting modes,
inclusive and exclusive. In inclusive mode, once the light is associated with some objects, it will only illuminate those objects. In exclusive mode, the light will illuminate all objects except for the ones with which it is associated.
clothing, but not to his head. This one is positioned exactly at the match flame, so that the hand and arm will be lit from a realistic angle. The other light is linked only to the character's head, and it is cheated forward, so that the match light will better define his face.
Figure 2.19. Light linking allows you to cheat, and
illuminate some objects using a light with a
different angle, color, or intensity than what
illuminates other objects.
Cookies
In lighting for movies, television, and theater, a cookie (also called a cucoloris or gobo) is a piece of metal, wood, or
cardboard with holes or shapes cut out of it. Cookies are
designed to break up a light or project a pattern into the scene. The exact origin of all these terms is not clear, but in the early days of movies, when lights were very hot, metal cookie sheets were used to make a cookie. Cucoloris could be a contraction of
cookie and iris, and gobo could be short for go-between. Figure 2.20 shows a real cookie in action.
Figure 2.20. A real-life cookie has holes cut out to
shape or dapple a spotlight's illumination.
It is possible to model a cookie as a 3D object and put it in front a light that casts shadows. However, a more direct way to
create a similar effect in computer graphics is to map an image onto a light. In most 3D programs, the color of a light is
to the color of a spotlight. On the right side of the figure, you can see the pattern projected into a scene.
Figure 2.21. A texture map used as a cookie (left)
breaks up your lighting as if the sun had filtered
Lighting in Production
Now that you've added lights to your scene, and adjusted their options and controls, you press Render. Your first render is, at best, a rough draft of what you want to develop into a
professional final product. Most of your time in lighting is spent revising and improving the setupthis is where the real work gets done. The art of lighting is essentially the art of revising
lighting, to get it to look as good as possible by your deadline.
When to Light
When you are working in the early stages of a project, like modeling, rigging, or layout, you probably don't want to spend too much time on lighting. At most, you could use a simple lighting rig that allows you to see the models.
By the time animation is being test-rendered, it is a good idea to have at least one light casting a shadow. If you render
animation without any shadows, it is easy to overlook physical contact mistakes, like a foot not making contact with the
ground. These kinds of mistakes will become apparent in a fully lit scene, so it is best if you can see them when testing
animation.
The real lighting process begins when your layout is done: You know where your camera will be positioned and how the shot is composed, your animation is complete, and you can see where the characters will appear throughout the shot. Also, your
shaders and textures are finished, so you can see how objects will respond to light.
to the camera. This is an unfortunate necessity. Lighting a
scene that is still changing will waste a lot of your time, because you will need to go back and change your lighting (sometimes multiple times) in reaction to changes made to the animation, shaders, or textures.
The Feedback Loop
An essential part of refining your scene is the feedback loop: making changes, waiting to see the results of each change, evaluating those results, and then making more changes. The key here is a tight feedback loop, which means seeing results as soon as possible after making changes. This leads to a quicker work pace and allows more refined results on a tight schedule.
How can you get feedback faster? For some types of changes, such as changing the position of a light or adjusting the size of a spotlight's cone, most modern 3D software supports real-time feedback, which shows you the basic illumination, highlights, and shadows as you drag the light. What's visible in real-time is limited, however, and usually doesn't show you how everything will appear in a final render.
When you are doing software test-renders, you should always think of ways to save rendering time.
Leave visible in your scene only those objects that you really need to see in each render; hide everything else. If there are any particularly complex models in your scene, sometimes a simpler object can be used as a stand-in while you adjust lights around it.
clearer view of exactly what the light is contributing to the scene, but it also saves valuable rendering time by skipping the calculation of the other lights and shadows in your
scene.
Most changes can be made while looking at only part of your imagecrop a region that only shows you what you need to see, rather than rerendering the entire frame.
Even when lighting film resolution shots, render your earlier tests at a video resolution, and render only a few frames from the shot at full resolution until you have the lighting approved.
Turn off any functions or effects that aren't a part of what you are currently adjusting. You can light a character without her hair visible in the shot for most of your test renders, and then do only a few tests with hair visible when you are working on the hair lighting. You do not need time-consuming functions such as raytracing, global illumination, or high-quality anti-aliasing turned on during all of your test renders.
Since computers are getting faster, you may wonder why you even need to learn all of these optimization and test-render tricks. Even though computers get faster every year, computer graphics productions also continue to get more complex and push the limits of even the newest hardware. Learning to work smart and think strategically before each render is a skill you'll need later in your career.
Naming Lights
Naming becomes especially important when you are installing lights that more than one person will use or edit. If you expect other people to be able to make sense of your lighting design, or if you want to avoid mistakes that arise from confusing one light and another, take care to label every light clearly.
The most informative names refer to the type of light, its motivation, and what it is illuminating. For example,
"Spec_fromMatch_onEyes" will tell you that a light is designed to create specular highlights, motivated by a match,
illuminating the character's eyes.
"Bounce_fromRedCarpet_onSet" describes light bouncing off the red carpet onto the rest of the set. Most studios have much
more exacting naming conventions. Exactly which conventions you follow doesn't matter as much as making sure that
everyone follows the same set of rules, consistently trying to create helpful names for each light.
Organizing your lights into clearly named groups is also important. If you have some lights used for similar
purposessuch as exterior lights coming in through windows of a set, interior lights on the set, lights added around a particular character, or lights associated with a particular effect, then grouping the lights and giving the groups intuitive names makes them easy to find and adjust, and easier to save as separate files and reuse in another shot.
Managing Versions
a version of a scene to the client, you might make a folder with a backup of the 3D files and the rendered images from that version, so that you can go back and retrieve that version if needed. Often you will go backwardclients do request changes one day and then ask you to revert to a previous iteration. Often when you make two versions of something, you will be asked to "split the difference" between a previous version and the current one, making it vital to maintain an association between the 3D scenes used and the images that you show to the client.
Exercises
A review of lighting basics may have been old news for some readers, but new to those just getting started. Here are some ideas for readers who want to go further with the material covered in this chapter:
1.
The essential process of soloing a lighthiding all other lights and rendering your scene with just one light visibleis the best way to explore what each light is doing in your scene. If you have any older scenes that you have lit before reading this book, load them up and try soloing some of the lights. See if you discover any surprises, such as lights in your scene that don't actually do anything, or lights that aren't illuminating the intended subject.
2.
Run some tests in your software to explore each type of light available. While most scenes can be lit entirely with spotlights, be sure you go through and test each of the other lighting tools available to you.
3.
Chapter Three. Shadows and Occlusion
Setting up shadows takes just as much time and attention as setting up lights. You can think of all of your illumination as one half of your lighting design, and shadows as the other, equally important half. Shadows can add richness to the tones and
shadows is a key technical area to master. Making the best choices of shadow-casting algorithms, building up a bag of
The Visual Functions of Shadows
People commonly think of shadows as obscuring and limiting vision. But shadows can often reveal things that otherwise would not have been seen. Here are some of the visual
functions that shadows serve in cinematic images and computer graphics.
Defining Spatial Relationships
When objects cast shadows onto each other, the spatial
relationships between the objects are revealed. For example, compare the scene in Figure 3.1 before and after shadows are added. Without shadows, you can't tell exactly where each ball is located. On the right side of the figure, the added shadows reveal how close some of the balls are to the back wall, when a ball is on the ground, and when two balls are near each other.
Figure 3.1. On the left side, you cannot tell how
close the large upper ball is to the back wall. The
most basic use of shadows is to show spatial
relationships between objects, as in the right side
The way shadows visually indicate spatial relationships is both a blessing and a curse. When a scene is rendered with shadows, the shadows can reveal mistakes and inaccuracies in your
animation, such as if a character's feet are floating above the ground instead of planted firmly on it. Animation that was created and approved without shadows may need to be fixed once it has been test-rendered with shadows and any flaws are made visible.
If you are reading this book indoors, look around the room at all the places where furniture meets the floor. At a glance, you can probably tell whether each piece is directly touching the floor or is held above the floor by wheels or casters, just by looking at the shadows each piece of furniture is casting. As you look around the room, your eye interprets small differences in the shadows almost instantly, determining the spatial relationship between the furniture and the floor.
Revealing Alternate Angles
Figure 3.2. The shadow reveals a character's
profile, which otherwise would not be seen in the
rendering.
You can think of the light casting shadows as something like a second camera, with its own angle of view and perspective on the character. Most 3D programs enable you to view the scene from a light's point-of-view, as an aid to positioning and aiming the light. The outline of what you seethe profile of the subject from the light's point-of-viewshows you the shape that will be rendered as the shadow.
Be careful that no part of the character is much closer to the point-source or spotlight, lest it become disproportionately enlarged in the shadow. Also, be sure that any cheats that the animator has created don't look strange from the shadow's perspective. For example, if the animator has stretched a character's arm to an extra long length in order to bring the hand into the foreground, that cheated pose might look believable from the point of view of the camera, but look
without the cheat as a shadow object (shadow objects are discussed below).
Enhancing Composition
Shadows can play an important role in the composition of your image. A shadow can lead the viewer's eye to a desired part of the rendering, or create a new design element to balance your composition. Figure 3.3 shows how a well-placed slash or other shadow can "break up" a space, adding variety to what
otherwise would be a monotonous rear wall.
Figure 3.3. A slash breaks up the space and adds
to the composition, making the image on the right
a more attractive rendering.
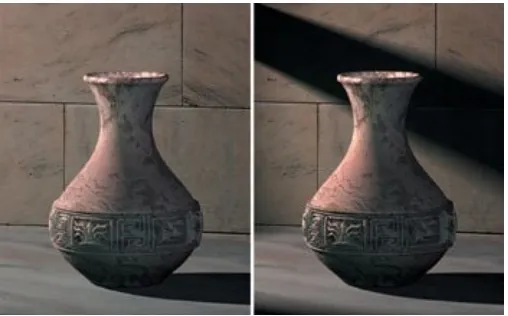
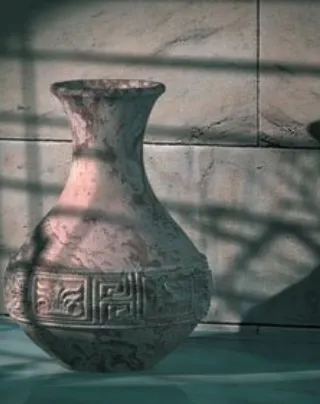
Adding Contrast
the right frame, the shadow behind the vase adds depth and definition to the rendering by increasing the contrast between the vase and the similarly colored wall behind it. The vase now pops out much more clearly from the frame, so that people will clearly notice its shape, even in a briefer shot.
Indicating Off-Screen Space
A shadow can also indicate the presence of off-screen objects. The sense of "off-screen space" is especially important when you are telling a story or trying to set a mood for a small scene. A shadow that appears to have been cast by objects not visible on the screen indicates that there is more to the world you are representing beyond what's directly visible in the shot. The shadows in Figure 3.4 suggest a great deal about the other elements that might be in the off-screen environment.
Sometimes you can just project an image, mapped to the color or intensity of the light, to simulate shadows from off-screen objects.
Integrating Elements
By cementing the relationship between objects, shadows can also create a kind of integration between the elements in a scene. In the fanciful or implausible scenes often created in computer graphics, realistic shadows may be the only threads of reality available to tie together and sell the whole image.
Even the commuting hippo in the subway car in Figure 3.5 looks more natural and present in the scene with shadows
underneath him. Building a solid sense of contact between 3D sets and characters, between human actors and digital
creatures, or even between 3D characters and real
environments, is perhaps the most essential function of
shadows. Without this contact, many scenes would fall apart into an apparent collage of disjointed images.
Which Lights Need Shadows?
In real life, all lights cast shadows; there is no equivalent in real life to having a light with shadows turned off. In computer
graphics, you could imitate this rule by turning on shadows from all of your lights. More often, however, 3D artists are highly selective about which lights need to cast shadows and which don't.
Shadow Clutter
Next time you watch a television comedy that was filmed in front of a studio audience, take a look at the floor. Around the actor's feet, you often see a pattern of overlapping shadows, each aiming a slightly different direction. The overlapping shadows are caused by the grid of spotlights overhead, which light the actors and the set. These shadows would not be motivated by the light in most real rooms.
You may even notice that the set itself was designed and built to hide many of the extra shadows. For example, the living room sofa in a situation comedy would be out in the middle of the stage, with a lot of space behind it. Often there will even be a staircase filling the rear wall of the set, so that the actors would never be sitting or standing right in front of a wall that would accumulate too many of those unmotivated overlapping shadows.