by David Byrnes and Mark Middlebrook
FOR
FOR
by David Byrnes and Mark Middlebrook
FOR
Hoboken, NJ 07030-5774
www.wiley.com
Copyright © 2006 by Wiley Publishing, Inc., Indianapolis, Indiana Published by Wiley Publishing, Inc., Indianapolis, Indiana Published simultaneously in Canada
No part of this publication may be reproduced, stored in a retrieval system or transmitted in any form or by any means, electronic, mechanical, photocopying, recording, scanning or otherwise, except as permit-ted under Sections 107 or 108 of the 1976 Unipermit-ted States Copyright Act, without either the prior written permission of the Publisher, or authorization through payment of the appropriate per-copy fee to the Copyright Clearance Center, 222 Rosewood Drive, Danvers, MA 01923, (978) 750-8400, fax (978) 646-8600. Requests to the Publisher for permission should be addressed to the Legal Department, Wiley Publishing, Inc., 10475 Crosspoint Blvd., Indianapolis, IN 46256, (317) 572-3447, fax (317) 572-4355, or online at
http://www.wiley.com/go/permissions.
Trademarks:Wiley, the Wiley Publishing logo, For Dummies, the Dummies Man logo, A Reference for the Rest of Us!, The Dummies Way, Dummies Daily, The Fun and Easy Way, Dummies.com, and related trade dress are trademarks or registered trademarks of John Wiley & Sons, Inc. and/or its affiliates in the United States and other countries, and may not be used without written permission. AutoCAD is a registered trademark of Autodesk, Inc. All other trademarks are the property of their respective owners. Wiley Publishing, Inc., is not associated with any product or vendor mentioned in this book.
LIMIT OF LIABILITY/DISCLAIMER OF WARRANTY: THE PUBLISHER AND THE AUTHOR MAKE NO REP-RESENTATIONS OR WARRANTIES WITH RESPECT TO THE ACCURACY OR COMPLETENESS OF THE CON-TENTS OF THIS WORK AND SPECIFICALLY DISCLAIM ALL WARRANTIES, INCLUDING WITHOUT LIMITATION WARRANTIES OF FITNESS FOR A PARTICULAR PURPOSE. NO WARRANTY MAY BE CRE-ATED OR EXTENDED BY SALES OR PROMOTIONAL MATERIALS. THE ADVICE AND STRATEGIES CON-TAINED HEREIN MAY NOT BE SUITABLE FOR EVERY SITUATION. THIS WORK IS SOLD WITH THE UNDERSTANDING THAT THE PUBLISHER IS NOT ENGAGED IN RENDERING LEGAL, ACCOUNTING, OR OTHER PROFESSIONAL SERVICES. IF PROFESSIONAL ASSISTANCE IS REQUIRED, THE SERVICES OF A COMPETENT PROFESSIONAL PERSON SHOULD BE SOUGHT. NEITHER THE PUBLISHER NOR THE AUTHOR SHALL BE LIABLE FOR DAMAGES ARISING HEREFROM. THE FACT THAT AN ORGANIZATION OR WEBSITE IS REFERRED TO IN THIS WORK AS A CITATION AND/OR A POTENTIAL SOURCE OF FUR-THER INFORMATION DOES NOT MEAN THAT THE AUTHOR OR THE PUBLISHER ENDORSES THE INFOR-MATION THE ORGANIZATION OR WEBSITE MAY PROVIDE OR RECOMMENDATIONS IT MAY MAKE. FURTHER, READERS SHOULD BE AWARE THAT INTERNET WEBSITES LISTED IN THIS WORK MAY HAVE CHANGED OR DISAPPEARED BETWEEN WHEN THIS WORK WAS WRITTEN AND WHEN IT IS READ. For general information on our other products and services, please contact our Customer Care Department within the U.S. at 800-762-2974, outside the U.S. at 317-572-3993, or fax 317-572-4002. For technical support, please visit www.wiley.com/techsupport.
Wiley also publishes its books in a variety of electronic formats. Some content that appears in print may not be available in electronic books.
Library of Congress Control Number: 2006920623 ISBN-13: 978-0-471-78649-8
ISBN-10: 0-471-78649-7
Manufactured in the United States of America 10 9 8 7 6 5 4 3 2 1
David Byrnesis one of those grizzled old-timers you’ll find mentioned every so often in AutoCAD 2007 For Dummies. He began his drafting career on the boards in 1979 and discovered computer-assisted doodling shortly thereafter. He first learned AutoCAD with version 1.4, around the time when personal computers switched from steam to diesel power. Dave is based in Vancouver, British Columbia, and has been an AutoCAD consultant and trainer for 15 years. Dave is a contributing editor for Cadalystmagazine and has been a contributing author to ten books on AutoCAD. He teaches AutoCAD and other computer graphics applications at Emily Carr Institute of Art + Design and British Columbia Institute of Technology in Vancouver. Dave has tech edited six AutoCAD For Dummies titles. AutoCAD 2007 For Dummies is his second go-round as coauthor of this title.
From Dave: To Anna and Delia, the two women in my life, who remind me there are other things besides keyboards and mice (and sometimes they have to try REALLY hard).
From Mark: To Puck and Pretzel, two absolute AutoCAD dummies who never cease to inspire and amuse. It was during walks in the woods with them that I originally worked out some of the details of these chapters. I’m pretty sure that Puck could learn AutoCAD, if only he could figure out how to manipulate a mouse. Pretzel, on the other hand, is too interested in squirrels to bother with mice.
Authors’ Acknowledgments
Mark thanks Bud Smith, who initiated this book eight editions ago, brought him in on it along the way, and eventually handed it over to him in toto. Dave in turn thanks Mark for bringing himon board as coauthor, and for asking him to tech edit the book for the last five editions.
Thanks too to two colleagues and friends at Autodesk, Shaan Hurley and Bud Schroeder, who never seem to mind being asked even the dumbest questions.
Some of the people who helped bring this book to market include the following:
Acquisitions, Editorial, and Media Development
Project Editor:Mark Enochs
Acquisitions Editors:Terri Varveris, Tiffany Ma Copy Editor:Heidi Unger
Technical Editor:Lee Ambrosius Editorial Manager:Leah Cameron Media Development Coordinator:
Laura Atkinson
Media Project Supervisor:Laura Moss Media Development Manager:
Laura VanWinkle
Editorial Assistant:Amanda Foxworth Cartoons:Rich Tennant
(www.the5thwave.com)
Composition Services
Project Coordinator: Michael Kruzil Layout and Graphics: Andrea Dahl,
Denny Hager, Stephanie D. Jumper, Barbara Moore, Heather Ryan, Ron Terry Proofreaders: Leeann Harney, Jessica Kramer,
Mary Lagu Indexer: Techbooks
Publishing and Editorial for Technology Dummies
Richard Swadley,Vice President and Executive Group Publisher Andy Cummings,Vice President and Publisher
Mary Bednarek,Executive Acquisitions Director Mary C. Corder,Editorial Director
Publishing for Consumer Dummies
Diane Graves Steele,Vice President and Publisher Joyce Pepple,Acquisitions Director
Composition Services
Introduction ...1
Part I: AutoCAD 101 ...9
Chapter 1: Introducing AutoCAD and AutoCAD LT ...11
Chapter 2: Le Tour de AutoCAD 2007 ...19
Chapter 3: A Lap Around the CAD Track...47
Chapter 4: Setup for Success ...71
Part II: Let There Be Lines...103
Chapter 5: Get Ready to Draw ...105
Chapter 6: Where to Draw the Line...133
Chapter 7: Edit for Credit ...159
Chapter 8: A Zoom with a View ...199
Chapter 9: On a 3D Spree...211
Part III: If Drawings Could Talk...227
Chapter 10: Text with Character ...229
Chapter 11: Entering New Dimensions ...255
Chapter 12: Down the Hatch ...281
Chapter 13: The Plot Thickens ...291
Part IV: Share and Share Alike ...319
Chapter 14: Playing Blocks and Rasteroids ...321
Chapter 15: Drawing on the Internet...355
Part V: The Part of Tens ...373
Chapter 16: Ten Ways to Do No Harm ...375
Chapter 17: Ten Ways to Swap Drawing Data with Other People and Programs ...379
Introduction...1
What’s Not in This Book...1
Who Are — and Aren’t — You?...2
How This Book Is Organized...3
Part I: AutoCAD 101...4
Part II: Let There Be Lines ...4
Part III: If Drawings Could Talk ...4
Part IV: Share and Share Alike ...5
Part V: The Part of Tens...5
Icons Used in This Book...5
A Few Conventions — Just in Case ...6
Part I: AutoCAD 101 ...9
Chapter 1: Introducing AutoCAD and AutoCAD LT . . . .11
Why AutoCAD? ...12
The Importance of Being DWG ...13
Seeing the LT...16
It’s CAD Heaven with 2007 ...16
Chapter 2: Le Tour de AutoCAD 2007 . . . .19
AutoCAD Does Windows ...20
And They’re Off: AutoCAD’s Opening Screen ...21
Those well-washed Windows ...23
Looking for Mr. Status Bar...27
A smoother ride: Dynamic input ...31
Let your fingers do the talking: The command window...32
The key(board) to AutoCAD success ...33
Down the main stretch: The drawing area ...38
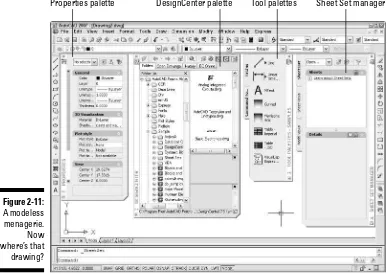
Keeping Tabs on Palettes ...40
Driving Miss AutoCAD ...42
Under the hood: System variables ...42
Chrome and gloss: Dialog boxes ...44
Chapter 3: A Lap Around the CAD Track . . . .47
A Simple Setup...48
Drawing a (Base) Plate ...52
Rectangles on the right layers ...52
Circling your plate...56
Place your polygon ...56
Get a Closer Look with Zoom and Pan ...59
Modify to Make It Merrier ...61
Hooray for array ...61
Stretch out...63
Cross your hatches ...66
Follow the Plot...67
Chapter 4: Setup for Success . . . .71
A Setup Roadmap...72
Choosing your units...74
Weighing your scales ...76
Thinking about paper ...78
Defending your border ...80
All system variables go...81
A Template for Success ...82
Making the Most of Model Space ...85
Setting your units ...85
Telling your drawing its limits ...87
Making the drawing area snap-py (and grid-dy) ...89
Setting linetype and dimension scales ...92
Entering drawing properties ...94
Plotting a Layout in Paper Space ...94
Creating a layout...95
Copying and changing layouts...98
Lost in paper space...99
Making Templates Your Own ...100
Part II: Let There Be Lines ...103
Chapter 5: Get Ready to Draw . . . .105
Drawing and Editing with AutoCAD ...105
Managing Your Properties...106
Putting it on a layer...106
Accumulating properties...109
Creating new layers...112
Using AutoCAD DesignCenter...118
Named objects ...118
Getting (Design)Centered...119
Precise-liness Is Next to CAD-liness...122
Keyboard capers: Coordinate entry...124
Grab an object and make it snappy ...126
Other precision practices ...130
Chapter 6: Where to Draw the Line . . . .133
Introducing the AutoCAD Drawing Commands...134
The Straight and Narrow: Lines, Polylines, and Polygons ...136
Toe the line...137
Connect the lines with polyline ...138
Square off with rectangle...144
Choose your sides with polygon ...145
(Throwing) Curves...146
Going full circle...147
Arc-y-ology ...148
Solar ellipses ...151
Splines: The sketchy, sinuous curves ...152
Donuts: The circles with a difference ...154
Revision clouds on the horizon...154
Scoring Points...156
Chapter 7: Edit for Credit . . . .159
Commanding and Selecting ...159
Command-first editing ...160
Selection-first editing ...160
Choosing an editing style ...161
Grab It ...162
One-by-one selection ...162
Selection boxes left and right ...163
Perfecting Selecting ...165
Ready, Get Set, Edit! ...168
The big three: Move, Copy, and Stretch ...171
More manipulations ...178
Slicing, dicing, and splicing...183
Get a Grip ...189
About grips...190
A gripping example ...190
Move it! ...193
Copy, or a kinder, gentler Move...194
A warm-up Stretch...195
Chapter 8: A Zoom with a View . . . .199
Zoom and Pan with Glass and Hand ...199
Out of the frying pan . . ...202
A View by Any Other Name . . ...204
Looking around in Layout Land ...205
Degenerating and Regenerating ...209
Chapter 9: On a 3D Spree . . . .211
Which Way Is Up?...212
Entering the Third Dimension ...212
Go Dashboarding!...214
Working out with the Dashboard ...217
Get some (visual) style ...219
Navigating in Three Dimensions ...222
Going into Orbit...223
Hungry for More? ...226
Part III: If Drawings Could Talk ...227
Chapter 10: Text with Character . . . .229
Getting Ready to Write ...230
Simply stylish text ...230
Taking your text to new heights ...234
One line or two?...236
Your text will be justified...237
Using the Same Old Line ...237
Saying More in Multiline Text ...240
Making it with Mtext ...240
It slices, it dices . . . ...244
Doing a number on your Mtext lists ...245
Modifying Mtext...248
Gather Round the Tables ...249
Tables have style, too ...249
Creating and editing tables ...251
Checking Out Your Spelling ...253
Chapter 11: Entering New Dimensions . . . .255
Discovering New Dimensions ...257
Anatomy of a dimension...258
A field guide to dimensions...259
Dimension associativity ...260
Pulling out your dimension tools ...261
Doing Dimensions with Style(s) ...261
Borrowing existing dimension styles...262
Creating and managing dimension styles...264
Drawing Dimensions ...269
Lining up some linear dimensions ...270
Drawing other kinds of dimensions ...273
Trans-spatial dimensioning...274
Editing Dimensions ...274
Editing dimension geometry...274
Editing dimension text...275
Controlling and editing dimension associativity...276
Pointy-Headed Leaders ...277
Chapter 12: Down the Hatch . . . .281
Hatch . . . Hatch . . . Hatchoo ...282
Pushing the Boundary (of) Hatch ...284
Hatch from scratch ...284
Getting it right: Hatch angle and scale ...287
Do fence me in: Defining hatch boundaries ...288
Hatching that knows its place ...289
Have palette, will hatch ...290
Editing Hatch Objects...290
Chapter 13: The Plot Thickens . . . .291
You Say Printing, I Say Plotting ...291
Get with the system ...292
Configure it out ...293
A Simple Plot...294
Plotting success in 16 steps ...294
Preview one, two ...298
Instead of fit, scale it ...299
Plotting the Layout of the Land...300
About paper space layouts and plotting ...300
The path to paper space layout plotting success ...301
Plotting Lineweights and Colors ...303
Plotting with style ...303
Plotting through thick and thin ...307
Plotting in color ...310
It’s a (Page) Setup!...311
Continuing the Plot Dialog ...312
Troubles with Plotting ...316
Part IV: Share and Share Alike...319
Chapter 14: Playing Blocks and Rasteroids . . . .321
Rocking with Blocks...322
Creating block definitions ...324
Attributes: Fill-in-the-blank blocks ...330
Exploding blocks ...335
Theme and variations: Dynamic blocks ...335
Going External ...341
Becoming attached to your xrefs ...343
Layer-palooza...345
Creating and editing an external reference file...345
Forging an xref path ...346
Managing xrefs...347
Blocks, Xrefs, and Drawing Organization...348
Mastering the Raster ...349
Attaching an image...350
Managing your image...351
A DWF Is Just a DWF ...352
Chapter 15: Drawing on the Internet . . . .355
The Internet and AutoCAD: An Overview ...357
Sending Strategies...358
Send it with ETRANSMIT ...359
Rapid eTransmit ...360
Transmitting multiple drawings ...362
FTP for you and me ...362
Bad reception? ...363
Help from the Reference Manager...364
Design Web Format — Not Just for the Web...365
All about DWF ...366
ePlot, not replot...366
Making DWFs with ePlot...367
Making DWFs (or plots) with PUBLISH...369
Hand-y objects ...370
Autodesk DWF Viewer ...371
The Drawing Protection Racket ...371
Part V: The Part of Tens ...373
Chapter 16: Ten Ways to Do No Harm . . . .375
Be Precise...375
Control Properties by Layer ...375
Know Your Drawing Scale Factor ...376
Know Your Space ...376
Explode with Care ...376
Don’t Cram Your Geometry ...376
Freeze Instead of Erase...377
Use CAD Standards ...377
Save Drawings Frequently...377
Chapter 17: Ten Ways to Swap Drawing Data with Other People
and Programs . . . .379
DWG ...380
DXF...382
DWF...382
PDF ...382
WMF ...383
BMP, JPEG, TIFF, and Other Raster Formats ...384
Windows Clipboard...385
OLE...386
Screen Capture ...387
TXT and RTF ...388
I
t’s amazing to think that AutoCAD came into being over two decades ago, at a time when most people thought that personal computers weren’t capable of industrial-strength tasks like CAD. (The acronym stands for Computer-Aided Drafting, Computer-Aided Design, or both, depending on whom you talk to.) It’s almost as amazing that, more than 20 years after its birth, AutoCAD remains the king of the microcomputer CAD hill by a tall margin. Many competing CAD programs have come to challenge AutoCAD; many have fallen, and a few are still around. One hears rumblings that the long-term future of CAD may belong to special-purpose, 3D-based software such as the Autodesk Inventor and Revit programs. Whether those rumblings amplify into a roar remains to be seen, but for the present and the near future anyway, AutoCAD is where the CAD action is.In its evolution, AutoCAD has grown more complex, in part to keep up with the increasing complexity of the design and drafting processes that AutoCAD is intended to serve. It’s not enough just to draw nice-looking lines anymore. If you want to play CAD with the big boys and girls, you need to organize the objects you draw, their properties, and the files where they reside in appro-priate ways. You need to coordinate your CAD work with other people in your office who will be working on or making use of the same drawings. You need to be savvy about shipping drawings around via the Internet.
AutoCAD 2007 provides the tools for doing all these things, but it’s not always easy to figure out which hammer to pick up or which nail to bang on first. With this book, you have an excellent chance of creating a presentable, usable, printable, and sharable drawing on your first or second try without putting a T square through your computer screen in frustration.
What’s Not in This Book
AutoCAD is also too big and complicated for us to cover every feature. We don’t address advanced topics like database connectivity, customization, 3D object creation, and programming in the interest of bringing you a book of a reasonable size — one that you’ll read rather than stick on your shelf with those other thousand-page tomes!
Autodesk likes to keep its users (and us authors!) guessing about new fea-tures in future versions of the software. For the previous edition of this book, we removed the chapter on 3D in order to make room for a new “A Lap around the CAD Track” chapter. We figured that, really, most people were using AutoCAD for 2D drafting, and anyway, there possibly were (gasp!) better, more modern programs for doing 3D than our beloved 20-plus-year old classic.
Wouldn’t you know it? Autodesk has revamped its 3D features so thoroughly that they’re not only logical and intuitive — they’re downright fun! So with this edition, we restore a mostly all-new 3D chapter. Something had to go to accommodate, so this time we’ve removed the previous edition’s chapter on sheet sets, replacing it with a sidebar in Chapter 13. Of course, now we’re expecting the next version of AutoCAD to revamp the sheet set feature so thoroughly that it’s not only logical and intuitive, it’ll be downright fun. And then we’ll have to find something elseto cut!
This book focuses on AutoCAD 2007 and addresses its slightly less-capable, much lower-cost sibling, AutoCAD LT 2007. We do occasionally mention dif-ferences with previous versions, going back to the highly popular AutoCAD Release 14, so that everyone has some context and upgraders can more read-ily understand the differences. We also mention the important differences between full AutoCAD and AutoCAD LT, so that you’ll know what you — or your LT-using colleagues — are missing. This book does notcover the disci-pline-specific features in AutoCAD-based products such as Autodesk Architectural Desktop, except for some general discussion in Chapter 1, but most of the information in this book applies to the general-purpose AutoCAD features in the AutoCAD 2007–based versions of those programs as well.
Who Are — and Aren’t — You?
However, you do need to have some idea of how to use your computer system before tackling AutoCAD — and this book. You need to have a com-puter system with AutoCAD or AutoCAD LT (preferably the 2007 version). A printer or plotter and a connection to the Internet will be big helps, too.
You also need to know how to use Windows to copy and delete files, create a folder, and find a file. You need to know how to use a mouse to select (high-light) or to choose (activate) commands, how to close a window, and how to minimize and maximize windows. Make sure that you’re familiar with the basics of your operating system before you start with AutoCAD.
How This Book Is Organized
Appearances can be deceptive. For example, if you saw the apparently random piles of stuff that covered the authors’ desks while they were writing this book, you might wonder how they could possibly organize a paragraph, let alone an entire book. But each of us (given some concerted thought) knows exactly where to put our hands on that list of new dimension vari-ables, or that bag of 1⁄
2" binder clips, or the rest of that bagel and cream cheese we started at coffee break.
We hope you’ll find that the book also reflects some concerted thought about how to present AutoCAD in a way that’s both easy-to-dip-into and smoothly-flowing-from-beginning-to-end.
The organization of this book into parts — collections of related chapters — is one of the most important, uh, partsof this book. You really can get to know AutoCAD one piece at a time, and each part represents a group of closely related topics. The order of parts also says something about priority; yes, you have our permission to ignore the stuff in later parts until you’ve mastered most of the stuff in the early ones. This kind of building-block approach can be especially valuable in a program as powerful as AutoCAD.
The following sections describe the parts that the book breaks down into.
Part I: AutoCAD 101
supposed to be slow, or do you have too wimpy a machine to use this wonder of modern-day computing? And why do you have to do this stuff in the first place?
Part I answers all these questions — and more. This part also includes what may seem like a great deal of excruciating detail about setting up a new draw-ing in AutoCAD. But what’s even more excruciatdraw-ing is to do your setup work incorrectly and then feel as though AutoCAD is fighting you every step of the way. With a little drawing setup work done in advance, it won’t.
Part II: Let There Be Lines
In this part, it’s time for some essential concepts, including object properties and CAD precision techniques. We know that you’re raring to make some drawings, but if you don’t get a handle on this stuff early on, you’ll be termi-nally confused when you try to draw and edit objects. If you want to make drawings that look good, plot good, and aregood, read this stuff!
After the concepts preamble, the bulk of this part covers the trio of activities that you’ll probably spend most of your time in AutoCAD doing: drawing objects, editing them, and zooming and panning to see them better on the screen. These are the things that you do in order to create the geometry— that is, the CAD representations of the objects in the real world that you’re designing. This part of the book ends by explaining how to navigate around in an AutoCAD 3D model, and how to change its visual appearance on-screen. By the end of Part II, you should be pretty good at geometry, even if your ninth-grade math teacher told you otherwise.
Part III: If Drawings Could Talk
CAD drawings do not live on lines alone — most of them require quite a bit of text, dimensioning, and hatching in order to make the design intent clear to the poor chump who has to build your amazing creation. (Whoever said “a picture is worth a thousand words” must not have counted up the number of words on the average architectural drawing!) This part shows you how to add these essential features to your drawings.
Part IV: Share and Share Alike
A good CAD user, like a good kindergartner, plays well with others. AutoCAD encourages this behavior with a host of drawing- and data-sharing features. Blocks, external reference files, and raster images encourage reuse of parts of drawings, entire drawings, and bitmap image files. AutoCAD’s Internet features enable sharing of drawings well beyond your hard disk and local network.
The drawing and data-sharing features in AutoCAD take you way beyond old-style, pencil-and-paper design and drafting. After you’ve discovered how to apply the techniques in this part, you’ll be well on your way to full CAD-nerdhood (you may want to warn your family beforehand).
Part V: The Part of Tens
This part contains guidelines that minimize your chances of really messing up drawings (your own or others’) and techniques for swapping drawings with other people and accessing them from other computer programs. There’s a lot of meat packed into these two chapters — juicy tidbits from years of drafting, experimentation, and fist-shaking at things that don’t work right — not to mention years of compulsive list-making. We hope that you find that these lists help you get on the right track quickly and stay there.
Icons Used in This Book
This icon tells you that herein lies a pointed insight that can save you time and trouble as you use AutoCAD. In many cases, tip paragraphs act as a funnel on AutoCAD’s impressive but sometimes overwhelming flexibility: After telling you all the ways that you cando something, we tell you the way that you shoulddo it in most cases.
This icon tells you how to stay out of trouble when living a little close to the edge. Failure to heed its message may have unpleasant consequences for you and your drawing — or maybe for both of you.
There’s a lot to remember when you’re using AutoCAD, so we’ve remembered to remind you about some of those things that you should be remembering. These paragraphs usually refer to a crucial point earlier in the chapter or in a previous chapter. So if you’re reading sequentially, a remember paragraph serves as a friendly reminder. If you’re not reading sequentially, this kind of paragraph may help you realize that you need to review a central concept or technique before proceeding.
This icon points to new stuff in AutoCAD 2007. It’s mostly designed for those of you who are somewhat familiar with a previous version of AutoCAD and want to be alerted to what’s new in this version. New AutoCAD users starting out their CAD working lives with AutoCAD 2007 will find this stuff interesting, too — especially when they can show off their new book-learnin’ to the griz-zled AutoCAD veterans in the office who don’t yet know about all the cool, new features.
This icon highlights differences between AutoCAD LT and AutoCAD. If you’re using AutoCAD LT, you’ll find out what you’re missing compared to “full” AutoCAD. If your friend is using LT, you’ll know where to look to find stuff in AutoCAD to brag about.
A Few Conventions — Just in Case
You can probably figure out for yourself all the information in this section, but here are the details just in case.
Text you type into the program at the command line, in a dialog box, in a text box, and so on appears in boldface type. Examples of AutoCAD prompts appear in a special typeface, as does any other text in the book that echoes a message, a word, or one or more lines of text that actually appear on-screen. Sequences of prompts that appear in the AutoCAD command line area have a shaded background, like so:
Specify lower left corner or [ON/OFF] <0.0000,0.0000>:
Often in this book, you see phrases such as “choose File➪Save As from the menu bar.” The funny little arrow (➪) separates the main menu name from the specific command on that menu. In this example, you open the File menu and choose the Save As command. If you know another way to start the same command (in this example, type SAVEASand press Enter), you’re welcome to do it that way instead.
A
utoCAD is more than just another application pro-gram; it’s a complete environment for drafting and design. So if you’re new to AutoCAD, you need to know several things to get off to a good start — especially how to use the command line area and set up your drawing properly. These key techniques are described in this part of the book.Introducing AutoCAD
and AutoCAD LT
In This Chapter
䊳Getting the AutoCAD advantage
䊳Using AutoCAD and DWG files
䊳Meeting the AutoCAD product family
䊳Using AutoCAD LT instead of AutoCAD
䊳Upgrading from a previous version
W
elcome to the community whose members are the users of one of the weirdest, wackiest, and most wonderful computer programs in the world: AutoCAD. Maybe you’re one of the few remaining holdouts who contin-ues to practice the ancient art of manual drafting with pencil and vellum. Or maybe you’re completely new to drafting and yearn for the wealth and fame (would we lead you on?) of the drafter’s life. Maybe you’re an engineer or archi-tect who needs to catch up with the young CAD hotshots in your office. Or maybe you’re a full-time drafter whose fingers haven’t yet been pried away from your beloved drafting board. Maybe you tried to use AutoCAD a long time ago but gave up in frustration or just got rusty. Or maybe you currently use an older version, such as AutoCAD 2000 or even (if you like antiques) Release 14.Whatever your current situation or motivation, we hope that you enjoy the process of becoming proficient with AutoCAD. Drawing with AutoCAD is chal-lenging at first, but it’s a challenge worth meeting. CAD rewards those who think creatively about their work and look for ways to do it better. You can always find out more, discover a new trick, or improve the efficiency and quality of your drawing production.
and even Apple’s Macintosh. By far, the most popular of those early versions was for MS-DOS (your dad can tell you about that one). Eventually, Autodesk settled on Microsoft Windows as the sole operating system for AutoCAD. AutoCAD 2007 works with Windows XP — Professional, Home, and Tablet PC editions — and Windows 2000.
Because of AutoCAD’s MS-DOS heritage and its emphasis on efficiency for production drafters, it’s not the easiest program to master, but it has gotten easier and more consistent. AutoCAD is pretty well integrated into the Windows environment now, but you still bump into some vestiges of its MS-DOS legacy — especially the command line (that text area lurking at the bottom of the AutoCAD screen — see Chapter 2 for details). But even the command line — oops! command window— has gotten kinder and gentler in AutoCAD 2007. This book guides you around the bumps and minimizes the bruises.
Why AutoCAD?
AutoCAD has been around a long time — since 1982. AutoCAD ushered in the transition from really expensivemainframe and minicomputer CAD systems costing tens of thousands of dollars to merely expensive microcomputer CAD programs costing a few thousand dollars.
AutoCAD is, first and foremost, a program to create technical drawings: draw-ings in which measurements and precision are important because these kinds of drawings often get used to build something. The drawings you create with AutoCAD must adhere to standards established long ago for hand-drafted drawings. The up-front investment to use AutoCAD is certainly more expen-sive than the investment needed to use pencil and paper, and the learning curve is much steeper, too. Why bother? The key reasons for using AutoCAD rather than pencil and paper are
⻬Precision:Creating lines, circles, and other shapes of the exactly correct dimensions is easier with AutoCAD than with pencils.
⻬Modifiability:Drawings are much easier to modify on the computer screen than on paper. CAD modifications are a lot cleaner, too.
⻬Efficiency:Creating many kinds of drawings is faster with a CAD program — especially drawings that involve repetition, such as floor plans in a multistory building. But that efficiency takes skill and prac-tice. If you’re an accomplished pencil-and-paper drafter, don’t expect CAD to be faster at first!
Why choose AutoCAD? AutoCAD is just the starting point of a whole industry of software products designed to work with AutoCAD. Autodesk has helped this process along immensely by designing a series of programming inter-faces to AutoCAD that other companies — and Autodesk itself — have used to extend the application. Some of the add-on products have become such winners that Autodesk acquired them and incorporated them into its own products. When you compare all the resources — including the add-ons, extensions, training courses, books, and so on — AutoCAD doesn’t have much PC CAD competition.
The Importance of Being DWG
To take full advantage of AutoCAD in your work environment, you need to be aware of the DWG file format, the format in which AutoCAD saves drawings.
⻬In some cases, an older version of AutoCAD can’t open a DWG file that’s been saved by a newer version of AutoCAD.
⻬A newer version of AutoCAD can alwaysopen files saved by an older version.
⻬Someprevious versions of AutoCAD can open files saved by the subse-quent one or two versions. For example, AutoCAD 2004 can open DWG files saved by AutoCAD 2006. That’s because Autodesk didn’t change the DWG file format between AutoCAD 2004 and AutoCAD 2006. However, the drawing file format didchange with AutoCAD 2007, so drawings cre-ated in the current version must be saved in an older format to be open-able in AutoCAD 2006 and earlier.
⻬You can use the Save As option in newer versions to save the file to some older DWG formats. In fact, AutoCAD 2007 will save as far back as AutoCAD Release 14, which was released in 1997!
Table 1-1 shows which versions (described later in this chapter) use which DWG file formats.
Table 1-1
AutoCAD Versions and DWG File Formats
AutoCAD Version AutoCAD LT Version Release Year DWG File Format
AutoCAD 2007 AutoCAD LT 2007 2006 Acad 2007
AutoCAD 2006 AutoCAD LT 2006 2005 Acad 2004
AutoCAD 2005 AutoCAD LT 2005 2004 Acad 2004
AutoCAD 2004 AutoCAD LT 2004 2003 Acad 2004
AutoCAD 2002 AutoCAD LT 2002 2001 Acad 2000
AutoCAD 2000i AutoCAD LT 2000i 2000 Acad 2000
AutoCAD 2000 AutoCAD LT 2000 1999 Acad 2000
AutoCAD Release 14 AutoCAD LT 98 & 97 1997 Acad R14
AutoCAD Release 13 AutoCAD LT 95 1994 Acad R13
AutoCAD Release 12 AutoCAD LT Release 2 1992 Acad R12
Many programs claim to be DWG compatible— that is, capable of converting data to and from AutoCAD’s DWG format. But achieving this compatibility is a difficult thing to do well. Even a small error in file conversion can have results ranging in severity from annoying to appalling. If you exchange DWG files with people who use other CAD programs, be prepared to spend time finding and fixing translation problems. This is even more of an issue when there’s a new DWG format, as there is for AutoCAD 2007.
Seeing the LT
AutoCAD LT is one of the best deals around, a shining example of the old 80/20 rule: roughly 80 percent of the capabilities of AutoCAD for roughly 20 percent of the money. (Actually, with recent price creep, it’s now more like a 75/25 rule!) Like AutoCAD, AutoCAD LT runs on mainstream Windows com-puters and doesn’t require any additional hardware devices. With AutoCAD LT, you can be a player in the world of AutoCAD, the world’s leading CAD pro-gram, for a comparatively low starting cost.
AutoCAD-based applications
Autodesk has expanded AutoCAD into a whole product line of programs with AutoCAD as a base and specialized, discipline-specific add-ons built on top and included as one complete product. As an AutoCAD 2007 user, you’ll be looking for the 2007-compatible versions of these tools, which should appear a few months after AutoCAD 2007 ships. These discipline-specific flavors of AutoCAD include Autodesk Architectural Desktop, Autodesk Building Systems (Mechanical, Electrical, and Plumb-ing), AutoCAD Mechanical, Autodesk Map 3D, Autodesk Land Desktop, Autodesk Survey, and Autodesk Civil 3D.
To make matters even more confusing, Autodesk also offers two flavors of Autodesk Revit (Revit Building and Revit Structure) and Autodesk Inventor, software applications that compete with Architectural Desktop and
Mechanical, respectively. Revit and Inventor are not based on AutoCAD; they sacrifice AutoCAD compatibility in favor of a more fun-damental design- and 3D-oriented approach to CAD. Whether they ultimately replace the tradi-tional AutoCAD-based applications remains to be seen. While many architectural firms have not made the leap to Revit, their mechanically-oriented colleagues do seem to be favoring Inventor over Mechanical Desktop.
AutoCAD LT is a very close cousin to AutoCAD. Autodesk creates AutoCAD LT by starting with the AutoCAD program, taking out a few features to justify charging a lower price, adding a couple of features to enhance ease of use versus full AutoCAD, and testing the result. As a result, AutoCAD LT looks and works much like AutoCAD. The drawing screen and menus of the two programs are nearly identical. (LT is missing a few commands from the AutoCAD menus.)
In fact, the major difference between the programs has nothing to do with the programs themselves. The major difference is that AutoCAD LT lacks support for several customization and programming languages that are used to develop AutoCAD add-ons. So almost none of the add-on programs or utilities offered by Autodesk and others are available to LT users.
AutoCAD LT also has only limited 3D support. You can view and edit 3D objects in AutoCAD LT, so you can work with drawings created in AutoCAD that contain 3D objects. However, you cannot create true 3D objects in LT.
The lack of 3D object creation in LT is not as big a negative for many users as you may think. Despite a lot of hype from the computer press and CAD ven-dors (including Autodesk), 3D CAD remains a relatively specialized activity. The majority of people use CAD programs to create 2D drawings. It’s going to be interesting to see if AutoCAD 2007’s new 3D capabilities change anything.
Although you may hear claims that AutoCAD LT is easier to master and use than AutoCAD, the truth is that they’re about equally difficult or easy, depending on your NQ (nerd quotient). The LT learning curve doesn’t differ significantly from that of AutoCAD. AutoCAD was originally designed for max-imum power and then modified somewhat to improve ease of use. AutoCAD LT shares this same heritage.
Fortunately, the minimal differences between LT and AutoCAD mean that after you have climbed that learning curve, you’ll have the same great view. You’ll have almost the full range of AutoCAD’s 2D drafting tools, and you’ll be able to exchange DWG files with AutoCAD users without data loss.
This book covers AutoCAD 2007, but almost all the information in it applies to AutoCAD LT 2007 as well. The icon that you see at the left of this para-graph highlights significant differences.
It’s CAD Heaven with 2007
You should know the following before you upgrade from any older AutoCAD release:
⻬Wash those old Windows:AutoCAD 2007 does notsupport older ver-sions of Windows, such as Windows NT, 98, and Me. You must use Windows XP (Professional, Home, or Tablet PC) or Windows 2000, all patched with the latest service packs.
⻬DWG file compatibility:The previous three releases shared a common DWG file format, but AutoCAD 2007 uses a new format. You have to use File➪Save As to create DWG files for users of AutoCAD 2006 and earlier versions as far back as Release 14. (If you need to go even further back, you can save to the Release 12 DXF format — see Chapter 17 for instructions.)
⻬Application compatibility:If you use third-party applications with a previous version of AutoCAD, they may not work with AutoCAD 2007. AutoCAD 2004, 2005, and 2006 applications, including those developed with the ARX (AutoCAD Runtime eXtension) and VBA (Visual Basic for Applications) programming interfaces, work with AutoCAD 2007; but older ARX and VBA applications don’t work.
Many LSP (AutoLISP) programs written for the last several versions of AutoCAD work with AutoCAD 2007.
⻬Increased computer system requirements:For AutoCAD 2007, Autodesk recommends an 800 MHz Pentium III or better processor, at least 512MB of RAM, 1024 x 768 or higher display resolution with True Color graphics, 750MB of available hard disk space, an Internet connection, and Microsoft Internet Explorer 6.0 with Service Pack 1 or later.
⻬Additional requirements for working in 3D:AutoCAD recommends a 3 GHz processor; 2GB of RAM; a workstation-class, OpenGL-capable graphics card with at least 128 MB of memory; and an additional 2GB of hard disk space beyond the 750 MB required for installation.
We find even the recommended system requirements on the minimal side. For example, Mark works at a screen resolution of 1280 x 1024, and Dave works at 1600 x 1200. The figures in this book were shot at a resolution of 1024 x 768, and as you can see, things can get pretty crowded at that resolu-tion. We also think 512MB of RAM is on the low side for productive work — get at least a gigabyte.
⻬Save As: As we already mentioned, you can save a DWG all the way back to Release 14. This is a welcome change from the previous policy of let-ting users save back to only the two previous releases.
⻬DWF Underlay: Similar to external references (see Chapter 14) with the added benefit of eliminating many of the bottlenecks involved with xrefs. Team workers will be very happy!
If you’re coming from AutoCAD 2005 or even earlier, you may have over-looked some new features introduced in AutoCAD 2006; these were the big changes in that version, and all have been tweaked in AutoCAD 2007:
⻬Dynamic input: You can almostforget about the command window — command line. In addition to the command line, AutoCAD 2007 features a heads-up interface that displays command names, options, prompts, and values right next to the crosshairs. (See Chapter 2.)
⻬Improved object selection: AutoCAD provides more positive feedback than ever before with its rollover highlighting feature. (See Chapter 7.)
⻬Dynamic blocks: You no longer need separate blocks for every door or window size in your drawings. Now you can insert a single block defini-tion and choose its configuradefini-tion as you insert it. (See Chapter 14.)
If you have any interest at all in updating your AutoCAD skills by venturing into the third dimension, now is the time and AutoCAD 2007 is your version. Even if you’re not interested in 3D, there are enough refinements to make upgrading worth your while. That’s especially the case if you’re an LT user, since many of the full-version-only Express Tools have been incorporated into the core program and so are available in LT, too.
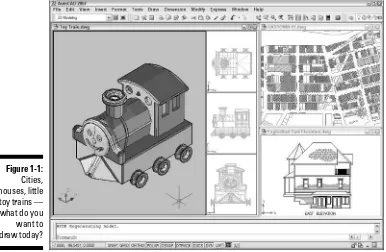
No Express service?
If your menu bar doesn’t include the Express menu (it’s the third item from the right in Figure 1-1), you should consider installing the Express Tools from your AutoCAD CD (AutoCAD LT does not include or support the Express Tools).
When you first install AutoCAD 2007, you choose between a Typical or a Custom installa-tion. If you choose Typical, the next screen asks if you want to install the Express Tools. If you
Le Tour de AutoCAD 2007
In This Chapter
䊳Touring the AutoCAD 2007 screens
䊳Going bar hopping: title bars, the menu bar, toolbars, and the status bar
䊳Dynamically inputting and commanding the command line
䊳Discovering the drawing area
䊳Making the most of Model and Layout tabs
䊳Practicing with palettes
䊳Setting system variables and dealing with dialog boxes
䊳Using online help
A
utoCAD 2007 is a full-fledged citizen of the Windows world, with toolbars, dialog boxes, right-click menus, a multiple-document interface, and all the other trappings of a real Windows program. And it’s becoming more and more Windows-like with each release. One of the last weird but essential holdovers from the DOS days is the AutoCAD command line. The command line area is still there (and wouldn’t you know it, officially it’s now known as the command window), but in AutoCAD 2007, you’ll be less reliant on this “look down here — now look up here” method of interacting with the program.AutoCAD 2007, like the fanciest Detroit iron, bristles with heads-up display features. The dynamic input systemputs much of the command line informa-tion right under your nose (or at least under your crosshairs). And recently entered data is just a right-click away.
Like the rest of the book, this chapter is written for someone who has used other Windows programs but has little or no experience with AutoCAD. If you areexperienced with recent versions of AutoCAD, some of this chapter will be old hat for you — although you may get a shock when you open AutoCAD 2007 for the first time, especially if you choose to enter the 3D Modeling workspace the first time you start the program.
programs anyway. Times change, and so has AutoCAD. The 3D engine has been completely rebuilt, stroked, polished, and tuned to the extent that we now think 3D is a useable feature. We introduce you to AutoCAD’s 3D viewing and navigation tools in Chapter 9. In this chapter, we focus on 2D drafting which, after all, is still what the great majority of AutoCAD users do with the software.
AutoCAD Does Windows
Finding your way around AutoCAD 2007 can be an odd experience. You recog-nize from other Windows applications much of the appearance and workings of the program, such as its toolbars and pull-down menus, which you use for entering commands or changing system settings. But other aspects of the program’s appearance — and some of the ways in which you work with it — are quite different from other Windows programs. You can, in many cases, tell the program what to do in at least four ways — pick a toolbar icon, pick from a pull-down menu, type at the keyboard, or pick from a right-click menu — none of which is necessarily the best method to use for every task.
Profiling your display
The illustrations and descriptions in this chap-ter and throughout the book show the default configuration of AutoCAD — that is, the way the screen looks if you use the standard version of AutoCAD (not a flavored version such as Architectural Desktop) and haven’t messed with the display settings. You can change the appearance of the screen with settings on the Display tab of the Options dialog box (choose Tools➪Options➪Display) and by dragging tool-bars and other screen components.
The main change we’ve made is to configure the drawing area background to be white instead of black, because the figures in the book show up better that way. You may want to set a white background on your own system or stay with the default black background — it’s your choice, and there’s no right or wrong. Some of AutoCAD’s colors show up better on a white background, and some are better on a black one.
As with other Windows programs, the menus at the top of the AutoCAD screen enable you to access most of the program’s functions and are the easiest-to-remember method of issuing commands. When you want to get real work done, you need to combine the pull-down menus with other methods — especially entering options at the keyboard or choosing them from the right-click menus. We show you how throughout this book.
And They’re Off: AutoCAD’s
Opening Screen
By default, when you start an AutoCAD 2007 session, a dialog box (see Figure 2-1) asks in which of the two standard workspaces you want to start your drawing session:
⻬3D Modeling:Opens a new drawing file configured for a 3D modeling environment with navigation, visualization, and modeling tools suitable for working in 3D.
⻬AutoCAD Classic: Opens a new drawing configured for a 2D drafting environment, with drafting and drawing management tools suitable for working in 2D.
A workspaceis a collection of menus, palettes, and toolbars tailored for spe-cific tasks, such as 3D modeling or 2D drafting. AutoCAD 2007 includes two workspaces for just those purposes, called 3D Modelingand AutoCAD Classic, and you can easily create additional workspaces to suit your requirements. For more information, look up “workspace” in the online help system. Figure 2-1:
In this chapter we’re going to focus on drawing rather than modeling — we’ll look at visualizing and navigating in 3D space in Chapter 9.
If you don’t see the Workstations dialog box shown in Figure 2-1, it means that you or someone who uses your computer checked that little box that says Don’t Show Me This Again down there in the lower-left corner. If you want to restore the Workstations dialog box, choose Tools➪Options, and on the Systems tab, General Options area, check the box beside Show All Warning Messages. Then click OK.
The Workstations dialog box appears only when you start an AutoCAD ses-sion — it’s not there if AutoCAD is already open. If that’s the case and you want to switch between 2D drafting and 3D modeling, follow these steps:
1. Choose Tools➪Workspaces➪AutoCAD Classic.
Assuming the 3D Modeling workspace is current, a bunch of toolbars and palettes open and close. You end up with the Tool Palettes and the Sheet Set Manager displayed at the left and right sides of the screen. (Don’t worry about what those are for right now — we’ll get to them in later chapters.)
2. Choose File➪New or open a 2D AutoCAD drawing file.
If you choose to start a new file, the Select Template dialog box opens. Choose acad.dwt if you want to work in imperial units, or acadiso.dwt, if you want to work in metric.
To switch back from 3D modeling to a 2D drafting environment, reverse the procedure as follows:
3. Choose Tools➪Workspaces ➪3D Modeling.
After more whizzing and whirring, AutoCAD closes Sheet Set Manager and opens the Modeling tab of the Tool Palettes and the Dashboard (we discuss these features in Chapter 9).
4. Choose File➪New or open a 3D AutoCAD model file.
If you choose to start a new file, the Select Template dialog box opens. Choose acad3d.dwt if you want to work in imperial units, or acadiso3d. dwt, if you want to work in metric.
For the remainder of this chapter (and nearly all the rest of the book), we focus on 2D drafting, by far the easier way of getting your feet wet with AutoCAD.
If you have a previous version of AutoCAD on your computer, AutoCAD 2007 displays a Migrate Settings dialog box the first time you run the program. Unless you’re a competent AutoCAD user who is reading this book to find out about the new features, we recommend that you click Cancel and start fresh. If you later decide you want to migrate your custom settings, you can do so by choosing Start➪All Programs➪Autodesk➪AutoCAD 2007➪Migrate Custom Settings and then choosing the installed version from which you want to migrate settings. Be warned, however, that doing so will overwrite any new customization you’ve added to AutoCAD 2007.
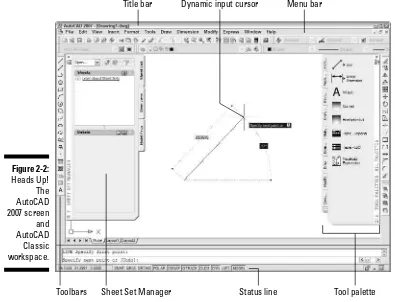
Those well-washed Windows
As shown in Figure 2-2, much of the AutoCAD screen is standard Windows fare — title bars, a menu bar, toolbars, and a status bar.
Menu bar
Dynamic input cursor
Title bar
Tool palette
Status line
Sheet Set Manager
Toolbars Figure 2-2:
A hierarchy of title bars
Like most Windows programs, AutoCAD has a title barat the top of its pro-gram window that reminds you which propro-gram you’re in (not that you’d ever mistake the AutoCAD window for, say, Microsoft Word!).
⻬At the right side of the title bar is the standard set of three Windows control buttons: Minimize, Maximize/Restore, and Close.
⻬Each drawing window within the AutoCAD program window has its own title bar. You use the control buttons on a drawing window’s title bar to minimize, maximize/restore, or close that drawing, instead of the entire AutoCAD program.
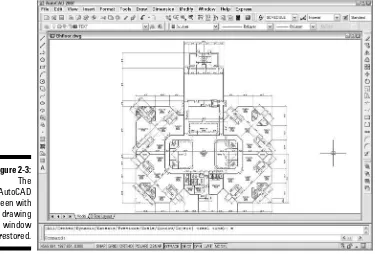
As in other Windows programs, if you maximize a drawing’s window, it expands to fill the entire drawing area. (AutoCAD 2007 starts with the draw-ing maximized in this way.) As shown in Figure 2-2, the drawdraw-ing’s control but-tons move onto the menu bar, below the control butbut-tons for the AutoCAD program window; the drawing’s name appears in the AutoCAD title bar. To unmaximize (restore) the drawing so that you can see any other drawings that you have open, click the lower Restore button. The result is as shown in Figure 2-3: a separate title bar for each drawing with the name and controls for that drawing.
Making choices from the menu bar
The menu barcontains the names of all the primary menus in your version of AutoCAD. As with any program that’s new to you, it’s worth spending a few minutes perusing the menus in order to familiarize yourself with the com-mands and their arrangement. (If your menu bar doesn’t include the Express menu — and note that AutoCAD LT does not include the Express menu — see the end of Chapter 1 for installation instructions.)
Cruising the toolbars
As in other Windows programs, the toolbars in AutoCAD provide rapid access to the most commonly used AutoCAD commands. AutoCAD 2007 ships with toolbars in this default arrangement (as shown in Figure 2-4):
⻬Standard toolbar:Located just below the menu bar. You find file manage-ment and other common Windows functions here, plus some specialized AutoCAD stuff such as zooming and panning.
⻬Styles toolbar:To the right of the Standard toolbar. Used for selecting and formatting AutoCAD’s text, dimension, and table styles. Chapters 10 and 11 cover these features.
⻬Workspaces toolbar: Below the Standard toolbar. Used to switch between or manage workspaces. AutoCAD Classic is the default 2D workspace we use throughout this book (except for Chapter 9).
⻬Layers toolbar:To the right of the Workspaces toolbar. Includes com-mands and a drop-down list for manipulating layers,which are AutoCAD’s fundamental tools for organizing and formatting objects. Chapter 5 con-tains the layer lowdown.
Hot-wiring the menu bar
Some standard tips and tricks for Windows are especially useful in AutoCAD. Control-key short-cuts for the most popular functions — Ctrl+S to save, Ctrl+O to open a file, and Ctrl+P to print — work the same way in AutoCAD as in most other Windows programs. Use them!
Also worth exploring are the Alt-key shortcuts, which are available for all menu choices, not
⻬Properties toolbar:To the right of the Layers toolbar. Used for formatting AutoCAD object properties, such as colors, linetypes, and lineweights. See Chapter 5 when you’re ready to play with AutoCAD’s object properties.
⻬Draw toolbar:Vertically down the left edge of the screen. Includes the most commonly used commands from the Draw menu. Chapter 6 covers most of the items on this toolbar.
⻬Modify toolbar: Vertically down the right edge of the screen. Includes the most commonly used commands from the Modify menu. Chapter 7 shows you how to use almost everything on this toolbar.
⻬Draw Order toolbar:Vertically below the Modify toolbar. Offers com-mands for controlling which objects appear on top of which other objects. If you need this kind of flexibility, look up “DRAWORDER com-mand” in the AutoCAD online help system.
You can rearrange, open, and close toolbars as in other Windows programs.
⻬To move a toolbar, point to its border (the double-line control handle at the leading edge of the toolbar is the easiest part to grab), click, and drag.
⻬To open or close toolbars, right-click any toolbar button and choose from the list of available toolbars, as shown in Figure 2-4.
The AutoCAD screen in Figure 2-4 shows the default toolbar arrangement, which works fine for most people. Feel free to close the Draw Order toolbar; you aren’t likely to use its features frequently. You may want to turn on a couple of additional toolbars, such as Object Snap and Dimension, as you dis-cover and make use of additional features. Throughout this book, we point out when a particular toolbar may be useful.
If you’re not satisfied with just rearranging the stock AutoCAD toolbars, you can customize their contents or even create new ones. The procedures are beyond the scope of this book; they involve bouncing among the Interfaces, Commands, Toolbars, and Properties areas in the Customize User Interface dialog box in not entirely intuitive ways. Resist slicing and dicing the stock AutoCAD toolbars until you’re at least somewhat familiar with them. If you want to get creative thereafter, check out this book’s companion volume, AutoCAD and AutoCAD LT All-In-One Desk Reference For Dummies.
Looking for Mr. Status Bar
The status bar(see Figure 2-5) appears at the bottom of the AutoCAD screen. The status bar displays and allows you to change several important settings that affect how you draw and edit in the current drawing. Some of these settings won’t make complete sense until you’ve used the AutoCAD commands that they influence, but here’s a brief description, with pointers to detailed descriptions elsewhere in this book of how to use each setting:
⻬Coordinates of the crosshairs:The coordinates’ readout displays the current X,Y,Z location of the crosshairs in the drawing area, with respect to the origin point (whose coordinates are 0,0,0). Chapter 5 describes AutoCAD’s coordinate conventions and how to use this area of the status bar.
Modify toolbar
Properties toolbar
Styles toolbar
Layers toolbar
Workspaces toolbar Standard toolbar
Draw Order toolbar
Draw toolbar
If the coordinates in the lower-left corner of the screen are grayed out, coordinate tracking is turned off. Click the coordinates so that they appear in dark numbers that change when you move the crosshairs in the drawing area.
If dynamic input is enabled, the tooltip at the crosshairs also displays the current X,Y,Z location of the crosshairs. This constantly active dis-play is not affected by changes to coordinate tracking in the status bar.
⻬SNAP, GRID, and ORTHO mode buttons:These three buttons control three of AutoCAD’s tools for ensuring precision drawing and editing:
•Snap constrains the crosshairs to regularly spaced hot spots, enabling you to draw objects a fixed distance apart more easily.
•Griddisplays a series of regularly spaced dots, which serve as a distance reference.
•Orthoconstrains the crosshairs to horizontal and vertical move-ment, which makes drawing orthogonal (straight horizontal and vertical) lines easy.
See Chapter 4 for instructions on how to configure these modes and Chapter 5 for information about why, when, and how to use them in actual drawing operations.
⻬POLAR tracking mode button:Polar tracking causes the crosshairs to prefer certain angles when you draw and edit objects. By default, the preferred angles are multiples of 90 degrees, but you can specify other angle increments, such as 45 or 30 degrees. See Chapter 5 for instruc-tions to specify the polar tracking angles that you prefer. Clicking the
Manage Dynamic User Coordinate System on/off
POLAR button toggles polar tracking on or off. Ortho and polar tracking are mutually exclusive — turning on one mode disables the other.
⻬Running Object Snap (OSNAP) and Object Snap Tracking (OTRACK) buttons: Object snapis another AutoCAD tool for ensuring precision drawing and editing. You use object snaps to grab points on existing objects — for example, the endpoint of a line or the center of a circle.
• When you turn on running object snap,AutoCAD continues to hunt for object snap points. Chapter 5 contains detailed instructions on how to use this feature.
• When you turn on object snap tracking,AutoCAD hunts in a more sophisticated way for points that are derived from object snap points. Chapter 5 briefly describes this advanced feature.
⻬Dynamic User Coordinate System (DUCS) button: This one’s for 3D object creation (and so is not included in AutoCAD LT). We don’t cover 3D modeling in this book. All you need know for now is that when it’s enabled, you can align your current construction plane with the face of a 3D solid. (See — wouldn’t you rather have waited ‘til Chapter 9?)
⻬Dynamic Input (DYN) button:Dynamic inputdisplays commands, options, prompts, and user input in a tooltip adjacent to the crosshairs and enables you to keep focused on what you’re drawing. In addition, the dynamic input tooltip displays what you type in response to prompts.
⻬Lineweight (LWT) display mode button:One of the properties that you can assign to objects in AutoCAD is lineweight— the thickness that lines appear when you plot the drawing. This button controls whether you see the lineweights on the screen. (This button doesn’t control whether lineweights appear on plots; that’s a separate setting in the Plot dialog box.) Chapter 5 gives you the skinny (and the wide) on lineweights.
⻬MODEL/PAPER space button:As we describe in the section, “Down the Main Stretch: The Drawing Area,” later in this chapter, the drawing area is composed of overlapping tabbed areas labeled Model, Layout1, and Layout2 by default. The Model tab displays a part of the drawing called model space,where you create most of your drawing. Each of the remaining tabs displays a paper space layout,where you can compose a plottable view with a title block. A completed layout will include one or more viewports,which reveal some or all the objects in model space at a particular scale.
• When the MODEL/PAPER button says MODEL,drawing and editing operations take place in model space, inside a viewport.
• When the button says PAPER,drawing and editing operations take place in paper space on the current layout.
Don’t worry if you find model space and paper space a little disorienting at first. The paper space layout setup information in Chapter 4 and plot-ting instructions in Chapter 13 will help you get your bearings and navi-gate with confidence.
⻬Maximize/Minimize Viewport button(this status bar button appears on paper space layouts only): When you’re looking at one of the Layout tabs instead of the Model tab, the status bar displays an additional Maximize Viewport button. Click this button to expand the current paper space viewport so that it fills the entire drawing area. Click the button — now called Minimize Viewport — again to restore the viewport to its normal size. (Chapter 4 describes viewports.)
⻬Communication Center:This button opens a dialog box containing recent AutoCAD-related headlines that Autodesk thinks you may find useful. The headlines are grouped into categories called channels:Live Update Maintenance Patches, Articles and Tips, Product Support Information, and so on. Each headline is a link to a Web page with more information, such as how to download a software update or fix a prob-lem. Click the Settings button in the Communication Center dialog box to select channels you see in the Communication Center window.
⻬Lock/Unlock Toolbar Palette Positions:“Now, where did I leave that Properties palette?” You’ll never have to ask yourself again — AutoCAD 2007 lets you lock toolbars or palettes (which for some reason they’ve started calling windows) in position, so you’ll always know where they are.
⻬Trusted Autodesk DWG: You see this button when AutoCAD opens a drawing that was created by AutoCAD or AutoCAD LT. In recent years, more and more programs have been able to save in DWG format, but in Autodesk’s eyes, these files are not to be trusted.
⻬Manage Xrefs:You won’t see this combination button and notification symbol until you open a drawing that contains xrefs (external DWG files that are incorporated into the current drawing). Chapter 14 tells you how to use xrefs and what the Manage Xrefs button does.
⻬Associated Standards File:You’ll see this button if you’ve enabled CAD standards checking and configured a drawing standards (DWS) file. Clicking this button displays the Check Standards dialog box.
⻬Clean Screen: No, it doesn’t squeegee your monitor. Clicking this button frees up a bit more screen space by first maximizing the AutoCAD window and then turning off the title bar, toolbars and palettes, and the Windows task bar. Click the button again to restore those elements.
You can open dialog boxes for configuring many of the status bar button functions by right-clicking the status bar button and choosing Settings. Chapters 4 and 5 give you specific guidance about when and how to change these settings.
A button’s appearance shows whether the setting is turned on or off. Depressed, or down, means on; raised, or up, means off. If you’re unclear whether a setting is on or off, click its button; its mode changes and the new setting is reflected on the command line — <Osnap off>, for example. Click again to restore the previous setting.
A smoother ride: Dynamic input
One of the tasks faced by every AutoCAD instructor is the frequent need to badger students to “Watch the Command Line!” because the command line can be confusing for people who are new to CAD and computers. To anyone familiar with any other Windows graphic program, the command line is really tough to take — a throwback to an earlier time, when the knuckles of com-puter-aided drafters dragged on the ground. The challenge for experienced AutoCAD users now is going to be “Stop Watching the Command Line!”
When dynamic input is enabled, the crosshairs take on some extra features:
⻬The coordinates of the current pointer location are always visible at the crosshairs.
⻬Typed commands appear in the tooltip adjacent to the crosshairs.
⻬When a command is started, you can display options by pressing the down-arrow key on the keyboard.
⻬Values that you type appear in the tooltip, and the dynamic input system displays dimensions when you’re drawing things or moving them around. (Refer to Figure 2-2.)
Dynamic input is enabled by default, so it’s going to be one of the first things you notice when you get behind the wheel.
The DYN status bar button controls AutoCAD 2007’s dynamic input system. You can toggle off dynamic input by clicking this button, but we recommend you use it — you won’t have to keep looking down at the command line nearly so often!
Let your fingers do the talking:
The command window
If the title bars, menu bar, status bar, and dynamic input tooltips are the Windows equivalent of comfort food — familiar, nourishing, and unthreaten-ing — then the command window, shown in Figure 2-7, must be the steak tartare or blood sausage of the AutoCAD screen feast. It looks weird, turns the stomachs of newcomers, and delights AutoCAD aficionados. Despite the promise of AutoCAD 2007’s heads-up dynamic input, for now at least, the hard truth is that you have to come to like — or at least tolerate — the com-mand line if you want to become at all comfortable using AutoCAD.
You should cotton on and cozy up to the command line because the com-mand line is still AutoCAD’s primary communications conduit with you. Figure 2-7: