Bounce
Tumble,
and Splash!
Simulating the Physical
World with Blender 3D
To n y M u l l e n
Bounce
Tumble,
and Splash!
Simulating the Physical
World with Blender 3D
To n y M u l l e n
Acquisitions Editor: Mariann Barsolo
Vice President and Executive Group Publisher: Richard Swadley Vice President and Executive Publisher: Joseph B. Wikert Vice President and Publisher: Neil Edde
Project Manager, I: Laura Moss-Hollister Media Associate Producer: Kit Malone Media Quality Assurance: Josh Frank
Compositor and Book Designer: Kate Kaminski, Happenstance Type-O-Rama Proofreader: C.M. Jones
Indexer: Ted Laux Cover Designer: Ryan Sneed
Cover Images: Milos Zajíc (school corridor) Mike Pan (strawberries and milk) Luma Studios (ClubSilo racing game) Tony Mullen (pop bottle and boxes tumbling)
© Blender Foundation | peach.blender.org (cartoon animals)
Copyright © 2008 by Wiley Publishing, Inc., Indianapolis, Indiana
Published simultaneously in Canada
ISBN: 978-0-470-19280-1
No part of this publication may be reproduced, stored in a retrieval system or transmitted in any form or by any means, electronic, mechanical, photocopying, recording, scanning or otherwise, except as permitted under Sections 107 or 108 of the 1976 United States Copyright Act, without either the prior written permission of the Publisher, or authorization through payment of the appropriate per-copy fee to the Copyright Clearance Center, 222 Rosewood Drive, Danvers, MA 01923, (978) 750-8400, fax (978) 646-8600. Requests to the Publisher for permission should be addressed to the Legal Department, Wiley Publishing,
Inc., 10475 Crosspoint Blvd., Indianapolis, IN 46256, (317) 572-3447, fax (317) 572-4355, or online at http://www.wiley.com/go/permissions.
Limit of Liability/Disclaimer of Warranty: The publisher and the author make no representations or warranties with respect to the accuracy or completeness of the contents of this work and specifically disclaim all warranties, including without limitation warranties of fitness for a particular purpose. No warranty may be cre-ated or extended by sales or promotional materials. The advice and strategies contained herein may not be suitable for every situation. This work is sold with the understanding that the publisher is not engaged in rendering legal, accounting, or other professional services. If professional assistance is required, the services of a competent professional person should be sought. Neither the publisher nor the author shall be liable for damages arising herefrom. The fact that an organization or Website is referred to in this work as a citation and/or a potential source of further information does not mean that the author or the publisher endorses the information the organization or Website may provide or recommendations it may make. Further, readers should be aware that Internet Websites listed in this work may have changed or disappeared between when this work was written and when it is read.
For general information on our other products and services or to obtain technical support, please contact our Customer Care Department within the U.S. at (800) 762-2974, outside the U.S. at (317) 572-3993 or fax (317) 572-4002.
Wiley also publishes its books in a variety of electronic formats. Some content that appears in print may not be available in electronic books.
Library of Congress Cataloging-in-Publication Data
Mullen, Tony,
1971-Bounce, tumble, and splash! : simulating the physical world with Blender 3D / Tony Mullen. -- 1st ed.
p. cm.
Includes index.
ISBN 978-0-470-19280-1 (paper/cd-rom)
1. Computer graphics. 2. Computer simulation. 3. Blender (Computer file) 4. Computer animation. 5. Three-dimensional display systems. I. Title.
T385.M8425 2008
006.6'96--dc22
2008014650
TRADEMARKS: Wiley, the Wiley logo, and the Sybex logo are trademarks or registered trademarks of John Wiley & Sons, Inc. and/or its affiliates, in the United States and other countries, and may not be used without written permission. All other trademarks are the property of their respective owners. Wiley Publishing, Inc., is not associated with any product or vendor mentioned in this book.
Dear Reader,
Thank you for choosing Bounce, Tumble, and Splash! Simulating the Physical World
with Blender 3D. This book is part of a family of premium-quality Sybex books, all of which are written by outstanding authors who combine practical experience with a gift for teaching.
Sybex was founded in 1976. More than thirty years later, we’re still committed to producing consistently exceptional books. With each of our titles we’re working hard to set a new standard for the industry. From the paper we print on, to the authors we work with, our goal is to bring you the best books available.
I hope you see all that reflected in these pages. I’d be very interested to hear your comments and get your feedback on how we’re doing. Feel free to let me know what you think about this or any other Sybex book by sending me an email at
[email protected], or if you think you’ve found a technical error in this book, please
visit http://sybex.custhelp.com. Customer feedback is critical to our efforts at Sybex.
Best regards,
Neil Edde
Acknowledgments
One of the most frequent things I hear from people seeing Blender for the first time is,
“Wow, and this is free?” Of course, in the sense of freeas in free software, it most
cer-tainly is. It is free for users to copy and distribute, and it is free to be developed and modified by anybody who wants to do so. But the truth is that nothing as good as Blender comes without a cost. The cost of Blender is paid in the form of countless hours donated by the dedicated and highly skilled team of volunteer developers who make Blender what it is. For this reason, I would first and foremost like to thank them, the Blender developers, and Ton Roosendaal, Blender’s own “benevolent dictator for life,” for all their hard work and dedication. Without them, there would be no Blender. Please
visit http://wiki.blender.org/index.php/List_of_Contributorsfor a complete list of the
cur-rent developers and the specific work they have done.
I would especially like to thank some of the developers who have been particu-larly helpful to me in my work on this book: Martin Poirier (theeth), Janne Karhu (jahka), Daniel Genrich (Genscher), Jens Ole Wund (bjornmose), Dolf Veenlivet
(macouno), Joe Eagar (joeedh), Ramon Carlos Ruiz (RCruiz), Erwin Coumans, and Nils Theurey for their patience and responsiveness to my various questions and pestering. I’d like to give a special thank you to Tom Musgrove (LetterRip) and all those who worked to prepare the 2.46 release for placing such a high priority on maintaining a release schedule that facilitates the creation of good documentation, and also to Roland Hess for his work as technical editor of this book.
Thanks also to the Peach team of developers and artists: Campbell Barton, Sacha Goedegebure, Andy Goralczyk, William Reynish, Enrico Valenza, Brecht van Lommel, and Nathan Vegdahl, for raising the bar yet again for Blender features and artwork, and for putting up with me hanging around, drinking their espresso, and peeking over their shoulders for a week. Many other developers and users have also helped me in various ways, and I’m very grateful for all the support I’ve received from the Blender commu-nity. I can’t begin to list all of the individuals at BlenderArtists.org whose artwork, com-ments, and tutorials have helped me to learn what I know about Blender, but if you spend a little time reading the forums, you will know who many of them are soon enough. Thanks also to Bart Veldhuizen and all the contributors to BlenderNation.com for their support and for the great service they provide the Blender community.
This book would not have been possible without the efforts of my editors and colleagues at Sybex/Wiley, and I’m very grateful to all of them. Thank you to Mariann Barsolo, Pete Gaughan, Kathryn Duggan, Liz Britten, Janet Chang, Joe Grasso, Kelly Trent, and everyone else who had a hand in publishing and promoting the book.
I’m also very grateful to my colleagues and students at Tsuda College for their support and encouragement of my Blender-related work.
About the Author
Tony Mullen
is a college lecturer, animator, independent filmmaker, and writer liv-ing in Tokyo. He has worked as a newspaper cartoonist, a graphic designer, a software developer, and a researcher in natural language processing, among other things. Since discovering Blender, he has been involved in CG animation to the point of obsession, but he also maintains a keen interest in stop-motion techniques, notably as the leadanimator and codirector of the 16mm film Gustav Braüstache and the Auto-Debilitator
(winner of the Best Narrative Short award at the New Beijing International Movie Festi-val, 2007) and other independent shorts. He is an active member of the Blender com-munity and one of the original members of the Blender Foundation’s Trainer Certification Review Board. He is the author of a monthly series of Blender tutorials in the Japanese
magazine Mac People and of the best-selling Sybex book Introducing Character
Contents
Foreword xiii
Introduction xv
Chapter 1
Re-creating the World: An Overview
1
Re-creating the Physical World with Blender. . . 2
Blender’s Physical Simulation Functionality 2
The Science of Simulation 5
Nonsimulation Tools and Techniques 6
Using Materials and Textures . . . 6
Hot Lava with Material Nodes 7
Transparency and Subsurface Scattering 14
Sky Maps 20
Faking Physics with General Tools . . . 23 Modeling Bodies of Water by Using Modifiers and Textures 24 Faking a Cloth Flag by Using a Displacement Modifier 41 Creating a Poseable Spring by Using an Array Modifier, Shape Keys,
and PyDrivers 46
Chapter 2
The Nitty-Gritty on Particles
59
Introducing Particles . . . 60
Setting Particle Parameters 60
Using the Physics Tab 65
Setting Visualization Options 67
Using the Extras Tab 72
Using Force Fields and Deflection 73
Working with Dynamic Particles . . . 79
Creating Fire and Smoke 80
The BB vs. the Crystal Ball: Using the Explode Modifier 94
Boids! . . . 101
Setting Up the Boids System 102
Working with Goals and Predators 102
Creating a Simple Flying Bird 106
Chapter 3
Getting Flexible with Soft Bodies and Cloth
109
Getting the Hard Facts on Soft Bodies . . . 110
Understanding Soft Body Basics 110
Baking 112
Animating a Spring with Soft Bodies 112
Using Force Fields and Collision 118
Working with Soft Bodies and Curves 121
Using Stress-Mapped Textures for Rubbery Surfaces 132
Getting Jiggly with Lattices . . . 139
Simulating Cloth and Clothing . . . 146
Learning More about Cloth 156
Demolition! . . . 158
Chapter 4
Hair Essentials: The Long and Short of Strand Particles
165
Introducing Blender Hair . . . 166
Setting Up a Hair Simulation 168
Creating Clumping, Roughness, and Kink 176
Texture Mapping 180
More Tips and Tricks for Controlling Hair 199
Soft Bodies and Hair 204
Other Uses for “Hair” Particles . . . 206
Chapter 5
Making a Splash with Fluids
213
Using the Blender Fluid Simulator . . . 214
Chapter 6
Bullet Physics and the Blender Game Engine
271
The Blender Game Engine . . . 272
Getting Started with BGE 276
Using Ipos and Actions in BGE 282
Rigid Body Simulation and Ipos . . . 284
Baking Game Ipos 284
Frame Rate and Simulation Speed 285
Ctrl+Alt+Shift+P 288
Actor Parameters, Boundaries, and Hull Types 295
General Tips on Working with Bullet 305
Joints, Ragdolls, and Robots . . . 306
Using Rigid Body Joint Constraints 306
Using Generic (6DoF) Joints 309
Setting Up a Ragdoll Armature 310
Controlling an Armature 317
A Passive-Walking Robot 319
Chapter 7
Imitation of Life: Simulating Trees and Plants
325
The Blender Greenhouse: Creating Foliage with L-Systems
and ngPlant . . . 326
L-Systems 327
ngPlant 337
Other Software 348
An Open Source Ivy Generator . . . 349
A Few More Points to Mention. . . 359
Tips for Creating an Outdoor Scene 359
The Importance of Observation 361
Appendix
About the Companion CD
363
What You’ll Find on the CD . . . 364
Chapter Files 364
Blender 2.46 Software 364
System Requirements. . . 364
Using the CD. . . 364
Troubleshooting . . . 365
Customer Care 365
Foreword
Physics simulation
is a fun and rewarding discipline. Fun, because it allows us to experiment with virtual creations that can go beyond real-world experiences, limited just by our imagination. Rewarding, because it allows us to author complex and large scale configurations that are out of reach by pure manual work.Tony Mullen’s Bounce, Tumble, and Splash!does a great job of stimulating our
imagination, and unlocking all the simulation authoring tools of Blender. The rich 3D tools in Blender help authoring the various types of simulation, such as particles, cloth, soft bodies, and rigid bodies, useful for animations as well as real-time applications. The sheer amount of functionality and options in the Blender user interface can be overwhelming or even intimidating, but with books like this it becomes a pleasure to explore and become more familiar with all the different simulation methods that Blender has to offer. The combination of authoring, simulation, and visualization and a very fast turnaround time makes the user more productive.
Since the start of Not a Number, back in 2000, I’ve been involved in Blender development, mainly its interactive development. This became a great environment to try out the latest collision detection and rigid body simulation techniques, and my col-leagues at Havok often looked surprised to see what Blender could do. Lacking the time to explain the custom user interface in detail, and lacking a book like this one, the oth-ers didn’t have a chance to explore those possibilities. Now at Sony Computer Enter-tainment, with colleagues such as Craig Reynolds who is quoted in the chapter on particles for his work on flocking, the simulation capabilities of Blender proved very useful during prototyping our work on COLLADA physics export. This is a rich data standard that includes physics properties such as mass and friction, collision shapes, and rag-doll joints. With this background it is no surprise I’m fluent with the rigid body functionality of Blender, but I was unfamiliar with the other simulation methods such as particle systems, cloth, deformable objects, and fluid simulation. Until reading this book.
Visual Computing is a very active research and development area, and the gap between movie production physics simulation and real-time game physics is narrowing rapidly. I can hardly wait to see all the beautiful examples in this book becoming avail-able in real-time applications, allowing the users to interact in real-time with cloth, rope, and soft body simulation.
Last but not least, as insider Tony welcomes the reader to the vibrant Blender community, people, forums, activities and recent projects such as the “Big Buck Bunny” open movie. This book should find its way to artists, students, researchers, developers, professionals, enthusiasts, and anyone who shares the passion to build creations using Blender.
Art and science have more in common than they are often
given credit for. Although they tend to occupy far-flung
cor-ners of your typical college campus, they have always been
closer in spirit than they sometimes seem on the surface. Both
artists and scientists are highly creative people, and both can
sometimes be a little quirky. At their best, both types can help
us see the world in new ways through their work.
This book deals with what I think is a particularly interesting intersection between the worlds of art and science: the use of sophisticated computer simulations of physical phenomena for visual, expressive—that is to say, artistic—purposes. A huge amount of technical expertise has gone into the development of these tools, and in the hands of skilled and inspired creators, a lot of wonderful artwork can be created using them. I hope this book will help to bridge the gap between these tools and the people with the vision and the talent to use them most effectively.
In the last quarter of a century, the development of CG imagery has revolution-ized how people think about the visible world. It is no exaggeration to say that in terms of technical methods applied to art, the recent developments in graphics are in the same league with the advances of the Italian Renaissance. It’s not a coincidence that many of the same phenomena that are now central to CG are the same things that fascinated the visionaries of that era. Optics, physical laws, geometry, and material properties have always been of interest to artists, and the underlying relationships between things in the world have always been the true raw materials from which art is created.
There’s another common point between art and science: the way that even the most astonishing new ideas and methods become accepted and even commonplace over time. The technical innovations of the Renaissance, once found only in the work of the most brilliant artists of the era, are now so accepted and accessible that perspective drawing is routinely taught as part of grade school art classes. Advances in the sciences, likewise, begin by being comprehensible only to a few brilliant minds, and wind up being taught to school children. Newtonian physics, one of the themes in this book, is a perfect example.
An analogous thing is happening now in the world of CG. For years, the tools and technologies for creating high-quality CG artwork have been expensive and inac-cessible to most people. Recently, however, this has begun to change rapidly, and
xv
■
INTRODUCTION
xvi
INTRODUCTION
■
Blender is a big part of the change. Now, students, hobbyists, freelancers, and studios alike have access to a powerful, extremely versatile 3D content-creation tool with no restrictions on using, distributing, or modifying it to suit their needs. Casual users can dip into Blender to see whether it suits their needs at no expense at all, and serious users can keep up with every upgrade, fix, and new feature patch even between official releases, all entirely for free.
It still requires effort, skill, and resources to create top-quality work, and it always will. However, the availability of a free resource such as Blender has begun to lead to a considerable increase in the number of people who can entertain the thought of creating CG artwork. One of the artists who created work for this book began creat-ing artwork in Blender at the age of 12. Few 12-year-olds can afford high-quality pro-prietary CG software.
To say that it’s an exciting time in the Blender world is an understatement. It’s hard to know where to begin when listing recent milestones. Releases have been com-ing frequently, with excitcom-ing new features becom-ing implemented at a steady clip. The
recently completed Peach project, the creation of the new open movie Big Buck Bunny
to follow 2007’s Elephants Dream, has pushed Blender forward once again. Blender is
the most widely installed 3D modeling and animation application in the world, and has been making steady inroads into the CG industry. The perennial need for documenta-tion and learning materials has also begun to be addressed, with a spate of
commer-cially released books and training material including the Blender Foundation’s Essential
Blender, an excellent series of tutorial DVDs, my own book Introducing Character Ani-mation with Blender,which has been translated into Spanish and Japanese, and several other books and videos in the works to cover various aspects of Blender’s functionality.
Who Should Read This Book
Ton Roosendaal, lead developer of Blender and chairman of the Blender Foundation, is fond of saying, “Blender is for Blender users!” Everything about Blender is designed with the goal in mind of enabling the most efficient workflow for experienced users who have put in the time and effort to learn the software. Likewise, this book is for Blender users. To the best of my knowledge, in fact, this book is the first Blender book
that is explicitly nottargeted at beginners. To get the most out of this book, you should
already know your way around the interface, and you should be reasonably well versed in the basics of modeling and animation in Blender. I won’t be telling you how to split desktop windows or extrude faces or keyframe Ipos in this book. Beginners should
start with the Blender Foundation’s Essential Blender and my own previous book,
Introducing Character Animation with Blender,both of which contain information that I will assume you know if you are reading this book.
xvii
■
INTRODUCTION
in sufficient detail that fairly casual users of Blender can follow along, but I highly recommend that those users save themselves some headaches by getting familiar with the basics of Blender before diving into this material.
What You Will Learn from This Book
This book is concerned with how to represent physical phenomena in Blender. As I did in Introducing Character Animation with Blender, I am casting the net wide in terms of what I cover here. Traditional physics simulations are covered, such as fluid simulation, soft body simulation, and rigid body Newtonian physics. In addition, the book covers such topics as the recently rewritten Blender particle system (including hair and fur), and the use of algorithms that simulate the growth of plants. Although the book’s main objective is to cover these sophisticated simulation features, in practice artists also need to know how to get similar and related effects quickly and with as little computational overhead as possible, so I’ve devoted one chapter to general-purpose methods that I think will be of use to anybody interested in the material in this book. I’ve made an effort to cover material that is not thoroughly and accessibly documented elsewhere.
How to Use This Book
For the most part, you can work through this book in whatever order you choose. Each chapter addresses a different area of Blender’s functionality and so can be read inde-pendently of the rest of the book. In some cases, reference is made to material covered previously, but in general this is not crucial to understanding the subject at hand. Chap-ter 4, “Hair Essentials: The Long and Short of Strand Particles,” is a bit of an excep-tion in that it assumes a basic familiarity with the subjects of the previous two chapters: the particle system in general and soft bodies. Even in this case, however, most interme-diate Blender users should have no trouble diving directly into the chapter.
Hardware and Software Considerations
Blender has a very small footprint and is exceedingly light to run, so in general, you should have no trouble running Blender on any current machine. Some graphics proces-sors are known to have trouble with OpenGL, which is a necessary graphical compo-nent of Blender. I have had problems with Blender graphics only on Windows Vista running on certain laptop PCs. Usually, these problems can be solved by updating your graphics drivers. Hopefully, after a few Windows service packs, these problems will diminish.
Although Blender itself is light and fast, the brutal truth is that some simulation methods can still be time- and memory-intensive. Although most Blender users will have hardware that can handle much of the simulation functionality, there are a few examples in this book that may try your patience or max out your RAM if you attempt them at high resolutions. Running some of these simulators will remind you of another
practical reason to use free software: It leaves more money to upgrade your hardware.
xviii
INTRODUCTION
■
simulation effect. In this book, I’ve made an effort to indicate where things might get resource intensive and to give suggestions for how to work around this and get what you want accomplished in the most efficient way possible.
As an intermediate or advanced Blender user, you are no doubt accustomed to upgrading from one version to another, but it bears repeating that Blender is a constantly evolving thing. Official releases come frequently, and for those interested in using devel-opment builds, new features become available even more quickly. To truly learn Blender is to become comfortable with the pace of development. Still, changes from one release to the next are incremental, and documentation usually has a fairly long shelf life. This book is written to be accurate to the 2.46 release, the official release of the Peach proj-ect. Much of the functionality described in this book is new or has been recently updated and will not change drastically in the near future. Most changes will likely be intuitive for anyone who learns the material in this book. For example, 2.50 may see the fluid bake system replaced by a system more in line with the caching functionality of the current particles and soft body systems. If you have worked through this book, you will find it straightforward to keep abreast with such developments.
I recommend that you study the material in this book with the Blender version on the accompanying CD, and refer to the official online release notes for the latest Blender version to find out where there might be updates. Release notes are available
for all versions on the official Blender website, at www.blender.org. If you are interested
in exploring new features, unofficial executable builds are available at www.graphicall.org.
Because installing multiple copies of Blender is no problem, you can always keep a stable version and an experimental version installed. However, be careful if you choose to do this. Stick with stable versions for important projects, and always be sure to back up your work and to test thoroughly if you plan to upgrade in the middle of a project.
How This Book Is Organized
Each chapter of this book deals with a specific topic related to physical simulation in Blender. The exception to this is the first chapter, which is a bit of a hodgepodge, cover-ing a variety of general-purpose methods, tricks, and tools. The material covered in each chapter is as follows:
Chapter 1, Re-creating the World: An Overview, introduces the themes that will come up throughout the book, and provides tutorials on a variety of useful fea-tures and techniques that have not been extensively covered in print. The chap-ter covers using the Wave, Displacement, and Array modifiers, working with node-based materials, and using animated textures in interesting ways. It also touches briefly on the use of PyDrivers. The goal of the chapter is to provide information about techniques that I think will be of interest to most readers of this book, but that are not covered elsewhere in print.
xix
■
INTRODUCTION
to shatter into bits with the Explode modifier, and how to simulate swarming behavior with boids.
Chapter 3, Getting Flexible with Soft Bodies and Cloth, shows you how to get the most out of Blender’s soft body simulation functionality and the new cloth simulation. You’ll look in detail at how soft body simulation operates on meshes, lattices, and curves, and how soft body objects and cloth interact with forces, deflection objects, each other, and themselves. Several common mistakes are pointed out, and related topics such as the popular Demolition Python script are also covered.
Chapter 4, Hair Essentials: The Long and Short of Strand Particles, builds on the previous two chapters to introduce strand particles for hair and fur. In this chapter, you’ll learn how to set up particle hair and create convincing hairstyles by using Blender’s powerful new styling tools. Portions of this chapter assume an understanding of soft bodies, and discuss using soft body simulations with hair. Some other uses of strand particles are also touched on.
Chapter 5, Making a Splash with Fluids, dives into Blender’s fluid simulation functionality. You’ll learn how to set up fluid domains and to control inflows and outflows, how to make fluids interact with other objects, and how to use fluid particles. The chapter also contains in-depth discussion about obtaining the level of quality you need for the effect you’re after, and how to think about the memory and time demands of your simulation.
Chapter 6, Bullet Physics and the Blender Game Engine, covers the basics of working with the Blender Game Engine, with a focus on using it to create rigid body physics simulations for use in your animations. You’ll learn how the Bullet Physics library works with rigid body objects, hinges, and forces. Using rigid body objects to control an armature ragdoll is also covered.
Chapter 7, Imitation of Life: Simulating Trees and Plants,is devoted to methods of simulating plants and foliage. This chapter takes a step outside Blender’s built-in functionality to introduce several useful scripts and external open source software that can be used to create convincing flora quickly and easily.
xx
INTRODUCTION
■
What’s on the CD
This book comes with an accompanying CD that includes Blender 2.46 installers for Windows and Macintosh and a source tarball for users of Linux and other flavors of
Unix. You will also find a variety of .blendfiles intended to support the text.
How to Contact the Author
If you run into trouble at any point in reading this book, or if you have any insights or tips you would like to share, the first place I recommend to turn for quick responses and
knowledgeable feedback is to the community itself at www.blenderartists.org/forum,
where I post regularly under the handle bugman_2000. You can also contact me directly
1
Re-creating the physical world with Blender
Using materials and textures
Faking physics with general-purpose tools
Re-creating the
World: An Overview
In this chapter, I introduce some of the main
themes that come up throughout the book, and
give a brief description of what you can expect
in later chapters. Then I move on to some
important general-purpose tools in Blender that
can be of great use in modeling and animating
certain physical phenomena. Some of the
fea-tures covered here, such as node-based
materi-als, are things you will use in conjunction with
advanced physical simulations. Other features
will come in handy when full-fledged physical
simulations would be unnecessary or
inappro-priate. Some of the techniques I describe here
use common tools such as textures and
2
Re-creating the Physical World with Blender
If you’re reading this book, you probably already know that Blender is a powerful tool for creating 3D imagery and animation. You probably also know that it can be difficult to find good documentation on a lot of Blender’s advanced functionality. There is of course the official Blender wiki, which is an invaluable resource, and numerous excel-lent online tutorials. Nevertheless, getting good, thorough information about many of these features can be a challenge. Unfortunately, this means that many of Blender’s most exciting features tend to be underused; artists want to create, not spend their time searching for tutorials and documentation.
I’d like to change that with this book, by giving a complete introduction to Blender’s intermediate to advanced functionality. I hope that this book will help artists become familiar enough with this functionality to comfortably incorporate these
fea-tures into their creative workflow. Unlike in my previous book, Introducing Character
Animation with Blender (Sybex, 2007), which has readers model, rig, and animate a character over the course of the book, there’s no single, overarching goal here. This book, like the physical world it aims to simulate, is a bit of a hodgepodge. Each chap-ter addresses a specific aspect of Blender’s functionality. There’s not much dependence between chapters, so you don’t need to read the chapters in strict order. Regardless of the order you choose to approach it in, I hope that this book helps unlock some of the mysteries of Blender’s advanced functionality and gives Blender artists some powerful new tools to create their worlds.
Blender’s Physical Simulation Functionality
Blender has a variety of tools for simulating physical phenomena. For Blender users who have not yet had the opportunity to study these tools closely, some of them can be a bit confusing. Not all the effects discussed in this book are located in the same place in Blender, and not all are activated in the same way. Getting them to interact in the ways you want them to requires a certain degree of understanding what’s going on. In particular, this book is geared toward animators who want to incorporate physics simu-lations into actual animated scenes. This is not at all difficult to do, but it may some-times require stepping out of your comfort zone. For example, although the Blender game engine and its integrated Bullet physics engine is widely used by Blender game creators, that area of Blender’s functionality remains unexplored by many animators. One of the things you will learn in this book is how to access the various physics-related tools in Blender and put them to work to create the animations you are after.
3
■
RE-CREA
TING THE PHYSICAL WORLD WITH BLENDER
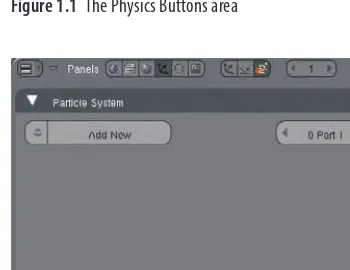
Figure 1.1The Physics Buttons area
Figure 1.2The Particles Buttons area
4
The simulation features available in the Physics Buttons area are the following:
Particles Particles are used to simulate very small real-world objects whose collective behavior can be calculated by the simulator. Particles are often used to simulate smoke and fire, by assigning translucent halo materials to each particle. Particles can also be used to simulate swarm behavior—for example, in the case of insects—and Blender 3D objects can be treated as constituents of a particle system by use of the Duplivert tool. Parameters relating to the speed, direction, life span, and other traits of particles can be set. Using “static” particles, the trajectory of each particle from the emitter is also mod-eled in the 3D space, to simulate strandlike real-world objects such as hair. Numerous options exist for controlling the behavior and appearance of static particles. In this book, both ordinary and static particles are covered.
Soft Body This simulates the behavior of materials that are flexible, and are visibly deformed by the forces acting on them, such as friction, gravity, and others. In Blender, soft bodies’ vertices can move relative to each other, but their underlying structure does not change. Depending on settings, soft body simulation may be appropriate for model-ing rubber, gelatin, sheet metal, cloth, and other materials. As you will see in Chapter 4, soft bodies can also be used with static particles to control hair, which also exhibits soft body behavior.
Fields and Deflection These settings are pertinent to both particles and to soft body simulation. Fields are options for external forces that can be made to act on other objects that have soft body properties or particle systems active. Among the fields available are curve guide fields, wind, vortex, and spherical fields. Each of these field options is dis-cussed throughout the course of this book.
Fluid Simulation The Fluid Simulation panel contains settings pertinent to fluid simula-tion, and any objects that will play a roll in the fluid simulasimula-tion, including any obstacles, inflow or outflow objects, and the object that acts as the domain for the simulation and marks off the spatial area in which the simulation will take place.
These features are all in some way connected to the internal structure of objects. In soft body simulation, the mesh structure is affected; in fluid simulation completely new meshes are constructed on the fly; and in particle simulation mesh structure is bypassed entirely in favor of a different approach to calculating the location and rela-tionship between points.
For forces that operate on objects and enable rigid bodies to interact as they would in nature, with mass, gravity, friction, and collisions accurately modeled, it is necessary to use the Bullet physics engine, a component of Blender’s game engine.
5
■
RE-CREA
TING THE PHYSICAL WORLD WITH BLENDER
overview of all of Blender’s physical simulation functionality. To take advantage of Blender’s rigid body physics capabilities, it is necessary to do some work in the game engine environment. Because this book is written primarily with animators in mind, I don’t assume that you have experience with that, and include a brief overview of how to get what you need out of the game engine.
The Science of Simulation
The main objective of this book is to give CG animators a complete understanding of the various physical simulation tools available in Blender, to enable them to realize their creative ideas. For this reason, the book is “artist-oriented” and is intended to be only as technical as is necessary for artists to understand what is possible and how to achieve it with the available tools. Nevertheless, Blender being an open source project as it is, there is another audience I would like to reach with this book, and that is the audience of technically-oriented readers who may be inspired to take an interest in the area of physics-based animation research or, if already engaged in such research, may be motivated to use Blender in their work or to contribute to Blender’s code base. For those people, I hope that this book can serve as a way to become quickly familiar with the Blender approach to physical simulation, and as a demonstration of what Blender is capable of at present. People who are aware of recent developments in physical simula-tion will quickly identify numerous areas in which Blender could be extended and improved.
Physical simulation for 3D animation is an active field of research. Although it is a subfield of general physics simulation, the requirements and objectives of 3D anima-tion are different from those for other kinds of physics simulaanima-tion. Simulaanima-tions used for engineering purposes, for example, must be able to compute real-world effects of physi-cal situations with great accuracy, and they don’t have to be especially fast. When plan-ners of a skyscraper use fluid simulations to evaluate how the structure will hold up to wind, it is worth a considerable amount of time and money to ensure that the results in terms of forces and stress are as physically accurate as possible down to very small details, and at the same time the visual aspect of this simulation is likely not to be of interest at all. An example of a powerful open source package for computing these kinds of simulations is the OpenFOAM tools from OpenCFD. On the other hand, simulations for animation must be visually convincing, and computationally efficient enough to be carried out in a reasonable time frame on an appropriate budget, whereas very little depends on precise accuracy.
As Kenny Erleben and his coauthors amusingly observe in Physics-Based
Anima-tion, another difference is that the “artists and creative people” who use these
6
of a human would not allow this. In the area of physical simulation for CG animation, the line between flexibility and robustness on the one hand and verisimilitude on the other is a key consideration. As in other areas of Blender, very high levels of accuracy are not the objective. In the same way that Blender’s modeling functionality is not ori-ented toward advanced computer-assisted design (CAD) work, the approaches taken to physical simulations are intended to be useful to artists, not aeronautics engineers. Not to say that CG animators are not rocket scientists, but indeed, their needs in terms of fluid dynamics simulations are quite distinct!
If you’re interested in the technical underpinnings of the physical simulations described in this book, a good place to start reading more is the home page for the
Bullet Physics Library, at www.bulletphysics.com. In the forum area of that website
you’ll find a special area dedicated to links, research papers, libraries, demos, and dis-cussions of Bullet and other physics software. For technically inclined readers, the
previously mentioned book, Physics-Based Animationby Kenny Erleben, Jon Sporring,
Knud Henriksen, and Henrik Dohlmann (Charles River Media, 2005), provides an excellent overview of many of the main methodologies used in physics simulation for CG. The book goes into considerable detail about kinematics, interaction of multiple rigid bodies, soft body and fluid simulations, and collision detection, among other subjects.
Nonsimulation Tools and Techniques
As you’ll see throughout this book, there are cases when physical simulation can be demanding in terms of time and computing resources, and cases when the results are not exactly what you have in mind for your effect. For these reasons, it is important to have a solid understanding of your other options for creating physical effects. Even without dipping into sophisticated simulation methods, you’ll find that there is an awful lot in the toolbox of Blender’s standard features. A good understanding of mate-rials, textures, and modifiers will enable you to think creatively and to approach each simulation challenge with freedom and flexibility. The remainder of this chapter is a tour of tools and techniques that have not been covered in much depth in print in the past. None of the techniques touched on in this chapter are crucial to understanding the rest of this book, but I think that people who want to get the most out of Blender will find them well worth checking out.
Using Materials and Textures
7
■
USING MA
TERIALS AND TEXTURES
textures that can be used to create stunning effects such as the mountain in Figure 1.4. Because this book is for intermediate to advanced users of Blender, it’s assumed that you know the basics of using materials and textures, but there are a few techniques and functions that are either relatively new in Blender, or else are specific enough in use to be worth describing here in detail.
Figure 1.4Mount Reckon by Robert J.Tiess is an excellent example of the potential of Blender’s procedural textures.
Hot Lava with Material Nodes
The nodes system greatly increases Blender’s power and flexibility in creating materials. By using nodes, it is possible to mix materials with different qualities in a wide variety of ways. In this example, I demonstrate how to use the system to combine two materi-als to achieve a simple but effective lava effect.
8
is the flowing, molten part of the lava, which is liquid and glows from heat, and there is the portion of the lava that has been exposed to cold air and hardened, which is a dark-colored rocky crust. In Blender, it is possible to create these two materials separately and then combine them by using nodes. To create this material, follow these steps:
1. Delete the default cube and add a UV sphere with default values (32 segments,
32 rings, radius 1). Set it to have an active material called Material.
2. Select Nodes in the Links And Pipeline tab of Material, as shown in Figure 1.5.
This makes Material a node material. If you are not used to working with node materials, it is easy to get confused, so it helps to keep track of which materials need to be node materials and which materials do not need to be. In most cases, materials that you use as inputs into node materials should not be node materi-als themselves. You can always tell which materimateri-als are node based and which
are the basic kind in the material list, because each node material has an Nbefore
its name. Open a nodes window now and you will see the setup in Figure 1.6. What you’re looking at are two nodes: an Input material node and an Output node. The Output node represents the final appearance that Material will take on. At present, the Input node is not linked to any material, as indicated by the red Add New button. Click Add New to create a new material node. The node’s header bar will now read MatNode.
Figure 1.5Activating Nodes on Material
3. Add a second material node to the node setup. Do this by pressing the spacebar
while in the Nodes Editor window and choosing Add >Input >Material, and
then selecting Add New from the highlighted drop-down list on the node. The new node will be connected to the previous node by default. Hold the left mouse button (LMB) and drag your mouse across this connection to sever it,
as shown in Figure 1.7. Rename MatNode and MatNode.001 to Rockand
Magma, respectively, and rename the main node material from Material
9
■
USING MA
TERIALS AND TEXTURES
Figure 1.6Nodes window
Figure 1.7Two new input materials
4. Select the Rock material node and set its material values by using the Material
10
CHAPTER
1
: R
E
-CREA
TING
THE
W
ORLD
: A
N
O
VER
VIEW
■
Figure 1.8 Material settings for Rock
11
■
USING MA
TERIALS AND TEXTURES
Figure 1.10 Material settings for Magma
5. You now have the two basic materials completed in your node setup. What
remains is to mix them. To do this, add a Mix node by pressing the spacebar
while in the Nodes Editor and choosing Add >Color >Mix. Create connections
between nodes by LMB-dragging your mouse from one node’s socket to another socket. To mix the two materials, draw a connection between Rock and the Color1 socket on the Mix node, and a connection between Magma and the Color2 socket. Draw a connection between the Color sockets on the Mix node and the Output node, as shown in Figure 1.11. As you can see, the output mate-rial is now a mixture of the two input matemate-rials. The mix factor of the Mix node is 0.50, which means that the two materials are mixed at a uniform level of 50/50 across the entire object. It is necessary to input a mix factor that will give a more-appropriate mix effect.
6. Add a new Input node in the same way you did for the previous two material
nodes, except this time select Texture instead of Material for the node type. In the drop-down menu on the node, select Add New to create a new texture, and
name the texture Mix. Make this texture a hard Clouds texture with the values
12
CHAPTER
1
: R
E
-CREA
TING
THE
W
ORLD
: A
N
O
VER
VIEW
■
Figure 1.11 Mixing the materials
Figure 1.12 A hard Clouds texture for Mix
7. Add an RGB Curves node by pressing the spacebar and choosing Add >Color >
13
■
USING MA
TERIALS AND TEXTURES
mix pattern that looks best. To get the correct black-and-white pattern, reverse the direction of the RGB curve so that it goes from upper left to lower right, and then edit the shape of the curve itself. The more gentle the curve, the smoother the transition between the two materials will be. Points can be added on the curve simply by clicking the LMB, and deleted by clicking the button on the node itself
marked with an x.
8. Finally, add a Displace modifier to the object with the settings shown in
Fig-ure 1.14. Type Mixin the Texture field to use the texture you just created to
determine the displacement. After you’ve done this, set up your lights and take a render. The finished material should look something like Figure 1.15.
If you have trouble getting the object lit the way you see it here, check the file lava.blend on the CD for the book to see how I’ve done the lighting.
Figure 1.13 Finished node setup for lava
14
As you can see, being able to mix different materials and textures in this way is a powerful way to create complex materials that more faithfully represent the complex-ity of nature.
Transparency and Subsurface Scattering
In Blender, there are three kinds of transparency: Z transparency, ray transparency, and the environment (Env) material setting. In fact, only the first two are true transparencies in terms of the Blender 3D environment. The Env setting creates an area of alpha 0 transparency in the rendered image itself and is used primarily for compositing. In Fig-ure 1.16, you can see an example of the three types of transparency together. The knight piece on the left has the Env option selected, as shown in Figure 1.17, and the area defined by its outline is alpha 0, with the world background visible in the render. This material does not have any transparency option selected, and its true material alpha value is 1. The Env option is not gradated in any way; if it’s on, the object and every-thing behind it will be cut out of the final render. Note that every-things that are in front of the object are not cut out, such as the middle horse’s nose in the image. This option is useful for compositing.
15
■
USING MA
TERIALS AND TEXTURES
Figure 1.16The knight piece on the left has the material setting Env selected.The piece in the middle has ZTransp selected, and the one on the right has RayTransp selected.
Figure 1.17The Env option
16
CHAPTER
1
: R
E
-CREA
TING
THE
W
ORLD
: A
N
O
VER
VIEW
■
Figure 1.18 Z transparency values
To represent a material’s IOR, it is necessary to use ray tracing to follow the path of the light. Using ray tracing will make render times longer, but in cases like these it is necessary. The Depth value on the Ray Transp panel is set at 2 by default. This means that the ray calculation will pass through two surfaces. If there are more than two transparent surfaces for the light to pass through, the subsequent surfaces will appear black. To calculate ray information passing through more surfaces than this, you must raise the Depth value. Again, this will increase render times, so it should be done only when necessary.
Transparent Shadows
Ray shadows cast by transparent objects are transparent. However, in order for them to appear as they should, the material on which they are cast needs to be set to take
Figure 1.19
17
■
USING MA
TERIALS AND TEXTURES
transparent shadows. This setting is found on the shaders tab, as shown in Figure 1.20. You can see how this affects the shadow that falls on the checkerboard material in Fig-ure 1.21.
Figure 1.20TraShadow option for receiving transparent shadows
18
If you want to avoid ray tracing, transparent shadows can also be produced by using a spotlight with the Irregular shadow buffer type and setting a <1 value for Shad A in the shadowing object’s Material tab. In upcoming versions of Blender, the new Deep Shadow Maps functionality coded by Joe Eagar as part of the Google Summer of Code will offer significant speed and quality benefits, as well as transparence, to non-raytraced shadows.
Subsurface Scattering
When light strikes an object, it can be reflected in a variety of ways. Mostly, the way it reflects depends on qualities of the surface of the object. In Blender, the diffuse and specular shader settings determine how a material reflects light (other settings, such as ray mirroring, may also play a part). With some materials, however, calculating how light behaves on the surface only is not enough. For materials such as wax, skin, most vegetation, jade, milk, and many others, a very small amount of surface translucency influences the way light reflects. Although most of the light reflects back from the sur-face, some of the light penetrates the surface of the material and is reflected back through the material in a scattered state, diffusing some of the light. Although this effect is subtle, it is present on many of the things that humans are best at recognizing, such as food, animals, and other people. For this reason, a lack of subsurface scattering can be a dead giveaway that an image is CG. When used well, it can enable you to achieve extremely realistic organic materials, as in Enrico Cerica’s image in Figure 1.22.
Figure 1.22 Enrico Cerice used subsurface scattering to achieve photorealism in this image.
19
■
USING MA
TERIALS AND TEXTURES
up the presets was eager to get to lunch!) You can select one of these and then modify the values to create a Custom setup.
The settings for subsurface scattering are as follows:
Scale indicates the scale of the objects that the material is applied to. It is used to cal-culate the size of the blurring radius for the material. To calcal-culate the scale you should use, divide 1 by the number of millimeters you want a single Blender unit (BU) to rep-resent. If you want a Blender unit (BU) to represent a meter, the Scale value should be 1/1000 = 0.001. If you want a BU t to represent 2 centimeters, the scale is 1/20 = 0.05. If a BU is a millimeter, the scale is 1.0. It is important to pay attention to this, because correct scale is the most important factor in getting your materials with SSS to look realistic.
Radius R, G, and B are the blurring radii for Red, Green, and Blue. These values determine the distance that different colored light scatters under the surface of the material. If you’ve ever shone a flashlight through your hand in the dark, you have seen that the red in your hand scatters more than the other colors.
IOR is the index of refraction, or the degree to which light is bent when it travels
through the material. As mentioned in the previous section, higher IOR values indicate higher density. In the case of subsurface scattering, the effect is subtle, because no actual rays pass through the material. In most cases, you can get away with setting the IOR to approximately the value of water, 1.3.
Error controls the precision of sampling. Higher error values will speed up rendering but can result in visible artifacts. You can set it as low as 0.02.
Col determines how much the base color of the material is affected by the diffuse color
set in the color picker above the Col field.
Tex controls the degree to which textures on the material are also blurred. 0 will leave
the textures unaffected by the scattering.
Front is the weighting factor for front scattering. Front here means pointing toward the camera. Front scattering shows as diffusing of the light and blurring of shadows on the surface of the material.
Back is the weighting factor for back scattering. Back scattering shows up as light
pass-ing through from behind the material.
20
Figure 1.24 shows three objects with materials that differ only in their subsur-face scattering. The knight on the left has no SSS, the knight in the middle has strong front SSS with weaker back SSS, and the knight on the right has strong back SSS with weak front SSS. Of course, for more-convincing materials, you would also want to adjust the shader values appropriately; wax has a different specularity from jade. This example is mainly to highlight the differences in the subsurface scattering effect itself.
Figure 1.24 Three materials: no SSS, strong front SSS, strong back SSS
The algorithm used in Blender for subsurface scattering was originally presented at SIGGRAPH ’02 in the paper “A Rapid Hierarchical Rendering Technique for Translu-cent Materials” by Henrik Jensen and Juan Buhler. You can find the original paper at
http://graphics.ucsd.edu/~henrik/papers/fast_bssrdf.
Sky Maps
If you want to make outdoor scenes, you need to create a sky background. There are a variety of ways to go about modeling clouds and other features of skies. Mostly, though, it is enough for the sky to be a background, and in this case the simplest and most common approach to making skies is to use an image texture called a sky map. I won’t discuss how to make sky maps here. You can make them by taking photographs, or by using sky and landscape creation software such as Terragen. Blender user M@dcow
has created a fantastic repository of free sky maps at http://blenderartists.org/forum/
showthread.php?t=24038that you can use in any way you like. The sky maps used in the various examples in this book were taken from that resource.
The two sky maps shown in Figure 1.25 are included on the CD accompanying
21
■
USING MA
TERIALS AND TEXTURES
sky maps can come in several forms, which require different mapping methods to accu-rately fit into a scene. The rectangular sky map shown in the figure is intended to be mapped onto the top half of a sphere. Angular maps appear as highly distorted sphere-shaped reflections, and represent the entire visible background in all directions.
Figure 1.25A sphere map and an angular map
22
Note that in the case of the Sphere mapped image, only the top half of the back-ground space is mapped with the image. The remainder is the default blue. The spheri-cal mapping describes a hemisphere extending from the horizon to the zenith in the 3D space. Because this map is all sky, it is assumed to end at the horizon. If you use this mapping, you must set up your world to include or conceal the horizon, just as in real life. If you want to have the horizon in view, it may be better to map the sky image onto a mesh dome or tube, so that you have more control over where the horizon is in the camera view. It is also possible to turn the camera’s clipping value up very high and extend a plane so that it nearly meets the horizon, and then to match the gap of back-ground color to the color of the plane. The AngMap option is necessary if you want the entire background, ground and all, to be included in the sky map. For example, if you are animating an airplane dogfight, you want your camera to be able to move freely and have an accurately mapped image background visible from any angle. It should be noted that the motion of the “ground” part of the image will not necessarily match up with the motion of real 3D objects on the ground if the camera is moving, making them appear to slide across the terrain, so this is most useful as a backdrop for flying objects. As with everything, remember that different shots may have different setup requirements.
23
■
F
AKING PHYSICS WITH GENERAL TOOLS
Figure 1.27World buttons for an AngMap sky map
Figure 1.28World buttons for a sphere sky map
Faking Physics with General Tools
24
The artist who created Haikuand Mount Reckon, Robert J Tiess has been a Blender user since he discovered the software in 2003, and has gained a reputation in the Blender community for his stunning, thought-provoking images. His lush, richly textured character illustrations were featured in Introducing Character Animation with Blender.His
work covers a wide variety of styles, and he is con-stantly exploring new ways to use Blender to the fullest in expressing his own artistic vision. His enthusiasm for Blender comes through clearly in his comments about the software and its community. He writes,“Blender’s thriving community, amazing artists, gifted and generous coders, supporters, forum moderators, and documentation writers, all make it so much less a piece of a software and far more of a generally positive and empowering phe-nomenon that is truly global in scope and as uni-versal in appeal, adaptability, and usability as it gets in the technology world.”
Modeling Bodies of Water by Using Modifiers and Textures
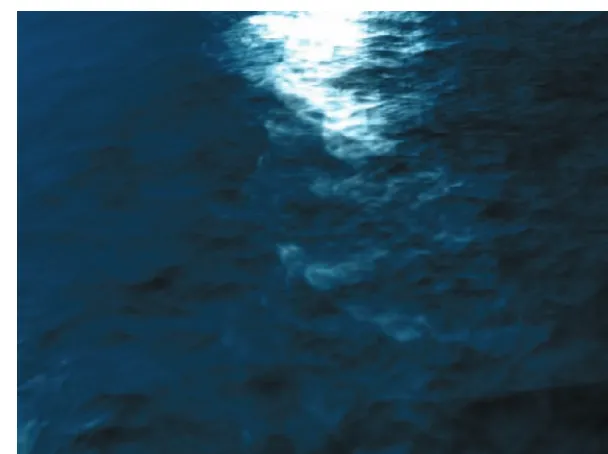
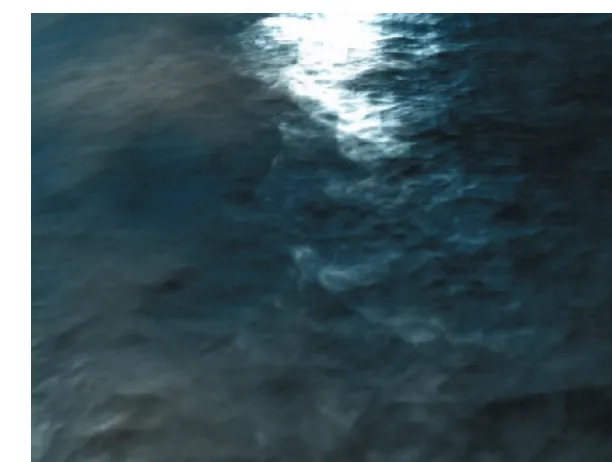
In Chapter 5, “Making a Splash with Fluids,” you’ll see how to work with the Blender fluid simulator. It is a common misconception that this is the best way to represent water and liquids, and in many cases this is not the most direct way to get the effect you want. Other methods for creating fluid effects include displacement textures, as used in Figure 1.29 to excellent effect.
In this section, I show you an approach for representing the behavior of large bodies of water in a way that animates convincingly. I also show a simple way to make the surface of the water interact with an object floating in the water. The meth-ods I present here draw on several methmeth-ods described in Colin Litster’s excellent ocean
tutorials, which you can find at his web page, at www.cogfilms.com. The method I
present here is somewhat simplified, but it will give you a good sense of the main ideas of the approach. I highly recommend a visit to Colin’s website to see the rest of his tutorials.
To create this effect, follow these steps:
1. Delete the default cube and add a plane in the top view (NUM7). Scale the plane
25
■
F
AKING PHYSICS WITH GENERAL TOOLS
Figure 1.29Haiku by Robert J.Tiess uses displacement textures to model the wave pattern on the surface of water.
26
2. Give the plane a material, as in Figure 1.31. Choose a base color for the water
similar to the one shown, and increase the specularity slightly from the default. Set up your lights and camera along the lines shown in Figure 1.32. The camera view should be filled by the water surface. I have one lamp placed off to the left of the camera and one placed over the far corner of the plane in front of the camera. Place your lamps in similar positions. Turn off shadows for the lamps.
3. With the plane selected, add two Wave modifiers, with the settings shown in
Figure 1.33. The first wave will move along the Y axis, from one edge of the plane to the other. The other wave will move along the Z normal of the plane, creating a swelling effect. Using the two Wave modifiers together will help make the motion less obviously regular. Note that each modifier can be set to display in render, 3D, and edit mode view. For now set the modifiers to display in ren-der and 3D views. Throughout the tutorial, I’ve switched the 3D view display on and off. Also, add a Subsurf modifier with the settings of Levels: 2, Render Lev-els: 3. Make sure that the Subsurf modifier is at the bottom of the modifier stack. The Wave modifiers should be acting on the subsurfaced mesh, not the other way around. I’ve set the start time for the waves at –200, so that the waves will be in full effect by frame 1.
Figure 1.31 A base material for the water
27
■
F
AKING PHYSICS WITH GENERAL TOOLS
4. Everything else to be done for the ocean surface effect from here on involves
adding textures and texture effects. First, add an Empty object at the center of the plane. Snap the cursor to the plane by pressing Shift+S and selecting Cursor
To Selected. Add the empty by pressing the spacebar and choosing Add >Empty,
and then press Alt+R to clear the rotation of the empty (this is not necessary if you add the empty in top view). Create the first texture for your ocean surface material and map it by using the Empty object. Make the texture a soft noise
Clouds texture with settings as in Figure 1.34 and name it Displacement. Map it
to Nor and Disp with the values shown in Figure 1.35, and set the Disp value in the texture to 0.3. This will add one more level of displacement waves to make the movement of the surface even more uneven. Scale the Empty up a factor of 3 by pressing the S key and 3. Run a test render and make sure your surface looks something like Figure 1.36. If not, back up a bit and figure out where yours is different.
Figure 1.33
28
CHAPTER
1
: R
E
-CREA
TING
THE
W
ORLD
: A
N
O
VER
VIEW
■
Figure 1.34 Displacement texture
29
■
F
AKING PHYSICS WITH GENERAL TOOLS
Figure 1.36 Test render
5. These texture-based waves will be animated by keying the movement of the empty.
Key two points for the empty and set the empty’s Ipos as shown in Figure 1.37.
Select the curves, and choose Curve >Extend Mode >Extrapolation in the header
menu to make steady slopes. The empty should move along X and Y axes only, and be sure to keep the slopes gradual so that the empty doesn’t move too fast.
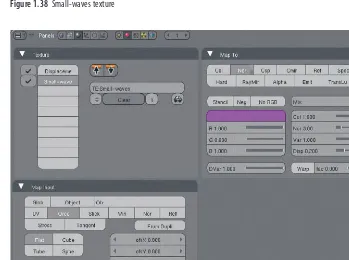
6. Make a texture to represent the small wavelets on the surface of the water, and call
it Small-waves. This texture will be a hard noise texture, as shown in Figure 1.38. The mapping values for the texture are shown in Figure 1.39. Note that Size is set to 10.0 for all dimensions, to make these wavelets small. The Map To value is Nor. Change the Nor value in the Map To panel to 3.0. When you take a test render, you should see something like Figure 1.40. Once again, the placement of the lights will make a lot of difference in exactly how your render turns out. Experiment a bit with this.
If you find yourself having difficulty getting things to look as I have them, study
the lighting setup in the corresponding file ocean.blendon the CD.
30
CHAPTER
1
: R
E
-CREA
TING
THE
W
ORLD
: A
N
O
VER
VIEW
■
Figure 1.38 Small-waves texture
31
■
F
AKING PHYSICS WITH GENERAL TOOLS
Figure 1.40 Test render
7. For the foam on the waves, use the same texture as you used for the displacement.
Do this by selecting channel 0 (the top channel) and pressing the Copy To Clip-board button (the left-hand button of the two highlighted buttons in Figure 1.41). Then select channel 5 (the sixth one down, as shown in the figure) and press the Copy From Clipboard button. Map this texture to color, and make sure the R, G, and B values are turned to white. A test render yields something like Figure 1.42.
32
8. Following the same procedure as step 7, copy the Displacement texture from
channel 5 to channel 6. With channel 6 selected, go into the texture buttons. This time, you will create a separate texture by pressing the 3 highlighted in Figure 1.43 to make this texture a single- user texture. The 3 represents the number of “users” of the texture, which in this case means the number of channels that the texture is associated with. Clicking this button separates the texture you are working with from the texture associated with the other channels, creating a new, identi-cal texture. You can edit this texture now without affecting the other channels.
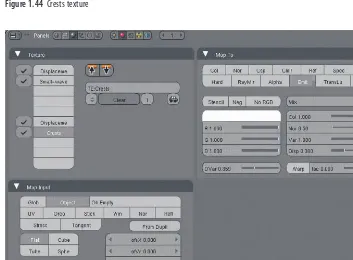
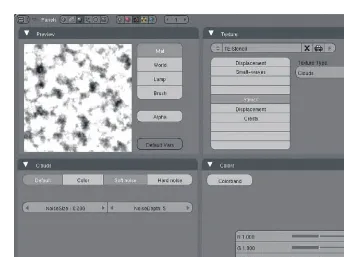
Rename this texture Crestsand adjust the brightness, contrast, and colorband as
shown in Figure 1.44. Map this with the Empty object also, but select Emit as the Map To value. Set DVar to about 0.359, as shown in Figure 1.45. This tex-ture channel will give a faked translucency to higher points of the textex-tured dis-placement.
Figure 1.43
33
■
F
AKING PHYSICS WITH GENERAL TOOLS
Figure 1.44Crests texture
34
CHAPTER
1
: R
E
-CREA
TING
THE
W
ORLD
: A
N
O
VER
VIEW
■
9. Select channel 4 in the Texture tab of the Material buttons and click Add New
to add a new texture. Name this texture Stenciland set its values as shown in
Figure 1.46. Select Stencil in the Map To tab. This will prevent the foam and crest textures from matching the displacement too perfectly. A test render should look like Figure 1.47.
Figure 1.46 Stencil texture
35
■
F
AKING PHYSICS WITH GENERAL TOOLS
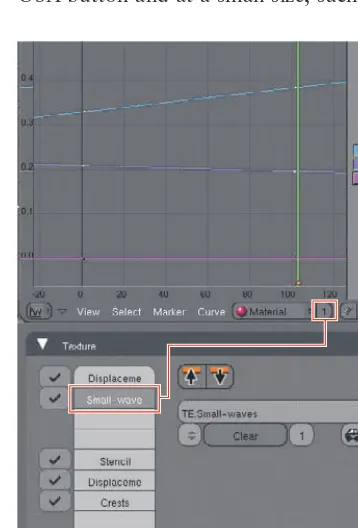
10. Key the movement for the small waves as shown in Figure 1.48. Note that this is
a Material Ipo and that the index of the Ipo to the right of the drop-down must match the channel of the texture, counting from top to bottom and beginning at 0. The second channel down, therefore, is channel 1. This wraps up the water itself. If you like, render out a few seconds of animation to see how the move-ment looks. You might want to do this without oversampling by deselecting the OSA button and at a small size, such as 25 percent, to make it quicker.
Figure 1.48 Keying the offset for channel 1
11. When you’re satisfied with the water, set the modifiers on the plane not to
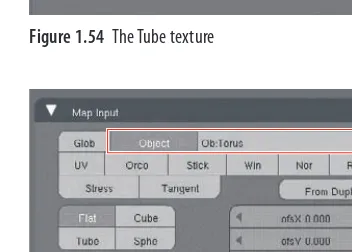
dis-play in the 3D view mode, as shown in Figure 1.49, so that the plane appears perfectly flat. Snap the cursor to the plane again, go into top view, and add a
torus by pressing spacebar and choosing Add >Mesh >Torus. The default
set-tings and size are just fine as they are. Add a white and a red material to the object, as shown in Figure 1.50, to make a simple life ring.
36
CHAPTER
1
: R
E
-CREA
TING
THE
W
ORLD
: A
N
O
VER
VIEW
■
Figure 1.50 A life ring
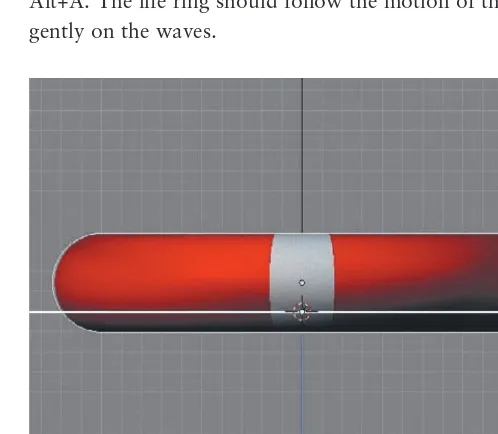
12. In Object mode, move the torus up slightly, as shown in Figure 1.51. With the
torus selected, Shift-select the plane and enter Edit mode with Tab. Select three vertices in the plane in places that correspond to points on the ring, as shown in Figure 1.52. Press Ctrl+P to make the vertex parent. Set the modifiers on the plane to display in the 3D view again and preview the animation by pressing Alt+A. The life ring should follow the motion of the displaced surface, floating gently on the waves.