THE EXPERT’S VOICE
®IN ORACLE
Linux
Recipes
for
Oracle DBAs
Darl Kuhn, Charles Kim,
and
Bernard Lopuz
Linux Recipes for
Oracle DBAs
■ ■ ■
Linux Recipes for Oracle DBAs
Copyright © 2009 by Darl Kuhn, Charles Kim, Bernard Lopuz
All rights reserved. No part of this work may be reproduced or transmitted in any form or by any means, electronic or mechanical, including photocopying, recording, or by any information storage or retrieval system, without the prior written permission of the copyright owner and the publisher.
ISBN-13 (pbk): 978-1-4302-1575-2
ISBN-13 (electronic): 978-1-4302-1576-9
Printed and bound in the United States of America 9 8 7 6 5 4 3 2 1
Trademarked names may appear in this book. Rather than use a trademark symbol with every occurrence of a trademarked name, we use the names only in an editorial fashion and to the benefit of the trademark owner, with no intention of infringement of the trademark.
Lead Editor: Jonathan Gennick
Technical Reviewers: Bernard Lopuz, Charles Kim
Editorial Board: Clay Andres, Steve Anglin, Mark Beckner, Ewan Buckingham, Tony Campbell,
Gary Cornell, Jonathan Gennick, Michelle Lowman, Matthew Moodie, Jeffrey Pepper, Frank Pohlmann, Ben Renow-Clarke, Dominic Shakeshaft, Matt Wade, Tom Welsh
Project Manager: Kylie Johnston Copy Editor: Kim Wimpsett
Associate Production Director: Kari Brooks-Copony Production Editor: Elizabeth Berry
Compositor: Susan Glinert Stevens Proofreader: Nancy Sixsmith Indexer: Carol Burbo Artist: April Milne
Cover Designer: Kurt Krames
Manufacturing Director: Tom Debolski
Distributed to the book trade worldwide by Springer-Verlag New York, Inc., 233 Spring Street, 6th Floor, New York, NY 10013. Phone 1-800-SPRINGER, fax 201-348-4505, e-mail [email protected], or visit http://www.springeronline.com.
For information on translations, please contact Apress directly at 2855 Telegraph Avenue, Suite 600, Berkeley, CA 94705. Phone 510-549-5930, fax 510-549-5939, e-mail [email protected], or visit http:// www.apress.com.
Apress and friends of ED books may be purchased in bulk for academic, corporate, or promotional use. eBook versions and licenses are also available for most titles. For more information, reference our Special Bulk Sales–eBook Licensing web page at http://www.apress.com/info/bulksales.
The information in this book is distributed on an “as is” basis, without warranty. Although every precaution has been taken in the preparation of this work, neither the author(s) nor Apress shall have any liability to any person or entity with respect to any loss or damage caused or alleged to be caused directly or indirectly by the information contained in this work.
To Heidi, Brandi, and Lisa, who put up with the long hours. Also to Paul and Deni, for teaching me the value of hard work.
—Darl Kuhn
I dedicate this book to my precious wife, Melissa, and our three boys, Isaiah, Jeremiah, and Noah, for their support during the project and sacrifice of precious family time. Thank you
for your unceasing prayers and encouragement. —Charles Kim
Contents at a Glance
About the Authors
. . . xviiAcknowledgments
. . . xixIntroduction
. . . xxiii■
CHAPTER 1
Getting Started
. . . 1■
CHAPTER 2
Working in the Shell
. . . 21■
CHAPTER 3
Managing Processes and Users
. . . 49■
CHAPTER 4
Creating and Editing Files
. . . 67■
CHAPTER 5
Managing Files and Directories
. . . 83■
CHAPTER 6
Archiving and Compressing Files
. . . 127■
CHAPTER 7
Shell Scripting
. . . 147■
CHAPTER 8
Analyzing Server Performance
. . . 183■
CHAPTER 9
Viewing and Configuring System Resources
. . . 213■
CHAPTER 10
Managing Server Software
. . . 239■
CHAPTER 11
Automating Jobs
. . . 279■
CHAPTER 12
Implementing Automatic Storage Management on Linux
. . . 305■
CHAPTER 13
Implementing Real Application Clusters on Linux
. . . 351■
CHAPTER 14
Working Securely Across a Network
. . . 395■
CHAPTER 15
Managing X Window
. . . 415■
CHAPTER 16
Managing Remote Servers with VNC
. . . 433■
APPENDIX A
RAID Concepts
. . . 457■
APPENDIX B
Server Log Files
. . . 473Contents
About the Authors
. . . xviiAcknowledgments
. . . xixIntroduction
. . . xxiii■
CHAPTER 1
Getting Started
. . . 11-1. Connecting Securely to a Remote Server
. . . 21-2. Logging On Remotely via the Command Line
. . . 61-3. Logging Off the Server
. . . 81-4. Running a Command
. . . 91-5. Getting Help
. . . 111-6. Correcting Command-Line Mistakes
. . . 171-7. Clearing the Screen
. . . 181-8. Resetting the Screen
. . . 19■
CHAPTER 2
Working in the Shell
. . . 212-1. Running Previously Entered Commands
. . . 222-2. Automatically Completing Long Commands
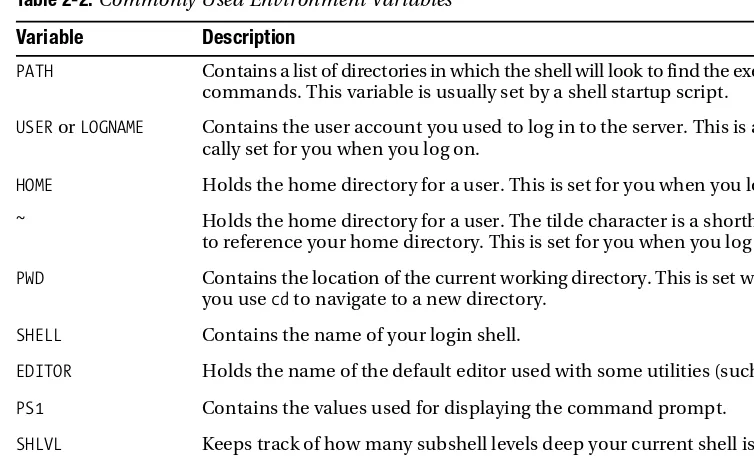
. . . 252-3. Viewing Environment Variables
. . . 262-4. Displaying the Current Shell
. . . 282-5. Automatically Setting Shell Variables
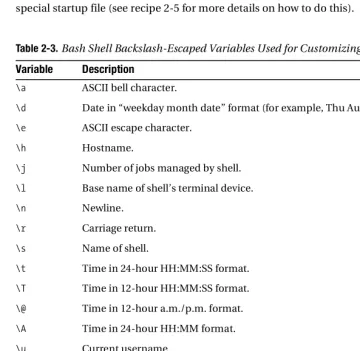
. . . 292-6. Customizing the Command Prompt
. . . 312-7. Creating a Command Shortcut
. . . 332-8. Providing Input to Commands
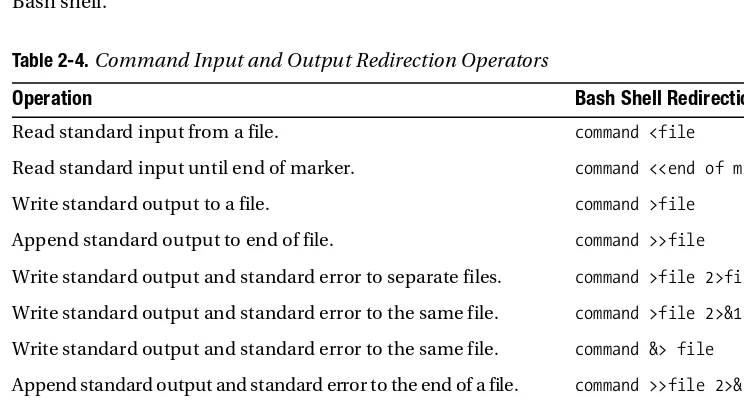
. . . 352-9. Redirecting Command Output
. . . 372-10. Sending Output to Nowhere
. . . 382-11. Displaying and Capturing Command Output
. . . 392-12. Recording All Shell Command Output
. . . 402-13. Changing the Login Shell
. . . 412-14. Modifying Command Path Search
. . . 432-15. Viewing Built-in Commands
. . . 442-16. Setting the Backspace Key
. . . 46viii ■C O N T E N T S
■
CHAPTER 3
Managing Processes and Users
. . . 493-1. Listing Processes
. . . 493-2. Terminating Processes
. . . 503-3. Listing the Users Logged On
. . . 533-4. Listing the Last Logon Time of a User
. . . 553-5. Limiting the Number of User Processes
. . . 563-6. Viewing How Long the Server Has Been Running
. . . 573-7. Viewing How Long a Process Has Been Running
. . . 573-8. Displaying Your Username
. . . 583-9. Changing Your Password
. . . 593-10. Becoming the System Privileged (root) User
. . . 603-11. Running Commands As the root User
. . . 613-12. Adding a Group
. . . 633-13. Removing a Group
. . . 643-14. Adding a User
. . . 643-15. Removing a User
. . . 65■
CHAPTER 4
Creating and Editing Files
. . . 674-1. Creating a File
. . . 684-2. Maneuvering Within a File
. . . 714-3. Copying and Pasting
. . . 724-4. Manipulating Text
. . . 734-5. Searching for and Replacing Text
. . . 744-6. Inserting One File into Another
. . . 754-7. Joining Lines
. . . 764-8. Running Operating System Commands
. . . 774-9. Repeating a Command
. . . 784-10. Undoing a Command
. . . 784-11. Displaying Line Numbers
. . . 794-12. Automatically Configuring Settings
. . . 804-13. Creating Shortcuts for Commands
. . . 814-14. Setting the Default Editor
. . . 81■
CHAPTER 5
Managing Files and Directories
. . . 835-1. Showing the Current Working Directory
. . . 845-2. Changing Directories
. . . 855-3. Creating a Directory
. . . 88■C O N T E N T S ix
5-5. Removing a Directory
. . . 915-6. Listing Files
. . . 925-7. Creating a File Quickly
. . . 945-8. Changing File Permissions
. . . 945-9. Changing File Ownership and Group Membership
. . . 985-10. Viewing the Contents of a Text File
. . . 995-11. Viewing Nonprinting Characters in a File
. . . 1005-12. Viewing Hidden Files
. . . 1015-13. Determining File Type
. . . 1025-14. Finding Differences Between Files
. . . 1045-15. Comparing Contents of Directories
. . . 1065-16. Copying Files
. . . 1065-17. Copying Directories
. . . 1085-18. Moving Files and Directories
. . . 1095-19. Renaming a File or Directory
. . . 1115-20. Removing a File
. . . 1115-21. Removing Protected Files Without Being Prompted
. . . 1125-22. Removing Oddly Named Files
. . . 1135-23. Finding Files
. . . 1145-24. Finding Strings in Files
. . . 1155-25. Finding a Recently Modified File
. . . 1175-26. Finding and Removing Old Files
. . . 1185-27. Finding the Largest Files
. . . 1195-28. Finding a File of a Certain Size
. . . 1205-29. Sorting Files by Size
. . . 1215-30. Finding the Largest Space-Consuming Directories
. . . 1215-31. Truncating an Operating System File
. . . 1235-32. Counting Lines and Words in a File
. . . 1235-33. Creating a Second Name for a File
. . . 1245-34. Creating a Second Name for a Directory
. . . 125■
CHAPTER 6
Archiving and Compressing Files
. . . 1276-1. Bundling Files Using tar
. . . 1286-2. Unbundling Files Using tar
. . . 1306-3. Finding Differences in Bundled Files Using tar
. . . 1326-4. Bundling Files Using cpio
. . . 1326-5. Unbundling Files Using cpio
. . . 1336-6. Bundling Files Using zip
. . . 1346-7. Unbundling Files Using zip
. . . 135x ■C O N T E N T S
6-9. Bundling Files Using find
. . . 1376-10. Adding to a Bundled File
. . . 1386-11. Compressing and Uncompressing Files
. . . 1396-12. Validating File Contents
. . . 1416-13. Encrypting and Decrypting Files
. . . 142■
CHAPTER 7
Shell Scripting
. . . 1477-1. Writing a Simple Shell Script
. . . 1487-2. Checking Simple Conditions
. . . 1507-3. Testing a Condition
. . . 1527-4. Checking Complex Conditions
. . . 1577-5. Repeating a Task
. . . 1597-6. Iterating Until a Condition Is Met
. . . 1617-7. Displaying a Menu of Choices
. . . 1627-8. Running Commands Based on Success/Failure of the Previous
Command
. . . 1647-9. Modularizing Scripts
. . . 1647-10. Passing Parameters to Scripts
. . . 1667-11. Processing Parameters
. . . 1687-12. Running Database Commands in Scripts
. . . 1707-13. Crafting a Robust DBA Shell Script
. . . 1737-14. Running Scripts in the Background
. . . 1767-15. Monitoring the Progress of a Script
. . . 1797-16. Debugging a Script
. . . 180■
CHAPTER 8
Analyzing Server Performance
. . . 1838-1. Identifying System Bottlenecks
. . . 1848-2. Identifying CPU-Intensive Processes
. . . 1868-3. Identifying CPU Bottlenecks
. . . 1918-4. Analyzing Historical CPU Load
. . . 1938-5. Identifying Memory-Intensive Processes
. . . 1958-6. Identifying Memory Bottlenecks
. . . 1978-7. Analyzing Historical Memory Load
. . . 1998-8. Monitoring Disk Space
. . . 2028-9. Monitoring I/O
. . . 2058-10. Analyzing Historical I/O Load
. . . 209■C O N T E N T S xi
■
CHAPTER 9
Viewing and Configuring System Resources
. . . 2139-1. Displaying Server Hardware and the Operating System
. . . 2149-2. Listing CPUs
. . . 2169-3. Displaying Physical Memory
. . . 2179-4. Viewing Kernel Parameters
. . . 2189-5. Modifying Kernel Parameters
. . . 2209-6. Displaying Semaphores
. . . 2239-7. Configuring Semaphores
. . . 2259-8. Viewing Shared Memory Settings
. . . 2259-9. Modifying Shared Memory
. . . 2279-10. Viewing Memory Structures
. . . 2289-11. Removing In-Memory Structures
. . . 2309-12. Viewing Network Configuration Settings
. . . 2329-13. Configuring Network Settings
. . . 2349-14. Modifying System Open File Limits
. . . 2349-15. Showing Shell Limits
. . . 2359-16. Changing Shell Limits
. . . 236■
CHAPTER 10
Managing Server Software
. . . 23910-1. Installing Packages
. . . 23910-2. Switching to Oracle’s Unbreakable Linux Network
. . . 24110-3. Associating Linux Files with RPM Packages
. . . 24610-4. Listing the Contents of an RPM Package
. . . 24610-5. Downloading RPMs
. . . 24810-6. Automating with Oracle Validated Install
. . . 24910-7. Upgrading Packages
. . . 25110-8. Removing Packages
. . . 25210-9. Checking RPM Requirements to Install Oracle Database
. . . 25310-10. Checking RPM Requirements for Grid Control and
E-Business Suite
. . . 25910-11. Performing Silent Oracle Software Installation
. . . 26010-12. Ignoring System Prerequisites
. . . 26610-13. Creating a Database with a Response File
. . . 26710-14. Creating a Network Configuration with a Response File
. . . 26910-15. Applying Interim Patches
. . . 271xii ■C O N T E N T S
■
CHAPTER 11
Automating Jobs
. . . 27911-1. Automating Database Shutdown and Startup
. . . 27911-2. Automating the Shutdown and Startup of Oracle
Application Server
. . . 28311-3. Enabling Access to Schedule Jobs
. . . 28511-4. Scheduling a Job to Run Automatically
. . . 28811-5. Automating Oracle Performance Reports
. . . 29211-6. Monitoring Jobs Using the Data Dictionary
. . . 29411-7. Monitoring Tablespace Fullness
. . . 29611-8. Automating File Maintenance
. . . 29911-9. Rotating Your Log Files
. . . 30011-10. Scheduling a Job using DBMS_SCHEDULER
. . . 303■
CHAPTER 12
Implementing Automatic Storage Management
on Linux
. . . 30512-1. Installing RPMs for ASMLIB
. . . 30612-2. Installing ASMLIB from Oracle’s Unbreakable Linux Network
. . . 30712-3. Autostarting the Non-RAC ASM Instance After a Reboot
. . . 30912-4. Configuring ASMLIB
. . . 31012-5. Labeling Disks with ASMLIB
. . . 31212-6. Unmarking ASMLIB Disks
. . . 31412-7. Changing the Disk Label of Member Disks
. . . 31512-8. Listing ASMLIB Disks
. . . 31612-9. Troubleshooting ASMLIB
. . . 31812-10. Checking ASMLIB Status
. . . 31912-11. Installing ASM Software on a Non-RAC Implementation
. . . 32012-12. Creating the ASM Instance
. . . 32312-13. Connecting to a Remote ASM Instance
. . . 32512-14. Creating an ASM Diskgroup
. . . 32712-15. Adding Disks to an Existing Diskgroup
. . . 32812-16. Dropping an ASM Diskgroup
. . . 32912-17. Invoking the ASM Command Shell
. . . 33012-18. Displaying Online Manual Pages
. . . 33112-19. Removing Files or Directories for a Database with asmcmd
. . . 33312-20. Reviewing Disk Usage with asmcmd
. . . 33412-21. Locating Files in ASM with asmcmd
. . . 33512-22. Listing Currently Connected Clients
. . . 33612-23. Retrieving Diskgroup Information with asmcmd
. . . 337■C O N T E N T S xiii
12-25. Migrating to ASM from the Filesystem
. . . 33912-26. Creating a Database in ASM
. . . 34512-27. Creating/Adding Database Files in ASM
. . . 346■
CHAPTER 13
Implementing Real Application Clusters on Linux
. . . 35113-1. Architecting a RAC Environment
. . . 35213-2. Setting Up the Linux Kernel Parameters for RAC
. . . 35413-3. Installing the cvuqdisk Package
. . . 35513-4. Setting Up the /etc/hosts File
. . . 35513-5. Setting Up User Equivalence
. . . 35713-6. Checking the OS and Hardware Configuration
. . . 35913-7. Installing Oracle Clusterware
. . . 36213-8. Removing Oracle Clusterware Software
. . . 36813-9. Registering RAC Resources
. . . 36913-10. Starting and Shutting Down RAC Resources
. . . 37013-11. Obtaining Help for the srvctl Command
. . . 37113-12. Viewing CRS Resources
. . . 37213-13. Debugging srvctl
. . . 37413-14. Configuring the hangcheck-timer Kernel Module
. . . 37513-15. Starting and Stopping Oracle Clusterware
. . . 37713-16. Enabling and Disabling CRS from Autostartup
. . . 37813-17. Checking the Viability of Oracle Clusterware
. . . 37813-18. Converting a Stand-Alone Database to RAC
. . . 37913-19. Bonding Network Interface Cards
. . . 38213-20. Implementing RAC on NFS
. . . 38413-21. Adding Voting Disks
. . . 38513-22. Removing/Moving a Voting Disk
. . . 38713-23. Implementing RAC on OCFS2
. . . 387■
CHAPTER 14
Working Securely Across a Network
. . . 39514-1. Setting Up SSH
. . . 39614-2. Generating Host Keys
. . . 39914-3. Logging On Securely
. . . 40214-4. Copying Files Securely
. . . 40414-5. Authenticating Through Public Keys
. . . 40614-6. Configuring a Promptless Logon
. . . 409xiv ■C O N T E N T S
■
CHAPTER 15
Managing X Window
. . . 41515-1. Configuring an X Server
. . . 41615-2. Starting an X Server
. . . 41915-3. Stopping the X Server
. . . 42115-4. Displaying an X Client on a Remote Server
. . . 42315-5. Tunneling X Over SSH
. . . 42615-6. Changing Desktop Environment
. . . 42815-7. Manipulating the Terminal Emulator for X Windows
. . . 430■
CHAPTER 16
Managing Remote Servers with VNC
. . . 43316-1. Downloading the VNC Software
. . . 43416-2. Installing the VNC Software
. . . 43516-3. Manually Starting and Stopping the VNC Server
. . . 43616-4. Automatically Starting the VNC Server
. . . 44016-5. Starting the VNC Viewer
. . . 44416-6. Sharing a VNC Connection
. . . 44516-7. Securing a VNC Connection
. . . 44816-8 Accessing VNC via a Proxy Server
. . . 45016-9. Running X Applications with VNC
. . . 45216-10. Troubleshooting VNC
. . . 453■
APPENDIX A
RAID Concepts
. . . 457Understanding RAID
. . . 457Defining Array, Stripe Width, Stripe Size, Chunk Size
. . . 458RAID 0
. . . 459RAID 1
. . . 460Generating Parity
. . . 462RAID 4
. . . 463RAID 5
. . . 465Building Hybrid (Nested) RAID Devices
. . . 466RAID 0+1
. . . 467RAID 1+0
. . . 468RAID 5+0
. . . 469Determining Disk Requirements
. . . 470Capacity Planning
. . . 471■C O N T E N T S xv
■
APPENDIX B
Server Log Files
. . . 473Rotating Log Files
. . . 474Setting Up a Custom Log Rotation
. . . 475Monitoring Log Files
. . . 476About the Authors
■DARL KUHN is currently a DBA with Sun Microsystems. He has coauthored two other books: RMAN Recipes for Oracle Database 11g: A Problem-Solution Approach (Apress, 2007) and Oracle RMAN Pocket Reference (O’Reilly, 2001). He also teaches advanced database courses at Regis University and performs volunteer database administration work for the Rocky Mountain Oracle Users Group. He has a graduate degree from Colorado State University and currently lives near Spanish Peaks, Colo-rado, with his wife, Heidi, and daughters, Brandi and Lisa.
■CHARLES KIM serves as the practice manager of database technologies at Novara Solutions. He has more than 18 years of IT experience and has worked with Oracle since 1991. Charles is an Oracle ACE, coauthor of Oracle Database 11g New Features for DBAs and Developers (Apress, 2007), and author of the “Maximum Availability Architecture” case study at Oracle’s web site (http://www.oracle.com/technology/deploy/availability/ htdocs/FNF_CaseStudy.html); he has certifications in Oracle, Red Hat Linux, and Microsoft. Prior to Novara Solutions, Charles functioned as the chief Oracle database engi-neering counsel for Fidelity National Information Services and worked at companies such as GMAC Mortgage, Oracle Corporation, and i2 Technologies.
Charles has presented advanced topics for IOUG and Oracle OpenWorld on such topics as RAC/ASM and 24/7 high availability considerations. Charles also blogs regularly at http:// blog.dbaexpert.com and provides technical solutions to Oracle DBAs and developers.
Acknowledgments
S
pecial thanks go to Jonathan Gennick. He skillfully guided and directed every aspect of this book, from its inception to print. This book would not have been possible without him.We’re thankful to Kylie Johnston for being an effective and enthusiastic project manager. We also want to acknowledge the contributions of production editor Elizabeth Berry, the meticulous work of our copy editor Kim Wimpsett, and the entire production and marketing team at Apress for all the effort they put into producing the final book.
Darl Kuhn, Charles Kim, and Bernard Lopuz
A huge thanks goes to Heidi Kuhn who taught me that the short hills build overconfidence; it’s the long uphill rides that give character to your lungs, and with effort, today’s long hills become tomorrow’s short ones. Also, it has been a special pleasure to work with my two coauthors, Charles Kim and Bernard Lopuz, who are both excellent Oracle DBAs and Linux experts.
Thanks to the system administrators who answer my “dumb DBA” questions: Mike Tanaka, Will Thornburg, Khanh Truong, Dona Smith, and Mike O’Neill.
Thanks to John “Chief” Lilly and Dave Wood for providing a challenging work environment. Thanks also to the talented “A” team: Todd Wichers, Joey Canlas, Jeff Shoup, Steve Buckmelter, Casey Costley, John Goggin, Randy Carver, Pascal Ledru, Kevin O’Grady, Peter Schow, Brett Guy, Eric Wendelin, Zack Tillotson, and Jessa Rothenberg. Thanks also to the operations team Kier Gombart, Laurie Bourgeois, Scott Elvington, Jen Simsick, Jeff Markland, Simon Ip, and Joe Foote.
Thanks to Dave Jennings and Kevin Quinlivan for my first DBA job. A huge thanks to Barbara Lewis for having me on her IT team. Also thanks to the numerous DBAs who I’ve learned from: Sujit Pattanaik, Doug Davis (and his scripts), Shawn Heisdorffer, Janet Bacon, Kevin Bayer, Sam Falkner, Mehran Sowdaey, Gaurav Mehta, Inder Ganesan, Sue Wagner, Ken Roberts, Tim Gorman, Pete Mullineaux, Abid Malik, Margaret Carson, Roger Murphy, Dan Fink, Roy Backstrom, Guido Handley, Tim Colbert, Nehru Kaja, Jon Nordby, John Liu, Lou Ferrante, Bill Padfield, Glenn Balanoff, Brad Blake, Mike Nims, Mark James, Sam Conn, Dan Likarish, Ravi Narayanaswamy, Dave Hathway, Kevin Hoyt, Abdul Ebadi, Trent Sherman, Sandra Montijo, Jim Secor, Sean Best, Krish Hariharan, Theresa Haisley, Stephan Haisley, Patrick Gates, Geoff Strebel, Chris Blais, Sherry Glass, Sloan Stricker, Jan Toom, Frank Bommarito, Maureen Frazzini, Ken Toney, Bob Suehrstedt, Tom Wheltle, Debbie Earman, Greg Roberts, Gabor Gyurovszky, Gary Smith, Michael Del Toro, Mark Lutze, Mark Blair, Dave Bourque, Kevin Powers, James Jackson, Greg Oehmen, and Kathi Gregarek and the CCI team.
xx ■A C K N O W L E D G M E N T S
Also thanks to previous coauthors who have added encouragement and sage advice: Sam Alapati, Arup Nanda, and Scott Schulze.
Darl Kuhn
I would like to extend my appreciation to Nitin Vengurlekar, a RAC Pack engineer at Oracle Corporation and a member of the technical staff. Nitin is the coauthor of the best-selling Oracle Automatic Storage Management book. Nitin’s review of the ASM chapter proved invaluable, provided great insight, and enhanced the overall quality of the chapter.
I would also like to thank a colleague and fellow respected RAC database administrator in the Oracle community, Tom Roach, for reviewing the RAC chapter. Thank you for the valuable time and recommendations.
Charles Kim
Any time I accomplish something, I am always reminded of the words of Dr. José P. Rizal, Philippine national hero: “He who does not know how to look back at where he came from will never get to his destination.” I feel it is appropriate that I acknowledge the people who have shared a wonderful 40 years with me and one way or another have greatly influenced who I am today.
First and foremost, I am deeply grateful to our God the Almighty for a beautiful life; for a lovely and faithful wife, Leizle; and for blessing us with two daughters, Juliet and Carol, who are the source of my inspiration. Also, a million thanks to my parents, Jeremias and Salud Lopuz, and Leizle’s parents, Virgilio and Felisa Alinas, for their unconditional love and understanding. Without them, my wife and I would never have been in this world. Many thanks also to the enormous support and encouragement of my immediate families, namely, Willy and Flor, Hermie and Raquel, Jay, and Joey, as well as my sister-in-law, Liviliza, and her husband, Frank. Even though they are miles away, they remain always close to my heart.
I would like to thank my (past and present) managers at Oracle Corporation, namely, Mike Craig, Brent Chin, Sue Alsbury, Sharon Yourth, Martin Ingram, Maggie Wells, Sam Riley, Khaled Kassis, Chris Warticki, Katherine Mason, Ana Cristina Nickolayeva, Cathy Scully, John Donlin, Amin Abbas, and Christine Mok. I am also indebted to my mentors at Oracle Support, namely, Matt Arrocha, Matt Hart, Demetre Vlachos, Rodica Mihaila, Bill Loi, and Wes Root, as well as the following (past and present) Oracle engineers/analysts, namely, Fred Wong, Michael Chang, Jason Hsu, Chris Bryczkowski, Sylvia Gaw, Sabrina Hutchison, Sebastian Zinkiewicz, Sam Perciasepe, Harry Joseph, Marc Savereux, Andrew Duffus, Christina Lee-Yow, Marianne de Melo, Julie Dagostino, Anwar Naim, Cindy Johnson, Andrew Soutar, Renu Tikku, Gord Leach, Andy Socha, Yoly Young, Cliff Sowa, Daniel Mateos, Linda Boldt, Michelle Harris, Reem Munakash, Samer Salem, Anca Stevens, Ray Ming, Alysa Leeve, Peter Trent, Patti Trainor, Mark Batchelder, Luz Rodriguez, My-Le Rutledge, Joe Krismer, Frank Sanchez, Robert Kohon, Brian Judd, Susan Wagner, Jose Perez, Kevin Cook, Ken Janiec, Vinson Nichols, Scott Jesse, Derek Callaghan, David Vespa, and Sharmila Kamath. You guys are one of the reasons why Oracle rocks!
■A C K N O W L E D G M E N T S xxi
I also would like to acknowledge my former co-workers at National Steel Corporation, namely, Antonio Besas, Richard Aranas, Robert Ham, Audie Battad, Malou Esmores, Gerry Cruzabra, Jenny Lacar, Rey Orbe, Elmer Gopo, Laureano Pabello, Casilda Sabolboro, Cesar Mozar, Dr. William Torres, Cesar Canlas, Donna Lim, Brenda Gallegos, Robert Caballes, Faith Longakit, Leah Zerna, Eva and Nereus Babiera, Joselito Asibal, Roy Jakosalem, Susan Fortinez, Raul Mercado, Norman Tito Lluisma, Rey Bautista, Joselito Angeles, Abraham Torcende, Alan Lagua, Rex Michael and Mary Leah Hisona, Rey Dalagan, Edgar Moso, Ellen Membreve, Baby Dy, and Daisy Bama. Our learning experience employing Unisys and Oracle technologies has certainly put many of us in different corners of the globe.
My escapades during high school are still fresh in my mind even though I am about to celebrate my silver jubilee next year. For the memorable years I spent at La Salle Academy, I am thankful to my teachers and schoolmates, namely, Mif Obach, Bro. Andrew Jacobson, Martha Giltendez, Mila Manatad, Atty. Rolly Marapao, Johnny Fetalvero, Ricky Jaro, Nico Nabua, Genevieve Cabildo, Lee Quijano, Clifford Tamula, Bong Saroca, Kim Obach-Monterroyo, Ralph Obach, Orwell Obach, Leila Simbajon, Dr. Tonton Eltanal-Pascual, Angeli Echiverri, Mariter Alejo, Mark Siangco, Gina May Adeva, Eric Regala, Eric Capitan, Eric Siao, Eric Sobremisana, Manny Cabili, Bernard Pacaa, Vinci Casas, and Dr. Celina Torres. Likewise, I love to reminisce about my five years at Mapúa Institute of Technology and my college buddies, namely, Medel Macatula, Arnol Magtibay, and Tyrone Florendo.
To my classmates, the staff, and the professors at Regis University, led by my advisor, Daniel Likarish; professors Sam Conn and Donald Archer; and practicum leader, Rossie Trujillo— thank you for your support while I aspire to complete my master’s degree in computer infor-mation technology.
I am proud to mention the football fanatics in Iligan, led by our football guru Consor Manreza, as well as my teammates, namely, Carlos Buenavista, Jr., Rolly dela Cruz, Monico dela Cruz, Jr., Mateo Oliveros, Nene Arat, and Gifford Balucan. I hope someday we can play football together again.
By the time you read this book, my family and I will have already moved to Canada’s capital city. I am delighted to return to Ottawa and see my friends, including Jun and Flor Barbon, Askhan and Desiree Zandi, Mark and Ethel Bergado, Rohnny and Wilma Bayona, Manfred and Jane Cantal, Cesar and Malou Ong, Raffy and Maribel Caday, Al and Lucille Sasedor, Gerry and Myrna Panes, Celso and Vicky Salvatierra, Rey and Edna Noynay, Mac and Ivy Manning, Oni Alday, Alex and Bambeth Fortinez, Melvin and Lolit Milan, Rene and Marilyn Flores, Joey and Joyce Bunagan, and Manny and Jenny Villanueva. Thanks for your outpouring of support and for welcoming us back.
After nine years in Toronto, my family and I have mixed emotions as we depart our friends, Leo Arthur and Marivic Padilla, Gerard and Maricon Nisce, Christian and Cristine Manuel, Roy and Marivic Llanes, Tito and Estrelita Bravo, Gil and Carmencita Caluen, Ervin and Emma Aspiras, Josenilo and Aida dela Cruz, Romy and Lina Yuayan, Jun and Alma Casilang, Benjie and Divine Tabucan, Jimmy and Jette Carillo, Juanito Jumao-as, Dinah Lil Alcoseba, Oliver and Dolly Valera, Ruth Garcia, and Fr. Randy Hendriks.
xxii ■A C K N O W L E D G M E N T S
Lilia and Aurie; I would never forget the summer vacations at their Quezon City residence. I also appreciate the care provided by Dr. Gary Mok, who makes sure I am alive and kicking.
I am fortunate to have worked with an excellent team, particularly Darl Kuhn and Charles Kim; I have the utmost respect and admiration for their broad IT skillsets and and thank them for generously sharing their ideas. Special thank you to Darl for inviting and trusting me as technical reviewer and coauthor of this book. I also salute the amazing people behind this book: the vision and guidance of Jonathan Gennick, the incredible project management of Kylie Johnston, the careful copy editing of Kim Wimpsett, and the impressive production work led by Elizabeth Berry, as well as the rest of the magnificent Apress team. Also, thanks to Sam Alapati for his encouraging words and pushing me to be an author. Last but not the least, my sincerest thanks to you, our dear readers; I hope you enjoy reading this book. ☺
Introduction
S
uccessful organizations utilize data to gain insights about their operations to make better decisions and discover new growth opportunities. Gathering and storing data and extracting business intelligence are critical for success in today’s competitive environment. Server tech-nologies and database software are used in combination to transform information assets into profitable actions.The databases that house important business data require a stable and effective operating platform. The Linux operating system continues to build momentum as a cost-effective and reliable database server. Year after year, more companies report success stories of migrating from expensive hardware to commodity servers running a flavor of the Linux operating system such as Red Hat, SUSE, or Oracle Enterprise Linux. More and more Fortune 1000 companies are embracing Linux as part of their enterprise solution to address today’s dynamic business require-ments. Linux has repeatedly proven itself to be a viable operating system for mission-critical applications and databases.
As a database administrator, it’s inevitable that you will shoulder the responsibility of implementing and maintaining corporate databases on Linux boxes. Your job depends on your ability to work seamlessly with the server hosting your databases. The more you understand about the operating system and tools, the better you’ll be able to perform. The best DBAs are the ones who know how to use which operating system features in which situations.
This book provides you with task-oriented, ready-made solutions for Oracle DBAs in a Linux environment. We cover Linux topics from the DBA’s perspective of utilizing the operating system. You don’t have to read the book cover to cover. Rather, each recipe is a how-to guide for a particular problem. This format allows you to focus on a Linux/Oracle topic and its corre-sponding solution.
Audience
This book is for database administrators who work in Linux/Unix environments. We focus on command-line tools and techniques for working with the operating system from a DBA’s view-point. If you’re a DBA who wants to operate expertly with Linux technology, then this book is for you. Whether you are new or experienced, you’ll find solutions for the gamut of tasks that DBAs perform on Linux servers.
Book Structure
Each recipe title acts as pointer to the problem at hand. Each recipe contains a to-the-point
xxiv ■I N T R O D U C T I O N
chapters cover advanced technical topics. These chapters build on the foundation material and allow you to expertly leverage the Linux operating system.
Conventions
The following typographical conventions are used in this book:
• $ is used to denote Linux commands that can be run by the owner of the Oracle binaries (usually named oracle).
• # is used to denote Linux commands that should be run as the root user.
• Italic is used to highlight a new concept or word.
• Monospaced font is used for code examples, utility names, file names, and directory paths.
• UPPERCASE indicates view names, column names, and column values.
• Constant width boldis used to highlight the statements being discussed.
Downloading Linux and Oracle
Whether you have a powerful Linux server or an old Pentium III box, you can use the following web sites to download the Oracle Enterprise Linux (OEL) operating system and Oracle relational database management system (RDBMS) software:
• Download OEL from the E-Delivery web site: http://edelivery.oracle.com/linux. This web site has instructions on how to download and install Oracle Enterprise Linux and Oracle VM products.
• Obtain the RDBMS and documentation at Oracle Technology Network: http:// otn.oracle.com. From this web site, you can obtain the latest versions of Oracle for the various supported operating systems and hardware platforms.
Comments
We value your input. We’d like to know what you like about the book and what you don’t like about it. You can send us comments via email to [email protected]. When providing feed-back, please make sure you include the title of the book in your note to us.
■I N T R O D U C T I O N xxv
Contacting Us
You can contact us directly at the following e-mail addresses:
Darl Kuhn: [email protected]
Charles Kim: [email protected]
Bernard Lopuz: [email protected]
In addition, Charles Kim maintains a web site and a blog at http://www.dbaexpert.com and
■ ■ ■
C H A P T E R 1
Getting Started
L
inux continues to gain market share as a reliable 24/7 mission-critical enterprise server plat-form. A rapidly increasing number of employers are specifically seeking database administrators (DBAs) with Linux expertise. In fact, as a database administrator, it’s inevitable that you’ll someday find yourself using Linux servers to store your data. You will be responsible for ensuring that your database is working symbiotically with the underlying Linux operating system. Managers will look to you to guarantee that corporate databases are competently implemented and maintained.DBAs are crucial members of every information technology team (well, that’s our unabashed and biased opinion). Database administrators are responsible for mission-critical tasks such as the following:
• Installing software and creating databases
• Providing a highly scalable and well-behaving database environment
• Monitoring and maintaining company databases
• Ensuring that your corporate data is backed up, secured, and protected
• Troubleshooting system performance and availability issues
• Being the holistic source of database engineering information
DBAs must possess a combination of database and operating system (OS) expertise. It’s a fact that you (the DBA) cannot architect, implement, and maintain a large, high-transaction database environment without being intimately familiar with the underlying operating system. In many situations, the OS is your only conduit to the database. Therefore, it’s imperative that you must be particularly knowledgeable of the operating system to competently perform your database administration duties.
2 C H A P T E R 1 ■ 1 - 1 . C O N N E C T I N G S E C U R E L Y T O A R E M O T E S E R V E R
The information in this book will enable you to function as an expert DBA in performing key responsibilities. We provide direct answers to specific problems regarding Oracle database technology and the Linux operating system. The recipes in this first chapter assume you know nothing about Linux and cover situations that you’ll be presented with when first connecting to a server and using operating system commands. If you are already fairly experienced with the Linux operating system, then you may want to skip this chapter.
In this chapter, we start by walking you through some of the most common methods for logging on to a Linux server. We then cover the basics of running Linux commands and detail how to use the built-in help and online documentation. We finish the chapter by showing tech-niques for correcting command-line mistakes and resetting your terminal screen.
■
Note
You might be wondering, what is the difference between Linux and Unix? On the surface, Linux and Unix are mostly (83.1 percent) identical in commands and syntax. However, as a DBA, you must understand the nuances of the Linux kernel and how it impacts the database. These important concepts are explained in later chapters in this book.1-1. Connecting Securely to a Remote Server
Problem
You want to securely connect over the network to your remote Linux database server.
Solution
This solution shows how to download and use the PuTTY application to initiate secure remote connections over the network:
1. To get started, first open your favorite Internet search engine, and search for the string
PuTTY download. You should see information on your screen similar to Figure 1-1.
C H A P T E R 1 ■ 1 - 1 . C O N N E C T I N G S E C U R E L Y T O A R E M O T E S E R V E R 3
2. Click the link to the PuTTY download site. In this example, that link is titled “PuTTY Download Page.” On the PuTTY download site, you’ll find links that will allow you to download the PuTTY application. You can download just the putty.exe file or all util-ities available via the putty.zip file.
3. After you have downloaded the desired files, navigate on your personal computer to the directory where you downloaded the PuTTY utility. You should see a screen similar to Figure 1-2. Double-click the PuTTY icon to start the connection utility.
Figure 1-2. PuTTY application icon
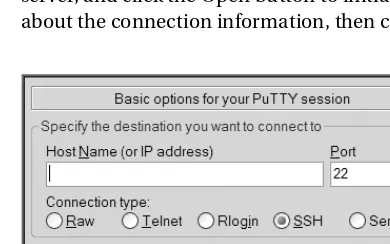
4. Figure 1-3 shows a partial screen shot of what you are presented with next. From this screen you can enter the hostname or IP address and connection port of the remote server to which you want to connect. Enter the connection details of your Linux database server, and click the Open button to initiate a remote connection. If you are not sure about the connection information, then contact your system administrator for details.
Figure 1-3. PuTTY connection details
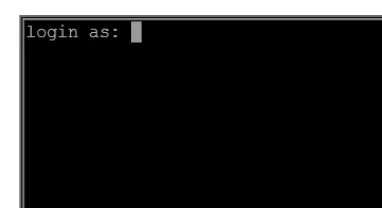
4 C H A P T E R 1 ■ 1 - 1 . C O N N E C T I N G S E C U R E L Y T O A R E M O T E S E R V E R
Figure 1-4. Linux server logon screen
How It Works
PuTTY is a free open source utility that allows you to create a secure shell (SSH) connection to your remote database server. This utility is popular because it’s a free, easy-to-use application that allows you to connect securely over the network to remote Linux database servers. This tool allows you to store your server preferences and connection information, which eliminates the need to retype lengthy hostnames or IP addresses.
■
Note
Other utilities also allow you to initiate remote connections via a secure shell. For example, the Cygwin/X application is a popular Windows-based implementation of the X Window System. This Cygwin/X utility allows you to run X applications on your Windows desktop and start remote secure shell connections to your database server.You can also use PuTTY to connect via proxy servers and SSH tunneling. Examples of doing this are explained briefly in the next sections.
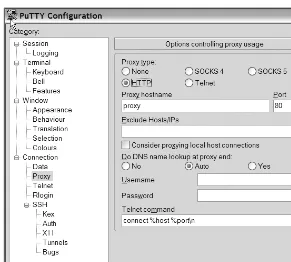
Connecting via a Proxy Server
Many companies require all their Internet connections to pass through a proxy server for secu-rity and performance reasons. To use PuTTY to connect via a proxy server, open the PuTTY Configuration dialog box, and click the Proxy node under the Connection category, as shown in Figure 1-5.
C H A P T E R 1 ■ 1 - 1 . C O N N E C T I N G S E C U R E L Y T O A R E M O T E S E R V E R 5
Figure 1-5. PuTTY—proxy server configuration
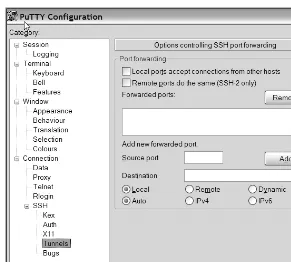
Connecting via SSH Tunneling
You can also use PuTTY to tunnel (also called port forwarding) to a remote server. To use tunneling, open the PuTTY Configuration dialog box, as shown in previously in Figure 1-3, and then choose the SSH as the connection type. Next, provide the hostname or IP address of the designated SSH server, as well as the SSH port number (the default is 22). Afterward, click the Connection node, then the SSH node, and finally the Tunnels node, as shown in Figure 1-6.
6 C H A P T E R 1 ■ 1 - 2 . L O G G I N G O N R E M O T E L Y V I A T H E C O M M A N D L I N E
Figure 1-6. PuTTY—SSH tunneling configuration
1-2. Logging On Remotely via the Command Line
Problem
Your system administrator has just provided you with a username and password to your data-base server. You now want to log on to a Linux server via a command-line utility such as telnet
or ssh.
Solution
This example assumes you can access a terminal from which you can initiate an ssh command. Depending on your environment, your “terminal” could be a PuTTY session (see recipe 1-1) on your home PC or workstation. Ask your system administrator for help if you’re not sure how to start a terminal session (this can vary quite a bit depending on your working environment).
In this next line of code, the username is oracle, and the hostname is rmoug1:
$ ssh -l oracle rmoug1
If ssh successfully locates the database server, you should be prompted for a password (the prompt may vary depending on the version of the operating system):
C H A P T E R 1 ■ 1 - 2 . L O G G I N G O N R E M O T E L Y V I A T H E C O M M A N D L I N E 7
For security purposes, your password will not be displayed as you type it. After typing your password, hit the Enter or Return key to complete the logon process.
■
Tip
If you think you have made a mistake while entering your password, press Ctrl+U to erase all invisible text from the password line. This technique will save you time and prevent many accidental failed logins. Alternatively, you can try to use the Backspace key or the Delete key to erase any text you’ve entered.How It Works
By default, most SSH servers listen on the TCP port 22. If your system administrator has set up the server to listen on a different port, then you will have to explicitly specify it with the -p (port) option. This example connects as the oracle user to the rmoug1 server on port 71:
$ ssh -p 71 -l oracle rmoug1
After entering a valid username and password, your system may display information such as the last time you logged on, from what machine you initiated the connection, whether your account has unread mail, and so on. Additionally, if your system administrator has entered any text within the /etc/motd file (message of the day), then that information will also be displayed. The following text is a typical login message:
Last login: Tue Dec 25 15:31:31 2007 from 63-227-41-191.hlrn.qwest.net
After your username and password have been successfully authenticated by the Linux server, you should see a $ (dollar sign) prompt:
$
The $ character signifies you are at the shell command-line prompt. The $ character is the default command-line prompt for most Linux/Unix systems. All command-line examples in this book will show the $ prompt. You don’t have to type the $ prompt as part of any of the example commands in this book.
Your system administrator may have configured your account to display a different prompt (other than the $ character). See recipe 2-6 for changing your command-line prompt from something other than the default.
■
Note
If you are logged as the root (sometimes called superuser) account, the default command-line prompt is the # character.Some servers accept remote connections from telnet clients. For security reasons, we recommend you do not use telnet to initiate a logon to a server over the network. The telnet
8 C H A P T E R 1 ■ 1 - 3 . L O G G I N G O F F T H E S E R V E R
occasionally have to use telnet because ssh isn’t available. The following example uses telnet
to log on to a remote server over the network:
$ telnet -l oracle dbsrver
1-3. Logging Off the Server
Problem
You want to log off the server.
Solution
Three methods for logging out of the database server are covered in this solution:
• Pressing Ctrl+D
• Typing exit
• Typing logout
The quickest way to log off is to press Ctrl+D. This will immediately log you off your server. In this next example, the keys Ctrl and D are pressed at the same time:
$ Ctrl+D
You should now see a message like this:
Connection to <your server> closed.
You can also type the exit command to log off your database server:
$ exit
You should now see a message like this:
Connection to <your server> closed.
You can also type the logout command to log off the system:
$ logout
You should now see a message like this:
Connection to <your server> closed.
How It Works
If you have started a subshell within an existing shell session, then the logout techniques described in the “Solution” section will exit you from only the innermost shell. For example, say you have logged on to your Linux server and then issued the following command:
C H A P T E R 1 ■ 1 - 4 . R U N N I N G A C O M M A N D 9
You now have started a subshell. If you want to exit the subshell, use one of the techniques described in the “Solution” section:
$ exit
Similarly, if you have issued an su command to switch to another user, then when exiting from that session, you will be returned to the shell from which you initiated the su command.
It’s a good security practice to log out of your operating system session if you plan on being away from your terminal. As a DBA, you’ll typically find yourself logged on to the server as the user who owns the database binaries (usually the oracle operating system account). The oracle
account is like a database superuser account.
The database operating system account can do potentially damaging operations like drop databases, remove database files, and so on. Logging out ensures that your database operating system account isn’t compromised.
■
Tip
Set the TMOUT variable to limit the amount of idle time a session can have before it is automatically logged off. This parameter can be set globally in the /etc/bashrc file. See recipe 2-5 for automatically setting variables when logging on to a server.1-4. Running a Command
Problem
You’re new to Linux, and you want to run a shell command from the operating system prompt.
Solution
Linux commands are run from the command line by typing them and pressing the Enter or Return key. This example uses the df (disk-free) command to display the amount of unused disk space on the database server:
$ df
By default, the output of the commands is displayed on your screen (standard output). After running the df command, you should see some output similar to this:
Filesystem 1K-blocks Used Available Use% Mounted on /dev/sda2 236141180 7026468 217119380 4% /
/dev/sda1 101086 9448 86419 10% /boot none 1037452 0 1037452 0% /dev/shm
How It Works
10 C H A P T E R 1 ■ 1 - 4 . R U N N I N G A C O M M A N D
You can modify the default behavior of a command by running it with one or more options
(sometimes called flags or switches). This next example shows using the ls (list) command with the -a option to display all files:
$ ls -a
Commands may also take arguments. Arguments typically designate a file or text that the command should use. When running a command, arguments are usually placed after the options. This next example uses the df (disk-free) command with the -h (human-readable) option and uses the argument of /dev/sda2 (which is a directory):
$ df -f /dev/sda2
This book does not detail the use of various graphical user interfaces (GUIs) or browser user interfaces (BUIs). These tools are great for situations when you don’t know the actual command. As useful as these graphical tools are, we strongly recommend you explore using Linux commands from the command-line prompt. As a DBA, you will encounter situations where the GUI/BUI tool doesn’t do everything you need in order to accomplish a task. For some problems, you will need access to the command line to debug and troubleshoot issues. Many complicated or custom DBA tasks require that you be proficient with command-line programming techniques (see Chapter 7 for more information on shell scripting).
If you don’t know the appropriate shell commands and their features, then you’ll poten-tially waste a lot of time trying to solve a problem when it could have easily been resolved had you known which tools and options were available.
GOLDEN HAMMER RULE
The Golden Hammer Rule can be stated as “When the only tool you have is a hammer, everything looks like a nail.” What does that mean? When people find a tool that solves a problem, they have a natural tendency to use that tool again and again to solve other problems. This might be because once you’re familiar with a given tool or technique, you’ll continue to use it because it’s available, you’ve had training with the tool, and you’ve developed a skill set.
Nothing is wrong with that approach per se. However, if you want to be a more marketable DBA, then you should expand your horizons from time to time by learning new skills and investigating up-to-date methods for solving problems. In today’s ever-changing technology environment, the DBA with the most current skills is often the one who survives the longest.
C H A P T E R 1 ■ 1 - 5 . G E T T I N G H E L P 11
1-5. Getting Help
Problem
You want to find more information about how to use a shell command.
Solution
One extremely nice feature of Linux is that there are several options for quickly obtaining more information regarding shell commands. Listed next are command-line help features that are readily available on most Linux systems:
man: Read the online manual for a command.
whatis: View a brief description of a command.
which or whereis: Find a tool.
--version: Display the version.
--help: Show help.
apropos: Display manual page documentation.
info: List extensive documentation.
Tab key: Show available commands.
Each of the help methods in the previous list will be described in the following subsections.
Reading Manual Pages
The man (manual) page for a command displays online documentation for almost every shell command. The following command displays information about man:
$ man man
Here’s a partial listing of the output:
NAME man - format and display the on-line manual pages
SYNOPSIS man [-acdfFhkKtwW] [--path] [-m system] [-p string] [-C config_file] [-M pathlist] [-P pager] [-S section_list] [section] name ...
12 C H A P T E R 1 ■ 1 - 5 . G E T T I N G H E L P
the documentation line by line. Table 1-1 lists the less command options available to you while viewing man pages. Press the Q key to exit the man utility.
The man pages are usually divided into ten sections. The man command will display the first
man page match it finds for a specified command. The following list shows the section number and type of commands documented in each section:
1. User commands
2. System calls
3. Subroutines (library functions)
4. Devices
5. File formats
6. Games
7. Miscellaneous
8. System administration
9. Local
10. New
Sometimes a Linux utility will be documented in more than one man section. To view all man
documentation available for a tool, use the -f option (this is equivalent to running the whatis
command). This example views all man pages available with the cd command:
Table 1-1. The less Command Options Available While Viewing man Pages
Keystroke Action
J, E, or down arrow Move down one line. K, Y, or up arrow Move up one line. Up arrow Move up one line. Down arrow Move down one line. /<string> Search for <string>.
N Repeat the previous search forward. Shift+N Repeat the previous search backward. H Display help page.
C H A P T E R 1 ■ 1 - 5 . G E T T I N G H E L P 13
$ man -f cd
From the output, you can see that cd is documented in two different man sections:
cd (1p) - change the working directory cd [builtins] (1) - bash built-in commands, see bash(1)
Sometimes DBAs are confused when they type man cd and are presented with the Bash shell’s built-in documentation. To view the man documentation specific to the cd utility, then specify the 1p page:
$ man 1p cd
To scroll through all man sections associated with a command, use the -a option. When in this mode, press the Q key to advance to the next man section of information.
CAPTURING MAN PAGES IN A TEXT FILE
Sometimes it’s helpful to capture the output of a man command in a file that can be used later to search and scroll through with a text editor. The following command writes the output of the man page for the find command to a file named find.txt:
$ man find >find.txt
However, if you inspect the output of the find.txt file, you’ll notice that it contains unreadable characters that are produced from the man page output. Run the following command to clean up the output of the man page:
$ man find | col -b >find.txt
The previous command takes the output from the man command and sends it to the col -b (postprocessing filter) command. This filtering command will remove the unreadable backspace characters from the man page output and make it human-readable.
Viewing a Brief Description of a Command
If you’re new to Linux (or if you’re old to Linux and have forgotten the material), use the aptly named whatis command to answer the question, “what is” a command’s basic information? The whatis command lists the first line of text from the man (manual) page. This next example shows how to use the whatis command to find more information about the pwd command:
$ whatis pwd
pwd (1) - print name of current/working directory pwd [builtins] (1) - bash built-in commands, see bash(1)
14 C H A P T E R 1 ■ 1 - 5 . G E T T I N G H E L P
Another interesting use of the whatis command is to view a one-line description of commands in the /bin directory. This example uses whatis with ls, xargs, and less to view, one page at a time, the descriptions of all commands in the /bin directory:
$ cd /bin
$ ls | xargs whatis | less
The previous line of code will first list the files in the /bin directory; then, the output of that is piped to the xargs command. The xargs command will take the output of ls and send it to the whatis utility. The less command will display the output one page at a time. To exit from the documentation (displayed by less), press the Q key (to quit).
■
Note
The whatis command is identical to the man -f command.Locating a Command
Use which or whereis to locate the executable binary file of a command. This next line of code locates the binary man executable file:
$ which man /usr/bin/man
The output indicates that man is located in the /usr/bin directory. The whereis command locates the binary file, source, and manuals for a particular utility. The following example displays the location of the echo command and its corresponding man documentation files:
$ whereis echo
echo: /bin/echo /usr/share/man/man1/echo.1.gz /usr/share/man/man1p/echo.1p.gz
Getting the Version
Sometimes it’s useful to see the version of a command. This next example uses the --version
option to display the version of the who command:
$ who --version who (coreutils) 5.2.1
Showing Help
Use the --help option to quickly display basic information about a tool’s usage and its syntax. This next example demonstrates how to get help for the df command:
C H A P T E R 1 ■ 1 - 5 . G E T T I N G H E L P 15
Here’s a partial listing of the output:
Usage: df [OPTION]... [FILE]...
Show information about the filesystem on which each FILE resides,
or all filesystems by default. Mandatory arguments to long options are mandatory for short options too.
-a, --all include filesystems having 0 blocks -B, --block-size=SIZE use SIZE-byte blocks
-h, --human-readable print sizes in human readable format (e.g., 1K 234M 2G)
Depending on the version of the operating system, all Linux operating system commands may not have a --help option. If this is the case, you’ll have to use one of the other documen-tation sources listed in this recipe.
Finding Manual Page Documentation
If you can remember only partially the name of the utility you seek, then use the apropos command to find more documentation. The apropos command is similar to whatis except that it searches for any string that matches your input. For example, the following example searches the whatis
database for the string find:
$ apropos find
Here’s a partial snippet of the output:
find (1) - search for files in a directory hierarchy find (1p) - find files
find2perl (1) - translate find command lines to Perl code findchip (8) - checks the FIR chipset
findfs (8) - Find a filesystem by label or UUID
The previous output shows you that many different types of find commands are available. Use the man command (previously discussed in this recipe) to view more information about a particular find command. The number in the second column (in the parentheses) lists which section of the man page the documentation is contained in.
■
Note
The apropos command is equivalent to man -k.Listing Extensive Documentation
The info utility often contains extensive documentation on many Linux commands. To view all documents available, type info with no parameters, as shown here:
$ info
16 C H A P T E R 1 ■ 1 - 5 . G E T T I N G H E L P
Figure 1-7. The info command introduction screen
Once within the utility, use the N key to go to the next section. The P key will take you to a previous section. Any line that starts with an asterisk (*) is a link to other sections (nodes) in the document. To go to a linked document, navigate to the line containing the asterisk and press the Enter or Return key. Press the Q key to exit the info page. Table 1-2 lists some of the commonly used navigational info commands.
You can also view information regarding specific commands. This next example starts the
info utility to display help for the cpio command:
$ info cpio
Table 1-2. Commonly Used Navigation Keystrokes Within the info Utility
Keystroke Action
N Move to the next section. P Move to the previous section. Return Move to a linked document. Q Exit.
? List all commands.
C H A P T E R 1 ■ 1 - 6 . C O R R E C T I N G C O M M A N D - L I N E M I S T A K E S 17
To view a tutorial on info, type the following:
$ info info
Showing Available Commands
You can use the Tab key to show all executable files that start with a certain string. For example, if you want to view all commands that start with the string ls, then type ls and hit the Tab key twice (with no space between the ls command and pressing the Tab key):
$ ls<Tab><Tab>
ls lsb_release lsnrctl lspgpot lsattr lshal lsnrctl0 lss16toppm
You should hear a bell sound (sometimes called a beep) after you press the first Tab. After pressing the second Tab, the Bash shell will attempt to find all commands that start with ls that are located in any directories contained in the PATH variable.
This feature of automatically looking for files is known as command completion. See recipe 2-2 for more details on command completion.
How It Works
The “Solution” section of this recipe contains some of the most useful information you’ll need to elevate your Linux skills. You should take some time to familiarize yourself with all the helpful techniques described in this recipe.
You’ll find that Linux has extensive utilities for easily viewing command documentation. Using these built-in help features allows you to quickly find basic syntax and usage of a given shell command. We suggest you become particularly familiar with man and info. You’ll use these informational tools on a regular basis.
1-6. Correcting Command-Line Mistakes
Problem
You’re a typical DBA, and you often mistype things on the command line. You wonder whether there are command-line tools to correct your typing mistakes.
Solution
Press Ctrl+_ at the same time to undo what you just typed at the command line. Notice that you’ll have to use the Shift key to get the underscore (_) character. If you type a long command string, then pressing Ctrl+_ will erase everything to the left of the prompt. If you have backspaced over a command, pressing Ctrl+_ will undo what you have backspaced over.
How It Works
18 C H A P T E R 1 ■ 1 - 7 . C L E A R I N G T H E S C R E E N
$ pdw Ctrl+T
You should now see the following:
$ pwd
Table 1-3 summarizes the commands available to you to correct typing mistakes at the command line.
1-7. Clearing the Screen
Problem
Your screen has become cluttered with command output. You want to clear the screen of any previously displayed text or command output.
Solution
Either use the clear command or press Ctrl+L to clear your terminal screen. The clear command works in most Linux/Unix shells, and it does what you would expect—it clears the screen. Simply type the command as shown with no options or arguments:
$ clear
Another method for clearing the screen (on some Linux systems) is to press Ctrl+L:
$ Ctrl+L
One nice feature about Ctrl+L is that you can enter this command while typing other commands on the command line. Pressing Ctrl+L will clear the screen and retain any current commands you have entered on the command line. For example, say you are in the middle of typing a find command; you can enter Ctrl+L as shown here:
$ find . -name *.sql Ctrl+L
When you press Ctrl+L, it will clear the screen and place the command you are currently typing at the top of the screen. In this example, the find command appears at the top of the screen:
$ find . -name *.sql
Table 1-3. Command-Line Keystrokes to Correct Typing Errors
Keystroke Action
Ctrl+_ Undo what was just typed in.
Ctrl+U Clear out everything to the left of the prompt.