Oracle® Fusion Middleware
Installation Guide for Oracle Web Tier
11g Release 1 (11.1.1)
E14260-07
Oracle Fusion Middleware Installation Guide for Oracle Web Tier 11g Release 1 (11.1.1) E14260-07
Copyright © 2011 Oracle and/or its affiliates. All rights reserved. Primary Author: Kevin Hwang
This software and related documentation are provided under a license agreement containing restrictions on use and disclosure and are protected by intellectual property laws. Except as expressly permitted in your license agreement or allowed by law, you may not use, copy, reproduce, translate, broadcast, modify, license, transmit, distribute, exhibit, perform, publish, or display any part, in any form, or by any means. Reverse engineering, disassembly, or decompilation of this software, unless required by law for interoperability, is prohibited.
The information contained herein is subject to change without notice and is not warranted to be error-free. If you find any errors, please report them to us in writing.
If this software or related documentation is delivered to the U.S. Government or anyone licensing it on behalf of the U.S. Government, the following notice is applicable:
U.S. GOVERNMENT RIGHTS Programs, software, databases, and related documentation and technical data delivered to U.S. Government customers are "commercial computer software" or "commercial technical data" pursuant to the applicable Federal Acquisition Regulation and agency-specific supplemental regulations. As such, the use, duplication, disclosure, modification, and adaptation shall be subject to the restrictions and license terms set forth in the applicable Government contract, and, to the extent applicable by the terms of the Government contract, the additional rights set forth in FAR 52.227-19, Commercial Computer Software License (December 2007). Oracle USA, Inc., 500 Oracle Parkway, Redwood City, CA 94065.
This software is developed for general use in a variety of information management applications. It is not developed or intended for use in any inherently dangerous applications, including applications which may create a risk of personal injury. If you use this software in dangerous applications, then you shall be responsible to take all appropriate fail-safe, backup, redundancy, and other measures to ensure the safe use of this software. Oracle Corporation and its affiliates disclaim any liability for any damages caused by use of this software in dangerous applications.
Oracle is a registered trademark of Oracle Corporation and/or its affiliates. Other names may be trademarks of their respective owners.
Contents
Preface
... ixIntended Audience... ix
Documentation Accessibility ... ix
Related Documents ... x
Conventions ... x
1
Installation Overview
1.1 Oracle Web Tier Components ... 1-1 1.2 Methods of Installation ... 1-2 1.3 Installation Topology ... 1-2 1.4 Installation Roadmaps... 1-3 1.4.1 Installing Oracle Web Tier in Stand-Alone Mode... 1-3 1.4.2 Installing Oracle Web Tier and Associating With an Existing Domain ... 1-4 1.4.3 Associating Oracle Web Tier With a Domain Post-Installation... 1-5
2
Installing Oracle Web Tier
2.1 Preparing to Install ... 2-1 2.1.1 Installing 32-bit Oracle Web Tier on a 64-bit Operating System ... 2-1 2.1.1.1 Windows Operating Systems ... 2-1 2.1.1.2 Linux Operating Systems ... 2-2 2.1.2 Oracle Fusion Middleware Support of 64-bit JDK... 2-2 2.2 Installation Types... 2-3 2.3 Installing Oracle Web Tier with a WebLogic Server Domain ... 2-3 2.3.1 Creating a WebLogic Server Domain for your Oracle Web Tier Components ... 2-3 2.3.2 Starting Node Manager When Registering Oracle Web Tier with a WebLogic Server
Domain 2-4
2.4.4.2 Patching the Software ... 2-6 2.4.4.3 Configuring Your Components... 2-6 2.5 Post-Installation Tasks ... 2-8 2.5.1 Configuring Routing Between Oracle HTTP Server and Oracle WebLogic Server... 2-8 2.5.2 Using Oracle Web Cache with Oracle BAM ... 2-8 2.6 Verifying the Installation ... 2-8 2.6.1 Verify the Installation Logs ... 2-8 2.6.2 Verifying the Domain Server Logs... 2-9 2.6.3 Verifying OPMN Status ... 2-9 2.6.4 Check Browser URLs... 2-9
3
Deinstalling Oracle Web Tier
3.1 Deinstallation Options ... 3-1 3.2 Deinstallation Instructions... 3-2 3.2.1 Starting the Deinstaller ... 3-2 3.2.2 Removing Your Oracle Instances ... 3-2 3.2.3 Removing Your Web Tier Oracle Home ... 3-3 3.2.4 Removing Your Oracle Common Home ... 3-4 3.2.5 Manually Removing The Oracle Home Directory ... 3-5 3.2.6 Removing the Program Groups (Windows Only) ... 3-5 3.2.7 Rebooting Your System (Windows Only)... 3-5 3.3 Reinstallation ... 3-5
A
Oracle Web Tier Installation Screens
A.1 Specify Inventory Directory Screen (UNIX Only)... A-2 A.2 Inventory Location Confirmation Screen (UNIX Only) ... A-3 A.3 Welcome Screen ... A-4 A.4 Select Installation Type Screen... A-5 A.5 Prerequisite Checks Screen... A-6 A.6 Specify Installation Location Screen... A-7 A.7 Configure Components Screen ... A-8 A.8 Specify WebLogic Domain Screen... A-9 A.9 Specify Component Details Screen... A-10 A.10 Web Cache Administrator Password Screen ... A-11 A.11 Configure Ports Screen... A-12 A.12 Specify Security Updates Screen... A-13 A.13 Installation Summary Screen ... A-14 A.14 Installation Progress Screen... A-15 A.15 Configuration Progress Screen... A-16 A.16 Installation Complete Screen... A-17
B
Oracle Web Tier Deinstallation Screens
B.5 Select Managed Instance Screen ... B-6 B.6 Specify Instance Location Screen... B-7 B.7 Deinstallation Summary Screen (Unmanaged Instance) ... B-8 B.8 Deinstallation Summary Screen (Managed Instance)... B-9 B.9 Deinstallation Progress Screen... B-10 B.10 Deinstallation Complete Screen... B-11
C
Silent Installation and Deinstallation
C.1 About Silent Installation and Deinstallation... C-1 C.2 Creating a WebLogic Domain in Silent Mode ... C-1 C.2.1 Task 1: Install the Latest Oracle WebLogic Server in Silent Mode ... C-1 C.2.2 Task 2: Create the WebLogic Server Domain Using WLST... C-2 C.2.3 Task 3: Enable the WebLogic Server Domain with JRF and EM ... C-2 C.2.4 Task 4: Start the Administration Server in the WebLogic Server Domain... C-3 C.2.5 Task 5: Verify the Domain is Up and Running ... C-3 C.3 Oracle Web Tier Response Files... C-3 C.3.1 Installation Response Files ... C-3 C.3.1.1 Contents of the WebTierConfigureOnly.rsp File ... C-4 C.3.1.2 Contents of the WebTierInstallAndConfigure.rsp File... C-6 C.3.1.3 Contents of the WebTierSoftwareOnly.rsp File ... C-8 C.3.2 Patch Set Installer Response Files... C-8 C.3.3 Deinstallation Response Files ... C-10 C.3.3.1 Contents of the deinstall_managed_instances.rsp File ... C-10 C.3.3.2 Contents of the deinstall_unmanaged_instances.rsp File ... C-11 C.3.3.3 Contents of the deinstall_oh.rsp File ... C-12
D
Troubleshooting
D.1 General Troubleshooting Tips ... D-1 D.2 Troubleshooting Oracle Fusion Middleware Installation... D-1 D.2.1 Installation Log Files ... D-2 D.2.2 Configuration Log Files ... D-2 D.3 Configuring Java Required Files (JRF)... D-3 D.4 Need More Help?... D-3
Preface
The Oracle Fusion Middleware Installation Guide for Oracle Web Tier provides information and instructions for installing, configuring, and troubleshooting Oracle Web Tier.
Intended Audience
This guide is intended for users who are installing Oracle Fusion Middleware for the first time and are comfortable running some system administration operations, such as creating users and groups, adding users to groups, and installing operating system patches on the computer where your products will be installed. Users on UNIX systems who are installing need root access to run some scripts.
Documentation Accessibility
Our goal is to make Oracle products, services, and supporting documentation accessible to all users, including users that are disabled. To that end, our
documentation includes features that make information available to users of assistive technology. This documentation is available in HTML format, and contains markup to facilitate access by the disabled community. Accessibility standards will continue to evolve over time, and Oracle is actively engaged with other market-leading
technology vendors to address technical obstacles so that our documentation can be accessible to all of our customers. For more information, visit the Oracle Accessibility Program Web site at http://www.oracle.com/accessibility/.
Accessibility of Code Examples in Documentation
Screen readers may not always correctly read the code examples in this document. The conventions for writing code require that closing braces should appear on an
otherwise empty line; however, some screen readers may not always read a line of text that consists solely of a bracket or brace.
Accessibility of Links to External Web Sites in Documentation
This documentation may contain links to Web sites of other companies or
organizations that Oracle does not own or control. Oracle neither evaluates nor makes any representations regarding the accessibility of these Web sites.
Access to Oracle Support
http://www.fcc.gov/cgb/consumerfacts/trs.html, and a list of phone numbers is available at http://www.fcc.gov/cgb/dro/trsphonebk.html.
Related Documents
For additional information, see the following manuals:
■ Oracle Fusion Middleware Installation Planning Guide
■ Oracle Fusion Middleware Administrator's Guide
■ Oracle Fusion Middleware Concepts
■ Oracle Fusion Middleware High Availability Guide
Conventions
The following text conventions are used in this document:
Convention Meaning
boldface Boldface type indicates graphical user interface elements associated with an action, or terms defined in text or the glossary.
italic Italic type indicates book titles, emphasis, or placeholder variables for which you supply particular values.
1
1
Installation Overview
Oracle Web Tier contains two main components: Oracle HTTP Server and Oracle Web Cache. Oracle Process Manager and Notification Server (OPMN) is also installed by default. Together, these products are responsible for managing incoming HTTP requests, caching web messages, and sending XML and HTML back to the client. The Oracle Web Tier installation will give you the option of installing Oracle HTTP Server and Oracle Web Cache. Oracle Process Manager and Notification Server is automatically installed and you will not have the option to de-select this product. The chapter includes the following sections:
■ Section 1.1, "Oracle Web Tier Components"
■ Section 1.2, "Methods of Installation"
■ Section 1.3, "Installation Topology"
■ Section 1.4, "Installation Roadmaps"
1.1 Oracle Web Tier Components
Oracle Web Tier contains the following components:
■ Oracle HTTP Server
Oracle HTTP Server provides a listener for Oracle WebLogic Server and the framework for hosting static pages, dynamic pages, and applications over the Web. It is based on Apache 2.2.10 infrastructure, and includes modules developed specifically by Oracle. The features of single sign-on, clustered deployment, and high availability enhance the operation of the Oracle HTTP Server.
■ Oracle Web Cache
Oracle Web Cache is a content-aware server accelerator, or reverse proxy, for the Web tier that improves the performance, scalability, and availability of Web sites that run on Oracle HTTP Server. Oracle Web Cache is the primary caching mechanism provided with Oracle Fusion Middleware. Caching improves the performance, scalability, and availability of Web sites that run on Oracle WebLogic Server by storing frequently accessed URLs in memory.
■ Oracle Process Manager and Notification Server (OPMN)
Methods of Installation
For more information about these components, refer to Oracle Fusion Middleware Concepts.
1.2 Methods of Installation
Oracle Web Tier can be installed in either one of the following ways:
■ In stand-alone mode.
Oracle Web Tier is configured without a domain and administered from the command line. See Section 1.4.1, "Installing Oracle Web Tier in Stand-Alone Mode"
for an overview of the installation procedure.
■ Using Oracle Enterprise Manager Fusion Middleware Control.
In order to use Oracle Enterprise Manager Fusion Middleware Control, a WebLogic Server domain needs to be configured using both the Enterprise Manager and Java Required Files (JRF) domain templates.
It is not possible to create this domain during the installation of Oracle Web Tier, and so the domain must already exist prior to installation and configuration. See
Section 1.4.2, "Installing Oracle Web Tier and Associating With an Existing Domain" for an overview of the installation procedure.
Alternatively, you can install Oracle Web Tier without configuring the
components, then create a WebLogic Server domain, then run the configuration tool to associate your Oracle Web Tier components with that domain. See
Section 1.4.3, "Associating Oracle Web Tier With a Domain Post-Installation" for an overview of the installation procedure.
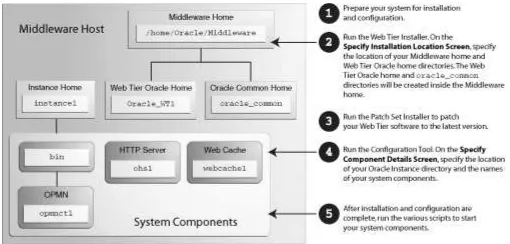
1.3 Installation Topology
Figure 1–1 shows the directory structure of a simple Oracle Web Tier installation on a single host, using all of the default values.
Installation Roadmaps
1.4 Installation Roadmaps
This section provides an overview of each installation option described in Section 1.2, "Methods of Installation". Determine the method of installation you will use for your environment, and then follow the instructions in that section.
1.4.1 Installing Oracle Web Tier in Stand-Alone Mode
Table 1–1 describes the high-level tasks for installing and configuring Oracle Web Tier in stand-alone mode. The table also provides information on where to get more details on each task.
Note: Although Oracle WebLogic Server is not required in order to complete an Oracle Web Tier installation in stand-alone mode, the directory structure for the Middleware home must still be present. This is to make the directory structure for Oracle Web Tier consistent with other Oracle Fusion Middleware products, all of which require the existence of WebLogic Server and its corresponding directory structure.
In the case of an Oracle Web Tier installation in stand-alone mode, the directory structure will still be created despite the absence of Oracle WebLogic Server.
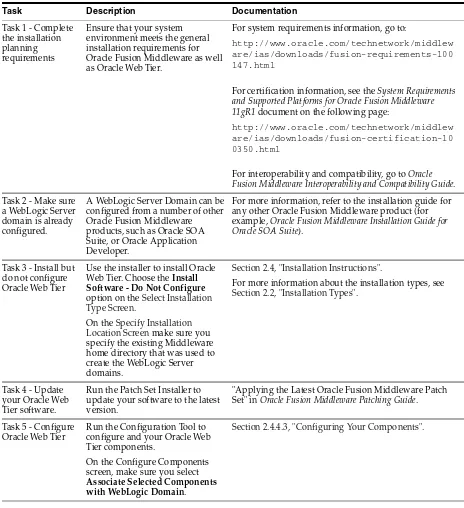
Table 1–1 Tasks For A Stand-Alone Oracle Web Tier Installation
Task Description Documentation
Task 1 - Complete the installation planning requirements
Ensure that your system environment meets the general installation requirements for Oracle Fusion Middleware as well as Oracle Web Tier.
For system requirements information, go to:
http://www.oracle.com/technetwork/middlew are/ias/downloads/fusion-requirements-100 147.html
For certification information, see the System Requirements and Supported Platforms for Oracle Fusion Middleware 11gR1 document on the following page:
http://www.oracle.com/technetwork/middlew are/ias/downloads/fusion-certification-10 0350.html
Installation Roadmaps
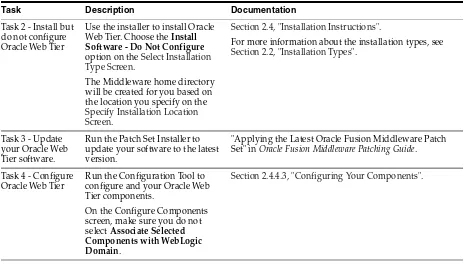
1.4.2 Installing Oracle Web Tier and Associating With an Existing Domain
Table 1–2 describes the high-level tasks for installing and configuring Oracle Web Tier and associating the components with an existing WebLogic Server domain. The table also provides information on where to get more details on each task.
Task 2 - Install but do not configure Oracle Web Tier
Use the installer to install Oracle Web Tier. Choose the Install Software - Do Not Configure option on the Select Installation Type Screen.
The Middleware home directory will be created for you based on the location you specify on the
Specify Installation Location Screen.
Section 2.4, "Installation Instructions".
For more information about the installation types, see
Section 2.2, "Installation Types".
Task 3 - Update your Oracle Web Tier software.
Run the Patch Set Installer to update your software to the latest version.
"Applying the Latest Oracle Fusion Middleware Patch Set" in Oracle Fusion Middleware Patching Guide.
Task 4 - Configure Oracle Web Tier
Run the Configuration Tool to configure and your Oracle Web Tier components.
On the Configure Components screen, make sure you do not select Associate Selected Components with WebLogic Domain.
Section 2.4.4.3, "Configuring Your Components". Table 1–1 (Cont.) Tasks For A Stand-Alone Oracle Web Tier Installation
Installation Roadmaps
1.4.3 Associating Oracle Web Tier With a Domain Post-Installation
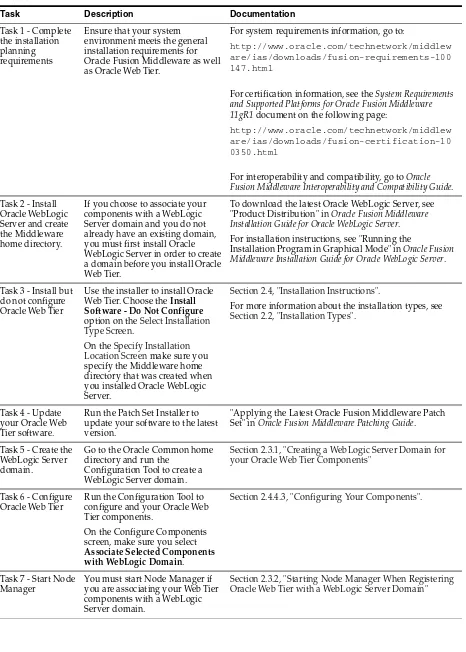
Table 1–3 describes the high-level tasks for installing Oracle Web Tier, then creating a WebLogic Server domain, and then associating the components with that WebLogic Server domain. The table also provides information on where to get more details on each task.
Table 1–2 Tasks To Install and Configure Oracle Web Tier With An Existing Domain
Task Description Documentation
Task 1 - Complete the installation planning requirements
Ensure that your system environment meets the general installation requirements for Oracle Fusion Middleware as well as Oracle Web Tier.
For system requirements information, go to:
http://www.oracle.com/technetwork/middlew are/ias/downloads/fusion-requirements-100 147.html
For certification information, see the System Requirements and Supported Platforms for Oracle Fusion Middleware 11gR1 document on the following page:
http://www.oracle.com/technetwork/middlew are/ias/downloads/fusion-certification-10 0350.html
For interoperability and compatibility, go to Oracle Fusion Middleware Interoperability and Compatibility Guide.
Task 2 - Make sure a WebLogic Server domain is already configured.
A WebLogic Server Domain can be configured from a number of other Oracle Fusion Middleware products, such as Oracle SOA Suite, or Oracle Application Developer.
For more information, refer to the installation guide for any other Oracle Fusion Middleware product (for example, Oracle Fusion Middleware Installation Guide for Oracle SOA Suite).
Task 3 - Install but do not configure Oracle Web Tier
Use the installer to install Oracle Web Tier. Choose the Install Software - Do Not Configure option on the Select Installation Type Screen.
On the Specify Installation Location Screen make sure you specify the existing Middleware home directory that was used to create the WebLogic Server domains.
Section 2.4, "Installation Instructions".
For more information about the installation types, see
Section 2.2, "Installation Types".
Task 4 - Update your Oracle Web Tier software.
Run the Patch Set Installer to update your software to the latest version.
"Applying the Latest Oracle Fusion Middleware Patch Set" in Oracle Fusion Middleware Patching Guide.
Task 5 - Configure Oracle Web Tier
Run the Configuration Tool to configure and your Oracle Web Tier components.
On the Configure Components screen, make sure you select Associate Selected Components with WebLogic Domain.
Installation Roadmaps
Table 1–3 Tasks To Install Oracle Web Tier, Then Create A Domain, Then Associate The Components With The Domain
Ensure that your system environment meets the general installation requirements for Oracle Fusion Middleware as well as Oracle Web Tier.
For system requirements information, go to:
http://www.oracle.com/technetwork/middlew are/ias/downloads/fusion-requirements-100 147.html
For certification information, see the System Requirements and Supported Platforms for Oracle Fusion Middleware 11gR1 document on the following page:
http://www.oracle.com/technetwork/middlew are/ias/downloads/fusion-certification-10 0350.html
For interoperability and compatibility, go to Oracle Fusion Middleware Interoperability and Compatibility Guide.
Task 2 - Install Oracle WebLogic Server and create the Middleware home directory.
If you choose to associate your components with a WebLogic Server domain and you do not already have an existing domain, you must first install Oracle WebLogic Server in order to create a domain before you install Oracle Web Tier.
To download the latest Oracle WebLogic Server, see "Product Distribution" in Oracle Fusion Middleware Installation Guide for Oracle WebLogic Server.
For installation instructions, see "Running the
Installation Program in Graphical Mode" in Oracle Fusion Middleware Installation Guide for Oracle WebLogic Server.
Task 3 - Install but do not configure Oracle Web Tier
Use the installer to install Oracle Web Tier. Choose the Install Software - Do Not Configure option on the Select Installation Type Screen.
On the Specify Installation Location Screen make sure you specify the Middleware home directory that was created when you installed Oracle WebLogic Server.
Section 2.4, "Installation Instructions".
For more information about the installation types, see
Section 2.2, "Installation Types".
Task 4 - Update your Oracle Web Tier software.
Run the Patch Set Installer to update your software to the latest version.
"Applying the Latest Oracle Fusion Middleware Patch Set" in Oracle Fusion Middleware Patching Guide.
Task 5 - Create the WebLogic Server domain.
Go to the Oracle Common home directory and run the
Configuration Tool to create a WebLogic Server domain.
Section 2.3.1, "Creating a WebLogic Server Domain for your Oracle Web Tier Components"
Task 6 - Configure Oracle Web Tier
Run the Configuration Tool to configure and your Oracle Web Tier components.
On the Configure Components screen, make sure you select Associate Selected Components with WebLogic Domain.
Section 2.4.4.3, "Configuring Your Components".
Task 7 - Start Node Manager
You must start Node Manager if you are associating your Web Tier components with a WebLogic Server domain.
2
Installing Oracle Web Tier
This chapter describes how to install the Oracle Web Tier components. During the install and configuration process, you will have the option to install and configure the following products:
■ Oracle HTTP Server (OHS) ■ Oracle Web Cache
Oracle Process Manager and Notification Server (OPMN) is installed and configured by default.
The following topics are covered:
■ Section 2.1, "Preparing to Install" ■ Section 2.2, "Installation Types"
■ Section 2.3, "Installing Oracle Web Tier with a WebLogic Server Domain" ■ Section 2.4, "Installation Instructions"
■ Section 2.5, "Post-Installation Tasks" ■ Section 2.6, "Verifying the Installation"
2.1 Preparing to Install
Make sure you have read "Before you Begin" in Oracle Fusion Middleware Installation Planning Guide before you install Oracle Web Tier.
In addition, you should also check the following prior to installation:
■ Section 2.1.1, "Installing 32-bit Oracle Web Tier on a 64-bit Operating System" ■ Section 2.1.2, "Oracle Fusion Middleware Support of 64-bit JDK"
2.1.1 Installing 32-bit Oracle Web Tier on a 64-bit Operating System
This section contains important information regarding the installation of 32-bit Oracle Web Tier products on a 64-bit operating system. If this does not describe your
environment, you can skip this section.
2.1.1.1 Windows Operating Systems
Preparing to Install
2.1.1.2 Linux Operating Systems
A 32-bit Linux version of Oracle Web Tier may be installed on most 64-bit Linux platforms. To see which platforms are supported, refer to the "System Requirements and Supported Platforms for Oracle Fusion Middleware 11gR1" document, available on the following page:
http://www.oracle.com/technetwork/middleware/ias/downloads/fusion-certi fication-100350.html
To install your 32-bit Oracle Web Tier software on a certified 64-bit Linux system, do the following:
1. Run the following command before starting the installer:
linux32 bash
2. During the installation, you will receive an error during the linking phase. To work around this error:
a. Login as root user.
b. Move the existing /usr/bin/gcc file to /usr/bin/gcc.orig with the mv
command:
mv /usr/bin/gcc /usr/bin/gcc.orig
c. Using a text editor such as vi, create a new file called gcc41 that contains the following content:
#!/bin/sh
exec /usr/bin/gcc.orig -m32 -static-libgcc -B /usr/lib/gcc/i586-suse-linux/2.95.3/ $*
d. Change the file permission for the gcc41 file using the following command:
chmod 755 /usr/bin/gcc41
e. Create a symbolic link to /usr/bin/gcc with the following command:
ln -s -f /usr/bin/gcc41 /usr/bin/gcc
2.1.2 Oracle Fusion Middleware Support of 64-bit JDK
If you are using a 64-bit JVM in your environment, ensure that all your Oracle Fusion Middleware components are using the 64-bit JVM. You cannot mix components using a 32-bit JVM with those using a 64-bit JVM.
For more information, refer to the "System Requirements and Supported Platforms for Oracle Fusion Middleware 11gR1" document, available on the following page:
http://www.oracle.com/technetwork/middleware/ias/downloads/fusion-certi fication-100350.html
Installing Oracle Web Tier with a WebLogic Server Domain
If your Oracle Fusion Middleware components are running in a 64-bit JVM
environment, ensure that WebLogic Server is installed with the 64-bit JDK. For 32-bit JVM support, refer to the Oracle Fusion Middleware Release Notes for information on how to configure your environment for 32-bit JVM support for your platform.
2.2 Installation Types
The Oracle Web Tier installer provides two installation options:
■ Install and Configure
This option will install the product binaries in an Oracle home directory and create and configure a working instance in an Oracle instance directory. After this is complete, you should be able to begin configuring and managing your products using the Administration Console or Enterprise Manager.
■ Install Software - Do Not Configure
This option only installs the software binaries in an Oracle home directory. You must then manually run the Configuration Tool from the bin directory in your Web Tier Oracle home to configure your products before you can use them. This option can be used to quickly create multiple instances of the software that share a common disk.
To install the latest Oracle Web Tier software, you must choose the Install Software - Do Not Configure installation type, as described in Section 1.4, "Installation
Roadmaps".
2.3 Installing Oracle Web Tier with a WebLogic Server Domain
If you are installing Oracle Web Tier and associating the components with a WebLogic Server domain, you will need to do the following:
■ Creating a WebLogic Server Domain for your Oracle Web Tier Components ■ Starting Node Manager When Registering Oracle Web Tier with a WebLogic
Server Domain
2.3.1 Creating a WebLogic Server Domain for your Oracle Web Tier Components
If you do not already have a WebLogic Server domain to associate with your Oracle Web Tier components, you can create one as follows:
1. Install certified versions of a JDK and Oracle WebLogic Server.
2. Install (do not configure) any Oracle Fusion Middleware product, including Oracle Web Tier.
Installation of an Oracle Fusion Middleware product creates the Oracle Common home directory (MW_HOME/oracle_common on UNIX operating systems, or MW_ HOME\oracle_common on Windows operating systems). This directory contains the domain templates for Enterprise Manager and Java Required Files (JRF).
3. Run the Configuration Wizard from the Oracle Common home directory
(config.sh on UNIX operating systems or config.cmd on Windows operating systems).
On the Select Domain Source screen, select the Oracle Enterprise Manager and
Installation Instructions
4. After the installation is complete, start the Administration Server in the domain, and then verify that the Oracle Web Tier components are listed by accessing the following URL:
http://host:port/em
2.3.2 Starting Node Manager When Registering Oracle Web Tier with a WebLogic
Server Domain
If you are registering your Oracle Web Tier instance with an existing WebLogic Domain, you must start Node Manager as described below:
1. On UNIX operating systems, run the ORACLE_ HOME/common/bin/setNMProps.sh script. On Windows operating systems, run the ORACLE_ HOME\common\bin\setNMProps.cmd script.
This script appends the required properties to the nodemanager.properties
file. These properties can also be appended manually, or provided as command-line arguments.
2. On UNIX operating systems, start Node Manager by running the WebLogic_ Server_Home/server/bin/startNodeManager.sh script.
On Windows operating systems, start Node Manager by running the WebLogic_ Server_Home\server\bin\startNodeManager.cmd script.
For more information about Node Manager, refer to Oracle Fusion Middleware Node Manager Administrator's Guide for Oracle WebLogic Server.
2.4 Installation Instructions
This section contains information and instructions for installing Oracle Web Tier. The following topics are covered:
■ Section 2.4.1, "Obtaining the Software" ■ Section 2.4.2, "Starting the Installer"
■ Section 2.4.3, "Inventory Screens (UNIX Only)"
■ Section 2.4.4, "Installing and Configuring Oracle Web Tier"
2.4.1 Obtaining the Software
See "Obtain the Oracle Fusion Middleware Software" in Oracle Fusion Middleware Installation Planning Guide for information on where to obtain the software.
Select one of the download locations and download "Oracle Web Tier." This will be saved to your system as a .zip archive file.
After you download the archive file, unpack the archive file into a directory of your choice on the machine where you will be performing the installation.
Note: The StartScriptEnabled=true property is required for Managed Servers to receive proper classpath and command
Installation Instructions
2.4.2 Starting the Installer
To start the installer, go to the directory where you unpacked the archive file and switch to the Disk1 directory.
2.4.2.1 Run the rootpre.sh Script on IBM AIX Operating Systems
If you are installing on an IBM AIX operating system, you must run the rootpre.sh
script from the Disk1 directory before you start the installer.
2.4.2.2 Start the Installer
Start the installer from the Disk1 directory: On UNIX operating systems:
./runInstaller
On Windows operating systems:
setup.exe
2.4.2.3 Installation Log Files
The installer writes logs files to the Oracle_Inventory_Location/log (on UNIX operating systems) or Oracle_Inventory_Location\logs (on Windows
operating systems) directory. Refer to Section D.2.1, "Installation Log Files" for more information about the log files and their contents.
2.4.3 Inventory Screens (UNIX Only)
If you are installing on a UNIX system, and if this is the first time any Oracle product is being installed on your system with the Oracle Universal Installer, you will be asked to provide the location of an inventory directory. This is where the installer will set up subdirectories and maintain inventory data for each Oracle product that is installed on this system.
Follow the instructions in Table 2–1 to configure the inventory directory information. For more help, click on the screen name in the table below, or click the Help button in the GUI.
2.4.4 Installing and Configuring Oracle Web Tier
Follow the instructions in this section to install and configure the latest Oracle Web Tier software.
Note: Running the installer as root user is not supported.
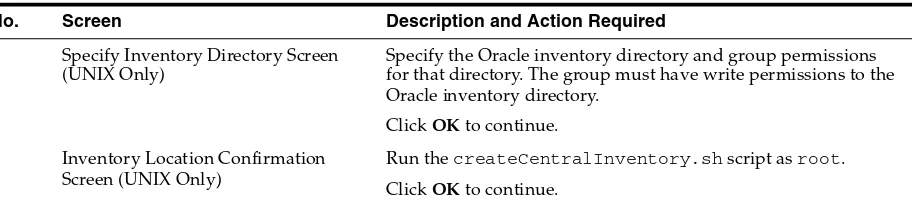
Table 2–1 Inventory Directory and Group Screens
No. Screen Description and Action Required
1 Specify Inventory Directory Screen (UNIX Only)
Specify the Oracle inventory directory and group permissions for that directory. The group must have write permissions to the Oracle inventory directory.
Click OK to continue.
2 Inventory Location Confirmation Screen (UNIX Only)
Installation Instructions
2.4.4.1 Installing the Software
After you have started the installer (Section 2.4.2, "Starting the Installer"), follow the instructions in Table 2–2 to install Oracle Web Tier.
If you need additional help with any of the installation screens, refer to Appendix A, "Oracle Web Tier Installation Screens" or click Help to access the online help.
2.4.4.2 Patching the Software
After the installation is complete, you must run the Patch Set Installer for Oracle Web Tier to update your software to the latest version.
For instructions, go to "Applying the Latest Oracle Fusion Middleware Patch Set" in
Oracle Fusion Middleware Patching Guide.
After you have patched your software to the latest version, you are ready to configure your components. Go to Section 2.4.4.3, "Configuring Your Components" for
instructions.
2.4.4.3 Configuring Your Components
Run the Configuration Tool to configure your Oracle Web Tier products. On UNIX operating systems:
Web_Tier_ORACLE_HOME/bin/config.sh
On Windows operating systems:
Web_Tier_ORACLE_HOME\bin\config.bat
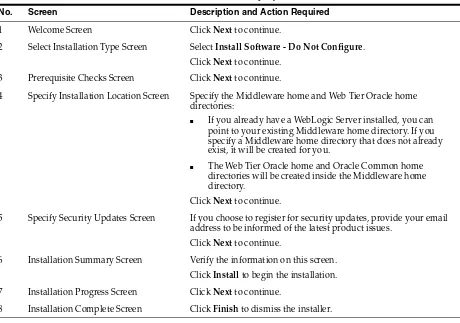
Table 2–2 Installation Flow for Install Only Option
No. Screen Description and Action Required
1 Welcome Screen Click Next to continue.
2 Select Installation Type Screen Select Install Software - Do Not Configure. Click Next to continue.
3 Prerequisite Checks Screen Click Next to continue.
4 Specify Installation Location Screen Specify the Middleware home and Web Tier Oracle home directories:
■ If you already have a WebLogic Server installed, you can
point to your existing Middleware home directory. If you specify a Middleware home directory that does not already exist, it will be created for you.
■ The Web Tier Oracle home and Oracle Common home
directories will be created inside the Middleware home directory.
Click Next to continue.
5 Specify Security Updates Screen If you choose to register for security updates, provide your email address to be informed of the latest product issues.
Click Next to continue.
6 Installation Summary Screen Verify the information on this screen. Click Install to begin the installation.
7 Installation Progress Screen Click Next to continue.
Installation Instructions
After you have started the Configuration Tool, follow the instructions in Table 2–3.
Note: Make sure the Oracle Web Tier installer is not running; running the installer and Configuration Tool concurrently is not supported.
Table 2–3 Configuration Flow
No. Screen
When Does This
Screen Appear? Description and Action Required
1 Welcome Screen Always Click Next to continue.
2 Configure
Components Screen
Always Select the component(s) you want to configure.
select Associate Selected Components with WebLogic Domain if you want to associate these components with an existing WebLogic Domain.
Click Next to continue.
3 Specify WebLogic
Domain Screen Only if Associate Selected Components with WebLogic Domain is selected on the Configure Components Screen.
Specify the credentials for your existing WebLogic Domain. Click Next to continue.
4 Specify Component Details Screen
Always Specify the Oracle Instance location and names for your components.
Click Next to continue.
5 Web Cache Administrator Password Screen
If you selected Oracle Web Cache on the Configure
Components Screen
Specify the password for your Oracle Web Cache administrator.
Click Next to continue.
6 Configure Ports
Screen Always Select whether you want automatic or manual port configuration.
NOTE - If you choose to use the staticports.ini (or any custom port file), port numbers less than 1024 will not be validated by the installer. You will, however, be able to proceed with the installation.
See "Port Numbers" in Oracle Fusion Middleware Administrator's Guide for more information.
Click Next to continue.
7 Specify Security Updates Screen
Always If you choose to register for security updates, provide your email address to be informed of the latest product issues. Click Next to continue.
8 Installation Summary Screen
Always Verify the information on this screen. Click Configure to begin the configuration.
9 Configuration
Progress Screen Always Click Next to continue.
10 Installation Complete Screen
Always Click Save to save your configuration information to a file. This information includes port numbers, installation directories, URLs, and component names which you may need to access at a later time.
Post-Installation Tasks
When configuration is complete, go to Section 2.5, "Post-Installation Tasks".
2.5 Post-Installation Tasks
After installation and configuration are complete, there may be some post-installation tasks you need to perform, depending on your specific topology and configuration. The following topics are covered in this section:
■ Configuring Routing Between Oracle HTTP Server and Oracle WebLogic Server ■ Using Oracle Web Cache with Oracle BAM
2.5.1 Configuring Routing Between Oracle HTTP Server and Oracle WebLogic Server
By default, routing between Oracle HTTP Server and Oracle WebLogic Server is not configured. In order to allow requests to be proxied from Oracle HTTP Server to Oracle WebLogic Server, you must configure a plug-in.
For instructions on how to do this, see "mod_wl_ohs" in the Oracle Fusion Middleware Administrator's Guide for Oracle HTTP Server.
2.5.2 Using Oracle Web Cache with Oracle BAM
If you are using Oracle Web Cache with Oracle BAM, you must perform the
configuration steps detailed in "Basic Tasks for Configuring and Monitoring Caching Rules" in Oracle Fusion Middleware Administrator's Guide for Oracle Web Cache.
Use the following Oracle BAM settings:
Expression Type : Regular Expression
URL Expression : oracle.bam.web (or Event=viewReport, for the second rule) HTTP Methods : Select all
Leave URL and POST Body Parameters empty. POST Body Expression : .*
Caching Policy : Don't Cache Leave Comment as it is. Compression : Off Enabled : yes
2.6 Verifying the Installation
You can perform any combination of the following tasks to verify that your installation was successful:
■ Verify the Installation Logs ■ Verifying the Domain Server Logs ■ Verifying OPMN Status
■ Check Browser URLs
2.6.1 Verify the Installation Logs
Check for the presence of installation log files in logs directory inside your Oracle Inventory directory. On UNIX systems, if you do not know the location of your Oracle Inventory directory, you can find it in the WebTier_ORACLE_HOME/oraInst.loc
file. On Windows systems, the default location for the inventory directory is
Verifying the Installation
2.6.2 Verifying the Domain Server Logs
Check the domain server logs, which are located in the servers directory inside the domain home directory. For example, on UNIX systems:
Web_Tier_ORACLE_HOME/user_projects/domains/domain_name/servers/server_name
On Windows systems:
Web_Tier_ORACLE_HOME\user_projects\domains\domain_name\servers\server_name
2.6.3 Verifying OPMN Status
Run the opmnctl status command from the INSTANCE_HOME/bin (on UNIX operating systems) or INSTANCE_HOME\bin (on Windows operating systems) directory in your instance home location. For example:
> ./opmnctl status
Processes in Instance: instance2
---+---+---+---This information shows the components configured for this installation. The status "Alive" means the component is up and running.
2.6.4 Check Browser URLs
Run the opmnctl status -l command from the INSTANCE_HOME/bin (on UNIX operating systems) or INSTANCE_HOME\bin (on Windows operating systems) directory in your instance home location to obtain a list of ports used by the components. For example:
> ./opmnctl status -l
---+---+---+---+---1067146469 | 43712 | 14:43:29 | http_admin:7799
webcache1 | WebCache | 24056 | Alive | 1067146468 | 64072 | 14:43:29 | http_stat:7800,http_invalidation:7801,https_ listen:7802,http_listen:7798
ohs1 | OHS | 23890 | Alive | 1067146467 | 50260 | 14:43:39 | https:9999,https:4447,http:7777
Use the port numbers in this display to point your browser to the appropriate pages. Use the format:
http://system_name:port_number
Verifying the Installation
Table 2–4 Sample Web Tier URLs
Page Sample URL
Oracle HTTP Server http://system_name:7777
Oracle HTTP Server SSL https://system_name:4447
Oracle Web Cache http://system_name:7798
Oracle Web Cache SSL https://system_name:7802
3
Deinstalling Oracle Web Tier
This chapter describes how to remove Oracle Web Tier from your system.
You should always use the instructions provided in this chapter for removing the software. If you try to remove the software manually, you may experience problems when you try to reinstall the software again at a later time. Following the procedures in this chapter will ensure that the software is properly removed. See Section 3.3, "Reinstallation" for more information.
■ Section 3.1, "Deinstallation Options" ■ Section 3.2, "Deinstallation Instructions" ■ Section 3.3, "Reinstallation"
3.1 Deinstallation Options
The Oracle Web Tier deinstaller gives you the following software removal options:
■ Deinstall Oracle Home
This option removes everything under the Oracle Home from which the deinstaller is started. Be sure that no system components are using the Oracle Home you want to remove.
■ Deinstall ASInstances managed by WebLogic Domain
This options removes instances of your system components that are managed by a WebLogic domain. This happens if you select Associate Selected Components with WebLogic Domain on the Configure Components Screen. You will need to specify credentials to access your WebLogic domain.
■ Deinstall Unmanaged ASInstances
This option removes instances of your system components not associated with a WebLogic domain. Instances not associated with a WebLogic domain are created when you do not select Associate Selected Components with WebLogic Domain
on the Configure Components Screen.
In order to properly deinstall Oracle Web Tier, you must perform the following in order:
1. Start the deinstaller (Section 3.2.1, "Starting the Deinstaller").
2. Remove all managed and unmanaged Oracle Instances (Section 3.2.2, "Removing Your Oracle Instances").
Deinstallation Instructions
4. Remove the Oracle Common home (Section 3.2.4, "Removing Your Oracle Common Home").
3.2 Deinstallation Instructions
Follow the instructions in this section to remove Oracle Web Tier:
■ Section 3.2.1, "Starting the Deinstaller"
■ Section 3.2.2, "Removing Your Oracle Instances" ■ Section 3.2.3, "Removing Your Web Tier Oracle Home" ■ Section 3.2.4, "Removing Your Oracle Common Home"
■ Section 3.2.5, "Manually Removing The Oracle Home Directory" ■ Section 3.2.6, "Removing the Program Groups (Windows Only)" ■ Section 3.2.7, "Rebooting Your System (Windows Only)"
3.2.1 Starting the Deinstaller
Go to the Web_Tier_ORACLE_HOME/oui/bin (on UNIX operating systems) or Web_ Tier_ORACLE_HOME\oui\bin (on Windows operating systems) directory and start the deinstaller.
On UNIX operating systems:
./runInstaller -deinstall
On Windows operating systems:
setup.exe -deinstall
On Windows systems, you can also start the deinstaller from the Start menu. For example, you might select Programs > Oracle Web Tier 11g - Home1 > Uninstall.
3.2.2 Removing Your Oracle Instances
All managed and unmanaged Oracle instances must be removed from the system before you remove the Web Tier Oracle home.
If you associated your components with a WebLogic domain during installation, follow the instructions in Table 3–1 to deinstall your managed instances:
Note: If you want to remove an Oracle instance which is registered with a WebLogic domain, make sure to launch the deinstaller from Oracle home directory that is associated with the Oracle instance you are removing.
Deinstallation Instructions
If you did not associate your components with a WebLogic domain during installation, follow the instructions in Table 3–2 to deinstall your unmanaged instances:
3.2.3 Removing Your Web Tier Oracle Home
After all managed and unmanaged Web Tier instances have been removed, start the deinstaller again (Section 3.2.1, "Starting the Deinstaller") and follow the instructions in Table 3–3 to remove your Web Tier Oracle Home.
Table 3–1 Removing Managed Instances Flow
No. Screen Description and Action Required
1 Welcome Screen Click Next to continue.
2 Select Deinstallation Type Screen Select Deinstall AS Instances managed by WebLogic Domain.
3 Specify WebLogic Domain Detail Screen Specify the credentials of your WebLogic Domain. Click Next to continue.
4 Select Managed Instance Screen Select the managed instance you want to deinstall. Click Next to continue.
5 Deinstallation Summary Screen
(Managed Instance) Verify the information on this screen. Click Deinstall to continue.
6 Deinstallation Progress Screen This screen shows the progress and status of the deinstallation.
7 Deinstallation Complete Screen Click Finish to dismiss the screen.
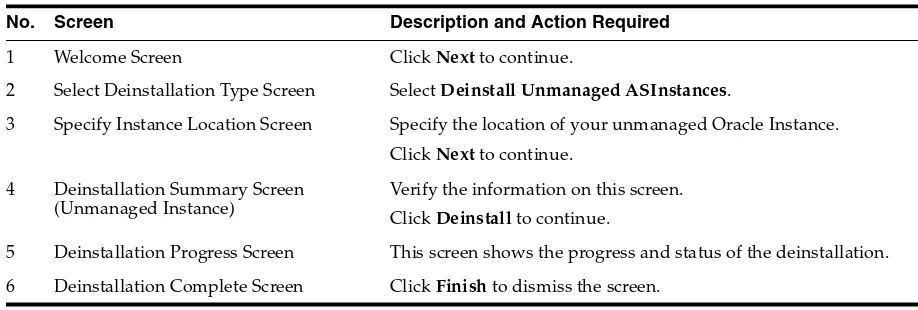
Table 3–2 Removing Unmanaged Instances Flow
No. Screen Description and Action Required
1 Welcome Screen Click Next to continue.
2 Select Deinstallation Type Screen Select Deinstall Unmanaged ASInstances.
3 Specify Instance Location Screen Specify the location of your unmanaged Oracle Instance. Click Next to continue.
4 Deinstallation Summary Screen (Unmanaged Instance)
Verify the information on this screen. Click Deinstall to continue.
5 Deinstallation Progress Screen This screen shows the progress and status of the deinstallation.
Deinstallation Instructions
3.2.4 Removing Your Oracle Common Home
This section describes how to remove the oracle_common directory. This directory contains its own deinstaller in oui/bin (on UNIX operating systems) or oui\bin (on Windows operating systems), just like any other Oracle home directory.
Before you begin, you must:
1. Stop all processes that use the oracle_common directory.
2. Remove all Oracle Instances (see Section 3.2.2, "Removing Your Oracle Instances").
3. Remove the Oracle Home directory (see Section 3.2.3, "Removing Your Web Tier Oracle Home").
To start the deinstaller, navigate to the MW_HOME/oracle_common/oui/bin (on UNIX operating systems) or MW_HOME\oracle_common\oui\bin (on Windows operating systems) directory and start the deinstaller.
The deinstaller requires the location of a Java Runtime Environment (JRE) on your system. When the Middleware home directory was created (Section A.6, "Specify Installation Location Screen"), a JRE was installed on your system. You can use this location (the location of the jre directory) to start the deinstaller. The default location for the JRE is MW_HOME/jdk160_18 (on UNIX operating systems) or MW_
HOME\jdk160_18 (on Windows operating systems), where MW_HOME is the Middleware home directory.
On UNIX operating systems:
./runInstaller -deinstall -jreLoc JRE_LOCATION
On Windows operating systems:
setup.exe -deinstall -jreLoc JRE_LOCATION
You must specify the absolute path to your JRE_LOCATION; relative paths will not work.
Table 3–3 Removing the Web Tier Oracle Home Flow
No. Screen Description and Action Required
1 Welcome Screen Click Next to continue.
2 Select Deinstallation Type Screen Select Deinstall Oracle Home.
3 Deinstall Oracle Home Screen Verify the Oracle Home directory that is about the be deinstalled. Click Next to continue.
On the Warning screen, select whether or not you want the deinstaller to remove the Oracle home directory in addition to removing the software.
Click Yes to have the deinstaller remove the software and Oracle home, No to remove only the software, or Cancel to return to the previous screen.
If you select No, go to Section 3.2.5, "Manually Removing The Oracle Home Directory" for instructions on how to manually remove your Oracle home directory.
4 Deinstallation Progress Screen This screen shows the progress and status of the deinstallation.
Reinstallation
After the deinstaller is started, follow the instructions in Table 3–3 to remove the Oracle Common home.
3.2.5 Manually Removing The Oracle Home Directory
If you selected No on the warning screen during deinstallation, you must manually remove your Oracle home directory and any sub-directories. For example, if your Oracle Common home directory was /home/Oracle/Middleware/oracle_ common on a UNIX operating system:
> cd /home/Oracle/Middleware > rm -rf oracle_common
On a Windows operating system, if your Oracle Common home directory was
C:\Oracle\Middleware\oracle_common, use a file manager window and navigate to the C:\Oracle\Middleware directory, then right-click on the oracle_ common folder and select Delete.
3.2.6 Removing the Program Groups (Windows Only)
On Windows operating systems, you must also manually remove the program groups from the Start Menu\Programs folder. As an example (the folder names and program group names on your system may be different), you might remove the following from C:\Documents and Settings\All Users\Start Menu\Programs:
■ Oracle Fusion Middleware 11.1.1.3.0 ■ Oracle HTTP Server 11g - Home1
3.2.7 Rebooting Your System (Windows Only)
On Windows operating systems, you should reboot your computer after you have finished removing all your programs to ensure proper cleanup.
3.3 Reinstallation
The installer does not allow reinstallation of Oracle Web Tier in a directory that already contains an Oracle instance. To reinstall Web Tier in the same directory as before, you must:
1. Follow the instructions in Section 3.2.2, "Removing Your Oracle Instances" to remove all Oracle instances from the directory.
A
Oracle Web Tier Installation Screens
This appendix contains screenshots and descriptions for all of the Oracle Web Tier installation screens:
■ Welcome Screen
■ Select Installation Type Screen ■ Prerequisite Checks Screen
■ Specify Installation Location Screen ■ Configure Components Screen ■ Specify WebLogic Domain Screen ■ Specify Component Details Screen
■ Web Cache Administrator Password Screen ■ Configure Ports Screen
Specify Inventory Directory Screen (UNIX Only)
A.1 Specify Inventory Directory Screen (UNIX Only)
This screen appears for UNIX systems only; if this is your first Oracle installation on this host, you must specify the location of the inventory directory. This inventory directory is used by the installer to keep track of all Oracle products installed on the computer.
The default inventory location is USER_HOME/oraInventory.
In the Operating System Group name field, select the group whose members you want to grant access to the inventory directory; all members of this group will be able to install products on this machine.
Inventory Location Confirmation Screen (UNIX Only)
A.2 Inventory Location Confirmation Screen (UNIX Only)
This screen appears for UNIX systems only; you are asked to run the
inventory_directory/createCentralInventory.sh script as root. If you do not have root access on this machine but wish to continue with the installation, select Continue installation with local inventory.
Welcome Screen
A.3 Welcome Screen
Select Installation Type Screen
A.4 Select Installation Type Screen
Select the type of installation you want to perform.
■ Install and Configure
This option will install the product binaries in an Oracle Home directory and create and configure a working instance in an Oracle Instance directory. After this is complete, you should be able to begin configuring and managing your products using the Administration Console or Enterprise Manager.
■ Install Software - Do Not Configure
This option only installs the software binaries in an Oracle Home directory. You must then manually run the Configuration Tool from your
Web_Tier_ORACLE_HOME/bin (on UNIX operating systems) or
Web_Tier_ORACLE_HOME\bin (on Windows operating systems) directory to configure your products before you can use them. This option can be used to quickly create multiple instances of the software that share a common disk.
Prerequisite Checks Screen
A.5 Prerequisite Checks Screen
If there is a problem, a short error message appears in the bottom portion of the screen. Fix the error and click Retry to try again.
If you want to ignore the error or warning messages and continue with the installation, click Continue.
Specify Installation Location Screen
A.6 Specify Installation Location Screen
Specify the following installation locations:
■ Oracle Middleware Home
The absolute path to the directory where WebLogic Server was installed.
■ Oracle Home Directory
The directory name for your Oracle home:
– You can specify a pre-existing directory that you want to use as the Oracle home; the directory must be an empty directory.
– You can specify the name of a new directory that will be created for you inside the Middleware home.
Your Oracle Home directory where your products will be installed. All software binaries will reside in this directory, and no runtime process can write to this directory.
If you are performing an installation on a Windows operating system, be sure that your directory paths are valid and do not contain double backslashes (\\).
For more information about the Middleware Home and Oracle Home directories, refer to "Oracle Fusion Middleware Directory Structure and Concepts" in Oracle Fusion Middleware Installation Planning Guide.
Note: This installation directory will be referred to as
Configure Components Screen
A.7 Configure Components Screen
This screen shows the products and components that are available for installation and configuration. Select the component(s) you want to configure. Oracle Process Manager Notification (OPMN) is configured by default.
Specify WebLogic Domain Screen
A.8 Specify WebLogic Domain Screen
This screen only appears if you selected Associate Selected Components with WebLogic Domain on the Configure Components Screen.
Specify the following WebLogic Domain credentials:
■ Domain Host Name
Specify the WebLogic Domain host name. The default name is localhost (same system as the one where you are installing Oracle Web Tier).
■ Domain Port No
Specify the WebLogic Domain port number. The default port number is 7001.
■ User Name
Specify the user name. The default user name is weblogic.
■ Password
Specify Component Details Screen
A.9 Specify Component Details Screen
Specify the following component details:
■ Instance Home Location
The absolute path to the directory where your Oracle Instance will reside. This is where application configuration files reside and where the application process runs from. Runtime components write only to this location.
■ Instance Name
Specify the unique name of your Oracle Instance. The Oracle Instance name may only contain alphanumeric and underscore (_) characters, it must begin with an alphabetic (a-z or A-Z) character, and must be 4 to 30 characters in length.
■ OHS Component Name
Specify the name for your Oracle HTTP Server (OHS) component. This name may only contain alphanumeric and underscore (_) characters, and must be 4 to 30 characters in length.
■ Web Cache Component Name
Specify the unique name of your Web Cache component. This name may only contain alphanumeric and underscore (_) characters, it must begin with an alphabetic (a-z or A-Z) character, and must be 4 to 30 characters in length. For more information, see "Oracle Fusion Middleware Concepts for All Users" in
Web Cache Administrator Password Screen
A.10 Web Cache Administrator Password Screen
Configure Ports Screen
A.11 Configure Ports Screen
Select Auto Port Configuration if you want the installer to automatically assign the default ports to the components. For a list of default port numbers, refer to Oracle Fusion Middleware Administrator's Guide.
Select Specify Ports Using File if you have already created a port configuration file that specifies the port numbers that you want to use for each component. Enter the full path and filename of this file in the Filename field, or click Browse to locate an existing file on your system.
A default file called staticports.ini is provided in the Disk1/stage/Response
(on UNIX operating systems) or Disk1\stage\Response (on Windows operating systems) directory on the CD-ROM. You can use this file as a template to create your own custom ports file.
After providing the location and name of a valid file, click View/Edit File to view or edit the contents of the file.
Note: If you choose to use the staticports.ini (or any custom port file), port numbers less than 1024 will not be validated by the installer. You will, however, be able to proceed with the installation. See "Port Numbers" in Oracle Fusion Middleware Administrator's Guide
for more information.
Specify Security Updates Screen
A.12 Specify Security Updates Screen
Enter your E-mail address if you want to receive the latest product information and security updates. If you have a My Oracle account and wish to receive updates via this mechanism, select I wish to receive security updates via My Oracle Support, then enter your account password.
If you do not wish to register for security updates, leave all the fields on this screen blank. You will be prompted to confirm your selection with the following screen:
Installation Summary Screen
A.13 Installation Summary Screen
Review the information on this screen, and click Install to begin the installation. The operations summarized on this page will be performed when you click Install. If you want to make any changes to the configuration before starting the installation, use the navigation pane and select the topic you want to edit.
If you want to save this configuration to a text file (called a response file), click Save. You will be prompted for the location of name of the file you want to create (for example, silent_install.rsp). This file can be used later if you choose to perform the same installation from the command line. Some sample response files are provided on the CD-ROM in the Disk1/stage/Response (on UNIX operating systems) or
Installation Progress Screen
A.14 Installation Progress Screen
This screen shows you the progress of the installation.
If you are installing on a UNIX system, you may be asked to run the
Web_Tier_ORACLE_HOME/oracleRoot.sh script as root user before the installation is completed:
Configuration Progress Screen
A.15 Configuration Progress Screen
This screen shows you the progress of the component configuration.
If there is a problem, a short error message appears in the bottom portion of the screen. Fix the error and click Retry to try again.
If you want to ignore the error or warning and continue with the configuration, click
Continue.
Click Abort to stop prerequisite checking for all components.
Installation Complete Screen
A.16 Installation Complete Screen
This screen summarizes the installation that was just completed.
At the end of the summary information, there is a section called Accessible URLs which give you the links needed to access the configured Oracle HTTP Server and Oracle Web Cache. You should make a note of these URLs so you can access these pages when you need to.
You can also save this summary information to a file for future reference by clicking
Save. You will be prompted to specify a name and location for your summary file. Click Finish to dismiss the screen.
B
Oracle Web Tier Deinstallation Screens
This appendix contains screenshots and descriptions for all of the Oracle Web Tier deinstallation screens:
■ Welcome Screen
■ Select Deinstallation Type Screen
■ Deinstall Oracle Home Screen
■ Specify WebLogic Domain Detail Screen
■ Select Managed Instance Screen
■ Specify Instance Location Screen
■ Deinstallation Summary Screen (Unmanaged Instance)
■ Deinstallation Summary Screen (Managed Instance)
■ Deinstallation Progress Screen
Welcome Screen
B.1 Welcome Screen
Select Deinstallation Type Screen
B.2 Select Deinstallation Type Screen
Select the type of deinstallation you want to perform:
■ Deinstall Oracle Home
Select this option to deinstall all binaries in the specified Oracle Home directory (the directory from which you started the deinstaller).
■ Deinstall ASInstances managed by WebLogic Domain
Select this option to deinstall a specific Oracle Instance and its system components that are registered to a WebLogic Domain.
■ Deinstall Unmanaged ASInstances
Select this option to deinstall all unmanaged Oracle Instances and their system components.
Deinstall Oracle Home Screen
B.3 Deinstall Oracle Home Screen
This screen only appears if you selected Deinstall Oracle Home on the Select Deinstallation Type Screen.
This screen shows the Oracle home directory that is about to be deinstalled. This is the Oracle home directory from which the deinstaller was started.
Verify that this is the correct directory, then click Next to continue. The following warning screen will appear:
Click Yes to remove the software and the Oracle home directory from which the deinstaller was started.
Specify WebLogic Domain Detail Screen
B.4 Specify WebLogic Domain Detail Screen
This screen only appears if you selected Deinstall ASInstances managed by WebLogic Domain on the Select Deinstallation Type Screen.
Specify the WebLogic Domain credentials:
■ Domain Host Name
The name of the system on which the WebLogic Domain is running.
■ Domain Port No
Listen port number of the domain. The default port number is 7001.
■ User Name
The WebLogic Domain user name.
■ Password
Select Managed Instance Screen
B.5 Select Managed Instance Screen
This screen only appears if you selected Deinstall ASInstances managed by WebLogic Domain on the Select Deinstallation Type Screen.
Select the managed instance you want to deinstall.
Click Next to continue.
Specify Instance Location Screen
B.6 Specify Instance Location Screen
This screen only appears if you selected Deinstall Unmanaged ASInstances on the
Select Deinstallation Type Screen.
Specify the full path to your Oracle Instance directory. If you are unsure, click Browse
Deinstallation Summary Screen (Unmanaged Instance)
B.7 Deinstallation Summary Screen (Unmanaged Instance)
This screen only appears if you selected Deinstall Unmanaged ASInstances on the
Select Deinstallation Type Screen.
Verify that the specified instance is the one you want to deinstall, then click Deinstall
Deinstallation Summary Screen (Managed Instance)
B.8 Deinstallation Summary Screen (Managed Instance)
This screen only appears if you selected Deinstall ASInstances managed by WebLogic Domain on the Select Deinstallation Type Screen.
Verify that the specified instance is the one you want to deinstall, then click Deinstall
Deinstallation Progress Screen
B.9 Deinstallation Progress Screen
This screen shows you the progress of the deinstallation.
Deinstallation Complete Screen
B.10 Deinstallation Complete Screen
C
Silent Installation and Deinstallation
This appendix describes how to install and remove Oracle Web Tier from the command line in silent mode. This appendix contains the following topics:
■ Section C.1, "About Silent Installation and Deinstallation"
■ Section C.3, "Oracle Web Tier Response Files"
C.1 About Silent Installation and Deinstallation
For information about silent installation and deinstallation, refer to "Silent Installation and Deinstallation" in Oracle Fusion Middleware Installation Planning Guide.
C.2 Creating a WebLogic Domain in Silent Mode
Oracle Web Tier can be installed as described in Section 1.2, "Methods of Installation"; the Oracle Web Tier installer does not provide a mechanism for creating an Oracle WebLogic Server domain.
If you are performing a silent installation of Oracle Web Tier without a WebLogic Server domain already configured on your system, and you want to associate your components with a WebLogic Server domain, you must use the procedure described in this section to create and enable a WebLogic Server domain using WebLogic Server Scripting Tool (WLST) scripts:
■ Task 1: Install the Latest Oracle WebLogic Server in Silent Mode
■ Task 2: Create the WebLogic Server Domain Using WLST
■ Task 3: Enable the WebLogic Server Domain with JRF and EM
■ Task 4: Start the Administration Server in the WebLogic Server Domain
■ Task 5: Verify the Domain is Up and Running
After the domain is created, you can run the Web Tier installer in silent mode using the response files to associate your components with the domain.
C.2.1 Task 1: Install the Latest Oracle WebLogic Server in Silent Mode
See "Product Distribution" in Oracle Fusion Middleware Installation Guide for Oracle WebLogic Server to obtain the latest software.