Oracle® Fusion Middleware
Installation Planning Guide
11g Release 1 (11.1.1)
B32474-12Oracle Fusion Middleware Installation Planning Guide 11g Release 1 (11.1.1) B32474-12
Copyright © 2011, Oracle and/or its affiliates. All rights reserved. Primary Author: Kevin Hwang
This software and related documentation are provided under a license agreement containing restrictions on use and disclosure and are protected by intellectual property laws. Except as expressly permitted in your license agreement or allowed by law, you may not use, copy, reproduce, translate, broadcast, modify, license, transmit, distribute, exhibit, perform, publish, or display any part, in any form, or by any means. Reverse engineering, disassembly, or decompilation of this software, unless required by law for interoperability, is prohibited.
The information contained herein is subject to change without notice and is not warranted to be error-free. If you find any errors, please report them to us in writing.
If this software or related documentation is delivered to the U.S. Government or anyone licensing it on behalf of the U.S. Government, the following notice is applicable:
U.S. GOVERNMENT RIGHTS Programs, software, databases, and related documentation and technical data delivered to U.S. Government customers are "commercial computer software" or "commercial technical data" pursuant to the applicable Federal Acquisition Regulation and agency-specific supplemental regulations. As such, the use, duplication, disclosure, modification, and adaptation shall be subject to the restrictions and license terms set forth in the applicable Government contract, and, to the extent applicable by the terms of the Government contract, the additional rights set forth in FAR 52.227-19, Commercial Computer Software License (December 2007). Oracle USA, Inc., 500 Oracle Parkway, Redwood City, CA 94065.
This software is developed for general use in a variety of information management applications. It is not developed or intended for use in any inherently dangerous applications, including applications which may create a risk of personal injury. If you use this software in dangerous applications, then you shall be responsible to take all appropriate fail-safe, backup, redundancy, and other measures to ensure the safe use of this software. Oracle Corporation and its affiliates disclaim any liability for any damages caused by use of this software in dangerous applications.
Oracle is a registered trademark of Oracle Corporation and/or its affiliates. Other names may be trademarks of their respective owners.
Contents
Preface
... ixIntended Audience... ix
Documentation Accessibility ... ix
Related Documents ... x
Conventions ... x
1
Understanding Your Installation Starting Point
1.1 Starting as a New Oracle Fusion Middleware User... 1-1 1.1.1 Using the Patch Set Installer... 1-1 1.1.1.1 Creating the Database Schemas... 1-2 1.1.1.2 Installing Oracle WebLogic Server ... 1-2 1.1.1.3 Installing Oracle Fusion Middleware Release 11g (11.1.1.2.0) Products ... 1-3 1.1.1.4 Updating Your Products to Release 11g (11.1.1.5.0) ... 1-3 1.1.1.5 Configuring Your Products and Creating Your WebLogic Domains... 1-4 1.1.2 Using the Product Installer... 1-4 1.1.2.1 Creating the Database Schemas... 1-4 1.1.2.2 Installing an Application Server... 1-4 1.1.2.3 Installing Oracle Fusion Middleware Release 11g (11.1.1.5.0) Products ... 1-5 1.1.2.4 Configuring Your Products and Creating the WebLogic Domains ... 1-5 1.2 Starting with Oracle Application Server 10g... 1-5 1.3 Starting with Oracle Fusion Middleware 11g (11.1.1.1.0) ... 1-6 1.3.1 Updating Oracle WebLogic Server to Version 10.3.2 ... 1-6 1.3.2 Installing Oracle Fusion Middleware 11g Release 1 (11.1.1.2.0) Products ... 1-7 1.3.3 Migrating Your 11g Release 1 (11.1.1.1.0) Configuration Data to 11g Release 1
(11.1.1.2.0) 1-8
1.3.4 Updating to 11g Release 1 (11.1.1.5.0) ... 1-8 1.4 Starting with Oracle Fusion Middleware 11g (11.1.1.2.0), 11g (11.1.1.3.0), and 11g
(11.1.1.4.0) 1-8
1.4.1 Update WebLogic Server... 1-8 1.4.2 Update Your Existing Software ... 1-8 1.4.3 Update Your Database Schemas... 1-9
2
Understanding Oracle Fusion Middleware Concepts and Directory Structure
2.2.1 Middleware Home and WebLogic Server Home Directories ... 2-1 2.2.2 Oracle Home and Oracle Common Home Directories ... 2-2 2.2.2.1 Creating the Product Oracle Home... 2-2 2.2.2.2 Creating the Oracle Common Home ... 2-3 2.2.2.3 Checking Port Numbers Across Multiple Oracle Homes... 2-3 2.2.3 WebLogic Server Domain... 2-3 2.2.4 Multiple Products with Multiple WebLogic Server Domains ... 2-4 2.2.4.1 Notes for Creating Multiple Domains ... 2-4 2.2.4.2 Additional Information for Multiple Products and Multiple Domains ... 2-5 2.2.5 Extending an Existing Domain ... 2-5 2.2.6 Oracle Instance and WebLogic Server Domain... 2-5
3
Common Installation Tasks
3.1 Before You Begin... 3-1 3.1.1 Review System Requirements and Specifications ... 3-1 3.1.2 Review Certification Information... 3-2 3.1.3 Review Interoperability and Compatibility... 3-2 3.1.4 Read and Understand Oracle Fusion Middleware Concepts... 3-2 3.1.5 Obtain the Oracle Fusion Middleware Software ... 3-2 3.1.6 Install an Application Server... 3-2 3.1.7 Install and Configure a Database ... 3-3 3.1.8 Create Operating System Users for IBM DB2 Databases... 3-3 3.2 Installing Oracle Configuration Manager ... 3-4 3.3 Understanding Installation and Configuration Privileges and Users... 3-4 3.3.1 Installation and Configuration Privileges ... 3-4 3.3.2 Installing as a Non-Default User on UNIX Operating Systems... 3-4 3.4 Installing and Configuring Java Access Bridge (Windows Only) ... 3-5 3.5 Installing on DHCP Hosts ... 3-5 3.5.1 For Linux x86 Platforms... 3-5 3.5.2 For Windows x86 Platforms... 3-5 3.5.3 Installing a Loopback Adapter (Windows Only)... 3-5 3.5.4 Removing a Loopback Adapter (Windows Only) ... 3-6 3.6 Installing on a Non-Networked Computer... 3-7 3.7 Installing on a Multihomed Computer ... 3-7 3.8 Checking Your Hosts File Entries for OPMN ... 3-7 3.9 Recovering From a Partial or Interrupted Installation ... 3-7 3.10 Creating and Starting Managed Servers on a Remote Machine ... 3-8
4
Silent Oracle Fusion Middleware Installation and Deinstallation
4.4 Silent Database Schema Creation ... 4-3 4.5 Silent Oracle WebLogic Server Installation... 4-3 4.6 Silent Product Installation ... 4-4 4.6.1 Sample Silent Install Commands... 4-6 4.6.2 Sample Silent Install Output ... 4-6 4.7 Silent Product Configuration ... 4-7 4.7.1 System Components... 4-7 4.7.2 Java Components ... 4-8 4.8 Silent Product Deinstallation... 4-8 4.8.1 Command Line Parameters for Silent Deinstallation... 4-8 4.8.2 Sample Silent Deinstall Output ... 4-10
Preface
The Oracle Fusion Middleware Installation Planning Guide covers common Oracle Fusion Middleware concepts that affect installation, installation procedures, and
troubleshooting.
Intended Audience
This guide is intended for users who are installing Oracle Fusion Middleware products for the first time and are comfortable running some system administration operations, such as creating users and groups, adding users to groups, and installing operating system patches on the computer where the products are going to be installed. Users on UNIX systems who are installing Oracle Fusion Middleware need root access to run some scripts.
Documentation Accessibility
Our goal is to make Oracle products, services, and supporting documentation accessible to all users, including users that are disabled. To that end, our
documentation includes features that make information available to users of assistive technology. This documentation is available in HTML format, and contains markup to facilitate access by the disabled community. Accessibility standards will continue to evolve over time, and Oracle is actively engaged with other market-leading
technology vendors to address technical obstacles so that our documentation can be accessible to all of our customers. For more information, visit the Oracle Accessibility Program Web site at http://www.oracle.com/accessibility/.
Accessibility of Code Examples in Documentation
Screen readers may not always correctly read the code examples in this document. The conventions for writing code require that closing braces should appear on an
otherwise empty line; however, some screen readers may not always read a line of text that consists solely of a bracket or brace.
Accessibility of Links to External Web Sites in Documentation
This documentation may contain links to Web sites of other companies or
organizations that Oracle does not own or control. Oracle neither evaluates nor makes any representations regarding the accessibility of these Web sites.
Deaf/Hard of Hearing Access to Oracle Support Services
process. Information about TRS is available at
http://www.fcc.gov/cgb/consumerfacts/trs.html, and a list of phone numbers is available at http://www.fcc.gov/cgb/dro/trsphonebk.html.
Related Documents
For additional information, see the following manuals:
■ Oracle Fusion Middleware Repository Creation Utility User's Guide
■ Oracle Fusion Middleware Installation Guide for Oracle Enterprise Content Management
Suite
■ Oracle Fusion Middleware Installation Guide for Oracle WebLogic Server
■ Oracle Fusion Middleware Installation Guide for Oracle SOA Suite and Oracle Business
Process Management Suite
■ Oracle Fusion Middleware Installation Guide for Oracle WebCenter
■ Oracle Fusion Middleware Installation Guide for Oracle Identity Management ■ Oracle Fusion Middleware Installation Guide for Oracle Portal, Forms, Reports and
Discoverer
■ Oracle Fusion Middleware Installation Guide for Oracle Web Tier ■ Oracle Fusion Middleware Administrator's Guide
■ Oracle Fusion Middleware Concepts
■ Oracle Fusion Middleware High Availability Guide
Conventions
The following text conventions are used in this document:
Convention Meaning
boldface Boldface type indicates graphical user interface elements associated with an action, or terms defined in text or the glossary.
italic Italic type indicates book titles, emphasis, or placeholder variables for which you supply particular values.
1
Understanding Your Installation Starting
Point
Oracle Fusion Middleware is a collection of standards-based software products that spans a range of tools and services from J2EE and developer tools, to integration services, business intelligence, collaboration, and content management. Oracle Fusion Middleware offers complete support for development, deployment, and management.
This guide provides important information about preparing your system and
instructions for obtaining the latest version of Oracle Fusion Middleware, which is 11g
Release 1 (11.1.1.5.0). The procedures you will need to follow will vary depending on the configuration of your existing system.
Find the starting point that best describes your current environment and go to that section for more information:
■ Section 1.1, "Starting as a New Oracle Fusion Middleware User"
■ Section 1.2, "Starting with Oracle Application Server 10g"
■ Section 1.3, "Starting with Oracle Fusion Middleware 11g (11.1.1.1.0)"
■ Section 1.4, "Starting with Oracle Fusion Middleware 11g (11.1.1.2.0), 11g
(11.1.1.3.0), and 11g (11.1.1.4.0)"
1.1 Starting as a New Oracle Fusion Middleware User
If you are a new Oracle Fusion Middleware user, there are two methods to installing 11g Release 1 (11.1.1.5.0), depending on the product:
■ If you are installing Oracle Identity Management or Oracle Web Tier, go to
Section 1.1.1, "Using the Patch Set Installer".
■ If you are installing any other Oracle Fusion Middleware product, go to
Section 1.1.2, "Using the Product Installer".
1.1.1 Using the Patch Set Installer
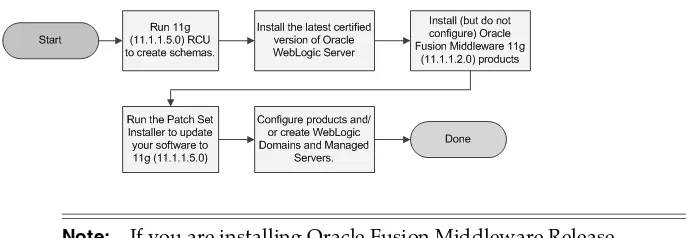
If you are installing Oracle Identity Management or Oracle Web Tier for the first time, you cannot install any other 11g Release (11.1.1.5.0) products directly, as the installers for this release are designed only to patch an existing installation. Therefore, you must install the latest full versions of your product, which are available in 11g Release 1 (11.1.1.2.0). Then you must patch your installation to update your software to the latest version. This process involves the following:
Starting as a New Oracle Fusion Middleware User
■ Installing Oracle WebLogic Server
■ Installing Oracle Fusion Middleware Release 11g (11.1.1.2.0) Products
■ Updating Your Products to Release 11g (11.1.1.5.0)
■ Configuring Your Products and Creating Your WebLogic Domains
Figure 1–1 illustrates the overall installation and configuration flow.
Figure 1–1 Installing Release 11.1.1.5.0 Using the Patch Set Installer
1.1.1.1 Creating the Database Schemas
Installation of most Oracle Fusion Middleware products requires the availability of a database (only Oracle Web Tier does not require a database). This database must be up and running, and does not have to be on the same system where you are installing the components. The database must also be compatible with Repository Creation Utility (RCU), which is used to create the schemas necessary for your Oracle Fusion
Middleware components.
For information about which databases are certified for use with Oracle Fusion Middleware and RCU, and important database configuration information, see "RCU System and Database Requirements" in Oracle Fusion Middleware Repository Creation Utility User's Guide.
After your database is installed and configured, run the latest version of RCU to create your schemas. For instructions, see "Creating Schemas" in Oracle Fusion Middleware Repository Creation Utility User's Guide.
1.1.1.2 Installing Oracle WebLogic Server
All Oracle Fusion Middleware products (except for Oracle WebTier) require an application server on your system. For all products other than Oracle Application
Note: Oracle WebLogic Server is not included in this list of products as it has its own installer for new installations or upgrade installers for patching existing installations.
Note: If you are installing Oracle Fusion Middleware Release 11.1.1.5.0 on a SUSE11 Linux platform, take note of the following:
The SUSE11 Linux platform is only supported for Release 11.1.1.3.0 and later. Because you must first install Release 11.1.1.2.0 (which does not support SUSE11) and then patch your software to Release
Starting as a New Oracle Fusion Middleware User
Developer and Oracle SOA Suite and Business Process Management Suite, Oracle WebLogic Server is the only supported application server.
You should be installing the latest available version or Oracle WebLogic Server, as listed in the System Requirements and Supported Platforms for Oracle Fusion Middleware 11gR1 document on the following page:
http://www.oracle.com/technetwork/middleware/ias/downloads/fusion-certi fication-100350.html
All Oracle Fusion Middleware products must be installed in the Oracle Middleware home directory, which can be created by installing Oracle WebLogic Server.
For installation instructions, refer to "Running the Installation Program in Graphical Mode" in Oracle Fusion Middleware Installation Guide for Oracle WebLogic Server.
1.1.1.3 Installing Oracle Fusion Middleware Release 11
g
(11.1.1.2.0) Products
After the schemas and Oracle WebLogic Server are installed, you are ready to install your Oracle Fusion Middleware products.
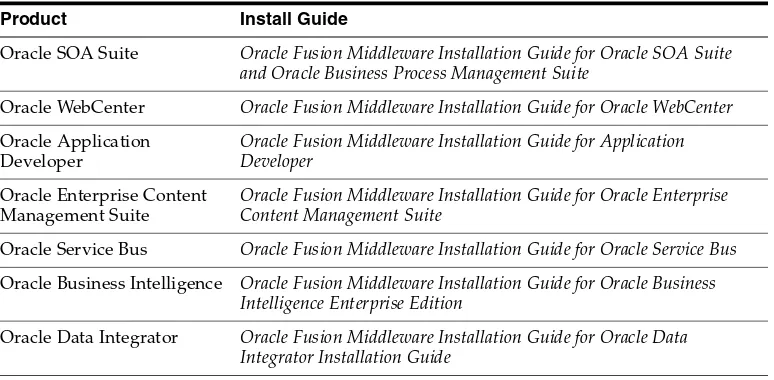
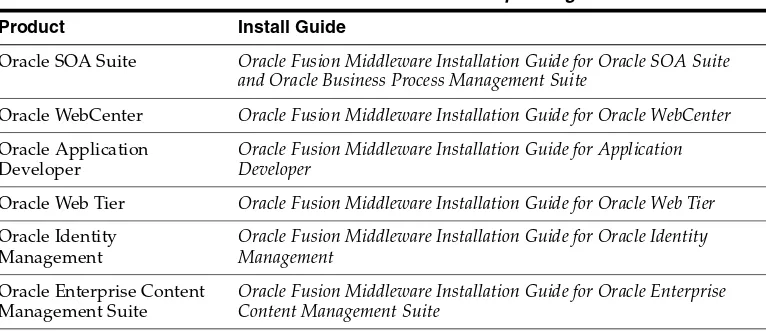
Table 1–1 lists the Oracle Fusion Middleware product along with its corresponding installation guide. Follow the instructions in the installation guide to install your products:
1.1.1.4 Updating Your Products to Release 11
g
(11.1.1.5.0)
Run the Patch Set Installer to update your software to the latest version. For
instructions, see "Applying the Latest Oracle Fusion Middleware Patch Set" in Oracle Fusion Middleware Patching Guide.
Note: You must install but do not configure the 11g Release 1 (11.1.1.2.0) version of your product. You should only configure your products after you have run the Patch Set Installer and updated your software to the latest version.
When you run the installer, you should select the Install Software - Do Not Configure installation type on the Select Installation Type screen.
If you happen to configure your products before you upgrade your software to the latest version, you must follow the instructions in Section 1.4, "Starting with Oracle Fusion Middleware 11g (11.1.1.2.0), 11g (11.1.1.3.0), and 11g (11.1.1.4.0)" in order to properly upgrade and configure your software.
Table 1–1 Oracle Fusion Middleware Products and Corresponding Install Guides
Product Install Guide
Oracle Web Tier Oracle Fusion Middleware Installation Guide for Oracle Web Tier
Oracle Identity Management
Starting as a New Oracle Fusion Middleware User
1.1.1.5 Configuring Your Products and Creating Your WebLogic Domains
After your products are installed, you must configure them for use. To do so, run the OUI-based configuration tool from bin directory inside your product’s Oracle home directory to create a WebLogic Domain, Oracle instances and Managed Servers.
Please note that this configuration tool is not the same as the Configuration Wizard that is available with Oracle Application Developer, Oracle WebCenter, Oracle SOA Suite and Business Process Management Suite, or Oracle Service Bus. Instructions for running the configuration tool for system components can be found in the various product installation guides (see Table 1–1).
1.1.2 Using the Product Installer
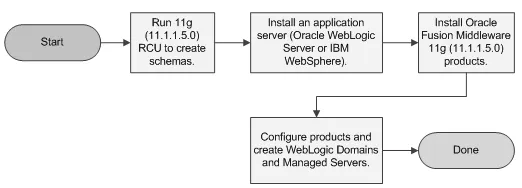
Installing a Release 11.1.1.5.0 Oracle Fusion Middleware product using the product installer involves the following:
■ Creating the Database Schemas
■ Installing an Application Server
■ Installing Oracle Fusion Middleware Release 11g (11.1.1.5.0) Products
■ Configuring Your Products and Creating the WebLogic Domains
Figure 1–2 illustrates the overall installation and configuration flow.
Figure 1–2 Installing Release 11.1.1.5.0 Using the Product Installer
1.1.2.1 Creating the Database Schemas
See Section 1.1.1.1, "Creating the Database Schemas".
1.1.2.2 Installing an Application Server
All Oracle Fusion Middleware products (except for Oracle WebTier) require an application server on your system. For Oracle Application Developer or Oracle SOA Suite and Business Process Management Suite you can choose to install Oracle
Note: If you are a new Oracle Fusion Middleware user, you should only read the following sections in this chapter:
■ "Summary of the Patch Set Installation Process"
■ "Perform General Pre-Patching Tasks"
■ "Download and Start the Product Installer or Patch Set Installer"
■ "Patch Set Installer Instructions"
Starting with Oracle Application Server 10g
WebLogic Server or IBM WebSphere as the application server. Refer to the System Requirements and Supported Platforms for Oracle Fusion Middleware 11gR1 document to determine the certified versions of these application servers for installation on your system. You should be installing the latest available version:
http://www.oracle.com/technetwork/middleware/ias/downloads/fusion-certi fication-100350.html
All Oracle Fusion Middleware products must be installed in the Oracle Middleware home directory, which can be created by installing Oracle WebLogic Server as the application server on your system. If you choose to use IBM WebSphere as your application server, you must manually create a Middleware home directory in which you can install your Oracle Fusion Middleware products.
For Oracle WebLogic Server installation instructions, refer to "Running the Installation Program in Graphical Mode" in Oracle Fusion Middleware Installation Guide for Oracle WebLogic Server.
1.1.2.3 Installing Oracle Fusion Middleware Release 11
g
(11.1.1.5.0) Products
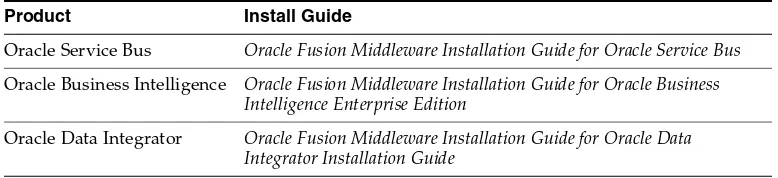
Table 1–2 lists the Oracle Fusion Middleware product along with its corresponding installation guide. Follow the instructions in the installation guide to install your products:
1.1.2.4 Configuring Your Products and Creating the WebLogic Domains
After your products are installed, you must configure them for use. To do so, run the Fusion Middleware Configuration Wizard to create your WebLogic Domain,
Administration Server, and various Managed Servers.
Information about creating domains and Managed Servers with the Configuration Wizard can be found in Oracle Fusion Middleware Creating Domains Using the
Configuration Wizard. For Oracle Enterprise Content Management, this information can also be found in Oracle Fusion Middleware Installation Guide for Oracle Enterprise Content Management Suite.
1.2 Starting with Oracle Application Server 10
g
For information on upgrading from Oracle Application Server 10g to Oracle Fusion Middleware 11g Release 1 (11.1.1.5.0), refer to the Oracle Fusion Middleware Upgrade
Table 1–2 Oracle Fusion Middleware Products and Corresponding Install Guides
Product Install Guide
Oracle SOA Suite Oracle Fusion Middleware Installation Guide for Oracle SOA Suite and Oracle Business Process Management Suite
Oracle WebCenter Oracle Fusion Middleware Installation Guide for Oracle WebCenter
Oracle Application Developer
Oracle Fusion Middleware Installation Guide for Application Developer
Oracle Enterprise Content Management Suite
Oracle Fusion Middleware Installation Guide for Oracle Enterprise Content Management Suite
Oracle Service Bus Oracle Fusion Middleware Installation Guide for Oracle Service Bus
Oracle Business Intelligence Oracle Fusion Middleware Installation Guide for Oracle Business Intelligence Enterprise Edition
Starting with Oracle Fusion Middleware 11g (11.1.1.1.0)
Planning Guide, as well as the other upgrade guides in the Oracle Fusion Middleware 11g documentation library:
■ Oracle Fusion Middleware Upgrade Guide for Java EE
■ Oracle Fusion Middleware Upgrade Guide for Oracle Portal, Forms, Reports, and
Discoverer
■ Oracle Fusion Middleware Upgrade Guide for Oracle Identity Management
■ Oracle Fusion Middleware Upgrade Guide for Oracle SOA Suite, WebCenter, and ADF ■ Oracle Fusion Middleware Upgrade Guide for Oracle WebCenter Suite
1.3 Starting with Oracle Fusion Middleware 11
g
(11.1.1.1.0)
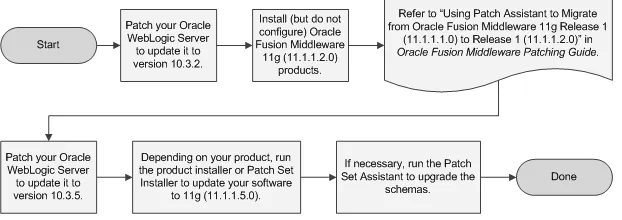
If your existing Oracle Fusion Middleware software is 11g Release 1 (11.1.1.1.0), you must first migrate your existing software and configuration data to 11g Release 1 (11.1.1.2.0), and then update the software to 11g Release 1 (11.1.1.5.0).
Updating to 11g Release 1 (11.1.1.2.0) involves the following:
■ Updating Oracle WebLogic Server to Version 10.3.2
■ Installing Oracle Fusion Middleware 11g Release 1 (11.1.1.2.0) Products
■ Migrating Your 11g Release 1 (11.1.1.1.0) Configuration Data to 11g Release 1
(11.1.1.2.0)
After this is complete, you should follow the instructions in Section 1.4, "Starting with Oracle Fusion Middleware 11g (11.1.1.2.0), 11g (11.1.1.3.0), and 11g (11.1.1.4.0)" to complete updating your software to the latest version.
Figure 1–3 illustrates the overall installation and configuration flow.
Figure 1–3 Install Flow for Existing 11g (11.1.1.1.0) Users
1.3.1 Updating Oracle WebLogic Server to Version 10.3.2
You must first update the version of Oracle WebLogic Server on your system to 10.3.2. In order to update your WebLogic Server, you must have a My Oracle Support account.
Starting with Oracle Fusion Middleware 11g (11.1.1.1.0)
If you have Oracle WebLogic Server version 10.2.x or earlier, then you must refer to the upgrade instructions in Oracle Fusion Middleware Upgrade Guide for Oracle WebLogic Server.
1.3.2 Installing Oracle Fusion Middleware 11g Release 1 (11.1.1.2.0) Products
Before you can patch your software to 11g Release 1 (11.1.1.4.0), you must first install the latest full versions of your product, which are available in 11g Release 1 (11.1.1.2.0). Make sure that you do not configure your products. The following products offer installers which are separate from the configuration tool, meaning you should install the software only, and do not run the configuration tool:
■ Oracle SOA Suite and Business Process Management Suite
■ Oracle WebCenter
■ Oracle Application Developer
■ Oracle Service Bus
■ Oracle Enterprise Content Management Suite
The following products offer two installation types: Install and Configure and Install Software - Do Not Configure:
■ Oracle Identity Management
■ Oracle Web Tier
■ Oracle Data Integrator
■ Oracle Business Intelligence
For these products, make sure you select the Install Software - Do Not Configure
installation type.
Table 1–3 lists the Oracle Fusion Middleware product along with its corresponding installation guide. Follow the instructions in the installation guide to install your products:
Note: This link will take you to a document in the Release 11.1.1.3.0 documentation library. The instructions, however, are applicable for updating your Oracle WebLogic Server to 10.3.2, which is the version supported in Release 11.1.1.2.0.
Table 1–3 Oracle Fusion Middleware Products and Corresponding Install Guides
Product Install Guide
Oracle SOA Suite Oracle Fusion Middleware Installation Guide for Oracle SOA Suite and Oracle Business Process Management Suite
Oracle WebCenter Oracle Fusion Middleware Installation Guide for Oracle WebCenter
Oracle Application Developer
Oracle Fusion Middleware Installation Guide for Application Developer
Oracle Web Tier Oracle Fusion Middleware Installation Guide for Oracle Web Tier
Oracle Identity Management
Oracle Fusion Middleware Installation Guide for Oracle Identity Management
Oracle Enterprise Content Management Suite
Starting with Oracle Fusion Middleware 11g (11.1.1.2.0), 11g (11.1.1.3.0), and 11g (11.1.1.4.0)
1.3.3 Migrating Your 11g Release 1 (11.1.1.1.0) Configuration Data to 11g Release 1
(11.1.1.2.0)
After you have upgraded your software, you must run the Patch Assistant tool to migrate your data to the updated version. For instructions, refer to "Using Patch Assistant to Migrate from Oracle Fusion Middleware 11g Release 1 (11.1.1.1.0) to Release 1 (11.1.1.2.0)" in Oracle Fusion Middleware Patching Guide.
1.3.4 Updating to 11g Release 1 (11.1.1.5.0)
Now that your software is updated to Release 1 (11.1.1.2.0), follow the instructions in Section 1.4, "Starting with Oracle Fusion Middleware 11g (11.1.1.2.0), 11g (11.1.1.3.0), and 11g (11.1.1.4.0)" to update your software to the latest version.
1.4 Starting with Oracle Fusion Middleware 11
g
(11.1.1.2.0), 11
g
(11.1.1.3.0), and 11
g
(11.1.1.4.0)
Figure 1–4 illustrates the overall installation and configuration flow.
Figure 1–4 Install Flow for Existing 11g (11.1.1.2.0), 11g (11.1.1.3.0), and 11g (11.1.1.4.0) Users
1.4.1 Update WebLogic Server
You must first update the version of Oracle WebLogic Server on your system to 10.3.5. In order to update your WebLogic Server, you must have a My Oracle Support account.
If you have Oracle WebLogic Server version 10.3.0, 10.3.1, 10.3.2, 10.3.3, or 10.3.4, use the upgrade installers to upgrade your WebLogic Server to 10.3.5. For more
information, see "Downloading an Upgrade Installer From My Oracle Support" in
Oracle Fusion Middleware Installation Guide for Oracle WebLogic Server.
If you have Oracle WebLogic Server version 10.2.x or earlier, then you must refer to the upgrade instructions in Oracle Fusion Middleware Upgrade Guide for Oracle WebLogic Server.
1.4.2 Update Your Existing Software
If you are updating Oracle Identity Management or Oracle Web Tier, download and use the Patch Set Installer to update your existing software to the latest version. For all Oracle Service Bus Oracle Fusion Middleware Installation Guide for Oracle Service Bus
Oracle Business Intelligence Oracle Fusion Middleware Installation Guide for Oracle Business Intelligence Enterprise Edition
Oracle Data Integrator Oracle Fusion Middleware Installation Guide for Oracle Data Integrator Installation Guide
Table 1–3 (Cont.) Oracle Fusion Middleware Products and Corresponding Install Guides
Starting with Oracle Fusion Middleware 11g (11.1.1.2.0), 11g (11.1.1.3.0), and 11g (11.1.1.4.0)
other Oracle Fusion Middleware products, download and use the latest product installer to update your existing software to the latest version.
Refer to "Applying the Latest Oracle Fusion Middleware Patch Set" in Oracle Fusion Middleware Patching Guide for instructions.
Oracle WebCenter and Oracle Identity and Access Management have special patching instructions. For more information, see "Patching Oracle WebCenter" and "Patching Oracle Identity and Access Management 11.1.1.3.0 to 11.1.1.5.0" in Oracle Fusion Middleware Patching Guide.
1.4.3 Update Your Database Schemas
Run the Patch Set Assistant to upgrade the existing schemas in your database to the latest version. To see which schemas need to be upgraded, refer to "Which Schemas Need to be Updated with Patch Set Assistant?" in Oracle Fusion Middleware Patching Guide.
2
Understanding Oracle Fusion Middleware
Concepts and Directory Structure
During the installation process, you will be asked for a variety of directory locations. This section defines each of these directories and explains the contents of each directory.
This chapter contains the following content:
■ Section 2.1, "Oracle Fusion Middleware Concepts"
■ Section 2.2, "Oracle Fusion Middleware Directory Structure"
2.1 Oracle Fusion Middleware Concepts
For more information about important Oracle Fusion Middleware concepts for all users, refer to Oracle Fusion Middleware Concepts.
2.2 Oracle Fusion Middleware Directory Structure
This section describes the various directories that are created when you install Oracle Fusion Middleware products.
2.2.1 Middleware Home and WebLogic Server Home Directories
All Oracle Fusion Middleware products (except for Oracle Web Tier) require the presence of an application server on your system. All Oracle Fusion Middleware products support Oracle WebLogic Server as the application server. Beginning with 11g Release 1 (11.1.1.4.0), the following products also support IBM WebSphere as the application server:
■ Oracle Application Developer
■ Oracle SOA Suite and Business Process Management Suite
The top-level directory for all Oracle Fusion Middleware products is called the Middleware home; this directory serves as a container for the Oracle WebLogic Server home, Oracle Common home, and one or more product Oracle homes. The
Middleware home directory is created when Oracle WebLogic Server is installed. If you choose to use IBM WebSphere as your application server, then you must still manually create a Middleware home directory where your Oracle Fusion Middleware products will be installed.
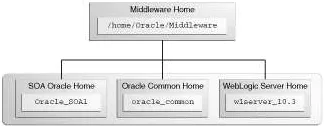
Oracle Fusion Middleware Directory Structure
Figure 2–1 Directory Structure after an Oracle WebLogic Server Installation
Some of the notable directories in the Middleware home are the WebLogic Server home (wlserver_10.3), the directory for the JDK which you can use for product installations (jdk160_21), and the Oracle Coherence directory, which is used by Oracle Service Bus for its business service result caching functionality (coherence_ 3.6).
If you choose to use IBM WebSphere as your application server, a WebSphere home is created with the IBM WebSphere installation, but you must also manually create a Middleware home, as shown in Figure 2–2:
Figure 2–2 Directory Structure after an IBM WebSphere Installation and Middleware Home
The Middleware home and WebSphere home do not have any relation to each other and can be located anywhere on your system.
2.2.2 Oracle Home and Oracle Common Home Directories
Each Oracle Fusion Middleware product must be installed in its own Oracle home location. When a product is installed, two Oracle home directories are created: the product Oracle home and the Oracle Common home.
The product’s software binaries will be installed into the product Oracle home; no runtime process can write to this directory.
The Oracle Common home contains the binary and library files required for the Oracle Enterprise Manager Fusion Middleware Control and Java Required Files (JRF). There can be only one Oracle Common home within each Middleware home.
Both the product Oracle home (in the example shown in Figure 2–3, the SOA Oracle home) and Oracle Common home directories must reside inside an existing
Middleware home directory:
Figure 2–3 Directory Structure with Oracle Home Directories
2.2.2.1 Creating the Product Oracle Home
The product Oracle home directory can be created in the following ways:
■ Before running the installation, you can create your Oracle home directory on your
Oracle Fusion Middleware Directory Structure
directory, and it must also be an empty directory. Then, when you run the installer and are asked to provide the location of your Oracle home, you can specify the directory you have created.
■ While running the installer, you can specify the name of a new directory. This
directory will automatically be created for you by the installer and will be located inside the Middleware home directory.
2.2.2.2 Creating the Oracle Common Home
The Oracle Common home directory is created in the following ways:
■ Installing Oracle Application Developer. For more information, see the Oracle
Fusion Middleware Installation Guide for Application Developer.
■ Installing any Oracle Fusion Middleware product. The directory oracle_common
is automatically created inside the Middleware home directory.
2.2.2.3 Checking Port Numbers Across Multiple Oracle Homes
Each product requires its own Oracle home directory. If you are creating an
environment where you will have multiple products (and therefore, multiple Oracle home directories), Oracle recommends that you use the staticports.ini file, so that you will have a record of all the ports that are in use on your system to help avoid conflicts.
To use the staticports.ini file, select Specify Ports using Configuration file on the Configure Ports screen during installation.
2.2.3 WebLogic Server Domain
After a product is installed, it can be configured into a WebLogic Server domain. See
Oracle Fusion Middleware Concepts for more information about WebLogic Server domains.
During configuration, on the "Specify Domain Name and Location" screen, you will be asked for the location where you want to store data for your domains and
applications. Specifically, you will be asked for:
■ Domain name
■ Domain location
■ Application location
The domain location and domain name together are referred to as the domain home. For example, on a UNIX operating system, if you specified
/home/Oracle/Middleware/domains as your domain location and soa_domain as your domain name, the domain home would be
/home/Oracle/Middleware/domains/soa_domain.
The application location and domain name together are referred to as the application home. For example, on a Windows operating system, if you specified
C:\Oracle\Middleware\applications as your application location, then the application home would be C:\Oracle\Middleware\applications\soa_ domain.
Note that a directory with the specified domain name is created in both the specified domain location and application location.
Oracle Fusion Middleware Directory Structure
user_projects/domains under the Middleware home. The default location for the application home is user_projects/applications, also under the Middleware home. It is recommended that you create your domain home and application home outside of both the Middleware home and Oracle home directories, so that in the event you need to patch either the Middleware home or Oracle home, your domain and application information would remain untouched.
For more information about domain configuration, see the Installation Guide for your product. For recommendations about configuring a domain in an enterprise
production environment, see the Enterprise Deployment Guide for your product.
Figure 2–4 Directory Structure after a WebLogic Server Domain is Created
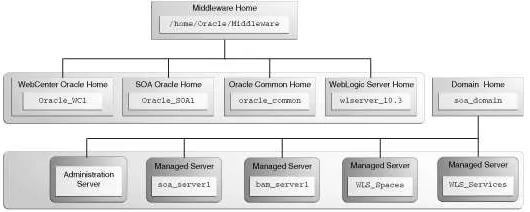
2.2.4 Multiple Products with Multiple WebLogic Server Domains
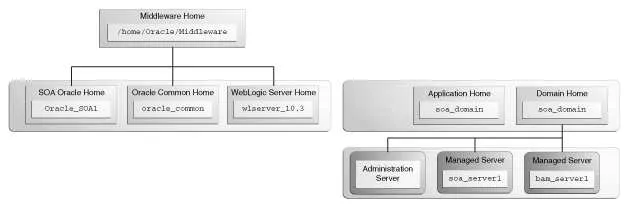
If you install multiple products and choose to create a separate domain for each product, then your directory structure would look something like the one shown in Figure 2–5:
Figure 2–5 Directory Structure with Multiple Oracle Fusion Middleware Products
Notice that each product has its own Oracle home directory. To differentiate among all the product Oracle home directories, the install guides typically refer to each Oracle home by product name; for example, the Oracle home for Oracle SOA Suite is referred to as the SOA Oracle home, while the Oracle home for Oracle WebCenter Suite is referred to as the WebCenter Oracle home.
2.2.4.1 Notes for Creating Multiple Domains
Oracle Fusion Middleware Directory Structure
domain might have the name wc_domain, while the SOA domain could be called soa_domain. Refer to the product installation guides for more information.
When you are configuring multiple domains, you must also make sure that the Administration Server and Managed Servers in each domain use a unique port number. There is no provision for checking port numbers across multiple domains, so you will have to keep track of this manually.
To customize the Administration Server port number, select Administration Server on the "Select Optional Configuration" screen in the Configuration Wizard. This will cause the Configure the Administration Server screen to appear, on which you can specify the Administration Server port number.
To customize the Managed Server port numbers, select Managed Servers, Clusters and Machines on the "Select Optional Configuration" screen in the Configuration Wizard. This will cause the Configure Manager Servers screen to appear, on which you can specify the port numbers for your managed servers.
2.2.4.2 Additional Information for Multiple Products and Multiple Domains
For more information about multiple products and multiple domains, refer to the following documentation:
■ Oracle Fusion Middleware Enterprise Deployment Guide for Oracle SOA Suite ■ Oracle Fusion Middleware Enterprise Deployment Guide for Oracle WebCenter
■ Oracle Fusion Middleware Enterprise Deployment Guide for Oracle Identity Management
2.2.5 Extending an Existing Domain
During installation and configuration, you may chose to extend an existing domain rather than creating a new domain. Extending a domain means that you add products and funtionality to an existing domain. If, for example, you first install Oracle SOA Suite to create a new domain, then install Oracle WebCenter while choosing to extend the existing Oracle SOA Suite domain, then your topology would look like the one shown in Figure 2–6:
Figure 2–6 Directory Structure with Multiple Oracle Fusion Middleware Products in a Single Domain
In essence, you are adding the products and functionality of Oracle WebCenter Suite to the existing Oracle SOA Suite domain.
2.2.6 Oracle Instance and WebLogic Server Domain
Oracle Fusion Middleware Directory Structure
consists of Java components) while the other product (Oracle WebTier) is configured in an Oracle Instance (because it consists of system components):
Figure 2–7 Directory Structure with an Oracle Instance and a WebLogic Server Domain
3
Common Installation Tasks
This chapter describes some common tasks that should be performed prior to beginning any Oracle Fusion Middleware installation.
The following topics are covered:
■ Section 3.1, "Before You Begin"
■ Section 3.2, "Installing Oracle Configuration Manager"
■ Section 3.3, "Understanding Installation and Configuration Privileges and Users"
■ Section 3.4, "Installing and Configuring Java Access Bridge (Windows Only)"
■ Section 3.5, "Installing on DHCP Hosts"
■ Section 3.6, "Installing on a Non-Networked Computer"
■ Section 3.7, "Installing on a Multihomed Computer"
■ Section 3.8, "Checking Your Hosts File Entries for OPMN"
■ Section 3.9, "Recovering From a Partial or Interrupted Installation"
■ Section 3.10, "Creating and Starting Managed Servers on a Remote Machine"
3.1 Before You Begin
This section contains important information that you should read before you begin to install or upgrade your system:
■ Section 3.1.1, "Review System Requirements and Specifications"
■ Section 3.1.2, "Review Certification Information"
■ Section 3.1.3, "Review Interoperability and Compatibility"
■ Section 3.1.4, "Read and Understand Oracle Fusion Middleware Concepts"
■ Section 3.1.5, "Obtain the Oracle Fusion Middleware Software"
■ Section 3.1.6, "Install an Application Server"
■ Section 3.1.7, "Install and Configure a Database"
■ Section 3.1.8, "Create Operating System Users for IBM DB2 Databases"
3.1.1 Review System Requirements and Specifications
Before performing any upgrade or installation you should read the system
Before You Begin
The system requirements document covers information such as hardware and software requirements, database schema requirements, minimum disk space and memory requirements, and required system libraries, packages, or patches:
http://www.oracle.com/technetwork/middleware/ias/downloads/fusion-requi rements-100147.html
3.1.2 Review Certification Information
Before performing any upgrade or installation you should read the "Oracle Fusion Middleware Supported System Configurations" document. This document contains certification information related to supported 32-bit and 64-bit operating systems, databases, web servers, LDAP servers, adapters, IPv6, JDKs, and third-party products. It is located on the following page:
http://www.oracle.com/technetwork/middleware/ias/downloads/fusion-certi fication-100350.html
3.1.3 Review Interoperability and Compatibility
Before performing any upgrade or installation you should read Oracle Fusion
Middleware Interoperability and Compatibility Guide. This document contains important information regarding the ability of Oracle Fusion Middleware products to function with previous versions of other Oracle Fusion Middleware, Oracle, or third-party products. This information is applicable to both new Oracle Fusion Middleware users and existing users who are upgrading their existing environment.
3.1.4 Read and Understand Oracle Fusion Middleware Concepts
If you are new to Oracle Fusion Middleware, you should read Chapter 2,
"Understanding Oracle Fusion Middleware Concepts and Directory Structure" to familiarize yourself with some of the concepts and terminology you will encounter. You should also be familiar with the concepts described in Oracle Fusion Middleware Concepts before proceeding with an installation or upgrade.
3.1.5 Obtain the Oracle Fusion Middleware Software
Depending on your specific needs, there are multiple places where you can obtain Oracle Fusion Middleware software. For details, see "Task 4: Select an Oracle Fusion Middleware Software Download Site" in the Oracle Fusion Middleware Download, Installation, and Configuration ReadMe:
http://download.oracle.com/docs/html/E18749_01/download_readme.htm
3.1.6 Install an Application Server
All Oracle Fusion Middleware products (except for Oracle Web Tier) require the presence of an application server on your system. All Oracle Fusion Middleware products support Oracle WebLogic Server as the application server. Beginning with 11g Release 1 (11.1.1.4.0), the following products also support IBM WebSphere as the application server:
■ Oracle Application Developer
■ Oracle SOA Suite and Business Process Management Suite
Before You Begin
WebSphere as your application server, you must manually create a separate
Middleware home directory, in which you can install your Oracle Fusion Middleware products.
For more information about the installation directory structure, see Section 2.2, "Oracle Fusion Middleware Directory Structure".
To determine the version of Oracle WebLogic Server or IBM WebSphere required for your installation, refer to the "Oracle Fusion Middleware Supported System
Configurations" document on the following page:
http://www.oracle.com/technetwork/middleware/ias/downloads/fusion-certi fication-100350.html
For instructions on how to install Oracle WebLogic Server, see "Running the
Installation Program in Graphical Mode" in Oracle Fusion Middleware Installation Guide for Oracle WebLogic Server.
For instructions on how to install IBM WebSphere, see Oracle Fusion Middleware Third-Party Application Server Guide.
3.1.7 Install and Configure a Database
Some Oracle Fusion Middleware products, such as Oracle SOA Suite and Oracle WebCenter, require an metadata repository with schemas before those products can be successfully configured. To create or update schemas in a database, use the Repository Creation Utility (RCU).
For more information about managing metadata repositories, refer to "Managing the Oracle Metadata Repository" in Oracle Fusion Middleware Administrator's Guide.
For more information about running RCU, refer to Oracle Fusion Middleware Repository Creation Utility User's Guide.
3.1.8 Create Operating System Users for IBM DB2 Databases
If you are not using an IBM DB2 database, you can skip this section.
IBM DB2 databases authenticates its database users using equivalent operating system users. Therefore, prior to running RCU, one operating system user must be created on the database host for each schema. The operating system user name must match the schema owner name and must contain only lowercase letters; no all-uppercase or mixed-case names are allowed. For example, if you plan to create a schema named DEV_MDS using RCU, then the operating system user must be named dev_mds (all lowercase letters).
You can create the operating system user with the following command (this example creates the operating system user dev_mds and assigns the password welcome1):
/usr/sbin/useradd dev_mds -p welcome1 -d /scratch/dev_mds
Refer to your system documentation for more information.
Installing Oracle Configuration Manager
3.2 Installing Oracle Configuration Manager
During installation, you will be asked whether or not you want to configure your system to automatically check for security (Specify Security Updates screen) and software (Install Software Updates screen) updates. Electing to do so installs Oracle Configuration Manager on your system.
Oracle Configuration Manager continuously tracks key Oracle and system details, providing essential data to help you manage and service your configurations.
Collected data is sent via HTTPS to Oracle Support, which maintains a secure view of each configuration. My Oracle Support then provides system health checks, patch advice, and other valuable information about your Oracle products. Configuration manager does NOT collect application data, such as user passwords.
For more information, log into or create a My Oracle Support account at https://support.oracle.com/, then click on the Collector tab.
3.3 Understanding Installation and Configuration Privileges and Users
This section contains the following:
■ Section 3.3.1, "Installation and Configuration Privileges"
■ Section 3.3.2, "Installing as a Non-Default User on UNIX Operating Systems"
3.3.1 Installation and Configuration Privileges
The user who installs a Fusion Middleware product owns and has read, write, and execute privileges on the binary files installed in the Oracle home. Other users in the operating system group have only read and execute privileges (no write privileges). This means they cannot write to the files, but they can use the installed binaries in the Oracle home to configure a domain or set of Fusion Middleware products.
During configuration, the files generated by the configuration process are owned by the user who ran the Configuration Wizard. The user who ran the Configuration Wizard has read, write, and execute privilege on those files. Other users in the operating system group can read and execute the files, but they do not have write privileges.
These defaults are set with the assumption that all the administrators are in the same group. Multiple administrators in that group will be configuring domains and products from a common set of Middleware homes and Oracle homes.
3.3.2 Installing as a Non-Default User on UNIX Operating Systems
On UNIX operating systems, the installation of Fusion Middleware products is owned and controlled as a known user (for example, "oracle"). The file permissions associated with this installation are configured to ensure the highest level of security possible, which by default are 700 (meaning all files are owned and accessible by the owner only).
Changing the default permissions settings will reduce the security of the installation and possibly your system. Therefore, making such a change is not recommended. If access to particular files or executables is required by other users, the UNIX sudo command (or other similar command) should be considered in lieu of changing file permissions.
Installing on DHCP Hosts
3.4 Installing and Configuring Java Access Bridge (Windows Only)
If you are installing on a Windows operating system, you have the option of installing and configuring Java Access Bridge for Section 508 Accessibility. For more information on how to do this, refer to "Install and Configure Java Access Bridge (Windows Only)" in Oracle Fusion Middleware Administrator's Guide.
3.5 Installing on DHCP Hosts
If you are installing your Oracle Fusion Middleware product on a DHCP host, you must follow the configuration steps in this section for your platform.
3.5.1 For Linux x86 Platforms
On Linux x86 operating systems, configure the host to resolve host names to the loopback IP address by modifying the /etc/hosts file to contain the following entries:
127.0.0.1 hostname.domainname hostname 127.0.0.1 localhost.localdomain localhost
After doing so, check that the host name resolves to the loopback IP address by entering the following command:
/bin/ping hostname.domainname
3.5.2 For Windows x86 Platforms
On Windows operating systems, install a loopback adapter on the DHCP server (see Section 3.5.3, "Installing a Loopback Adapter (Windows Only)"). This assigns a local IP address to your computer.
After installing the adapter, add a line to the
%SYSTEMROOT%\system32\drivers\etc\hosts file with the following format, immediately after the localhost line:
IP_address hostname.domainname hostname
Replace IP_address with the local IP address of the loopback adapter.
3.5.3 Installing a Loopback Adapter (Windows Only)
To install a loopback adapter on Windows 2003 or Windows XP:
1. Open the Windows Control Panel.
Windows 2003: Select Start > Control Panel > Add Hardware.
Windows XP: Select Start > Control Panel, then double-click Add Hardware.
2. In the "Welcome" window, click Next.
3. In the "Is the hardware connected?" window, select Yes, I have already connected the hardware, then click Next.
4. In the "The following hardware is already installed on your computer" window, in the list of installed hardware, select Add a new hardware device, then click Next.
Installing on DHCP Hosts
6. In the "From the list of hardware types, select the type of hardware you are installing" window, select Network adapters, then click Next.
7. In the "Select Network Adapter" window, make the following selections:
■ Manufacturer: Microsoft
■ Network Adapter: Microsoft Loopback Adapter
8. Click Next.
9. In the "The wizard is ready to install your hardware" window, click Next.
10. In the "Completing the Add Hardware Wizard" window, click Finish.
11. If you are using Windows 2003, restart your computer.
12. Right-click My Network Places on the desktop and choose Properties. This displays the Network Connections Control Panel.
13. Right-click the connection that was just created. This is usually named "Local Area Connection 2". Choose Properties.
14. On the "General" tab, select Internet Protocol (TCP/IP), then click Properties.
15. In the "Properties" dialog box, click Use the following IP address and do the following:
a. IP Address: Enter a non-routable IP for the loopback adapter. Oracle recommends the following non-routable addresses:
192.168.x.x (x is any value between 1 and 255) 10.10.10.10
b. Subnet mask: Enter 255.255.255.0.
c. Record the values you entered, which you will need later in this procedure.
d. Leave all other fields empty.
e. Click OK.
16. In the "Local Area Connection 2 Properties" dialog, click OK.
17. Close Network Connections.
18. Restart the computer.
3.5.4 Removing a Loopback Adapter (Windows Only)
To remove a loopback adapter on Windows 2003 or Windows XP:
1. Start the System Control panel.
Windows 2003: Select Start > Control Panel > System.
Windows XP: Select Start > Control Panel, then double-click System.
2. In the "Hardware" tab, click Device Manager.
3. In the "Device Manager" window, expand Network adapters. You should see
Microsoft Loopback Adapter.
4. Right-click Microsoft Loopback Adapter and select Uninstall.
Recovering From a Partial or Interrupted Installation
3.6 Installing on a Non-Networked Computer
You can install your Oracle Fusion Middleware product on a non-networked
computer, such as a laptop. Because a non-networked computer has no access to other computers, you have to install all the components that you need on the computer.
In addition, you must follow the instructions in Section 3.5, "Installing on DHCP Hosts" to install a loopback adapter and modify the hosts file on your system.
3.7 Installing on a Multihomed Computer
You can install your Oracle Fusion Middleware product on a multihomed computer. A multihomed computer is associated with multiple IP addresses. This is typically achieved by having multiple network cards on the computer. Each IP address is associated with a host name; additionally, you can set up aliases for each hostname.
The installer picks up the fully qualified domain name from the first entry in /etc/hosts (on UNIX operating systems) or
%SYSTEMROOT%\system32\drivers\etc\hosts (on Windows operating systems) file. So if your file looks like the following:
127.0.0.1 localhost.localdomain localhost
10.222.333.444 examplehost1.example.com examplehost1 20.222.333.444 examplehost2.example.com examplehost2
examplehost1.example.com would be picked for configuration.
For specific network configuration of a system component, refer to the individual component’s configuration documentation.
3.8 Checking Your Hosts File Entries for OPMN
If you are installing an Oracle Fusion Middleware product that also installs Oracle Process Manager and Notification Server (OPMN), you must make sure the
installation system has valid entries in the hosts (/etc/hosts on UNIX systems and C:\windows\system32\drivers\etc\hosts on Microsoft Windows systems) file. You must make sure that the IP address is valid and corresponds to the network setup on the system.
You can check your system’s IP address and host name as follows:
On UNIX operating systems:
ipconfig -a
On Microsoft Windows operating systems:
ipconfig /all
The IP address and corresponding host name in your hosts file must match the IP address and host name you get from the ipconfig command. Otherwise, the opmn.xml file will contain incorrect configuration information, and OPMN will not start.
3.9 Recovering From a Partial or Interrupted Installation
Creating and Starting Managed Servers on a Remote Machine
approach is to attempt to uninstall the previous installation. If that is successful, you can re-install normally, otherwise you should re-install into a new Middleware home.
3.10 Creating and Starting Managed Servers on a Remote Machine
To create and start a Managed Server in a WebLogic domain on a remote machine, complete the following steps:
■ Use the pack command located in the WebLogic_Home/common/bin (on UNIX
operating systems) or WebLogic_Home\common\bin (on Microsoft Windows operating systems) directory to create a Managed Server template that contains a subset of the files in a domain that are required to create a Managed Server domain directory hierarchy on a remote machine.
The -managed={true|false} parameter of the pack command specifies whether the template is to be used to create Managed Servers on remote machines.
■ Use the unpack command located in the WebLogic_Home/common/bin (on
UNIX operating systems) or WebLogic_Home\common\bin (on Windows operating systems) directory to create the Managed Server domain directory on the remote machine.
4
Silent Oracle Fusion Middleware Installation
and Deinstallation
This chapter describes how to install and deinstall your Oracle Fusion Middleware environment from the command line in silent mode.
This chapter contains the following content:
■ Section 4.1, "What is a Silent Installation?"
■ Section 4.2, "Response Files"
■ Section 4.3, "Pre-Installation Tasks"
■ Section 4.4, "Silent Database Schema Creation"
■ Section 4.5, "Silent Oracle WebLogic Server Installation"
■ Section 4.6, "Silent Product Installation"
■ Section 4.7, "Silent Product Configuration"
■ Section 4.8, "Silent Product Deinstallation"
4.1 What is a Silent Installation?
Silent installation eliminates the need to monitor your product installation because no graphical output is displayed and no input by the user is required.
Silent installation of your Oracle Fusion Middleware product is accomplished by using the -silent flag on the command line when you start the installer. In most cases, you will need to supply the location and name of a file containing certain variable and parameter values (for example, installation location). These are the values that would be asked for during a typical installation using the graphical user interface.
For Oracle Fusion Middleware products, this file is typically called a response file. For more information, see Section 4.2, "Response Files".
Note: For UNIX users, if this is a first time installation of any Oracle product, you must create the oraInst.loc file before starting. Please refer to Section 4.3.1, "UNIX Users: Creating the oraInst.loc File" for more information.
Response Files
4.2 Response Files
Before doing a silent installation, you must provide information specific to your installation in a response file. The installer will fail if you attempt an installation using a response file that is not configured correctly. Response files are text files that you can create or edit in a text editor.
4.2.1 Creating a Response File
Oracle recommends creating a response file in the following manner:
1. Run your product’s graphical installer, as described in your product installation guide.
2. On the Installation Summary Screen, click Save to save your installation parameters to a response file.
You will be prompted for a name and location where you want to create this response file. After it is created, you can use it exactly as-is to replicate the installation on other systems, or modify it as needed.
4.2.2 Sample Response Files
Pre-existing sample response files are provided in the Disk1/stage/Response (on UNIX operating systems) or Disk1\stage\Response (on Windows operating systems) directory in the location where you unzipped your downloaded archive files for installation.
Refer to your product installation guide for more detailed descriptions of the sample installation and deinstallation response files that are provided for each product.
4.2.3 Securing Your Response Files for Silent Installation
Your response files contain certain passwords required by the installer. To minimize security issues regarding these passwords in the response file, follow these guidelines:
■ Set the permissions on the response files so that they are readable only by the
operating system user who will be performing the silent installation.
■ If possible, remove the response files from the system after the silent installation is
completed.
4.3 Pre-Installation Tasks
This section covers the pre-installation tasks that may be required before you are able to perform a silent installation.
The following topics are covered:
■ Section 4.3.1, "UNIX Users: Creating the oraInst.loc File"
■ Section 4.3.2, "Windows Users: Creating the Registry Key"
Silent Oracle WebLogic Server Installation
4.3.1 UNIX Users: Creating the
oraInst.loc
File
The Oracle inventory directory is used by the installer to keep track of all Oracle products installed on the computer. The inventory directory is stored in a file called oraInst.loc. If this file does not already exist on your system, you must create it before starting a silent installation. This file is used by the installer.
1. Log in as the root user.
prompt> su
2. Using a text editor such as vi or emacs, create the oraInst.loc file in the directory of your choice. The contents of the file consist of the following two lines:
inventory_loc=oui_inventory_directory inst_group=oui_install_group
Replace oui_inventory_directory with the full path to the directory where you want the installer to create the inventory directory. Then, replace oui_ install_group with the name of the group whose members have write permissions to this directory.
3. Exit from the root user.
# exit
4.3.2 Windows Users: Creating the Registry Key
If you have not installed Oracle SOA Suite on your computer, then you need to create the following Registry key and value:
HKEY_LOCAL_MACHINE / SOFTWARE / Oracle / inst_loc = [inventory_directory]
Replace Inventory_Directory with the full path to your installer files. For example:
C:Program Files\Oracle\Inventory
4.4 Silent Database Schema Creation
If your Oracle Fusion Middleware product requires database schemas, you must first create the schemas in your database before installing and configuring your product.
For instructions on how to create the schemas in silent mode, refer to "Running Repository Creation Utility (RCU) from the Command Line" in Oracle Fusion Middleware Repository Creation Utility User's Guide.
4.5 Silent Oracle WebLogic Server Installation
Installation of all Oracle Fusion Middleware products requires the presence of an Oracle Middleware home directory, which can be created by installing Oracle WebLogic Server.
Silent Product Installation
4.6 Silent Product Installation
To install your Oracle Fusion Middleware product in silent mode, use the -silent mode from the command line. The full syntax for running the installer from the command line on UNIX operating systems is shown below:
runInstaller [-mode] [-options] [(<CommandLinevariable=Value>)*]
On Windows operating systems:
setup.exe [-mode] [-options] [(<CommandLinevariable=Value>)*]
Table 4–1 lists the valid command line parameters for silent installation.
Table 4–1 Installer Command Line Parameters
Parameter Description
Installation Modes - Only One Mode Can be Specified
-i
-install
Launches the installer in GUI mode. This is the default mode and is used if no mode is specified on the command line.
-silent Install in silent mode. The installer must be passed either a response file or command line variable value pairs.
-d
-deinstall
Launches the installer in GUI mode for deinstallation.
NOTE - this option is only available when you start the deinstaller from the ORACLE_HOME/oui/bin (on UNIX operating systems) or ORACLE_HOME\oui\bin (on Windows operating systems) directory.
-p
-prerequisite
Launches the installer in GUI mode but only checks the prerequisites. No software is installed.
-v
-validate
Launches the installer in GUI mode and performs all prerequisite and validation checking, but does not install any software.
-sv
-silentvalidate
Performs all prerequisite and validation checking in silent mode. You must pass the installer either a response file or a series of command line variable value pairs.
Installation Options
-help
--help
--usage
Displays the usage parameters for the runInstaller command.
-invPtrLocfile Pointer to the inventory location file. Replace file with the full path and name of the oraInst.loc file.
-responsefile
-responseFilefile
Pointer to the response file. Replace file with the full path and name of the response file.
See Section 4.2, "Response Files" for information about creating the response files.
Silent Product Installation
-logLevellevel Specify the level of logging performed by the installer; all messages with a lower priority than the specified level will be recorded. Valid levels are:
■ severe
■ warning
■ info
■ config
■ fine
■ finer
■ finest
-debug Obtain debug information from the installer.
-force Allow the silent installation to proceed in a non-empty directory.
-printdiskusage Log debugging information pertaining to disk usage.
-printmemory Log debugging information pertaining to memory usage.
-printtime Log debugging information pertaining to time usage. This command causes the timeTakentimestamp.log file to be created.
-waitforcompletion Windows only - the installer will wait for completion instead of spawning the Java engine and exiting.
-noconsole Messages will not be displayed to the console window.
-ignoreSysPrereqs Ignore the results of the system prerequisite checks and continue with the installation.
-executeSysPrereqs Execute the system prerequisite checks only, then exit.
-paramFilefile Specify the full path to the oraparam.ini file. This file is the initialization file for the installer. The default location of this file is Disk1/install/platform (on UNIX operation systems) or Disk1\install\platform (on Windows operation systems).
-novalidation Disables all validation checking performed by the installer.
-nodefaultinput For the GUI install, several screens have information or default values pre-populated. Specifying this option disables this behavior so that no information or values are pre-populated.
Command Line Variables
Installer Variables Installer variables are specified using varName=value. For example, on a UNIX operating system:
ORACLE_HOME=/home/Oracle/Middleware/as_1
On a Windows operating system:
ORACLE_HOME=C:\products\Oracle\Middleware\as_1
Session Variables Session variables are specified using session:varName=value.
Component Variables Component variables are specified using
session:compInternalName:[Version:]varName=value.
Table 4–1 (Cont.) Installer Command Line Parameters