Oracle® Fusion Middleware
Installation Guide for Oracle Enterprise Repository
11g Release 1 (11.1.1.5.0)
E15745-07
Oracle Fusion Middleware Installation Guide for Oracle Enterprise Repository, 11g Release 1 (11.1.1.5.0) E15745-07
Copyright © 2008, 2011, Oracle and/or its affiliates. All rights reserved.
Primary Author: Vimmika Dinesh
Contributing Author: Atturu Chandra Prasad Reddy, Jeff Cunnigham, Joe Masar, John Yoder, Phil Reed, Scott Spieker, Dave Berry
This software and related documentation are provided under a license agreement containing restrictions on use and disclosure and are protected by intellectual property laws. Except as expressly permitted in your license agreement or allowed by law, you may not use, copy, reproduce, translate, broadcast, modify, license, transmit, distribute, exhibit, perform, publish, or display any part, in any form, or by any means. Reverse engineering, disassembly, or decompilation of this software, unless required by law for interoperability, is prohibited.
The information contained herein is subject to change without notice and is not warranted to be error-free. If you find any errors, please report them to us in writing.
If this software or related documentation is delivered to the U.S. Government or anyone licensing it on behalf of the U.S. Government, the following notice is applicable:
U.S. GOVERNMENT RIGHTS Programs, software, databases, and related documentation and technical data delivered to U.S. Government customers are "commercial computer software" or "commercial technical data" pursuant to the applicable Federal Acquisition Regulation and agency-specific supplemental regulations. As such, the use, duplication, disclosure, modification, and adaptation shall be subject to the restrictions and license terms set forth in the applicable Government contract, and, to the extent applicable by the terms of the Government contract, the additional rights set forth in FAR 52.227-19, Commercial Computer Software License (December 2007). Oracle USA, Inc., 500 Oracle Parkway, Redwood City, CA 94065.
This software is developed for general use in a variety of information management applications. It is not developed or intended for use in any inherently dangerous applications, including applications which may create a risk of personal injury. If you use this software in dangerous applications, then you shall be responsible to take all appropriate fail-safe, backup, redundancy, and other measures to ensure the safe use of this software. Oracle Corporation and its affiliates disclaim any liability for any damages caused by use of this software in dangerous applications.
Oracle is a registered trademark of Oracle Corporation and/or its affiliates. Other names may be trademarks of their respective owners.
iii
Contents
1
Preparing for Your Installation
2
Installing Oracle Enterprise Repository
2.1 Starting the Installation Program ... 2-1 2.1.1 Before You Start ... 2-1 2.1.2 Starting the Installation Program on Windows Platforms ... 2-2 2.1.2.1 Starting the Installation in Graphical Mode ... 2-2 2.1.2.2 Starting the Installation in Console Mode ... 2-3 2.1.2.3 Starting the Installation in Silent Mode ... 2-3 2.1.3 Starting the Installation Program on UNIX Platforms ... 2-4 2.1.3.1 Using Installers with Filenames Ending in .bin ... 2-5 2.1.3.1.1 Starting the Installation in Graphical Mode ... 2-5 2.1.3.1.2 Starting the Installation in Console Mode ... 2-5 2.1.3.1.3 Starting the Installation in Silent Mode ... 2-6 2.1.3.2 Using Installers with Filenames Ending in .jar ... 2-7 2.1.3.2.1 Starting the Installation in Graphical Mode ... 2-7 2.1.3.2.2 Starting the Installation in Console Mode ... 2-8 2.1.3.2.3 Starting the Installation in Silent Mode ... 2-8 2.2 Running the Installation Program ... 2-9 2.2.1 Running the Installation Program in Graphical Mode ... 2-9 2.2.2 Running the Installation Program in Console Mode... 2-15 2.2.2.1 Starting the Console Installer Using Windows ... 2-15 2.2.2.2 Starting the Console Installer Using UNIX... 2-15 2.2.2.3 Install Oracle Enterprise Repository Using Console Mode ... 2-16 2.2.3 Running the Installation Program in Silent Mode ... 2-22 2.2.3.1 What Is Silent-Mode Installation? ... 2-23 2.2.3.2 Using Silent-Mode Installation ... 2-23 2.2.3.2.1 Important Considerations for Silent-Mode Installation ... 2-23 2.2.3.3 Creating a silent.xml File for Silent-Mode Installation ... 2-24 2.2.3.3.1 Guidelines for Component Selection... 2-27 2.2.3.4 Sample silent.xml Files for Silent-Mode Installation ... 2-28 2.2.3.5 Returning Exit Codes to the Console ... 2-29
3
Post-Installation Steps
3.1 Configure Your Application Server ... 3-1 3.1.1 WebLogic Server Installations ... 3-1 3.1.1.1 Run WebLogic Server Domain Configuration Wizard... 3-1 3.1.1.1.1 Create New Domain with default Managed Server... 3-2 3.1.1.1.2 Extend Existing Domain and Target on an existing Managed Server... 3-6 3.1.1.2 Set WebLogic Server Environment Parameters ... 3-9 3.1.2 WebSphere Installations ... 3-10 3.1.2.1 Deploying the Oracle Enterprise Repository Application ... 3-10 3.1.2.2 Change the Server Classloader Order for XLST ... 3-12 3.2 Install Java Web Start ... 3-12 3.2.1 Download and Install Java Web Start ... 3-12 3.2.2 Troubleshooting Java Web Start ... 3-13 3.3 Configure Oracle Enterprise Repository Web Start on Linux ... 3-14 3.4 Start Your Application Server and Log Into the Oracle Enterprise Repository Web-based
v
3.5 Use the Oracle Enterprise Repository Diagnostics Testing Tool ... 3-16 3.6 Import Oracle Enterprise Repository Solution Packs ... 3-17 3.7 Test the Oracle Enterprise Repository Installation ... 3-17 3.7.1 Submit an Asset ... 3-18 3.7.2 Accept the Asset... 3-18 3.7.3 Register the Asset... 3-19 3.7.4 Find the Registered Asset and View Details ... 3-20 3.7.5 Enable System Setting for Asset Editor to Work... 3-20
4
Uninstalling the Software
4.1 About the Uninstallation Program ... 4-1 4.2 Uninstalling Your Software in Graphical Mode... 4-2 4.3 Uninstalling Your Software in Console Mode... 4-2 4.4 Uninstalling Your Software in Silent Mode ... 4-3 4.5 Removing the Deployed Application ... 4-4 4.5.1 Removing the Deployed Application from WebLogic Server ... 4-4 4.5.2 Removing the Deployed Application from WebSphere Server ... 4-5 4.6 Removing the Database Schema... 4-5 4.7 Reinstalling Your Software... 4-6
5
Install Oracle Enterprise Repository into a Clustered Environment
5.1 Overview... 5-1 5.2 Step 1: Install and Configure Oracle Enterprise Repository... 5-2 5.3 Step 2: Install, Deploy, and Validate Oracle Enterprise Repository on One Cluster Member
5-3
5.4 Step 3: Create the Clustered Environment ... 5-3 5.5 Step 4: Move the Application Properties to the Database... 5-3 5.6 Step 5: Configure the cluster.properties File on Each Cluster Member... 5-5 5.7 Step 6: Validate the Installation ... 5-6 5.8 Clustering JVM Parameter for WebLogic Server ... 5-8 5.9 Clustered JMS Servers for Advanced Registration Flows ... 5-8
vii
Preface
Oracle Fusion Middleware Installation Guide for Oracle Enterprise Repository provides information and instructions for installing, configuring, and troubleshooting Oracle Enterprise Repository.
Audience
This document is intended for system administrators or application developers who are installing Oracle Enterprise Repository 11g software. It is assumed that readers are familiar with Web technologies and have a general understanding of Windows and UNIX platforms.
Documentation Accessibility
Our goal is to make Oracle products, services, and supporting documentation accessible to all users, including users that are disabled. To that end, our
documentation includes features that make information available to users of assistive technology. This documentation is available in HTML format, and contains markup to facilitate access by the disabled community. Accessibility standards will continue to evolve over time, and Oracle is actively engaged with other market-leading
technology vendors to address technical obstacles so that our documentation can be accessible to all of our customers. For more information, visit the Oracle Accessibility Program Web site at http://www.oracle.com/accessibility/.
Accessibility of Code Examples in Documentation
Screen readers may not always correctly read the code examples in this document. The conventions for writing code require that closing braces should appear on an
otherwise empty line; however, some screen readers may not always read a line of text that consists solely of a bracket or brace.
Accessibility of Links to External Web Sites in Documentation
This documentation may contain links to Web sites of other companies or
organizations that Oracle does not own or control. Oracle neither evaluates nor makes any representations regarding the accessibility of these Web sites.
Access to Oracle Support
Oracle customers have access to electronic support through My Oracle Support. For information, visit http://www.oracle.com/support/contact.html or visit
Related Documents
For more information, see the following documents in the Oracle Enterprise Repository 11g Release 1 (11.1.1.5.0) documentation set:
■ Oracle Enterprise Repository on OTN - The home page for Oracle Enterprise
Repository on Oracle Technology Network (OTN) is:
http://www.oracle.com/technology/products/soa/repository/inde x.html
■ Architect Center: SOA Governance: Essential to Your Business - Learn how
effective SOA governance is an essential element in any enterprise transformation strategy by reading the Architect Center: SOA Governance: Essential to Your Business documents at:
http://www.oracle.com/us/technologies/soa/center-066464.html
■ SOA Blog - Keep on top of the latest SOA blogs at:
http://blogs.oracle.com/governance
Conventions
The following text conventions are used in this document:
Convention Meaning
boldface Boldface type indicates graphical user interface elements associated with an action, or terms defined in text or the glossary.
italic Italic type indicates book titles, emphasis, or placeholder variables for which you supply particular values.
Part I
Part I
Installing Oracle Enterprise Repository
This part describes how to install Oracle Enterprise Repository.
This part contains the following chapters:
■ Chapter 1, "Preparing for Your Installation"
■ Chapter 2, "Installing Oracle Enterprise Repository"
■ Chapter 3, "Post-Installation Steps"
1
Preparing for Your Installation 1-1
1
Preparing for Your Installation
This chapter provides information that you must know before installing your Oracle software:
This chapter contains the following sections:
■ Section 1.1, "Installation Overview"
■ Section 1.2, "Oracle Enterprise Repository Sizing Guidelines"
■ Section 1.3, "Installable Product Components"
■ Section 1.4, "Product Distribution Methods"
■ Section 1.5, "Installation Prerequisites"
■ Section 1.6, "Database Installation Procedures"
■ Section 1.7, "Selecting Directories for Your Installation"
■ Section 1.8, "Running the Oracle Enterprise Repository Product Installation"
■ Section 1.9, "Generating a Verbose Installation Log"
1.1 Installation Overview
The installation program provides a complete framework for the installation and uninstallation of your entire Oracle software product, or individual components, as desired. You can install Oracle Enterprise Repository using the default option, which enables you to install Oracle Enterprise Repository and its examples.
The following sections provide an overview about:
■ Section 1.1.1, "Installation Modes"
1.1.1 Installation Modes
You can use the Oracle Products installation program in one of the following modes:
■ Section 1.1.1.1, "Graphical Mode"
■ Section 1.1.1.2, "Console Mode"
■ Section 1.1.1.3, "Silent Mode"
1.1.1.1 Graphical Mode
Graphical-mode installation is an interactive, GUI-based method for installing your software. It can be run on both Windows and UNIX systems. For installation
Oracle Enterprise Repository Sizing Guidelines
If you want to run graphical-mode installation, the console attached to the computer on which you are installing the software must support a Java-based GUI. All consoles for Windows systems support Java-based GUIs, but not all consoles for UNIX systems do.
1.1.1.2 Console Mode
Console-mode installation is an interactive, text-based method for installing your software from the command line, on either a UNIX system or a Windows system. For instructions for using this method, see Section 2.2.2, "Running the Installation Program in Console Mode".
1.1.1.3 Silent Mode
Silent-mode installation is a noninteractive method of installing your software that requires the use of an XML properties file for selecting installation options. You can run silent-mode installation in either of two ways: as part of a script or from the command line. Silent-mode installation is a way of setting installation configurations only once and then using those configurations to duplicate the installation on many computers. For information on running the installation program in the silent mode, see Section 2.2.3, "Running the Installation Program in Silent Mode".
1.2 Oracle Enterprise Repository Sizing Guidelines
This section describes the Oracle Enterprise Repository sizing guidelines:
■ Oracle Enterprise Repository offers greatest capacity on a 64-bit architecture.
Oracle Enterprise Repository is essentially a single java process. With a 32 -bit architecture any process is limited to 4GB (a little less on Windows), regardless of how much memory is in the system. With a 64-bit architecture the processes are limited to the amount of memory in the system and the JDK is more tunable. This enables you to make much larger amounts of memory available to the application server, which includes the cache that the assets load into.
■ Treat virtualized environments just like actual hardware when sizing your
environment.
■ Minimum Configuration
– 32 -bit architecture
– Application Server
* Supported Platforms
For the list of Oracle Enterprise Repository supported platforms, see
http://www.oracle.com/technology/products/soa/repository/index.html.
* Minimum 2GB RAM available for application server usage (dependent on the number of assets expected within the Oracle Enterprise Repository). Creating large numbers of assets and complex taxonomies consumes memory.
* Initial RAM size for application server: 1GB
Installable Product Components
Preparing for Your Installation 1-3
* Minimum CPU Speeds: 1.8Ghz (Recommended 2.4Ghz Dual Core processors)
* Minimum Network Speeds connecting Application Server and Database Server: 100Mbit (Recommended 1Gbit)
■ Large Configuration
– 64-bit architecture
– Multiple CPU cluster
– Isolated development and test environments
■ Typical Database Configuration
– Using Oracle 11g
– 20MB for Data (including blob data)
– 20MB for Index
– Rule of thumb on DB drive size is 10 X physical table and index size for 100K tables and index at 1.1GB so figure 10 or 11 GB for DB drive space. This varies based on how the DBAs have configured the drives.
– A properly configured database server has enough drives to optimize disk usage. Oracle’s performance testing database server for Oracle Enterprise Repository has 6 drives.
■ The Oracle Enterprise Repository design is one of the most important performance
components and the following can impact performance:
– Number of assets (Oracle Enterprise Repository is easily capable of storing hundreds of thousands of assets. There are however some limitations with the GUI.)
– Number of asset types
– Nested taxonomies (Complexity of the taxonomy can have a huge impact on performance, not to mention decrease the usability for asset consumers)
– Number of relationships
– Number of active users
1.3 Installable Product Components
Using the Oracle Products installation program, you can install the following components on your system:
■ Section 1.3.1, "Oracle Enterprise Repository"
For additional information about:
■ The features and capabilities of Oracle Enterprise Repository, see Section 1.3.1,
"Oracle Enterprise Repository".
■ Operating systems and hardware supported by your software, see Oracle
Products Supported Configurations.
Installable Product Components
1.3.1 Oracle Enterprise Repository
Oracle Enterprise Repository manages the metadata for any type of software asset, from business processes and Web services to patterns, frameworks, applications, and components. It maps the relationships and interdependencies that connect those assets to improve impact analysis, promote and optimize their reuse, and measure their impact on the bottom line.
Oracle Enterprise Repository consists of the following subcomponents that can be installed on your system:
■ Core Repository with Examples: Installs everything necessary for Oracle
Enterprise Repository. The evaluation customers should choose just this option.
■ Oracle Enterprise Repository Plug-in for Eclipse: This plug-in allows access to
the repository from Eclipse. The Repository Access View supports browsing, searching, and retrieval of assets from Oracle Enterprise Repository.
■ Oracle Enterprise Repository Plug-ins
The Oracle Enterprise Repository Plug-in depends upon the OEPE plug-in for Eclipse. The OEPE Plug-in depends on the Eclipse WST project, therefore making WST a transitive dependency for Oracle Enterprise Repository. You can retrieve the WST project from the following location:
http://download.eclipse.org/webtools/updates/
The following list describes the plug-ins available in Oracle Enterprise Repository:
– Development Environments (IDEs) * Oracle JDeveloper
* Eclipse
* VS .NET
– Service Registry
* Oracle Service Registry
* UDDI v3.0
– Version Control Systems * Clear Case
* CVS
* PVCS
* Harvest
* Serena
– Workflow Engine * Oracle BPM
– Harvester Plug-ins for * WLST
* Ant
* Oracle Enterprise Manager Management Pack Plus for SOA
* JDeveloper
Installation Prerequisites
Preparing for Your Installation 1-5
– Defect Tracking Systems * ClearQuest
1.4 Product Distribution Methods
Your Oracle software is distributed on the Oracle Web site.
■ Section 1.4.1, "Web Distribution"
1.4.1 Web Distribution
You can download your software from the Oracle Web site at
http://www.oracle.com/technetwork/middleware/repository/downloads/index.html?ssSourceSit eId=ocomen
In the Downloads panel, click Oracle Enterprise Repository to go to the Oracle Enterprise Repository Downloads page. From the list of operating systems, choose the appropriate operating system to download the installer to your local computer.
1.5 Installation Prerequisites
The following sections specify the installation prerequisites:
■ Section 1.5.1, "System Requirements"
■ Section 1.5.2, "Temporary Disk Space Requirements"
1.5.1 System Requirements
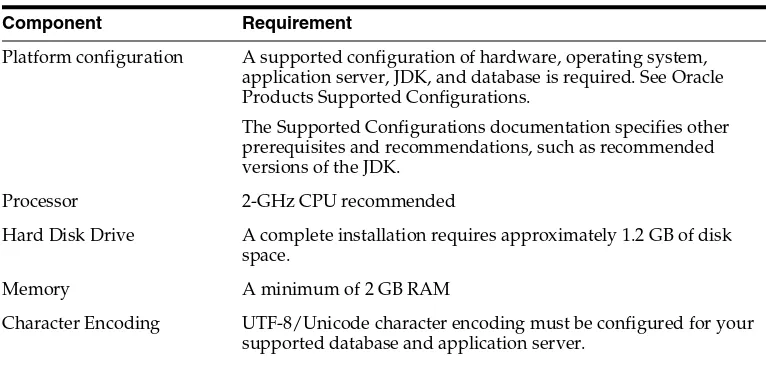
The system requirements for your installation are given in the following table. Note: You must accept the license agreement, before you download the installer.
Note: For more information about the Oracle Enterprise Repository sizing guidelines, see Section 1.2, "Oracle Enterprise Repository Sizing Guidelines".
Table 1–1 System Requirements
Component Requirement
Platform configuration A supported configuration of hardware, operating system, application server, JDK, and database is required. See Oracle Products Supported Configurations.
The Supported Configurations documentation specifies other prerequisites and recommendations, such as recommended versions of the JDK.
Processor 2-GHz CPU recommended
Hard Disk Drive A complete installation requires approximately 1.2 GB of disk space.
Memory A minimum of 2 GB RAM
Installation Prerequisites
1.5.2 Temporary Disk Space Requirements
The Oracle installation program uses a temporary directory into which it extracts the files necessary to install the software on the target system. During the installation process, your temporary directory must contain sufficient space to accommodate the compressed Java run-time environment (JRE) bundled with the installation program and an uncompressed copy of the JRE that is expanded into the temporary directory. The extracted files are deleted from the temporary directory after the installation process. As a general rule, installation programs require approximately 2.5 times the amount of temporary space that is ultimately required by the installed files.
By default, the installation program uses the following temporary directories:
■ Windows platforms: directory referenced by the TMP system variable
■ UNIX platforms: system-dependent temporary directory
To ensure that you have adequate temporary space, you may want to allocate an alternate directory for this purpose. To do so, follow the instructions provided in the following table.
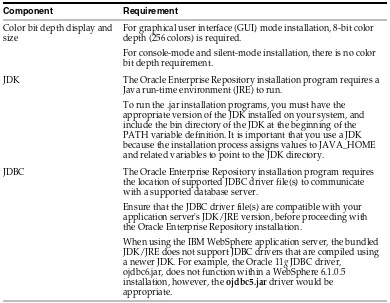
Color bit depth display and size
For graphical user interface (GUI) mode installation, 8-bit color depth (256 colors) is required.
For console-mode and silent-mode installation, there is no color bit depth requirement.
JDK The Oracle Enterprise Repository installation program requires a Java run-time environment (JRE) to run.
To run the .jar installation programs, you must have the appropriate version of the JDK installed on your system, and include the bin directory of the JDK at the beginning of the PATH variable definition. It is important that you use a JDK because the installation process assigns values to JAVA_HOME and related variables to point to the JDK directory.
JDBC The Oracle Enterprise Repository installation program requires the location of supported JDBC driver file(s) to communicate with a supported database server.
Ensure that the JDBC driver file(s) are compatible with your application server's JDK/JRE version, before proceeding with the Oracle Enterprise Repository installation.
When using the IBM WebSphere application server, the bundled JDK/JRE does not support JDBC drivers that are compiled using a newer JDK. For example, the Oracle 11g JDBC driver,
ojdbc6.jar, does not function within a WebSphere 6.1.0.5 installation, however, the ojdbc5.jar driver would be appropriate.
Note: If you do not have enough temporary space to run the installation program, you are prompted to specify an alternate directory or exit the installation program.
Table 1–1 (Cont.) System Requirements
Database Installation Procedures
Preparing for Your Installation 1-7
1.6 Database Installation Procedures
The database administrator must create an empty database for Oracle Enterprise Repository to install its files into. A user for this database must also be created (for example, OER_USER) and that user must have database owner privileges on the Oracle Enterprise Repository database.
This section contains the following topics:
■ Section 1.6.1, "Oracle Database Installation"
■ Section 1.6.2, "Oracle Real Application Clusters Database Installation"
■ Section 1.6.3, "SQL Server 2008 Database Installation"
■ Section 1.6.4, "UDB Database Installation"
1.6.1 Oracle Database Installation
Appropriate administrative privileges are necessary to complete this process. This section contains the following topics:
■ Section 1.6.1.1, "Oracle Database"
■ Section 1.6.1.2, "Prerequisites"
■ Section 1.6.1.3, "Create the Tablespaces"
■ Section 1.6.1.4, "Build a Database User"
1.6.1.1 Oracle Database
1. Connect to the database as a DBA.
2. From a SQL Plus command prompt, run: select * from nls_database_parameters where Parameter='NLS_CHARACTERSET';
The output has two columns, Parameter and Value. The most common Values are:
■ UTF-8 Encoding: AL32UTF8 (International support)
■ ISO-8859-1 Encoding: WE8ISO8859P1 (U.S. English Encoding)
Platform To allocate more space in the temp folder
Windows Do one of the following:
■ Set the TMP system variable to a directory of your choice.
■ If starting the installation program from the command line,
include the -Djava.io.tmpdir=tmpdirpath option, replacing
tmpdirpath with the full path of the directory that you want to designate as a temporary storage area for the Oracle Enterprise Repository installation program. For example:
java -jar OER1111xx_generic.jar -Djava.io.tmpdir=D:\Temp
UNIX Enter the following option on the command line when you start the installation program:
java -jar OER1111xx_generic.jar -Djava.io.tmpdir=tmpdirpath
Database Installation Procedures
1.6.1.2 Prerequisites
You must verify the following database prerequisites before beginning the Oracle Enterprise Repository installation process.
■ A login with database administrator privileges
■ The name of the supported JDBC driver for Oracle: You could use either
ojdbc5.jar or ojdbc6.jar depending on the JDK used by your application server. The supported Oracle Database versions are - 10.2.0.4.0, 11.1.0.7.0, and 11.2.
For supported Oracle Enterprise Repository JDBC Drivers, see Table 2–1, " Oracle Enterprise Repository 11g Supported JDBC Driver Information".
■ JDK 1.5.x or higher on the current workstation/server
■ SQL *Plus Client tools
1.6.1.3 Create the Tablespaces
Follow these steps to create the necessary tablespaces before installing Oracle Enterprise Repository:
1. Log in to Oracle (system or DBA privileges are required).
2. Create a data tablespace named OER_DATA with at least 300M of available space.
3. Create an index tablespace named OER_INDEX with at least 300M of available space.
Example Tablespace Creation Script
The following example scripts show how to create the OER_DATA and OER_INDEX
tablespaces.
CREATE TABLESPACE OER_DATA
DATAFILE '/opt/oracle/oradata/oer/oer_data.dbf' SIZE 300M AUTOEXTEND ON NEXT 10240K MAXSIZE UNLIMITED
EXTENT MANAGEMENT LOCAL AUTOALLOCATE LOGGING
ONLINE
SEGMENT SPACE MANAGEMENT AUTO;
CREATE TABLESPACE OER_LOB
DATAFILE '/opt/oracle/oradata/oer/oer_lob.dbf' SIZE 300M AUTOEXTEND ON NEXT 10240K MAXSIZE UNLIMITED
EXTENT MANAGEMENT LOCAL AUTOALLOCATE LOGGING
ONLINE
SEGMENT SPACE MANAGEMENT AUTO;
CREATE TABLESPACE OER_INDEX
DATAFILE '/opt/oracle/oradata/oer/oer_index.dbf' SIZE 300M
Note: The Oracle Database driver that you use should be based on your application servers JDK.
Database Installation Procedures
Preparing for Your Installation 1-9
AUTOEXTEND ON NEXT 5120K MAXSIZE UNLIMITED EXTENT MANAGEMENT LOCAL AUTOALLOCATE LOGGING
ONLINE
SEGMENT SPACE MANAGEMENT AUTO;
1.6.1.4 Build a Database User
Follow these steps to create the necessary database user before installing Oracle Enterprise Repository:
1. Log in to Oracle (administrative privileges required).
2. Create a user and password.
3. Ensure that the user has the following privileges:
■ Privilege to create sessions
■ Ability to create tables
■ Default tablespace is oer_data
■ Assigned quota of 300M for oer_data
■ Assigned quota of 300M for oer_lob
■ Assigned quota of 300M for oer_index
Example User Creation Script
The following example script show how to create a user for newly created Oracle Enterprise Repository Tablespaces.
CREATE USER OER IDENTIFIED BY OER_PWD DEFAULT TABLESPACE OER_DATA
TEMPORARY TABLESPACE TEMP;
GRANT CREATE MATERIALIZED VIEW TO OER; GRANT CREATE SEQUENCE TO OER;
GRANT CREATE SESSION TO OER; GRANT CREATE SYNONYM TO OER; GRANT CREATE TABLE TO OER; GRANT CREATE TRIGGER TO OER; GRANT CREATE VIEW TO OER;
GRANT UNLIMITED TABLESPACE TO OER;
1.6.2 Oracle Real Application Clusters Database Installation
The Oracle Enterprise Repository 11g Release 1 (11.1.1.5.0) Installer does not support the installation into Oracle Real Application Cluster (Oracle RAC) environments, but supports Oracle RAC postinstall configurations. The Oracle Enterprise Repository installer requires a standard SID to connect and create relations, and also to insert the sample data for use with the initial installation of Oracle Enterprise Repository.
The Oracle Database administrators should assist in the database configuration of Oracle Enterprise Repository when the migration from SID to an Oracle RAC
Database Installation Procedures
db.url=jdbc:oracle:thin:@(DESCRIPTION = (load_balance = true) (failover =true) (ADDRESS = (PROTOCOL = TCP)(HOST = db_
host1)(PORT = 1521)) (ADDRESS =(PROTOCOL = TCP)(HOST = db_ host2)(PORT = 1521)) (CONNECT_DATA = (SERVICE_NAME = siprc)(failover_mode = (type = session) (method = basic) (retries = 0) (delay = 0))))
1.6.3 SQL Server 2008 Database Installation
Appropriate administrative privileges are necessary to complete this process. These instructions assume the use of Enterprise Manager. This section contains the following topics:
■ Section 1.6.3.1, "SQL Server 2008 Database"
■ Section 1.6.3.2, "Prerequisites"
■ Section 1.6.3.3, "Create a Database"
■ Section 1.6.3.4, "Create a Database User"
1.6.3.1 SQL Server 2008 Database
SQL Server is automatically configured to support UTF-8/Unicode character encoding. No additional configuration is necessary.
1.6.3.2 Prerequisites
You must verify the following database prerequisites before beginning the Oracle Enterprise Repository installation process.
■ A login with database administrator privileges (Usually the SA account).
■ The name of the supported JDBC driver for SQL Server 2008: sqljdbc.jar (driver
version 1.1.1501.101)
1.6.3.3 Create a Database
Follow these steps to create the necessary database before installing Oracle Enterprise Repository:
1. Open the SQL Server 2008 Management Studio.
2. Right-click the Databases folder and select New Database.
3. In the New Database window, enter Oracle Enterprise Repository as the database name.
4. In the Database files section, change the Logical Name of Oracle Enterprise Repository to OER_DATA.
5. Enter OER_USER as the database owner (or choose a Windows login account as appropriate for your security policy).
6. Click Add to create a Filegroup, as follows:
a. In Logical Name, enter OER_INDX.
b. Click the Filegroup cell and select <new filegroup>.
c. On the New Filegroup for Oracle Enterprise Repository page, enter INDEX for the name.
Database Installation Procedures
Preparing for Your Installation 1-11 7. Click OK again to create the database.
1.6.3.4 Create a Database User
Follow these steps to create the necessary user before installing Oracle Enterprise Repository:
1. Open the SQL Server 2008 Management Studio.
2. Expand the Server tree to open the Security folder.
3. Right-click Logins and select New Login.
4. Enter OER_USER as the Login name (or choose a Windows login account as appropriate for your security policy).
5. Select SQL Server Authentication.
6. Enter a password that meets your password policy into the Password and Confirm password fields.
7. Change the default database to Oracle Enterprise Repository.
8. Select a page list, select User Mappings, and then in the Map column select the Oracle Enterprise Repository database option.
9. Grant database roles for public and db_owner. 10. Click OK to create the user account.
1.6.4 UDB Database Installation
Appropriate administrative privileges are necessary to complete this process. This section contains the following topics:
■ Section 1.6.4.1, "UDB Database"
■ Section 1.6.4.2, "Prerequisites"
■ Section 1.6.4.3, "Create a Database"
■ Section 1.6.4.4, "Tune the Database"
1.6.4.1 UDB Database
1. Connect to the database as a DBA.
2. From a DB2 shell command prompt, run the following:
> get db cfg
The output should include the line Database code set = UTF-8. If this line does not appear, it is necessary to create a UTF-8 database.
1.6.4.2 Prerequisites
You must ensure a successful login to the database using the administrator privileges, before beginning the Oracle Enterprise Repository installation process.
Database Installation Procedures
1.6.4.3 Create a Database
To create the required database before installing Oracle Enterprise Repository, perform the following steps:
1. Open the DB2 Command Editor.
2. Run db2 -tv to start the DB2 shell command prompt with semicolon command termination.
3. Create a database named OER that includes bufferpools and tablespaces.
a. Name the bufferpools as: OER32kDataBP, OER32kIndxBP, OER32kBlobBP, and OER32kTempBP.
b. Create three large tablespaces named: OERDataTS, OERIndxTS, and
OERLobTS with at least 300M of available space.
c. Create one temporary tablespace named: OERTempTS with at least 100M of available space.
Example 1–1 Example Database Create Script
CREATE DATABASE OER USING CODESET UTF-8 TERRITORY US; -- Connect to the OER database
-- Replace <user> and <password> with the user who would own the OER schema. CONNECT TO OER USER <user> USING <password>;
-- Create the OER 32K Buffer Pools
CREATE BUFFERPOOL OER32KDATAbp SIZE 1000 PAGESIZE 32K; CREATE BUFFERPOOL OER32KINDXbp SIZE 1000 PAGESIZE 32K; CREATE BUFFERPOOL OER32KBLOBbp SIZE 1000 PAGESIZE 32K; CREATE BUFFERPOOL OER32KTEMPbp SIZE 1000 PAGESIZE 32K; CONNECT RESET;
-- Same <user> and <password> replacements as before are required. CONNECT TO OER USER <user> USING <password>;
CREATE LARGE TABLESPACE oerdatats PAGESIZE 32 K MANAGED BY DATABASE USING(file '/opt/IBM/DB2/data/oerdatats.dat' 300M) extentsize 512k BUFFERPOOL OER32KDATAbp; CREATE LARGE TABLESPACE oerindxts PAGESIZE 32 K MANAGED BY DATABASE USING(file '/opt/IBM/DB2/data/oerindxts.dat' 300M) extentsize 512k BUFFERPOOL OER32KINDXbp; CREATE LARGE TABLESPACE oerlobts PAGESIZE 32 K MANAGED BY DATABASE USING(file '/opt/IBM/DB2/data/oerlobts.dat' 300M) extentsize 512k BUFFERPOOL OER32kBLOBbp; -- Create the OER Temp Tablespace
CREATE TEMPORARY TABLESPACE oertempts PAGESIZE 32 K MANAGED BY DATABASE USING(file '/opt/IBM/DB2/data/oertempts.dat' 128M) BUFFERPOOL OER32KTEMPbp;
1.6.4.4 Tune the Database
To configure the tuning parameters, perform the following steps in the Configuration Advisor Wizard:
1. In the DB2 Control Center, click Tools, Wizards, and then select Configuration Advisor. The Configuration Advisor Wizard - Introduction page is displayed. 2. Select the new Oracle Enterprise Repository database, and click Next. The
Configuration Advisor Wizard - Server page is displayed.
Note: The tablespace names OERDataTS, OERIndxTS, and
Selecting Directories for Your Installation
Preparing for Your Installation 1-13 3. Select a percentage of memory to allocate to the Oracle Enterprise Repository
database in DB2, and then click Next. The Configuration Advisor Wizard - Workload page is displayed.
4. Select the Mixed option in the Optimize for Workload Type list, and then click
Next. The Configuration Advisor Wizard - Transactions page is displayed.
5. Select the More than 10(long transactions) option in the Average Number of SQL Statements Per Unit of Work list. Take the default number of transactions per minute.
6. Click Next. The Configuration Advisor Wizard - Priority page is displayed. 7. Select a database administration priority. The default option is Both.
8. Click Next. The Configuration Advisor Wizard - Populated page is displayed. 9. Select No, as the database is not yet populated with data. Then, click Next. The
Configuration Advisor Wizard - Connections page is displayed.
10. Select 0 local and 25 remote as the average number of connected applications, and then click Next. The Configuration Advisor Wizard - Isolation page is displayed. 11. Select the Cursor Stability (many locks of short duration) option, and then click
Next. The Configuration Advisor Wizard - Results page is displayed.
12. Accept the suggested modifications, and click Finish to apply changes to your database.
1.7 Selecting Directories for Your Installation
During the installation process, you must specify locations for the following directories:
■ Section 1.7.1, "Choosing an Oracle Home Directory"
■ Section 1.7.2, "Choosing Product Installation Directory"
1.7.1 Choosing an Oracle Home Directory
During the installation of the Oracle software, you are prompted to specify an Oracle home directory. This directory serves as a repository for common files that are used by various Oracle products installed on the same computer. For this reason, the Oracle home directory can be considered a central support directory for all the Oracle products installed on your system.
The files in the Oracle home directory are essential to ensuring that Oracle software operates correctly on your system. These files:
■ Facilitate checking of cross-product dependencies during installation
■ Facilitate Service Pack installation
Note: On all future visits to this wizard for the Oracle Enterprise Repository database, select the answer as "Yes".
Selecting Directories for Your Installation
The default Oracle home directory where these files are installed is:
$ORACLE_HOME/repository111
All files related to the application installation are found under this Oracle home directory. In the case of a WebLogic Server installation, the application domain template file is found in the $ORACLE_HOME/wl_server11.x/templates/applications
directory.
Listing 2-1
For Oracle home directory selection task: Oracle_HOME directory is not empty. Proceed with installation?
For product installation directories selection task:One or more installation directories are not empty. Proceed with
installation?
■ The product maintenance level of the current installer must be compatible with
the maintenance level of the product already installed. If not, an error message is displayed and you must obtain the compatible installer or perform maintenance to achieve compatibility.
1.7.2 Choosing Product Installation Directory
The product installation directory contains all the software components that you choose to install on your system, including program files and examples. You are prompted during your initial installation to choose a product installation directory. If you accept the default on a Windows system, for example, your software is installed in the following directory:
<ORACLE_HOME>/repositoryXXX
where, ORACLE_HOME is the Oracle home directory and repositoryXXX is the product installation directory for the Oracle Enterprise Repository software. However, you can specify any name and location on your system for your product installation
Note:
■ On some UNIX platforms, the installation program does not
install the JDK. During installation of your Oracle software, you are prompted to choose an existing Oracle home directory or specify a path to create a Oracle home directory. If you choose to create a directory, the installation program automatically creates it for you.
■ Oracle recommends that you do not exceed a maximum of 12
characters when naming your Oracle home directory. If the name of this directory has more than 12 characters, or if there are spaces in the directory name, the CLASSPATH may not be resolved properly. You can install only one instance of each version of an Oracle product in a single Oracle home directory.
■ If the Oracle home directory is populated and it does not contain registry.xml, or if any of the other installation directories are not empty, the following messages are displayed. You are then prompted to continue installation, or return to the directory selection task with the one of the error message as shown in
Generating a Verbose Installation Log
Preparing for Your Installation 1-15 directory; you need not name the directory repositoryXXX or create it under the Oracle home directory.
1.8 Running the Oracle Enterprise Repository Product Installation
This section describes the steps to run the Oracle Enterprise Repository product installation:
1. If you are planning to use a Generic Application Server (Tomcat, JBoss, Jetty.), then a supported JDK is required to be installed before the installation of Oracle Enterprise Repository.
2. Use of the JDK that is installed with WebSphere or WebLogic Server as your
JAVA_HOME environment variable and the JAVA_HOME/bin directory being prepended to your PATH environment variable.
3. Run the following command-line option to start the Oracle Enterprise Repository installer:
java -jar OER1111xx_generic.jar
1.9 Generating a Verbose Installation Log
If you launch the installation from the command line or from a script, you can specify the -log option to generate a verbose installation log. The installation log stores messages about events that occur during the installation process, including informational, warning, error, and irrecoverable messages. This type of file can be especially useful for silent installations.
Syntax
To create a verbose log file during installation, include the -log=full_path_to_log_file option in the command line. For example:
$JAVA_HOME/bin/java -jar OER1111xx_generic.jar -log=c:\logs\OER_install.log
where JAVA_HOME represents the path the users java.
The path must specify a file. You cannot create a folder simply by including a name for it in a path name; your path should specify only existing folders. If your path includes a nonexistent folder when you execute the command, the installation program does not create the log file.
Note: You may see some warning messages in the installation log. However, unless a irrecoverable error occurs, the installation program completes the installation successfully. The installation user interface indicates the success or failure of each installation attempt, and the installation log file includes an entry indicating that the installation was successful.
2
Installing Oracle Enterprise Repository 2-1
2
Installing Oracle Enterprise Repository
This chapter describes how to start the installation program on Windows and UNIX platforms.
This chapter contains the following sections:
■ Section 2.1, "Starting the Installation Program"
■ Section 2.2, "Running the Installation Program"
2.1 Starting the Installation Program
This section contains the following topics:
■ Section 2.1.1, "Before You Start"
■ Section 2.1.2, "Starting the Installation Program on Windows Platforms"
■ Section 2.1.3, "Starting the Installation Program on UNIX Platforms"
2.1.1 Before You Start
Before you start installing the software, please review the following information:
■ According to Sun Microsystems, the Firefox 3.6 browser requires Java SE 6 Update
10 or later. Otherwise, Java-based Web applications does not work. For more information, see http://www.java.com/en/download/faq/firefox_newplugin.xml.
■ Ensure your system meets the hardware and the software requirements before you
install the Oracle Enterprise Repository software. A complete list of documents that describe Oracle Product family configurations supported by Oracle can be found at
http://www.oracle.com/technology/software/products/middleware/index.html
■ You cannot reinstall any Oracle product on top of a previously installed version of
the same product - in the same Oracle home directory or in the same file location. You can, however, add products and product components to an existing
installation. For example, you can install Oracle Enterprise Repository during one installation, and Oracle BPM during a later installation. However, to reinstall the same version of one of the products, you must first uninstall the previous installation, as described in Chapter 4, "Uninstalling the Software".
■ If you are adding components to an existing installation of Oracle Enterprise
Starting the Installation Program
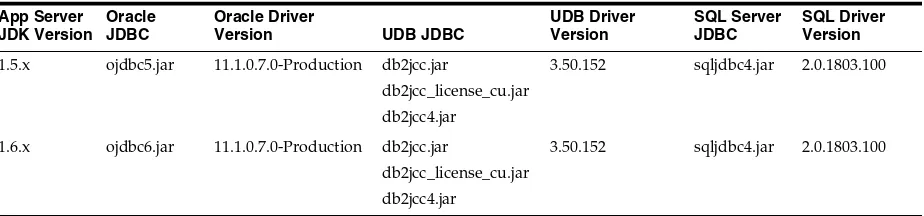
Table 2–1 describes the supported JDBC Driver file names for Oracle Enterprise Repository 11g as well as its mapping to the appropriate application server.
For information about supported application servers and databases, see Oracle Enterprise Repository Supported Configurations.
2.1.2 Starting the Installation Program on Windows Platforms
This section describes how to start the installation program on Windows Platforms:
■ Section 2.1.2.1, "Starting the Installation in Graphical Mode"
■ Section 2.1.2.2, "Starting the Installation in Console Mode"
■ Section 2.1.2.3, "Starting the Installation in Silent Mode"
2.1.2.1 Starting the Installation in Graphical Mode
To start the graphical-mode installation process on a Windows platform, perform the following steps:
1. Enter the following command to start the installation:
Note: If you are installing the software on a Windows system that supports more than one monitor, you must disable all but one monitor before starting the installation program.
■ Ensure that you have a supported application server available.
The Oracle Enterprise Repository installer optionally provides a default application server.
■ Ensure that you have a supported database that is configured,
running, and supports UTF-8/Unicode character encoding. For more information, see Section 1.6, "Database Installation Procedures".
■ Ensure that your supported application server is configured to use
UTF-8/Unicode character encoding. Database Configuration for UTF-8/Unicode Character Encoding.
Table 2–1 Oracle Enterprise Repository 11g Supported JDBC Driver Information
App Server
1.6.x ojdbc6.jar 11.1.0.7.0-Production db2jcc.jar
db2jcc_license_cu.jar db2jcc4.jar
3.50.152 sqljdbc4.jar 2.0.1803.100
Starting the Installation Program
Installing Oracle Enterprise Repository 2-3
filename.exe [-log=full_path_to_log_file]
For example:
OER1111XX_generic.exe [-log=full_path_to_log_file]
2. To continue the installation in the Graphical mode on Windows, see Section 2.2.1, "Running the Installation Program in Graphical Mode".
2.1.2.2 Starting the Installation in Console Mode
To start the console-mode installation process on a Windows platform, perform the following steps:
1. Log in to the target Windows system.
2. Launch the installation by entering one of the following commands:
filename.exe -mode=console
For example:
OER1111xx_generic.exe -mode=console
3. To continue the installation in the Console mode on Windows, see Section 2.2.2.3, "Install Oracle Enterprise Repository Using Console Mode".
2.1.2.3 Starting the Installation in Silent Mode
For details about silent-mode installation, see Section 2.2.3.1, "What Is Silent-Mode Installation?".
To start the installation in silent-mode follow these steps:
1. Log in to the Windows system.
2. Create a silent.xml file that defines the configuration settings normally entered by a user during an interactive installation process, such as graphical-mode or
Note:
■ -log=full_path_to_log_file is optional.
■ By default, the installer starts in the graphical mode.
■ You can also start the installer by double-clicking the file.
Note: You can also include the -log=full_path_to_log_file
option in the command line to create a verbose installation log. For example:
OER1111xx_generic -mode=console -log=C:\logs\OER30_ install.log
For more information on generating a verbose log, see Section 1.9, "Generating a Verbose Installation Log".
Starting the Installation Program
console-mode installation. For information about creating a silent.xml file, see
Section 2.2.3.3, "Creating a silent.xml File for Silent-Mode Installation".
3. Launch the installation by entering the following commands:
filename.exe -mode=silent -silent_xml=path_to_silent.xml
Here, filename.exe is the name of the software installation file, and path_to_ silent.xml is the full path name of the silent.xml file.
For more information, see Section 1.9, "Generating a Verbose Installation Log".
An Installer window is displayed, indicating that the files are being extracted. No other prompt or text is displayed.
For more information, see Section 2.2.3, "Running the Installation Program in Silent Mode".
2.1.3 Starting the Installation Program on UNIX Platforms
The Oracle Enterprise Repository installation program requires a Java run-time environment (JRE) to run. A JRE is bundled in the Windows installation program, and in some UNIX installation programs (those with filenames ending in .bin). For other UNIX platforms, the installation program does not include a JRE. Filenames for these installation programs end in .jar. To run the .jar installation programs, you must have an appropriate version of a JDK installed on your system, and include the bin
directory of the JDK at the beginning of your PATH system variable.
To run graphical-mode installation, your console must support a Java-based GUI. If the installation program determines that your system cannot support a Java-based GUI, it automatically starts running in console mode. For details, see Section 2.2.3, "Running the Installation Program in Silent Mode". The section describes how to start the installation using the following types of installers:
■ Section 2.1.3.1, "Using Installers with Filenames Ending in .bin"
■ Section 2.1.3.2, "Using Installers with Filenames Ending in .jar"
Note: Incorrect entries in the silent.xml file can cause installation failures. To help you determine the cause of a failure, Oracle
recommends that you create a log file when you start the installation.
Note: You can also include the -log=full_path_to_log_file
option in the command line to create a verbose installation log. For example:
OER1111xx_generic.exe -mode=silent -silent_ xml=C:\silent.xml -log=C:\logs\OER_install.log
Starting the Installation Program
Installing Oracle Enterprise Repository 2-5
2.1.3.1 Using Installers with Filenames Ending in .bin
The following sections describe how to start the installation program on UNIX platforms using filenames that end in .bin:
■ Section 2.1.3.1.1, "Starting the Installation in Graphical Mode"
■ Section 2.1.3.1.2, "Starting the Installation in Console Mode"
■ Section 2.1.3.1.3, "Starting the Installation in Silent Mode"
2.1.3.1.1 Starting the Installation in Graphical Mode To start the graphical-mode installation process using the installation files with names ending in .bin, do the following:
1. Log in to the target UNIX system.
2. To change the permissions of the file enter the following command:
chmod a+x filename.bin
For example:
chmod a+x OER11XX_linux32.bin.
To continue the installation in the graphic mode, see Section 2.2.1, "Running the Installation Program in Graphical Mode".
2.1.3.1.2 Starting the Installation in Console Mode To start the console-mode installation process for installation files with names ending in .bin, follow these steps:
1. Log in to the target UNIX system.
2. Launch the installation by entering the following commands:
chmod a+x filename.bin
./filename.bin -mode=console
Here filename.bin is the name of the installation program specific to your platform, for example,
chmod a+x OER11XX_linux32.bin.
Note: You can also include the -log=full_path_to_log_file
option in the command line to create a verbose installation log. For example:
OER11XX_linux32.bin -log=/home/logs/OER_install.log
Starting the Installation Program
To continue the installation in the console mode, see Section 2.2.2, "Running the Installation Program in Console Mode".
2.1.3.1.3 Starting the Installation in Silent Mode For details about silent-mode installation, see Section 2.2.3.1, "What Is Silent-Mode Installation?"
To start the silent-mode installation process for installation files with names ending in .bin, follow these steps:
1. Log in to the target UNIX system.
2. Create a silent.xml file that defines the configuration settings normally entered by a user during an interactive installation process, such as graphical-mode or console-mode installation.
For information about creating a silent.xml file, see Section 2.2.3.3, "Creating a silent.xml File for Silent-Mode Installation".
3. Complete the appropriate procedure as in the following table.
4. Launch the installation program by entering the following commands:
chmod a+x filename
./filename.bin -mode=silent -silent_xml=/path_to_silent.xml
Here filename.bin is the name of the installation file, for example,
chmod a+x OER11XX_linux32.bin
and path_to_silent.xml is the full path name of the silent.xml template file.
Note: You can also include the -log=full_path_to_log_file
option in the command line to create a verbose installation log. For example:
OER11XX_linux32.bin -mode=console -log=/home/logs/OER_install.log
For more information about generating a verbose log, see Section 1.9, "Generating a Verbose Installation Log".
Note: Incorrect entries in the silent.xml file can cause installation failures. To help you determine the cause of a failure, Oracle
recommends that you create a log file when you start the installation.
If you are installing
from... Do this...
Web download Go to the directory to which you have downloaded the installation program.
DVD 1. Insert the software DVD into the DVD drive and go to the DVD directory.
Starting the Installation Program
Installing Oracle Enterprise Repository 2-7 An Installer window is displayed, indicating that the files are being extracted. No other prompt or text is displayed. For more information on Silent-Mode installation, see Section 2.2.3, "Running the Installation Program in Silent Mode".
2.1.3.2 Using Installers with Filenames Ending in .jar
The following sections describe how to start the installation program on UNIX platforms using filenames that end in .jar:
■ Section 2.1.3.2.1, "Starting the Installation in Graphical Mode"
■ Section 2.1.3.2.2, "Starting the Installation in Console Mode"
■ Section 2.1.3.2.3, "Starting the Installation in Silent Mode"
2.1.3.2.1 Starting the Installation in Graphical Mode To start the graphical-mode installation process using the installation files with names ending in .jar, do the following:
1. Log in to the target UNIX system.
2. Add the bin directory of the appropriate JDK to the beginning of the PATH variable definition on the target system. For example:
PATH=<JAVA_HOME>/bin:$PATH export PATH
Here <JAVA_HOME> represents the full path to the JDK directory.
3. Launch the installation program by entering the following command::
java -jar filename.jar [-log=full_path_to_log_file]
The installation program begins the graphical mode.
To continue the installation in the graphic mode, see Section 2.2.1, "Running the Installation Program in Graphical Mode".
Note: You can also include the -log=full_path_to_log_file
option in the command line to create a verbose installation log. For example:
OER11XX_linux32.bin -mode=silent -silent_
xml=/home/silent.xml -log=/home/logs/OER_install.log
For more information on generating a verbose log, see Section 1.9, "Generating a Verbose Installation Log".
Note: You can also include the -log=full_path_to_log_file
option in the command line to create a verbose installation log. For example:
OER1111xx_generic.jar -log=/home/logs/OER_ install.log
Starting the Installation Program
2.1.3.2.2 Starting the Installation in Console Mode To start the console-mode installation process for installation files with names ending in .jar, follow these steps:
1. Log in to the target UNIX system.
2. Add the bin directory of the appropriate JDK to the beginning of the PATH variable definition on the target system. For example:
PATH=<JAVA_HOME>/bin:$PATH export PATH
Here <JAVA_HOME> represents the full path to the JDK directory.
3. Launch the installation by entering the following command:
java -jar filename.jar -mode=console [-log=full_path_to_log_file]
where, filename.jar is the name of the installation file, for example,
oer_generic.jar.
To continue the installation in the console mode, see Section 2.2.2, "Running the Installation Program in Console Mode".
2.1.3.2.3 Starting the Installation in Silent Mode For details about silent-mode installation, see Section 2.2.3.1, "What Is Silent-Mode Installation?".
To start the silent-mode installation process for installation files with names ending in
.jar, follow these steps:
1. Log in to the target UNIX system.
2. Create a silent.xml file that defines the configuration settings normally entered by a user during an interactive installation process, such as graphical-mode or console-mode installation.
For information about creating a silent.xml file, see Section 2.2.3.3, "Creating a silent.xml File for Silent-Mode Installation".
3. Add the bin directory of the appropriate JDK to the beginning of the PATH variable definition on the target system. For example:
PATH=<JAVA_HOME>/bin:$PATH export PATH
Note: You can also include the -log=full_path_to_log_file
option in the command line to create a verbose installation log. For example:
java -jar OER1111xx_generic.jar -mode=console -log=/home/logs/OER_install.log
For more information about generating a verbose log, see Section 1.9, "Generating a Verbose Installation Log".
Note: Incorrect entries in the silent.xml file can cause installation failures. To help you determine the cause of a failure, Oracle
Running the Installation Program
Installing Oracle Enterprise Repository 2-9 Here <JAVA_HOME> represents the full path to the JDK directory.
4. Launch the installation by entering the following command:
java -jar filename.jar -mode=silent -silent_xml=/path_to_silent.xml [-log=full_ path_to_log_file]
where, filename.jar is the name of the installation file for example,
oerXX_generic.jar
where, XX represents the version number of the software you are installing and
path_to_silent.xml is the full path to the silent.xml file.
An Installer window is displayed, indicating that the files are being extracted. No other prompt or text is displayed. For more information on Silent-Mode installation, see Section 2.2.3, "Running the Installation Program in Silent Mode".
2.2 Running the Installation Program
This section contains the following topics:
■ Section 2.2.1, "Running the Installation Program in Graphical Mode"
■ Section 2.2.2, "Running the Installation Program in Console Mode"
■ Section 2.2.3, "Running the Installation Program in Silent Mode"
2.2.1 Running the Installation Program in Graphical Mode
Start the installation program as described in Section 2.1, "Starting the Installation Program".
The installation program prompts you to enter specific information about your system and configuration.
Note: You can also include the -log=full_path_to_log_file
option in the command line to create a verbose installation log. For example:
oer_generic.jar -mode=silent -silent_
xml=/home/silent.xml -log=/home/logs/OER_install.log
For more information on generating a verbose log, see Section 1.9, "Generating a Verbose Installation Log".
Caution: Before running the installer, follow the preparation guidelines in Preparing for Your Installation, especially the Database Installation Procedures for your DBMS.
Running the Installation Program
1. Double-click the installer file to start the installation. The Oracle Enterprise Repository - Oracle Products Welcome screen is displayed, as shown in
Figure 2–1.
Figure 2–1 Oracle Enterprise Repository - Oracle Products Welcome Screen
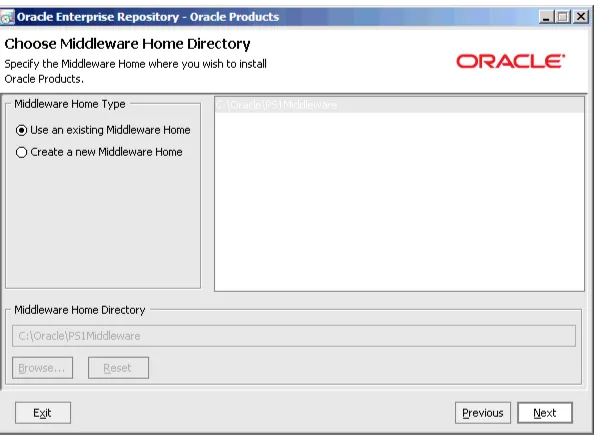
2. Click Next. The Choose Middleware Home Directory screen is displayed, as shown in Figure 2–2.
Figure 2–2 Choose Middleware Home Directory Screen
Choose either of the following options:
■ Use an existing Middleware Home: If you already have a Middleware Home
directory on your system, you can select that directory (recommended).
■ Create a Middleware Home: Creates a new Middleware Home directory. If
Running the Installation Program
Installing Oracle Enterprise Repository 2-11 the installation program automatically creates one for you. You can also click
Browse and select a directory from the Middleware Home Directory Selection dialog. Click Reset to reset the Middleware Home Directory field.
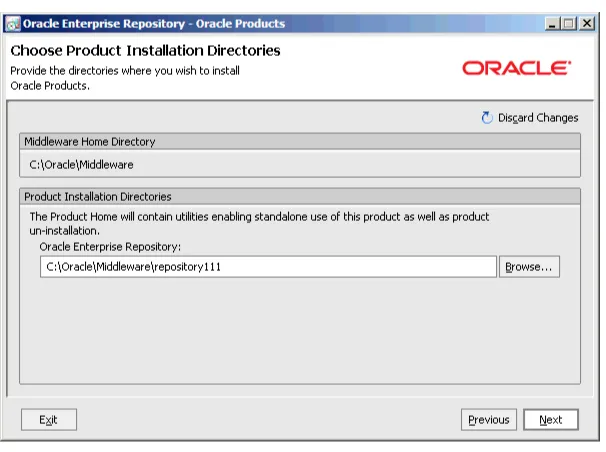
3. Click Next. The Choose Products Installation Directories screen is displayed, as shown in Figure 2–3.
Figure 2–3 Choose Products Installation Directories Screen
4. Click Next. The Choose Application Server screen is displayed, as shown in
Figure 2–4.
Figure 2–4 Choose Application Server Screen
Note: For information about the Middleare Home directory, see
Running the Installation Program
5. Select the appropriate application server and click Next. The Initialize Repository Properties screen is displayed, as shown in Figure 2–5.
Figure 2–5 Initialize Repository Properties Screen
6. Specify the information required to initialize Oracle Enterprise Repository for your application server, and click Next. The Configure Database screen is displayed, as shown in Figure 2–6.
Figure 2–6 Configure Database Screen
Specify whether you want to enter information for the Oracle Enterprise
Repository Tablespaces that were configured as a prerequisite to this installation procedure or to configure a database at a later time.
Running the Installation Program
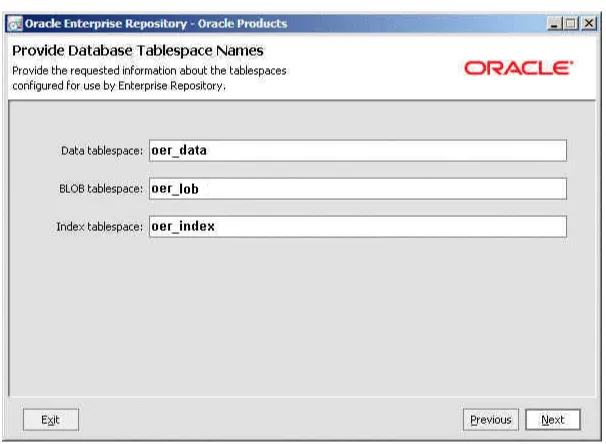
Installing Oracle Enterprise Repository 2-13 7. Select Yes, and then click Next. The Provide Database Tablespace Names screen is
displayed, as shown in Figure 2–7.
Figure 2–7 Provide Database Tablespace Names Screen
Specify the Oracle Enterprise Repository tablespace names that were created before the installation procedure, as follows:
■ SQL Server: provide the file group and index group names to be used by
Oracle Enterprise Repository. Typically, the value for Data Tablespace would be PRIMARY and Index Tablespace would be INDEX.
■ Oracle: provide the data and index tablespace names to be used by Oracle
Enterprise Repository. Typically, the value for Data Tablespace would be
OER_DATA and Index Tablespace would be OER_INDEX.
8. Click Next. The Initialize Repository Database Properties screen is displayed, as shown in Figure 2–8.
Note: In case of database configurations errors, you can retry the database configuration by running the Oracle Enterprise Repository db_config command from the <OER_home>/common/bin/db_
config.cmd/.sh directory.
Note: It is recommended that you use three distinctly different Oracle Enterprise Repository tablespace names in Figure 2–7.
Running the Installation Program
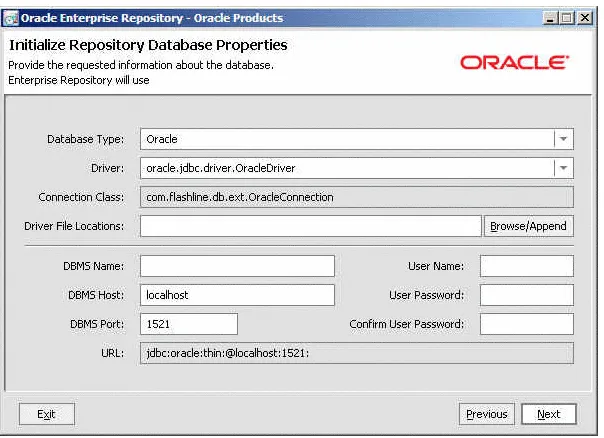
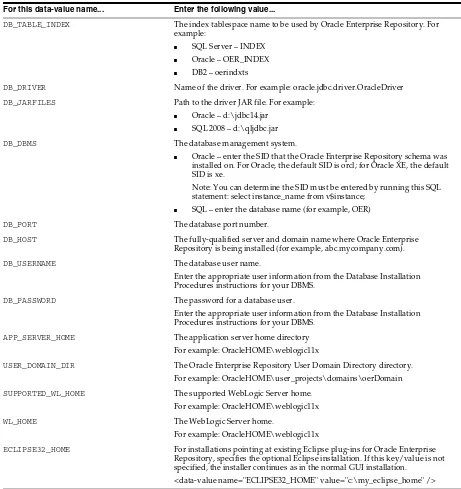
Figure 2–8 Initialize Repository Database Properties Screen
Specify the properties required to initialize your database.
■ Driver File Locations:
– Oracle: ojdbc5.jar or ojdbc6.jar For more information, see Table 2–1.
– IBM UDB/DB2: db2jcc.jar, db2jcc_licence_cu.jar, db2jcc4.jar
– SQL 2008: sqljdbc4.jar
■ DBMS Name:
– Oracle: Enter the SID that the Oracle Enterprise Repository schema was installed on. For Oracle, the default SID is orcl; for Oracle XE, the default SID is xe.
– SQL: Enter the database name, for example, OER.
■ DBMS Host: Enter the fully-qualified server and domain name where Oracle
Enterprise Repository is being installed, for example, abc.mycompany.com.
■ User Name and User Password fields: Ensure that you enter the appropriate
user information from the Preparing for Your Installation instructions. If you used the recommended sample Build a Database User scripts for Oracle, or if you followed the Create a Database User steps for SQL Server 2008, they are
OER and OER_PWD.
9. Click Next. The Test Passed screen is displayed.
Note: By default, the Oracle Enterprise Repository installer does not have JDBC driver. You must download the respective JDBC driver.