11
g
Release 1 (11.1.1.5.0)
E15754-08Copyright © 2008, 2011, Oracle and/or its affiliates. All rights reserved. Primary Author: Vimmika Dinesh
Contributing Author: Aditi Dalia, Atturu Chandra Prasad Reddy, David DiFranco, Dennis Chin, Jeff Cunnigham, John Yoder, Mike Wallace, Scott Spieker, Sharon Fay, Viswanatha Basavalingappa, Manoramya Chandramohan
This software and related documentation are provided under a license agreement containing restrictions on use and disclosure and are protected by intellectual property laws. Except as expressly permitted in your license agreement or allowed by law, you may not use, copy, reproduce, translate, broadcast, modify, license, transmit, distribute, exhibit, perform, publish, or display any part, in any form, or by any means. Reverse engineering, disassembly, or decompilation of this software, unless required by law for interoperability, is prohibited.
The information contained herein is subject to change without notice and is not warranted to be error-free. If you find any errors, please report them to us in writing.
If this software or related documentation is delivered to the U.S. Government or anyone licensing it on behalf of the U.S. Government, the following notice is applicable:
U.S. GOVERNMENT RIGHTS Programs, software, databases, and related documentation and technical data delivered to U.S. Government customers are "commercial computer software" or "commercial technical data" pursuant to the applicable Federal Acquisition Regulation and agency-specific supplemental regulations. As such, the use, duplication, disclosure, modification, and adaptation shall be subject to the restrictions and license terms set forth in the applicable Government contract, and, to the extent applicable by the terms of the Government contract, the additional rights set forth in FAR 52.227-19, Commercial Computer Software License (December 2007). Oracle USA, Inc., 500 Oracle Parkway, Redwood City, CA 94065.
This software is developed for general use in a variety of information management applications. It is not developed or intended for use in any inherently dangerous applications, including applications which may create a risk of personal injury. If you use this software in dangerous applications, then you shall be responsible to take all appropriate fail-safe, backup, redundancy, and other measures to ensure the safe use of this software. Oracle Corporation and its affiliates disclaim any liability for any damages caused by use of this software in dangerous applications.
Oracle is a registered trademark of Oracle Corporation and/or its affiliates. Other names may be trademarks of their respective owners.
1
Configuring an Artifact Store
1.1 Overview... 1-1 1.2 Creating and Configuring an Artifact Store... 1-1 1.3 Selecting a New Artifact Store ... 1-3
2
ClearCase Integration
2.1 ClearCase Web Interface... 2-1 2.1.1 Overview... 2-1 2.1.2 Prerequisites ... 2-2 2.1.3 Creating and Configuring Repository and Assets... 2-3 2.2 File Stores ... 2-6 2.2.1 Overview... 2-6 2.2.2 Adding the File Stores Feature to Oracle Enterprise Repository... 2-6 2.2.3 Creating a File Store ... 2-7 2.2.4 Configuring an Artifact Store For a File Store ... 2-8 2.2.5 Adding a File to an Asset Using the File Store's Artifact Store... 2-8 2.2.6 Using File Stores ... 2-9 2.3 ClearQuest Integration... 2-10 2.3.1 Adding ClearQuest... 2-11 2.3.2 Configuring a ClearQuest Artifact Store... 2-11 2.3.3 Adding a File to an Asset Using the ClearQuest Artifact Store... 2-11
3
Harvest-HTTP Repository Host Integration
3.1 Overview... 3-1 3.2 Installation ... 3-1 3.3 Configure an Artifact Store... 3-2 3.4 Add the Harvest Artifact Store to an Asset... 3-2
4
Serena ChangeMan Integration
5.1 Overview... 5-1 5.1.1 Prerequisites ... 5-1 5.1.2 Obtaining the Enterprise Manager Integration Utility... 5-3 5.1.3 High Level Use Cases... 5-3 5.2 Using the Enterprise Manager Integration Utility ... 5-3 5.2.1 Running from Command Line ... 5-4 5.2.2 Scheduling from Enterprise Manager ... 5-5 5.2.3 Metric Publishing... 5-5 5.2.3.1 Oracle Service Bus ... 5-6 5.2.3.2 BPEL PM ... 5-6 5.2.3.3 Web Services... 5-6 5.2.3.4 Artifacts Creation ... 5-7 5.2.3.5 Endpoint Creation ... 5-7 5.2.3.6 Metrics to Update ... 5-7 5.3 Configuring the Enterprise Manager Integration Utility... 5-8 5.3.1 Setting the Repository and Enterprise Manager Connection Information for the
Command-line Utility 5-8
5.3.2 Advanced Configuration ... 5-9 5.3.2.1 Metric Mappings... 5-9 5.3.2.2 Target Finders ... 5-10 5.3.2.3 Logging ... 5-11 5.4 Encrypting the Configuration File Passwords... 5-11 5.5 Known Issues... 5-11 5.5.1 Using Incorrect Encrypted Password ... 5-12
6
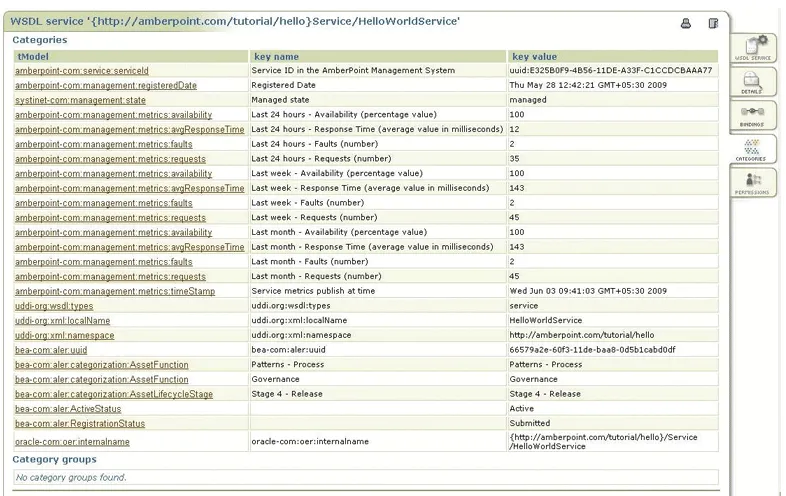
Integration with Amberpoint
7
Integration with Development Environments
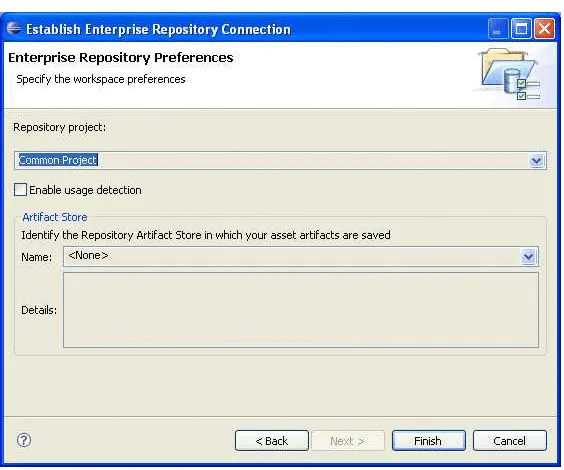
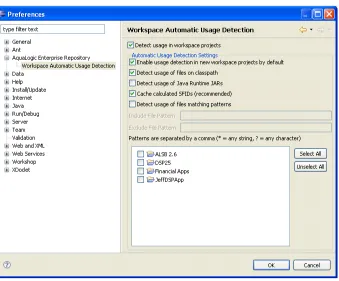
8.1 Install the Harvester ... 8-1 8.2 Assign IDE Users to Oracle Enterprise Repository Projects ... 8-1 8.3 Establish Compliance Templates ... 8-1 8.4 Set up Automatic Usage Detection... 8-2
9
Configuring Your IDE to Support Integration with Oracle Enterprise
Repository
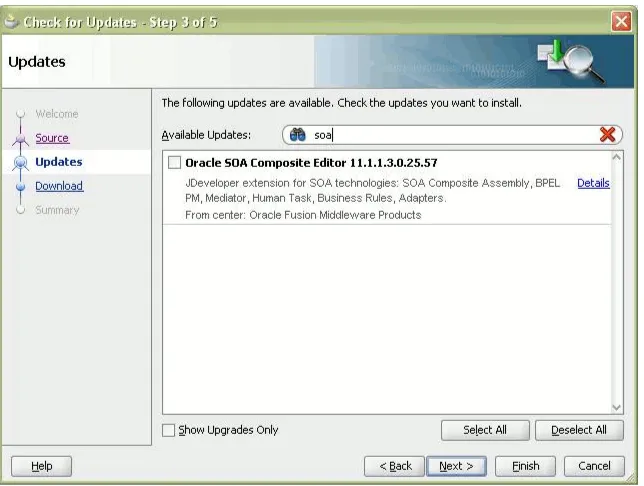
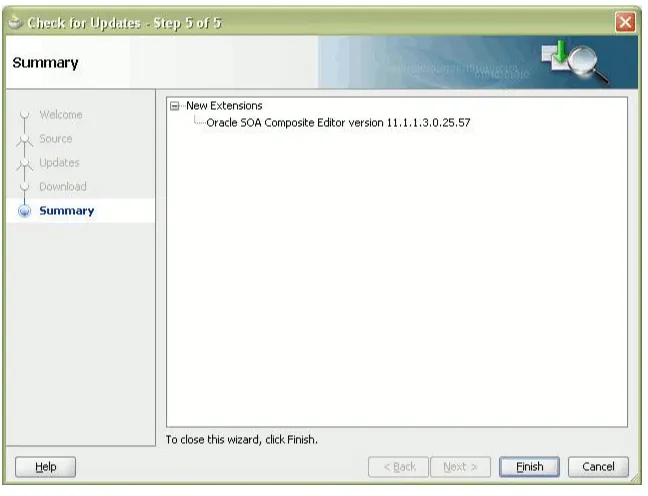
9.1 Configuring Oracle JDeveloper ... 9-1 9.1.1 Integrating with Oracle JDeveloper 11g R1 Patchset Releases... 9-1 9.1.2 Integrating with Oracle JDeveloper 11g R1 ... 9-7 9.1.3 Integrating with Oracle JDeveloper 10g... 9-7 9.2 Configuring Eclipse ... 9-8 9.2.1 Enable Harvesting in Eclipse ... 9-8 9.2.1.1 Setting up Eclipse Environment to use Harvester as an "External Program" ... 9-8 9.2.1.2 Harvesting in Eclipse Environment using "External Program" ... 9-10 9.2.1.3 Setting up Eclipse Environment to use Harvester via ANT... 9-11 9.2.1.4 Harvesting in Eclipse Environment using ANT ... 9-12 9.2.2 Configure the Oracle Enterprise Repository Plug-ins ... 9-12 9.2.2.1 Configuring the Oracle Enterprise Repository Plug-ins for Repository Access ...
9-13
9.2.2.2 Prerequisites for Using the Oracle Enterprise Repository Plug-ins for Eclipse ... 9-13
9.2.2.2.1 Assign Users to an Oracle Enterprise Repository Project ... 9-13 9.2.2.2.2 Enabling the Assets-in-Progress Properties ... 9-14 9.2.2.2.3 SiteMinder ... 9-14 9.2.2.2.4 Java JDK ... 9-14 9.2.2.2.5 XML Parsing... 9-14 9.2.3 Configure the Oracle Enterprise Repository Preferences ... 9-15 9.2.4 Enable Automatic Usage Detection ... 9-16 9.3 Configuring VS .NET ... 9-18 9.3.1 Enable Harvesting in VS .NET ... 9-18 9.3.2 Configure the Oracle Enterprise Repository Plug-ins ... 9-19 9.3.2.1 Prerequisities... 9-20 9.3.2.2 Installation ... 9-20 9.3.3 Configure the Connection to Oracle Enterprise Repository ... 9-21 9.3.4 Assign an Oracle Enterprise Repository Project to a .NET Solution... 9-22 9.3.5 Enable Automatic Usage Detection ... 9-23 9.3.5.1 Overview of SFID ... 9-23 9.3.5.2 Configuring Automatic Usage Detection... 9-23
10
Using the IDE to Interact with Oracle Enterprise Repository
10.1.4.1 Associating JDeveloper Application with Oracle Enterprise Repository ... 10-3 10.1.4.2 Consuming WSDL/Service from Oracle Enterprise Repository... 10-4 10.1.5 Prescriptive Reuse ... 10-6 10.2 Using Eclipse ... 10-6 10.2.1 Submit Files ... 10-6 10.2.2 Harvest Artifacts ... 10-7 10.2.3 Search Oracle Enterprise Repository ... 10-7 10.2.4 View Asset Details... 10-7 10.2.5 Download Artifacts ... 10-9 10.2.6 Prescriptive Reuse ... 10-10 10.2.7 Automatic Usage Detection... 10-10 10.3 Using VS .NET... 10-11 10.3.1 Submit Files ... 10-12 10.3.2 Harvest Artifacts ... 10-12 10.3.3 Search Oracle Enterprise Repository ... 10-12 10.3.4 View Asset Details... 10-13 10.3.4.1 Accessing the Repository Assets Pane ... 10-14 10.3.4.1.1 About Oracle Enterprise Repository Projects... 10-14 10.3.4.1.2 Accessing the Repository Assets View... 10-14 10.3.4.2 Accessing the Oracle Enterprise Repository Log... 10-15 10.3.5 Download Artifacts ... 10-15 10.3.6 Automatic Usage Detection... 10-17
11
Integration with SAP
11.1 Overview... 11-1 11.2 Prerequisites ... 11-2 11.3 Configuring Integration with SAP ... 11-3 11.3.1 Aligning the Taxonomy Between SAP and Oracle Enterprise Repository Assets. 11-3 11.3.2 Exporting the Selected SAP Service Assets from SAP Enterprise Service Registry to
OER 11-3
11.3.3 Receiving New Services from SAP... 11-4 11.3.4 Configuring Ongoing Updates from SAP... 11-4 11.3.5 End User Visibility of Available SAP Services ... 11-4
12
Repository Extensibility Framework
13
ArtifactStore API
13.1 Overview... 13-1 13.2 Use Cases... 13-1 13.2.1 Use Case: Create missing ArtifactStore ... 13-1
14
AcceptableValueLists API
14.1 Overview... 14-1 14.2 Use Cases... 14-1 14.2.1 Use Case: Create and Edit an Acceptable Value List... 14-1 14.2.2 Use Case: Find an Acceptable Value List and use it in an asset ... 14-3
15
Asset API
15.1 Overview... 15-1 15.1.1 Definitions... 15-3 15.1.2 Sample Code... 15-3 15.1.3 Related Subsystems ... 15-6 15.2 Use Cases... 15-7 15.2.1 Use Case: Creating a new asset... 15-8 15.2.2 Use Case: Creating a new asset from XML ... 15-9 15.2.3 Use Case: Modifying an asset ... 15-11 15.2.4 Use Case: Assign users to an asset ... 15-13 15.2.5 Use Case: Building an asset search... 15-15 15.2.6 Use Case: Upgrading asset status... 15-18 15.2.7 Use Case: Downgrading asset status ... 15-20 15.2.8 Use Case: Apply and remove Compliance Templates from a project ... 15-21 15.2.9 Use Case: Creating the new version of an asset and retiring the old version... 15-23 15.2.10 Use Case: "Housekeeping" ... 15-25 15.2.11 Use Case: Finding assets and updating custom-data... 15-28 15.2.12 Use Case: Reading an Asset's Tabs ... 15-29 15.2.13 Use Case: Retrieve An Asset's Tab Based on TabType ... 15-30 15.2.14 Use Case: Approving and Unapproving a tab ... 15-31
16
AssetType API
16.1 Overview... 16-1 16.2 Use Cases... 16-2 16.2.1 Use Case: Create and edit a new Type ... 16-2 16.2.2 Use Case: Create a Compliance Template Type... 16-3 16.2.3 Use Case: Find Types ... 16-4 16.2.4 Use Case: Read tab types ... 16-6 16.2.5 Use Case: Retrieve all Asset Type tabs ... 16-7
17
Categorization Types and Categorizations API
17.2.2 Use Case: Manipulate Categorization Types... 17-4 17.2.3 Use Case: Manipulate Categorizations... 17-7
18
CMF Entry Type API
18.1 Overview... 18-1 18.2 Use Cases... 18-1 18.2.1 Use Case: Manipulating CMF Entry Types ... 18-1
19
Custom Access Settings API
19.1 Overview... 19-1 19.2 Use Cases... 19-2 19.2.1 Use Case: Retrieve a List of Custom Access Setting Types ... 19-2 19.2.2 Use Case: Get Default Custom Access Setting Names... 19-3
20
Department API
20.1 Overview... 20-1 20.2 Use Cases... 20-1 20.2.1 Use Case: Manipulate Departments... 20-1
21
Extraction API
21.1 Overview... 21-1 21.2 Use Cases... 21-2 21.2.1 Use Case: Extract an Asset... 21-2 21.2.2 Use Case: Read an Extraction... 21-5 21.2.3 Use Case: Update an Extraction ... 21-6
22
Localization of REX Clients
22.1 Overview... 22-1 22.2 Use Cases... 22-2 22.2.1 Use Case: Creating localized messages from REX Exceptions... 22-2 22.2.2 Use Case: Creating localized messages from REX Audit Messages ... 22-3
23
Notification API
23.1 Overview... 23-1 23.2 Use Cases... 23-1 23.2.1 Use Case: Read Notification Substitution List... 23-1 23.2.2 Use Case: Create a Notification ... 23-1
24
Policy API
24.2.4 Use Case: Get Policies That Have Been Applied To An Asset... 24-7 24.2.5 Use Case: Set Which Policies Are Applied To An Asset... 24-8 24.2.6 Use Case: Evaluate Asset Compliance... 24-9
25
Projects API
25.1 Overview... 25-1 25.2 Use Cases... 25-1 25.2.1 Use Case: Create a New Project... 25-2 25.2.2 Use Case: Read a Project ... 25-3 25.2.3 Use Case: Validate a Project ... 25-4 25.2.4 Use Case: Update a Project... 25-6 25.2.5 Use Case: Update a Project's Produced Assets... 25-8 25.2.6 Use Case: Remove Produced Assets from a Project ... 25-9 25.2.7 Use Case: Update a Project's Asset Usage... 25-11 25.2.8 Use Case: Closing a Project with Hidden Assets ... 25-13 25.2.9 Use Case: Add Users and Related Projects to a Project ... 25-15 25.2.10 Use Case: Remove Related Projects and Users from a Project... 25-19 25.2.11 Use Case: Update a Project's Extractions - Reassign Extractions to a Different User on
the Same or a Different Project 25-23
25.2.12 Use Case: Update a Project's User - Reassign User and His/Her Extractions to Another Project 25-25
25.2.13 Use Case: Update a Project's User - Reassign User Only (Not the User's Extractions) to Another Project 25-27
25.2.14 Use Case: Read the Value-Provided for a Project and Asset... 25-31 25.2.15 Use Case: Update the Value Provided for a Project and Asset - Use Predicted Value ...
25-33
25.2.16 Use Case: Update the Value Provided for a Project and Asset - Use Consumer Value .... 25-36
25.2.17 Use Case: Update the Value-Provided for a Project and Asset - Use Project Lead Value 25-39
26
Relationship Types API
26.1 Overview... 26-1 26.2 Use Cases... 26-1 26.2.1 Use Case: Create a new relationship type... 26-1 26.2.2 Use Case: Modify related assets ... 26-3 26.2.3 Use Case: Query related assets ... 26-4
27
Role API
28.1 Overview... 28-1 28.2 Use Cases... 28-1 28.2.1 Use Case: Create Subscription to Assets ... 28-1 28.2.2 Use Case: Delete Subscription to Assets... 28-3 28.2.3 Use Case: Read Subscriptions for Assets... 28-4 28.2.4 Use Case: Read Users Subscribed to an Asset ... 28-5
29
System Settings API
29.1 Overview... 29-1 29.2 Use Cases... 29-1 29.2.1 Use Case: Query for System Settings ... 29-1
30
User API
30.1 Overview... 30-1 30.2 Use Cases... 30-1 30.2.1 Use Case: Manipulating Users... 30-1
31
Vendor API
31.1 Overview... 31-1 31.2 Use Cases... 31-1 31.2.1 Use Case: Manipulating Vendors... 31-1
Oracle Fusion Middleware Integration Guide for Oracle Enterprise Repository describes how to configure Enterprise Manager, Oracle JDeveloper, VS .NET with Oracle Enterprise Repository. This guide also describes the Oracle Enterprise Repository connectors.
Audience
This document is intended for all Oracle Enterprise Repository users who want configure the development environments to easily produce or consume files from Oracle Enterprise Repository. This document is also intended for all Oracle Enterprise Repository users who want to use REX and the REX APIs.
Documentation Accessibility
Our goal is to make Oracle products, services, and supporting documentation accessible to all users, including users that are disabled. To that end, our
documentation includes features that make information available to users of assistive technology. This documentation is available in HTML format, and contains markup to facilitate access by the disabled community. Accessibility standards will continue to evolve over time, and Oracle is actively engaged with other market-leading
technology vendors to address technical obstacles so that our documentation can be accessible to all of our customers. For more information, visit the Oracle Accessibility Program Web site at http://www.oracle.com/accessibility/.
Accessibility of Code Examples in Documentation
Screen readers may not always correctly read the code examples in this document. The conventions for writing code require that closing braces should appear on an
otherwise empty line; however, some screen readers may not always read a line of text that consists solely of a bracket or brace.
Accessibility of Links to External Web Sites in Documentation
This documentation may contain links to Web sites of other companies or
organizations that Oracle does not own or control. Oracle neither evaluates nor makes any representations regarding the accessibility of these Web sites.
Access to Oracle Support
For more information, see the following documents in the Oracle Enterprise Repository 11g Release 1 (11.1.1.5.0) documentation set:
■ Oracle Enterprise Repository on OTN - The home page for Oracle Enterprise Repository on Oracle Technology Network (OTN) is:
http://www.oracle.com/technologies/soa/enterprise-repository. html
■ Architect Center: SOA Governance: Essential to Your Business - Learn how effective SOA governance is an essential element in any enterprise transformation strategy by reading the Architect Center: SOA Governance: Essential to Your Business documents at:
http://www.oracle.com/us/technologies/soa/center-066464.html
■ SOA Blog - Keep on top of the latest SOA blogs at:
http://blogs.oracle.com/governance
Conventions
The following text conventions are used in this document:
Convention Meaning
boldface Boldface type indicates graphical user interface elements associated with an action, or terms defined in text or the glossary.
italic Italic type indicates book titles, emphasis, or placeholder variables for which you supply particular values.
Part I
Part I
Oracle Enterprise Repository Connectors
This part describes how to get started with Oracle Enterprise Repository connectors.
This part contains the following chapters:
■ Chapter 1, "Configuring an Artifact Store"
■ Chapter 2, "ClearCase Integration"
■ Chapter 3, "Harvest-HTTP Repository Host Integration"
1
1
Configuring an Artifact Store
This chapter provides an overview of artifact stores and describes how to create and configure an artifact store.
This chapter contains the following sections:
■ Section 1.1, "Overview"
■ Section 1.2, "Creating and Configuring an Artifact Store"
■ Section 1.3, "Selecting a New Artifact Store"
1.1 Overview
An Artifact Store is where the files relevant to assets in Oracle Enterprise Repository are stored. Launch the Asset Editor window from the Oracle Enterprise Repository home page.
1.2 Creating and Configuring an Artifact Store
This section describes the the steps to create and configure an artifact store.
1. Click Edit/Manage Assets. The Asset Editor is displayed, as shown in Figure 1–1.
Figure 1–1 Asset Editor
Figure 1–2 Configure Artifact Stores Dialog
3. Click Add. The Create a New Artifact Store dialog is displayed, as shown in Figure 1–3.
Figure 1–3 Create a New Artifact Store Dialog
4. Enter a unique name for the artifact store in the Name text box.
5. Select the type of artifact store from the Type list (this example uses UNC).
6. Enter the host name of the application server in the Hostname box.
7. Enter the rest of the path in the Path text box.
A file link, appended with the host name and path, appears in the URL text box. This link can be cut/pasted into a file explorer/browser window in order to view the file.
8. If necessary, enter the appropriate information in the Username and Password text boxes.
9. Click OK.
1.3 Selecting a New Artifact Store
After configuring an artifact store as described in Creating and Configuring an Artifact Store, you must select it using the Submission Upload Artifact Store system setting on the Oracle Enterprise Repository Admin page.
1. Open the Oracle Enterprise Repository Admin page.
2. In the left panel, click System Settings.
3. Locate the Upload Area section in the Server Settings group of system settings, as shown in Figure 1–3.
4. Use the Submission Upload Artifact Store list to select the newly created artifact store.
2
2
ClearCase Integration
This chapter describes how to set up a ClearCase repository and integrate it with Oracle Enterprise Repository.
This chapter contains the following sections:
■ Section 2.1, "ClearCase Web Interface"
■ Section 2.2, "File Stores"
■ Section 2.3, "ClearQuest Integration"
2.1 ClearCase Web Interface
This section explains the procedure to follow to setup a ClearCase repository, which allows ClearCase files to be linked to assets for future use/download. This section contains the following topics:
■ Section 2.1.1, "Overview"
■ Section 2.1.2, "Prerequisites"
■ Section 2.1.3, "Creating and Configuring Repository and Assets"
2.1.1 Overview
This section contains the following topics:
■ "Webshpere 5.x Apache Plug-In"
■ "WebLogic 8.1 Tuxedo Plug-In"
Webshpere 5.x Apache Plug-In
When using an HTTP server (such as Apache, IIS, IBM HTTP Server) to connect to a Websphere 5.x server using the mod_was_ap20_http.so or mod_was_ap20_ http.dll plug-in, a configuration change must be applied to the plugin-cfg.xml
document used with this connector:
Each time the crtplugininst application is run to regenerate the plugin-cfg.xml
WebLogic 8.1 Tuxedo Plug-In
When using the Weblogic Tuxedo Plugin, there is a requirement of 8.1 SP3 being applied to both the application server as well as the Tuxedo Plug-In on the Apache server.
2.1.2 Prerequisites
Before using ClearCase, you must perform the following prerequisites:
■ The application server must support the UTF-8 character set to allow ClearCase and Oracle Enterprise Repository to function properly together.
■ Ensure the application server has access to the ClearCase server.
■ CCWeb and/or ClearTool must be installed and enabled on the application server computer. For more information, see the ClearCase documentation.
Enabling UTF-8 Support
Enabling the UTF-8 character set is accomplished in the following manners based on the server employed.
■ Weblogic 7.x/8.x
You may specify the character set for all deployed Weblogic Web applications deployed on a Weblogic Server instance by setting the system properties
client.encoding.override and file.encoding equal to the name of the character set. Set this system property in the environment variable called JAVA_OPTIONS, for example, JAVA_OPTIONS=-Dclient.encoding.override=UTF-8
-Dfile.encoding=UTF-8.
These values can also be supplied as part of the startup options for the domain.
■ Websphere 5.x
Change the Generic JVM Arguments for the server to include the following parameter: -Dclient.encoding.override=UTF-8
■ Tomcat 5.0.25
Change the URIEncoding value in the Connector element within the
server.xml file in the CATALINA_HOME/conf directory:
<Connector port="8080" URIEncoding="UTF-8" ...
Important Notes
1. Construct a view in CCWeb.
2. Create the link based on that view constructed in CCWeb.
3. Add the link within the File Information section of the asset within the Asset Editor.
4. Select the Test button to verify that the link is valid.
5. It should also be possible to access the link by pasting the URL into a browser address window. If this is not possible the link itself may be in error, or there may be a problem with the network connection to the ClearCase server.
2.1.3 Creating and Configuring Repository and Assets
You can create and configure repository and assets in Oracle Enterprise Repository. This section contains the following topics:
■ "Configure an Artifact Store"
■ "Set the artifact store from which to extract files"
■ "Create an asset for the ClearCase file(s)"
■ "Link the ClearCase file to the asset"
■ "Extract the asset and the ClearCase file(s)"
Configure an Artifact Store
This procedure is performed in the Oracle Enterprise Repository Asset Editor screen.
1. Open the Actions menu.
2. Click Configure Artifact Store.
3. Click Add. The Create a New Artifact Store dialog is displayed, as shown in Figure 2–1.
4. Fill in the appropriate information, as shown in Figure 2–1.
Figure 2–1 Create a New Artifact Store Dialog
5. Click OK.
Set the artifact store from which to extract files
This procedure is performed on the Oracle Enterprise Repository Admin screen.
1. Click System Settings.
Figure 2–2 Search Box
The Upload Area section within the Server Settings section is displayed, as shown in Figure 2–3.
Figure 2–3 Upload Area Section
3. Use the Submission Upload Artifact Store list to select the ClearCase repository.
4. Click Save when finished.
Create an asset for the ClearCase file(s)
1. Click Submit an Asset in the Oracle Enterprise Repository Assets screen. New assets may also be created through the File menu in the Asset Editor.
2. Select an Asset Type from the drop-down menu.
3. Enter a name for the new asset in the Name text box.
4. Enter a brief description in the Description field.
Link the ClearCase file to the asset
1. Open the asset in the Asset Editor.
2. Locate the File Information section (typically on the General tab).
3. Click Add.
4. Create a name and/or description.
5. Click Edit.
6. Select the Repository File radio button.
Figure 2–4 Edit URL Dialog
7. Select ClearCase in the Host list.
■ The path should populate with information configured in artifact store section:
– http://clearcase.example.com/ccaseweb/bin/ccweb/test.txt?dir=//usr/vobs/geneva&ele m=test.txt&cmd=view&user=ccuser&password=<password>
8. Populate the file name field with the path of the view from CCWeb and the file name.
9. Click View to test the file.
Extract the asset and the ClearCase file(s)
1. In the Oracle Enterprise Repository Assets screen, use Search to locate the newly created asset.
2. Click the asset to open its Asset Detail Display.
3. Click Use/Download. The Use - Download page is displayed, as shown in Figure 2–5.
Figure 2–5 Use - Download Page
2.2 File Stores
File Stores allow Oracle Enterprise Repository to integrate with underlying proprietary repositories. File Stores allow integration with Rational ClearCase.
This section contains the following topics:
■ Section 2.2.1, "Overview"
■ Section 2.2.2, "Adding the File Stores Feature to Oracle Enterprise Repository"
■ Section 2.2.3, "Creating a File Store"
■ Section 2.2.4, "Configuring an Artifact Store For a File Store"
■ Section 2.2.5, "Adding a File to an Asset Using the File Store's Artifact Store"
■ Section 2.2.6, "Using File Stores"
2.2.1 Overview
The File Store integration with Rational ClearCase allows an asset registrar to browse the ClearCase Repository. The registrar can select a specific branch and version of a file to be used when the asset is extracted. In addition, the config spec for a file can be made available for use with WSAD or XDE.
The Rational ClearCase client must be installed and configured on the application server to use File Stores with Rational ClearCase. All connections to ClearCase use the ClearTool application in the ClearCase client and share a common set of ClearCase authentication credentials.
2.2.2 Adding the File Stores Feature to Oracle Enterprise Repository
To add the file stores feature to Oracle Enterprise Repository, perform the following steps:
1. Download the Oracle Enterprise Repository installation package from the Oracle download website.
2. Unzip the downloaded file to a temporary directory.
3. Download the SQL scripts from the following location to a temporary directory:
https://support.oracle.com/oip/faces/secure/km/DownloadAttachment.jspx?attachid=82597 3.1:SCMIntegration
4. Using a SQL tool appropriate for your database, run the SQL script located in the temporary directory to add the File Store Artifact Store to your Oracle Enterprise Repository database.
5. Click the Admin link on the Oracle Enterprise Repository menu bar.
6. On the Admin screen, click System Settings.
7. Enable the property registry.advanced.filestores.enabled. A new section called File Store appears, to which the application automatically navigates.
8. Set Advanced Access File Stores to true.
9. Click Save.
2.2.3 Creating a File Store
1. Install the Rational ClearCase client on the application server hosting Oracle Enterprise Repository.
2. Locate the cleartool.exe file on the application server. The entire file path to
cleartool.exe is necessary. It is used with a File Store parameter called
cleartool.path.
3. In the ClearCase client on the application server, create a view to be used by Oracle Enterprise Repository. A recommended practice is to include the word Flashline in the name of the view. The access path for the view is used with a File Store parameter called view.dir.
4. Mount all desired ClearCase VOBs to the created view. Each VOB requires the creation of a different File Store. The name of the VOB is the beginning of a File Store parameter called vob.path.
5. Locate a temporary directory on the application server. The full path to the temporary directory is used with a File Store parameter called tmp.dir.
6. Click the Admin link in the Oracle Enterprise Repository menu bar.
7. In the Admin screen, locate the File Stores section.
8. Click Create New to create a new File Store. The Create New File Store dialog is displayed, as shown in Figure 2–6.
Figure 2–6 Create New File Store Dialog
9. Populate the fields with the following parameters:
■ Name: specify a representative name for the ClearCase VOB referenced by the File Store. The CC prefix is recommended to indicate that the File Store is of type ClearCase. Recommended protocol for the File Store name is CC_ VOBNAME.
■ Store Path: enter /cc/store01 for the first ClearCase File Store, /cc/store02 for the second ClearCase File Store, and so on. The Store Path field is a symbolic path in Oracle Enterprise Repository. All File Stores use a common URL for file extraction. The Store Path appears in the URL, indicating which File Store hosts the integration to the actual content. The Store Path must be unique across all File Stores. The construction /cc/store01 is recommended.
■ Store Type: select ClearCase from the list.
■ vob.path: enter the name of the ClearCase VOB mounted in the view on the application server.
■ view.dir: enter the access path for the ClearCase view on the application
server.
■ tmp.dir: enter the temporary directory on the application server.
10. Click the Test Connection button to test the connection to the ClearCase client. If the connection is properly configured, then the message Test Succeeded appears.
11. Click the Save button to save the File Store for use with Artifact Stores.
2.2.4 Configuring an Artifact Store For a File Store
This procedure is performed in the Asset Editor screen.
1. Select Configure Artifact Stores on the Actions menu. The Configure Artifact Stores dialog is displayed.
2. Click Add. The Create a New Artifact Store dialog is displayed, as shown in Figure 2–7.
Figure 2–7 Create a New Artifact Store Dialog
3. Enter a name for the artifact store. CC_VOBNAME is the recommended protocol.
4. In the Type list, select FileStore as the Artifact Store type.
■ FileStore accesses the list of File Stores created on the Oracle Enterprise Repository Admin screen.
5. Enter a Store Path by clicking on the Elipses button (next to the Store Path field) and selecting the name of the File Store to be used by this Artifact Store.
6. When finished, click OK. A separate Artifact Store must be created for each File Store.
2.2.5 Adding a File to an Asset Using the File Store's Artifact Store
This procedure is performed in the Asset Editor.
1. Select the asset to which the file is to be added.
2. Click the Add button in the File Information section on the Overview tab.
3. In the dialog enter a name (and description, if necessary).
4. Click Edit. The Edit URL dialog is displayed.
5. Click the Artifact Store File option.
7. Next to the File Name box, browse the ClearCase repository.
8. When browsing, the top-level branches in the VOB. Select a branch. The branchname format is Branchname/Version. The version LATEST refers to the information that is currently checked in. Generally the highest number before LATEST is the desired version. In the image below, /main/server_preed_release/6 is version six of the branch /main/server_preed_release. The name in the folder area (store01) refers to the Store Path for the designated File Store.
Figure 2–8 Open Dialog
9. The second level displays the folders within the selected Branchname/Version pair.
10. The third level displays the versions of the selected folder.
11. Subsequently, every selected folder is followed by a desired version. The last two browsed levels are:
■ The selected filename
■ The version of that file
12. The Select button populates the File Name field on the Edit URL window.
13. Click View to test the URL.
2.2.6 Using File Stores
A File Store allows the user to see all versions of all files contained in the store. At this time File Stores work only with ClearCase.
To view a file in a store, perform the following steps in the Asset Editor screen:
1. Select an asset.
2. Click the Overview tab.
Figure 2–9 Overview Tab
Figure 2–10 Edit Dialog
4. Click the Edit button. The Edit URL dialog is displayed, as shown in Figure 2–11.
Figure 2–11 Edit URL Dialog
5. In the Edit URL dialog, select Repository File.
6. Select a file store from the Host list.
7. Click Browse to locate a file, or enter the filename in the File Name text box.
8. Click View to view the file.
9. Click OK when finished.
2.3 ClearQuest Integration
Integrating ClearQuest with your system enables you to use a ClearQuest store in Oracle Enterprise Repository. Typically, an URL used to reach a file in ClearQuest resembles the following:
cmd=view&user=username&password=<password>
This section contains the following topics:
■ Section 2.3.1, "Adding ClearQuest"
■ Section 2.3.2, "Configuring a ClearQuest Artifact Store"
■ Section 2.3.3, "Adding a File to an Asset Using the ClearQuest Artifact Store"
2.3.1 Adding ClearQuest
To add ClearQuest to your instance of Oracle Enterprise Repository:
1. Download the Oracle Enterprise Repository installation package (clearquest.zip) from the Oracle download site.
2. Unzip the download file to a temporary directory.
3. Using a SQL tool appropriate for your database, run the SQL script located in the temporary directory to add ClearQuest to your Oracle Enterprise Repository database.
4. Restart the application server.
2.3.2 Configuring a ClearQuest Artifact Store
To configure a ClearQuest artifact store in Oracle Enterprise Repository:
1. Click the Assets link in the Oracle Enterprise Repository menu bar. The Oracle Enterprise Repository Assets page is displayed.
2. Click Edit/Manage Assets to launch the Asset Editor.
3. Open the Actions menu.
4. Click Configure Artifact Stores. The Configure Artifact Stores dialog is displayed.
5. Click Add.
6. On the Create a new Artifact Store screen, enter a name for the artifact store file.
■ (Recommended: ClearQuest.)
7. In the Type list, select ClearQuest.
■ Accesses the ClearQuest web interface.
8. Enter a host name for the server.
9. For the Path, enter: logon/url/default.asp.
10. (Optional) Enter a username.
11. (Optional) Enter a password.
12. When finished, click OK.
2.3.3 Adding a File to an Asset Using the ClearQuest Artifact Store
To add a file to an asset using a ClearQuest artifact store:
1. Launch the Asset Editor.
2. Select the appropriate asset.
4. Click Add.
5. In the dialog, enter a name and description, if necessary.
6. Click Edit. The Edit URL dialog is displayed.
7. Select the Artifact Store File option.
8. From the Store list, select ClearQuest Repository.
9. Click the Browse button (next to the File Name box) to edit a ClearQuest shortcut.
10. Click the button to Launch ClearQuest Web interface and create a shortcut to a ClearQuest resource.
11. In the ClearQuest Web interface use the Operation -> Create a Shortcut link to run the wizard to generate a shortcut in ClearQuest.
12. Copy and paste everything following the question mark (?) in the resulting shortcut to the Launch ClearQuest Web shortcut screen.
13. Click OK to populate the File Name with the shortcut portion.
14. Click View to test the URL.
3
3
Harvest-HTTP Repository Host Integration
This chapter describes how to set up a Harvest-HTTP repository and integrate it with Oracle Enterprise Repository.
This chapter contains the following sections:
■ Section 3.1, "Overview"
■ Section 3.2, "Installation"
■ Section 3.3, "Configure an Artifact Store"
■ Section 3.4, "Add the Harvest Artifact Store to an Asset"
3.1 Overview
The Harvest-HTTP Repository Integration is a single servlet Web application that allows the addition of files residing in a Harvest Repository to assets within Oracle Enterprise Repository. The application handles the physical retrieval of a file within a Harvest Repository based on an URL. The servlet name is retrieve.
3.2 Installation
1. Deploy the Harvest-HTTP Repository Host Integration on the application server.
2. Modify and edit the <app_server>/harvest_ rep/WEB-INF/classes/harvest.properties file.
■ enterprise.repositories.harvest.hco.path
– Local path to the Harvest hco.exe file (for example, \C:\\Program Files\\CA\\AllFusion Harvest Change Manager\\hco.exe)
■ enterprise.repositories.harvest.tmp.path
– Local path to where files are temporarily stored.
■ enterprise.repositories.harvest.use-single-sign-on=false
Leave the rest of the properties as they are by default.
3. Save changes and close.
4. Restart application server.
3.3 Configure an Artifact Store
This procedure is performed in the Oracle Enterprise Repository Asset Editor.
1. Select Configure Artifact Stores from the Actions menu.
2. Click Add to open the Create a new Artifact Store dialog.
3. Create a new http repository using the following parameters:
■ Hostname: <app server name with port> where Harvest-HTTP Artifact
Store Integration was installed.
■ Path: harvest_rep/retrieve/<harvest_broker_name>
■ Leave Username and Password blank.
4. Click OK.
3.4 Add the Harvest Artifact Store to an Asset
This procedure is performed in the Oracle Enterprise Repository Asset Editor.
1. Use Search or other means to locate the asset to which the files are to be added.
2. Open the asset.
3. Add the file:
■ Click Repository File Selection.
■ Select the Artifact Store corresponding to Harvest.
■ For File Name specify the Harvest path with the following format:
– <package_name>/<project_name>/<state_name>/<repository_ path>/<filename>
4
4
Serena ChangeMan Integration
This chapter describes how to integrate Serena PVCS Dimensions with Oracle Enterprise Repository, which enables the use of a webdav-enabled PVCS repository within Oracle Enterprise Repository.
This chapter contains the following sections:
■ Section 4.1, "Adding Serena Changeman Plug-ins"
■ Section 4.2, "Configuring an Artifact Store"
■ Section 4.3, "Configuring a PVCS Artifact Store"
■ Section 4.4, "Add a File to an Asset Using a PVCS Repository"
■ Section 4.5, "Security Considerations"
4.1 Adding Serena Changeman Plug-ins
To add Serena Changeman Plug-ins:
1. Navigate to this Oracle_HOME\repositoryXXX\core\tools\solutions
directory on your computer. A list of all the solution packs for Oracle Enterprise Repository is displayed.
2. Unzip the OER30-RC-Enhanced-SCM-Integrations.zip file to a temporary directory.
3. Using an SQL tool appropriate for your database, run the SQL script located in the temporary directory to add Serena Changeman to your Oracle Enterprise
Repository database.
4.2 Configuring an Artifact Store
This procedure is performed in the Oracle Enterprise Repository Asset Editor.
1. Select Configure Artifact Stores from the Actions menu.
2. Click Add to open the Create a new Artifact Store dialog.
3. Create a new SCM repository using the following parameters:
■ Hostname: <app server name with port> where Harvest-HTTP Artifact
Store Integration was installed.
■ Path: harvest_rep/retrieve/<harvest_broker_name>
4.3 Configuring a PVCS Artifact Store
To configure a PVCS artifact store:
1. Login to Oracle Enterprise Repository as a user. (Requires assignment to a role that includes the Edit Artifact Stores permission.)
2. Click the Edit/Manage Assets link in the sidebar on the Assets screen. The Asset Editor launches.
3. Select Configure Artifact Stores in the Actions menu. The Configure Artifact Stores dialog is displayed.
4. Click the Add button. The Create a new Artifact Store dialog is displayed.
5. Enter a descriptive name for the repository.
6. In the Type list, select the PVCS repository type for this repository definition.
7. Enter a host name and path for the server.
8. If necessary, enter a username and password.
9. When finished, click Save.
4.4 Add a File to an Asset Using a PVCS Repository
To add a file to an asset using a PVCS repository:
1. Launch the Asset Editor.
2. Select the appropriate asset.
3. Navigate to the File Information section on the asset's Overview tab.
4. Click Add.
5. In the dialog, enter a name and description, if necessary.
6. Click Edit. The Edit URL dialog is displayed.
7. Select the Repository File option.
8. From the Host drop-down list, select PVCS Repository.
9. In the File Name box, enter the file name or browse to the file in the PVCS repository and select it.
10. Select View to test the URL. Note:
■ This is an option; entering a username and password allows automatic login. To add a database password, add the "+" character and the database password. An example PVCS URL used to reach a specific file in PVCS through webdav resembles the following:
http://repositoryName+databaseName:[email protected]:port/w ebdavPath/additionalPathStructure/filename
4.5 Security Considerations
■ Depending on the specific configuration, user names and passwords may be visible in URLs. Forcing individual user authentication at the file level solves the issue, but disables the Serena PVCS Dimensions browser in the Oracle Enterprise Repository Asset Editor. Using the Proxy Download Requests option in the artifact store definiton eliminates the possibility of the user gaining access to these details.
Part II
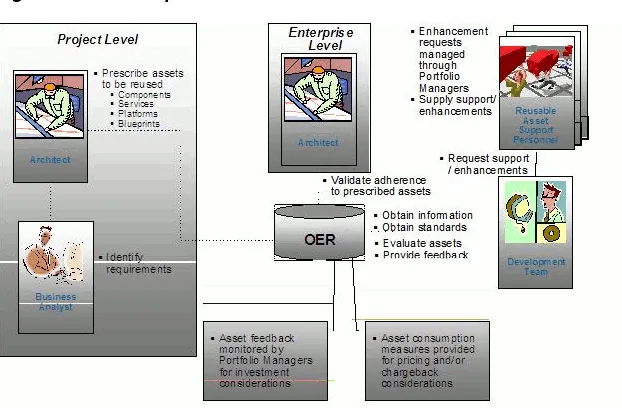
Part IIOracle Enterprise Repository Integration
with Runtime Monitoring Tools
This part describes how to use the Enterprise Manager Integration Utility to integrate Enterprise Manager with Oracle Enterprise Repository. The Enterprise Manager Integration Utility is used from the command line.
This part contains the following chapters:
■ Chapter 5, "Enterprise Manager Integration Utility"
5
5
Enterprise Manager Integration Utility
This chapter describes how to get started with the Enterprise Manager Integration Utility and use it to integrate Enterprise Manager with Oracle Enterprise Repository.
This chapter contains the following sections:
■ Section 5.1, "Overview"
■ Section 5.2, "Using the Enterprise Manager Integration Utility"
■ Section 5.3, "Configuring the Enterprise Manager Integration Utility"
■ Section 5.4, "Encrypting the Configuration File Passwords"
■ Section 5.5, "Known Issues"
5.1 Overview
Enterprise Manager (EM) is a comprehensive monitoring tool. It includes support for monitoring Oracle's SOA Products, as well as J2EE Servers, Databases, JVMs, and Operating Systems.
The EM Integration utility closes the loop between runtime and design-time by providing a summary of runtime performance metrics from EM into Oracle Enterprise Repository. The EM Integration utility pulls metrics from EM and pushes to Oracle Enterprise Repository. The EM Integration tool currently supports and works with EM Grid Control 10g R3 (10.2.0.5) and EM Grid Control 11g.
EM Grid control (EMGC) is capable of monitoring multiple versions of a product or target simultaneously for one EMGC instance, be it EMGC 10g or EMGC 11g. For example, Oracle Service Bus 10g and 11g can be simulataneously monitorerd by EMGC, and hence metrics for both these instances can be pulled back into a single Oracle Enterprise Repository instance, which has projects harvested from Oracle Service Bus 10g or 11g. So Oracle Enterprise Repository-EM Integration also supports gathering metrics for multiple product version targets into Oracle Enterprise
Repository regardless of EM GC 10g or 11g.
This section contains the following topics:
■ Section 5.1.1, "Prerequisites"
■ Section 5.1.2, "Obtaining the Enterprise Manager Integration Utility"
■ Section 5.1.3, "High Level Use Cases"
5.1.1 Prerequisites
■ The EM Integration utility requires the OER-Harvester datapack to be installed in Oracle Enterprise Repository.
■ The assets that receive metrics from EM must already be in Oracle Enterprise Repository. They should have been published to Oracle Enterprise Repository from SOA Suite/BPEL-PM or Oracle Service Bus using the Oracle Enterprise Repository Harvester. The EM Integration utility requires the OER-Harvester datapack to be installed in Oracle Enterprise Repository.
For more information about importing, see Oracle Fusion Middleware Configuration Guide for Oracle Enterprise Repository.
■ The EM Integration utility needs read access to the Enterprise Manager shared database views.
For more information about Enterprise Manager Database views, see
http://download.oracle.com/docs/cd/B16240_ 01/doc/em.102/b40007/views.htm#BACCEIBI.
To create a read-only user in Enterprise Manager (in cases where you do not have a SYSMAN repository owner privilege):
1. Log in to Enterprise Manager Grid Control (EMGC) console as SYSMAN or any super administrator. The Oracle Enterprise Manager Fusion Middleware Control page is displayed.
2. In the top-right corner, click Setup, and then select Administrators on the left pane and click Create.
3. Enter the username and password and accept the defaults for the other fields, and then click Next.
4. Remove the Public role that is listed in the table on the right hand side.
5. Under Create Administrator: System Privileges, select VIEW ANY TARGET.
6. Under Create Administrator: Targets, select all the targets that this new admin should be able to view.
7. Under Create Administrator: Target Privileges , select BATCH ASSIGN and then click View.
8. Click Apply.
9. Login to SQLPLUS with SYSMAN user to grant additional privileges to this new user, for example, oem_view.
Grant SELECT on MGMT$METRIC_DAILY to oem_view; Grant SELECT on MGMT$METRIC_CURRENT to oem_view; Grant SELECT on MGMT$TARGET_PROPERTIES to oem_view; Grant SELECT on MGMT_VERSIONS to oem_view;
Grant SELECT on MGMT_TARGET_PROPERTIES to oem_view; Grant SELECT on MGMT_TARGET_ASSOCS to oem_view; Grant SELECT on MGMT_TARGETS to oem_view;
Grant SELECT on MGMT_TARGET_ASSOC_DEFS to oem_view;
■ The EM Integration utility requires Java SDK version 6 or higher.
■ Install 10g or 11g EM Grid Control to enable EM Integration tool to harvest metrics into Oracle Enterprise Repository. The Oracle Enterprise Repository EM
Integration tool, currently, integrates with EM-Grid control and works with both 10g and 11g version of SOA.
■ When integrating with EM 11g, use the em-integration-settings.xml configuration file. However, when integrating with EM 10g, you have to use the
em-integration-settings-em10.xml configuration file.
5.1.2 Obtaining the Enterprise Manager Integration Utility
To obtain the Enterprise Manager Integration utility:
1. Navigate to this Oracle_HOME\repositoryXXX\core\tools\solutions
directory on your computer. A list of all the solution packs for Oracle Enterprise Repository is displayed.
2. Unzip the 11.1.1.x.x-EM-Integration.zip file to a temporary directory.
3. Import the 11.1.1.x.x-OER-Harvester-Solution-Pack.zip file into Oracle Enterprise Repository using the Import/Export Tool. For more information, see Oracle Fusion Middleware User's Guide for Oracle Enterprise Repository.
5.1.3 High Level Use Cases
You can use the EM Integration utility to:
■ Publish metrics from Oracle Service Bus Services in EM to existing Oracle Enterprise Repository assets.
■ Publish metrics from BPEL-PM Processes in EM to existing Oracle Enterprise Repository assets.
■ Publish metrics from Web Services in EM to existing Oracle Enterprise Repository assets.
■ Publish Endpoint and Deployment : BPEL assets in Oracle Enterprise Repository from deployment information in EM.
■ Support links back to the detailed metrics in EM, from the Oracle Enterprise Repository Web UI.
■ Support configurability and extensibility, so that new targets in EM can be mapped to Oracle Enterprise Repository assets.
■ Support capturing metrics for Oracle SOA Suite composite targets in EM 11g. EM Integration allows you to publish metrics for composites that are invoking a service and are being monitored in EM 11g. However, unlike the other targets such as Oracle Service Bus, BPEL, WebLogic, if the service endpoint does not exist in Oracle Enterprise Repository, it will not be created during the integration process. If the assets do exist, they will be updated with the metrics.
5.2 Using the Enterprise Manager Integration Utility
This section describes how to use the Enterprise Manager Integration Utility.
This section contains the following topics:
■ Section 5.2.1, "Running from Command Line"
■ Section 5.2.3, "Metric Publishing"
5.2.1 Running from Command Line
The EM Integration utility can be run in the command line using the
em-integration.bat utility (for Windows) or em-integration.sh (for Linux and Unix).
Before running em-integration.bat or em-integration.sh, ensure that the environment variables mentioned in Table 5–1 are set. In Windows, from a command window, you can type "set X" to see the value of the variable X, and "set X=abc" to set the value of FOO to "abc".
Table 5–2 shows the options that can be specified using the EM Integration command line utility:
Table 5–1 Command Line Script
Environment Variable Description
JAVA_HOME Ensure that the JAVA_HOME environment variable points to an installed java runtime (JRE) or SDK. This must be Java version 5 or higher.
JAVA_OPTS Ensure that you set your JAVA_OPTS parameter as follows:
set JAVA_OPTS=-Dhttp.proxyPort=80
-Dhttp.proxyHost=www-proxy.us.oracle.com -Dhttp.nonProxyHosts= "*.oracle.com|localhost" JAVA_OPTS refers to the extra options to the java executable. In normal cases, there is no must set this variable. However, a common exception when you must set this variable is when your computer is inside a firewall, and you must use an HTTP proxy to access external servers.
See Also:
http://java.sun.com/javase/6/docs/technotes/guides/net/proxies.html
Table 5–2 Command Line Options for the EM Integration
EM Integration Options Description
-settings <file> Refers to the configuration settings specified in the XML file.
-er_url <URL> Specifies the URL for the Oracle Enterprise Repository instance.
-er_user <User Name> Specifies the name of the Oracle Enterprise Repository user.
-er_password <Password>
Specifies the password of the Oracle Enterprise Repository user. To ensure security, the password must be encrypted.
The Oracle Enterprise Repository Web console has a tool to encrypt passwords:
http://<host>:<port>/<domain>/diag/encryptstrings.jsp
-em_url <URL> Specifies the JDBC URL for the EM database.
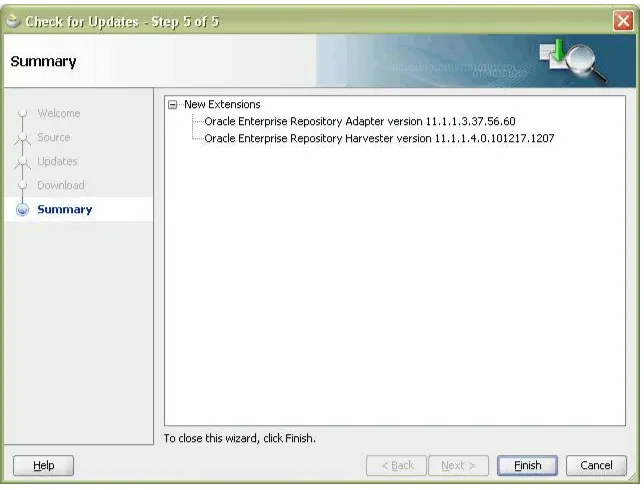
Figure 5–1 shows the command line utility options and online help displayed by the
em-integration.bat -help command.
Figure 5–1 Enterprise Manager Integration Command-Line Utility Options
5.2.2 Scheduling from Enterprise Manager
Enterprise Manager has the ability to schedule command-line applications to run periodically. The EM Integration utility can be scheduled to run this way.
For more information, see "Job System" in Oracle Enterprise Manager Administrator's Guide.
It is recommended that you schedule the EM Integration to run once a day, in the evening or when there is low activity on the system.
5.2.3 Metric Publishing
The section describes the various metric publishing options:
-em_password <Password>
Specifies the EM database password.
To ensure security, the password must be encrypted. The Oracle Enterprise Repository Web console has a tool to encrypt passwords:
http://<host>:<port>/<domain>/diag/encryptstrings.jsp
For more information about encrypting passwords from command-line, see Section 5.4, "Encrypting the Configuration File Passwords".
-help Displays the online help for the EM Integration utility.
Note: Note none of the above options are mandatory and these can be omitted. If the options are omitted, then the utility makes use of the information in the em-integration-settings.xml file in the current directory where em-integration.bat resides. If the command line parameters are provided, then these override the information in em-integration-settings.xml.
Table 5–2 (Cont.) Command Line Options for the EM Integration
5.2.3.1 Oracle Service Bus
EM Integration updates existing assets in Oracle Enterprise Repository of type "Endpoint", which have an endpointURI attribute that matches the endpointURI metric in EM, for Oracle Service Bus Proxy Services and External Services.
If no "Endpoint" asset is found with the matching endpointURI, then the tool
attempts to find a matching Service asset, by name and Oracle Service Bus service type (BusinessService or ProxyService). If it finds one, then it creates a new
"Endpoint" asset and relates it to the service. In the case of Business Services, the endpoint is related to the External Service invoked by the Business Service.
If there are issues collecting metrics for the Oracle Service Bus target in EM, such as the metrics are not being collected or there are errors in EM Grid Control to collect the Oracle Service Bus service metrics, then see the following link for more details:
http://download.oracle.com/docs/cd/E11857_01/install.111/e17558/disc_mon_osb.htm
5.2.3.2 BPEL PM
EM Integration updates existing assets in Oracle Enterprise Repository of type "Deployment:BPEL", which has the "EntryPoint" relationship to an "Endpoint" asset that has an endpointURI attribute that matches the endpointURI metric in EM. EM stores the WSDL location of the endpoint.
If no "Endpoint" asset is found with the matching endpointURI, then the tool
attempts to find a matching Service asset, by qualified name from the WSDL. If it finds one, then it creates a new "Endpoint" asset and relates it to the service.
If no "Deployment:BPEL" asset is found, then the tool attempts to find a maching
Business Process: BPEL asset, by process name. If it finds one, then it creates a new "Deployment:BPEL" asset and relates it to the service.
5.2.3.3 Web Services
EM Integration updates existing assets in Oracle Enterprise Repository of type "Endpoint"", which have an endpointURI attribute that matches the endpointURI
metric in EM.
If no "Endpoint" asset is found with the matching endpointURI, then the tool
attempts to find a matching Service asset, by qualified name from the WSDL. If it finds one, then it creates a new "Endpoint" asset and relates it to the service.
Note: An External Service is a service, which is invoked by an Oracle Service Bus Business Service.
Note: As mentioned in the link, the first time the metrics for Oracle Service Bus services is uploaded to the EM, the value is "0". And if no metric is collected, then turn the monitoring Flag on under Oracle Service Bus Console -> Global Settings.
5.2.3.4 Artifacts Creation
For every "Endpoint" that is created, the EM Integration Utility creates a
corresponding Artifact:WSDL asset, if it does not already exist in Oracle Enterprise Repository. The EM Integration Utility also creates the Artifact:WSDL and
Artifact:XSD assets for any imported file. It follows the fingerprinting rules in Oracle Enterprise Repository Harvester to look for existing artifacts in Oracle Enterprise Repository.
5.2.3.5 Endpoint Creation
It is common for production endpoints to be monitored in EM, but not captured in Oracle Enterprise Repository. The EM Integration utility creates these endpoints, if it can find a matching service.
The EM Integration utility creates Endpoint assets, if it can find a matching Service and creates Deployment:BPEL assets, if it can find a matching Business Process:BPEL.
5.2.3.6 Metrics to Update
In its default configuration, EM Integration attempts to update the following metrics in Oracle Enterprise Repository. These are all visible in the Operational tab for the asset in the Oracle Enterprise Repository Web user interface.
Not all of these metrics are gathered in EM for all of the target types mentioned above, so some might be omitted. The em-integration-settings.xml file configures which metrics are gathered for which targets.
■ Daily Average Response Time
■ Weekly Average Response Time
■ Monthly Average Response Time
■ Minimum Response Time
■ Maximum Response Time
■ Daily Requests
■ Weekly Requests
■ Monthly Requests
■ Daily Faults
■ Weekly Faults
■ Monthly Faults
■ Availability - Daily %
■ Availability - Weekly %
■ Availability - Monthly %
■ Availability - Daily %
■ Current Rated Maximum Requests per Second
■ Start Date for Metrics Monitoring
■ Last Updated
■ Link back to detailed metrics in EM
5.3 Configuring the Enterprise Manager Integration Utility
This section describes how to configure the Enterprise Manager Integration Utility. It contains the following topics:
■ Section 5.3.1, "Setting the Repository and Enterprise Manager Connection Information for the Command-line Utility"
■ Section 5.3.2, "Advanced Configuration"
5.3.1 Setting the Repository and Enterprise Manager Connection Information for the
Command-line Utility
Open the em-integration-settings.xml file, which is located at <EM
Integration Home> and modify the following XML chunk to point to the Oracle Enterprise Repository instance, the EM database, and the web console with the right credentials.
The EM database is used to retrieve the metric information that is sent to Oracle Enterprise Repository. The EM console URL is used as the base URL for links back to EM, that are created within Oracle Enterprise Repository.
The introspectionSettings section is used to configure the properties of any Endpoint assets that the utility creates. The createMissingEndpoints attribute indicates whether Endpoint and Deployment:BPEL assets are created. If false, then the rest of the section in the code below is ignored.
The matchMultipleEndpoints attribute indicates the required action to be taken if the utility finds multiple Endpoints or Deployment:BPEL assets in Oracle Enterprise Repository that match a target in EM. If true, then it updates all the endpoints with metrics (and log a warning). If false, then it skips the target (and log a warning).
The matchMultipleServices attribute indicates the required action to be taken if the utility finds multiple Services or Business Process:BPEL assets in Oracle Enterprise Repository that match a target in EM, during endpoint creation. If true, then it attaches new Endpoints / Deployment:BPELs to each of the matching assets (and log a warning). If false, then it skips the target (and log a warning).
The introspectionDescription, introspectionVersion, and registrationStatus attributes indicate properties that are set on any assets created.
<repository>
<uri>http://localhost:7131/oer30/services/FlashlineRegistry</uri> <credentials>
<user>admin</user>
<password>*****</password>
<enableTransaction>false</enableTransaction> <triggerEvent>false</triggerEvent>
</credentials>
<timeout>120000</timeout> </repository>
<introspectionSettings>
<createMissingEndpoints>true</createMissingEndpoints>
<introspectionDescription>Found in EM </introspectionDescription> <introspectionVersion>1.0</introspectionVersion>
<namespace>mythings</namespace>
<registrationStatus>Submitted</registrationStatus> </introspectionSettings>
<emDatabase>
<driverClass>oracle.jdbc.driver.OracleDriver</driverClass> <url>jdbc:oracle:[email protected]:1501:mysid</url> <credentials>
<user>sysman</user> <password>*****</password> </credentials>
</emDatabase>
Alternatively, the connection information can also be passed as parameters to the command line utility as follows:
C:\test\em-integration> em-integration - er_url
http://localhost:7101/oer/services/FlashlineRegistryTr -er_user admin - er_password <password> - em_url
jdbc:oracle:thin:@remotehost.there.com:1501:mysid - em_user sysman - em_password <empassword>
5.3.2 Advanced Configuration
This section describes the following advanced configuration options for the Enterprise Manager Integration utility:
■ Section 5.3.2.1, "Metric Mappings"
■ Section 5.3.2.2, "Target Finders"
■ Section 5.3.2.3, "Logging"
5.3.2.1 Metric Mappings
The mapping between metrics in EM and fields in Oracle Enterprise Repository are configured in em-integration-settings.xml, as shown in Figure 5–2. To change these from the default settings, open this file and modify the following:
■ <metricMappingGroup>: Mappings for a set of metrics with the same metric name in the EM database views. EM groups a set of related metrics under the same "metric name". Each individual metric has a different "metric column". This element has the following attribute:
– metricName: The EM metric name from the EM database views.
■ <metricMapping>: Mapping for a single metric. This element has the following attributes:
– metricColumn: The EM metric column from the EM database views.
– rollupPeriod: Indicates which EM database view to query against, and how to aggregate the data. Must be one of {DAILY, WEEKLY, MONTHLY, CURRENT}.
– viewColumn: Indicates which column in the EM database view to pull the data from. Must be one of {VALUE, AVERAGE, SUM, MINIMUM,
MAXIMUM, STANDARD_DEVIATION, SAMPLE_COUNT, COLLECTION_ TIMESTAMP, ROLLUP_TIMESTAMP, NOW(), DETAILS_URL}.
* The CURRENT rollup period does not support columns AVERAGE, SUM, MINIMUM, MAXIMUM, STANDARD_DEVIATION, SAMPLE_COUNT, or ROLLUP_TIMESTAMP.
* The DAILY, WEEKLY and MONTHLY rollup periods doe not support columns VALUE or COLLECTION_TIMESTAMP.
* NOW() is a "virtual column" that contains the time of the query against EM.
* DETAILS_URL is a "virtual column" that contains a URL to the detailed information in EM. This is constructed by the EM Integration code - it's not in the EM database views.
– oerField: The internal name of the custom data field in Oracle Enterprise Repository where this data is stored.
– overwrite: Indicates whether to overwrite the custom data field in Oracle Enterprise Repository if it already has data. It represents either true or false, by default the value is true, if not specified.
Figure 5–2 Metric Mappings
5.3.2.2 Target Finders
The logic for correlating targets in EM with assets in Oracle Enterprise Repository is different for each target type. EM Integration ships with target finders for the following products: Oracle Service Bus, BPEL-PM, WebLogic.
If you are an advanced user, then you can create your own target finder classes. These must be configured in em-integration-settings.xml, as shown in Figure 5–3.
■ <targetFinder>: Mappings for a target type in EM to a target finder class. This element has the following attributes
– targetType: The EM target type from the EM database views.