•Short,simple,andfocusedcodeexamples
For your convenience Apress has placed some of the front
matter material after the index. Please use the Bookmarks
and Contents at a Glance links to access them.
Contents at a Glance
About the Author ...
xiii
About the Technical Reviewer ...
xv
Acknowledgments ...
xvii
Introduction ...
xix
Chapter 1: Introducing Ruby
■
...
1
Chapter 2: Operators
■
...
9
Chapter 3: Strings
■
...
15
Chapter 4: Arrays
■
...
21
Chapter 5: Hashes
■
...
31
Chapter 6: Numbers
■
...
39
Chapter 7: Booleans
■
...
. 47
Chapter 8: Objects
■
...
53
Chapter 9: Loops and Iterators
■
...
63
Chapter 10: Functions and Methods
■
...
73
Chapter 11: Classes and Modules
■
...
83
Chapter 12: Blocks, Procs, and Lambdas
■
...
93
■ CONTENTS AT A GLANCE
Chapter 14: Input/Output
■
...
109
Chapter 15: Files and Directories
■
...
119
Chapter 16: Metaprogramming
■
...
129
Introduction
Welcome to Ruby Quick Syntax Reference and thank you for purchasing and reading this book. During this book we will investigate and discover the basics of the Ruby programming language, along with discovering the syntax used, the way that the Ruby programming language works, and overcoming any pitfalls or caveats with the Ruby language.
Ruby is a powerful and easily language to discover and learn, if you don’t know how to program Ruby is a very simple language to pick up and learn; but if you have programmed previously, such as in PHP, Perl, Pascal or C you will find Ruby an easy language to grasp.
Ruby is a very pragmatic language, often having multiple ways of doing things; I will highlight within the book the options available to you as a programmer, along with any pitfalls to avoid.
We won’t cover any bloated samples, or drawn out history lessons; but instead quick details as to what we can achieve with the Ruby language, and quick syntax notes as to how to write Ruby code. This book has been written to learn from scratch, with very little previous experience programming; or as a quick syntax guide to pick up and remind you of the syntax and abilities of the Ruby language.
Ruby was designed and developed by Yukihiro “Matz”Matsumoto in the mid-90’s, but is now used across the world, and often is commonly known when used within the framework Rails (Ruby on Rails), but can also be used on it’s own, or with other frameworks. Ruby is used by sites such as Twitter, Shopify, Airbnb and Github.
CHAPTER 1
Introducing Ruby
Ruby is a dynamic, object-oriented, programming language with an expressive syntax. It takes inspiration from several languages such as Smalltalk, Lisp, and Perl, adding features that make it very pleasant to program with. In recent years, Ruby exploded in popularity mainly thanks to the success of web development frameworks such as Ruby on Rails and Sinatra. However, it is also used with success in many other different contexts such as computer security (Metasploit), voice communications (Adhearsion), and server configuration (Opscode Chef and Puppet), to name just a few.
Installing Ruby
In this book, we use the latest stable version available, which is, at the time of writing, the 2.0.0-p247. If you are using a Linux distribution or Mac OS X, you’ll find a Ruby interpreter already installed. However, it might be an outdated version and usually it also has some limitations caused by the package manager on your operating system (for example, apt for Debian/Ubuntu linux distributions).
There are several ways to install the latest version of the Ruby interpreter, depending on the operating system you are using. If you already have this version installed, feel free to skip the following section.
Installing on Linux or Mac OS X
Even if Linux and Mac OS X are completely different operating systems, they both share the same UNIX philosophy and tools under the hood, so we have grouped them in the same section.
Linux Dependencies
On Debian/Ubuntu Linux, you can install these dependencies using the following command inside a terminal:
sudo apt-get install build-essential openssl libreadline6 libreadline6-dev curl git-core zlib1g zlib1g-libreadline6-dev libssl-libreadline6-dev libyaml-libreadline6-dev libsqlite3-libreadline6-dev sqlite3 libxml2-dev libxslt-dev autoconf libc6-dev ncurses-dev automake libtool bison subversion pkg-config libgdbm-dev libffi-dev libreadline-dev
Some of the preceding packages are already installed because they are pretty common dependencies. This is not a problem; the apt tool manages this for you automatically.
If you are using another Linux distribution (Fedora/RedHat/CentOS, Arch Linux, etc.), don’t worry, they all have a package management system that will help you install the dependencies.
Mac OS X Dependencies
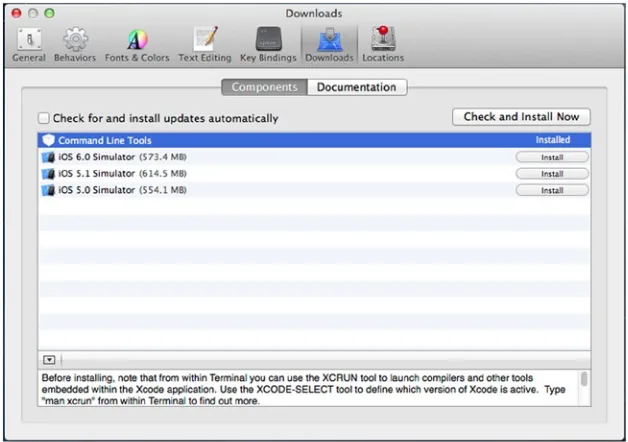
On Mac OS X there isn’t a default package manager; however, most people use
Homebrew (http://brew.sh) and so do we. To do this, you need to have Xcode installed along with its command line tools. If you don’t have Xcode installed, we suggest you install it from the Apple Mac App Store and install the command line tools in Xcode Preferences (Figure 1-1)
CHAPTER 1 ■ INTRODUCING RUBY
Once Xcode and its command line tools are installed, you can proceed with the Homebrew installation. As we mentioned previously, Mac OS X ships with its default Ruby, we are going to use it to bootstrap Homebrew, which is written in Ruby too. Open
Term.app and run the following command:
ruby -e "$(curl -fsSL https://raw.github.com/mxcl/homebrew/go)"
To check whether all the process went correctly, run:
brew doctor
This checks whether your system has all the tools and settings to run Homebrew properly. For example, you might be faced with this error:
Error: No such file or directory - /usr/local/Cellar
Don’t worry, it’s just telling you that the default directory used by Homebrew to store all its stuff is missing. You can fix this with the following commands:
sudo mkdir /usr/local/Cellar sudo chown -R `whoami` /usr/local
Setting Up RVM
Now that you have the tools for compiling and installing programs from source, you can finally install RVM. For now it doesn’t matter if you are on Linux or Mac OS X, in both cases you have all the requirements. Run the following command inside your shell:
curl -L get.rvm.io | bash
This command installs and sets up RVM tools in your user directory, which means that RVM is available only for your current user and all the files are installed under your home directory. Once the installation is complete, you need two more steps. Run the following command to use RVM in the current shell:
source ~/.rvm/scripts/rvm
Add the following line to your ~/.profile to load RVM every time you open your terminal:
[[ -s "$HOME/.rvm/scripts/rvm" ]] && source "$HOME/.rvm/scripts/rvm"
As we have already seen for Homebrew, even RVM has a tool to check that all its requirements are met. Run the following command:
If you have any missing required packages, you will need to install them before continuing by running brew install <missing package name> or apt-get install <missing package name>.
Installing Ruby 2.0.0
As stated before, RVM lets you install and use different Ruby versions on your system with ease. However, for our purposes, we are going to install only the latest stable available release. In your terminal, run the following command:
rvm install 2.0.0-p247
Now RVM downloads, compiles, and installs the specified version. Once it finishes, you need to set it as default Ruby interpreter and check that it works:
rvm use 2.0.0-p247 --default ruby –v
The output may vary depending on the operating system you are using; however it should look something like this:
ruby 2.0.0p247 (2013-06-27 revision 41674) [x86_64-darwin12.4.0]
Installing on Windows
On Windows things are bit different. Download the official installer on
http://rubyinstaller.org/downloads/ , then run it and you’re done.
A Quick Tour
CHAPTER 1 ■ INTRODUCING RUBY
irb: The Interactive Ruby Shell
Before starting with examples, we’ll introduce irb (short for interactive Ruby), a Ruby shell. In other words, you type a Ruby expression at the irb prompt, and the expression will be evaluated and displayed. In this way, you can quickly try out small snippets without the need to edit a file and the run it. Open a terminal and run irb:
irb(main):001:0> 1 + 1 => 2
irb(main):002:0> 'hello ' * 3 => 'hello hello hello'
Type exit to close irb.
Object-Oriented
If you are not new to programming, you might have already heard of object-oriented languages such as Java or C#. However, Ruby is a bit different: it is completely object-oriented. In Ruby every value is an object, even numbers and booleans. In the following examples, you can see how a method is called on basic objects such as a numeric literal and a string. The # character indicates a comment (anything after it is not executed) and => is a commonly used convention to indicate the value returned by the commented code.
1.odd? # => true 1.even? # => false
'hello'.reverse # => 'olleh' 'hello'.length # => 5
Also note how parentheses are omitted—they are optional and make the code more readable. We’ll see several, more focused examples in the next chapters.
Blocks and Iterators
There are methods called iterators that act as loops. They take a piece of code called a block to serve as the body of the loop and to be executed at each iteration. Here are some simple examples:
1.upto(5) {|n| puts n } # Prints '12345' a = [1, 2, 3] # Create an array literal a.each do |n| # Multiline block call print n * 2 # Prints '246'
end
Although blocks are mainly used for loop-like constructs, it is also possible for methods that invoke the block only once:
File.open('example.txt') do |f| # Open the file and pass the stream to block print f.readline # Read from the file
end # Close the stream when the block ends
Modules
Modules define a namespace, a sandbox that groups together methods, classes, and constants and can be included in classes to extend their behavior. For example:
module Greeter # Define a module called Greeter def greet # Define a method called 'greet' puts "Hello!"
end end
class Person # Define a class called Person include Greeter # Include the Greeter module end
alice = Person.new # Instantiate a new Person
alice.greet # Call the method 'greet' from the instance
Again, this is just a simple introduction; we’ll discuss this more in the chapters that follow.
Duck Typing
Unlike other object-oriented languages, the type of an object is defined more by its methods and attributes rather than from its class. This is called duck typing because of the motto:
If it walks like a duck and talks like a duck, then I treat it like a duck
There is no need to define an object as a certain type as in most other object-oriented languages. This makes the syntax easy for new developers using Ruby for the first time.
Let’s use a simple example to show how it works:
# define a simple method that accepts any object with a 'each' method def duck_printer(object)
if object.respond_to? :each # check if object has a method called 'each' object.each {|n| print n } # iterates over the contents and print them else # otherwise raise an error
raise "passed argument doesn't provide #each method." end
CHAPTER 1 ■ INTRODUCING RUBY
# define some variables with different classes hash = {a: 1, b: 2, c: 3}
array = [1, 2, 3] string = 'hello' # with an Hash
duck_printer hash # Prints '[:a, 1][:b, 2][:c, 3]' # with an Array
duck_printer array # Prints '123' # with a String
duck_printer string # Raises a RuntimeError with our error message
Where to Find Ruby Documentation
There are a lot of resources to dive in to the Ruby documentation, both on Internet and on your own computer as well.
RDoc and ri
Like many other languages, Ruby has adopted an internal documentation system called RDoc. This documentation can be extracted from its source and exported to HTML or ri formats. The ri tool is a local documentation viewer that can be invoked from your terminal. For example, if you want to find documentation for the Hash class, just type:
ri Hash
To exit, type q. You can also get information on a particular method by passing its name as a parameter:
ri Hash.merge ri Hash#each
Operators
Expressions
Unlike other programming languages, in Ruby there isn’t a distinction between statements and expressions: everything is evaluated as an expression that produces a return value. The simplest expressions are:
• literals: values such as numbers, strings, arrays, hashes, etc…
• variable and constant references: A variable (or a constant) is referenced by citing its name. For example:
x = 1 # assignment expression x # variable reference expression MY_CONST # constant reference
• method invocations: the (return) value of a method invocation is the value of the last evaluated expression in the body of the method.
Operators
Expressions can be combined through operators. An operator represents an operation (such as addition, multiplication or even a comparison) that is performed on one or more values, called operands, to build another, bigger, expression. For example, we can take two numeric literals such as 2 and 3, then use the + operator to combine them and produce the value 5. There are three characteristics you need to know about operators to use them in proper way: arity, precedence and associativity.
The arity of an operator is the number of operands it operates on. For example binary operators expect two operands, while the unary operators expect only one.
The precedence of an operator affects the order of evaluation of an expression. For example:
CHAPTER 2 ■ OPERATORS
As you can see, the addition operator has a lower precedence than the multiplication operator, that’s why the above expression evaluates to 5 and not 6. However, you are free to change the default order of precedence by grouping specific sub expressions inside parentheses. Here is how we can obtain a different result by modifying the above example:
(1 + 2) * 2 # => 6
We have grouped the two addition operands so that the expression inside the parentheses would be evaluated as a whole value before it becomes another operand for the multiplication.
The associativity of an operator specifies the order of evaluation when the same operator (or operators with the same precedence) appears sequentially in an expression. Each operator has a different order to evaluate an expression: left to right, right to left and the case where an operator is not associative, so that you need to use parentheses to determine the desired evaluation order.
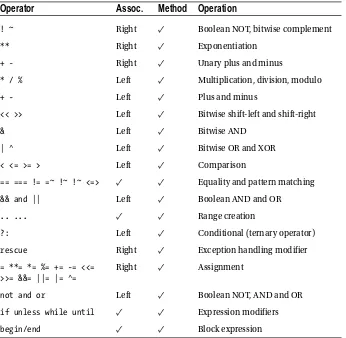
As you may already know, most arithmetic operators are left-associative, which means that 2 + 2 - 3 is evaluated as (2 + 2) - 3 rather than 2 + (2 - 3). On the other end, exponentiation is right-associative, so 2**3**4 is evaluated as 2**(3**4). Several Ruby operators are implemented as methods, allowing classes (or even single objects) to define new meanings for those operators. For example, the String class implements the + operator to concatenate two strings. Table 2-1 at the end of the chapter, shows a list of the main Ruby operators, ordered by higher to lower precedence.
At the end of this chapter, you’ll find a table to summarize all the operators, meanwhile, we’ll explain some of them in the next pages.
Arithmetic: + - * / %
The arithmetic operators perform on all Numeric classes, this is a very common behavior in other programming languages. Other classes, might use some of these operators to perform other operations. For example, the String class uses the + operator to concatenate two strings and the * operator is used to repeat it, while Array uses + and
-operator to respectively perform array concatenation and array subtraction.
1 + 1 # => 2 5 / 2 # => 2 5 % 2 # => 1
"hello" + "world" # => "hello world" "hello" * 3 # => "hello hello hello" 2 / 0 # => ZeroDivisionError
2.0 / 0 # => NaN
Shift or Append: << >>
As we have already seen with arithmetic operators, the << and >> operators can behave differently, depending by the classes they are operating on. The Fixnum and Bignum
classes, define the << and >> operators to shift the bits of the left-hand respectively to the left and to the right.
10 << 1 # => 20 10 >> 1 # => 5
On the other hand, the << operator is used by String,Array, IO and many other classes as an append operator:
"hello" << "world" # => "hello world"
"hello" << "appended " << "world" # => "hello appended world" [] << 1 # => [1]
[] << 1 << 2 # => [1, 2]
STDOUT << "hello" # prints "hello" to standard output stream
Comparison: < <= > >= <=>
The comparison operators are used to make assertions about the relative order of two values. Usually, some classes are ordered by their values: numbers are ordered by magnitude, strings are ordered alphabetically and dates are ordered chronologically.
2 > 1 # => true "hello" > "a" #=> true "hello" > "z" #=> false now = Time.now
sleep 5
later = Time.now now > later # => false
However, classes may define their own comparison operators individually or, more commonly, by defining the <=> operator which is a general purpose comparison operator that returns the relative order of two values: it is -1 if the left-hand value is less than the right-hand operand, +1 if the left-hand is greater than the right-hand, and 0 if they are equal. The operator <=> alone, doesn’t come too much in handy, but when you define it and include the Comparable module inside a class, then you’ll get the other comparison operators such as > <, ==, and >= <=. Here is a simple example:
class Person
include Comparable attr_reader :name
CHAPTER 2 ■ OPERATORS
# define the comparison operator by using the 'name' attribute def <=> other
self.name <=> other.name end
end
mario = Person.new 'Mario' luigi = Person.new 'Luigi' mario > luigi # => true
As you can see, in this case the comparison is based on the Person’s name attribute (a String value), however, we can change its behavior by considering another field or attribute, such as age (Numeric) or birthday (Time, Date or similar).
Booleans: && || ! and or not
Boolean operators are built into the Ruby language and are not based on methods like we’ve seen with comparison operators. This means, for example, that classes cannot define this kind of operator. Unlike many other programming languages, Ruby doesn’t have boolean types, however it defines true or false special values. As a rule of thumb, the
false and nil are considered false, true in all other cases. Let’s see some basic example:
x = 5
x > 0 && x < 10 # => true AND true => true x < 0 || x == 5 # false OR true => true !(x > 0) # => !true => false
In this case, there are two comparisons which return a boolean value. However, because the non-null values of the elements are considered true, the return value of a boolean expression is either the value of the elements:
y = 6 z = false
x && y # => 5 AND 6 => 6
z && x # => false AND 5 => false z || x # => false OR 5 => 5
result = !z && (x || y) # => true && (5 || 6) => 5
As you can see, the returned value depends by the result of the boolean expression. For example, the && operator first evaluates the left-hand operand and returns that value if the expression is nil or false, otherwise it returns the value of the right-hand expression. A side advantage of this is the opportunity to execute expressions in a very succinct and declarative way. Consider the following simple example:
def max(x, y)
# the righthand expression would be skipped if x is not greater than y x > y && return x
Beside the fact that the above method might be written in several different ways, the point here is to show how the boolean operator might skip the righthand operator in case the first expression is false.
Until now we have used the high precedence versions of the boolean operators, but there are also the low precedence ones: and, or and not, respectively referred to &&, ||and !. The following example shows how this precedence gap can influence the results of two apparently similar constructs:
x || y && nil # => x x or y and nil # => nil
Ranges: .. …
Ranges are a very common occurrence in programming, for example when referring to time intervals (eg: from Monday to Sunday). Ruby uses ranges to implement sequences, conditions and intervals.
Sequences are the most common usage of ranges in Ruby. They have a start, an end point and a way to produce successive values. To do this, you need to use the range ..
operators and .... The first form creates an inclusive range, while the three-dot form creates a range that excludes the last value:
1..10 # from 1 to 10 1...10 # from 1 to 9
'a'..'Z' # all characters from 'a' to 'Z'
Ranges can be converted to Array or Enumerator using to_a or to_enum.
(1..10).to_a # => [1, 2, 3, 4, 5, 6, 7, 8, 9, 10] alphabet = ('a'..'z').to_enum
alphabet.next # => 'a' alphabet.next # => 'b'
Ranges as conditions are a bit less common in everyday Ruby programming, however it has its benefits for certain constructs. Here’s a brief example that prints a set of lines from standard input where the first line in each set contains the word start and the last line contains end.
while line = gets
puts line if line =~ /start/.. line =~ /end/ end
Ranges as intervals are more common than the use as conditions. It is possible to check if some value falls within the interval represented by a range using the === operator:
CHAPTER 2 ■ OPERATORS
Table 2-1. Operators precedence, high to low precedence
Operator
Assoc.
Method
Operation
! ~ Right • Boolean NOT, bitwise complement
** Right • Exponentiation
+ - Right • Unary plus and minus
* / % Left • Multiplication, division, modulo
+ - Left • Plus and minus
<< >> Left • Bitwise shift-left and shift-right
& Left • Bitwise AND
| ^ Left • Bitwise OR and XOR
< <= >= > Left • Comparison
== === != =~ !~ !~ <=> • • Equality and pattern matching
&& and || Left • Boolean AND and OR
.. ... • • Range creation
?: Left • Conditional (ternary operator)
rescue Right • Exception handling modifier
= **= *= %= += -= <<= >>= &&= ||= |= ^=
Right • Assignment
not and or Left • Boolean NOT, AND and OR
if unless while until • • Expression modifiers
Strings
String Literals
A string within Ruby is a sequence of one of more bytes, typically a set of characters. These can be created, manipulated, and output when required. Strings are generally wrapped in single or double quotation marks:
2.1.0 :001 > puts "Hello World" Hello World
2.1.0 :001 > puts 'Hello World' Hello World
However if the string contains another double/single quote, these will need to be escaped in order for the string to be complete, and the code to compile:
2.1.0 :001'> puts 'Welcome to John's website'
SyntaxError: (irb):5: syntax error, unexpected tIDENTIFIER, expecting end-of-input
puts 'Welcome to John's website' # ^
from /Users/matt/.rvm/rubies/ruby-2.1.0/bin/irb:1:in `<main>' 2.1.0 :001 > puts 'Welcome to John\'s website'
Welcome to John's website
Because John's contains a single quote mark, and the string is contained in single quotes, a backslash is required before the quote mark within the string for the code to compile and run.
There is one minor difference between using single and double quotes within Ruby, in regards to the supported escape characters that are permitted.
Single quotes support:
CHAPTER 3 ■ STRINGS
Double quotes support a much broader range of escape characters as well as embedding Ruby variables and code within the string literals. The embedding of Ruby variables/code within a string literal is known as interpolation:
\" = Escaping a double quote using a backslash \\ = Escaping a backslash with another backslash \a = Bell/Alert
\b = Backspace \r = Carriage Return \n = New Line \s = Space \t = Tab
puts "Welcome to John's Website\nWhich page would you like to visit" page = gets.chomp
puts "Welcome to John's #{page}!" #=> "Welcome to John's Blog!" puts "2 + 2 = #{2+2}" #=> 2 + 2 = 4
puts "Seconds/day: #{24*60*60}" #=> Seconds/day: 86400
There are also three other alternatives to the single/double quotes used previously. We can use a here document, which is ideal for long passages of text as follows:
puts text = <<END
Lorem ipsum dolor sit amet, consectetur adipiscing elit Donec at neque sapien. Donec eu libero quis erat
volutpat venenatis. Vivamus suscipit elit eu odio facilisis END
#=> Lorem ipsum dolor sit amet, consectetur adipiscing elit Donec at neque sapien. Donec eu libero quis erat
volutpat venenatis. Vivamus suscipit elit eu odio facilisis
We can also use %q and %Q start delimited strings, which allow you to specify the start delimiter and will continue until the next occurrence of the delimiter is reached.
%q{Hello World, Welcome to John's Website!} %q/Hello World, Welcome to John's Website/ %q*Hello World, Welcome to John's Website* #=> Hello World, Welcome to John's Website
In the previous code samples we have used the function puts, which outputs the following string, followed by a new line by default. We can also instead use the function
2.1.0 :001 > print "Hello", "World", "Welcome", "to", "my", "Website" HelloWorldWelcometomyWebsite
2.1.0 :002 > puts "Hello", "World", "Welcome", "to", "my", "Website" Hello
World Welcome to my Website
String Methods
A number of string manipulation methods are made available within Ruby to easily manipulate the string. Some of the most common manipulation methods are
"Hello John".downcase #=> "hello john" "Hello John".upcase #=> "HELLO JOHN" "hello john".capitalize #=> "Hello john" "Hello John".swapcase #=> "hELLO jOHN" "Hello John".reverse #=> "nhoJ olleH"
These string manipulation methods can also be used inline to manipulate a variable by appending an exclamation mark to the method:
hello = "Hello John" hello.downcase!
puts hello #=> "hello john"
Further string methods are available within Ruby to interpret a string in a number of ways:
"Hello John".length #=> 10 "Hello John".empty? #=> false
"1000".to_s #=> "1000" #Cast & Output to String "1000".to_i #=> 1000 #Cast & Output to Integer "1000".to_f #=> 1000.0 #Cast & Output to Float
Concatenating Strings
Within Ruby there are a number of ways to concatenate strings together. These all have minor differences to their functionality, but more-so come down to personal preference.
CHAPTER 3 ■ STRINGS
text = "world"
puts "Hello #{text}" #=> "Hello world"
The main difference between the + and << concatenations are that << changes the variable on the left, where as the + does not.
msg = "Hello"
puts msg + "World" #this doesn't change the variable puts msg #=> Hello
puts msg << "World" #this changes the variable puts msg #=> World
Repeating Strings
We can use arithmetic to repeat strings when required. This is written by providing a String, followed by the arithmetic symbol for times *, then the number of times that the string should be repeated.
puts "Hello"*3 #=> "HelloHelloHello"
Extracting Strings
Within Ruby we have two methods to extract subsets of strings. These are substring and character extraction.
Character extraction extracts a single character from a string by providing the characters location as an integer. Note that the first position is notated as position 0:
puts "Hello"[1] #=> "e"
We can also use negative positions to output a character by position from right to left (note that the last character is notated as -1):
puts "Hello"[-1] #=> "o"
Alternatively we can output a number of characters from within a string, by using substring, rather than character extraction. We use the same notation of character positions (0 = First Character), however we supply a second parameter to show the length of the substring. This means that [0,3] would detail starting at the first character (0), and outputting 3 characters (3).
Utilizing Strings
The Ruby String class is one of the largest Ruby classes, with over 150 methods available to utilize. We are going to interpret a text file of DVDs within a collection using String methods to output a list of available films under 125 minutes that are suitable for a 14 year old by:
100000 | 2:17 | Skyfall | 12 100001 | 2:06 | The Hurt Locker | 15 100002 | 1:45 | 21 Jump Street | 15 100003 | 1:40 | Finding Nemo | U
To start off, we set the preceding text into a variable, loop through per line and then split each column when a vertical bar is found (with optional spaces):
dvds = <<EOF
100000 | 2:17 | Skyfall | 12 100001 | 2:06 | The Hurt Locker | 15 100002 | 1:45 | 21 Jump Street | 15 100003 | 1:40 | Finding Nemo | U EOF
dvds.chomp.split(/\n/).each do |line|
id, length, name, rating = line.chomp.split(/\s*\|\s*/) puts name
end #=> Skyfall
The Hurt Locker 21 Jump Street Finding Nemo
We now need to calculate from this list the suitable films for the 14 year old to watch. We use some simple if statements utilizing string comparisons/methods to output the suitable films.
dvds = <<EOF
CHAPTER 3 ■ STRINGS
dvds.chomp.split(/\n/).each do |line|
id, length, name, rating = line.chomp.split(/\s*\|\s*/) if rating.to_i <= 14
hours, mins = length.split(/:/) min_length = hours.to_i*60+ mins.to_i if min_length < 125
puts "\aYAY! We can watch #{name}" else
puts "Cannot watch #{name}, too long" end
else
puts "Cannot watch #{name}, only suitable for #{rating}" end
end #=>
Cannot watch Skyfall, too long
Arrays
Ruby arrays are integer–indexed arrays starting at position 0, rather like Java or C. Negative values can be used to retrieve values from the array from the end, so −1 would show the last element of an array, and −2 would show the second from last element.
2.1.0 :001 > array = [1,10,3,1] => [1, 10, 3, 1]
2.1.0 :002 > array[0] => 1
2.1.0 :003 > array[-1] => 1
2.1.0 :004 > array[-2] => 3
Creating Arrays
An array can be created within ruby in a number of different syntaxes, the simplest is the use of the literal constructor []. Arrays are not type dependent, and therefore can contain multiple data types such as another array, a string and an integer.
2.1.0 :001 > array = [2, "Hello", 10.02] => [2, "Hello", 10.02]
An array can also be initialized by using the new method from the Array class; this can be called with 0, 1, or 2 arguments. The first optional parameter is the number of elements to initialize the array with; the second optional parameter is the default value for each of these elements.
2.1.0 :001 > array = Array.new => []
CHAPTER 4 ■ ARRAYS
Note that the default value is populated into each element of the array, and therefore is only normally used to initialize an array that will be updated afterward.
To set an array to have default elements that are objects, rather than primitive data-types, the block syntax can be used instead:
2.1.1 :001 > array = Array.new(4) {Hash.new} => [{}, {}, {}, {}]
Accessing Array Elements
Within Ruby, a number of methods are made available to us, in order to access array elements, like used previously when accessing strings as shown previously.
The [] method can be used to retrieve individual elements, using the integer index position (starting from 0):
2.1.1 :001 > array = [1,10,3,1] => [1, 10, 3, 1]
2.1.1 :002 > array[0] => 1
2.1.1 :003 > array[3] => 1
2.1.1 :004 > array[2] => 3
Again, similar to accessing a string, a negative index position can be used:
2.1.1 :001 > array = [1,10,3,1] => [1, 10, 3, 1]
2.1.1 :002 > array[-2] => 3
Alternatively, pairs and ranges of indexes can be used to extract portions of the array. A pair of indexes is shown as the initial position, followed by the length to extract:
2.1.1 :001 > array = [1,10,3,1] => [1, 10, 3, 1]
2.1.1 :002 > array[1,3] => [10, 3, 1]
In addition to the preceding methods of extracting data by position, Ruby provides an at method that works identically to the [] method
2.1.1 :001 > array = [1,10,3,1] => [1, 10, 3, 1]
2.1.1 :002 > array.at(1) => 10
2.1.1 :003 > array.at(5) => nil
Using the preceding methods can cause an issue when attempting to extract an element, which does not exist from the array; this would be returned as a nil value. As an alternative we can use the fetch method, which takes a default value on the element not existing within our array.
2.1.1 :001 > array = [1,10,3,1] => [1, 10, 3, 1]
2.1.1 :002 > array.at(5) => nil
2.1.1 :003 > array[5] => nil
2.1.1 :004 > array.fetch(5)
IndexError: index 5 outside of array bounds: -4...4 from (irb):4:in `fetch'
from (irb):4
from /Users/matt/.rvm/rubies/ruby-2.1.1/bin/irb:11:in `<main>' 2.1.1 :005 > array.fetch(5,"error")
=> "error"
Accessing Array Elements (Part 2)
Similar to the string extraction, we also have a number of methods that can be used with an array to extract data and information about the array. Using the method named “methods” will detail a list of all available methods that we can use to extract data from our array:
2.1.1 :001 > [1,2,6].methods
CHAPTER 4 ■ ARRAYS
A few of these are detailed here.
Length – Output the Array Length (we can also use Size or Count):
2.1.1 :001 > [1,2,6].length => 3
2.1.1 :002 > [1,2,6].size => 3
2.1.1 :003 > [1,2,6].count => 3
First/Last – Output the First/Last element of the array:
2.1.1 :001 > [1,2,6].first => 1
2.1.1 :002 > [1,2,6].last => 6
Sample – Output a random element of the array:
2.1.1 :001 > [1,2,6].sample => 6
2.1.1 :002 > [1,2,6].sample => 1
2.1.1 :003 > [1,2,6].sample => 1
Empty – Query whether the array is empty:
2.1.1 :001 > [1,2,6].empty? => false
Include – Check whether the array contains an element with a particular value:
2.1.1 :001 > [1,2,6].include?(5) => false
Sort – Reorders the array by values:
2.1.1 :001 > [1,6,2].sort => [1, 2, 6]
Shuffle – Randomizes the order of the arrays elements:
2.1.1 :014 > [1,6,2].shuffle => [2, 6, 1]
Adding/Removing Items from an Array
Within Ruby we can also add and remove items within an array after the array is
initialized. Depending on the action required and the position of the new elements, there are a number of methods available.
Adding a new element to the end of an array:
2.1.1 :001 > [1,6,2].push(10) => [1, 6, 2, 10]
An alternative syntax to push is <<:
2.1.1 :003 > [1,6,2] << 10 => [1, 6, 2, 10]
However the push method adds an element to the end of an array; if we need to add an element to the beginning of an array we can instead use unshift:
2.1.1 :004 > [1,6,2].unshift(10) => [10, 1, 6, 2]
If we need to add an element (or elements) to the middle of an array, we can use the
insert method. For this we specify the index position (beginning at 0) for the insert, and the elements to insert:
2.1.1 :005 > [1,6,2].insert(2,10) => [1, 6, 10, 2]
2.1.1 :006 > [1,6,2].insert(2,10,12) => [1, 6, 10, 12, 2]
The preceding methods allow us to add elements to various positions of an array; we have similar methods available to remove elements from an array. The pop method is the reverse of the push method; simply removing the last element:
2.1.1 :001 > array = [1,6,2] => [1, 6, 2]
2.1.1 :002 > array.pop => 2
2.1.1 :003 > array => [1, 6]
To retrieve, and remove the first element from the array we use shift (the opposite of unshift):
2.1.1 :001 > array = [1,6,2] => [1, 6, 2]
2.1.1 :002 > array.shift => 1
CHAPTER 4 ■ ARRAYS
Like the insert method, we can use a delete_at method to delete a specific position of an array:
2.1.1 :001 > array = [1,6,2] => [1, 6, 2]
2.1.1 :002 > array.delete_at(1) => 6
2.1.1 :003 > array => [1, 2]
We can also use a delete method to delete by value, rather than by position:
2.1.1 :001 > array = [1,6,2] => [1, 6, 2]
2.1.1 :002 > array.delete(6) => 6
2.1.1 :003 > array => [1, 2]
The previous methods allow us to add and remove specific values to specific positions. If we need to clean up arrays that contain nil or duplicate values, we have two methods available. The first is compact, for removing nil values:
2.1.1 :001 > array = [1,6,nil,2,nil] => [1, 6, nil, 2, nil]
2.1.1 :002 > array.compact => [1, 6, 2]
2.1.1 :003 > array => [1, 6, nil, 2, nil] 2.1.1 :004 > array.compact! => [1, 6, 2]
2.1.1 :005 > array => [1, 6, 2]
Notice, that the initial compact method simply strips the nil values and displays them, to update the array object itself, we need to use a compact! method instead.
Likewise we can use a uniq method to remove duplicate values from an array. Note that as per the compact method, we also need to use the uniq! method to update the array variable:
2.1.1 :001 > array = [1,6,1,1,nil,2] => [1, 6, 1, 1, nil, 2]
2.1.1 :004 > array.uniq! => [1, 6, nil, 2] 2.1.1 :005 > array => [1, 6, nil, 2]
Looping Through Arrays
Like all enumerable objects within Ruby, an array has an each method for iterating through the elements within the array.
2.1.1 :001 > array = [1,6,1,1,2,1] => [1, 6, 1, 1, 2, 1]
2.1.1 :002 > array.each { |item| print item, " " } 1 6 1 1 2 1 => [1, 6, 1, 1, 2, 1]
Likewise, if we want to print items in a reverse order we can replace the each
method, with a reverse_each method.
2.1.1 :001 > array = [1,6,1,1,2,1] => [1, 6, 1, 1, 2, 1]
2.1.1 :002 > array.reverse_each { |item| print item, " " } 1 2 1 1 6 1 => [1, 6, 1, 1, 2, 1]
With the each method, even if we update the elements value, this does not change the initial array. Instead we can use the map method to output the changed elements, or the map! method to change the original array.
2.1.1 :001 > array = [1,6,1,1,2,1] => [1, 6, 1, 1, 2, 1]
2.1.1 :002 > array.each { |item| item-1 } => [1, 6, 1, 1, 2, 1]
2.1.1 :003 > array.map { |item| item-1 } => [0, 5, 0, 0, 1, 0]
2.1.1 :004 > array => [1, 6, 1, 1, 2, 1]
2.1.1 :005 > array.map! { |item| item-1 } => [0, 5, 0, 0, 1, 0]
CHAPTER 4 ■ ARRAYS
While these methods are extremely useful for looping through an array, these simply loop through the elements within the array. We can also use a method each_with_index, which pulls through two items with each iteration of the loop, the index and the value
2.1.1 :002 > array.each_with_index { |item,index| puts "#{index} = #{item}" }
0 = Hello 1 = World 2 = Welcome
=> ["Hello", "World", "Welcome"]
Selecting Elements from an Array
Using Ruby we have a number of methods to select elements from an array. This works similar to the each or reverse_each method, but allows selective filtering of these arrays to further limit the elements within the array. We have two types of selection methods:
• Non-destructive methods: These are simply the limiting of an array without making any changes to the original array once we are finished selecting from it.
• Destructive methods: These are methods that limit down an array, but then make changes to the original array.
Starting with the non-destructive methods, we can select (only include this range) and reject/drop_while (exclude this range):
2.1.1 :001 > array = [1,2,3,4,5,6,7,8] => [1, 2, 3, 4, 5, 6, 7, 8]
2.1.1 :002 > array.select { |item| item > 5 } => [6, 7, 8]
2.1.1 :003 > array.reject { |item| item > 5 } => [1, 2, 3, 4, 5]
2.1.1 :004 > array.drop_while { |item| item < 5 } => [5, 6, 7, 8]
2.1.1 :005 > array
=> [1, 2, 3, 4, 5, 6, 7, 8]
Alternatively we could use similar selection methods with destructive methods, which will affect the final array:
2.1.1 :001 > array = [1,2,3,4,5,6,7,8] => [1, 2, 3, 4, 5, 6, 7, 8]
2.1.1 :002 > array.delete_if { |item| item > 5 } => [1, 2, 3, 4, 5]
2.1.1 :001 > array = [1,2,3,4,5,6,7,8] => [1, 2, 3, 4, 5, 6, 7, 8]
2.1.1 :002 > array.keep_if { |item| item > 5 } => [6, 7, 8]
2.1.1 :003 > array => [6, 7, 8]
Exercise
Now we can utilize a number of array methods to replicate the example within Chapter 3. Rather than using string adaption/extraction we can instead use arrays and array methods to replicate the same result.
dvds = Array.new
dvds.push([100000,[2,17],"Skyfall",12])
dvds.push([100001,[2,06],"The Hurt Locker",15]) dvds.push([100002,[1,45],"21 Jump Street",15]) dvds.push([100003,[1,40],"Finding Nemo",'U'])
dvds.map { |item| item[1] = item[1][0]*60+item[1][1]} dvds.delete_if { |item| item[3].to_i >=14}
dvds.keep_if { |item| item[1] < 125 }
dvds.each { |item| print "\aYAY! We can watch ", item[2], "\n" } #=>
CHAPTER 5
Hashes
A hash in Ruby is a dictionary-style collection, also known as an associative array in other programming languages. Rather than using integer-based indexes, a hash uses any object as the key.
Creating Hashes
To create a hash within Ruby, we can simply use the {} braces, surrounding a set of elements. We can also initialize an empty hash using the empty {} braces:
2.1.1 :001 > score = { "Joe Bloggs" => 10, "Sarah Bloggs" => 8 } => {"Joe Bloggs"=>10, "Sarah Bloggs"=>8}
2.1.1 :002 > stock = {} => {}
When creating a hash, an alternative syntax is available using symbols as the index, this is shown by using the :key_name syntax, which can also be written without the initial colons:
2.1.1 :001 > stock = { :books => 25, :cds => 7 } => {:books=>25, :cds=>7}
2.1.1 :002 > stock = { books: 25, cds: 7 } => {:books=>25, :cds=>7}
A hash can also be initialized using the new method:
2.1.1 :001 > stock = Hash.new => {}
2.1.1 :002 > stock[:books] = 25 => 25
2.1.1 :003 > stock[:cds] = 7 => 7
We can also assign a default value to use when attempting to retrieve a key that does not exist within the hash:
2.1.1 :001 > stock = Hash.new(0) => {}
2.1.1 :002 > stock[:books] = 25 => 25
2.1.1 :003 > stock[:dvds] => 0
Alternatively, we can set the default parameter on an existing hash:
2.1.1 :001 > stock = { :books => 25, :cds => 7 } => {:books=>25, :cds=>7}
2.1.1 :002 > stock.default = 0 => 0
2.1.1 :003 > stock[:dvds] => 0
Hash Information
Just like other data types, we have a number of methods available to view meta-data style information about a hash and its elements.
Possibly the simplest method is the ability to show the number of elements within a hash:
2.1.1 :001 > score = { "Joe Bloggs" => 10, "Sarah Bloggs" => 8 } => {"Joe Bloggs"=>10, "Sarah Bloggs"=>8}
2.1.1 :002 > score.count => 2
2.1.1 :003 > score.size => 2
2.1.1 :004 > score.length => 2
To determine whether a hash is empty, we can use the simpleempty? method, which returns true or false:
2.1.1 :001 > score = { "Joe Bloggs" => 10, "Sarah Bloggs" => 8 } => {"Joe Bloggs"=>10, "Sarah Bloggs"=>8}
2.1.1 :002 > score.empty? => false
2.1.1 :003 > stock = {} => {}
CHAPTER 5 ■ HASHES
We can also determine whether two hashes are identical by using the eql? method:
2.1.1 :001 > score = { "Joe Bloggs" => 10, "Sarah Bloggs" => 8 } => {"Joe Bloggs"=>10, "Sarah Bloggs"=>8}
2.1.1 :002 > grades = { "Joe Bloggs" => 10, "Sarah Bloggs" => 8 } => {"Joe Bloggs"=>10, "Sarah Bloggs"=>8}
2.1.1 :003 > score.eql? grades => true
2.1.1 :004 > grades = { "Joe Bloggs" => 10, "Sarah Bloggs" => 9 } => {"Joe Bloggs"=>10, "Sarah Bloggs"=>9}
2.1.1 :005 > score.eql? grades => false
If we need to expose whether the hash contains a particular key or value, we can utilize the has_key? and has_value? methods:
2.1.1 :001 > score = { "Joe Bloggs" => 10, "Sarah Bloggs" => 8 } => {"Joe Bloggs"=>10, "Sarah Bloggs"=>8}
2.1.1 :002 > score.has_key? "Joe Bloggs" => true
2.1.1 :003 > score.has_key? "John Bloggs" => false
2.1.1 :004 > score.has_value? 3 => false
2.1.1 :005 > score.has_value? 8 => true
Sorting Hash Elements
To complete basic sorting on a hash within Ruby, we can utilize the sort method:
2.1.1 :001 > stock = { 25 => "Books", 7 => "CDs", 2 => "DVDs" } => {25=>"Books", 7=>"CDs", 2=>"DVDs"}
2.1.1 :002 > stock.sort
=> [[2, "DVDs"], [7, "CDs"], [25, "Books"]]
Accessing Hash Elements
To retrieve hash elements, rather like an array, you address the hash symbol with the hash [key] syntax:
2.1.1 :001 > stock = { :books => 25, :cds => 7 } => {:books=>25, :cds=>7}
We can also utilize other types of keys, such as the strings used previously in the first example:
2.1.1 :001 > score = { "Joe Bloggs" => 10, "Sarah Bloggs" => 8 } => {"Joe Bloggs"=>10, "Sarah Bloggs"=>8}
2.1.1 :002 > score["Joe Bloggs"] => 10
Hashes are commonly used when passing named parameters into a method, where the number and order of parameters can differ depending on what is required. With using a traditional set of parameters, nil or empty data would have to be passed during the method call, and filtered out later; instead a hash can be used. If a hash is used as the last parameter to a method, no braces are required either.
class Score
def self.register(params) @name = params[:name] @score = params[:score]
puts "#{@name} got a score of #{@score}" end
end
Score.register(name: "Joe Bloggs", score: 10) => Joe Bloggs got a score of 10
We can also utilize a select method to pass a statement to the hash, in order to select a range of elements:
2.1.1 :001 > stock = { :books => 25, :cds => 7, :dvds => 2 } => {:books=>25, :cds=>7, :dvds=>2}
2.1.1 :002 > stock.select{|type,quantity| quantity > 5 } => {:books=>25, :cds=>7}
Looping Through Hashes
At times, we need to loop through hashes rather than retrieving individual elements, to do this utilize the each method.
scores = {
"John" => 10, "Paul" => 8, "Sarah" => 9 }
CHAPTER 5 ■ HASHES
This outputs:
John: 10 Paul: 8 Sarah: 9
Hashes are unordered unlike arrays, and therefore will not necessarily be looped through in the order that elements are inserted.
To shortcut the syntax for this, we can use each_value and each_key instead if only the keys or values are required:
scores = { "John" => 10, "Paul" => 8, "Sarah" => 9 } scores.each_key do|name|
puts "#{name}" end
=> John Paul Sarah
scores = { "John" => 10, "Paul" => 8, "Sarah" => 9 } scores.each_value do|score|
puts "#{score}" end
=> 10 8 9
Altering Hashes
Rather like an array, we have a number of methods available in order to alter and manipulate hashes, such as deleting elements by the key:
2.1.1 :001 > stock = {:books => 2, :cds => 7} => {:books=>2, :cds=>7}
2.1.1 :002 > stock.delete(:books) => 2
Likewise, under certain scenarios we can utilize a delete_if method if we need to delete elements within a hash based upon the value (or the key):
2.1.1 :001 > stock = {:books => 2, :cds => 7, :dvds => 200} => {:books=>2, :cds=>7, :dvds=>200}
2.1.1 :002 > stock.delete_if {|key, value| value < 3 } => {:cds=>7, :dvds=>200}
2.1.1 :003 > stock.delete_if {|key, value| key == :dvds } => {:cds=>7}
We can reverse this logic and use a keep_if instead, where all matching elements from the block are kept and any which return false are deleted:
2.1.1 :001 > stock = {:books => 2, :cds => 7, :dvds => 200} => {:books=>2, :cds=>7, :dvds=>200}
2.1.1 :002 > stock.keep_if {|key, value| value < 3 } => {:books=>2}
We can also clear a hash of all elements if required:
2.1.1 :001 > stock = {:books => 2, :cds => 7, :dvds => 200} => {:books=>2, :cds=>7, :dvds=>200}
2.1.1 :002 > stock.clear => {}
Similar to an array, we can use a shift method to remove an element from the hash. However, note that as a hash’s order is not guaranteed, there is no control over which key/value pair is being deleted. This is, however, useful during a loop.
stock = {:books => 2, :cds => 7, :dvds => 200} until stock.empty?
name, stock_level = stock.shift
puts "Removing stock for #{name}: #{stock_level}" end
CHAPTER 5 ■ HASHES
Merging Hashes
There are times when you will have two hashes (such as an internal variable and a set of parameters passed in to a method), which you need to merge to have one hash to iterate through. Ruby has a merge method for a hash, which can merge two hashes. If you are merging a hash with the same keys, the new hash being merged in will win on any conflicts unless otherwise specified:
stock1 = {:books => 2, :cds => 7} stock2 = {:cds => 2, :dvds => 7} stock1.merge(stock2)
=> {:books=>2, :cds=>2, :dvds=>7} stock1
=> {:books=>2, :cds=>7} stock1.merge!(stock2)
=> {:books=>2, :cds=>2, :dvds=>7} stock1
=> {:books=>2, :cds=>2, :dvds=>7}
Note that we have to use the merge! method instead if we want the stock1 hash updated, rather than just the result of the merge returned.
stock1 = {:books => 2, :cds => 7} stock2 = {:cds => 2, :dvds => 7}
stock1.merge(stock2){|key, oldvalue, newvalue| newvalue+oldvalue} => {:books=>2, :cds=>9, :dvds=>7}
As you can see from the preceding code, we have used a block for matching keys to have their values added together, rather than just the new hash winning conflicts.
Exercise
As in previous chapters, we can now utilize a number of methods linked to hashes to complete an example.
dvds = Hash.new
dvds["Skyfall"] = {:id => 100000, :hours => 2, :mins => 17, :classification => 12}
dvds["The Hurt Locker"] = {:id => 100001, :hours => 2, :mins => 6, :classification => 15}
dvds["21 Jump Street"] = {:id => 100002, :hours => 1, :mins => 45, :classification => 15}
dvds.each do|name,details|
details[:mins] = details[:mins] + (details[:hours]*60) end
dvds.delete_if { |name,details| details[:classification].to_i >=14} dvds.keep_if { |name,details| details[:mins] < 125 }
CHAPTER 6
Numbers
The Numeric class within Ruby is a containing class for the Integer and Float classes. This contains all methods linked to numeric variables either with (float) or without (integer) decimal places. The Numeric class is a very simple class, which holds the ability to perform a number of complex calculations with numbers.
Creating Numbers
Creating a number in Ruby is extremely simple, rather like creating a String. Rather than using a New method, or a set of braces, like an array or hash, a Number is created by setting a variable without quotation marks. If the number contains a decimal place, it is created as a float; if the number is without a decimal place, it is created as an integer
2.1.1 :001 > number = 10 => 10
2.1.1 :002 > number.is_a?(Integer) => true
2.1.1 :003 > number = 10.2 => 10.2
2.1.1 :004 > number.is_a?(Integer) => false
2.1.1 :005 > number.is_a?(Float) => true
This is one of the reasons that Ruby’s loosely typed structure is a very powerful tool.
Numeric Alterations
2.1.1 :001 > number = 10 => 10
2.1.1 :002 > number = number + 2 => 12
2.1.1 :003 > number = number - 5 => 7
2.1.1 :004 > number = number * 2 => 14
2.1.1 :005 > number = number / 7 => 2
Ruby will not always adjust the data type between an Integer and Float as required. Note that Ruby classes an Integer as a Fixnum, and a Float as a Float
2.1.1 :001 > number = 10 => 10
2.1.1 :002 > number.class => Fixnum
2.1.1 :003 > number = number + 2 => 12
2.1.1 :004 > number.class => Fixnum
2.1.1 :005 > number / 4
=> 2 #Notice this should be 2.5
2.1.1 :006 > number.class => Fixnum
2.1.1 :007 > number = 10 => 10
2.1.1 :008 > number.class => Fixnum
2.1.1 :009 > number = number / 6.5
=> 1.5384615384615385 #Notice a conversion has taken place as the divider was a float
2.1.1 :010 > number.class => Float
In addition to simple mathematical arithmetic, we have the ability to call methods in order to return various calculations of a number. The first, is the + or – of the initial number. This will return the unary positive or negative of the number (i.e. the original number, or the negative of the number
2.1.1 :001 > number = 10 => 10
2.1.1 :002 > +number => 10
CHAPTER 6 ■ NUMBERS
2.1.1 :004 > number = -5 => -5
2.1.1 :005 > +number => -5
2.1.1 :006 > -number => 5
In addition, we may be required to find out the absolute value of the number, this is, the positive value of the number, regardless as to whether the original number is positive, or negative.
2.1.1 :001 > number = 10 => 10
2.1.1 :002 > number.abs => 10
2.1.1 :003 > number = -4 => -4
2.1.1 :004 > number.abs => 4
If we have a float value, and wish to round this to the next or previous decimal number, we can use the ceil or floor methods. The ceil (for ceiling) method rounds the number to the next decimal number. The floor method rounds the number to the previous decimal number
2.1.1 :001 > number = 11.5 => 11.5
2.1.1 :002 > number.ceil => 12
2.1.1 :003 > number.floor => 11
2.1.1 :004 > number = 3.1 => 3.1
2.1.1 :005 > number.ceil => 4
2.1.1 :006 > number.floor => 3
We also have the ability to perform a natural, mathematical round in order to round the number up or down as expected. A .4 will round down, a .6 will round up, and ties will round up, so a .5 will also round up
2.1.1 :001 > number = 10.6 => 10.6
2.1.1 :003 > number = 10.4 => 10.4
2.1.1 :004 > number.round => 10
2.1.1 :005 > number = 10.5 => 10.5
2.1.1 :006 > number.round => 11
In addition to the / divide operator, we have a div method in order to perform a division to a number
2.1.1 :001 > number = 10 => 10
2.1.1 :002 > number = number.div 5 => 2
Whilst this is useful, we discovered that conversions do not always change the data type, therefore dividing 10 by 4 should output 2.5; however as the data type is an Integer this will actually output 2. We can therefore use remainder method to find out the remainder of the division.
2.1.1 :001 > number = 10 => 10
2.1.1 :002 > number = number.remainder 4 => 2
We could, instead, use the modulo method instead of the remainder method. The modulo outputs the remainder again; however the remainder method rounds the calculated value towards 0, where as the modulo rounds downwards. The remainder also always outputs the same sign (positive/negative) as the original number.
2.1.1 :001 > number = 10 => 10
2.1.1 :002 > number = number.modulo 4 => 2
2.1.1 :003 > number = -10 => -10
2.1.1 :004 > number.modulo 4 => 2
2.1.1 :005 > number.remainder 4 => -2
CHAPTER 6 ■ NUMBERS
2.1.1 :001 > number = 10 => 10
2.1.1 :002 > number.divmod 4 => [2, 2]
2.1.1 :003 > number = -10 => -10
2.1.1 :004 > number.divmod 4 => [-3, 2]
The main issue we have seen previously is the lack of automatically converting the Numeric Type when a division leaves a remainder. There are times that we require an exact calculation, rather than just a remainder. For this Ruby has a quo method, which divides (as per the div method) and returns a float when dividing floats, or rational’s for all other scenarios. Note that rational’s can be cast to floats
2.1.1 :001 > number = 10 => 10
2.1.1 :002 > number.quo 2 => (5/1)
2.1.1 :003 > number = 10 => 10
2.1.1 :004 > number = number.quo 4 => (5/2)
2.1.1 :005 > number.to_f => 2.5
Numeric Comparisons
Previously we have used a number of mathematical formulae, and methods in order to alter the value or Numeric variables, however at times we need to compare numbers in order to calculate whether they meet a certain criteria. Again we can utilize a number of mathematical comparators, and methods.
The first sets of mathematical comparators are the greater than, greater than/equals to, less than, less than/equals to
2.1.1 :001 > number = 10 => 10
2.1.1 :002 > number > 5 => true
2.1.1 :003 > number >= 10 => true
2.1.1 :004 > number < 5 => false
We can also utilize the == comparator to check for equal values
2.1.1 :001 > 10 == 10 => true
2.1.1 :002 > 10 == 10.0 => true
2.1.1 :003 > 10 == 11 => false
2.1.1 :004 > 10 == 10.001 => false
The final comparator we can utilize is the “spaceship” operator. This returns -1 if the original is less than the comparison, 0 if they are equal, and +1 if the original is greater than the comparison. This comparator is used to calculate the previous such as greater than and less than.
2.1.1 :001 > 10 <=> 11 => -1
2.1.1 :002 > 10 <=> 9 => 1
2.1.1 :003 > 10 <=> 10 => 0
We can also utilize other methods in order to compare Numeric values. The simplest of these is the eql? method, which simply returns the same output as the == operator. Note however that the == operator will often cast an integer with an added decimal place (such as 10.0) whereas the eql? method will not cast.
2.1.1 :001 > 10.eql? 10 => true
2.1.1 :002 > 10.eql? 10.0 => false
2.1.1 :003 > 10.eql? 11 => false
2.1.1 :004 > 10.eql? 10.001 => false
In order to check types, we have the integer? method to check whether the number passed in is an integer type, again note that no casting takes place
2.1.1 :001 > 10.integer? => true
2.1.1 :002 > 10.2.integer? => false
2.1.1 :003 > 10.0.integer? => false
CHAPTER 6 ■ NUMBERS
We can check whether the Numeric value is equals (or not equals) to zero. Notice here that the zero method returns true or false booleans, whereas the nonzero method returns the non-zero value (or a nil if the value is 0)
2.1.1 :001 > 10.zero? => false
2.1.1 :002 > 0.zero? => true
2.1.1 :003 > 10.nonzero? => 10
2.1.1 :004 > 0.nonzero? => nil
In order to find out whether a value is odd or even, we can use the odd? and even? methods.
2.1.1 :001 > 10.odd? => false
2.1.1 :002 > 10.even? => true
2.1.1 :003 > 15.odd? => true
2.1.1 :004 > 15.even? => false
2.1.1 :005 > 0.even? => true
2.1.1 :006 > 0.odd? => false
In addition to the mathematical comparators we used previously, we have the ability to check whether a particular Numeric value or variable is between an allowed range. For this we use the between? method, which accepts 2 parameters as the 2 bound values.
2.1.1 :001 > 10.between?(5,15) => true
2.1.1 :002 > 15.between?(5,15) => true
2.1.1 :003 > 16.between?(5,15) => false
2.1.1 :004 > 5.between?(5,5) => true
In order to easily increment in steps, we can use the upto method, which accepts a single parameter, followed by a block to be run for each iteration of the loop.
2.1.1 :001 > 10.upto(16) { |i| puts i } 10
11 12 13 14 15 16 => 10
2.1.1 :002 > -5.upto(-10) { |i| puts i } => -5
2.1.1 :003 > -10.upto(-5) { |i| puts i } -10
-9 -8 -7 -6 -5 => -10
Exercise
As previously, we can utilize a number of Numeric methods in order to further advance our DVD selector application. Notice that we have advanced our Array example, and set the length in minutes in order to utilize the quo method in order to calculate all films that are under 2 hours in length. We are also checking that the age bracket of our movies is between 10 and 15.
dvds = Array.new
dvds.push([100000,137,"Skyfall",12])
dvds.push([100001,114,"The Hurt Locker",15]) dvds.push([100002,105,"21 Jump Street",15]) dvds.push([100003,100,"Finding Nemo",'U'])
dvds.delete_if { |item| item[3].to_i.between?(10,15)} dvds.keep_if { |item| item[1].quo(60).to_f < 2 }
dvds.each { |item| print "\aYAY! We can watch ", item[2], "\n" } #=>
CHAPTER 7
Booleans
Booleans within Ruby are actually known as parts of the TrueClass and FalseClass, rather than a Boolean Data Type as such. It is worth noting that nil (Ruby's version of a null) is not a Boolean.
2.1.1 :001 > true.class => TrueClass
2.1.1 :002 > false.class => FalseClass
Creating Boolean Values
Creating a Boole