ook
Transitioning t
o S
wif
t
Get up to speed on Swift quickly by leveraging
your knowledge of Objective-C
Transitioning to
Swift
Scott Gardner
•
•
•
•
Co
vers
Swif
For your convenience Apress has placed some of the front
matter material after the index. Please use the Bookmarks
and Contents at a Glance links to access them.
v
Contents at a
Glance
About the Author ...
xiii
About the Technical Reviewer ...
xv
Acknowledgments ...
xvii
Who This Book Is For ...
xix
Chapter 1: Getting Started
■
...
1
Chapter 2: Declaring Variables and Constants
■
...
13
Chapter 3: Working with Strings and Collections
■
...
27
Chapter 4: Performing Operations
■
...
49
Chapter 5: Controlling Program Flow
■
...
65
Chapter 6: Creating Functions
■
... 79
Chapter 7: Constructing Classes, Structures,
■
and Enumerations ...
105
Contents at a Glance vi
Chapter 9: Subclassing and Extending
■
...
167
Chapter 10: Controlling Access
■
...
185
Chapter 11: Generic Programming
■
...
203
1
Chapter
1
Getting Started
In this chapter you will download, install, and set up the Apple developer tools necessary to follow along with this book. You will be introduced to the Swift programming language, by way of writing the venerable “Hello world” program and by seeing how two common actions are performed in Swift as compared with Objective-C: logging and commenting.
Installing Xcode
CHAPTER 1: Getting Started 2
The INSTALL APP button label will change to INSTALLING while the app downloads and is installed. Weighing it at nearly 2.5 GB in size, this may take a while to download, and the only indication given within the App Store app is the button label. One way to observe the process is via the Launchpad app, which can be launched from /Applications folder if there is not a shortcut available on your Dock; Figure 1-2 demonstrates.
Figure 1-1. Drag to install Xcode in your Applications folder
CHAPTER 1: Getting Started 3
Once installation is complete, a sparkle animation will appear on top of the Xcode app icon in Launchpad and the INSTALLING label in App Store will change to INSTALLED. Either click the Xcode app icon in Launchpad or locate and double-click the Xcode app icon in your /Applications folder to launch Xcode. An Xcode and iOS SDK License Agreement window will appear as shown in Figure 1-3. Review the terms and click Agree to proceed in launching Xcode.
Figure 1-3. Xcode and iOS SDK License Agreement
You will be asked to enter admin credentials in order for Xcode to install necessary components to your system. After entering admin credentials, a progress window will briefly appear during that installation, and then the Welcome to Xcode window should appear (see Figure 1-4). If not, select from the menu Window ➤ Welcome to Xcode.
Creating a Playground
In the Welcome to Xcode window, click Get started with a playground, or select File ➤ New ➤ Playground... from the menu.
CHAPTER 1: Getting Started 4
Accept or change the suggested filename, leave the platform selection as iOS, and then click Next (Figure 1-5) and save the file to a convenient location such as your ~/Documents folder. You may find it useful to also drag this file to your Dock to create a shortcut.
Figure 1-5. Creating a playground
Figure 1-6. New playground
Click Enable in the Enable Developer Mode on this Mac? window that appears, and again enter admin credentials when prompted. Your Swift playground file will appear (Figure 1-6), complete with a comment, import statement, and declaration of a string variable (more on that later).
Notice the import UIKit line, but there is no import Swift line, as there would similarly need to be an import Foundation line (or some other import that imports Foundation) in an Objective-C source file. This is because the Swift standard library is automatically imported. You could, in fact, delete the
CHAPTER 1: Getting Started 5
Also notice the "Hello, playground" printout on the right, which is the results sidebar. Swift playgrounds provide an interactive environment in which you can type Swift code and immediately see the results—no Xcode project and no build and run process required. Type the following code in the line below the variable declaration:
println("Hello world")
In addition to the results sidebar, you have the option displaying console output in the Assistant Editor. I have found that displaying the Assistant Editor on the bottom makes best use of screen real estate. To specify the location of the Assistant Editor, such as on the bottom, select View ➤
Assistant Editor ➤ Assistant Editors on Bottom. To actually display the Assistant Editor, select View ➤ Assistant Editor ➤ Show Assistant Editor
(Figure 1-7).
Figure 1-7. Playground with Assistant Editor
Voilà! You now have a single-file, interactive Swift coding environment in which to write and observe the results of your Swift code. I’ve only scratched the surface of the power and versatility of Swift playgrounds, but it’s all you need to know for this book. I encourage you to watch the Swift Playgrounds WWDC video at the following URL for a deeper dive into the capabilities of playgrounds:
CHAPTER 1: Getting Started 6
Running a REPL
You may also set up and run a REPL — read, eval, print, loop — in order to write interactive Swift code in the command line. To enable this capability, open the Terminal app from your /Applications/Utilities folder and type xcrun
swift (or lldb --repl) at the command prompt and press return.
You will be welcomed to the Swift REPL (Figure 1-8). Type
println("Hello world") at the 1> prompt and hit return, which will instruct
the REPL to execute this function and print out, “Hello world.” Type :quit (or even just :q) and press return to exit out of the Swift REPL and return to the command line.
Figure 1-8. Swift REPL
Of course, you can also create an Xcode Swift project in the same traditional manner as you would create an Objective-C project in order to write, build, and run test/exploratory code.
Logging to the Console
Objective-C utilizes NSLog() to log messages to the console during runtime.
NSLog() prefixes the provided string with a timestamp and the process
ID, and adds a hard return to the end of the string. NSLog()’s closest counterpart in Swift is println() (print line). println() writes the provided string followed by a newline character. However, println() does not include a timestamp or process ID.
CHAPTER 1: Getting Started 7
Swift also provides print() (sans the “ln”), which prints the supplied string without appending a newline character:
print("Hello ") print("world")
// Prints "Hello world" on one line
Table 1-1. Printing out common value types in Objective-C and Swift
Objective-C Swift
String literal NSLog(@"Hello world"); println("Hello world")
String format NSString *helloWorld = @"Hello world";
NSLog(@"%@", helloWorld);
let helloWorld = "Hello world"
println("\(helloWorld)")
Unsigned integer
NSLog(@"numberOfObjects: %lu", (unsigned long)sectionInfo. numberOfObjects);
println("numberOfObjects: \(sectionInfo.
numberOfObjects)")
Tip NSLog() will also work in Swift if Foundation is imported,
however, println() and print() (part of the Swift standard library) will be used throughout this book.
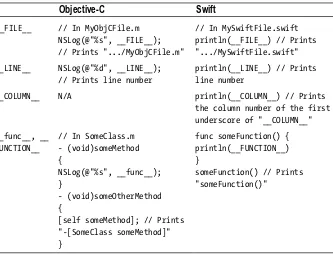
Similar to preprocessor macros in Objective-C, Swift includes special literal expressions that can be printed out to display source code and file information. Table 1-2 demonstrates; the function syntax will be covered in Chapter 6.
CHAPTER 1: Getting Started 8
Adding Comments
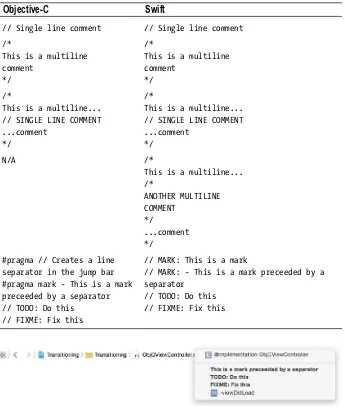
The syntax for writing single and multiline comments in Objective-C and Swift is identical. Although Objective-C and Swift both allow nesting single-line comments within multiline comments, Swift adds the ability to nest multiline comments within multiline comments.
Swift does not include a preprocessor as does Objective-C, so preprocessor directives such as #pragma marks are not available. In place of #pragma marks, Xcode 6+ supports // MARK:, //MARK: -, // TODO:, and // FIXME: landmarks in Swift source files to help organize code and provide visual separation in the jump bar. Although these landmarks are also recognized in Objective-C source files, in Swift source files, Xcode will also create a line separator for // MARK: and a line separate preceeding any text typed after the dash for // MARK: -, thereby making them suitable replacements
for #pragma marks. Table 1-3 compares these commenting capabilities in
Objective-C and Swift, followed by screenshots of the resulting Xcode jump bars for Objective-C and Swift source files in Figures 1-9 and 1-10.
Table 1-2. Printing out source code and file information in Objective-C and Swift
Objective-C Swift
__FILE__ // In MyObjCFile.m
NSLog(@"%s", __FILE__); // Prints ".../MyObjCFile.m"
// In MySwiftFile.swift println(__FILE__) // Prints ".../MySwiftFile.swift"
__LINE__ NSLog(@"%d", __LINE__);
// Prints line number
println(__LINE__) // Prints line number
__COLUMN__ N/A println(__COLUMN__) // Prints
the column number of the first underscore of "__COLUMN__"
__func__, __ FUNCTION__
// In SomeClass.m - (void)someMethod {
NSLog(@"%s", __func__); }
- (void)someOtherMethod {
[self someMethod]; // Prints "-[SomeClass someMethod]" }
func someFunction() { println(__FUNCTION__) }
CHAPTER 1: Getting Started 9
Table 1-3. Entering comments in Objective-C and Swift
Objective-C Swift
// Single line comment // Single line comment
/*
This is a multiline comment
*/
/*
This is a multiline comment
*/
/*
This is a multiline... // SINGLE LINE COMMENT ...comment
*/
/*
This is a multiline... // SINGLE LINE COMMENT ...comment
*/
N/A /*
This is a multiline... /*
ANOTHER MULTILINE COMMENT
*/
...comment */
#pragma // Creates a line separator in the jump bar #pragma mark - This is a mark preceeded by a separator // TODO: Do this
// FIXME: Fix this
// MARK: This is a mark
// MARK: - This is a mark preceeded by a separator
// TODO: Do this // FIXME: Fix this
Figure 1-9. Jump bar in Xcode 6 for an Objective-C source file
CHAPTER 1: Getting Started 10
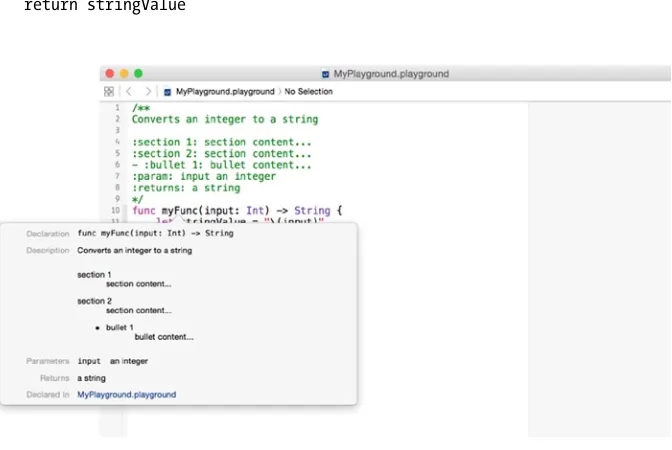
Xcode 6 also recognizes comments beginning with either /** or ///, placed atop a line or block of code, as documentation comments. For proper formatting, enter the description on a new line followed by a blank line. Document parameters with :param: and return values with :returns:. Additionally, sections can be added to the description using :sectionTitle:, and bullets can be added using - :bulletTitle: (* :bulletTitle: also works), replacing sectionTitle and bulletTitle with whatever titles you want. See Figure 1-11 (disregard the function syntax for now).
/**
Converts an integer to a string
:section 1: section content... :section 2: section content... - :bullet 1: bullet content... :param: input an integer :returns: a string */
func myFunc(input: Int) -> String { let stringValue = "\(input)" return stringValue
}
CHAPTER 1: Getting Started 11
Although I’ll leave it as an exercise for those interested to further explore, I’d be remiss not to at least mention an excellent Xcode plugin
that simplifies this process, VVDocumenter-Xcode
(https://github.com/onevcat/VVDocumenter-Xcode), which can be conveniently installed via Alcatraz (http://alcatraz.io).
Using Dot Notation
There remains a healthy debate among Objective-C developers regarding the use of dot versus bracket notation for accessing properties (getters and setters). Prior to iOS 8, certain methods—such as count for NSArray,
NSDictionary, and others—would compile even if called using dot notation
(e.g., myArray.count). This was regarded by some (myself included) as being syntactically incorrect. However, with iOS 8, most if not all of these methods have been converted to properties, thus eschewing the controversy. That said, Swift exclusively uses dot syntax to access properties and members, and to call methods.
Summary
Chapter
2
Declaring Variables
and Constants
Programming is largely about solving problems with math, and to do that you need to store values and represent them in your algorithms. Most programming languages share a similar approach to storing values, yet the simplicity or terseness of syntax seems to be a differentiator amongst modern languages. Swift delivers a concise yet logical syntax that creates a harmonious balance between the coder and the compiler. This chapter will show you how to create stored values in Swift as compared with Objective-C, beginning with an explanation of how the two languages differ in approach.
Note The phrase “stored value” is used interchangeably with “variable” and/or “constant” throughout this book.
Value Types and Reference Types
Objective-C, being a superset of C, deals in scalar values (such as int, float,
and char), typedef wrappers around scalar values (for example, NSInteger
and CGFloat), object pointer references (seminally, NSObject), and even
CHAPTER 2: Declaring Variables and Constants 14
Value types include structures and enumerations. All of Swift’s basic data types—integers, floating-point numbers, booleans, strings, arrays, and dictionaries—are implemented as structures. Characters are implemented as enumerations. Classes and closures are reference types. Figure 2-1 provides a breakdown of value types and reference types in Swift. Of the types listed in the figure, you may not be familiar with tuples or closures, which will be covered in the next chapter and in Chapter 5, respectively.
Figure 2-1. Value types and reference types in Swift
A value type is copied, such as when assigned to a variable or when passed to a method. Behind the scenes, Swift will actually only perform a copy when it is absolutely necessary to do so. But for all intents and purposes, consider that you are always passing value types by copy. Coming from Objective-C, you may be used to using the copy attribute when creating immutable properties of classes such as NSString that have mutable counterparts, to ensure that your property maintains its own state. This is automatic in Swift with all value types including String, for example.
CHAPTER 2: Declaring Variables and Constants 15
Named Types and Compound Types
Swift also classifies types as being either named or compound. Named types can, well, be named when they are defined. Named types can also have methods associated with them and be extended; see Chapters 7, 8, and 9 for details. Classes, structures, enumerations, and protocols are named types. Compound types are not named, as they are defined in the Swift language itself. Function types and tuples are compound types. Function types represent closures, functions (also known as named closures), and methods (functions within a class); see Chapter 6 for details. Tuple types are comma-separated lists enclosed in parentheses.
Being aware of this lexical grouping may be of less practical importance than knowing whether an item you’re dealing with is passed around in your code as a copy or as a reference to the same instance. Just remember that only class types are passed by reference; everything else is passed by copy. Figure 2-2 provides a breakdown of named types and compound types in Swift.
Figure 2-2. Named types and compound types in Swift
Naming
CHAPTER 2: Declaring Variables and Constants 16
Mutability
Objective-C offers several classes in both “regular” and mutable versions, such as NSString/NSMutableString, NSArray/NSMutableArray, and so on. In Swift, mutability is determined when you create an instance, not by choice of class. An instance is declared as being either a variable or constant, thus establishing whether it can or cannot be changed.
Variables are declared using the var keyword and are mutable. Constants are immutable and declared using the let keyword. Constants must be assigned a value when declared, with one exception: when declaring properties, a constant property can be declared without assigning a value. This is because it is init()’s job to ensure that all properties are assigned a value; see Chapter 7 for details.
Although it is possible to apply the const keyword from C to a variable in Objective-C to make it immutable, in practice this is most commonly done at the global level within a class, for example, to create string constants that will take advantage of code completion versus using literal strings which are prone to typo-based errors. In Swift, constants are used ubiquitously. Apple advises to always declare a stored value as a constant when you know its value is not going to change, because doing so aids performance and also better conveys the intended use of a stored value.
Table 2-1 shows how to create a variable and constant in Swift.
Table 2-1. Creating variable and constant stored values in Swift
Variable var valueThatMayChange = "Hello "
Constant let valueThatWillNotChange = "Hello world"
Declaring Type
To specifically declare the type of a stored value, follow the name with a colon and then the type annotation—for example, to create a variable named “greeting” that explicitly is of type String:
var greeting: String = "Hello world"
CHAPTER 2: Declaring Variables and Constants 17
have to, as long as it can be inferred by the value being assigned. This helps to make Swift a type safe language. The previous greeting variable could have been created as implicitly of type String like this:
var greeting = "Hello world"
An exception to this rule is with the Character type. A Character value will be inferred to be of type String unless explicitly typed Character:
let eAcute1 = "é"
println(_stdlib_getDemangledTypeName(eAcute1)) // Prints "Swift.String" let eAcute2: Character = "é"
println(_stdlib_getDemangledTypeName(eAcute2)) // Prints "Swift.Character"
Tip In Xcode, you can option + click on a stored value to display its type in a popup.
Similar to id in Objective-C, you can declare a variable or constant in Swift as type AnyObject to indicate that it can be an instance of any class type. Furthermore, in Swift you can declare a variable or constant as type Any to indicate that it can be of any type except a function type. Apple discourages this in favor of the code clarity achieved by being explicit about types. And in the case of constants, one plausible usage is for constant stored properties, which can be declared with assignment deferred to init(); see Chapter 7 for details.
Multiple stored values can be declared in a comma-separated list on one line. Values not explicitly declared as of a type are inferred to be of the first type specified:
var red, green, blue, alpha: Double // All values are of type Double var firstName, lastName: String, birthYear, birthMonth, birthDay: Int // firstName and lastName are of type String; birthYear, birthMonth, and birthDay are of type Int
Defining Type
CHAPTER 2: Declaring Variables and Constants 18
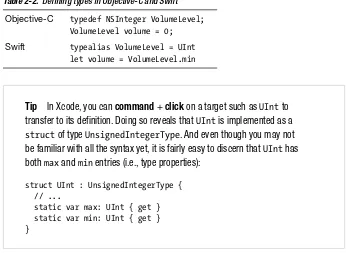
Table 2-2 also demonstrates that structures in Swift can have properties; even the types themselves can have properties. In this case, UInt has a min type property (see Chapter 7 for details).
Table 2-2. Defining types in Objective-C and Swift
Objective-C typedef NSInteger VolumeLevel; VolumeLevel volume = 0;
Swift typealias VolumeLevel = UInt let volume = VolumeLevel.min
Tip In Xcode, you can command + click on a target such as UInt to transfer to its definition. Doing so reveals that UInt is implemented as a
struct of type UnsignedIntegerType. And even though you may not
be familiar with all the syntax yet, it is fairly easy to discern that UInt has both max and min entries (i.e., type properties):
struct UInt : UnsignedIntegerType { // ...
static var max: UInt { get } static var min: UInt { get } }
Declaration Attributes
Swift includes several attributes that can be used to provide additional information about a stored value being declared, which will be displayed in a popup when option + clicking on the stored value, or in an error message if applicable. While these attributes can be used with independent stored values (e.g., declared in a global scope), they are more likely to be used and encountered with properties of classes, structures, and enumerations; see Chapter 7 for additional information about these types and declaration attribute usage examples. One attribute in particular, @availability, takes two or more arguments to specify the applicable platform(s), followed by one or more additional arguments in comma-separated list. The first argument of the @availability attribute indicates the applicable platform, e.g., iOS,
iOSApplicationExtension, or OSX; alternatively, an asterisk (*) can be used to
CHAPTER 2: Declaring Variables and Constants 19
The renamed @availability argument can be used in conjunction with a
typealias to indicate a custom type (such as a custom class, structure, or
enumeration type) has been renamed, along with an alias to the old name so that existing code continues to work; an example will be provided in Chapter 7. @NSCopying and @noreturn attributes are also available for use with properties and functions, respectively. Chapter 6 will cover @noreturn and Chapter 7 will cover @NSCopying. The @objc declaration attribute can be used to mark an entity as being available to Objective-C source code within the same module—which is required for protocols containing optional requirements; Chapters 7 and 8 will examine these use cases.
Additional declaration attributes are available for use in Xcode projects, of which coverage is beyond the scope of this book, including
@UIApplicationMain, @NSManaged, @IBAction, @IBInspectable, @IBAction,
and @IBDesignable. Beginning iPhone Development with Swift
(http://www.apress.com/9781484204108) provides coverage
of @UIAppliationMain and @IBAction, and here are some shortlinks to
additional helpful resources:
http://bit.ly/whatsNewInInterfaceBuilder
http://bit.ly/whatsNewInInterfaceBuilderTextVersion http://bit.ly/NSManagedObjectAttribute
@, *, and ;
The @ symbol is used ubiquitously in Objective-C, as an object string format specifier (e.g., for use in -[NSString stringWithFormat:]), and to create data types such as NSString, NSNumber, NSArray, and NSDictionary using Objective-C literal syntax. Such is not the case in Swift, where @ is used only as a prefix for certain declaration attributes, as mentioned in the previous Table 2-3. Examples of using the @availability declaration attribute with stored value declarations in Swift
Introduced @availability(iOS, introduced=1.0) var anIOSOnlyValue: Int
Deprecated with message
@availability(OSX, deprecated=1.0,
message="anUnusedOSXOnlyTuple has been deprecated and will be removed in a future release. Use aUsefulOSXOnlyTuple(Double, String) instead.") var anUnusedOSXOnlyTuple: (Int, String)
Obsoleted @availability(*, obsoleted=1.0) var anUnavailableValue: String
CHAPTER 2: Declaring Variables and Constants 20
Asterisks are all but gone, save for their continued use in operators, multiline comments, and declaration attributes. Swift abstracts pointer management for reference types such that a variable or constant that refers to an instance of a reference type is not a direct pointer to an address in memory as in Objective-C, and you do not write an asterisk to indicate that a variable or constant is a reference type.
Semicolons are no longer required at the end of statements, except when including multiple statements on the same line, such as in a for loop. You can still end your statements with semicolons if you wish; however, this “syntactic noise” is discouraged.
Declaring Values
Number values in Swift can optionally use underscores to increase readability of long numbers.
Apple encourages using Int instead of UInt, even if a stored integer value is intended to be non-negative, unless you specifically require an unsigned integer type or an integer type of a specific size (Int can store any value between -2,147,483,648 and 2,147,483,647); this aids in code consistency and interoperability.
Swift’s Double represents a 64-bit floating-point number with at least 15 decimal points precision, versus Float, which represents a 32-bit floating-point number of as little as 6 decimal digits precision. Swift will infer a floating-point number as type Double unless explicitly declared as type Float:
let pi = 3.14159 // pi is inferred to be of type Double let pi: Float = 3.14159 // pi is explicity declared as a Float
Whereas booleans in Objective-C are assigned the value YES or NO, Swift assigns true or false.
Tables 2-4 and 2-5 compare creating variables and constants in Objective-C and Swift. Recognizing that creating constants in Objective-C is far
CHAPTER 2: Declaring Variables and Constants 21
Table 2-4. Creating mutable variables in Objective-C and Swift
Objective-C Swift
Signed integer NSInteger x = -1; NSNumber *x = @-1;
var x = -1
Unsigned integer NSUInteger x = 1000000; NSNumber *x = @1000000;
var x: UInt = 1_000_000
Floating-point CGFloat pi = 3.14159f; NSNumber *pi = @3.144159f;
var π = 3.14159
Boolean BOOL success = YES; NSNumber *success = @YES;
var = true
Character char a = 'a'; NSNumber *a = @'a';
var a: Character = "ⓐ"
String NSMutableString *greeting = [@"Hello" mutableCopy];
var greeting = "Hello"
id id greeting = @"Hello world"; var greeting: AnyObject
= "Hello "
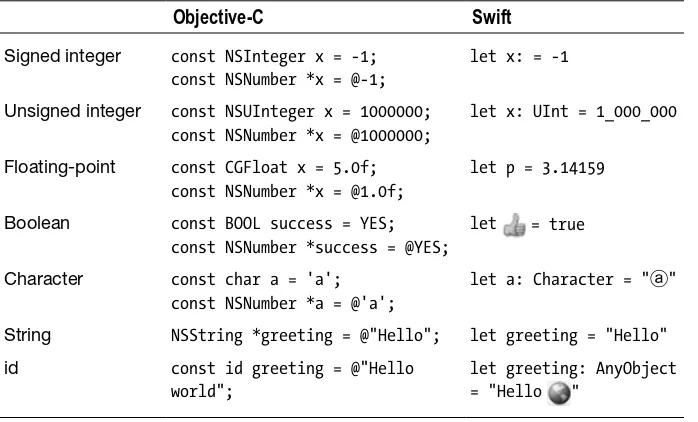
Table 2-5. Creating immutable constants in Objective-C and Swift
Objective-C Swift
Signed integer const NSInteger x = -1; const NSNumber *x = @-1;
let x: = -1
Unsigned integer const NSUInteger x = 1000000; const NSNumber *x = @1000000;
let x: UInt = 1_000_000
Floating-point const CGFloat x = 5.0f; const NSNumber *x = @1.0f;
let p = 3.14159
Boolean const BOOL success = YES; const NSNumber *success = @YES;
let = true
Character const char a = 'a'; const NSNumber *a = @'a';
let a: Character = "ⓐ"
String NSString *greeting = @"Hello"; let greeting = "Hello"
id const id greeting = @"Hello
world";
let greeting: AnyObject
CHAPTER 2: Declaring Variables and Constants 22
It’s worth noting that Swift’s Character type is actually a sequence of one or more Unicode scalars—also known as an extended grapheme cluster—that (singularly or combined) represent a single character. And a Swift String type is simply a sequence of those clusters. You can create characters by typing in the actual Unicode character (as seen in the previous tables), or you can use the string interpolation syntax: \u{N}, where N is the hexadecimal portion of the Unicode scalar value, wherein it is also ok to omit leading 0s. For example, to represent the letter “a” (Unicode scalar U+0061), use \u{61}. Additionally, a character with an accent, such as “é,” can be represented by a single Unicode scalar or a pair of scalars separately representing the “e” and the accent. And, although these two representations of “é” are made up of different clusters, they are canonically equivalent—that is, they have the same linguistic meaning—and, therefore, Swift considers them equal:
let eAcute1 = "\u{E9}" let eAcute2 = "\u{65}\u{301}"
println(eAcute1 == eAcute2) // Prints "true"
let string1 = "The e acute character is \u{E9}"
let string2: String = "The e acute character is \u{65}\u{301}" println(string1 == string2) // Prints "true"
Writing Numeric Literals
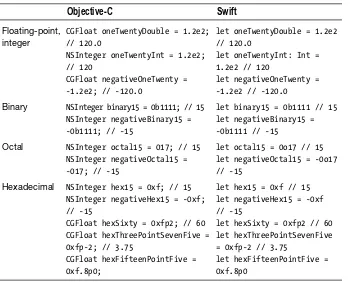
Numeric literals include floating-point and integer literals with optional exponents, binary integer literals, and hexadecimal numeric (integer or floating-point) literals with optional exponents. All of these are written the same way in Swift as they are in Objective-C. However, octal integer literals are written with the 0o (zero and letter “o”) prefix in Swift versus a 0 alone in Objective-C. Table 2-5 provides examples of writing numeric literals in Objective-C and Swift.
Tip A handy keyboard shortcut to know is command + control +
CHAPTER 2: Declaring Variables and Constants 23
Access Control
Although Objective-C has long offered compile-time instance variable access control, properties and methods have lacked this feature. In recent years, Apple has also boosted encouragement of using properties instead of instance variables. As a result, access control in Objective-C has seen minimal usage as compared with other languages. Still, Objective-C’s instance variable access control directives adhere to traditional usage patterns: @public, which Apple warns should never be used as it violates the principle of encapsulation, @protected (the default) that limits access to class in which the instance variable is declared and its subclasses, and
@private, which limits access to the declaring class alone.
Swift, by contrast, offers comprehensive access control, taking a somewhat avante-garde approach. Because access control is often something of an advanced interest—such as for framework and library development—and because the nature of Swift’s implementation of access control is generally Table 2-6. Writing numeric literals in Objective-C and Swift
Objective-C Swift
Floating-point, integer
CGFloat oneTwentyDouble = 1.2e2; // 120.0
NSInteger oneTwentyInt = 1.2e2; // 120
CGFloat negativeOneTwenty = -1.2e2; // -120.0
let oneTwentyDouble = 1.2e2 // 120.0
let oneTwentyInt: Int = 1.2e2 // 120
let negativeOneTwenty = -1.2e2 // -120.0
Binary NSInteger binary15 = 0b1111; // 15 NSInteger negativeBinary15 = -0b1111; // -15
let binary15 = 0b1111 // 15 let negativeBinary15 = -0b1111 // -15
Octal NSInteger octal15 = 017; // 15 NSInteger negativeOctal15 = -017; // -15
let octal15 = 0o17 // 15 let negativeOctal15 = -0o17 // -15
Hexadecimal NSInteger hex15 = 0xf; // 15 NSInteger negativeHex15 = -0xf; // -15
CGFloat hexSixty = 0xfp2; // 60 CGFloat hexThreePointSevenFive = 0xfp-2; // 3.75
CGFloat hexFifteenPointFive = 0xf.8p0;
let hex15 = 0xf // 15 let negativeHex15 = -0xf // -15
let hexSixty = 0xfp2 // 60 let hexThreePointSevenFive = 0xfp-2 // 3.75
CHAPTER 2: Declaring Variables and Constants 24
Protocol Adoption
A basic introduction to declaring protocol adoption is provided here. Complete coverage of protocols can be found in Chapter 8.
In Objective-C, to create a variable or constant and declare that it adopts one or more protocols, you would create the variable or constant as type id and enclose one or more protocols in a comma-separated list within angle brackets.
In Swift, you can declare that a variable or constant adopts a protocol in the same manner as declaring type. This is not generally necessary thanks to Swift’s type inference, although you do need to cast the assigned value using the as operator. Table 2-7 compares creating a stored value that is of a type that adopts a protocol in Objective-C and Swift.
Table 2-7. Creating a stored value with protocol adoption in Objective-C and Swift
Objective-C id <NSFetchedResultsSectionInfo> sectionInfo = [self.fetchedResultsController.sections[section];
Swift let sectionInfo = self.fetchedResultsController. sections[section] as NSFetchedResultsSectionInfo
nil
and Optionals
All this time you have been assigning a value during declaration of a variable or constant. Although constants must be assigned a value when declared (except properties, as previously noted), variables do not require value assignment during declaration. How you go about doing this in Swift is different than in Objective-C, however. In Objective-C, a variable declared without assigning a value is nil (actually a pointer to nil). In Swift, nil literally means no value.
In order for a variable (of any type) to optionally be able to store a value or be nil, its type must be marked as an optional. This is done by explicitly declaring the type followed with a ? (no space):
var anEmptyStringForNow: String?
This is a syntactic shortcut for declaring the variable of type Optional followed by angle brackets enclosing the value type:
CHAPTER 2: Declaring Variables and Constants 25
The former question mark syntax is preferred for declaring an optional. There will be plenty of opportunity to use the latter syntax while taking advantage of Swift’s generic programming capabilities to create functions and types that are more flexible and reusable than in Objective-C; see chapters Chapter 11 for details.
A variable declared as optional without assigning a value is nil. It can subsequently be assigned a value of its specified type or be set to nil again. A constant can also be declared as optional, although because a constant is immutable, this is of lesser practical value:
var myConditionalInt: Int? myConditionalInt = 1 myConditionalInt = nil
An optional must be unwrapped in order to access its value, and this can be done explicitly, implicitly, via optional binding, or during optional chaining. To explicitly unwrap an optional, suffix it with an !, also referred to as “forced unwrapping”:
var myInt1: Int? = 1 var myInt2: Int? = 2 let sum = myInt1! + myInt2!
Operators such as + will be covered in Chapter 4.
If you are certain that an optional will always have a value, you can implicitly unwrap the optional during declaration by suffixing the type with an !, and this avoids having to force unwrap the optional to access its value every time:
var myInt1: Int! myInt1 = 1
let myInt2: Int! = 2 let sum = myInt1 + myInt2
CHAPTER 2: Declaring Variables and Constants 26
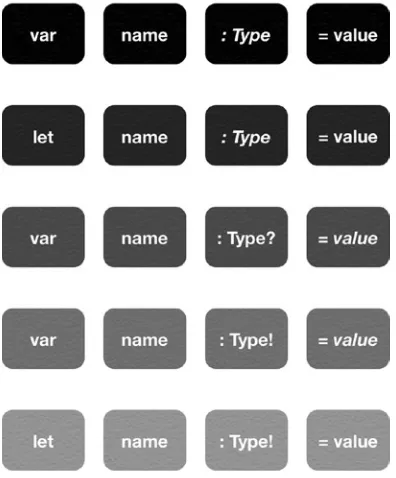
Figure 2-3. Syntax for creating variables and constants in Swift
Summary
This chapter provided an overview of Swift value types and explained how to create variables and constants in Swift. Swift is designed to be a modern programming language that blends simplified syntax, powerful capabilities, and strong compiler support, to help you write more succinct and readable code that is also less prone to runtime errors. After reading this chapter and writing the example code in your Swift playground or REPL, you should be comfortable with how to declare, store, and print out values in Swift. The side-by-side nature used to compare Objective-C and Swift code in this chapter will be used throughout the book.
Syntax Reference
Chapter
3
Working with Strings
and Collections
Chapter 2 introduced the basic structure of Swift and explained the different types, mutability versus immutability, and notable syntax changes, among other things. This chapter builds on that foundation of knowledge, focusing on creating and manipulating strings and collections of values.
Working with Strings
The Swift String value type is bridged seamlessly to Objective-C’s NSString class, meaning that any NSString method can be called on a String value, and a String value can be used with any API that expects an NSString
instance. However, this does not mean that there is complete interchangability between String and NSString. For example, String methods such as
toInt()(), computed properties such as endIndex, and global functions such
as countElements() will not work with an NSString instance.
Following an examination of the salient differences between Swift’s String type and Objective-C’s NSString and NSMutableString classes, Table 3-1 provides several examples that compare NSString and NSMutableString methods and techniques with Swift String equivalents (see Chapter 5 for additional coverage of the conditional syntax used in some of the examples).
CHAPTER 3: Working with Strings and Collections 28
As in Objective-C and mentioned in the last chapter, a String type in Swift is actually an ordered collection (i.e., sequence) of Unicode characters (specifically, Character values in Swift). Exploring String’s definition (such as by command + clicking on a String type declaration in Xcode) reveals that String is actually a simple struct type accompanied by a series of extensions:
struct String { init() }
extension String : CollectionType { // ...
Clicking into CollectionType’s definition shows that it is a protocol, and so this extension adopts and conforms to the CollectionType protocol, which (clicking through to its definition) conforms to the _CollectionType protocol, which is the input type expected by the global countElements() function. Therefore, countElements() can be called, passing a String type, and it will return the count of Character values that make up the string:
let abcString = "ABC"
countElements(abcString) // 3
Note A protocol in Swift is—much as in Objective-C—simply a contract. By adopting a protocol in Swift, a type is agreeing to implement the protocol’s requirements. Chapter 8 will cover protocols in full.
countElements() should normally suffice when the need to get a String
value’s length arises. Remember from the last chapter, however, that the
Character type represents a sequence of extended grapheme clusters that are
combined to produce a single human-readable character. countElements() counts Character values, not the individual clusters, which could be one or more per each Character value. Reading further into the extension that adopts
the CollectionType protocol will disclose how, then, to get the length of a
String value in terms of the count of individual clusters:
extension String : CollectionType {
struct Index : BidirectionalIndexType, Comparable, Reflectable { func successor() -> String.Index
CHAPTER 3: Working with Strings and Collections 29
var startIndex: String.Index { get } var endIndex: String.Index { get }
subscript (i: String.Index) -> Character { get } func generate() -> IndexingGenerator<String> }
Even though much of this syntax may be new to you at this point, the lines defining the vars startIndex and endIndex should look familiar. These are computed properties that return the position of the index before the first cluster, and position of the index after the last cluster, respectively (computed properties will be further covered in Chapter 7):
let abcString = "ABC" abcString.startIndex // 0 abcString.endIndex // 3
Notice that, because endIndex is the position of the index after the last character, it also happens to be equal to the length of the string. This is not always the case, however:
let circledStar: Character = "\u{2606}\u{20DD}" //
circledStar is a single Character value made up of two clusters: a white
star (U+2606) and a combining enclosing circle (U+20DD). Let's create a
String from circledStar and compare the results of countElements() and
endIndex:
let circledStarString = "\(circledStar)" countElements(circledStarString) // 1 circledStarString.endIndex // 2
All that said, Swift’s exact counterpart to Objective-C’s NSString length property is String’s utf16Count computed property, because both are based on the number of 16-bit code units, not the number of Unicode extended grapheme clusters. It is therefore possible that two String values made up using different clusters are considered equal and countElements() returns the same result; however, their endIndex and utf16Count properties will be different. In the following example, the character “é” is created using a single cluster (U+00E9) in string1, and two clusters (U+0065 for “e” and U+0301 for the combining acute accent) in string2:
let string1 = "The e acute character is \u{E9}" // "é" let string2 = "The e acute character is \u{65}\u{301}" // "é"
println(countElements(string1) == countElements(string2)) // Prints "true" println(string1.endIndex == string2.endIndex) // Prints "false"
CHAPTER 3: Working with Strings and Collections 30
println(string2.endIndex) // Prints "27"
println(string1.utf16Count == string2.utf16Count) // Prints "false" println(string1.utf16Count) // Prints "26"
println(string2.utf16Count) // Prints "27"
The Swift String type also has an isEmpty computed property, which can be used to determine if a string is, well, empty. Similar to Objective-C’s
–[NSString hasPrefix] and –[NSString hasSuffix] methods, Swift String
types also have hasPrefix() and hasSuffix() methods.
String has several init() methods that can be used to create strings from
integer value types, as well as a variety of init() methods that use format strings (wherein the format string arguments can either be provided as a comma-separated list or in an array). String also has a toInt() method that will attempt to convert a String value to an Int value. Because this attempt may fail, an optional Int? is returned. Remember to unwrap the optional before use. Swift does not currently offer a toDouble() method; however, an example of how to convert a String value to a Double value (by casting to an
NSString and using NSString API) is provided in Table 3-1.
Swift strings can be concatenated using the + and += operators. A Character value can be appended to a String value using the append() method.
Note A character literal assigned to a variable or constant will be implicitly inferred to be of type String. Explicitly cast a character as type
Character as necessary.
Remember that NSString instances in Objective-C are passed by reference unless explicitly copied, whereas String values in Swift are always passed by copy.
CHAPTER 3: Working with Strings and Collections 31
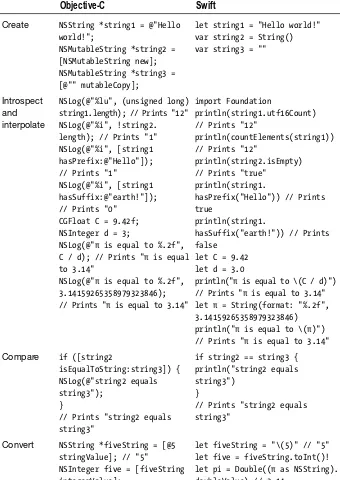
Table 3-1. Comparing Objective-C NSString and NSMutableString methods and techniques to Swift String equivalents
Objective-C Swift
Create NSString *string1 = @"Hello world!";
NSMutableString *string2 = [NSMutableString new]; NSMutableString *string3 = [@"" mutableCopy];
let string1 = "Hello world!" var string2 = String() var string3 = ""
Introspect and interpolate
NSLog(@"%lu", (unsigned long) string1.length); // Prints "12" NSLog(@"%i", !string2. length); // Prints "1" NSLog(@"%i", [string1 hasPrefix:@"Hello"]); // Prints "1"
NSLog(@"%i", [string1 hasSuffix:@"earth!"]); // Prints "0"
CGFloat C = 9.42f; NSInteger d = 3;
NSLog(@"π is equal to %.2f", C / d); // Prints "π is equal to 3.14"
NSLog(@"π is equal to %.2f", 3.14159265358979323846); // Prints "π is equal to 3.14"
import Foundation
println(string1.utf16Count) // Prints "12"
println(countElements(string1)) // Prints "12"
println(string2.isEmpty) // Prints "true"
println(string1.
hasPrefix("Hello")) // Prints true
println(string1.
hasSuffix("earth!")) // Prints false
let C = 9.42 let d = 3.0
println("π is equal to \(C / d)") // Prints "π is equal to 3.14" let π = String(format: "%.2f", 3.14159265358979323846)
println("π is equal to \(π)") // Prints "π is equal to 3.14"
Compare if ([string2
isEqualToString:string3]) { NSLog(@"string2 equals string3");
}
// Prints "string2 equals string3"
if string2 == string3 { println("string2 equals string3")
}
// Prints "string2 equals string3"
Convert NSString *fiveString = [@5 stringValue]; // "5"
NSInteger five = [fiveString integerValue];
CHAPTER 3: Working with Strings and Collections 32
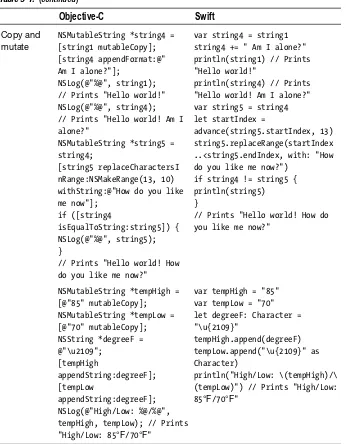
Objective-C Swift
Copy and mutate
NSMutableString *string4 = [string1 mutableCopy]; [string4 appendFormat:@" Am I alone?"];
NSLog(@"%@", string1); // Prints "Hello world!" NSLog(@"%@", string4); // Prints "Hello world! Am I alone?"
NSMutableString *string5 = string4;
[string5 replaceCharactersI nRange:NSMakeRange(13, 10) withString:@"How do you like me now"];
if ([string4
isEqualToString:string5]) { NSLog(@"%@", string5); }
// Prints "Hello world! How do you like me now?"
var string4 = string1 string4 += " Am I alone?" println(string1) // Prints "Hello world!"
println(string4) // Prints "Hello world! Am I alone?" var string5 = string4 let startIndex =
advance(string5.startIndex, 13) string5.replaceRange(startIndex ..<string5.endIndex, with: "How do you like me now?")
if string4 != string5 { println(string5) }
// Prints "Hello world! How do you like me now?"
NSMutableString *tempHigh = [@"85" mutableCopy];
NSMutableString *tempLow = [@"70" mutableCopy]; NSString *degreeF = @"\u2109"; [tempHigh appendString:degreeF]; [tempLow appendString:degreeF]; NSLog(@"High/Low: %@/%@", tempHigh, tempLow); // Prints
"High/Low: 85°F/70°F"
var tempHigh = "85" var tempLow = "70" let degreeF: Character = "\u{2109}"
tempHigh.append(degreeF) tempLow.append("\u{2109}" as Character)
println("High/Low: \(tempHigh)/\ (tempLow)") // Prints "High/Low: 85°F/70°F"
CHAPTER 3: Working with Strings and Collections 33
Creating Tuples and Collections
Swift defines two formal collection types: Array and Dictionary. Although collections of type NSSet, NSMutableSet and NSCountedSet can be created and worked with in Swift using Foundation API, there are no direct counterparts to these classes in the Swift standard library. Although not a formal collection type, Swift does add a new type for which there is no counterpart in Objective-C that can be used for grouping multiple values into a single compound value, called a tuple.
Creating Tuples
Tuples, although new to Objective-C developers transitioning to Swift, are by no means a new programming construct. Tuples can be found in several other languages, including Python, Haskell, and C#. Tuples in Swift are intended for temporarily grouping related values, and Apple advises to not use tuples to create complex data structures. Common uses include returning multiple values from a function (see Chapter 6 for details) and to test multiple values in a switch case statement (covered in Chapter 5). For data structures that are more complex or will persist beyond a temporary scope, use a class or structure instead (covered in Chapter 7).
Tuple values are ordered and can be composed of the same or differing types. To create a tuple, enclose a comma-separated list of values in parentheses:
var httpStatus = (200, "OK")
The previous example relies on type inference and the tuple created is of type (Int, String). You can also explicitly state the type of a tuple, as in the following example, which adheres to good form by making the variable an optional, because we do not assign a value:
var httpStatus: (Int, String)?
Because tuples are ordered lists, you can access tuple elements at their numerical order index (beginning with 0) using dot syntax:
var httpStatus = (200, "OK") let code = httpStatus.0 let message = httpStatus.1
CHAPTER 3: Working with Strings and Collections 34
More succinctly, tuples can also be decomposed into separate stored values using another tuple:
let (code, message) = httpStatus
println("The code is \(code) and the description is \(message).")
You can also optionally assign a name to one or more tuple elements during creation, and subsequently access named elements by either name or index.
let httpStatus = (200, message: "OK")
println("The code is \(httpStatus.0) and the message is \(httpStatus.message).")
If you do not need to access a tuple element during decomposition, you can ignore it by using an underscore character. You’ll see similar usage elsewhere in Swift, generally encouraged to aid performance and code clarity:
let (code, _) = httpStatus println("The code is \(code).")
Tuples can also be nested:
let (score, (firstName, _)) = (100, ("Scott", "Gardner")) println("\(firstName) received a score of \(score).")
Table 3-2 demonstrates how tuples in Swift can reduce code and increase clarity, compared with how you might perform the same task in Objective-C.
Table 3-2. Comparing Objective-C and Swift tuple approach to performing a common task
Objective-C NSUInteger code = 200; NSString *message = @"OK";
NSLog(@"The code is %lu and the message is %@.", (unsigned long)code, message);
Swift let (code, message) = (200, "OK")
println("The code is \(code) and the message is \(message).")
Creating Arrays
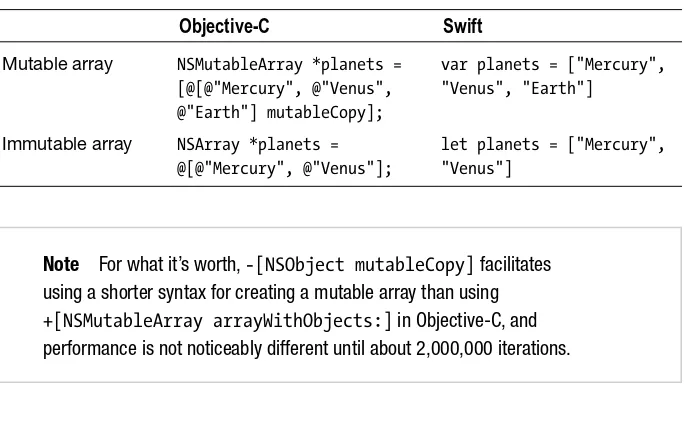
CHAPTER 3: Working with Strings and Collections 35
As with any variable or constant, a Swift array’s type can be inferred based on its contents if set during declaration, or it can be explicitly stated. Swift’s literal syntax for creating an array is the same as Objective-C’s literal syntax but without the @ prefix.
Table 3-3 compares creating arrays in Objective-C and Swift. Notice the lack of using the const keyword in Objective-C, as doing so does not make the array any more immutable.
Table 3-3. Creating arrays in Objective-C and Swift
Objective-C Swift
Mutable array NSMutableArray *planets = [@[@"Mercury", @"Venus", @"Earth"] mutableCopy];
var planets = ["Mercury", "Venus", "Earth"]
Immutable array NSArray *planets = @[@"Mercury", @"Venus"];
let planets = ["Mercury", "Venus"]
Note For what it’s worth, -[NSObject mutableCopy] facilitates using a shorter syntax for creating a mutable array than using
+[NSMutableArray arrayWithObjects:] in Objective-C, and
performance is not noticeably different until about 2,000,000 iterations.
In the previous table, the Swift array type is inferred based on the type of the values stored in the array. A Swift array’s type can also be explicity stated during declaration. The syntax for doing so is to enter the type enclosed in square brackets, or specify the type is of Array<SomeType>, although the former is preferred. Specifying an array is optional (using ? postfix) indicates that the array can be nil, in addition to being empty or containing values:
var intArray1: [Int] = [1, 2, 3] var intArray2: Array<String>? var intArray3: [Int]?
CHAPTER 3: Working with Strings and Collections 36
Table 3-4. Creating mutable empty arrays in Objective-C and Swift
Objective-C Swift
NSMutableArray *arrayOfAnyObjects = [NSMutableArray array];
var stringArray = Array<String>() var intArray = [Int]()
var myClassArray = [MyClass]()
Note There are of course additional ways to instantiate an empty array in Objective-C, such as [[NSMutableArray alloc] init],
[NSMutableArray new], and [[NSMutableArray alloc] initWit
hCapacity:<#(NSUInteger)#>]. Because our focus is on transitioning
to and learning Swift, Objective-C examples will typically be a single common use-case versus being exhaustive.
It is possible to store different types in a Swift array; however, doing so may produce unexpected results with type inference. For example, an array of Ints and Strings has its type inferred to be NSArray, but add an NSObject instance to it and its type is then inferred to be [NSObject], and yet add an instance of a custom Swift reference type such as the MyClass type we created earlier, and the array’s type is once again inferred to be NSArray. What should be mentioned, however, is that if you need an array that can hold multiple types, you can do so by explicitly declaring a variable array of type [AnyClass] or [Any], the former being an array capable of holding any reference type, the latter capable of holding any type whatsoever; AnyClass is a typealias for AnyObject:
var anyArray = [Any]()
var anyClassArray = [AnyClass]()
Swift arrays also have an initializer to create an array of a specified count with each element having the specified repeatedValue:
var studentScores = [(String, Int)](count: 3, repeatedValue: ("Name", 100)) println(studentScores) // Prints "[(Name, 100), (Name, 100), (Name, 100)]"
Creating Dictionaries
CHAPTER 3: Working with Strings and Collections 37
Objective-C dictionaries can only store objects, and can use any object for the key as long as it conforms to the NSCopying protocol. Swift dictionaries can store any type and use any type for the key as long as it conforms to the
Hashable protocol (protocols are covered in Chapter 8). All of Swift’s basic
value types can be used as dictionary keys, including Character, String,
Int, Double, Float, and Bool. Also, members of a new type of enumeration
in Swift (in which its members are not specifically assigned a value) can be used as dictionary keys (enumerations are covered in Chapter 7).
The literal syntax for creating a Swift dictionary uses square brackets just like arrays, and has the same key: value syntax as found in Objective-C’s literal syntax, sans the @. Table 3-5 compares creating dictionaries in Objective-C and Swift.
Table 3-5. Creating dictionaries in Objective-C and Swift
Objective-C Swift
Mutable dictionary
NSMutableDictionary *planets = [@{@1: @"Mercury", @2: @"Venus", @3: @"Earth"} mutableCopy];
var planets = [1: "Mercury", 2: "Venus", 3: "Earth"]
Immutable dictionary
NSDictionary *planets =
[@{@1: @"Mercury", @2: @"Venus", @3: @"Earth"} mutableCopy];
let planets = [1: "Mercury", 2: "Venus", 3: "Earth"]
A Swift dictionary’s type can be inferred by the type of keys and values assigned to the dictionary during declaration, as in the preceding table, or they can be explicitly stated during declaration using either literal [KeyType:
ValueType] or full Dictionary<KeyType, ValueType> syntax, with the literal
syntax being preferable:
var stringDictionary1: [Int: String] = [1: "One", 2: "Two"] var stringDictionary2: Dictionary<Int, String>?
var stringDictionary3: [Int: String]?
CHAPTER 3: Working with Strings and Collections 38
Table 3-6. Creating mutable empty dictionaries in Objective-C and Swift
Objective-C Swift
NSMutableDictionary *dictionaryOfAnyObjects = [NSMutableDictionary dictionary];
var stringDictionary1 = [Int: String]() var stringDictionary2 = Dictionary<Int, String>()
var stringDictionary3 = [1: ""] stringDictionary3 = [:]
It is possible to create a dictionary in Swift that is assigned multiple types of keys and values during declaration; however, doing so not only changes the dictionary’s type to NSDictionary, but it also makes the dictionary immutable. Although the Swift standard library does not enable you to declare a
Dictionary type that uses different (hashable) key types and multiple value
types (that is, [Hashable: Any] won’t work), it does enable you to create a dictionary of a specified key type that can store multiple value types:
var dictionaryOfAnyTypes = [Int: Any]()
var dictionaryOfAnyClassTypes = [String: AnyClass]()
Mutability
Swift’s approach to mutability of tuples and collections is logical and consistent, yet somewhat different from Objective-C. The next section will cover modifying tuples and collections. It is important first to gain a solid understanding of how mutability is applied to Swift tuples, arrays, and dictionaries.
As with all stored values in Swift, the mutability of a Swift tuple, array, or dictionary is determined during declaration, not by choice of class as it is in Objective-C (NSArray/NSMutableArray, NSDictionary/NSMutableDictionary).
Swift tuples and collections declared as variables can be reassigned to new tuples or collections, respectively, of the same type. Arrays and dictionaries– but not tuples–declared as variables can have items added to and removed from them. Arrays and dictionaries declared as constants cannot be reassigned, nor can they have items added or removed.
CHAPTER 3: Working with Strings and Collections 39
Table 3-7. Summary of tuple, array, and dictionary mutability in Objective-C and Swift
Tuple Array Dictionary
Objective-C
Mutable N/A Values can be added
or removed
Values can be modified
Same as for Array
Immutable N/A Values cannot be added
or removed
Values can be modified
Same as for Array
Swift
Variable Value types are
modifiable
Variable properties of reference types are modifiable
Same as for Tuple, plus values can be added or removed
Same as for Tuple, plus values can be added or removed
Constant Value types are
not modifiable Variable properties of reference types are modifiable
Same as for Tuple Same as for Tuple
Multidimensional Tuples and Collections
Swift tuples and collections can contain nested tuples and collections, just like arrays and dictionaries in Objective-C:
var tupleWithArrayWithTuplesAndDictionaryWithArrays = (([(1, 2, 3), (4, 5, 6)]),[1: ["a", "b", "c"], 2: ["d", "e", "f", "g"]])
println(tupleWithArrayWithTuplesAndDictionaryWithArrays.0) // Prints "[(1, 2, 3), (4, 5, 6)]"
println(tupleWithArrayWithTuplesAndDictionaryWithArrays.1) // Prints "[1: [a, b, c], 2: [d, e, f, g]]"
println(tupleWithArrayWithTuplesAndDictionaryWithArrays.1[2]![3]) // Prints "g"
Working with Tuples and Collections
CHAPTER 3: Working with Strings and Collections 40
Working with Tuples
A tuple cannot be sorted, nor can it have items added to or removed from it. A variable tuple can be modified, and its value type elements can also be modified. Use the same dot syntax to change the value of a tuple element as you would to access it, but each value can only be changed to a new value of the same type. Value types passed into a variable tuple can be modified, whereas value types passed into a constant tuple cannot. This is regardless of whether the value type being passed in is itself declared as a variable or constant, because—remember—value types are always passed by copy:
var spade = ("Spade", symbol: "♣")
let club = ("Club", symbol: "♠")
spade.symbol = "♠"
var suits = (spade: spade, club: club)
suits.club.symbol = "♣"
println(suits.club) // Prints "(Club, ♣ )"
println(club) // Prints "(Club, ♠ )"
Reference types are passed by reference, and therefore, their mutability— that is, the mutability of their properties—within a tuple is the same as outside the tuple (Chapter 7 will cover reference types in depth, including the syntax used to create the class in the following example):
class MyClass {
var myVariableProperty = "Can be changed" }
let myClass1 = MyClass() let myClass2 = MyClass()
var classTuple = (myClass1, myClass2) classTuple.0.myVariableProperty = "Changed"
A tuple can also be declared to store value types of Any (value or reference types) or AnyClass (reference types only), and subsequently have those members assigned and reassigned:
var suits: (Any, Any, Any, Any)
suits = ("Spade", "Club", "Heart", "Diamond") suits.0 = ["Spade": "♠"]
CHAPTER 3: Working with Strings and Collections 41
Working with Arrays
Table 3-8 compares several ways to work with arrays in Objective-C and Swift, following highlights of the similarities and differences between the two.
Swift uses the same subscript syntax as Objective-C to access array items.
NSArray instances have count, firstObject, and lastObject properties, and,
similarly, Array values have count, first, and last computed properties. Ranges of items can be retrieved from Objective-C arrays using –[NSArray
subarrayWithRange:], whereas Swift enables using range operators with
subscript syntax to retrieve or replace a subarray of values from another array. When replacing a range of values, the replacement array does not need to be the same length as the range it is replacing. There are two kinds of range operators: the closed range operator (..., as in a...e) includes the range of values from the start value to and including the end value (a to and including e), and the half-open range operator (..<, as in a..<e) includes the range of values from the start value up to but not including the end value (a up to but not e). Range operators will be mentioned again in the next chapter on operators and receive additional coverage in Chapter 5 for their use in program control flow statements.
To check if an array is empty in Objective-C, the count property can be checked to see if it is greater than 0; however, Swift includes the isEmpty computed property for this purpose.
Finding items in an NSArray is made possible by a variety of indexOf... methods such as -[NSArrayindexOfObject:], coupled with using subscript syntax or –[NSArray objectAtIndex:] to access the found item. Swift simplifies this task with the find() method, which searches the array passed in for the value passed in, and returns an optional wrapping the value if found, or nil if not. Pairing up with Objective-C’s –[NSArray
filteredArrayUsingPredicate:], which takes an NSPredicate instance,
CHAPTER 3: Working with Strings and Collections 42
developers, it should quickly become the de facto standard. See Chapter 6 for elaborate coverage of closures and the variety of syntax options. One tip that may help make sense of the syntax in these examples before consulting Chapter 6 is that numbers prefixed with $ refer to a closure’s arguments (e.g., $0 is the first argument).
Arrays can be sorted in Objective-C using a comparator block, selector, function, or descriptor. Swift array can be sorted using sorted() and sort() (the former returns a new array and the latter mutates the array it is called on), and also map() and reduce() methods, all of which take advantage of closures to reorder, transform, and combine an array’s items, respectively.
Adding to and replacing items in an NSMutableArray instance in Objective-C can be done via methods that include –[NSMutableArray addObject:],
-[NSMutableArray insertObjectAtIndex:], -[NSMutableArray replaceObje
ctsAtIndexes:withObjects:], and variations. Similar methods are available
for Array in Swift, and additionally, Swift enables use of the + and +=
operators to concatenate two arrays.
Note A value itself cannot be added to a Swift array using the + and +=
operators. Use the append() method instead, or optionally enclose the value(s) in an array to use as the right operand of a + or += operator.
Removing items from an NSMutableArray instance in Objective-C is accomplished using a variety of remove... methods such as
–[NSMutableArrayremoveObjectAtIndex:]. Swift matches these methods
with removeAtIndex() and others.
CHAPTER 3: Working with Strings and Collections 43
Table 3-8. Comparing Objective-C NSArray and NSMutableArray methods and techniques to Swift Array equivalents
Objective-C Swift
NSMutableArray *array = [@[@1, @2, @3, @4, @5] mutableCopy];
var array = [1, 2, 3, 4, 5]
Inspect NSLog(@"array is empty? %@", array.count ? @"NO" : @"YES"); // Prints "NO"
NSLog(@"%lu", (unsigned long) array.count); // Prints "5"
println(array.isEmpty) // Prints "false" println(array.count) // Prints "5"
Access NSNumber *itemAtIndex3 = array[3]; // 4
NSArray *rangeOf0to3 = [array subarrayWithRange:NSMakeRange (0, 3)]; // (1, 2, 3)
NSArray *rangeOf0through3 = [array subarrayWithRange: NSMakeRange(0, 4)]; // (1, 2, 3, 4)
let itemAtIndex3 = array[3] // 4 let rangeOf0to3 = array[0..<3] // [1, 2, 3] let rangeOf0through3 = array[0...3] // [1, 2, 3, 4]
Find NSInteger index = [array
indexOfObject:@5]; NSNumber *foundItem = array[index]; // 5
let foundItem = find(array, 5)! // 4
Filter NSPredicate *predicate = [NSPredicate predicateWithFormat:@"self > 3"]; NSArray *greaterThan3 = [array filt eredArrayUsingPredicate:predicate]; // (4, 5)
let greaterThan5 = array.filter { $0 > 3 } // [4, 5]
Sort NSSortDescriptor *descriptor
= [NSSortDescriptor
sortDescriptorWithKey:@"self" ascending:NO];
NSArray * reverseSortedArray = [[array sortedArrayUsingDescriptors: @[descriptor]] mutableCopy]; // (5, 4, 3, 2, 1)
let reverseSortedArray = sorted(array, >) // [5, 4, 3, 2, 1]
array.sort { $0 > $1 } // [5, 4, 3, 2, 1]
Append [array addObject:@7]; // (1, 2, 3, 4, 5, 7)
array = [1, 2, 3, 4, 5] array += [7] // [1, 2, 3, 4, 5, 7]
CHAPTER 3: Working with Strings and Collections 44
Objective-C Swift
Insert [array insertObject:@0 atIndex:0]; // (0, 1, 2, 3, 4, 5, 7)
array.insert(0, atIndex: 0) // [0, 1, 2, 3, 4, 5, 7]
Replace array[6] = @6; // (0, 1, 2, 3, 4, 5, 6)
array[6] = 6 // [0, 1, 2, 3, 4, 5, 6]
Remove [array removeLastObject]; // (0, 1, 2, 3, 4, 5)
array.removeLast() // [0, 1, 2, 3, 4, 5]
Map NSMutableArray *dollarsArray =
[NSMutableArray array];
[array enumerateObjectsUsingBlock: ^(id obj, NSUInteger idx, BOOL *stop) {
[dollarsArray addObject:[NSString stringWithFormat:@"%@%@", @"$", obj]];
}];
NSLog(@"%@", dollarsArray); // Prints "("$0", "$1", "$2", "$3", "$4", "$5")"
let dollarsArray = array.map { "$\($0)" } // ["$0", "$1", "$2", "$3", "$4", "$5"]
Reduce int totalOfArray;
for (NSNumber *i in array) { totalOfArray += [i intValue]; }
NSLog(@"%i", totalOfArray); // Prints "15"
let totalOfArray = array.reduce(0, +) // 15 Table 3-8. (continued )
Working with Dictionaries
Objective-C and Swift dictionaries work in similar ways, yet have some differences that will be noted first, followed by comparative examples in Table 3-9.
Swift dictionaries have isEmpty and count computed properties just like arrays, the latter of which is also available in Objective-C as a property of
NSDictionary and NSMutableDictionary instances.
Objective-C’s –[NSDictionary allKeys] and –[NSDictionary allValues] methods that return NSArray instances (order unspecified) have
CHAPTER 3: Working with Strings and Collections 45
for details), or new arrays can be created from the collections using syntax that will be demonstrated in Table 3-9. The collections returned for both the keys and values computed properties are ordered ascending by key, as is the order of key-value pairs when a Dictionary value is printed out.
Swift uses the same subscript syntax as Objective-C to access dictionary items. Values can be retrieved and added using subscript syntax in both Objective-C and Swift. Retrieving a value from a Swift dictionary is handled differently. Because a lookup may not find a value for the key provided, the returned value is an optional of the value if found, or nil if not. Similar
to –[NSMutableDictionary setObject:forKey:] in Objective-C (and
–[NSMutableDictionary setValue:forKey:], except that it requires an
NSString instance for the key), Swift dictionary values can also be changed
using the updateValue(forKey:) method. Unlike in Objective-C, however,
updateValue(forKey:) returns an optional of the old value, and if a value
was not found for the key provided, a new value for that key is added and nil is returned.
Although Objective-C does not allow it, a key-value pair can be removed from a Swift Dictionary type by using subscript syntax to set the value to nil for the key. Both languages offer methods to remove items by key or remove all items; however, Swift does not currently offer a counterpart to Objective-C’s –[NSMutableDictionary removeObjectsForKeys:].
Table 3-9. Comparing Objective-C NSDictionary and NSMutableDictionary methods and techniques to Swift Dictionary equivalents
Objective-C Swift
NSMutableDictionary *dictionary = [@{@1: @"One", @2: @"Two", @3: @"Three"} mutableCopy];
var dictionary = [1: "One", 2: "Two", 3: "Three"]
Inspect NSLog(@"%@", dictionary.count ? @"NO" : @"YES"); // Prints "NO" NSLog(@"%lu", (unsigned long) dictionary.count); // Prints "3"
println(dictionary.isEmpty) // Prints "false"
println(dictionary.count) // Prints "3"
Access NSLog(@"%@", dictionary[@1]); // Prints "One"
NSArray *dictionaryKeys = [dictionary allKeys]; // (3, 1, 2)
NSArray *dictionaryValues = [dictionary allValues]; // (Three, One, Two)
println(dictionary[1]) // Prints "One"
let dictionaryKeys = [Int] (dictionary.keys) // [1, 2, 3] let dictionaryValues = [String] (dictionary.values)
CHAPTER 3: Working with Strings and Collections 46
Syntax Reference
Figures 3-1 to 3-5 provide syntax summaries for creating characters, strings, tuples, arrays, and dictionaries in Swift. The same optional declarations (? and !) can be used as demonstrated in the variable and constant syntax summary in Figure 2-3 (see Chapter 2), and are thus omitted here. Italicized text indicates optional components, which are omitted in successive examples of identical usage for each type.
Objective-C Swift
Insert dictionary[@4] = @"Five"; NSLog(@"%@", dictionary); // Prints "(3 = Three, 2 = Two, 1 = One, 4 = Five)"
dictionary[4] = "Five"
println(dictionary) // Prints "[1: One, 2: Two, 3: Three, 4: Five]"
Update dictionary[@4] = @"Four"; // (3 = Three, 2 = Two, 1 = One, 4 = Four)
dictionary[4] = "Six" // [1: "One", 2: "Two", 3: "Three", 4: "Six"]
if let oldValue = dictionary. updateValue("Four", forKey: 4) { println("The value for key 4 was changed from \(oldValue) to \(dictionary[4]!)")
}
// Prints "The value for key 4 was changed from Six to Four"
Remove [dictionary