Consultant
Windows
Server 2012 R2
Storage, Security,
& Networking
PUBLISHED BY Microsoft Press
A Division of Microsoft Corporation One Microsoft Way
Redmond, Washington 98052-6399
Copyright © 2014 by William R. Stanek
All rights reserved. No part of the contents of this book may be reproduced or transmitted in any form or by any means without the written permission of the publisher.
Library of Congress Control Number: 2013956655 ISBN: 978-0-7356-8259-7
Printed and bound in the United States of America.
First Printing
Microsoft Press books are available through booksellers and distributors world - wide. If you need support related to this book, email Microsoft Press Book Support at [email protected]. Please tell us what you think of this book at http://www.microsoft.com/learning/booksurvey.
Microsoft and the trademarks listed at http://www.microsoft.com/en-us/legal/ intellectualproperty/trademarks/en-us.aspx are trademarks of the Microsoft group of companies. All other marks are property of their respective owners.
The example companies, organizations, products, domain names, email addresses, logos, people, places, and events depicted herein are fictitious. No association with any real company, organization, product, domain name, email address, logo, person, place, or event is intended or should be inferred.
This book expresses the author’s views and opinions. The information contained in this book is provided without any express, statutory, or implied warranties. Neither the authors, Microsoft Corporation, nor its resellers, or distributors will be held liable for any damages caused or alleged to be caused either directly or indirectly by this book.
Acquisitions Editor: Anne Hamilton Developmental Editor: Karen Szall
Editorial Production: Online Training Solutions, Inc. (OTSI) Project Editor: Karen Szall
Technical Reviewer: Charlie Russell; Technical Review services provided by Content Master, a member of CM Group, Ltd.
What do you think of this book? We want to hear from you!
Microsoft is interested in hearing your feedback so we can continually improve our books and learning resources for you. To participate in a brief online survey, please visit:
microsoft.com/learning/booksurvey
Contents
Introduction xv
Chapter 1 Managing file systems and drives 1
Managing the File And Storage Services role . . . .1
Adding hard drives . . . .5
Physical drives 5
Preparing a physical drive for use 8
Using Disk Management 11
Using removable storage devices 14
Installing and checking for a new drive 16
Understanding drive status 16
Working with basic, dynamic, and virtual disks . . . .18
Using basic and dynamic disks 18
Special considerations for basic and dynamic disks 19
Changing drive types 20
Reactivating dynamic disks 22
Rescanning disks 22
Moving a dynamic disk to a new system 22
Managing virtual hard disks 23
Using basic disks and partitions. . . 24
Partitioning basics 24
Creating partitions and simple volumes 25
Formatting partitions 28
Compressing drives and data . . . .30
Compressing drives 30
Compressing directories and files 30
Expanding compressed drives 31
Encrypting drives and data . . . .31 Understanding encryption and the encrypting file
system 32
Encrypting directories and files 33
Working with encrypted files and folders 34
Configuring recovery policies 35
Decrypting files and directories 36
Chapter 2 Configuring storage 37
Using volumes and volume sets . . . .38
Understanding volume basics 38
Understanding volume sets 39
Creating volumes and volume sets 42
Deleting volumes and volume sets 44
Managing volumes 44
Improving performance and fault tolerance with RAID . . . .44
Implementing RAID on Windows Server 2012 R2 . . . .45
Implementing RAID-0: disk striping 45
Implementing RAID-1: disk mirroring 46
Implementing RAID-5: disk striping with parity 49
Managing RAID and recovering from failures . . . .50
Breaking a mirrored set 50
Resynchronizing and repairing a mirrored set 50
Repairing a mirrored system volume to enable boot 51
Removing a mirrored set 52
Repairing a striped set without parity 52
Regenerating a striped set with parity 52
Standards-based storage management . . . .53
Getting started with standards-based storage 53
Working with standards-based storage 54
Using storage pools and allocating space 57
Creating a storage pool 58
Creating a virtual disk in a storage space 62
Creating a standard volume 64
Deleting partitions and drives 69
Converting a volume to NTFS 70
Resizing partitions and volumes 72
Repairing disk errors and inconsistencies automatically 73
Analyzing and optimizing disks 78
CHAPTER 3 Data sharing and redundancy 81
Using and enabling file sharing . . . .82 Configuring standard file sharing . . . .85
Understanding SMB changes 85
Viewing existing shares 86
Creating shared folders in Computer Management 88
Creating shared folders in Server Manager 91
Changing shared folder settings 94
Managing share permissions . . . .95
Understanding the various share permissions 95 Viewing and configuring share permissions 95
Managing existing shares . . . .100
Understanding special shares 100
Connecting to special shares 101
Viewing user and computer sessions 102
Stopping file and folder sharing 106
Configuring NFS sharing . . . .107
Using shadow copies . . . .109
Understanding shadow copies 109
Creating shadow copies 110
Restoring a shadow copy 110
Reverting an entire volume to a previous shadow copy 111
Deleting shadow copies 111
Disabling shadow copies 111
Connecting to network drives . . . .112
Mapping a network drive 112
Disconnecting a network drive 113
Configuring synced sharing . . . .114 Getting started with Work Folders 114
Creating sync shares and enabling SMB access 116
CHAPTER 4 Data security and auditing 121
Object management, ownership, and inheritance . . . .121
Objects and object managers 121
Object ownership and transfer 122
Object inheritance 123
File and folder permissions . . . .124 Understanding file and folder permissions 125 Setting basic file and folder permissions 127 Setting special permissions on files and folders 129 Setting claims-based permissions 132
Auditing system resources . . . .134
Setting auditing policies 135
Auditing files and folders 136
Auditing the registry 138
Auditing Active Directory objects 139
Using, configuring, and managing NTFS disk quotas . . . .140 Understanding NTFS disk quotas and how
NTFS quotas are used 141
Setting NTFS disk quota policies 142
Enabling NTFS disk quotas on NTFS volumes 145
Viewing disk quota entries 147
Creating disk quota entries 147
Deleting disk quota entries 148
Exporting and importing NTFS disk quota settings 149
Disabling NTFS disk quotas 150
Using, configuring, and managing Resource Manager
disk quotas . . . .150 Understanding Resource Manager disk quotas 151
Managing disk quota templates 152
Creating Resource Manager disk quotas 155
CHAPTER 5 Enhancing computer security 157
Using security templates . . . .157
Using the Security Templates and Security
Using the Security Configuration Wizard . . . .172
Creating security policies 172
Editing security policies 177
Applying security policies 177
Rolling back the last applied security policy 178
Deploying a security policy to multiple computers 178
CHAPTER 6 Managing users and computers
with Group Policy 181
Centrally managing special folders . . . .181
Redirecting a special folder to a single location 182
Redirecting a special folder based on group
membership 184
Removing redirection 186
User and computer script management . . . .187
Assigning computer startup and shutdown scripts 187
Assigning user logon and logoff scripts 189
Deploying software through Group Policy . . . .190
Getting to know Software Installation policy 190
Deploying software throughout your organization 191 Configuring software deployment options 192
Updating deployed software 194
Upgrading deployed software 194
Automatically configuring Work Folders . . . .195 Automatically enrolling computer and user certificates . . . .196
Managing Automatic Updates in Group Policy . . . .197
Configuring Automatic Updates 198
Optimizing Automatic Updates 199
Using intranet update service locations 200
CHAPTER 7 Managing TCP/IP networking 201
Navigating networking in Windows Server 2012 R2 . . . .201
Managing networking in Windows 8.1 and
Windows Server 2012 R2 . . . .205
Installing TCP/IP networking . . . .208
Configuring TCP/IP networking . . . .209
Configuring dynamic IP addresses and alternate
IP addressing 211
Configuring multiple gateways 212
Configuring networking for Hyper-V 213
Managing network connections . . . .214
Checking the status, speed, and activity for
network connections 215
Enabling and disabling network connections 215
Renaming network connections 215
CHAPTER 8 Running DHCP clients and servers 217
Understanding DHCP . . . .217 Using dynamic IPv4 addressing and configuration 217 Using dynamic IPv6 addressing and configuration 219 Checking IP address assignment 221
Understanding scopes 222
Installing a DHCP server . . . .223
Installing DHCP components 223
Starting and using the DHCP console 225
Connecting to remote DHCP servers 227
Starting and stopping a DHCP server 227
Authorizing a DHCP server in Active Directory 228
Configuring DHCP servers . . . .228
Configuring server bindings 228
Updating DHCP statistics 229
Auditing and troubleshooting DHCP 229
Integrating DHCP and DNS 230
Integrating DHCP and NAP 232
Avoiding IP address conflicts 236
Saving and restoring the DHCP configuration 236
Managing DHCP scopes . . . .238
Creating and managing superscopes 238
Creating and managing scopes 239
Creating and managing failover scopes 249
Reserving DHCP addresses 255
Modifying reservation properties 257
Deleting leases and reservations 257
Backing up and restoring the DHCP database . . . .257
Backing up the DHCP database 257
Restoring the DHCP database from backup 258
Using backup and restore to move the DHCP
database to a new server 258
Forcing the DHCP Server service to regenerate
the DHCP database 259
Reconciling leases and reservations 259
Chapter 9 Optimizing DNS 261
Understanding DNS . . . .261
Integrating Active Directory and DNS 262
Enabling DNS on the network 263
Configuring name resolution on DNS clients . . . .266
Installing DNS servers . . . .267 Installing and configuring the DNS Server service 268
Configuring a primary DNS server 270
Configuring a secondary DNS server 273
Configuring reverse lookups 274
Configuring global names 275
Managing DNS servers . . . .276
Adding and removing servers to manage 277
Starting and stopping a DNS server 278
Using DNSSEC and Signing Zones 278
Creating child domains within zones 280
Creating child domains in separate zones 281
Deleting a domain or subnet 282
Managing DNS records . . . .282
Adding address and pointer records 283
Adding DNS aliases with CNAME 284
Adding mail exchange servers 284
Adding name servers 285
Viewing and updating DNS records 286
Updating zone properties and the SOA record . . . .287
Allowing and restricting zone transfers 289
Notifying secondaries of changes 290
Setting the zone type 291
Enabling and disabling dynamic updates 291
Managing DNS server configuration and security . . . .292 Enabling and disabling IP addresses for a DNS server 292
Controlling access to DNS servers outside the
organization 292
Enabling and disabling event logging 294
Using debug logging to track DNS activity 294
Monitoring a DNS server 295
Chapter 10 Administering network printers and print services 297
Managing the Print and Document Services role . . . .297
Using print devices 298
Printing essentials 298
Configuring print servers 300
Enabling and disabling file and printer sharing 302
Getting started with Print Management . . . .302
Installing printers . . . .304
Using the autoinstall feature of Print Management 305 Installing and configuring physically attached
print devices 307
Installing network-attached print devices 311
Connecting to printers created on the network 314
Deploying printer connections 315 Configuring point and print restrictions 317 Moving printers to a new print server 319 Monitoring printers and printer queues automatically 320
Solving spooling problems 322
Configuring printer properties. . . .322 Adding comments and location information 322
Listing printers in Active Directory 323
Managing printer drivers 323
Scheduling and prioritizing print jobs 325
Starting and stopping printer sharing 327
Setting printer access permissions 327
Auditing print jobs 329
Setting document defaults 329
Configuring print server properties . . . .329 Locating the Spool folder and enabling printing
on NTFS 329
Managing high-volume printing 330 Enabling print job error notification 330
Managing print jobs on local and remote printers . . . .331 Viewing printer queues and print jobs 331 Pausing the printer and resuming printing 332
Emptying the print queue 332
Pausing, resuming, and restarting individual
document printing 332
Removing a document and canceling a print job 332
Checking the properties of documents in the printer 333
Setting the priority of individual documents 333
Scheduling the printing of individual documents 333
Chapter 11 Data backup and recovery 335
Creating a backup and recovery plan . . . .335
Figuring out a backup plan 335
Basic types of backup 337
Differential and incremental backups 338
Selecting backup devices and media 339
Common backup solutions 339
Buying and using backup media 340
Selecting a backup utility 341
Backing up your data: the essentials . . . .342
Installing the Windows backup and recovery utilities 343
Getting started with Windows Server Backup 343
Getting started with the Backup Command-Line utility 346
Working with Wbadmin commands 348
Using general-purpose commands 348
Using backup management commands 349
Performing server backups . . . .350
Configuring scheduled backups 352
Modifying or stopping scheduled backups 355
Creating and scheduling backups with Wbadmin 356
Running manual backups 357
Recovering your server from hardware or
startup failure 358
Recovering from a failed start 361
Starting a server in safe mode 361
Backing up and restoring the system state 363
Restoring Active Directory 364
Restoring the operating system and the full system 364
Restoring applications, nonsystem volumes, and
files and folders 367
Managing encryption recovery policy . . . .368 Understanding encryption certificates and
recovery policy 368
Configuring the EFS recovery policy 370
Backing up and restoring encrypted data and certificates . . . .371
Backing up encryption certificates 371
Restoring encryption certificates 372
Index 373
Acknowledgments
T
o my readers—thank you for being there with me through many books and many years. It has been an honor and a privilege to be your pocket consultant. To my wife—for many years, through many books, many millions of words, and many thousands of pages she’s been there, providing support and encouragement and making every place we’ve lived a home.To my kids—for helping me see the world in new ways, for having exceptional patience and boundless love, and for making every day an adventure.
To Anne, Karen, Martin, Lucinda, Juliana, and many others who’ve helped out in ways both large and small.
Special thanks to my son Will for not only installing and managing my extensive dev lab for all my books since Windows 8 Pocket Consultant but for also perform-ing check reads of all those books as well.
Introduction
W
indows Server 2012 R2 Pocket Consultant: Storage, Security, & Networkingis designed to be a concise and compulsively usable resource for Windows administrators, developers, and programmers, and for anyone else who wants to use the storage, networking, and security features of Windows Server 2012 R2. This is the readable resource guide that you’ll want on your desk or in your pocket at all times. The book discusses everything you need to perform core tasks. Because the focus is directed on providing you with the maximum value in a pocket-sized guide, you don’t have to wade through hundreds of pages of extraneous information to find what you’re looking for. Instead, you’ll find exactly what you need to get the job done. In short, the book is designed to be the one resource you consult whenever you have questions regarding storage, networking, and security in Windows Server 2012 R2. To this end, the book concentrates on configuration options, frequently used tasks, documented examples, and options that are representative but not necessarily inclusive. One of the goals is to keep the content so concise that the book remains compact and easy to navigate while ensuring that the book is packed with as much information as possible—making it a valuable resource.
Anyone transitioning to Windows Server 2012 R2 from Windows Server 2012 might be surprised at just how much has been updated, as changes both subtle and substantial have been made throughout the operating system. Like Windows Server 2012, Windows Server 2012 R2 supports a touch user interface (UI), in addition to the traditional mouse and keyboard.
Although you might not install Windows Server 2012 R2 on touch UI–capable computers, you can manage Windows Server 2012 R2 from your touch UI–capable computers. If you do end up managing it this way, understanding the touch UI in addition to the revised interface options will be crucial to your success. For this rea-son, I discuss both the touch UI and the traditional mouse and keyboard techniques throughout this book.
When you are working with touch-enabled computers, you can manipulate on-screen elements in ways that weren’t possible previously. You can do any of the following:
■ Tap Tap an item by touching it with your finger. A tap or double-tap of elements on the screen generally is the equivalent of a mouse click or double-click.
■ Press and hold Press your finger down and leave it there for a few seconds. Pressing and holding elements on the screen generally is the equivalent of a right-click.
■ Swipe from edge (slide in from edge) Starting from the edge of the screen, swipe or slide in. Sliding in from the right edge opens the Charms panel. Sliding in from the left edge shows open apps and enables you to switch between them easily. Sliding in from the top or bottom edge shows commands for the active element.
■ Pinch Touch an item with two or more fingers, and then move the fingers toward each other. Pinching zooms out.
■ Stretch Touch an item with two or more fingers, and then move the fingers away from each other. Stretching zooms in.
You are also able to enter text using the on-screen keyboard. Although the UI changes are substantial, they aren’t the most significant changes to the operating system. The most significant changes are below the surface, affecting the under -lying architecture and providing many new features. Some of these features are revolutionary in that they forever change the way we use Windows.
As you’ve probably noticed, a great deal of information about Windows Server 2012 R2 is available on the Web and in other printed books. You can find tutorials, reference sites, discussion groups, and more to make using Windows Server 2012 R2 easier. However, the advantage of reading this book is that much of the information you need to learn about Windows Server 2012 R2 is organized in one place and pre-sented in a straightforward and orderly fashion. This book has everything you need to customize Windows Server 2012 R2 installations, master Windows Server 2012 R2 configurations, and maintain Windows Server 2012 R2 servers.
In this book, I teach you how features work, why they work the way they do, and how to customize them to meet your needs. I also offer specific examples of how certain features can meet your needs, and how you can use other features to troubleshoot and resolve issues you might have. In addition, this book provides tips, best practices, and examples of how to optimize Windows Server 2012 R2. This book won’t just teach you how to configure Windows Server 2012 R2, it will teach you how to squeeze every last bit of power out of it and make the most from the features and options it includes.
Unlike many other books about managing Windows Server 2012 R2, this book doesn’t focus on a specific user level. This isn’t a lightweight beginner book. Regard -less of whether you are a beginning administrator or a seasoned professional, many of the concepts in this book will be valuable to you, and you can apply them to your Windows Server 2012 R2 installations.
Who is this book for?
To pack in as much information as possible, I had to assume that you have basic networking skills and a basic understanding of Windows Server. With this in mind, I don’t devote entire chapters to explaining Windows Server architecture or why you want to use Windows Server. I do, however, cover configuring storage, security, auditing, and much more.
I also assume that you are fairly familiar with Windows commands and procedures in addition to the Windows user interface. If you need help learning Windows basics, you should read other resources (many of which are available from Microsoft Press).
How is this book organized?
Rome wasn’t built in a day, nor was this book intended to be read in a day, in a week, or even in a month. Ideally, you’ll read this book at your own pace, a little each day as you work your way through all the features Windows Server 2012 R2 has to offer. This book is organized into 11 chapters. The chapters are arranged in a logical order, taking you from planning and deployment tasks to configuration and maintenance tasks.
Ease of reference is an essential part of this hands-on guide. This book has an expanded table of contents and an extensive index for finding answers to problems quickly. Many other quick-reference features have been added to the book as well, including quick step-by-step procedures, lists, tables with fast facts, and extensive cross references.
Conventions used in this book
I’ve used a variety of elements to help keep the text clear and easy to follow. You’ll find code listings in monospace type. When I tell you to actually enter a command, the command appears in bold type. When I introduce and define a new term or use a code term in a paragraph of text, I put it in italics.
NOTE Group Policy includes both policies and preferences. Under the Computer
Configuration and User Configuration nodes, you find two nodes: Policies and
Preferences. Settings for general policies are listed under the Policies node. Settings for general preferences are listed under the Preferences node. When referencing settings under the Policies node, I sometimes use shortcut references, such as User
Configuration\Administrative Templates\Windows Components, or specify that the policies are found in the Administrative Templates for User Configuration under
Windows Components. Both references tell you that the policy setting being dis -
cussed is under User Configuration rather than Computer Configuration and can be found under Administrative Templates\Windows Components.
Other conventions include the following:
■ Best Practices To examine the best technique to use when working with advanced configuration and maintenance concepts
■ Important To highlight important concepts and issues
■ More Info To provide more information on a subject
■ Note To provide additional details on a particular point that needs emphasis
■ Real World To provide real-world advice when discussing advanced topics
■ Security Alert To point out important security issues
■ Tip To offer helpful hints or additional information
I truly hope you find that Windows Server 2012 R2 Pocket Consultant: Storage, Security, & Networking provides everything you need to perform the essential administrative tasks on Windows servers as quickly and efficiently as possible. You are welcome to send your thoughts to me at [email protected]. Follow me on Twitter at WilliamStanek and on Facebook at www.facebook.com/William.Stanek.
Author.
Other resources
No single magic bullet for learning everything you’ll ever need to know about Windows Server 2012 R2 exists. Even though some books are offered as all-in-one guides, there’s just no way one book can do it all. With this in mind, I hope you use this book as it is intended to be used—as a concise and easy-to-use resource. It covers everything you need to perform core administration tasks for Windows servers, but it is by no means exhaustive.
Your current knowledge will largely determine your success with this or any other Windows resource or book. As you encounter new topics, take the time to practice what you’ve learned and read about. Seek out further information as necessary to get the practical hands-on know-how and knowledge you need.
I recommend that you regularly visit the Microsoft website for Windows Server (microsoft.com/windowsserver) and support.microsoft.com to stay current with the latest changes. To help you get the most out of this book, you can visit my cor-responding website at williamstanek.com/windows. This site contains information about Windows Server 2012 R2 and updates to the book.
Errata and book support
We’ve made every effort to ensure the accuracy of this book and its companion con-tent. Any errors that have been reported since this book was published are listed at:
http://aka.ms/WSR2PC2/errata
If you find an error that is not already listed, you can report it to us through the same page.
We want to hear from you
At Microsoft Press, your satisfaction is our top priority, and your feedback is our most valuable asset. Please tell us what you think of this book at:
http://aka.ms/tellpress
The survey is short, and we read every one of your comments and ideas. Thanks in advance for your input!
Stay in touch
CHAP TE R 1
Managing file systems
and drives
■ Managing the File And Storage Services role 1
■ Adding hard drives 5
■ Working with basic, dynamic, and virtual disks 18
■ Using basic disks and partitions 24
■ Compressing drives and data 30
■ Encrypting drives and data 31
A
hard drive is the most common storage device used on network workstations and servers. Users depend on hard drives to store their word-processing doc-uments, spreadsheets, and other types of data. Drives are organized into file sys -tems that users can access either locally or remotely.Local file systems are installed on a user’s computer and can be accessed without remote network connections. The C drive, which is available on most workstations and servers, is an example of a local file system. You access the C drive by using the file path C:\.
On the other hand, you access remote file systems through a network connec -tion to a remote resource. You can connect to a remote file system by using the Map Network Drive feature of File Explorer.
Wherever disk resources are located, your job as a system administrator is to manage them. The tools and techniques you use to manage file systems and drives are discussed in this chapter. Chapter 2, “Configuring storage,” looks at partition management, volume sets, and fault tolerance.
Managing the File And Storage Services role
Table 1-1 provides an overview of the role services associated with the File And Storage Services role. When you add any needed role services to a file server, you might also want to install the following optional features, available through the Add Roles And Features Wizard:
■ Windows Server Backup The standard backup utility included with Win-dows Server 2012 R2.
■ Enhanced Storage Supports additional functions made available by devices that support hardware encryption and enhanced storage. Enhanced storage devices support Institute of Electrical and Electronics Engineers (IEEE) standard 1667 to provide enhanced security, which can include authentication at the hardware level of the storage device.
■ Multipath I/O Provides support for using multiple data paths between a file server and a storage device. Servers use multiple I/O paths for redun -dancy in case of the failure of a path and to improve transfer performance. Binaries needed to install roles and features are referred to as payloads. With Windows Server 2012 R2, payloads are stored in subfolders of the %SystemDrive% \Windows\WinSXS folder. If the binaries for the tools have been removed, you might need to install the tools by specifying a source.
TABLE 1-1 Role services for file servers
ROLE SERVICE DESCRIPTION
BranchCache For Network Files
Enables computers in a branch office to cache commonly used files from shared folders. It takes advantage of data deduplica -tion techniques to optimize data transfers over the wide area networks (WAN) to branch offices.
Data Deduplication
Uses subfile variable-size chunking and compression to achieve greater storage efficiency. This works by segmenting files into 32-KB to 128-KB chunks, identifying duplicate chunks, and replacing the duplicates with references to a single copy. Opti-mized files are stored as reparse points. After deduplication, files on the volume are no longer stored as data streams and instead are replaced with stubs that point to data blocks within a common chunk store.
ROLE SERVICE DESCRIPTION
DFS Replication Enables you to synchronize folders on multiple servers across local or WAN connections by using a multimaster replication engine. The replication engine uses the Remote Differential Compression (RDC) protocol to synchronize only the portions of files that have changed since the last replication. You can use DFS Replication with DFS Namespaces or by itself. When a domain is running in a Windows 2008 domain functional level or higher, domain controllers use DFS Replication to provide more robust and granular replication of the SYSVOL directory.
File Server Enables you to manage file shares that users can access over the network.
File Server Resource Man-ager (FSRM)
Installs a suite of tools that administrators can use to better manage data stored on servers. By using FSRM, administrators can generate storage reports, configure quotas, and define file-screening policies.
File Server VSS Agent Service
Enables VSS-aware backup utilities to create consistent shadow copies (snapshots) of applications that store data files on the file server.
iSCSI Target Server
Turns any Windows Server into a network-accessible block storage device, which can be used for testing of applications prior to deploying storage area network (SAN) storage. It sup-ports shared storage on both Windows iSCSI initiators and those iSCSI initiators that are not based on Windows as well as network/diskless boot for diskless servers.
iSCSI Target Storage Provider
Supports managing iSCSI virtual disks and shadow copies (snapshots) from an iSCSI initiator.
Server for NFS Provides a file-sharing solution for enterprises with a mixed Windows and UNIX environment. When you install Server for Network File System (NFS), users can transfer files between Windows Server and UNIX operating systems by using the NFS protocol.
Storage Services Enables you to manage storage, including storage pools and storage spaces. Storage pools group disks so that you can create virtual disks from the available capacity. Each virtual disk you create is a storage space.
IMPORTANT If payloads have been removed and you don’t specify a source, pay-
loads are restored via Windows Update by default. however, Group Policy can be used to control whether Windows Update is used to restore payloads and to provide alternate source paths for restoring payloads. The policy with which you want to work is Specify Settings For Optional Component Installation And Component Repair, which is under
Computer Configuration\Administrative Templates\System. This policy also is used for
obtaining payloads needed to repair components.
You can configure the File And Storage Services role on a server by following these steps:
1. In Server Manager, tap or click Manage, and then tap or click Add Roles And
Features, or select Add Roles And Features in the Quick Start pane. This starts the Add Roles And Features Wizard. If the wizard displays the Before You Begin page, read the Welcome text, and then tap or click Next.
2. On the Installation Type page, Role-Based Or Feature-Based Installation is
selected by default. Tap or click Next.
3. On the Server Selection page, you can choose to install roles and features
on running servers or virtual hard disks. Either select a server from the server pool or select a server from the server pool on which to mount a virtual hard disk (VHD). If you are adding roles and features to a VHD, tap or click Browse and then use the Browse For Virtual Hard Disks dialog box to locate the VHD. When you are ready to continue, tap or click Next.
NOTE Only servers that are running Windows Server 2012 R2 and that have
been added for management in Server Manager are listed.
4. On the Server Roles page, select File And Storage Services. Expand the related
node, and select the additional role services to install. If additional features are required to install a role, you’ll see an additional dialog box. Tap or click Add Features to close the dialog box and add the required features to the server installation. When you are ready to continue, tap or click Next.
5. On the Features page, select the features you want to install. If additional
functionality is required to install a feature you selected, you’ll see an addi -tional dialog box. Tap or click Add Features to close the dialog box and add the required features to the server installation. When you are ready to con -tinue, tap or click Next. Depending on the added feature, there might be additional steps before you get to the Confirm page.
6. On the Confirm page, tap or click the Export Configuration Settings link to
generate an installation report that can be displayed in Internet Explorer.
REAL WORLD If the server on which you want to install roles or features
images, enter the WIM path prefixed with WIM: and including the index of the image to use, such as WIM:\\CorpServer25\WinServer2012R2\install.wim:4.
7. After you review the installation options and save them as necessary, tap or
click Install to begin the installation process. The Installation Progress page tracks the progress of the installation. If you close the wizard, tap or click the Notifications icon in Server Manager, and then tap or click the link provided to reopen the wizard.
8. When Setup finishes installing the server with the roles and features you
selected, the Installation Progress page will be updated to reflect this. Review the installation details to ensure that all phases of the installation were com-pleted successfully.
Note any additional actions that might be required to complete the installa -tion, such as restarting the server or performing additional installation tasks. If any portion of the installation failed, note the reason for the failure. Review the Server Manager entries for installation problems, and take corrective actions as appropriate.
If the File Services role is already installed on a server and you want to install additional services for a file server, you can add role services to the server by using a similar process.
Adding hard drives
Before you make a hard drive available to users, you need to configure it and con -sider how it will be used. With Windows Server 2012 R2, you can configure hard drives in a variety of ways. The technique you choose depends primarily on the type of data with which you’re working and the needs of your network environment. For general user data stored on workstations, you might want to configure individual drives as stand-alone storage devices. In that case, user data is stored on a work-station’s hard drive, where it can be accessed and stored locally.
Although storing data on a single drive is convenient, it isn’t the most reliable way to store data. To improve reliability and performance, you might want a set of drives to work together. Windows Server 2012 R2 supports drive sets and arrays by using the redundant array of independent disks (RAID) technology, which is built into the operating system.
Physical drives
Disks perform physical media updates in the granularity of their physical sector size. 512b disks work with data 512 bytes at a time; 512e disks work with data 4,096 bytes at a time. At an elevated, administrator prompt, you can use the command-line utility Fsutil to determine bytes per physical sector by entering the following:
Fsutil fsinfo ntfsinfo DriveDesignator
DriveDesignator is the designator of the drive to check, such as:
Fsutil fsinfo sectorinfo c:
Having a larger physical sector size is what allows drive capacities to jump well beyond previous physical capacity limits. When there is only a 512-byte write, hard drives must perform additional work to complete the sector write. For best perfor-mance, applications must be updated to read and write data properly in this new level of granularity (4096 bytes).
Windows Server 2012 R2 supports many drive interface architectures, including
■ Small Computer System Interface (SCSI)
■ Parallel ATA (PATA), also known as IDE
■ Serial ATA (SATA)
The terms SCSI, IDE, and SATA designate the interface type used by the hard drives. The interface is used to communicate with a drive controller. SCSI drives use SCSI controllers, IDE drives use IDE controllers, and so on.
SCSI is one of the most commonly used interfaces, and there are multiple bus designs for SCSI and multiple interface types. Parallel SCSI (also called SPI) has largely been replaced by Serial Attached SCSI (SAS). Internet SCSI (iSCSI) uses the SCSI architectural model, but it uses TCP/IP as the transport rather than the tradi-tional physical implementation.
SATA was designed to replace IDE. SATA drives are increasingly popular as a low-cost alternative to SCSI. SATA II and SATA III, the most common SATA interfaces, are designed to operate at 3 gigabits per second and 6 per second, respectively. In addition, eSATA (also known as external SATA) is meant for externally connected drives.
NOTE Windows Server 2012 R2 features enhancements to provide improved support for SATA drives. These enhancements reduce metadata inconsistencies and enable
drives to cache data more efficiently. Improved disk caching helps to protect cached
data in the event of an unexpected power loss.
Generally speaking, when comparing drives that conform to the same specifica -tion, such as Ultra640 SCSI or SATA III, the higher the rotational speed (measured in thousands of rotations per minute) and the lower the average seek time (measured in milliseconds, or msecs), the better. As an example, a drive with a rotational speed of 15,000 RPM gives you 45–50 percent more I/O per second than the average 10,000 RPM drive, all other things being equal. A drive with a seek time of 3.5 msecs gives you a 25–30 percent response time improvement over a drive with a seek time of 4.7 msecs.
Other factors to consider include the following:
■ Maximum sustained data transfer rate A measurement of how much data the drive can continuously transfer
■ Mean time to failure (MTTF) A measurement of how many hours of operation you can expect to get from the drive before it fails
■ Nonoperational temperatures Measurements of the temperatures at which the drive fails
Most drives of comparable quality have similar transfer rates and MTTF. For example, if you compare enterprise SAS drives with 15,000 RPM rotational speed from different vendors, you will probably find similar transfer rates and MTTF. Transfer rates can be expressed in megabytes per second (MBps) or gigabits per second (Gbps). A rate of 1.5 Gbps is equivalent to a data rate of 187.5 MBps, and 3.0 Gbps is equivalent to 375 MBps. Sometimes you’ll get a maximum external trans-fer rate (per the specification to which the drive complies) and an average sustained transfer rate. The average sustained transfer rate is the most important factor.
NOTE Don’t confuse MBps and Mbps. MBps is megabytes per second. Mbps is megabits per second. Because there are 8 bits in a byte, a 100 MBps transfer rate is equivalent to an 800 Mbps transfer rate.
Temperature is another important factor to consider when you’re selecting a drive, but it’s a factor few administrators take into account. Typically, the faster a drive rotates, the hotter it runs. This is not always the case, but it is certainly some-thing you should consider when making your choice. For example, 15K drives tend to run hot, and you must be sure to carefully regulate temperature. Typical 15K drives can become nonoperational at temperatures of 70 degrees Centigrade or higher (as would most other drives).
in Chapter 2 of Windows 8.1 Administration Pocket Consultant: Storage, Networking,
& Security (Microsoft Press, 2013).
Preparing a physical drive for use
After you install a drive, you need to configure it for use. You configure the drive by partitioning it and creating file systems in the partitions as needed. A partition is a section of a physical drive that functions as if it were a separate unit. After you cre-ate a partition, you can crecre-ate a file system in the partition.
The MBR and GPT partition styles
Two partition styles are used for disks: master boot record (MBR) and GUID partition table (GPT). The MBR contains a partition table that describes where the partitions are located on the disk. With this partition style, the first sector on a hard drive contains the master boot record and a binary code file called the master boot code
that’s used to boot the system. This sector is unpartitioned and hidden from view to protect the system.
With the MBR partitioning style, disks traditionally support volumes of up to 4 terabytes (TB) and use one of two types of partitions: primary or extended. Each MBR drive can have up to four primary partitions or three primary partitions and one extended partition. Primary partitions are drive sections you can access directly for file storage. You make a primary partition accessible to users by creating a file system on it. Although you can access primary partitions directly, you can’t access extended partitions directly. Instead, you can configure extended partitions with one or more logical drives that are used to store files. Being able to divide extended partitions into logical drives allows you to divide a physical drive into more than four sections.
GPT was originally developed for high-performance, Itanium-based computers. The key difference between the GPT partition style and the MBR partition style has to do with how partition data is stored. With GPT, critical partition data is stored in the individual partitions, and redundant primary and backup partition tables are used for improved structural integrity. Additionally, GPT disks support volumes of up to 18 exabytes (1 exabyte equals 1,024 x 1,024 terabytes) and as many as 128 partitions. Although the GPT and MBR partitioning styles have underlying differ-ences, most disk-related tasks are performed in the same way.
Legacy and protective MBRs
A legacy MBR is located at the first logical block on a disk that is not using the GPT disk layout. The first 512 bytes on an MBR disk have the following layout:
■ The MBR begins with a 424-byte boot code, which is used to select an MBR partition record and load the first logical block of that partition. The boot code on the MBR is not executed by UEFI.
■ The boot code is followed by a 4-byte unique MBR disk signature, which can be used by the operating system to identify the disk and distinguish the disk from other disks on the system. The unique signature is written by the oper -ating system and not used by UEFI.
■ A 2-byte separator follows the disk signature. At byte offset 446, there is an
array of four MBR partition records, with each record being 16 bytes in length. Block 510 contains 0x55 and block 511 contains 0xAA. Block 512 is reserved.
The four partition records each define the first and last logical blocks that a par -ticular partition uses on a disk:
■ Each 16-byte MBR partition record begins with a 1-byte boot indicator. For example, a value of 0x80 identifies a bootable legacy partition. Any other value indicates that this is not a bootable legacy partition. This value is not used by UEFI.
■ The boot indicator is followed by a 3-byte address identifying the start of the
partition. At byte offset 4, there’s a 1-byte value that indicates the operating system type, which is followed by a 3-byte value that identifies the end of the partition. These values are not used by UEFI.
■ At byte offset 8, there is a 4-byte value indicating the first logical block of the partition, and this is followed by a 4-byte value indicating size of the partition in units of logical blocks. Both of these values are used by UEFI.
NOTE If an MBR partition has an operating system type value of 0xEF, firmware must
add the UeFI system partition GUID to the handle for the MBR partition. This allows boot applications, operating system loaders, drivers, and other lower-level tools to locate the UeFI system partition, which must physically reside on the disk.
A protective MBR may be located at the first logical block on a disk that is using the GPT disk layout. The protective MBR precedes the GUID Partition Table Header and is used to maintain compatibility with tools that do not understand GPT parti-tion structures. The purpose of the protective MBR is to protect the GPT partiparti-tions from boot applications, operating system loaders, drivers, and other lower-level tools that don’t understand the GPT partitioning scheme. The protective MBR does this by defining a fake partition covering the entire disk. When a disk has a protec -tive MBR, the first 512 bytes on the disk have the following layout:
■ The protective MBR begins with a 424-byte boot code, which is not executed by UEFI.
■ A 2-byte separator follows the disk signature. This separator is set to zero and not used by UEFI.
■ At byte offset 446, there is an array of four MBR partition records, with each record being 16-bytes in length. Only the first partition record—the protec -tive partition record—is used. The other partition records are set to zero.
■ Block 510 contains 0x55 and block 511 contains 0xAA. Block 512 is reserved.
The protective partition record reserves the entire space on the disk after the first 512 bytes for the GPT disk layout. The protective partition record begins with a 1-byte boot indicator that is set to 0x00, which indicates a non-bootable partition. The boot indicator is followed by a 3-byte address identifying the start of the parti-tion at 0x000200, which is the first usable block on the disk.
At byte offset 4, there’s a 1-byte value set to 0xEE to indicate the operating sys-tem type as GPT Protective. This is followed by a 3-byte value that identifies the last usable block on the disk, which is the end of the partition (or 0xFFFFFF if it is not possible to represent this value).
At byte offset 8, there is a 4-byte value set to 0x00000001, which identifies the logical block address of the GPT partition header. This is followed by a 4-byte value indicating size of the disk minus one block (or 0xFFFFFFFF if the size of the disk is too large to be represented).
Disk types and file systems
In addition to a partition style, physical drives have a disk type, which is either basic or dynamic, as discussed later in the chapter in the section “Working with basic, dynamic, and virtual disks.” After you set the partition style and disk type for a phys -ical drive, you can format free areas of the drive to establish log-ical partitions. For-matting creates a file system on a partition. Windows Server 2012 R2 supports the following file systems:
■ FAT
■ FAT32
■ exFAT
■ NTFS
■ ReFS
With FAT, the number of bits used with the file allocation table determines the variant with which you are working and the maximum volume size. FAT16, also known simply as FAT, defines its file allocation tables using 16 bits. Volumes that are 4 gigabytes (GB) or less in size are formatted with FAT16.
volume-size limit of FAT32 file systems. The exFAT format supports allocation unit sizes of up to 128 KB for volumes up to 256 TB.
NTFS volumes have a very different structure and feature set than FAT volumes. The first area of the volume is the boot sector, which stores information about the disk layout, and a bootstrap program executes at startup and boots the operating system. Instead of a file allocation table, NTFS uses a relational database called the master file table (MFT) to store information about files.
The MFT stores a file record of each file and folder on the volume, pertinent volume information, and details about the MFT itself. NTFS gives you many advanced options, including support for the Encrypting File System, compression, and the option to configure file screening and storage reporting. File screening and storage reporting are available when you add the File Server Resource Manager role service to a server as part of the File Services role.
Resilient File System (ReFS) can be thought of as the next generation of NTFS. As such, ReFS remains compatible with core NTFS features while cutting noncore features to focus relentlessly on reliability. This means disk quotas, Encrypting File System (EFS), compression, file screening, and storage reporting are not available but built-in reliability features have been added.
One of the biggest reliability features in ReFS is a data integrity scanner, also called a data scrubber. The scrubber provides proactive error identification, isolation, and correction. If the scrubber detects data corruption, a repair process is used to localize the area of corruption and perform automatic online correction. Through an automatic online salvage process, corrupted areas that cannot be repaired, such as those caused by bad blocks on the physical disk, are removed from the live volume so that they cannot adversely affect good data. Because of the automated scrubber and salvage processes, a Check Disk feature is not needed when you use ReFS (and there’s no Check Disk utility for ReFS).
NOTE When you are working with File And Storage Services, you can group available physical disks into storage pools so that you can create virtual disks from available capacity. each virtual disk you create is a storage space. Because only NTFS and ReFS support storage spaces, you’ll want to keep that in mind when you are formatting
vol-umes on file servers. For more information about storage spaces, see “Standards-based
storage management” in Chapter 2.
Using Disk Management
Disk Management has three views: Disk List, Graphical View, and Volume List. With remote systems, you’re limited in the tasks you can perform with Disk Manage-ment. Remote management tasks you can perform include viewing drive details, changing drive letters and paths, and converting disk types. With removable media drives, you can also eject media remotely. To perform more advanced manipulation of remote drives, you can use the DiskPart command-line utility.
NOTE You should be aware that if you create a partition but don’t format it, the
partition is labeled as Free Space. In addition, if you haven’t assigned a portion of the disk to a partition, this section of the disk is labeled Unallocated.
In Figure 1-1, the Volume List view is in the upper-right corner, and the Graphical View is in the lower-right corner. This is the default configuration. You can change the view for the top or bottom pane as follows:
■ To change the top view, select View, choose Top, and then select the view you want to use.
■ To change the bottom view, select View, choose Bottom, and then select the
view you want to use.
■ To hide the bottom view, select View, choose Bottom, and then select Hidden.
Windows Server 2012 R2 supports four types of disk configurations:
■ Basic The standard fixed disk type. Basic disks are divided into partitions and are the original disk type for early Windows operating systems.
■ Dynamic An enhanced fixed disk type that you can update without having to restart the operating system (in most cases). Dynamic disks are divided into volumes.
■ Removable The standard disk type associated with removable storage devices.
■ Virtual The virtual hard disk (VHD) disk type associated with virtualization. Computers can use VHDs just like they use regular fixed disks and can even be configured to boot from a VHD.
These disk configurations can be used with legacy storage approaches as well as standards-based storage. From the Disk Management window, you can get more detailed information on a drive section by pressing and holding or right-clicking it, and then selecting Properties. When you do this, you get a dialog box. Figure 1-2 shows the dialog boxes for two fixed disks. The one on the left uses NTFS, and the one on the right uses ReFS. Both disks have additional tabs based on the server configuration.
FIGURE 1-2 The General tab of the Properties dialog box provides detailed information about a drive.
Tasks you can perform include the following:
■ Viewing limited disk properties, but not volume properties. When you are
viewing disk properties, you’ll see only the General and Volumes tabs. You won’t be able to see volume properties.
■ Changing drive letters and mount paths.
■ Formatting, shrinking, and extending volumes. With mirrored, spanned, and striped volumes, you are able to add and configure related options.
■ Deleting volumes (except for system and boot volumes).
■ Creating, attaching, and detaching VHDs. When you create and attach VHDs, you need to enter the full file path and won’t be able to browse for the .vhd file.
Some tasks you perform with disks and volumes depend on the Plug and Play and Remote Registry services.
Using removable storage devices
Removable storage devices can be formatted with ReFS, NTFS, FAT, FAT32, or exFAT. You connect external storage devices to a computer rather than installing them inside the computer. This makes external storage devices easier and faster to install than most fixed disk drives. Most external storage devices have either a USB or a FireWire interface. When working with USB and FireWire, the transfer speed and overall performance of the device from a user’s perspective depends primarily on the version supported. Currently, several versions of USB and FireWire are used.
USB 2.0 is the current industry standard until the world transitions to USB 3.0. USB 2.0 devices can be rated as either full speed (up to 12 Mbps) or high speed (up to 480 Mbps). Although high-speed USB 2.0 supports data transfers at a maximum rate of 480 Mbps, sustained data-transfer rates are usually 10–30 Mbps. The actual sustainable transfer rate depends on many factors, including the type of device, the data you are transferring, and the speed of a computer. Each USB controller on a computer has a fixed amount of bandwidth, which all devices attached to the con -troller must share. The data transfer rates are significantly slower if a computer’s USB port is an earlier version than the device you are using. For example, if you connect a USB 3.0 device to a USB 2.0 port or vice versa, the device operates at the signifi -cantly reduced USB 2.0 transfer speed.
currently used. FireWire 400 (IEEE 1394a) has maximum sustained transfer rates of up to 400 Mbps. IEEE 1394b allows 400 Mbps (S400), 800 Mbps (S800), and 1600 Mbps (S1600). As with USB devices, if you connect an IEEE 1394b device to an IEEE 1394a port or vice versa, the device operates at the significantly reduced FireWire 400 transfer speed.
As with USB ports, the sustained transfer rate for IEEE 1394a and IEEE 1394b ports will be considerably less than the maximum rate possible. IEEE 1394a and IEEE 1394b ports and cables have different shapes, making it easier to tell the difference between them—if you know what you’re looking for. FireWire 400 cables without bus power have four pins and four connectors. FireWire 400 cables with bus power have six pins and six connectors. FireWire 800 and FireWire 1600 cables always have bus power and have nine pins and nine connectors.
Another option is external SATA (eSATA), which is available on newer computers and is an ultra-high-performance connection for data transfer to and from external mass storage devices. eSATA operates at speeds up to 6 Gbps. If your computer doesn’t come with eSATA ports, you can add support for eSATA devices by installing an eSATA controller card.
When you are purchasing an external device for a computer, you’ll also want to consider what interfaces it supports. In some cases, you might be able to get a device with more than one interface, such as one that supports USB 3.0 and eSATA. A device with multiple interfaces gives you more options.
Working with removable disks is similar to working with fixed disks. You can do the following:
■ Press and hold or right-click a removable disk, and then select Open or Explore to examine the disk’s contents in File Explorer.
■ Press and hold or right-click a removable disk, and then select Format to format a removable disk as discussed in “Formatting partitions” later in this chapter. Removable disks generally are formatted with a single partition.
■ Press and hold or right-click a removable disk, and then select Properties to view or set properties. On the General tab of the Properties dialog box, you can set the volume label as discussed in “Changing or deleting the volume label” in Chapter 2.
Removable disks differ from standard NTFS sharing in that they don’t necessarily have an underlying security architecture. With exFAT, FAT, or FAT32, folders and files stored on a removable disk do not have any security permissions or features other than the basic read-only or hidden attribute flags that you can set.
Installing and checking for a new drive
Hot swapping is a feature that allows you to remove internal devices without shut-ting off the computer. Typically, hot-swappable internal drives are installed and removed from the front of the computer. If your computer supports hot swapping of internal drives, you can install drives without having to shut down. After you have installed a new drive, open Disk Management, and then choose Rescan Disks from the Action menu. New disks that are found are added with the appropriate disk type. If a disk that you’ve added isn’t found, restart the computer.
If the computer doesn’t support hot swapping of internal drives, you must turn the computer off and then install the new drives. Then you can scan for new disks as described previously. If you are working with new disks that have not been initialized —meaning they don’t have disk signatures—Disk Management will start the Initial-ize Disk dialog box as soon it starts up and detects the new disks.
You can initialize the disks by following these steps:
1. Each disk you install needs to be initialized. Select the disk or disks you
installed.
2. Disks can use either the MBR or GPT partition style. Select the partition style
you want to use for the disk or disks you are initializing.
3. Tap or click OK. If you elected to initialize disks, Windows writes a disk
signa-ture to the disks and initializes the disks with the basic disk type.
If you don’t want to use the Initialize Disk dialog box, you can close it and use Disk Management instead to view and work with the disk. In the Disk List view, the disk is marked with a red downward-pointing arrow icon, the disk’s type is listed as Unknown, and the disk’s status is listed as Not Initialized. Press and hold or right-click the disk’s icon and select Online. Press and hold or right-right-click the disk’s icon again, and select Initialize Disk. You can then initialize the disk as discussed previously.
NOTE At an elevated, administrator Windows PowerShell prompt, you can use Get-Disk to list available disks and Initialize-Disk to initialize new disks.
Understanding drive status
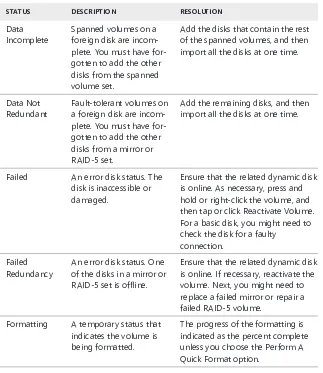
TABLE 1-2 Common drive status values
STATUS DESCRIPTION RESOLUTION
Online The normal disk status. It means the disk is accessible and doesn’t have problems. Both dynamic disks and basic disks display this status.
The drive doesn’t have any known problems. You don’t need to take any corrective action.
Online (Errors) I/O errors have been detected on a dynamic disk.
You can try to correct temporary errors by pressing and holding or right-clicking the disk and select-ing Reactivate Disk. If this doesn’t work, the disk might have physical damage or you might need to run a thorough check of the disk. Offline The disk isn’t accessible and
might be corrupted or tem-porarily unavailable. If the disk name changes to Miss-ing, the disk can no longer be located or identified on the system.
Check for problems with the drive, its controller, and cables. Make sure that the drive has power and is connected properly. Use the Reactivate Disk command to bring the disk back online (if possible).
Foreign The disk has been moved to your computer but hasn’t been imported for use. A failed drive brought back online might sometimes be listed as Foreign.
Press and hold or right-click the disk, and then tap or click Import Foreign Disks to add the disk to the system.
Unreadable The disk isn’t accessible cur-rently, which can occur when disks are being rescanned. Both dynamic and basic disks display this status.
STATUS DESCRIPTION RESOLUTION
Unrecognized The disk is of an unknown type and can’t be used on the system. A drive from a system that is not based on Windows might display this status.
If the disk is from another operat-ing system, don’t do anythoperat-ing. Normally, you can’t use the drive on the computer without initializ-ing and formattinitializ-ing it, so try a dif-ferent drive.
Not Initialized The disk doesn’t have a valid signature. A drive from a system not based on Windows might display this status.
If the disk is from another operat-ing system, don’t do anythoperat-ing. You can’t use the drive on the computer, so try a different drive. To prepare the disk for use on Windows Server 2012 R2, press and hold or right-click the disk, and then tap or click Initialize Disk.
No Media No media has been inserted into the DVD or removable drive, or the media has been removed. Only DVD and removable disk types display this status.
Insert a DVD or a removable disk to bring the disk online. With FireWire and USB card readers, this status is usually (but not always) displayed when the card is removed.
Working with basic, dynamic, and virtual disks
Windows Server 2012 R2 supports basic, dynamic, and virtual disk configurations. This section discusses techniques for working with each disk configuration type.
Using basic and dynamic disks
Basic, dynamic, and virtual disk configurations can be used with both legacy stor -age approaches and standards-based stor-age. Normally, Windows Server 2012 R2 disk partitions are initialized as basic disks. The exception is when you want to use software-based RAID instead of standards-based storage.
same partitioning style, which can be either MBR or GPT. Note that Disk Management allows you to start many disk configuration tasks regardless of whether the disks with which you are working use the dynamic disk type. The catch is that during the con-figuration process, Disk Management will convert the disks to the dynamic disk type. To learn how to convert a disk from basic to dynamic, see “Changing drive types” on the next page.
You can perform different disk configuration tasks with basic and dynamic disks. With basic disks, you can do the following:
■ Format partitions, and mark them as active
■ Create and delete primary and extended partitions
■ Create and delete logical drives within extended partitions
■ Convert from a basic disk to a dynamic disk
With dynamic disks, you can do the following:
■ Create and delete simple, striped, spanned, mirrored, and RAID-5 volumes
■ Remove a mirror from a mirrored volume
■ Extend simple or spanned volumes
■ Split a volume into two volumes
■ Repair mirrored or RAID-5 volumes
■ Reactivate a missing or offline disk
■ Revert to a basic disk from a dynamic disk (requires deleting volumes and restoring from backup)
With either disk type, you can do the following:
■ View properties of disks, partitions, and volumes
■ Make drive-letter assignments
■ Configure security and drive sharing
■ Use Storage Spaces to implement standards-based storage
Special considerations for basic and dynamic disks
Whether you’re working with basic or dynamic disks, you need to keep in mind five special types of drive sections:
■ Active The active partition or volume is the drive section for system cach-ing and startup. Some devices with removable storage might be listed as having an active partition.
■ Boot The boot partition or volume contains the operating system and its support files. The system and boot partition or volume can be the same. ■ Crash dump The partition to which the computer attempts to write dump