Foundation ASP for
Dreamweaver 8
Lead Editor
Copyright © 2006 by Omar Elbaga and Rob Turnbull
All rights reserved. No part of this work may be reproduced or transmitted in any form or by any means, electronic or mechanical, including photocopying, recording, or by any information storage or retrieval system,
without the prior written permission of the copyright owner and the publisher.
ISBN (pbk): 978-1-59059-568-8
ISBN (pbk): 1-59059-568-8
Printed and bound in the United States of America 9 8 7 6 5 4 3 2 1
Trademarked names may appear in this book. Rather than use a trademark symbol with every occurrence of a trademarked name, we use the names only in an editorial fashion and to the benefit of the trademark
owner, with no intention of infringement of the trademark.
Distributed to the book trade worldwide by Springer-Verlag New York, Inc., 233 Spring Street, 6th Floor, New York, NY 10013. Phone 1-800-SPRINGER, fax 201-348-4505, e-mail [email protected], or visit www.springeronline.com. For information on translations, please contact Apress directly at 2560 Ninth Street, Suite 219, Berkeley, CA 94710.
Phone 510-549-5930, fax 510-549-5939, e-mail [email protected], or visit www.apress.com.
The information in this book is distributed on an “as is” basis, without warranty. Although every precaution has been taken in the preparation of this work, neither the author(s) nor Apress shall have any liability to any person or entity with respect to any loss
or damage caused or alleged to be caused directly or indirectly by the information contained in this work.
The source code for this book is freely available to readers at www.friendsofed.comin the Downloads section.
sister, Tamer, Hesham, Soliman, and Yasmine; my fiancée, Mona;
my entire family; and all my faithful readers.
—Omar Elbaga
This book is dedicated to my family and friends who always
support me. Special thanks go to baby Theo who always
About the Authors
. . .xiv
About the Technical Reviewer
. . .xv
Acknowledgments
. . .xvi
Introduction
. . .xvii
Chapter 1
Dreamweaver and Dynamic Sites
. . .1
Chapter 2
The Dreamweaver Environment
. . .19
Chapter 3
A First Taste of ASP
. . .45
Chapter 4
Databases
. . .83
Chapter 5
Working with Forms
. . .133
Chapter 6
Building a Random Quote Generator
. . .175
Chapter 7
Completing the Quotes Administration System
. . .195
Chapter 8
Restricting Access
. . .223
Chapter 9
Creating a Blog
. . .245
Chapter 10
Image Gallery
. . .287
About the Authors
. . .xiv
About the Technical Reviewer
. . .xv
Acknowledgments
. . .xvi
Introduction
. . .xvii
Chapter 1
Dreamweaver and Dynamic Sites
. . .1
Data exchange . . . 2
Dynamic takes over static . . . 7
Dreamweaver server models . . . 7
The ASP VBScript server model . . . 7
What Dreamweaver 8 offers you as an ASP developer . . . 9
Checking out data . . . 9
Connecting to databases . . . 9
Where is ASP in Dreamweaver? . . . 10
ASP features supported by Dreamweaver . . . 10
Insert bar . . . 11
The Insert bar’s ASP tab . . . 12
The Insert bar’s Application tab . . . 14
Application panel . . . 16
The Databases tab . . . 16
The Bindings tab . . . 16
Conclusion . . . 17
Chapter 2
The Dreamweaver Environment
. . .19
Workspace layout . . . 19
The Multiple Document Interface . . . 20
The CSS panel . . . 21
The Application panel group . . . 22
The Databases panel . . . 22
The Bindings panel . . . 23
The Server Behaviors panel . . . 24
The Tag Inspector panel group . . . 25
Dynamic e-mail interaction . . . 156
Chapter 7
Completing the Quotes Administration System
. . .195
Creating onews_admin_details.asp . . . 270
Designing onews_admin_details.asp . . . 271
Wiring up onews_admin_details.asp . . . 273
Securing the blog administration pages and creating login/logout functionality . . . . 276
Omar Elbagahas been passionately involved in web development for over six years, over which time he has completed several projects for small businesses and nonprofit organizations, including personal sites. He has previously coauthored two books on Dreamweaver web development, and maintains his own Dreamweaver tutorial/resource site, now known as dmxfire.com. Because he did not start out as a pro-grammer himself, he has a knack for teaching dynamic web develop-ment to those who do not have programming backgrounds.
He is also a postsecondary language arts instructor, artist, independent filmmaker, and graduate student at New Jersey City University, currently finalizing his master thesis as a reading specialist. You can find some of his work in these areas and more information at http://elbaga.net.
Rob Turnbull is the senior developer for Lighthouse – design for busi-ness limited, an established new media design and marketing company based in Shrewsbury, UK. Clients across Europe, from small businesses to blue chip companies, provide an increasing workload, which includes the development of databases, websites, multimedia presentations, interactive CD-ROMs, promotional videos, and 3D artwork (animations and stills).
Jason Nadonhas been in the information technology field for the past nine years, and building web applications and solutions with Macromedia tools for the past six. He holds several industry certifi-cations and is currently employed by Thomson Creative Solutions as a web services administrator.
Thanks to my mom and dad for raising me, supporting me, and pushing me toward fulfilling all of my educational goals and aspirations. Thanks to Uncle Ibrahim and Uncle Salah for being two of the greatest male role models in my life. Thanks to Aunt Khadiga and Aunt Hanem for being like second mothers to me. Thanks to my classy fiancée, Mona, for always being there, standing beside me and supporting me whether things are up or down, and always making my heart smile. Thanks to my brothers and sister, Tamer, Hesham, Soliman, and Yasmine—I couldn’t ask for better siblings to have in my life! Thanks to my baby niece, Safiya; I can’t wait to see you grow up. Also, thanks to all spouses and relatives of the people I have mentioned who have also been there for me. Thanks to the true and caring educators who taught me at NJCU, and my sincere and faithful teachers at McNair Academic High School. Thanks to all of my own students at Middlesex County College and Hudson County Community College. Thanks to Ihsan, and all my friends who stand by me; you know who you are. Thanks to you, dear reader, for entrusting me with your learning.
We’re glad you picked up this book to begin learning about building dynamic websites using Dreamweaver 8 with ASP technology. This book is geared for both beginners who know little about dynamic and database-driven websites, and intermediate users who want to begin building more powerful web applications—such as blogs and photo albums—along with working administration systems to effectively manage those data-driven applications.
To complete all of the activities in this book, you will only need Dreamweaver 8, a server running Microsoft’s classic ASP (Active Server Pages), and Windows 2000 or above. If you do not use the Windows platform, you can run the code remotely, such as on your web host’s server—just make sure your web host allows ASP scripts to run on its server.
You should also have either Microsoft Access 97 or higher, or SQL Server 2000 or higher, to build the databases that you will connect your pages to. You can download a 180-day trial of the new SQL Server 2005 at www.microsoft.com/sql. Alternatively, you can make use of the new (and free) Express edition of SQL Server 2005, which is available from the same location. You can also down-load a 30-day trial of Dreamweaver 8 at www.macromedia.com.
It is possible that throughout your reading of this book, you will have some questions or comments, so feel free to drop the authors a note. Omar Elbaga can be contacted directly through the feed-back/contact section of his website, http://elbaga.net, and Rob Turnbull can be contacted through the contact form on his website, http://robgt.com.
In this chapter, you’ll learn about a number of important concepts, including what a dynamic website is and how it’s different from a static site, what awesome dynamic features Dreamweaver offers you as a progressing web developer, and how ASP (Active Server Pages) fits into the mix. You’ll also discover which ASP features are supported by Dreamweaver, where ASP features are located in Dreamweaver, and how Dreamweaver automates ASP code to create dynamic sites.
The first thing going through your mind is probably “What in the world is a dynamic website?” Well, I want you to figure this out with me. Take two minutes and jot down some things you know about the word “dynamic.” What do you think a dynamic site is? And what do you think it can do? Do that, and then come back and continue reading. Remember, you’re thinking of the word “dynamic” in the context of com-puters and web development.
All right, you’re back! That was fast! What did you write down?
According to the American Heritage Dictionary, dynamic means “characterized by continuous change, activity, or progress.” That’s it! It’s all about change. See Figure 1-1 for further clarification on the definition.
Figure 1-1.Here is a screenshot of the definition of the word “Dynamic” at Dictionary.com. “Dynamic” means “changing.”
So sit back, relax, and let’s have some dynamic fun!
The first thing I want you to ask yourself is “What do I personally do with web development now?” and “What more do I want to be able to do?” If you said to yourself that you’re writing back-end database models for Amazon.com, you might want to stop right here!
If you said something like one of the following, though, this book will definitely help you take your web development skills to the next level:
I am designing websites for myself and family.
I am working for a company whose managers want me to upgrade the site so that they can begin adding content to the site on their own.
I want to start doing more dynamic things to my site, such as allowing web surfers to register and log in.
I want to start collecting information from my site visitors.
I want to start protecting site content from particular web surfers.
Data exchange
simple fact that it doesn’t change. Imagine Amazon.com without the personal wish list, or without the capability of tracking your recent purchases, or without the feature that says “Customers interested in this title may also be interested in . . .” Dynamic websites can spontaneously reconstruct themselves according to an individual web surfer’s needs. These sites change depending on how each user inter-acts with them. This is what data exchange is all about, and data exchange is what enables Dreamweaver 8 with ASP to save your website from static doom!
You want to exchange data between yourself and the web surfer; technically, the web surfer’s com-puter will be doing the exchanging. Basic HTML can’t handle this kind of data exchange, which is why we now use web programming technologies to do this for us—in our case, the particular technology is ASP. The web programming aspect takes care of all the dynamic stuff and then tells HTML what to print out. So instead of having to tell HTML what to do every time you want to change your data (by recreating HTML web pages), you set up an interactive system in which ASP tells HTML what to do. You’re saying, “HTML, we’ve already designed you. From now on, let ASP deal with you for major changes in terms of data.”
Let me show you a quick example. If you’ve already set up your environment, you should be up and running to view ASP pages on your local server. (You’ll learn all about setting up the Dreamweaver environment in Chapter 2.)
1.
Load Dreamweaver.3.
On your new “basic” page, type in the following message in design view:Hi, I don't know who you are because I'm just a plain ol' HTML web page.
You might want to change the title of your document. I changed the title of my document to
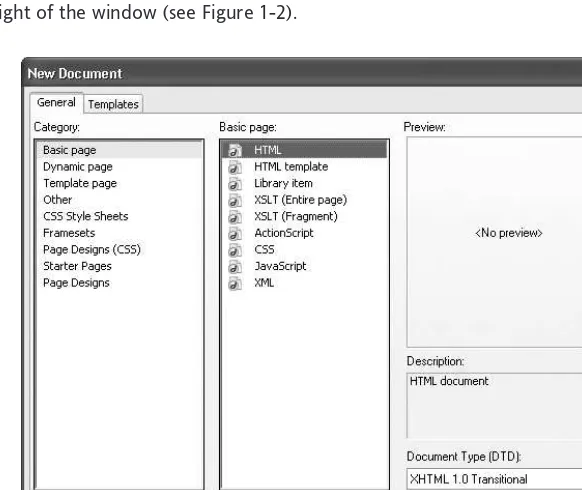
Plain ‘ol HTML. View the page in your web browser by selecting File ➤Save As, naming the file, and finally loading it into your browser. You can also press F12 to have Dreamweaver automatically load the page into your browser (see Figure 1-3).
Figure 1-3.View of static HTML page in the web browser
4.
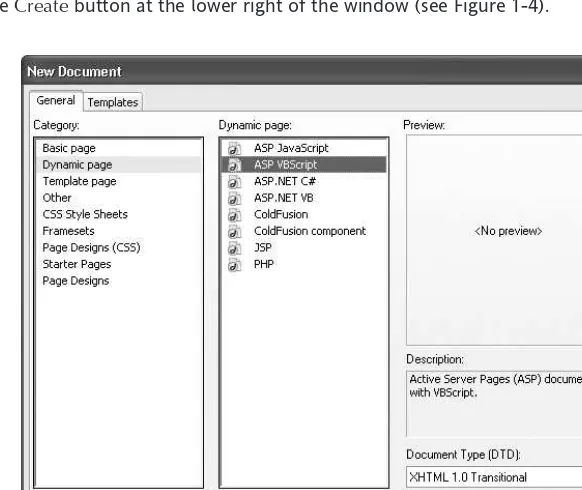
Next, within Dreamweaver, select File ➤New. Select theGeneraltab, highlight Dynamic pagefrom the left-hand Categorylist and ASP VBScriptfrom the right-hand Dynamic pagelist, and click the Createbutton at the lower right of the window (see Figure 1-4).
Your cursor will now be within the design body of the document. From the standard toolbar, select Insert ➤ASP Objects ➤Output. Dreamweaver will now create the following ASP brack-ets for you: <%= %>. (We’ll go into more detail about these brackbrack-ets in Chapter 3.)
5.
Within the brackets, type the following code:Request.ServerVariables("REMOTE_ADDR")
In Code view, your final code should look like the following:
<%= Request.ServerVariables("REMOTE_ADDR") %>
In Design view, you’ll see an ASP textual placeholder that represents the dynamic code. Highlighting the dynamic text in Design view will automatically highlight the same code from within Code view. Switch to Design view, take the focus off the dynamic text by moving your cursor to the right of the text, and hit Enter. Now type the following message:
I know who you are now. Your IP address is listed. Don't try anything funny!
6.
Save your page as dynamic_asp.aspand view it in your web browser (see Figure 1-5).Figure 1-5.View of the dynamic_asp.asp page in the web browser
See the difference? With HTML, you’re unable to recognize the web surfer; you can only share your information with him or her. But with ASP, you can collect information from the user. In this vein, you can also have the web surfer provide you with specific information, which can be accomplished through forms. We’ll go into further detail about this in the chapters to come, but most importantly, we want to drive the following point home:
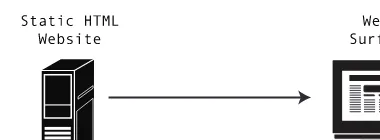
With a static HTML website, your data is merely sent to the web surfer’s web browser, unchanged and unprocessed, by a dynamic web programming language such as ASP (see Figure 1-6).
Figure 1-6.Illustration of data flow from a static site
With a dynamic ASP website, data can be sent back and forth between the website and the web surfer’s web browser (see Figure 1-7). As a web developer, you can do a variety of things with the data, such as collecting it for statistical purposes or processing it with a dynamic web programming lan-guage such as ASP. In the latter case, ASP processes the data on the server and then recreates the HTML page, sending the data back to the web surfer’s browser with new data.
Figure 1-7.Illustration of how data is exchanged between a dynamic site and the web surfer
Data that you provide, and data you collect from the web surfer’s computer, can be stored in a data-base. The ASP page can then connect and interact with the database while interacting with the web user. The flow of the interaction is all up to you (see Figure 1-8). For example, you can send data that you specify (such as contact info or “about” info) from a database to the web surfer’s browser with-out allowing the user to alter the data, or you can actually allow the surfer direct access to the data-base so they can add, edit, and delete data.
Dynamic takes over static
What do I mean by dynamic “taking over” static? I mean that we’re now in a new era of web develop-ment and we need to pick up the pace and get with the times. Web developdevelop-ment has been zooming right by us, and you’re just sitting around doing nothing! Well, not you, since you picked up this book.
Web development has progressed from displaying simple pictures to streaming live video footage. Even more drastically, it has gone from displaying basic text to regenerating huge reports on the fly, in seconds, at the touch of a web button. It has gone from static text to dynamic text—for example, you were once able to write up your own resume, create a website with basic HTML pages, and upload it to the Web. Now, websites are able to generate your resume and a thousand others on the fly, at the same time, based on the simple submission of a couple of online forms! If you don’t believe me, go visit Yahoo’s Hotjobs (http://hotjobs.yahoo.com) or www.monster.com.
Dreamweaver server models
How exactly does Dreamweaver make your sites dynamic? In the past, you could create HTML pages through Dreamweaver’s powerful visual layout system, but you would then have to edit the content of the actual HTML page and hand-code the HTML tags over again to make the pages more dynamic. Now, Dreamweaver integrates what Macromedia calls server models. You, as a web developer creating websites with Dreamweaver, get to choose whichever server model you want to create dynamic web-sites with, almost seamlessly. And the best part about it is that Dreamweaver generates the web pro-gramming code for you through its robust internal storage of stock code. It does so based on the server model you select.
The ASP VBScript server model
When developing web applications in Dreamweaver, it’s a good idea to choose a server model that you’re familiar with, or at least one that you want to become more familiar with. When you use server models, Dreamweaver will generate full-blown programming code—but you’ll want to be able to know what Dreamweaver is doing, and you’ll also want the ability to tweak code to attain more desir-able results. As such, this book will familiarize you with ASP as a language before teaching you how to develop using Dreamweaver’s drag-and-drop ASP server behaviors.
We’ll show you how to set up your environment in the next chapter—but for now, fire up Dreamweaver. Let’s take a look at the server models that Dreamweaver supports.
1.
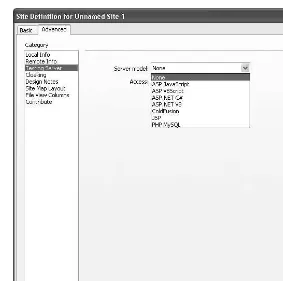
From the toolbar at the top, select Site ➤New Site.3.
You’ll see a drop-down list of the server models. Take a look at all of the server models Dreamweaver supports (also shown in Figure 1-9).Figure 1-9.The listing of server models Dreamweaver supports
ASP can be coded using either JavaScript or VBScript. Throughout this book, you’ll be using ASP with VBScript, not JavaScript. The reason for this is that VBScript is much easier to code with. JavaScript is much more sensitive—it’s case-sensitive, which can drive a programmer crazy, let alone people like us. One incorrect case and the entire web application can go bananas. Even more importantly, there is loads of free information on ASP with VBScript; but it’s hard to get support with ASP coded with JavaScript because it’s rarely used. VBScript is the most popular language to code ASP pages in, and you’ll find tons of resources on the Web. Go ahead and do a Google search if you don’t believe me, but I know you trust your teacher!
What Dreamweaver 8 offers you as
an ASP developer
Earlier, I said that ASP makes web pages dynamic by allowing the exchange of data between your web-site and the web server. ASP does this in two main ways. One way is through ASP’s own unique lan-guage, which makes use of conditional logic, functions, sessions, and cookies. (You’ll learn more about all of these in Chapter 3.) Another way ASP does this is through connecting to databases.
Checking out data
Regarding the first way mentioned, ASP can respond to a user’s interaction in various ways depending on the criteria you specify. For example, you could have ASP detect which browser your web surfer is using to view your site, and then you could have ASP automatically redirect the user to a different page of your choice. Before ASP, you couldn’t do this sort of thing with ease—now, you no longer have to be there when it’s all happening. You can set the conditions and then let ASP do the work. (You’ll learn more about this in Chapter 3.)
With ASP functions, you can verify data submitted through a form on your site and have ASP respond accordingly. For example, say you want to make sure that a user reads a “Terms and Conditions” page before proceeding on your site. In such a case, you can make sure the user ticks an appropriate check box before submitting a form—if the user fails to do this, you can redirect him or her to an error page. More generally, you can make sure the user provides you the data you need in order for him or her to go on interacting with your site.
Connecting to databases
The second way that ASP allows the exchange of data is one of the most unique and fun features about Dreamweaver: ASP can actually connect to a database, and Dreamweaver automates the whole process for you. Being that ASP code itself can qualify data, imagine how much more ASP can do when it has the ability to connect to a database. Now you’re talking about qualification on a much grander scale.
As you know, databases can store huge amounts of data efficiently. Databases make it easy to store, edit, and view data once an efficient database schema is set up. I’m sure you’re familiar with Microsoft Access—this is one of the most popular database systems used around the world, but it’s mainly used for local office use, and not to store huge amounts of data, because it’s simply not as robust as others. When it comes to companies that need to store massive amounts of data, SQL Server is more popular.
Where is ASP in Dreamweaver?
Great question! Now you’ll take a quick look at where the heck your ASP stock code is located within Dreamweaver, and how you access it.
ASP features supported by Dreamweaver
Anything you can do in ASP can be done within Dreamweaver. Dreamweaver’s versatile page layout options allow you to view your pages in three different views: Design, Code, and Split (shown in Figures 1-10, 1-11, and 1-12, respectively). Design view allows you to use Dreamweaver’s built-in func-tions for HTML, JavaScript, and ASP. Code view gives you the option to insert ASP code directly onto the page. Split view allows you to switch easily between Design and Code view, or have a look at both views at the same time. This is helpful when you want to make changes to code directly and see instantly how they affect the design of the page.
Figure 1-10.Example of Dreamweaver page development in Design view
Figure 1-12.Example of Dreamweaver page development in Split view
Before you dive into any ASP, which will naturally be a bit foreign to you, you’ll briefly look at two main sections of Dreamweaver: the Insertbar and the Applicationpanel.
Insert bar
Once you select the server model you’ll be using—ASP VBScript—you can gain access to ASP from two main sections in Dreamweaver: the Insertbar and the Applicationpanel.
Let’s take a look at the Insertbar first, which is located above the Dreamweaver document window and below the standard toolbar. It’s displayed by default—but to be sure it’s open in your Dreamweaver window, go to View ➤Toolbarsand make sure Insertis checked. Once it’s open, you can view the
Insertbar in two different styles. The first style is the Show as Menu view, in which each category in the bar is displayed separately (this is Dreamweaver’s default style). With this view, you have to click your selection from a drop-down menu on the left-hand side of the Insertbar each time you want to view a new category. Figure 1-13 shows this style, in which the Applicationcategory is displayed.
Figure 1-13.The Application category of the Insert bar in the Show as Menu view
If you click the Applicationtext, you’ll see a menu displaying the other elements.
The other Insertbar style, which I personally prefer, is the Show as Tabs style. In this style, elements are grouped as tabs that form one panel (see Figure 1-14). You can select this style by clicking Application
on the Insertbar, and then clicking Show as Tabs. This view allows you to switch between different ele-ments easily.
Switch to the Show as Tabs view, and try clicking the ASPtab Your Insertbar should now look like Figure 1-15.
Figure 1-15.The ASP tab of the Insert bar in the Show as Tabs view
You can also access these same menus through the standard toolbar by selecting Insert ➤Application Objectsand Insert ➤ASP Objects. This is where the majority of your ASP functionality is located. Before I describe the other place Dreamweaver stores ASP functionality—the Applicationpanel—let’s take a brief look at what’s stored in the ASPand Applicationtabs of the Insertbar.
The Insert bar’s ASP tab
The Insertbar’s ASPtab stores some of your basic ASP hand-coding functionality. Using this menu will help speed up some of your basic hand-coding. This menu doesn’t store your major ASP dynamic functionality, however. You won’t use it that often because it only automates some basic text for you. You should still try it out, though. By the time you get through Chapter 3, you’ll be able to write all of this code yourself with ease. This menu just helps speed up the process slightly.
In the sections that follow, I'll briefly describe the functions of each icon on the ASPtab, from left to right. (You can see the name of each button in a tooltip if you hover over the icon.) Note that some of the buttons are described under one heading due to their relationship.
Server Variables. Server variables hold information about your server—the computer server your web pages are hosted on. This information includes data such as IP address, type of computer, loca-tion of your web pages, names of files and folders, and so on. ASP can access these variables using code such as the following, which prints out the server’s IP address to the screen:
<%= Request.ServerVariables("REMOTE_HOST") %>
Dreamweaver stores the different code needed for your convenience so you don’t have to remember it.
Include. Includes, also known as Server Side Includes (SSI), are simply pieces of code saved as sepa-rate files and embedded into other web pages. They come in handy very often—for example, say you have some code that you need on every page, such as a footer including a company name and a date. The date can be automatically updated using an ASP function—but what if you want to update the company name? If the company name is stored in an include file, you just need to change the instance in the include, and the name will be updated on every page.
Code Block. This is Dreamweaver’s way of adding a new, blank block or line of dynamic code to your web page. All ASP code must be within ASP delimiters (<%and %>). Here’s an example of how these delimiters are used in code:
<% ' ASP code goes here %>
These delimiters are similar to HTML tags. If you’re familiar with HTML, you know that all HTML con-tent must appear within brackets, as in the following code:
<p>This is my web page!</p>
Dreamweaver will add the ASP delimiters for you when you want to hand-code a block of ASP code. You can either type out the ASP delimiters or you can just click the icon labeled Code Block, and Dreamweaver will write the delimiters out for you. Then you simply write your ASP code within the delimiters.
Output. The Outputbutton inserts the <%=and %>delimiters, as shown in the following code: <%= "ASP forever" %>
The Outputbutton functions similarly to the Code Blockbutton, but it also includes an equals sign after the first delimiter. The addition of the equals sign tells the HTML to print to the screen whatever is within the code block. The opening bracket along with an equals sign is actually an ASP shortcut for another, longer object, Response.Write, which tells the HTML to print to the screen.
Response.Write. The equivalent of the Outputbutton code using the full Response.Writesyntax is as follows:
<% Response.Write "ASP Forever" %>
If, Else If, Else, End. This is actually part of VBScript’s conditional logic. It’s used to tell the ASP processor to execute code based on conditions. When you use this code, you tell the ASP processor something like the following: Ifthis is true Thendo this, Elsedo this, End. You’ll see exactly how to do this with real coding in Chapter 3.
Server.CreateObject. You don’t need to worry much about this right now, but this is code that’s needed to create an instance of an ASP object. You’ll be using one of these objects for sending emails through your ASP pages, because the code for triggering emails will require that you create an instance of the mailobject. You’ll learn more about this in Chapter 5.
Trimmed Form Element. This code will get rid of all empty spaces before and after any text that’s submitted through a form element, upon retrieving the data. This is important because you don’t want to have white space taking up unnecessary room if this code block is to be submitted into your database.
The code ensures that no empty spaces are received for the value of the user_idand username vari-ables. Again, you’ll learn more about querystrings in Chapter 3.
The Insert bar’s Application tab
Now switch to the Applicationtab from the Insertbar so you can take a look at the ASP functionality there. The Applicationtab is where you’ll be using the majority of the ASP functionality, and where most of the dynamic functionality is located. Figure 1-16 shows the Applicationtab.
Figure 1-16.The Application tab from the Insert bar, which contains 14 elements
Next, I’ll briefly describe each element on the Applicationtab, from left to right.
Recordset. A recordset is a set of records stored in a database. Since ASP can connect to a database, you can retrieve records from any database table(s) you specify in any order you specify. This is the foundation of your database-driven ASP web pages. Most other dynamic ASP functions within Dreamweaver will not work without having at least one recordset specified in your document, because you first need to retrieve data before you can display or edit it. However, you won’t necessarily need to create a recordset when you simply want to insert data into the database.
Command. Simply put, the Commandobject will contain SQL instruction to be executed against the database (e.g., inserting, updating, or deleting a record). You’ll learn more about SQL commands in upcoming chapters.
Dynamic Data. Dynamic data is any data that comes from a database or that’s passed through ASP variables. You can insert this data anywhere in your document as regular text, you can have Dreamweaver create an HTML table to display it, or you can have Dreamweaver attach it to a form element.
Repeated Region. A repeated region is used for cycling through a number of records retrieved from a database in a recordset and displaying them on a web page. For example, say you’ve retrieved a list of products in a recordset. ASP will only display one product, unless you use a repeated region, which allows you to loop through all the products and display each one in turn. A repeated region also allows you to specify how many records from a recordset you want to show at once; if you have hundreds of products, it makes sense to browse them a few at a time.
SQL (Structured Query Language) is a language that allows you to access and make modifications to a database.
Show Region. The Show Regionbutton allows you to show or hide regions of data based on criteria you specify for a recordset. For example, suppose a user is searching through your database for a record. If the record isn’t found, the recordset will come up empty. You can then show a particular message to your user when the record isn’t found, such as, Sorry, your query returned no results. It can also be used to make extra functions available to someone logged in as an administrator as opposed to a regular user. This feature is versatile and can help make your web applications much more user-friendly and intuitive.
Recordset Paging. This feature gives you the ability to page through records. Dreamweaver will add the ASP functionality to allow the user to go to the previous, next, first, or last record. This works only when you’re not displaying every record in a database table. For example, say you retrieve 100 records in your recordset—how will you display all of those records on a page? Will you display them all at once in a repeated region, or will you group them? This question goes back to style, but also usability. It’s common to group that many records in tens or twenties so that a user can view 10 or 20 records at a time. The Repeated Region behavior allows you to show a specified amount of records from a recordset. After using this behavior, you can apply the Recordset Pagingbehavior to allow your user to page through the recordset.
Go To. This behavior makes it easy to pass values from your database to a page of your choice. With this behavior, you’re given the option to pass the values through form elements or through the querystring of a hyperlink. This is great because it’s like a filtering system. You can then make a detail page that would query the database to retrieve a matching value from within the database.
Recordset navigation status. This behavior displays a numerical count of how many records were retrieved in a recordset. This is helpful in various ways, because it provides the user with an idea of how many records exist in a database query. For example, if your user searched for something in your database, it’s helpful to tell him or her how many records were found. Alternatively, you as the web developer might want to know how many users are in your database. In this case, you can just add this behavior to a document, and each time it’s accessed, it will display the current number of records in a recordset without having to display every record on the page.
Master Detail Page Set. This behavior is similar to the Go Tobehavior, but instead it creates a set of two pages: one master page (the Go Topage), and one detail page, which fetches whatever values were requested through the master page.
Insert Recordset, Update Record, Delete Record. These three behaviors do exactly what their names say. They will create the ASP code needed to insert, update, or delete records in a database. Keep in mind, once you know the SQL commands for inserting, updating, and deleting, you can use the Commandbehavior to do the same thing. The difference between using the Commandbehavior and using these behaviors is that these behaviors insert, update, or delete records through stock ASP code. Using your own SQL commands with the Commandbehavior does the same thing a little more efficiently, though, because it doesn’t have to produce so much code.
User Authentication. This consists of several behaviors that allow you to authenticate your users. Dreamweaver will automate the following types of web applications for you: logging in a user, logging out a user, restricting access to a page based on your own criteria, and checking to see if a username already exists in a database table before allowing a web surfer to submit his or her username choice so that the username isn’t duplicated for two different people.
XSL Transformation. This option allows you to integrate XSL transformations to any XML data resid-ing on the server. XSL transformations will not be discussed in this book.
Application panel
The Applicationpanel is the second major section that stores a great amount of dynamic ASP functionality. It’s divided into three tabs:
Databases, Bindings, and Server Behaviors. If you see another tab labeled Components, don’t worry about it, because it isn’t active for the ASP VBScript server model. You could also remove the tab to free up some space, but remember to put it back if you’re using a different server model. You can do so by selecting Windowfrom the standard toolbar and checking Components. The Application panel is an area that gathers related functionality in one spot. The server behaviors listed in the Applicationpanel give you access to the same behaviors in the Applicationtab of the Insertbar (which were described in the pre-vious section). Figure 1-17 shows an example of the Applicationpanel. Next, I’ll briefly describe the Databases and Bindings tabs on the
Applicationpanel.
The Databases tab
This is where you connect your ASP pages to your database. Dreamweaver creates all the necessary code for you once you enter the connection string. The code is then automatically inserted on each new dynamic page created. All the database connections related to your site are accessible through this tab. This is discussed in more detail in Chapter 6.
The Bindings tab
The Bindingstab consists of a list of any dynamic data you add to your document, such as recordsets, commands, and ASP variables. It’s called Bindings because it allows you to bind dynamic data to selected areas of your document, such as form elements, static text, and HTML attributes. You can bind dynamic data that comes from a database or an ASP variable. For example, when having users update account-related data, you can automatically bind data already stored in the database to the text field of an update form so users don’t have to retype all the data every time they want to update a single item related to their account (e.g., their password or the city and state they live in). This will be discussed further in Chapter 3.
Figure 1-17.The Application panel, which is comprised
Conclusion
In this chapter, we’ll discuss the features of the Dreamweaver environment that you should be aware of before you start to create your websites. We’ll begin by examin-ing the workspace layout, and then we’ll move on to cover the panels and features of the Multiple Document Interface and the various toolbars available to make your work easier. Then we’ll look at the new tools available in Design view before we wrap up the chapter with a demonstration of how to define an ASP VBScript website.
Workspace layout
When you first run Dreamweaver, you are asked to choose a layout, either Designer or Coder. There are only a couple of fundamental differences between the two:
Designerlayout places the side panels to the right of the main document window and opens documents in Design view by default.
Coderlayout places the side panels to the left of the main document window and opens documents in Code view by default.
In both layouts, you are able to drag and drop panel groups to the left and right of your workspace or undock them completely in order to get exactly the working
A new, much beloved feature in Dreamweaver 8 is that you can now save your own workspace layouts. Once inside the program, you can change the layout by selecting Window ➤
Workspace Layout(Figure 2-1).
You’ll notice a third standard option on the list of workspace layouts, Dual Screen, which is for those with dual monitor setups. The other two options allow you to save a workspace that you have set up under a name you specify and also to manage the layouts that you create (i.e., rename or delete them from your list of saved layouts).
The Multiple Document Interface
The Multiple Document Interface, or MDI, has remained structurally the same for this latest release of Dreamweaver, but a few items have been merged or moved around to make the workflow a bit smoother or more logical.
The main change has been in the creation of the unified CSSpanel, which is now an all-encompassing panel showing the cascade of styles applied to a specific element, making it easy to see which attrib-utes are being styled and how the cascade of the CSS applies to the tag selected on the page. You can also edit the styles directly in the panel and see your changes applied instantly to the page.
Another sensible change involves the Referencepanel being moved to the wider Resultspanel at the bottom of the screen, making it much easier to read the panel’s content (Figure 2-2).
Figure 2-2.The Reference panel contains several very useful reference books.
You can still group the panels in whichever way you prefer and, of course, you can rename most of the panel group names by right-clicking the panel group and selecting Rename Panel Group(Figure 2-3).
Figure 2-3.The Rename Panel Group dialog Figure 2-1.The new Workspace Layout
Each panel has a context menu that can be accessed by right-clicking the panel tab or left-clicking the
Panel Group Optionsmenu icon (Figure 2-4).
There are a couple of restrictions that you should bear in mind when it comes to panel groupings: You cannot regroup the Properties panel and the Insertpanel, nor can you group anything with them. However, you can group all other panels as you like.
To change the panel group in which a panel appears, use the Group [panel] withcontext menu option. This is also the method you would use to arrange the panels within the same panel group. When you group a panel within a panel group, it is added to the right-hand side of the list of tabs for that panel group. To shuffle the panel left, you regroup the other panels within the same panel group to add them to the right. This process can be bit of a pain, but if you must have the panels in a specific order,
it’s the only way to do it.
Nineteen panels make up the Dreamweaver environment. Fortunately, you don’t have to have them all open at once. And now, because you’re now able to save your own layouts in Dreamweaver, there’s no need to have loads of panels open all the time, which results in more screen real estate for those panels that you use most and do need to have open.
In the sections that follow, we’ll delve into each of the Dreamweaver panels you’ll use most often.
The CSS panel
This new release of Dreamweaver is heavily geared toward CSS, which is apparent with the new unified CSSpanel (Figure 2-5). It’s a lengthy panel that includes everything about the CSS styles you’re using when editing your pages.
A toggle button at the top of the CSS panel allows you to switch between looking at Allstyles available on the page and styles that apply to the Currentselection on the page.
In the Allview, the panel lists all the styles in the stylesheet under a heading of All Rules, and below that list it displays the properties for the style selected in a list labeled Properties.
In the Currentview, the panel is split into three sections. The first section, Summary for Selection, dis-plays a summary of styles applied to the currently selected tag on the page. Below that is the Rules
section, which displays a list of CSS rules that apply to the selection. And finally, below the Rules sec-tion is the Propertiessection, which displays the properties for the selected rule. You can also edit the properties for the selected rule in this section.
The Application panel group
Below the CSSpanel is the Applicationpanel group, which houses four panels: Databases, Bindings,
Server Behaviors, and Components(Figure 2-6).
Apart from the Componentspanel, which is not used for ASP sites, we’ll be using these panels in this book quite a lot, so let’s take a good look at them now to get familiar with them.
The Databases panel
The Databasespanel displays your database connection information. If you have a connection to a database configured in Dreamweaver, this panel will display it. If you expand the connection, Dreamweaver goes to the database and brings back all the objects that it finds in there, grouping them under three items: Stored procedures, Tables, and Views(Figure 2-7). This panel assists you in creating database-driven, dynamic websites.
Figure 2-7.The Databases panel of the Application panel group shows the database connection(s) used in your site. Expand the connection to show the database objects available through it.
You can also define a new connection to a database from this panel by clicking the + button and selecting how the connection should be made, either through a custom connection string or by using a Data Source Name (DSN), as shown in Figure 2-8.
The Bindings panel
The Bindingspanel allows you to create data sources that you can then bind to your page, including recordsets, commands, request variables, session variables, and application variables (Figure 2-9).
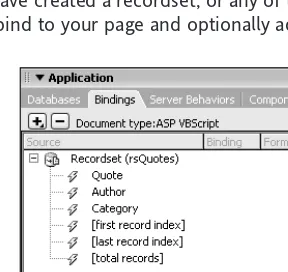
Once you have created a recordset, or any of the other data source items, it will be listed in this panel for you to bind to your page and optionally add formatting to (Figure 2-10).
Figure 2-10.A recordset displayed in the Bindings panel
Figure 2-9.The Bindings panel and its menu of options
Figure 2-8.Creating a connection to a database
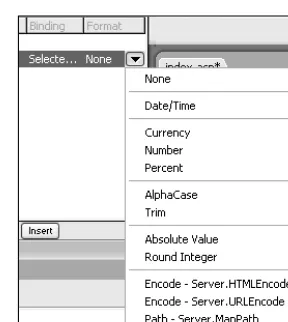
When you bind an item from the Bindingspanel to the page, selecting that item on the page will expand the item in the Bindingspanel to show the options available to you for that binding. Clicking the arrow icon in the Formatcolumn displays a large array of formatting options to suit lots of differ-ent purposes (Figure 2-11).
The Server Behaviors panel
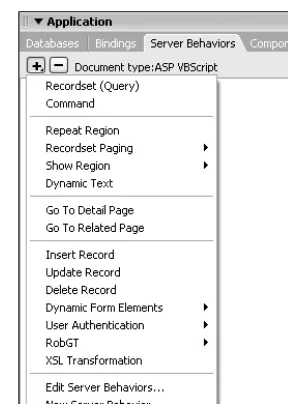
The Server Behaviorspanel displays all the server-side logic that you have applied to the page (Figure 2-12), including recordsets, commands, and any server behaviors, of course!
Double-clicking an item in this list will launch the appropriate dialog for you to edit that item’s details. For example, if you double-click a recordset, the Recordsetdialog will launch.
Many options are available from the +menu in the Server Behaviorspanel, including entries that allow you to create a recordset or add a command to the page, duplicated from the Bindings panel (Figure 2-13).
Figure 2-12.Displaying a list of items in the Server Behaviors panel
The Componentspanel isn’t used in ASP VBScript sites, so you can close that panel to make room for something else you might use more readily, or to simply have less clutter in your environment.
The Tag Inspector panel group
The Tag Inspectorpanel group holds two panels by default: Attributesand Behaviors. The title of this group changes depending on what is selected in the document you’re editing. If nothing is selected, then the name displayed is Tag <body>, meaning that you’re at the top level of your document: the
<body>tag (Figure 2-14).
Figure 2-14.The Tag Inspector panel group as displayed with nothing selected on the page
If you select something on your page, the title will change to reflect that selection. For example, selecting a paragraph of text on your page will make the title of this group Tag <p>(Figure 2-15).
Figure 2-15.The Tag Inspector panel group as displayed with a paragraph item selected on the page
This is to let you know, at a glance, what tag you will be affecting with any changes you make in this panel group.
The Attributes panel
The Attributespanel displays the properties of the tag you are editing in one of two ways: Category view or List view. Category view displays the properties grouped together into relevant categories. List view lumps them all into one long list. The two icons at the top of the panel switch between these two views (Figure 2-16).
The Behaviors panel
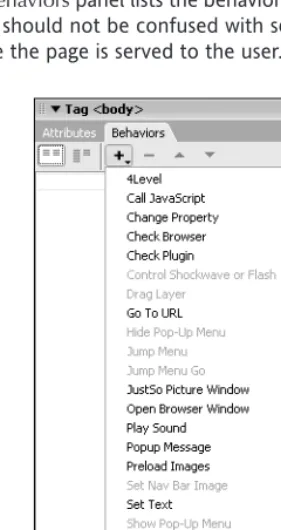
The Behaviorspanel lists the behaviors that have been applied (if any) to the selected tag (Figure 2-17). These should not be confused with server behaviors, which are pieces of code that run on the server before the page is served to the user.
Figure 2-17.The Behaviors menu, which will grow as you install even more extensions!
Behaviorsare usually JavaScript code that control or react to events on the web page that the user is interacting with, such as popping up windows and showing/hiding layers of the page. These types of actions are usually controlled by JavaScript; therefore, you use behaviors in Dreamweaver to apply that code to your pages.
The Files panel group
The Filespanel group contains three panels by default: Files, Assets, and Snippets.
The Files panel
This panel is where you can access all the files of your site for editing and so forth (Figure 2-18). At the top of the panel are two drop-down lists. The left one lists all the sites you have currently defined in Dreamweaver. The bottom option in the list is Manage Sites, which launches the Manage Sites dialog, allowing you to add, edit, and delete sites, along with import and export site def-initions and duplicate a site definition—all of which can speed up the site definition process quite a bit.
The drop-down list on the right allows you to choose which view you want to look at in the Files panel. The choices are Local view, Remote view, Testing server, and Map view. The first three options display the files of your site as per your site definition
structure. If you haven’t specified a remote server or a testing server for your site, these options will not display anything. If you have specified a remote server, the files at that location will appear. The Map viewoption will display a graphical representa-tion of your website, so long as you have defined a homepage for your site.
Below the two lists is a series of icons that have some very useful functions. Left to right, they are as follows:
Disconnect from remote hostis grayed out unless you are connected. Refreshwill refresh the listing of files displayed in the panel.
Get file(s)will get the files currently selected in your site from the remote server and overwrite them if you tell it to.
Put file(s)will put a copy of the files currently selected in your local site on the remote server. Check Outwill check out the selected files, if you have check-in/check-out enabled for the site. Otherwise, this button is grayed out.
Check Inwill check in the selected files, if you have check-in/check-out enabled for the site. Otherwise, this button is grayed out.
Expand to show local and remote siteswill replace the current Dreamweaver window with a full-size Files panel window that lists one set of files (local) on one side of the screen and another set of files (remote) on the other side of the screen (Figure 2-19). You can change what is displayed on the screen using the toggle buttons at the top of the screen, and you can return to the main Dreamweaver window by clicking the same icon (this time with the label
Collapse to show only local or remote files) again.
Figure 2-19.The expanded Files panel displays local and remote files for easy management.
The Assets panel
Dreamweaver keeps track of all the media, or assets, that your site makes use of and categorizes them for you. The Assetspanel is the place to look for your media when you need to add something to your page, be it an image, a Flash movie, a script, a template, or even a URL (Figure 2-20).
The Snippets panel
Used properly, the Snippetspanel can be a real productivity boon for web developers. The Snippets
panel is a repository of code for you to reuse over and over again, saving you lots of time when it comes to doing the same thing on multiple sites (Figure 2-21). This panel comes populated with lots
of JavaScript code that covers many areas of JavaScripting, including populated drop-down menus (such as months and years), calculations (such as areas of circles, rectangles, etc.), conversion scripts (for time, weight, file size, etc.)—the list goes on and on. Check them out when you can. Some of them are quite useless, and some of them are outdated techniques, but the majority can be useful under the right circumstances.
The Properties panel
At the bottom of the Dreamweaver integrated development environment (IDE) sits the Properties
panel, better known as the Property inspectoror PI(Figure 2-22). This ever-changing panel displays the properties of whatever is selected in Design view. You can access the page properties by clicking the Page Propertiesbutton on the dialog when nothing is selected in Design view.
Figure 2-22.The Properties panel, also known as the Property inspector or PI
Your changes in Design view are immediately reflected in the Propertiespanel, where appropriate. If you make a change to your page in Code view, then the Propertiespanel needs to be manually updated before you can use it again to make property changes, and it will tell you the same (Figure 2-23).
The alternative to manually updating the Propertiespanel is to switch back to Design or Split view, which will also refresh the page.
The Propertiespanel is your friend, and you will undoubtedly use it a lot. We certainly make great use of it in this book!
The Results panel group
Sitting below the Propertiespanel is the Resultspanel group. It’s an awkwardly named panel group due to its contents not all being “results” particularly, but we’ll brush past that point. Of course, if its name really grieves you, you can always rename it to something you think more suitable for the job. Just right-click the panel name and select the Rename panel groupoption from the context menu.
The Resultspanel group contains eight panels by default (Figure 2-24): Search, Validation, Target Browser Check, Link Checker, Site Reports, FTP Log, Server Debug, and Reference.
Figure 2-24.The Search panel in the Results panel group. Results of find and replace searches appear here.
The icons down the left side of the report area change from panel to panel, but some remain the same, such as Save report, which does exactly that.
The Search panel
The Searchpanel is actually a results panel for find and replace operations that are performed. Each result line is clickable and will take you to that location of the document it refers to, to show you what was replaced, or found. If you have purchased a third-party file comparison tool, such as the one listed on the Macromedia website and made by Araxis, then you can tell Dreamweaver to make use of it via the Preferencessection (Edit ➤Preferences ➤File Compare). After you specify a tool to compare files, the Compare filesoption becomes usable in Dreamweaver; you can find this option in the con-text menu (right-click) in the Filespanel. Results of the comparison tool’s findings are displayed in the Resultspanel.
The Validation panel
The Validation panel displays validation errors encountered on the page, when the validator is run. The settings for the validator are in the Preferencesarea, which you can access by selecting Edit ➤
The Target Browser Check panel
In the Target Browser Checkpanel, you can run checks against the list of browsers you’ve specified that you want your site or page to work in. Again, you can select the options for this panel by choos-ing Settchoos-ingsfrom the menu that pops up when you click the green arrow. The drop-down list at the top of this dialog allows you to select whether you want to check the current document only or check the entire site.
The Link Checker panel
The Link Checkerpanel offers three options. You can check your website for broken links, external links (or links that go to pages not contained in your local website), and orphaned links. These options can be run only once an entire site scan has been performed, so Dreamweaver has a site cache that it can use to check for orphaned links, which are links to files in your local site that no longer exist.
The Site Reports panel
The Site Reportspanel displays the results of the report you ask it to run. To run a report, click the green arrow and the Reportsdialog will appear. Here you can specify what you want to see a report on. Just select the items relevant to your report and click Run(Figure 2-25).
Figure 2-25.The Reports dialog options allow you to specify what level of detail you want to see in your report.
Once the report is complete, the results are displayed in the list. Be aware that this is not a flawless mechanism and should not be relied upon solely—get a second opinion!
The FTP Log panel
The Server Debug panel
The Server Debugpanel is useless for ASP VBScript sites and can be ignored.
The Reference panel
The Referencepanel has moved from the side panels down to the much wider bottom panel, so read-ing its content is now a much more comfortable experience than in previous Dreamweaver versions.
Thirteen reference books are available in this panel. These books cover a wide range of topics, many of which web developers today need to have a grasp of, including HTML, JavaScript, CSS, XML, XSLT, SQL, and more.
Toolbars
The toolbars sit at the top of a document by default. Some developers like to have them docked as part of the IDE, and remove them from a document and dock them below the Inserttoolbar. Choose the location for them that works best and is most comfortable for you.
Figure 2-26.The Insert bar in Tab mode, along with the other toolbars available to the workspace
The Insert toolbar/panel group
The Insertpanel group is a kind of crossbreed. It’s not really a panel group like the other the panel groups, but it does contain lots of panels, so we’ll stick with the analogy for now.
You can view the Insertpanel in Menu mode as shown in Figure 2-27 or in Tab mode as shown at the top of Figure 2-26.
Figure 2-27.The Insert toolbar in Menu mode
Each of the panels in the Insertbar contains shortcut icons to perform an action that can also be per-formed by selecting one of the main menu selections found on the Insertmenu.
Figure 2-28.The Customize Favorite Objects dialog, where you can create your own handy toolbar of regularly used objects
You can select the element you want to appear on your Favoritestoolbar in the left list, click the dou-ble arrow button in the middle, and that element will appear in the list to the right. If you need to add a separator to the bar, click the Add separator button at the bottom of the dialog. You can also reorder the items in the list by selecting an item to move and then clicking the up or down arrow to move it in that direction. To remove an item from the bar, click the trash can icon above the list on the right after you select the item(s) to remove.
Once you’re happy with the contents of your Favoritestoolbar, click OKand the toolbar will be built for you (Figure 2-29 shows an example).
Figure 2-29.A customized Favorites toolbar
You can, of course, edit the content of the Favoritesbar at any time by right-clicking an empty area of the bar and selecting Customize Favoritesagain.
The Document toolbar
The Documenttoolbar contains several buttons and one input text field. The text field is for editing the title of the page you are working on (Figure 2-30).
The three leftmost buttons, Code, Split, and Design, allow you to switch between the three views available in Dreamweaver. The remaining buttons, from left to right, are as follows:
Live Data View: This button is a very powerful feature that allows you to view actual data from your database on the page you are creating, while you are creating it. You can make design changes (or code changes) to your page and see—in real time—
what presentational effect they will have on the data being displayed. (The page’s Titlefield separates this button from the rest of the buttons.)
Browser Check: This button gives you quick access to run a browser check and to the settings for what you would like to have checked. You can also specify if the browser check should run when you open a page or not, and you’ll find links to the relevant report page in the Resultspanel to view any errors that it finds (Figure 2-31). This toolbar button will change to let you know if the page passed or failed the checks.
Validate Markup: This button pops up a menu that gives you options to check the markup of the current document, the entire site, and selected files in the site, and also to specify the settings that you would like to validate against (Figure 2-32).
File Management: This button is used for quick access to file actions such as Get, Put, and Locate. The Locate in sitefeature is useful if you are editing lots of files at once in a large site and
need a quick reminder which file you are looking at (we all create lots of index.asppages, right?). Clicking Locate in sitewill expand the Filespanel to show the currently file selected in the list.
Preview/Debug in Browser: This button allows you to launch one of the browsers listed for preview/debugging purposes. You can also edit the browser list from this menu.
Refresh Design View: This button enables you to bring Design view into line with any changes you may have made in Code view. Most of the changes you make will be reflected in Design view, but for those times when they are not, clicking this button does the trick.
View Options: This button lets you decide how you want certain visual elements to be dis-played (Figure 2-33). You can use any or all of the visual aids that Dreamweaver has to offer, and you use this menu to specify which ones. If you work in Split view, you also have the option of setting Design view to be above or below the code window. The menu contains different options in Code view that are relevant to code editing only.
Figure 2-33.The View Options menu options to quickly show and hide Design view layout helpers
Figure 2-31.The Browser Check menu options
Visual Aids: This button gives you several options for turning on or off visual items that Dreamweaver can display in Design view to help you while developing your web pages. With Dreamweaver’s vastly improved CSS handling, the new additions to this menu include showing CSS layout backgrounds, the CSS layout box model, and CSS layout outlines (Figure 2-34). This button is disabled in Code view (obviously!).
The Standard toolbar
This toolbar gives you quick access to create new files, open existing files, save an open file (if it needs to be saved), and save all open files. The latest addition to this toolbar is the Print Codebutton. The rest of the toolbar is pretty standard (pun intended!), with Cut, Copy, and Pastebuttons, along with Undoand Redo(Figure 2-35).
Figure 2-35.The Standard toolbar
If you need to set a different number of allowed undos in Dreamweaver than the default of 50, select Edit ➤Preferences, and in the Generalsection, change the value in the Maximum number of history stepstext field. The larger the number of undos, the more memory Dreamweaver will use to remem-ber what happens as you use it, so be judicious!
The Style Rendering toolbar
The Style Renderingtoolbar is hidden by default, but you can easily unhide it by right-clicking any-where in the toolbar area and selecting the Style Renderingoption (Figure 2-36).
Figure 2-36.The Style Rendering toolbar
This toolbar is a new addition to Dreamweaver, and a welcome one at that. With a good deal of the focus of this release on CSS enhancements, the Style Renderingtoolbar is a great benefit for those who create websites that will be viewed on different mediums, such as WebTV or handheld devices. If you create separate stylesheets for these specific mediums, you can see what the content will look like rendered in Dreamweaver’s Design view using this toolbar. Click the appropriate button on the
The options on the Style Renderingtoolbar as are follows:
Screen: View the page as it would appear on a computer screen.
Print: View the page as it would appear printed.
Handheld: View the page as it would appear on a handheld device, such as a mobile phone or PDA.
Projection: View the page as it would appear on a projection device.
TTY: View the page as it would appear on a teletype machine.
TV: View the page as it would appear on a television screen.
Toggle CSS: Turn CSS rendering on or off in Design view.
The Coding toolbar
There have been some great improvements to the coding environment in Dreamweaver. A massive boost for productivity here is the long-awaited Codingtoolbar (Figure 2-37).
The Coding toolbar provides quick access to many standard coding operations, such as high-lighting invalid code, applying and removing comments, indenting and outdenting code, and inserting recently used code snippets. One of our favorite features of the toolbar is the ability
to collapse and expand code selections. This is a superb feature, and once you’ve used it for a while you’ll wonder how you ever did without it.
To collapse a section of code, follow these steps:
1.
Highlight every line that you want to include in the collapsed section, and then click the Collapsebutton. The easiest way to select lines of code may be to click the line num-bers if they are visible; otherwise, click in the thin blue bar where they appear, between the Codingtoolbar and the code window.2.
Click the line where you want to begin the collapse and drag down to the end of the section to collapse. As you drag, a line is drawn with a box at each end with a minus symbol in it.3.
When you release the mouse at the endpoint of the section you want to collapse, the line stays in place.Click the minus box icon to collapse that section, which leaves just a few characters visible in a gray/brown box for identifying the section collapsed. Click the plus sign button to expand the area with again. Clicking in the document away from the collapsed selection will hide the plus sign icon. Clicking a collapsed section’s gray/brown box will display the plus sign icon for you to expand the selection again.
The Expand Alltoolbar button will do exactly that: expand all collapsed code blocks. Bear in mind that
once you expand an item, if you don’t collapse it again before clicking elsewhere in the document or otherwise moving the selection focus to something else, the selection for the code collapse will dis-appear, and to collapse it again you will need to reselect the code again first. While the code block remains selected, the collapse area remains active. If you expand an area to edit it, you will need to reselect the area before you can collapse it again. It’s a bit of a bind, but that’s the way it works. It’s a great tool for helping to navigate those long pages of code.
The Coding toolbar is visible only in Code view and appears on the left side of the code window. You can’t undock it, but you can hide it if you don’t want to use it.
New tools in Design view
Design view now features a couple of handy new tools: a Zoomtool, a Magnificationlist, a Handtool, and a Guides feature. With the exception of the Guidesfeature, these items can be found at the bot-tom of the document window, to the right of the tag selector bar (Figure 2-38).
Figure 2-38.New Design view tools for zooming and panning
Zoom
The magnifying glass icon is the Zoomtool. Clicking this button allows you to drag an area of the page to zoom in to, or to simply click to zoom in by one magnification step at a time. Pressing the Alt key when clicking zooms back out one level at a time.
You can now get really close to the page to fine-tune anything you might be having trouble with, such as alignment of elements on the page. Zooming right in might help you to resolve these types of issues.
Magnification
The Magnificationlist has a preset selection of zoom levels for you to choose from. Selecting one of them will zoom to that level in the open document, starting at the top left of the page—unless you were already zoomed on a specific area, in which case it will continue to zoom on that area.
Hand
The Handtool enables you to pan around the document when you are zoomed in to it. To return to editing mode to modify the content on the page when zoomed in, click the black arrow icon.
Guides
Select View ➤Guides to display a menu with several options for controlling how guides should be seen (or not seen) in the Dreamweaver workspace (Figure 2-39).
Figure 2-39.The Guides menu, along with several preset standard website sizes
The lower portion of the menu offers preset guide sizes which, when selected, will add guides at those sizes to the document window.
You can also access the Guidessettings by selecting View ➤Guides ➤Edit Guides (Figure 2-40).
Figure 2-40.Editing guide properties in the Guides dialog
If you have the rulers turned on (View ➤Rulers ➤Show), you can drag guides out from the top or the side of the document by clicking the ruler and then dragging. A guide is created and a little yellow tooltip tells you the pixel position as you drag it along. The tooltip also appears when you mouse over a guide that is already positioned in the document (Figure 2-41).