Manga Studio 5 Beginner's Guide
An extensive and fun guide to let your imagination loose
using Manga Studio 5
Michael Rhodes
Copyright © 2014 Packt Publishing
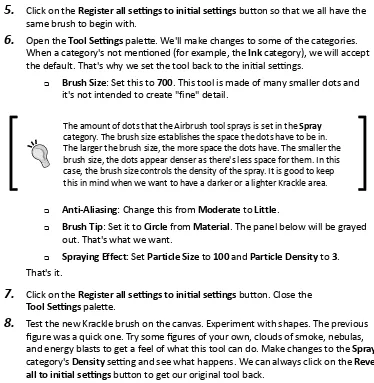
All rights reserved. No part of this book may be reproduced, stored in a retrieval system, or transmitted in any form or by any means, without the prior written permission of the publisher, except in the case of brief quotations embedded in critical articles or reviews.
Every effort has been made in the preparation of this book to ensure the accuracy of the information presented. However, the information contained in this book is sold without warranty, either express or implied. Neither the author, nor Packt Publishing, and its dealers and distributors will be held liable for any damages caused or alleged to be caused directly or indirectly by this book.
Packt Publishing has endeavored to provide trademark information about all of the companies and products mentioned in this book by the appropriate use of capitals. However, Packt Publishing cannot guarantee the accuracy of this information.
First published: April 2014
Production Reference: 1170414
Published by Packt Publishing Ltd. Livery Place
35 Livery Street
Birmingham B3 2PB, UK
ISBN 978-1-84969-766-8
www.packtpub.com
About the Author
Michael Rhodes
took apart grocery bags at the age of five to create pads of drawing paper. Decades later, he still hasn't stopped, although he has switched from grocery bags and crayons to charcoal, paint, pen, ink, and computer. He has taught web designing at Silicon Valley College and has conducted cartooning classes for elementary school children. He has illustrated Tales of The Living Room Warrior, an eight-part fable following the epic adventuresof cats from the creation of the world to the domestication of humans.
He is also the creator of Thingies, a fantasy comic book series that details the adventures and perils that a reporter experiences while she uncovers secrets of her universe. His books and art work are carried by Fantastic Comics in Berkeley, Heroes and Villains Comics in Pleasanton, and Solo Comics in the Napa wine country. He holds a Bachelor's degree in Digital Design. His cartoons and artwork are displayed at www.crtoons.com and www.quatumgumbo.com.
About the Reviewers
Heldrad
is a freelance web comic artist who has been posting her work online since 2004. She writes and draws her own stories, and lately, she has begun self-publishing her comics at local conventions and participating in the international manga contest, The Morning International Comic Competition.Dawn Blair has a passion for telling stories about noble hearts and fantastic places. Though
she started out writing novels, her life expanded into art and photography. She created Morning Sky Studios to support all of her creative endeavors: writing, painting, illustrating, and photography. She is currently teaching herself how to animate. She began using Manga Studio 3 and Anime Studio 5 and has loved the Smith Micro line of products since then.She has two fictional series in publication: Sacred Knight and The Loki Adventures, published by Morning Sky Studios, as well as a non-fiction editing book for authors titled The Write Edit. She has won numerous awards for writing, painting, and photography,
and has collectors of her art in Canada, Spain, Australia, and the United States.
imagination to life through various mediums.
I would like to thank Smith Micro for bringing us needy artists such a wonderful and versatile app for drawing and painting.
Mark Egan is a web cartoonist based in Oslo, Norway. He is an Irish expat and originally
comes from the Dublin region of Ireland, but has since lived in China as an English teacher before settling in Oslo.He graduated from Griffith College, Dublin with a Bachelor of Science degree in Computer Science in 2004, and following his time in China, started his career in the Telecom industry in Ireland, working as a call center agent. He later progressed to technical roles prior to the economic downturn in Ireland, after which he migrated to Norway, where he continues to live and work.
Having been actively cartooning since 2003, he focuses on producing manga-style web comics. His main noteworthy works are Back Office, an office comedy based in a call center, and Bata Neart, a magical girl web-manga set in Ireland.
www.PacktPub.com
Support files, eBooks, discount offers and more
You might want to visit www.PacktPub.com for support files and downloads related to your book.
Did you know that Packt offers eBook versions of every book published, with PDF and ePub files available? You can upgrade to the eBook version at www.PacktPub.com and as a print book customer, you are entitled to a discount on the eBook copy. Get in touch with us at [email protected] for more details.
At www.PacktPub.com, you can also read a collection of free technical articles, sign up for a range of free newsletters and receive exclusive discounts and offers on Packt books and eBooks.
TM
http://PacktLib.PacktPub.com
Do you need instant solutions to your IT questions? PacktLib is Packt's online digital book library. Here, you can access, read and search across Packt's entire library of books.
Why Subscribe?
Fully searchable across every book published by Packt Copy and paste, print and bookmark content
On demand and accessible via web browser
Free Access for Packt account holders
Table of Contents
Preface 1
Chapter 1: Installing and Setting Up Manga Studio 5
9
Preparing for installation 10
Computer requirements 10
Monitor 10
Tablets or input devices 11
Workspace 11
Installation of Manga Studio 5 11
Where are those files? 12
Starting up Manga Studio for the first time 13
Not your morning cereal 13
Palettes, toolbars, and documents 13
The main Manga Studio 5 toolbar 13
Palettes 14
That new document template smell! 16
Time for action – creating a new document dialog box 17
From your hand into the computer 20
The Wacom tablet control panel 20
Manga Studio 5 Stylus settings 27
From a blank document to a finished page 28
Summary 30
Chapter 2: Messing Around with Manga Studio 5
31
The dreaded blank page 31
Time for action – making our comic book page preset 32
Making our marks 34
Time for action – sketching and the digital environment 35
Creating our first custom pencil 42
Creating our custom marking tool 43
Time for action – duplicating an existing tool 44 Time for action – modifying the new Sketching Large pencil 45
Drawing with our new pencil tool 49
Duplicating subtools 51
Differences between Revert and Register 52
Time for action – duplicating a subtools for our second pencil 53
Creating a details pencil 54
Time for action – making a detail pencil, our third pencil 55
What about the brush category settings? 57
Making a custom sub group 58
Making folders and saving files 60
Testing out the pencils 62
Summary 65
Chapter 3: Formatting Your Stories
67
Story formats 68
The comic book and graphic novel 71
Settings for the new document dialog box 71
Tabs in the canvas area 73
Modifying older page presets or the character sheet revisited 75 Time for action – modifying an existing page preset 76
Using grids for display lettering 77
Using text for the first time in Manga Studio 80
Adding content to the material palette 85
Time for action – making new materials 85
Summary 90
Chapter 4: Roughing It
91
What are roughs? 92
From script to panels 92
Time for action – breaking down the page 93
Examining a page breakdown for the sample story 94
Making our page 98
Life with layers 98
Know your buttons 100
Time for action – using layers 101
Layer properties 103
Drawing our rough page 105
Time for action – making our mark on the page 105
Using the layer color effect 106
Time for making actions 108
Time for action – making actions 109
Time for action – adding existing actions 110
Filling in the panel contents 111
Refining the roughs 112
Time for action – refining the line 113
The process so far 114
Panels in Manga Studio 115
Time for action – creating and setting up a frame folder layer 116 Using the cut frame border tool to make panels 118 Time for action – cutting frames out of the frame folder layer 120
Setting up panels in separate folders 124
Time for action – creating an action to create a frame folder layer 125
Making panels separate frame folders 127
Time for action – making new frame folders using the cut frame border tool 128 Time for action – bleeding out to the ends of the page 132
Summary 134
Chapter 5: Putting Words in My Mouth
135
The soundtrack of comics 135
Got to get them all 136
Font formats 136
Comic lettering font conventions 138
Categories of comic fonts 139
Lettering in Manga Studio 5 139
Preparing our page for lettering 140
Time for action – writing the script 141
The text tool 143
Time for action – using the text tool 143
Text tool settings 146
Font category 146
Time for action – creating a text tool for dialogs and captions 148
Putting down text on the page 150
Time for action – lettering our first page 150 Adding dialog balloons and caption boxes 155 Time for action – making a custom dialog balloon subtool 155
Making dialog balloons on the page 156
Time for action – ballooning our dialog 156
Summary 163
Chapter 6: Pencil Mechanics
165
The hidden hand of comics 166
Time for action – preparing our workspace 167
Making a basic detailing pencil 169
Basic pencil settings 169
Time for action – configuring the pencil size and pressure settings 169 Time for action – configuring ink and anti-aliasing settings 172
Establishing a look for the pencil tool 174
Time for action – configuring brush shape categories and settings 174 Time for action – configuring correction, starting, and ending settings 178
Making selections and working with them 184
Resizing panel artwork and the selection launcher 186 Time for action – adding a button to the selection launcher 186
Time for action – resizing a selection 190
Rulers and curves 194
What good are rulers? 194
Rulers in Manga Studio 195
Creating an abstract design ruler 196
Time for action – setting up our document and tools 196
Creating lines and curves for the design 199
Time for action – drawing the straight lines 200
Time for action – making a curved ruler 203
Snapping our pencils in a good way 205
Time for action – snapping pencils to the rulers 206
Getting some perspective 209
Time for action – creating a perspective ruler 209
Managing perspective and other rulers 214
Interface tweaks to make penciling easier and faster 217 Drawing with transparency and other digital benefits 217 Time for action – drawing with transparency 218
Layering our pencils 218
Unmasking masks 219
Time for action – drawing on the mask 222 Time for action – applying the mask and merging layers 223
Using reference images 226
Summary 228
Chapter 7: Ink Slingers
229
The role of inking 230
It's all about the lines 230
Inking tools in Manga Studio 232
Markers 233
Time for action – making a technical pen subtool 233 Time for action – inking basic shapes with the technical pen 235
Pens 238
Time for action – creating an inking brush with custom pressure settings 240
Time for action – pressure settings 242
Brushes 244
Time for action – using a Bit Husky brush for fine inking 244
Airbrushes 245
Time for action – using the airbrush for shading 246
Decoration 248
Making a Kirby Krackle tool 248
Time for action – crafting a custom Kirby Krackle tool 249
Time for action – creating the brush tips 252
Time for action – adding the brush tips to the materials 253 Time for action – adding the brush tips to the brush 255
Inking our page 258
Setting the tones 259
What's so great about tones? 259
Time for action – locating tones in the Material palette 260 Time for action – preparing artwork for tones 262 Time for action – inking pencils with tones in mind 264 Time for action – applying tones to artwork 265
Time for action – making our own tones 267
Summary 269
Chapter 8: Coloring the World
271
Using the color theory for digital works 272
Coloring in comics is a history 273
Examining the color tools 274
Color choosers 274
Time for action – shortcuts for switching main and subcolors 277
The approximate and intermediate color palettes 278
Color sets 278
Time for action – making a 70s comic color set 282
The eyedropper tool 286
Looking at colors IRL 287
Using the color marking tools 288
A process for coloring comics 289
Time for action – setting up our file for flats 290
Time for action – making a flatting brush 292
Coloring our flats 295
Time for action – coloring the flat color layer 297 Time for action – using the auto select (magic wand) tool 300
Painting our comic 302
Time for action – tool settings for painting 302 Time for action – basic painting techniques for comics 304
Summary 307
Chapter 9: Adding a Third "D"
309
3D objects in Manga Studio 309
A basic primer in 3D 309
3D in Manga Studio 5 311
Dealing with 3D objects 311
Time for action – placing and manipulating a 3D material 312
Using a 3D mannequin 316
Time for action – posing the 3D mannequin 316
Time for action – making a scene 320
Manga Studio's 3D features and the future 321
Summary 322
Chapter 10: Caring about Sharing
323
Art is just part of the process 323
Exporting from Manga Studio 324
Paper or pixels 326
Proofing and reviewing the work 327
Tips and hints about spelling and grammar 327
Printing our comic 328
Using our home printer 328
Time for action – setting up printing at home 329
Using a copy store 334
Time for action – exporting for copy stores 335
Going for print on demand 337
Time for action – exporting for the Web 339
Other ways to display 341
Applications other than Manga Studio 342
Getting the word (and pictures) out 343
Keeping the momentum 343
Summary 344
Chapter 11: One More Thing
345
Manga Studio 5 EX 346
Stories 347
Time for action – starting a story 347
Time for action – the Page Manager window 350
Batch operations 356
Import 356
Time for action – using the batch import 357
Export 358
Time for action – using the batch export on our comic 359
Process 361
Time for action – batch processing a story 362
Wrapping up the Story menu 364
Summary 366
Pop Quiz Answers
367
Preface
Manga, comics, sequential art, cartoon strips, and graphic novels are all the same, they tell stories with pictures and words. While the style, manner, and packaging of these stories have changed, the process of creating them has remained relatively stable. The artist draws on paper, the pages are sent to a letterer, an inker renders the pencil marks so that the pages can be reproduced for printing, and finally, the pages are sent to the colorist for coloring. The system has remained basically the same (with occasional flourishes) and lasted since the beginning of comics as we know them, from the 1940s to the 1990s.
Then, computers came along, and as the saying goes "everything changed."
Way, way back in 1988, Mike Saenz drew a comic called Shatter. It was the first comic entirely drawn on a computer. Using an, now ancient to us in the new millennium, original Apple Macintosh with MacPaint, I read it and my world changed. Sure, I still drew on paper, but programs like Photoshop, Painter, and Illustrator became more robust and I was able to do so much on my trusty Mac IIsi with an incredible 32 MB of RAM.
Things evolved very quickly, because of you know, Moore's Law (go ahead and do a search on it if it's new to you).
Malibu comics was the first publisher (that I know of) to incorporate digital coloring in all their comics. Then, letterers got into the digital game. Graphic tablets became the norm.
What comic creators needed was a new tool. What we got was Manga Studio. And everything changed.
I heard about this program lurking in various forums. Soon, I had Manga Studio EX 3 installed on my Mac. Ever did something that you got right from the start? I grokked Manga Studio the moment I first used a pencil tool in it. I could create pages within stories; no more dealing with dozens of files or hunting around and being fixated on filenames or directory structures as much as before. Here was a program that got comics in a way that no other program did before. Instead of having to work the way a program wants you to, Manga Studio allows the artist to determine how to work. No more hacks, add-ons, or manually using masks to make panels, Manga Studio does it all, in one place.
Manga Studio was my Star Wars. It changed everything.
My wife says that I'm a brain-dumper, meaning that I get the structure of a story first and then fill in details. With Manga Studio, I was able to sketch out an entire story, roughly, and then go in and add, delete, or move pages as it fit the story. I could see the entire story, in thumbnails before me—on the computer! This was big stuff for me. No longer was I a prisoner of filenames. No longer did I have to sketch out my story on paper and scan the sketches to individual files. I only had to worry about the art of comics.
Now with Version 5, drawing, inking, and coloring comics is even more elegant. Heck, you can even skip the inking and just paint your comics if you're so inclined. The engine that drives the various marking tools (pencils, pens, and brushes) has been overhauled to make customizations even easier. If you're not the type to roll your own, there are many pre-made brush sets for penciling, inking, and painting for Manga Studio 5 that you can purchase (go to http://www.frenden.com, see some examples of Frenden's work, and check out his Manga Studio 5 brushes).
No app is perfect, nor is there truly an application that can really "do it all." The previous statement notwithstanding, neither is Manga Studio perfect. I'm a lettering, calligraphy, and font nut, so I come down hard on Manga Studio's lettering abilities. But instead of just whining about it, let's consider a work-around. Be sure to check out the free e-book where I introduce you to Comic Life 3, whose only job is to letter comics. It does that job very well, and in the e-book, I'll show you a method of using it in conjunction with Manga Studio (and other graphic apps if you've not seen the Manga Studio light).
It's quite possible that in the next five, ten, or more years, it'll be the next big thing in creating comics. It will probably change our world. But for now, we have Manga Studio 5. With it, we can change the world. One story at a time.
What this book covers
Chapter 1, Installing and Setting Up Manga Studio 5, is where it all begins. Installing and registering Manga Studio 5 is covered in this chapter. Getting started with creating a new file and using a pencil tool is also covered.
Chapter 2, Messing Around with Manga Studio 5, is a walkthrough of the basic interface of Manga Studio, from the dreaded blank page to the plethora of palettes in this program. The marking tools of Manga Studio are covered.
Chapter 3, Formatting Your Stories, covers creating presets for comic pages or comic strips and more. A brief taste of the Material palette and the text tool is also included.
Chapter 4, Roughing It, examines the crucial step between story idea and putting that story
down in comic storytelling. Aspects of layers are covered, as are Auto actions—a way of recording steps that can be replayed anytime.
Chapter 5, Putting Words in My Mouth, covers the captivating craft of calligraphy or lettering our comics. The limitations of Manga Studio 5 are candidly examined and work-arounds are investigated.
Chapter 6, Pencil Mechanics, explains tool creation to using rulers and perspective guides.
Chapter 7, Ink Slingers, focuses on tools, techniques, and more to render artwork in Manga
Studio. Do not miss the shocking secrets of the Material palette explained in this chapter.
Chapter 8, Coloring the World, displays the wide spectrum of color, painting, and brushes
Chapter 9, Adding a Third "D", covers the 3D abilities of Manga Studio and some ways
to work with the models, from placing one on the canvas to posing it.
Chapter 10, Caring about Sharing, explores the nuances of exporting for print and pixel.
From printing out to your home printer to a faraway print on demand service and out to the outer regions of the Internet, this chapter covers it all.
Chapter 11, One More Thing, explores the features of Manga Studio 5 EX, stories of Manga Studio EX, batch processing of story files, and the page manager.
Chapter 12, Along for the Ride, is an online chapter that has sections and exercises that the
physical book just didn't have room for. It contains information on vectors in Manga Studio, and more about color palettes and rulers. You can find this chapter at https://www. packtpub.com/sites/default/files/downloads/7668OT_Chapter_12.pdf.
Chapter 13, Lettering Comics with Comic Life 3, is an online chapter that details introduction and methods to use Comic Life for comic lettering; layout is the focus of this free e-book. You can find this chapter at https://www.packtpub.com/sites/default/files/ downloads/7668OT_Chapter_13.pdf.
What you need for this book
To make the most of this book, you need to have a copy of Manga Studio 5 and a computer that can operate this application. Although not required, a graphics tablet is good to have as so much functionality of Manga Studio comes to life with a tablet in ways a mere mouse cannot.
Who this book is for
This book is for anyone who draws, wants to create their own comics, and wishes to do it digitally. For novices, the exercises within are designed to stretch their artistic muscles. And for comic pros, the Beginner in the title means a beginner's user guide of Manga Studio.
Conventions
In this book, you will find several headings that appear frequently.
Time for action – heading
1.
Action 12.
Action 23.
Action 3Instructions often need some extra explanation so that they make sense, so they are followed with:
What just happened?
This heading explains the working of tasks or instructions that you have just completed.
You will also find some other learning aids in the book, including:
Pop quiz – heading
These are short multiple-choice questions intended to help you test your own understanding.
Have a go hero – heading
These practical challenges give you ideas for experimenting with what you have learned.
You will also find a number of styles of text that distinguish between different kinds of information. Here are some examples of these styles, and an explanation of their meaning.
Folder names, filenames, file extensions, pathnames, dummy URLs, user input,
Twitter handles, and Secret Identities are shown as follows: "We want to name our file Too_Many_Minions inside the Stories directory."
Newterms and importantwords are shown in bold. Words that you see on the screen,
in menus or dialog boxes for example, appear in the text like this: "On the New dialog box, click on the Paper Color check box to set the color of the canvas in the new document."
Warnings or important notes appear in a box like this.
Reader feedback
Feedback from our readers is always welcome. Let us know what you think about this book—what you liked or may have disliked. Reader feedback is important for us to develop titles that you really get the most out of.
To send us general feedback, simply send an e-mail to [email protected], and mention the book title through the subject of your message.
If there is a topic that you have expertise in and you are interested in either writing or contributing to a book, see our author guide on www.packtpub.com/authors.
Customer support
Now that you are the proud owner of a Packt book, we have a number of things to help you to get the most from your purchase.
Downloading the example files
You can download the example code files for all Packt books you have purchased from your account at http://www.packtpub.com. If you purchased this book elsewhere, you can visit http://www.packtpub.com/support and register to have the files e-mailed directly to you.
Downloading the color images of this book
We also provide you a PDF file that has color images of the screenshots/diagrams used in this book. The color images will help you better understand the changes in the output. You can download this file from https://www.packtpub.com/sites/default/files/ downloads/7668OT_ColorImages.pdf.
Errata
Although we have taken every care to ensure the accuracy of our content, mistakes do happen. If you find a mistake in one of our books—maybe a mistake in the text or the code—we would be grateful if you would report this to us. By doing so, you can save other readers from frustration and help us improve subsequent versions of this book. If you find any errata, please report them by visiting http://www.packtpub.com/submit-errata, selecting your book, clicking on the erratasubmissionform link, and entering the details of your errata. Once your
Piracy
Piracy of copyright material on the Internet is an ongoing problem across all media. At Packt, we take the protection of our copyright and licenses very seriously. If you come across any illegal copies of our works, in any form, on the Internet, please provide us with the location address or website name immediately so that we can pursue a remedy.
Please contact us at [email protected] with a link to the suspected pirated material.
We appreciate your help in protecting our authors, and our ability to bring you valuable content.
Questions
1
Installing and Setting Up
Manga Studio 5
This chapter is the beginning of our adventure creating comics with Manga
Studio 5. We'll install Manga Studio 5, snoop around at what was installed and where it is, set up our tablet, create our first page, and see some examples of work done with Manga Studio. If you can remain conscious through the first part of this chapter, we'll explore and learn how Manga Studio 5 has been used by other comic artists, and introduce a project that we'll be working on throughout this book.
In this chapter, we will cover the following topics:
Computer requirements for Manga Studio Installing Manga Studio
Registering Manga Studio and registration number tips
Introducing the Manga Studio 5 interface and document creation Drawing on a document canvas
Preparing for installation
If we purchased our copy of Manga Studio from Smith Micro, it will currently be on a DVD. When Manga Studio 5 was ordered from Smith Micro, the serial number should've been included in the e-mail that has the link to the download URL. Make a note of this, copy it as a text file, and put it in your document folder. This is the number that Smith Micro will require so that you can download updates and patches to Manga Studio. For now, we'll need a serial number so that we can install Manga Studio 5.
Computer requirements
Manga Studio's computer requirements are pretty basic. If you're using a relatively modern computer (manufactured within the past 10 years or so) and can run at least a version of an operating system released within that time frame, you should be good to go. But here's a list of the minimum requirements, just to be sure:
A desktop or laptop computer that's using Windows XP or Macintosh OS X 10.6,
or newer versions of either operating system.
A minimum of 256 MB of video RAM on the video card. If your machine is at least
five years old or newer, this should be no issue.
At least 2 GB of RAM that can be used by Manga Studio 5. Like with many things
in life, more is better. The more RAM your computer has, the more documents you can open in Manga Studio 5 concurrently.
If you have more than 2 GB of hard disk space, you'll do just fine. Like with RAM,
more space is a good thing. Hard discs, especially external USB drives, are relatively inexpensive right now and getting one to store backups of your work is never wasted money.
A DVD drive attached to your computer, if you received a boxed version of Manga Studio 5.
Monitor
Tablets or input devices
There are many different kinds of tablets that can be used with Manga Studio 5. We'll show you how to set up a Wacom Tablet. If you have another model, the principles will be the same. Although I have seen people use Manga Studio without a tablet, to make use of everything this program can do, get a tablet. For me, it was the single best computer purchase ever made. I will assume that you're all using tablets with Manga Studio for all the descriptions and exercises in this book. If you are using just a mouse, then most of the instructions can be performed, but the options about pressure sensitivity can be ignored.
Workspace
Between the chair and the keyboard, there is a part of this whole affair that just gets ignored or given cursory attention: you. In the mad energy of creation, it's so easy to let hours go by like minutes. Take breaks. Set a timer to go off every 40 minutes or hour. Then get away from the computer. Take a little walk outside or in your home. Your bones will thank you by not getting all achy and stiff. If our bodies aren't hurting when we create, we can put more effort into our work without being distracted by pain. Search for hand, wrist, and forearm stretches on Google. Do these prior to drawing and during your breaks. Our hands and arms are crucial to doing our art and getting tendonitis isn't fun at all.
A few artists have their desks raised so that they can draw while standing. This is great as our bodies are getting some exercise and the human form is built to stand.
As silly as this seems, don't forget to blink. It prevents our eyes from drying out and getting eye strain faster. Every so often, look at things farther away than your monitor, like outside your window. This will exercise our eye muscles and reduce some eye strain.
We'll touch on this subject occasionally. Remember, it's more fun to write out tendonitis than it is to experience it.
Installation of Manga Studio 5
It's the same whether you install it from a DVD, DMG, or EXE file. Once your computer gets the DVD on the desktop and you open the DVD or you locate the downloaded installation file, double-click on the installation file.
Manga Studio will install not only the program itself, but a number of other files (brushes, pens, tones, color palettes, and more) in different locations. Unless you're really comfortable with such things, it's best to let Manga Studio install the files where it wants.
Where are those files?
On the Mac, the files are inside your Documents folder as shown in the following screenshot:
As we can tell, this is where all the cool stuff is located. If we ever need to reinstall Manga Studio, this folder should be backed up as it contains all the settings for preferences, keyboard shortcuts, customized tools, and much more. Fortunately, we won't have to directly install files into these folders; Manga Studio will do that for us.
Like other graphic art programs, the Interface for Manga Studio 5 is huge and
complex. To make things a bit more manageable, we'll just use screenshots of the sections of our workspace. We'll make sure that the area is identified and made clear. This way we'll focus in on the area of the program that we're concerned with. You can go to https://www.packtpub.com/sites/ default/files/downloads/7668OT_ColorImages.pdf and
download a ZIP file that has the color versions of all the screenshots in
this book.
Starting up Manga Studio for the first time
Now that the computer's work is done, our work is just beginning. We'll be starting up Manga Studio for the first time and creating our first document. Let's begin!
Not your morning serial
There should be a shortcut to Manga Studio 5 on your desktop. Double-click on it and Manga Studio 5 will start up. If this is the first time it's being run, we'll have to tell it that we are legitimate users by giving Manga Studio a proper serial number. This is the only time that Manga Studio will demand an Internet connection, as it needs to validate the serial number with Smith Micro's servers. If we run into problems, we can try to register Manga Studio later. Keep in mind that this serial number contains both upper and lower case letters along with numbers.
Once we're all done with that, we can get down to some art! Finally! So let's grab something good to drink (I prefer tea, thank you) and we'll walk through just enough of the interface to create a new document template, and then play around with the pencil tool.
Palettes, toolbars, and documents
With Manga Studio open, take a look at the screen. This is going to be our home for our art. This interface has it all from pencils to pens, from paper to tones, from watercolor paints to oil paints. Instead of trying to redo Akira, Watchmen, or the Sistine chapel, let's just create a new document and put marks on it as a start.
The main Manga Studio 5 toolbar
The toolbar looks like the following screenshot when you first install Manga Studio 5 (callouts for your learning enjoyment):
Palettes
Further to the left, we see that Manga Studio 5 has two rows of palettes. On the furthest left is the Tool Palette. What we see here on the page won't match what you see on the screen. That's because Manga Studio remembers which tool was used last and will display that tool within this palette. If you click-and-drag a tool icon up or down, we can see that a thick red line appears between icons. And if we release our mouse/stylus button, the tool will be dropped where we released our stylus. Move the tool icon back to where it was.
If we click on a tool, we'll see that the palette to the right is updated. That's the Sub tool
palette. This palette shows us all the various related tools that we can use. In the following screenshot, we have the Pencil tool selected and in the subtool palette we see that we can choose from many options. Below the Sub tool palette is the Tool property. This is where we can determine just how the tool will work. Pay particular attention to the icon that looks like a wrench with a circle around the end of it. This is how we can go deep inside the tool and create variations that are distinctly our own.
Back to Tools, we can see that the tool bar is split into three sections. We can think of them
That new document template smell!
Even though what we'll be covering may seem boring, this is setting the stage for the magic that we'll be doing with Manga Studio, so it'll be worth it.
Time for action – creating a new document dialog box
The process of creating a new document dialog box is given in the following steps:
1.
Click on the New Document button on the toolbar. A dialog box will pop up. The one on the screen will have different values than the one here. Being the heroes we are, we will create a new template that we'll be using for some tasks as we wind our way though this book. The template shown in the New Document dialog box is used for a Webcomic.2.
The top line is File Name. We can give our new document a name here.3.
The next section is labeled Canvas size. This is where we set up the full size of our document (in printing this is called theBleed size). For our example, it's 7.75 x 10.25 inches. The resolution (dots per inch) is set at 600. If our computer has limited memory or is a bit sluggish, set it to 300.4.
Enter in 7.75 in the Width entry box.5.
Enter in 10.25 in the Height entry box.6.
We see that the Preset drop-down menu now says Custom. That's just what we want.7.
There's a double-headed button to the left of the width and height entries. This button swaps out the width and height.8.
Unit is set to inches. There are options for metric and pixel-based measurement in the drop-down menu.9.
The Manga draft setting should be checked. If unchecked, our page will not haveborders and the binding and default borders will be greyed out.
10.
In the Binding (finish) size area, enter the following values: 7.25 for the Width
9.75 for Height
0.25 for Bleed width
Be sure to include the leading zero. Manga Studio doesn't like entries that begin with a decimal point without that leading zero.
11.
The default border (inner) is called the live area outside of Manga Studio. This is the area where we'll be doing most of our work inside of this soon-to-be-created document. And all lettering must be within this area. Set the values to: Width is 7 inches
Height is 9.75 inches
The bottom two entries, X and Yoffset, are for when you need to have your
live area a bit higher or lower, or closer to one side or another. Just leave both of these at 0.
12.
There's a checkbox next to the text Paper color. This is where we can change the default paper color from white to another color or get rid of it. If we are doing a story that needs to have a solid color up to the edges of the page, then we will click on the Color bar and choose a color. But right now, we don't need to get fancy,besides we want to hurry up with this and get to drawing!
13.
Double check the values. If we mistyped a number, Manga Studio will automatically recalculate other values and we could end up with some pretty strange pages.14.
Once we've made sure all our values are correct, let's save this as a Preset!15.
Under the OK and Cancel button there's a button labeled Register to preset. Clicking on this button will give us a dialog box as shown in the following screenshot:16.
In the Preset name box, we can name it Preset. Type in Webcomic w/Bleed.17.
There are a number of checkboxes below where we named our preset: Resolution: This will save the set resolution as part of the preset. Usually if
we're working on a series, we want the resolution to be consistent.
Default expression color: This sets the default way any new layers will be,
either color, grey, or monochrome.
Template: This will automatically load up any selected template. This is a
bit advanced for us now, so leave it unchecked.
18.
Click on OK.19.
We're back in the New document dialog box. Look closely at the Preset drop-down menu. It now lists the preset we just saved.20.
To the right of the drop-down menu is a trash can icon. If we create way too many presets and want to clear them up a bit, we can select the old templates one at a time, and click on the trash icon to delete them. We'll be given a dialog that asks us if we're really sure we want to delete the preset. We want to keep this preset, so click on Cancel if you pressed the trash icon.21.
Back in the New dialog box, click on the OK button and we're presented with a brand new document we can draw on.22.
Now take a few moments to mess around with the tools. What you do can be either undone or deleted. Go ahead, play around. You've earned it.What just happened?
We went through, step-by-step, the creation of a new preset and made a new document based on that preset. We also encountered some odd things about Manga Studio, such as how it coined its own terminology for common print terminology. Here's a quick breakdown:
Manga Studio Term Print Term Description
Canvas size Bleed size The full size of the sheet that's being printed on Binding (finish) size Trim area The size of sheet once it's been cut to this size Default border (inner) Active (or Live) area All important drawings and text must be within
this area
Have a go hero – creating a new document Dialog Box
Artists know faces. We'll recognize faces before we remember names. When we've created our first new document, fill it with faces of all kinds. Human, animal, or alien. Get used to moving around in the canvas area. Like with most other graphic applications, holding down the space bar will make your cursor a hand icon so that you can grab the canvas and move it around. ALT/Command + = will zoom in your view, ALT/Command + - will zoom out your view.
Use these keyboard commands to move the canvas and zoom in or out and draw the faces in each of the four corners of your document, then zoom in and add details. In the toolbar, there's an icon that looks like an old style floppy disc, that's the Save button. Click on it and save your file with the name practice_001.lip. Remember where this file is as it can be helpful in warm-up exercises in the future. Experiment with the various marking tools. Get used to how the various tools work.
From your hand into the computer
Setting up the control panel for your tablet is one of those things that can seem like drudgery. It's worth doing because it can open up the full abilities of your tablet and make using aspects of Manga Studio 5 so much easier. We'll be covering how to set up a Wacom Tablet. These basic instructions are for an Intous 3 tablet, but can be adapted to a newer tablet model or to other manufacturers of tablets.
The Wacom tablet control panel
The Wacom control panel looks deceptively simple. There's a lot of functionality under those icons, buttons, and sliders. In my experience (and what Wacom recommends), the best results can be had by installing the drivers before plugging in your tablet. And this goes for installing updated control panel software. You should regularly save backups of your tablet settings.
When you first installed your tablet software, a folder named Wacom Tablet was created (on the Mac OS, it's in the Applications folder and in Windows, it's where applications are installed). Inside that folder is an application named Wacom Tablet Utility. This application is very simple: there's a button to remove, backup, and restore. First click on the backup button. Navigate to where you want to save your tablet settings. Save those settings. Remember where you have saved them. When it's time to update the tablet software, fire up Wacom Tablet Utility and click on the Remove button. This button does exactly what it says. Next, install the new tablet software. Once it's installed, run the Wacom Tablet Utility and click on the Restore... button. A dialog box will pop up and you need to navigate to
The control panel shown in the previous screenshot has four main areas:
Tablet
Tool
Application
Pen, Eraser, and Mapping
The tablet area is where you select your tablet. If there's only one tablet installed, we can move on. If there are two tablets installed, select the tablet you want to configure.
The tool settings have an icon for Functions and the pens you have (a grip pen, an art pen, or an airbrush pen). Select the pen you want to configure. You will have to go through the following set up for the Application area for each pen you have. We'll get to the Functions
tool after the pen tool.
The previous image has Manga Studio already setup. To set it up on your system just click on the "+" button on the right side of the tier named Application. In the drop-down menu,
there's a list of currently active applications and a Browse button. If Manga Studio 5 is running, select it from the list. If it's not, we'll just have to click on the Browse button and navigate to where Manga Studio 5 is installed.
In other graphic apps, we would need to change Tip Feel, but we can do that within Manga Studio 5. The grip pen has what Wacom calls a duo switch where there's a top and bottom part of the switch that can be pressed. Let's set it up so that when top part is pressed, it'll be like right-clicking a mouse by choosing, on the top drop-down menu, Click and then Right
Click from the menu that pops up.
Just because something has a feature, it doesn't mean it has to be used. If you're constantly hitting the duo switch without meaning to, just go into the
Wacom control panel and choose Manga Studio in the App scroller. Then in the Pen section, click on the drop-down menu for the switch. At the bottom of the menu is an entry named Disabled. Choose that and the duo switch
will now have no effect in Manga Studio.
For the bottom switch, let's set it up for the Move tool (it looks like a cartoon hand). Click on the bottom drop-down menu, from the drop-down menu select Keystroke..., and then in the dialog box, press the space bar key and a space will appear in the top box. Don't press
Tab (as that will add tab to the top box); just click in the textbox next to Name: and give your keystroke a name. I call this move tool the Grabber tool. Click on OK. We're now done here.
Now, click on the Mapping section button. If you have two monitors (like your author does), choose one to be the main drawing monitor. This is important so that it'll feel more natural. We can choose the monitor by clicking on the drop-down menu next to Screen area. Be sure to click on the Force Proportions checkbox. This is vital, in my opinion, because of muscle memory. We draw a circle on paper and we know it's a circle because of visual feedback. On a tablet (not a Cintiq or other display tablets), we don't have the single view of watching our hand draw a circle, we move our hand and watch it appear on our monitor. So if the tablet is stretched or squished in one direction or another, our hand draws an oval, but looks like a circle on the monitor. That's not good. Make things easy for yourself, click the Force
Proportions checkbox.
After this final set of settings, we can get back to Manga Studio 5 and have a bit of fun. In the Tool settings click on the Functions icon. Notice how the bottom part of the control
panel changes?
We'll be making a few changes. Let's start with the ExpressKeys. On my tablet, there's a
Right and Left side. I'm left handed, which means that in addition to being in my right mind,
Assigning the keystrokes is exactly like what we did for theGrabber tool. Click on the drop-down menu and then choose the Keystroke... menu item. Here's a list of the names and the keyboard commands:
For Swap fg/bg/transparent the Keystroke is a lowercase z For rotate canvas the Keystroke is a lowercase r
For Zoom inthe Keystroke is + For Zoom out the Keystroke is - (dash) The rest are default settings.
The last Wacom Tablet setting we'll deal with is the Touch Stripsetting. In newer models it's a circle, but the principle is the same. On one side of Touch Strip, we want to be able to
Undo and Redo. On the other side of Touch Strip, we want to swap colors.
Even though I've put swap colors in two places, it's sometimes good to have more than one way to do something. If you find something that works better for you, go do it. Probably by the time we get to coloring, my tablet settings will have changed.
Each side can be set to have a top and bottom function. Usually, I try to make them related functions, such as zoom in and out, undo and redo, swap foreground and background colors. Click on the drop-down menu and follow the instructions carefully. Any or all keystrokes will be added to the command, so just press the keystrokes you want and use the mouse/ pointing device to move to a different area.
The keystroke entry areas are shown in the following screenshot. There's one area for the up arrow and one area for the down arrow. The control panel can detect when you type a key in the number pad (if you have an extended keyboard), so be careful.
The settings we want are:
Undo: command + Z Redo: command + Y
One thing that has helped me out is making a cheat sheet for the various buttons and keystrokes for the tablet's buttons. I made a drawing of the layout (left and right) of the tablet buttons and the Touch Strip and wrote down what the buttons do. I then wrote the name of the application it's for. So here's what it would look like for what we just did:
Manga Studio 5 Stylus settings
You can draw several strokes and the adjustment will be tailored to the way you draw. From experience, if the tablet has its pressure adjusted in the Control Panel and then in Manga Studio 5, the results are somewhat the same—the technical term is wacky. So it's best to adjust the pressure from within Manga Studio 5. The Wacom tablets I've used seem to be extremely sensitive on the light touch end, so you can see on the curve that it's very gradual at light pressure and then goes up and tops out at around 90 percent. This has worked well for me, but in your experience this may be different. So experiment. We can always go back to initial settings if we need to.
From a blank document to a finished page
The rest of this book will be about how to use Manga Studio. In addition to learning about page sizes, pencils, brushes and such, we'll cover the process of making a comic right from an initial idea to getting it ready for print.
This is how we'll roll for the rest of this book:
Idea: The gem of a story. We'll tend to this seed and let it grow into a story.
Script: This is where we figure out what follows what and address things such as
pacing, characterization, and learn basic script formats.
Layouts, Penciling, and Lettering: We'll layout pages, see how much text we have
and make sure that the text and art work together.
Inking: This is where the pencil marks take form as we embellish our drawing so it
can be reproduced.
Coloring: We'll look at the color wheel and brush up on some color theory to give
our pages a nice complexion and make them interesting for our readers to look at.
Putting our work out: We'll cover some aspects of modern comics, such as
Webcomics, print on demand, and digital comics.
In the course of covering all these aspects, we'll see just how Manga Studio 5 fits into every possible comic creation workflow and learn all we can about the specific features of Manga Studio 5 along the way. Even if we're seasoned pros who are new to Manga Studio but not comic creation, this is a good way to see how your workflow can fit with how Manga Studio operates.
This is where our internal critic has way too much fun. Don't listen to that part of us. We're just doing this story for pure fun and to learn Manga Studio 5 in the process. We have to start somewhere and we can do this one story just for ourselves. If it is a stinker, it'll be our secret, okay? And if you're really stalled, just find a public domain play and use that as your story. The thing here is to have something that we can work on. If you can't come up with a story, just follow the examples in the exercises. There's a sample story (with characters, script, and so on) included in the downloadable ZIP file.
Pop Quiz
Q1. A pencil can be found:
1. In the toolbar 2. In the Tool palette
3. The last place we used it
Q2. A Wacom Tablet is the only kind of tablet we can use with Manga Studio:
1. True 2. False
Q3. In Manga Studio, the Default border (inner) is what printers would refer to as the:
1. Trim area
2. Bleed amount
3. Active area
4. Slip region
Q4. A tablet is necessary to use Manga Studio.
Summary
Quite the quick tour, wasn't it? We learned the basic requirements that our computer should have to run Manga Studio 5 with and we installed Manga Studio 5. We learned that the registration number should be copied and stored in a few places so we don't lose this very important number. Then we toured the interface of Manga Studio, created a document, and drew on it with a pencil tool. With a tablet, we learned how to set it up for use with Manga Studio. Then we ramped down a bit and worked on some sketches for further work in Manga Studio that we'll be using in the forthcoming chapters.
2
Messing Around with Manga Studio 5
In this chapter, we'll go through a more in-depth overview of Manga Studio 5's interface, tools, and file formats. By creating customized workspaces and key stroke commands, we will make it possible to spend more time drawing and less time wrangling with the interface.
In this chapter, we will cover the following topics:
Creating a new page and page preset
Using Pencil tools and modifying them for sketching Duplicating a tool and creating a new subtool group
Creating new layers, drawing on them, and transferring contents to the layer
below the current layer
The different kinds of marking tools we have in Manga Studio Types of file formats we can import and export from Manga Studio
The dreaded blank page
Before we can draw our page, we need to have a document to put it in. This means we need to create a new preset for comic book pages. Since we've already gone through the process in the last chapter, we'll breeze through the process here. For more information on the New
Time for action – making our comic book page preset
Perform the following steps to make our comic book page preset:
1.
With Manga Studio running, click on the New document button in the command bar or go to File | New. The New document dialog appears.2.
Like in the previous chapter, we need to specify the dimensions of the canvas (or document).3.
Make sure Unit is set to in (inches).4.
Put 7.00 against Width and 10.50 against Height. This is the basic size of the untrimmed comic page.5.
Set resolution to 600 by using the drop-down menu, or just type in the value. If youenter 300, the pencils and other tools we'll be making through out this book will be huge; twice as large as needed. So, remember what your resolution for the file is (it'll be in the title bar of the document, by the way), and if it's not 600 dpi, you may want to adjust the size given accordingly.
6.
Check the Manga draft settings checkbox. This allows us to set the borders below it.7.
As Binding (finish) size, enter 6.75 for Width and 10.25 for Height. This is our trimsize; anything outside of this will be trimmed off in the printing process.
8.
Make sure that the Bleed width is set at zero. This is a very fussy and unpredictable setting implemented by Manga Studio, and we don't really need it for this preset.9.
In Default border (inner), set Width to 6.25 and Height to 9.75. If you don't seeSet size (to the right of the Height entry, as shown in the previous screenshot), then
click on this drop-down menu and select Set size.
10.
X offset and Y offset should be zero.11.
Set the Basic expression color drop-down menu to Color.12.
Make sure that the Paper color is checked. It should default to white. If it isn't, click on the color swatch, and in the color chooser that appears, select white and click on OK.13.
Double-check the data. It should match with what's been entered in the image and in these steps.14.
Click on the Register to preset button.15.
In the dialog box that appears, name the preset as Basic Comic Page. The checkboxesfor Resolution, Paper color, and Default color expression should be checked.
16.
Click on OK.17.
Back in the New dialog box, the preset name should be visible in the drop-down menu. (In the previous screenshot, it says Ka-Blam Comic Page.)What just happened?
We just breezed through making a new preset. This preset will have all the borders we need to make most of every comic page we will work on. Although Manga Studio comes with many presets, mostly everyone is, sadly, not fit for western comics. This preset remedies that.
Making our marks
If we compare what you're seeing with the previous screenshot, we will find Sub tool tabs named Sketch and MS4B, which probably aren't on your screen. These tabs are created after installing Manga Studio. On your screen, the active tab and tool are highlighted with a bluish tint. This is a consistent interface feature of Manga Studio.
Manga Studio 5 allows us to customize the interface quite a bit. That's why, in some of the screenshots to follow, and for the rest of this book, the images are from my setup of Manga Studio 5. I've made a number of changes and additions to the interface, and these will be covered in the appropriate sections.
This is done to allow us to become comfortable with the basics of Manga Studio and not get too bogged down in details. We can (and will) learn how to make Manga Studio 5 work for us, rather than working for Manga Studio.
Right now, take a break. Put away this book and just doodle on your shiny new document. Use the pencil tool or any other tool. Just mess around. Notice what happens in the Sub tool
palette and the Tool property palette when you click on a tool in the Tool palette. Have some
fun, take as much time as you want. I'll be here when you're done. This is like breaking in a new pencil or brush. The more comfortable we are with our tools, the easier it will be to learn how to really use them.
Time for action - sketching and the digital environment
If we've set up our Wacom (or other manufacturer) tablet as shown in Chapter 1, Installing and
Setting Up Manga Studio 5, we can refer to the cheat sheet (which you did make, right?) for shortcuts. If we're in a situation where using the buttons isn't possible, or if we're not using a tablet, we'll have one hand on the mouse and the other ready to perform keyboard shortcuts.
Although there is a tablet bias in this book, everything (save for pressure
In this exercise, we'll be using any pencil to draw on the canvas, some keyboard shortcuts to zoom in and out, and transparency to erase. The following is a quick little exercise to get us familiar with drawing in Manga Studio and using shortcuts and layer commands:
1.
Manga Studio should be open and a new document created. The new document should have a paper layer (if we're using a template we created, it will be the default).2.
Look at the Layer palette. It has two layers: Paper and Layer 1. The Paper layer isa special layer; it's there to give our canvas a color. It's handy to have, as we don't have to stare at the checkerboard pattern that indicates transparency. Layer 1
should have a blue tint to indicate it's the current layer.
3.
Choose a pencil from the Tool palette.4.
In the Sub tool palette, choose any pencil.5.
Draw a rough figure or face. Don't get into details.6.
Once we're happy with the rough sketch, go to the Layer palette and set theOpacity of the layer down to 30-40 percent. Our sketch should be greyed out.
7.
On the bottom of the layer palette, there's a series of buttons that look like dog-eared pages. Hover the cursor over the first one. The tooltip should readNew Raster Layer. Click on the icon.
8.
A new Layer is created.9.
Use the same pencil or pick another one. If the size of the tool is too large, go into the Brush size palette and click on a smaller size.10.
Add details on the new layer. If there's hair, don't draw it now.11.
Create another layer and add hair details on that layer. This new layer should be automatically named Layer 3.12.
Alt/Command + = and Alt/Command + – will zoom in and out of our canvas, respectively, in steps that are mentioned in the Preferences dialog box under theCanvas category. Alt/Command + 0 (zero) will fit the canvas to our view, so we can
see the entire document at once.
14.
When we're finished with the hair, we will go to the Layer palette and right-click on the layer with the hair (it should be named Layer 3).15.
The contextual menu that pops up has a number of menu items. We're interested in two of them, Transfer to Lower Layer and Merge with Lower Layer: Transfer to Lower Layer will send the contents of the current layer to the
layer directly below. This will leave the current layer empty.
Merge with Lower Layer will combine the contents of the current layer with
the layer directly below, making the combined layer the active one.
16.
Select Merge with Lower Layer.17.
Notice how we no longer have a Layer 3 in the Layer palette, but Layer 2 has all the drawings we did on Layer 3 added to it. Transfer and Merge are handy to use if we want to try something out but don't want to mess up an existing drawing.18.
Continue drawing the details. Instead of using the eraser, try changing the current color to transparency. At the bottom of the toolbar, there are color options for the main, sub, and transparency swatches. Click on the transparency swatch (it's the one with the checkerboard pattern in it). Now use the pencil as an eraser. It behaves just like the previous pencil did, except that it draws with transparency instead of a visible color. This is a great way to add detail in shadowed areas.What just happened?
We're getting used to working digitally and making the most of this virtual environment. We used one layer for our rough sketch and made a new layer for refining and adding details. We then created another layer to experiment with hair and combined it with the layer below. We also used the view shortcuts to zoom in and out and to rotate and change our view of the document. We'll be refining this process as we go along, but nothing beats practice.
The marking tools
The following screenshot shows the marking tools with arrows pointing to the specific
Sub tool tabs that appear in the Sub tool palette: