Release 2.x
Cake Software Foundation
1 Getting Started 1
Blog Tutorial . . . 1
Blog Tutorial - Adding a layer . . . 8
2 Installation 29 Requirements . . . 29
License . . . 29
Downloading CakePHP . . . 30
Permissions . . . 30
Setup . . . 30
Development . . . 30
Production. . . 31
Advanced Installation and URL Rewriting . . . 32
Fire It Up . . . 39
3 CakePHP Overview 41 What is CakePHP? Why use it?. . . 41
Understanding Model-View-Controller . . . 42
Where to Get Help . . . 44
4 Controllers 47 The App Controller . . . 47
Request parameters . . . 48
Controller actions . . . 48
Request Life-cycle callbacks . . . 49
Controller Methods . . . 50
Controller Attributes . . . 57
More on controllers . . . 59
Layouts . . . 133
Elements. . . 135
Creating your own view classes. . . 138
View API . . . 139
More about Views . . . 141
6 Models 241 Understanding Models . . . 241
More on models . . . 243
7 Core Libraries 369 General Purpose. . . 369
Behaviors . . . 569
Components . . . 597
Helpers . . . 647
Utilities . . . 737
8 Plugins 849 Installing a Plugin . . . 849
Plugin configuration. . . 849
Advanced bootstrapping . . . 850
Using a Plugin. . . 851
Creating Your Own Plugins . . . 851
Plugin Controllers . . . 852
Plugin Models . . . 853
Plugin Views . . . 853
Plugin assets. . . 854
Components, Helpers and Behaviors . . . 855
Expand Your Plugin . . . 855
Plugin Tips . . . 856
9 Console and Shells 857 The CakePHP console. . . 857
Creating a shell . . . 859
Shell tasks . . . 860
Invoking other shells from your shell . . . 862
Console output levels . . . 862
Styling output . . . 863
Configuring options and generating help . . . 864
Routing in shells / CLI . . . 871
Shell API . . . 871
More topics . . . 874
10 Development 887 Configuration . . . 887
Error Handling . . . 929
Debugging. . . 931
Testing. . . 935
REST . . . 957
Dispatcher Filters . . . 961
Vendor packages . . . 964
11 Deployment 967 Check your security . . . 967
Set document root . . . 967
Update core.php . . . 967
Improve your application’s performance . . . 968
12 Tutorials & Examples 969 Blog Tutorial . . . 969
Blog Tutorial - Adding a layer . . . 976
Simple Authentication and Authorization Application . . . 987
Simple Acl controlled Application . . . 994
Simple Acl controlled Application - part 2 . . . 1000
13 Appendices 1005 2.4 Migration Guide. . . 1005
2.3 Migration Guide. . . 1011
2.2 Migration Guide. . . 1018
2.1 Migration Guide. . . 1024
2.0 Migration Guide. . . 1035
Migration from 1.2 to 1.3 . . . 1068
General Information. . . 1087
14 Indices and tables 1091
Getting Started
The CakePHP framework provides a robust base for your application. It can handle every aspect, from the user’s initial request all the way to the final rendering of a web page. And since the framework follows the principles of MVC, it allows you to easily customize and extend most aspects of your application.
The framework also provides a basic organizational structure, from filenames to database table names, keep-ing your entire application consistent and logical. This concept is simple but powerful. Follow the conven-tions and you’ll always know exactly where things are and how they’re organized.
The best way to experience and learn CakePHP is to sit down and build something. To start off we’ll build a simple blog application.
Blog Tutorial
Welcome to CakePHP. You’re probably checking out this tutorial because you want to learn more about how CakePHP works. It’s our aim to increase productivity and make coding more enjoyable: we hope you’ll see this as you dive into the code.
This tutorial will walk you through the creation of a simple blog application. We’ll be getting and installing CakePHP, creating and configuring a database, and creating enough application logic to list, add, edit, and delete blog posts.
Here’s what you’ll need:
1. A running web server. We’re going to assume you’re using Apache, though the instructions for using other servers should be very similar. We might have to play a little with the server configuration, but most folks can get CakePHP up and running without any configuration at all. Make sure you have PHP 5.2.8 or greater.
2. A database server. We’re going to be using MySQL server in this tutorial. You’ll need to know enough about SQL in order to create a database: CakePHP will be taking the reins from there. Since we’re using MySQL, also make sure that you havepdo_mysqlenabled in PHP.
4. Finally, you’ll need a basic knowledge of the MVC programming pattern. A quick overview can be found inUnderstanding Model-View-Controller. Don’t worry, it’s only a half a page or so.
Let’s get started!
Getting CakePHP
First, let’s get a copy of fresh CakePHP code.
To get a fresh download, visit the CakePHP project on GitHub: https://github.com/cakephp/cakephp/tags and download the latest release of 2.0
You can also clone the repository using git (http://git-scm.com/). git clone git://github.com/cakephp/cakephp.git
Regardless of how you downloaded it, place the code inside of your DocumentRoot. Once finished, your directory setup should look something like the following:
/path_to_document_root /app
/lib /plugins /vendors .htaccess index.php README
Now might be a good time to learn a bit about how CakePHP’s directory structure works: check out the CakePHP Folder Structuresection.
Creating the Blog Database
Next, let’s set up the underlying database for our blog. If you haven’t already done so, create an empty database for use in this tutorial, with a name of your choice. Right now, we’ll just create a single table to store our posts. We’ll also throw in a few posts right now to use for testing purposes. Execute the following SQL statements into your database:
/* First, create our posts table: */
CREATE TABLE posts (
id INT UNSIGNED AUTO_INCREMENT PRIMARY KEY, title VARCHAR(50),
body TEXT,
created DATETIME DEFAULT NULL, modified DATETIME DEFAULT NULL
);
/* Then insert some posts for testing: */
INSERT INTO posts (title,body,created)
VALUES (’The title’, ’This is the post body.’, NOW()); INSERT INTO posts (title,body,created)
INSERT INTO posts (title,body,created)
VALUES (’Title strikes back’, ’This is really exciting! Not.’, NOW()); The choices on table and column names are not arbitrary. If you follow CakePHP’s database naming con-ventions, and CakePHP’s class naming conventions (both outlined inCakePHP Conventions), you’ll be able to take advantage of a lot of free functionality and avoid configuration. CakePHP is flexible enough to accommodate even the worst legacy database schema, but adhering to convention will save you time. Check outCakePHP Conventionsfor more information, but suffice it to say that naming our table ‘posts’ automatically hooks it to our Post model, and having fields called ‘modified’ and ‘created’ will be automag-ically managed by CakePHP.
CakePHP Database Configuration
Onward and upward: let’s tell CakePHP where our database is and how to connect to it. For many, this is the first and last time you configure anything.
A copy of CakePHP’s database configuration file is found in
/app/Config/database.php.default. Make a copy of this file in the same directory, but name itdatabase.php.
The config file should be pretty straightforward: just replace the values in the$defaultarray with those that apply to your setup. A sample completed configuration array might look something like the following:
public $default = array(
’datasource’ => ’Database/Mysql’,
’persistent’ => false,
’host’ => ’localhost’,
’port’ => ’’,
’login’ => ’cakeBlog’,
’password’ => ’c4k3-rUl3Z’,
’database’ => ’cake_blog_tutorial’,
’schema’ => ’’,
’prefix’ => ’’,
’encoding’ => ’utf8’
);
Once you’ve saved your newdatabase.phpfile, you should be able to open your browser and see the CakePHP welcome page. It should also tell you that your database connection file was found, and that CakePHP can successfully connect to the database.
Note: Remember that you’ll need to have PDO, and pdo_mysql enabled in your php.ini.
Optional Configuration
The security salt is used for generating hashes. Change the default salt value by editing /app/Config/core.php line 187. It doesn’t much matter what the new value is, as long as it’s not easily guessed:
/**
* A random string used in security hashing methods. */
Configure::write(’Security.salt’, ’pl345e-P45s_7h3*S@l7!’);
The cipher seed is used for encrypt/decrypt strings. Change the default seed value by editing /app/Config/core.php line 192. It doesn’t much matter what the new value is, as long as it’s not easily guessed:
/**
* A random numeric string (digits only) used to encrypt/decrypt strings. */
Configure::write(’Security.cipherSeed’, ’7485712659625147843639846751’);
The final task is to make theapp/tmpdirectory web-writable. The best way to do this is to find out what user your webserver runs as (<?php echo ‘whoami‘; ?>) and change the ownership of theapp/tmp directory to that user. The final command you run (in *nix) might look something like this:
$ chown -R www-data app/tmp
If for some reason CakePHP can’t write to that directory, you’ll be informed by a warning while not in production mode.
A Note on mod_rewrite
Occasionally a new user will run into mod_rewrite issues. For example if the CakePHP welcome page looks a little funny (no images or CSS styles), it probably means mod_rewrite isn’t functioning on your system. Please refer to one of the sections below about URL rewriting for your webserver to get you up and running:
URL Rewriting
Apache and mod_rewrite (and .htaccess)
While CakePHP is built to work with mod_rewrite out of the box–and usually does–we’ve noticed that a few users struggle with getting everything to play nicely on their systems.
Here are a few things you might try to get it running correctly. First look at your httpd.conf (Make sure you are editing the system httpd.conf rather than a user- or site-specific httpd.conf).
These files can vary on different distributions and apache versions. You may also take a look at http://wiki.apache.org/httpd/DistrosDefaultLayoutfor further information.
# Each directory to which Apache has access can be configured with respect # to which services and features are allowed and/or disabled in that
# directory (and its subdirectories). #
# First, we configure the "default" to be a very restrictive set of # features.
#
<Directory />
Options FollowSymLinks AllowOverride All
# Order deny,allow # Deny from all </Directory>
2. Make sure you are loading up mod_rewrite correctly. You should see something like:
LoadModule rewrite_module libexec/apache2/mod_rewrite.so
In many systems these will be commented out (by being prepended with a #) by default, so you may just need to remove those leading # symbols.
After you make changes, restart Apache to make sure the settings are active. Verify that your .htaccess files are actually in the right directories.
This can happen during copying because some operating systems treat files that start with ‘.’ as hidden and therefore won’t see them to copy.
3. Make sure your copy of CakePHP is from the downloads section of the site or our GIT repository, and has been unpacked correctly by checking for .htaccess files.
CakePHP root directory (needs to be copied to your document, this redirects everything to your CakePHP app):
<IfModule mod_rewrite.c> RewriteEngine on
RewriteRule ^$ app/webroot/ [L] RewriteRule (.*) app/webroot/$1 [L] </IfModule>
CakePHP app directory (will be copied to the top directory of your application by bake):
<IfModule mod_rewrite.c> RewriteEngine on
RewriteRule ^$ webroot/ [L] RewriteRule (.*) webroot/$1 [L] </IfModule>
CakePHP webroot directory (will be copied to your application’s web root by bake):
<IfModule mod_rewrite.c> RewriteEngine On
RewriteRule ^(.*) $ index.php [QSA,L] </IfModule>
If your CakePHP site still has problems with mod_rewrite you might want to try and modify settings for virtualhosts. If on ubuntu, edit the file /etc/apache2/sites-available/default (location is distribu-tion dependent). In this file, ensure thatAllowOverride Noneis changed toAllowOverride All, so you have:
If on Mac OSX, another solution is to use the tool virtualhostx to make a virtual host to point to your folder.
For many hosting services (GoDaddy, 1and1), your web server is actually being served from a user directory that already uses mod_rewrite. If you are installing CakePHP into a user direc-tory (http://example.com/~username/cakephp/), or any other URL structure that already utilizes mod_rewrite, you’ll need to add RewriteBase statements to the .htaccess files CakePHP uses (/.htac-cess, /app/.htac(/.htac-cess, /app/webroot/.htaccess).
This can be added to the same section with the RewriteEngine directive, so for example your webroot .htaccess file would look like:
<IfModule mod_rewrite.c> RewriteEngine On
RewriteBase /path/to/cake/app
RewriteCond %{REQUEST_FILENAME} !-d RewriteCond %{REQUEST_FILENAME} !-f RewriteRule ^(.*) $ index.php [QSA,L] </IfModule>
The details of those changes will depend on your setup, and can include additional things that are not CakePHP related. Please refer to Apache’s online documentation for more information.
4. (Optional) To improve production setup, you should prevent invalid assets from being parsed by CakePHP. Modify your webroot .htaccess to something like:
<IfModule mod_rewrite.c> RewriteEngine On
RewriteBase /path/to/cake/app
RewriteCond %{REQUEST_FILENAME} !-d RewriteCond %{REQUEST_FILENAME} !-f
RewriteCond %{REQUEST_URI} !^/(app/webroot/)?(img|css|js)/(.*) $ RewriteRule ^(.*) $ index.php [QSA,L]
The above will simply prevent incorrect assets from being sent to index.php and instead display your webserver’s 404 page.
Additionally you can create a matching HTML 404 page, or use the default built-in CakePHP 404 by adding anErrorDocumentdirective:
ErrorDocument 404 /404-not-found
Pretty URLs on nginx
nginx is a popular server that uses less system resources than Apache. Its drawback is that it does not make use of .htaccess files like Apache, so it is necessary to create those rewritten URLs in the site-available configuration. Depending upon your setup, you will have to modify this, but at the very least, you will need PHP running as a FastCGI instance.
server {
listen 80;
server_name www.example.com;
rewrite ^(.*) http://example.com $1 permanent; }
server {
listen 80;
server_name example.com;
# root directive should be global
root /var/www/example.com/public/app/webroot/; index index.php;
access_log /var/www/example.com/log/access.log;
error_log /var/www/example.com/log/error.log; location / {
try_files $uri $uri/ /index.php?$uri&$args; }
location ~ \.php $ { try_files $uri =404;
include /etc/nginx/fastcgi_params; fastcgi_pass 127.0.0.1:9000; fastcgi_index index.php;
fastcgi_param SCRIPT_FILENAME $document_root$fastcgi_script_name; }
}
URL Rewrites on IIS7 (Windows hosts)
1. UseMicrosoft’s Web Platform Installer(http://www.microsoft.com/web/downloads/platform.aspx) to install the URL Rewrite Module 2.0 (http://www.iis.net/downloads/microsoft/url-rewrite) or down-load it directly (32-bit (http://www.microsoft.com/en-us/download/details.aspx?id=5747) / 64-bit (http://www.microsoft.com/en-us/download/details.aspx?id=7435)).
2. Create a new file in your CakePHP root folder, called web.config.
3. Using Notepad or any XML-safe editor and copy the following code into your new web.config file...
<?xml version="1.0" encoding="UTF-8"?> <configuration>
<system.webServer> <rewrite>
<rules>
<rule name="Rewrite requests to test.php" stopProcessing="true"> <match url="^test.php(.*)$" ignoreCase="false" />
<action type="Rewrite" url="app/webroot/test.php{R:1}" /> </rule>
<rule name="Exclude direct access to app/webroot/*" stopProcessing="true"> <match url="^app/webroot/(.*)$" ignoreCase="false" />
<action type="None" /> </rule>
<rule name="Rewrite routed access to assets (img, css, files, js, favicon)" <match url="^(img|css|files|js|favicon.ico)(.*)$" />
<action type="Rewrite" url="app/webroot/{R:1}{R:2}" appendQueryString="false" </rule>
<rule name="Rewrite requested file/folder to index.php" stopProcessing="true"> <match url="^(.*)$" ignoreCase="false" />
<action type="Rewrite" url="index.php" appendQueryString="true" /> </rule>
</rules> </rewrite> </system.webServer> </configuration>
Once the web.config file is created with the correct IIS-friendly rewrite rules, CakePHP’s links, CSS, JavaS-cipt, and rerouting should work correctly.
I don’t / can’t use URL rewriting
If you don’t want to or can’t use URL rewriting on your webserver, refer to thecore configuration. Now continue toBlog Tutorial - Adding a layerto start building your first CakePHP application.
Blog Tutorial - Adding a layer
Create a Post Model
operations later.
CakePHP’s model class files go in /app/Model, and the file we’ll be creating will be saved to /app/Model/Post.php. The completed file should look like this:
class Post extends AppModel { }
Naming conventions are very important in CakePHP. By naming our model Post, CakePHP can automat-ically infer that this model will be used in the PostsController, and will be tied to a database table called posts.
Note: CakePHP will dynamically create a model object for you if it cannot find a corresponding file in
/app/Model. This also means that if you accidentally name your file wrong (i.e. post.php or posts.php), CakePHP will not recognize any of your settings and will use the defaults instead.
For more on models, such as table prefixes, callbacks, and validation, check out theModelschapter of the Manual.
Create a Posts Controller
Next, we’ll create a controller for our posts. The controller is where all the business logic for post interaction will happen. In a nutshell, it’s the place where you play with the models and get post-related work done. We’ll place this new controller in a file calledPostsController.phpinside the/app/Controller directory. Here’s what the basic controller should look like:
class PostsController extends AppController {
public $helpers = array(’Html’, ’Form’); }
Now, let’s add an action to our controller. Actions often represent a single function or interface in an application. For example, when users request www.example.com/posts/index (which is also the same as www.example.com/posts/), they might expect to see a listing of posts. The code for that action would look something like this:
class PostsController extends AppController {
public $helpers = array(’Html’, ’Form’);
public function index() {
$this->set(’posts’, $this->Post->find(’all’)); }
}
Warning: You may be tempted to name your controllers and actions a certain way to obtain a certain URL. Resist that temptation. Follow CakePHP conventions (plural controller names, etc.) and create readable, understandable action names. You can map URLs to your code using “routes” covered later on.
The single instruction in the action usesset()to pass data from the controller to the view (which we’ll create next). The line sets the view variable called ‘posts’ equal to the return value of thefind(’all’) method of the Post model. Our Post model is automatically available at $this->Post because we’ve followed CakePHP’s naming conventions.
To learn more about CakePHP’s controllers, check out theControllerschapter.
Creating Post Views
Now that we have our data flowing to our model, and our application logic and flow defined by our controller, let’s create a view for the index action we created above.
CakePHP views are just presentation-flavored fragments that fit inside an application’s layout. For most applications they’re HTML mixed with PHP, but they may end up as XML, CSV, or even binary data. Layouts are presentation code that is wrapped around a view, and can be defined and switched between, but for now, let’s just use the default.
Remember in the last section how we assigned the ‘posts’ variable to the view using theset()method? That would hand down data to the view that would look something like this:
// print_r($posts) output:
Array
(
[0] => Array
(
[Post] => Array
(
[id] => 1
[title] => The title
[body] => This is the post body. [created] => 2008-02-13 18:34:55
[modified] => )
)
[1] => Array
(
[Post] => Array
(
[id] => 2
[title] => A title once again
[body] => And the post body follows. [created] => 2008-02-13 18:34:56
[modified] => )
[2] => Array
(
[Post] => Array
(
[id] => 3
[title] => Title strikes back
[body] => This is really exciting! Not. [created] => 2008-02-13 18:34:57
[modified] => )
) )
CakePHP’s view files are stored in/app/Viewinside a folder named after the controller they correspond to (we’ll have to create a folder named ‘Posts’ in this case). To format this post data in a nice table, our view code might look something like this
<!-- File: /app/View/Posts/index.ctp -->
<!-- Here is where we loop through our $posts array, printing out post info --> <?php foreach ($posts as $post): ?>
<tr>
<td><?php echo $post[’Post’][’id’]; ?></td> <td>
<?php echo $this->Html->link($post[’Post’][’title’],
array(’controller’ => ’posts’, ’action’ => ’view’, $post[’Post’][’id’])); ?> </td>
<td><?php echo $post[’Post’][’created’]; ?></td> </tr>
<?php endforeach; ?> <?php unset($post); ?> </table>
Hopefully this should look somewhat simple.
You might have noticed the use of an object called $this->Html. This is an instance of the CakePHP
HtmlHelperclass. CakePHP comes with a set of view helpers that make things like linking, form output, JavaScript and AJAX a snap. You can learn more about how to use them inHelpers, but what’s important to note here is that thelink()method will generate an HTML link with the given title (the first parameter) and URL (the second parameter).
the form of /controller/action/param1/param2.
At this point, you should be able to point your browser tohttp://www.example.com/posts/index. You should see your view, correctly formatted with the title and table listing of the posts.
If you happened to have clicked on one of the links we created in this view (that link a post’s title to a URL /posts/view/some_id), you were probably informed by CakePHP that the action hasn’t yet been defined. If you were not so informed, either something has gone wrong, or you actually did define it already, in which case you are very sneaky. Otherwise, we’ll create it in the PostsController now:
class PostsController extends AppController {
public $helpers = array(’Html’, ’Form’);
public function index() {
$this->set(’posts’, $this->Post->find(’all’)); }
public function view($id = null) {
if (!$id) {
throw new NotFoundException(__(’Invalid post’)); }
$post = $this->Post->findById($id);
if (!$post) {
throw new NotFoundException(__(’Invalid post’)); }
$this->set(’post’, $post); }
}
Theset()call should look familiar. Notice we’re using findById()rather thanfind(’all’) be-cause we only really want a single post’s information.
Notice that our view action takes a parameter: the ID of the post we’d like to see. This parameter is handed to the action through the requested URL. If a user requests/posts/view/3, then the value ‘3’ is passed as$id.
We also do a bit of error checking to ensure a user is actually accessing a record. If a user requests /posts/view, we will throw aNotFoundException and let the CakePHP ErrorHandler take over. We also perform a similar check to make sure the user has accessed a record that exists.
Now let’s create the view for our new ‘view’ action and place it in/app/View/Posts/view.ctp
<!-- File: /app/View/Posts/view.ctp -->
<h1><?php echo h($post[’Post’][’title’]); ?></h1>
<p><small>Created: <?php echo $post[’Post’][’created’]; ?></small></p> <p><?php echo h($post[’Post’][’body’]); ?></p>
Adding Posts
Reading from the database and showing us the posts is a great start, but let’s allow for the adding of new posts.
First, start by creating anadd()action in the PostsController:
class PostsController extends AppController {
public $helpers = array(’Html’, ’Form’, ’Session’);
public $components = array(’Session’);
public function index() {
$this->set(’posts’, $this->Post->find(’all’)); }
public function view($id) {
if (!$id) {
throw new NotFoundException(__(’Invalid post’)); }
$post = $this->Post->findById($id);
if (!$post) {
throw new NotFoundException(__(’Invalid post’)); }
$this->set(’post’, $post); }
public function add() {
if ($this->request->is(’post’)) { $this->Post->create();
if ($this->Post->save($this->request->data)) {
$this->Session->setFlash(__(’Your post has been saved.’));
return $this->redirect(array(’action’ => ’index’)); }
$this->Session->setFlash(__(’Unable to add your post.’)); }
} }
Note: You need to include the SessionComponent - and SessionHelper - in any controller where you will
use it. If necessary, include it in your AppController.
Here’s what theadd()action does: if the HTTP method of the request was POST, try to save the data using the Post model. If for some reason it doesn’t save, just render the view. This gives us a chance to show the user validation errors or other warnings.
Every CakePHP request includes aCakeRequestobject which is accessible using$this->request. The request object contains useful information regarding the request that was just received, and can be used to control the flow of your application. In this case, we use theCakeRequest::is()method to check that the request is a HTTP POST request.
$this->request->data. You can use the pr() or debug()functions to print it out if you want to see what it looks like.
We use the SessionComponent’s SessionComponent::setFlash() method to set a message to a session variable to be displayed on the page after redirection. In the layout we have
SessionHelper::flash which displays the message and clears the corresponding session vari-able. The controller’s Controller::redirect function redirects to another URL. The param array(’action’ => ’index’)translates to URL /posts i.e the index action of posts controller. You can refer toRouter::url()function on theAPI(http://api20.cakephp.org) to see the formats in which you can specify a URL for various CakePHP functions.
Calling thesave()method will check for validation errors and abort the save if any occur. We’ll discuss how those errors are handled in the following sections.
Data Validation
CakePHP goes a long way in taking the monotony out of form input validation. Everyone hates coding up endless forms and their validation routines. CakePHP makes it easier and faster.
To take advantage of the validation features, you’ll need to use CakePHP’s FormHelper in your views. The
FormHelperis available by default to all views at$this->Form. Here’s our add view:
<!-- File: /app/View/Posts/add.ctp --> <h1>Add Post</h1>
<?php
echo $this->Form->create(’Post’);
echo $this->Form->input(’title’);
echo $this->Form->input(’body’, array(’rows’ => ’3’));
echo $this->Form->end(’Save Post’); ?>
Here, we use the FormHelper to generate the opening tag for an HTML form. Here’s the HTML that $this->Form->create()generates:
<form id="PostAddForm" method="post" action="/posts/add">
Ifcreate()is called with no parameters supplied, it assumes you are building a form that submits to the current controller’sadd()action (oredit()action whenidis included in the form data), via POST. The $this->Form->input() method is used to create form elements of the same name. The first parameter tells CakePHP which field they correspond to, and the second parameter allows you to specify a wide array of options - in this case, the number of rows for the textarea. There’s a bit of introspection and automagic here:input()will output different form elements based on the model field specified.
The$this->Form->end()call generates a submit button and ends the form. If a string is supplied as the first parameter toend(), the FormHelper outputs a submit button named accordingly along with the closing form tag. Again, refer toHelpersfor more on helpers.
<?php echo $this->Html->link(
’Add Post’,
array(’controller’ => ’posts’, ’action’ => ’add’) ); ?>
You may be wondering: how do I tell CakePHP about my validation requirements? Validation rules are defined in the model. Let’s look back at our Post model and make a few adjustments:
class Post extends AppModel {
public $validate = array(
’title’ => array(
’rule’ => ’notEmpty’
),
’body’ => array(
’rule’ => ’notEmpty’
) ); }
The$validatearray tells CakePHP how to validate your data when thesave()method is called. Here, I’ve specified that both the body and title fields must not be empty. CakePHP’s validation engine is strong, with a number of pre-built rules (credit card numbers, email addresses, etc.) and flexibility for adding your own validation rules. For more information on that setup, check theData Validation.
Now that you have your validation rules in place, use the app to try to add a post with an empty title or body to see how it works. Since we’ve used theFormHelper::input()method of the FormHelper to create our form elements, our validation error messages will be shown automatically.
Editing Posts
Post editing: here we go. You’re a CakePHP pro by now, so you should have picked up a pattern. Make the action, then the view. Here’s what theedit()action of the PostsController would look like:
public function edit($id = null) {
if (!$id) {
throw new NotFoundException(__(’Invalid post’)); }
$post = $this->Post->findById($id);
if (!$post) {
throw new NotFoundException(__(’Invalid post’)); }
if ($this->request->is(array(’post’, ’put’))) { $this->Post->id = $id;
if ($this->Post->save($this->request->data)) {
$this->Session->setFlash(__(’Your post has been updated.’));
return $this->redirect(array(’action’ => ’index’)); }
if (!$this->request->data) { $this->request->data = $post; }
}
This action first ensures that the user has tried to access an existing record. If they haven’t passed in an$id parameter, or the post does not exist, we throw aNotFoundExceptionfor the CakePHP ErrorHandler to take care of.
Next the action checks whether the request is either a POST or a PUT request. If it is, then we use the POST data to update our Post record, or kick back and show the user validation errors.
If there is no data set to$this->request->data, we simply set it to the previously retrieved post. The edit view might look something like this:
<!-- File: /app/View/Posts/edit.ctp --> <h1>Edit Post</h1>
<?php
echo $this->Form->create(’Post’);
echo $this->Form->input(’title’);
echo $this->Form->input(’body’, array(’rows’ => ’3’));
echo $this->Form->input(’id’, array(’type’ => ’hidden’));
echo $this->Form->end(’Save Post’); ?>
This view outputs the edit form (with the values populated), along with any necessary validation error messages.
One thing to note here: CakePHP will assume that you are editing a model if the ‘id’ field is present in the data array. If no ‘id’ is present (look back at our add view), CakePHP will assume that you are inserting a new model whensave()is called.
You can now update your index view with links to edit specific posts:
<!-- File: /app/View/Posts/index.ctp (edit links added) --> <h1>Blog posts</h1>
<p><?php echo $this->Html->link("Add Post", array(’action’ => ’add’)); ?></p> <table>
<tr>
<th>Id</th> <th>Title</th> <th>Action</th> <th>Created</th> </tr>
<!-- Here’s where we loop through our $posts array, printing out post info --> <?php foreach ($posts as $post): ?>
<tr>
<?php echo $this->Html->link($post[’Post’][’title’], array(’action’ => ’view’, </td>
<td>
<?php echo $this->Html->link(’Edit’, array(’action’ => ’edit’, $post[’Post’][’id’
</td> <td>
<?php echo $post[’Post’][’created’]; ?> </td>
</tr>
<?php endforeach; ?> </table>
Deleting Posts
Next, let’s make a way for users to delete posts. Start with adelete()action in the PostsController:
public function delete($id) {
if ($this->request->is(’get’)) {
throw new MethodNotAllowedException(); }
if ($this->Post->delete($id)) {
$this->Session->setFlash(__(’The post with id: %s has been deleted.’, h($id)));
return $this->redirect(array(’action’ => ’index’)); }
}
This logic deletes the post specified by $id, and uses $this->Session->setFlash() to show the user a confirmation message after redirecting them on to/posts. If the user attempts to do a delete using a GET request, we throw an Exception. Uncaught exceptions are captured by CakePHP’s exception handler, and a nice error page is displayed. There are many built-in Exceptions that can be used to indicate the various HTTP errors your application might need to generate.
Because we’re just executing some logic and redirecting, this action has no view. You might want to update your index view with links that allow users to delete posts, however:
<!-- File: /app/View/Posts/index.ctp --> <h1>Blog posts</h1>
<p><?php echo $this->Html->link(’Add Post’, array(’action’ => ’add’)); ?></p> <table>
<tr>
<th>Id</th> <th>Title</th> <th>Actions</th> <th>Created</th> </tr>
<tr>
<td><?php echo $post[’Post’][’id’]; ?></td> <td>
<?php echo $this->Html->link($post[’Post’][’title’], array(’action’ => ’view’, </td>
<td>
<?php echo $this->Form->postLink(
’Delete’,
array(’action’ => ’delete’, $post[’Post’][’id’]),
array(’confirm’ => ’Are you sure?’)); ?>
<?php echo $this->Html->link(’Edit’, array(’action’ => ’edit’, $post[’Post’][’id’
</td> <td>
<?php echo $post[’Post’][’created’]; ?> </td>
</tr>
<?php endforeach; ?> </table>
UsingpostLink()will create a link that uses JavaScript to do a POST request deleting our post. Allowing content to be deleted using GET requests is dangerous, as web crawlers could accidentally delete all your content.
Note: This view code also uses the FormHelper to prompt the user with a JavaScript confirmation dialog
before they attempt to delete a post.
Routes
For some, CakePHP’s default routing works well enough. Developers who are sensitive to user-friendliness and general search engine compatibility will appreciate the way that CakePHP’s URLs map to specific actions. So we’ll just make a quick change to routes in this tutorial.
For more information on advanced routing techniques, seeRoutes Configuration.
By default, CakePHP responds to a request for the root of your site (i.e. http://www.example.com) using its PagesController, rendering a view called “home”. Instead, we’ll replace this with our PostsController by creating a routing rule.
CakePHP’s routing is found in/app/Config/routes.php. You’ll want to comment out or remove the line that defines the default root route. It looks like this:
Router::connect(’/’, array(’controller’ => ’pages’, ’action’ => ’display’, ’home’)); This line connects the URL ‘/’ with the default CakePHP home page. We want it to connect with our own
controller, so replace that line with this one:
Note: CakePHP also makes use of ‘reverse routing’ - if with the above route defined you pass array(’controller’ => ’posts’, ’action’ => ’index’)to a function expecting an ar-ray, the resultant URL used will be ‘/’. It’s therefore a good idea to always use arrays for URLs as this means your routes define where a URL goes, and also ensures that links point to the same place too.
Conclusion
Creating applications this way will win you peace, honor, love, and money beyond even your wildest fan-tasies. Simple, isn’t it? Keep in mind that this tutorial was very basic. CakePHP hasmanymore features to offer, and is flexible in ways we didn’t wish to cover here for simplicity’s sake. Use the rest of this manual as a guide for building more feature-rich applications.
Now that you’ve created a basic CakePHP application you’re ready for the real thing. Start your own project, read the rest of theCookbookandAPI(http://api20.cakephp.org).
If you need help, there are many ways to get the help you need - please see theWhere to Get Helppage. Welcome to CakePHP!
Suggested Follow-up Reading
These are common tasks people learning CakePHP usually want to study next: 1. Layouts: Customizing your website layout
2. Elements: Including and reusing view snippets 3. Scaffolding: Prototyping before creating code
4. Code Generation with Bake: Generating basic CRUD code
5. Simple Authentication and Authorization Application: User authentication and authorization tutorial
Additional Reading
A Typical CakePHP Request
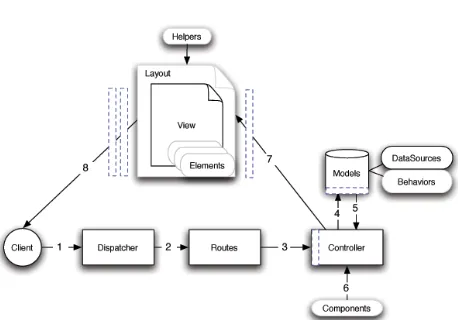
We’ve covered the basic ingredients in CakePHP, so let’s look at how objects work together to complete a basic request. Continuing with our original request example, let’s imagine that our friend Ricardo just clicked on the “Buy A Custom Cake Now!” link on a CakePHP application’s landing page.
Figure: 2. Typical CakePHP Request.
Black = required element, Gray = optional element, Blue = callback
1. Ricardo clicks the link pointing tohttp://www.example.com/cakes/buy, and his browser makes a re-quest to your web server.
3. Using routes, a request URL is mapped to a controller action (a method in a specific controller class). In this case, it’s the buy() method of the CakesController. The controller’s beforeFilter() callback is called before any controller action logic is executed.
4. The controller may use models to gain access to the application’s data. In this example, the controller uses a model to fetch Ricardo’s last purchases from the database. Any applicable model callbacks, behaviors, and DataSources may apply during this operation. While model usage is not required, all CakePHP controllers initially require at least one model.
5. After the model has retrieved the data, it is returned to the controller. Model callbacks may apply. 6. The controller may use components to further refine the data or perform other operations (session
manipulation, authentication, or sending emails, for example).
7. Once the controller has used models and components to prepare the data sufficiently, that data is handed to the view using the controller’s set() method. Controller callbacks may be applied before the data is sent. The view logic is performed, which may include the use of elements and/or helpers. By default, the view is rendered inside of a layout.
8. Additional controller callbacks (like afterFilter) may be applied. The complete, rendered view code is sent to Ricardo’s browser.
CakePHP Conventions
We are big fans of convention over configuration. While it takes a bit of time to learn CakePHP’s con-ventions, you save time in the long run: by following convention, you get free functionality, and you free yourself from the maintenance nightmare of tracking config files. Convention also makes for a very uniform system development, allowing other developers to jump in and help more easily.
CakePHP’s conventions have been distilled out of years of web development experience and best practices. While we suggest you use these conventions while developing with CakePHP, we should mention that many of these tenets are easily overridden – something that is especially handy when working with legacy systems.
Controller Conventions
Controller class names are plural, CamelCased, and end in Controller. PeopleController and LatestArticlesControllerare both examples of conventional controller names.
The first method you write for a controller might be theindex() method. When a request specifies a controller but not an action, the default CakePHP behavior is to execute the index() method of that controller. For example, a request for http://www.example.com/apples/ maps to a call on theindex() method of the ApplesController, whereas http://www.example.com/apples/view/maps to a call on theview()method of theApplesController.
You can also change the visibility of controller methods in CakePHP by prefixing controller method names with underscores. If a controller method has been prefixed with an underscore, the method will not be accessible directly from the web but is available for internal use. For example:
class NewsController extends AppController {
$this->_findNewArticles(); }
protected function _findNewArticles() {
// Logic to find latest news articles
} }
While the page http://www.example.com/news/latest/ would be accessible to the user as usual, someone trying to get to the pagehttp://www.example.com/news/_findNewArticles/would get an error, because the method is preceded with an underscore. You can also use PHP’s visibility keywords to indicate whether or not a method can be accessed from a URL. Non-public methods cannot be accessed.
URL Considerations for Controller Names As you’ve just seen, single word controllers map easily to
a simple lower case URL path. For example,ApplesController(which would be defined in the file name ‘ApplesController.php’) is accessed fromhttp://example.com/apples.
Multiple word controllerscanbe any ‘inflected’ form which equals the controller name so: • /redApples
• /RedApples • /Red_apples • /red_apples
will all resolve to the index of the RedApples controller. However, the convention is that your URLs are lowercase and underscored, therefore /red_apples/go_pick is the correct form to access the RedApplesController::go_pickaction.
For more information on CakePHP URLs and parameter handling, seeRoutes Configuration.
File and Class Name Conventions
In general, filenames match the class names, which are CamelCased. So if you have a classMyNiftyClass, then in CakePHP, the file should be namedMyNiftyClass.php. Below are examples of how to name the file for each of the different types of classes you would typically use in a CakePHP application:
• The Controller class KissesAndHugsController would be found in a file named KissesAnd-HugsController.php
• The Component class MyHandyComponent would be found in a file named MyHandyCompo-nent.php
• The Model classOptionValuewould be found in a file namedOptionValue.php
• The Behavior classEspeciallyFunkableBehaviorwould be found in a file named EspeciallyFunk-ableBehavior.php
Each file would be located in the appropriate folder in your app folder.
Model and Database Conventions
Model class names are singular and CamelCased. Person, BigPerson, and ReallyBigPerson are all examples of conventional model names.
Table names corresponding to CakePHP models are plural and underscored. The underlying tables for the above mentioned models would bepeople,big_people, andreally_big_people, respectively. You can use the utility libraryInflectorto check the singular/plural of words. See theInflectorfor more information.
Field names with two or more words are underscored like, first_name.
Foreign keys in hasMany, belongsTo or hasOne relationships are recognized by default as the (singular) name of the related table followed by _id. So if a Baker hasMany Cake, the cakes table will refer to the bakers table via a baker_id foreign key. For a multiple worded table like category_types, the foreign key would be category_type_id.
Join tables, used in hasAndBelongsToMany (HABTM) relationships between models should be named after the model tables they will join in alphabetical order (apples_zebras rather than zebras_apples).
All tables with which CakePHP models interact (with the exception of join tables), require a singular primary key to uniquely identify each row. If you wish to model a table which does not have a single-field primary key, CakePHP’s convention is that a single-field primary key is added to the table. You have to add a single-field primary key if you want to use that table’s model.
CakePHP does not support composite primary keys. If you want to directly manipulate your join table data, use directquerycalls or add a primary key to act on it as a normal model. E.g.:
CREATE TABLE posts_tags (
id INT(10) NOT NULL AUTO_INCREMENT, post_id INT(10) NOT NULL,
tag_id INT(10) NOT NULL, PRIMARY KEY(id));
Rather than using an auto-increment key as the primary key, you may also use char(36). CakePHP will then use a unique 36 character UUID (String::uuid) whenever you save a new record using the Model::save method.
View Conventions
View template files are named after the controller functions they display, in an underscored form. The getReady() function of the PeopleController class will look for a view template in /app/View/People/get_ready.ctp.
The basic pattern is /app/View/Controller/underscored_function_name.ctp.
• Database table: “people”
• Model class: “Person”, found at /app/Model/Person.php
• Controller class: “PeopleController”, found at /app/Controller/PeopleController.php • View template, found at /app/View/People/index.ctp
Using these conventions, CakePHP knows that a request tohttp://example.com/people/maps to a call on the index() function of the PeopleController, where the Person model is automatically available (and automati-cally tied to the ‘people’ table in the database), and renders to a file. None of these relationships have been configured by any means other than by creating classes and files that you’d need to create anyway.
Now that you’ve been introduced to CakePHP’s fundamentals, you might try a run through theBlog Tutorial to see how things fit together.
CakePHP Folder Structure
After you’ve downloaded and extracted CakePHP, these are the files and folders you should see: • app
• lib • vendors • plugins • .htaccess • index.php • README
You’ll notice three main folders:
• Theappfolder will be where you work your magic: it’s where your application’s files will be placed. • Thelibfolder is where we’ve worked our magic. Make a personal commitmentnotto edit files in this
folder. We can’t help you if you’ve modified the core.
• Finally, thevendorsfolder is where you’ll place third-party PHP libraries you need to use with your CakePHP applications.
The App Folder
CakePHP’s app folder is where you will do most of your application development. Let’s look a little closer at the folders inside of app.
Config Holds the (few) configuration files CakePHP uses. Database connection details, bootstrapping, core
configuration files and more should be stored here.
Console Contains the console commands and console tasks for your application. This directory can also
Controller Contains your application’s controllers and their components.
Lib Contains 1st party libraries that do not come from 3rd parties or external vendors. This allows you to separate your organization’s internal libraries from vendor libraries.
Locale Stores string files for internationalization.
Model Contains your application’s models, behaviors, and datasources.
Plugin Contains plugin packages.
Test This directory contains all the test cases, and test fixtures for your application. TheTest/Case di-rectory should mirror your application and contain one or more test cases per class in your application. For more information on test cases and test fixtures refer to theTestingdocumentation.
tmp This is where CakePHP stores temporary data. The actual data it stores depends on how you have CakePHP configured, but this folder is usually used to store model descriptions, logs, and sometimes session information.
Make sure that this folder exists and that it is writable, otherwise the performance of your application will be severely impacted. In debug mode, CakePHP will warn you if it is not the case.
Vendor Any third-party classes or libraries should be placed here. Doing so makes them easy to access
using the App::import(‘vendor’, ‘name’) function. Keen observers will note that this seems redundant, as there is also a vendors folder at the top level of our directory structure. We’ll get into the differences between the two when we discuss managing multiple applications and more complex system setups. View Presentational files are placed here: elements, error pages, helpers, layouts, and view files.
webroot In a production setup, this folder should serve as the document root for your application. Folders here also serve as holding places for CSS stylesheets, images, and JavaScript files.
CakePHP Structure
CakePHP features Controller, Model, and View classes, but it also features some additional classes and objects that make development in MVC a little quicker and more enjoyable. Components, Behaviors, and Helpers are classes that provide extensibility and reusability to quickly add functionality to the base MVC classes in your applications. Right now we’ll stay at a higher level, so look for the details on how to use these tools later on.
Application Extensions
Controllers, helpers and models each have a parent class you can use to define application-wide changes. AppController (located at /app/Controller/AppController.php), Ap-pHelper (located at /app/View/Helper/AppHelper.php) and AppModel (located at /app/Model/AppModel.php) are great places to put methods you want to share between all controllers, helpers or models.
Some features in an application merit packaging as a whole. A plugin is a package of models, controllers and views that accomplishes a specific purpose that can span multiple applications. A user management system or a simplified blog might be a good fit for CakePHP plugins.
Controller Extensions (“Components”)
A Component is a class that aids in controller logic. If you have some logic you want to share between controllers (or applications), a component is usually a good fit. As an example, the core EmailComponent class makes creating and sending emails a snap. Rather than writing a controller method in a single controller that performs this logic, you can package the logic so it can be shared.
Controllers are also fitted with callbacks. These callbacks are available for your use, just in case you need to insert some logic between CakePHP’s core operations. Callbacks available include:
• beforeFilter(), executed before any controller action logic
• beforeRender(), executed after controller logic, but before the view is rendered
• afterFilter(), executed after all controller logic, including the view render. There may be no difference betweenafterRender()andafterFilter()unless you’ve manually made a call torender()in your controller action and have included some logic after that call.
Model Extensions (“Behaviors”)
Similarly, Behaviors work as ways to add common functionality between models. For example, if you store user data in a tree structure, you can specify your User model as behaving like a tree, and gain free functionality for removing, adding, and shifting nodes in your underlying tree structure.
Models also are supported by another class called a DataSource. DataSources are an abstraction that enable models to manipulate different types of data consistently. While the main source of data in a CakePHP application is often a database, you might write additional DataSources that allow your models to represent RSS feeds, CSV files, LDAP entries, or iCal events. DataSources allow you to associate records from different sources: rather than being limited to SQL joins, DataSources allow you to tell your LDAP model that it is associated to many iCal events.
Just like controllers, models are featured with callbacks as well: • beforeFind()
• afterFind() • beforeValidate() • beforeSave() • afterSave() • beforeDelete() • afterDelete()
View Extensions (“Helpers”)
Installation
CakePHP is fast and easy to install. The minimum requirements are a webserver and a copy of CakePHP, that’s it! While this manual focuses primarily on setting up on Apache (because it’s the most commonly used), you can configure CakePHP to run on a variety of web servers such as LightHTTPD or Microsoft IIS.
Requirements
• HTTP Server. For example: Apache. mod_rewrite is preferred, but by no means required. • PHP 5.2.8 or greater.
Technically a database engine isn’t required, but we imagine that most applications will utilize one. CakePHP supports a variety of database storage engines:
• MySQL (4 or greater) • PostgreSQL
• Microsoft SQL Server • SQLite
Note: All built-in drivers require PDO. You should make sure you have the correct PDO extensions
in-stalled.
License
Downloading CakePHP
There are two main ways to get a fresh copy of CakePHP. You can either download an archived copy (zip/tar.gz/tar.bz2) from the main website, or check out the code from the git repository.
To download the latest major release of CakePHP. Visit the main websitehttp://cakephp.organd follow the “Download Now” link.
All current releases of CakePHP are hosted onGitHub(http://github.com/cakephp/cakephp). GitHub houses both CakePHP itself as well as many other plugins for CakePHP. The CakePHP releases are available at GitHub tags(https://github.com/cakephp/cakephp/tags).
Alternatively you can get fresh off the press code, with all the bug-fixes and up to the minute enhancements. These can be accessed from GitHub by cloning theGitHub(http://github.com/cakephp/cakephp) repository:
git clone git://github.com/cakephp/cakephp.git
Permissions
CakePHP uses the app/tmpdirectory for a number of different operations. A few examples would be Model descriptions, cached views and session information.
As such, make sure the directory app/tmp and all its subdirectories in your CakePHP installation are writable by the web server user.
Setup
Setting up CakePHP can be as simple as slapping it in your web server’s document root, or as complex and flexible as you wish. This section will cover the three main installation types for CakePHP: development, production, and advanced.
• Development: easy to get going, URLs for the application include the CakePHP installation directory name, and less secure.
• Production: Requires the ability to configure the web server’s document root, clean URLs, very se-cure.
• Advanced: With some configuration, allows you to place key CakePHP directories in different parts of the filesystem, possibly sharing a single CakePHP core library folder amongst many CakePHP applications.
Development
Unpack the contents of the CakePHP archive into/var/www/html. You now have a folder in your doc-ument root named after the release you’ve downloaded (e.g. cake_2.0.0). Rename this folder to cake_2_0. Your development setup will look like this on the file system:
/var/www/html/ cake_2_0/
app/ lib/ plugins/ vendors/ .htaccess index.php README
If your web server is configured correctly, you should now find your CakePHP application accessible at http://www.example.com/cake_2_0/.
Using one CakePHP Checkout for multiple Applications
If you are developing a number of applications, it often makes sense to have them share the same CakePHP core checkout. There are a few ways in which you can accomplish this. Often the easiest is to use PHP’s include_path. To start off, clone CakePHP into a directory. For this example, we’ll use /home/mark/projects:
git clone git://github.com/cakephp/cakephp.git /home/mark/projects/cakephp This will clone CakePHP into your/home/mark/projectsdirectory. If you don’t want to use git, you can download a zipball and the remaining steps will be the same. Next you’ll have to locate and modify your php.ini. On *nix systems this is often in/etc/php.ini, but usingphp -iand looking for ‘Loaded Configuration File’. Once you’ve found the correct ini file, modify theinclude_pathconfiguration to include/home/mark/projects/cakephp/lib. An example would look like:
include_path = .:/home/mark/projects/cakephp/lib:/usr/local/php/lib/php After restarting your webserver, you should see the changes reflected inphpinfo().
Note: If you are on windows, separate include paths with ; instead of :
Having finished setting up yourinclude_pathyour applications should be able to find CakePHP auto-matically.
Production
Unpack the contents of the CakePHP archive into a directory of your choice. For the purposes of this example, we assume you chose to install CakePHP into /cake_install. Your production setup will look like this on the filesystem:
/cake_install/ app/
webroot/ (this directory is set as the ‘‘DocumentRoot‘‘
directive) lib/
plugins/ vendors/ .htaccess index.php README
Developers using Apache should set theDocumentRootdirective for the domain to:
DocumentRoot /cake_install/app/webroot
If your web server is configured correctly, you should now find your CakePHP application accessible at http://www.example.com.
Advanced Installation and URL Rewriting
Advanced Installation
Installing CakePHP with PEAR Installer
CakePHP publishes a PEAR package that you can install using the PEAR installer. Installing with the PEAR installer can simplify sharing CakePHP libraries across multiple applications. To install CakePHP with pear you’ll need to do the following:
pear channel-discover pear.cakephp.org pear install cakephp/CakePHP
Note: On some systems installing libraries with PEAR will requiresudo.
After installing CakePHP with PEAR, if PEAR is configured correctly you should be able to use thecake command to create a new application. Since CakePHP will be located on PHP’s include_pathyou won’t need to make any other changes.
Installing CakePHP with Composer
{
"name": "example-app",
"repositories": [ {
"type": "pear",
"url": "http://pear.cakephp.org"
} ],
"require": {
"pear-cakephp/cakephp": ">=2.4.0"
},
"config": {
"vendor-dir": "Vendor/"
} }
Save this JSON into composer.json in the root directory of your project. Next download the com-poser.phar file into your project. After you’ve downloaded Composer, install CakePHP. In the same directory as yourcomposer.jsonrun the following:
$ php composer.phar install
Once Composer has finished running you should have a directory structure that looks like:
example-app/ composer.phar composer.json Vendor/
bin/
autoload.php composer/
pear-pear.cakephp.org/
You are now ready to generate the rest of your application skeleton:
$ Vendor/bin/cake bake project <path to project>
By defaultbakewill hard-codeCAKE_CORE_INCLUDE_PATH. To make your application more portable you should modify webroot/index.php, changing CAKE_CORE_INCLUDE_PATH to be a relative path:
define(
’CAKE_CORE_INCLUDE_PATH’,
ROOT . DS . APP_DIR . ’/Vendor/pear-pear.cakephp.org/CakePHP’
);
If you’re installing any other libraries with Composer, you’ll need to setup the autoloader, and work around an issue in Composer’s autoloader. In yourConfig/bootstrap.phpfile add the following:
// Load Composer autoload.
require APP . ’/Vendor/autoload.php’;
// See https://github.com/composer/composer/commit/c80cb76b9b5082ecc3e5b53b1050f76bb27b127b
spl_autoload_unregister(array(’App’, ’load’));
spl_autoload_register(array(’App’, ’load’), true, true);
You should now have a functioning CakePHP application installed via Composer. Be sure to keep the composer.json and composer.lock file with the rest of your source code.
Sharing CakePHP Libraries with multiple Applications
There may be some situations where you wish to place CakePHP’s directories on different places on the filesystem. This may be due to a shared host restriction, or maybe you just want a few of your apps to share the same CakePHP libraries. This section describes how to spread your CakePHP directories across a filesystem.
First, realize that there are three main parts to a Cake application: 1. The core CakePHP libraries, in /lib/Cake.
2. Your application code, in /app.
3. The application’s webroot, usually in /app/webroot.
Each of these directories can be located anywhere on your file system, with the exception of the webroot, which needs to be accessible by your web server. You can even move the webroot folder out of the app folder as long as you tell CakePHP where you’ve put it.
To configure your CakePHP installation, you’ll need to make some changes to the following files. • /app/webroot/index.php
• /app/webroot/test.php (if you use theTestingfeature.)
There are three constants that you’ll need to edit:ROOT,APP_DIR, andCAKE_CORE_INCLUDE_PATH. • ROOTshould be set to the path of the directory that contains your app folder.
• APP_DIRshould be set to the (base)name of your app folder.
• CAKE_CORE_INCLUDE_PATHshould be set to the path of your CakePHP libraries folder.
Let’s run through an example so you can see what an advanced installation might look like in practice. Imagine that I wanted to set up CakePHP to work as follows:
• The CakePHP core libraries will be placed in /usr/lib/cake. • My application’s webroot directory will be /var/www/mysite/. • My application’s app directory will be /home/me/myapp.
Given this type of setup, I would need to edit my webroot/index.php file (which will end up at /var/www/mysite/index.php, in this example) to look like the following:
// /app/webroot/index.php (partial, comments removed)
if (!defined(’ROOT’)) {
}
if (!defined(’APP_DIR’)) {
define (’APP_DIR’, ’myapp’); }
if (!defined(’CAKE_CORE_INCLUDE_PATH’)) {
define(’CAKE_CORE_INCLUDE_PATH’, DS . ’usr’ . DS . ’lib’); }
It is recommended to use theDSconstant rather than slashes to delimit file paths. This prevents any missing file errors you might get as a result of using the wrong delimiter, and it makes your code more portable.
Apache and mod_rewrite (and .htaccess)
This section was moved toURL rewriting.
URL Rewriting
Apache and mod_rewrite (and .htaccess)
While CakePHP is built to work with mod_rewrite out of the box–and usually does–we’ve noticed that a few users struggle with getting everything to play nicely on their systems.
Here are a few things you might try to get it running correctly. First look at your httpd.conf (Make sure you are editing the system httpd.conf rather than a user- or site-specific httpd.conf).
These files can vary on different distributions and apache versions. You may also take a look at http://wiki.apache.org/httpd/DistrosDefaultLayoutfor further information.
1. Make sure that an .htaccess override is allowed and that AllowOverride is set to All for the correct DocumentRoot. You should see something similar to:
# Each directory to which Apache has access can be configured with respect # to which services and features are allowed and/or disabled in that
# directory (and its subdirectories). #
# First, we configure the "default" to be a very restrictive set of # features.
#
<Directory />
Options FollowSymLinks AllowOverride All
# Order deny,allow # Deny from all </Directory>
2. Make sure you are loading up mod_rewrite correctly. You should see something like:
In many systems these will be commented out (by being prepended with a #) by default, so you may just need to remove those leading # symbols.
After you make changes, restart Apache to make sure the settings are active. Verify that your .htaccess files are actually in the right directories.
This can happen during copying because some operating systems treat files that start with ‘.’ as hidden and therefore won’t see them to copy.
3. Make sure your copy of CakePHP is from the downloads section of the site or our GIT repository, and has been unpacked correctly by checking for .htaccess files.
CakePHP root directory (needs to be copied to your document, this redirects everything to your CakePHP app):
<IfModule mod_rewrite.c> RewriteEngine on
RewriteRule ^$ app/webroot/ [L] RewriteRule (.*) app/webroot/$1 [L] </IfModule>
CakePHP app directory (will be copied to the top directory of your application by bake):
<IfModule mod_rewrite.c> RewriteEngine on
RewriteRule ^$ webroot/ [L] RewriteRule (.*) webroot/$1 [L] </IfModule>
CakePHP webroot directory (will be copied to your application’s web root by bake):
<IfModule mod_rewrite.c> RewriteEngine On
RewriteCond %{REQUEST_FILENAME} !-d RewriteCond %{REQUEST_FILENAME} !-f RewriteRule ^(.*) $ index.php [QSA,L] </IfModule>
If your CakePHP site still has problems with mod_rewrite you might want to try and modify settings for virtualhosts. If on ubuntu, edit the file /etc/apache2/sites-available/default (location is distribu-tion dependent). In this file, ensure thatAllowOverride Noneis changed toAllowOverride All, so you have:
<Directory />
Options FollowSymLinks AllowOverride All </Directory>
<Directory /var/www>
Options Indexes FollowSymLinks MultiViews AllowOverride All