Karl G. Kowalski
Learn to:
•
Download the Mac App SDK and start
working with Xcode
®•
Take advantage of Mac desktop features
to create amazing apps
•
Submit your app to the Mac App Store
and navigate the approval process
IN FULL COLOR!
Mac
®
Application Deve
lopment
Start with
FREE
Cheat Sheets
Cheat Sheets include
•
Checklists
•
Charts
• Common Instructions
• And Other Good Stuff!
Get Smart at Dummies.com
Dummies.com makes your life easier with 1,000s
of answers on everything from removing wallpaper
to using the latest version of Windows.
Check out our
•
Videos
• Illustrated Articles
• Step-by-Step Instructions
Plus, each month you can win valuable prizes by entering
our Dummies.com sweepstakes. *
Want a weekly dose of Dummies? Sign up for Newsletters on
• Digital Photography
• Microsoft Windows & Office
• Personal Finance & Investing
• Health & Wellness
• Computing, iPods & Cell Phones
•
eBay
•
Internet
• Food, Home & Garden
Find out “HOW” at Dummies.com
To access the Cheat Sheet created specifically for this book, go to
by Karl G. Kowalski
Development
FOR
111 River Street Hoboken, NJ 07030-5774
www.wiley.com
Copyright © 2012 by John Wiley & Sons, Inc., Hoboken, New Jersey Published by John Wiley & Sons, Inc., Hoboken, New Jersey
Published simultaneously in Canada
No part of this publication may be reproduced, stored in a retrieval system or transmitted in any form or by any means, electronic, mechanical, photocopying, recording, scanning or otherwise, except as permit-ted under Sections 107 or 108 of the 1976 Unipermit-ted States Copyright Act, without either the prior written permission of the Publisher, or authorization through payment of the appropriate per-copy fee to the Copyright Clearance Center, 222 Rosewood Drive, Danvers, MA 01923, (978) 750-8400, fax (978) 646-8600. Requests to the Publisher for permission should be addressed to the Permissions Department, John Wiley & Sons, Inc., 111 River Street, Hoboken, NJ 07030, (201) 748-6011, fax (201) 748-6008, or online at http://
www.wiley.com/go/permissions.
Trademarks: Wiley, the Wiley logo, For Dummies, the Dummies Man logo, A Reference for the Rest of Us!, The Dummies Way, Dummies Daily, The Fun and Easy Way, Dummies.com, Making Everything Easier,and related trade dress are trademarks or registered trademarks of John Wiley & Sons, Inc. and/or its affiliates in the United States and other countries, and may not be used without written permission. Dragon NaturallySpeaking is a registered trademark Nuance Communications, Inc. All other trademarks are the property of their respective owners. John Wiley & Sons, Inc. is not associated with any product or vendor mentioned in this book.
LIMIT OF LIABILITY/DISCLAIMER OF WARRANTY: THE PUBLISHER AND THE AUTHOR MAKE NO REPRESENTATIONS OR WARRANTIES WITH RESPECT TO THE ACCURACY OR COMPLETENESS OF THE CONTENTS OF THIS WORK AND SPECIFICALLY DISCLAIM ALL WARRANTIES, INCLUDING WITH-OUT LIMITATION WARRANTIES OF FITNESS FOR A PARTICULAR PURPOSE. NO WARRANTY MAY BE CREATED OR EXTENDED BY SALES OR PROMOTIONAL MATERIALS. THE ADVICE AND STRATEGIES CONTAINED HEREIN MAY NOT BE SUITABLE FOR EVERY SITUATION. THIS WORK IS SOLD WITH THE UNDERSTANDING THAT THE PUBLISHER IS NOT ENGAGED IN RENDERING LEGAL, ACCOUNTING, OR OTHER PROFESSIONAL SERVICES. IF PROFESSIONAL ASSISTANCE IS REQUIRED, THE SERVICES OF A COMPETENT PROFESSIONAL PERSON SHOULD BE SOUGHT. NEITHER THE PUBLISHER NOR THE AUTHOR SHALL BE LIABLE FOR DAMAGES ARISING HEREFROM. THE FACT THAT AN ORGANIZATION OR WEBSITE IS REFERRED TO IN THIS WORK AS A CITATION AND/OR A POTENTIAL SOURCE OF FUR-THER INFORMATION DOES NOT MEAN THAT THE AUTHOR OR THE PUBLISHER ENDORSES THE INFOR-MATION THE ORGANIZATION OR WEBSITE MAY PROVIDE OR RECOMMENDATIONS IT MAY MAKE. FURTHER, READERS SHOULD BE AWARE THAT INTERNET WEBSITES LISTED IN THIS WORK MAY HAVE CHANGED OR DISAPPEARED BETWEEN WHEN THIS WORK WAS WRITTEN AND WHEN IT IS READ.
For general information on our other products and services, please contact our Customer Care Department within the U.S. at 877-762-2974, outside the U.S. at 317-572-3993, or fax 317-572-4002. For technical support, please visit www.wiley.com/techsupport.
Wiley also publishes its books in a variety of electronic formats and by print-on-demand. Not all content that is available in standard print versions of this book may appear or be packaged in all book formats. If you have purchased a version of this book that did not include media that is referenced by or accompanies a standard print version, you may request this media by visiting http://booksupport. wiley.com. For more information about Wiley products, visit us www.wiley.com.
Library of Congress Control Number: 2011937927
To my parents, Constance and Stanley Kowalski, who have always encour-aged me to do the best and at every step helped me to become who I am today. Thanks, Mom, for making sure I eat right and especially enough.
To my family — Lee Anne, David, Rosemarie, Joseph, Candi, and Reese and Mason — who helped me to keep focused and moving forward. Thanks for letting me vent when things weren’t always perfect.
Finally, to the members of the RSA Credentials Everywhere team, past and present: You have always been behind my efforts to express myself, 100 per-cent. Thank you for keeping me sane during the non-book-writing hours.
Author’s Acknowledgments
I owe many thanks to Carole Jelen for her efforts to keep me writing. She is everything I want in an agent, and she has set the bar very high.
Acquisitions Editor Kyle Looper kept me on top of my progress and gave me more than a few ideas for things to think about and write about. Project Editor Pat O’Brien has earned tremendous thanks for all his efforts to move me above the level of apprentice-writer and for keeping me on track with all my chapters and rewrites. Senior Copy Editor Barry Childs-Helton helped me greatly by taking my letters and attempts at punctuation and polishing them into something readable. And Dennis Cohen was phenomenal at keeping my technical expertise sharpened and shiny.
Thanks to Daniel Bailey at EMC for his efforts to ensure that I maintained a distinct separation between my EMC efforts and my writing efforts.
And very special thanks to Irina Furman ([email protected]) for her work in creating a spectacular set of icons for DiabeticPad.
outside the U.S. at 317-572-3993, or fax 317-572-4002.
Some of the people who helped bring this book to market include the following:
Acquisitions, Editorial, and Vertical Websites
Project Editor: Pat O’Brien Acquisitions Editor: Kyle Looper Senior Copy Editor: Barry Childs-Helton Technical Editor: Dennis Cohen Editorial Manager: Kevin Kirschner Vertical Websites Project Manager:
Laura Moss-Hollister
Vertical Websites Project Manager: Jenny Swisher
Supervising Producer: Rich Graves Vertical Websites Associate Producers:
Josh Frank, Marilyn Hummel, Douglas Kuhn, and Shawn Patrick
Editorial Assistant: Amanda Graham Sr. Editorial Assistant: Cherie Case
Cover Photo: © iStockphoto.com / Cary Westfall Cartoons: Rich Tennant
(www.the5thwave.com)
Composition Services
Project Coordinator: Patrick Redmond Layout and Graphics: Samantha K. Cherolis Proofreaders: Melissa Cossell,
Christine Sabooni
Indexer: Potomac Indexing, LLC
Publishing and Editorial for Technology Dummies
Richard Swadley, Vice President and Executive Group Publisher Andy Cummings, Vice President and Publisher
Mary Bednarek, Executive Acquisitions Director Mary C. Corder, Editorial Director
Publishing for Consumer Dummies
Kathy Nebenhaus, Vice President and Executive Publisher Composition Services
Introduction ... 1
Part I: Getting Started on Macintosh Apps ... 7
Chapter 1: Gathering What You Need to Develop Mac Apps ... 9
Chapter 2: Mac OS X Coding with Xcode ... 39
Chapter 3: Giving Your App Something to Do ... 63
Chapter 4: Objective-C and Cocoa Applications ... 87
Part II: A View to an App ... 115
Chapter 5: Using Interface Builder to Lay Out Your Views ... 117
Chapter 6: Controlling Your Windows and Views ... 147
Chapter 7: Drawing Advanced Views ... 177
Part III: Focus on the User ... 207
Chapter 8: Maintaining Your Users’ Data ... 209
Chapter 9: Working in the Background ... 251
Chapter 10: Printing Your User’s Data ... 283
Part IV: Polishing and Supporting Your App ... 303
Chapter 11: Debugging Your App ... 305
Chapter 12: Putting On the Finishing Touches ... 337
Part V: The Part of Tens ... 367
Chapter 13: Ten Useful Apple Sample Apps ... 369
Chapter 14: Ten Macintosh Development Tips... 377
Introduction ... 1
About This Book ... 1
Conventions Used in This Book ... 2
Foolish Assumptions ... 2
How This Book Is Organized ... 3
Part I: Getting Started on Macintosh Apps ... 3
Part II: A View to an App ... 4
Part III: Focus on the User ... 4
Part IV: Polishing and Supporting Your App ... 4
Part V: The Part of Tens ... 4
Icons Used in This Book ... 5
Where to Go from Here ... 5
Part I: Getting Started on Macintosh Apps ... 7
Chapter 1: Gathering What You Need to Develop Mac Apps. . . .9
Why Develop Macintosh Apps? ... 10
Discovering Apps Like a User ... 11
Understanding how users interact with their Mac ... 14
Seeing what your users see ... 17
Tooling Up ... 19
Buying a great development Mac ... 19
Downloading the software you need ... 21
Using Your Programming Skills ... 25
Objective-C programming for Mac apps ... 26
Debugging ... 31
Using software patterns ... 32
Understanding Macintosh Application Development Challenges ... 33
Targeting an OS X version ... 34
Programming defensively ... 35
Stepping into a Brave, New World of Mac Apps ... 36
Deciding what kind of app to create... 37
Brainstorming, alone or in groups ... 37
Chapter 2: Mac OS X Coding with Xcode. . . .39
Getting Familiar with Xcode ... 39
Creating a Macintosh Application with Xcode ... 41
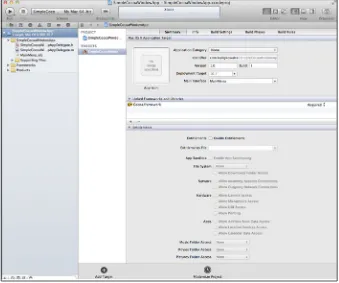
What type of app are you? ... 42
Creating a new project ... 42
Xcode’s visual details ... 49
Chapter 3: Giving Your App Something to Do . . . .63
Creating a Tip Calculator ... 63
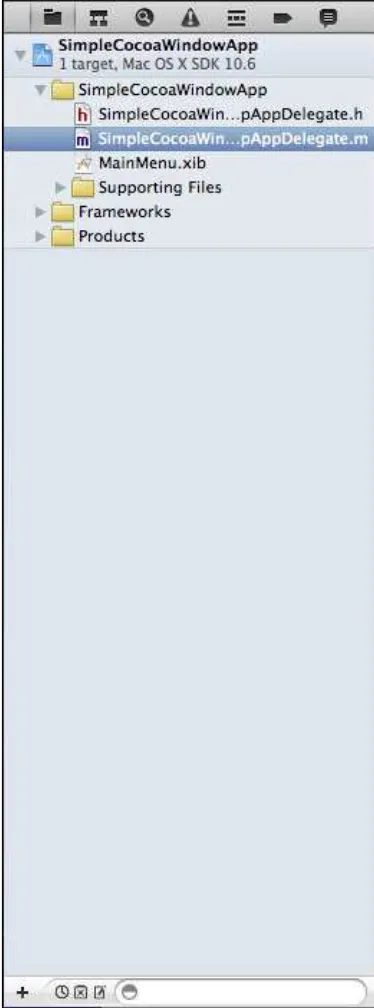
Analysis of the changes to SimpleCocoaWindowApp ... 77
Analysis of the calculateTip: method ... 79
Dude, where’s my app? ... 80
Archiving your app ... 81
Setting Xcode to Your Preferred Preferences ... 83
Chapter 4: Objective-C and Cocoa Applications . . . .87
Objective-C ... 88
Objects ... 93
Member variables ... 95
Creating objects ... 97
Methods ... 98
Protocols ... 100
Delegates ... 102
Managing memory ... 105
Using Cocoa Frameworks ... 109
Understanding the Application Life Cycle ... 112
Part II: A View to an App ... 115
Chapter 5: Using Interface Builder to Lay Out Your Views . . . .117
Going with the Flow ... 118
From code to screen and back again... 119
Touring Interface Builder ... 121
Looking through the Library ... 125
The inspectors ... 130
Modifying your menus ... 132
Sizing up your windows ... 143
Chapter 6: Controlling Your Windows and Views . . . .147
Opening Windows ... 148
Using MVC in Your App ... 154
Starting with the Model ... 154
Creating the View component ... 159
Implementing a Controller ... 160
Adding a Preferences Window ... 167
Using notifications ... 174
Chapter 7: Drawing Advanced Views. . . .177
Reviewing Apple’s Component Collection ... 178
Understanding Cocoa’s Views ... 179
Drawing on the screen ... 181
Creating a Custom View ... 187
Drawing ... 189
Drawing with Beziér paths ... 191
Drawing text ... 196
Drawing images ... 199
Animating Views ... 201
Part III: Focus on the User ... 207
Chapter 8: Maintaining Your Users’ Data . . . .209
Analyzing the Data ... 209
Storing the Data ... 210
Creating a data class ... 211
The DPData class ... 217
Storing data in files ... 218
Using Core Data to store information ... 222
Maintaining User Preferences ... 239
Exporting data ... 244
Importing data ... 248
Chapter 9: Working in the Background . . . .251
Understanding Basic Threads ... 252
Knowing when to use a thread ... 254
Thread rules to keep in mind ... 256
Using Threads to Schedule Events ... 260
Setting up and executing a scheduled one-time event ... 261
Using an NSTimer to schedule repeated events ... 268
Chapter 10: Printing Your User’s Data . . . .283
Printing with Cocoa ... 283
Setting up a Page ... 286
Printing a Page ... 290
Printing Straight to PDF ... 294
Printing with Multiple Pages ... 295
Paging your own way... 296
Part IV: Polishing and Supporting Your App ... 303
Chapter 11: Debugging Your App. . . .305
Understanding Where Errors Happen ... 306
Using Xcode’s Debugger ... 309
Navigating the Debug area ... 310
Setting, deleting, and disabling breakpoints ... 313
Viewing intentional errors in the debugger... 318
Doing even more useful things with the debugger ... 321
Setting conditional breakpoints ... 326
Using the Macintosh Logger ... 328
Introducing NSLog ... 328
Using NSLog ... 329
Removing NSLog statements ... 331
Keeping Track of Bugs ... 333
Identifying common solutions ... 334
Using a bug-tracking program ... 336
Chapter 12: Putting On the Finishing Touches . . . .337
Working with Application and File Icons ... 337
Painting a good picture ... 338
Adding an application icon to your apps... 340
Adding file icons to your apps ... 343
Creating Your Own About Panel ... 347
Tightening Your App’s Memory ... 354
Using Instruments to track down memory leaks ... 356
Viewing the line that created the leak ... 359
Part V: The Part of Tens ... 367
Chapter 13: Ten Useful Apple Sample Apps . . . .369
ToolbarSample ... 371
CustomMenus ... 372
ButtonMadness ... 372
SimpleCocoaApp ... 372
NSTableViewBinding ... 373
IconCollection ... 373
PictureSharing ... 373
Squiggles ... 374
DictionaryController ... 374
ImageTransition ... 374
Chapter 14: Ten Macintosh Development Tips . . . .377
Keep Track of Memory ... 378
Read Apple’s Documentation ... 379
Use Online Resources ... 380
Always Remember the Parent Class ... 381
Look Beyond the Current Problem ... 381
Follow Interface Builder’s Guidelines ... 382
Reduce, Reuse, Recycle ... 383
Use Keyboard Shortcuts ... 383
Set Xcode to Your Preferences ... 385
Stay Up to Date ... 385
T
he Apple Macintosh personal computer ushered in an age of powerful computer capabilities combined with elegant user experience. More than a quarter-century later, the Macintosh is still going strong, with even more powerful features and more usability, allowing all kinds of users to take advantage of their computers in new and productive ways. The engineers at Apple could not achieve this all by themselves, and so they created and put together tools and libraries of code to give independent software developers the ability to craft Macintosh apps beyond the basic software Apple ships with each Macintosh. And in January 2011, Apple went one step further: The Macintosh App Store opened its virtual doors, giving Macintosh developers a place to market, advertise, and sell their apps to Macintosh users all around the world.Macintosh Application Development For Dummies shows you how to develop
a Mac app from concept to completion, from coding to uploading to the Macintosh App Store where users can find it and buy it.
About This Book
Macintosh Application Development For Dummies is a guide to developing
Macintosh applications for Apple’s Mac OS X. This book will show you the paths through the basics of Mac app development so you can create apps that extend the features and functionality of your Macintosh beyond what Apple provides. No Macintosh development experience is required, but familiarity with a programming language such as C, C++, or Java is assumed. The libraries of code, also known as frameworks, that Apple supplies with every Macintosh were created to work with a programming language called
Objective-C. Objective-C is an object-oriented language and is similar enough
to C and C++ that you’ll be able to pick it up fairly quickly if you’ve used either of those languages. If you’re a Java programmer, you’ll also find Objective-C to be relatively easy to understand, and you should have no dif-ficulty figuring out the code examples.
experience. Your app’s display is its primary means of communication with your users, and you want your app to present itself to meet their expecta-tions. This book will give you experience in putting together the visual interface for your apps, so that you understand how to support your users according to Apple’s interface guidelines.
This book will help you get started with the resources of Macintosh develop-ment to show you only what’s absolutely necessary to start developing Mac apps that are useful and rewarding for your users. And at the end, you’ll see how to polish your apps to make them ready for submission and review at the Macintosh App Store, so your apps can find Mac users worldwide, and users can purchase and download your app with the click of their mouse.
Conventions Used in This Book
You’re going to come across a lot of code examples in this book, because that’s one of the best ways I know to learn how to write code. The code exam-ples in this book appear in a monospace font so they will stand out from the surrounding descriptive text. A code block will look like this:
#import <Cocoa/Cocoa.h>
@interface MyAppDelegate : NSObject <NSApplicationDelegate> {
} @end
Objective-C is a case-sensitive programming language, just like the C pro-gramming language it derives from. When you use code that appears in this book, type it exactly as it appears in the text. (You can find code samples for this book at www.dummies.com/go/macintoshappdev — download the code samples, and you won’t have to type in long code blocks!)
All the URLs referenced in this book also appear in a monospace font as well; for example, www.apple.com.
Foolish Assumptions
✓ An Apple Macintosh computer with an Intel CPU
✓ Version 10.6 or later of Mac OS X
✓ Version 4.0 or later of Xcode
I assume that you’re comfortable and familiar with using a Macintosh com-puter. I’ll cover what type of Mac hardware is useful in a later chapter, but for now you don’t need to worry about the differences between an iMac, a MacBook, or a Mac Pro. Apple makes OS X behave identically on all Mac models, so your development efforts don’t have to target one machine sepa-rate from another.
You’ll need some skills in using a Macintosh computer. You should be famil-iar with the different aspects of working with Mac OS X as a user, including how to launch applications, open and save files, work with the Finder, and access online resources over the Internet. I also assume you have some kind of Internet access so you can download the resources you need and also so you can establish yourself at Apple online as a registered Macintosh devel-oper. You’ll definitely need this to upload your Mac apps to Apple so they can get onto a shelf at the App Store.
Lastly, I assume you have some programming knowledge and that you have at least a basic understanding of object-oriented programming (OOP), either in Java or C++. If you’d like a more comprehensive introduction to Objective-C, consider Objective-C For Dummies by Neal Goldstein. Apple also provides many helpful online tutorials for Objective-C and Macintosh development.
How This Book Is Organized
The chapters in Macintosh Application Development For Dummies are divided into five parts.
Part I: Getting Started on Macintosh Apps
Part I opens and walks you through the door into the world of Macintosh application development. You’ll discover what you need to know about Macintosh apps in general and how to get ready for developing Mac apps. Before the end of this part, you’ll also create a very basic Macintosh app.
Part II: A View to an App
In Part II, you’ll take the lid off of Mac programming and dive right into code. Not the deep end, but not exactly shallow, either. You’ll learn the basics of Objective-C programming and how to use the code libraries that make up the Cocoa Framework. Then you’ll find out how to create a Mac app’s user inter-face so you can effectively communicate with your users and give them a top-notch experience when using your app.
Part III: Focus on the User
Part III gives you strategies and ideas for supporting users and their expecta-tions about what your app is doing. You’ll learn how to manage and store the information users will provide to your app, as well as how to print that infor-mation when users want a hard copy. In addition, you’ll find out how to place certain operations your app performs into the background so they don’t detract from the user’s control over your app and their machine.
Part IV: Polishing and Supporting Your App
In Part IV I’ll show you the basics of one of the most important tasks you will do while developing your app: hunting down and terminating the program-ming anomalies — also known as bugs — that always appear in apps.
When your app is ready to submit to Apple, Bonus Chapter 2 and Bonus Chapter 3 on the web site contain the steps you follow to organize all the files and data you need to upload your app to Apple’s reviewers.
Part V: The Part of Tens
Icons Used in This Book
When you see this icon, you’re looking at a code example that is also avail-able at the For Dummies website. You don’t have to type in all the code in this book’s examples; instead, you can go to www.dummes.com/go/ macintoshappdev and save your fingers some wear and tear.
This icon indicates a useful pointer that you shouldn’t skip. Tips make your development effort easier by showing a shortcut or letting you know the information provided gives you an easy approach to resolving a coding problem.
This icon represents a friendly reminder so that you are aware that this sec-tion of a chapter contains important informasec-tion you should keep in mind.
You’ll see this icon when the accompanying information may be helpful or even interesting, but is technical and is not required for your goal of under-standing Mac application development. You can safely detour around these pieces without losing any valuable information.
This icon alerts you to potential challenges you may encounter on the way. Read and obey these commentaries to avoid problems later on.
Where to Go from Here
You’re ready to start your Macintosh app development adventure. You can turn the page and start your journey right at Chapter 1. If you’re anxious to start doing some development, you can jump to Chapter 2 and get through the registration and downloads sections so you’ve got the latest tools and access to the online resources. If you have a particular question or problem, check the Index or Table of Contents to find the information you need.
If you have questions or comments about this book or about Macintosh app development in general, contact me at [email protected]. You can also find additional information about my Macintosh application, DiabeticPad, at www.diabeticpad.com. And you can find sample code for this book at www.dummies.com/go/macintoshappdev.
Y
our objective is to develop an application that will run on the most innovative, creative, and captivating computer systems the world has ever seen — the Apple Macintosh. You’ve got a fantastic idea for an app that will astound and amaze everyone who runs it. So now what?You start here. In this part, you’ll learn how to start devel-oping Macintosh apps, including what tools you need and how to use them.
Also in this part, you get a chance to learn about Xcode, the main weapon in your arsenal of Macintosh application development. You’ll also discover Cocoa and all the code resources that Apple engineers have developed for your battles to deliver a great user experience with as little code as possible. Finally, you get to jump into coding a simple application that will let you get comfortable with Xcode and Cocoa and let you see just how easy it is to get a Mac app up and running.
Gathering What You Need to
Develop Mac Apps
In This Chapter
▶ Discovering Mac apps and why to develop them ▶ Collecting the right tools
▶ Sharpening the right skills
▶ Meeting the challenges of Mac app development
Y
ou’ve just awakened, gotten out of bed, and you want to check your stocks because one of those big high-tech companies made an announcement just after the market closed, and you want to see how the overnight trading of some of your favorite high-tech stocks has turned out. You look at your Mac laptop sitting on your dresser, and say, “Show me how Apple is doing today.”Your laptop speaks back at you: “Password.”
“Adam Smith,” is your response. The MacBook’s monitor comes alive and shows the current pre-market trading trends for Apple stock. If you’d said the wrong thing, the laptop would have remained off, and you wouldn’t know how Apple stock was doing.
Does that sound like a dream? Everything I’ve mentioned above is possible for a Mac application. A Mac application can hear you speak and analyze your voice — Mac laptops and iMacs come with built-in microphones, and a library of code to listen for and react to sounds. Saying specific words in your voice such that an app can identify you as you would be the most dif-ficult part of the scenario just described, but there are companies that sell software that can understand what you say, so even that aspect would be possible.
the app isn’t there today, it soon will be. Users now use their Macs for every-thing: e-mailing, web browsing, accounting, keeping track of dates, keeping track of contacts, listening to music, watching videos — the list is endless. And since today’s laptop computers have become smaller, lighter, and more powerful, users now take them everywhere.
A Mac application is meant to be useful, fast, and responsive to its users, because that’s what those users expect. Your app may not please all your users, but you can develop apps that do useful work and do that job well. Your app should provide the user with the kind of experience that standard Mac apps deliver, so that your app will fit right into the elite set of must-use apps, giving your users what they want and need.
In this chapter, I will show you what tools, skills, and ideas you need to gather and discover to start developing Macintosh applications.
On the web site, Bonus Chapter 1 shows how to become a Registered Apple Developer, sign on to the Mac Dev Center website, download the latest Xcode tools, and join the Mac Developer program.
Why Develop Macintosh Apps?
The Apple App Store now provides millions of Macintosh users with thou-sands of apps they can download, just like the App Store does for millions of iOS device users. Apple opened the store in January 2011, and although many apps are available there already, a great many apps of all different kinds have yet to be built. The Mac consumers are out there, and Apple has just created a marketplace that will bring your software to them. You don’t need card-board boxes, or shrink-wrap, or a machine to make millions of DVD-ROMs. All you need to make the next Killer App is your idea and a Mac to develop it with.
Apple takes care of the virtual shelf space your app sits on, and will accept users’ payment for your app on your behalf, charging only 30 percent of the price you choose to sell. Your users can feel safe and secure — they’re deal-ing with Apple, so they don’t worry about handdeal-ing credit card information to a stranger on the other end of a wire. Users also know that Apple cares about their experience, and will only allow well-behaved apps to be put up for sale. Your app will sit with the thousands of others at the App Store, available to everyone with a Macintosh and the latest version of OS X.
✓ The Mac desktop App Store is new. There are millions of Mac users out there, and until now they bought their software shrink-wrapped and packaged, or found an online site they trusted to provide a safe down-load. With the success of the iPhone App Store, Apple has brought the same ease-of-use to the desktop. There’s still a lot of shelf space at the App Store.
✓ Your app’s life cycle is now made easier. You no longer have to main-tain your app via a website; when you make improvements to your app, your users will know about it via the App Store. Upgrades are easy, and you don’t have to keep in contact with your users to tell them about the new things your app will do.
✓ The tools are free. You can do all your development on an Apple Macintosh, but the tools to create Mac apps are free to download from Apple. And your development machine also turns into your test machine, because Apple makes sure that all Macs running the same ver-sion of OS X provide your app with the same functionality. You can rest assured that if you develop the next 3-D chess app on your MacBook Air running OS X 10.7, it will work equally well on an iMac 21.5” with a 3GHz processor also running OS X 10.7.
✓ There are millions of Mac users. This is a huge marketplace, and the doors to the App Store have only just opened. This means only one thing: huge demand.
✓ Apple provides the App Store for you to showcase and sell your app. This venue takes care of the responsibility for credit card handling, host-ing, downloadhost-ing, and notifying your users of updates. The App Store has a variety of pricing tiers, including free and try-and-buy. Apple keeps 30 percent of your application price to cover some of its costs. You will have to pay a fee of $99 per year, but that’s all the payment you have to make to Apple, no matter how many apps you put up for sale.
I love my Mac — it’s the first computer I use every day, and it’s the most usable of all the computers I’ve ever used. Apple has made it into a great machine, and now Apple has given developers a great way to deliver apps to consumers. This is A Great Thing, and it’s a beautiful opportunity.
Discovering Apps Like a User
to the computer user’s world before the Mac. And now, nearly all computer users expect to interact with their machines through the same approach, by maneuvering a cursor and clicking buttons to make their apps do what they need done.
Your app will have to live up to these expectations — you shouldn’t feel con-fined to obeying the same look-and-feel as every other app out there, but you should understand what users want, and anticipate their needs. You want them to enjoy using your app so they’ll use it again and again, and as a result you don’t want them to learn a completely new way of doing the same thing.
If you’re just starting to use a Mac, run some of the Apple apps available on every Macintosh so that you can get a good feel for how Apple sees its apps’ users — and how you can exploit all the user experience expertise Apple has invested in its products.
The following apps all come with every Mac and are worthwhile to play with in order to get a feel for how users see and use Apple apps:
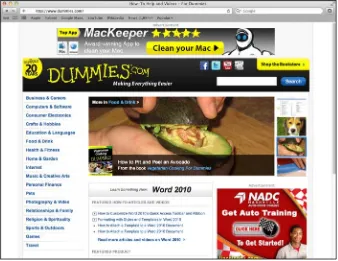
✓ Safari. Safari is Apple’s web browser. It behaves like every other web browser by rendering HTML for display. I recommend Safari because you’re undoubtedly experienced with the other browsers, and you can explore Safari while still retaining some familiarity with what it’s supposed to be doing. Figure 1-1 shows the Dummies’ main page, and you can see the different visual aspects of the Safari web browsing experience.
✓ Mail. Apple provides an e-mail app that users can set up to access their mail from anywhere they connect to the Internet. Mail provides a rich user experience for creating, reading, and searching their e-mail messages.
✓ Address Book. Address Book lets you store the contact information for all the important people in your life. The Address Book provides a great user experience — you don’t have to save the changes you make, you simply make them and Address Book keeps track. Figure 1-2 shows you an entry in the Address Book.
✓ iCal. My Professional Organizer keeps my life organized — and she has introduced me to iCal. This calendar program syncs with my iPhone and keeps on top of all my scheduled appointments. This is another great app that will demonstrate a number of different design possibilities for your user interface.
Figure 1-1: Buttons, scrollbars, and entry fields in Safari.
✓ App Store. While the App Store is very similar to iTunes in many respects, it also provides another look at how to do things for your users. And it’s great for getting an advance look at how to present your app when you’re ready to deliver.
✓ The Finder. The Finder is the main interface between the user and the Macintosh. This is where users manage all of the items on their computer — hard drives, folders containing files, all the day-to-day bureaucratic tools that computers need. You should pay attention to the different ways the Finder allows users to do things, because these are the basic actions that users do all the time when they use their Macs.
Each of these apps, written and designed by Apple, demonstrates the basic user interface components and interactions that Mac users expect to see in your application. Mac users will be using the standard applications often, and so you should become familiar with how users get things done with them. The idea is to make sure your users feel at home with your app.
You can see in both Safari and Address Book some common user interface components:
✓ Buttons for ordering the app to perform an action
✓ Icons for representing information in a compact form
✓ Text fields for displaying unchanging text information
✓ Text-entry fields, such as the search field
Understanding how users interact with their Mac
Your app will give users an improvement in their lives by giving them the capability to store and manage their unique information in a way that is comfortable and easy. To do this bit of magic, you’ll need to understand the different ways that users interact with their Macs — and how your app can accommodate their expectations and your app’s features and functionality.
In general, users interact with their Macs in the following patterns:
✓ Clicking a button on a PD. The most direct form of interaction between a user and her Mac is through the buttons on her PD. Clicking a button can select commands from a menu, or any items displayed on the Mac screen. Users click GUI buttons, click and drag files and windows, and will try to click everything your app displays.
✓ Typing on the keyboard. Every Mac except the Mac mini comes with a keyboard, and every app uses a keyboard to accept text information from users. Mac apps allow users to enact menu commands via their keyboards, as discussed in an upcoming subsection. Some games allow users to control aspects of playing the game through their keyboards (to take advantage of using ten fingers to deliver input to the game) in addition to the motion of the pointing device and the actions of its buttons.
✓ Speaking into a microphone. Mac OS X comes with the capability to hear and understand spoken commands. Users with accessibility chal-lenges can take advantage of this feature to perform many tasks with their Macs that normally require a mouse or a keyboard. In addition, some apps capture and record input from the microphone to create podcasts or deliver network-based vocal communications.
Your apps can use any of these different forms for users to deliver informa-tion to and command your apps. The majority of users will use the keyboard and their favorite pointing device to interact with your app, and most apps conform to these two interactions.
Always think about ease of use when you’re designing and implementing your apps. Mac users have been trained to expect the app they’re using to be painless to interact with. Your users will be focused on entering and retrieving their information using your app; you should design your app to enable your users’ actions to do so smoothly and efficiently. Your app should be easy to use with a pointing device in those areas where using a PD makes the most sense, such as selecting items on the screen or moving quickly through tables of data. Your app should likewise be easy to use when users are entering data from the keyboard through a source like a notepad app or a spreadsheet.
Pointing device (PD)
✓ All PDs do the same basic thing: The user moves the device, and the pointer moves around the screen. To interact with objects on the screen: the user moves the mouse pointer over something and then clicks.
✓ Each PD may have additional features — the new Apple Magic Trackpad, for example, is a clickable pad that tracks finger movements and ges-tures, like the screen of an iPhone.
Users will choose the PDs that suit them best — I happen to like trackballs but I also like the Magic Trackpad. The end result is the same, no matter which PD is connected; you don’t need to worry about how users are clicking around in your app when they’re using the basic mouse-movement features of their PDs. However, Mac OS X Lion now incorporates multi-touch gestures
similar to those available in iOS apps, so your app can take advantage of users using a multi-touch device such as the Magic Trackpad or the Magic Mouse.
Certain types of apps may be optimized to use particular types of pointing devices; be sure you understand the best ways to use the information that Mac OS X will provide your app for users and their interactions. Now that Mac OS X Lion can provide multi-touch and gesture information to your app, you can deliver an app that can use that information to deliver a better expe-rience for your users.
Some types of apps that depend on a pointing device include these:
✓ Paint programs
✓ The Finder
✓ E-book readers
✓ Games
✓ DVD players
Keyboard
Types of apps that depend heavily on a keyboard include these:
✓ Spreadsheets
✓ Word processors
✓ Integrated development environments (IDEs)
To keep your users happy while using your app, provide key-combinations for the sets of actions they’ll perform most frequently using your app. It’s far easier to hit Ô-S than it is to take my fingers off the keyboard while I’m typing this document, reach for my favorite trackball, drag the mouse pointer to select the Save menu item from the File menu, or click a Save toolbar button. If I use the keyboard, the interruption is a split second, and I can save in the middle of a sentence without losing track of what I want to write. The default application template I introduce in Chapter 3 includes the standard key- combinations for user actions such as creating, opening, closing, and saving files; printing data; and the usual edit functions of cut, copy, and paste. Your app should provide its own key-combinations for the actions that your app adds to its menus.
Seeing what your users see
Your users will have display devices attached to their Macs; your app can find that out and adjust accordingly. I’ll show you in Chapter 5 how to use Interface Builder to make your screens’ contents handle different display sizes automatically. What you need to know now is that your app will be run-ning on screens of many different shapes and sizes.
Here are some of the different configurations possible:
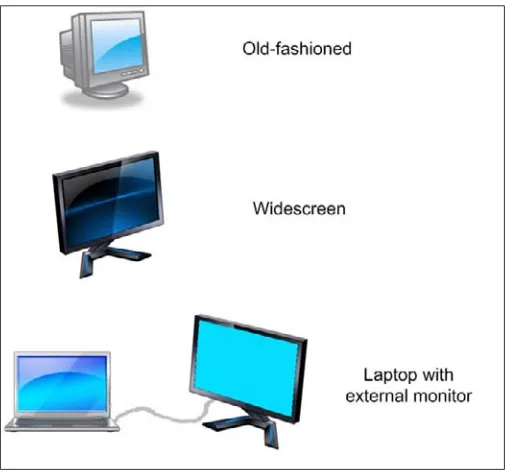
✓ Old-fashioned 4:3. Not long ago, all screens had the same ratio of width to height: each screen was 33 percent wider than it was tall. Some of these are still out there. The first couple of generations of flat-panel LCD displays still copied this aspect ratio, and, yes, there are still some CRT screens around.
✓ Widescreen. This is the most common type of display; examples of it come in several different sizes. In addition, users may be able to rotate these displays to be taller than they are wide — your app should behave appropriately if or when the aspect ratio (the ratio of the screen’s width to its height) changes.
You can see examples of the different screen types in Figure 1-3.
Sometimes, working as a developer, you’ll want an extra monitor so you can keep more of Xcode’s windows around without cluttering up any one screen or jumping from one Desktop to another (Mission Control is Apple’s app for creating virtual desktops).
Figure 1-3: The different screen types and configurations your app may encounter on a Mac.
Tooling Up
You are the most important tool in your software development toolkit. No matter what project you work on, alone or in a team, your expertise is more important than all the other tools you use to put together a Macintosh app. Your skill in using those tools is what makes the tools useful.
But you need a good set of software and hardware tools at hand before you start to do Mac development. The next sections cover the tools for making Macintosh apps.
Buying a great development Mac
There’s no way around it: You’ll need an Apple Macintosh as your develop-ment machine. The programming language you use (Objective-C) and the compiler (LLVM) are available to run on many platforms, but only Apple has the libraries and frameworks to run your apps on a Mac. And because you’re creating a Mac app, you’ll have to run it on a Mac anyway to see that it runs the way it should.
Your development machine will need to handle the following tasks when you’re developing your Mac apps:
✓ Editing code. You’ll be typing and editing lots of code, and every Mac available today — from a MacBook to an iMac to a Macintosh Pro — will support this. However, larger screens — such as an iMac (Model MC812LL/A) — are better than smaller — such as that on a 13-inch MacBook (MC516LL/A).
✓ Editing the visual interface. This task isn’t much more draining than editing code, but it’s always good to err on the side of higher speed and larger screen size.
✓ Building the app. You will perform this task many times during the development of each app, and this is one of the most power-hungry tasks for a computer to do. Building your code into an app and packag-ing it for delivery is very CPU- and memory-intensive, so you want a machine that has good processor speed, and as much memory as you can give it. Xcode 4 is optimized for running on the latest generation of Mac hardware, so you’ll find newer Macs will build your apps faster than older Macs.
pieces. A debugging session also uses a lot of memory, and you want a speedy processor capable of running Xcode, its Debugger, and your app smoothly. Apple creates a wide range of different Macs for all users, but as a developer you’ll benefit from a system that has these:
• Fast processor: 3 GHz or better
• Large amounts of memory: 8GB or higher
• Large widescreen display: 1920 pixels wide by 1200 pixels high
• Large hard drive: 1TB or more
• External hard drive: 2TB or more, for backups using Apple’s TimeMachine
I prefer developing on Macintosh desktop machines rather than laptops — this may be due to the time period in which I started developing, back when a portable computer weighed 50 pounds and was carried in a suitcase. But don’t let my bias prevent you from using a laptop. After all, a laptop allows you to develop anywhere, including at 30,000 feet. If you prefer a portable computer and can find a MacBook or MacBook Pro that’s fast enough and has enough memory, don’t hesitate to get it.
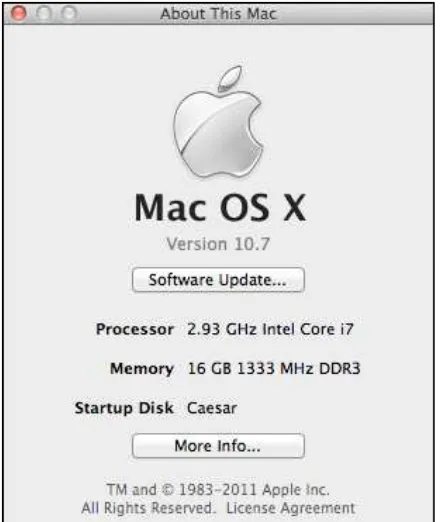
Table 1-1 outlines the specifications of the development Macintosh I used while writing the apps for this book.
Table 1-1
Requirements for a Development Macintosh
Equipment Optimum Requirements
Processor 3.0 GHz quad-core Intel CPU RAM 16GB
Operating system OS X 10.7 Screen 27” widescreen Hard drive 1TB
Network connection Broadband network access available today is all you need. If you can afford something faster — get it!
Figure 1-4: Intel Inside.
Downloading the software you need
If you’ve just opened your new Mac, you will discover that Xcode hasn’t been installed. But that’s easy to rectify:
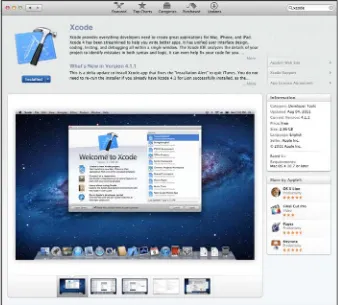
✓ Check for the latest and greatest version of Xcode available for down-load from Apple’s App Store.
At the time of this writing, the latest version of Xcode is 4.1.1, and it’s free to download if you’re running OS X 10.7 Lion.
Figure 1-5 shows you the App Store page for Xcode.
Figure 1-5: Using the Mac OS X Install DVD to install Xcode on a new Mac.
Xcode tools
Your Mac app development efforts will require you to turn your ideas into the correct sequence of instructions for a Mac to execute. In addition, your app may need to use visual or audio resources and other data that will be embedded within it. To create this package of executable code and data, you’ll use several tools that are automatically installed with Xcode. And to make sure your app works as perfectly as possible, Xcode also provides tools that will help you ensure that your app will be careful with memory and its performance.
✓ Xcode. This is Apple’s integrated development environment. Xcode includes the code editor, debugger, project manager, compiler, and package-maker. Xcode provides all this capability within itself, so you never need to leave Xcode to perform any of these functions.
✓ Interface Builder. You’ll need Interface Builder to assist with the devel-opment of your app’s graphical user interface. While you can do every-thing that IB does within code, you’ll find that using IB to put together your screens graphically will save you a lot of time typing.
✓ Instruments. Apple has developed an app that can watch your app’s use of memory — this is important while you’re developing your app so you can avoid memory leaks. Apple will reject your app submission to the App Store if your app is leaking memory. (I go over memory leaks in Chapter 12; for now, just keep in mind that Instruments is instrumental to your app’s successful appearance at the App Store.)
✓ Shark. You will use Shark to trace your app’s performance hurdles — you will discover where your app is spending most of its time, and this can help you to improve the code in those areas so that your app doesn’t keep your users waiting. Shark is an Apple app that installs with Xcode.
Other tools
Depending on what your app does, here are some other tools you should consider adding to your collection:
✓ An image editor. While your app may not depend on images for buttons or background screens, you will need to create an application icon for Apple to display at the App Store.
I recommend GIMP, the GNU Image Manipulation Program. It’s free, and you can find it at www.gimp.org. Alternatively, you can purchase Adobe’s Photoshop Elements, which provides most of the same fea-tures at a price lower than the full version of Photoshop. You can find Photoshop Elements at www.adobe.com.
✓ An audio editor. If your app makes use of sounds, you will want some-thing that can record audio and let you edit it.
If your audio needs are simple, such as providing audio help, I recom-mend Apple’s GarageBand application. GarageBand is part of iLife, is bundled on new Macs, and is very easy to use.
New Macs come with iMovie, a very useful — and free — video- editing app.
✓ Backup software. Every new Mac comes with Time Machine, Apple’s backup software. You should definitely consider using this app to back up your work. Time Machine requires a separate hard disk, such as an external drive. Along with OS X 10.7 Lion, Apple has announced the cre-ation of iCloud, an online storage service that comes with 5GB of free storage, which you can access from anywhere you have an Internet con-nection. You can purchase additional storage space as needed. Amazon (amazon.com) also has a cloud storage solution, and Mozy (mozy.com) provides online backup services.
Store your backups on a CD or DVD — hard drives do fail, and you will regret relying solely on their correct operation to maintain copies of the work you do.
If you assume that all your work can be lost with one power outage — it’s as simple as tripping over your Mac’s power cord — you will gain a healthy paranoia about ensuring that your work gets saved, somewhere. Back up your work — regularly. Your hours, days, or weeks of effort are worth the small amount of time it takes to move them off your computer and onto some other medium. Considering that you might be able to rewrite all your code in less time than it took to create it from scratch, you still have to spend that time rewriting it, instead of adding new features or fixing bugs. Do your backups.
Watching your language(s)
While the programming language of choice for Mac development is Objective-C, and while Objective-C is what I’ll use to develop my Mac apps throughout this book, it isn’t the only language available for use in developing Mac applications. Your app should use only the public APIs of Apple frameworks to avoid rejection during the App Store review process. In addition, your app cannot use optional tech-nologies such as Java, as this will also cause a rejection of your app.
✓ The compiler used by Xcode — LLVM — supports the C and C++ programming languages as well. In addition, you aren’t restricted to using the Objective-C
✓ Nokia supports a cross-platform develop-ment framework based on C++ called Qt; you can find more information about it at
Using Your Programming Skills
You will need some general skills to develop Mac applications:
✓ Objective-C programming. The Objective-C programming language is the primary development language used to develop Macintosh apps. It’s based on the C programming language, so if you have a good back-ground in C you’ll recognize most of the syntax and program structures you encounter. In addition, you can create C-based source code mod-ules, and Xcode will compile and integrate them into your app.
Objective-C is an object-oriented language, so you will need some under-standing of object-oriented programming — if you’re experienced with C++, your knowledge of that language can help (not to worry — the basics of Objective-C development show up later in this book). And you’ll find that Objective-C can be used in conjunction with C++ source code modules as well, so if you have a library of platform-neutral C++ sources you can make use of them with only a few modifications.
In addition, Objective-C is a dynamic language, offering your app’s code capabilities such as creating objects from just a class name, executing a method using just its name, and the ability to extend the classes pro-vided in the Apple frameworks to suit your app’s needs.
✓ Debugging. After you’ve implemented your app, there’s a statistical like-lihood that it won’t be perfect. If you’re lucky, those imperfections will make themselves apparent quickly and obviously. As you create more apps, you’ll stop making the obvious and quickly fixed mistakes, which leaves the subtle and more challenging bugs. Your skills at debugging — looking at code as it runs, keeping track of what is going right and what is going wrong, and so on — will play an important part in completing your apps.
✓ Software design patterns. As with most modern computing platforms, your app will benefit from using software patterns where appropri-ate. You can create a functional and usable Mac application without relying on any of the canonical design patterns, but applications that are to have a long-duration existence will require a solid structure for operation that the use of software patterns will support. The most obvious of these is the Model-View-Controller (MVC) pattern, which enforces the separation of your app into pieces that are easy to manage. The basic Apple framework classes encourage using software design patterns — one of the fundamental classes for your app will be an
Objective-C programming for Mac apps
The Objective-C programming language was created in the 1980s to add object-oriented features to the C language. Objective-C is the language I use in this book to demonstrate how to program Mac apps, because it’s the lan-guage used by Apple for all of its applications. You should be familiar with C programming, and familiar with object-oriented programming in general. I’ll go over some of the basic concepts here, but if you want a full experience, you should check out Neal Goldstein’s Objective-C For Dummies (Wiley).
You may be familiar with procedural programming, where the computer moves from one program statement to the next in a straight line. If so, you’re probably used to thinking of the operations of an application as being linear, one right after another. In object-oriented programming, your view of the application’s operation will change: you will start to think of the app as a set of objects, with each object representing functionality coupled with the data that functionality will work with. The combination of this functionality and data is a mini-library of code called a class; the data is represented as member variables, and the code of a function in the class is called a method. The pro-cess of executing a particular method with a specific object is called sending
a message to the object. Keep in mind that sending a message in Objective-C
is different from calling a method in other OO languages such as C++. In Objective-C, the recipient of the message is determined when the code is exe-cuting — and that recipient is responsible for exeexe-cuting the code associated with the message or reporting an error to the OS. In C++, calling a method on an object means that the sequence of code to be executed is determined by the compiler, not the runtime environment. Because Objective-C puts the responsibility for handling a message onto the object receiving it, Objective-C classes can be more flexible in handling messages than C++ classes.
In addition to binding functionality and data together in one class, object-oriented programming provides the capability to subclass — that is, create a class that inherits data and functionality from a parent class. You create sub-classes in order to
✓ Use the functionality and data of the parent class while adding your own new functionality and new data
✓ Replace the functionality of the parent class with your own improvements
✓ Execute the parent’s functionality in addition to your own
Each Objective-C class consists of two code files:
✓ Header: The header describes the structure of the class, including the member variables it contains, and the methods that can be called. In addition, the header provides information about the parent class. You will create a header file for every class you create, and you will use the header file to provide information to Xcode when it compiles the classes that want to know about a particular class. For instance, you create a class that represents a set of data values, such as the date, time, and text of a Notepad note. Then, when you want to display the contents of one set of those values in a View object, the view’s class needs to know how to extract that information from a Note object — so you import the header file of the Note class into the source module for the View class.
Listing 1-1 shows a simple header file for a Note object data class.
✓ Source file: The source file for a class provides implementations for the methods described by the header file. In addition, in order to over-ride the implementation of a method in the parent class, you provide your new and improved method in the source file. Because of how Objective-C interprets inheritance, you only need to create declarations of new methods in the header file. The source file contains all the source code your class will execute.
Listing 1-2 shows the Note object source code implementation.
Listing 1-1: A very simple data class header file, Note.h
//
// Note.h // NotePadApp //
#import <Cocoa/Cocoa.h> @interface Note : NSObject {
NSString* m_text; NSDate* m_timestamp; }
- (void)setText:(NSString*)inText;
- (void)setTimestamp:(NSDate*)inTimestamp; - (NSString*)getText;
- (NSDate*)getTimestamp;
The important things to take away from Listing 1-1 and Listing 1-2 are these:
✓ Comment lines start with “//”. From that pair of characters onward on the same line, the Xcode compiler will ignore anything typed. This makes it really easy to remove a line of code that you might need to put back, which can happen a lot during debugging. You can also remove multiple lines of code by placing “/*” before the first line of code to be removed and “*/” after the last.
✓ You reference header files through #import statements. In C and C++, you would use #include; Objective-C understands that form as well, but #import improves upon this by ensuring that any one header file is included only once — eliminating the possibility of an infinite loop in which header file A includes header file B which includes header file C which includes header file A again.
✓ The declaration of the Note class starts with the @interface statement.
✓ The parent class of Note is the NSObject class, denoted to the right of the colon “:”.
✓ In the header file, all member variables are enclosed by braces {}.
✓ In the header file, methods are declared and listed one line at a time, starting with a dash “-” and ending with a semicolon “;”.
Methods can span multiple lines, but I prefer the one-line-per-method rule; it has the effect of keeping method names shorter, which means each one is simpler to understand. However, multiline method declara-tions and definideclara-tions can be easier to read, especially if you put each of the method’s parameters on a separate line.
✓ The method declaration consists of a return value, such as
(NSString*), surrounded by parentheses, and followed by the method name, which is a combination of its parameters and their types. Unlike C and C++, Objective-C methods take their parameters separated by text descriptions of what the parameter represents. The following code snip-pet shows the difference between Objective-C and C or C++ in declaring functions (in C) and methods (in C++ and Objective-C):
// C function or C++ method declaration int addTwoValues( int value1, int value2 ); // Objective-C method declaration
- (int)addValue:(int)value1 toValue:(int)value2;
✓ The declaration of the Note class ends with the @end statement.
✓ In the source file, the implementation for the Note class starts with the @ implementation statement.
✓ You can see all the four methods declared in the header file imple-mented in the source module.
✓ You can see one new method, - (id)init, also implemented. Because the exact same method is declared in the header file of the parent class or any ancestor class, you need not declare that method again in Note’s header file, although doing so won’t harm the app. The init method in
Note.m will override the parent’s method of the same name.
init is declared for the root class of all Objective-C classes, NSObject. You will never need to declare it in any Objective-C class you create as long as your class is a subclass of NSObject or any of its descendants.
✓ In the init method, the code executes [super init]. This is how you can execute a method declared in a parent class (also called the super-class) from within the overriding method of the child class. In addition, the brackets “[]” indicate that the code is sending the init message to the super object.
The return type for init is id. This is the type used to represent any object type that inherits from NSObject. It is used as a pointer to some object type, but without necessarily knowing what the actual type is. In C and C++, this is the equivalent of void*.
You’ll get more of a handle on Objective-C and how to program Mac apps as I show you how to develop using Xcode.
Listing 1-3: A Matrix-multiplication method in Objective-C
- (Matrix*)multiplyMatrix:(Matrix*)inMatrixA byMatrix:(Matrix*)inMatrixB;
In Objective-C, you only ever use pointers to objects. A pointer is just a fancy name for the address in computer memory where an object exists. But since you’ll only ever be able to use pointers to objects instead of the objects themselves, you’ll start thinking — and I will continue writing — of these as the objects. In Listing 1-3 you can see that Matrix* items are being passed into, manipulated, and returned by the method. These are pointers to Matrix
Your code can also include methods that take scalar values as parameters. A scalar is a simple variable type, such as the following C types:
int
short
long
float
double
char
Debugging
Xcode comes with a source-level debugger that makes tracking down and squashing bugs very easy. However, your own skills in debugging software apps are what matter most.
I assume that in your software application development experience your apps didn’t always work perfectly. I’m guessing that you’ve presumably spent time analyzing code to find where the errors were hiding, and mercilessly corrected them. In general, debugging is still more art than science. Your tools can assist with shining light on the places where code goes wrong, but you still need creativity and imagination to know where to start shining that light. Small apps are usually easy to debug, but when your app has several dozen classes and layers, bugs find more places to hide.
You can find resources online and in print regarding debugging, as well as habits and approaches you can use to make your code easier to debug. I’ve worked on very few apps where no debugging was required before they ran flawlessly — that includes the sample apps I show you in the chapters that follow. All of them had quirks and gotchas that required analysis and imagi-nation to overcome.
Using software patterns
Programmers have been developing software for a long enough time that a lot of the ways to solve problems have become standardized. Software pat-terns are a collection of these standard solutions to certain kinds of program-ming problems. You’ll find not only that Apple has used them (and provided some of them as classes within the Mac app frameworks), but also that you can use them yourself to resolve the issues you encounter while writing your own apps.
You’ll find that using software patterns can greatly simplify your code, and this leads you to developing code that’s easier to maintain. Patterns tend to be simple and effective, focusing on delivering a limited set of functionality within your app. A class in your application that is the implementation of a particular software pattern for achieving a specific objective is straightfor-ward and easy to test.
A simple example of a software pattern that you might use is one I use in many of the apps I develop: the Observer pattern. An Observer is an object that wants to know when another object has been modified — the Observer will adjust its behavior based on the new set of data in the other object. Apple provides classes within its core framework that support the Observer pattern, and Listing 1-4 shows a code snippet that makes use of these classes to support inter-object communication.
The initialize method of the class implementing the Observer behavior demonstrates how to use NSNotificationCenter to register the Observer to receive events named notifyObserver. In addition, the Observer pro-vides the name of another method, methodToCallOnNotify:, when the named notification event occurs.
Any other object posting an event notification to the NSNotificationCenter will cause the Observer’s registered method to be executed. You can use this type of software pattern to create apps that perform operations in the background and update the display while the user has control over the foreground.
Listing 1-4: Using the NSNotification and NSNotificationCenter to
provide an Observer behavior
// in the Observer object class - (void)initialize
{
[[NSNotificationCenter defaultCenter] addObserver:self selector:@selector(methodToCallOnNotify:) name:@”notifyObserver” object:nil];
}
- (void)methodToCallOnNotify:(NSNotification*)inNotification {
// when a notification is broadcast by some other // object, this method gets executed
}
// in some other object class broadcasting a notification - (void)updateObservers
{
[[NSNotificationCenter defaultCenter] postNotificationNam e:@”notifyObserver” object:nil];
}
Understanding Macintosh Application
Development Challenges
If writing solid Macintosh apps were easy, you wouldn’t need this book. So you’ll want to be prepared for the hurtling boulders of difficulty that will cross your path. Sometimes these challenges are caused by the limitations of the Macintosh or its operating system, OS X — you’ll have to “code around” these types of problems. Other times, you’ll find you’ve “coded yourself into a corner”: for example, a decision of how to implement some part of your app at an earlier phase of development may force responsibilities on your code in later parts of your effort.
Targeting an OS X version
Apple has a habit of releasing a major new version of OS X once every 12-24 months. In 2009 it was Snow Leopard, OS X 10.6. In 2011, the next version is Lion, OS X 10.7. Here are some of the improvements that Lion offers in OS X:
✓ FullScreen Apps. Lion provides users with the ability to launch an app that takes over the entire screen. Your app can take advantage of having every square pixel of screen real estate to itself.
✓ Aqua. Lion will improve the user interaction of Aqua, adding support for popovers (small, window-like displays), Overlay Scrollbars (scrollbars that appear when needed and disappear when not needed), and Multi-Touch Gestures and Animations (Apple’s Magic Trackpad is available on its current laptops and as a Bluetooth add-on, and the Magic Mouse is also available). I imagine users will start expecting to take advantage of these features — which first arrived for the iPhone and iPad — in their Mac apps.
✓ AV Foundation. Apple is providing a new framework for Lion that includes Objective-C classes to play, examine, and compose audio-visual media from within your app. This will make it easier for you to capture audio and video from the user. For instance, you could create a game app that uses the user’s voice to talk to other characters in the game, after reading through a script.
✓ Auto Save and Versions. In the old days — like, last week — users were cautioned to save early, and save often. Lion provides a built-in auto-save feature that will store changes to documents your app creates without requiring the user to take any action. And Lion’s implementation of Versions will provide an automatically recorded history of changes made to documents, displaying a Time Machine–like interface that lets users browse through all the changes they’ve made.
✓ Resume. Before Lion, your app would have to keep track of the windows and their contents that users opened and left displayed onscreen when the user logged out or restarted the machine — assuming your app was considerate enough to do so. If it wasn’t so considerate, it would require the users to re-open everything they could remember being open. Lion allows users to restore your app exactly where they left it. Apps left run-ning when the logout or restart occurred will relaunch automatically. In addition, Lion will restore the state of an app that was terminated acci-dentally, such as from an application crash or a power outage.


![Wiley Publishing Digital Video For Dummies [2003]](data:image/gif;base64,R0lGODlhAQABAIAAAP///wAAACH5BAEAAAAALAAAAAABAAEAAAICRAEAOw==)