Digital Video
FOR
DUMmIES
‰by Keith Underdahl
Digital Video
FOR
DUMmIES
‰909 Third Avenue New York, NY 10022
www.wiley.com
Copyright © 2003 by Wiley Publishing, Inc., Indianapolis, Indiana Published by Wiley Publishing, Inc., Indianapolis, Indiana Published simultaneously in Canada
No part of this publication may be reproduced, stored in a retrieval system or transmitted in any form or by any means, electronic, mechanical, photocopying, recording, scanning or otherwise, except as permit-ted under Sections 107 or 108 of the 1976 Unipermit-ted States Copyright Act, without either the prior written permission of the Publisher, or authorization through payment of the appropriate per-copy fee to the Copyright Clearance Center, 222 Rosewood Drive, Danvers, MA 01923, (978) 750-8400, fax (978) 646-8700. Requests to the Publisher for permission should be addressed to the Legal Department, Wiley Publishing, Inc., 10475 Crosspoint Blvd., Indianapolis, IN 46256, (317) 572-3447, fax (317) 572-4447, e-mail:
Trademarks:Wiley, the Wiley Publishing logo, For Dummies, the Dummies Man logo, A Reference for the Rest of Us!, The Dummies Way, Dummies Daily, The Fun and Easy Way, Dummies.com and related trade dress are trademarks or registered trademarks of Wiley Publishing, Inc., in the United States and other countries, and may not be used without written permission. All other trademarks are the property of their respective owners. Wiley Publishing, Inc., is not associated with any product or vendor mentioned in this book.
LIMIT OF LIABILITY/DISCLAIMER OF WARRANTY: WHILE THE PUBLISHER AND AUTHOR HAVE USED THEIR BEST EFFORTS IN PREPARING THIS BOOK, THEY MAKE NO REPRESENTATIONS OR WAR-RANTIES WITH RESPECT TO THE ACCURACY OR COMPLETENESS OF THE CONTENTS OF THIS BOOK AND SPECIFICALLY DISCLAIM ANY IMPLIED WARRANTIES OF MERCHANTABILITY OR FITNESS FOR A PARTICULAR PURPOSE. NO WARRANTY MAY BE CREATED OR EXTENDED BY SALES REPRESENTA-TIVES OR WRITTEN SALES MATERIALS. THE ADVICE AND STRATEGIES CONTAINED HEREIN MAY NOT BE SUITABLE FOR YOUR SITUATION. YOU SHOULD CONSULT WITH A PROFESSIONAL WHERE APPRO-PRIATE. NEITHER THE PUBLISHER NOR AUTHOR SHALL BE LIABLE FOR ANY LOSS OF PROFIT OR ANY OTHER COMMERCIAL DAMAGES, INCLUDING BUT NOT LIMITED TO SPECIAL, INCIDENTAL, CON-SEQUENTIAL, OR OTHER DAMAGES.
For general information on our other products and services or to obtain technical support, please contact our Customer Care Department within the U.S. at 800-762-2974, outside the U.S. at 317-572-3993, or fax 317-572-4002.
Wiley also publishes its books in a variety of electronic formats. Some content that appears in print may not be available in electronic books.
Library of Congress Control Number: 2003105656 ISBN: 0-7645-4114-5
Manufactured in the United States of America 10 9 8 7 6 5 4 3 2 1
1B/RW/QX/QT/IN
Keith Underdahllives in Albany, Oregon. Professionally, Keith is an electronic-publishing specialist for Ages Software, where he serves as program manager, interface designer, video-media producer, multimedia specialist, graphic artist, and when the day is over, he even sweeps out the place. Mr. Underdahl has written numerous books, including Teach Yourself Microsoft Word 2000,
Microsoft Windows Movie Maker For Dummies, Macworld Final Cut Pro 2 Bible
Not all those who wander are lost.
When people find out that I have written several books, they usu-ally react with awe and amazement, because writing an entire book seems like a monumental task. Writing a book is a monumental task, unless you’re as fortunate and blessed as I am with such wonderful family and friends. I can’t imagine getting up in the morning, much less writing a book like Digital Video For Dummies, without the help and support of my wife Christa. She has been my support staff, cheerleader, business manager, and inspiration throughout my writing career. Without Christa’s initial encouragement and tireless ongoing support, I would not be writing.
Once again I must also thank my favorite movie subjects, Soren and Cole Underdahl. Not only do they take direction well, but they are also incredibly intelligent and look great on camera! Soren and Cole are featured in screen shots through this book, as well as some of the sample video clips found on the companion CD-ROM. Best of all, because they’re my own boys, the Wiley Publishing legal depart-ment doesn’t make me fill out all kinds of model releases and other daunting forms. If someone writes Boilerplate For Dummies, I’ll buy the first copy.
Of course, I was working on this book before I even knew I was working on this book, making videos and developing my skills. I’ve received a lot of help from people in and out of the video and software business, including Jon D’Angelica, Patrick BeauLieu, John Bowne, Ingrid de la Fuente, havoc23, Linda Herd, Pete Langlois, Andy Marken, Rick Muldoon, Paulien Ruijssenaars, Steve from Hard Times, and probably a lot of other people I can’t remember right at the moment.
Some of the people who helped bring this book to market include the following:
Acquisitions, Editorial, and Media Development
Project Editor:Linda Morris
Senior Acquisitions Editor:Steven Hayes
Senior Copy Editor: Barry Childs-Helton
Technical Editor: Dennis Short
Editorial Manager: Kevin Kirschner
Permissions Editor: Laura Moss
Media Development Specialist: Kit Malone
Media Development Supervisor:
Richard Graves
Editorial Assistant: Amanda Foxworth
Cartoons:Rich Tennant www.the5thwave.com
Production
Project Coordinator: Erin Smith
Layout and Graphics: Seth Conley, Joyce Haughey, Leandra Hosier, Stephanie D. Jumper, Tiffany Muth, Janet Seib, Erin Zeltner
Proofreaders: John Tyler Connoley, Andy Hollandbeck, Carl William Pierce, Kathy Simpson, Brian H. Walls,
TECHBOOKS Production Services
Indexer: TECHBOOKS Production Services
Publishing and Editorial for Technology Dummies
Richard Swadley,Vice President and Executive Group Publisher
Andy Cummings,Vice President and Publisher
Mary C. Corder,Editorial Director
Publishing for Consumer Dummies
Diane Graves Steele,Vice President and Publisher
Joyce Pepple,Acquisitions Director
Composition Services
Gerry Fahey,Vice President of Production Services
Introduction ...1
Part I: Getting Ready for Digital Video...7
Chapter 1: Introducing Digital Video ...9
Chapter 2: Getting Your Computer Ready for Digital Video ...25
Chapter 3: Getting Your Digital Video Gear ...49
Part II: Gathering Footage...69
Chapter 4: Shooting Better Video ...71
Chapter 5: Capturing Digital Video ...93
Chapter 6: Capturing Analog Video ...111
Chapter 7: Importing Audio ...121
Part III: Editing Your Movie...135
Chapter 8: Hollywood Comes Home: Basic Editing ...137
Chapter 9: Using Transitions and Titles ...163
Chapter 10: Working with Audio ...185
Chapter 11: Advanced Video Editing ...197
Chapter 12: Working with Still Photos and Graphics ...209
Chapter 13: Wrapping Up Your Movie ...223
Part IV: Sharing Your Video...235
Chapter 14: Putting Your Movies on the Internet ...237
Chapter 15: Exporting Digital Video to Tape ...255
Chapter 16: Recording CDs and DVDs ...267
Part V: The Part of Tens ...283
Chapter 17: Ten Videography Tips and Tricks ...285
Chapter 18: Ten Tools for Digital Video Production ...303
Chapter 19: Comparing Ten Video-Editing Programs ...315
Part VI: Appendixes ...325
Appendix A: About the CD ...327
Appendix B: Glossary ...333
Appendix C: Installing Apple iMovie ...341
Appendix D: Using Pinnacle Studio ...345
Appendix E: Using Windows Movie Maker ...349
Introduction...1
Why This Book? ...1
Foolish Assumptions ...2
Conventions Used in This Book ...3
How This Book Is Organized ...3
Part I: Getting Ready for Digital Video ...3
Part II: Gathering Footage ...4
Part III: Editing Your Movie ...4
Part IV: Sharing Your Video ...4
Part V: The Part of Tens ...4
Part VI: Appendixes ...4
Icons Used in This Book ...5
Where to Go From Here ...5
Part I: Getting Ready for Digital Video ...7
Chapter 1: Introducing Digital Video . . . .9
What Is Digital Video? ...9
Comparing analog and digital video ...10
Warming up to FireWire ...11
Editing Video ...13
Comparing editing methods ...13
Editing a short video project ...14
Performing Hollywood magic at the click of a mouse ...16
Sharing Video ...20
Exporting a movie ...20
Playing your movie ...22
Chapter 2: Getting Your Computer Ready for Digital Video . . . .25
Resolving the Mac-versus-PC Debate Once and for All ...25
Upgrading Your Computer ...27
Using a Macintosh ...28
Buying a new Mac ...28
Upgrading ye olde Mac ...29
Using a Windows PC ...33
Buying a new PC ...33
Upgrading your PC for digital video ...35
Choosing Windows video software ...38
Optimizing Windows for video work ...39
Choosing Analog Capture Hardware ...42
Selecting capture cards ...42
Selecting external video converters ...43
Improving the Human-Machine Interface ...44
Working with video monitors ...44
Using a multimedia controller ...46
Chapter 3: Getting Your Digital Video Gear . . . .49
Choosing a Camcorder ...49
Mastering Video Fundamentals ...50
The mechanics of video recording ...50
Broadcast formats ...51
Interlacing versus progressive scan ...53
The many aspects of aspect ratios ...54
Color ...55
Picking a Camera Format ...56
MiniDV ...57
Digital8 ...57
Other digital formats ...58
Analog formats ...59
Choosing a Camera with the Right Features ...59
Accessorizing Your Camcorder ...62
Sounding Out Audio Equipment ...63
Choosing a microphone ...63
Selecting an audio recorder ...65
Shedding Some Light on the Scene ...65
Stabilizing Your Video Image ...66
Part II: Gathering Footage ...69
Chapter 4: Shooting Better Video . . . .71
Planning a Video Production ...71
Composing a Shot ...73
Evaluating Lighting ...73
Choosing lights ...75
Bouncing light ...75
Diffusing light ...77
Dealing with backlighting ...78
Controlling Focus and Exposure ...80
Setting Up Your Camcorder ...81
Shooting Video ...82
Panning effectively ...83
Using (not abusing) the zoom lens ...84
Avoiding timecode breaks ...84
Recording Sound ...86
Managing ambient noise ...87
Creating your own sound effects ...88
Video-Shoot Checklist for Dummies ...90
Basic checklist ...90
Advanced checklist ...91
Chapter 5: Capturing Digital Video . . . .93
Preparing for Digital Video Capture ...93
Making room for video files ...96
Connecting a digital camcorder to your computer ...97
Capturing Digital Video ...99
Capturing video in Pinnacle Studio ...99
Capturing video in Apple iMovie ...106
Troubleshooting Capture Problems ...108
You can’t control your camera through your capture software ...108
Frames drop out during capture ...108
Capture stops unexpectedly ...109
Chapter 6: Capturing Analog Video . . . .111
Preparing for Analog Video Capture ...111
Preparing your computer for analog video ...112
Setting up capture hardware ...112
Capturing Video ...115
Adjusting video-capture settings in Studio ...116
Capturing your video ...118
Chapter 7: Importing Audio . . . .121
Understanding Audio ...121
Understanding sampling rates ...122
Delving into bit depth ...122
Recording Audio ...122
Recording audio with your Macintosh ...123
Recording voice-over tracks in Pinnacle Studio ...125
Working with CD Audio ...127
Importing CD audio in iMovie ...128
Working with MP3 Audio ...130
Ripping MP3 files on a Mac ...131
Ripping MP3 files in Windows ...132
Part III: Editing Your Movie ...135
Chapter 8: Hollywood Comes Home: Basic Editing . . . .137
Starting a New Project ...137
Working with Clips ...139
Organizing clips ...140
Previewing clips ...142
Trimming out the unwanted parts ...143
Turning Your Clips into a Movie ...146
Visualizing your project with storyboards ...146
Using the timeline ...148
Fine-Tuning Your Movie in the Timeline ...152
Trimming clips in the timeline ...152
Removing clips from the timeline ...155
Undoing what you’ve done ...156
Adjusting playback speed ...156
Fixing Color and Light Issues ...159
Adjusting image qualities in Pinnacle Studio ...159
Modifying light and color in Apple iMovie ...161
Chapter 9: Using Transitions and Titles . . . .163
Using Fades and Transitions Between Clips ...163
Choosing the best transition ...164
Adding a transition to the timeline ...167
Adjusting transitions ...168
Giving Credit with Titles ...171
Creating titles for your movies ...171
Making effective titles ...172
Using Studio’s Title Editor ...175
Editing titles ...175
Changing backgrounds ...179
Creating Titles in iMovie ...181
Changing the Length of Titles ...183
Chapter 10: Working with Audio . . . .185
Using Audio in a Project ...185
Understanding audio tracks ...186
Adding audio to the timeline ...187
Adjusting volume ...188
Adding a Soundtrack to Your Project ...194
Adding music from a CD ...195
Generating background music with SmartSound ...196
Chapter 11: Advanced Video Editing . . . .197
Using Video Effects in iMovie ...197
Reviewing iMovie’s effects ...198
Customizing effects ...201
Using Video Effects in Studio ...202
Stepping Up to More Advanced Editing ...204
Chapter 12: Working with Still Photos and Graphics . . . .209
Using Still Graphics in Movies ...209
Adjusting the image size ...210
Getting the colors just right ...212
Inserting Stills in Your Movie ...212
Using pictures in Apple iMovie ...212
Using pictures in Pinnacle Studio ...216
Freezing Frames from Video ...219
Chapter 13: Wrapping Up Your Movie . . . .223
Previewing Your Movie ...223
Casting a critical eye on your project ...224
Previewing on an external monitor ...225
Exporting the Movie ...226
Choosing AVI settings ...229
Setting MPEG settings ...232
Part IV: Sharing Your Video ...235
Chapter 14: Putting Your Movies on the Internet . . . .237
Choosing a Video Format ...238
Streaming your video ...238
Comparing player programs ...239
Exporting Movies for the Online World ...243
Making QuickTime movies with iMovie ...243
Exporting Internet movies from Studio ...248
Putting Your Movie on the Web ...251
Finding an online home for your movies ...252
Chapter 15: Exporting Digital Video to Tape . . . .255
Prepping Your Movie for TV Playback ...255
Setting Up Your Hardware ...256
Exporting the Movie ...258
Exporting to tape in Apple iMovie ...259
Exporting to tape in Pinnacle Studio ...261
Chapter 16: Recording CDs and DVDs . . . .267
Understanding DVD Basics ...267
Getting ready to record DVDs ...268
Comprehending DVD standards ...268
Making Effective Menus ...272
Creating a menu ...272
Previewing your menu ...276
Burning DVDs ...277
Part V: The Part of Tens ...283
Chapter 17: Ten Videography Tips and Tricks . . . .285
Beam Me Up, Scotty! ...285
Seeing Stars ...287
Forcing a Perspective ...288
Making Your Own Sound Effects ...290
Filtering Your Video ...291
Working with Assistants ...292
Rehearse! ...293
To Zoom or Not to Zoom? ...293
Dealing with the Elements ...294
Compositing Video ...296
Understanding compositing ...296
Shooting video against a blue screen ...298
Compositing video tracks ...300
Chapter 18: Ten Tools for Digital Video Production . . . .303
Tripods and Other Stabilization Devices ...303
Monopods ...304
Mobile stabilizers ...305
Lighting ...305
DVD-R Drives ...306
Microphones ...307
MiniDisc Recorders ...308
Multimedia Controllers ...309
Graphical Video Background Elements ...312
Helmet Cams ...313
Video Decks ...313
Chapter 19: Comparing Ten Video-Editing Programs . . . .315
Reviewing the Basics ...316
Importing Media ...317
Editing Your Movies ...319
Exporting Your Movies ...323
Part VI: Appendixes...325
Appendix A: About the CD . . . .327
System Requirements ...327
Using the CD with Microsoft Windows ...328
Using the CD with Mac OS ...329
What You’ll Find on the CD ...330
Sample video clips ...330
Pinnacle Studio ...330
Links Page...331
Troubleshooting ...331
Appendix B: Glossary . . . .333
Appendix C: Installing Apple iMovie . . . .341
Installing and Upgrading iMovie ...341
Enhancing iMovie with Plug-ins ...343
Appendix D: Using Pinnacle Studio . . . .345
Updating Studio ...345
Using Hollywood FX Plug-ins for Pinnacle Studio ...347
Appendix E: Using Windows Movie Maker . . . .349
Why Isn’t Movie Maker Featured in This Book? ...349
Upgrading Windows Movie Maker ...350
Getting Acquainted with Windows Movie Maker ...351
I
f marketing folks want to breathe new life into an existing technology, the method du jouris to tack “digital” onto the name. Today we have digitalcable, digital cell phones, digital fuel injection, and now, digital video. But unlike some other technologies that have recently earned the digital prefix, digital video isn’t just a minor improvement over the old way of doing things. Digital video is a revolution that is changing the way we think about and use moving pictures.
Regular folks have had the capability to record their own video for many years now. Affordable film movie cameras have been available since the 1950s, and video cameras that record directly onto videotape have been with us for over two decades. But after you recorded some video or film with one of these old cameras, you couldn’t do much else with it. You could show your movies to friends and family in raw, unedited form, but there was no confusing your rough home movie with a professional Hollywood production.
Digital camcorders provide a slight quality improvement over older cam-corders, but the real advantage of digital video is that you can now easily edit your video on a computer. I don’t have to tell you how far computer technology has progressed over the last few years, and you know that modern Macs and PCs can now do some pretty amazing things. In a matter of seconds, you can import video from your digital camcorder into your computer, cut out the scenes you don’t want, add some special effects, and then instantly send your movies to friends over the Internet — or burn them to a DVD. The capability to easily edit your own movies adds a whole new level of creativity that was — just five years ago — the exclusive realm of broadcast and movie professionals. In a culture so accustomed to and influenced by video images, it’s actually kind of surprising that personal moviemaking hasn’t burgeoned sooner. Video is the art of our time, and now — at last — you have the power to use this art for your own expression. What will you draw on your digital-video canvas?
Why This Book?
Needless to say, you’re no “dummy.” If you were, you wouldn’t be reading this book and trying to figure out how to use digital video. Thanks to digital video, high-quality moviemaking has never been easier or more affordable. I have included instructions on performing the most important video-editing tasks, including lots of graphics so you can better visualize what I’m talking about. You’ll also find tips and other ideas in this book that you wouldn’t find in the documentation that comes with your editing software.
Digital Video For Dummies doesn’t just help you use software or understand a new technology. It’s about the art of moviemaking, and how you can apply this exciting new technology to make movies of your very own. I have designed this book to serve as a primer to moviemaking in general. Sections of this book will help you choose a good camcorder, shoot better video, publish movies online, and speak the industry technobabble like a Hollywood pro.
Foolish Assumptions
Conventions Used in This Book
Digital Video For Dummies helps you get started with moviemaking quickly and efficiently. Much of this book shows you how to perform tasks on your computer, which means you will find that this book is a bit different from other kinds of texts you have read. The following are some unusual conven-tions that you will encounter in this book:
⻬Filenames or lines of computer code will look like THISor this. This style of print usually indicates something you should type in exactly as you see it in the book.
⻬Internet addresses will look something like this: www.dummies.com. Notice that we’ve left the http://part off the address because you never actually need to type it in your Web browser anymore.
⻬You will often be instructed to access commands from the menu bar of your video-editing program. The menu baris that strip that lives along the top of the program window and usually includes menus like File, Edit, Window, and Help. If I’m telling you to access the Save command in the File menu, it will look like this: File ➪Save.
⻬You’ll be using your mouse a lot. Sometimes you’ll be told to click some-thing to select it. This means that you should click onceon whatever it is you are supposed to click, using the left mouse button if you use Microsoft Windows. Other times you will be told to double-click something; again, you double-click with the left mouse button if you are using Windows.
How This Book Is Organized
Believe it or not, I did put some forethought into the organization of this book. I hope you find it logically arranged and easy to use. This book is divided into six major parts. The parts are described in the following sections.
Part I: Getting Ready for Digital Video
Part II: Gathering Footage
Editing video on your computer is just one part of the digital video experi-ence. Before you can do any editing, you need something to actually edit. Part II shows you how to shoot better video, and then I show you how to get that video into your computer — even if you don’t yet have a digital cam-corder, or you just have some footage on old VHS tapes that you want to use. I also help you record and import better audio because good audio is just as important as video when you’re making movies.
Part III: Editing Your Movie
Until just a few years ago, video editing was something that required
professional-grade equipment, which cost in the hundreds of thousands of dol-lars. But with digital video and a semi-modern computer, editing video is now easy and very affordable. In Part III of this book, I’ll introduce you to the basics of editing. You’ll find out how to arrange scenes in the order you like and trim out the unwanted parts. I show you how to add cool transitions between video clips, use titles (text that appears onscreen), and top off your creation with sound effects, musical soundtracks, still graphics, and special effects.
Part IV: Sharing Your Video
When you’ve poured your heart into a movie project, you’ll definitely want to share it with others. This part helps you share your movies on the Internet or on videotape. You even find out how to make your own DVDs in this part.
Part V: The Part of Tens
I wouldn’t be able to call this a For Dummies book without a “Part of Tens” (really, it’s in my contract). Actually, the Part of Tens always serves an impor-tant purpose. In this book, it gives me a chance to show you ten cool tips and tricks for better moviemaking, as well as ten tools that will improve your movies and make your work easier. Because there are a lot of video-editing programs out there to choose from, I also provide a chapter that compares ten of them, feature by feature.
Part VI: Appendixes
Next up is a glossary to help you decrypt the alphabet soup of video-editing terms and acronyms. Additional appendixes help you install and update the editing programs shown throughout this book.
Icons Used in This Book
Occasionally you’ll find some icons in the margins of this book. The text next to these icons includes information and tips that deserve special attention, and some warn you of potential hazards and pitfalls you may encounter. Icons you’ll find in this book include
Although every word of Digital Video For Dummies is important (of course!), I sometimes feel the need to emphasize certain points or remind you of some-thing that was mentioned elsewhere in the book. I use the Remember icon to provide this occasional emphasis.
Tips are usually brief instructions or ideas that, although not always docu-mented, can greatly improve your movies and make your life easier. Tips are among the most valuable tidbits in this book.
Heed warnings carefully. Some warn of things that will merely inconvenience you, whereas others tell you when a wrong move could cause expensive and painful damage to your equipment and/or person.
Computer books are often stuffed with yards of technobabble, and if it’s sprinkled everywhere, it can make the whole book a drag and just plain diffi-cult to read. As much as possible I have tried to pull some of the deeply tech-nical stuff out into these icons. This way, the information is easy to find if you need it, and just as easy to skip if you already have a headache.
The CD-ROM that accompanies this book contains sample clips and still images that you can use to practice the techniques we discuss, as well as a trial version of Pinnacle Studio. This icon lets you know when you might need to access something from the CD. For a full run-down on everything that appears on the CD, see Appendix A.
Where to Go From Here
F
ilms and videos have been around for many years now, but digital video is quickly changing how we think of movies. Never before has it been so easy for just about anyone to make high-quality movies with Hollywood-style features and effects. All you need is a camcorder and a semi-modern computer to make your own movie magic. This first part of Digital Video For Dummies, 3rd EditionIntroducing Digital Video
In This Chapter
䊳Defining digital video䊳Editing video on your own computer
䊳Sharing digital video
I
n 1996, I read a technical paper on a new technology from Apple Computer called FireWire.This new technology promised the ability to transfer data at speeds of up to 400 megabits per second. “Yeah, right!” I quietly scoffed to myself, “Why on Earth would anyone need to transfer that much data that quickly? Besides, Apple will be out of business by the end of ’97.”Yeah, right.
Thankfully I was wrong about Apple, and I soon learned about a new phenom-enon called digital video that could take advantage of this new FireWire tech-nology. Digital video files are big, too big in fact for computers of just a few years ago to handle. But FireWire allows high quality video to be shared easily and efficiently between digital camcorders and computers.
Of course, more than just FireWire was needed for this digital video thing to catch on. Personal computers still had to become fast enough to handle digi-tal video, and prices for digidigi-tal camcorders only fell within reach of mere mor-tals just a couple of years ago. Digital video is here now, and anyone with a reasonably modern computer and a $500 digital camcorder can make movies like a pro. With the recent advent of DVD players and recordable DVD drives, sharing your high quality movies with others has never been easier.
This chapter introduces you to digital video and shows you how easy it is to edit and share your movies with others.
What Is Digital Video?
graceful motion of an eagle in flight, we are receiving a steady stream of infi-nitely variable data through our various senses. Of course, we don’t think of all these things as “data” but rather as light, sound, smell, and touch. Computers are pretty dumb compared to the human brain. They can’t com-prehend the analog data of the world; all computers understand are yes (one) and no (zero). In spite of this limitation, we force our computers to show pic-tures, play music, and display moving video; infinitely variable sounds, colors, and shapes must be converted into the language of computers — ones and zeros. This conversion process is called digitizing. Digital video — often abbreviated as DV— is video that has been digitized.
To fully understand the difference between analog data and digital data, sup-pose you want to draw the profile of a hill. An analog representation of the profile (shown in Figure 1-1) would follow the contour of the hill perfectly, because analog values are infinitely variable. However, a digital contour of that same hill would not be able to follow every single detail of the hill, because, as shown in Figure 1-2, digital values are made up of specifically defined, individual bits of data.
Comparing analog and digital video
Digital recordings are theoretically inferior to analog recordings because analog recordings can contain more information. But the truth is that major advances in digital technology mean that this really doesn’t matter. Yes, a dig-ital recording must be made up of specific individual values, but modern recordings have so many discrete values packed so closely together that human eyes and ears can barely tell the difference. In fact, casual observation often reveals that digital recordings actually seem to be of a higher quality than analog recordings. Why?
Figure 1-1:
A major problem with analog recordings is that they are highly susceptible to deterioration. Every time analog data is copied, some of the original, infi-nitely variable data is lost. This phenomenon, called generational loss,can be observed in that dark, grainy copy of a copy of a copy of a wedding video that was first shot more than 10 years ago. However, digital data doesn’t have this problem. A one is always a one, no matter how many times it is copied, and a zero is always a zero. Likewise, analog recordings are more susceptible to deterioration after every playback, which explains why your 1964-vintage
Meet the BeatlesLP pops, hisses, and has lost many of its highs and lows over the years. Digital recordings are based on instructions that tell the computer how to create the data; as long as it can read the instructions, it creates the data the same way every time.
Whether you are editing analog or digital material, always work from a copy of the master and keep the master safe. When adding analog material to your project, the fewer generations your recording is from the original, the better. When you consider the implications of generational loss on video editing, you begin to see what a blessing digital video really is. You’re constantly copying, editing, and recopying content as you edit your movie projects — and with digital video, you can edit to your heart’s content, confident that the quality won’t diminish with each new copy you make.
Warming up to FireWire
FireWire is one of the hot new technologies that makes digital video so fun and easy to work with. FireWire — also sometimes called IEEE-1394 or i.LINK — was originally developed by Apple Computer and is actually an interface
Figure 1-2:
format for computer peripherals. Various peripherals including scanners, CD burners, external hard drives, and of course digital video cameras use FireWire technology. Key features of FireWire include
⻬Speed:FireWire is really fast, way faster than USB or serial ports. FireWire is capable of transfer rates up to 400Mbps (megabits per second). Digital video contains a lot of data that must be transferred quickly, making FireWire an ideal format.
⻬Mac and PC compatibility:(What a concept.) Although FireWire was developed by Apple, it is widely implemented in the PC world as well. This has helped make FireWire an industry standard.
⻬Plug-and-play connectivity:When you connect your digital camcorder to a FireWire port on your computer (whether Mac or PC), the camera is automatically detected. You won’t have to spend hours installing soft-ware drivers or messing with obscure computer settings just to get everything working.
⻬Device control:Okay, this one isn’t actually a feature of FireWire, it’s just one of the things that makes using FireWire really neat. If your digi-tal camcorder is connected to your computer’s FireWire port, most video editing programs can control the camcorder’s playback features. This means you don’t have to juggle your fingers and try to press Play on the camcorder and Record in the software at exactly the same time. Just click Capture in a program like iMovie or Pinnacle Studio, and the software automatically starts and stops your camcorder as needed.
⻬Hot-swap capability: You can connect or disconnect FireWire compo-nents whenever you want. You don’t need to shut down the computer, unplug power cables, or confer with your local public utility district before connecting or disconnecting a FireWire component.
All new Macintosh computers come with FireWire ports. Some — but not all — Windows PCs have FireWire ports as well. If your PC does not have a FireWire port, you can usually add one using an expansion card. (I cover all kinds of optional upgrades and adjustments to your system in Chapter 2.) Windows 98 and higher include software support for FireWire hardware. If you’re buying a new PC and you plan to do a lot of video editing, consider a FireWire port a must-have feature.
Editing Video
Editing video projects with a program like Pinnacle Studio or Apple iMovie is pretty easy, but this wasn’t always the case. Until recently, the only practical way for the average person to edit video was to connect two VCRs and use the Record and Pause buttons to cut out unwanted parts. This was a tedious and inefficient process. The up-to-date (and vastly improved) way to edit video is to use a computer — and the following sections introduce you to the video-editing techniques you’re most likely to use.
Comparing editing methods
Video (and audio, for that matter) is considered a linear medium because it comes at you in a linear stream through time. A still picture, on the other hand, just sits there — you take it in all at once — and a Web site lets you jump randomly from page to page. Because neither of these is perceived as a stream, they’re both examples of nonlinear media.
You tweak a linear medium (such as video) by using one of two basic methods — linear or nonlinear editing. If your approach to editing is linear, you must do all the editing work in chronological order, from the start of the
Online versus offline editing
A video file represents a huge amount ofinformation — so it takes up a lot of space in the digital world. You need fast hardware to handle video, and monster hard drives to store it. To conserve storage space during editing, profess-ionals have long used a trick called offline editing. The idea is to capture lower-quality “working” copies of your video into the com-puter. After you complete all your edits and you’re ready to make your final movie, the soft-ware decides which portions of the original video must be captured at full quality — and then auto-matically captures only the portions you need.
Conversely, if you work with full-quality video on your computer for all your edits, you are per-forming what video pros call online editing.
movie to the finish. Here’s an old-fashioned example: If you “edit” video by dubbing certain parts from a camcorder tape onto a VHS tape in your VCR, you have to do all your edits in one session, in chronological order. As you probably guessed, linear editing is terribly inefficient. If you dub a program and then decide to perform an additional edit, subsequent video usually has to be redubbed. (Oh, the pain, the tedium.)
What is the alternative? Thinking outside the line: nonlinear editing. You can do nonlinear edits in any order; you don’t have to start at the beginning and slog on through to the end every time. The magical gizmo that makes nonlin-ear editing possible is a combination of the personal computer and programs designed for nonlinear editing (NLE). Using such a program (for example, Apple iMovie or Pinnacle Studio), you can navigate to any scene in the movie, insert scenes, move them around, cut them out of the timeline altogether, and slice, dice, tweak and fine-tune to your heart’s content.
Editing a short video project
Editing video is really cool and easy to do if you have a reasonably modern computer. But why talk about editing when you can jump right into it? Here’s the drill:
1. Open Windows Movie Maker (Windows) or Apple iMovie (Macintosh).
If you don’t know how to open your video-editing program, or if you aren’t sure you have the latest version, check out Appendix C for infor-mation about iMovie, or Appendix E for the scoop on Windows Movie Maker. If you are prompted to create a new project by iMovie, create a new project and call it Chapter 1.
2. Put the CD-ROM that accompanies this book in your CD-ROM drive.
3. Choose File➪Import in iMovie or File➪Import into Collections in Windows Movie Maker.
4. Browse to the Samples\Chapter 1folder on the CD-ROM.
In iMovie, hold down the Ô(Mac) key and click each clip once to select all three of them. In Windows Movie Maker, click the file Chapter1to select it.
5. Click Open (iMovie) or Import (Windows Movie Maker).
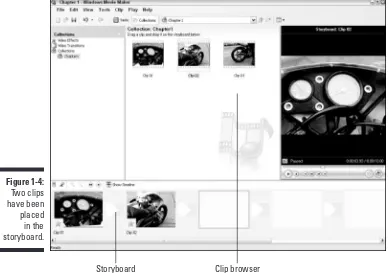
Three clips appear in the browser window of your video-editing pro-gram, as shown in Figure 1-3. The figure shows iMovie, but Windows Movie Maker (shown in Figure 1-4) is fairly similar.
6. Click-and-drag Clip 01 from the clip browser and then drop it on the storyboard.
Congratulations! You’ve just made your first movie edit. You should now have two clips on the storyboard, looking similar to Figure 1-4.
If your Windows Movie Maker window doesn’t look quite like this, click the Show Timeline button (if you see it on-screen).
Well, okay, what’s so nonlinear about that? After all, you placed one clip after another — that’s about as linear as an edit can get. You could easily imagine doing the same thing with a camcorder, a VCR, and some cables.
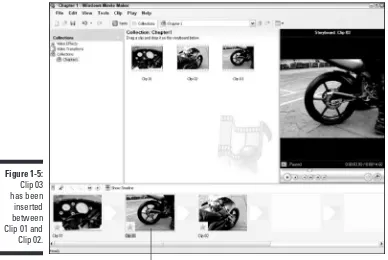
Aha, but here’s the kicker: What if you decide to insert Clip 03 in-between Clips 01 and 02? If you’re “editing” with a camcorder and VCR, this move suddenly becomes a horrendously tricky edit to make. But with a nonlinear editing program like iMovie or Windows Movie Maker, the edit is easy. Just click-and-drag Clip 03 and drop it right between Clips 01 and 02. The software automatically shifts Clip 02 over to make room for Clip 03, as shown in Figure 1-5. Almost as easy as shuffling cards, edits like these are the essence of nonlinear video editing.
Storyboard Clip browser
Figure 1-3:
Performing Hollywood magic
at the click of a mouse
The previous section shows the basics of making a movie by assembling clips in a specific order — and frankly, most of your editing work will probably consist of simple tasks like that. But when you want to go beyond ordinary, you can really spice up your movies by adding special effects or transitions between clips. (Special effects are covered in Chapter 11, and I show you just about everything you’ll ever need to know about transitions in Chapter 9.) Of course, there’s no need to wait until later. Modern video-editing programs make it really easy to add special creative touches to your movies.
Creating a transition
You can add a transition to the simple movie you put together in the previous section by following these steps:
Storyboard Clip browser
Figure 1-4:
1. Open the Chapter 1 sample project you created in the previous sec-tion if it isn’t already open.
You can follow these steps using any movie project that includes two or more clips.
2. Open the list of video transitions in your editing program.
In Apple iMovie, click the Trans button just below the browser window. In Windows Movie Maker, click Video Transitions under Collections on the left side of the screen.
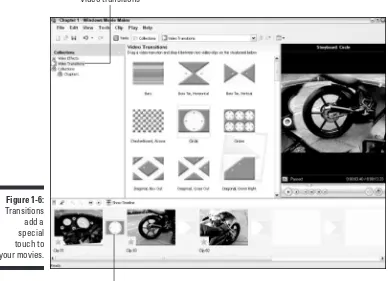
3. Click-and-drag one of the Circle transitions to a spot between two clips on the storyboard.
A transition indicator appears between the two clips, as shown in Figure 1-6.
4. Click Play in the preview window to preview the transition.
If you are using iMovie, the transition may not appear immediately. If you see a tiny red progress bar under the transition, wait a few seconds for it to finish. When the progress bar is complete, you should be able to preview the transition.
Inserted clip
Figure 1-5:
Clip 03 has been
Pretty cool, huh? But wait, that’s not all!
Creating special effects
Adding special effects to your video is pretty easy too. Here’s one that makes a video clip look like it came from a really old reel of film:
1. Click a clip in the storyboard to select it.
If you’re following along using the sample clips from the companion CD-ROM, choose Clip 02, which is probably the last clip in your storyboard.
2. Open the list of video effects in your video-editing program.
In iMovie, click the Effects button under the browser window. In Windows Movie Maker, click Video Effects under Collections on the left side of the screen.
Video transitions
Drop transitions between clips
Figure 1-6:
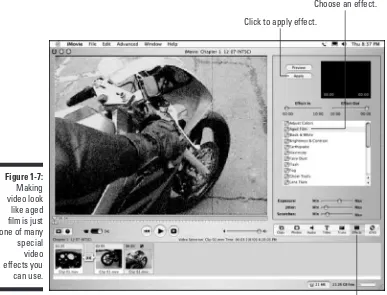
3. Click an Aged Film effect to select it.
In iMovie, there is only one Aged Film effect. In Windows Movie Maker, scroll down in the list of effects and choose one of the Film Age effects. It doesn’t matter if you choose Old, Older, or Oldest.
4. Apply the effect to the clip.
In iMovie, click Apply at the top of the effects window. In Windows Movie Maker, click-and-drag the effect onto the clip on the storyboard.
5. Click Play in the preview window to preview the effect as shown in Figure 1-7.
Again, if you’re using iMovie, you will probably have to wait for the tiny red progress bar on the clip to finish before you can preview the effect. These are just a couple of the cool things you can do with digital video. Part III of this book helps you explore the wonders of video editing in greater detail. So break out your director’s chair and get ready to make some movie magic!
Click to apply effect.
Click to see effects. Choose an effect.
Figure 1-7:
Sharing Video
One of the best things about digital video is that it enables you to get really creative with your own movie projects. To make your work worthwhile, you may want to share your video work with others. Thankfully, sharing digital video is pretty easy too. Part IV of this book shows you all the details of shar-ing video on tape, DVD, or the Internet, but the followshar-ing sections provide a handy, brief glimpse of what you can do.
Exporting a movie
Modern video-editing programs are designed to make it as easy as possible to share your movie projects — often with no more than a couple of mouse clicks. For now, we’ll export a movie that would be suitable for viewing over the Internet. This section uses the project created in Chapter 1 (using sample clips from the CD-ROM), but if you have your own edited movie, you can use it instead. The steps for exporting your movie are a little different depending on whether you are using Apple iMovie or Windows Movie Maker, so I’ll address each program separately.
Exporting from Apple iMovie
Apple iMovie exports movies in QuickTime format, or you can export directly to your camcorder’s videotape or Apple iDVD. To export your project in iMovie, follow these steps:
1. Open the project you want to export (such as the Chapter 1project).
2. Choose File➪Export.
The iMovie Export dialog box appears.
3. Choose how you want to export your movie from the Export menu.
For now, I recommend that you choose To QuickTime (as shown in Figure 1-8).
4. Choose a Format, such as Web.
5. Click Export.
6. Give a name for your movie file in the Save As box.
Make a note of the folder in which you are saving the movie. Choose a different folder if you wish.
If you remove the .movfilename extension, Windows users (you proba-bly know a few) will have a hard time viewing your movie.
iMovie exports your movie. The export process may take a few minutes, depending on how long your movie is.
Exporting from Windows Movie Maker
Like iMovie, Windows Movie Maker also enables you to export video for a variety of applications. Windows Movie Maker is especially well suited to exporting movies for Internet playback. To export a movie for online viewing, follow these steps:
1. Open the project that you want to export (such as the Chapter 1 project).
2. Choose File➪Save Movie File.
The Save Movie Wizard appears.
3. Choose an export format for your movie and then click Next.
For now I recommend choosing My Computer.
4. Enter a filename for your movie and choose a location in which to save the file.
5. Click Next again.
The Save Movie Wizard shows details about the file, including the file size (see Figure 1-9).
6. Click Next again.
The export process begins.
7. When export is done, click Finish.
Your movie will probably begin playing in Windows Media Player. Enjoy!
Figure 1-8:
Choose export settings
Playing your movie
After your movie has been exported, playing it is pretty easy. Simply locate the file on your hard disk and double-click its name. The movie should auto-matically open and start to play, as shown in Figure 1-10.
If you exported your movie from Windows Movie Maker, the movie file will be in Windows Media (WMV) format. Despite the name, you don’t have to be a Windows user to view Windows Media video. You do need Windows Media Player to view Windows Media files, but Microsoft offers a version of Windows Media Player for Macintosh. Figure 1-10 shows a Windows Media version of the Chapter 1 movie, playing contentedly on my Mac.
Movies created on a Mac are also cross-platform-friendly. iMovie outputs videos in Apple QuickTime format, and Windows versions of QuickTime (shown in Figure 1-11) have been available for years. Chapter 14 tells you more about available video-player programs.
Click for more quality options.
Estimated file size
Figure 1-9:
After you have previewed your movie, you can either share it with others or edit it some more. I usually go through the preview and re-edit process dozens of times before I decide that a movie project is ready for release, but thanks to digital video, re-editing is no problem at all. Chapter 13 offers some tips for previewing your movies more effectively.
Figure 1-11:
. . . and QuickTime files can be played in Windows.
Figure 1-10:
Getting Your Computer Ready for
Digital Video
In This Chapter
䊳Deciding between a Mac or a PC
䊳Tips for safe computer upgrades
䊳Choosing and configuring a Mac for digital video
䊳Choosing and configuring a PC for digital video
䊳Selecting analog video capture hardware
䊳Improving the interface between you and your computer
A
digital camcorder is just one part of the digital video equation. You also need a computer that is ready to capture, edit, and export digital video. Modern computers are pretty powerful, but there are still some important fac-tors to consider if you want a computer well suited for digital video work. This chapter helps you choose a new computer, upgrade your current computer, and choose other gear that makes video editing fun and easy. But first, I’ll start with something simple — trying to resolve the age-old debate of whether a Mac or Windows PC is better. (And if I succeed at that, I can work on a way to achieve world peace in the next chapter!)Resolving the Mac-versus-PC
Debate Once and for All
Yeah. Right.
Legal disclaimer: Wiley Publishing, Inc., is not responsible for physical or emotional harm which may result from compliance with the preceding foolish suggestion.
Like the debate over whether cats or dogs make better pets, the question of whether to use a Mac or a PC has been disputed tirelessly between the true believers. It has been a largely unproductive dispute: For the most part, Mac people are still Mac people, and PC people are still PC people.
But who is right? If you want the best computer for working with digital video, should you choose a PC or a Mac? Well, look at the important factors:
⻬Ease of use:Macintosh users often boast that their computers are exceedingly easy to use, and they are right. But if you’re a long-time Windows user, you might not think so. Some things are easier to do on a Mac, but other things are easier to do in Windows. Neither system offers a clear advantage, so if you’re a creature of habit, you’ll probably be happiest if you stick with what you know.
⻬Reliability:The Windows Blue Screen of Death (you know, the dreaded screen that often appears when a Windows PC crashes) is world-famous and the butt of countless jokes. But the dirty little secret of the Macintosh world is that until recently, most Macs crashed nearly as often as Windows PCs. Apple’s new Macintosh operating system — OS X — brings a new level of stability and refinement to the Macintosh world, but the latest Windows XP is pretty dependable as well. Reliability is important to you because video pushes your computer’s performance to its limits. Get a Mac with OS X or a PC with Windows XP and you should be just fine.
⻬Digital video support:I can’t be wishy-washy any longer; if you want a great computer ready to edit digital video right out of the box, a new Macintosh is the safer bet. All new Macs come with built-in FireWire ports, making it easy to hook up your digital camcorder. Macs also come with iMovie, a pretty good entry-level video-editing program. Windows comes with Windows Movie Maker, but it is not as capable as iMovie. Also, many Windows PCs still don’t come with built-in FireWire, meaning you’ll either have to special-order it or install a FireWire card yourself. So there you have it: Macs and PCs are both pretty good. Sure, Macs all come with FireWire, but if you shop around, you should be able to find a Windows PC with FireWire for about the same price as a new Mac. Both platforms can make excellent video-editing machines, so if you’re already dedicated to one or the other, you should be fine.
Upgrading Your Computer
Picture this: Our hero carefully unscrews an access panel on the blinking device, revealing a rat’s nest of wires and circuits. A drop of sweat runs down his face as the precious seconds tick away, and he knows that fate hangs by a slender thread. The hero’s brow creases as he tries to remember the proce-dure: “Do I cut the blue wire or the red wire?”
If the thought of opening up your computer and performing upgrades fills you with a similar level of anxiety, you’re not alone. The insides of modern computers can seem pretty mysterious, and you might be understandably nervous about tearing apart your expensive PC or Mac to perform hardware upgrades. Indeed, all the chips, circuit boards, and other electronic flotsam inside the computer case are sensitive and easily damaged. You can even hurt yourself if you’re not careful, so if you don’t have any experience with hardware upgrades, you are probably better off consulting a professional before making any changes or repairs to your PC.
But if you have done hardware upgrades before, digital video may well inspire you to make more upgrades now or in the near future. If you do decide to upgrade your computer, some basic rules include
⻬Review your warranty.Hardware upgrades might invalidate your com-puter’s warranty if it still has one.
⻬RTM.This is geek-speak for, “Read The Manual.” The owner’s manual that came with your computer almost certainly contains important information about what can be upgraded and what can’t. The manual may even have detailed, illustrated instructions for performing common upgrades.
⻬Back up your data.Back up your important files on recordable CDs, Zip disks, or another storage device available to you. You don’t want to lose work, pictures, or other data that will be difficult or impossible to replace.
⻬Gather license numbers and ISP (Internet Service Provider) informa-tion.If you have any important things like software licenses stored in saved e-mails, print them out so that you have hard copies. Also, make sure that you have all the access information for your ISP (account name, password, dial-up numbers, server addresses, and so on) handy in case you need to re-install your Internet service.
⻬Gather all your software CDs.Locate all your original installation discs for your various programs, including your operating system (Mac OS or Windows), so that you’ll be able to reinstall them later if necessary.
⻬Avoid static electricity build-up.Even if you didn’t just walk across a shag carpet and pet your cat, your body still probably has some static electricity built up inside. A tiny shock can instantly destroy the tiny cir-cuits in expensive computer components. Before touching any compo-nents, touch your finger to a bare metal spot on your computer’s case to ground yourself. I also recommend wearing a grounding strap, which can be purchased at most electronics stores for $2-3. Now that’s what I call cheap insurance!
⻬Handle with care.Avoid touching chips and circuitry on the various computer components. Try to handle parts by touching only the edges or other less-delicate parts.
⻬Protect those old parts.If you are taking out an old component (such as a 64MB memory module) and replacing it with something better (like a 256MB memory module), the old part may still be worth something to somebody. If nothing else, if your newly purchased part is defective, at least you can put the old part back in to get your computer running again. And if the new part works fine, you may be able to salvage a few bucks by auctioning the old part on the Internet!
Again, when in doubt, you should consult with a computer hardware profes-sional. In fact, you may find that the retailer that sold you the upgraded parts also offers low cost or even free installation service.
Using a Macintosh
Apple has put considerable effort into promoting the great multimedia capabilities of modern Macintosh computers. Indeed, Apple has been at the forefront of many important developments in digital video, and the video-capabilities of current Macs are impressive. In fact, any new Macintosh will work quite well with digital video. The following sections show you what to consider when choosing a new Mac, how to decide if your current Mac can handle digital video, and what video-editing software is available for your Mac.
Buying a new Mac
⻬512MB of RAM:Video-editing software needs a lot of RAM (Random Access Memory) to work with, so the more the better. You might be able to get away with 256MB (megabytes) for a while, but you will find that video editing work is slow and tedious. Fortunately, the RAM in most Macs can be easily upgraded. In fact, iMacs incorporate a handy little access panel that enables you to upgrade RAM in mere seconds.
⻬500MHz G3 processor:A lot of video pros will tell you that you need a lot more, but you can get away with only a 500MHz (megahertz) G3 Mac. As you edit video, you’ll find that you spend a lot of time sitting there, waiting for the computer to work. The faster the processor (and the more RAM), the less time you will spend waiting.
⻬60GB hard drive:I’m going to get e-mails from the video pros, I just know it! Video files take up lots and lots and lots of drive space. At one time, 60GB (gigabytes) was considered insanely massive for a hard drive, but when you are working with digital video, you’ll eat up that space in a hurry. Less than five minutes of video eats up an entire giga-byte on your hard drive, which also has to hold software files, system files, and all kinds of other information. Lots of people will tell you that you need at least 100GB of drive space, and they’re right: 100GB or more would be really nice. But you should be able to get away with a 60GB hard drive if your budget is tight. If you can afford a bigger drive, it’s worth the expense.
⻬OS X:Any new Mac will include the latest version of Apple’s operat-ing system software. But if you are buyoperat-ing a previously enjoyed Mac, I strongly recommend that you buy one that already has OS version 10.1.5 or higher. If the computer you want to buy doesn’t have OS X, factor the cost of a software upgrade (about $130) into the price. If you’re considering a portable iBook or PowerBook computer, pay special attention to the specifications before you buy. Portable computers usually have considerably less RAM and hard drive space than similarly priced iMacs and PowerMacs.
Upgrading ye olde Mac
One of the biggest obstacles you’ll face involves FireWire. If your Mac does not already have a FireWire port, you may have difficulty adding one. PowerMacs can usually be upgraded with a FireWire card, but the few Mac-compatible FireWire cards available tend to be pretty expensive. The Media 100 EditDV 2.0 FireWire card, for example, will set you back about $580. If you have a PowerBook G3, a slightly more affordable option is the Digital Origin MotoDV Mobile (retail price about $300) editing suite with a FireWire card that uses the PowerBook’s CardBus interface.
Before you think you can get away without FireWire, keep in mind that if your Mac is too old for FireWire, its USB port won’t be fast enough to capture full-quality digital video either.
Some parts of your Mac may be more easily upgradeable, as described in the following sections. For more details on upgrade information and installation instructions, check out The iMac For Dummies by David Pogue, or Mac OS X All-in-One Desk Reference For Dummies by Mark Chambers (both published by Wiley Publishing, Inc.). Macworld (www.macworld.com) also provides online articles and tutorials to help you upgrade your Mac. And of course, follow all the safe computer upgrade guidelines I provided earlier in this chapter.
Improving your Mac’s memory
Digital video editing uses a lot of computer memory, so you should see signifi-cant performance improvements if you upgrade your RAM. Memory is usually pretty easy to upgrade in most desktop Macs. In fact, most iMacs incorporate a handy access panel that enables you to add memory in mere seconds. Memory comes on little cards called DIMMs(dual inline memory modules) and they easily snap into place in special memory slots on the computer’s motherboard. Figure 2-1 illustrates what a DIMM looks like. Read the documentation from Apple that came with your Mac for specific instructions on installing more memory.
Make sure you obtain memory that is specifically designed for your Mac — specify the model as well as its processor type and speed (for example: 500MHz G3). Memory modules come in various sizes, so even if all memory slots in your Mac appear full, you might be able to upgrade by replacing your current DIMMs with bigger ones.
Portable Macs can also receive memory upgrades, but the task is more tech-nically challenging. It usually requires that you remove the keyboard and some other parts of your iBook or PowerBook. I recommend that you leave such upgrades to a professional unless you really know exactly what you are doing.
Upgrading Mac hard drives
Standardization keeps the initial cost of new Macs affordable, and it tends to make replacement parts cheaper and easier to find. But resist the urge to run off and buy (for example) that gargantuan 200GB EIDE drive advertised in a Sunday flyer to replace the 4GB drive in your four-year-old Bondi blue iMac. Hold your horses until you consider two potential problems:
⻬The new hard drive may be too big. Older Macs may not support some of the massive newer hard drives available today.
⻬The new hard drive may be too hot. Literally. One of the greatest chal-lenges facing computer hardware engineers today involves heat manage-ment. Modern processors and hard drives put off a lot of heat, and if too much heat is allowed to build up inside the computer’s case, the life of your Mac will be greatly shortened. Many older iMacs were not designed to manage the heat generated by the newest, fastest hard drives.
You should only buy a hard drive recommended for your specific Macintosh model. This means you’re best off buying a new hard drive from a knowledge-able Macintosh retailer. As with memory, make sure you specify your Mac’s model and processor when purchasing a hard drive.
Adding an external hard drive to your Mac
By far, the easiest way to add storage space to your Mac is to use an external hard drive. External drives that connect to a FireWire or USB port are widely available, and although they tend to be more expensive than internal drives, their ease of installation and use makes them worthwhile.
Unfortunately, external drives are usually less than ideal for working with dig-ital video. Even a FireWire or USB 2.0 (a newer, faster USB standard) external drive will be slower than an internal drive — and drive speed is crucial when you are capturing or exporting video. External hard drives are fine if you need a big place to store music or other files, but I don’t recommend using an external drive as your main drive for video work.
Figure 2-1:
Choosing Mac video software
Apple offers a pretty good selection of video-editing software for the
Macintosh — good thing they do, too, because not many other software ven-dors offer Mac-compatible editing programs. Chapter 19 provides a compre-hensive comparison of various editing programs; if you’re a Mac user, your choices are pretty much limited to these:
⻬Adobe Premiere:Available for both Windows and Mac, this was one of the first pro-caliber video-editing programs for personal computers. It’s a little expensive (about $550), but provides an advanced, power set of video-editing tools. For more on this great program, check out Adobe Premiere For Dummies by yours truly, published by Wiley Publishing, Inc..
⻬Apple iMovie:It comes free with all new Macintosh computers, and you can download the latest version of iMovie for free from www.apple.com. iMovie 3 is featured throughout this book.
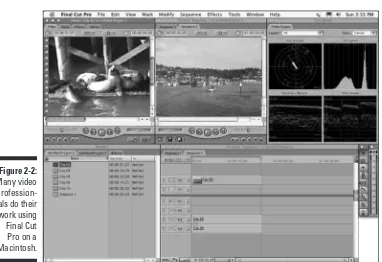
⻬Apple Final Cut Pro:If you can afford pro-level prices and you want one of the most cutting edge video-editing programs available, consider Final Cut Pro (about $1000). Final Cut Pro, shown in Figure 2-2, is used by many professional video editors.
Figure 2-2:
⻬Apple Final Cut Express:This program offers many of the features of Final Cut Pro for a fraction of the price (about $300). Final Cut Express is a good choice if you want style editing features but can’t afford pro-level prices.
⻬Avid Xpress DV:Avid has been making professional video-editing work-stations and gear for years, so it’s no surprise that they also offer one of the most advanced video-editing programs as well. And it better be good too, because it retails for $1699 (for Windows or Mac).
As you can see, if you’re a professional video editor, you can choose between several programs for your Mac. If you’re not a pro, however, your choices are a little more limited. Fortunately, iMovie is a reasonably capable program. You can even expand the capabilities of iMovie with plug-ins from Apple (and some third parties). Visit www.apple.com/imovie/and check out the iMovie Downloads section for more information.
Using a Windows PC
Macintosh computers have long been favored by professional graphic and video artists, but you can do some pretty advanced video editing on a Windows PC as well. In fact, the greater variety of editing software available for Windows means that these days you can do just about anything on a PC that you can do on a Mac. The next few sections show you what to consider when choosing and preparing a Windows PC for digital video.
Buying a new PC
Countless PC vendors offer computers running Windows for just about any budget these days. For about the same amount of money as you would have spent just to buy a printer 10 years ago, you can now buy a new PC — including monitor — and if you shop around, you might even find someone to throw in the printer for free.
You may find, however, that a bargain-basement computer is not quite good enough for digital video. The hard drive may be too small, the processor may not be fast enough, the computer might not have enough memory, or some other features may not be ideal. Look for these features when you’re shop-ping for a new PC:
⻬512MB RAM: Video editing requires a lot of random-access memory (RAM) — the more the better.
As if you didn’t already have enough acronyms to remember, some PCs have a type of memory called DDR (Double Data Rate) RAM. DDR works twice as efficiently as regular RAM, so a computer with 256MB of DDR RAM will work about as well as a computer with 512MB of other types of RAM.
⻬32MB video RAM:The video image on your monitor is generated by a component in your computer called the video cardor display adapter. The video card has its own memory — I recommend at least 32MB. Some video cards share system RAM (the computer’s spec sheet might say something like “integrated” or “shared” in reference to video RAM). This tends to slow down the performance of your computer, so I recommend that you avoid shared video RAM.
⻬1GHz (gigahertz) processor:I recommend a processor speed of at least 1 GHz (equal to 1000MHz) or faster. This shouldn’t be a problem because there aren’t too many PCs still being sold with processors slower than 1 GHz. It really doesn’t matter if the processor is an Intel Pentium, an AMD Athlon, or even an AMD Duron. The faster the better, naturally.
⻬FireWire:Unlike Macs, not all PCs come with FireWire (also called IEEE-1394) ports. You can upgrade most PCs with a FireWire card, but buying a computer that already has FireWire is a lot easier.
⻬60GB hard drive:When it comes to hard drives, bigger is better. If you plan to do a lot of video-editing work, 60GB is an absolute minimum. Sure, it soundslike a lot, but you’ll use it up in a hurry as you work with digital video.
Another option, of course, is to build your own computer. For some, the act of building a PC from scratch remains a vaunted geek tradition (you know who you are). If you choose to build your own, make sure that your system meets — preferably exceeds— the guidelines given here. I built a computer last year tailored specifically for video editing — and it only cost me about $400 plus some spare parts scrounged from my own stocks. But know what you’re doing before you start down this path; it’s definitely not the path of least resistance. Heed the wisdom of this ancient computer-geek proverb:
Building your own PC is cheap only if your time is worthless!


![Wiley Publishing Windows XP Gigabook For Dummies [2004]](data:image/gif;base64,R0lGODlhAQABAIAAAP///wAAACH5BAEAAAAALAAAAAABAAEAAAICRAEAOw==)