by Barbara Obermeier
Author of
Photoshop 7 All-in-One Desk Reference For Dummies
by Barbara Obermeier
Author of
Photoshop 7 All-in-One Desk Reference For Dummies
Copyright © 2003 by Wiley Publishing, Inc., Indianapolis, Indiana Published by Wiley Publishing, Inc., Indianapolis, Indiana Published simultaneously in Canada
No part of this publication may be reproduced, stored in a retrieval system or transmitted in any form or by any means, electronic, mechanical, photocopying, recording, scanning or otherwise, except as permit-ted under Sections 107 or 108 of the 1976 Unipermit-ted States Copyright Act, without either the prior written permission of the Publisher, or authorization through payment of the appropriate licensing fee to the Copyright Clearance Center, 222 Rosewood Drive, Danvers, MA 01923, (978) 750-8400, fax (978) 646-8700. Requests to the Publisher for permission should be addressed to the Legal Department, Wiley Publishing, Inc., 10475 Crosspoint Blvd., Indianapolis, IN 46256, (317) 572-3447, fax (317) 572-4447, e-mail:
Trademarks:Wiley, the Wiley Publishing logo, For Dummies, the Dummies Man logo, A Reference for the Rest of Us!, The Dummies Way, Dummies Daily, The Fun and Easy Way, Dummies.com, and related trade dress are trademarks or registered trademarks of John Wiley & Sons, Inc. and/or its affiliates in the United States and other countries, and may not be used without written permission. Photoshop is a registered trademark of Adobe Systems Incorporated in the United States and/or other countries. All other trade-marks are the property of their respective owners. Wiley Publishing, Inc., is not associated with any prod-uct or vendor mentioned in this book.
LIMIT OF LIABILITY/DISCLAIMER OF WARRANTY: WHILE THE PUBLISHER AND AUTHOR HAVE USED THEIR BEST EFFORTS IN PREPARING THIS BOOK, THEY MAKE NO REPRESENTATIONS OR WAR-RANTIES WITH RESPECT TO THE ACCURACY OR COMPLETENESS OF THE CONTENTS OF THIS BOOK AND SPECIFICALLY DISCLAIM ANY IMPLIED WARRANTIES OF MERCHANTABILITY OR FITNESS FOR A PARTICULAR PURPOSE. NO WARRANTY MAY BE CREATED OR EXTENDED BY SALES REPRESENTA-TIVES OR WRITTEN SALES MATERIALS. THE ADVICE AND STRATEGIES CONTAINED HEREIN MAY NOT BE SUITABLE FOR YOUR SITUATION. YOU SHOULD CONSULT WITH A PROFESSIONAL WHERE APPRO-PRIATE. NEITHER THE PUBLISHER NOR AUTHOR SHALL BE LIABLE FOR ANY LOSS OF PROFIT OR ANY OTHER COMMERCIAL DAMAGES, INCLUDING BUT NOT LIMITED TO SPECIAL, INCIDENTAL, CON-SEQUENTIAL, OR OTHER DAMAGES.
For general information on our other products and services or to obtain technical support, please contact our Customer Care Department within the U.S. at 800-762-2974, outside the U.S. at 317-572-3993, or fax 317-572-4002.
Wiley also publishes its books in a variety of electronic formats. Some content that appears in print may not be available in electronic books.
Library of Congress Control Number: 2003105673 ISBN: 0-7645-4212-5
Manufactured in the United States of America 10 9 8 7 6 5 4 3 2 1
Reference For Dummiesand coauthor of Photoshop 7 For Dummies, Illustrator 10 For Dummiesand Adobe Master Class: Illustrator Illuminated. She has con-tributed as coauthor, technical editor, or layout designer for 18 books. Barb also teaches computer graphics at the University of California, Santa Barbara, and at Ventura College.
Dedication
To Gary, Kylie, and Lucky.
Author’s Acknowledgments
Acquisitions, Editorial, and Media Development
Project Manager: Nicole Haims Development Editor:Kim Darosett Acquisitions Editor:Bob Woerner Copy Editor:Nicole Haims Technical Editor:David Herman Editorial Manager:Carol Sheehan,
Leah Cameron
Permissions Editor:Carmen Krikorian Media Development Manager:
Laura VanWinkle
Media Development Supervisor: Richard Graves
Editorial Assistant:Amanda Foxworth Cartoons:Rich Tennant www.the5thwave.com
Production
Project Coordinator: Regina Snyder Layout and Graphics:Seth Conley,
Stephanie Jumper, Tiffany Muth
Proofreaders: TECHBOOKS Production Services, Kathy Simpson, Brian H. Walls
Indexer: TECHBOOKS Production Services
Publishing and Editorial for Technology Dummies
Richard Swadley,Vice President and Executive Group Publisher Andy Cummings,Vice President and Publisher
Mary C. Corder,Editorial Director Publishing for Consumer Dummies
Diane Graves Steele,Vice President and Publisher Joyce Pepple,Acquisitions Director
Composition Services
Introduction ...1
Part I: Getting Started with Photoshop Album ...5
Chapter 1: Introducing Album ...7
Chapter 2: Performing Basic Tasks ...13
Chapter 3: Working with Resolution, Color Modes, and File Formats ...35
Part II: Importing, Organizing, and Managing Photos ...63
Chapter 4: Importing Files ...65
Chapter 5: Organizing, Categorizing, and Cross-Referencing Photos ...89
Chapter 6: Giving Your Photos a Better Identity ...109
Chapter 7: Managing Your Photos ...121
Part III: Finding, Viewing, and Editing Photos ...139
Chapter 8: Locating Your Photos ...141
Chapter 9: Viewing Your Photos ...159
Chapter 10: Setting Up Your Editing Environment ...173
Chapter 11: Making Quick Fixes ...181
Chapter 12: Extra-Strength Editing ...203
Part IV: Sharing and Printing Photos ...215
Chapter 13: Spreading Photographic Joy Electronically ...217
Chapter 14: Getting Your Images on Paper ...229
Chapter 15: Using Online Services to Share and Print Photos ...249
Part V: Creating Larger Projects with Photos ...261
Chapter 16: Using the Workspace ...263
Chapter 17: Creating Projects ...273
Chapter 18: Taking Creations to the Next Level ...299
Part VI: The Part of Tens ...315
Chapter 19: Ten Tips for Composing Better Photos ...317
Chapter 20: Ten Great Digital Camera Accessories ...335
Chapter 21: Ten Cures for Ten Problems ...343
Introduction...1
About This Book...1
What’s in This Book and How to Use It ...1
Part I: Getting Started with Photoshop Album ...2
Part II: Importing, Organizing, and Managing Photos...2
Part III: Finding, Viewing, and Editing Photos...2
Part IV: Sharing and Printing Photos ...3
Part V: Creating Larger Projects with Photos ...3
Part VI: The Part of Tens ...3
Conventions Used in This Book ...3
Icons Used in This Book...4
Feedback, Please ...4
Part I: Getting Started with Photoshop Album ...5
Chapter 1: Introducing Album . . . .7
Album and Organization ...7
What Album Does and Why You Need It ...8
Chapter 2: Performing Basic Tasks . . . .13
Using the Quick Guide ...13
What You Can Do in Album...16
Getting photos ...16
Organizing, managing, and finding photos...16
Viewing photos ...17
Editing photos...18
Sharing and printing photos ...18
Creating with photos...19
Checking Out the Album Interface...20
Working with the Photo Well...20
Using the Workspace ...21
Using the Menu bar ...22
Saving time with the Shortcuts bar...22
Working with the Options bar...23
Using the Find bar ...24
Getting to know the timeline...24
Viewing info in the Properties pane...25
Working with the Tags pane...25
Setting Your Preferences ...27
Setting general preferences...27
Using Help ...29
Checking out the Adobe Web site ...32
Using Context-Sensitive Menus and Tool Tips ...33
Chapter 3: Working with Resolution, Color Modes,
and File Formats . . . .35
Getting a Handle on Resolution...36
Introducing pixels...36
Understanding the pixel-resolution connection...37
Changing the resolution by enlarging the pixels...38
Working with output and printer resolution...39
Working with Camera Resolution...41
Working with scanner resolution ...43
Working with monitor resolution ...44
Understanding Color ...45
Working with Different File Formats ...50
Graphic file formats ...50
Choosing a format for your digital photos or scanned images ...56
Converting one file format to another ...57
Audio file formats ...58
Video file formats ...60
Part II: Importing, Organizing, and Managing Photos ....63
Chapter 4: Importing Files . . . .65
Gathering Your Source Materials ...65
Importing Files from Your Hard Drive ...67
Importing photos by using menu commands...67
Importing photos by dragging and dropping ...70
Searching for files on your hard drive ...70
Importing Photos from Cameras and Card Readers...73
Getting Photos from a Scanner...76
Importing Photos from CDs, DVDs, and Adobe Resources ...79
Setting Import Preferences ...82
Camera or card reader preferences ...82
Scanner preferences...83
Preferences for offline photos ...84
Getting Photos from Adobe PhotoDeluxe or Adobe ActiveShare Albums...85
Cross-Referencing Photos . . . .89
Organizing Photos in the Photo Well ...90
Selecting a viewing arrangement...90
Using the timeline...91
Changing the Date of a Photo ...92
Creating Subcategories and Custom Tags...94
Using the Tags pane ...95
Working with tag categories...96
Using the Favorites and Hidden tags ...99
Creating tag subcategories ...101
Creating custom tags ...101
Using folders to create subcategories and tags ...102
Attaching, Editing, and Deleting Tags...104
Attaching tags to photos ...104
Removing tags...105
Modifying and deleting tags...105
Chapter 6: Giving Your Photos a Better Identity . . . .109
Renaming Your Photos ...109
Renaming a single file ...110
Renaming a group of files ...110
Using Captions with Your Images ...112
Adding a caption ...112
Editing and deleting captions ...112
Adding Notes to Photos ...113
Adding Audio Captions ...114
Viewing Information About a Photo ...116
Chapter 7: Managing Your Photos . . . .121
Organizing Files into Catalogs ...121
Creating new catalogs ...122
Changing the default catalog folder ...124
Copying catalogs ...125
Opening catalogs ...126
Removing items from the catalog ...126
Keeping Your Catalog Safe and Sound...127
Backing up your catalog ...127
Recovering and restoring your catalog ...130
Archiving Your Photos ...132
Working with Different Versions of Photos ...133
Naming edited files...133
Reverting to an original photo...134
Replacing an original photo with an edited version ...134
Duplicating photos ...135
Updating thumbnails ...136
Chapter 8: Locating Your Photos . . . .141
Finding Photos by Date ...141
Using the timeline...141
Using the calendar ...143
Finding Photos by Caption, Note, or Filename...145
Finding Photos by Their History...146
Tracking Down Files by Media Type...152
Finding Files with Unknown Dates ...153
Locating Images by Their Color ...153
Using Tags to Find Files ...154
Using the timeline with tagged files ...155
Searching with the Find bar and tags ...157
Finding Favorite or Hidden files ...157
Chapter 9: Viewing Your Photos . . . .159
Choosing a Viewing Size...159
Sorting Images in the Photo Well ...163
Sorting by media type...164
Sorting by arrangement...164
Viewing Instant Slide Shows ...166
Viewing photos as a slide show...166
Setting instant slide show preferences...168
Viewing Video Clips ...170
Chapter 10: Setting Up Your Editing Environment . . . .173
Keeping Your Lighting Consistent...173
Removing Distractions ...174
Using a neutral background ...175
Choosing a work area with neutral walls ...175
Sitting Pretty ...176
Find a Vendor and Stick with It...176
Running Tests, Tests, and More Tests ...177
Calibrating Your Monitor ...177
Using Adobe Gamma...178
Using another calibration utility ...180
Chapter 11: Making Quick Fixes . . . .181
Improving Images with Fix Photo ...181
Choosing a viewing option ...182
Introducing editing tools ...184
All you ever wanted to know about reverting ...185
Rotating images ...191
Cropping photos...192
Removing the dreaded red eye ...194
Improving contrast with Brightness and Contrast ...197
Fixing shadows and highlights with the Lighting option ...199
Intensifying with Color Saturation ...200
Chapter 12: Extra-Strength Editing . . . .203
Comparing Photoshop Elements and Photoshop...203
Elements ...204
Photoshop ...205
Specifying an External Image Editor in Album ...205
Fixing a Photo in an External Image Editor...206
Editing in Elements or Photoshop ...206
Editing in an application other than Elements or Photoshop ...209
Bringing Photos into Other Applications...210
Copying and pasting to other applications...211
Exporting images...212
Dragging and dropping into other applications ...213
Part IV: Sharing and Printing Photos ...215
Chapter 13: Spreading Photographic Joy Electronically . . . .217
Sharing Photos Via E-Mail ...217
Setting Up Album for E-Mail...218
Setting your preferences ...218
Creating your contact book ...220
E-Mailing Photos and Creations ...222
Chapter 14: Getting Your Images on Paper . . . .229
Basics on Getting High-Quality Prints ...229
Getting Intimate with Your Printer...230
Setting Print Options ...231
Printing Your Images...232
Printing individual photos ...232
Printing a picture package ...235
Printing a contact sheet ...237
Printing creations ...239
Finding Images You’ve Previously Printed...241
Tips for Getting Better Prints ...242
Check your resolution ...242
Use a good printer...246
Use good paper...248
Chapter 15: Using Online Services to Share and Print Photos . . . . .249
Signing Up for Online Services ...249
Checking for New Online Services ...251
Sharing Photos Using Online Services ...251
Ordering Prints from Online Services ...254
Ordering Creations from Online Services ...256
Downloading Templates from Online Services ...257
Part V: Creating Larger Projects with Photos ...261
Chapter 16: Using the Workspace . . . .263
Getting Cozy with the Workspace ...263
Working with Workspace Items ...266
Adding tags to Workspace items ...266
Creating a slide show from Workspace items...266
Sharing, exporting, e-mailing, and printing items from the Workspace...267
Making creations from the Workspace ...271
Finding photos from the Workspace...271
Chapter 17: Creating Projects . . . .273
Making Creations with the Creations Wizard ...273
Creating albums...275
Creating slide shows ...280
Creating greeting cards...284
Creating eCards ...286
Creating calendars ...290
Creating Video CDs...292
Creating photo books ...293
Editing Creations...295
Opening Saved Creations ...297
Chapter 18: Taking Creations to the Next Level . . . .299
Creating a Web Photo Gallery...299
Creating an Adobe Atmosphere 3D Gallery ...304
Making a 3D Gallery ...305
Viewing and navigating the Adobe Atmosphere 3D Gallery ...308
Using Your Photos on Your Desktop...309
Using photos as desktop wallpaper...309
Getting your images onto stuff ...312
Documenting projects...313
Photo Potpourri ...313
Part VI: The Part of Tens...315
Chapter 19: Ten Tips for Composing Better Photos . . . .317
Establishing a Focal Point ...317
Using the Rule of Thirds...318
Moving from Center ...318
Getting Close to Your Subject...320
Cleaning Up Your Background...321
Lighting Your Subject ...323
Getting Creative with Light ...325
Using an Unexpected Angle ...325
Keeping It Sharp ...327
Using a tripod ...328
Catching fast-moving subjects...328
Understanding Digital Camera Focus Issues ...328
Giving Direction...329
Getting Vertical...330
Using Leading Lines ...331
Telling a Story...332
Tripods or monopods ...338
Lenses ...339
Filters ...340
Lights, reflectors, scrims, action ...340
Compact printers ...340
Paper and media...341
Just for fun ...341
Don’t leave home without it...342
Chapter 21: Ten Cures for Ten Problems . . . .343
Update Now!...343
You Can’t Import Files ...344
Your Catalog Has Gone South...348
Your Files Are “Broken” ...349
Your Images Are below the Optimum Resolution ...350
Your Files Are Marked with “?”...351
You Can’t Edit Your Photo...352
You Can’t Read Your PDF Creation ...352
You Can’t Burn Files onto Your CD or DVD Disc ...353
I
f I had a dime for every time I wrote “Organize Photos” on my to-do list, only to leave it undone, I’d have enough cash to retire to some tropical hideaway and do nothing but photograph coconuts all day. Unfortunately, no dimes came my way, and I find myself here. The good news, however, is that Adobe has given me, and you, Photoshop Album. Within this inexpensive piece of software lies all of the tools you need in order to import, organize, and manage your collection of photos. And it doesn’t stop there. Album is also capable of handling video and audio clips and, as an added bonus, lets you flex your creative muscles with the capability to create fun and interest-ing projects — all with simplicity and ease.Because of Album I finally crossed “Organize Photos” off my to-do list for good.
About This Book
For some people, me included, launching a new program for the first time is like driving in a strange city with no road map. Sure, you could drive around and probably find where you need to go — eventually. But you would waste a lot of time going down the wrong streets, stopping and asking for directions, and pulling over to call people for help. You get the picture. Armed with a map, on the other hand, you’re a virtual road warrior.
That’s how it is with Album. Even though it’s a user-friendly program, it’s not without its quirk or two. Sure, you could figure it out — eventually. Consider this book your handy road map to Album. Armed with it, you don’t have to worry about driving in circles.
What’s in This Book and How to Use It
Part I: Getting Started with
Photoshop Album
In these first chapters, I introduce Album and its features. This part is the place to start if you have just installed the program and haven’t a clue as to what Album can do for you. I cover the basics, like the Album interface, set-ting your preferences, and getset-ting help if you find yourself lost. The most important chapter in this part is Chapter 3. Here’s where you’ll find the low-down on working with resolution, color modes, and file formats. These topics pop up throughout the book because understanding resolution and formats is key to working with digital images. If those topics are new to you, don’t skip this chapter.
Part II: Importing, Organizing, and
Managing Photos
Before you can really reap the benefits Album has to offer, you need to import and organize your files. These chapters show you how to import your files from a variety of sources, such as your digital camera and your Photo CDs. The info in this part also shows you how to create and use tags, cap-tions, and notes for optimum identification and organization. Finally, I show you how to work with different versions of your photos and how to create new and backup copies of catalogs — the database backbone of your collec-tion of files.
Part III: Finding, Viewing, and
Editing Photos
The chapters in this part deal with locating and looking. Album has numer-ous ways to find your images and clips quickly and efficiently, so you don’t waste time scrolling thorough endless numbers of thumbnails. Find out how to change your viewing options — from various thumbnail sizes to creating instant slide shows. Discover how to sort your images, by date, folder, media type, and more, depending on what’s most meaningful and efficient for your purpose at the time.
Part IV: Sharing and Printing Photos
Part IV describes all the ways you can spread the love with your photos, clips, and creations. Album makes it quick and easy to e-mail attachments, print, and even post images online. In fact, sharing images in a variety of ways with Album is so fool-proof that you’ll end up recommending the pro-gram to even the most computer-challenged of your family and friends.
Part V: Creating Larger Projects
with Photos
After importing, organizing, and editing your inventory of files, you’ll want to check out these chapters. Here you can find how to make all of the great
creations Album is capable of — slideshows, photo books, calendars, eCards, and much more. Before you know it, you’ll be a creations addict and will have made enough personalized gifts to last until the year 2010.
Part VI: The Part of Tens
These three chapters are chock-full o’ tips. If you find that people are nod-ding off when you show them your vacation slideshow, maybe a few tips in composing better images will help remedy the situation. And, if you’re look-ing to add to your repertoire of digital camera goodies, take a gander at Chapter 20. Here you’ll find a brief description of some practical and fun camera accessories. Finally, if you encounter the occasional snafu, look at Chapter 21. You may find that the cure to your problem lies in these few pages.
Conventions Used in This Book
If you’ve worked on a computer even a short time, you’ve probably discov-ered that sometimes commands require using the mouse along with the key-board. Working in Album sometimes involves that keyboard/mouse combo. For example, “To select more than one item, press the Ctrl key and click on additional items.”
Icons Used in This Book
The icons you see in this book aren’t here just because they’re cute. Their purpose is to alert you that something noteworthy is coming your way.
You know it’s a law in most states that you can’t have a computer book with-out a sprinkling of computer-geek tech talk. Even though Album is more user friendly than most computer programs, a few explanations required the presence of this nerdy icon.
Whenever you see a target, look for a tidbit that hits the spot, making your time spent in Album a little easier.
This icon is a gentle reminder of things I’ve already mentioned and want to make sure you haven’t already tossed out of your memory banks.
Don’t skip the information that appears next to the Warning icon. The infor-mation here is stronger than a gentle reminder — ignore what I’m saying and the consequences could be permanent, like lost files.
Feedback, Please
Getting Started
with Photoshop
Introducing Album
In This Chapter
䊳The growth of digital photography
䊳What Album does and why you need it
O
wning and using Photoshop Album is like having the world’s best personal assistant — organized, efficient, always at your beck and call, saves you time, money, and frustration and just makes your life easier. I admit it. Before Album came into my life, I was a closet photo “shoeboxer.” Well, actually, more like a “33-gallon storage toter.” Maybe you’re the same way.Album and Organization
I bet that you love photos — taking them, looking at them, and sharing them. I bet that you love knowing that you’ve captured and preserved the memory of special events, milestones and moments of your life and those of your family and friends.
And maybe you’re like me because the thing you don’t love is the time-consuming task of organizing, labeling, and placing the photos into albums. That task always seemed to stay permanently affixed to my to-do list.
When I switched to a digital camera, things improved some. I didn’t need any more storage totes or garage space. But, digital images bring on a whole new set of problems. Does this scenario sound familiar? Do you have a clutter of inconsistently named folders and unintelligible alpha-numerically named files scattered all over your hard drives or burned haphazardly onto CDs?
into efficient organizers (I still have to scan my analog prints). But because of its ease of use, you might find yourself (like me) full of renewed enthusi-asm for the task of organizing your images. The proof, as they say, is in the pudding, or in this case, in the albums. I have seen how efficient Album is at transforming unorganized clutter into an ordered, streamlined system. I have seen the best organizational system since the Dewey Decimal system at work. I have seen the light!
And the bonus is that after you’ve gotten your images organized and manage-able, you can relax and use those images in some creative and expressive ways. And Album is there to help you with that as well, allowing you to make wonderful creations. So Album not only makes your life easier, it makes it more fun, too. It’s the best 50 bucks I ever spent.
What Album Does and Why You Need It
The bottom line is that when you save time you save money. And the program that’s going to save you both time and money is downright dirt cheap. I mean, for the cost of a cheap dinner and a couple of movie tickets, you probably just purchased a program that can make you more organized, more produc-tive, and even get some creative juices flowing.
You may have thought when you first bought your camera that the software that came bundled with the camera was all you needed. Now you may see that the features of those programs are limited and really intended to just facilitate the importing of images onto your computer.
Album allows you to import, identify, organize, export, manage, edit, and share your photos, as shown in Figure 1-1. About the only thing it can’t do is make you a latte while you enjoy all the free time you gain from Album doing all the work. Here’s a quick glance at Album’s multiple features:
For the two readers who don’t already
have a digital camera
Not too long ago if you had a digital camera, you were considered to be on the technological cutting edge. Now it is just as common to see a digital camera as it is a film camera. Some esti-mates predict that, worldwide, consumers will buy 10 million digital cameras in 2003. The digital trend has steadily escalated for many reasons. Anytime a product offers conve-nience, immediate satisfaction, and a time and cost savings, it is bound to be embraced by the masses. If you haven’t jumped on the digital bandwagon yet, here are a few reasons why you may want to make the switch:
⻬ Immediacy:There’s nothing like being able to correct your mistakes immediately after you make them, instead of regretting it later. Shooting digitally allows you to take a photo, view it in the LCD (Liquid Crystal Display), monitor attached to your digital camera, and, if you like what you see, great. On the other hand, if the exposure, lighting, or composition is a little off, delete the photo, make your adjustments and reshoot right then and there. And, as an added bonus, because you can make instant adjustments, you can improve your photographic skills more quickly.
You can try different angles and composi-tions. If they don’t work, you just delete them from the memory card. You also can really test your camera’s features and get to know how it ticks by taking shots using dif-ferent settings. Hey, and no more streaked or fogged film from airport x-ray machines!
⻬ Convenience and time savings: Here are four nice words for you: No more photo
processing.No more driving to the photo lab, filling out the order, waiting for the development, and picking up the order. You also find that the time you spend scanning steadily declines. Going digital means simply cabling up the camera or card reader to your computer, making a couple of mouse clicks and the photos are on your hard drive, ready for action.
⻬ Less expense: Just like time isn’t wasted with photo processing, neither is money wasted paying for processing. Just print (and pay for) only the photos you really want. Invest the savings from paying for film and processing toward accessories for your digital camera (see Chapter 20). Some people argue that a high-quality digi-tal camera is more expensive than a comparable film camera. This may be a true statement now, but is becoming less so. Because the technology is still evolving, quality cameras are becoming less expen-sive and will continue to do so.
⻬ Less clutter, and less retouching: Going dig-ital means not having to store negatives, slides, or prints. Storing all that output not only consumes precious storage space, but keeping track of it all is tedious. And because there is no film or prints involved, you’ll spend less time retouching dust, dirt, or scratches.
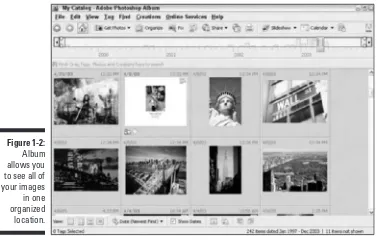
⻬Identify, view, and export: After your images are imported into your catalog, you can view them in one location — any time, all the time, as shown in Figure 1-2.
Album provides you with a tagging system that enables you to attach keywords or phrases to your images to make sorting and locating them a breeze. You can locate and view your images by tags, dates, folders, and other criteria. It doesn’t matter where the images reside, whether on your computer or on other external media. Album also keeps a history of each image, details such as if you e-mailed or printed the photo. And you can even export images in a variety of file formats for use in other applications.
⻬Edit:If you didn’t quite get your images perfect during the shooting process, Album lets you edit your images using cropping, red-eye removal, and color and contrast tools, all of which require only a mouse click or two. Album also provides seamless integration with many exter-nal image editors, such as Photoshop Elements, for those images that require extra-strength editing.
⻬Create:Keep it simple and just e-mail or print your images. Or be a little more innovative and make projects, called creations,such as albums, slide shows, cards, calendars, photo books (shown in Figure 1-3), and more in just five easy steps.
⻬Share:After your images have been cleaned up and enhanced, Album makes sharing your files a snap. You can e-mail images and creations as attachments, post them online via a photo sharing Web site like Shutterfly. com, or view them as a Web gallery.
You can print the images, or burn them to CD or DVD. Album can save your files as PDFs (Portable Document Format), which means that anyone, anywhere with just a computer and free Acrobat reader can view your images and creations.
⻬Preserve:Album makes it quick and easy to back up your catalog or archive your images to CD or DVD. Store the media in a safety deposit box or other offsite location to ensure your memories are safe from disaster — natural or man-made.
Performing Basic Tasks
In This Chapter
䊳Getting to know Album
䊳Getting started in the Quick Guide
䊳Checking out the interface
䊳Setting preferences
䊳Getting help
A
fter you’ve successfully installed Album, you’re ready to get started using it. Often, even with the most user-friendly programs, launching it for the first time can be a little overwhelming. You sit staring at the screen, not quite knowing where to start first. To get over that awkward hump, this chapter introduces the main elements of the interface to give you a feel for how Album works. You discover how to set your preferences so the program works the way you want it to. You also find out where to go for assistance, both within Album and outside of it. After going through this chapter, you’ll be ready to dive in and start wrangling your files into Album.Using the Quick Guide
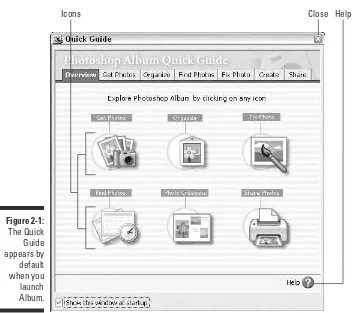
When you first launch Album, the Quick Guide window appears, as shown in Figure 2-1. The Quick Guide is an easy place for you to get started if you’re new to Album. Think of it as the “Getting Started Wizard.” Using the Quick Guide, you can execute just about task. Here are your options:
⻬Get photos
⻬Organize
⻬Fix photos
⻬Share photos
You also can use the menus, palettes, and bars to execute all of these tasks, as discussed later in this chapter.
The Quick Guide appears by default when you first launch Album. You also can access it at anytime by any of these methods:
⻬Choose Help➪Quick Guide.
⻬Press Shift+F1.
⻬Click the Quick Guide button in the Shortcuts bar (it’s the icon that looks like a book and a stopwatch). For more on the Shortcuts bar, stay tuned.
Help
Icons Close
1. From the Quick Guide Overview window, click the icon or the tab for the task you want to execute.
Most likely, if you’re new to Album, the first thing you’ll be doing is get-ting, or imporget-ting, photos.
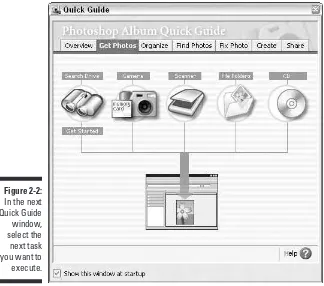
2. Depending on which icon or tab you selected, click the task you want to execute.
For example, if you click the Get Photos icon, you’re presented with all the ways to import photos, as shown in Figure 2-2. For intricate details on how to import files, see Chapter 4.
If you need more information about a particular task, click the Help button in the bottom, right corner of the Quick Guide window. For more on using Help, see the section, “Using Help,” later in this chapter.
Guide to appear when you launch Album. If so, uncheck the Show This Window at Startup button in the bottom, left corner of the Quick Guide window.
What You Can Do in Album
Album enables you to do a variety of tasks, as discussed in the next few sec-tions. In order to perform most of the tasks, however, you first have to get your photos into Album. Once you’ve imported your files, you can then orga-nize them, edit them and share them with others in a variety of fun and cre-ative ways.
Getting photos
Album lets you import photos, video clips, and audio clips from your hard drive, camera, card reader, scanner, CDs or DVDs, and external media such as Zip disks. When you import items into Album, it creates linksto your files so it knows where the photo is located, what the file format is, and other information.
Here’s how this linking works. Album keeps track of your files in a database of information called the catalog.Album automatically creates a catalog (appropriately named My Catalog.psa) when you first launch the program and brings in your photos and clips. The catalog keeps track of your files, whether they are on your computer’s hard drive or reside on other media such as CDs or DVDs.
The catalog collects information (called metadata) about each photo, but it doesn’t contain the actual photos themselves. Album retains the metadata and a proxy, which is a low-resolution copy of the image, a kind of file body double. For full details on importing photos, see Chapter 4.
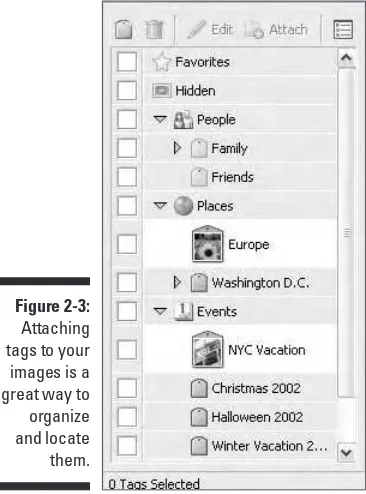
Organizing, managing, and finding photos
locate them. They could be based on people’s names, certain events, or spe-cific locations, as shown in Figure 2-3. Tags give you much more control when it comes to identifying, organizing, and locating your photos. You can further identify your images with written captions, audio captions, and notes.
Album allows you to use a variety of tools and criteria to find your images. For example, you can use the timeline (described later in this chapter) to specify a date range. Or you can search for specific images based on a common history, such as which photos have been printed. For lots of info on organizing, managing, and finding images, see Chapters 5, 6, 7, and 8.
Viewing photos
All of your files — photos, video clips, audio clips, and creations — appear in the Photo Well arranged in a grid of thumbnails, small display versions of your images. You can select from various size thumbnails, or you can choose to see your selected file in a single photo view.
Photo Well. And you’re not restricted to viewing your images as static photos in the Photo Well. You also can select images and view them in an instant slide show, which provides a more enriching viewing experience. For details on viewing photos, see Chapter 9.
Editing photos
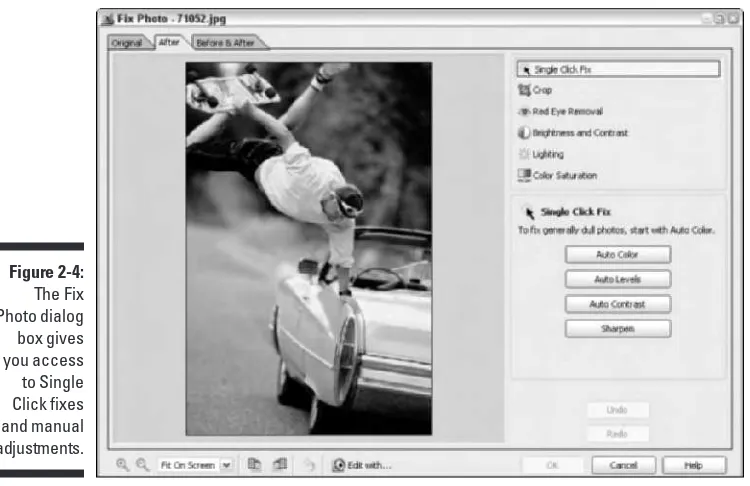
Album provides you with a slew of easy-to-use editing tools to clean up and enhance your images. You can rotate, crop, get rid of red eye, and adjust color, contrast and lighting — all from the Fix Photo dialog box, shown in Figure 2-4.
Album divides these editing tools into two categories — Single Click fixes and manual adjustments.
Album saves your edited file as a copy, thereby preserving the original. That way, you can revert to the original later if you desire.
For hard-core editing that goes beyond Album’s capability, the program provides seamless integration with many external image editors, such as Photoshop Elements and Photoshop. For more on editing images, see Chapters 10, 11, and 12.
Sharing and printing photos
If you like taking photos, you probably like sharing them, too. You’re in luck. Album makes it easy to share your photos in a variety of ways:
⻬E-mail: You can e-mail your photos as image attachments. Or you can e-mail your photos after you’ve incorporated them into creations, such as albums, slide shows or eCards.
⻬Online: Album allows you to share your images online in a couple ways. You can create galleries that you can then upload onto the Web. Or you can post your photos on a photo sharing Web site such as
Shutterfly.com.
Or if you want a professional print job, you can order photo lab-quality prints and hard-bound photo books from online service providers using the Online Wizard in Album.
If you need to export your images to a certain file format, Album can handle that as well. Check out Chapters 13, 14, and 15 for details on e-mailing, print-ing, and using online services.
Creating with photos
Another great feature of Album is its Creations feature. In a mere five steps, Album’s Creation Wizard lets you create a variety of great creations: albums, slide shows, greeting cards (see Figure 2-5), eCards, calendars, photo books, Video CDs, a Web gallery, and an Adobe Atmosphere 3D gallery. You’ll also discover that you can use your photos and your digital camera in a variety of ways, besides just in Album’s creations. See Chapters 16, 17, and 18 for all you need to know about making creations and more.
Checking Out the Album Interface
The Album work area is chock full of bars, panes and areas to work in. I make a lot of references to these features in the book, so it would good to get an idea of where they reside and what they do. Here is a brief synopsis of each com-ponent of Album’s work area. To get the details on each, see the referenced chapter.
Working with the Photo Well
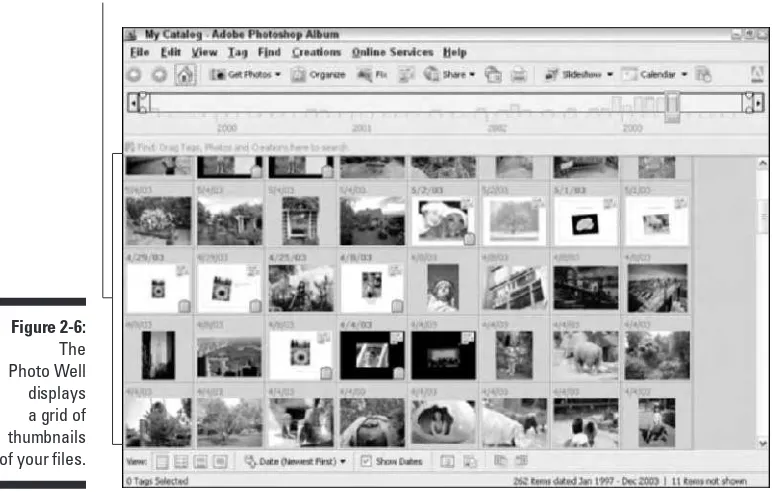
All of your files — photos, video clips, audio clips, and creations — are imported and displayed in the Photo Well, organized in a grid of thumbnails, shown in Figure 2-6. The size of the thumbnails depends on your selected viewing option, which you can change at any time. You also can view your images as single photos. How your photos are organized depends on how you’ve sorted your files. By default, files are sorted by date, newest files being first. But you also can sort by folder location, import batch, color similarity Figure 2-5:
Album’s creations are easy and fun, and only take five steps
and sorting criteria, is to click the icons in the Options bar, located below the Photo Well. Video clips are displayed by the first frame of the clip. Audio clips are displayed with a generic audio icon. Depending on the size of your thumb-nails, date, time and tags will also appear on or around your thumbnails. When you search for images, the Photo Well displays all search results. For more on working with Photo Well, see Chapters 4 and 5.
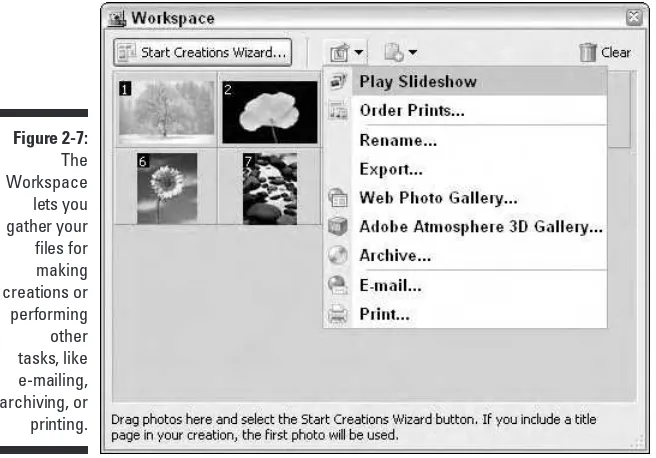
Using the Workspace
The Workspaceis a separate window, shown in Figure 2-7, which you use pri-marily when you select items to use in a creation(a special project such as a slide show or greeting card). To access the Workspace, you select your desired items in the Photo Well and then click the Create button on the Shortcuts bar (described later in this chapter). The items are copied to the Workspace window, where you can rearrange their order, if necessary. If no items are selected, an empty Workspace appears. You can then drag and drop items from the Photo Well into the Workspace. In the Workspace, you can edit and remove items, as well.
Photo Well
Figure 2-6: The Photo Well
You also can use the Workspace to attach tags, play a slide show, export, archive, e-mail, print, or create a Web photo or Adobe Atmosphere 3D Gallery. To access the Workspace for these tasks, choose View➪Workspace and drag your desired files into the window. For more on the using the Workspace, see Chapter 16.
Using the Menu bar
The Menu bar, shown in Figure 2-8, contains commands for executing most tasks. The menus are organized according to the kind of task you perform. For example, the View menu contains commands for viewing slide shows, for choosing the size and arrangement or your Photo Well thumbnails and for accessing panes and other Album components. The Create menu contains commands for making all sorts of projects with your images.
Saving time with the Shortcuts bar
The Shortcuts bar, located just below the Menu bar, displays buttons for commonly used commands (refer to Figure 2-8). Those buttons with black down-pointing triangles next to their names have drop-down sub-menus that contain additional commands. With just a couple clicks with the mouse, you Figure 2-7:
photos with others. Because the Shortcuts bar is so multifaceted, details on using it are sprinkled throughout the book.
Instead of using the Menu bar, save yourself a few seconds and click
these buttons. If you’re not sure what a button does, hover your mouse over the button. The handy tool tip appears, describing what the button does.
Working with the Options bar
The Options bar is located below the Photo Well. The buttons in the Options bar allow you to change your viewing and sorting options of your files in the Photo Well. It also has buttons to that enable you to quickly show and hide the Properties pane and Workspace. And finally, you can rotate your images clockwise and counter-clockwise with one click of the rotate buttons, located on the far-right side of the Options bar. For more on the Options bar, see Chapter 9.
Shortcut bar
Menu bar Find bar Timeline
Tags pane Options bar Properties pane
Figure 2-8: Album contains bars and panes galore to make working on your photo collection
Using the Find bar
The Find bar comes into play when you are searching for images based on various criteria. If you drag one or more tags onto the bar, for example, Album gathers up all images containing those tags and displays them in the Photo Well. To start a new search, just click the Clear button.
When you’re not searching, the Find bar takes a break and is represented by the small, horizontal blue bar above the Photo Well (refer to Figure 2-8). When you’re searching for files, the Find bar expands, and the Search Criteria field opens within the Find bar so you can see the tags you’ve chosen for the search, shown in Figure 2-9. For details on the Find bar, see Chapter 8.
Getting to know the timeline
The timeline, located just below the Menu bar, allows you find photos by the date, folder location, or import batch, depending on the option you chose in the Options bar.
The timeline shows how items are distributed, and bars in the timeline repre-sent the images. The height of each bar is proportional to the number of images.
for this tool. You designate a range of time or select a specific date in the time-line, and all files that were created or saved with applicable date(s) display in the Photo Well.
The timeline is divided into years and months. Hover your mouse pointer over a bar in the timeline, and the name of the month appears. For more information on using the timeline, see Chapter 8.
Viewing info in the Properties pane
The Properties pane, shown in Figure 2-10, contains oodles of information about your files. To display the Properties pane, choose View➪Properties or click the Show or Hide Properties button in the Options bar. Select a file to view the following information:
⻬The filename
⻬Any captions or notes you’ve added to the image
⻬The date you imported or modified the file
⻬Any creations it’s been used in
⻬Any tags
⻬Metadata (like digital camera details)
⻬The file’s location on your computer
You also can record or listen to audio annotations attached to photos by clicking on the Audio icon in the Properties pane.
The Properties pane allows you rename a file, add a caption or notes, and adjust the date and time of the photo file. For details on using the Properties pane, see Chapter 6.
Working with the Tags pane
of tags by clicking the gray triangles in the pane. To quickly find and view specifically tagged images, simply click in the square in the first column. The Find icon (which looks like a pair of binoculars) appears in the square, and your tagged images appear in the Photo Well. You can’t get any more efficient than that.
Setting Your Preferences
Most computer applications enable you to set preferences to establish the way your application works in various circumstances. Album’s no different. When you first install Album, it comes equipped with default preferences. The defaults remain intact until you change them. Choose Edit➪Preferences to bring up the huge Preferences dialog box. Album has a few different areas where you can set your preferences.
Setting general preferences
These preferences, shown in Figure 2-12, allow you customize Album to suit your needs. Here are the specifics on each:
•Show Closely Matching Sets for Searches: Select this option to have Album find not only exact matches, but any photos that are close matches. Photos that are tagged with one or more, but not all, of the search criteria tags are considered close matches.
•Show Quick Guide at Startup: Select this option to have Album show or hide the Quick Guide when you launch Album.
•Scale Up Single Photo to Fit Window:Select this option to maxi-mize the size of the photos that appear in the Photo Well.
⻬File Options:You can choose locations on your hard drive for saving your catalogs and saved files. If you don’t want to use the default paths, click the Browse button to choose a new file location.
EXIF (Exchangeable, Image File) data is extra information that is saved with digital photos. Info such as shutter speed, exposure, flash settings, ISO number and the date and time the image was taken are included in the EXIF data. You can choose to import EXIF captions or use the modifi-cation date of a file if lacks EXIF data.
⻬Offline Media: You can choose a proxy file size for files that will be stored on offline media, such as CDs and DVDs. For more on storing images offline, see Chapter 7.
Setting other preferences
Here is a brief description of the other preferences. Check out specific chap-ters for more details:
⻬E-mail:Before you e-mail photos for the first time, you should set your e-mail preferences. You also can set these preferences when you send your first e-mail. For full details on setting e-mail preferences, see Chapter 13.
⻬Editing:These settings have to do with which external image editor you want to automatically launch when you choose Edit➪Edit with . . . Command in Album. For more on using external editors, see Chapter 12.
fool-proof. If you change the settings and experience problems importing your photos, click the Restore Default Settings button to return the origi-nal, default preferences to. For details on all of the camera and card reader preferences, see Chapter 4.
⻬Scanner:Choose your scanner from the pop-up menu. Choose a file format from the Save As pop-up menu.
JPEG is the default format, but I recommend choosing TIFF instead. For more information about the difference between TIFF files and JPEGs, see Chapter 3. You will have larger file sizes, but better quality images. Choose the folder where you want your scanned photos to be stored. For more on scanning preferences, see Chapter 4.
⻬Slide show:Establish your settings for viewing instant slide shows. These are the quickie slide shows that are designed to be viewed within Album. You can select background music, transitions, page durations, and other options. For intricate details on these preferences, see Chapter 9.
When your preferences have been set, click OK to close the Preferences dialog box.
Getting a Helping Hand
Album, being the benevolent, user-friendly program that it is, provides you with a host of ways to get help while you’re working. You can access the built-in Help menu, use context-sensitive menus and tool tips, and perform tasks using the Quick Guide. You also can find some Portable Document Format (PDF) files on the Album Install CD, which include late-breaking news, undocumented features, and other useful information. You can read these PDFs using the free Adobe Acrobat Reader, which is included on the CD and also downloadable from www.adobe.com.
Using Help
You need to have either Netscape Communicator (4.75 or higher) or
Microsoft Internet Explorer (5.0 or higher) installed, and you need to be con-nected to the Internet in order to use the HTML-based Help system. The Help system uses frames and JavaScript, so be sure that your browser supports both. You must also set your browser to always accept cookies.
The Help window, shown in Figure 2-13, is divided into two frames: the Navigation frame on the left and the Topic frame on the right. To resize the frames, just drag the border between them.
Figure 2-13: Album’s built-in Help system is easy to access and navigate.
Your best friends: The Undo/Redo commands
One of the best friends you can have in the world of software programs is Ctrl+Z. That just happens to be the keyboard shortcut for the Undo command. This command does what you think it does. Make a mistake, and choose Edit Undo, or press Ctrl+Z, and your operation is undone. If you didn’t mean to choose Undo, you
also can then choose Edit Redo, or press Ctrl+Y, which reapplies the last operation.
⻬Choose Help➪Adobe Photoshop Album Help.
⻬Click the Help button in the lower-right corner of the Quick Guide window.
⻬Press the F1 key.
There are several ways you can use the Help system. Here they are:
⻬Index:The index contains keywords followed by links to the online loca-tions where the topics are discussed. Click Index at the top of the Navigation frame. Then click a letter in the alphabet that corresponds with the Help topic you’re looking for information about. For example, if you want to find out about cropping, click C.
Select the entry you’re interested in and click one of the numbered links after the entry to see more information.
If you’re using Internet Explorer 5 or Netscape 6, you can display the title of a link’s target by just hovering your mouse over a numbered link.
⻬Site Map:The Site Map contains links to all topics in Help and all entries in the Index. Click Site Map at the top of the Navigation frame. Scroll through the Site Map until you spot your desired topic or index entry. Click the title or the numbered link at the after the index entry.
⻬Contents: The Contents contains links to chapter titles in Help. Click Contents at the top of the Navigation frame. Then click a title. The topic appears in the Topic frame, equipped with links to all related subtopics. Click a subtopic link.
⻬Search: Click Search to look for topics containing a keyword. Here are a few tips to help navigate around the Topic frame:
⻬Click Previous to display the previous topic.
⻬Click Next to display the next topic.
⻬Click Top to go to the top of a topic.
⻬Click the cross-references to other topics to go to that referenced topic.
⻬Click the parent topic links at the top and bottom of the topic to move back in the structure of Help topics.
Checking out the Adobe Web site
I am assuming you have an Internet connection. But if you don’t, you really should consider getting one. It will allow you to share your photos via e-mail or on the Web. It will also allow you to access resources for working in Album. Visit Adobe’s Web site, shown in Figure 2-14, by using one of the following methods:
⻬Click the Go to Adobe.com button in the top-right corner of the Album window. Click the Go to the Adobe Web site (www.adobe.com) button near the top-right corner of the application window.
⻬Choose Help➪Adobe Online.
⻬Go to www.adobe.comin your Web browser. At the site, you’ll find the goodies, such as
⻬Album software updates (called patches)
⻬Tutorials
⻬User-to-user forum
⻬Support Knowledgebase database of commonly reported problems and issues
Figure 2-14: Visit www. adobe.com
⻬Tech Support contact information
Choose Help➪Support to go right to the Customer Support page of www.adobe.com.
Using Context-Sensitive
Menus and Tool Tips
Album makes use of context-sensitive menus that can save you time by allowing you to quickly execute commands with a single mouse click. These context-sensitive menus display different commands and options and dynami-cally change according to what you’ve already selected or where you are within Album. To display a context-sensitive menu, position your mouse pointer over an image or item in a pane (mini-window) in Album. Right-click your mouse. If a context-sensitive menu doesn’t appear, no menu is available for that tool, pane, or item.
You may have noticed while taking a breather and resting your mouse that if you position your mouse pointer and pause over almost any item on the screen — a tool, a button, or an icon — that a name, keyboard shortcut or explanation appears. That name or explanation is known as a tool tip and is a handy feature, especially when you’re first learning the ropes of Photoshop Album.
Working with Resolution, Color
Modes, and File Formats
In This Chapter
䊳Understanding resolution
䊳Getting familiar with color modes
䊳Working with different file formats
D
igital images come in two flavors: pixel based and vector based. Pixel-based images, also called raster or bitmap images, usually are photo-graphic in nature, although they also can be comprised of artwork, objects, or even miscellaneous parts of the body that have been scanned on a scanner.Vector-based images, also called object-oriented images, are mathematically defined by lines, curves, and points. The vector format is perfect for illustra-tions such as logos and line art. Adobe Illustrator, CorelDRAW, and Macromedia Freehand are examples of popular vector drawing programs. Because you will be dealing primarily with raster images in Photoshop Album, this chapter focuses on the characteristics of that type of digital image.
Getting a Handle on Resolution
Resolution can take on many meanings depending on what you’re referring to. For example, when people discuss resolution, they may be referring to image resolution, which describes the number of pixels per linear inch (a line 1 inch long). Or they may be discussing the resolution of certain devices such as printers, cameras, scanners, and monitors. All are entwined and interrelated, and comprehending the differences can be somewhat confusing.
Introducing pixels
Raster images, such as digitized photographs, are made up of a grid of squares called pixels (short for PICture Element). Each pixel lives in a specific location on that grid and contains a single color. When you edit a raster image, you’re editing one or more of those pixels.
Think of a grid of pixels as a mosaic. When viewed from afar, the mosaic looks like a painting. But up close, you see the individual square tiles that comprise the image.
Although it doesn’t seem like it when you’re viewing an image that fits nicely inside your monitor window, your entire image can be broken down into a grid of square pixels — which becomes very evident when you try to zoom
waaay in on the image. Suddenly, that photo leaves the realm of reality and looks like stacks of colored building blocks. Even round, curvy shapes have to fit within this grid of squares.
Raster images try to fake a curve by mimicking the overall shape with square pixels, as shown in Figure 3-1. Amazingly, this con job is virtually impercepti-ble at high resolutions viewed at full size (100 percent). But when you zoom in at high magnifications, those square pixels are plain as day.
Understanding the pixel-resolution
connection
Image resolution refers to the number of pixels along the total width and height of the image, known also as pixel dimensions.For example, if the pixel dimensions of a photo are 640 x 480, the image contains 640 pixels in its width and 480 pixels in its height.
The pixel dimensions, in turn, correspond to the image’s file size. The larger the pixel dimensions, the more data (and therefore the larger the file size). Every image has a set number of pixels. How does it get these pixels in the first place? You establish the number by the capture setting on your digital camera or the resolution setting on your scanner (see the sections “Working with Camera Resolution” and Working with scanner resolution” later in this chapter).
To see the pixel dimensions and file size of an image in Photoshop Album, choose View➪Size➪Single Photo. The file size and pixel dimensions appear below the photo and also in the Properties pane, as shown in Figure 3-2. If your Properties pane isn’t visible, choose View➪Properties.
Resolution in a nutshell
If you’re to the point where you’re going to tear this book into smithereens if you read the word
resolutionone more time, the information here may help to lower your blood pressure a bit. Keep it simple by following these few points:
⻬ If you want to make images available on the Web for the general public, keep your camera’s setting at 640 x 480. Use 800 x 600 if your audience is middle of the road in sophistication. Reserve 1024 x 768 only for the snobby techno-lusters. Remember, the smaller the size of your graphics, the quicker they download on-screen, espe-cially for those who are using older com-puters and/or dialup Internet connections.
⻬ If your images are destined for print, be sure and capture enough pixels with your
camera or scanner so that your output res-olution is around 300 ppi. Check with your printer documentation for any specific rec-ommendations. Not sure? Go with the high-est. At least you won’t be stuck with poor image quality as a result of not having enough pixels. Just be sure and have lots of memory available on your computer’s hard drive and in your camera’s flash card or memory stick.
Size takes on two roles in digital imaging:
⻬File size: A result of the pixel dimensions just mentioned
⻬Print or image size:The width and height of an image when printed on paper (described in the section “Working with output and printer resolu-tion,” later in this chapter)
The file sizes of raster images can be very large, in comparison to slim and petite file sizes of vector images. You may have discovered this fact on your own while working with your digital camera or scanner. It seems that in no time flat, that CompactFlash card, memory stick, or hard drive space is eaten up. Another disadvantage of raster images is that because they contain a fixed number of pixels, when they’re enlarged the quality can go downhill fast.
Changing the resolution by
enlarging the pixels
Album allows you to resize your images in certain instances. You should be careful in choosing a new size that is a significant increase from the original. What happens is that the original number of pixels is spread across a larger area resulting in pixelated mush, as shown in Figure 3-3. Here are a few sce-narios in which you want to avoid increasing the size of images with small pixel dimensions:
⻬Web Photo Gallery: I took a small photo of a dog, which had dimensions of 66 x 100 pixels. When I created my Web Photo Gallery, I chose X-Large in the Resize Photos option and set the quality to Medium. The result Figure 3-2:
view was an indefinable, grainy animal (refer to Figure 3-3). I then took a new photo of the dog with pixel dimensions of 2048 x 3072 and used the same settings. The result was a happy dog — sharp and recognizable.
⻬Slide Show: Similarly, if you take a photo with small pixel dimensions and use it in Slide Show creation, Album responds with a warning that your image is low resolution and will not display well at this size.
⻬Greeting Card:When you take low-resolution images and try and use them in creations such as greeting cards, which are intended to be printed and require images with higher resolution, Album warns you that the images you chose are below optimum resolution for printing.
All the preceding scenarios involve taking the set number of pixels in an image and spreading them across a larger area, whether on-screen or on paper. The result is larger-sized pixels and therefore a chunkier, pixelated-looking image. Enlarging pixels isn’t recommended. The best thing to do is to start with images that contain enough pixels for their intended end-usage size.
Working with output and printer resolution
When you print an image from Photoshop or Photoshop Elements, you can enter the desired output resolution. The output resolution is measured in pixels per linear inch (a line that is 1 inch long), or ppi,and can be calculated by dividing the number of pixels wide or high by the printed size in width or height. For example, if an image is 800 pixels wide and you print it so that it’s 4 inches wide, the output resolution is 200 ppi. The higher the ppi, the higher the quality, as shown in Figure 3-4.
After an image is printed onto paper, the resolution is measured in dots per inch,or dpi.Generally, the greater the number of dots, the better the print quality. Although Photoshop Album doesn’t allow you to manually manipu-late the output resolution, it warns you if you’ve chosen a print size that will cause the photo to print poorly — at a dpi setting of less than 150 dpi.
Figure 3-4:
Changing the resolution by resampling
In programs such as Photoshop and Photoshop Elements, you can manually change the image size (height and width) and resolution. But rather than increasing the size of the individual pixels to fill the space, Photoshop, Photoshop Elements, and other image-editing programs perform a kind of voodoo called resampling.
(Photoshop Album doesn’t allow you to resam-ple images.)
Resampling enables you to add or delete pixels to increase the pixel dimensions of an image. Many graphics programs perform a process called interpolation.Interpolation is as fancy and technical as it sounds. The process involves performing an algorithm that manufactures pixels by averaging the color of original pixels and adding them to the existing ones.
When you downsample (resample down), you eliminate pixels and therefore delete information and detail from your image. Downsampling is done pretty frequently because high-resolution images must be downsampled for posting on the Web. And in actuality, you may not notice much degradation in the image quality because the images are just being viewed on-screen — unless, of course, you take it to the extreme.
⻬Read the documentation that shipped with your printer. The documen-tation will give you the various resolution settings it can print at, as well as tips on the recommended image resolution of your photos.
⻬Be sure that your image has an adequate resolution. Raster images areresolution dependent.Because raster images contain a fixed number of pixels, generally, your printer’s resolution doesn’t much influence the quality of these images. For example, an image of only 72 ppi doesn’t look any better printed at a printer resolution of 600 dpi than it does at 1200 dpi. So be sure that your image has an adequate image resolution to start with.
⻬Don’t use a higher resolution than you need.All you’ll do is create an unnecessarily huge file with a slower print time. In addition, the printer may be incapable of reproducing all the detail in the image. In some cases, higher-than-necessary printer resolution settings may make your printout look muddier.
⻬Remember that one printed dot doesn’t correlate to one image pixel.
Most printers today use several dots per image pixel. Therefore, your printer manufacturer may recommend that you use a 300 ppi image to print at a printer resolution of 1440 or 2880 dpi.
You can easily calculate the maximum size to print an image at your desired print resolution based on the image’s pixel dimensions. Simply divide the pixel dimension by the printer resolution to get the print size. For example, an image with the pixel dimensions of 640 x 480 yields a print of 2.1 x 1.6 inches at 300 dpi. Or an 8 x 10 print with a printer resolution of 300 dpi requires an image with a resolution of 2400 x 3000 pixels.
The term image size doesn’t refer to pixel dimensions per se. Image size refers more to the physical dimensions and dpi of an image when it’s printed. For example, a conversation at the local coffee house may go like this, “So what’s the image size on that photo?” and the response would be “Well, it’s 5 x 7 inches at 300 dpi.”
Working with Camera Resolution
settings as Image Size.
Some manufacturers also tie in image quality with resolution and file format. For example, if you choose a Hi setting, your image will be stored as a TIFF, not a JPEG. (For more on file formats, see “Working with Different File Formats,” later in this chapter.) And that Hi setting is only available if you choose Full res-olution (which is equal to 2560 x 1920 pixels).
After you’re familiar with your camera’s settings, consider what setting is optimum for your intended output:
⻬For high-quality printed images, shoot your photos at a higher resolution. If you take the resolution setting in pixels and divide it by the recom-mended resolution of the printer (described in the preceding section), you get the size of your image when printed.
⻬If the image is intended for the Web, be sure and take into account the demographics of your audience. Are they imaging professionals with 21-inch monitors or are they your friends and family with a 15- to 17-inch monitor?
Table 3-1 is a guide to the settings.
Table 3-1
Camera Resolution, Print Size (at a Printer Resolution of
300 dpi), and Screen Display
Camera Resolution Print Size Screen Display
2560 x 1920 8.5 x 6.4 Full — too large to display on any monitor
2560 x 1710 8.5 x 5.7 3:2 — too large to display on any monitor
1600 x 1200 5.3 x 4 UXGA (Ultra Extended Graphics Array) — displays full screen on 22- and 23-inch monitors
1280 x 960 4.3 x 3.2 SXGA (Super Extended Graphics Array) — displays full screen on 21-inch monitors
1024 x 768 3.4 x 2.6 XGA (Extended Graphics Array) — displays full screen on 17-inch monitors


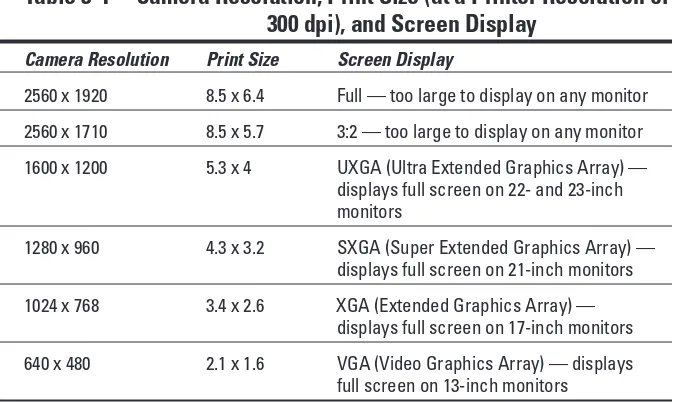
![Wiley Publishing Digital Video For Dummies [2003]](data:image/gif;base64,R0lGODlhAQABAIAAAP///wAAACH5BAEAAAAALAAAAAABAAEAAAICRAEAOw==)