by Peter Bauer
Photoshop
®CS3
FOR
by Peter Bauer
Photoshop
®CS3
FOR
Photoshop®CS3 For Dummies®
Copyright © 2007 by Wiley Publishing, Inc., Indianapolis, Indiana Published by Wiley Publishing, Inc., Indianapolis, Indiana Published simultaneously in Canada
No part of this publication may be reproduced, stored in a retrieval system or transmitted in any form or by any means, electronic, mechanical, photocopying, recording, scanning or otherwise, except as permit-ted under Sections 107 or 108 of the 1976 Unipermit-ted States Copyright Act, without either the prior written permission of the Publisher, or authorization through payment of the appropriate per-copy fee to the Copyright Clearance Center, 222 Rosewood Drive, Danvers, MA 01923, (978) 750-8400, fax (978) 646-8600. Requests to the Publisher for permission should be addressed to the Legal Department, Wiley Publishing, Inc., 10475 Crosspoint Blvd., Indianapolis, IN 46256, (317) 572-3447, fax (317) 572-4355, or online at
http://www.wiley.com/go/permissions.
Trademarks:Wiley, the Wiley Publishing logo, For Dummies, the Dummies Man logo, A Reference for the Rest of Us!, The Dummies Way, Dummies Daily, The Fun and Easy Way, Dummies.com, and related trade dress are trademarks or registered trademarks of John Wiley & Sons, Inc. and/or its affiliates in the United States and other countries, and may not be used without written permission. Photoshop is a registered trademark of Adobe Systems Incorporated. All other trademarks are the property of their respective owners. Wiley Publishing, Inc., is not associated with any product or vendor mentioned in this book.
LIMIT OF LIABILITY/DISCLAIMER OF WARRANTY: THE PUBLISHER AND THE AUTHOR MAKE NO REP-RESENTATIONS OR WARRANTIES WITH RESPECT TO THE ACCURACY OR COMPLETENESS OF THE CONTENTS OF THIS WORK AND SPECIFICALLY DISCLAIM ALL WARRANTIES, INCLUDING WITHOUT LIMITATION WARRANTIES OF FITNESS FOR A PARTICULAR PURPOSE. NO WARRANTY MAY BE CREATED OR EXTENDED BY SALES OR PROMOTIONAL MATERIALS. THE ADVICE AND STRATEGIES CONTAINED HEREIN MAY NOT BE SUITABLE FOR EVERY SITUATION. THIS WORK IS SOLD WITH THE UNDER-STANDING THAT THE PUBLISHER IS NOT ENGAGED IN RENDERING LEGAL, ACCOUNTING, OR OTHER PROFESSIONAL SERVICES. IF PROFESSIONAL ASSISTANCE IS REQUIRED, THE SERVICES OF A COM-PETENT PROFESSIONAL PERSON SHOULD BE SOUGHT. NEITHER THE PUBLISHER NOR THE AUTHOR SHALL BE LIABLE FOR DAMAGES ARISING HEREFROM. THE FACT THAT AN ORGANIZATION OR WEBSITE IS REFERRED TO IN THIS WORK AS A CITATION AND/OR A POTENTIAL SOURCE OF FURTHER INFORMATION DOES NOT MEAN THAT THE AUTHOR OR THE PUBLISHER ENDORSES THE INFORMA-TION THE ORGANIZAINFORMA-TION OR WEBSITE MAY PROVIDE OR RECOMMENDAINFORMA-TIONS IT MAY MAKE. FURTHER, READERS SHOULD BE AWARE THAT INTERNET WEBSITES LISTED IN THIS WORK MAY HAVE CHANGED OR DISAPPEARED BETWEEN WHEN THIS WORK WAS WRITTEN AND WHEN IT IS READ. For general information on our other products and services, please contact our Customer Care
Department within the U.S. at 800-762-2974, outside the U.S. at 317-572-3993, or fax 317-572-4002. For technical support, please visit www.wiley.com/techsupport.
Wiley also publishes its books in a variety of electronic formats. Some content that appears in print may not be available in electronic books.
Library of Congress Control Number: 2006939488 ISBN: 978-0-470-11193-2
About the Author
Dedication
For my wife — I am continually in awe of all you have accomplished and all you continue to accomplish! Your dedication to the law governing armed conflict makes the world a safer and more civilized place.
Author’s Acknowledgments
First, I’d like to thank Bob Woerner and Nicole Sholly of Wiley, as well as Virginia Sanders, Ron Rockwell, and the rest of the superb crew at Wiley that put the book itself together. I’d also like to acknowledge Scott and Kalebra Kelby, Jim Workman, Jean Kendra, Larry Becker, Jeff Kelby, and Dave Moser of the National Association of Photoshop Professionals (NAPP), who make my professional life what it is today. With their support, I’m the Help Desk Director for NAPP, and I get to share my Photoshop knowledge with tens of thousands of NAPP members — and with you. I also thank my Help Desk colleagues Jeanne Rubbo and Rob Sylvan for their support during the devel-opment of this book.
Another great group from whom I continue to receive support are my col-leagues on the Photoshop World Instructor Dream Team. If you haven’t been to Photoshop World, try to make it — soon. Rather than “Photoshop conference,” think “Photoshop festival.” Where else can you see suits and slackers, side by side, savoring every single syllable? It’s more than just training and learning; it’s a truly intellectually stimulating environment. (If only you could be a fly on the wall during the now-traditional breakfast discussions I share with the great photographers Vincent Versace and John Paul Caponigro!) Photoshop World is a collection of the world’s most renowned Photoshop experts, sharing their knowledge with Photoshop users of all levels. I thank each of the members of the Dream Team for the knowledge they have shared with me over the years. I would also like to single out Robb Kerr, one of the original Photoshop World instructors, who continues to inspire me both spiritually and intellectually.
Publisher’s Acknowledgments
We’re proud of this book; please send us your comments through our online registration form located at www.dummies.com/register/.
Some of the people who helped bring this book to market include the following:
Acquisitions, Editorial, and Media Development
Project Editor:Nicole Sholly
Senior Acquisitions Editor:Bob Woerner Copy Editor:Virginia Sanders
Technical Editor:Ron Rockwell Editorial Manager:Kevin Kirschner
Media Development Manager:Laura VanWinkle Editorial Assistant:Amanda Foxworth
Sr. Editorial Assistant:Cherie Case
Cartoons:Rich Tennant (www.the5thwave.com)
Composition Services
Project Coordinator: Heather Kolter Layout and Graphics:Denny Hager,
Joyce Haughey, Melanee Prendergast, Heather Ryan
Proofreaders: Melissa D. Buddendeck, Dwight Ramsey
Indexer: Broccoli Information Management Anniversary Logo Design:Richard Pacifico
Publishing and Editorial for Technology Dummies
Richard Swadley,Vice President and Executive Group Publisher Andy Cummings,Vice President and Publisher
Mary Bednarek,Executive Acquisitions Director Mary C. Corder,Editorial Director
Publishing for Consumer Dummies
Diane Graves Steele,Vice President and Publisher Joyce Pepple,Acquisitions Director
Composition Services
Contents at a Glance
Introduction ...1
Part I: Breezing through Basic Training...7
Chapter 1: Welcome to Photoshop!...9
Chapter 2: Knowing Just Enough about Digital Images...23
Chapter 3: Taking the Chef’s Tour of Your Photoshop Kitchen...41
Chapter 4: Getting Images into and out of Photoshop ...61
Part II: Easy Enhancements for Digital Images ...83
Chapter 5: Adding Dark Shadows and Sparkling Highlights ...85
Chapter 6: Making Color Look Natural ...105
Chapter 7: The Adobe Camera Raw Plug-In ...131
Chapter 8: Fine-Tuning Your Fixes...153
Chapter 9: Common Problems and Their Cures...181
Part III: Creating “Art” in Photoshop ...197
Chapter 10: Combining Images ...199
Chapter 11: Precision Edges with Vector Paths ...219
Chapter 12: Dressing Up Images with Layer Styles...243
Chapter 13: Giving Your Images a Text Message ...265
Chapter 14: Painting in Photoshop ...293
Chapter 15: Filters: The Fun Side of Photoshop ...311
Part IV: Power Photoshop ...329
Chapter 16: Streamlining Your Work in Photoshop ...331
Chapter 17: Introducing Photoshop CS3 Extended...347
Part V: The Part of Tens ...359
Chapter 18: Pete’s Top Ten Favorite Photoshop Tips and Tricks ...361
Chapter 19: Ten Reasons to Love Your Wacom Tablet ...371
Chapter 20: Ten Reasons to Own a Digital Camera...375
Table of Contents
Introduction...1
About This Book...1
How This Book Is Organized...3
Part I: Breezing through Basic Training...3
Part II: Easy Enhancements for Digital Images ...4
Part III: Creating “Art” in Photoshop...4
Part IV: Power Photoshop ...4
Part V: The Part of Tens...4
Conventions Used in This Book ...5
Icons Used in This Book...5
How to Use This Book ...6
Part I: Breezing through Basic Training ...7
Chapter 1: Welcome to Photoshop! . . . .9
Exploring Adobe Photoshop...10
What Photoshop is designed to do ...10
Other things you can do with Photoshop ...13
If you don’t have specialized software ...14
Viewing Photoshop’s Parts and Processes ...16
Reviewing basic computer operations ...16
Photoshop’s incredible selective Undo...18
Installing Photoshop: Need to know ...20
Chapter 2: Knowing Just Enough about Digital Images . . . .23
What Exactly Is a Digital Image?...24
The True Nature of Pixels ...25
How Many Pixels Can Dance on the Head of a Pin?...27
Resolution revelations ...27
Resolving image resolution ...28
File Formats: Which Do You Need? ...35
Formats for digital photos...36
Formats for Web graphics ...37
Formats for commercial printing ...38
x
Chapter 3: Taking the Chef’s Tour of Your Photoshop Kitchen . . . .41
Food for Thought: How Things Work ...42
Ordering from the menus ...42
Your platter full of palettes ...43
The tools of your trade...45
Get Cookin’ with Customization...47
Clearing the table: Custom workspaces ...48
Sugar and spice, shortcuts are nice...50
Spoons can’t chop: Creating tool presets ...51
Season to Taste: The Photoshop Settings...52
Standing orders: Setting the Preferences ...52
Ensuring consistency: Color Settings ...58
When Good Programs Go Bad: Fixing Photoshop ...60
Chapter 4: Getting Images into and out of Photoshop . . . .61
Bringing Images into Photoshop ...62
Downloading from your digital camera ...63
Scanning prints ...64
Keeping Your Images Organized...67
Creating a folder structure ...67
Using Adobe Bridge...68
Renaming image files easily ...71
Printing Your Images...71
Cropping to a specific aspect ratio ...72
Remembering resolution ...73
Controlling color using Print with Preview ...74
Considering color management solutions ...76
Printing alternatives...77
Sharing Your Images ...78
Creating a PDF Presentation ...78
Collecting thumbnails in a contact sheet...80
E-mailing your images...81
Part II: Easy Enhancements for Digital Images ...83
Chapter 5: Adding Dark Shadows and Sparkling Highlights . . . .85
Adjusting Tonality to Make Your Images Pop...86
Histograms Simplified...86
Using Photoshop’s Auto Corrections ...90
Levels and Curves and You...91
Level-headed you!...92
Tonal corrections with the eyedroppers...94
Adjusting your curves without dieting...95
xi
Grabbing Even More Control ...97
Using Shadow/Highlight ...98
Changing exposure after the fact ...101
Using Photoshop’s toning tools...102
Chapter 6: Making Color Look Natural . . . .105
What Is Color in Photoshop? ...105
Color modes, models, and depths ...106
Recording color in your image ...111
Color Adjustments in Photoshop...111
Watching the Histogram and Info palettes...113
Choosing color-adjustment commands...114
Working with Variations ...126
Manual corrections in individual channels...128
The People Factor: Flesh Tone Formulas...129
Chapter 7: The Adobe Camera Raw Plug-In . . . .131
Understanding the Raw Facts...131
What’s the big deal about Raw?...132
Working in Raw ...134
Do You Have What It Takes? ...135
Working in the Camera Raw Plug-In...136
Tools and preview options...136
The histogram...140
The preview area ...140
Workflow options and presets ...141
The Basic pane ...143
Adjusting the tone curve ...144
The Detail pane...147
HSL, grayscale, and split toning ...148
Compensating with Lens Correction ...150
Customizing camera profiles and the Presets tab...151
The Camera Raw buttons ...152
Chapter 8: Fine-Tuning Your Fixes . . . .153
What Is a Selection? ...154
Feathering and Anti-Aliasing...157
Making Your Selections with Tools ...158
Marquee selection tools ...159
Lasso selection tools ...162
The Quick Selection tool ...164
The Magic Wand tool ...164
Refine Selection Edge...165
xii
Your Selection Commands ...166
The primary selection commands ...166
The Color Range command...167
Selection modification commands ...169
Transforming the shape of selections ...170
The mask-related selection commands...172
Masks: Not Just for Halloween Anymore ...172
Saving and loading selections...172
Editing an alpha channel ...173
Working in Quick Mask mode ...175
Adding masks to layers and Smart Objects ...176
Masking with vector paths...177
Adjustment Layers: Controlling Changes...177
Adding an adjustment layer ...178
Limiting your adjustments ...179
Chapter 9: Common Problems and Their Cures . . . .181
Making People Prettier ...182
Getting the red out . . . digitally ...182
The digital fountain of youth ...183
Dieting digitally...184
Deglaring glasses ...185
Whitening teeth ...186
Reducing Noise in Your Images ...187
Decreasing digital noise...187
Eliminating luminance noise ...188
Fooling Around with Mother Nature...188
Removing the unwanted from photos ...188
Eliminating the lean: Fixing perspective ...193
Rotating images precisely ...195
Part III: Creating “Art” in Photoshop ...197
Chapter 10: Combining Images . . . .199
Compositing Images: 1 + 1 = 1...199
Understanding layers...200
Why you should use Smart Objects...201
Using the basic blending modes...202
Opacity, transparency, and layer masks...205
Creating clipping groups ...206
Making composited elements look natural ...207
Selecting with Extract...208
Vanishing Point...209
xiii
Putting Together Images Automatically ...214
Creating panoramas with Photomerge ...214
Combining exposures for HDR images ...216
Chapter 11: Precision Edges with Vector Paths . . . .219
Pixels, Paths, and You...220
Easy Vectors: Using Shape Layers ...222
Your basic shape tools...222
The Custom Shape tool ...223
More custom shapes — free! ...224
Changing the appearance of the shape layer ...226
Simulating a multicolor shape layer ...227
Using Your Pen Tool to Create Paths...229
Understanding paths ...229
Clicking and dragging your way down the path of knowledge...230
A closer look at the Paths palette ...232
Customizing Any Path ...236
Adding, deleting, and moving anchor points...236
Combining paths ...238
Tweaking type for a custom font...240
Chapter 12: Dressing Up Images with Layer Styles . . . .243
What Are Layer Styles?...244
Using the Styles Palette ...245
Creating Custom Layer Styles...247
Exploring the Layer Style menu...247
Exploring the Layer Style dialog box ...249
Layer effects basics...250
Opacity, fill, and advanced blending...258
Saving Your Layer Styles ...262
Adding styles to the Style palette ...262
Preserving your layer styles ...263
Chapter 13: Giving Your Images a Text Message . . . .265
Making a Word Worth a Thousand Pixels ...266
A type tool for every season, or reason ...268
What are all those options? ...271
Taking control of your text with palettes ...274
The palette menus — even more options ...278
Putting a picture in your text...280
Creating Paragraphs with Type Containers...282
Selecting alignment or justification...284
Ready, BREAK! Hyphenating your text ...285
Shaping Up Your Language with Warp Text and Type on a Path ...285
Applying the predefined warps ...286
Customizing the course with paths ...287
xiv
Finding and Adding Fonts ...289
Downloading and purchasing fonts ...290
Installing (and removing) fonts: Mac ...291
Installing (and removing) fonts: Windows ...292
Chapter 14: Painting in Photoshop . . . .293
Discovering Photoshop’s Painting Tools ...294
Painting with the Brush tool ...295
Adding color with the Pencil tool...297
Removing color with the Eraser tool ...298
Picking a color ...298
Working with other brush-using tools ...301
Filling, stroking, and dumping to add color ...303
Using gradients ...304
Browsing the Brushes Palette ...305
An overview of options...306
Creating and saving custom brush tips...308
Chapter 15: Filters: The Fun Side of Photoshop . . . .311
Smart Filters: Your Creative Insurance Policy...311
The Filters You Really Need...313
Sharpening to focus the eye...313
Unsharp Mask ...314
Smart Sharpen ...315
Blurring images or selections ...316
Using the Lens Correction filter...319
Cleaning up with Reduce Noise ...321
Getting Creative with the Filter Gallery...323
Push, Pull, and Twist with Liquify...325
Do I Need Those Other Filters? ...328
Bending and bubbling...328
Creating clouds...328
Part IV: Power Photoshop...329
Chapter 16: Streamlining Your Work in Photoshop . . . .331
Running on Auto...332
Creating a PDF presentation ...332
Collecting thumbnails in a contact sheet...334
One-step Web sites...336
Saving paper with Picture Package ...337
xv
Ready, Set, Action!...340
Recording your own Actions...341
Working with the Batch command...344
Sticking to the Script ...345
Chapter 17: Introducing Photoshop CS3 Extended . . . .347
Understanding Photoshop CS3 Extended ...348
Painting and Layers in 32-Bit Color...348
Smart Object Stack Modes...350
Working with 3D Artwork...351
Editing Imported Video ...353
Measuring, Counting, and Analyzing Pixels...354
Measuring length, area, and more...354
Counting crows or maybe avian flu ...356
Ignoring MATLAB, DICOM, and Other Initials...357
Part V: The Part of Tens ...359
Chapter 18: Pete’s Top Ten Favorite Photoshop Tips and Tricks . . . .361
Adding Artistic and Creative Effects...361
Smoothing skin perfectly...362
From a photo to a painting...363
Creating a sketch from a photo ...364
Creating snow or rain...366
The Glass Text effect...367
Useful Tricks to Make Life Easier ...367
Changing product colors in a snap ...367
Deleting a plain white background...368
Making dashed and dotted lines ...368
Quick and easy edge effects...368
Professional-looking contact sheets ...369
Programmable ExpressKeys and Touch Strips...372
The optimal tablet ...372
The pen’s switch ...373
Setting preferences ...373
Don’t forget the accessories ...374
Cintiq for the ultimate control ...374
xvi
Chapter 20: Ten Reasons to Own a Digital Camera . . . .375
Shooting Digital for Your Work ...376
Shooting Digital for Yourself ...377
Shooting Digital for the Rest of Us ...377
Introduction
A
dobe Photoshop is one of the most important computer programs of our age. It’s made photo editing a commonplace thing, something for the everyperson. Still, Photoshop can be a scary thing (especially that first purchase price!), comprising a jungle of menus and palettes and tools and options and shortcuts as well as a bewildering array of add-ons and plug-ins. And that’s why you’re holding this book in your hands. And why I wrote it. And why Wiley published it.You want to make sense of Photoshop — or, at the very least, be able to work competently and efficiently in the program, accomplishing those tasks that need to get done. You want a reference that discusses how things work and what things do, not in a technogeek or encyclopedic manner, but rather as an experienced friend might explain something to you. Although step-by-step explanations are okay if they show how something works, you don’t need rote recipes that don’t apply to the work you do. You don’t mind discovering tricks, as long as they can be applied to your images and artwork in a productive, meaningful manner. You’re in the right place!
About This Book
This is a For Dummiesbook, and as such, it was produced with an eye toward you and your needs. From Day One, the goal has been to put into your hands the book that makes Photoshop understandable and useable. You won’t find a technical explanation of every option for every tool in every situation, but rather a concise explanation of those parts of Photoshop you’re most likely to need. If you happen to be a medical researcher working toward a cure for cancer, your Photoshop requirements might be substantially more specific than you’ll find here. But for the overwhelming majority of the people who have access to Adobe Photoshop CS3, this book provides the background needed to get your work done with Photoshop.
2
Photoshop CS3 For Dummies
You’ll see that I used mostly Apple computers in producing this book. That’s simply a matter of choice and convenience. You’ll also see (if you look closely) that I shoot mostly with Canon cameras and use Epson printers. That doesn’t mean that you shouldn’t shoot with Nikon, Sony, or Fuji, or that you shouldn’t print with HP or Canon. If that’s what you have, if it’s the equip-ment with which you’re comfortable, if it fulfills your needs, stick with it! One additional note: If you’re brand new to digital imaging and computers, this probably isn’t the best place to start. I do indeed make certain assump-tions about your level of computer knowledge (and, to a lesser degree, your knowledge of digital imaging). But if you know your File➪Open from your File➪Close and can find your lens cap with both hands, read Chapter 1, and you’ll have no problem with Photoshop CS3 For Dummies.
About the cover images
The image on the front of Photoshop CS3 For Dummies represents some of the key concepts of digital image manipulation. The flower photo forms the “floor” of the “room.” Photographs are the base upon which most Photoshop work is built. The photo you open into Photoshop is the foundation upon which you build creatively. The blend from grayscale to color represents both the progression of photography itself over the years and the advances within Photoshop. (I dis-cuss the Black & White palette a little later on.)
The “room” itself represents the “box” within which you might find yourself thinking. It is indeed possible to do great creative work while thinking “inside the box.” But with Photoshop, there’s always the chance to think outside the box, as you can see to the right where Photoshop’s palettes provide an escape from walls confining creativity. The mountains beyond represent the heights to which we can aspire. They’re also (in contrast to most of the rest of the elements in the cover image) virtually unchanged in Photoshop — the natural and the “true” among all the creative and artistic bits.
The grid that forms two of the walls does dual duty. It not only represents alignment and order, things Photoshop does very well, but with the glow effect, it also represents the many and
varied electronic ways in which you can display and distribute your artwork — the digital gal-leries of the 21st Century. (The grid itself comes from the very powerful Vanishing Point filter.)
Another of Photoshop’s important features, Photomerge, is showcased by the panorama of the glacier, which represents the environment. Digital photography is much more environmentally friendly than the film-and-darkroom photography of past generations. The glacier also represents global warming. Just a few short years ago, according to the captain of the ship from which we viewed the glacier, spectators considered themselves very lucky to get a chance to see “calving,” the separation (and resulting splash) of a large piece of the glacier. While we were present, calving occurred roughly every three to five minutes. Someday in the not-too-distant future, all that remains of that glacier might be photographs, such as those from which the panorama was created.
How This Book Is Organized
Photoshop CS3 For Dummies is primarily a reference book. As such, you can check the Table of Contents or the index for a specific subject, flip to those pages, and get the information you need. You can also start at the beginning and read cover to cover (just to make sure you don’t miss a single tip, tech-nique, or joke). To give you an indication of the type of information in each chapter, I organized the book into parts. Here’s a quick look at what sort of content you can find in each part.
Part I: Breezing through Basic Training
The first set of chapters presents the basic operation of Photoshop, what you need to know to get around in the program, and the core process of getting images into Photoshop and back out again. If you’re new to digital imaging, and particularly unfamiliar with Photoshop, make sure to read Chapter 1 through Chapter 3. If you’ve worked with Photoshop or another image-editing program and aren’t quite sure about the concept of resolution or which file formats are best for which purposes, don’t overlook Chapter 2. Chapter 4 is the meat and potatoes of Photoshop: scanning and downloading images from cameras, cropping to fit specific print and frame sizes, and printing or post-ing your images on the Web. All in one nice, tidy package.
3
Introduction
character, he also stands for (pun intended) the 3D features of Photoshop CS3 Extended. His shadow climbs the wall realistically, something that’s easy to simulate in Photoshop with a layer mask, a gradient, and a blur filter.
A new feature in Photoshop CS3, the Black & White adjustment, provides incredible control over the conversion from color to grayscale. A great new feature, it’s featured prominently. The shape of the palette? It represents the abil-ity to squeeze every last bit of artistic excel-lence from the conversion process.
Tools remain the heart and soul of Photoshop, and so Photoshop’s Toolbox is also featured in the foreground. The ability to effect change to parts of an image, rather than working only globally, is what makes Photoshop so much more powerful than the lesser image-editing
programs available. And note that the wonder-ful new Quick Selection tool is itself being selected.
The somewhat-threatening eyes to the left represent the other “outside the box” — the sometimes harmful or dishonest uses of photo manipulation. Hopefully, as you work with the power of Photoshop, you can resist any such temptations. . . .
4
Photoshop CS3 For Dummies
Part II: Easy Enhancements for Digital Images
In Chapters 5 through 9, you discover ideas and techniques for improving the appearance of your images. You read about tonality (the lightness and dark-ness of the image), color correction (making the image’s color look natural), and making selections to isolate individual parts of your image for correction. Part II also includes a full chapter on the Raw file format for digital cameras — what it is, why it’s important, and how to determine whether it’s right for you. At the end of this part, I include a chapter on the most common problems in digital photos: red-eye, wrinkles, and unwanted objects and people. And, yes, that chapter includes what to do about those problems, too!
Part III: Creating “Art” in Photoshop
The chapters in Part III take a walk on the creative side. Although not every-one wants to use Photoshop as a digital painting program, everyevery-one should understand how to get around in the complex and daunting Brushes palette.
Compositing images (making one picture from two or more), adding text (whether a simple copyright notice or an entire page), using paths, and adding layer styles are all valuable skills for just about all folks who work with Photoshop, even if they don’t consider their work to be art.
Part IV: Power Photoshop
The two chapters in Part IV are more specialized than the rest of the book. If you don’t work in a production environment (even cropping to the same dimensions regularly can count as production), you might not need to use Actions in Photoshop. But there’s far more to Chapter 16 than just Actions and scripting! It also shows you how you can create an on-screen presenta-tion that anyone can view, automatically generate a single page with small thumbnail images of all your photos, and save paper by printing multiple images on a single sheet. Chapter 17 is a brief introduction to those features found only in Photoshop CS3 Extended. If you have Photoshop CS3 rather than Photoshop CS3 Extended, you might be interested in the highly techni-cal, very complex scientific, technitechni-cal, video, and 3D features. Or not.
Part V: The Part of Tens
Conventions Used in This Book
To save some space and maintain clarity, I use an arrow symbol as shorthand for Photoshop menu commands. I could write this:
Move the cursor onto the word Image at the top of your screen and press the mouse button. Continuing to press the mouse button, move the cursor downward to the word Adjustments. Still pressing the mouse button, move the cursor to the right and downward onto the words Shadow/Highlight. Release the mouse button.
But it makes more sense to write this:
Choose Shadow/Highlight from the Image➪Adjustments menu. Or even to use this:
Choose the Image➪Adjustments➪Shadow/Highlight command.
You’ll also note that I include keyboard shortcuts (when applicable) for both Mac and Windows. Generally the shortcuts are together, with Mac always first, and look like this:
Move the selection to a separate layer with the shortcut Ô+Shift+J/ Ctrl+Shift+J.
Icons Used in This Book
You’ll see icons in the margins as you read this book, icons that indicate something special. Here, without further ado, is the gallery:
This icon tells you I’m introducing a new feature, something just added to the program with Photoshop CS3. If you’re brand new to Photoshop yourself, you can ignore this icon — it’s all new to you. If you’re an experienced Photoshop user, take note. Please note that in Chapter 17, just about everythingis new, and I decided that you really didn’t need to see this icon next to just about
everyparagraph.
When I have a little secret or shortcut to share with you — something that can make your life easier, smoother, more convenient — you see the Tip icon.
6
Photoshop CS3 For Dummies
This icon doesn’t appear very often, but when it does, read carefully! I reserve the Warning icon for those things that can really mess up your day — things that can cause you to lose work by ruining your file or messing up Photoshop. If there were to be a quiz afterward, every Warning would be in the essay section!
The Remember icon shows you good-to-know stuff, things that are applicable in a number of different places in Photoshop, or things that can make your Photoshop life easier.
You might notice this icon in a place or two in the book. It’s not common because I exclude most of the highly technical background info: you know, the boring techno-geek concepts behind Photoshop.
How to Use This Book
This is a reference book, not a lesson-based workbook or a tips-and-tricks cookbook. When you have a question about how something in Photoshop works, flip to the Table of Contents or the index to find your spot. You cer-tainly can read the chapters in order, cover to cover, to make sure that you get the most out of it. Nonetheless, keep this book handy while you work in Photoshop. (Reading cover to cover not only ensures that you find out the most about Photoshop, but it guarantees that you don’t miss a single cartoon or joke.)
Part I
A
solid understanding of certain basic concepts and techniques makes learning Photoshop much easier. Heck, it’s difficult to understand a discussion of feathered selections when you don’t know pixels from a hole in the ground, right?1
Welcome to Photoshop!
In This Chapter
䊳What Photoshop does very well, kind of well, and just sort of, well . . .
䊳What you need to know to work with Photoshop
䊳What you need to know about installing Photoshop
A
dobe Photoshop is, without question, the leading image-editing program in the world. Photoshop has even become somewhat of a cultural icon. It’s not uncommon to hear Photoshop used as a verb (“That picture is obvi-ously Photoshopped!”), and you’ll even see references to Photoshop in the daily comics and cartoon strips. And now you’re part of this whole gigantic phenomenon called Photoshop.Whether you’re new to Photoshop, upgrading from Photoshop CS2 or earlier, or transitioning from Elements to the full version of Photoshop CS3
10
Part I: Breezing through Basic Training
Exploring Adobe Photoshop
Photoshop is used for an incredible range of projects, from editing and cor-recting digital photos to preparing images for magazines and newspapers to creating graphics for the Web. You can also find Photoshop in the forensics departments of law-enforcement agencies, scientific labs and research facili-ties, and dental and medical offices, as well as in classrooms, offices, studios, and homes around the world. As the Help Desk Director for the National Association of Photoshop Professionals (NAPP), I solve problems and provide solutions for Photoshop users from every corner of the computer graphics field and from every corner of the world. People are doing some pretty amaz-ing thamaz-ings with Photoshop, many of which are so far from the program’s original roots that it boggles the mind!
What Photoshop is designed to do
Adobe Photoshop is an image-editing program. It’s designed to help you edit images — digital or digitized images, photographs, and otherwise. This is the core purpose of Photoshop. Over the years, Photoshop has grown and devel-oped, adding features that supplement its basic operations. But at its heart, Photoshop is an image editor. At its most basic, Photoshop’s workflow goes something like this: You take a picture, you edit the picture, and you print the picture (as illustrated in Figure 1-1).
Figure 1-1: Basic Photoshop: Take photo, edit photo, print photo. Drink coffee (optional).
Astronaut image courtesy of NASA
Figure 1-2: Some common Photoshop tasks.
New in Photoshop CS3 is the powerful Black and White adjustment (found in the Image➪Adjustments menu). Used to convert the appearance of a color image to that of a black and white (or grayscale) photo, it lets you blend the content of the various component colors to achieve a perfect grayscale image. As you can see in Figure 1-3, you also have the option of creating a sepia or tinted version of the image.
Figure 1-3: The Black and White adjustment gives incredible control over grayscale and tinted conversions.
12
Part I: Breezing through Basic Training
Over the past few updates, Photoshop has developed some rather powerful illustration capabilities to go with its digital-imaging power. Although Photoshop is still no substitute for Adobe Illustrator, Photoshop certainly can serve you well for smaller illustration projects. (Keep in mind that Photoshop is a raster art program — it works with pixels — and vector artwork is only simulated in Photoshop.) Photoshop also has a very capable brush engine, which makes it feasible to paint efficiently on your digital canvas. Figure 1-4 shows a compar-ison of raster artwork (the digital photo, left), vector artwork (the illustration, center), and digital painting (right). The three types of artwork can appear in a single image, too. (Simulating vector artwork with Photoshop’s shape layers is presented in Chapter 11, and you can read about painting with Photoshop in Chapter 14.)
Photoshop CS3 includes some basic features for creating Web graphics, including slicing and animations (but Web work is best done in a true Web-development program, such as Dreamweaver). Photoshop even includes special Web Photo Gallery features to help you create an entire Web site to display your artwork, and a PDF Presentation feature to prepare on-screen presentations, complete with transition effects between slides. (Read about Web Photo Gallery and PDF Presentation in Chapter 16.)
Photoshop CS3 and Photoshop CS3 Extended
Although there have been different versions of “Photoshop” for years (Photoshop versus Photoshop LE versus Photoshop Elements), this is the first time that Adobe has marketed two dif-ferent versions of Photoshop itself. Photoshop CS3 and Photoshop CS3 Extended both have all of Photoshop’s powerful image-editing, vector-drawing, painting, and type capabilities. Photoshop CS3 Extended also includes some very specialized, highly technical features for use in science, research, and video editing, and for use with 3D modeling programs. (These fea-tures are introduced in Chapter 17.)
So, if you have Photoshop CS3 rather than Photoshop CS3 Extended, should you feel cheated or like a second-class citizen? Nope! Unless you specifically need those extended features, there’s no real reason to purchase them. But what if you got Photoshop CS3 Extended as part of a Creative Suite or Adobe Bundle package of software — did you pay for
something you don’t need? Well, sort-of-yeah-but-not-really. The folks who’re really paying extra for the extended features are those who purchase Photoshop CS3 Extended as a stand-alone program. The additional cost they pay funds the research and development of the extended features.
Figure 1-4: You can use Photoshop with raster images, vector artwork, and even to paint.
Other things you can do with Photoshop
Although Photoshop isn’t a page layout or illustration program, you certainly can produce simple brochures, posters, greeting cards, and the like using only Photoshop. (See Figure 1-5.) One of the features that sets Photoshop apart from basic image editors is its powerful type engine, which can add, edit, format, and stylize text as capably as many word-processing programs. Photoshop even has a spell-check feature — not bad for a program that’s designed to work with photos, eh?
Figure 1-5: You can use Photoshop to create cards, posters, and brochures.
14
Part I: Breezing through Basic Training
Photoshop CS3 takes yet another giant step with the introduction of Smart Filters. Smart Filters, which are applied to Photoshop’s Smart Objects, are the long-awaited answer to the prayers of many in the creative world: re-editable filters! In the past, you applied a filter to a copy of an image and, if you changed your mind about what settings to use, you had to undo all subsequent work or (gasp!) start from scratch. Smart Filters enable you to change your mind and simply re-open the filter’s dialog box and apply differ-ent settings to change your image enhancemdiffer-ents or special effects. What a time (and project) saver! (Smart Filters are discussed in Chapter 15; Smart Objects are introduced in Chapter 10.)
Even if you don’t have the high-end video features found in Photoshop CS3 Extended, you can certainly supplement your video-editing program with Photoshop CS3 (even if Photoshop can’t open and play movies you capture with your video camera). From Adobe Premiere (or other professional video programs), you can export a series of frames in the FilmStrip format, which you can open and edit in Photoshop.
If you don’t have specialized software
Admittedly, Photoshop CS3 just plain can’t do some things. It won’t make you a good cup of coffee. It can’t press your trousers. It doesn’t vacuum under the couch. It isn’t even a substitute for iTunes, Microsoft Excel, or Netscape Navigator — it just doesn’t do those things.
However, there are a number of things for which Photoshop isn’t designed that you can do in a pinch. If you don’t have InDesign, you can still lay out the pages of a newsletter, magazine, or even a book, one page at a time. (With PDF Presentation, you can even generate a multipage PDF document from your individual pages.) If you don’t have Dreamweaver or GoLive, you can use Photoshop to create a Web site, one page at a time, sliced and optimized and even with animated GIFs. You also have tools that you can use to simulate 3D in Photoshop CS3, such as Vanishing Point (see Chapter 10).
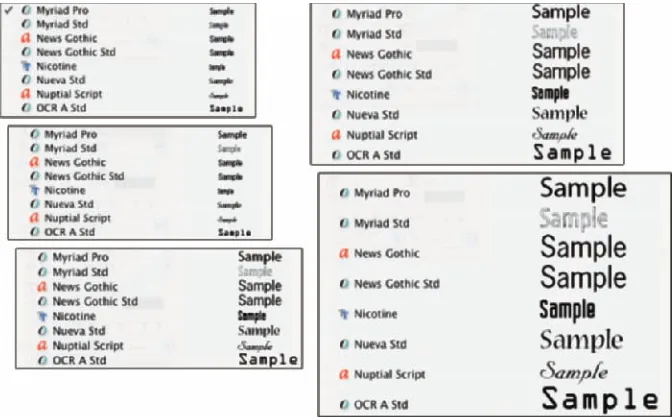
Figure 1-6: Now in Photoshop CS3:Five sample font sizes!
Dreamweaver is a state-of-the-art Web design tool, with good interoperability with Photoshop. However, if you don’t have Dreamweaver and you desperately need to create a Web page, Photoshop comes to your rescue. After laying out your page and creating your slices, use the Save for Web & Devices command to generate an HTML document (your Web page) and a folder filled with the images that form the page (see Figure 1-7). One of the advantages to creating a Web page in Dreamweaver rather than Photoshop is HTML text. (Using Photoshop, all the text on your Web pages is saved as graphic files. HTML text not only produces smaller Web pages for faster download, but it’s resizable in the Web browser.)
Figure 1-7: You can create an entire Web page in Photoshop.
16
Part I: Breezing through Basic Training
Viewing Photoshop’s Parts and Processes
In many respects, Photoshop CS3 is just another computer program — you launch the program, open files, save files, and quit the program quite normally. Many common functions have common keyboard shortcuts. You enlarge, shrink, minimize, and close windows as you do in other programs.
Reviewing basic computer operations
Chapter 3 looks at Photoshop-specific aspects of working with floating palettes, menus and submenus, and tools from the Options bar, but I want to take just a little time to review some fundamental computer concepts.
Launching Photoshop
You can launchPhotoshop (start the program) by double-clicking an image file or through the Applications folder (Mac) or the Start menu (Windows). Mac users can drag the Photoshop program icon (the actual program itself) to the Dock to make it available for one-click startup. You can find the file named Adobe Photoshop CS3 inside the Adobe Photoshop CS3 folder, inside the main Applications folder. (Chapter 3 shows you the Photoshop interface and how to get around in the program.)
Never open an image into Photoshop from removable media (CD, DVD, your digital camera or its Flash card, Zip disks, jump drives, and the like) or from a network drive. Always copy the file to a local hard drive, open from that drive, save back to the drive, and then copy the file to its next destination. You can open from internal hard drives or external hard drives, but to avoid the risk of losing your work (or the entire image file) because of a problem reading from or writing to removable media always copy to a local hard drive.
Working with images
Photoshop can’t read. It cannot, for example, open an Excel spreadsheet or a Microsoft Word DOC file because those aren’t image formats — and Photoshop is, as you know, an image-editing program. If you have a brand-new digital camera and Photoshop won’t open its Raw images, check for an update to the Adobe Camera Raw plug-in at
www.adobe.com/products/photoshop/cameraraw.html
You will find installation instructions for the update there. (Make sure to read and follow the installation instructions exactly.)
Saving your files
You must use the Save or Save As command to preserve changes to your images. And after you save and close an image, those changes are irre-versible. When working with an important image, consider these three tips:
⻬Work on a copy of the image file. Unless you’re working with a digital photo in the Raw format (discussed in Chapter 7), make a copy of your image file as a backup before changing it in Photoshop. The backup ensures that should something go horribly wrong, you can start over. (You never actually change a Raw photo — Photoshop can’t rewrite the original file — so you’re always, in effect, working on a copy.)
⻬Open as a Smart Object.Rather than choosing File➪Open, make it a habit to choose File➪Open As Smart Object. When working with Smart Objects, you can scale or transform multiple times without continually degrading the image quality, and you can work with Smart Filters, too!
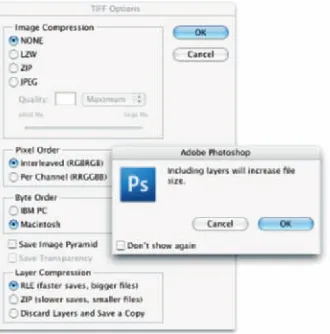
⻬Save your work as PSD, too. Especially if your image has layers, save it in Photoshop’s PSD file format (complete with all the layers) before using Save As to create a final
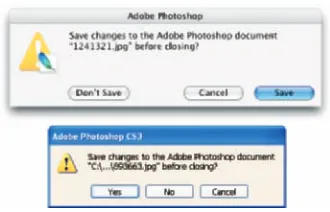
copy in another format. If you don’t save a copy with layers, going back to make one little change can cost hours of work. If you attempt to close an image or quit Photoshop without saving your work first, you get a gentle reminder asking whether you want to save, close without saving, or cancel the close/quit (as shown in Figure 1-8).
17
Chapter 1: Welcome to Photoshop!
18
Part I: Breezing through Basic Training
Keyboard shortcuts
Keyboard shortcuts are customizable in Photoshop (check out Chapter 3), but some of the basic shortcuts are the same as those you use in other programs. You open, copy, paste, save, close, and quit just as you do in Microsoft Word, your e-mail program, and just about any other software. I suggest that you keep these shortcuts unchanged, even if you do some other shortcut customization.
Photoshop’s incredible selective Undo
Here’s one major difference between Photoshop and other programs. Almost all programs have some form of Undo, enabling you to reverse the most recent command or action (or mistake). Like many programs, Photoshop uses the Ô+Z/Ctrl+Z shortcut for Undo/Redo and the Ô+Option+Z/Ctrl+ Alt+Z shortcut for Step Backward, which allows you to undo a series of steps (but remember that you can change those shortcuts, as described in Chapter 3). Photoshop also has, however, a couple of great features that let you partially undo.
Painting to undo with the History Brush
You can use Photoshop’s History Brush to partially undo just about any filter, adjustment, or tool by painting. You select the History Brush, choose a his-tory state (a stage in the image development) to which you want to revert, and then paint over areas of the image that you want to change back to the earlier state.
You can undo as far back in the editing process as you want, with a couple of limitations: The History palette (where you select the state to which you want to revert) holds only a limited number of history states. In the Photoshop Preferences➪General pane, you can specify how many states you want Photoshop to remember (to a maximum of 1,000). Keep in mind that storing lots of history states takes up computer memory that you might need for processing filters and adjustments. That can slow things down. The default of 20 history states is good for most projects, but when using painting tools or other procedures that involve lots of repetitive steps (such as touching up with the Dodge, Burn, or Clone Stamp tools), a larger number (perhaps as high as 60) is generally a better idea.
commands, you cannot revert to prior steps with the History Brush. You can choose as a source any history state that comes after the image’s pixel dimensions change but none that come before.
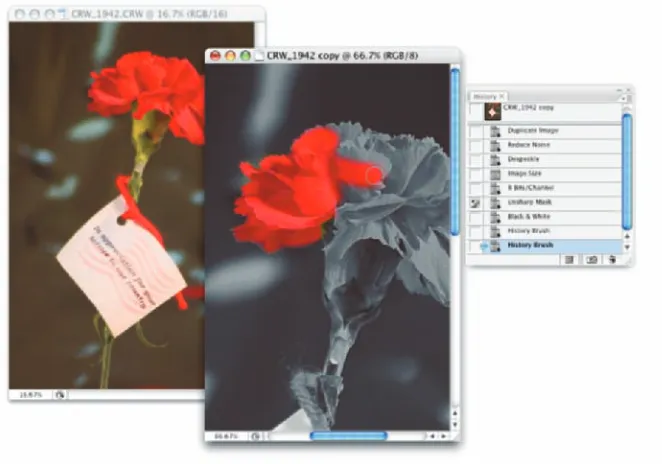
Here’s one example of using the History Brush as a creative tool. You open a copy of a photograph in Photoshop. You edit as necessary. You use the Black and White adjustment on the image to make it appear to be grayscale. In the History palette, you click in the left column next to the step immediately prior to Black and White to designate that as the source state, the appearance of the image to which you want to revert. You select the History Brush and paint over specific areas of the image to return them to the original (color) appearance (see Figure 1-9). There you have it — a grayscale image with areas of color, compliments of the History Brush!
Figure 1-9: Painting to undo with the History Brush.
20
Part I: Breezing through Basic Training
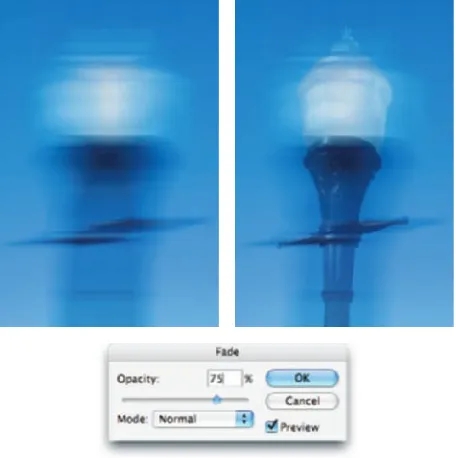
Reducing to undo with the Fade command
Immediately after applying a filter or adjustment or using most of Photoshop’s tools, you can choose Edit➪Fade and change the opacity or blending mode with which the previous step was performed. You might, for example, apply a sharp-ening filter and then choose Edit➪Fade Unsharp Mask to change the blending mode from Normal to
Luminosity. (Sharpening only the luminosity of your image, whether with this technique or in the Lab color mode, prevents unwanted opacity of the blur to 75%. That gives you the appearance of a back-and-forth motion while leaving the subject more readily recogniz-able (see Figure 1-10).
Installing Photoshop: Need to know
If you haven’t yet installed Photoshop CS3 (or the Adobe Creative Suite), here are a few points to keep in mind:
⻬Install only into the default location. Photoshop is a resource-intensive program. Installing it into the default location ([harddrive]➪Applications on a Mac and C:\Program Filesfor Windows) ensures that it has access to the operating system and hardware as necessary. Installing into any other location or attempting to run Photoshop across a net-work can lead to frustrating problems and loss of net-work in progress.
⻬Disable all spyware and antivirus software before installing. Antivirus software can intercept certain installation procedures, deeming them to be hazardous to your computer’s health. That can lead to malfunctions, crashes, lost work, frustration, and what I like to call Computer Flying Across Room Syndrome. If you use antivirus software (and if you use Windows, you’d better!), turn it off before installing any program, espe-cially one as complex as Photoshop. You might find the antivirus pro-gram’s icon in the Windows taskbar; or you might need to go to the Start menu, use All Programs to locate the antivirus software, and disable it. On Mac, check the Dock. And don’t forget to restart your antivirus software afterward! If you already installed Photoshop and antivirus software was running at the time, I urge you to uninstall and reinstall. (Reinsert the Photoshop CS3 CD and launch the installer to use the built-in uninstall feature.)
⻬If you use autobackup software, shut it down, too. Never run autobackup software when installing software. Like antivirus software, it can also lead to problems by interfering with the installer.
⻬Connect to the Internet and activate right away. It’s best to run the Photoshop installer while your computer is connected to the Internet. That enables Photoshop’s activation process to happen right away, making sure you can get started as soon as the installer finishes.
⻬If you have third-party plug-ins, install them elsewhere. Third-party
plug-ins — those filters and other Photoshop add-ons that you buy from companies other than Adobe — can be installed into a folder outside the Photoshop folder. You can then make an alias (Mac) or shortcut (Windows) to that folder and drag the alias/shortcut to Photoshop’s Plug-Ins folder. (If you have a multibutton mouse, right-click the folder to create an alias/shortcut; Control+click if you’re still using a one-button mouse.) Why install outside the Photoshop folder? Should you ever need to (gasp!) reinstall Photoshop, you won’t need to reinstall all your third-party plug-ins. Just create a new alias/shortcut and move it into Photoshop’s new Plug-Ins folder.
⻬Check for plug-in updates.Go to the manufacturer’s Web site for each of your third-party plug-ins and check for updates. This is especially impor-tant if you’re using an Intel-based Mac. Unless the plug-ins have been updated (“Universal”), they won’t run. There’s a workaround, however. In the Finder, go to [harddrive]➪Applications➪Adobe Photoshop CS3. Right-click or Control+click on the program icon and choose Get Info. In the Get Info window, select the option Open Using Rosetta. Photoshop will run more slowly, but you’ll have your unupdated third-party plug-ins available. When the plug-ins are finally updated (or you decide speed is more impor-tant), reopen Get Info and deselect the Open using Rosetta check box.
22
Part I: Breezing through Basic Training
⻬If you have lots of plug-ins, create sets. Plug-ins require RAM (com-puter memory that Photoshop uses to process your editing commands). If you have lots of plug-ins, consider dividing them into groups accord-ing to how and when you use them. Sort (or install) them into separate folders. (Hint: Plug-ins that you use in many situations can be installed into multiple folders.) When you need to load a specific set, do so through the Photoshop Preferences➪Plug-Ins pane by designating a second plug-ins folder and relaunching Photoshop.
2
Knowing Just Enough
about Digital Images
In This Chapter
䊳Understanding digital images
䊳Discovering resolution
䊳The many file formats of Photoshop
I
n the early days of photography, some less-advanced cultures viewed a photo with great suspicion and even fear. Was that an actual person, trapped in the paper? Did taking a photo steal a person’s soul? You know that a camera doesn’t trap anyone inside the paper — and you can be pretty sure about the stolen soul issue — but how much does the average shooter know about digital images? And how much do you need to know aboutdigital images to work effectively in Photoshop? The answers to those two questions are, “Not as much as he/she should” and “Not as much as you might fear.” In this chapter, I give you some basic informa-tion about how digital images exist in Photoshop, a real understanding of that critical term resolution,
and an overview of the different ways that you can save your images. But most important, I help you understand the very nature of digital images by explaining the world of pixels.
24
Part I: Breezing through Basic Training
What Exactly Is a Digital Image?
Whether you take a picture with a digital camera or use a scanner to bring a photo (or other artwork) into Photoshop, you are digitizing the image. That is,
digit not as in a finger or toe but as in a number. Computers do everything — absolutely everything — by processing numbers, and the basic language of computers is binary code. Whether it’s a photo of a Tahitian sunset, a client’s name in a database, or the latest box score on the Internet, your computer works on it in binary code. In a nutshell, binary code uses a series of zeros and ones (that’s where the numbers part comes into play) to record information. (In Photoshop, the actual number of zeros and ones used to record information about each pixel in your image — 8 or 16 or 32 — is a critical concept for color, as you can see in Chapter 6.) Binary code might look like this:
00100101 01010011 00011011 11010100 11101000 11000110 10101001 10010011 11010101 01011010 00101100 11101110
This example, of course, would be complete gibberish to a computer — if those two lines turn out to be the launch code for some missile, it’s just a coincidence.
So what does binary code have to do with the wedding photos that you took this weekend or the masterpiece you must print for your thesis pro-ject? An image in Photoshop consists of tiny squares of color called pixels
(pixelis short for picture element), as you can see in the close-up to the right in Figure 2-1. The computer records and processes each pixel in binary code. These pixels replicate a photo the same way that tiles in a mosaic reproduce a painting.
A tile in a mosaic isn’t face or sky or grass; rather, it’s beige or blue or green. The tiles individually have no relationship to the image as a whole; rather, they require an association with the surrounding tiles to give them purpose, to make them part of the picture. Without the rest of the tiles, a single tile has no meaning.
Likewise, a single pixel in a digital image is simply a square of color. It doesn’t become a meaningful part of your digital image until it’s surrounded by other pixels of the same or different color, creating a unified whole — a comprehensible picture. How you manipulate those pixels, from the time you
capture the image digitally until you output the image to paper or the Web, determines how successfully your pixels will represent your image, your art-work, your dream.
The True Nature of Pixels
Here are some basic truths about pixels that you really need to know. Although reading this section probably can’t improve your love life, let you speak to the dead, or give you the winning lottery number, it can help you understand what’s happening to your image as you work with it in Photoshop.
⻬Each pixel is independent. You might think that you see a car or a circle or a tree or Uncle Bob in an image, but the image is actually only a bunch of little colored squares. Although you can read about various ways to work with groups of pixels throughout this book, each pixel exists unto itself.
⻬Each pixel is square (except on TV ). Really! Each pixel in a digital image is square except when you’re creating images for television, which uses nonsquare pixels. ( That’s a rather specialized field, which I very briefly address in Chapter 3.) It’s important that you understand the square-ness of pixels because you sometimes have to deal with those pointy little corners.
⻬Each pixel can be exactly one color.
That color can change as you edit or alter the image, but each pixel consists entirely of a single color — there’s no such thing as a two-tone pixel. Figure 2-2, zoom in to 3,200 per-cent. (The old limit
was 1,600 percent.) And, if you’re working on a Mac or use Windows Vista, you can show or hide the pixel grid,the fine lines separating the individual pixels when zoomed in, in the View➪Show menu.
25
Chapter 2: Knowing Just Enough about Digital Images
26
Part I: Breezing through Basic Training
⻬Smaller is better (generally speaking). The smaller each pixel, the better the detail in an image. ( However, when preparing images for the Web, you need smaller images that invariably have less detail.) If you capture an image of a dog in a park with 2 million pixels and capture the same shot with only 30,000 pixels, it’s pretty obvious which image will better show the individual blades of grass and the fur. Take a look at Figure 2-3 for an example of this critical concept.
Smaller pixels also help hide those nasty corners of pixels that are some-times visible along curves and diagonal lines. When the corners of pixels are noticeable and degrade the image, you call it a bad case of the jaggies.
⻬Pixels are aligned in a raster.The term raster appears regularly when you discuss images created from pixels. Raster, in this case, refers to the nice orderly rows and columns in which pixels appear. Each image has a certain number of rows of pixels, and each row is a certain number of pixels wide — the columns. Within the raster, the pixels perfectly align side to side and top to bottom.
⻬Every picture created with pixels is rectangular. Some images might appear to be round, or star-shaped, or missing a hole from the middle, but they aren’t unless you print them out and grab your scissors. The image file itself is rectangular, even if it appears round. There are actually pixels in those seemingly empty areas; the pixels are, however, transparent.
How Many Pixels Can Dance
on the Head of a Pin?
You hear the term resolution a lot when working with digital images. Digital cameras have so-many megapixels of resolution; inkjet printers have so-much by so-much resolution; to work in Photoshop CS3, your monitor must have a
resolution of at least 1,024 x 768 pixels; when printing your images, you must use 300 pixels per inch (ppi) as your resolution (wrong!), but your Web images must have a resolution of 72 ppi (again wrong!); and don’t forget your New Year’s resolution!
Resolution revelations
In this wonderful world of digital imaging, you see resolution used in four basic ways:
⻬Image resolution: Image resolution is the size of your image’s individual pixels when you print. I go into greater detail about this concept in the upcoming section, “Picking an image resolution.”
⻬Camera resolution: Digital cameras capture each image in a specific number of pixels. Check your camera’s user guide or open one of the images in Photoshop and choose Image➪Image Size. Take a look at the number of pixels that your camera records for the width and for the height. Multiply the numbers together, divide by one million, and round off the result. (If you’re in the camera maker’s marketing department, make sure that you round up.) That’s the megapixel (MP) rating for the camera. Use it as a general guideline when shopping. If you create Web graphics or snapshot-size prints, 3 or 4 MP is fine. For large prints, you need at least 6 MP.
⻬Monitor resolution: Monitor resolution determines how many pixels are visible on-screen. Whether you use a Mac or a PC, you set the monitor resolution at the system level (as shown in Figure 2-4). When you use a higher monitor resolution, you get a larger workspace, but each pixel is smaller, which might make some jobs tougher. Experiment to find a mon-itor resolution that works just right for you.
28
Part I: Breezing through Basic Training
•Mac:Click the blue Apple menu in the upper-left corner of the screen and choose System Preferences. Then click Displays. (Some Apple monitors have a button on the bezel that automatically opens the window for you.)
•Windows:Choose Start➪Control Panel and then double-click Display. Click the Settings tab to see what monitor resolutions are available.
⻬Printer resolution: Unlike the three preceding terms, printer resolution doesn’t involve pixels. Rather, a printer resolution tells you how many tiny droplets of ink are sprayed on the paper. Remember that it takes several droplets to reproduce a single image pixel — you certainly don’t need an image resolution anywhere close to the printer’s resolution! (See the following section for more on this.)
Figure 2-4: Set a Mac’s resolution through the System Preferences (left), a PC’s resolution through the Control Panel (right).
Resolving image resolution
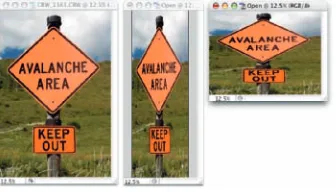
You can always check — or change — a picture’s resolution by choosing Photoshop Image➪Image Size. The Image Size dialog box (which you can see in Figure 2-5) has two separate but related sets of information about your image. At the top, you see information about the actual image itself, in the Pixel Dimensions area. Below, in the Document Size area, you see instructions for a printing device — that “size” pertains only to printing and has no impact on what you do in Photoshop.
Figure 2-5: At the top, real information about your image. Below, simply printing instructions.
You’ll find it very handy to change the pixel dimensions and the print size at the same time in the Image Size dialog box. And, much to the delight of math-challenged folks, the Image Size feature does most of the calculations. For example, with the Constrain Proportions option selected, you enter a new Width and Photoshop calculates the new Height automatically!
30
Part I: Breezing through Basic Training
Changing the size of your artwork with the Image Size command
You have a number of ways to change the size of your photos and other art. In Chapter 4, I introduce you to
cropping (chopping off part of the artwork to make it fit a certain size or to improve its overall appearance and impact). You can use Photoshop’s Image Size command to change the image dimensions or printing instruc-tions without altering the composition,
which is the visual arrangement of the image or artwork. All the content of the original image is there, just at a different size. Of course, as you can see in Figure 2-6, if you reduce the size of an image too much, some of that original content can become virtually unrecognizable.
If you know the specific pixel dimen-sions that you need for the final image — say for a Web page — you can simply type a new number in one of the upper fields in the Image Size dialog box and click OK. In most cases, you select all three check boxes at the bottom of the dialog box, enter your desired print width or height (letting Photoshop calculate the other dimension), enter your desired print resolution, and click OK. Of course, you probably want a little more control over the process, don’t you? Figure 2-7 gives you a closer look at the Image Size dialog box.
In the lower part of the Image Size dialog box, you have three decisions to make. The first is rather easy: If you’re resizing an image that uses layer styles (see Chapter 12), you want to select the Scale Styles check box to pre-serve the image’s appearance as it shrinks or grows. In a nutshell, layer styles (such as shadows, glows, and bevels) are applied to a layer at a specific size. You can scale the image without changing those sizes, or you can scale the image and change the style sizes proportionally. Not scaling layer styles can dramatically alter the appearance of a resized image, as you can see in Figure 2-8. A slight bevel combined with a small drop shadow produces a subtle 3D effect in the original (upper) image. Below, when the image is
Figure 2-7: Your choices can have a substantial impact on the appearance of your final image.
scaled down to ƒ1⁄
4the original size without scaling the effects, your chips
change to chumps, and the artwork is ruined.
Figure 2-8: Scaling an image without scaling its layer styles can ruin your image.
The middle check box, Constrain Proportions, should almost always remain selected. Some exceptions might come up, but you normally want to preserve an image’s aspect ratio (the relationship between height and width) when resizing to prevent distorting the image. Figure 2-9 shows you what can happen when you scale one dimension without constraining the image’s proportions.
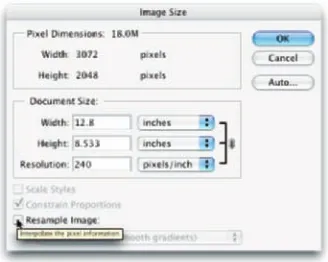
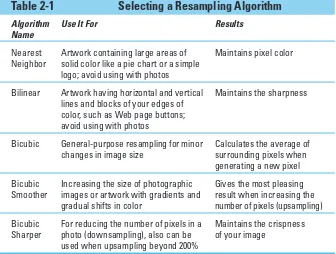
The third check box, Resample Image, is the one that most often
requires the attention of that gray matter within your skull. Not only do you need to decide whether you want to resample the image (change its pixel dimensions), but you also need to decide how you want to resample. Refer to Figure 2-7 to see that you have five different ways to calculate the change (called resampling algorithms).
31
Chapter 2: Knowing Just Enough about Digital Images
32
Part I: Breezing through Basic Training
Before I talk about those choices, let me explain what happens when the Resample Image box is left deselected. The top portion of the Image Size dialog box becomes unavailable — you can no longer make changes in the Pixel Dimensions fields (as you see in Figure 2-10). The information is there, but it won’t change. When you clear the Resample Image check box, you protect the original pixels, preventing any change to the image itself. So what’s left? When using Image Size without resampling, you’re simply
changing the instructions recorded in the image for your printing device. When you enter one dimension, either width or height, Photoshop does the math and fills in both the other dimension and the new resolution.
Take a look at Figure 2-11. I cleared the Resample Image check box and entered 10 and inches for my new print width in order to print this image to a letter-size (8.5 x 11 inches) sheet of paper. Photoshop fills in the new height (6.667 inches) and a new resolution (307.2 ppi). But what if I want an 8 x 10 print? If I enter 8 and
inches for the height, Photoshop recalculates the width to 12 inches and enters a resolution of 256 ppi. If I want a true 8 x 10, I have to crop some of the image because a digital photo and an 8 x 10 have different aspect ratios. (You can read more about that in Chapter 4.)
Okay then, back to the subject of resampling! When you resample an image (change the pixel dimensions), Photoshop takes the image and maps it to the new size, attempting to preserve the image’s appearance as much as possible at the new size, using the new number of pixels. Of course, if you take an image that’s more than 3,000 pixels wide and resample it to 300 pixels wide, you’re going to lose some of the detail. (Remember what happened to Hugo the Bulldog earlier in this chapter in Figure 2-3!)
Figure 2-11: Enter a value, and Photoshop recalculates the fields automatically.