Security utility
For
Linux server
Table of Contents
Introduction
Filter traffic through the firewall Presentation Flood or denial of service Port Scan
Banned an IP Preventing intrusions
Portsentry (port scan)
Fail2ban (brute-force, dictionary, denial of service) Snort (intrusion detection)
Monitor logs
Introduction
This guide will teach you how to secure a server and thus introduce you to the topics of computer security. How is it important? By definition, a server is open to the world, so a minimum of security is the most simplistic attacks.
The procedure will be as follows: presentation of flaws.
presentation of tools to mitigate them.
Of course, I do not do a complete computer security course, this tutorial is an initiation. To put it simply, it is a like closing the shutters at night.
Material point of view, this is what you will need:
a server with an xBuntu or Debian distribution (for other distributes, the principle will be the same, but the commands may be different). a root access (in ssh for example) and a console.
Filter traffic through the firewall
Presentation
The firewall is the indispensable element to secure its server. It will filter all the traffic in allowing only the exchanges permitted by the administrator. Without a correctly set firewall, all traffic is more or less (that is, an attacker can do what he wants in your home) and this kind of flaw is detectable by simply scanning ports.
However, the Linux kernel already provides a firewall to the user, which can be configured via the iptables software (normally contained in /sbin/iptables). If not installed:
We will now detail the operation of a firewall - relatively simple. A firewall analyzes all the traffic and checks if each packet exchanged complies with its rules (filter criteria). So, you just have to specify good rules for prohibit unnecessary traffic.
Criteria can be diverse (filter ports, protocols, IP addresses, etc.). Basic, we will specify our rules on ports. Of course, we must be as strict as possible in the choice of rules; therefore, by default, any firewall is regulated in the first place by blocking everything, absolutely everything. Then we will "open" (allow traffic) some ports that we want to use (for example for a web server, we will open port 80 so that the website is accessible).
Declaration of rules
integral filteringNote that the command iptables -L -v will allow you to view the current rules.
1. Let's create the script:
And we written : #!/bin/sh
2. We erase the previous rules to leave on good bases:
3. We block by default all the traffic (if you are logged in with ssh, do not run the script yet! You lose the connection with the server, the final script you will find it at the end):
We indicate with the -m and --state parameters not to close the connections that are already established.
5. We allow the loopback (we will not block ourselves!)
Note: lo means localhost (the server itself).
Everything is blocked, we just have to open the ports used. Open used ports
From now on, let's take a closer look at the parameters of iptables: -t: will default to « filter ».
-A: will indicate the direction of traffic: INPUT or OUTPUT. -p: indicates the protocol (TCP or UDP).
--dport and --sport: destination port and source port (as we are the server, we will use mainly dport).
-j: how to process the package (we will use ACCEPT and DROP to accept and reject the package).
The more precise we are, the more secure we will be. It is therefore essential to provide these few options.
Thus, a simple rule will have the following form:
Finally, note that if you want an exchange, always open the port in both directions (INPUT and OUTPUT) ... logic.
Example if you have a web server (port 80):
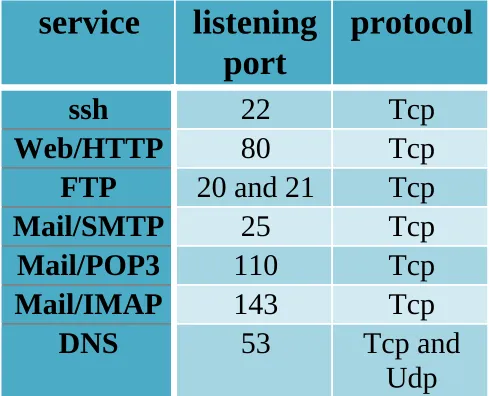
All you have to do is specify all the necessary rules. Here is a small table to help you (this is the default data):
service
listening
Starting the firewall
Finally, we will launch our firewall:
Advanced configuration
Flood or denial of serviceThis kind of attack aims to overload the query machine. It is possible to guard itself quite directly at the level of the firewall:
The TCP syn flags generate connection requests, and the purpose of this rule is to limit them to one per second (limit fields).
However, it is not recommended to go beyond the second (otherwise the flow control and TCP error recovery).
The same can be done with the UDP and ICMP protocols:
Note, however, that this type of attack allows the server to be dropped, but not to access it. That's why the risk of being the target is quite thin (unless you are called Google). In general, a simple anti-intrusion software like
fail2ban is sufficient, according to the level of security sought.
Port Scan
You can also limit the port scan (which consists of testing all your ports to detect which ports are open). For that, a rule of this kind would go:
This is somewhat the same principle as above. Knowing that a proper TCP connection requires three packets with three different flags, one sees right away the finesse of this rule that can work packet by packet. For more information on TCP flags, see Wikipedia.
Banned an IP
Preventing intrusions
Currently, the firewall will block any attempts of connections on the closed ports. But what about open ports?
In order to control more precisely what is going on, the firewall is not sufficient and we will have to use other tools, called IDS (Intrusion Detection System) and IPS (Intrusion Prevention System). These two categories of software will -as their name suggests - monitor any intrusion attempts on the server.
The following procedure will show you how to react to each step of a conventional intrusion attempt, namely:
1. Port scanning (more generally, information gathering) to find vulnerabilities.
2. Simple attacks, witnesses of low security.
3. Intrusion (via techniques that will not be described here because they go beyond our framework).
Portsentry (port scan)
This utility allows to block in real time most of the known port scans (even very discrete and escaping the rules of filtering of the basic firewall). I recall in passing that scanning ports means testing all the ports of a machine in order to determine which ones are open (wholesale input gates). However, do not panic if your server is the target of a simple port scan, this will be common, and if you are well protected, the pirate will go his way.
Portsentry is so nice if you want to complicate the task of the attacker:
To configure it:
Or :
Comment the lines KILL_HOSTS_DENY .
Uncomment the line KILL_ROUTE="/sbin/iptables -I INPUT -s $TARGET$ -j DROP".
Thus, Portsentry will add a rule in the firewall (iptables) to reject the packets in case of scans.
We start the software (it must be run twice, for TCP and UDP):
Fail2ban (brute-force, dictionary, denial of service)
As I said, the open ports on the machine are a priori without much protection, and subject to simple attacks such as attempting to connect by brute force or by dictionary (for example, testing all combinations of passes to log into ssh), denial of services (overloading the query server) or - more foolishly - searching for users without passwords ... If your machine is infiltrated so easily, the attacker will be really content .
Fail2ban is a small utility that relies on machine logs to look for repeated suspect actions (for example, password errors) in a given amount of time. If it finds it, it will ban the IP of the attacker via iptables. This type of software is indispensable because, although it is lightweight, it offers good protection against the basic attacks mentioned above.
For installation:
For configuration:
I encourage you to fill in the field below:
Destmail: enter an email address if you want to receive alerts from fail2ban.
The protection level can be modulated via the following fields (note that the default configuration is normally sufficient):
Bantime: time of banning suspicious IPs.
Note that in the JAILS section (in nano: ctrl w => search JAILS) you will see all the services that fail2ban will monitor. If you have changed the default ports, you must specify them here too. For example, with ssh:
Save and exit.
I encourage you to quickly go through the rest of the options to customize your app a little.
Snort (intrusion detection)
Monitor logs
Most of the software mentioned above will send you email
notifications in the event of an alert. However, monitoring logs is important because they reflect the "life" of your server. The most interesting logs are:
/var/log/auth.log that contains all attempts to access the server. It may be useful to filter the content, for example: cat /var/log/auth.log | grep authentication failure
/var/log/message and /var/log/syslog contains a bit of everything (errors, bugs, information, etc).
/var/log/fail2ban is the fail2ban alert log. Search for: cat / var / log / fail2ban | grep ban.
Testing server security
It is well known that to test the security of its server, the simplest is still to put itself in the skin of a pirate.
Port Scanner
nmap is the best port scan tool: it will attempt to open connections on a large number of ports on your machine to determine whether they are open or not.
As it is our server, it is best to perform the most incisive (and therefore least discreet) scan possible:
You will then have the list of open ports. You can also test a particular port with the -p port argument.