Adobe Photoshop CS/CS2 Breakthroughs By David Blatner, Conrad Chavez
... Publisher: Peachpit Press
Pub Date: November 23, 2005
ISBN: 0-321-33410-8
Pages: 288
Table of Contents | Index
Adobe Photoshop CS/CS2 Breakthroughs By David Blatner, Conrad Chavez
... Publisher: Peachpit Press
Pub Date: November 23, 2005
ISBN: 0-321-33410-8
Pages: 288
Table of Contents | Index
Copyright
Introduction
How to Read This Book
For More Information
Acknowledgements
Chapter 1. Photoshop Essentials
Evaluating an Image
Chapter 7. Enhancing Creativity
Brushes
Filter Fun
Perspective and Distortion
Darkroom Adventures
Paths and the Pen
Chapter 8. Keeping Color Consistent
Setting Up Color
Previewing Color Output
Color Space Conversions
Chapter 9. Organizing and Finding Images
Building Your Bridge
Annotating and Organizing
Fast File Finding
Production Practices
Chapter 10. Printing, Saving, and Exporting
Printing
Images for Other Programs
Images for the Internet
It's Showtime!
Copyright
ADOBE PHOTOSHOP CS/CS2 BREAKTHROUGHS
David Blatner and Conrad Chavez
Copyright © 2006 by David Blatner and Conrad Chavez
Blatner Books are published in association with PEACHPIT PRESS
1249 Eighth Street
Berkeley, California 94710 (800) 283-9444
(510) 524-2178
(510) 524-2221 (fax)
Find us on the World Wide Web at: http://www.peachpit.com
Peachpit Press is a division of Pearson Education
Editor: Nancy Davis
Production Editor Extraordinaire: Lisa Brazieal
Indexer: Patti Schiendelman
Cover design: Charlene Charles-Will, David Blatner
Cover photograph courtesy Getty Images
Interior design and production: David Blatner (moo.com) and Conrad Chavez
All rights reserved. No part of this book may be reproduced or transmitted in any form by any means, electronic, mechanical, photocopying, recording, or otherwise, without the prior written permission of the publisher. For information on getting
permission for reprints and excerpts, contact
Disclaimer
The information in this book is distributed on an "As Is" basis, without warranty. While every precaution has been taken in the preparation of the book, neither the authors nor Peachpit Press shall have any liability to any person or entity with respect to any loss or damage caused or alleged to be caused directly or indirectly by the instructions contained in this book or by the computer software and hardware products described in it.
Trademarks
Throughout this book trademarked names are used. Rather than put a trademark symbol in every occurrence of a
trademarked name, we state we are using the names only in an editorial fashion and to the benefit of the trademark owner with no intention of infringement of the trademark. All trademarks or service marks are the property of their respective owners.
9 8 7 6 5 4 3 2 1
Printed and bound in the United States of America
Dedication
Introduction
HEY BUDDY, WHAT'S YOUR PROBLEM? No, wait, we're not trying to be obnoxious; we really do want to know what your problem iswell, as long as it involves Adobe Photoshop. After all, that is our job: listening to problems and coming up with breakthrough solutions.
In fact, we've spent much of the past couple of years listening to seminar attendees about their problems, teaching new and advanced users, working with clients, reading online Photoshop forums, and talking with other Photoshop trainers. We
discovered that there are certain questions that are asked over and over againquestions about resolution, opening Camera Raw files, adjusting tone and color, saving files to disk. . .
This book is a compendium of those commonly encountered problems, andmore importantlytheir solutions! Some solutions are simple, such as pointing out a feature that you might never have known about. Other solutions are complex, requiring
multi-step procedures and waving witchbane around your head while standing on one foot.
A few solutions involve problems with Photoshop CS which were fixed in Photoshop CS2, while some are more concerned with new problems that popped up in this most recent version. Most of the solutions in this book are applicable to both CS and CS2.
Of course, with all this talk about problems and solutions, you might get the feeling that we think Photoshop is buggy or
causes headaches. No way: We love Photoshop and it is among the most stable, functional pieces of software we own. But
we've been around long enough to know that all software has bugsand they usually bite you just before a big deadline. And
How to Read This Book
As much as we'd love to fly out to [insert name of your city here] and sit by your side as you work, we just can't right now. That's where this book comes in: Each chapter of this book covers an area we know people have problems withorganizing myriad images, for instance, or keeping color consistent. We don't expect you to read the whole thing cover to cover. Rather, skip around the book, gathering what you need when you need it.
You might strategically leave this book wherever you go when you have a major problem: For David, it's next to the
For More Information
Note that we have no intention of this book covering every feature in Photoshop. Sure, we cover a lot of ground, and we take an in-depth look at some areas that often cause confusion with users. But we expect that you'll use this book in
conjunction with other resources on Photoshop. For example, we don't cover how to script Photoshop or create cool effects that look like fire or ice or whatever else you're in the mood to add to your images. Fortunately, there are other resources out there. Here's a few places you can go for more information.
Real World Adobe Photoshop CS2. While we are a bit biased (this book was written by David Blatner and our friend Bruce Fraser), this is also the book recommended by members of the Photoshop development team at Adobe.
Adobe Photoshop CS2 Visual QuickStart Guide. This big step-by-step instruction book by Elaine Weinmann and Peter Lourekas offers a great introduction to Photoshop. We tend to like this better than the Adobe Photoshop Classroom in a Book, though that one is good, too.
Adobe Photoshop Web Site. Most corporate Web sites are filled with marketing materials. You'll find plenty of that at Adobe, but it's alongside excellent useful information, too. It's definitely worth a trip to
www.adobe.com/products/photoshop. Also, the answers to many of your most puzzling Photoshop questions can often be answered by the knowledgeable and helpful volunteers in the Photoshop User to User Forums at
www.adobe.com/support/forums/main.html
thousands of Photoshop resources on the Internet. For keeping up to date, check out www.photoshopnews.com. For tips and tricks, see www.photoshoptechniques.com or just go to Google, type in "photoshop tips," and have your mind blown.
Magazines. There are an ever-growing number of
magazines that cover cool Photoshop techniques. Some of our favorites are DG Magazine (formerly Digital Graphics, from Australia), PhotoshopUser (from the NAPP), and
Acknowledgements
Any undertaking that involves Adobe Photoshop necessarily taps into the rich and deep web that surrounds this amazing program. We wrote the words, but we couldn't have done it without that infrastructure!
Thanks to Peachpit publisher Nancy Ruenzel, who liked the idea of Blatner Books. To our editor, Nancy Davis, for her
extraordinary patience and suggestions. And to our production editor Lisa Brazieal for her happy, reassuring voice on the end of the telephone. To Pamela Pfiffner, our champion embedded inside the Peachpit fortress. And to Don Sellers, for his excellent copyediting.
Our sincere appreciation goes to Bruce Fraser, Anne-Marie Concepción, Deke McClelland, Greg Vander Houwen, and participants in the Photoshop User to User Forums.
David: "I am so thankful to my wife, Debbie, and our two boys, Gabriel and Daniel, who have supported me and this project in so many ways. Thanks, too, to my mom and step-dad, who loaned me the money to buy a laser printer back in the 1980s, even though they thought it was a crazy thing for me to do. And a huge round of applause to my co-author Conrad, who was instrumental in making this book a reality".
1. Photoshop Essentials
WHEN YOU FIRST MOVE INTO A NEW HOME, it's easy to find the basics, such as the kitchen and the shower. But you never quite feel at home until you've got all your stuff arranged just the way you like it: the TV in the best corner of the living room for watching movies, the kitchen utensils stored right where you'd reach for them when you cook, and the alarm clock at just the right position on the nightstand for when your arm swings over to crush the snooze button every morning.
First Things First
Getting To Know You
Each time I launch Photoshop I'm overwhelmed by all the palettes and menus. What's the best way to get
familiar with what I see on screen?
Becoming familiar with Photoshop's work area is a wise first step. The entire work area is designed not only to provide you with the tools you need, but also to surround the document window with useful information about the status of the image, the current tool, and Photoshop itself. Because Photoshop is used in many different and specialized ways, it's possible to customize the work area to a great extent. We show you how in "Making Arrangements for Your Palettes," later in this chapter.
Here is an overview of the Photoshop work area (Figure 1.1):
Menu bar. As in other programs, the menu bar contains commands you can apply to alter an image or Photoshop's behavior.
Options bar. Located just below the menu bar, the Options bar presents controls for the tool you've selected in the Tools palette.
this chapter.
Tip
Because the controls on the Options bar change when you change tools, the Options bar isn't like those unchanging horizontal toolbars found in other programs. Note that you can always jump to the first editable field of the Options bar
(when there is one) by pressing the
Return/Enter key. If there is more than one field, you can Tab or Shift-Tab from one to the next.
Document window. Photoshop makes good use of the space around the document window. Along the top of the window you see the normal title bar. To the left of the title is a preview icon that's dimmed (on the Mac OS) if recent
changes aren't saved. To the right of the title are the zoom percentage, the color mode, and the bit depthplus the
preview mode, if View > Proof Colors is turned on (not shown in Figure 1.1).
Along the bottom edge of the document window, at the left edge, you'll find a numerical field you can use to control the view magnification. To the right of that is a Version Cue indicator icon (it won't do anything if Version Cue is
disabled), and to the right of that is a status bar you can customize by clicking the triangle.
Figure 1.1. In the default Photoshop work area,
you see the Tools palette on the far left, the menu
menu bar. At the far right of the Options bar is
the palette well, and to the left of the palette well
is the Go to Bridge button that switches to Adobe
Bridge (or File Browser in Photoshop CS).
[View full size image]
Teaching Yourself Photoshop
Okay, I've bought your book. But other than your sage wisdom, what might I do when I have a question that isn't answered in this particular book?
over the Internet.
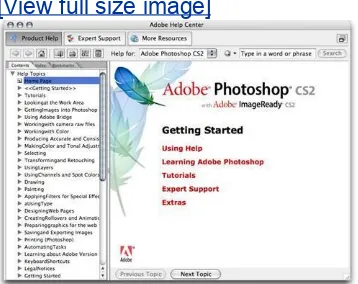
The online help system contains all of the topics in the printed manual along with additional topics, so you're more likely to find and answer there. Open the help system by choosing Help > Photoshop Help (Figure 1.2).
Figure 1.2. The Photoshop help system
[View full size image]
Figure 1.3. Tool tips appear in a yellow rectangle
In Photoshop CS2, Adobe uses the bottom of the Info palette to provide a little more information than they could fit in the tool tips (Figure 1.4). The Info palette goes beyond simply telling you about the currently selected tool. It reminds you how modifier keys can change the tool's behavior.
Figure 1.4. The bottom of the Info palette for the
Marquee tool with no keys pressed (left) and with
Upgrading Smoothly
Because Photoshop is upgraded every 18 months or so, you may experience the upgrade process a few times before you've even accumulated five years of experience with the program. But upgrading can lose files and settings that your workflow may depend on. Therefore, we want to include a few topics that help you upgrade Photoshop without throwing your workflow into a tailspin.
Migrating Your Plug-ins
I upgraded to Photoshop CS2 and none of my non-Adobe plug-ins came along for the ride. Do I have to buy them all over again?
Photoshop plug-ins are installed into the Plug-ins folder inside each Photoshop version's application folder. This means that plug-ins don't automatically appear in a newer version of Photoshopyou have to move them manually. Before you delete your old Photoshop folder, locate each non-Adobe plug-in and drag it to the corresponding folder in the Photoshop CS2 Plug-ins folder (Figure 1.5).
Figure 1.5. The Plug-ins folder inside the
Photoshop CS2 folder
If you move a plug-in to a newer version of Photoshop and it isn't compatible, Photoshop displays an alert (when you launch the program) telling you that the plug-in wasn't loaded. At that point, you know that it's time to get a newer version of that plug-in.
Migrating Actions
OK, so I've got my plug-ins working in the upgrade. But now I don't see all of my carefully crafted Photoshop actions. What's the answer this time?
Before you upgrade, save your actions from the Actions palette to a file on disk. (This is also a good way to back up your actions at any time.) Here's how:
2. Name the folder and click OK. Now you've got a folder where you can store just the actions you create (Figure 1.6).
Figure 1.6. A design studio's custom actions kept
in their own folder, separately from Photoshop
CS2's Default Actions.
3. If you're storing any custom actions in Photoshop's default actions folder, drag your actions into the folder you created.
4. In the Actions palette menu, choose Save Actions.
5. Specify a name and location, and click Save.
Once your old actions are saved to disk, you can import them into Adobe Photoshop CS2 by choosing Load Actions from the Actions palette menu, locating your saved actions file, and clicking Load.
You'll probably want to test any actions you migrate between versions. Some actions might not work correctly if they depend on commands, palettes, dialog boxes, and file locations that have changed.
If you have any plug-ins that didn't come with
Photoshop, keep them in a folder that's independent of the folders containing the plug-ins that do come with Photoshop. For example, if your name is John, create a folder named John and drag your non-Adobe plug-ins into that folder only. When you upgrade to a new version, just move or copy that whole folder to your new Photoshop's Plug-ins folder. This works because Photoshop finds any plug-in in any subfolder of the Plug-ins folder.
Migrating Your Preferences
Can I transfer my Preferences dialog box settings to a new version? The settings I use are quite different than the defaults.
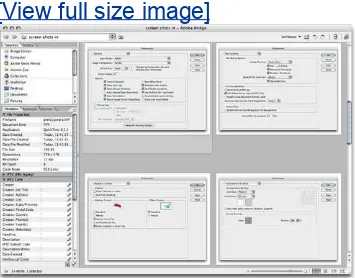
Alas, there's no way to directly transfer your current set of preferences from one version to another, or from one person to another. However, you can make a record of the settings in your Preferences dialog box and enter them into the new version.
Figure 1.7. Screen shots of Photoshop CS
preferences viewed in Adobe Bridge for reference
[View full size image]
Migrating Workspaces
I've painstakingly arranged Photoshop workspaces. How can I transfer these to a new version of Photoshop?
Because the number and shape of palettes can change
between Photoshop releases, workspaces aren't always carried over to new versions.
Computer/username/Library/Preferences/Adobe Photoshop CS2 Settings/WorkSpaces
In Windows, workspaces are stored here:
C:\Program Files\Adobe\Adobe Photoshop CS2\Presets\Workspaces
However, Photoshop is very sensitive to changes in the window environment. Photoshop may reset to the default workspace if there is anything even slightly incompatible about the old
workspace, such as if a workspace uses a palette that's changed. If transferring old workspaces doesn't work, you'll need to create new workspaces in Photoshop CS2.
Tip
We hope you've noticed that one of the most
important upgrade tips is to keep a backup of your old Photoshop installation until you're sure that you've migrated all of your Photoshop
Controls and Menus
Make UI Text More Readable
My new monitor has such high resolution that it's hard to read text in dialog boxes and palettes. Is there a way to adjust the size of text in those locations?
On large monitors or on monitors set to a very high resolution, the pixels get so small that text in windows and dialog boxes can become hard to read. In Photoshop CS2, you can change the user interface (UI) font size in the Preferences dialog box. Simply open the Preferences dialog box, and in the General pane, choose a size from the UI Font Size popup menu.
Your Keyboard, Your Way
Is it just me, or does it seem like Adobe is always
changing keyboard shortcuts? Why do they do that, and is there any way to stop it? Old habits die hard, and all that.
Well, it's not easy to come up with a single set of keyboard shortcuts that works for everybody. In addition, Photoshop doesn't exist in a vacuum. Over the years, Photoshop has changed shortcuts to be consistent with the other Adobe products that people like to use together; also, the Mac and Windows operating systems have added shortcuts that
sometimes clash with Photoshop shortcuts.
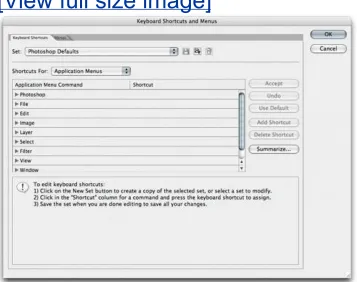
shortcuts (Figure 1.8).
Figure 1.8. The Keyboard Shortcuts tab of the
Keyboard Shortcuts and Menus dialog box lets
you assign any shortcut to any menu item.
[View full size image]
1. Choose Edit > Keyboard Shortcuts.
2. Choose a category from the Shortcuts For popup menu.
3. In the commands list, locate the command you want to customize by scrolling and clicking the disclosure triangles as needed.
Photoshop warns you if the shortcut is already in use or not available for use, so that you can try again.
5. Click Accept.
Tip
Do you often mistakenly press a shortcut that's one key off from the actual shortcut? Photoshop allows more than one shortcut per feature, so you can add your "mistake" shortcut to the same feature. Just click the Add Shortcut button in the Keyboard
Shortcuts tab of the Keyboard Shortcuts and Menus dialog box. Now you get what you want whether you press the "right" shortcut or the "wrong" one.
Search for the Missing Shortcut Card
I miss the Quick Reference card that used to be
included with Photoshop for keyboard shortcuts. How do they expect me to learn the shortcuts now? After all, not all shortcuts appear in the menus.
you can print it out if you want to tack it up on the wall with your other shortcut cards. The great advantage of the
Summarize button, of course, is that you can always keep your shortcut reference up to date if you change shortcuts.
Roll Your Own Menus
Every time I upgrade, the menus in Photoshop get
longer and longer. I don't even use half of the commands that are available. Can't Adobe make Photoshop modular so that we don't have to see the features we don't use?
There isn't a way to turn features off (unless they're plug-ins), but you shouldn't have to worry about that anywaywhile all features are made available at startup, they don't actually load into memory unless you start using them. (That's why it often takes longer to use a feature the first time.)
On the other hand, there is a way to simplify the menus.
Starting with Photoshop CS2, Adobe makes it possible for you to hide menu items. You can make Photoshop display only the commands that are useful to you or your workgroup. In
addition, you can highlight menu commands with a color. This feature can be useful for emphasizing preferred workflows, or if you want to associate certain commands with each other.
The controls to customize the menus are in a different tab in the same dialog box as the one to customize keyboard
shortcuts. To customize menus:
1. Choose Edit > Menus.
3. Scroll to locate the menu command you want to edit.
4. For the command you're editing, click the Visibility column to hide or show the command, or click the Color column to apply a color to the command.
5. Click the Save icon (the first one to the right of the Set popup menu) to save your changes to the current set.
6. Click the Save New Set icon (second from the left) to create a new set based on the current settings. After you create a new set, you can choose it from the Window > Workspace submenu. Photoshop comes with several custom menu
Windows and Palettes
Making Arrangements for Your Palettes
I often see other people with interesting palette arrangements, including different ways to attaching palettes to each other. Can you let me in on some of these secrets?
Let us open the book of palette secrets. The three main ideas with palette arrangement are grouping, docking, and workspaces.
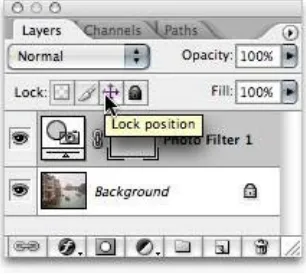
When you group palettes, they occupy the same space, so only one of the palettes in a group can be in front at a time. You can group or ungroup palettes by dragging palette tabs to or from other palette tabs.
When you dock palettes, they're attached to each other vertically, so they're all visible at once. You can combine
grouping and docking (Figure 1.9). To dock a palette, drag its palette tab to the bottom of another paletteyou can let go when you see the dark black line appear at the bottom of the palette. Grouped palettes always appear and disappear at the same time. For example, David always docks his Character and Paragraph palettes together.
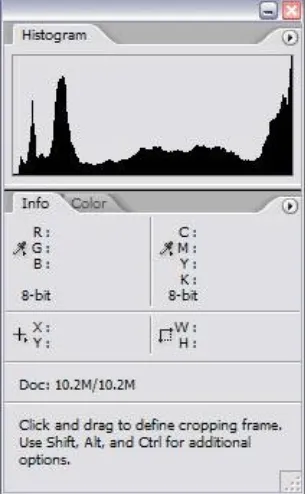
Figure 1.9. Here, the Histogram and Info palettes
are docked, and the Info and Color palettes are
grouped. Dragging the title bar moves all three
You can hide or show all palettes at once by pressing the Tab key (as long as the Text tool isn't typing, of course). You can control all palettes from the Window menu, but if you want a palette to be clickable yet still take up no screen space, drag its tab to the palette well, the dark area at the right side of the Options bar (Figure 1.10).
Individual palettes have their own tricks. The minimize/zoom button in a palette's title bar alternates between collapsing a palette into its title bar, and showing all of its options. If a
palette is touching the bottom of the screen when you collapse it, the palette conveniently collapses at the bottom of the
screen.
Customize the Status Bar
I see two numbers at the bottom of my document window, and I've never known what those numbers stand for. How can I find out?
What you're seeing is the status bar. By default, it displays the document size, or rather, sizes. The first number is the size of the document if you flatten it, and the second number is the size of the document as saved (uncompressed) on disk with all of its layers (Figure 1.11). If the document doesn't have any layers, the first and second numbers are probably the same.
Figure 1.11. The status bar at the bottom of a
document window can display different kinds of
document information, such as the disk usage
information shown at right.
image will print on the current page size. If you Option/Alt-click, you get info about the image size and dimensions.
How can you tell that they're document sizes? Because it says so: Click the black triangle to the right of the status bar to see a popup menu of the different kinds of information you can
display in the status bar. You can choose a different status bar display from the popup menu, such as the document
dimensions or the document's color profile.
Navigate the Seas of Photoshop
Dragging the scroll bars all day long sure makes my arms tired. Are there better ways to move around a document?
You're going to get tired of us saying this, but it's always good to hear: Photoshop provides many ways to accomplish the same thing. You can get around quite well in a document
without any scroll bars at all. You can:
Use the Navigator palette to zoom and scroll around a document window.
Use the Hand tool to push the document around in its window.
Press Page Up and Page Down to scroll vertically. To scroll horizontally, add the Command/Ctrl key. These shortcuts are like clicking the scroll bars. To scroll in smaller
increments, add the Shift key; it's like clicking the scroll bar arrows.
press End to scroll to the bottom right corner of a document.
Organize Multiple Windows
Are there some quick ways to organize multiple
windows on screen? When I work with many images at a time for my publication, the document windows get out of control pretty quickly.
Why, you can practically turn yourself into a window-managing drill sergeant with the options that Photoshop provides.
To offset windows across the screen while keeping them large, choose Window > Arrange > Cascade (Figure 1.12).
Figure 1.12. Multiple document windows
cascaded (left) and tiled (above).
[View full size image]
Vertically.
To cycle through each window, press Ctrl-Tab (or Shift-Ctrl-Tab to cycle backward; yes, that's the Control key, even on the Macintosh). This is useful for flipping through a stack of large windows, particularly when your windows are in Full Screen mode.
Tip
You probably already know that palette edges snap to each other. But you can also snap a palette to the nearest edge of the screen by Shift-dragging a palette's title bar.
On Mac OS X, press F10 to use the Exposé
window-selection feature on the current application's windows only (in this case, Photoshop). You can't edit documents in this mode, so it's useful mostly for comparing documents.
To close all open image windows, press Option (Mac OS) or Shift (Windows) while clicking any image window's close button. If any open images have unsaved changes, you'll be asked whether you want to save them before closing the document.
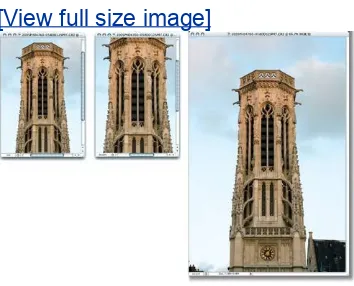
Preserve Windows when Zooming
I arranged my document windows on the screen just the way I like them, but when I use the keyboard
and I have to arrange the windows again. This is driving me nuts... please, make it stop!
Don't worry, there is a way out of this. By default, Photoshop resizes the image window when you zoom a window using the keyboard shortcuts, such as Command-+ (plus sign) (Mac OS) or Ctrl-+ (Windows) (Figure 1.13). This can sometimes be inconvenient, such as when you have a carefully tiled window arrangement that you want to preserve.
Figure 1.13. Original (left), zoomed in without
window resizing (middle), and zoomed in with
window resizing (right).
[View full size image]
default. Choose Preferences > General (Mac OS) or Edit > Preferences > General (Windows), deselect Zoom Resizes Windows, and click OK.
Tip
There's no built-in shortcut for closing all open documents without saving changes. However, you can use the Actions palette to create an action that closes a document without saving, and then run that as a batch action on all open documents. Of course, you have to be sure you want to discard all
changesthat's why there's no built-in shortcut for this inherently risky operation.
To reverse the default window resizing behavior, add the Option (Mac OS) or Alt (Windows) key. For example, if you set the Zoom Resizes Windows default to be on but you'd like to
override it this one time, press Command-Option-+ (plus key) instead of Command-+.
The Big Screen Experience
Is there a way to fill the screen with an image, similar to when you view a slide show?
Of course, you do lose some features in full screen view. For example, you don't have scroll bars, the title bar, or the status bar, or even the menu bar if you hid that. However, there are plenty of ways to be productive and flexible in full screen mode:
To hide and show the menu bar, press Shift-F.
To hide and show all palettes, use the Tab key.
If you're addicted to the status bar, you can display the
same information in the Info palette (choose Palette Options from the palette's menu) and leave the palette open.
You can still switch tools and open palettes using keyboard shortcuts. Remember, you can customize Photoshop's
keyboard shortcuts!
To zoom and scroll, use the Navigator palette. If you prefer to hide the Navigator palette, use keyboard shortcuts or a mouse wheel to zoom and scroll. See the topic "Navigating the Seas of Photoshop," earlier in this chapter.
If you move the document window to another monitor
before entering full screen mode, the document displays in full screen mode on that monitor without affecting other monitors.
Change the Window Background Color
Yes, there is a way. First, set the foreground color using the toolbox, the Swatches palette, or the Color palette. In your case, set the foreground color to black. In a document window, zoom out until you can see the background area outside of an image. Then select the Paint Bucket tool, and Shift-click the window background. Voilà, now black is the new gray!
Tip
Full screen mode is a great way to make the most of a laptop monitor or a relatively small desktop
monitor. It's also a great way to present an image to a client when you happen to have it open in
Photoshop.
One Document, Two Views
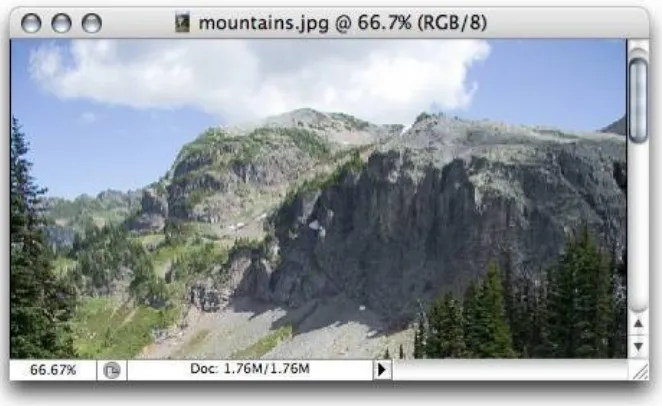
Can I see two views of the same document? What I'd like to do is see the same document at two zoom levelsa close-up of the area I'm editing in the document, and a big-picture view I can keep an eye on.
We've got the perfect solution: the New Window command. With your document open, choose Window > Arrange > New Window For <document name>. You can certainly set one
window to a different zoom level than the other window (Figure 1.14). But you can also use the New Window command for
Figure 1.14. Two windows on the same
document. In each window's title bar and status
bar, you can see that each window is set to a
different zoom percentage.
[View full size image]
You don't even have to limit yourself to two views. You can open as many new windows as you want, and set each of them to different view settings.
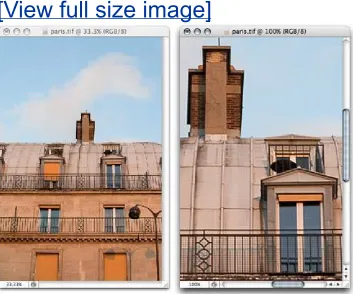
Synchronize Multiple Windows
other window and change its view too. Can I avoid this tedious shuffling between windows?
You're in luckthere's an easy answer. First, activate the window that you want the other windows to match. Then choose one of the following commands from the Window >
Arrange submenu: Match Zoom, Match Location, or Match Zoom and Location.
The commands are pretty self-explanatory. Match Zoom sets all other windows to the same zoom level, and Match Location sets them all to the same scroll position (of course, Match Location is most predictable if the windows are the same size).
Match Zoom and Match Location commands affect all open windows, whether they're views of the same document or different documents. When you use these commands, you
might want to make sure that the only windows you have open are windows that you want to be affected by these commands.
Tip
For a clean preview of your document, you can instantly hide all nonprinting objects like the grid, guides, annotations, current selections, and slices. Just press Command/Ctrl-H, which is the keyboard shortcut for enabling or disabling the View > Extras command.
Tip
Once you have a palette arrangement you like, be sure to save the arrangement as a workspace (see the topic "Making Arrangements for Your Palettes," earlier in this chapter). This is especially important on a laptop, where you may be connecting and disconnecting monitors often.
When Print Size. . . Isn't
Here's something that's been bugging me for years: If I choose View > Print Size, and hold a print of that same document up to the screen, it isn't the same size! Not only that, but the on-screen ruler doesn't match up to a real ruler. What exactly does Print Size mean, then, and can I make it work right?
This is a tricky answer, but stick with us. To display an image at its real-world size, an application must know both the
resolution and the physical size of the monitor it's displaying on. While it isn't too hard to obtain the monitor dimensions in
pixels, it's usually impossible to automatically detect the size of the screen in inches. However, there is a manual way.
First, find out the pixel dimensions of your monitor. On Mac OS X, this information is in the Display tab of the Displays system preference. On Windows, right-click the desktop, choose
Properties from the popup menu, and click the Settings tab. For example, Conrad's laptop screen is at its native setting of 1280 x 854 pixels.
A scroll wheel mouse is extremely useful in
Photoshop. Obviously you can spin the scroll wheel to pan a window vertically, but such a mouse can do other tricks. too. To pan horizontally, press
Command/Ctrl as you spin the mouse wheel. To zoom in and out, Option/Alt-scroll. To scroll or zoom in larger increments, press Shift as you spin the mouse wheel.
Next, get the physical dimensions of your monitor's display area. Conrad's laptop screen is 12 11/16 inches (12.6875 inches) wide. Now divide the width in pixels by the width in inches, and you'll get the actual resolution of the screen in
pixels per inch. Conrad's monitor works out to about 100 pixels per inch.
Now open up the Photoshop Preferences dialog box and switch to the Units & Rulers pane. For Screen Resolution, enter the resolution that you worked out in the previous paragraph.
Monitors
Fun with Multiple Monitors
I've heard of people using multiple monitors with Photoshop. What makes multiple monitors so useful? I usually only look at one image at a time.
In an application like Photoshop, you're usually not just
looking at an image. You also need space for palettes and dialog boxes. Multiple monitors are useful whenever more screen real estate would come in handy. Here are some ways to use
multiple monitors:
Keep your palettes on a less expensive monitor, so you can dedicate your best calibrated and profiled monitor to image display. A monitor used only for palettes doesn't have to be of high quality.
Spread out palettes that you want to have visible all the time. For example, if you often use the History and Actions palettes, drag them apart. It'll take a lot of space, but that's what the second monitor is for.
Keep Photoshop on one monitor and other applications on another monitor. For example, on your second monitor you can keep Adobe Bridge nearby for easy image access, or watch for incoming messages in your e-mail application.
When a dialog box opens, drag it to the monitor that
doesn't contain the image, so you can see the entire image.
Window > Arrange > New Window, you get a second
window on the same image. For example, one window can show the entire image while another window shows a
zoomed-in detail of the same image.
Match Color Across Monitors
I connected a second monitor, but when I look at the same image on both monitors simultaneously, they don't look the same. How can I fix this?
To match image tone and color across multiple monitors, you pretty much have to use a hardware monitor calibrator (such as the Gretag Macbeth Eye-One device) to create a monitor profile for each monitor. However, even calibrated monitors may not match completely if their basic characteristics are different, such as comparing the same image on a CRT monitor and an LCD monitor.
Tools
Reveal the Multiple Personalities of a Tool
I'm really getting into using the keyboard so I don't have to mouse around so much. But I'd like to find a way to select the tools that are in the popup menus in the toolbox. Any shortcuts for that?
The key to achieving your goal is the Shift key. First, make sure you're familiar with the single-letter keyboard shortcuts for your favorite tools, such as M for the Marquee tool or V for the Move tool.
Next, open the Preferences dialog box, switch to the General pane, and enable the Use Shift Key for Tool Switch checkbox. After you click OK, you'll be able to use the Shift key to cycle through the tools in each of the popup tool menus. For
example, press J to switch to the Spot Healing Brush tool, and press Shift-J to cycle through the other tools in the same popup menu (the Healing Brush, Patch, and Red Eye tools).
If you don't select the Shift key preference mentioned above, you can cycle through tools without adding the Shift key. For example, to cycle through the marquee tools, you would simply press M repeatedly. However, we prefer to use the Shift key to cycle, because it's a safer way to work, especially if you like to hide the toolbox. If the Shift key preference is on, you always know that pressing a tool's shortcut selects the last-used
variation of that tool. If Shift-switching is off and you can't see the toolbox, you might not realize that pressing the tool
Keep Your Options Open
I once saw an option that lets me scroll all windows simultaneously. I want to do this when I'm comparing different views of the same document. I looked in
Window > Arrange submenu, but the Match commands there aren't real-time.
An often overlooked area of available options is the Options bar. In your example, select the Hand tool and you'll see that this is where the Scroll All Windows option appears (Figure 1.15). (The Options bar for the Zoom tool contains a similar Zoom All Windows option.)
Figure 1.15. Even though the Options bar is
usually at the top of the screen, most people
don't look closely at the cool tool options and
buttons it contains.
[View full size image]
Give Tools a Memory
I have a few crop sizes that I always use, but I'm
getting tired of entering each set of dimensions over and over again. Is there a way to save the settings?
If you haven't yet clicked the button at the left end of the Options bar, now would be a good time. That button manages tool presets, which are saved settings for the current tool. When you have tool settings that you want to save, click the tool presets button and then click the Create New Tool Preset button. Name the preset and click OK, and from now on you can use that preset by clicking the Tool Preset button and selecting your preset from the list.
Adobe must really want you to use tool presets, because the Options bar isn't the only way to use them. You can more easily manage tool presets by using the Tool Presets palette (Figure 1.16), especially when the Options bar isn't visible. If you
disable the Current Tool Only checkbox, tool presets for all tools are listed. Then, clicking a preset in the Tool Presets palette both switches tools and selects a preset in one step.
A More Precise Cursor
When I do detailed retouching, the tool icons seem a bit clumsy and imprecise. Is there a way to make the cursor show the size of the brush I'm using?
You've got lots of options here. Open the Preferences dialog box, and then open the Display & Cursors pane. In the middle of the dialog box, you'll see a number of cursor options.
Photoshop ships with the cursors set to the Standard option you see in the Display & Cursors pane. You can set any cursor to Precise, which displays a little crosshair so that you can tell exactly where you're clicking.
For painting cursors, which have a brush size, you can choose the Normal Brush Tip or Full Size Brush Tip. The Full Size Brush Tip is a little more intuitive; it's the outer edge of the brush size you're using. Normal Brush Tip is a little trickierthe circle it
draws is where the brush opacity is at 50%, based on how much feathering you've applied. Knowing where 50% falls can be handy because it is a common threshold value for things like magic wand selections.
You can see both the precise click point and the brush size if you enable the Show Crosshair in Brush Tip option.
Tip
Editing Objects
Adjust Numbers Easily
I've seen people use shortcuts for nudging numbers in palettes and dialog boxes. How exactly does that work?
There are several handy shortcuts you can use when you just want to tweak a number up or down a little. These
shortcuts work in number fields in both palettes and dialog boxes.
Press the up arrow or down arrow key to increase or decrease a value by 1 increment. The increment varies depending on the option.
Press Shift-Up Arrow key or Shift-Down Arrow key to increase an increment by ten times the normal arrow key increment.
Position the cursor over a numeric field and Command/Ctrl-drag left to increase a value, or right to increase a value (Figure 1.17). You can add the Shift key here too, if you want to change the numbers more quickly.
Figure 1.17. Adjusting font size by
Take the Fast Lane through Dialog Boxes
In other programs, I've used the keyboard to move around in dialog boxes. Can I do the same thing in Photoshop?
You can do more than you possibly imagined. In Photoshop, there are several cool shortcuts that can make dialog boxes much more pleasant to use:
As in palettes and many other applications, you can press Tab and Shift-Tab to highlight the next and previous text or number fields.
In many dialog boxes, such as Curves, Levels, and filter dialog boxes, you can actually zoom and pan the window with keyboard shortcuts while the dialog box is still open. For example, you can press the spacebar to use the Hand tool, and you can press the Zoom tool shortcuts to zoom in and out.
you can press the D key.
Context Menus are Your Friend
I am a long-time Mac user and am used to the single mouse button. What's so special about having a right mouse button bring up a context menu, when I can do the same thing from menu bar commands and keyboard shortcuts?
The beauty of context menus is that you don't have to
remember where a command is on a menu, and you don't have to remember the command's keyboard shortcut either. As the feature's name suggests, context menus show you commands that relate directly to whatever you clicked, automatically
excluding a whole lot of commands that don't apply to what you're trying to do.
Context menus can be so useful that many Mac power users like them too. You don't need a two-button mouse to enjoy context menus. On the Mac, Control-click to see an object's context menu. If you use a graphics stylus or other non-mouse pointing device on Mac OS X or Windows, you can usually program one of its buttons to bring up context menus.
Tip
Handling Documents
Open Multiple Documents at Once
Is there a good way to open many images at the same time? It would help me when I have to process large numbers of images from my camera or scanner.
There are actually several ways to open multiple documents in Photoshop.
From a Mac Finder or Windows desktop folder window, select the files and drag them to the Photoshop icon in the Dock (Mac OS) or to the Photoshop application window (Windows).
In Adobe Bridge, you can select multiple files and choose File > Open or just press Return or Enter. Dragging and dropping to Photoshop works too. If the images open in a program other than Photoshop, from Bridge choose File > Open With > Adobe Photoshop CS2.
Or, in Photoshop, choose File > Open, locate a folder containing multiple files you want to open, and select them. As on the
desktop, you can use the Shift key to select a continuous range, and you can use the Command (Mac OS) or Ctrl (Windows) to select a discontinuous range.
Reducing File Size
I have a file that takes up way too much disk space. How can I make it smaller?
making a copy for the Web or e-mail, choose File > Save for Web and use the optimization controls there to lower the file size.
If you're trying to reduce the size of a file that you want to
archive or use on press, you need to be more careful in order to preserve high resolution and quality. Here are a few ideas:
If you no longer need to use layers, choose Layer > Flatten Image. If you don't want to flatten, look for unneeded
layers you can delete.
If you've been working in 16-bit mode but you no longer need to, choose Image > Mode > 8 Bits/Channel.
If the image dimensions are currently larger than the
largest size at which you anticipate using the graphic, you can choose Image > Image Size, turn on the checkbox
labeled Resample Image, and reduce the image dimensions.
All of those methods are irreversible once you save and close the document, so be sure you want to do them.
Tip
Renaming Many Files at Once
I don't like the way my digital camera names photos. Does Photoshop provide a way to rename many files at once?
In CS2, you can easily take care of this using the Adobe Bridge application, which includes a powerful batch renaming feature.
1. In Adobe Bridge, select the images you want to rename. If no images in the current folder are selected, they'll all get renamed, so be sure to move or delete images you don't want to rename.
2. Arrange images in the order you want to number them during renaming. You can drag images into the order you want, or you can choose View > Sort and choose a sort order.
3. Choose Tools > Batch Rename. In the Batch Rename dialog box (Figure 1.18), select a Destination Folder. It's always safest to use the Copy to Other Folder option so that your originals are intact in case you make a mistake.
Figure 1.18. The Batch Rename dialog box
4. In the New Filenames section, set up options for renaming. To build a name out of the naming option such as date, sequence number, or metadata, click a plus button. The Preview section shows you what you'll get.
5. In the Options section, change the options if needed, and click Rename.
Backing Up Your Preferences File
A little while back, Photoshop was acting strangely, and the next time I started Photoshop, my preferences were somehow reset to their default settings, so I had to enter all my customized preference settings again. Is there a way to restore preference settings?
Photoshop may revert back to its default preferences.
Photoshop has no mechanism for backing up its preferences file, but it's a good idea to do it yourself. Once you've got the Photoshop preferences just the way you like them, make a copy of the preferences file wherever you keep backup copies of
other valuable documents. The file you're looking for is called Adobe Photoshop CS Prefs.psp or Adobe Photoshop CS2
Prefs.psp. It's located in Mac OS X at:
Computer/Users/[username]/Library/Preferences/Adobe Photoshop CS2 Settings
Tip
On Mac OS X, you can drag the title bar icon of a document as if it was the file icon in the Finder (but only after saving the document). For example,
dragging the title bar icon to a Finder folder window moves the document to that folder.
Tip
Here's a quick way to manually reset Photoshop preferences to their default settings. Immediately after you start up Photoshop, hold down the Shift, Option, and Command keys on Mac OS X, or Shift, Alt and Ctrl keys on Windows. An alert appears, asking you if you want to delete the Adobe
In Windows, it's located at:
C:\[username]\Application Data\Adobe\Photoshop\9.0\Adobe Photoshop CS2 Settings
If you ever find that your Photoshop preferences are reset, you can easily copy your backup preferences file into the Settings folder and continue on your merry way.
Observe and Control Memory Usage
Photoshop seems a little sluggish. How can I tell if I need to install more memory in my computer?
At the bottom of a Photoshop document window, click the black triangle to the right of the status bar, and choose
Efficiency (or Show > Efficiency if Version Cue is installed). If Efficiency falls below 100%, you may want to install more RAM in your computer.
You can also switch the status bar to display Scratch Sizes. The number on the left tells you how much RAM your open
documents are using; it goes up and down depending on what's open and how much work you're doing. The number on the left tells you how much unused RAM you have available. If the
number on the left becomes more than the number on the right, Photoshop starts using disk space to store temporary working files. If you find that your hard disk space is running low when you use Photoshop, connect another hard disk and assign it as a scratch disk in the Plug-Ins and Scratch Disks pane of the Preferences dialog box.
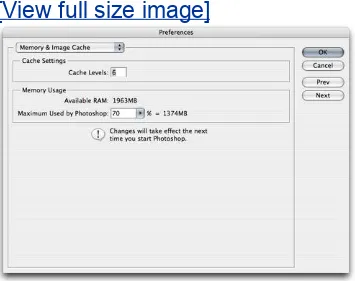
Photoshop, you can try increasing the percentage of RAM that you allow Photoshop to use. Open the Memory & Image Cache pane in the Preferences dialog box (Figure 1.19) and increase the Maximum Used by Photoshop value. It's usually a good idea to set a value no higher than 75% unless you have several
gigabytes of RAM installed, because you must leave a few hundred megabytes for the system to use. If you plan to use Photoshop alongside other programs, such as those in the Adobe Creative Suite, you may want to lower Photoshop memory usage to leave RAM for those other programs.
Figure 1.19. The Memory & Image Cache pane in
the Preferences dialog box for Photoshop
2. Getting the Picture
THE UNIVERSE PHOTOSHOP USERS IS BOTH wide and deep; people use Photoshop for everything from purely creative works to precise scientific imaging and processing. It naturally follows that there are many ways for an image to find its way into
Photoshop. For years, many Photoshop images would start out as files from a scanner, but now many images arrive directly from a digital camera. Many fine artists and graphic designers start by "painting" on the proverbial blank canvas.
However, digital cameras have become so ubiquitous and scanners have become so cheap that it's easy to find yourself with hundreds of new digital photos each day. Opening each image at a time is not always practical, so the trick is to see how efficiently you can process massive numbers of
imagespreparing them for a Web site or a printer. We wrote
most of this chapter to help you become as efficient as possible, using not only Photoshop but the cool (and super powerful)
Creating and Opening Files
New Document Secrets
I've noticed that when I choose New from the File menu, the document size numbers sometimes change. Not only that, but sometimes the numbers mysteriously become exactly what I need. What's going on and how can I control this?
The New dialog box has a few tricks up its sleeve. When you choose File > New, Photoshop automatically guesses the
specifications for the document. By default, the New dialog box displays the specifications from the most recent document you created.
If there's an image on the Clipboard, the New dialog box uses the specifications of that image (Figure 2.1). Accordingly, the Preset popup menu is set to Clipboard in this case.
Figure 2.1. Set up new documents in the New
dialog box. Here, Photoshop takes the default
You can also copy document settings from any document
currently open in Photoshop. Just choose the document's name from the Windows menu on the menu bar (it's not in the New dialog box). This is one of those times when you can use the menu bar even though a dialog box is open.
Making Your Own Document Presets
In my job, we create graphics for a few standard sizes. Is there a way to make Photoshop templates so that I don't have to keep checking all of my document specs every time I create a new document?
If you often use certain new document settings that aren't already in the Preset popup menu in the New dialog box, the next time you enter those settings, click the Save Preset button to name and save your own preset.
What's the best and fastest way to bring digital camera photos into Photoshop? Some people tell me that I
should use the included cable, while others tell me I need to buy a separate reader even though I already have a cable.
You typically get a cable free with the camera, so it's an obvious, easy way to get pictures from your camera to Photoshop. However, it may not be the best way, for the following reasons:
If you're shooting an event, you can't take any pictures while you're transferring photos.
You spend precious battery energy for file transfer, leaving less energy for taking pictures, unless you plug an AC
adapter into the camera during the transfer.
Many cameras still transfer photos using USB 1.1 or the Full Speed version of USB 2.0, both of which are very slow. Hi-Speed USB 2.0 and FireWire are much faster.
If a transmission glitch occurs, the glitch may ruin photos on your camera's memory card. It does happen.
What's the alternative? Instead of using a cable, use a card reader connected to your computer. Remove the card from your camera and insert it in the reader; you can then put another card into your camera and keep taking pictures during the transfer. A card reader is powered by your computer, so you don't drain your camera battery. FireWire and Hi-Speed USB 2.0 card readers are the fastest.
Tip
camera or the card. This practice is unreliable and also very slow compared to a hard disk. First copy the images to a folder on your computer's hard disk, and then edit them. Professional photographers
often make at least one backup copy of the
untouched originals on CD or DVD before editing, in case something goes horribly wrong during editing or a batch process.
Also, consider using Adobe Bridge to preview, annotate, and open one or more images in Photoshop. If you are using raw camera files, in Adobe Bridge you can also choose File > Open in Camera Raw to make adjustments without having to open or tie up Photoshop.
Opening Images That Don't Want to Open
Sometimes I double-click an image that's a file type Photoshop should be able to open, but instead the system tells me that it can't be opened, or a different program opens it. How can I fix this?
Don't give up. A file can sometimes "forget" which
application it belongs to as it's transferred over networks or across platforms. However, Photoshop can often look deeper into an image than the operating system can. Instead of
double-clicking the image file, try opening it from Photoshop by choosing File > Open (or File > Open As in Windows) and
selecting the file. You can also try dragging the file to the
Also, check to see if the file has an extension at the end of the filename, such as .TIF or .JPG. Sometimes that's all the system needs to hook up format with the default application that opens it. On the Mac OS, you can also select the file in the Finder and choose File > Get Info to set which application it belongs to. In Windows, open the Properties dialog box and click the Change button.
Become a Screen Shot Gunslinger
In my job, I have to process a lot of screen shots. How can I streamline the process of cleaning them up?
After you take your screen shots using your operating system shortcuts or a screen shot program, try these suggestions:
If the screen shot is saved to the desktop (as on Mac OS X by default), drag it to Photoshop to open it. If you simply double-click the file, it will likely open in a program other than Photoshop.
If the screen shot is on the clipboard (as in Windows, by default), choosing File > New in Photoshop enters the
clipboard contents as the dimensions of the new document you're about to create. After the new document appears, all you need to do is paste.
If you need to remove empty blank space around the screen shot (Figure 2.2), the easiest way is to choose
Figure 2.2. The Trim command can remove
extra space (left) without cutting off a drop
shadow (right).
Exploring Camera Raw
The Deeper Meaning of Camera Raw
What is the point of Camera Raw? The files are bigger, they take longer to save, and are more complicated to process. My camera takes great pictures, and when I take them off the camera they're ready to roll. So why shouldn't I just use the JPEG format, which seems more convenient all around?
Many people believe that the JPEG image that comes out of a camera is exactly what the camera saw. In fact, the raw sensor data needs a great deal of processing which digital cameras perform as you take the shot. A camera converts the raw datawhich isn't even really RGB yetinto tones and colors, and applies other enhancements like sharpening. All of this
processing affects the final JPEG image.
The problem with JPEG is the camera typically has a 12-bit sensor producing pure, uncompressed data, while JPEG is only an 8-bit format which is highly compressed to save space. This means the camera already throws out a lot of information
before the image even reaches your camera's memory card. In addition, JPEG compression allows quality to degrade as you apply successive edits. However, if your camera can save its raw sensor data and if the camera's format is supported by Adobe Camera Raw, you can alter the judgments that would normally be applied by the camera, and you'll end up with higher-quality data.
If you want the most control in order to achieve the best
important to you, you may be happier shooting JPEG.
A useful analogy to editing raw camera data is developing your own film and prints in a darkroom. You can get exactly the
quality you want because you have control over every step, but the process can be too daunting for casual users. Happily,
learning Adobe Camera Raw is much faster and easier than learning how to use a darkroom!
When an Image Isn't in the Camera Raw Club
I select images in Bridge and try to open them in Camera Raw, but instead they open directly into
Photoshop. Also, the Open in Camera Raw command isn't available for these images. How can I edit these images in Camera Raw?
The big question here is, are those images actually camera raw files? In Bridge, check the Document Kind field in the File Properties section of the Metadata tab. If it doesn't say Camera Raw, it won't open in Camera Raw.
Camera Raw only opens camera raw files. Image files in formats like TIFF, JPEG, and Photoshop must be opened in Photoshop itself. Only digital cameras can save camera raw files; you can't save or convert existing files to Camera Raw format. This is because a camera raw file is a record of a specific camera sensor.
If you're absolutely sure you're trying to open an actual camera raw file and this is the first time you've tried to do this, it's
Camera Raw. Check the list of supported cameras at:
www.adobe.com/products/photoshop/cameraraw.html
When you have a new camera that isn't yet supported by Camera Raw, you may need to convert the camera's raw files with the software provided by the camera manufacturer. Raw conversion software is typically included with cameras that can save raw data. You might not have as much control as you would in Camera Raw, but you'll be able to use your files.
Department of Redundancy Dept.?
In Camera Raw, I see lots of functions that duplicate features in Photoshop itself, like Contrast and Sharpness. Do I apply these in Camera Raw, in Photoshop, or in both places?
The general rule is, if you can do it in Camera Raw, do it thereyou'll generally get a cleaner image with the controls in Camera Raw. For example, fixing white balance in Camera Raw preserves more image quality than converting a raw image at the wrong color balance and fixing it in Photoshop.
However, there are important exceptions. In some cases it may be better to apply sharpening and noise reduction in Photoshop rather than in Camera Raw.
In the Detail tab in the Camera Raw dialog box (Figure 2.3), the amount of Sharpness is best adjusted relative to the
specifications of your final output. If you don't yet know the exact conditions of the output for the image, it may be better to apply sharpness later, after conversion. In addition, the
Sharpness control in Camera Raw is rather basic; you can apply better sharpening techniques in Photoshop, including the
Figure 2.3. The Adobe Camera Raw dialog box
with the Detail tab visible on the right side.
[View full size image]
Similarly, the Reduce Noise feature in Photoshop CS2 provides different controls than the noise reduction features in Camera Raw (Luminance Smoothing and Color Noise Reduction in the same Detail tab). Depending on the noise reduction, you may want to use the Reduce Noise feature in Photoshop CS2 (Filter > Noise > Reduce Noise); in that case, set the Camera Raw noise reduction to zero.
Cracking the Camera Raw Code
I'm confused. Camera Raw is supposed to help me get the most quality out of my digital camera. But for years, the experts have been warning us away from the
Brightness and Contrast sliders in Photoshop, because they can wreck a photographic image. And yet I see Brightness and Contrast sliders prominently placed in Camera Raw. Does that mean it's OK to touch Brightness and Contrast now? And one more thing: What's the
difference between Exposure and Brightness?
It's true, there is some confusing terminology in the Adjust tab of the Camera Raw dialog box. Some of the labels in
Camera Raw actually don't mean the same thing they do in Photoshop. The trick is to ignore what the labels say, and study what they actually do. Here's a head start:
Exposure sets the value of the lightest level you'll convert. To adjust Exposure, enable the Highlights checkbox at the top of the Camera Raw dialog box. This marks clipped
highlights (lost details in bright areas) in red. Now drag the Exposure slider as far to the right as you can without
blowing out details in the highlights.
Shadows sets the value of the darkest level you'll convert. Enable the Shadows checkbox at the top of the Camera Raw dialog box to mark clipped shadows (lost details in dark areas) in blue. Now drag the Shadows slider as far to the right as you can without blocking up shadow details.
Brightness is nothing like the Brightness control in
Photoshop, so you don't have to be afraid of it. Brightness actually sets the image's midtone for the conversion.
Brightness.
Contrast is not as destructive as the Contrast control in Photoshop, so it's really not scary either. In Photoshop, contrast pushes tones apart and lets them clip. In Camera Raw, Contrast applies an S-curve around the midtone you set using Brightness. While the S-curve doesn't clip tones, if you turn it up too high it can still push midtones too far into the harder-to-reproduce highlights and shadows.
Tip
There is so much more that we could say about Camera Raw but couldn't fit in this bookthat one Camera Raw dialog box is deeper than it looks. If you love (or want to learn to love) what
Camera Raw does, you should read either Real World Photoshop CS2 or Real World Camera Raw with Adobe Photoshop (both Peachpit Press), written by our esteemed colleague Bruce Fraser.
Saturation, fortunately, does exactly what it says, and has the same implications as it does in Photoshop. Saturation simply controls the intensity of color.
There's one more control to mention here, and that's the Curve tab. If you're a Photoshop veteran, you might instinctively
bypass the Adjust tab and run straight to the Curve tab. In Camera Raw, don't do that. The Curve tab applies after the Adjust tab, so to apply Curves to the best possible source data, first get the Adjust tab right, and then use Curve for
Raw Files Cooked to Order
Every time I convert camera raw files, they come out as 8-bit AdobeRGB files. I like to work in 16-bit ProPhoto RGB. Is there a way to change the conversion?
At the bottom of the Camera Raw dialog box, enable the Show Workflow Options checkbox. In the rest of the dialog box you control how the image looks, and you use the workflow options to control the specifications of the converted file. Here are your options:
The Space popup menu determines the color space. It
defaults to Adobe RGB, but you can change it. This is where you can convert the raw data into a nice ProPhoto RGB
image for fine-art printing, or as 8-bit sRGB for the Web.
The Depth popup menu determines the bit depth. If you want 16 bits per channel, set it here; there's no point in converting to 8 bits per channel and later changing to 16.
Size is the dimensions of the image in pixels. Sizes with a minus or plus sign after the dimensions are downsampled or upsampled from the original, respectively. However, the more advanced resizing choices in the Image Size dialog box in Photoshop are superior to resizing in Camera Raw, so if you'd rather resize in Photoshop, leave the middle
(original size) command selected in Camera Raw's Size popup menu and resize in Photoshop later.