Microsoft
®Office Word 2010
Inside Out
Published with the authorization of Microsoft Corporation by: O’Reilly Media, Inc.
1005 Gravenstein Highway North Sebastopol, California 95472
Copyright © 2010 Katherine Murray.
Complying with all applicable copyright laws is the responsibility of the user. All rights reserved. Without limiting the rights under copyright, no part of this document may be reproduced, stored in or introduced into a retrieval system, or transmitted in any form or by any means (electronic, mechanical, photocopying, recording, or otherwise), or for any purpose, without express written permission of O’Reilly Media, Inc.
Printed and bound in the United States of America.
1 2 3 4 5 6 7 8 9 WCT 5 4 3 2 1 0
Microsoft Press titles may be purchased for educational, business or sales promotional use. Online editions are also available for most titles (http://my.safaribooksonline.com). For more information, contact our corporate/institutional sales department: (800) 998-9938 or [email protected]. Visit our website at microsoftpress.oreilly.com. Send comments to [email protected].
Microsoft, Microsoft Press, ActiveX, Excel, FrontPage, Internet Explorer, PowerPoint, SharePoint, Webdings, Windows, and Windows 7 are either registered trademarks or trademarks of Microsoft Corporation in the United States and/or other countries. Other product and company names mentioned herein may be the trademarks of their respective owners.
Unless otherwise noted, the example companies, organizations, products, domain names, e-mail addresses, logos, people, places, and events depicted herein are fictitious, and no association with any real company, organization, prod-uct, domain name, e-mail address, logo, person, place, or event is intended or should be inferred.
This book expresses the author’s views and opinions. The information contained in this book is provided without any express, statutory, or implied warranties. Neither the author, O’Reilly Media, Inc., Microsoft Corporation, nor their respective resellers or distributors, will be held liable for any damages caused or alleged to be caused either directly or indirectly by such information.
Acquisitions and Development Editors: Juliana Aldous and Kenyon Brown
Production Editor: Kristen Borg
Production Services: Octal Publishing, Inc.
Technical Reviewer: Todd Meister
Indexing: Denise Getz
Cover: Karen Montgomery
Compositor: Octal Publishing, Inc.
Illustrator: Robert Romano
Contents at a Glance
Right Now Document Design with
Word 2010 . . . . 69
Chapter 4
Templates and Themes for a
Professional Look . . . . 101
Chapter 5
Customizing Page Setup and
Controlling Pagination . . . . 139
Chapter 6
Setting Up Your Layout with Page
Backgrounds and Columns . . . . 173
Part 2: Creating Global Content: From
Research to Review
Part 3: Make Your Point, Clearly
and Visually
Adding the Extras: Equations, Text
iv Contents at a Glance
Part 5: Word 2010 Interactive
Chapter 23
Preparing Tables of Contents
and Indexes . . . . 705
Chapter 24
Special Features for Long Documents . . . . 731
Chapter 25
Blogging and Using the
Word Web App . . . . 747
Chapter 26
Creating Mailings Large
and Small . . . . 761
Chapter 27
Customizing Documents with
Content Controls . . . . 789
Chapter 28
Table of Contents
Acknowledgments . . . xxiii
Conventions and Features Used in This Book . . . .xxv
Text Conventions. . . .xxv
Design Conventions . . . .xxv
Introduction . . . .xxvii
Get Busy with Word 2010 . . . .xxvii
Some Assumptions About You . . . xxviii
About This Book . . . xxix
How This Book Is Organized . . . xxix
Getting Started . . . .xxx
Part 1: Word 2010: Make an Immediate Impact
Chapter 1
Spotlight on Microsoft Word 2010 . . . . 3
Imagining Word 2010 . . . 3
What’s New in Word 2010? . . . 4
Enhancing Your User Experience . . . 5
Better Authoring Features . . . 7
Use Word 2010 Anywhere . . . 11
Finding Your Way Around the Word 2010 Window . . . 13
Get What You Need, Intuitively . . . 13
Exploring the Ribbon . . . 14
Keep Your Favorite Tools in Reach with the Quick Access Toolbar. . . 16
Using Dialog Launchers . . . 17
Working with Galleries . . . 19
Making Quick Formatting Changes with the Mini Toolbar . . . 20
Getting a New View of Your Document . . . 21
Finding What You Need Quickly with the Navigation Pane . . . 24
Displaying Rulers and Gridlines . . . 26
Viewing More Than One Page at a Time . . . 28
Working with Multiple Documents . . . 28
Understanding and Tailoring the Status Bar . . . 30
What’s Next?. . . 31
What do you think of this book? We want to hear from you!
viii Table of Contents
Table of Contents xiii
Specialized Printing . . . 454
Printing Envelopes . . . 456
Creating Labels . . . 458
What’s Next?. . . 460
xvi Table of Contents
Part 4: Word 2010 As a Team Effort, Anywhere, Always
Table of Contents xix
Creating Subdocuments . . . 741
Importing Data for Subdocuments . . . 741
Working with the Master and Subdocuments . . . 742
What’s Next?. . . 745
Table of Contents xxi
Protecting Your Macros . . . 835 Digitally Signing Macros . . . 835 Creating a Self-Signed Digital Signature. . . 836 Third-Party Digital Signature . . . 836 Digitally Signing a VBA Project. . . 837 What’s Next?. . . 839
Index . . . . 841
Acknowledgments
Microsoft Word 2010 Inside Out represents a kind of milestone for me. After a year of writ-ing about various Microsoft Office 2010 programs and features (in a variety of formats), Microsoft Word 2010 Inside Out is the culmination of all we’ve learned and developed throughout the beta and launch of Word 2010. I think this version of Microsoft Word is the best yet. Echoing the maturation of the software, this book has also found a voice and purpose in sync with the times, offering readers many practical examples, plenty of how-to information, and a flexibility designed to help content creators prepare what they need for a variety of formats and distribution channels.
Growth and development never happens in a vacuum but requires a supportive environ-ment—complete with wind, sunlight, and rain—to produce the best results. A huge thank you goes out to the following people for contributing to the tending and nurturing of this project:
•
Juliana Aldous, who was responsible for acquiring this project when we started manymonths ago (and who has since moved into a new role at Microsoft Learning), a big thanks for catching the vision and being enthusiastic about the new ideas and approach I wanted to take in these pages;
•
Claudette Moore, my agent at Moore Literary Agency, for her always-helpfulsugges-tions, insights, and encouragement when there’s a lot to do and not much time in which to do it! Thanks, Claudette; as always, you make these projects possible—and even fun.
•
Kenyon Brown, senior editor, for overseeing this book, (our most recent in a wholeseries of Office 2010 projects) with his characteristic professional style and holistic management skills. Keeping everyone moving, in sync, and on schedule is no simple task, but Ken seems to do it naturally.
•
Todd Meister, technical editor, for his careful and insightful review of all content inthis book. Tech editing isn’t easy when a book project spans the process of beta development and software release, and Todd not only makes the task look simple, but offers corrections and great suggestions in a supportive and collaborative way.
•
Bob Russell at Octal Publishing, for a great copy edit, complete with fun andthoughtful comments and suggestions that helped make this a better book;
•
Kristen Borg, Production Editor, for her careful and kind project management as thebook moved through editing, review, and production;
•
Sumita Mukherji, for her friendly and helpful scheduling and coordination of theproject early-on; and
•
Dianne Russell, also at Octal Publishing, for the beautiful, clean, and effective layoutConventions and Features Used in This Book
This book uses special text and design conventions to make it easer for you to find the information you need.
Text Conventions
Convention Feature
Abbreviated menu commands
For your convenience, this book uses abbreviated menu commands. For example, “Choose Tools, Forms, Design A Form” means that you should click the Tools menu, point to Forms, and select the Design A Form command.
Boldface type Boldface type is used to indicate text that you enter or type.
Initial Capital Letters
The first letters of the names of menus, dialog boxes, dialog box elements, and commands are capitalized. Example: The Save As dialog box.
Italicized type Italicized type is used to indicate new terms.
Plus sign (+) in text Keyboard shortcuts are indicated by a plus sign (+) separating two
key names. For example, Shift+F9 means that you press the Shift and F9 keys at the same time.
Design Conventions
Note
Notes offer additional information related to the task being discussed .
Cross-references point you to other locations in the book that offer additional information on the topic being discussed .
Caution
!
xxvi
INSIDE OUT
This Statement Illustrates an Example of an “Inside Out” Problem StatementThese are the book’s signature tips . In these tips, you’ll get the straight scoop on what’s going on with the software—inside information on why a feature works the way it does . You’ll also find handy workarounds to different software problems .
troubleshooting
This statement illustrates an example of a “Troubleshooting” problem statement.
Look for these sidebars to find solutions to common problems you might encounter . Troubleshooting sidebars appear next to related information in the chapters . You can also use the Troubleshooting Topics index at the back of the book to look up problems by topic .
Sidebar
Introduction
Maybe you’ve noticed: creating simple documents today is so 2009. In this new decade,
the emphasis has shifted from designing, creating, editing, and printing real hold-in-your-hands documents to creating content that can be used in a variety of smart, efficient ways. You might create content about a new product, for example, and instead of simply print-ing a fact sheet that you hand to all your sales reps, you save one version as a PDF, send another in an e-mail message, post some of the content to a blog, include some of the description in a catalog, and forward the Word file to peers around the globe.
What’s more, you’ll rarely create these content pieces alone. The use of teams is growing throughout industries of all types, and with good reason. When you work collaboratively, each person on a team can contribute his or her expertise, without tying up anybody’s time around the clock. Shared review enables many people with many perspectives to provide feedback so the content is the best that it can be. Team work, when it works well, can make
a huge difference in the type and quality of materials you create. When team work doesn’t
work well, of course, it’s another story. Luckily, Word 2010 includes some great new features that help you to reduce or dissolve collaboration challenges.
Another big change in the way we work has brought about changes in Word 2010. Today, thanks to the advent of the mobile phone and the wanderlust spirit of today’s information enthusiast, we know it’s possible—and we increasingly want—to work anywhere, anytime. You know those moments that seem wasted on the train out of the city? Now you can use them to finish reviewing a document you need to share with your team in the morning. You can access your Word files—and edit, format, review, and share in real time—from any point you have Web or smartphone access.
With these major changes in the way we work and where we work underway, Word 2010 is positioned to be a state-of-the-art word processing program that really is there for you. With the tools you need to produce any kind of content you want and the flexibility to enable you to create, edit, and share that content from almost any point on the globe, Word 2010 pops the lid on anything that was holding you and your creativity back before.
Get Busy with Word 2010
With all that being said, the book you now hold in your hands is a major revamp from
pre-vious versions of MicrosoftWord Inside Out. As Word users, our need for content creation
xxviii
anywhere, flows through the examples, features, and projects. We hope you’ll find examples that speak to the way you use Word every day to accomplish the goals of your business, department, company, or school.
The various parts and chapters in this book help you to explore the whole Word 2010 land-scape from a variety of entrance points. The parts focus generally on the types of overall tasks you are likely to want to complete, and individual chapters within each part zoom in on a specific tool or technique (or range of techniques) related to that task. Along the way, you’ll find notes, Inside Out tips, and troubleshooting ideas, as well as some “green” ideas and sidebars offering additional information that can help boost your understand or appli-cation of Word 2010 concepts.
Some Assumptions About You
The Inside Out series is designed for readers who have some experience with Word and are pretty comfortable finding their way around the program. You don’t have to be a power user or Word developer by any means; you aren’t necessarily a technology enthusiast (like your author) although you do like the idea of using programs in a way that is efficient and effective so you can accomplish what you want to accomplish without a lot of fuss and bother.
For this reason, Microsoft Word 2010 Inside Out touches only briefly on some of the basic
topics that you’ll find covered in more detail elsewhere. Although we want the coverage in a book this size to be as complete as possible (we want you to get what you paid for), we also focus in on techniques and topics that are likely to appeal to readers who have already mastered many of the basics in Word.
If you find that you’d like to brush up on Word 2010 basics in addition to taking on the topics you’ll find covered fully in this book, you may want to check out any or all of the fol-lowing books:
•
Microsoft Word 2010 Plain & Simple, by yours truly (Microsoft Press, 2010)•
Microsoft Word 2010 Step by Step, by Joyce Cox and Joan Preppernau (MicrosoftPress, 2010)
Tip
xxix
About This Book
Microsoft Word 2010 Inside Out helps you learn to master Word 2010 in the way you’re most likely to use the program, following a linear process that looks something like this:
•
Create a new document•
Apply a template and make layout choices•
Choose your theme for color and style•
Add content•
Translate phrases and documents•
Edit your content and use reference tools•
Apply and customize Quick Styles•
Add tables, diagrams, art, and more•
Co-author and share your documents with your team, near and far•
Work almost anywhere with the Office Word Web App•
Use Word 2010 for special projects, like blogging, mailings, long documents, andmore
•
Tackle the high-end Word features, including macros and formsEach chapter provides the detail you need to know in order to accomplish those various tasks successfully, and you’ll find tips and cautions along the way to steer you away from trouble spots and help you optimize the time you spend creating content.
How This Book Is Organized
Microsoft Word 2010 Inside Out gives you a comprehensive look at the various features you will use whether you create long or short projects for print or online uses. The chapters are organized according to the types of tasks you are likely to be performing. Here’s the gen-eral roadmap for the book:
xxx
Part II, “Creating Global Content: From Research to Review,” focuses on the ways you pull together different elements to create your Word document, translate it for a global audi-ence, and edit, proof, and use reference tools as you polish up your words. In this part, you also learn the ins and outs of Quick Styles and find out how to create them on your own. You use the new Navigation Pane to find just what you want when you want it, reorganize content with Outline view, and spend a little time with the streamlined print process.
Part III, “Make Your Point Visually,” shines a light on one of the big improvements in Word 2010. As it becomes easier to grab and insert photos in our documents and content pieces, the overall look of the files we create is improving. Today you can create a professional mar-keting piece in under an hour that used to take weeks (no kidding) at a commercial print shop. Not only are the cost and quality under your control, but the images you choose to portray and the styles and artistic effects that you select enable your content to rival that produced by expensive firms or elaborate marketing departments. Also in this part, you learn how to add screenshots to your content and reflow text around the art elements on your pages.
Part IV, “Word 2010 as a Team Effort—Anywhere, Always,” helps you tackle the challenge of creating content in a global workplace that likely needs that content to be produced in dif-ferent ways for difdif-ferent audiences. The reality of localizing content is that programs need to include translation tools that are easy to use and extend—and Word 2010 has just those sorts of translation tools. With the new language features in Word 2010, you can choose from a variety of languages and set up multiple levels of control for translations, whether you want to translate entire documents, sections, or words and phrases on the fly.
Part V, “Word 2010 Interactive,” moves things to a new level as you consider the differ-ent ways you can share the contdiffer-ent you create. Whether you are generating an enormous master document that combines subdocuments contributed by a number of team mem-bers; blogging for a global audience; or designing and completing mass mailings to your customer base, donor list, or parent population; you’ll find what you need to complete your projects in this part of the book. This part also includes more specialized high-end Word 2010 techniques related to designing and distributing documents that use content controls and automating tasks using macros.
Getting Started
PART 1
Word 2010: Make an
Immediate Impact
Chapter 1
Spotlight on Microsoft Word 2010 . . . .3
Chapter 2
Managing Your Documents with
Backstage View . . . . 33
Chapter 3
Right Now Document Design
with Word 2010 . . . . 69
Chapter 4
Templates and Themes for a
Professional Look . . . . 101
Chapter 5
Customizing Page Setup and
Controlling Pagination . . . . 139
Chapter 6
Setting Up Your Layout with Page
C H A P T E R 1
Spotlight on Microsoft Word 2010
Imagining Word 2010 . . . . 3
What’s New in Word 2010? . . . . 4
Finding Your Way Around the Word 2010 Window . . . .13
Understanding and Tailoring the Status Bar . . . .30
What’s Next? . . . .31
F
or most of us, the phrase word processing doesn’t bring to mind exciting images ofmovement, color, sound, and images. It doesn’t promise a lot of fun and connection
like the phrase social networking does. It doesn’t hint at an unlimited world of
informa-tion or draw you closer to what fascinates you like the phrase web browsing does.
But that’s all changing with Microsoft Word 2010.
The newest version of Word offers new and improved features that make it easy for you to make your documents look better than ever. You can control the format, enhance your text, and apply artistic filters to images to make your documents really shine. You can easily translate content on the fly, access your documents from almost anywhere, blog and share content with social media sites, and share your content with colleagues in a number of different formats with just a few clicks of the mouse. And you can access your content in a variety of ways—from the server, your desktop PC, your smartphone, or any device with Web access.
This chapter encourages you to envision the types of projects you’d like to create with Word 2010 and spotlights the new and improved features that will help get you there. Along the way, you’ll learn about the Word 2010 window, explore the Ribbon, and find out more about Word options, the Trust Center, and tweaking program features to your liking.
Imagining Word 2010
So how will you use Word 2010? Maybe one of the following scenarios fits what you have in mind or reflects tasks you might want to try in the future:
•
Create a four-color annual report with photos of your staff, services, and office.•
Design a new product brochure with high-quality typography.•
Download the latest version of a document from shared server space so that you canC
4 Chapter 1 Spotlight on Microsoft Word 2010
•
Draft a letter to your top-level donors.•
Post an entry to your blog.•
Edit a book chapter simultaneously with others on your team.•
Review and edit your document while you’re on the road.The content you create today is likely to be much different from the ho-hum documents you drafted, printed, and photocopied a dozen years ago. Thanks to the advent of Web and mobile technologies, change is happening at an ever-increasing rate, and it’s touching the way we create, edit, and share our information—printed and otherwise. Yesterday you were working on documents, one at a time, using revision marks and then waiting for your docu-ments to come back from review. To move a file from one computer to another, you either e-mailed it or saved it to a disk or USB drive.
As today’s Word user, you are probably not tied to a single computer as you create, edit, review, and share the content you create. You might use one computer at home and another at work; perhaps you check e-mail on your smartphone and log in to the office server from remote places that offer Web access. No longer are you working on one docu-ment at a time and then sending it to another member of your team for review—now your group might be viewing, editing, discussing, and commenting on the document in real time. And nobody is stuck at a stand-alone or networked PC any longer; now editing on your smartphone is a real option, as is logging in to your files using the Word Web App.
The idea is to give you a consistent user experience with Word 2010 no matter which device you might be using. Whether you open and work with files on the Web, review con-tent on your smartphone, or edit documents on your PC, you’ll be able to access and lever-age the content you create in an almost unlimited number of ways.
What’s New in Word 2010?
C
h
a
p
te
r 1
What’s New in Word 2010? 5
The changes in Word 2010 offer new and improved features in three key areas:
•
Creating a better user experience. The Ribbon—which was introduced with Word 2007—can now be fully customized, which means that you can create your own tabs and tab groups. And now Backstage view brings together all the tools you need to set program preferences, work with files, and protect and share your content. Other user experience enhancements include the Navigation pane, which enhances the power of your search capabilities, and Paste with Live Preview, which enables you to preview various paste options before you add content to your document.•
Improvements in authoring. Co-authoring, also known as simultaneous editing, is the big story in authoring features for Word 2010, but you’ll also find great new image features and text effects that help your content really stand out. What’s more, now you can use high-end typographic features through the OpenType fonts that support them, including ligatures, kerning, stylistic sets, and more.•
Word power in new contexts. The idea of taking Word beyond the desktop becomes reality in Word 2010. Now you can move from desktop to Web to smart-phone to server—and back again—using any of the various access choices for Word 2010. You can also run Word 2010 on 64-bit systems to take advantage of the full processing power your computer possesses.The sections that follow give you a quick introduction to each of these features in more detail.
Enhancing Your User Experience
Word 2010 is all about flexibility—putting more power in your hands and giving you the tools to tailor the program to work the way you do. These are some of the top enhance-ments that will make your user experience a more pleasant one in Word 2010:
C
h
a
p
te
r 1
6 Chapter 1 Spotlight on Microsoft Word 2010
Figure 1-1 You can easily customize the Word 2010 Ribbon to add tabs and tab groups (as demonstrated on the Share tab in this image) that fit the way you use the program.
For specific steps on tailoring the Ribbon to include the tools and tabs you want, see Chapter 2, “Managing Your Documents with Backstage View . .
•
Navigation pane. The Navigation pane combines the best of the Find tool with Outline view and thumbnail displays, giving you three different ways to navigate the content in your document. You can search by heading, by thumbnail, or by text phrase. Additionally, you can use Word’s Find and Replace tools from the Navigation pane and browse through the objects in your document as well.C
h
a
p
te
r 1
What’s New in Word 2010? 7
•
Backstage view. In Backstage view you have access to all the tools you’ll use to create, save, open, share, protect, and print the files you create. Backstage view sim-plifies many of the most common file management tasks and gives you access to program information, Word Options, and Help choices (see Figure 1-2).Figure 1-2 Backstage view pulls together all the tools you need to work with files and program preferences.
Better Authoring Features
Many different features in Word 2010 are designed to improve your authoring experience so that you can create content that accomplishes the goal you’re reaching for. Some of the top authoring features include:
C
h
a
p
te
r 1
8 Chapter 1 Spotlight on Microsoft Word 2010
Chapter 22, “Collaborating and Co-Authoring in Real Time,” shows you the ins and outs of co-authoring and walks you through the process of resolving authoring conflicts in your files .
Figure 1-3 When you use Word 2010’s co-authoring feature, you can see when and where others are making changes in a shared file.
•
Better translation tools help you talk to the world. With Word 2010, you can choose the language you want to use for a number of translation and on-screen features. You can customize help text and program prompts, or translate text, sec-tions, or entire documents on the fly using the Mini Translator (see Figure 1-4), the Research task pane, or whole-document translation services.C
h
a
p
te
r 1
What’s New in Word 2010? 9
Figure 1-4 The Mini Translator pops up over your Word window and enables you to copy, look up, or listen to the translation.
•
Check what you mean—as well as what you say. The new contextual spelling checker helps you check your document for errors in usage as well as spelling. Did you say “there” when you meant to say “their”? Or did you use “loose” instead of “lose”? The new contextual spelling checker points out these and other errors so that you can make sure your document is as grammatically accurate as possible.C
h
a
p
te
r 1
10 Chapter 1 Spotlight on Microsoft Word 2010
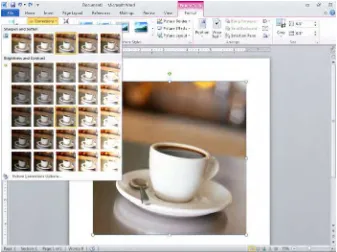
Figure 1-5 With Artistic Effects, you can apply high-end graphics filters to images in your documents.
Tip
Word 2010 also includes enhancements to SmartArt . Find out about SmartArt’s new features in Chapter 16, “Create Compelling SmartArt Diagrams and Charts .”
•
Show others your screen. If you create training materials or want to share a pic-ture of what you see on-screen, you’ll enjoy the new Insert Screenshot feapic-ture in Word 2010. As part of the Illustrations group, you can either grab a portion of the screen or insert an entire screen image in your current document. You’ll find out more about adding screenshots in Chapter 17.C
h
a
p
te
r 1
What’s New in Word 2010? 11
also take advantage of high-end typography features available with some OpenType fonts, including ligatures, stylistic sets, and number styles to extend the look you want to create.
Chapter 7, “Creating and Reusing Content,” introduces you to the ways that you can use text effects to spruce up the look of your text and increase your font choices with OpenType support .
Tip
Expanded inking capabilities. Word 2010 now includes improved support for ink users via an expanded pen palette, enhanced touch sensitivity, and the ability to incorporate and convert inked content to digitized text and equations . Turn to Chapter 7 for more information on using ink capabilities in Word 2010 .
Use Word 2010 Anywhere
When was the last time you sat at your desk all day long and worked on one continuous document? We thought so. Word 2010 takes into account the needs of today’s user, who is often on the go, juggling multiple projects, and working seamlessly with others down the hall or around the world. New features that help you take Word 2010 beyond your desktop PC include:
•
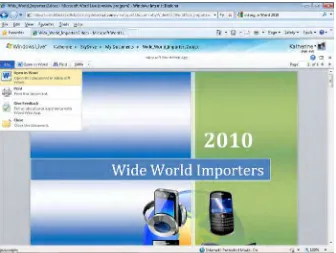
The Word Web App. Now you can access your Word 2010 files and review, edit, update, format, and share them normally from any point where you have Web access. Using your SharePoint Workspace or Windows Live SkyDrive account, you can access your saved files and work with them in a Web version of the Word 2010 interface you’re accustomed to (see Figure 1-6). This means you don’t need to carry a flash drive or e-mail documents to yourself in order to access them in different places.C
h
a
p
te
r 1
12 Chapter 1 Spotlight on Microsoft Word 2010
Figure 1-6 The Word Web App makes it easy for you to work on your files from any point you have Web access.
•
Using Word Mobile 2010. In addition to having the flexibility to work on your Word files from the Web or saving to your server, you can also access and work with your files from your smartphone. Using a streamlined Microsoft Office 2010 interface designed for the small screen, you can view, edit, format, update, and share your documents easily from your phone.Note
C
h
a
p
te
r 1
Finding Your Way Around the Word 2010 Window 13
Finding Your Way Around the Word 2010 Window
It turns out that we’re still dealing with the aftermath of the Office 2007 user interface redesign. People had greatly divergent views on the overall approach that the designers of Office 2007 were reaching for—and many people just plain didn’t like the Ribbon. Early reactions were generally positive—people were intrigued by the idea that Office designers went “back to the drawing board” when they began brainstorming about the new look and feel of the user interface. Experienced users were wary—why fix what’s not broken?—and power users wondered whether the simplified design would make it impossible to use the shortcuts, macros, and more they had come to rely on to expedite their document tasks.
Word 2010 (along with all the other Office 2010 applications) carries forward the purpose and intent of the new user interface, this time offering increased flexibility—now you can customize the Ribbon to suit your needs. Shortcut keys still work, macros are easier to create than ever, and we realize—as the software continues to move forward—that we haven’t lost any of the familiar tools that we were worried about misplacing in the new design.
Get What You Need, Intuitively
But, you know, everybody’s different. One of the lessons I think Word 2007 taught was that not everybody was in agreement that “new = better.” The intention to create an interface that was easier to use and ultimately uncluttered the workspace was a good one. And the design philosophy behind the Ribbon—bringing you just the tools you need when you need them, organized around specific tasks you want to complete—was also sound. But learning a dramatically new interface and getting comfortable finding your favorite tools and options when you need to get things done can be a bit of a headache—one many Word users suffered through on the way to a more intuitive word processing experience.
C
h
a
p
te
r 1
14 Chapter 1 Spotlight on Microsoft Word 2010
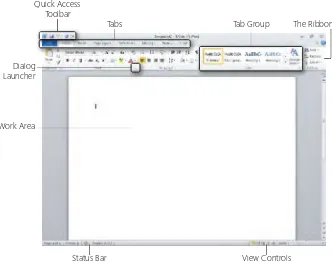
Quick Access Toolbar
Tabs
Status Bar View Controls
Tab Group The Ribbon
Dialog Launcher
Work Area
Figure 1-7 The Word 2010 window.
Exploring the Ribbon
The Ribbon across the top of the window organizes the tools in tabs, which reflect the dif-ferent tasks you are likely to want to accomplish with the program. For example, when you create the document, the Home tab provides the commands you are likely to use as you start out. When you want to add pictures, shapes, diagrams, and more, you find the tools you need on the Insert tab. When you’re ready to share your document with others, the Review tab offers a variety of tools for preparing the file for review and working with the review copies when you receive them.
The Ribbon, as it appears by default, includes all the following elements:
•
Tabs (Home, Insert, Page Layout, References, Mailings, Review, and View). Tabs stretch across the screen just below the window’s title bar. You can also customize the Ribbon by adding tabs and tab groups that provide tools you use most often.C
h
a
p
te
r 1
Finding Your Way Around the Word 2010 Window 15
•
Contextual tabs. Contextual tabs help keep the window uncluttered by displaying task-related tools only when an object is selected in the document. When you select a picture, for example, the contextual Picture Tools tab appears along the top of the Ribbon. The commands displayed when the tab is selected all relate to the object you’ve selected (see Figure 1-8).Figure 1-8 Contextual tabs display tools related to the specific object you select in the document.
Note
C
h
a
p
te
r 1
16 Chapter 1 Spotlight on Microsoft Word 2010
You can tailor the Word 2010 interface to fit your own style . Now you can add tab groups, create new groups, reorder tools, and rename groups already displayed . You’ll find everything you need to make these changes in Word Options . See Chapter 2 to find out the specifics .
Keep Your Favorite Tools in Reach with the Quick
Access Toolbar
In the upper-left corner of the screen you’ll find the Quick Access Toolbar, which offers, within clicking distance, favorite file-management tools you are likely to use often. When you first launch Word 2010, the Save, Undo Typing, and Repeat Typing tools appear in the Quick Access Toolbar. You can click the Customize The Quick Access Toolbar arrow to dis-play a list of additional tools and options that you can use to tailor the tools offered there (see Figure 1-9).
Figure 1-9 You can tailor the Quick Access Toolbar to include the tools you use often and want to make available while you work.
You can customize the Quick Access Toolbar a couple of different ways. First, you can sim-ply click the tool you want from the Customize Quick Access Toolbar list. If the tool doesn’t appear in the list, you can click More Commands, navigate to the tool you want to add, and click it. You can also add a tool to the Quick Access Toolbar by right-clicking the tool in the Ribbon, and then click Add To Quick Access Toolbar (see Figure 1-10).
Tip
C
h
a
p
te
r 1
Finding Your Way Around the Word 2010 Window 17
Figure 1-10 Add favorite tools to the Quick Access Toolbar easily.
Note
If you add a number of tools to the Quick Access Toolbar, you might want to give it more room by displaying the toolbar in its own row below the Ribbon . To do so, Right-click anywhere on the Ribbon and choose Show Quick Access Toolbar Below The Ribbon . To return the display of the toolbar to its original state, right-click the Quick Access Toolbar and choose Show Quick Access Toolbar Above The Ribbon .
Using Dialog Launchers
The Ribbon is great for providing you with groups of tools that are related to the task you’re trying to accomplish, but sometimes it’s helpful to see all the options you have avail-able so you can make the best choice. In those situations, having a traditional-style dialog box comes in handy. Dialog boxes are available for some groups on the Ribbon. Those
groups that do have a dialog box display a small, boxed arrow symbol, called a dialog
C
h
a
p
te
r 1
18 Chapter 1 Spotlight on Microsoft Word 2010
Figure 1-11 Dialog launchers display dialog boxes.
Options for displaying dialog boxes are also available at the bottom of any gallery that offers additional options. For example, when you click Columns in the Page Setup group on the Page Layout tab, a gallery of column settings appears. Click the More Columns option (see Figure 1-12) at the bottom of the gallery to launch the Columns dialog box.
C
h
a
p
te
r 1
Finding Your Way Around the Word 2010 Window 19
Working with Galleries
Word 2010 includes all sorts of galleries—themes, styles, picture styles, and more—that graphically display the range of choices from which you can click the design, color, layout, and style you want. You will see galleries displayed in different ways, depending on your screen resolution and the size of the Word window. The Ribbon was designed to adjust to the size of the screen, so in some cases you might see galleries appear as selections on the Ribbon, while other galleries appear as drop-down items.
Basically you’ll see galleries presented in one of three ways in Word. Some galleries are shown as part of a group on the Ribbon (similar to the Picture Styles gallery shown in Figure 1-13); you can click the More button in the lower-right corner of the gallery to display the full collection of choices. Other galleries (such as those available for Themes, Margins, and Position commands) display as drop-down galleries from which you can make your selection.
Figure 1-13 Some galleries display choices in the Ribbon.
Other galleries open as a palette of choices, like the Corrections gallery shown in Figure 1-14. Using galleries, you can easily see at a glance which color combination, format, color scheme, transition, or chart type you want. The choices you see in the galleries are con-nected with the theme you’ve selected (if any) for your document. This helps you be sure that when you’re choosing a chart type, for example, it reflects the colors, fonts, and effects used in other parts of your document.
C
h
a
p
te
r 1
20 Chapter 1 Spotlight on Microsoft Word 2010
Figure 1-14 Some galleries open as palettes from which you can easily click your choice.
Tip
You can easily preview how the new selection will look by hovering your mouse over the option you’re thinking about selecting . The effect of the choice will show in the selected object or text in your document . In this way, you can try out different choices before you commit to one by clicking it .
Making Quick Formatting Changes with the Mini Toolbar
C
h
a
p
te
r 1
Finding Your Way Around the Word 2010 Window 21
Figure 1-15 The Mini Toolbar displays quick formatting choices whenever you select text.
Note
If you find the Mini Toolbar distracting or don’t think you’ll use it, you can simply turn the feature off . On the File tab, choose Options; in the General tab of the Word Options dialog box, clear the Show Mini Toolbar On Selection check box, and then click OK . Now the Mini Toolbar is disabled and will not appear the next time you select text . (It will appear, however, when you right-click selected text .) To reactivate the Mini Toolbar, display the Word Options dialog box again and reselect the check box .
Getting a New View of Your Document
C
h
a
p
te
r 1
22 Chapter 1 Spotlight on Microsoft Word 2010
document. Word offers you many different ways to view your work, depending on the type of document you’re creating and the task at hand:
•
Print Layout This view, which is used by default when you create a new document, seems to be the view most people use as they create and edit their documents. It shows how the document will look when printed. In this view, you can see headers and footers as well as footnotes and endnotes. The edges of the page and the space between pages are also visible as you type and edit.Tip
You can alternately suppress and display the top and bottom margins of your document in Page Layout view by double-clicking the space between the pages . By default, Page Layout view shows a gap between pages . If you position the pointer over the page break, the pointer changes to two arrows and a tooltip prompts you to double-click the space to remove it . Double-clicking at that point removes the space between the pages and enables you to view text before and after the break in a continuous paragraph . To return the page display to the default setting, position the pointer over the page break line and double-click .
C
h
a
p
te
r 1
Finding Your Way Around the Word 2010 Window 23
Figure 1-16 Using Full Screen Reading view, you can view, comment on, and edit your document with a maximum amount of room on the screen.
C
h
a
p
te
r 1
24 Chapter 1 Spotlight on Microsoft Word 2010
Figure 1-17 Web Layout view shows you what your document will look like as a Web page.
•
Outline With this view, you can see the document in outline form, with headings and subordinate text indented so that you can easily identify and work with sections in a long document.•
Draft This view is a fast, no-frills mode that many people prefer to use when they need to write or edit something quickly. Note that some elements—such as headers and footers—are not visible while you’re working in Draft view.Finding What You Need Quickly with the Navigation Pane
C
h
a
p
te
r 1
Finding Your Way Around the Word 2010 Window 25
Figure 1-18 The Navigation pane enables you to view, move through, and search your document by heading, page view, or text search.
The Navigation pane offers three different tabs that move you through the information in your document by one of these methods:
•
Browse the headings in your document. When you click this tab (shown in Fig-ure 1-18), Word 2010 displays a list of headings in your document. Clicking on any of these heading will bring you directly to the point in the file where the heading appears.•
Browse the pages in your document. This tab displays thumbnail images of the pages in your document. Again, you can move to a specific page by clicking on an image in this view.C
h
a
p
te
r 1
26 Chapter 1 Spotlight on Microsoft Word 2010
Figure 1-19 You can search for text in your document, and the Navigation pane shows you every place the word or phrase appears.
Tip
You can also search for specific objects in your document using the Browse Object features . For more about searching and navigating your document, see Chapter 8, “Navigating Your Document .”
Displaying Rulers and Gridlines
When you are working on a document in which the alignment and sizing of elements is important, you will want to turn on rulers and gridlines to ensure that items line up on the page and meet the measurements you need. The controls for both items are found in the Show/Hide group on the View tab.
C
h
a
p
te
r 1
Finding Your Way Around the Word 2010 Window 27
Alternatively, you can display vertical and horizontal rulers by selecting the Ruler check box on the View tab. To hide the rulers, clear the Ruler check box.
Adding gridlines is a similar process. On the View tab, select the Gridlines check box. Grid-lines appear on your document to which you can easily align pictures, quotes, or other ele-ments on your page (see Figure 1-20).
Figure 1-20 Gridlines help you to align pictures, charts, and other elements in your document.
Note
C
h
a
p
te
r 1
28 Chapter 1 Spotlight on Microsoft Word 2010
Viewing More Than One Page at a Time
The Zoom group on the View tab includes five different tools with which you can change the size and number of pages you view on the screen at any one time. Page Width view is selected by default, but you can easily change the view to match your own comfort level.
To change the size of the text, click the Zoom tool to open the Zoom dialog box. You can choose one of the preset sizes or specify your own by clicking in the Percent box and typ-ing a new value (see Figure 1-21). You can also change the number of pages displayed by choosing the Many Pages option and then dragging to select the number of pages you want to display on the screen. The Preview window shows you how your document will look, and the sample text area shows how readable (or not!) your text will be. When you’ve made changes you are happy with, click OK to save them.
Figure 1-21 Use the Zoom dialog box to change the way your document is displayed.
In addition to changing the page display in the Zoom dialog box, you can also easily switch among multipage views by clicking the One Page, Two Pages, or Page Width tools in the Zoom group on the View tab. Each of these tools behaves the way you would expect—One Page shows you the whole page at the cursor position; Two Pages displays the page on which the cursor is active and the next full page in the document; and Page Width magni-fies or reduces the size of the document so that it fits the width of the Word window.
Working with Multiple Documents
C
h
a
p
te
r 1
Finding Your Way Around the Word 2010 Window 29
When you want to easily move among open Word documents, use the Switch Windows tool. When you click Switch Windows, a list appears that shows you the various open win-dows (see Figure 1-22); just click the one you want to see.
Figure 1-22 Click Switch Windows and choose the document you want to view to move among open files.
Use the New Windows tool when you want to open a new copy of the current document in a new window. You might use this tool when you need to edit or compare different por-tions of a large document instead of endlessly scrolling back and forth. When you’re ready to close the copy, click the close button in the upper-right corner of the screen.
The Arrange All, Split, and View Side By Side commands all enable you to choose how you want to view the open documents. If you have more than two documents open at once, clicking View Side By Side displays the Compare Side By Side dialog box, as shown in the following image. Here, you can choose the other open document you want to compare with the current one. Select your choice and click OK to display the document.
Note
C
h
a
p
te
r 1
30 Chapter 1 Spotlight on Microsoft Word 2010
When you use the View Side By Side command, Word sets the default to Synchronous Scroll-ing, which means that as you scroll through one document, the other document scrolls automatically as well. This is helpful for comparing documents in which you’re looking for paragraphs, sections, or even phrases that might be slightly different.
Understanding and Tailoring the Status Bar
The status bar, which is located in the lower-left corner of the Word 2010 window, provides useful information about your current document. By default, the status bar shows you:
•
The location of the cursor position•
The number of pages in the document•
The number of words•
Whether any proofing errors exist•
The selected language you are using if you have installed more than one languagekeyboard preference
Note
You might also see in the status bar an indicator that lets you know whether any macros are currently being recorded in your document .
The status bar includes four key elements:
•
The Page area shows the number of the current page and the length of yourdocu-ment. You can also click this area to display the Go To tab in the Find and Replace dialog box.
•
Word displays a continually updating word count on the status bar as well. If youselect text, Word shows you how many words of the total word count are selected (for example, 50/451). Click this area to display the Word Count dialog box, in which you can view additional statistics on number of characters, paragraphs, and more.
•
To detect errors, an ongoing spelling and grammar checker continuously reviews yourC
h
a
p
te
r 1
What’s Next? 31
•
If you have installed more than one language and keyboard preference for yourversion of Word 2010, the language you have selected as the default appears in the status bar to the right of the proofing indicator. Click this option to display the Language dialog box and choose the language used for the spelling and grammar checker.
In addition to the controls that show in the status bar by default, you can add or remove options by right-clicking anywhere on the bar. The Customize Status Bar list appears, presenting statistics about your document and showing you which features are currently enabled (see Figure 1-23). Additionally, the Customize Status Bar list provides the status of various elements that show you the status of the file; for example, in Figure 1-23, you can see that there is no macro currently being recorded and that Permissions and Track Changes are both turned off for the current file.
Figure 1-23 The Customize Status Bar list displays the status of various features in your document and enables you to add or remove additional options.
What’s Next?
C H A P T E R 2
Managing Your Documents with
Backstage View
Introducing Backstage View . . . .34
Working with Document Properties in the Info Tab . . . .38
Accessing Recent Files . . . .55
Starting a New File . . . .57
Previewing and Printing Documents . . . .57
Saving and Sending Your Documents . . . .58
Getting Help in Word 2010 . . . .60
Setting Word Options . . . .62
What’s Next? . . . .68
W
ORKING with your documents in Word 2010 isn’t all about creating content. Once you design your page, enter your text, format it the way you want it, add your illustrations, and do your proofreading pass, you need to think about what youwant to do with the file. Will you print it? Share it? Close it and go to lunch?
This chapter is all about what you do with the files you create in Word 2010. While you’re creating your document, you will be making decisions about who can access it and when, what kind of editing you want them to do, what kinds of tags and comments you add to the file, and much more. In order to manage that type of information, perform file manage-ment tasks, and set program preferences in Word, you will use the new Backstage view. This view pulls together in one convenient place all the commands you need to set program preferences, work with your Word files, get help, and save, share, and print your files.
Backstage view was designed with the idea of giving you an easy way to access all the tools you need as you manage your documents. Because today we have so many different ways to use and share the content we create, having one central location for file-management tasks is more important than ever. We need to be able to use a consistent process to find, save, create, open, and share our files—and that process should be similar, no matter which Office 2010 program we are using.
C
h
a
p
te
r 2
34 Chapter 2 Managing Your Documents with Backstage View
Introducing Backstage View
You’ll find Backstage view on the File tab, which is located at the far left end of the Ribbon. This takes you to a window that looks similar to the Word 2010 document window—same color scheme and fonts—but provides a multicolumn interface, with tabs stretching down the left side of the window (see Figure 2-1).
Figure 2-1 Backstage view shares a color and font scheme with the Word 2010 window, but the interface lets you know you’ve entered a new realm.
At the top of the tabs column, you find four selections called fast commands in Office 2010.
These are the common operations you perform regularly in Word—Save, Save As, Open, and Close. When you click Save, Save As, or Open, the familiar dialog boxes open from which you can navigate to the folder you need and save or open a file, depending on your selection. When you click Close, Word 2010 prompts you to save the file if needed and then closes the current document. Pretty straightforward.
C
in this portion of the Backstage tab column by clicking the Recent tab and changing the Quickly Access This Number of Recent Documents entry at the bottom of the Recent files list.
The Tabs Area
The Backstage tabs column offers a set of six tabs, organized according to the different ways you will want to work with your files. Here’s a quick definition of what you’ll do with each tab:
•
Info Use the options on the Info tab to display document properties; set userper-missions for your document; inspect the document before sharing it and run acces-sibility and compatibility tests; and recover or delete draft versions of documents you’ve worked on previously.
•
Recent When you click Recent a listing of documents you’ve already worked on appears in the center column of the view. You can scroll through the list, click a file to open it, or “pin” a file to the list (this causes it to remain at the top of the list and not scroll out of view) so that you can access is easily later. Further, at the bottom of the Recent file list, you can click the Recover Unsaved Documents link to open a dialog box that gives you access to versions of files you have closed without saving. You can also set the number of recent documents you want to be displayed on the tab area beneath the Close tool.•
New The New tab displays your options for creating a new document in Word.You can choose to start with a blank file, a blog post, an existing or sample template, or create a new file based on an existing one. Additionally, you can browse through literally dozens of Office Online templates. After you find the document you want to create, click it and a thumbnail image of the template appears in the preview pane on the left. Click Create to create the document.
•
Print The Print tab is where you can preview and set print options for your file. The preview shows you in real time the changes you make in the print selections. For example, if you change the orientation of the page from portrait to landscape, Print Preview shows the change. You can set the options you want for the print job and then click Print to complete the operation.Tip
C
36 Chapter 2 Managing Your Documents with Backstage View
•
Save & Send The Save & Send tab lists the various options you have for sharing your document. Depending on whether you are part of a team or use either Share-Point Workspace or Windows Live SkyDrive for your files, you might have the fol-lowing options or others in the Save & Send area: Send Using E-mail, Save To Web, Save To SharePoint, Publish As Blog Post. When you choose any of these options, additional selections—for example, the location of the SharePoint site to which you want to save the file—become available in the pane on the right. In the File Types area on the tab, you can select the type of the file you’re saving or create a PDF/XPS document.•
Help The Help tab in Word 2010 provides you with information about yoursoft-ware registration and your product ID and version. It also provides access to tutorials, searchable help, and links to program updates.
The final choice in the tabs column isn’t a tab per se—it’s the Options command. Clicking
Options in Backstage view displays the Word Options dialog box, where you can control a wide range of settings related to various aspects of the program.
The sections that follow offer more detail about the different tasks you’ll accomplish in Backstage view. Because the Info tab provides access to file information you won’t find any-where else in Word 2010, many of the techniques described in this chapter concern this tab and the actions you carry out in it. You will also find information about each of the tabs and their basic functions and get pointers to specific chapters where techniques are described in greater detail. Along the way, you’ll discover a few tips and techniques for tailoring the program to handle your documents the way you want them to be handled.
The Groups Area
C
h
a
p
te
r 2
Introducing Backstage View 37
Figure 2-2 The groups area on the Print tab enables you to choose the settings for Print options for the current file.
The Preview and Properties Area
C
h
a
p
te
r 2
38 Chapter 2 Managing Your Documents with Backstage View
Figure 2-3 The right column in Backstage view gives you additional information about the current document and the choices you make in the groups area of the view.
Working with Document Properties in the Info Tab
Have you noticed that in earlier versions of Word, there’s no easy way to display your docu-ment’s properties without taking up a large portion of the document window? You might want to know, for example, when the file was last modified, who has been working on the document, or whether the file has been printed recently. You can find out all this—and more—by viewing the properties on the Info tab.
By default, Word 2010 provides the following document properties:
•
Size Displays the file size of the current document•
Pages Shows the number of pages•
Words Gives you a total word count of the entire documentC
Working with Document Properties in the Info Tab 39
•
Title Displays the title you’ve given the document•
Tags Enables you to add tags to identify the document content and topic•
Comments Lets you add a note that stays with the file so that others viewing or editing the file can see itYou can also find out when the document was last modified, when it was created, and when it was last printed. This information is for viewing only; there’s nothing you can do to change the date information displayed (except, of course, modify or print the document).
Adding and Using Document Tags and Comments
Tagging provides an important and easy way to identify the content in such a way that you can find it easily again later. Suppose, for example, that you are creating copy for a new catalog your department is producing. If you create a document with blurbs for the catalog
copy, you could add the tag catalog—or, if you want to be more specific, two tags, such as
catalog, smartphone—so that others compiling the content later can search and find your document for inclusion in the larger catalog file.
Tip
If you work as part of a team that is working together to produce content for a spe-cific project, meet and discuss the tags you are going to use before you start using them . Because tagging provides you with a system for locating and grouping files, you want to be sure you’re all using the same tags; otherwise, the benefit of tagging is lost because the files won’t be found together in a search .
Likewise, you can add comments to your document to make an overall comment that is not visible to people who are viewing your document. You can add a note to your editor about a section you are working on, but when others view the file in Final view, the comment won’t be visible.
Tip
C
h
a
p
te
r 2
40 Chapter 2 Managing Your Documents with Backstage View
The process for adding tags and comments to your document is a simple one.
1. Click the File tab to display Backstage view.
2. The Info tab is displayed by default. Click Add A Tag in the Tags area in the right
column.
3. Type one or more tags, separating the tags with commas—for example, catalog,
smartphone, fall (see Figure 2-4).
4. Save and close your document.
Figure 2-4 Enter tags for your document by clicking the Add A Tag area and typing the tags you want to use.
You can use the tag and comment information you use in your Word 2010 document when you are viewing your files at the operating system level. For example, suppose that you are looking for a specific Word document in which you discuss different smartphone models. The tags you entered in your Word 2010 document will help you locate the catalog file. (Note, however, that a file you’ve just created might not show up because the operating system needs to have a chance to include the file in a file index before it is displayed in search results.) Here’s how to do it:
1. Click the Windows 7 Start button.
2. Type smartphone in the search box.
C
h
a
p
te
r 2
Working with Document Properties in the Info Tab 41
Figure 2-5 You can easily locate a specific file using the tags you entered in Word 2010.
The tags and comments you add on the Info tab of Backstage view stay with the file and are visible when you choose a file in a folder in Windows 7 as well. In Figure 2-6, you see that when you click the file, the tags appear in the details at the bottom of the folder window. You can also display all the file’s properties by right-clicking the file, choosing Properties, and then clicking the Details tab.
Right-click
file Tags