Oracle® Fusion Middleware
Upgrade Guide for Oracle Data Integrator
11
g
Release 1 (11.1.1)
E12642-02
Oracle Fusion Middleware Upgrade Guide for Oracle Data Integrator 11g Release 1 (11.1.1)
E12642-02
Copyright © 2011, Oracle and/or its affiliates. All rights reserved.
Primary Author: Lisa M. Jamen
This software and related documentation are provided under a license agreement containing restrictions on use and disclosure and are protected by intellectual property laws. Except as expressly permitted in your license agreement or allowed by law, you may not use, copy, reproduce, translate, broadcast, modify, license, transmit, distribute, exhibit, perform, publish, or display any part, in any form, or by any means. Reverse engineering, disassembly, or decompilation of this software, unless required by law for interoperability, is prohibited.
The information contained herein is subject to change without notice and is not warranted to be error-free. If you find any errors, please report them to us in writing.
If this software or related documentation is delivered to the U.S. Government or anyone licensing it on behalf of the U.S. Government, the following notice is applicable:
U.S. GOVERNMENT RIGHTS Programs, software, databases, and related documentation and technical data delivered to U.S. Government customers are "commercial computer software" or "commercial technical data" pursuant to the applicable Federal Acquisition Regulation and agency-specific supplemental regulations. As such, the use, duplication, disclosure, modification, and adaptation shall be subject to the restrictions and license terms set forth in the applicable Government contract, and, to the extent applicable by the terms of the Government contract, the additional rights set forth in FAR 52.227-19, Commercial Computer Software License (December 2007). Oracle USA, Inc., 500 Oracle Parkway, Redwood City, CA 94065.
This software is developed for general use in a variety of information management applications. It is not developed or intended for use in any inherently dangerous applications, including applications which may create a risk of personal injury. If you use this software in dangerous applications, then you shall be responsible to take all appropriate fail-safe, backup, redundancy, and other measures to ensure the safe use of this software. Oracle Corporation and its affiliates disclaim any liability for any damages caused by use of this software in dangerous applications.
Oracle is a registered trademark of Oracle Corporation and/or its affiliates. Other names may be trademarks of their respective owners.
iii
Contents
Preface
... vAudience... v
Documentation Accessibility ... v
Related Documents ... vi
Conventions ... vi
1
Oracle Data Integrator Upgrade Overview
1.1 Flowchart of the Oracle Data Integrator Upgrade Process... 1-1 1.2 Steps in the Oracle Data Integrator Upgrade Process ... 1-2
2
Oracle Data Integrator 11
g
for 10
g
Users
2.1 Components of the Oracle Data Integrator Installation ... 2-1 2.2 Important Changes for Oracle Data Integrator 10g Users ... 2-2 2.2.1 Upgrade Considerations... 2-2 2.2.2 Changes in the Run-Time Agent ... 2-3 2.2.3 Other Changes... 2-3
3
Upgrading Your Oracle Data Integrator Environment
3.7 Task 7: Run Upgrade Assistant to Upgrade ODI Middle Tier and Repositories ... 3-13 3.7.1 Task 7a: Run the Upgrade Assistant for Oracle Data Integrator ... 3-14 3.7.2 Task 7b: Upgrade the Middle Tier Instance... 3-14 3.7.3 Task 7c: Upgrade the Oracle Data Integrator Repositories ... 3-15 3.8 Task 8: Perform Any Required Post-Upgrade Manual Steps... 3-18
4
Oracle Data Integrator Post-Upgrade Tasks
4.1 Redistributing Centralized Repositories After Upgrade ... 4-1 4.2 Updating the Work Repository Connection Parameters ... 4-2 4.3 Updating Topology and Security Metadata ... 4-2 4.4 Re-applying ODI 10g Modifications to the ODI 11g Topology and Security Metadata... 4-3 4.5 Re-applying Open Tools ... 4-3 4.6 Replacing KMs with Mandatory Updates... 4-3
A
Oracle Data Integrator Upgrade Screens
A.1 Welcome ... A-1 A.2 Specify Operation... A-1 A.3 Specify Source Home... A-5 A.4 Prerequisites ... A-5 A.5 Target Database... A-6 A.6 Specify Work Repositories... A-9 A.7 Examine ... A-9 A.8 Upgrade Summary ... A-10 A.9 Upgrade Progress... A-10 A.10 End of Upgrade ... A-11
v
Preface
This preface contains the following sections:
■ Audience
■ Documentation Accessibility
■ Related Documents
■ Conventions
Audience
This guide is intended for Oracle Fusion Middleware system administrators who are responsible for installing, maintaining, and upgrading Oracle Data Integrator. It is assumed that readers of this manual have knowledge of the following:
■ Oracle Fusion Middleware system administration and configuration
■ Configuration parameters and expected behavior of the system being upgraded
Documentation Accessibility
Our goal is to make Oracle products, services, and supporting documentation accessible to all users, including users that are disabled. To that end, our
documentation includes features that make information available to users of assistive technology. This documentation is available in HTML format, and contains markup to facilitate access by the disabled community. Accessibility standards will continue to evolve over time, and Oracle is actively engaged with other market-leading
technology vendors to address technical obstacles so that our documentation can be accessible to all of our customers. For more information, visit the Oracle Accessibility Program Web site at http://www.oracle.com/accessibility/.
Accessibility of Code Examples in Documentation
Screen readers may not always correctly read the code examples in this document. The conventions for writing code require that closing braces should appear on an
otherwise empty line; however, some screen readers may not always read a line of text that consists solely of a bracket or brace.
Accessibility of Links to External Web Sites in Documentation
This documentation may contain links to Web sites of other companies or
Access to Oracle Support
Oracle customers have access to electronic support through My Oracle Support. For information, visit http://www.oracle.com/support/contact.html or visit http://www.oracle.com/accessibility/support.html if you are hearing impaired.
Related Documents
For more information, see the following related documentation available in the Oracle Fusion Middleware 11g documentation library:
■ Oracle Fusion Middleware Developer's Guide for Oracle Data Integrator ■ Oracle Fusion Middleware Installation Guide for Oracle Data Integrator ■ Oracle Fusion Middleware Upgrade Planning Guide
■ Oracle Fusion Middleware Application Adapters Guide for Oracle Data Integrator ■ Oracle Fusion Middleware Connectivity and Knowledge Modules Guide for Oracle Data
Integrator
Conventions
The following text conventions are used in this document:
Convention Meaning
boldface Boldface type indicates graphical user interface elements associated with an action, or terms defined in text or the glossary.
italic Italic type indicates book titles, emphasis, or placeholder variables for which you supply particular values.
1
Oracle Data Integrator Upgrade Overview 1-1
1
Oracle Data Integrator Upgrade Overview
This chapter provides a high-level overview of the Oracle Data Integrator upgrade process. Refer to the following sections for more information:
■ Section 1.1, "Flowchart of the Oracle Data Integrator Upgrade Process"
■ Section 1.2, "Steps in the Oracle Data Integrator Upgrade Process"
1.1 Flowchart of the Oracle Data Integrator Upgrade Process
Steps in the Oracle Data Integrator Upgrade Process
Figure 1–1 ODI Upgrade Process Flow
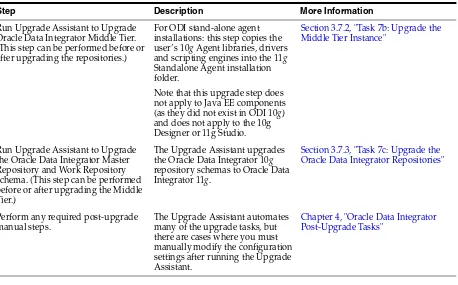
1.2 Steps in the Oracle Data Integrator Upgrade Process
Table 1–1 describes each of the steps in the upgrade process flowchart which is shown in Figure 1–1. The table also provides information on where to go to get more
Steps in the Oracle Data Integrator Upgrade Process
Oracle Data Integrator Upgrade Overview 1-3
Table 1–1 Table Describing the Steps in the Oracle Data Integrator Upgrade Process
Step Description More Information
Review upgrade concepts in the
Oracle Fusion Middleware Upgrade Planning Guide
The Oracle Fusion Middleware Upgrade Planning Guide provides a high-level overview of how to upgrade your entire Oracle Data Integrator environment to Oracle Fusion Middleware, including compatibility information and instructions for upgrading any databases that support your Oracle Fusion Middleware components.
"Developing an Upgrade Strategy" in
Oracle Fusion Middleware Upgrade Planning Guide
Understand the upgrade starting points
Before planning your upgrade, you should be familiar with the supported starting points for an Oracle Data Integrator upgrade.
Section 3.1, "Task 1: Understand the Starting Points for Oracle Data Integrator"
Decide upon an Oracle Data Integrator Component Architecture
With the introduction of Oracle WebLogic Server, the component configuration and architecture for Oracle Data Integrator has changed. Before you begin an upgrade, make sure you are familiar with the basic
configurations in Oracle Fusion Middleware 11g.
Section 3.2, "Task 2: Plan the Oracle Data Integrator Component Architecture"
If necessary, upgrade the repository database to a supported database version
The Oracle Data Integrator Repositories are stored into database schemas. Before you can upgrade these schemas, you must make sure the database is a supported version.
Section 3.3, "Task 3: If Necessary, Upgrade the Database that Contains the ODI Repository"
Copy (clone) existing Master and Work Repositories into a single database instance before running the Upgrade Assistant
Oracle recommends that you perform repository upgrades on cloned repository schemas. Upgrading repositories distributed on different database instances is not supported. Clone schemas into a single database instance and then redistribute them after the upgrade to their original instances.
Section 3.4, "Task 4: Copy (Clone) Existing Master and Work Repositories"
Create a database backup of the ODI schema that will be upgraded.
Creating a backup is mandatory if the repository schemas have not been cloned and you are attempting to upgrade a
non-cloned schema. Performing a backup of the ODI schemas is particularly important if the upgrade fails and corrupts the content. With a backup, you can delete the corrupted schemas and re-clone the originals to complete the upgrade.
Section 3.5, "Task 5: Create a Backup of the ODI Repositories to be Upgraded"
Install and Configure Oracle Data Integrator 11g
The Upgrade Assistant is available as part of the ODI 11g installation.
Section 3.6, "Task 6: Install and Configure Oracle Data Integrator 11g"
Begin the upgrade process with the Upgrade Assistant.
The Upgrade Assistant automates most of the Oracle Data Integrator upgrade tasks.
Steps in the Oracle Data Integrator Upgrade Process
Run Upgrade Assistant to Upgrade Oracle Data Integrator Middle Tier. (This step can be performed before or after upgrading the repositories.)
For ODI stand-alone agent installations: this step copies the user’s 10g Agent libraries, drivers and scripting engines into the 11g
Standalone Agent installation folder.
Note that this upgrade step does not apply to Java EE components (as they did not exist in ODI 10g) and does not apply to the 10g Designer or 11g Studio.
Section 3.7.2, "Task 7b: Upgrade the Middle Tier Instance"
Run Upgrade Assistant to Upgrade the Oracle Data Integrator Master Repository and Work Repository schema. (This step can be performed before or after upgrading the Middle Tier.)
The Upgrade Assistant upgrades the Oracle Data Integrator 10g
repository schemas to Oracle Data Integrator 11g.
Section 3.7.3, "Task 7c: Upgrade the Oracle Data Integrator Repositories"
Perform any required post-upgrade manual steps.
The Upgrade Assistant automates many of the upgrade tasks, but there are cases where you must manually modify the configuration settings after running the Upgrade Assistant.
Chapter 4, "Oracle Data Integrator Post-Upgrade Tasks"
Table 1–1 (Cont.) Table Describing the Steps in the Oracle Data Integrator Upgrade Process
2
Oracle Data Integrator 11g for 10g Users 2-1
2
Oracle Data Integrator 11
g
for 10
g
Users
The following sections introduce some key concepts of the Oracle Data Integrator environment for 10g Release 3 (10.1.3.x) users:
■ Section 2.1, "Components of the Oracle Data Integrator Installation"
■ Section 2.2, "Important Changes for Oracle Data Integrator 10g Users"
2.1 Components of the Oracle Data Integrator Installation
Oracle Data Integrator 10g Release 3 (10.1.3) provided the following components:
■ Oracle Data Integrator
■ Oracle Data Profiling
■ Oracle Data Quality for Data Integrator
Oracle Data Integrator 11g provides updates to all of these components, but not in a single installation. In Oracle Data Integrator 11g, Oracle Data Profiling and Oracle Data Quality components are packaged and installed separately, but they still provide the same resources and services.
Specifically, Oracle Data Integrator 11g provides the following installation options:
■ Oracle Data Integrator Client Components
– ODI Studio
This component replaces the Oracle Data Integrator 10g graphical modules (Designer, Operator, Topology and Security Manager), which are all merged into a single Fusion Common Platform (FCP) user interface.
– ODI Software Development Kit (SDK)
This new component is a Java API for performing run-time and design-time operations.
■ Oracle Data Integrator Standalone Agent
– Standalone Agent
This component corresponds to the ODI 10g run-time agent. It runs on a Java Machine.
■ Oracle Data Integrator Java EE Components
– Java EE Agent
Important Changes for Oracle Data Integrator 10g Users
– Oracle Data Integrator Console
This component replaces the ODI 10g Repository Explorer (Metadata Navigator) and Lightweight Designer components. It also installs the Oracle Enterprise Manager Plug-in for ODI.
– Public Web Service
This component is a web service that allows context and scenario listing. Other run-time web service operations (executing scenarios and sessions) are available on the Standalone and Java EE agent components.
For more information, see "Working with Web Services in Oracle Data Integrator" in Oracle Fusion Middleware Developer's Guide for Oracle Data Integrator
2.2 Important Changes for Oracle Data Integrator 10g Users
Although the overall product architecture has not changed, 10g users should be aware the following changes to plan for their updates.
■ Upgrade Considerations
■ Changes in the Run-Time Agent
■ Other Changes
2.2.1 Upgrade Considerations
Before you begin the upgrade process, consider the following:
■ Upgrading to ODI 11gR1 is performed using the Upgrade Assistant. It is not possible to upgrade repositories from the Oracle Data Integrator user interface.
■ The Upgrade Assistant does not support the upgrade of externally authenticated repositories. If your repository was authenticated externally, the authentication has to be switched from external to internal before upgrade. After upgrade the authentication can be switched back to internal.
For more information see "Switching the Authentication Mode" in the Oracle Fusion Middleware Developer's Guide for Oracle Data Integrator.
■ The database that contains the Oracle Data Integrator repositories must be supported by Oracle Fusion Middleware 11g. For the latest list of supported databases, see:
http://www.oracle.com/technology/software/products/ias/files/ fusion_certification.html
■ For instructions on verifying that your database meets the requirements of Oracle Fusion Middleware 11g, see "Upgrading and Preparing Your Databases" in the Oracle Fusion Middleware Upgrade Planning Guide. Oracle recommends that you refer to your database-specific upgrade documentation for additional information.
■ During the upgrade process Work Repositories must reside on the same database server as their Master Repository. The repositories can be manually redistributed after the upgrade.
Important Changes for Oracle Data Integrator 10g Users
Oracle Data Integrator 11g for 10g Users 2-3
2.2.2 Changes in the Run-Time Agent
The run-time agent is available as a standalone agent or a Java EE agent. Both of these agents are now connected to a single Work Repository and act as schedulers. The agents connect systematically to the Master Repository at startup.
For these agents to start properly:
■ For the standalone agent the connection configuration (using the odiparams file) must be performed. Running the agent.bat starts a scheduler agent.
■ For the Java EE agent, the connection configuration is made in the agent template, and the agent connects to the repositories using JDBC data sources defined in the application server.
The agent now uses the HTTP protocol rather than its own protocol. In addition, the standalone agent is no longer started as a service using the Wrapper tool. To configure the agent for high availability, Oracle Process Manager and Notification Server (OPMN) is used and can be configured using some built-in scripts.
2.2.3 Other Changes
Oracle Data Integrator 10g users should also be aware of the following changes in Oracle Data Integrator 11g:
■ The getObjectName method now automatically truncates object names to the maximum object length allowed for the technology. Prior to ODI 11g, object names were not truncated. To prevent object names from truncating and to reproduce the 10g behavior you must add the server a property OBJECT_NAME_LENGTH_ CHECK_OLD and set its value to "true". This property can be added in the Properties tab of the data server.
NOTE: If your object names continue to truncate after upgrading to 11g, consider changing the code and only use the method above as a temporary workaround.
■ The ODI login files snps_login_security.xml and snps_login_work.xml are now merged into a single file called snps_login_work.xml. The snps_ login_work.xml file is located in the %APPDATA%/odi/oracledi directory for Windows operating systems and USER_HOME/.odi/oracledi on Unix
operating systems.
■ With ODI version 11.1.1.5.0, ODI ships with a bundled HSQL database version 2.0. Previous versions of ODI shipped with a HSQL database version 1.7.3. The HSQL database is used for the memory engine, the demonstration environment, and the memory storage for the XML and LDAP drivers. You may have your own HSQL 1.7.3 database instances connected from ODI. If so, once you upgrade the HSQL database to version 2.0, ODI can no longer connect to HSQL database version 1.7.3 databases. You must upgrade your HSQL database version 1.7.3 to version 2.0 before upgrading to ODI 11.1.1.5.0.
For more information on upgrading databases, see the HSQL database documentation at
http://www.hsqldb.org/doc/2.0/guide/deployment-chapt.html#dep loyment_upgrade-sect
See also the HSQL database Changelog at
http://www.hsqldb.org/web/changelog.html
■ Knowledge modules and technologies are available in a directory called
Important Changes for Oracle Data Integrator 10g Users
■ The demonstration environment is delivered separately from the ODI Installer on the ODI Companion CD.
■ Host and Modules are removed from the Security. This entire feature is deprecated.
■ The following scripts are deprecated: Jython, agentscheduler, agentweb, designer, topology, security, and operator.
■ Repository creation for Oracle, DB2 and Microsoft SQL Server can be performed using Repository Creation Utility (RCU). This tool allows creation and
management of schemas for multiple Oracle products.
■ Repository creation and import is possible from the ODI Studio. The mimport and mupgrade scripts are deprecated.
■ ODI is now shipped with DataDirect JDBC drivers to connect to technologies such as MSSQL and DB2. Note that the other ODI drivers can still be used to connect to the database. The additional drivers for the Standalone Agent are in the
/drivers directory, but the drivers for the ODI Studio are in the DOMAIN_HOME.
For more information, see "Add Additional Drivers and Open Tools" in Oracle Fusion Middleware Installation Guide for Oracle Data Integrator.
3
Upgrading Your Oracle Data Integrator Environment 3-1
3
Upgrading Your Oracle Data Integrator
Environment
This chapter describes how to upgrade your existing Oracle Data Integrator 10g environment to Oracle Data Integrator 11g. If you are upgrading an existing 11g environment to a newer 11g version of ODI, see the Oracle Fusion Middleware Patching Guide.
This chapter contains the following sections:
■ Task 1: Understand the Starting Points for Oracle Data Integrator
■ Task 2: Plan the Oracle Data Integrator Component Architecture
■ Task 3: If Necessary, Upgrade the Database that Contains the ODI Repository
■ Task 4: Copy (Clone) Existing Master and Work Repositories
■ Task 5: Create a Backup of the ODI Repositories to be Upgraded
■ Task 6: Install and Configure Oracle Data Integrator 11g
■ Task 7: Run Upgrade Assistant to Upgrade ODI Middle Tier and Repositories
– Task 7a: Run the Upgrade Assistant for Oracle Data Integrator
– Task 7b: Upgrade the Middle Tier Instance
– Task 7c: Upgrade the Oracle Data Integrator Repositories
■ Task 8: Perform Any Required Post-Upgrade Manual Steps
3.1 Task 1: Understand the Starting Points for Oracle Data Integrator
The supported starting points for an upgrade depend on the components you will be upgrading and the components you have installed.
It is also important to note that if you are upgrading ODI 10g to 11.1.1.5.0, you will use the Upgrade Assistant for ODI as described in the following sections. If you are upgrading ODI 11.1.1.3.0 to 11.1.1.5.0, you will use the Oracle Patch Set Assistant for ODI. For more information on using the Patch Set Assistant, see Oracle Fusion Middleware Patching Guide.
This section describes the starting points for the following upgrade operations:
■ Starting Points When Upgrading the Middle Tier Instance
Task 1: Understand the Starting Points for Oracle Data Integrator
3.1.1 Starting Points When Upgrading the Middle Tier Instance
The ODI Middle Tier Upgrade copies the 10g Agent libraries, drivers and scripting engines into the 11g Standalone Agent installation folder.
To run the Middle Tier Upgrade for Oracle Data Integrator, you must have both the ODI 10g (10.1.3) Run-Time Agent and ODI 11g Standalone Agent installed on the same system.
3.1.2 Starting Points When Upgrading the Oracle Data Integrator Repositories
The database that contains the Oracle Data Integrator repository must be supported by Oracle Fusion Middleware 11g. The Upgrade Assistant supports Master and Work repository upgrades for databases listed below.
If your current database is not listed below or to validate that your database version is compatible with ODI 11g, see Task 3: If Necessary, Upgrade the Database that Contains the ODI Repository.
■ Oracle RDBMS
NOTE: The Oracle Database DBA must have SYSDBA privileges to perform the upgrade.
■ Microsoft SQL Server
■ Sybase Adaptive Server
NOTE: In order to upgrade repositories stored in Sybase, it is required that the repository is stored in a database with a page size of 4k or greater. If the repository is stored in a database with a smaller page size, the database should be migrated to a database of an appropriate page size before upgrading the repository.
For details on increasing the page size, refer to
http://www.sybase.com/content/1021203/sybmigrate_wp.pdf
■ Hypersonic SQL
■ IBM DB2
■ IBM DB2/400
■ PostgreSQL
NOTE: The ODI 11g Upgrade Assistant includes the drivers for all the supported databases except PostgreSQL. To use the Upgrade Assistant with PostgreSQL, you must have postgresql-8.4-701.jdbc4.jar installed in the following directory before using the Upgrade Assistant:
ODI_HOME/upgrade/jlib
Where ODI_HOME is the installation directory of Oracle Data Integrator 11g. Note: The Oracle Data Integrator 10g Release 3 (10.1.3) Data Quality products are not part of the standard Oracle Data Integrator 11g installation. These components must be installed as a separate installation and upgraded in a separate upgrade process.
Task 4: Copy (Clone) Existing Master and Work Repositories
Upgrading Your Oracle Data Integrator Environment 3-3
3.2 Task 2: Plan the Oracle Data Integrator Component Architecture
The Oracle Data Integrator 10g component architecture changed with ODI 11g. Although you can keep the same component organization as ODI 10g, Oracle recommends that you review the new components organization in "Introduction to Oracle Data Integrator" in Oracle Fusion Middleware Developer's Guide for Oracle Data Integrator to identify any architecture changes.
3.3 Task 3: If Necessary, Upgrade the Database that Contains the ODI
Repository
The database that contains the Oracle Data Integrator repositories must be supported by Oracle Fusion Middleware 11g. For the latest list of supported databases, see:
http://www.oracle.com/technology/software/products/ias/files/fus ion_certification.html
For instructions on verifying that your database meets the requirements of Oracle Fusion Middleware 11g, see "Upgrading and Preparing Your Databases" in the Oracle Fusion Middleware Upgrade Planning Guide. Oracle recommends that you refer to your database-specific upgrade documentation for additional information.
3.4 Task 4: Copy (Clone) Existing Master and Work Repositories
Oracle recommends that you clone each original ODI Master and Work repository before beginning the upgrade process. During the Master Repository upgrade process, the Upgrade Assistant will prompt you for the location and credentials of the cloned Master Repository and Work Repositories.
Note: If your RDBMS was supported in Oracle Data Integrator 10g, but is no longer supported in Oracle Data Integrator 11g, use the ODI 10g version to do the following before you upgrade:
1. Export the ODI 10g repositories from the unsupported database systems/versions.
2. Import Master and Work Repositories into new repositories created with the 10g version into supported database systems/versions.
For additional information, see "Repository-Level Export/Import" in the Oracle Fusion Middleware Developer's Guide for Oracle Data
Task 4: Copy (Clone) Existing Master and Work Repositories
The following sections provide basic schema cloning procedures for databases that are supported to host ODI repositories. For detailed information, refer to your
database-specific documentation.
■ Schema Cloning Process for Oracle Database
■ Schema Cloning Process for Microsoft SQL Server Database
■ Schema Cloning Process for PostgreSQL Database
■ Schema Cloning Process for IBM DB2 Universal Database
■ Schema Cloning Process for IBM DB2 AS/400 Database
■ Schema Cloning Process for Sybase AS Enterprise 15+
■ Schema Cloning Process for Hypersonic SQL 1.7.3.3
3.4.1 Schema Cloning Process for Oracle Database
The following steps can be used to clone Oracle Database schemas for ODI:
1. Export ODI 10g Master and Work schemas using Oracle Export Utility Example:
Caution: The Upgrade Assistant does not support the upgrade of repositories distributed on different instances or technologies.
Both ODI 10g and ODI 11g support a repository configuration where the Master Repository can be on different database instances than the Work Repository. During the upgrade process, however, the Master Repository and all Work Repositories must reside on the same database instance. After the upgrade process they can be redistributed.
Once both the Master and Work repositories are upgraded and optionally redistributed, you must update the Work Repositories connections defined in the Topology to match their post-upgrade location. See Section 4.2, "Updating the Work Repository Connection Parameters" for more information on updating the connection parameters to the Work Repository as defined in the Topology.
Note: The goal of this section is to stress the importance of creating a clone (or copy) of each of the ODI 10g or 11g repositories before you begin the upgrade process. The cloning procedures documented in this section are sample procedures for each of the ODI 11g supported databases. You are not restricted to using these procedures. Always use the cloning procedures that suit your specific needs.
Task 4: Copy (Clone) Existing Master and Work Repositories
Upgrading Your Oracle Data Integrator Environment 3-5 exp userid=odi_work_10g/odi_work_10g file=/tmp/odi_work_10g.dmp
exp userid=odi_work1_10g/odi_work1_10g file=/tmp/odi_work1_10g.dmp
Export ODI 11g Master and Work schemas using Datapump Utilities
Example:
expdp odi_tmp/odi_tmppwd schemas=odiw10135 dumpfile=odiw10135.dmp
2. Create Master and Work clone schemas
Using SQL*Plus, create Master and Work clone schemas and grant connect/resource privileges.
Example:
create user odi_master_10g_cp identified by odi_master_10g_cp; create user odi_work_10g_cp identified by odi_work_10g_cp; create user odi_work1_10g_cp identified by odi_work1_10g_cp;
grant connect,resource to odi_master_10g_cp, odi_work_10g_cp,odi_work1_10g_cp;
3. Import ODI 10g Master and Work schemas into cloned schemas using Oracle Import Utility.
Using Oracle Import, import the ODI 10g Master and Work schema dump into the cloned Master and Work schemas.
Example:
imp userid='system/manager' touser=odi_master_10g_cp fromuser=odi_master_10g file=/tmp/odi_master_10g.dmp
imp userid='system/manager' touser=odi_work_10g_cp fromuser=odi_work_10g file=/tmp/odi_work_10g.dmp
imp userid='system/manager' touser=odi_work1_10g_cp fromuser=odi_work1_10g file=/tmp/odi_work1_10g.dmp
Import ODI 11g Master and Work schemas using the Datapump Utilities
Example:
impdp ODI_TMP/ODI_TMPPWD dumpfile=odim10135 remap_tablespace=repo10135:odi11g remap_schema=odim10135:odim1113
Note that with impdp it is also possible to modify the schema name and tablespace for data storage. The remap_xx parameters are optional.
3.4.2 Schema Cloning Process for Microsoft SQL Server Database
The following steps can be used to clone Microsoft SQL 2005/2008 database schemas:
1. Export the ODI 10g Master and Work schemas using SQL Management Studio. Example:
BACKUP DATABASE [odi_10g] TO DISK = N'C:\Program Files\Microsoft SQL Server\MSSQL.1\MSSQL\Backup\odi_10g.bak' WITH INIT, NOSKIP;
2. Restore Master and Work schemas into the new database using SQL Management Studio.
Using SQL Management Studio Express perform the following:
1. Restore the Master and Work schemas.
Task 4: Copy (Clone) Existing Master and Work Repositories
3. Move the files used to store database.
Example:
RESTORE DATABASE [odi_10g_cp] FROM DISK = N'C:\Program Files\Microsoft SQL Server\MSSQL.1\MSSQL\Backup\odi_10g.bak'
WITH FILE = 1, MOVE N'odi_10g' TO N'C:\Program Files\Microsoft SQL Server\MSSQL.1\MSSQL\DATA\odi_10g_cp.mdf',
MOVE N'odi_10g_log' TO N'C:\Program Files\Microsoft SQL Server\MSSQL.1\MSSQL\DATA\odi_10g_cp_log.ldf', NOUNLOAD; go
3. Create login and user for cloned Master and Work schemas using SQL Management Studio.
Using SQL Management Studio Express, create logins and users to access cloned Master and Work schemas. Be sure to select the correct database instance in SQL Management Studio Express, as these commands are applied to the selected database instance.
Example:
create login odi_10g_cp with password=N'odi_10g_cp',
default_database=odi_10g_cp, check_expiration = off, check_policy = off; go
USE odi_10g_cp go
create user odi_10g_cp for login odi_10g_cp; go
USE odi_10g_cp go
4. To move the old schema to the new schema location, run the following SQL script:
NOTE: In the example below, the old schema name is odi_10g and the new schema name is odi_10g_cp.
CREATE SCHEMA [odi_10g_cp] AUTHORIZATION odi_10g_cp go
.
DECLARE @OldSchema AS varchar(255) DECLARE @NewSchema AS varchar(255) .
SET @OldSchema = 'odi_10g' SET @NewSchema = 'odi_10g_cp' .
DECLARE @sql AS varchar(MAX) SET @sql = CHAR(13) + CHAR(10) .
SELECT @sql = @sql + 'ALTER SCHEMA [' + @NewSchema + '] TRANSFER [' + TABLE_SCHEMA + '].[' + TABLE_NAME + ']' + CHAR(13) + CHAR(10)
FROM INFORMATION_SCHEMA.TABLES WHERE TABLE_SCHEMA = @OldSchema .
EXEC (@sql) go
5. To finalize the schema move, run the following SQL query:
DROP SCHEMA [odi_10g] go
drop user odi_10g; go
Task 4: Copy (Clone) Existing Master and Work Repositories
Upgrading Your Oracle Data Integrator Environment 3-7 odi_10g_cp;
go
3.4.3 Schema Cloning Process for PostgreSQL Database
Use the following steps to clone PostgreSQL database schemas:
1. Export ODI 10g Master and Work schemas using PostgreSQL Backup Utility. Example:
pg_dump -U odi_master_10g --schema=odi_master_10g -Ft -f "c:/odi_master_ 10g.dmp.tar" odi_10g
pg_dump -U odi_work_10g --schema=odi_work_10g -Ft -f "c:/odi_work_10g.dmp.tar" odi_10g
pg_dump -U odi_work1_10g --schema=odi_work1_10g -Ft -f "c:/odi_work1_ 10g.dmp.tar" odi_10g
2. Create a clone of the database and the Master and Work users.
Using PostgreSQL Interactive Terminal, create a clone database and users for Master and Work clone schemas with SUPERUSER option.
Example:
psql -U postres
CREATE ROLE odi_master_10g_cp WITH SUPERUSER LOGIN PASSWORD 'odi_master_10g_ cp';
CREATE ROLE odi_work_10g_cp WITH SUPERUSER LOGIN PASSWORD 'odi_work_10g_cp'; CREATE ROLE odi_work1_10g_cp WITH SUPERUSER LOGIN PASSWORD 'odi_work1_10g_cp'; CREATE DATABASE odi_10g_cp with owner=odi_master_10g_cp;
3. Restore Master and Work schemas into clone database using PostgreSQL.
Using PostgreSQL Restore Utility, restore Master and Work schemas into cloned database.
Example:
pg_restore -O -U odi_master_10g_cp -d odi_10g_cp -C "c:/odi_master_10g.dmp.tar" pg_restore -O -U odi_work_10g_cp -d odi_10g_cp "c:/odi_work_10g.dmp.tar" pg_restore -O -U odi_work1_10g_cp -d odi_10g_cp "c:/odi_work1_10g.dmp.tar"
4. Configure Master and Work clone schemas.
Using PostgreSQL Interactive Terminal, set NOSUPERUSER for Master and Work clone schema users.
Example:
psql -U postres -d odi_10g_cp
ALTER USER odi_master_10g_cp WITH NOSUPERUSER; ALTER USER odi_work_10g_cp WITH NOSUPERUSER; ALTER USER odi_work1_10g_cp WITH NOSUPERUSER;
Using PostgreSQL Interactive Terminal, rename Master and Work clone schemas.
Example:
Task 4: Copy (Clone) Existing Master and Work Repositories
3.4.4 Schema Cloning Process for IBM DB2 Universal Database
Chose one of the following procedures to clone IBM’s DB2 Universal Database schemas:
■ Same Host Cloning Process for ODI 10g Master and Work Schemas
■ Different Host Cloning Process for ODI 10g Master and Work Schemas
3.4.4.1 Same Host Cloning Process for ODI 10g Master and Work Schemas
Use the following steps to clone IBM DB2 schemas on the same host or platform:
1. Create DB2 Database using Command Line Processor.
Example:
db2 CREATE DATABASE ODI11 AUTOMATIC STORAGE YES ON 'C:\' DBPATH ON 'C:\' USING CODESET IBM-1252 TERRITORY US COLLATE USING SYSTEM PAGESIZE 32768
2. Copy ODI 10g Master and Work schemas using DB2 Database Movement Tool to new schema.
Master Schema Example:
db2move ODI10G COPY -sn odi_master_10g -co TARGET_DB ODI10GCP USER db2admin USING welcome SCHEMA_MAP ((odi_master_10g,odi_master_10g_cp)) TABLESPACE_MAP ((USERSPACE1,USERSPACE1),SYS_ANY) owner odi_master_10g_cp
Work Schema Example:
db2move ODI10G COPY -sn odi_work_10g -co TARGET_DB ODI10GCP USER db2admin USING welcome SCHEMA_MAP ((odi_work_10g,odi_work_10g_cp)) TABLESPACE_MAP
((USERSPACE1,USERSPACE1),SYS_ANY) owner odi_work_10g_cp
3.4.4.2 Different Host Cloning Process for ODI 10g Master and Work Schemas
Use the following steps to clone IBM DB2 schemas on different hosts or platforms:
1. Export DDL and Data from Master and Work schemas using DB2 Database Movement Tool and DDL Extracting Tool.
DB2 Database Movement Tool produces PC/IXF files with data and
db2move.lst file with list of tables, Files are produced in the folder where the tool was called. The DDL Extracting Tool produces db2master.sql and db2work.sql with SQL queries to recreate database structure.
Example:
db2move ODI10G export -sn odi_master_10g,odi_work_10g db2look -d ODI10G -z odi_master_10g -e -o c:/db2master.sql db2look -d ODI10G -z odi_work_10g -e -o c:/db2work.sql
2. Transfer exported files to new location.
1. Ensure that the PC/IXF files were transferred in binary mode, and that the db2move.lst file and the db2master.sql and db2work.sql files were transferred in ASCII mode.
Task 4: Copy (Clone) Existing Master and Work Repositories
Upgrading Your Oracle Data Integrator Environment 3-9 3. Create DB2 database using Command Line Processor.
Example:
db2 CREATE DATABASE ODI10G AUTOMATIC STORAGE YES ON 'C:\' DBPATH ON 'C:\' USING CODESET IBM-1252 TERRITORY US COLLATE USING SYSTEM PAGESIZE 32768
4. Import the exported DDL to the new database using the Command Line Processor.
Example:
db2 -tvf c:/db2backup/db2master.sql db2 -tvf c:/db2backup/db2work.sql
5. Import exported data to new database using DB2 Database Movement Tool.
Example:
db2move ODI10G load
6. Verify that cloned schemas are intact; some tables may be in "check pending" state (because of check constraint).
Use command set integrity to move to the normal state.
Example:
db2 set integrity for <table name> immediate checked
3.4.5 Schema Cloning Process for IBM DB2 AS/400 Database
Use the following steps to clone IBM DB2 AS/400 database schemas:
1. Save ODI 10g Master and Work schemas.
Using Telnet Client, save the ODI 10g Master and Work schemas. Example:
CRTLIB LIB(ODI10GDMP) TYPE(*TEST) CRTSAVF FILE(ODI10GDMP/ODIM10GDMP) CRTSAVF FILE(ODI10GDMP/ODIW10GDMP)
SAVLIB ODIM10G DEV(*SAVF) SAVF(ODI10GDMP/ODIM10GDMP) ACCPTH(*YES) CLEAR(*ALL) SAVLIB ODIW10G DEV(*SAVF) SAVF(ODI10GDMP/ODIW10GDMP) ACCPTH(*YES) CLEAR(*ALL)
2. Create Master and Work clone schemas.
Using Telnet, create user profiles for the cloned schemas.
Example:
CRTUSRPRF USRPRF(ODIMCP) PASSWORD(ODIMCP) PWDEXP(*NO) CRTUSRPRF USRPRF(ODIWCP) PASSWORD(ODIWCP) PWDEXP(*NO)
3. Create ODI 10g Master and Work clone schemas.
Using iSeries Navigator or Interactive SQL (STRSQL), create ODI 10g Master and Work clone schemas.
Example:
CREATE SCHEMA AUTHORIZATION ODIMCP CREATE SCHEMA AUTHORIZATION ODIWCP
Task 4: Copy (Clone) Existing Master and Work Repositories
Using Telnet, restore ODI 10g Master and Work schema into clone schemas. Example:
RSTLIB SAVLIB(ODIM10G) DEV(*SAVF) SAVF(ODI10GDMP/ODIM10GDMP) OPTION(*NEW) RSTLIB(ODIMCP)
RSTLIB SAVLIB(ODIW10G) DEV(*SAVF) SAVF(ODI10GDMP/ODIW10GDMP) OPTION(*NEW) RSTLIB(ODIWCP)
CHGOWN OBJ('QSYS.LIB/ODIMCP.LIB/*.*') NEWOWN(ODIMCP) CHGOWN OBJ('QSYS.LIB/ODIWCP.LIB/*.*') NEWOWN(ODIWCP)
5. Using iSeries Navigator, select tables in schemas ODIM10G and ODIW10G to stop journalizing.
a. Select Journal from schema ODIM10G:
Databases>Denmlas3>Schemas>ODIM10G>Journals
b. Select file QSQJRN.
c. Select Start or End Table Journaling from journal's context menu.
d. Select tables for schema ODIM10G in 'Tables already journalized' view.
e. Click Remove to remove them.
f. Repeat steps a-e for Schema ODIW10G (Use ODIW10G instead of ODIM10G).
6. Using iSeries Navigator, select tables in schemas ODIMCP and ODIWCP to start journalizing.
Example:
a. Select Journal from schema ODIMCP:
Databases->Denmlas3->Schemas->ODIMCP->Journals.
b. Select file QSQJRN.
c. Select Start or End Table Journaling from journal's context menu.
d. Select schema ODIMCP in tables' view.
e. Add all tables from schema ODIMCP to 'Table to journal' view.
f. Check 'Journal both images' and 'Omit open/close entries' for them. Click OK.
g. Repeat steps a-f for Schema ODIWCP (Use ODIWCP instead of ODIMCP).
3.4.6 Schema Cloning Process for Sybase AS Enterprise 15+
Use the following steps to clone Sybase AS Enterprise database schemas:
1. Export ODI 10g Master and Work schema using ISQL Utility. Example:
isql -D odi -S STANE08 -U sa -P welcome
dump database odi10g to "c:/odi10g.dmp" with init go
2. Restore Master and Work schemas into new database using ISQL Utility.
Using ISQL Utility, restore Master and Work schemas.
Task 4: Copy (Clone) Existing Master and Work Repositories
Upgrading Your Oracle Data Integrator Environment 3-11 create database odi10gcp on master = 860
go
load database odi10gcp from "c:/odi10g.dmp" with override go
ONLINE DATABASE odi10gcp go
3. Create logins for cloned Master and Work schemas using ISQL Utility.
Using ISQL Utility, create logins to access the cloned Master and Work schemas.
Example:
sp_addlogin ODIMCP, ODIMCP, odi10gcp go
sp_addlogin ODIWCP, ODIWCP, odi10gcp go
4. Rename original Master and Work schemas using ISQL Utility. Note that you cannot change the owner of a table or rename user. You must rename users directly.
Example:
sql -D odi10gcp -S STANE08 -U sa -P welcome
sp_configure 'allow updates', 1 go
update dbo.sysusers set name='ODIMCP' where name='ODI_MASTER_10G' go
update dbo.sysusers set name='ODIWCP' where name='ODI_WORK_10G' go
sp_configure 'allow updates', 0 go
5. Assign created logins to renamed users using ISQL Utility. Note that you cannot assign a login to a user. You must assign logins to users directly.
Example:
select suid from master.dbo.syslogins where name='ODIMCP' go
NOTE: Use the returned suid ’ODIMCP’ in the first update query below.
select suid from master.dbo.syslogins where name='ODIWCP' go
NOTE: Use returned suid ’ODIWCP’ in the second update query below.
sp_configure 'allow updates', 1 go
update dbo.sysusers set suid=5 where name='ODIMCP' go
update dbo.sysusers set suid=6 where name='ODIWCP' go
sp_configure 'allow updates', 0 go
3.4.7 Schema Cloning Process for Hypersonic SQL 1.7.3.3
Task 4: Copy (Clone) Existing Master and Work Repositories
For more information on upgrading to HSQL database version 2.0, see
http://www.hsqldb.org/doc/2.0/guide/deployment-chapt.html#deploy ment_upgrade-sect.
Use the following steps to clone Hypersonic SQL 1.7.3.3 database schemas while upgrading to Hypersonic SQL 2.0.0:
1. Update server.properties
server.database.0=file:ODI/odi_10g server.dbname.0=odi_10g
2. Update sqltool.rc with new connection information:
urlid odi_sa
4. Using SQL Tool, stop the server.
java -jar ./lib/hsqldb.jar odi_sa checkpoint;
shutdown;
5. Clone ODI 10g Database copying *.properties, *.script and *.backup to location of new database.
1. Copy declaration for your database from HSQL 1.7.3.3 to HSQL 1.8.x server.properties file.
2. Copy your database files from HSQL 1.7.3.3 to HSQL 1.8.x
3. Open script file for your database from HSQL 1.8.x and replace the following words to include quotation marks:
POSITION in DDL statements to "POSITION"
SCHEMA_VERSION_REGISTRY$ to "SCHEMA_VERSION_REGISTRY$"
4. Start HSQL 1.8.x and database instance automatically upgrade your database.
5. Using SQL TOOL, stop HSQL 1.8.x
java -jar ./lib/hsqldb.jar odi_sa checkpoint;
shutdown;
6. Copy declaration for your database from HSQL 1.8.x to HSQL 2.0.0 server.properties file.
7. Copy your database files from HSQL 1.8.x to HSQL 2.0.0
8. Update server.properties for HSQL 2.0.0 to add declaration for clone database.
server.database.1=file:ODI/odi_10g_cp server.dbname.1=odi_10g_cp
9. Update sqltool.rc with new connection information for clone database
urlid odicp_sa
Task 7: Run Upgrade Assistant to Upgrade ODI Middle Tier and Repositories
Upgrading Your Oracle Data Integrator Environment 3-13 password
10. Copy database's file to the location of new database. ODI Uses MEMORY table therefore copy only properties and script files.
copy odi_10g.properties <HSQL1.8>/ODI/odi_10g.properties copy odi_10g.script <HSQL1.8>/ODI/odi_10g.script
start HSQL 2.0.0
6. Create new logins for cloned 10g Database Using SQL Tool
Example of SQL Queries:
create user odim10g_cp password odim10g_cp ADMIN create user odiw10g_cp password odiw10g_cp ADMIN drop user odim10g
drop user odiw10g
3.5 Task 5: Create a Backup of the ODI Repositories to be Upgraded
Oracle recommends that you create a backup for each ODI Master and Work
repository. The backup enables you to restore to a pre-upgrade state if necessary. For more information, see "Backup Strategies for Upgrade," in Oracle Fusion Middleware Upgrade Planning Guide.
The Upgrade Assistant Prerequisite screen prompts you to indicate whether the backup of the ODI repositories has been completed. It is important to note, however, that the Upgrade Assistant will not validate that a backup has been created.
3.6 Task 6: Install and Configure Oracle Data Integrator 11
g
Before running the Upgrade Assistant, use the Oracle Universal Installer to install and configure ODI 11g. Note that it is not necessary to run the Repository Configuration Utility (RCU), finalize the agent configuration, or configure Java EE components during the installation process.
The ODI installation and configuration procedures are documented in the Oracle Fusion Middleware Installation Guide for Oracle Data Integrator.
3.7 Task 7: Run Upgrade Assistant to Upgrade ODI Middle Tier and
Repositories
Caution: This is a critical step of the upgrade process; especially if the repositories were not cloned. In the event that upgrade results are unsatisfactory, having a backup copy of the ODI repositories ensures that you will not lose important data. For more information on creating a backup, refer to your database backup and recovery documentation.
Task 7: Run Upgrade Assistant to Upgrade ODI Middle Tier and Repositories
The Oracle Fusion Middleware Upgrade Assistant automates the upgrade of many aspects of your Oracle Data Integrator 10g environment. Some post-upgrade configuration procedures may be required, however.
The Upgrade Assistant performs the following tasks and provides the progress on each task:
■ Prompts you to specify the existing 10g ODI home location (path). ■ Examines the components to be upgraded.
■ Provides a summary of the components to be upgraded so you can verify that the Upgrade Assistant is upgrading the components you expect.
■ Provides a progress screen so you can see the status of the upgrade as it proceeds.
■ Alerts you of any errors or problems that occur during the upgrade.
■ Displays the End of Upgrade screen, which confirms that the upgrade was complete.
The Upgrade Assistant is installed automatically into the /bin directory of your Oracle Data Integrator home (ODI_HOME).
3.7.1 Task 7a: Run the Upgrade Assistant for Oracle Data Integrator
To start the Upgrade Assistant using the graphical user interface:
1. Change directory to the ODI_HOME/bin where ODI_HOME is the installation folder of Oracle Data Integrator directory of the Oracle Fusion Middleware installation.
2. Enter the following command to start the Upgrade Assistant.
On UNIX system:
./ua
On Windows systems:
ua.bat
3. Provide the required information in each of the Upgrade Assistant screens.
3.7.2 Task 7b: Upgrade the Middle Tier Instance
The Middle Tier upgrade copies the ODI 10g Agent libraries, drivers and scripting engines into the 11g Standalone Agent installation folder.
To upgrade the Middle Tier Instance, start the Upgrade Assistant as described in Task 7a: Run the Upgrade Assistant for Oracle Data Integrator and provide the required
See Also: Section B.1, "Troubleshooting Upgrade Assistant Problems and Issues" in the Oracle Fusion Middleware Upgrade Planning Guide for specific instructions for troubleshooting problems that occur while running the Upgrade Assistant
Task 7: Run Upgrade Assistant to Upgrade ODI Middle Tier and Repositories
Upgrading Your Oracle Data Integrator Environment 3-15
3.7.3 Task 7c: Upgrade the Oracle Data Integrator Repositories
The Oracle Data Integrator Repository upgrade option upgrades the Oracle Data Integrator 10g repositories to ODI 11g versions. The ODI 10g repositories should always be cloned (copied) before launching the Upgrade Assistant. See Task 4: Copy (Clone) Existing Master and Work Repositories.
No. Screen Name
When does this screen appear?
Description and Action Required
1 Welcome Always No action required.
2 Specify Operation Always Select the Upgrade Middle
Tier Instance option.
3 Specify Source Home Only if you selected
Upgrade Middle Tier Instance on the
Specify Operation
screen.
Specify the location of the 10g Oracle home you want to upgrade.
4 Examine Always The Upgrade Assistant
performs a series of
validations before upgrading the selected components. Ensure that all validations have succeeded.
5 Upgrade Summary Always If the summary information
looks correct, click Upgrade.
6 Upgrade Progress Always The Upgrading Components
screen shows the progress of the upgrade process. Once complete, click Next.
7 End of Upgrade Always The Upgrade Complete
Task 7: Run Upgrade Assistant to Upgrade ODI Middle Tier and Repositories
To upgrade ODI Repositories, start the Upgrade Assistant as described in Task 7a: Run the Upgrade Assistant for Oracle Data Integrator and provide the required
information in the following screens:
Note: ODI UA uses actual data and structure of the ODI master repository to determine if a repository has already been upgraded. The Upgrade Assistant will return a message stating that the repository has already been upgraded if the following conditions exist:
■ a version registry has valid state and version for the repository
■ the repository is 11g
■ version of the repository is equal or greater than version of ODI SDK
used by UA
To debug or view the repository catalog information, use the following query on Table schema_version_registry which is stored in the Admin user (not in the ODI schema/repository):
SELECT COMP_ID,COMP_NAME,MRC_NAME,OWNER,VERSION,STATUS,UPGRADED FROM schema_version_registry;
(On DB2/400 operating systems, the Admin user is QSECOFR, and the schema_version_registry table is located in the schema 'NULLID’.)
Rows with the component "ODI" are used to track ODI repositories.
Caution: If the upgrade process fails, you must close the Upgrade Assistant, correct the issue, and then restart the Upgrade Assistant as described in Section 3.7.1.
If the upgrade process fails after the upgrade process has started, you must drop the cloned repository and start from a freshly cloned repository in addition to correcting the underlying issue. There is no way to restart the failed upgrade process.
No. Screen Name
When does this screen appear?
Description and Action Required
Task 7: Run Upgrade Assistant to Upgrade ODI Middle Tier and Repositories
Upgrading Your Oracle Data Integrator Environment 3-17
2 Specify Operation Always Select Upgrade Oracle Data
Integrator Repositories and choose which additional repository upgrade options you want to perform:
■ Update Topology and Security Metadata
■ Replace KMs with Mandatory Updates
■ Check that Upgrade Occurs Only on Cloned Repositories
For more information on these options, see the Specify Operation screen description in Appendix A.
3 Prerequisites Only if you selected
Upgrade Oracle Data Integrator
Repositories on the
Specify Operation
screen.
The Upgrade Assistant requires that you indicate the following prerequisites have been met in order to continue the upgrade:
■ Database schema backup completed
Oracle recommends that you backup your ODI repositories on the database before
upgrading. The Upgrade Assistant does not verify that the repositories have been backed up, so this option serves as a reminder. See Task 5: Create a Backup of the ODI Repositories to be Upgraded for more information.
■ Database version is certified by Oracle for Fusion Middleware upgrade
The Upgrade Assistant requires that the Oracle Data Integrator repositories reside on a supported database. See
Task 3: If Necessary, Upgrade the Database that Contains the ODI Repository for a link to the latest list of Oracle Data Integrator supported databases.
No. Screen Name
When does this screen appear?
Task 8: Perform Any Required Post-Upgrade Manual Steps
3.8 Task 8: Perform Any Required Post-Upgrade Manual Steps
Depending on the options you selected during the upgrade process, you may have to perform manual procedures to finalize the upgrade process.
Refer to Chapter 4, "Oracle Data Integrator Post-Upgrade Tasks" for a description of the post-upgrade tasks you might need to perform for each of the Oracle Data Integrator components.
4 Target Database Only if you selected
Upgrade Oracle Data Integrator
Repositories on the
Specify Operation
screen.
The Specify Target Database screen prompts you for the database type and DBA login credentials of the target database that hosts the Master and Work
Repositories. You must also provide the database user name and password used to connect to the Master Repository and the ODI Supervisor name and password.
NOTE: The DBA user must have SYSDBA privileges.
5 Specify Work Repositories Only if you selected
Upgrade Oracle Data Integrator
Repositories on the
Specify Operation
screen.
The Specify Work Repositories User Name screen prompts you to enter the database user names and passwords used to connect to each of the ODI 11g Work Repositories.
6 Examine Always If status is succeeded for all
components, click Next. If the examination fails for one or more of the components, click
Back to review the
information you entered. The log file will also provide important information. (The log file location is listed at the bottom of the screen.)
7 Upgrade Summary Always If the summary information
looks correct, click Upgrade.
8 Upgrade Progress Always The Upgrading Components
screen shows the progress of the upgrade process. Once complete, click Next.
9 End of Upgrade Always The Upgrade Complete
screen provides a link to the upgrade log file. Review the log file and test the upgraded applications to ensure that they are working as expected. Click Close to dismiss the Upgrade Assistant.
No. Screen Name
When does this screen appear?
4
Oracle Data Integrator Post-Upgrade Tasks 4-1
4
Oracle Data Integrator Post-Upgrade Tasks
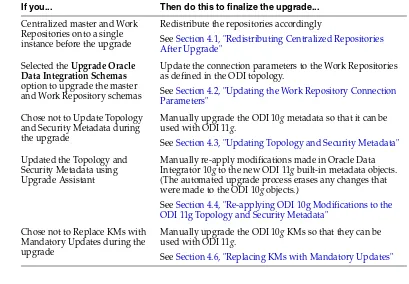
The Upgrade Assistant automates many of the upgrade tasks, but there are cases where you must manually modify the configuration settings after running the Upgrade Assistant. Review Table 4–1 to determine if you need to perform any additional upgrade procedures:
4.1 Redistributing Centralized Repositories After Upgrade
Both ODI 10g and ODI 11g support the distribution of schemas on multiple database instances. The Upgrade Assistant, however, supports only one set of database credentials at the time of the upgrade. To use the Upgrade Assistant, you must first clone (copy) all ODI 10g repositories to a single database/server instance. Once the upgrade is completed, you can redistribute the upgraded repositories.
Table 4–1 Post-Upgrade Procedures for ODI
If you... Then do this to finalize the upgrade...
Centralized master and Work Repositories onto a single instance before the upgrade
Redistribute the repositories accordingly
See Section 4.1, "Redistributing Centralized Repositories After Upgrade"
Selected the Upgrade Oracle Data Integration Schemas
option to upgrade the master and Work Repository schemas
Update the connection parameters to the Work Repositories as defined in the ODI topology.
See Section 4.2, "Updating the Work Repository Connection Parameters"
Chose not to Update Topology and Security Metadata during the upgrade
Manually upgrade the ODI 10g metadata so that it can be used with ODI 11g.
See Section 4.3, "Updating Topology and Security Metadata"
Updated the Topology and Security Metadata using Upgrade Assistant
Manually re-apply modifications made in Oracle Data Integrator 10g to the new ODI 11g built-in metadata objects. (The automated upgrade process erases any changes that were made to the ODI 10g objects.)
See Section 4.4, "Re-applying ODI 10g Modifications to the ODI 11g Topology and Security Metadata"
Chose not to Replace KMs with Mandatory Updates during the upgrade
Manually upgrade the ODI 10g KMs so that they can be used with ODI 11g.
See Section 4.6, "Replacing KMs with Mandatory Updates"
Updating the Work Repository Connection Parameters
4.2 Updating the Work Repository Connection Parameters
You must update the connection parameters to the upgraded Work Repositories as defined in the ODI topology.
To update the Work Repository Connection Parameters:
1. Launch the Oracle Data Integrator Console and connect to the Master Repository using Oracle Data Integrator Studio.
Expand the Work Repositories node in the Repositories accordion of the Topology Navigator.
2. Edit each Work Repository that is now hosted on a new server and edit its connection parameters by clicking the Connection button in the Work Repository editor toolbar.
3. Modify the connection parameters, User and Password, on the Definition tab. Modify the JDBC Driver and URL on the JDBC tab. Save the changes.
4. Validate your changes by creating and testing Repository Connections for these Work Repositories in Studio.
5. Modify your odiparams script to reflect the new connection parameters to your Master Repository. This file is in the ODI_HOME/oracledi/agent/bin
directory, where ODI_HOME is the Oracle Data Integrator installation directory.
■ On UNIX system:
odiparams.sh
■ On Windows system:
odiparams.bat
Edit the odiparams script with a text editor to set the configuration parameters as shown in the following example. (Note that the values are provided for example only; be sure to enter your own parameters):
ODI_MASTER_DRIVER=oracle.jdbc.driver.OracleDriver
6. For each ODI Agent configuration update the odiparams.bat (.sh) script as indicated in step 5.
4.3 Updating Topology and Security Metadata
By default, the Upgrade Assistant enables you to import the same ODI 10g
technologies, data types, data type conversions, and languages when upgrading to ODI 11g. If, however, you have selected not to have them upgraded automatically by the Upgrade Assistant, you should upgrade them manually to take advantage of the ODI 11g features. The following ODI 10g metadata should be manually updated using Oracle Data Integrator import features:
■ Technologies
Replacing KMs with Mandatory Updates
Oracle Data Integrator Post-Upgrade Tasks 4-3 ■ Action Groups
■ Languages
■ Security profiles
■ Objects
■ Methods
For more information on importing and exporting ODI metadata, see
"Exporting/Importing" in the Oracle Fusion Middleware Developer's Guide for Oracle Data Integrator.
4.4 Re-applying ODI 10g Modifications to the ODI 11
g
Topology and
Security Metadata
The ODI 11g upgrade process will automatically upgrade your ODI 10g topology and security metadata objects. However, if you modified the topology and security objects that were provided by default with ODI 10g, such as user defined profiles or
technologies, you must reapply your changes manually by editing the objects.
For information on modifying topology and security metatdata, see "Introduction to the Oracle Data Integrator Topology" in the Oracle Fusion Middleware Developer's Guide for Oracle Data Integrator.
4.5 Re-applying Open Tools
If you created Open Tools in ODI 10g, and you want to continue to use them in ODI 11g, you must add Open Tools to the classpath and then add as an Open Tool in ODI Studio.
For more information on using ODI tools, see "Oracle Data Integrator Tools Reference" in the Oracle Fusion Middleware Developer's Guide for Oracle Data Integrator
4.6 Replacing KMs with Mandatory Updates
By default, the Upgrade Assistant enables you to update ODI 10g Knowledge Modules (KMs) when upgrading to ODI 11g. Most ODI 10g KMs can be used with ODI 11g, so the update is not mandatory for all KMs.
Specifically the following KMs must be manually updated using KM Import/Replace before using ODI 11g (refer to the note below for more information):
■ LKM File to Oracle (EXTERNAL TABLE)
■ LKM File to Netezza (EXTERNAL TABLE)
■ LKM File to Oracle (SQLLDR)
■ LKM File to DB2 UDB (LOAD)
■ LKM SQL to Teradata (TTU)
Replacing KMs with Mandatory Updates
■ IKM SQL to Teradata (TTU)
■ LKM File to Teradata (TTU)
■ IKM File to Teradata (TTU)
■ IKM Teradata to File (TTU)
■ LKM File to Sybase IQ (LOAD TABLE)
Note: The Knowledge Modules listed above must be updated because they use calls to the odiRef.getTargetTable or
odiRef.getTableList APIs to request field or row separators for a file datastore. In ODI 10g, the returned values were inverted when requesting hexadecimal (XFILE_SEP_FIELD, XFILE_SEP_ROW) and ASCII (FILE_SEP_FIELD, FILE_SEP_ROW) separators. To address this issue, the ODI 10g KMs were implemented to work around this issue.
The 11gOdiRef APIs return the correct values; therefore, the KMs have been modified to request the correct hexadecimal or ASCII separators.
For example:
■ odiRef.getTargetTable("FILE_SEP_FIELD") was replaced with odiRef.getTargetTable("XFILE_SEP_ FIELD")
■ odiRef.getTargetTable("XFILE_SEP_FIELD") was replaced with odiRef.getTargetTable("FILE_SEP_ FIELD")
■ odiRef.getTargetTable("XFILE_SEP_ROW") was replaced with odiRef.getTargetTable("FILE_SEP_ROW")
■ odiRef.getTargetTable("FILE_SEP_ROW") was replaced with odiRef.getTargetTable("XFILE_SEP_ROW")
If you customized KMs using these methods, you must make the appropriate changes to the API calls.
Also note that the following KMs are no longer available:
■ LKM File to SAS
■ LKM SAS to SQL
A
Oracle Data Integrator Upgrade Screens A-1
A
Oracle Data Integrator Upgrade Screens
This appendix contains images and descriptions for all of the Oracle Fusion Middleware Upgrade Assistant for Oracle Data Integrator screens.
A.1 Welcome
Click Next.
A.2 Specify Operation
Specify Operation
■ Select Upgrade Middle Tier Instance to upgrade the ODI 10g Agent configuration information into the ODI 11g Standalone Agent. Java EE components are not affected by the Middle Tier Instance upgrade.
Specify Operation
Oracle Data Integrator Upgrade Screens A-3
Option Description
Update Topology and Security Metadata The Update Topology and Security Metadata option updates only the Oracle Data Integrator 10g built-in topology and security objects. Customized objects, such as user defined profiles or technologies, for example, are not updated. If you modified any ODI 10g objects, you must re-apply your changes after the upgrade process.
NOTE: If this option is deselected, the topology and security metadata objects will have to be manually upgraded in order to use the ODI 11g features. For more information, see Section 4.3, "Updating Topology and Security Metadata".
■ Updating the Topology Metadata upgrades the built-in technologies to support new 11g
features. If you do not upgrade your topology, you will not be able to use the 11g features defined in the technologies.
■ Updating the Security Metadata upgrades the profiles, objects and methods to support new 11g features and menus. If you do not upgrade the security metadata, some of the 11g features will not be available.