Oracle® Fusion Middleware
User's Guide for Oracle Business Intelligence Publisher Release 11g (11.1.1)
Part No. E18861-01
Oracle Fusion Middleware User's Guide for Oracle Business Intelligence Publisher, Release 11g (11.1.1) Part No. E18861-01
Copyright © 2010, 2011, Oracle and/or its affiliates. All rights reserved. Primary Author: Leslie Grumbach Studdard
Contributor: Oracle Business Intelligence Publisher development, product management, and quality assurance teams
Oracle is a registered trademark of Oracle Corporation and/or its affiliates. Other names may be trademarks of their respective owners.
This software and related documentation are provided under a license agreement containing restrictions on use and disclosure and are protected by intellectual property laws. Except as expressly permitted in your license agreement or allowed by law, you may not use, copy, reproduce, translate, broadcast, modify, license, transmit, distribute, exhibit, perform, publish or display any part, in any form, or by any means. Reverse engineering, disassembly, or decompilation of this software, unless required by law for interoperability, is prohibited.
The information contained herein is subject to change without notice and is not warranted to be error-free. If you find any errors, please report them to us in writing.
If this software or related documentation is delivered to the U.S. Government or anyone licensing it on behalf of the U.S. Government, the following notice is applicable:
U.S. GOVERNMENT RIGHTS
Programs, software, databases, and related documentation and technical data delivered to U.S. Government customers are "commercial computer software" or "commercial technical data" pursuant to the applicable Federal Acquisition Regulation and agency-specific supplemental regulations. As such, the use, duplication, disclosure, modification, and adaptation shall be subject to the restrictions and license terms set forth in the applicable Government contract, and, to the extent applicable by the terms of the Government contract, the additional rights set forth in FAR 52.227-19, Commercial Computer Software License (December 2007). Oracle USA, Inc., 500 Oracle Parkway, Redwood City, CA 94065.
This software or hardware is developed for general use in a variety of information management applications. It is not developed or intended for use in any inherently dangerous applications, including applications that may create a risk of personal injury. If you use this software or hardware in dangerous applications, then you shall be responsible to take all appropriate fail-safe, backup, redundancy, and other measures to ensure its safe use. Oracle Corporation and its affiliates disclaim any liability for any damages caused by use of this software or hardware in dangerous applications.
Contents
Send Us Your Comments
Preface
1 Introduction to Using Oracle Business Intelligence Publisher
Introduction to Oracle Business Intelligence Publisher... 1-1
New Features for Oracle Business Intelligence Publisher 11g Release 1 (11.1.1)... 1-3
2 Getting Started
Accessing Oracle Business Intelligence Publisher...2-1
Setting My Account Preferences and Viewing My Groups... 2-3
About the Home Page...2-5
About the Catalog... 2-8
About the Global Header... 2-10
Searching the Catalog...2-10
3 Viewing a Report
About Viewing Reports in BI Publisher...3-1
Viewing a Report... 3-1
Using the Report Viewer Options... 3-2
Creating an Ad Hoc Pivot Table with the Analyzer... 3-8
Creating an Interactive Pivot Table... 3-10
Using the Analyzer for Excel...3-14
Using the BI Publisher Menu... 3-16
4 Creating Report Jobs
Navigating to the Schedule Report Job Page...4-1
Setting General Options... 4-2
Setting Output Options... 4-2
Defining the Schedule for Your Job... 4-6
Configuring Notifications... 4-8
Submitting and Monitoring the Job... 4-9
Creating a Bursting Job... 4-9
Advanced Topics... 4-10
5 Viewing and Managing Report Jobs
About the Manage Report Jobs Page... 5-1
Viewing Jobs for a Specific Report... 5-2
Searching for Report Jobs... 5-3
Setting the Time Zone for Viewing Jobs... 5-3
Viewing Job Details... 5-3
Linking to Job History...5-4
Pausing Jobs... 5-4
Resuming Jobs... 5-4
Deleting Jobs... 5-4
Refreshing the Manage Report Jobs Page... 5-4
6 Viewing and Managing Report History
Viewing Report Job History and Saved Output...6-1
Viewing Job History for a Specific Report... 6-3
Searching for Report Job History...6-3
Viewing Details of a Job History... 6-4
Downloading Data from a Report Job... 6-5
Republishing a Report from History... 6-5
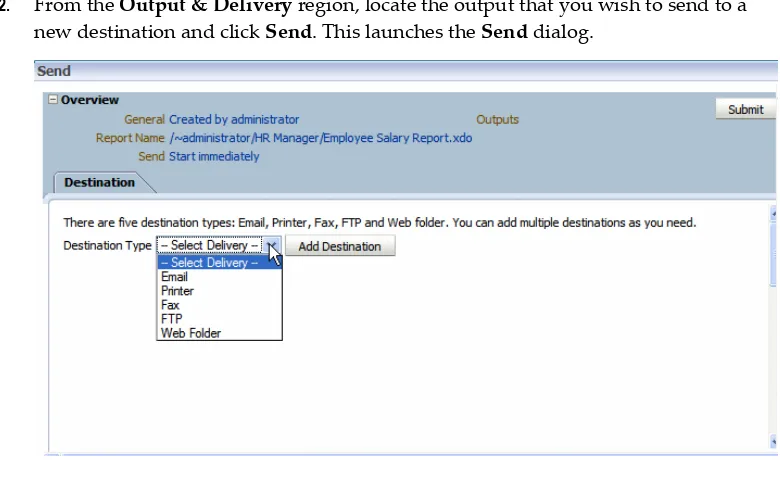
Sending an Output to a New Destination... 6-6
Monitoring Running Jobs... 6-6
Canceling a Running Job... 6-8
Getting Error and Warning Information for Reports... 6-9
Deleting a Job History... 6-9
Refreshing the Report Job History Page... 6-10
7 Managing Objects in the BI Publisher Catalog
What Objects Are Stored in the Catalog... 7-2
Creating a Folder or Subfolder... 7-2
Performing Tasks on Catalog Objects... 7-3
Downloading and Uploading Catalog Objects... 7-4
Understanding the Impact of Taking Actions on Objects Referenced by Reports... 7-5
Exporting and Importing Catalog Translation Files...7-5
Send Us Your Comments
Oracle Fusion Middleware User's Guide for Oracle Business Intelligence Publisher, Release 11g (11.1.1)
Part No. E18861-01
Oracle welcomes customers' comments and suggestions on the quality and usefulness of this document. Your feedback is important, and helps us to best meet your needs as a user of our products. For example: • Are the implementation steps correct and complete
• Did you understand the context of the procedures • Did you find any errors in the information
• Does the structure of the information help you with your tasks
• Do you need different information or graphics If so, where, and in what format • Are the examples correct Do you need more examples
If you find any errors or have any other suggestions for improvement, then please tell us your name, the name of the company who has licensed our products, the title and part number of the documentation and the chapter, section, and page number (if available).
Note: Before sending us your comments, you might like to check that you have the latest version of the document and if any concerns are already addressed. To do this, access the new Oracle E-Business Suite Release Online Documentation CD available on My Oracle Support and www.oracle.com. It contains the most current Documentation Library plus all documents revised or released recently.
Send your comments to us using the electronic mail address: [email protected] Please give your name, address, electronic mail address, and telephone number (optional).
If you need assistance with Oracle software, then please contact your support representative or Oracle Support Services.
Preface
Intended Audience
Welcome to Release 11g (11.1.1) of the Oracle Fusion Middleware User's Guide for Oracle
Business Intelligence Publisher.
This book is intended for the following users:
• report consumers who will be viewing and scheduling reports in Oracle BI Publisher
See Related Information Sources on page ix for more Oracle E-Business Suite product information.
Documentation Accessibility
For information about Oracle's commitment to accessibility, visit the Oracle
Accessibility Program website at http://www.oracle.com/us/corporate/accessibility/
Structure
1 Introduction to Using Oracle Business Intelligence Publisher 2 Getting Started
3 Viewing a Report 4 Creating Report Jobs
5 Viewing and Managing Report Jobs 6 Viewing and Managing Report History 7 Managing Objects in the BI Publisher Catalog
Related Information Sources
For more information, see the following documents in the Oracle Business Intelligence
• The Oracle Business Intelligence chapter in the Oracle Fusion Middleware Release Notes for your platform
• Oracle Fusion Middleware Administrator's Guide for Oracle Business Intelligence Publisher
• Oracle Fusion Middleware Developer's Guide for Oracle Business Intelligence Publisher
• Oracle Fusion Middleware Report Designer's Guide for Oracle Business Intelligence Publisher
• Oracle Fusion Middleware Data Modeling Guide for Oracle Business Intelligence Publisher
• Oracle Fusion Middleware Installation Guide for Oracle Business Intelligence
• Oracle Fusion Middleware User's Guide for Oracle Business Intelligence Enterprise Edition
System Requirements and Certification
Refer to the system requirements and certification documentation for information about hardware and software requirements, platforms, databases, and other information. Both of these documents are available on Oracle Technology Network (OTN).
The system requirements document covers information such as hardware and software requirements, minimum disk space and memory requirements, and required system libraries, packages, or patches:
http://www.oracle.com/technology/software/products/ias/files/fusion_requirements.ht m
The certification document covers supported installation types, platforms, operating systems, databases, JDKs, and third-party products:
http://www.oracle.com/technology/software/products/ias/files/fusion_certification.html
Do Not Use Database Tools to Modify Oracle E-Business Suite Data
Oracle STRONGLY RECOMMENDS that you never use SQL*Plus, Oracle Data Browser, database triggers, or any other tool to modify Oracle E-Business Suite data unless otherwise instructed.Oracle provides powerful tools you can use to create, store, change, retrieve, and maintain information in an Oracle database. But if you use Oracle tools such as SQL*Plus to modify Oracle E-Business Suite data, you risk destroying the integrity of your data and you lose the ability to audit changes to your data.
1
Introduction to Using Oracle Business
Intelligence Publisher
Introduction to Oracle Business Intelligence Publisher
Oracle BI Publisher is an enterprise reporting solution for authoring, managing, and delivering all your highly formatted documents, such as operational reports, electronic funds transfer documents, government PDF forms, shipping labels, checks, sales and marketing letters, and much more.
The Oracle Fusion Middleware User's Guide for Oracle Business Intelligence Publisher describes how report consumers use BI Publisher to view and schedule reports. See these other guides for more information about using the product for other business roles:
Role Sample Tasks Guide
Administrator Configuring Security
Configuring System Settings
Diagnosing and Monitoring System Processes
Oracle Fusion Middleware Administrator's Guide for Oracle Business Intelligence Publisher
Application developer or
integrator Integrating BI Publisher into existing applications using the application programming interfaces
Oracle Fusion Middleware Developer's Guide for Oracle Business Intelligence Publisher
Data Model developer Fetching and structuring the data to use
Role Sample Tasks Guide
Report designer Creating report definitions
Designing layouts
Oracle Fusion Middleware Report Designer's Guide for Oracle Business Intelligence Publisher
Overview for Report Consumers
A report consumer may perform the following tasks:
• Run and view reports in real-time from the BI Publisher catalog
• Schedule reports to run at selected intervals and to various destinations such as printer, fax, or e-mail
• View report history
• Create an ad hoc analysis of report data using BI Publisher's Analyzer feature
• Open and manipulate reports in Microsoft Excel using BI Publisher's Analyzer for Microsoft Excel
The tasks that are available to you will depend on the permission assigned to you by your administrator.
The topics in this book that describe performing report consumer tasks are: • Browsing the Catalog, page 2-8
• Viewing a Report, page 3-1
• Using the Online Analyzer, page 3-8
• Using the BI Publisher Analyzer for Excel, page 3-14
• Scheduling a Report, page 4-1
• Scheduling a Report To Be Burst, page 4-9
• Managing Your Scheduled Reports, page 5-1
New Features for Oracle Business Intelligence Publisher 11
g
Release 1
(11.1.1)
This preface describes new features in Oracle Business Intelligence Publisher 11g
Release 1 (11.1.1). If you are upgrading from a previous release, read the following for information about new features, tools, and procedures.
This section includes the following topics:
• New Features for Oracle BI Publisher 11g Release 1 (11.1.1.5)
• New Features for Oracle BI Publisher 11g Release 1 (11.1.1.3)
New Features for Oracle BI Publisher 11
g
Release 1 (11.1.1.5)
New features in Oracle BI Publisher 11g Release 1 (11.1.1.5) include:
Access Report History from the Manage Report Jobs Page
The Manage Report Jobs page now includes a History link for each job to enable you to quickly view the completed runs of a job. For more information, see About the Manage Report Jobs Page, page 5-1.
Monitor Running Report Jobs
While a scheduled report job is in running status, you can now monitor the stages of the
report processing in the Report Job History page. For more information, see
Monitoring Running Jobs, page 6-6.
Cancel Running Jobs
When a scheduled report job is in running status, you can now cancel the running job
from the Report Job History page. For more information, see Canceling a Running Job,
page 6-8.
Excel 2007 Output Type
Excel 2007 is a new output type available for reports. When selected, BI Publisher will generate the output in Excel XML format (.xlsx). If you have Excel 2007 or later
installed, this option provides the best preservation of layout and formatting. For more information see Using the Report Viewer Options, page 3-2.
New Features for Oracle BI Publisher 11g Release 1 (11.1.1.3)
Major User Interface Improvements
The user interface has undergone major improvements in several areas, including a new Home page and redesigned editors and panes. These improvements are intended to make working with Oracle BI Publisher easier and more consistent. This guide provides detailed information on working with the various pieces of the user interface.
Shared Oracle BI Presentation Catalog
For installations of BI Publisher with the Oracle BI Enterprise Edition, BI Publisher now shares the same catalog with Oracle BI Presentation services.
Interactive Viewer
For reports created with the new BI Publisher layout editor, a new interactive output type is available. The interactive viewer enables pop-up chart details, scrollable tables, table filtering, table sorting, and propagated filtering across different components of the report. This interactivity is achieved simply by designing the report in the layout editor, no additional coding is necessary.
Enhanced Scheduling Options
2
Getting Started
This chapter covers the following topics:
• Accessing Oracle Business Intelligence Publisher
• Setting My Account Preferences and Viewing My Groups • About the Home Page
• About the Catalog • About the Global Header • Searching the Catalog
Accessing Oracle Business Intelligence Publisher
Logging in with credentials:
1. Navigate to the URL provided by your administrator (for example:
2. Select the language you prefer for the user interface.
3. Enter your credentials to sign in to BI Publisher.
4. Click Sign In.
Note: Accessibility Mode renders the catalog in a tree structure for users requiring keyboard navigation.
Logging in as Guest:
If your administrator has enabled guest access, a Guest button will display on the log in
page.
A guest user does not require credentials and has privileges only to view reports available in the folder set up for guest access.
1. Select the language you prefer for the user interface.
2. Click Guest.
What's Next
To set user preferences, see Setting My Account Preferences, page 2-3. To view reports, see Viewing a Report, page 3-1.
To browse the catalog, see Browsing the Catalog, page 2-8. To schedule reports, see Creating Report Jobs, page 4-1.
Setting My Account Preferences and Viewing My Groups
Note: Your preferences may be inherited from another Oracle product. If this is true for your work environment, you cannot update your preferences from within BI Publisher. If you are not sure where to update your preferences, ask your administrator.
Use the My Account dialog to:
• Set general preferences
• Change your password
• View assigned roles
To Access the My Account dialog:
• In the global header, click your user name displayed after Signed In As and then
select My Account as shown in the following figure:
To Set General Preferences
Use the General tab to set the following:
Report Locale
A locale is a language and territory combination (for example, English (United States) or French (Canada)). BI Publisher uses the report locale selection to determine the following:
• the translation to apply to a report layout
• the number, date, and currency formatting to apply to the report data
Note that if a particular report does not have a translation for the selected locale, BI Publisher will apply a locale fallback logic to select the most appropriate layout
available. For more information, see Locale Selection Logic, Oracle Fusion Middleware
Report Designer's Guide for Oracle Business Intelligence Publisher.
BI Publisher applies localized number, date, and currency formatting independently of the layout translation.
UI Language
The UI language is the language that your user interface displays in. The language that you selected at login will be selected as the default. Choose from the languages that are available for your installation.
Time Zone
page 4-1). Note that the time displayed on the user interface and reflected in report processing times is governed by the BI Publisher server time zone.
Accessibility Mode
Setting this to "On" will display the report catalog in a tree structure that is accessible using keyboard strokes.
To Change Your Password
To change your password, click the Password tab of the My Account dialog.
Note: If your account password settings are inherited from another application you will not be able to update your password here.
To View Your User Groups
Click the My Groups tab to view a list of the application roles to which you are
assigned. You cannot modify this list.
About the Home Page
The Home page consists of the following sections:
Create
Provides links to initiate creation tasks, such as create report, create report job and
create data model. Click More to access options not shown. BI Publisher populates this
list based on what permissions or roles you have.
More information on each task, see the document indicated:
Task More Information
Create Report Creating or Editing a Report, Oracle Fusion Middleware Report Designer's Guide for Oracle Business Intelligence Publisher
Create Report Job Creating Report Jobs, page 4-1
Create Data Model Using the Data Model Editor, Oracle Fusion Middleware Data Modeling Guide for Oracle Business Intelligence Publisher
Task More Information
Create Subtemplate Creating and Implementing Subtemplates, Oracle Fusion Middleware Report Designer's Guide for Oracle Business Intelligence Publisher
Browse/Manage
Provides quick access to the catalog, where you can browse and manage reports and other catalog objects; and to the Report Jobs and the Report Jobs History pages, where you can view and manage scheduled, running, and completed report jobs.
Get Started
This section contains the following links: • Download BI Publisher Tools
This list contains additional products that you may download and install. • Template Builder for Word
This add-in for Microsoft Word facilitates the design of RTF templates. For more information, see Creating RTF Templates Using the Template Builder for
Word, Oracle Fusion Middleware Report Designer's Guide for Oracle Business
Intelligence Publisher.
The Template Builder for Excel is included in the Template Builder for Word installation. The Template Builder for Excel is an add-in for Microsoft Excel that enables you to preview Excel Templates. For more information, see Creating
Excel Templates, Oracle Fusion Middleware Report Designer's Guide for Oracle
Business Intelligence Publisher.
• Analyzer for Excel
This add-in for Microsoft Excel enables you to manipulate the results of a report query in Excel and also to upload a spreadsheet back to BI Publisher to use as a layout. For more information, see Using the BI Publisher Analyzer for Excel, page 3-14.
• Oracle SQL Developer
development tasks.
• Help Contents
Opens the Help table of contents.
• Oracle Technology Network
Access the Oracle Technology Network (OTN) to search for technical articles about Oracle products, participate in discussions about Oracle products, ask the user community technical questions, and search for and download Oracle products.
Recent
Contains a list of the reports that you have recently viewed, created, or updated. If your role includes access to data models, subtemplates, or style templates these will be included as well.
Most Popular
Contains the objects that are accessed the most often by you and the users assigned to the groups to which you belong.
About the Catalog
Use the Catalog page to locate objects in the catalog and perform tasks specific to those objects. The objects and options that are available to you are determined by your system privileges and the permissions assigned to individual folders and objects.
The Catalog page can also be used to perform more specialized tasks such as: • Setting object-level permissions
• Downloading and uploading archived objects
• Exporting and importing catalog translations
For more information about the functions you can perform in the catalog, see: Managing Objects in the Catalog, page 7-1.
Browsing the Catalog
Use the Folders pane of the Catalog page to display and navigate the content of personal (My Folders) and shared folders that all users can access. Select a folder to view its contents in the display area.
Using the Location Bar to Find Your Place and Navigate Back
The Location bar displays your current location within the catalog directory structure. The Location bar also maintains catalog locations that you have visited while in your current catalog session.
Location bar to open the list of locations as shown in the following figure:
About the Global Header
The global header, shown in the following figure, contains links and options that enable you to quickly begin a task or locate a specific object within BI Publisher. Many of the options that are available from the global header are also available within the Home page.
The global header is always displayed when you are working in BI Publisher. When you are viewing a report or working within one of the task editors, you can use the global header to quickly begin a new task, search the catalog, access product documentation, or view a different object.
The Signed In As area enables you to access the My Account dialog, where you can specify your preferences. For more information, see Setting Preferences, page 2-3.
If you are logged in as an administrator, the Administration link will display in the
global header to enable access to the Administration page. For more information about
the tasks on the Administration page, see About the Administration Page, Oracle Fusion
Middleware Administrator's Guide for Oracle Business Intelligence Publisher.
Searching the Catalog
3
Viewing a Report
About Viewing Reports in BI Publisher
View a report in your Web browser using the report viewer. Depending on the report properties and your user permissions, you may be able to select and view different layouts, interact directly with displayed data, change the output type, or send the report to someone else.
This chapter includes the following topics: • Viewing a Report, page 3-1
• Using the Report Viewer Options, page 3-2
• Creating an Ad Hoc Pivot Table with the Analyzer, page 3-8
• Viewing Data in Microsoft Excel, page 3-14
Viewing a Report
All reports reside in the catalog. Your Home page will display recently viewed and most popular reports for quick access.
To view a report
1. Navigate to the report.
The Catalog displays two main reports folders.
• Shared Folders contains the reports and folders you have been granted access to based on your role.
2. Open the appropriate folder and then click the report name or the Open link for the report. This will run the report using the options set in the report definition.
Note: Some reports are not configured for online viewing. For these reports, the Open link will not display. Select Schedule to
schedule a report job. See Creating Report Jobs, page 4-1. Some reports may require you to select parameter values before running the report. If the report does not immediately display data,
select values for the displayed parameters and click Apply.
Using the Report Viewer Options
The following figure shows the report viewer:
The following list describes components of the report viewer. Not all options are available for all reports:
• Parameters - if the report includes parameters, these are presented as prompts in the Report Viewer.
• A list from which you can make a selection (as shown above). Some lists support multiple selections. A multi-select list displays a check box next to each item. Click the box to select the item. Click the box again to deselect the item.
• A text box into which you can type a value.
• A search icon that launches a search dialog. Note that search strings are case sensitive. The % can be used as a wild card. The search will return results when the value matches the initial string.
• A date picker that launches a calendar from which to select the date.
After selecting or entering a parameter value, click Apply.
• View Report - this list contains other output types that are available for this report. The output will be rendered in your browser or you may be prompted to open an appropriate application for viewing.
Possible output options are:
• Interactive - this output is only available for layouts designed using BI Publisher's Layout Editor. Interactive output enables pop-up chart value displays, scrollable and filterable tables, and other interactive features for a report.
• HTML - (Hypertext Markup Language) formats the report for browser viewing.
• PDF - (Portable Document Format) formats the report as PDF and opens the report in Adobe Acrobat reader. This output type is optimized for printing.
• RTF - (Rich Text Format) is a format used by word processing applications. If you have a word processing application installed, such as Microsoft Word or OpenOffice.org, you will be prompted to open the application for viewing.
logos.
• Excel 2000 - choose this output type only if you are running the earlier versions of Microsoft Excel 2000 or 2002. This option generates HTML that can be opened in Excel. It does not support embedded images.
• Excel 2007 - choose this option to generate the report in Excel .xlsx (Excel XML format). If you have Excel 2007 or later installed, this option provides the best preservation of layout and formatting.
• PowerPoint - choose this output type to generate a PowerPoint file compatible with Microsoft PowerPoint 2003.
• PowerPoint 2007 - choose this output type to generate a PowerPoint 2007 file.
• Flash - displays output for templates designed using Adobe Flash. You must have the Adobe Flash Player Plug-in installed for your Web browser.
• CSV - displays the data in comma separated value format. The data must be in a simple <rowset>/<row> structure.
• Data - displays the report data as XML.
Important: For Safari browser users: The Safari browser renders XML as text. To view the XML generated by the data engine as XML, right-click inside the frame displaying the data and then
click View Frame Source. This is a display issue only. The data
will be saved properly if you choose to export the data.
• MHTML - (Mime HyperText Markup Language) this format enables you to save a Web page and its resources as a single MHTML file (.mht), in which all images and linked files will be saved as a single entity. Use this option if you want to send or save HTML output and retain the embedded images and stylesheet formatting.
• PDFZ - (Zipped PDF) - this option is only available for reports that have been designed to enable zipped PDF output. BI Publisher generates a zip file containing the report PDF output and index files.
• FO - generates an XML file with the XSL-FO information.
Actions
your user privileges and properties set for the report. The full list of options is shown in the following figure:
• Edit Report enables you to update the report definition. For example, you can add or create new layouts, update the report properties, or change the default parameter
values. See Creating a New Report, Oracle Fusion Middleware Report Designer's Guide
for Oracle Business Intelligence Publisher for information on using the report editor.
• Edit Layout enables you to update a layout. If the layout was created using BI
Publisher's Layout Editor, the Layout Editor will launch in your browser. See
Creating a BI Publisher Layout Template, Oracle Fusion Middleware Report Designer's
Guide for Oracle Business Intelligence Publisher. If the layout was not created in the Layout Editor, you will be prompted to save the template file. You can then open it in the appropriate application.
• Export exports the report to the default application for the output type you select (for example: Adobe Acrobat for PDF output or Microsoft Excel for Excel output).
• Send enables you to schedule the report for immediate delivery to an e-mail address, printer, or other destination.
The Send action launches the Schedule Report Job page where you can select the
output, destination, and notification options.
Note: You cannot send a report in Interactive mode. First, select a
different output type (such as PDF or HTML) from the View
• Schedule creates a job to run and distribute the report. See Creating Report Jobs, page 4-1.
• Jobs enables you to view and manage currently scheduled jobs for this report. See
Viewing and Managing Report Jobs, page 5-1.
• Job History enables you to view completed and running report jobs. See Viewing and Managing Report History, page 6-1.
• Republish from History enables you to select a previously scheduled, completed job and specific output for viewing in the report viewer.
• Analyzer enables you to create ad hoc pivot views of the data using the Online Analyzer. See Using the Online Analyzer, page 3-8.
• Analyzer for Excel exports the report data to Microsoft Excel. See Using the Oracle BI Publisher Analyzer for Excel, page 3-14.
• Share Report Link enables you to generate a link that you can copy and reuse, based on the report that you are currently viewing. When you select one of the options, a dialog displays the URL to the report. You can control what will be displayed by the URL as follows:
• Current Page displays the current page as shown.
• No Header displays the current report without the BI Publisher logo, tabs, or navigation path.
• No Parameters displays the current report without the header or any parameter selections. The Actions menu, Export, and View Report menus will still be available.
• Document Only displays the URL to the current report document only. No other page information or options will be displayed.
Note: Share Report Link is a report property that can be disabled.
See Defining Report Properties, Oracle Fusion Middleware Report
Designer's Guide for Oracle Business Intelligence Publisher for information on setting this and other report properties.
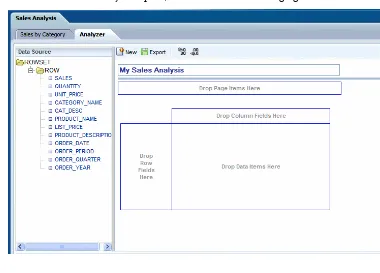
Creating an Ad Hoc Pivot Table with the Analyzer
The online Analyzer enables you to create ad hoc analyses of your data by quickly dragging and dropping your report data elements into a pivot table structure. You can then save your pivot table as a layout for the report. The interface enables you to easily rearrange and pivot your data by dragging items to different row, column or summary positions.
You can limit the data displayed in your pivot table by defining page-level filters. The page-level filter is an element from your data set by which to specify the results displayed in the table. Drag and drop the desired element from the data pane to the Page item area to automatically create a menu of the values for that element. You can then select a value from the list to filter the results in the table to display only the data that corresponds to your selection.
After selecting all the data elements for the table, choose whether to view the Sum, Average, or Count of the data.
This topic contains two procedures:
• Creating an Interactive Pivot Table, page 3-10
• Saving Your Interactive Pivot Table as a Layout, page 3-13
Limitations of the Online Analyzer
Because the data presented in the Online Analyzer is from the source XML file, no data type information is available; therefore, number formats cannot be localized according to Report Locale preferences.
Accessing the Online Analyzer
To access the Online Analyzer:
• From the Report Viewer, click Actions, then click Analyzer.
About the Online Analyzer Toolbar
The Analyzer toolbar enables you to perform the following functions:
• New creates a new empty pivot table structure. If you have already created an
analysis that you want to save, you must click Save before you click New.
• Export - enables you to export and save your pivot table as a BI Publisher layout. • Move decimal left - click once to display an additional decimal position. You can
continue clicking to move the decimal multiple times.
Creating an Interactive Pivot Table
This procedure describes how to create an interactive pivot table using the Online Analyzer:
To create an interactive pivot table:
The following example displays the usage of the Analyzer with a simple Sales Analysis report:
1. From the report viewer, click Actions and then click Analyzer.
The Analyzer interface displays the list of data fields on a pane and an empty pivot table structure on the adjacent pane, as shown in the following figure.
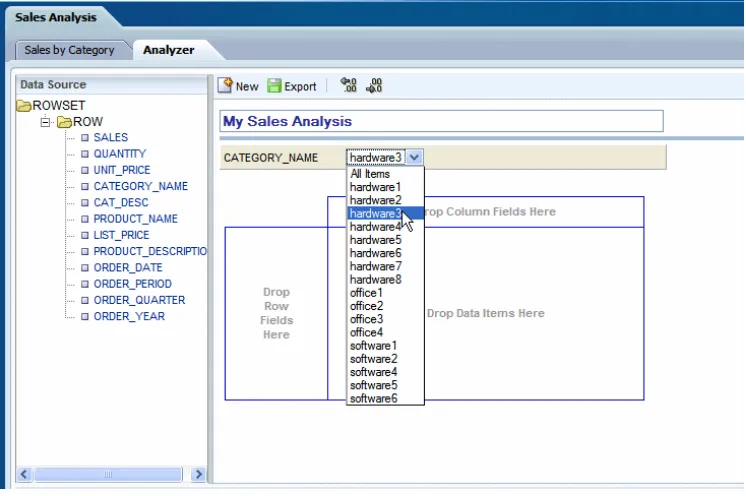
2. To filter by CATEGORY_NAME, drag the item to the Page Items region, as shown
3. To view product sales by year, drag PRODUCT_NAME into the Row Field area, and drop ORDER_YEAR into the Column Field area. Drop the SALES data into the table body area, as shown in the following figure:
You can now see the calculated sales totals as a sum of the data items.
4. Add the dimension of ORDER_PERIOD to the table by dragging the data item over
5. Now you can click the ORDER_YEAR to open it up to display each ORDER_PERIOD total. Click again to close the item and view only the ORDER_YEAR total.
Saving Your Interactive Pivot Table as a Layout:
layout type (.xpt). It will then have all the features and properties of a BI Publisher layout.
1. Click Export.
2. In the dialog, enter a name. The analyzer layout will be saved as a layout selection
for this report.
3. Close the Online Analyzer.
4. On the Actions menu, click Edit Report.
5. From the Report Editor, click View a List to display the layouts in the list view.
6. Locate your new layout in the layout table and select a locale for it.
7. Click Save.
Using the Analyzer for Excel
Note: Your administrator must assign you the appropriate permissions to use this feature.
Prerequisites
• Download and install the Analyzer for Excel from the Home Page, Get Started
region: Click Download BI Publisher Tools and then click Analyzer for Excel.
• Microsoft .NET Framework 3.0 or later
If not installed on your computer, you will be prompted to download it the first time you use the Analyzer for Excel.
• Supported version of Microsoft Excel. See System Requirements and Certification, page x for the most up-to-date information on supported hardware and software.
Important: If you have previously installed the Analyzer for Excel, and you are installing a later version, perform the following:
1. Uninstall the current version of Analyzer for Excel from the Control
panel, using the Add or Remove Programs function.
2. Remove Xmlpreportaddin.xla from the add-ins list.
To remove it from Word 2003: On the Tools menu, click Add-ins,
To remove it from Word 2007 or 2010: Click the Office button, then
click Excel Options, then click Add-Ins. Next to Manage: Excel
Add-ins, click Go. Select the box next to Xmlpreportaddin. When prompted, delete it from the list.
Features
The Analyzer for Excel offers two modes: online mode and offline mode. The report designer sets the mode as a property of the report. The online mode is the default mode and is described in this section. For information on the offline mode, see Excel Analyzer
Options, Oracle Fusion Middleware Report Designer's Guide for Oracle Business Intelligence
Publisher.
The Analyzer for Excel enables you to:
• Export the results of the report query to an Excel spreadsheet
• Log in to BI Publisher Enterprise from Excel to refresh your data, apply new parameter values, and apply layout to the report data
• Create Excel Analyzer layouts and upload them to the BI Publisher server
• Access and run your reports from an Excel session
Launching the Analyzer for Excel
1. From the report viewer, click the Actions toolbar button, then select Analyzer for
Excel from the list. You will be prompted to save or open the report file.
2. When you open the file in Excel, select Enable Macros from the Excel dialog.
Note: You must enable macros to use the Analyzer for Excel in online mode.
Your report data displays in an Excel worksheet and the Oracle BI Publisher menu appears on your Excel menu bar. Note that the data are the results of the report query with no layout or filtering applied.
You can now manipulate the report data in Excel.
Using the BI Publisher Menu
You must log in to enable all the menu commands.
Login enables you to log in to BI Publisher. See Logging in Through Excel, page 3-17.
Show Report Parameters – displays the updateable parameters and available layouts for the report in a toolbar.
Analyzer for Excel Toolbar
To update the data, select a new parameter value then click Refresh Data to refresh the
data in the current sheet.
To apply a layout, select the layout, then click Refresh Formatted Data. This will
download the report as HTML into a new worksheet. Select the new worksheet to see the data with the new layout applied.
Note: The layout you select must have HTML as an available output.
To change the parameter values from this worksheet, select the new values, then click
Refresh Data, then click Refresh Formatted Data.
Update Excel Template
If you have edited the layout and wish to save your changes, use this option to upload the updated layout to the report definition in the BI Publisher catalog.
Note that to include charts in your saved layout, you must create them on the same worksheet that is downloaded by the Excel Analyzer.
Add as New Excel Template
Use this option to upload your layout and save it to the report definition.
View Report Online
Browse for Reports Online
This feature enables you to select reports from the BI Publisher catalog and open them directly in Excel. You can either download the report data to Excel, or download an existing layout to update it or to use as a starting point for a new layout. See About the Open Template Dialog, page 3-17.
Preferences - select your locale and proxy settings if required.
About the Open Template Dialog
When you use the Open Template dialog to initiate the layout building process, you can then use the Update Excel Template options from the Oracle BI Publisher Menu to upload the layout directly to the appropriate report in the BI Publisher catalog.
Workspace
Select Oracle BI Publisher to browse the catalog.
Reports Pane
The Reports pane lists the reports in the selected folder. Select a report to display the available layouts in the Layout Templates pane.
Open Layout Template Downloads and opens the selected template in the Analyzer for Excel.
To start a new template, select <New> from the list of templates then select Open Layout Template; or double-click <New>.
Use the Report Browser's Up icon to move up the directory structure.
Use the View As menu to view the folder contents as Large Icons, Small Icons, List or Details.
Logging in Through Excel
Once you have installed the Analyzer for Excel, you can log in to the BI Publisher from Excel, you do not have to log in to BI Publisher first.
Once you have Excel open, select Log in from the Oracle BI Publisher menu. The BI
Publisher log in screen will prompt you to enter your credentials and to select (or enter) the Report Server URL. For example: http://example.com:7001/xmlpserver.
4
Creating Report Jobs
This chapter covers the following topics: • Navigating to the Schedule Report Job Page • Setting General Options
• Setting Output Options
• Defining the Schedule for Your Job • Configuring Notifications
• Submitting and Monitoring the Job • Creating a Bursting Job
• Advanced Topics
Navigating to the Schedule Report Job Page
Use the Schedule Report Job page to schedule a report job.
Navigate to the Schedule Report Job page in any of the following ways:
• From the Home page: From the Create region select Report Job
• From the catalog: Navigate to the report you wish to schedule, then select the
Schedule link.
• From the Report Viewer: Click Actions then click Schedule.
• From the global header: Click New then click Report Job.
Setting General Options
The General tab is shown in the following figure:
Enter the following general information for your report job:
Field Description
Report If you accessed the schedule page from the report, this field will display the report path and name.
If you accessed the schedule page from the Create region or the global header, click Choose to browse for and select the report you wish to schedule.
Parameters If the report definition includes parameters, these will be displayed. Enter the values you wish to use for this job.
Note: Date parameters can be incremented. See Incrementing Date Parameters, page 4-10.
Setting Output Options
The Output tab has two regions: Output and Destination. Each scheduled job can have multiple output files with distinct characteristics. Each output file can have multiple
Make selections for the following options:
Option Description
Use Bursting Definition to Determine
Output and Delivery Destination Select this box to use the report bursting definition for output anddelivery. Once selected, all other fields on this page are disabled for selection. Note that this box is only available for selection if the report has a bursting definition. For more information on report bursting, see Scheduling a Report to be Burst, page 4-9.
Make Output Public Select this box to make this job output available to all users with permission to access this report. Users with access can view the report from the Report Job History page.
Save Data for Republishing Select this box to save the XML data that is generated for this job. You can access and download the saved data from the Report Job History page (see Viewing and Managing Report Job History, page 6-1) or choose to republish this data, selecting a new layout and output options.
Adding Outputs
outputs for this job, click the Add toolbar button to add an entry to the table.
Field Description
Name Enter a name for this output, or accept the default.
Layout Choose the layout to apply to this output.
Format Choose the document output format. Output format is the type of document that is generated, for example, PDF, HTML, or Excel. The options available here are specified in the report definition.
Tip: If you require that the output be viewed as HTML and the report will contain images, charts, or other linked files, be sure to select output type MHTML to include the referenced files in the output.
Locale Select the language-territory combination for this report output. This field defaults to the Report Locale defined in the user Preferences (see Setting Preferences, page 2-3).
Note: If the layout does not have an available translation for the selected locale, BI Publisher will apply a locale fallback logic to select the layout. For more information, see Locale Selection Logic, Oracle Fusion Middleware Report Designer's Guide for Oracle Business Intelligence Publisher.
The appropriate number and date formatting will be applied independently of the template translation.
Timezone Select the time zone that you want to use for this report output. The time zone defaults to the time zone defined in the user Preferences (see Setting Preferences, page 2-3).
Calendar Choose the calendar to apply to this output.
Save Output Select this box if you want the report output saved. You must select this option if you want to view your report from the Report Job History page.
Adding Destinations
Enter the delivery details in the Destination region. To deliver a report document to
destinations as needed.
Note: Delivery servers are set up in the Administration interface. For
more information, see Setting Up Delivery Servers, Oracle Fusion
Middleware Administrator's Guide for Oracle Business Intelligence Publisher.
If you do not require a destination, leave this region blank. Select the Save Output
check box to view the output from the Report Job History page. See Viewing Report
History, page 6-1.
For each destination you add, select from the Output list which documents to send to this destination.
Then enter the appropriate fields for each destination type:
Enter multiple e-mail addresses separated by a comma. Enter any Message text that
you want to include with the report.
Printer
Select the Printer Group and the Printer, enter the Number of copies, and select Single
sided or Double sided (the printer must support duplex printing for this option to take
effect), then optionally select the printer Default Tray from which to print the report,
and the Print Range pages to print if you do not wish to print the entire report.
Fax
Select the Fax server to deliver the report and enter the Fax number to which to send
the report.
FTP
Select the FTP Server the server to deliver the report and enter valid Username and
Password credentials.
Remote File Name - enter the file name for BI Publisher to assign to the delivery document on the remote server. (Example: myreport.pdf)
To assign a file name dynamically using a date expression, see Defining a Destination File Name Dynamically Using a Date Expression, page 4-11.
Use Secure FTP - select the box to use secure FTP.
Web Folder
Select the Web Folder Server where you want the report delivered and enter valid
Username and Password credentials.
Remote Directory - enter the directory to which to deliver the document (example: /pub/). If no value is entered, the document will be delivered to the login directory.
Remote File Name - enter the file name for BI Publisher to assign to the delivery document on the remote server. (Example: myreport.pdf)
To assign a file name dynamically using a date expression, see Defining a Destination File Name Dynamically Using a Date Expression, page 4-11.
Defining the Schedule for Your Job
Use the Schedule tab to define the frequency for your report job. The Schedule tab is
shown in the following figure:
Defining Schedule Times
Once
Select Run Now or use the date selector to enter the specific Start date and time.
Hourly/Minute
Every - select Hour(s) or Minute(s) and enter the appropriate integer value for the increment.
Start - use the date selector to enter the date and time to start running this job.
End - (optional) use the date selector to enter an end date and time for this job.
Daily
Every - enter the increment in days. For example, to run the report every day enter 1; to run the report every other day, enter 2.
Start - use the date selector to enter the date and time to start running this job. The time selected will determine the time that the job is executed each day it runs.
End - (optional) use the date selector to enter an end date and time for this job.
Weekly
Every - enter the increment in weeks and select the desired day or days of the week. For example, to run the report every Tuesday and Thursday, enter 1, then select Tuesday and Thursday. To run the report every other Wednesday, enter 2, and select
Wednesday.
Start - use the date selector to enter the date and time to start running this job. The time selected will determine the time that the job is executed for each run.
End - (optional) use the date selector to enter an end date for this job.
Monthly
Every - select each month that the job will execute.
On - select either a day of the week, for example: 1st Monday of every month; or select a
specific day of the month, for example: 15.
Start - use the date selector to enter the date and time to start running this job. The time selected will determine the time that the job is executed for each run.
End - (optional) use the date selector to enter an end date for this job.
Annually
Every - enter the increment in years that the job will execute.
On - select either a day and a month, for example: Day 1 of January; or select a day of
Start - use the date selector to enter the date and time to start running this job. The time selected will determine the time that the job is executed for each run.
End - (optional) use the date selector to enter an end date for this job.
Specific Dates
Add Date - use the date selector to enter the specific date and time to run the job. Add multiple specific dates as needed.
Configuring Notifications
A notification is a message that a job has finished processing. BI Publisher supports three notification statuses that you can subscribe to:
• Completed
• Completed with warnings
• Failed
BI Publisher supports two methods of notification: e-mail and HTTP.
Adding Notifications
Use the Notification tab to configure notifications for a job.
Select the report completion status or statuses for which you want to be notified, and enter a comma-separated list of addresses to which to send the notification.
HTTP
To enable an HTTP notification:
Select the report completion status or statuses for which you want the notification to be sent. Select the server to which to send the HTTP notification. Enter the user name and password for the server, if required.
Note that the HTTP server must be set up as a delivery option by the Administrator for the HTTP notification to be available. For more information, see Adding an HTTP
Server, Oracle Fusion Middleware Administrator's Guide for Oracle Business Intelligence
Publisher.
Submitting and Monitoring the Job
Submit the Schedule Job
Select Submit. This will invoke the Submit Job dialog with confirmation details for you
to review. Enter a name for this job and click Submit.
To suspend or delete a job, navigate to the Manage Report Jobs page as follows: On the
global header, click Open and then click Report Jobs. See Viewing and Managing
Report Jobs, page 5-1.
To monitor a running or job see the results, navigate to Report Job History page as
follows: On the global header, click Open and then click Report Job History. See
Viewing Report Job History and Saved Output, page 6-1.
Creating a Bursting Job
Note: Bursting is the splitting of the report data into multiple blocks based on a key field in the data and then applying specific parameters for the layout and delivery for each block of data. For example, a customer invoice report can be burst to deliver each customer's invoice to their own e-mail address. A bursting definition for a report is set up in the report's data model. For more information, see Adding a
Bursting Definition, Oracle Fusion Middleware Data Modeling Guide for
Oracle Business Intelligence Publisher.
If your report has been enabled for bursting, the Use Bursting Definition to Determine
Enable a report to use a bursting definition on the Report Properties dialog of the
report editor. For more information see Configuring Report Properties, Oracle Fusion
Middleware Report Designer's Guide for Oracle Business Intelligence Publisher.
Advanced Topics
This section includes the following topics: • Incrementing Date Parameters, page 4-10
• Defining a Destination File Name Dynamically Using a Date Expression, page 4-11
Incrementing Date Parameters
If your scheduled report includes date parameters, when you enter the values for the dates for the schedule, these values are not updateable. Therefore, every time a scheduled instance of the report is run, the same date parameters will be used. If you require that the date parameters be incremented for each run, then you can enter an expression in the date parameter field of the scheduler to calculate the date each time the report job executes.
For example, assume you create a schedule for a report that runs every Monday to capture data from the previous week. Each week you need the date parameters passed to the report to increment to the first and last days of the previous week.
Enter one of the following functions using the syntax shown to calculate the appropriate date at the scheduled runtime for the report:
• {$SYSDATE()$} - current date (the system date of the server on which BI Publisher is running)
• {$FIRST_DAY_OF_MONTH()$} - first day of the current month
• {$LAST_DAY_OF_MONTH()$} - last day of the current month
• {$FIRST_DAY_OF_YEAR)$} - first day of the current year
• {$LAST_DAY_OF_YEAR)$} - last day of the current year
The date function calls in the parameter values are not evaluated until the report job is executed by the Scheduler.
You can also enter expressions using the plus sign "+" and minus sign "-" to add or subtract days as follows:
• {$SYSDATE()+1$}
• {$SYSDATE()-7$}
enter the following in the report's date parameter fields:
• Date From: {$SYSDATE()-7$}
• Date To: {$SYSDATE()-1$}
Note: The date functions can also be set up as default parameter values in the data model. In this case, every time a user views the report from the report viewer, the date parameters will be calculated according to the expression supplied for the default value. See Adding Parameters, Oracle Fusion Middleware Data Modeling Guide for Oracle Business Intelligence Publisher.
Defining a Destination File Name Dynamically Using a Date Expression
When entering the remote file name for a Web folder or FTP destination you can enter a date expression to have BI Publisher dynamically include a date expression in the file name. The date is set at runtime, using the server time zone.
The supported date expressions are:
Expression Description
%y Displays the year in four digits:
Example: 2011
%m Displays the month in two digits: 01-12 (where 01 = January)
%d Displays the date in two digits: 01-31
%H Displays the hour in two digits based on 24-hour day: 00-24
%M Displays the minute in two digits: 00 - 59
%S Displays the number of seconds in two digits: 00 - 59
%l Displays milliseconds in three digits: 000 - 999
Examples
Creating a File Name That Appends a Date
Enter the following: myfile_%d_%m_%y.pdf
Creating a File Name That Prefixes a Date and Appends a Time
To create a file name that prefixes the day, month, and year and appends the hour and minute, such as:
01_01_2010_myfile_22_57.pdf Enter the following:
%d_%m_%y_myfile_%H_%M.pdf
Note: If your file name includes an undefined expression, such as my_file_%a%b%c.pdf, the file will be created as named:
5
Viewing and Managing Report Jobs
This chapter covers the following topics: • About the Manage Report Jobs Page • Viewing Jobs for a Specific Report • Searching for Report Jobs
• Setting the Time Zone for Viewing Jobs • Viewing Job Details
• Linking to Job History • Pausing Jobs
• Resuming Jobs • Deleting Jobs
• Refreshing the Manage Report Jobs Page
About the Manage Report Jobs Page
The Manage Report Jobs page displays information about future scheduled and recurring report jobs and enables you to take actions on these jobs. You can access this page and then search for the report jobs to manage; or, you can access this page from the context of a specific report.
To search for jobs to manage, navigate to this page in one of the following ways:
• From the Home Page: Under Browse/Manage click Report Jobs
• On the global header: Click Open, and then click Report Jobs
To access this page from the context of a specific report perform one of the following:
• From the report viewer page, click Actions and then click Jobs
The following figure shows the Manage Report Jobs page:
Use the Manage Report Jobs page to:
• View future scheduled and recurring jobs for your private, shared, and public reports
• Select the time zone you wish to see the job times displayed in
• Refresh the display page to display recently submitted jobs
• Link to report history to view the output of completed job runs
• Delete a report job
• Suspend/Resume a report job
• View the job details
Viewing Jobs for a Specific Report
If you navigated to Manage Report Jobs from the context of a specific report, the jobs
for that report will automatically display in the table with the following default filters applied:
• Report Name - equals the name of the report from which you launched the Manage Report Jobs page
• Scope - equals All (public and private jobs) • Status - equals All (active and suspended jobs) Use the following procedure to further filter the results.
Searching for Report Jobs
1. Enter values for the Filter criteria to search for a specific job or group of jobs.
2. Click Search. The jobs that meet the filter criteria will be displayed in the Report Jobs table.
The table displays general information about the job as well as the status.
You can sort the table by a particular column by clicking the column heading and selecting the up arrow or down arrow for ascending or descending.
Possible status values are:
• Active - the job will run when the schedule event occurs.
• Paused - the job has been suspended. The report job will not run again until it
has been resumed. Paused jobs will display when searching for Suspended jobs
using the filter criteria.
Setting the Time Zone for Viewing Jobs
You can select the time zone for viewing the job start and end times.
1. Select the time zone from the list.
2. Click the Refresh button. The Report Jobs table will refresh displaying job start and
end times in the selected time zone.
Viewing Job Details
2. To view delivery information for each output, click the expand icon next to the output name.
3. Click Return to return to the Manage Report Jobs page.
Linking to Job History
To view the completed runs of this job, click the History link in the table to launch the
Report Job History page. For more information, see Viewing and Managing Report History, page 6-1.
Pausing Jobs
1. Select the job by clicking anywhere in the table row that lists the job information
(except the job name link). You can select multiple jobs by pressing Ctrl + Shift and then clicking the additional rows. Deselect a row by clicking it again.
2. Click the Pause button. The status of the job will change to Paused.
Resuming Jobs
1. Select the job by clicking anywhere in the table row of the paused job (except the job
name link). You can select multiple jobs by pressing Ctrl + Shift and then clicking the additional rows. Deselect a row by clicking it again.
2. Click the Resume button. The status of the job will change to Active.
Deleting Jobs
1. Select the job by clicking anywhere in the table row that lists the job information.
You can select multiple jobs by clicking additional rows.
2. Click the Delete button.
Refreshing the Manage Report Jobs Page
1. To refresh the Manage Report Jobs page, click the Refresh button at the top of the
6
Viewing and Managing Report History
This chapter covers the following topics:
• Viewing Report Job History and Saved Output • Viewing Job History for a Specific Report • Searching for Report Job History
• Viewing Details of a Job History • Downloading Data from a Report Job • Republishing a Report from History • Sending an Output to a New Destination • Monitoring Running Jobs
• Canceling a Running Job
• Getting Error and Warning Information for Reports • Deleting a Job History
• Refreshing the Report Job History Page
Viewing Report Job History and Saved Output
The Report Job History page displays information about running and completed report jobs. You can access this page and then search for the report job history; or, you can access this page from the context of a specific report.
To search for job history, navigate to this page in one of the following ways:
• From the Home Page: Under Browse/Manage click Report Job History
• On the global header: Click Open, and then click Report Job History
• From the catalog: Navigate to the report in the catalog and then click Job History
• From the report viewer, click Actions and then click Job History
The following figure shows the Report Job History page:
Use the Report Job History page to:
• View the status and details of running and completed report jobs
• Cancel a running job.
• Monitor a running job.
• View job submission details
• Download or view the XML data produced from the report (if you selected Save
Data for the report)
• Download or view the report document (if you selected Save output)
• Republish the report data using other formats or templates (if you selected Save
Data for the report)