Oracle® Fusion Middleware
Installation and Upgrade Guide for Oracle Application Integration
Architecture Foundation Pack
11
g
Release 1 (11.1.1.5.0)
E17949-04E17949-04
Copyright © 2011, Oracle and/or its affiliates. All rights reserved.
Primary Author: Ramakanth Kotha
This software and related documentation are provided under a license agreement containing restrictions on use and disclosure and are protected by intellectual property laws. Except as expressly permitted in your license agreement or allowed by law, you may not use, copy, reproduce, translate, broadcast, modify, license, transmit, distribute, exhibit, perform, publish, or display any part, in any form, or by any means. Reverse engineering, disassembly, or decompilation of this software, unless required by law for interoperability, is prohibited.
The information contained herein is subject to change without notice and is not warranted to be error-free. If you find any errors, please report them to us in writing.
If this software or related documentation is delivered to the U.S. Government or anyone licensing it on behalf of the U.S. Government, the following notice is applicable:
U.S. GOVERNMENT RIGHTS Programs, software, databases, and related documentation and technical data delivered to U.S. Government customers are "commercial computer software" or "commercial technical data" pursuant to the applicable Federal Acquisition Regulation and agency-specific supplemental regulations. As such, the use, duplication, disclosure, modification, and adaptation shall be subject to the restrictions and license terms set forth in the applicable Government contract, and, to the extent applicable by the terms of the Government contract, the additional rights set forth in FAR 52.227-19, Commercial Computer Software License (December 2007). Oracle USA, Inc., 500 Oracle Parkway, Redwood City, CA 94065.
This software is developed for general use in a variety of information management applications. It is not developed or intended for use in any inherently dangerous applications, including applications which may create a risk of personal injury. If you use this software in dangerous applications, then you shall be responsible to take all appropriate fail-safe, backup, redundancy, and other measures to ensure the safe use of this software. Oracle Corporation and its affiliates disclaim any liability for any damages caused by use of this software in dangerous applications.
Oracle is a registered trademark of Oracle Corporation and/or its affiliates. Other names may be trademarks of their respective owners.
Contents
List of Examples List of Figures List of Tables
Preface
... xiAudience... xi
Using This Guide... xi
Oracle AIA Guides ... xii
Additional Resources... xii
Documentation Accessibility ... xii
Conventions ... xiii
1
Understanding the Oracle AIA Foundation Pack Installation Process
1.1 Introduction to AIA Foundation Pack Installer and Installation... 1-1 1.2 Software Requirements ... 1-2 1.3 Hardware Requirements... 1-2 1.4 Installation and Deployment Topologies ... 1-2
2
Preparing for Foundation Pack Installation
2.1 Collecting Field Value Information for Installation and Deployment of Foundation Pack .... 2-1
2.1.1 Installation Location Screen ... 2-1 2.1.2 SOA Server Details Screen... 2-2 2.1.3 AIA Database Details Screen... 2-4 2.1.4 Metadata Service Repository Screen... 2-6 2.1.5 Oracle Enterprise Repository Details Screen (Optional)... 2-7 2.2 Performing Pre-Installation Configurations ... 2-8 2.2.1 Ensuring Correct Settings for Node Manager Startup ... 2-8 2.2.2 Performing Prerequisites for Cluster Installation ... 2-8 2.2.3 Creating AIA schemas (Optional) ... 2-9 2.2.4 Administering MDS Tablespace... 2-10 2.3 Installation Process ... 2-10
3.1.5 Validate SOA Server... 3-3 3.1.6 Specify AIA Database Details ... 3-3 3.1.7 Specify Metadata Service Repository Details ... 3-5 3.1.8 Specify Oracle Enterprise Repository Details (Optional) ... 3-5 3.1.9 Complete Installation ... 3-6 3.2 Performing Silent Installation and Deployment of Foundation Pack ... 3-7 3.2.1 Creating Oracle Inventory... 3-7 3.2.2 Creating a Response File... 3-7 3.2.2.1 Securing Response File ... 3-8 3.2.3 Installing Foundation Pack (Running Installation Scripts) ... 3-8 3.3 Copying only AIA Files ... 3-9 3.3.1 Launch the Oracle AIA Foundation Pack Installer... 3-9 3.3.2 Check Prerequisites ... 3-9 3.3.3 Copy AIA Software ... 3-9 3.3.4 Complete Copying Files ... 3-9
4
Installing and Deploying using Manual Steps
4.1 Manual Deployment of AIA Artifacts Overview... 4-1 4.2 Deploying Foundation Pack Using Scripts ... 4-2 4.2.1 Fulfill Prerequisites for Script Based Deployment... 4-2 4.2.2 Create AIA Instance ... 4-2 4.2.3 Run Installation Scripts... 4-3
5
Post-Installation Configurations
5.1 Setting up Oracle JDeveloper 11g for AIA ... 5-1 5.2 Setting up AIA Roles ... 5-2 5.3 Modifying Passwords Used for AIA Deployments ... 5-3
6
Verifying the Installation
6.1 Reviewing Installation and Patch information... 6-1 6.2 Verifying File Creation and Logs... 6-1 6.3 Verifying Foundation Pack Installation... 6-1
7
Uninstalling Oracle AIA
7.1 Overview of Oracle AIA Uninstallation ... 7-1 7.2 Uninstalling Foundation Pack using AIA Deinstaller... 7-1 7.3 Undeploying a Specific Instance of AIA Foundation Pack Using Manual Steps ... 7-2 7.4 Cleaning The Environment ... 7-3 7.4.1 Cleaning the MDS... 7-3 7.5 Verifying Uninstall Processes... 7-4
8
Installing Reference Process Models
8.2 Understanding the Installation Process... 8-3 8.3 Manually Uploading Reference Process Models to Business Process Publisher... 8-4 8.4 Configuring the AIA Redirect Servlet... 8-5 8.5 Configuring the Tomcat Redirect Servlet... 8-6
9
Upgrading Foundation Pack
9.1 Overview of the Upgrade Script (Upgrading from 11.1.1.2.0/11.1.1.3.0 to 11.1.1.5.0) .... 9-1 9.2 Upgrade and Verify Oracle SOA Suite Environment... 9-2 9.3 Upgrading from Foundation Pack 11.1.1.2.0/11.1.1.3.0 to 11.1.1.5.0 ... 9-2 9.3.1 Copying Foundation Pack 11g Release 1 (11.1.1.5.0) Files to AIA_HOME ... 9-3 9.3.1.1 Launch the Oracle AIA Foundation Pack Installer... 9-3 9.3.1.2 Check Prerequisites ... 9-3 9.3.1.3 Specify Installation Location... 9-3 9.3.1.4 Complete Copying Files ... 9-4 9.3.2 Updating the AIA Environment... 9-4 9.3.3 Running the EOL Upgrade Utility ... 9-4 9.3.4 Running the Upgrade Script ... 9-6 9.4 Upgrading from Foundation Pack 11.1.1.4.0 to 11.1.1.5.0... 9-8 9.4.1 Copying Foundation Pack 11g Release 1 (11.1.1.5.0) Files to AIA_HOME ... 9-8 9.4.1.1 Launch the Oracle AIA Foundation Pack Installer... 9-8 9.4.1.2 Check Prerequisites ... 9-9 9.4.1.3 Specify Installation Location... 9-9 9.4.1.4 Complete Copying Files ... 9-9 9.4.2 Running the EOL Upgrade Utility ... 9-10 9.4.3 Running the Upgrade Script ... 9-11 9.5 Copying Project Lifecycle Workbench Data to a New Foundation Pack 11g Release 1
(11.1.1.5.0) Instance 9-12
A
Licenses
List of Examples
List of Tables
Preface
This guide provides an overview of the Oracle Application Integration Architecture (AIA) Foundation Pack installation and upgrade processes.
Audience
This document is intended for users installing Oracle Application Integration Architecture (AIA) Foundation Pack 11g Release 1 (11.1.1.5.0). It is also intended for users upgrading from Foundation Pack 11g Release 1 (11.1.1.2.0/ 11.1.1.3.0/11.1.1.4.0) to Foundation Pack 11g Release 1 (11.1.1.5.0).
Using This Guide
Follow the steps mentioned while installing Oracle AIA for a faster and smoother installation.
1. Search for Required verifications before starting AIA 11g Foundation Pack Installation [ID 1298426.1] on http://support.oracle.com and perform the required pre-installation checks.
2. Access the latest Oracle Fusion Middleware Installation and Upgrade Guide for Oracle Application Integration Architecture Foundation Pack 11g Release 1 (11.1.1.5.0) on Oracle Technology Network at
http://www.oracle.com/technetwork/index.html.
3. Review the release notes for Oracle Application Integration Architecture Foundation Pack 11g Release 1 (11.1.1.5.0) available on Oracle Technology Network at
http://www.oracle.com/technetwork/middleware/docs/aiasoarelno tes-196861.html.
4. Check hardware requirements.
5. Fulfill software requirements.
6. Complete the Installer Interview section for Foundation Pack.
7. Fulfill pre-installation configurations.
1 (11.1.1.4.0).
Oracle AIA Guides
■ Oracle Fusion Middleware Installation and Upgrade Guide for Oracle Application Integration Architecture Foundation Pack 11g Release 1 (11.1.1.5.0)
■ Oracle Fusion Middleware Concepts and Technologies Guide for Oracle Application Integration Architecture Foundation Pack 11g Release 1 (11.1.1.5.0)
■ Oracle Fusion Middleware Developer's Guide for Oracle Application Integration Architecture Foundation Pack 11g Release 1 (11.1.1.5.0)
■ Oracle Fusion Middleware Infrastructure Components and Utilities User's Guide for Oracle Application Integration Architecture Foundation Pack 11g Release 1 (11.1.1.5.0)
■ Oracle Fusion Middleware Reference Process Models User's Guide for Oracle Application Integration Architecture Foundation Pack 11g Release 1 (11.1.1.5.0)
■ Oracle Fusion Middleware Migration Guide for Oracle Application Integration Architecture 11g Release 1 (11.1.1.5.0)
■ Oracle Fusion Middleware Product-to-Guide Index for Oracle Application Integration Architecture Foundation Pack 11g Release 1 (11.1.1.5.0)
Additional Resources
The following resources are also available:
Documentation Accessibility
Our goal is to make Oracle products, services, and supporting documentation accessible to all users, including users that are disabled. To that end, our
documentation includes features that make information available to users of assistive technology. This documentation is available in HTML format, and contains markup to facilitate access by the disabled community. Accessibility standards will continue to evolve over time, and Oracle is actively engaged with other market-leading
technology vendors to address technical obstacles so that our documentation can be accessible to all of our customers. For more information, visit the Oracle Accessibility Program Web site at http://www.oracle.com/accessibility/.
Accessibility of Code Examples in Documentation
Screen readers may not always correctly read the code examples in this document. The conventions for writing code require that closing braces should appear on an
otherwise empty line; however, some screen readers may not always read a line of text that consists solely of a bracket or brace.
Resource Location
Release Notes Oracle Technology Network:
http://www.oracle.com/technetwork/
Documentation updates Oracle Technology Network:
Accessibility of Links to External Web Sites in Documentation
This documentation may contain links to Web sites of other companies or
organizations that Oracle does not own or control. Oracle neither evaluates nor makes any representations regarding the accessibility of these Web sites.
Access to Oracle Support
Oracle customers have access to electronic support through My Oracle Support. For information, visit http://www.oracle.com/support/contact.html or visit http://www.oracle.com/accessibility/support.html if you are hearing impaired.
Conventions
The following text conventions are used in this document:
Convention Meaning
boldface Boldface type indicates graphical user interface elements associated with an action, or terms defined in text or the glossary.
italic Italic type indicates book titles, emphasis, or placeholder variables for which you supply particular values.
1
1
Understanding the Oracle AIA Foundation
Pack Installation Process
This chapter provides an overview of Oracle AIA Foundation Pack installation process. This chapter includes the following sections:
■ Section 1.1, "Introduction to AIA Foundation Pack Installer and Installation" ■ Section 1.2, "Software Requirements"
■ Section 1.3, "Hardware Requirements"
■ Section 1.4, "Installation and Deployment Topologies"
1.1 Introduction to AIA Foundation Pack Installer and Installation
AIA Foundation Pack Installer is built on Oracle Universal Installer and enables you to install products included in AIA.
Foundation Pack provides:
■ Standard business data object/service definitions: Enterprise Business Objects (EBOs), and Enterprise Business Messages (EBMs).
■ Core Infrastructure components that include the Composite Application Validation System (CAVS), Project Lifecycle Workbench, Error Handling and Logging Framework.
■ Oracle's best-practice service-oriented architecture (SOA) programming model Note: Ensure that you access the latest Oracle Fusion Middleware
Installation and Upgrade Guide for Oracle Application Integration Architecture Foundation Pack 11g Release 1 (11.1.1.5.0) on Oracle Technology Network at
http://www.oracle.com/technetwork/index.html. Ensure that you review the release notes for Oracle Application Integration Architecture Foundation Pack 11g Release 1 (11.1.1.5.0) available on Oracle Technology Network at
AIA Installer is platform independent. For information about system requirements and supported platforms for Oracle Application Integration Architecture Foundation Pack 11gR1, search for System Requirements and Supported Platforms for Oracle Application Integration Architecture Foundation Pack 11gR1 on
http://www.oracle.com/technetwork/middleware/ias/downloads/fusio n-certification-100350.html and download the xls file.
1.2 Software Requirements
This section details the software requirements for Foundation Pack.
1. Oracle Database and Oracle Fusion Middleware.
For complete Oracle Database and Oracle Fusion Middleware certification information for Foundation Pack on each platform, see
http://www.oracle.com/technology/software/products/ias/files/ fusion_certification.html
2. Oracle Enterprise Repository 11g R1 (optional).
Note: OER is an optional component for AIA Foundation Pack and/or Process Integration Packs. You can install and use AIA products without OER. If you want to use OER to obtain visibility to objects, services, composites, and so forth
throughout the SOA lifecycle, you need to purchase a Full Use License (FUL) of OER.
3. Oracle Service Registry (OSR) 11.1.1.2.0 (optional)
Note: OSR is an optional component for AIA Foundation Pack and/or Process Integration Packs. You can install and use AIA products without OSR. If you want to use OSR to manage only AIA objects and services at run time, a Restricted Use License (RUL) of OSR is included. The RUL allows you to view or edit objects and services included with AIA products.
If you want to use OSR to manage other content than standard out-of-the-box AIA artifacts, you need to purchase a Full Use License (FUL) of OSR. For license details on OSR see Licenses
4. JRE (only for installation purpose). Download the version that is suitable for the operating system on which you are installing AIA Foundation Pack.
Interim Patch Process
Any interim patches that you receive for AIA can be applied using Oracle's interim patch installer, OPatch. OPatch tool is available under AIA_HOME/OPatch. Follow the readme with your AIA patch for the exact steps
1.3 Hardware Requirements
■ To install and deploy the AIA Foundation Pack 11g Release 1 (11.1.1.5.0) you need at least 2 GB of space.
■ On the server where AIA Foundation Pack 11g Release 1 (11.1.1.5.0) is being deployed you require of 4 GB of the available memory.
1.4 Installation and Deployment Topologies
Installation and Deployment Topologies
the whitepaper AIA 11gR1 Installation and Deployment – Flexibilities, Topologies, Architecture and Tools on
2
2
Preparing for Foundation Pack Installation
This chapter provides an overview of the Foundation Pack screens in AIA Foundation Pack Installer and discusses how to complete pre-installation configurations. This chapter includes the following sections:
■ Section 2.1, "Collecting Field Value Information for Installation and Deployment of
Foundation Pack"
■ Section 2.2, "Performing Pre-Installation Configurations" ■ Section 2.3, "Installation Process"
2.1 Collecting Field Value Information for Installation and Deployment of
Foundation Pack
The AIA Foundation Pack Installer screens prompt you to enter the data required for successful installation and deployment of Foundation Pack. Complete this section, print it and keep it ready when you run AIA Foundation Pack Installer. This enables faster and error free installation.
2.1.1 Installation Location Screen
On this screen you set the home directory for installation. Table 2–1 lists the fields located on the Installation Location screen.
Note: Ensure that you access the latest Oracle Fusion Middleware Installation and Upgrade Guide for Oracle Application Integration Architecture Foundation Pack 11g Release 1 (11.1.1.5.0) on Oracle Technology Network at
http://www.oracle.com/technetwork/index.html. Ensure that you review the release notes for Oracle Application Integration Architecture Foundation Pack 11g Release 1 (11.1.1.5.0) available on Oracle Technology Network at
2.1.2 SOA Server Details Screen
All artifacts associated with the Foundation Pack infrastructure components are deployed to the SOA Suite server. This screen contains the fields listed in Table 2–2.
Table 2–1 Fields in Installation Location Screen
Field Description
AIA Home This is the logical name given to the current AIA Installation under the Oracle Inventory. Do not include spaces in the name and do not include any special characters apart from underscore(_). Example:
AIAFP.
AIA Home directory name is________________
AIA Home Path This is the full file path where the AIA Foundation Pack Installer installs the Foundation Pack product files. Select an empty directory location.
AIA Home Path is ___________________________________
AIA Instance Name If you are doing multiple deployments of AIA Foundation Pack for the same installation, AIA Instance Name helps you identify these different AIA Foundation Pack deployments. If you are installing and deploying Foundation Pack on this server for the first time, provide a logical name that can identify your deployment.
The name given can be up to 10 characters in length with no spaces. Underscore (_) is the only allowed special character. Example
ORDER2CASH.
AIA Instance Name is ______________________________
Java Home This is the path of Java home. This can be the JDK location/JRockit location delivered with Oracle Fusion Middleware in the Middleware Home of your FMW Installation.
Java home is ____________________________________ Complete
Installation
If you choose Complete Installation, the Installer installs the selected products at the specified directory.
Copy AIA Software Only
If you choose Copy AIA Software Only, the Installer copies the complete AIA software to the specified directory. You must manually complete the installation following tasks described in Chapter 4, "Installing and Deploying using Manual Steps".
Note: Do not use existing home directories if you want to reinstall Foundation Pack. Uninstall Foundation Pack using instructions provided in Chapter 7, "Uninstalling Oracle AIA" and then install using instructions provided in the respective installation chapters.
Table 2–2 Fields in SOA Server Details Screen
Field Description
Admin Host Name This is where the admin server resides. This can be a remote server or the same machine where the installer is launched. Example:
server1.company.com.
The Admin Host Name is _________________________________ Admin Port This is the port number on which Weblogic Admin server is started. To
Collecting Field Value Information for Installation and Deployment of Foundation Pack
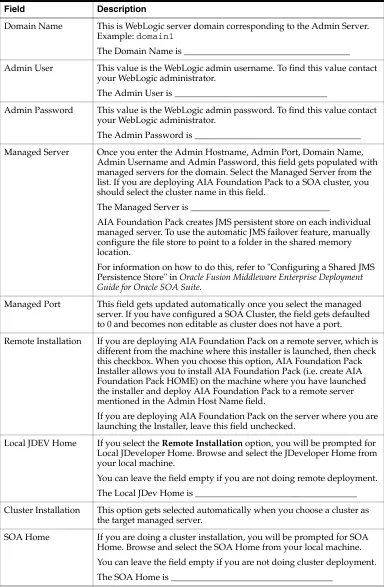
Domain Name This is WebLogic server domain corresponding to the Admin Server. Example: domain1
The Domain Name is _____________________________________ Admin User This value is the WebLogic admin username. To find this value contact
your WebLogic administrator.
The Admin User is __________________________________
Admin Password This value is the WebLogic admin password. To find this value contact your WebLogic administrator.
The Admin Password is _____________________________________ Managed Server Once you enter the Admin Hostname, Admin Port, Domain Name,
Admin Username and Admin Password, this field gets populated with managed servers for the domain. Select the Managed Server from the list. If you are deploying AIA Foundation Pack to a SOA cluster, you should select the cluster name in this field.
The Managed Server is _______________________________
AIA Foundation Pack creates JMS persistent store on each individual managed server. To use the automatic JMS failover feature, manually configure the file store to point to a folder in the shared memory location.
For information on how to do this, refer to "Configuring a Shared JMS Persistence Store" in Oracle Fusion Middleware Enterprise Deployment Guide for Oracle SOA Suite.
Managed Port This field gets updated automatically once you select the managed server. If you have configured a SOA Cluster, the field gets defaulted to 0 and becomes non editable as cluster does not have a port.
Remote Installation If you are deploying AIA Foundation Pack on a remote server, which is different from the machine where this installer is launched, then check this checkbox. When you choose this option, AIA Foundation Pack Installer allows you to install AIA Foundation Pack (i.e. create AIA Foundation Pack HOME) on the machine where you have launched the installer and deploy AIA Foundation Pack to a remote server mentioned in the Admin Host Name field.
If you are deploying AIA Foundation Pack on the server where you are launching the Installer, leave this field unchecked.
Local JDEV Home If you select the Remote Installation option, you will be prompted for Local JDeveloper Home. Browse and select the JDeveloper Home from your local machine.
You can leave the field empty if you are not doing remote deployment. The Local JDev Home is ____________________________________ Cluster Installation This option gets selected automatically when you choose a cluster as
the target managed server.
SOA Home If you are doing a cluster installation, you will be prompted for SOA Home. Browse and select the SOA Home from your local machine. You can leave the field empty if you are not doing cluster deployment. The SOA Home is ____________________________________
Table 2–2 (Cont.) Fields in SOA Server Details Screen
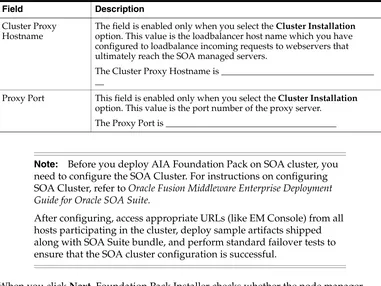
When you click Next, Foundation Pack Installer checks whether the node manager service is available. You may also need to check whether the node manager service is active from Oracle WebLogic Admin server Console. If your node manager is not active in the admin console, refer to Oracle Fusion Middleware Node Manager Administrator's Guide for Oracle WebLogic Server for troubleshooting.
2.1.3 AIA Database Details Screen
Configure the following database schemas for installation of AIA. These schemas are displayed in the screen. The AIA Instance name that you have provided (see Table 2–1) will be prefixed to the schema names. The following are the AIA related schemas:
■ <INST>_AIA: Holds error handling setup information, system setup information, CAVS data, and so on.
■ <INST>_XREF: Holds the cross-reference information.
■ <INST>_AIALIFECYCLE: Holds information created for AIA project lifecycle workbench application.
■ <INST>_JMS: For JMS usage in AIA.
To configure these schemas you need JDBC connection details, passwords for the schemas, and SYS user credentials (if you want AIA Foundation Pack Installer to create the schema and underlying tables). Keep the information ready before you run the Installer.
When you configure the schemas you can:
■ Choose the same JDBC information for one or more schemas. The schemas can reside in many or one physical database server.
■ Choose to connect to an existing AIA schema (created manually using scripts). This means a particular schema holds information common to multiple installations. For example: AIALIFECYCLE.
Cluster Proxy Hostname
The field is enabled only when you select the Cluster Installation option. This value is the loadbalancer host name which you have configured to loadbalance incoming requests to webservers that ultimately reach the SOA managed servers.
The Cluster Proxy Hostname is __________________________________ __
Proxy Port This field is enabled only when you select the Cluster Installation option. This value is the port number of the proxy server.
The Proxy Port is ______________________________________
Note: Before you deploy AIA Foundation Pack on SOA cluster, you need to configure the SOA Cluster. For instructions on configuring SOA Cluster, refer to Oracle Fusion Middleware Enterprise Deployment Guide for Oracle SOA Suite.
After configuring, access appropriate URLs (like EM Console) from all hosts participating in the cluster, deploy sample artifacts shipped along with SOA Suite bundle, and perform standard failover tests to ensure that the SOA cluster configuration is successful.
Table 2–2 (Cont.) Fields in SOA Server Details Screen
Collecting Field Value Information for Installation and Deployment of Foundation Pack
Fill out the information below for all the AIA schemas.
Database Connection Details
You can either Enter Custom JDBC URL or enter the required details in Host Name, Port and Service Name fields. When you opt for custom JDBC URL, the other three fields disappear. This will be useful when connecting to Oracle RAC databases.
Enter the Custom JDBC URL, as shown in Table 2–3.
Or
Enter Database Connection Details, as shown in Table 2–4.
Schema Details
If you choose to connect to an existing schema, you will be prompted to enter username and password.
If you choose to create a new schema, you will be prompted to enter the admin username/password required to create the required schema. This is typically SYS.
Note: If you are not sure whether you need to provide the same information for all schema types or different information, select all schema types. You can modify the schema information at any point post-installation.
Table 2–3 Fields in Database Details Screen - Custom JDBC URL
Fields Description
Enter Custom JDBC URL
When you select the Enter Custom JDBC URL check box, a field appears prompting you to enter the JDBC URL. To find this value, contact the database administrator. Example:
jdbc:oracle:thin:@<host>:<port>/<service name>
The Custom JDBC URL is _______________________________
Use RAC Database When you check this checkbox, a new screen is displayed that asks you to input individual RAC node details. Ensure that each of the RAC nodes is up before you begin installation.
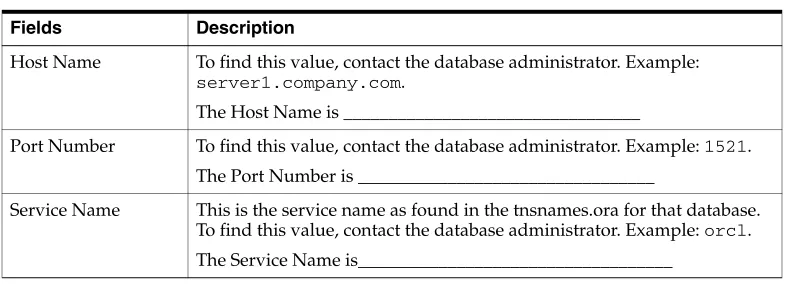
Table 2–4 Fields in Database Details Screen - Database Connection Details
Fields Description
Host Name To find this value, contact the database administrator. Example:
server1.company.com.
The Host Name is _________________________________
Port Number To find this value, contact the database administrator. Example: 1521. The Port Number is _________________________________
Connect to Existing Schema
Connect to existing schema, as shown in Table 2–5.
Or
Create New Schema
Create new schema, as shown in Table 2–6.
2.1.4 Metadata Service Repository Screen
This is the location where AIA Foundation Pack Metadata Artifacts are stored. Though the screen contains multiple fields, you need to provide only the password. Data in the other fields normally populates automatically. If it does not, then you need to enter the data manually. The screen contains the fields listed in Table 2–7.
Table 2–5 Fields in Database Details Screen - Connect to Existing Schema
Fields Description
Username This value is the database username. To find this value, contact the database administrator. Example: apps.
This value is read only and is the same in the table above. If this is not your existing schema name, then change the value in the Schema Type table above.
The Username is _____________________________________ Password To find this value, contact the database administrator.
The Password is _____________________________________
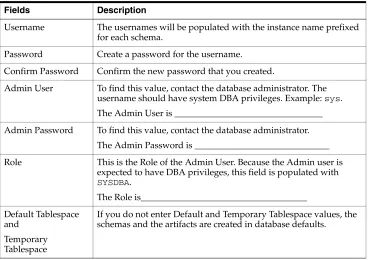
Table 2–6 Fields in Database Details Screen - Create New Schema
Fields Description
Username The usernames will be populated with the instance name prefixed for each schema.
Password Create a password for the username. Confirm Password Confirm the new password that you created.
Admin User To find this value, contact the database administrator. The username should have system DBA privileges. Example: sys. The Admin User is _________________________________ Admin Password To find this value, contact the database administrator.
The Admin Password is ______________________________ Role This is the Role of the Admin User. Because the Admin user is
expected to have DBA privileges, this field is populated with
SYSDBA.
If you do not enter Default and Temporary Tablespace values, the schemas and the artifacts are created in database defaults.
Collecting Field Value Information for Installation and Deployment of Foundation Pack
2.1.5 Oracle Enterprise Repository Details Screen (Optional)
Oracle Enterprise Repository is a product separate from AIA Foundation Pack and is an optional component in the context of AIA Foundation Pack installation and execution.
If you do not want to adopt Oracle Enterprise Repository at this time, click Next to skip this page.
During AIA Foundation Pack installation, provide the Oracle Enterprise
Repository-related information when prompted by the AIA Foundation Pack Installer. The screen contains the fields listed in Table 2–8.
When you click Next, Foundation Pack Installer prompts you to enable Remote JDBC.
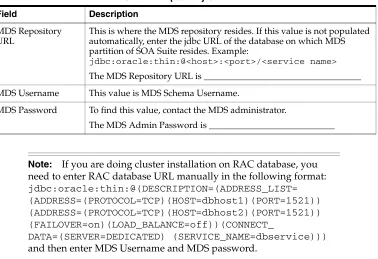
Table 2–7 Fields in Metadata Service Repository Screen
Field Description
MDS Repository URL
This is where the MDS repository resides. If this value is not populated automatically, enter the jdbc URL of the database on which MDS partition of SOA Suite resides. Example:
jdbc:oracle:thin:@<host>:<port>/<service name>
The MDS Repository URL is ___________________________________ MDS Username This value is MDS Schema Username.
MDS Password To find this value, contact the MDS administrator.
The MDS Admin Password is ____________________________
Note: If you are doing cluster installation on RAC database, you need to enter RAC database URL manually in the following format:
jdbc:oracle:thin:@(DESCRIPTION=(ADDRESS_LIST= (ADDRESS=(PROTOCOL=TCP)(HOST=dbhost1)(PORT=1521)) (ADDRESS=(PROTOCOL=TCP)(HOST=dbhost2)(PORT=1521)) (FAILOVER=on)(LOAD_BALANCE=off))(CONNECT_
DATA=(SERVER=DEDICATED) (SERVICE_NAME=dbservice)))
and then enter MDS Username and MDS password.
Table 2–8 Fields in Oracle Enterprise Repository Screen
Field Description
OER URL This value is typically the machine name, port number on which OER is installed. Provide URL in this format:
http://<hostname>:<port>/oer. The OER URL is_________________________ OER Username To find this value, contact the system administrator.
The OER Admin Username is __________________________ OER Password To find this value, contact the system administrator.
Click OK and continue with installation.
Run-time service information is not automatically available in Oracle Enterprise Repository at the end of AIA Foundation Pack installation. Populating this information is a post-install activity.
For more information about adopting Oracle Enterprise Repository after AIA Foundation Pack has been installed, see "Harvesting Oracle AIA Content" in Oracle Fusion Middleware Developer's Guide for Oracle Application Integration Architecture Foundation Pack.
2.2 Performing Pre-Installation Configurations
This section discusses the recommended configurations to optimize Oracle SOA Suite performance and enable your AIA Foundation Pack implementation to run smoothly. This section includes the following topics:
■ Section 2.2.1, "Ensuring Correct Settings for Node Manager Startup" ■ Section 2.2.2, "Performing Prerequisites for Cluster Installation" ■ Section 2.2.3, "Creating AIA schemas (Optional)"
■ Section 2.2.4, "Administering MDS Tablespace"
2.2.1 Ensuring Correct Settings for Node Manager Startup
To ensure correct settings for Node Manager startup:
1. Navigate to the $MW_HOME/wlserver_10.3/common/nodemanager.
2. Open the nodemanager.properties file and verify the value for StartScriptEnabled property.
3. If it is false change to StartScriptEnabled=true
4. If you changed the above value, restart Node Manager by navigating to $MW_ HOME/wlserver_10.3/server/bin and using the appropriate commands.
5. While starting the node manager, ensure that you set the listen address different from localhost. It is preferred to give the fully qualified name of the machine.
For Example: ./startNodeManager.sh for Linux and
startNodeManager.bat for Microsoft Windows.
Before running the command, navigate to the WebLogic console, click Machines, Nodemanager. Here ensure that the value of Listen address and Listen port are the fully qualified name of the machine and port number respectively.
6. Ensure that you start the SOA Server using the Node manager.
To ensure correct settings for Node Manager startup in production environment: You may also need to check whether the node manager service is active from Oracle WebLogic Admin server Console. If your node manager is not active in the admin console, refer to http://download.oracle.com/docs/cd/E13222_
01/wls/docs92/server_start/nodemgr.html for troubleshooting.
2.2.2 Performing Prerequisites for Cluster Installation
To perform prerequisites for cluster installation:
Performing Pre-Installation Configurations
2. Click on View Changes and Restart in Change Center.
3. Click on Restart Checklist.
4. Ensure that there is no admin server or any of the soa_servers of the cluster on the restart checklist.
5. If there are any servers listed, restart the mentioned server.
If you are installing only Foundation Pack on cluster, then:
1. Open the <WebTier_HOME>/instances/<instances_name>/config/OHS/ohs1/mod_wl_ ohs.conf file.
2. Add the following code.
<Location /AIA>
SetHandler weblogic-handler
WebLogicCluster <machine1_hostname>:<port>,<machine2_hostname>:<port> WLLogFile /tmp/web_log.log
</Location>
2.2.3 Creating AIA schemas (Optional)
AIA Foundation Pack Installer gives you the flexibility to choose the schema name, password along with the default and temporary tablespace on which the schemas have to be created.
In addition to that, AIA Foundation Pack allows you to create AIA Schemas and other DB artifacts in a manner that best fits your organization standards and advanced database options. AIA schemas along with the database artifacts can be created using the SQL script templates shipped with the AIA Foundation Pack installation bundle under <shiphome>/cd/Disk1/misc/sql of your AIA Foundation Pack Installation CD. These SQL scripts should be executed for creating the schemas before launching the Installer.
Follow the below steps before you launch the installer.
1. Create AIA, XREF, AIALIFECYCLE, JMS schemas. The scripts located under <shiphome>/cd/Disk1/misc/sql folder i.e. createAIASchema.sql,
createJMSSchema.sql, createLifecycleSchema.sql, createXRefSchema.sql can be used as templates to create the schemas.
2. Execute populate data scripts as described below:
a. populateAIASchema.sql against AIA schema.
b. populateJMSSchema.sql against JMS schema.
c. populateLifecycleSchema.sql against AIALIFECYCLE schema.
d. Execute SOA_HOME/rcu/integration/soainfra/sql/xref/createschema_xref_ oracle.sql against XREF Schema.
2.2.4 Administering MDS Tablespace
AIA Foundation Pack loads a lot of data to MDS as a part of deployment. The default tablespace allocated may not be sufficient when multiple repetitive AIA Foundation Pack deployments are done on the same server. This may cause the error
"Unable to extend tablespace "
If you see the message you can increase the tablespace size.
If you have cleared a large amount of data from a data object, and expect the
tablespace to have more data, you may still see this error. The tablespace release is not synchronous, and you must run command ALTER TABLE table_name SHRINK SPACE.
2.3 Installation Process
If you want to install Foundation Pack using AIA Foundation Pack Installer, go to
Chapter 3, "Installing and Deploying Using AIA Foundation Pack Installer". If you want to install Foundation Pack by running manual scripts, go to Chapter 4, "Installing and Deploying using Manual Steps".
3
3
Installing and Deploying Using AIA
Foundation Pack Installer
There are several installation and deployment topologies possible using AIA Foundation Pack Installer. This chapter discusses how to install and deploy the Foundation Pack using several different modes.
This chapter includes the following sections:
■ Section 3.1, "Installing and Deploying Foundation Pack Using
Basic/Remote/Cluster Installation Options"
■ Section 3.2, "Performing Silent Installation and Deployment of Foundation Pack" ■ Section 3.3, "Copying only AIA Files"
3.1 Installing and Deploying Foundation Pack Using
Basic/Remote/Cluster Installation Options
The section discusses the installation process. The screens in AIA Installer prompt you to enter data for successful installation of AIA Foundation Pack. Keep the completed
Note: Ensure that you access the latest Oracle Fusion Middleware Installation and Upgrade Guide for Oracle Application Integration Architecture Foundation Pack 11g Release 1 (11.1.1.5.0) on Oracle Technology Network at
http://www.oracle.com/technetwork/index.html. Ensure that you review the release notes for Oracle Application Integration Architecture Foundation Pack 11g Release 1 (11.1.1.5.0) available on Oracle Technology Network at
http://www.oracle.com/technetwork/middleware/docs/ai asoarelnotes-196861.html.
3.1.1 Launch the Oracle AIA Foundation Pack Installer
To launch the Oracle AIA Foundation Pack Installer: 1. Navigate to aiafp/Disk1.
2. Follow the launch instructions for your platform. Table 3–1 lists the steps that you must use based on your platform.
3. If you are prompted for the JRE location, provide the JRE that you have downloaded earlier. This JRE should be the version specific to your Operating System.
4. Click Next.
3.1.2 Check Prerequisites
To confirm whether the prerequisites for installing AIA are met: 1. Review prerequisites in the Prerequisite Checks screen.
2. Click Next.
3.1.3 Specify Installation Location
To specify installation location:
1. Enter a name for install directory in the AIA Home field.
2. Enter a path for the install location in the AIA Home Path field.
3. Provide AIA Instance name.
4. Provide Java Home path.
Note: Before you launch the installer ensure that SOA Server is configured and running. Also ensure that your Node manager is running. You can deploy a few sample composites and other SOA artifacts to ensure that the SOA Installation is successful. Remember to start the SOA Server using the Node manager.
For information on how to start and stop managed servers from the Administration Console and Node Manager, see "Configuring Node Manager to Use Start and Stop Scripts" in Oracle Fusion Middleware Node Manager Administrator's Guide for Oracle WebLogic Server.
Table 3–1 Commands to Launch Oracle AIA Foundation Pack Installer
Platform To launch the Oracle AIA Foundation Pack Installer:
Linux
Solaris SPARC HP-UX
IBM AIX Based Systems
At the command line prompt, enter:
./runInstaller -invPtrLoc <Soa_Home>/oraInst.loc -jreloc <location of the jre specific to your operating system. This directory should have /bin/java>
Installing and Deploying Foundation Pack Using Basic/Remote/Cluster Installation Options
This can be the JDK location delivered with Oracle Fusion Middleware in the Middleware Home of your FMW Installation.
5. Select Complete Installation option.
AIA Foundation Pack Installer provides two installation options, Copy AIA Software Only and Complete Installation.
■ When you choose Complete Installation, the Installer installs the selected products at the specified directory.
■ When you choose Copy AIA Software Only, the Installer copies the complete AIA software to the specified directory. You need to manually complete the installation.
6. Choose Complete Installation and click Next.
3.1.4 Specify SOA Server Details
To specify SOA Server details:
1. Enter information about Oracle SOA server installation in the SOA Server Details screen.
All artifacts associated with the Foundation Pack infrastructure components will be deployed to the SOA Suite server. This screen helps you choose among Basic, Remote, and Cluster installations.
2. Click Next.
When you click Next, Foundation Pack Installer checks whether the node manager service is available. You may also need to check whether the node manager service is active from Oracle WebLogic Admin server Console. If your node manager is not active in the admin console, refer to Oracle Fusion Middleware Node Manager Administrator's Guide for Oracle WebLogic Server for troubleshooting.
3.1.5 Validate SOA Server
SOA Server Validation screen validates the SOA server. You can either wait till the SOA server is validated or you can skip the screen. AIA recommends that you do this validation.
To validate SOA server:
1. Wait till the installer validates the SOA server.
The validation process takes a few minutes.
2. Click Next.
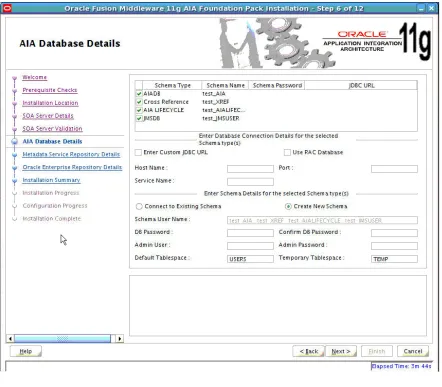
3.1.6 Specify AIA Database Details
This screen allows you to configure multiple schema types at the same time. You can provide input to the fields in several iterations or all at once.
In each iteration select only the schema type(s) that must be configured. You can select one or more or all schema type(s) at a time.
The schema names are automatically prefixed to the AIAInstance name. If you want to change the schema name to another schema name, click in the table, modify and press Enter in your keyboard.
Once you choose the schema types, provide the Database Connection Details and Schema Details for the selected schema types.
If you have not configured all schema types, clear the already configured schema types and select a new set of schema types and provide information for the same. You must provide information for all schema types.
Important: The option to change the schema name is useful when you make two installations pointing to the same database schema. For example when you have an existing AIA1_XREF schema which was created using an earlier run of the installation and want to connect to the same in this installation (for which AIA Instance is AIA2), the default value appearing will be AIA2_XREF. Modify this value in the table to AIA1_XREF and then use the Connect to schema option.
Installing and Deploying Foundation Pack Using Basic/Remote/Cluster Installation Options
Figure 3–1 AIA Database Details screen
2. Click Next.
3.1.7 Specify Metadata Service Repository Details
To specify Metadata Service Repository details:
1. Enter Metadata service repository password in the MetadataService Repository Details screen.
2. Click Next.
3.1.8 Specify Oracle Enterprise Repository Details (Optional)
To specify Oracle Enterprise Repository (OER) details:
3.1.9 Complete Installation
To complete installation:
1. Review the install information on the Installation Summary screen.
2. Click Install to accept this configuration and begin the installation.
The system displays installation progress on the Install screen.
The system displays any warnings or errors as necessary. You can review the install process log for additional details.
3. After installing the files, AIA Installer deploys Foundation Pack components to Fusion Middleware server. The progress is displayed in Configuration Progess screen. This screen starts automatically once installer installs the Foundation Pack files.
4. When installation process finishes without errors, the AIA Foundation Pack Installer displays the Installation Complete screen.
5. Click Exit to close the AIA Foundation Pack Installer.
6. Verify the installation using steps in Chapter 6, "Verifying the Installation". Note: If you want to make changes to the configuration before starting the installation, use the navigation pane on the left and select the topic you want to edit.
You can also create a response file based on the input provided and use it in future. For more information, see Section 3.2, "Performing Silent Installation and Deployment of Foundation Pack".
When you create a response file through OUI, passwords get stored as <SECURE>. Replace the password fields with actual passwords in the response file.
Note: It is normal for the servers to stop and restart during the configuration phase.
Note: At this stage you Install and Configure AIA products. If it fails, check the error in the log that appears in the Installer, rectify it and click Retry.
If you are unable to fix the issue and need to attempt a fresh
Installation, click Finish and exit the Installer (if you have it open) and use the AIA Deinstaller to uninstall as described in Chapter 7,
"Uninstalling Oracle AIA".
Performing Silent Installation and Deployment of Foundation Pack
3.2 Performing Silent Installation and Deployment of Foundation Pack
The Silent Installation option helps you install Foundation Pack without the use of the GUI based Installer.To perform a silent Foundation Pack installation, you invoke the Installer with the -silent flag and provide a response file from the command line. The response file is a text file containing variables and parameter values (validations) that provide answers to Installer prompts.
This section includes the following tasks for the silent installation of Foundation Pack.
■ Section 3.2.1, "Creating Oracle Inventory" ■ Section 3.2.2, "Creating a Response File"
■ ISection 3.2.3, "Installing Foundation Pack (Running Installation Scripts)"
3.2.1 Creating Oracle Inventory
For UNIX based Installations
AIA Foundation Pack Installer uses the Oracle inventory directory to keep track of all Oracle products that are installed on the systems. The inventory directory is stored in a file named oraInst.loc. If this file does not exist on your system, you must create it before starting a silent installation.
To create the oraInst.loc file: 1. Log in as root user.
2. Use a text editor such as vi or emacs and create the oraInst.loc file in any directory.
3. Added the following two lines:
inventory_loc=oui_inventory_directory inst_group=oui_install_group
■ Replace oui_inventory_directory with the full path to the directory where you want the AIA Foundation Pack Installer to create the inventory directory.
■ Replace oui_install_group with the name of the group whose members have write permissions to this directory.
4. Exit from the root user.
For Windows based installations
If you have not installed AIA on your system, then you need to create the following Registry key and value:
HKEY_LOCAL_MACHINE / SOFTWARE / Oracle / inst_loc = [inventory_directory]
Replace inventory_directory with the full path to your installer files. For example: C:Program Files\Oracle\Inventory.
■ Modify the response file template SampleAIAFP_CompleteResponse.rsp available in the installation media under the cd/Disk1 /misc/responseFiles.
■ Enter validation information in the AIA Foundation Pack Installer wizard and click Save when you complete installation in the Installation Summary screen.
For details, see Section 3.1.9, "Complete Installation".
3.2.2.1 Securing Response File
Your response files can contain passwords and other key information required by the Installer. To minimize security issues, AIA recommends the following guidelines:
■ Set the permissions on the response files so that they are readable only by the operating system user who will be performing the silent installation.
■ Remove the response files from the system after the silent installation is completed.
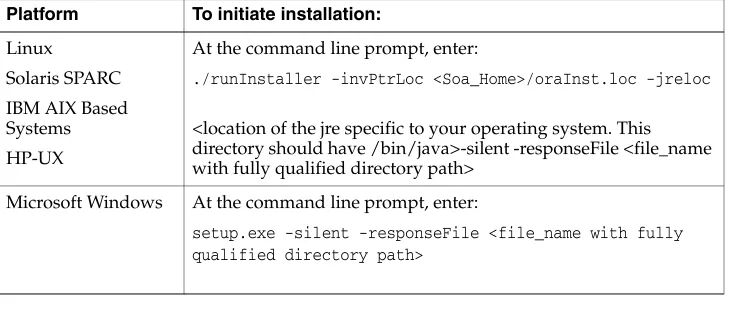
3.2.3 Installing Foundation Pack (Running Installation Scripts)
To run the installation script: 1. Navigate to cd/Disk1
2. Run the command to initiate installation. Table 3–2 lists the commands that you must use based on your platform.
■ Once the Installation is triggered, you do not need to interact with the installation process.
■ The brief logs can be seen on the command line and the system prompts when the installation is complete.
■ Post-installation, verify the installation logs as detailed in Section 6.2,
"Verifying File Creation and Logs".
3. Verify the installation using steps described in Chapter 6, "Verifying the Installation".
For information on how to deploy custom built services, refer to "Generating Deployment Plans and Deploying Artifacts" in Oracle Fusion Middleware Developer's Guide for Oracle Application Integration Architecture Foundation Pack.
Table 3–2 Commands to Run Installation Scripts
Platform To initiate installation:
Linux
Solaris SPARC IBM AIX Based Systems HP-UX
At the command line prompt, enter:
./runInstaller -invPtrLoc <Soa_Home>/oraInst.loc -jreloc
<location of the jre specific to your operating system. This directory should have /bin/java>-silent -responseFile <file_name with fully qualified directory path>
Microsoft Windows At the command line prompt, enter:
Copying only AIA Files
3.3 Copying only AIA Files
You can choose to copy only the AIA files and customize Foundation Pack Deployment Plan. Once you copy the files you can either:
■ Deploy using manual steps.
■ Browse AIA delivered EOL, Process models. This allows you to look at and modify the content on any machine without an actual server.
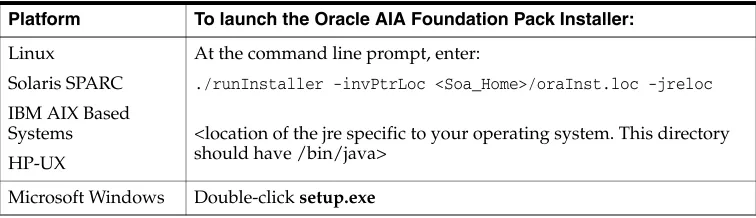
3.3.1 Launch the Oracle AIA Foundation Pack Installer
To launch the Oracle AIA Foundation Pack Installer: 1. Navigate to cd/Disk1.
2. Follow the launch instructions for your platform. Table 3–3 lists the commands you must use based on your platform.
3. If you are prompted for JRE location, provide the JRE that you downloaded earlier. This JRE should be the version specific to your Operating System.
4. Click Next.
3.3.2 Check Prerequisites
To check whether the prerequisites are met:
1. Review whether prerequisites are met in the Prerequisites Check screen.
2. Click Next.
3.3.3 Copy AIA Software
To copy AIA Software:
1. Specify the home directory for the product files in the Installation Location screen.
2. Select Copy AIA Software Only.
3. Click Next.
Table 3–3 Commands to launch Oracle AIA Foundation Pack Installer
Platform To launch the Oracle AIA Foundation Pack Installer:
Linux
Solaris SPARC IBM AIX Based Systems HP-UX
At the command line prompt, enter:
./runInstaller -invPtrLoc <Soa_Home>/oraInst.loc -jreloc
<location of the jre specific to your operating system. This directory should have /bin/java>
2. Click Install to proceed with the file creation and installation of the listed products and components.
The system displays installation progress on the Install screen.
The system displays any warnings or errors as necessary. You can review the install process log for additional details.
3. When the file installation process finishes without errors, the AIA Foundation Pack Installer displays the Installation Complete Screen.
4. Click Exit to close the AIA Foundation Pack Installer.
4
4
Installing and Deploying using Manual Steps
This chapter discusses how to deploy AIA artifacts manually without using the Installer.
This chapter includes the following sections:
■ Section 4.1, "Manual Deployment of AIA Artifacts Overview" ■ Section 4.2, "Deploying Foundation Pack Using Scripts"
4.1 Manual Deployment of AIA Artifacts Overview
Manual deployment of AIA delivered products is not a common scenario unless there is a need to do automation. You can do a manual installation after you do Copy AIA Files using AIA Foundation Pack Installer and execute the Installation driver. This is explained in this chapter.
You can also deploy fully or partially build AIA content.
For information on how to deploy custom built services, refer to "Generating Deployment Plans and Deploying Artifacts" in Oracle Fusion Middleware Developer's Guide for Oracle Application Integration Architecture Foundation Pack.
Installing fully or partially custom-built AIA content is a more common scenario. This mode of installation allows you to select the specific AIA components (SOA
Composites, JMS queues, and so on) you want to install and deploy. This content could be fully custom-built content for a specific business integration scenario or a combination of custom built content and Oracle AIA delivered content.
Note: Ensure that you access the latest Oracle Fusion Middleware Installation and Upgrade Guide for Oracle Application Integration Architecture Foundation Pack 11g Release 1 (11.1.1.5.0) on Oracle Technology Network at
http://www.oracle.com/technetwork/index.html. Ensure that you review the release notes for Oracle Application Integration Architecture Foundation Pack 11g Release 1 (11.1.1.5.0) available on Oracle Technology Network at
AIA Project Lifecycle Workbench allows you to manage your project. Using this application you can define your custom content, browse existing content, and create and maintain an AIA project. Once a project is defined you can select all elements or a subset of elements to auto generate a deployment plan. The deployment tool will deploy this plan to the specified servers.
4.2 Deploying Foundation Pack Using Scripts
You need to perform the following steps to complete manual deployment of Foundation Pack.
4.2.1 Fulfill Prerequisites for Script Based Deployment
To fulfill the prerequisites for script based deployment of Foundation Pack you need to configure the following environment variables:
1. Set MW_HOME (where you have installed FMW 11g).
2. Set SOA_HOME to the directory where you have installed SOA 11g. For example c:\MW_HOME\AS11gR1SOA.
3. Set AIA_HOME to the directory where you have copied AIA software. For example d:\AIA_HOME.
4. Set JAVA_HOME to directory where you have installed Java.
5. Set ANT_OPTS="-Xms512m -Xmx1024m -XX:MaxPermSize=512m".
6. Set ORACLE_HOME=$SOA_HOME.
7. Set WEBLOGIC_HOME=$MW_HOME/wlserver_10.3.
8. Set HARVESTER_HOME=$AIA_
HOME/Infrastructure/LifeCycle/AIAHarvester.
9. Set ANT_HOME=$AIA_HOME/ant.
10. Set PATH=.:$JAVA_HOME/bin:$ANT_HOME/bin:$PATH.
11. Set CLASSPATH=.:$WEBLOGIC_HOME/server/lib/weblogic.jar:$AIA_ HOME/lib/aia.jar:$MW_HOME/modules/net.sf.antcontrib_1.0.0.0_ 1-0b2/lib/ant-contrib.jar:$CLASSPATH.
4.2.2 Create AIA Instance
To create AIA instance:
1. Copy AIAHome/Infrastructure/Install/templates/AIAInstallProperties.xml.tmpl to AIAHome/config/AIAInstallProperties.xml.
2. Update AIAInstallProperties.xml to reflect to target server details.
3. Navigate to AIAHome/Infrastructure/Install/AID.
4. Run the following command to create an AIA Instance:
Deploying Foundation Pack Using Scripts
4.2.3 Run Installation Scripts
To run the installation script:
1. Navigate to AIA_HOME/aia_instances/<instance_name>/bin.
2. Run the command
. aiaenv.sh (for Unix based) aiaenv.bat (for windows)
3. Navigate to AIA_HOME/Infrastructure/Install/AID.
4. Run the following command to initiate installation:
ant -f AIAInstallDriver.xml
-DPropertiesFile=$AIA_HOME/aia_instances/<Instance Name>/config/AIAInstallProperties.xml
-logfile $AIA_HOME/aia_instances/<Instance Name>/logs/FPInstall.log -DDeploymentPlan=$AIA_HOME/aia_instances/<Instance
Name>/config/FPInstallDP.xml
5
5
Post-Installation Configurations
This chapter discusses post-installation configurations for Oracle AIA Foundation Pack. This chapter includes the following sections:
■ Section 5.1, "Setting up Oracle JDeveloper 11g for AIA" ■ Section 5.2, "Setting up AIA Roles"
■ Section 5.3, "Modifying Passwords Used for AIA Deployments"
5.1 Setting up Oracle JDeveloper 11g for AIA
Oracle JDeveloper enables you to modify AIA delivered content, or develop and deploy custom AIA content. AIA uses custom XPath functions and it is necessary to import these into the JDeveloper library. You can import these using either of the following procedures:
■ In JDeveloper, navigate to Tools, Preferences, SOA and add the library aia.jar. The aia.jar is available under AIA_HOME/lib directory
■ If you download the AIA plugin from update center to use AIA service constructor, navigate into Tools, Preferences, SOA and add <JDEV_
HOME>/jdeveloper/lib/aia.jar to make the functions available to all projects.
Now you can modify AIA delivered processes.
All SOA Composites delivered with AIA products include the JDeveloper projects (.jpr files) along with the source code.
To modify AIA delivered processes:
1. Copy the content from AIAHOME to the JDeveloper workspace.
2. All AIA delivered composites are available in AIA_HOME and also include the JDeveloper projects (.jpr files). Copy this content to JDeveloper workspace.
3. Modify the composites as per your requirements.
4. Deploy the composites from the JDeveloper context menu.
5. Review your changes and copy the contents back to AIA_HOME to the same folder where you copied it from.
5.2 Setting up AIA Roles
To set up AIA roles on WebLogic server:
1. Login to the WebLogic server using the appropriate port http://<hostname>:<port number>/console
2. Click Security Realms on the left panel.
3. Click myrealm (or the realm with true in the Default Realm column) in the list.
4. Click the Users and Groups tab.
5. Click the Groups tab.
6. Add the following roles (in JDeveloper they are Roles; in WebLogic Server they are Groups)
For AIA Lifecycle:
■ AIALifecycleUser
Assigning users to this role enables them to access all aspects of the Project Lifecycle Workbench, excluding bill of material generation. Typically, you would assign this role to solution architects and functional product managers.
■ AIALifecycleDeveloper
Assigning users to this role enables them to access all aspects of the Project Lifecycle Workbench, excluding bill of material generation. Typically, you would assign this role to integration developers.
■ AIALifecycleInstallDeveloper
Assigning users to this role enables them to access all aspects of the Project Lifecycle Workbench, including bill of material generation. Typically, you would assign this role to installation developers.
For CAVS
■ AIAApplicationUser
To add the roles:
1. Click the New button.
2. Enter the role in the Name field.
3. Click OK.
Now you need to assign groups to the roles.
To assign groups to a roles:
1. Click Security Realms on the left panel.
2. Click myrealm (or the realm with true in the Default Realm column) in the list.
3. Click the Users and Groups tab.
4. Click the Users tab.
Modifying Passwords Used for AIA Deployments
5. Select the weblogic user (or add your own).
6. Select the Groups tab.
7. Move the desired groups to the chosen list.
8. Click Save.
5.3 Modifying Passwords Used for AIA Deployments
The passwords specified at the time of AIA installation can be changed post-install. To help you change passwords, AIA provides a utility called UpdateStore. AIA stores its passwords in Keystore. This utility can modify the existing passwords in the Keystore.
In order to run this utility, the AIAIntallProperties.xml properties file should exist in the corresponding AIAHOME/AIA_INSTANCE/<Instance name>/config folder. Also the password being modified must exist in the file.
To modify passwords:
1. Source the aiaenv.sh in the AIA_INSTANCE/bin.
2. Browse to AIA_HOME/util/.
3. Execute ant -f updateStore.xml updateStore -DAdminUsername=<weblogic adminusername> -DAdminPassword=<weblogic admin password>
Update AIA Keystore screen appears.
4. Enter the Existing Username, Existing Password, New Username and New Password and the Xpath of the password which you want to change.
Example 5–1 shows the expected value of the Xpath.
Example 5–1 Xpath for Changing Passwords
<properties> <pips> <o2c>
<username>dummy</username> <password>[C76sjg98</password> </o2c>
</pips> </properties>
Note: This utility only updates encrypted passwords in AIA Installation. It will not change passwords of the SOA Server or the Database schemas.
Note: This utility modifies the username and the password in the AIAInstallProperties.xml. This does not sync the
Existing Password: welcome1
New Username: dummy1
New Password: welcome
6
6
Verifying the Installation
This chapter discusses the various options for verifying the Oracle AIA Foundation Pack installation. This chapter includes the following sections:
■ Section 6.1, "Reviewing Installation and Patch information" ■ Section 6.2, "Verifying File Creation and Logs"
■ Section 6.3, "Verifying Foundation Pack Installation"
6.1 Reviewing Installation and Patch information
You can view all the information related to installation using the AIA web interface. You can also verify patch information when you successfully apply them.
To verify installation and patch information:
1. Navigate to the AIA Console: http://<managed server name>:<managed server port number>/AIA/.
2. Login using the appropriate user which you have created using the pre-installation steps.
3. Navigate to CAVS, AIA Setup, and AIA Lifecycle UI. Verify if the tabs are accessible.
6.2 Verifying File Creation and Logs
AIA Foundation Pack Installer displays warning and errors messages in log files. You can also check whether the home directory that you defined was created and
populated with applicable product files.
■ To check log files and verify file creation, open the log files from AIAHome/cfgtoollogs/oui/install.<timestamp>.out once you close OUI.
■ You can also check the logs under AIAHome/aia_instances/<instance_name>/logs. These logs are descriptive.
2. Log in using the appropriate user which you have created using the pre-installation steps.
3. Navigate to Farm.
4. Expand Farm_soa_domain, SOA, soa infra in the left panel.
5. Navigate to Deployed Composites in the main panel and confirm that you can view the following composites:
■ AIAB2BErrorHandlerInterface
■ AIAB2BInterface
■ ReloadProcess
■ AIAAsyncErrorHandlingBPELProcess
■ AIAReadJMSNotificationProcess
7
7
Uninstalling Oracle AIA
This chapter discusses how to uninstall Oracle AIA Foundation Pack and verify uninstallation. This chapter includes the following sections:
■ Section 7.1, "Overview of Oracle AIA Uninstallation"
■ Section 7.2, "Uninstalling Foundation Pack using AIA Deinstaller"
■ Section 7.3, "Undeploying a Specific Instance of AIA Foundation Pack Using
Manual Steps"
■ Section 7.4, "Cleaning The Environment" ■ Section 7.5, "Verifying Uninstall Processes"
7.1 Overview of Oracle AIA Uninstallation
If you have multiple AIA instances, you need to manually uninstall the specific AIA instance that you want to undeploy.
Refer to Section 7.3, "Undeploying a Specific Instance of AIA Foundation Pack Using Manual Steps."
If you want to completely uninstall AIA (which means undeploying all AIA instances and removing AIA Home), then you need to undeploy all AIA instances except for one instance and then use the De-installer.
If you have deployed the Foundation Pack Demo, undeploy it before you uninstall Foundation Pack, because it does not get undeployed automatically when you uninstall Foundation Pack.
7.2 Uninstalling Foundation Pack using AIA Deinstaller
To uninstall Foundation Pack using AIA Deinstaller: 1. Navigate to AIAHOME/oui/bin.
2. Launch Deinstaller.