Oracle® Fusion Middleware
Quick Installation Guide for Oracle WebCenter
11g Release 1 (11.1.1)
E10146-05
March 2011
This guide describes how to install Oracle WebCenter.
The following topics are covered:
■ Section 1, "Installation Overview"
■ Section 2, "Planning Your Installation"
■ Section 3, "Installing Oracle WebCenter"
■ Section 4, "Configuring Oracle WebCenter"
■ Section 5, "Post-Installation Tasks"
■ Section 6, "Deinstalling Oracle WebCenter"
■ Section 7, "Additional Resources"
■ Section 8, "Documentation Accessibility"
1 Installation Overview
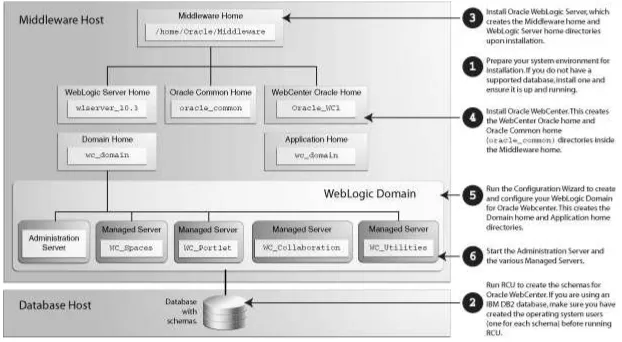
This guide contains instructions for installing and configuring Oracle WebCenter on a single host. The following applications are installed:
■ Oracle WebCenter Framework
Oracle WebCenter Spaces
■ Oracle WebCenter Portlets
■ Oracle WebCenter Discussions
■ Oracle WebCenter Ensemble
■ Oracle WebCenter Analytics
■ Oracle WebCenter Activity Graph
■ Oracle WebCenter Personalizations
Figure 1 Installation Topology and Order of Tasks
2 Planning Your Installation
This section contains important information you should read prior to installing Oracle WebCenter. The following topics are covered:
■ Section 2.1, "Verifying System Requirements, Certification, Interoperability and Compatibility"
■ Section 2.2, "Installing and Configuring a Database"
■ Section 2.3, "Creating Operating System Users for IBM DB2 Databases"
■ Section 2.4, "Creating Schemas for Oracle WebCenter"
■ Section 2.5, "Installing Oracle WebLogic Server and Creating the Middleware Home"
■ Section 2.6, "Installing and Configure Java Access Bridge (Windows Only)"
■ Section 2.7, "Installing on DHCP Hosts"
■ Section 2.8, "Installing on a Non-Networked Computer"
■ Section 2.9, "Installing on a Multihomed Computer"
2.1 Verifying System Requirements, Certification, Interoperability and
Compatibility
To verify that your system environment meets the minimum requirements for installation, refer to the following documents, available on Oracle Technology Network (OTN):
■ Oracle Fusion Middleware System Requirements and Specifications:
http://www.oracle.com/technetwork/middleware/ias/downloads/fusion-r equirements-100147.html
This document contains information related to hardware and software
requirements, minimum disk space and memory requirements, database schema requirements, and required system libraries, packages, or patches.
http://www.oracle.com/technetwork/middleware/ias/downloads/fusion-c ertification-100350.html
This page contains various certification documents for current and previous product releases. The System Requirements and Supported Platforms for Oracle Fusion Middleware 11gR1 document contains certification information related to
supported 32-bit and 64-bit operating systems, databases, web servers, LDAP servers, adapters, IPv6, JDKs, and third-party products.
■ Oracle Fusion Middleware Interoperability and Compatibility Guide
This document covers the compatibility and interoperability issues that may arise when installing or upgrading Oracle Fusion Middleware 11g products.
2.2 Installing and Configuring a Database
Installation of Oracle WebCenter requires the availability of a database. This database must be up and running, and does not have to be on the same system where you are installing the components. The database must also be compatible with Repository Creation Utility (RCU), which is used to create the schemas necessary for Oracle WebCenter components.
For the latest information about certified databases, visit the System Requirements and Supported Platforms for Oracle Fusion Middleware 11gR1 document on the Oracle Fusion Middleware Supported System Configurations page:
http://www.oracle.com/technetwork/middleware/ias/downloads/fusion-certi fication-100350.html
After you have installed a database, make sure that it is configured correctly by referring to the "Repository Creation Utility (RCU) Requirements" section in the System Requirements and Specifications document:
http://www.oracle.com/technetwork/middleware/ias/downloads/fusion-requi rements-100147.html
2.3 Creating Operating System Users for IBM DB2 Databases
If you are not using an IBM DB2 database, you can skip this section.
IBM DB2 databases authenticates its database users using equivalent operating system users. Therefore, prior to running RCU, one operating system user must be created for each schema. The operating system user name must match the schema owner name and must contain only lowercase letters; no all-uppercase or mixed-case names are allowed. For example, if you plan to create a schema named DEV_PT using RCU, then the operating system user must be named dev_pt (all lowercase letters).
Table 2 in Section 2.4, "Creating Schemas for Oracle WebCenter" shows the operating system users that should be created for Oracle WebCenter. Refer to your system documentation for information about how to create operating system users.
2.4 Creating Schemas for Oracle WebCenter
Oracle WebCenter requires that certain schemas exist in the database prior to
To see the platforms on which you can run RCU, review the "RCU Supported Platforms" section in Oracle Fusion Middleware System Requirements and Specifications document:
http://www.oracle.com/technetwork/middleware/ias/downloads/fusion-requi rements-100147.html
For more information about Repository Creation Utility, refer to Oracle Fusion Middleware Repository Creation Utility User's Guide.
2.4.1 Downloading and Starting RCU
To obtain the latest version of RCU:1. Go to the Oracle Fusion Middleware 11gR1 Software Download page on Oracle Technology Network:
http://www.oracle.com/technetwork/middleware/downloads/fmw-11-downl oad-092893.html
2. Click OTN License Agreement and read the license agreement.
3. Select the Accept License Agreement option. You must accept the license agreement before you can download RCU.
4. Look for Repository Creation Utility in the "Required Additional Software" table near the bottom of the page. After downloading the .zip file, extract the contents to a directory of your choice; this directory will be referred to as the RCU_HOME directory.
Start RCU from the bin directory inside the RCU_HOME directory. On Linux operating systems:
cd RCU_HOME/bin ./rcu
On Windows operating systems:
cd RCU_HOME\bin rcu.bat
2.4.2 RCU Screens for Schema Creation
Follow the instructions below to create the schemas:
1. Welcome Screen
Click Next.
2. Create Repository Screen
Select Create.
Click Next.
3. Database Connection Details Screen
If you are using an Oracle database, provide the following credentials:
■ Host Name: Specify the name of the machine on which your database resides in the format host.domain.com. For Oracle RAC databases, specify the Virtual IP name or one of the node names as the host name.
■ Port: Specify the database listen port number. The default port number for Oracle databases is 1521.
■ Database Name: Specify the service name for the database. Typically, the service name is the same as the global database name.
If you are unsure what the service name for your database is, you can obtain it from the SERVICE_NAMES parameter in the database's initialization
parameter file. If the initialization parameter file does not contain the SERVICE_NAMES parameter, then the service name is the same as the global database name, which is specified in the DB_NAME and DB_DOMAIN
parameters.
For Oracle RAC databases, specify the service name of one of the nodes in this field. For example: examplehost.exampledomain.com.
■ Username: Specify the name of a user with DBA or SYSDBA privileges. The default user name with SYSDBA privileges is SYS.
■ Password: Specify the password for your database user.
■ Role: Select the database user’s role from the drop-down list. The SYS user requires the SYSDBA role.
If you are using a Microsoft SQL Server database, provide the following credentials:
■ Unicode Support: Select Yes or No from the drop-down list.
■ Server Name: Enter the host name, IP address, or complete server name in host\server format of the server where your database is running.
■ Port: Specify the database listener port number.
■ Database Name: Specify the name of your database.
■ Username: Specify the name of a user with DBA or SYSDBA privileges.
■ Password: Specify the password for your database user.
If you are using an IBM DB2 database, provide the following credentials:
■ Server Name: Enter the host name, IP address, or complete server name in host\server format of the server where your database is running.
■ Port: Specify the database listener port number.
■ Database Name: Specify the name of your database.
■ Username: Specify the name of a user with DB Owner privileges.
■ Password: Specify the password for your database user.
Click Next. A "Checking Prerequisites" screen will appear. If there are errors, some details about the error will be displayed on the Database Connection Details Screen. Fix the error messages and click Next again.
After the checking is complete with no errors, click OK to dismiss the screen.
Near the top of the screen, select Create a New Prefix. If you are the only user of the database instance, you may use the default prefix DEV. If you are sharing the database instance with other Oracle Fusion Middleware users, refer to "Creating Custom Schemas and Tablespaces" in Oracle Fusion Middleware Repository Creation Utility User's Guide for more information about creating and using custom prefixes.
In the table that lists the available components, select WebCenter Suite. All of the product schemas within this component, including all the dependent schemas, are automatically selected.
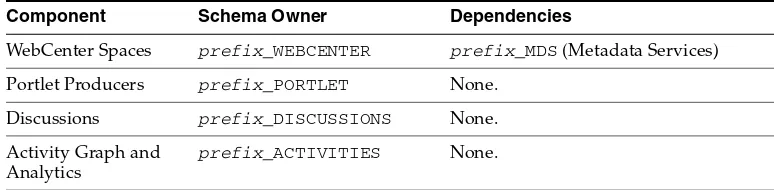
Table 1 lists the required schemas for Oracle WebCenter components for Oracle and Microsoft SQL Server databases:
Table 2 lists the required schemas for Oracle WebCenter components for IBM DB2 databases:
Click Next. A "Checking Prerequisites" screen will appear. If there are errors, some details about the error will be displayed on the Select Components Screen. Fix the error messages and click Next again.
After the checking is complete with no errors, click OK to dismiss the screen.
5. Schema Passwords Screen
Table 1 Required Schemas for Oracle WebCenter Components on Oracle and Microsoft SQL Server Databases
Component Schema Owner Dependencies
WebCenter Spaces prefix_WEBCENTER prefix_MDS (Metadata Services) Portlet Producers prefix_PORTLET None.
Discussions prefix_DISCUSSIONS None. Activity Graph and
Analytics
prefix_ACTIVITIES None.
Table 2 Required Schemas for Oracle WebCenter Components on IBM DB2 Databases
Component Schema Owner Dependencies
Required Operating System Users
WebCenter Spaces prefix_WC prefix_MDS (Metadata Services)
prefix_wc
prefix_mds
Portlet Producers prefix_PT None. prefix_pt
Discussions prefix_DS None. prefix_ds
Activity Graph and Analytics
prefix_AG None. prefix_ag
Near the top of the screen, select Use same password for all schemas.
In the Password field, enter your password. Enter your password again in the Confirm Password field.
Click Next.
6. Custom Variables Screen
Activity Graph and Analytics can be customized to enable database partitioning. Specify Y if you want to install Activity Graph and Analytics with database partitioning enabled, or N if you do not want to enable database partitioning.
7. Map Tablespaces Screen
Click Next. A "Creating Tablespaces" screen will appear. If there are errors, some details about the error will be displayed on the Map Tablespaces Screen. Fix the error messages and click Next again.
After the tablespaces are created with no errors, click OK to dismiss the screen.
8. Summary Screen
Click Create. A "CREATE" screen will appear. If there are errors, some details about the error will be displayed on the Summary Screen. Fix the error messages and click Next again.
After the schemas are created with no errors, click OK to dismiss the screen.
9. Completion Summary Screen
Click Close.
2.5 Installing Oracle WebLogic Server and Creating the Middleware Home
Oracle WebCenter requires an Oracle WebLogic Server on your system. If you do not already have one, follow the instructions in this section to install Oracle WebLogic Server.
For more information about installing WebLogic Server, refer to Oracle Fusion Middleware Installation Guide for Oracle WebLogic Server.
2.5.1 Downloading the WebLogic Server Installer
Download the latest version of the Oracle WebLogic Server installer from Oracle Technology Network:
1. Go to Oracle WebLogic Server Downloads page on Oracle Technology Network:
http://www.oracle.com/technetwork/middleware/ias/downloads/wls-main -097127.html
2. Click OTN License Agreement and read the license agreement.
3. Select the Accept License Agreement option. You must accept the license agreement before you can download the installer.
4. Follow the on-screen instructions to access the list of available installers for the current release and download the appropriate installer for your operating system.
The 32-bit executable files are bundled with the appropriate JDK version. If you use the 64-bit installer, you will need to invoke the installer with a supported JDK for your platform. This JDK must be installed on your system before you install Oracle
WebLogic Server. Refer to the System Requirements and Supported Platforms for Oracle Fusion Middleware 11gR1 document on the Oracle Fusion Middleware Supported System Configurations page for a list of supported JDKs for your platform:
http://www.oracle.com/technetwork/middleware/ias/downloads/fusion-certi fication-100350.html
2.5.2 Starting the WebLogic Server Installer
Before starting the WebLogic Server installer, take note of the following:
■ Before running the installer, set the DISPLAY environment variable on your system.
■ Replace JAVA_HOME with the installation location of the supported JDK you installed for your platform.
■ If you are installing a 64-bit Oracle WebLogic Server on a 64-bit platform, use the -d64 flag when using 32/64-bit hybrid JDKs (such as the HP JDK for HP-UX and SUN JDK for Solaris SPARC).
Execute JAVA_HOME/bin/java -version (or JAVA_HOME/bin/java -d64 -version on 32/64-bit hybrid JDKs) to ensure that your JAVA_HOME refers to a 64-bit JDK.
To run the installer on a 32-bit Linux operating system:
./wls_1034_linux32.bin
To run the installer on 32-bit Windows operating systems:
wls_1034_win32.exe
To run the installer on 64-bit UNIX operating systems:
JAVA_HOME/bin/java -jar wls_1034_generic.jar
or
JAVA_HOME/bin/java -d64 -jar wls_1034_generic.jar
To run the installer on 64-bit Windows operating systems:
JAVA_HOME\bin\java -jar wls_1034_generic.jar
2.5.3 WebLogic Server Installation Screens and Instructions
Follow the instructions below to install WebLogic Server:1. Welcome Screen
Click Next.
2. Choose Middleware Home Directory Screen
Specify the desired location of your new Middleware home directory. If this directory already exists on your system, it must be an empty directory. If this directory does not already exist, then it will be created for you.
For more information about the Middleware home directory, refer to "Middleware Home and WebLogic Server Home Directories" in Oracle Fusion Middleware Installation Planning Guide.
Click Next.
3. Register for Security Updates Screen
Select whether or not you want to receive the latest product and security updates. If you choose not to receive anything, you will be asked to verify your selection before continuing.
Click Next.
4. Choose Install Type Screen
Select Typical.
Click Next.
5. Choose Product Installation Directories Screen
Specify the desired location for your WebLogic Server home directory.
For more information about the WebLogic home directory, refer to "Middleware Home and WebLogic Server Home Directories" in Oracle Fusion Middleware Installation Planning Guide.
Click Next.
6. Choose Shortcut Location (Windows only)
If you are installing on a Windows system, you will be asked to specify a location where you would like Windows to create a shortcut to Oracle products.
Click Next.
7. Installation Summary Screen
Click Next.
8. Installation Progress Screen
No action is required on this screen.
9. Installation Complete Screen
De-select Run Quickstart.
Click Done.
2.6 Installing and Configure Java Access Bridge (Windows Only)
If you are installing on a Windows machine, you have the option of installing and configuring Java Access Bridge for Section 508 Accessibility. This is only necessary if you require Section 508 Accessibility features:
1. Download Java Access Bridge from the following URL:
http://java.sun.com/javase/technologies/accessibility/accessbridge/
2. Install Java Access Bridge.
3. Copy the access-bridge.jar and jaccess-1_4.jar from your installation location to the jre\lib\ext directory.
4. Copy the WindowsAccessBridge.dll, JavaAccessBridge.dll, and JAWTAccessBridge.dll files from your installation location to the jre\bin directory.
5. Copy the accessibility.properties file to the jre\lib directory.
For more information about Java Access Bridge, refer to "Install and Configure Java Access Bridge (Windows Only)" in Oracle Fusion Middleware Administrator's Guide.
2.7 Installing on DHCP Hosts
If you are installing Oracle WebCenter on a DHCP host, you must follow the configuration steps in this section for your platform.
2.7.1 For Linux x86 Platforms
On Linux x86 operating systems, configure the host to resolve host names to the loopback IP address by modifying the /etc/hosts file to contain the following entries:
127.0.0.1 hostname.domainname hostname 127.0.0.1 localhost.localdomain localhost
After doing so, check that the host name resolves to the loopback IP address by entering the following command:
/bin/ping hostname.domainname
2.7.2 For Windows x86 Platforms
On Windows operating systems, install a loopback adapter on the DHCP server (see Section 2.7.3, "Installing a Loopback Adapter (Windows Only)"). This assigns a local IP address to your computer.
After installing the adapter, add a line to the
%SYSTEMROOT%\system32\drivers\etc\hosts file with the following format, immediately after the localhost line:
IP_address hostname.domainname hostname
Replace IP_address with the local IP address of the loopback adapter.
2.7.3 Installing a Loopback Adapter (Windows Only)
To install a loopback adapter on Windows 2003 or Windows XP:
1. Open the Windows Control Panel.
Windows 2003: Select Start > Control Panel > Add Hardware.
Windows XP: Select Start > Control Panel, then double-click Add Hardware.
3. In the "Is the hardware connected?" window, select Yes, I have already connected the hardware, then click Next.
4. In the "The following hardware is already installed on your computer" window, in the list of installed hardware, select Add a new hardware device, then click Next.
5. In the "The wizard can help you install other hardware" window, select Install the hardware that I manually select from a list, then click Next.
6. In the "From the list of hardware types, select the type of hardware you are installing" window, select Network adapters, then click Next.
7. In the "Select Network Adapter" window, make the following selections:
■ Manufacturer: Microsoft
■ Network Adapter: Microsoft Loopback Adapter
8. Click Next.
9. In the "The wizard is ready to install your hardware" window, click Next.
10. In the "Completing the Add Hardware Wizard" window, click Finish.
11. If you are using Windows 2003, restart your computer.
12. Right-click My Network Places on the desktop and choose Properties. This displays the Network Connections Control Panel.
13. Right-click the connection that was just created. This is usually named "Local Area Connection 2". Choose Properties.
14. On the "General" tab, select Internet Protocol (TCP/IP), then click Properties.
15. In the "Properties" dialog box, click Use the following IP address and do the following:
a. IP Address: Enter a non-routable IP for the loopback adapter. Oracle recommends the following non-routable addresses:
192.168.x.x (x is any value between 1 and 255) 10.10.10.10
b. Subnet mask: Enter 255.255.255.0.
c. Record the values you entered, which you will need later in this procedure.
d. Leave all other fields empty.
e. Click OK.
16. In the "Local Area Connection 2 Properties" dialog, click OK.
17. Close Network Connections.
18. Restart the computer.
2.7.4 Removing a Loopback Adapter (Windows Only)
To remove a loopback adapter on Windows 2003 or Windows XP:
1. Start the System Control panel.
Windows 2003: Select Start > Control Panel > System.
Windows XP: Select Start > Control Panel, then double-click System.
3. In the "Device Manager" window, expand Network adapters. You should see Microsoft Loopback Adapter.
4. Right-click Microsoft Loopback Adapter and select Uninstall.
5. Click OK.
2.8 Installing on a Non-Networked Computer
You can install Oracle Web Tier on a non-networked computer, such as a laptop. Because a non-networked computer has no access to other computers, you have to install all the components that you need on the computer.
In addition, you must follow the instructions in Section 2.7, "Installing on DHCP Hosts" to install a loopback adapter and modify the hosts file on your system.
2.9 Installing on a Multihomed Computer
You can install Oracle WebCenter on a multihomed computer. A multihomed computer is associated with multiple IP addresses. This is typically achieved by having multiple network cards on the computer. Each IP address is associated with a host name; additionally, you can set up aliases for each hostname.
The installer picks up the fully qualified domain name from the first entry in /etc/hosts (on UNIX operating systems) or
%SYSTEMROOT%\system32\drivers\etc\hosts (on Windows operating systems) file. So if your file looks like the following:
127.0.0.1 localhost.localdomain localhost
10.222.333.444 examplehost1.example.com examplehost1 20.222.333.444 examplehost2.example.com examplehost2
examplehost1.example.com would be picked for configuration.
For specific network configuration of a system component, refer to the individual component’s configuration documentation.
3 Installing Oracle WebCenter
The Oracle WebCenter components (WebCenter Spaces, WebCenter Framework, and WebCenter Portlets) are installed onto your system by default. After the components are installed, you can run the Configuration Wizard to configure the components of your choice.
3.1 Obtaining the Software
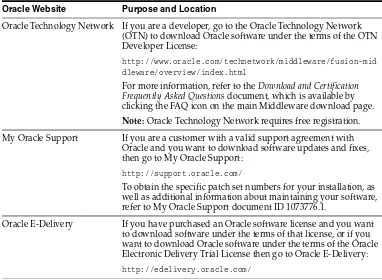
Table 3 describes the Oracle Web sites where you can download the latest Oracle Fusion Middleware software.
After you download the archive file, unpack the archive file into a directory of your choice on the machine where you will be performing the installation.
3.2 Starting the Installer
To start the installer, go to the directory where you unpacked the archive file and switch to the Disk1 directory.
On UNIX operating systems:
cd unpacked_archive_directory/Disk1 ./runInstaller -jreLoc JRE_LOCATION
On Windows operating systems:
cd unpacked_archive_directory\Disk1 setup.exe -jreLoc JRE_LOCATION
The installer requires the full path to the location of a Java Runtime Environment (JRE) on your system. When you installed Oracle WebLogic Server, Section 2.5, "Installing Oracle WebLogic Server and Creating the Middleware Home"), a JRE was installed on your system. You can use this location (the location of the jre directory) to start the installer. The default location for the JRE is inside the jdk160_21 directory in the Middleware home.
Table 3 Where to Download Oracle Fusion Middleware Software
Oracle Website Purpose and Location
Oracle Technology Network If you are a developer, go to the Oracle Technology Network (OTN) to download Oracle software under the terms of the OTN Developer License:
http://www.oracle.com/technetwork/middleware/fusion-mid dleware/overview/index.html
For more information, refer to the Download and Certification Frequently Asked Questions document, which is available by clicking the FAQ icon on the main Middleware download page.
Note: Oracle Technology Network requires free registration. My Oracle Support If you are a customer with a valid support agreement with
Oracle and you want to download software updates and fixes, then go to My Oracle Support:
http://support.oracle.com/
To obtain the specific patch set numbers for your installation, as well as additional information about maintaining your software, refer to My Oracle Support document ID 1073776.1.
Oracle E-Delivery If you have purchased an Oracle software license and you want to download software under the terms of that license, or if you want to download Oracle software under the terms of the Oracle Electronic Delivery Trial License then go to Oracle E-Delivery: http://edelivery.oracle.com/
On 64-bit platforms, the JRE location is the JAVA_HOME you used to install Oracle WebLogic Server. Refer to Section 2.5, "Installing Oracle WebLogic Server and Creating the Middleware Home" for more information.
3.3 Installation Screens
To install Oracle WebCenter:
1. Welcome Screen
Click Next.
2. Install Software Updates Screen
Select the method you want to use for installing software updates.
■ Skip Software Updates
You can choose to skip this option for now.
■ Search My Oracle Support for Updates.
If you have a My Oracle Support account, you can specify your account name and password to have the installer automatically download applicable software updates from My Oracle Support. After entering your credentials, you can test the connection by clicking Test Connection. Click Proxy Settings if you need to configure a proxy server in order to have the installer access My Oracle Support.
■ Search Local Directory for Updates.
If you have software updates available locally, you can specify the location by using this option. When you select Search Local Directory for Updates an additional "Location" field will appear; specify the location where your updates are located in this field.
After selecting your option, click Next.
3. Prerequisite Checks Screen
After the prerequisite checking is complete with no errors, click Next.
4. Specify Installation Location Screen
Oracle Middleware Home: Specify the location where WebLogic Server was installed.
Oracle Home Directory: Specify the location where you want to install the software:
■ If you specify a directory that already exists, it must be an empty directory and it must be inside the Oracle Middleware home.
■ If you specify a new directory, it will be created inside the Oracle Middleware home.
This will be your Oracle home directory. Runtime components cannot write to this directory.
For more information about the Middleware home and Oracle home directories, refer to "Oracle Fusion Middleware Directory Structure" in Oracle Fusion
Middleware Installation Planning Guide.
5. Application Server Screen
Select the application server you want to use for this installation.
Select WebLogic Server, then click Next.
6. Installation Summary Screen
Click Install.
7. Installation Progress Screen
Click Next when the installation is 100% complete.
8. Installation Complete Screen
Click Finish.
4 Configuring Oracle WebCenter
After you have successfully run the installer, you can configure your Oracle WebCenter components by running the Oracle Fusion Middleware Configuration Wizard.
For more information about configuring WebLogic domains, refer to Oracle Fusion Middleware Creating Domains Using the Configuration Wizard.
4.1 Starting the Configuration Wizard
The Configuration Wizard is located in the WebCenter_ORACLE_HOME directory. On UNIX operating systems:
cd WebCenter_ORACLE_HOME/common/bin ./config.sh
On Windows operating systems:
cd WebCenter_ORACLE_HOME\common\bin config.cmd
If you are using a 32-bit operating system, Oracle JRockit SDK is installed as part of the Oracle WebLogic installation (see Section 2.5, "Installing Oracle WebLogic Server and Creating the Middleware Home"). This is the JDK that the Configuration Wizard will use by default. If you want to invoke the Configuration Wizard with the Sun JDK, do the following prior to starting the Configuration Wizard:
1. Set the JAVA_HOME environment variable to the location of the Sun JDK. For example, you can set it to the Sun JDK that was installed with Oracle WebLogic Server in jdk160_21 inside the Middleware home.
2. Set the JAVA_VENDOR environment variable to "Sun."
4.2 Configuration Your WebLogic Domain
To configure a WebLogic domain for Oracle WebCenter:
Select Create a New WebLogic Domain.
Click Next.
2. Select Domain Source Screen
Select Generate a domain configured automatically to support the following products, then select the products that should be configured in this domain. For a complete Oracle WebCenter installation, select all of the following:
■ Oracle WebCenter Spaces - 11.1.1.0 [WebCenter_ORACLE_HOME] This will automatically select the following products as dependencies:
– Oracle Enterprise Manager - 11.1.1.0 [oracle_common]
– Oracle WSM Policy Manager - 11.1.1.0 [oracle_common]
– Oracle JRF - 11.1.1.0 [oracle_common]
■ Oracle Portlet Producers - 11.1.1.0 [WebCenter_ORACLE_HOME
■ Oracle WebCenter Discussion Server - 11.1.1.0 [WebCenter_ORACLE_HOME
■ Oracle WebCenter ActivityGraph Engines - 11.1.1.0 [WebCenter_ORACLE_ HOME
This will automatically select Oracle WebCenter Analytics Collector - 11.1.1.0 [WebCenter_ORACLE_HOME] as a dependency.
■ Oracle WebCenter Personalization - 11.1.1.0 [WebCenter_ORACLE_HOME
■ Oracle WebCenter Pagelet Producer - 11.1.1.0 [WebCenter_ORACLE_HOME If you have previously installed Oracle Fusion Middleware products on your system, you may see duplicate products on this screen; select only those products associated with your WebCenter_ORACLE_HOME.
Click Next.
3. Specify Domain Name and Location Screen
Specify the following domain information:
■ Domain name: The name of the domain you want to create. The default name is base_domain.
■ Domain location: The absolute path to the directory where this domain should be created. For the remainder of this document, the specified domain name and domain location will be referred to as the domain home directory (DOMAIN_HOME). This directory can be located anywhere on your system.
■ Application location: The absolute path to the directory where applications created in this domain should reside. For the remainder of this document, the specified application location and domain name will be referred to as the application home directory (APPLICATION_HOME). This directory can be located anywhere on your system.
See "WebLogic Server Domain" in Oracle Fusion Middleware Installation Planning Guide for more information about the domain name and location.
Click Next.
4. Configure Administrator Username and Password Screen
■ User name: The name of the administrator for this domain. The default name is weblogic.
■ User password: The administrator’s password.
■ Confirm user password: Re-enter the administrator’s password.
■ Description: Enter a description for this user, or leave the default description as is. This field is optional.
Click Next.
5. Configure Server Start Mode and JDK Screen
In the "WebLogic Domain Startup Mode" portion of the screen, Select Development Mode.
In the "JDK Selection" portion of the screen, select the JDK that is recommended for your platform in Development Mode. This text can be found immediately underneath Development Mode in the "WebLogic Domain Startup Mode" section. For example, on a Linux system, you would be asked to select "Sun SDK 1.6.0_21" from the list of available JDKs.
Click Next.
6. Configure JDBC Component Schema Screen
Configure the schema information for each data source listed on this screen. When you make changes to any field on this screen, the changes are applied to selected data sources only. For fields that are common with all data sources (for example, all data sources reside on the same database), you should select all of the data sources and make your changes. The changes are saved automatically as you type.
After all of the information that is common to all data sources has been specified, then you will need to select individual or smaller groups of data sources and enter information that is specific to them (for example, the schema owner).
Review the table on this screen and identify which fields you need to modify:
■ Vendor: Select the vendor for your database from the drop-down list.
■ Driver: Select the driver type from the drop-down list.
■ Schema Owner: Specify the schema owner for the schema; this is the name of the schema for this component in the following format:
prefix_schema_name
This information was specified on the Select Components Screen when the schemas were created using RCU. For more information, refer to Section 2.4, "Creating Schemas for Oracle WebCenter".
Note: By default, Oracle WebLogic Server grants the domain administrative privileges to the default user, weblogic. If you want to grant the domain administrative rights to a different user, then after creating the domain you must grant the administrator role to that user for WebCenter Spaces and Oracle WebCenter Discussions Server. For more information, see "Granting Administrator Role to a Non-Default User" in Oracle Fusion Middleware Installation Guide for Oracle
■ Password: Specify the password for the schema. You specified this password on the Schema Passwords Screen when creating the schemas using RCU. For more information, refer to Section 2.4, "Creating Schemas for Oracle
WebCenter".
■ DBMS/Service: Specify the service name for your database. This is the database on which the schema resides.
■ Host Name: Specify the name of the machine where your database is running.
■ Port: Specify the database listen port number.
Click Next.
7. Test Component Schema Screen
Verify that the connections to your data sources are successful.
Click Next.
8. Select Optional Configuration Screen
Do not select anything on this screen.
Click Next.
9. Configuration Summary
Verify the information on this screen. Use the navigation pane on the left or the Previous button if you want to return to a previous screen to alter some portion of the configuration.
If everything is correct, click Create.
10. Creating Domain Screen
When the domain has been successfully created, click Done.
5 Post-Installation Tasks
This section contains general information that will help you verify your installation and configuration. Some components may require custom or manual configuration, and this information is also included in this section:
■ Launching the Servers
■ Starting Managed Servers from the Administration Console
■ Starting Node Manager
■ Verifying the Installation
5.1 Launching the Servers
To get your deployments up and running, you must start the Administration Server and various Managed Servers:
1. To start the Administration Server, run the startWebLogic.sh (on UNIX operating systems) or startWebLogic.cmd (on Windows operating systems) script in the directory where you created your new domain.
On UNIX operating systems:
On Windows operating systems:
DOMAIN_HOME\startWebLogic.cmd
This information was provided on the Specify Domain Name and Location Screen in the Configuration Wizard.
2. To start the Managed Servers, run the startManagedWebLogic.sh (on UNIX operating systems) or startManagedWebLogic.cmd (on Windows operating systems) script in the bin directory inside the directory where you created your domain.
This command also requires that you specify a server name. The servers that need to be started are:
■ WC_Spaces (Oracle WebCenter Spaces)
■ WC_Portlet (Oracle WebCenter Portlets)
■ WC_Collaboration (Oracle WebCenter Services)
■ WC_Utilities (Oracle WebCenter Activity Graph, Oracle WebCenter Analytics)
For example, to start the Oracle WebCenter Spaces server on a UNIX operating system:
DOMAIN_HOME/bin/startManagedWebLogic.sh WC_Spaces http://administration_server_ host:administration_server_port
On Windows operating systems:
DOMAIN_HOME\bin\startManagedWebLogic.cmd WC_Spaces http://administration_ server_host:administration_server_port
Before the server is started, you will be prompted for the WebLogic Server username and password. These were provided on the Configure Administrator Username and Password Screen in the Configuration Wizard.
If you do not know the names of the Managed Servers that need to be started, you can view the contents of the startManagedWebLogic_readme.txt file in your
DOMAIN_HOME directory.
Alternatively, you can also access the Administration Server console at the following URL:
http://administration_server_host:administration_server_port/console
Supply the username and password that you specified on the Configure Administrator Username and Password Screen of the Configuration Wizard.
For more information about starting and stopping servers, see "Starting and Stopping Servers" in Oracle Fusion Middleware Managing Server Startup and Shutdown for Oracle WebLogic Server.
5.2 Starting Managed Servers from the Administration Console
1. Login to the Administration Console.
2. Navigate to Environment > Machines.
3. Click New.
4. Enter a machine name (for example, Machine-WC).
5. In the Administration Console, navigate to Environment > Servers and select the managed server for which you want to associate this machine (Machine-WC). Use the drop-down list to associate the managed server with the machine.
After this procedure, the managed server will start successfully and be accessible.
5.3 Starting Node Manager
Starting Node Manager on a machine that hosts Managed Servers allows you to start and stop the Managed Servers remotely using the Administration Console or the command line. Node Manager can also automatically restart a Managed Server after an unexpected failure.
To start Node Manager:
1. On UNIX operating systems, run the MW_HOME/oracle_ common/common/bin/setNMProps.sh script.
On Windows operating systems, run the MW_HOME\oracle_ common\common\bin\setNMProps.cmd script.
This script appends the required properties to the nodemanager.properties file. These properties can also be appended manually, or provided as
command-line arguments.
2. On UNIX operating systems, start Node Manager by running the WebLogic_ Home/server/bin/startNodeManager.sh script.
On Windows operating systems, start Node Manager by running the WebLogic_ Home\server\bin\startNodeManager.cmd script.
For more information about Node Manager, refer to Oracle Fusion Middleware Node Manager Administrator's Guide for Oracle WebLogic Server.
Note: Node Manager (see Section 5.3, "Starting Node Manager") must be up and running in order to start Managed Servers from the Administration Console.
Note: This procedure only works if the managed servers are shut down. If the managed servers are up and running, then no values will appear in the drop-down list.
Note: The StartScriptEnabled=true property is required for Managed Servers to receive proper classpath and command
arguments.
5.4 Verifying the Installation
Start your browser and enter the following URLs:
■ To access the Administration Server:
http://administration_server_host:administration_server_port
This information was visible on the Creating Domain Screen (the last screen) of the Configuration Wizard.
■ To access the Administration Server console:
http://administration_server_host:administration_server_port/console
You will be prompted for the username and password credentials that you specified on the Configure Administrator Username and Password Screen of the Configuration Wizard.
■ To access Enterprise Manager:
http://administration_server_host:administration_server_port/em
You will be prompted for the username and password credentials that you specified on the Configure Administrator Username and Password Screen of the Configuration Wizard.
■ To access WebCenter Spaces:
http://WC_Spaces_server_host:WC_Spaces_server_port/webcenter
The default port number for WebCenter Spaces is 8888.
■ To access WebCenter Pagelet Producer:
http://WC_Portlet_server_host:WC_Portlet_server_port/welcome
The default port number for WebCenter Pagelet Producer is 8889.
■ To access WebCenter Analytics, Activity Graph and Personalization Server:
http://WC_Utilities_server_host:WC_Utilities_server_port/activitygraph-engines
To access WebCenter Activity Graph:
http://WC_Utilities_server_host:WC_Utilities_server_ port/activitygraph-engines/Login.jsp
To access WebCenter Personalization Server:
http://WC_Utilities_server_host:WC_Utilities_server_ port/wcps/api/property/resourceIndex
The default port number for the WebCenter Analytics, Activity Graph and Personalization Server is 8891.
■ To access WebCenter Rich Text Portlet:
http://WC_Portlet_server_host:WC_Portlet_server_port/richtextportlet/
To access WebCenter WSRP Tools:
http://WC_Portlet_server_host:WC_Portlet_server_port/wsrp-tools/
http://WC_Portlet_server_host:WC_Portlet_server_ port/pageletadmin/login/loginpage.jspx
To access WebCenter OmniPortlet and Web Clipping Portlets:
http://WC_POrtlet_server_host:WC_Portlet_server_port/portalTools/
The default port number for WebCenter Portlets is 8889.
■ To access WebCenter Discussions:
http://WC_Collaboration_server_host:WC_Collaboration_server_port/owc_ discussions
The default port number for WebCenter Discussions is 8890.
6 Deinstalling Oracle WebCenter
Deinstalling Oracle WebCenter from your system involves the following:
■ Stopping Oracle Fusion Middleware
■ Removing the Oracle WebCenter Schemas
■ Deinstalling Oracle WebCenter
■ Deinstalling Oracle WebLogic Server
■ Deinstalling Oracle JDeveloper
■ Removing the Program Groups (Windows Only)
■ Rebooting Your System (Windows Only)
You should always use the instructions provided in this section for removing the software. If you try to remove the software manually, you may experience problems when you try to reinstall the software again at a later time. Following the procedures in this section will ensure that the software is properly removed.
6.1 Stopping Oracle Fusion Middleware
Before deinstalling Oracle Fusion Middleware software components, you should stop all servers and processes.
1. Stop the WebLogic Managed Servers.
On UNIX operating systems:
DOMAIN_HOME/bin/stopManagedWeblogic.sh managed_server_nanme administration_ server_url administration_server_username administration_server_password
On Windows operating systems:
DOMAIN_HOME\bin\stopManagedWeblogic.cmd managed_server_nanme administration_ server_url administration_server_username administration_server_password
2. Stop WebLogic Administration Server.
On UNIX operating systems:
DOMAIN_HOME/bin/stopWeblogic.sh administration_server_url administration_ server_username administration_server_password
DOMAIN_HOME\bin\stopWeblogic.cmd administration_server_url administration_ server_username administration_server_password
For both commands, specify the administration_server_url using the following format:
http://administration_server_host.administration_server_domain:administration_ server_port
For more information about starting and stopping Oracle Fusion Middleware, refer to "Starting and Stopping Oracle Fusion Middleware" in Oracle Fusion Middleware Administrator's Guide.
For more information about starting and stopping servers, see "Starting and Stopping Servers" in Oracle Fusion Middleware Managing Server Startup and Shutdown for Oracle WebLogic Server.
6.2 Removing the Oracle WebCenter Schemas
Run the Repository Creation Utility (RCU) to drop the WebCenter schemas from your database.
6.2.1 Starting RCU
Start RCU as described in Section 2.4.1, "Downloading and Starting RCU".
6.2.2 Instructions for Dropping the WebCenter Schemas
Follow the instructions below to drop the WebCenter schemas:1. Welcome Screen
Click Next.
2. Create Repository Screen
Select Drop.
Click Next.
3. Database Connection Details Screen
Provide the following credentials to connect to your database. These are the same credentials you provided on this screen when you created the WebCenter schemas. See Section 2.4.2, "RCU Screens for Schema Creation" for more information.
Click Next. A "Checking Prerequisites" screen will appear. If there are errors, some details about the error will be displayed on the Database Connection Details Screen. Fix the error messages and click Next again.
After the checking is complete with no errors, click OK to dismiss the screen.
4. Select Components Screen
Select the prefix and schemas you want to drop from the repository.
Click Next. A "Checking Prerequisites" screen will appear. If there are errors, some details about the error will be displayed on the Select Components Screen. Fix the error messages and click Next again.
After the checking is complete with no errors, click OK to dismiss the screen.
Click Drop. A "DROP" screen will appear. If there are errors, some details about the error will be displayed on the Summary Screen. Fix the error messages and click Next again.
After the schemas are dropped with no errors, click OK to dismiss the screen.
6. Completion Summary Screen
Click Close.
6.3 Deinstalling Oracle WebCenter
Deinstalling Oracle WebCenter involves removing the WebCenter Oracle home and the Oracle Common home directories.
The deinstaller will attempt to remove the Oracle home from which it was started. This procedure will not remove any WebLogic domains that you have created - it only removes the software in the Oracle home.
Before you choose to remove any Oracle home, make sure that it is not in use by an existing domain, and also make sure you stop all running processes that use this Oracle home. After you remove the software, you will no longer be able to use your WebLogic domain.
6.3.1 Deinstalling the WebCenter Oracle Home
To start the deinstaller, navigate to the WebCenter_ORACLE_HOME/oui/bin (on UNIX operating systems) or WebCenter_ORACLE_HOME\oui\bin (on Windows operating systems) directory and start the deinstaller.
On UNIX operating systems:
./runInstaller -deinstall
On Windows operating systems:
setup.exe -deinstall
On Windows systems, you can also start the deinstaller from the Start menu by selecting Programs > Oracle WebCenter 11g - Home1 > Uninstall.
Follow the instructions below to remove the installed software.
1. Welcome Screen
Click Next.
2. Deinstall Oracle Home Screen
Verify the Oracle home you are about to deinstall.
Click Deinstall to continue.
A warning dialog box will appear. Click Yes to confirm that you want to proceed with the deinstallation and remove the Oracle home directory.
3. Deinstallation Progress Screen
This screen shows the progress and status of the deinstallation. No action is required; the installer will automatically advance to the next screen when deinstallation is complete.
4. Deinstallation Complete Screen
5. On Windows operating systems, manually remove the Oracle home directory (even if you answer Yes in the warning dialog box).
For example, if your Oracle home directory is
C:\Oracle\Middleware\Oracle_WC1, then you should navigate to the C:\Oracle\Middleware directory, right-click on the Oracle_WC1 folder, and select Delete.
6.3.2 Deinstalling the Oracle Common Home
This section describes how to remove the oracle_common directory. This directory contains its own deinstaller in oui/bin (on UNIX operating systems) or oui\bin (on Windows operating systems), just like any other Oracle home directory.
To start the deinstaller, navigate to the MW_HOME/oracle_common/oui/bin (on UNIX operating systems) or MW_HOME\oracle_common\oui\bin (on Windows operating systems) directory and start the deinstaller.
On UNIX operating systems:
./runInstaller -deinstall
On Windows operating systems:
setup.exe -deinstall
After the deinstaller is started, follow the instructions below to remove the Oracle Common home.
1. Welcome Screen
Click Next.
2. Select Deinstallation Type Screen
Select Deinstall Oracle Home.
Click Next.
3. Deinstall Oracle Home Screen
Verify the Oracle home you are about to deinstall.
Click Next to continue.
A warning dialog box will appear. Click Yes to confirm that you want to proceed with the deinstallation and remove the Oracle home directory.
4. Deinstallation Progress Screen
This screen shows the progress and status of the deinstallation. No action is required; the installer will automatically advance to the next screen when deinstallation is complete.
5. Deinstallation Complete Screen
Click Finish.
6. On Windows operating systems, manually remove the Oracle Common home directory (even if you answer Yes in the warning dialog box).
For example, if your Oracle Common home directory is
6.4 Deinstalling Oracle WebLogic Server
To deinstall Oracle WebLogic Server:
1. Start the deinstaller from the WebLogic_Home/uninstall (on UNIX operating systems) or WebLogic_Home\uninstall (on Windows operating systems) directory. You specified the location of the WebLogic home directory on the Choose Product Installation Directories Screen in Section 2.5, "Installing Oracle WebLogic Server and Creating the Middleware Home".
On UNIX operating systems:
./uninstall.sh
On Windows operating systems:
uninstall.cmd
You must specify the absolute path to your JRE_LOCATION; relative paths will not work.
On Windows systems, you can also start the deinstaller from the Start menu by selecting Programs > Oracle WebLogic > Uninstall Oracle WebLogic.
2. Welcome Screen
Click Next.
3. Choose Components Screen
By default, all components are selected.
Click Next.
4. Uninstalling WebLogic Platform Screen
Click Done.
5. Manually remove the Middleware home directory.
For example, if your Middleware home directory was /home/Oracle/Middleware on a UNIX operating system:
> cd /home/Oracle > rm -rf Middleware
On a Windows operating system, if your Middleware home directory was C:\Oracle\Middleware, use a file manager window and navigate to the C:\Oracle directory, then right-click on the Middleware folder and select Delete.
6.5 Deinstalling Oracle JDeveloper
If you have installed Oracle JDeveloper on your system, refer to Oracle Fusion Middleware Installation Guide for Oracle JDeveloper for instructions on how to remove this software from your system.
6.6 Removing the Program Groups (Windows Only)
following from C:\Documents and Settings\All Users\Start Menu\Programs:
■ Oracle Fusion Middleware 11.1.1.4.0
■ Oracle WebCenter 11g - Home1
■ Oracle WebLogic
6.7 Rebooting Your System (Windows Only)
On Windows operating systems, you should reboot your computer after you have finished removing all your programs to ensure proper cleanup.
7 Additional Resources
For additional information, refer to the Oracle Fusion Middleware Installation Guide for Oracle WebCenter, which is available on the Oracle Fusion Middleware 11 g Release 1 (11.1.1) Documentation page at
http://www.oracle.com/technetwork/middleware/docs/middleware-093 940.html.
Printed documentation is available for sale through your Oracle representative or in the Oracle Store at http://oraclestore.oracle.com.
To download free release notes, installation documentation, white papers, or other collateral, visit Oracle Technology Network (OTN). You must register online before using OTN; registration is free and can be done at
http://www.oracle.com/technology/membership/.
If you already have a username and password for OTN, then you can go directly to the documentation section of OTN at
http://www.oracle.com/technetwork/indexes/documentation/.
7.1 Oracle Support Services
If you purchased Oracle Product Support, you can call Oracle Support Services for assistance. Oracle Support Services include phone assistance, version updates and access to our service offerings. You have access to phone support 24 hours a day, 7 days a week. In the U.S.A., you can call Product Support at 1-800-223-1711.
Make sure you have your CSI (CPU Support Identifier) number ready when you call. Keep the CSI number for your records, because it is your key to Oracle Support Services. The Oracle Store sends the CSI number to you in an e-mail alert when it processes your order. If you do not have your CSI number and you are in the U.S.A., you can look up your CSI number by accessing our online Order Tracker which provides detailed order information. Go to the Oracle Store and click on Order Tracker located above the top navigation bar.
For Oracle Support Services locations outside the U.S.A., call your local support center for information on how to access support. To find the local support center in your country, visit the Support Web Center at http://www.oracle.com/support.
At the Support Web Center you will find information on Oracle Support Services, such as:
■ Contact Information
■ Helpful Web Sites
■ Support Resources
■ Oracle Support Portfolio
■ Oracle Support Services news
With Oracle Product Support, you have round-the-clock access to My Oracle Support (formerly OracleMetaLink), Oracle Support Services premier Web support offering. My Oracle Support offers you access to installation assistance, product documentation, and a technical solution knowledge base.
It has technical forums, where you can post questions about your Oracle products and receive answers from Oracle Technical Support Analysts and other Oracle users. The questions and answers remain posted for the benefit of all users.
My Oracle Support options include:
■ Technical Assistance Request (TAR) access
■ Patch Downloads
■ Bug Database Query Access
■ Product Life-Cycle Information
You can access My Oracle Support at http://support.oracle.com.
7.2 Version Updates
If you do not have a currently supported license, you can purchase the most recent version of an Oracle product from the Oracle Store at
http://oraclestore.oracle.com.
If you do have a currently supported license, you can place non-urgent requests for version update shipments through the iTAR feature on My Oracle Support. You will need to log the iTAR type as a U.S. Client Relations/Non-Technical Request.
You can also request Version Update shipments in the U.S.A. by calling Client Relations. When requesting a Version Update, provide the following information to the Client Relations Analyst:
■ CSI Number
■ Contact Information
■ Platform
■ Product Name
■ Shipping Address
■ Product Version Number
Outside the U.S.A., call your local Oracle Support Center.
7.3 Premium Services
For information on our Premium Services, including onsite support, OracleGOLD, remote services, and upgrade packages, visit the Support Web Center at
http://www.oracle.com/support.
7.4 Quick Reference
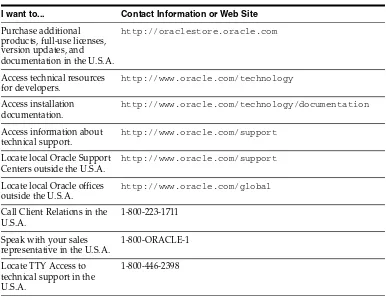
For quick access to additional information, refer to Table 4:
8 Documentation Accessibility
Our goal is to make Oracle products, services, and supporting documentation accessible to all users, including users that are disabled. To that end, our
documentation includes features that make information available to users of assistive technology. This documentation is available in HTML format, and contains markup to facilitate access by the disabled community. Accessibility standards will continue to evolve over time, and Oracle is actively engaged with other market-leading
technology vendors to address technical obstacles so that our documentation can be accessible to all of our customers. For more information, visit the Oracle Accessibility Program Web site at http://www.oracle.com/accessibility/.
Accessibility of Code Examples in Documentation
Screen readers may not always correctly read the code examples in this document. The conventions for writing code require that closing braces should appear on an
otherwise empty line; however, some screen readers may not always read a line of text that consists solely of a bracket or brace.
Accessibility of Links to External Web Sites in Documentation
This documentation may contain links to Web sites of other companies or
organizations that Oracle does not own or control. Oracle neither evaluates nor makes any representations regarding the accessibility of these Web sites.
Table 4 Links to Additional Information and Resources
I want to... Contact Information or Web Site
Purchase additional
Locate local Oracle Support Centers outside the U.S.A.
http://www.oracle.com/support
Locate local Oracle offices outside the U.S.A.
http://www.oracle.com/global
Call Client Relations in the U.S.A.
1-800-223-1711
Speak with your sales representative in the U.S.A.
1-800-ORACLE-1
Locate TTY Access to technical support in the U.S.A.
Deaf/Hard of Hearing Access to Oracle Support Services
To reach Oracle Support Services, use a telecommunications relay service (TRS) to call Oracle Support at 1.800.223.1711. An Oracle Support Services engineer will handle technical issues and provide customer support according to the Oracle service request process. Information about TRS is available at
http://www.fcc.gov/cgb/consumerfacts/trs.html, and a list of phone numbers is available at http://www.fcc.gov/cgb/dro/trsphonebk.html.
Oracle Fusion Middleware Quick Installation Guide for Oracle WebCenter 11g Release 1 (11.1.1) E10146-05
Copyright © 2011, Oracle and/or its affiliates. All rights reserved.
This software and related documentation are provided under a license agreement containing restrictions on use and disclosure and are protected by intellectual property laws. Except as expressly permitted in your license agreement or allowed by law, you may not use, copy, reproduce, translate, broadcast, modify, license, transmit, distribute, exhibit, perform, publish, or display any part, in any form, or by any means. Reverse engineering, disassembly, or decompilation of this software, unless required by law for interoperability, is prohibited.
The information contained herein is subject to change without notice and is not warranted to be error-free. If you find any errors, please report them to us in writing.
If this software or related documentation is delivered to the U.S. Government or anyone licensing it on behalf of the U.S. Government, the following notice is applicable:
U.S. GOVERNMENT RIGHTS Programs, software, databases, and related documentation and technical data delivered to U.S. Government customers are "commercial computer software" or "commercial technical data" pursuant to the applicable Federal Acquisition Regulation and agency-specific supplemental regulations. As such, the use, duplication, disclosure, modification, and adaptation shall be subject to the restrictions and license terms set forth in the applicable Government contract, and, to the extent applicable by the terms of the Government contract, the additional rights set forth in FAR 52.227-19, Commercial Computer Software License (December 2007). Oracle USA, Inc., 500 Oracle Parkway, Redwood City, CA 94065.