•HowtoexpressuserinterfaceswithSceneBuilderandFXML
•HowtousepropertybindingtokeeptheUIeasilyinsyncwiththemodel •HowtousetherichsetofJavaFXUIcontrols,charts,shapes,effects, •HowtousethepowerfulJavaFXlayoutclassestodefinetheuserinterface •Howtoleveragetheobservablecollectionclassestoobservechangesin, •HowtousetheJavaFXmediaclassestoplayaudioandvideo
For your convenience Apress has placed some of the front
matter material after the index. Please use the Bookmarks
Contents at a Glance
About the Authors ...
xv
About the Technical Reviewer ...
xvii
Acknowledgments ...
xix
Foreword ...
xxi
Introduction ...
xxiii
Chapter 1: Getting a Jump Start in JavaFX
■
...
1
Chapter 2: Creating a User Interface in JavaFX
■
...
31
Chapter 3: Using SceneBuilder to Create a User Interface
■
...
79
Chapter 4: Properties and Bindings
■
...
143
Chapter 5: Building Dynamic UI Layouts in JavaFX
■
...
187
Chapter 6: Using the JavaFX UI Controls
■
...
229
Chapter 7: Collections and Concurrency
■
...
271
Chapter 8: Creating Charts in JavaFX
■
...
349
Chapter 9: Using the Media Classes
■
...
377
Chapter 10: JavaFX 3D
■
...
429
Chapter 11: Accessing Web Services
■
...
491
Chapter 12: JavaFX on Embedded and Mobile
■
...
525
Chapter 13: JavaFX Languages and Markup
■
...
549
xxiii
Introduction
As a developer, author, speaker, and advocate for JavaFX since its inception in 2007, I am very excited about JavaFX 8. It was released in March 2014 as an integral part of Java SE 8, and is the successor to Java Swing. As you’ll read in the pages of this book, JavaFX runs on desktops (Mac, Windows, Linux), as well as embedded devices such as the Raspberry Pi. As the Internet of things (IoT) is increasingly realized, JavaFX is well positioned to enable the user interface of IoT. Also, because of community projects led by folks such as Johan Vos and Niklas Therning, developers are deploying JavaFX apps on Android and iOS devices.
The JavaFX community has many talented, passionate, and cordial developers, and I count it a privilege to call them my colleagues. One such colleague, Johan Vos, is a coauthor of our Pro JavaFX 2 book, and is the lead author of this Pro JavaFX 8 book. It has been my pleasure to continue working with Johan on this book under his leadership. Please join me in welcoming and congratulating him in this role, perhaps by tweeting him at @JohanVos or posting a review of this book on Amazon. It is my hope that you’ll find this book both enjoyable and instrumental in helping you learn JavaFX!
—James L. Weaver
Java Technology Ambassador
Getting a Jump Start in JavaFX
Don’t ask what the world needs. Ask what makes you come alive, and go do it. Because what the
world needs is people who have come alive.
—Howard Thurman
At the annual JavaOne conference in May 2007, Sun Microsystems announced a new product family named JavaFX. Its stated purpose includes enabling the development and deployment of content-rich applications on consumer devices such as cell phones, televisions, in-dash car systems, and browsers. Josh Marinacci, a software engineer at Sun, made the following statement, very appropriately, in a Java Posse interview: “JavaFX is sort of a code word for reinventing client Java and fixing the sins of the past.” He was referring to the fact that Java Swing and Java 2D have lots of capability, but are also very complex. By using FXML, JavaFX allows us to simply and elegantly express user interfaces (UIs) with a declarative programming style. It also leverages the full power of Java, because you can instantiate and use the millions of Java classes that exist today. Add features such as binding the UI to properties in a model and change listeners that reduce the need for setter methods, and you have a combination that will help restore Java to the client-side Internet applications.
In this chapter, we give you a jump start in developing JavaFX applications. After bringing you up to date on the brief history of JavaFX, we show you how to get the required tools. We also explore some great JavaFX resources and walk you through the process of compiling and running JavaFX applications. In the process you’ll learn a lot about the JavaFX application programming interface (API) as we walk through application code together.
A Brief History of JavaFX
JavaFX started life as the brainchild of Chris Oliver when he worked for a company named SeeBeyond. They had a need for richer user interfaces, so Chris created a language that he dubbed F3 (Form Follows Function) for that purpose. In the article “Mind-Bendingly Cool Innovation” (cited in the Resources section at the end of this chapter), Chris is quoted as follows: “When it comes to integrating people into business processes, you need graphical user interfaces for them to interact with, so there was a use case for graphics in the enterprise application space, and there was an interest at SeeBeyond in having richer user interfaces.”
SeeBeyond was acquired by Sun, who subsequently changed the name of F3 to JavaFX, and announced it at JavaOne 2007. Chris Oliver joined Sun during the acquisition and continued to lead the development of JavaFX.
The first version of JavaFX Script was an interpreted language, and was considered a prototype of the compiled JavaFX Script language that was to come later. Interpreted JavaFX Script was very robust, and there were two JavaFX books published in the latter part of 2007 based on that version. One was written in Japanese, and the other was written in English and published by Apress (JavaFX Script: Dynamic Java Scripting for Rich Internet/Client-Side Applications, Apress, 2007).
2
was commemorated in a blog post entitled “Congratulations to the JavaFX Script Compiler Team—The Elephant Is Through the Door.” That phrase came from the JavaFX Script compiler project leader Tom Ball in a blog post, which contained the following excerpt.
An elephant analogy came to me when I was recently grilled about exactly when the JavaFX Script
compiler team will deliver our first milestone release. “I can’t give you an accurate date,” I said. “It’s
like pushing an elephant through a door; until a critical mass makes it past the threshold you just
don’t know when you’ll be finished. Once you pass that threshold, though, the rest happens quickly
and in a manner that can be more accurately predicted.”
A screenshot of the silly, compiled JavaFX application written by one of the authors, Jim Weaver, for that post is shown in Figure 1-1, demonstrating that the project had in fact reached the critical mass to which Tom Ball referred.
Figure 1-1. Screenshot for the “Elephant Is Through the Door” program
Much progress continued to be made on JavaFX in 2008:
The NetBeans JavaFX plug-in became available for the compiled version in March 2008. •
Many of the JavaFX runtime libraries (mostly focusing on the UI aspects of JavaFX) were •
rewritten by a team that included some very talented developers from the Java Swing team.
In July 2008, the JavaFX Preview Software Development Kit (SDK) was released, and at •
JavaOne 2008, Sun announced that the JavaFX 1.0 SDK would be released in fall 2008.
On December 4, 2008, the JavaFX 1.0 SDK was released. This event increased the adoption •
rate of JavaFX by developers and IT managers because it represented a stable codebase.
In April 2009, Oracle and Sun announced that Oracle would be acquiring Sun. The JavaFX 1.2 •
SDK was released at JavaOne 2009.
In January 2010, Oracle completed its acquisition of Sun. The JavaFX 1.3 SDK was released in •
At JavaOne 2010, JavaFX 2.0 was announced. The JavaFX 2.0 roadmap was published by Oracle and included items such as the following.
Deprecate the JavaFX Script language in favor of using Java and the JavaFX 2.0 API. This brings •
JavaFX into the mainstream by making it available to any language (e.g., Java, Groovy, and JRuby) that runs on the Java Virtual Machine (JVM). As a consequence, existing developers do not need to learn a new language, but they can use existing skills and start developing JavaFX applications.
Make the compelling features of JavaFX Script, including binding to expressions, available in •
the JavaFX 2.0 API.
Offer an increasingly rich set of UI components, building on the components already available •
in JavaFX 1.3.
Provide a Web component for embedding HTML and JavaScript content into JavaFX •
applications.
Enable JavaFX interoperability with Swing. •
Rewrite the media stack from the ground up. •
JavaFX 2.0 was released at JavaOne 2011, and has enjoyed a greatly increased adoption rate due to the innovative features articulated previously.
JavaFX 8 marks another important milestone. JavaFX is now an integral part of the Java Platform, Standard Edition.
This is a clear indication that JavaFX is considered mature enough, and that it is the future of •
Java on the client.
This greatly benefits developers, as they don’t have to download two SDKs and tool suites. •
The new technologies in Java 8, in particular the Lambda expressions, Stream API, and default •
interface methods, are very usable in JavaFX.
Many new features have been added, including native 3D support, a printing API, and some •
new controls including a datepicker.
Now that you’ve had the obligatory history lesson in JavaFX, let’s get one step closer to writing code by showing you where some examples, tools, and other resources are.
Prepare Your JavaFX Journey
Required Tools
Because JavaFX is now part of Java, you don’t have to download a separate JavaFX SDK. The whole JavaFX API and implementation is part of the Java 8 SE SDK that can be downloaded from http://www.oracle.com/technetwork/java/javase/downloads/index.html.
This SDK contains everything you need to develop, run, and package JavaFX applications. You can compile JavaFX applications using command-line tools contained in the Java 8 SE SDK.
Most developers, however, prefer an integrated development environment (IDE) for increased productivity. By definition, an IDE that supports Java 8 also supports JavaFX 8. Hence, you can use your favorite IDE and develop JavaFX applications. In this book, we mainly use the NetBeans IDE, as it allows for a tighter
4
SceneBuilder is a stand-alone tool that allows you to design JavaFX interfaces rather than coding them. We discuss SceneBuilder in Chapter 3. Although SceneBuilder produces FXML—and we discuss FXML in Chapter 3 as well—that can be used in any IDE, NetBeans provides a tight integration with SceneBuilder. The SceneBuilder tool can be downloaded at http://www.oracle.com/technetwork/java/javase/downloads/sb2download-2177776.html.
JavaFX, the Community
JavaFX is not a closed-source project, developed in a secret bunker. To the contrary, JavaFX is being developed in an open spirit, with an open source code base, open mailing lists, and an open and active community sharing knowledge.
The source code is developed in the OpenJFX project, which is a subproject of the OpenJDK project in which Java SE is being developed. If you want to examine the source code or the architecture, or if you want to read the technical discussions on the mailing list, have a look at http://openjdk.java.net/projects/openjfx.
The developer community is very active, both in OpenJFX as well as in application-specific areas. The starting point for developers is the JavaFX Community at http://javafxcommunity.com. This is a community site created by Oracle, but with input from many JavaFX developers. The content of the JavaFX Community changes often, and in Figure 1-2 we show a snapshot on how this community site looked at the time of writing.
In addition, blogs maintained by JavaFX engineers and developers are great resources for up-to-the-minute technical information on JavaFX. For example, Oracle JavaFX Engineers Richard Bair, Jasper Potts, and Jonathan Giles keep the developer community apprised of the latest JavaFX innovations at http://fxexperience.com. The Resources section at the end of this chapter contains the URLs of the blogs that the authors of this book use to engage the JavaFX developer community.
Two important characteristics of the JavaFX Community are its own creativity and the desire to share. There are a number of open-source efforts bringing added value to the JavaFX Platform. Because of good cooperation between the JavaFX Platform engineers and the external JavaFX developers, these open-source projects fit very well with the official JavaFX Platform.
Some of the most interesting efforts are listed here:
RoboVM allows you to create iOS applications using Java and JavaFX. As a consequence, your •
JavaFX application can be used to create an app for the iPhone or the iPad.
The JavaFX-Android project maintains a JavaFX SDK for Android development. As a •
consequence, your JavaFX application can be used to create an app for Android devices.
The iOS and the Android port of JavaFX are discussed in more detail in Chapter 12.
• JFXtras.org is a project working on adding high-quality controls and add-ons to the JavaFX Platform.
ControlsFX is another project adding high-quality controls and tools to the JavaFX Platform. •
It is worth mentioning that the JavaFX team is closely watching the efforts in both JFXtras.org and ControlsFX, and ideas that are started in one of those projects might make it into one of the next releases of JavaFX.
DataFX is an open-source project aiming to facilitate the retrieval of external data in JavaFX •
applications, and to provide JavaFX developers with enterprise functionality like injection and flow management.
OpenDolphin is another project helping developers in separating and synchronizing client •
and server development, by implementing the highest degree of Model-View-Controller separation.
Take a few minutes to explore these sites. Next we point out some more valuable resources that are helpful.
Use the Official Specifications
6
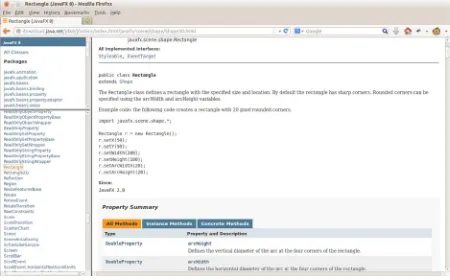
The API documentation in Figure 1-3, for example, shows how to use the Rectangle class, located in the
javafx.scene.shape package. Scrolling down this web page shows the properties, constructors, methods, and other helpful information about the Rectangle class. By the way, this API documentation is available in the Java 8 SE SDK that you downloaded, but we wanted you to know how to find it online as well.
Apart from the JavaDoc, it is very useful to have the Cascading Style Sheets (CSS) style reference at hand as well. This document explains all the style classes that can be applied to a particular JavaFX element. You can find this document at http://download.java.net/jdk8/jfxdocs/javafx/scene/doc-files/cssref.html.
ScenicView
You already downloaded SceneBuilder, which is the tool that allows you to create UIs by designing them, rather than writing code. We expect that there will be more tools developed by companies and individuals that help you create JavaFX applications. One of the first tools that was made available for free and that is very helpful when debugging JavaFX applications is ScenicView, originally created by Amy Fowler at Oracle, and later maintained by Jonathan Giles. You can download ScenicView at http://fxexperience.com/scenic-view/.
ScenicView is particularly helpful because it provides a convenient UI that allows developers to inspect properties of nodes (i.e., dimensions, translations, CSS) at runtime.
Packaging and Distribution
works if the end user has a JVM installed that is capable of executing the application. This is not always true. Even in the desktop world, where a system can be delivered preinstalled with a JVM, there are issues with versioning and security. Indeed, some applications are hard-coded against a specific version of the JVM. Although vulnerabilities in the JVM are in most cases fixed very fast, this still requires the end user to always install the latest version of the JVM, which can be pretty frustrating.
On top of that, browser manufacturers are increasingly reluctant to support alternative embedded platforms. In summary, relying on a browser and on a local, preinstalled JVM does not provide the best end-user experience.
The client software industry is shifting more and more toward the so-called AppStores. In this concept, applications can be downloaded and installed that are self-containing. They do not rely on preinstalled execution environments. The principles originated in the mobile space, where Apple with the AppStore and Android with the Play store are leading the market. Especially in these markets, single-click installs have a huge advantage over local downloads, unpacking, manual configuration, and more nightmares.
In Java terminology, a self-contained application means that the application is bundled together with a JVM that is capable of running the application. In the past, this idea was often rejected because it made the application bundle too big. However, with increasing memory and storage capacities, and with decreasing costs of sending bytes over the Internet, this disadvantage is becoming less relevant.
There are a number of technologies being developed currently that help you bundle your application with the correct JVM version and package it.
The JavaFXPackager, which is developed inside the OpenJFX project area, contains an API for creating self-contained bundles. This tool is used by NetBeans, and it can be used to generate self-contained bundles with just a few clicks.
Users of maven can use a maven plug-in created by Daniel Zwolenski. This plug-in, which is documented at http://zenjava.com/javafx/maven/ allows the creation of JavaFX self-contained bundles using familiar maven commands.
Now that you have the tools installed, we show you how to create a simple JavaFX program, and then we walk through it in detail. The first program that we’ve chosen for you is called “Hello Earthrise,” which demonstrates more features than the typical beginning “Hello World” program.
Developing Your First JavaFX Program: Hello Earthrise
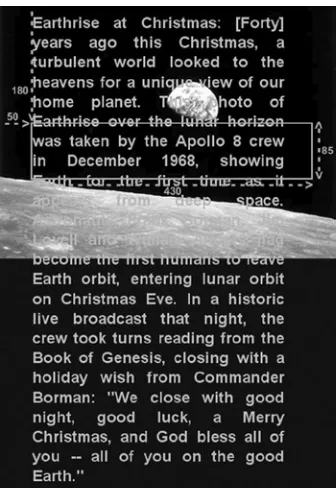
On Christmas Eve in 1968 the crew of Apollo 8 entered lunar orbit for the first time in history. They were the first humans to witness an “Earthrise,” taking the magnificent picture shown in Figure 1-4. This image is dynamically loaded from this book’s web site when the program starts, so you’ll need to be connected to the Internet to view it.
8
In addition to demonstrating how to dynamically load images over the Internet, this example shows you how to use animation in JavaFX. Now it’s time for you to compile and run the program. We show you two ways to do this: from the command line and using NetBeans.
Compiling and Running from the Command Line
We usually use an IDE to build and run JavaFX programs, but to take all of the mystery out of the process we use the command-line tools first.
Note
■
For this exercise, as with most others in the book, you need the source code. If you prefer not to type the
source code into a text editor, you can obtain the source code for all of the examples in this book from the code download
site. See the Resources section at the end of this chapter for the location of this site.
Assuming that you’ve downloaded and extracted the source code for this book into a directory, follow the directions in this exercise, performing all of the steps as instructed. We dissect the source code after the exercise.
COMPILING AND RUNNING THE HELLO EARTHRISE PROGRAM FROM
THE COMMAND LINE
You’ll use the javac and java command-line tools to compile and run the program in this exercise. From the
command-line prompt on your machine:
1.
Navigate to the
Chapter01/Hellodirectory.
2.
Execute the following command to compile the
HelloEarthRiseMain.javafile.
javac -d . HelloEarthRiseMain.java
3.
Because the
–doption was used in this command, the class files generated are placed
in directories matching the package statements in the source files. The roots of those
directories are specified by the argument given for the
–doption, in this case the current
directory.
4.
To run the program, execute the following command. Note that we use the fully qualified
name of the class that will be executed, which entails specifying the nodes of the path name
and the name of the class, all separated by periods.
java projavafx.helloearthrise.ui.HelloEarthRiseMain
The program should appear as shown in Figure
1-4
earlier, with the text scrolling slowly upward, reminiscent of
the
Star Wars
opening crawls.
Understanding the Hello Earthrise Program
Now that you’ve run the application, let’s walk through the program listing together. The code for the Hello Earthrise application is shown in Listing 1-1.
Listing 1-1. The HelloEarthRiseMain.java Program
package projavafx.helloearthrise.ui;
* Main class for the "Hello World" style example */
public class HelloEarthRiseMain extends Application {
/**
* @param args the command line arguments */
10
textRef.setTextOrigin(VPos.TOP);
textRef.setTextAlignment(TextAlignment.JUSTIFY); textRef.setWrappingWidth(400);
textRef.setFill(Color.rgb(187, 195, 107));
textRef.setFont(Font.font("SansSerif", FontWeight.BOLD, 24));
// Provides the animated scrolling behavior for the text
TranslateTransition transTransition = new TranslateTransition(new Duration(75000), textRef); transTransition.setToY(-820);
transTransition.setInterpolator(Interpolator.LINEAR); transTransition.setCycleCount(Timeline.INDEFINITE);
// Create an ImageView containing the Image
Image image = new Image ("http://projavafx.com/images/earthrise.jpg"); ImageView imageView = new ImageView(image);
textGroup.setClip(new Rectangle(430, 85));
// Combine ImageView and Group
Group root = new Group(imageView, textGroup); Scene scene = new Scene(root, 516, 387);
stage.setScene(scene);
stage.setTitle("Hello Earthrise"); stage.show();
// Start the text animation transTransition.play(); }
}
Now that you’ve seen the code, let’s take a look at its constructs and concepts in some more detail.
What Happened to the Builders?
Builders were very popular in JavaFX. However, it turned out that there were major technical hurdles with keeping them in the platform. As a consequence, it has been decided to phase builders out. In Java 8, Builder classes are still usable, but they are deprecated. In Java 9, Builder classes might be removed entirely.
More information on the reason why Builder classes are not preferred anymore can be found in a mailing list entry by JavaFX Chief Architect Richard Bair at http://mail.openjdk.java.net/pipermail/openjfx-dev/2013-March/006725.html. The bottom of this entry contains a very important statement: “I believe that FXML or Lambda’s or alternative languages all provide other avenues for achieving the same goals as builders but without the additional cost in byte codes or classes.”
This is what we will show throughout this book. Near the end of this chapter, we show a first example of a Lambda expression in our code. In Chapter 3, we show how SceneBuilder and FXML allow you to use a declarative way of defining a UI.
In the current example, we programmatically define the different components of the UI, and we glue them together. In Chapter 3, we show the same example using a declarative FXML-based approach.
The JavaFX Application
Let’s have a look at the class declaration in our first example:
public class HelloEarthRiseMain extends Application
This declaration states that our application extends the javafx.application.Application class. This class has one abstract method that we should implement:
public void start(Stage stage) {}
This method will be called by the environment that executes our JavaFX application.
Depending on the environment, JavaFX applications will be launched in a different way. As a developer, you don’t have to worry about how your application is launched, and where the connection to a physical screen is made. You have to implement the “start” method and use the provided Stage parameter to create your UI, as discussed in the next paragraph.
In our command-line example, we launched the applications by executing the main method of the application class. The implementation of the main method is very simple:
public static void main(String[] args) { Application.launch(args);
}
The only instruction in this main method is a call to the static launch method of the application, which will launch the application.
Tip
■
A JavaFX application always has to extend the
javafx.application.Applicationclass.
A Stage and a Scene
12
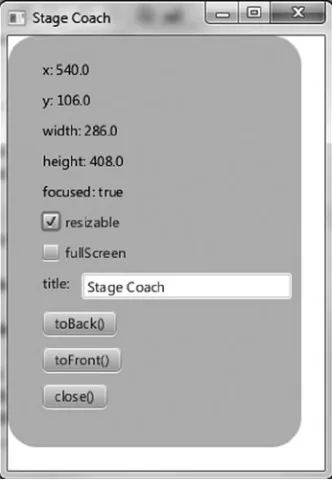
The initial stage is created by the JavaFX runtime, and passed to you via the start() method, as described in the previous paragraph. The Stage class has a set of properties and methods. Some of these properties and methods, as shown in the following code snippet from the listing, are as follows.
A scene that contains the graphical nodes in the UI •
A title that appears in the title bar of the window (when deployed on the desktop) •
The visibility of the
• Stage
stage.setScene(scene);
stage.setTitle("Hello Earthrise"); stage.show();
A Scene is the top container in the JavaFX scene graph. A Scene holds the graphical elements that are displayed on the Stage. Every element in a Scene is a graphical node, which is any class that extends javafx.scene.Node. The scene graph is a hierarchical representation of the Scene. Elements in the scene graph may contain child elements, and all of them are instances of the Node class.
The Scene class contains a number of properties, such as its width and height. A Scene also has a property named
root that holds the graphical elements that are displayed in the Scene, in this case a Group instance that contains an
ImageView instance (which displays an image) and a Group instance. Nested within the latter Group is a Text instance (which is a graphical element, usually called a graphical node, or simply node).
Notice that the root property of the Scene contains an instance of the Group class. The root property may contain an instance of any subclass of javafx.scene.Node, and typically contains one capable of holding its own set of Node instances. Take a look at the JavaFX API documentation that we showed you how to access in the “Use the Official Specifications” section earlier and check out the Node class to see the properties and methods available to any graphical node. Also, take a look at the ImageView class in the javafx.scene.image package and the Group class in the
javafx.scene package. In both cases, they inherit from the Node class.
Tip
■
We can’t emphasize enough the importance of having the JavaFX API documentation handy while reading this
book. As classes, variables, and functions are mentioned, it’s a good idea to look at the documentation to get more
information. In addition, this habit helps you become more familiar with what is available to you in the API.
Displaying Images
As shown in the following code, displaying an image entails using an ImageView instance in conjunction with an
Image instance.
Image image = new Image ("http://projavafx.com/images/earthrise.jpg"); ImageView imageView = new ImageView(image);
The Image instance identifies the image resource and loads it from the URL assigned to its URL variable. Both of these classes are located in the javafx.scene.image package.
Displaying Text
In the example, we created a Text Node as follows:
If you consult the JavaFX API documentation, you will notice that a Text instance, contained in package
javafx.scene.text, extends a Shape that extends a Node. As a consequence, a Text instance is a Node as well, and all the properties on Node apply on Text as well. Moreover, Text instances can be used in the scene graph the same way other nodes are used.
As you can detect from the example, a Text instance contains a number of properties that can be modified. Most of the properties are self-explanatory, but again, it is always useful to consult the JavaFX API documentation when manipulating objects.
Because all graphical elements in JavaFX directly or indirectly extend the Node class, and because the Node class already contains many useful properties, the amount of properties on a specific graphical element such as Text can be rather high.
In our example, we set a limited number of properties that we briefly explain next. The method
textRef.setLayoutY(100)
applies a vertical translation of 100 pixels to the Text content. The fill method is used to specify the color of the text.
While you’re looking at the javafx.scene.text package in the API documentation, take a look at the font function of the Font class, which is used to define the font family, weight, and size of the Text.
The textOrigin property specifies how the text is aligned with its area.
Referring again to the JavaFX API documentation, notice that the VPos enum (in the javafx.geometry package) has fields that serve as constants, for example, BASELINE, BOTTOM, and TOP. These control the origin of the text with respect to vertical locations on the displayed Text:
The TOP origin, as we’re using it in the previous code snippet, places the top of the text •
(including ascenders) at the layoutY position, relative to the coordinate space in which the
Text is located.
The BOTTOM origin would place the bottom of the text, including descenders (located in a •
lowercase g, for example) at the layoutY position.
The BASELINE origin would place the baseline of the text (excluding descenders) at the •
layoutY position. This is the default value for the textOrigin property of a Text instance. The wrappingWidth property enables you to specify at what number of pixels the text will wrap. The textAlignment property enables you to control how the text will be justified. In our example,
TextAlignment.JUSTIFY aligns the text on both the left and right sides, expanding the space between words to achieve that.
The text that we’re displaying is sufficiently long to wrap and be drawn on the Earth, so we need to define a rectangular region outside of which that text cannot be seen.
Tip
■
We recommend you modify some of the values, recompile the example, and run it again. This will help you
understanding how the different properties work. Alternatively, by using
ScenicViewyou can inspect and modify the
different properties at runtime.
Working with Graphical Nodes as a Group
One powerful graphical feature of JavaFX is the ability to create scene graphs, which consist of a tree of graphical nodes. You can then assign values to properties of a Group located in the hierarchy, and the nodes contained in the
14
a specific rectangular region within the Group so that the text doesn’t appear on the moon or the Earth as it animates upward. Here’s the relevant code snippet:
Group textGroup = new Group(textRef); textGroup.setLayoutX(50);
textGroup.setLayoutY(180);
textGroup.setClip(new Rectangle(430, 85));
Notice that the Group is located 50 pixels to the right and 180 pixels down from where it would have been located by default. This is due to the values assigned to the layoutX and layoutY variables of the Group instance. Because this
Group is contained directly by the Scene, its upper-left corner’s location is 50 pixels to the right and 180 pixels down from the upper-left corner of the Scene. Take a look at Figure 1-5 to see this example illustrated as you read the rest of the explanation.
Figure 1-5. The Scene, Group, Text, and clip illustrated
A Group instance contains instances of Node subclasses by assigning a collection of them to itself via the
children() method. In the previous code snippet, the Group contains a Text instance that has a value assigned to its
layoutY property. Because this Text is contained by a Group, it assumes the two-dimensional space (also called the coordinate space) of the Group, with the origin of the Text node (0,0) coincident with the top-left corner of the Group. Assigning a value of 100 to the layoutY property causes the Text to be located 100 pixels down from the top of the
Group, which is just below the bottom of the clip region, thus causing it to be out of view until the animation begins. Because a value isn’t assigned to the layoutX variable, its value is 0 (the default).
The layoutX and layoutY properties of the Group just described are examples of our earlier statement that nodes contained in a Group will be affected by values assigned to properties of the Group. Another example is setting the opacity property of a Group instance to 0.5, which causes all of the nodes contained in that Group to become translucent. If the JavaFX API documentation is handy, look at the properties available in the javafx.scene.Group
class. Then look at the properties available in the javafx.scene.Node class properties, which is where you’ll find the
Clipping Graphical Areas
To define a clipping area, we assign a Node subclass to the clip property that defines the clipping shape, in this case a
Rectangle that is 430 pixels wide and 85 pixels high. In addition to keeping the Text from covering the moon, when the Text scrolls up as a result of animation, the clipping area keeps the Text from covering the earth.
Animating the Text to Make It Scroll Up
When the HelloEarthriseMain program is invoked, the Text begins scrolling up slowly. To achieve this animation, we’re using the TranslateTransition class located in the javafx.animation package, as shown in the following snippet from Listing 1-1.
TranslateTransition transTransition = new TranslateTransition(new Duration(75000), textRef); transTransition.setToY(-820);
transTransition.setInterpolator(Interpolator.LINEAR); transTransition.setCycleCount(Timeline.INDEFINITE); ...code omitted...
// Start the text animation transTransition.play();
The javafx.animation package contains convenience classes for animating nodes. This TranslateTransition
instance translates the Text node referenced by the textRef variable from its original Y position of 100 pixels to a Y position of –820 pixels, over a duration of 75 seconds. The Interpolator.LINEAR constant is assigned to the interpolator property, which causes the animation to proceed in a linear fashion. A look at the API docs for the
Interpolator class in the javafx.animation package reveals that there are other forms of interpolation available, one of which is EASE_OUT, which slows down the animation toward the end of the specified duration.
Note
■
Interpolation in this context is the process of calculating the value at any point in time, given a beginning value,
an ending value, and a duration.
The last line in the previous snippet begins executing the play method of the TranslateTransition instance created earlier in the program. This makes the Text begin scrolling upward. Because of the value assigned to the
cycleCount variable, this transition will repeat indefinitely.
Now that you’ve compiled and run this example using the command-line tools and we’ve walked through the code together, it is time to begin using the NetBeans IDE to make the development and deployment process faster and easier.
Building and Running the Program with NetBeans
16
BUILDING AND RUNNING HELLO EARTHRISE WITH NETBEANS
To build and run the Hello Earthrise program, perform the following steps.
1.
Start up NetBeans.
2.
Choose File
➤
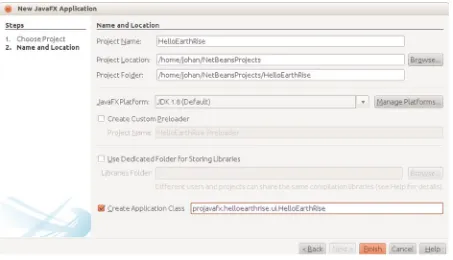
New Project from the menu bar. The first window of the New Project Wizard
will appear. Select the JavaFX category, and you will see wizard shown in Figure
1-6
:
4. On this screen, type the project name (we used HelloEarthRise) and click Browse.
5.
Select a Project Location, either by typing it directly into the text box or by clicking Browse to
navigate to the desired directory (we
used /home/johan/NetBeansProjects).
6.
Select the Create Application Class check box, and change the supplied package/class name
to
projavafx.helloearthrise.ui.HelloEarthRiseMain.
7.
Click Finish. The HelloEarthRise project with a default main class created by NetBeans should
now be created. If you’d like to run this default program, right-click the HelloEarthRise project
in the Projects pane and select Run Project from the shortcut menu.
8.
Enter the code from Listing 1-1 into the HelloEarthRiseMain.java code window. You can type
it in, or cut and paste it from the
HelloEarthRiseMain.javafile located in the
Chapter01/ HelloEarthRise/src/projavafx/helloearthrise/uidirectory of this book’s source code
download.
9.
Right-click the HelloEarthRise project in the Projects pane and select Run Project from the
shortcut menu.
The HelloEarthRise program should begin executing, as you saw in Figure
1-4
earlier in the chapter.
Figure 1-7. The next page of the New Prjoect Wizard18
At this point, you’ve built and run the “Hello Earthrise” program application, both from the command line and using NetBeans. Before leaving this example, we show you another way to achieve the scrolling Text node. There is a class in the javafx.scene.control package named ScrollPane whose purpose is to provide a scrollable view of a node that is typically larger than the view. In addition, the user can drag the node being viewed within the scrollable area. Figure 1-8 shows the Hello Earthrise program after being modified to use the ScrollPane control.
Figure 1-8. Using the ScrollPane control to provide a scrollable view of the Text node
Notice that the move cursor is visible, signifying that the user can drag the node around the clipped area. Note that the screenshot in Figure 1-8 is of the program running on Windows, and the move cursor has a different appearance on other platforms. Listing 1-2 contains the relevant portion of code for this example, named
HelloScrollPaneMain.java.
Listing 1-2. The HelloScrollPaneMain.java Program
...code omitted...
// Create a ScrollPane containing the text ScrollPane scrollPane = new ScrollPane(); scrollPane.setLayoutX(50);
scrollPane.setLayoutY(180); scrollPane.setPrefWidth(400); scrollPane.setPrefHeight(85);
scrollPane.setHbarPolicy(ScrollPane.ScrollBarPolicy.NEVER); scrollPane.setVbarPolicy(ScrollPane.ScrollBarPolicy.NEVER); scrollPane.setPannable(true);
scrollPane.setContent(textRef);
scrollPane.setStyle("-fx-background-color: transparent;");
// Combine ImageView and ScrollPane Group root = new Group(iv, scrollPane); Scene scene = new Scene(root, 516, 387);
Developing Your Second JavaFX Program: “More Cowbell!”
If you’re familiar with the Saturday Night Live television show, you may have seen the “More Cowbell” sketch, in which Christopher Walken’s character keeps asking for “more cowbell” during a Blue Oyster Cult recording session. The following JavaFX example program covers some of the simple but powerful concepts of JavaFX in the context of an imaginary application that lets you select a music genre and control the volume. Of course, “Cowbell Metal,” shortened to “Cowbell,” is one of the available genres. Figure 1-9 shows a screenshot of this application, which has a sort of retro iPhone application look.Figure 1-9. The Audio Configuration “More Cowbell” program
Building and Running the Audio Configuration Program
Earlier in the chapter, we showed you how to create a new JavaFX project in NetBeans. For this example (and the rest of the examples in the book), we take advantage of the fact that the code download bundle for the book contains both NetBeans and Eclipse project files for each example. Follow the instructions in this exercise to build and run the Audio Configuration application.
BUILDING AND RUNNING THE AUDIO CONFIGURATION PROGRAM
USING NETBEANS
To build and execute this program using NetBeans, perform the following steps.
20
2.
Select the AudioConfig project in the pane on the left, and click Open Project.
3.
Run the project as discussed previously.
The application should appear as shown in Figure
1-9
.
The Behavior of the Audio Configuration Program
When you run the application, notice that adjusting the volume slider changes the associated decibel (dB) level displayed. Also, selecting the Muting check box disables the slider, and selecting various genres changes the volume slider. This behavior is enabled by concepts that are shown in the code that follows, such as the following:
Binding to a class that contains a model •
Using change listeners •
Creating observable lists •
Understanding the Audio Configuration Program
The Audio Configuration program contains two source code files, shown in Listing 1-3 and Listing 1-4:
The
• AudioConfigMain.java file in Listing 1-3 contains the main class, and expresses the UI in a manner that you are familiar with from the Hello Earthrise example in Listing 1-1.
The
• AudioConfigModel.java file in Listing 1-4 contains a model for this program, which holds the state of the application, to which the UI is bound.
Listing 1-3. The AudioConfigMain.java Program
package projavafx.audioconfig.ui;
import javafx.application.Application; import javafx.geometry.VPos;
import javafx.scene.Group; import javafx.scene.Scene;
import javafx.scene.control.CheckBox;
public class AudioConfigMain extends Application {
// A reference to the model
AudioConfigModel acModel = new AudioConfigModel();
Text textDb; Slider slider;
CheckBox mutingCheckBox; ChoiceBox genreChoiceBox;
Color color = Color.color(0.66, 0.67, 0.69);
public static void main(String[] args) { Application.launch(args);
title.setFont(Font.font("SansSerif", FontWeight.BOLD, 20));
Text textDb = new Text(); textDb.setLayoutX(18); textDb.setLayoutY(69);
textDb.setTextOrigin(VPos.TOP); textDb.setFill(Color.web("#131021"));
textDb.setFont(Font.font("SansSerif", FontWeight.BOLD, 18));
Text mutingText = new Text(18, 113, "Muting"); mutingText.setTextOrigin(VPos.TOP);
mutingText.setFont(Font.font("SanSerif", FontWeight.BOLD, 18)); mutingText.setFill(Color.web("#131021"));
22
genreText.setFill(Color.web("#131021"));
genreText.setFont(Font.font("SanSerif", FontWeight.BOLD, 18));
slider = new Slider(); slider.setLayoutX(135); slider.setLayoutY(69); slider.setPrefWidth(162);
slider.setMin(acModel.minDecibels); slider.setMax(acModel.maxDecibels);
mutingCheckBox = new CheckBox(); mutingCheckBox.setLayoutX(280); mutingCheckBox.setLayoutY(113);
genreChoiceBox = new ChoiceBox(); genreChoiceBox.setLayoutX(204); genreChoiceBox.setLayoutY(154); genreChoiceBox.setPrefWidth(93);
genreChoiceBox.setItems(acModel.genres);
Stop[] stops = new Stop[]{new Stop(0, Color.web("0xAEBBCC")), new Stop(1, Color.web("0x6D84A3"))};
LinearGradient linearGradient = new LinearGradient(0, 0, 0, 1, true, CycleMethod.NO_CYCLE, stops);
Rectangle rectangle = new Rectangle(0, 0, 320, 45); rectangle.setFill(linearGradient);
Rectangle rectangle2 = new Rectangle(0, 43, 320, 300); rectangle2.setFill(Color.rgb(199, 206, 213));
Rectangle rectangle3 = new Rectangle(8, 54, 300, 130); rectangle3.setArcHeight(20);
rectangle3.setArcWidth(20); rectangle3.setFill(Color.WHITE); rectangle3.setStroke(color);
textDb.textProperty().bind(acModel.selectedDBs.asString().concat(" dB")); slider.valueProperty().bindBidirectional(acModel.selectedDBs);
slider.disableProperty().bind(acModel.muting);
mutingCheckBox.selectedProperty().bindBidirectional(acModel.muting); acModel.genreSelectionModel = genreChoiceBox.getSelectionModel(); acModel.addListenerToGenreSelectionModel();
acModel.genreSelectionModel.selectFirst();
stage.setScene(scene);
stage.setTitle("Audio Configuration"); stage.show();
} }
Take a look at the AudioConfigMain.java source code in Listing 1-3, after which we examine it together, focusing on concepts not covered in the previous example.
Now that you’ve seen the main class in this application, let’s walk through the new concepts.
The Magic of Binding
One of the most powerful aspects of JavaFX is binding, which enables the application’s UI to easily stay in sync with the state, or model, of the application. The model for a JavaFX application is typically held in one or more classes, in this case the AudioConfigModel class. Look at the following snippet, taken from Listing 1-3, in which we create an instance of this model class.
AudioConfigModel acModel = new AudioConfigModel();
There are several graphical node instances in the scene of this UI (recall that a scene consists of a sequence of nodes). Skipping past several of them, we come to the graphical nodes shown in the following snippet that have a property bound to the selectedDBs property in the model.
textDb = new Text(); ... code omitted slider = new Slider(); ...code omitted...
textDb.textProperty().bind(acModel.selectedDBs.asString().concat(" dB")); slider.valueProperty().bindBidirectional(acModel.selectedDBs);
As shown in this code, the text property of the Text object is bound to an expression. The bind function contains an expression (that includes the selectedDBs property), which is evaluated and becomes the value of the text property. Look at Figure 1-9 (or check the running application) to see the content value of the Text node displayed to the left of the slider.
Notice also in the code that the value property of the Slider node is bound to the selectedDBs property in the model as well, but that it uses the bindBidirectional() method. This causes the bind to be bidirectional, so in this case when the slider is moved, the selectedDBs property in the model changes. Conversely, when the selectedDBs
property changes (as a result of changing the genre), the slider moves.
Go ahead and move the slider to demonstrate the effects of the bind expressions in the snippet. The number of decibels displayed at the left of the slider should change as the slider is adjusted.
24
Colors and Gradients
The following snippet from Listing 1-3 contains an example of defining a color gradient pattern, as well as defining colors.
Stop[] stops = new Stop[]{new Stop(0, Color.web("0xAEBBCC")), new Stop(1, Color.web("0x6D84A3"))}; LinearGradient linearGradient = new LinearGradient(0, 0, 0, 1, true, CycleMethod.NO_CYCLE, stops); Rectangle rectangle = new Rectangle(0, 0, 320, 45);
rectangle.setFill(linearGradient);
If the JavaFX API docs are handy, first take a look at the javafx.scene.shape.Rectangle class and notice that it inherits a property named fill that is of type javafx.scene.paint.Paint. Looking at the JavaFX API docs for the
Paint class, you’ll see that the Color, ImagePattern, LinearGradient, and RadialGradient classes are subclasses of
Paint. This means that the fill of any shape can be assigned a color, pattern, or gradient.
To create a LinearGradient, as shown in the code, you need to define at least two stops, which define the location and color at that location. In this example, the offset value of the first stop is 0.0, and the offset value of the second stop is 1.0. These are the values at both extremes of the unit square, the result being that the gradient will span the entire node (in this case a Rectangle). The direction of the LinearGradient is controlled by its startX, startY,
endX, and endY values, which we pass via the constructor. In this case, the direction is only vertical because the startY
value is 0.0 and the endY value is 1.0, whereas the startX and endX values are both 0.0.
Note that in the Hello Earthrise example in Listing 1-1, the constant named Color.WHITE was used to represent the color white. In the previous snippet, the web function of the Color class is used to define a color from a
hexadecimal value.
The Model Class for the Audio Configuration Example
Take a look at the source code for the AudioConfigModel class in Listing 1-4.Listing 1-4. The Source Code for AudioConfigModel.java package projavafx.audioconfig.model;
import javafx.beans.Observable;
import javafx.beans.property.BooleanProperty; import javafx.beans.property.IntegerProperty; import javafx.beans.property.SimpleBooleanProperty; import javafx.beans.property.SimpleIntegerProperty; import javafx.collections.FXCollections;
import javafx.collections.ObservableList;
import javafx.scene.control.SingleSelectionModel;
/**
* The model class that the AudioConfigMain class uses */
public class AudioConfigModel { /**
* The minimum audio volume in decibels */
/**
* The maximum audio volume in decibels */
public double maxDecibels = 160.0;
/**
* The selected audio volume in decibels */
public IntegerProperty selectedDBs = new SimpleIntegerProperty(0);
/**
* Indicates whether audio is muted */
public BooleanProperty muting = new SimpleBooleanProperty(false);
/**
* List of some musical genres */
public ObservableList genres = FXCollections.observableArrayList( "Chamber",
* A reference to the selection model used by the Slider */
public SingleSelectionModel genreSelectionModel;
/**
* Adds a change listener to the selection model of the ChoiceBox, and contains * code that executes when the selection in the ChoiceBox changes.
*/
public void addListenerToGenreSelectionModel() {
26
In the earlier section “The Magic of Binding,” we showed how you can use property binding for dynamically changing parameters. There is another, more low-level but also more flexible way of achieving this, using ChangeListeners and
InvalidationListeners. These concepts are discussed in more detail in Chapter 4.
In our example, we add an InvalidationListener to the selectedIndexProperty of the genreSelectionModel. When the value of the selectedIndexProperty changes, and when we didn’t retrieve it yet, the
invalidated(Observable) method on the added InvalidationListener will be called. In the implementation of this method, we retrieve the value of the selectedIndexProperty, and based on its value, the value of the selectedDBs
property is changed. This is achieved with the following code:
public void addListenerToGenreSelectionModel() {
genreSelectionModel.selectedIndexProperty().addListener((Observable o) -> { int selectedIndex = genreSelectionModel.selectedIndexProperty().getValue(); switch(selectedIndex) {
Note that we are using a Lambda expression here rather than creating a new instance of the
InvalidationListener and implementing its single abstract method invalidated.
Tip
What causes selectedIndexProperty of the genreSelectionModel to change? To see the answer to this, we have to revisit some code in Listing 1-3. In the following code snippet, the setItems method of ChoiceBox is used to populate the ChoiceBox with items that each contain a genre.
genreChoiceBox = new ChoiceBox(); genreChoiceBox.setLayoutX(204); genreChoiceBox.setLayoutY(154); genreChoiceBox.setPrefWidth(93);
genreChoiceBox.setItems(acModel.genres);
This snippet from the model code in Listing 1-4 contains the collection to which the ComboBox items are bound:
/**
* List of some musical genres */
public ObservableList genres = FXCollections.observableArrayList( "Chamber",
"Country", "Cowbell", "Metal", "Polka", "Rock" );
When the user chooses a different item in the ChoiceBox, the invalidationListener is invoked. Looking again at the code in the invalidationListener, you’ll see that the value of the selectedDBs property changes, which as you may recall, is bidirectionally bound to the slider. This is why the slider moves when you select a genre in the combo box. Go ahead and test this by running the Audio Config program.
Note
■
Associating the
itemsproperty of the
ChoiceBoxwith an
ObservableListcauses the items in the
ChoiceBoxto be automatically updated when the elements in the underlying collection are modified.
Surveying JavaFX Features
We close this chapter by surveying many of the features of JavaFX, some of which are a review for you. We do this by describing several of the more commonly used packages and classes in the Java SDK API.
The javafx.stage package contains the following: The
• Stage class, which is the top level of the UI containment hierarchy for any JavaFX application, regardless of where it is deployed (e.g., the desktop, a browser, or a cell phone).
The
28
The javafx.scene package contains some classes that you’ll use often: The
• Scene class is the second level of the UI containment hierarchy for JavaFX applications. It includes all of the UI elements contained in the application. These elements are called graphical nodes, or simply nodes.
The
• Node class is the base class of all of the graphical nodes in JavaFX. UI elements such as text, images, media, shapes, and controls (e.g., text boxes and buttons) are all subclasses of
Node. Take a moment to look at the variables and functions in the Node class to appreciate the capabilities provided to all of its subclasses, including bounds calculation and mouse and keyboard event handling.
The
• Group class is a subclass of the Node class. Its purpose includes grouping nodes together into a single coordinate space and allowing transforms (e.g., rotate) to be applied to the whole group. Also, attributes of the group that are changed (e.g., opacity) apply to all of the nodes contained within the group.
Several packages begin with javafx.scene that contain subclasses of Node of various types. Examples include the following:
The
• javafx.scene.image package contains the Image and ImageView classes, which enable images to be displayed in the Scene. The ImageView class is a subclass of Node.
The
• javafx.scene.shape package contains several classes for drawing shapes such as Circle,
Rectangle, Line, Polygon, and Arc. The base class of the shapes, named Shape, contains an attribute named fill that enables you to specify a color, pattern, or gradient with which to fill the shape.
The
• javafx.scene.text package contains the Text class for drawing text in the scene. The
Font class enables you to specify the font name and size of the text. The
• javafx.scene.media package has classes that enable you to play media. The MediaView
class is a subclass of Node that displays the media. The
• javafx.scene.chart package has classes that help you easily create area, bar, bubble, line, pie, and scatter charts. The corresponding UI classes in this package are AreaChart,
BarChart, BubbleChart, LineChart, PieChart, and ScatterChart. Here are some other packages in the JavaFX 8 API.
The
• javafx.scene.control package contains several UI controls, each one having the ability to be skinned and styled via CSS.
The
• javafx.scene.transform package enables you to transform nodes (scale, rotate, translate, shear, and affine).
The
• javafx.scene.input package contains classes such as MouseEvent and KeyEvent that provide information about these events from within an event handler function such as the
Node class’s onMouseClicked event. The
• javafx.scene.layout package contains several layout containers, including HBox, VBox,
BorderPane, FlowPane, StackPane, and TilePane. The
• javafx.scene.effect package contains easy-to-use effects such as Reflection, Glow,
The
• javafx.scene.web package contains classes for easily embedding a web browser in your JavaFX applications.
The
• javafx.animation package contains time-based interpolations typically used for animation and convenience classes for common transitions.
The
• javafx.beans, javafx.beans.binding, javafx.beans.property, and javafx.beans. value packages contain classes that implement properties and binding.
The
• javafx.fxml package contains classes that implement a very powerful facility known as FXML, a markup language for expressing JavaFX UIs in XML.
The
• javafx.util package contains utility classes such as the Duration class used in the HelloEarthRise example earlier in this chapter.
The
• javafx.print package contains utilities for printing (parts of) the layout of a JavaFX application.
The
• javafx.embed.swing package contains the required functionality for embedded JavaFX applications in a Swing application.
The
• javafx.embed.swt package contains the required functionality for embedding JavaFX applications in an SWT application.
Take a look at the JavaFX API docs again in light of this information to get a deeper sense of how you can use its capabilities.
Summary
Congratulations! You learned a lot about JavaFX in this chapter, including:
JavaFX is rich-client Java, and is needed by the software development industry. •
Some of the high points of the history of JavaFX. •
Where to find JavaFX resources, including the Java SDK, NetBeans, SceneBuilder, ScenicView, •
and the API documentation.
How to compile and run a JavaFX program from the command line. •
How to build and run a JavaFX program using NetBeans. •
How to use several of the classes in the JavaFX API. •
How to create a class in JavaFX and use it as a model that contains the state of a JavaFX •
application.
How to use property binding to keep the UI easily in sync with the model. •
30
Resources
For some background information on JavaFX, you can consult the following resources.
This book’s code examples: The Source Code/Download section at the Apress web site •
(www.apress.com).
Java Posse #163: Newscast for February 8, 2008: This is a podcast of a Java Posse interview •
with Josh Marinacci and Richard Bair on the subject of JavaFX. The URL is http://javaposse.com/java_posse_163_newscast_for_feb_8th_2008.
“Congratulations to the JavaFX Script Compiler Team—The Elephant Is Through the Door”: •
A blog post by one of this book’s authors, Jim Weaver, that congratulated the JavaFX compiler team for reaching a tipping point in the project. The URL is
http://learnjavafx.typepad.com/weblog/2007/12/congratulations.html.
Oracles’s
• JavaFX.com site: The home page for JavaFX where you can download the JavaFX SDK and other resource for JavaFX. The URL is http://www.javafx.com.
The JavaFX Community site, with content from a wide source of contributors that are active in •
the JavaFX world. The URL is https:// javafxcommunity.com.
FX Experience: A blog maintained by Oracle JavaFX Engineers Richard Bair, Jasper Potts, and •
Jonathan Giles. The URL is http://fxexperience.com.
Jim Weaver’s JavaFX Blog: A blog, started in October 2007, the stated purpose of which is to •
help the reader become a “JavaFXpert.” The URL is http://javafxpert.com.
Weiqi Gao’s Observation: A blog in which Weiqi Gao shares his experience in software •
development. The URL is http://weiqigao.blogspot.com/.
Dean Iverson’s Pleasing Software Blog: A blog in which Dean Iverson shares his innovations in •
JavaFX and GroovyFX. The URL is http://pleasingsoftware.blogspot.com.
Steve on Java: A blog in which Stephen Chin keeps the world updated on his tireless exploits in •
the areas of JavaFX, Java, and Agile development. The URL is http://steveonjava.com.
Johan’s blog: A blog in which Johan Vos discusses JavaFX and Java Enterprise. The URL is •
http://blogs.lodgon.com/johan.
JavaFX Eclipse Plugin: Eclipse tooling for JavaFX 2.0, being developed by Tom Shindl. The URL •
for the announcement is http://tomsondev.bestsolution.at/2011/06/24/ introducing-efxclipse/.
ScenicView: An application for inspecting the scenegraph of your JavaFX applications. The •
URL is http://scenic-view.org.
RoboVM, allowing you to port JavaFX Applications to iOS. The URL is
• http://robovm.org.
JavaFX-Android port, allowing you to run JavaFX applications on Android. The URL is •
https://bitbucket.org/javafxports/android/wiki/Home.
JavaFXPorts, a web site dedicated to the mobile ports of JavaFX. The URL is •
http://javafxports.org.
ControlsFX, high-quality custom JavaFX controls. The URL is
• http://controlsfx.org.
JFXtras.org, high-quality custom JavaFX controls. The URL is
Creating a User Interface in JavaFX
Life is the art of drawing without an eraser.
—John W. Gardner
Chapter 1 gave you a jump start using JavaFX by covering the basics in developing and executing JavaFX programs. Now we cover many of the details about creating a UI in JavaFX that were glossed over in Chapter 1. First on the agenda is to get you acquainted with the theater metaphor used by JavaFX to express UIs and to cover the significance of what we call a node-centric UI.
Programmatic Versus Declarative Creation of the User Interface
The JavaFX platform provides two complementary ways for creating a UI. In this chapter, we discuss how you can use the Java API to create and populate a UI. This is a convenient way for Java developers who are used to writing code to leverage APIs.Designers often use graphical tools that allow them to declare rather than program a UI. The JavaFX platform defines FXML, which is an XML-based markup language that can be used to declaratively describe a UI. Furthermore, a graphical tool called SceneBuilder is made available by Oracle, and this tool is capable of working with FXML files. The use of SceneBuilder is demonstrated in Chapter 3.
Note that parts of a UI can be created using the API, where other parts can be created using SceneBuilder. The FXML APIs provide the bridge and the integration glue between the two approaches.
Introduction to Node-Centric UIs
Creating a UI in JavaFX is like creating a theater play, in that it typically consists of these very simple steps:
1. Create a stage on which your program will perform. The realization of your stage will depend on the platform on which it is deployed (e.g., a desktop, a tablet, or an embedded system).