CCNP SWITCH
Portable Command Guide
Scott Empson
Hans Roth
ii
CCNP SWITCH Portable Command Guide
Scott EmpsonHans Roth
Copyright© 2010 Cisco Systems, Inc.
Published by: Cisco Press 800 East 96th Street Indianapolis, IN 46240 USA
All rights reserved. No part of this book may be reproduced or transmitted in any form or by any means, electronic or mechanical, including photocopying, recording, or by any information storage and retrieval system, without written permission from the publisher, except for the inclusion of brief quotations in a review.
Printed in the United States of America
First Printing March 2010
Library of Congress Cataloging-in-Publication data is on file.
ISBN-13: 978-1-58720-248-3
ISBN-10: 1-58720-248-4
Warning and Disclaimer
This book is designed to provide information about the CCNP SWITCH exam (642-813). Every effort has been made to make this book as complete and as accurate as possible, but no warranty or fitness is implied.
The information is provided on an “as is” basis. The authors, Cisco Press, and Cisco Systems, Inc. shall have neither liability nor responsibility to any person or entity with respect to any loss or damages arising from the information contained in this book or from the use of the discs or programs that may accompany it.
The opinions expressed in this book belong to the author and are not necessarily those of Cisco Systems, Inc.
Trademark Acknowledgments
iii
Corporate and Government Sales
The publisher offers excellent discounts on this book when ordered in quantity for bulk purchases or special sales, which may include electronic versions and/or custom covers and content particular to your business, training goals, marketing focus, and branding interests. For more information, please contact:
U.S. Corporate and Government Sales
1-800-382-3419 [email protected]
For sales outside the United States please contact:
International Sales [email protected]
Feedback Information
At Cisco Press, our goal is to create in-depth technical books of the highest quality and value. Each book is crafted with care and precision, undergoing rigorous development that involves the unique expertise of members from the professional technical community.
Readers’ feedback is a natural continuation of this process. If you have any comments regarding how we could improve the quality of this book, or otherwise alter it to better suit your needs, you can contact us through e-mail at [email protected]. Please make sure to include the book title and ISBN in your message.
We greatly appreciate your assistance.
Publisher Paul Boger
Associate Publisher Dave Dusthimer
Cisco Representative Erik Ullanderson
Cisco Press Program Manager Anand Sundaram
Executive Editor Mary Beth Ray
Managing Editor Patrick Kanouse
Development Editor Andrew Cupp
Senior Project Editor Tonya Simpson
Copy Editor Kelly Maish
Technical Editor Sean Wilkins
Editorial Assistant Vanessa Evans
Book Designer Louisa Adair
Cover Designer Sandra Schroeder
Composition Mark Shirar
Proofreader Sheri Cain
Cisco has more than 200 offices worldwide. Addresses, phone numbers, and fax numbers are listed on the Cisco Website at www.cisco.com/go/offices.
CCDE, CCENT, Cisco Eos, Cisco HealthPresence, the Cisco logo, Cisco Lumin, Cisco Nexus, Cisco StadiumVision, Cisco TelePresence, Cisco WebEx, DCE, and Welcome to the Human Network are trademarks; Changing the Way We Work, Live, Play, and Learn and Cisco Store are service marks; and Access Registrar, Aironet, AsyncOS, Bringing the Meeting To You, Catalyst, CCDA, CCDP, CCIE, CCIP, CCNA, CCNP, CCSP, CCVP, Cisco, the Cisco Certified Internetwork Expert logo, Cisco IOS, Cisco Press, Cisco Systems, Cisco Systems Capital, the Cisco Systems logo, Cisco Unity, Collaboration Without Limitation, EtherFast, EtherSwitch, Event Center, Fast Step, Follow Me Browsing, FormShare, GigaDrive, HomeLink, Internet Quotient, IOS, iPhone, iQuick Study, IronPort, the IronPort logo, LightStream, Linksys, MediaTone, MeetingPlace, MeetingPlace Chime Sound, MGX, Networkers,
Americas Headquarters
Cisco Systems, Inc. San Jose, CA
Asia Pacific Headquarters
Cisco Systems (USA) Pte. Ltd. Singapore
Europe Headquarters
iv
About the Authors
Scott Empson is the associate chair of the Bachelor of Applied Information Systems Technology degree program at the Northern Alberta Institute of Technology in Edmonton, Alberta, Canada, where he teaches Cisco routing, switching, and network design courses in a variety of different programs—certificate, diploma, and applied degree—at the postsecondary level. Scott is also the program coordinator of the Cisco Networking Academy Program at NAIT, a Regional Academy covering central and northern Alberta. He has earned three undergraduate degrees: a Bachelor of Arts, with a major in English; a Bachelor of Education, again with a major in English/Language Arts; and a Bachelor of Applied Information Systems Technology, with a major in Network Management. Scott is currently completing his Master of Education from the University of Portland. He holds several industry certifications, including CCNP, CCAI, Network+, and C|EH. Prior to instructing at NAIT, he was a junior/senior high school English/Language Arts/Computer Science teacher at different schools throughout Northern Alberta. Scott lives in Edmonton, Alberta, with his wife, Trina, and two children, Zachariah and Shaelyn.
Hans Roth is an instructor in the electrical engineering technology department at Red River College in Winnipeg, Manitoba, Canada. Hans has been with the college for 13 years and teaches in both the engineering technology and IT areas. He has been with the Cisco Networking Academy since 2000, teaching CCNP curricula. Previous to teaching, Hans spent 15 years in R&D/product development designing microcontroller-based control systems for consumer products as well as for the automotive and agricultural industries.
About the Technical Reviewer
Sean Wilkins is an accomplished networking consultant and has been in the field of IT since the mid-1990s, working with companies such as Cisco, Lucent, Verizon, AT&T, and several other private companies. Sean currently holds certifications with Cisco (CCNP/ CCDP), Microsoft (MCSE), and CompTIA (A+ and Network+). He also has a Master of Science degree in information technology with a focus in network architecture and design, a Master’s certificate in network security, a Bachelor of Science degree in computer networking, and an Associate of Applied Science degree in computer information systems. In addition to working as a consultant, Sean spends a lot of his time as a technical writer and editor for various companies.
Dedications
This book is again dedicated to my wonderful family—Trina, Zach, and Shae. Working on these books as well as my master’s classes took me away from you all too often, and I thank you for all of your love and support.
—Scott
I’d like to again thank my wife, Carol, and daughter, Tess, for their constant support and understanding during those times I’ve spent cloistered in the basement writing.
v
Acknowledgments
Anyone who has ever had anything to do with the publishing industry knows that it takes many, many people to create a book. Our names might be on the cover, but there is no way that we can take credit for all that occurred to get this book from idea to publication.
From Scott Empson: To the team at Cisco Press, once again you amaze me with your professionalism and the ability to make me look good. Paul, Dave, Mary Beth, Drew, Tonya, and Dayna—thank you for your continued support and belief in my little engineering journal.
Also with Cisco Press, a huge thank you to the marketing and publicity staff—Kourtnaye, Doug, and Jamie, as well as Kristin, Curt, and Emily. Without your hard work, no one would even know about these books, and for that I thank you (as does my wife and her credit card companies).
To my technical reviewer, Sean Wilkins—thanks for keeping me on track and making sure that what I wrote was correct and relevant.
A big thank you goes to my co-author, Hans Roth, for helping me through this with all of your technical expertise and willingness to assist in trying to make my ideas a reality.
From Hans Roth: The writing part of this process is only the tip of the iceberg. The overall effort is large and the involvement is wide to get any book completed. Working with you folks at Cisco Press has again been a wonderful partnership. Your ongoing professionalism, understanding, and patience have consistently helped me do a little better each time I sit down to write. Thank you, Mary Beth, Chris, Patrick, Drew, and Dayna.
To the technical reviewer, Sean Wilkins, thank you for your clarifications and questions.
vi
Contents at a Glance
Introduction
xiii
Chapter 1
Analyzing Campus Network Designs
1
Chapter 2
Implementing VLANs in a Campus Network
5
Chapter 3
Implementing Spanning Tree
35
Chapter 4
Implementing Inter-VLAN Routing
55
Chapter 5
Implementing a Highly Available Network
79
Chapter 6
Implementing a First Hop Redundancy
Protocols Solution
87
Chapter 7
Minimizing Service Loss and Data Theft in a
Campus Network
111
Chapter 8
Accommodating Voice and Video in
Campus Networks
131
Chapter 9
Integrating Wireless LANs into a Campus Network
141
Appendix A
Private VLAN Catalyst Switch Support Matrix
177
vii
Contents
Introduction
xiii
Chapter 1
Analyzing Campus Network Designs
1
Cisco Hierarchical Model of Network Design
1
Cisco Enterprise Composite Network Model
2
Cisco Service-Oriented Network Architecture
3
PPDIOO Lifecycle Approach
4
Chapter 2
Implementing VLANs in a Campus Network
5
Virtual Local Area Networks
6
Creating Static VLANs
6
Assigning Ports to VLANs
7
Using the
range
Command
8
Dynamic Trunking Protocol
8
Setting the Encapsulation Type
9
Verifying VLAN Information
10
Saving VLAN Configurations
10
Erasing VLAN Configurations
11
Verifying VLAN Trunking
12
VLAN Trunking Protocol
12
Verifying VTP
15
Configuration Example: VLANs
15
Private Virtual Local Area Networks
19
Configuring Private VLANs
19
PVLAN Trunk on the Catalyst 3560/3750
21
PVLAN Trunk on the Catalyst 4500
22
PVLAN on a 3750 Layer 3 Switch
22
Verifying PVLANs
23
Configuration Example: PVLAN
23
EtherChannel
27
Interface Modes in EtherChannel
27
Guidelines for Configuring EtherChannel
27
Configuring L2 EtherChannel
28
Configuring L3 EtherChannel
29
Verifying EtherChannel
29
Configuration Example: EtherChannel
31
Chapter 3
Implementing Spanning Tree
35
Enabling Spanning Tree Protocol
35
viii
Configuring a Secondary Root Switch
37
Configuring Port Priority
37
Configuring the Path Cost
38
Configuring the Switch Priority of a VLAN
38
Configuring STP Timers
39
FlexLinks
39
Verifying STP
40
Optional STP Configurations
40
PortFast
40
BPDU Guard
41
BPDU Filtering
41
UplinkFast
42
BackboneFast
43
Root Guard
43
Loop Guard
43
Unidirectional Link Detection
44
Changing the Spanning-Tree Mode
45
Extended System ID
45
Enabling Rapid Spanning Tree
46
Enabling Multiple Spanning Tree
46
Verifying MST
48
Troubleshooting Spanning Tree
48
Configuration Example: STP
49
Core Switch (3560)
49
Distribution 1 Switch (3560)
50
Distribution 2 Switch (3560)
51
Access 1 Switch (2960)
52
Access 2 Switch (2960)
53
Chapter 4
Implementing Inter-VLAN Routing
55
Inter-VLAN Communication Using an External Router:
Router-on-a-Stick
55
Inter-VLAN Communication Tips
56
Inter-VLAN Communication on a Multilayer Switch Through a
Switch Virtual Interface
57
Removing L2 Switchport Capability of a Switch Port
57
Configuring SVI Autostate
57
Configuring a Layer 3 EtherChannel
58
Configuring Inter-VLAN Communication
58
Configuration Example: Inter-VLAN Communication
59
ix
CORP Router
61
L2Switch2 (Catalyst 2960)
64
L3Switch1 (Catalyst 3560)
66
L2Switch1 (Catalyst 2960)
68
Configuring DHCP Server on a Router or Layer 3 Switch
69
Verifying and Troubleshooting DHCP Configuration
70
Configuring a DHCP Helper Address
71
DHCP Client on a Cisco IOS Software Ethernet Interface
72
Configuration Example: DHCP
72
Edmonton Router
73
Gibbons Router
75
Configuring Cisco Express Forwarding
76
Verifying CEF
76
Troubleshooting CEF
77
Chapter 5
Implementing a Highly Available Network
79
Implementing Network Logging
79
Configuring Syslog
79
Configuring an SNMP Managed Node
81
Service Level Agreements (SLA)
83
Configuring IP SLA (Catalyst 3750)
83
Monitoring IP SLA Operations
86
Chapter 6
Implementing a First Hop Redundancy
Protocols Solution
87
Hot Standby Routing Protocol
87
Configuring HSRP
88
Default HSRP Configuration Settings
88
Verifying HSRP
89
HSRP Optimization Options
89
Multiple HSRP
91
HSRP IP SLA Tracking
92
Debugging HSRP
93
Virtual Router Redundancy Protocol
94
Configuring VRRP
94
Verifying VRRP
95
Debugging VRRP
95
Gateway Load Balancing Protocol
96
Configuring GLBP
96
Verifying GLBP
99
x
Configuration Example: HSRP on L3 Switch
99
Switch DLS1
101
Switch DLS2
103
IP SLA Tracking—Switch DLS1 VLAN 10
105
Configuration Example: GLBP
106
DLS1
107
DLS2
109
Chapter 7
Minimizing Service Loss and Data Theft in a
Campus Network
111
Configuring Static MAC Addresses
111
Configuring Switch Port Security
112
Verifying Switch Port Security
113
Sticky MAC Addresses
114
Programming Authentication Methods
114
Adding 802.1x Port-Based Authentication
115
Mitigating VLAN Hopping: Best Practices
117
VLAN Access Maps
117
Verifying VLAN Access Maps
119
Configuration Example: VLAN Access Maps
120
DHCP Snooping
121
Verifying DHCP Snooping
123
Implementing Dynamic ARP Inspection
124
Verifying DAI
125
Configuring IP Source Guard
125
Understanding Cisco Discovery Protocol Security Issues
126
Link Layer Discovery Protocol Configuration
126
Configuring the Secure Shell Protocol
127
Restricting Management Access with ACLs
128
Telnet Sessions
128
Web Interface Sessions
128
Disabling Unneeded Services
129
Securing End-Device Access Ports
129
Chapter 8
Accommodating Voice and Video in
Campus Networks
131
Communications Subsystems
132
Configuring and Verifying Voice VLANs
132
Power over Ethernet
133
xi
Configuring AutoQoS: 2960/3560/3750
137
Verifying Auto QoS Information: 2960/3560/3750
138
Configuring AutoQoS: 6500
139
Verifying AutoQoS Information: 6500
140
Chapter 9
Integrating Wireless LANs into a Campus Network
141
Wireless Roaming and Controllers
141
Switch Configuration for Standalone APs and
HREAPs
142
Switch Configuration for WLC and Controller-Based
APs
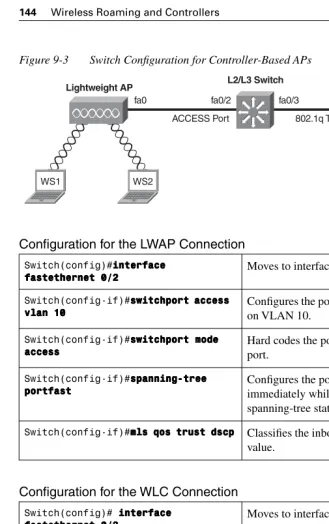
143
Configuration for the LWAP Connection
144
Configuration for the WLC Connection
144
Switch Configuration for 4400 Series Controllers
(EtherChannel)
145
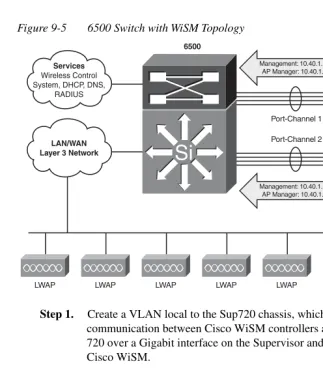
The Wireless Services Module
146
Configuring Communication Between the Supervisor 720
and Cisco WiSM
146
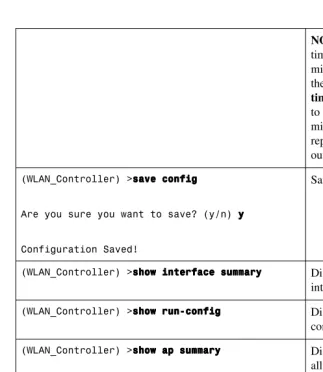
The Initial WiSM Configuration
152
Configuration Example: 4402 WLAN Controller Using the
Con-figuration Wizard
153
Configuration Example: 4402 WLAN Controller Using the Web
Interface
162
Configuration Example: Configuring a 3560 Switch to Support
WLANs and APs
171
Configuration Example: Configuring a Wireless Client
173
Appendix A
Private VLAN Catalyst Switch Support Matrix
177
xii
Command Syntax Conventions
The conventions used to present command syntax in this book are the same conventions used in the IOS Command Reference. The Command Reference describes these conventions as follows:
• Boldface indicates commands and keywords that are entered literally as shown. In actual configuration examples and output (not general command syntax), boldface indicates commands that are manually input by the user (such as a show command).
• Italic indicates arguments for which you supply actual values. • Vertical bars (|) separate alternative, mutually exclusive elements.
• Square brackets ([ ]) indicate an optional element.
• Braces ({ }) indicate a required choice.
xiii
Introduction
Welcome to CCNP SWITCH Portable Command Guide. When Cisco Press approached me about updating the four-volume CCNP Portable Command Guides, two thoughts immediately jumped into my head: “Is it time for revisions already?” and “Yikes! I am in the middle of pursuing my master’s degree. Where will I find the time?” Because of those thoughts, two more soon followed: “I wonder what Hans is up to?” and “I hope Carol is in a good mood, as I am about to ask to take Hans away again….” The result is what you now have before you: a new Portable Command Guide for the latest version of the CCNP exam that focuses on switching: CCNP SWITCH.
For those of you who have worked with my books before, thank you for looking at this one. I hope that it will help you as you prepare for the vendor exam, or assist you in your daily activities as a Cisco network administrator/manager.
For those of you who are new to my books, you are reading what is essentially a cleaned-up version of my own personal engineering journals—a small notebook that I carry around with me that contains little nuggets of information; commands that I use but then forget; IP address schemes for the parts of the network I work with only occasionally; and quick refreshers for those concepts that I work with only once or twice a year. Although I teach these topics to postsecondary students, the classes I teach sometimes occur only once a year; as you can attest to, it is extremely difficult to remember all those commands all the time. Having a journal of commands at your fingertips, without having to search the Cisco website, can be a real time-saver (or a job-saver if the network is down and you are responsible for getting it back online).
With the creation of the new CCNP exam objectives, there is always something new to read, or a new podcast to listen to, or another slideshow from CiscoLive that you missed or want to review. The engineering journal can be that central repository of information that won’t weigh you down as you carry it from the office or cubicle to the server and infrastructure rooms in some remote part of the building or some branch office.
To make this guide a more realistic one for you to use, the folks at Cisco Press have decided to continue with an appendix of blank pages—pages on which you can write your own personal notes, such as your own configurations, commands that are not in this book but are needed in your world, and so on. That way, this book will look less like the authors’ journals and more like your own.
Networking Devices Used in the Preparation of This Book
To verify the commands that are in this new series of CCNP Portable Command Guides, many different devices were used. The following is a list of the equipment used in the preparation of these books:• C2620 router running Cisco IOS Release 12.3(7)T, with a fixed Fast Ethernet interface, a WIC 2A/S serial interface card, and an NM-1E Ethernet interface
• C2811 ISR bundle with PVDM2, CMME, a WIC-2T, FXS and FXO VICs, running Cisco IOS Release 12.4(3g)
xiv
• WS-C3560-24-EMI Catalyst Switch, running Cisco IOS Release 12.2(25)SE
• WS-C3550-24-EMI Catalyst Switch, running Cisco IOS Release 12.1(9)EA1c
• WS-2960-24TT-L Catalyst Switch, running Cisco IOS Release 12.2(25)SE
• WS-2950-12 Catalyst Switch, running version C2950-C3.0(5.3)WC(1) Enterprise Edition Software
• WS-C3750-24TS Catalyst Switches, running ipservicesk9 release 12.2(52)SE
• C1760-V Voice Router with PVDM-256K-20, WIC-4ESW, VIC-2FXO, VIC-2FXS running ENTSERVICESK9 release 12.4(11)T2
You might notice that some of the devices were not running the latest and greatest IOS. Some of them are running code that is quite old.
Those of you familiar with Cisco devices will recognize that a majority of these commands work across the entire range of the Cisco product line. These commands are not limited to the platforms and IOS versions listed. In fact, in most cases, these devices are adequate for someone to continue their studies beyond the CCNP level as well. We have endeavored to identify throughout the book commands that are specific to a platform and/or IOS version.
Who Should Read This Book?
This book is for those people preparing for the CCNP SWITCH exam, whether through self-study, on-the-job training and practice, study within the Cisco Academy Program, or study through the use of a Cisco Training Partner. This book includes some handy hints and tips along the way to make life a bit easier for you in this endeavor. It is small enough that you will find it easy to carry around with you. Big, heavy textbooks might look impressive on your bookshelf in your office, but can you really carry them all around with you when you are working in a server room or equipment closet somewhere?
Strategies for Exam Preparation
The strategy that you use for CCNP SWITCH might be slightly different from strategies that other readers use, mainly based on the skills, knowledge, and experience you already have obtained. For example, if you have attended the SWITCH course, you might take a different approach than someone who learned routing via on-the-job training.
xv
Organization of This Book
Although this book could be read cover to cover, we strongly advise against it. The book is designed to be a simple listing of those commands that you need to understand to pass the SWITCH exam. Very little theory is included in the Portable Command Guides; they are designed to list commands needed at this level of study.
This book roughly follows the list of objectives for the CCNP SWITCH exam:
• Chapter 1: “Analyzing Campus Network Designs”—This chapter shows the Cisco Hierarchical Model of Network Design; the Cisco Enterprise Composite Network Model, the Cisco Service-Oriented Network Architecture (SONA), and the PPDIOO network lifecycle.
• Chapter 2: “Implementing VLANs in a Campus Network”—This chapter provides information on creating, verifying, and troubleshooting Virtual LANs, along with private VLANs and EtherChannel.
• Chapter 3: “Implementing Spanning Tree”—This chapter provides information on the configuration of Spanning Tree, along with commands used to verify the protocol and to configure enhancements to Spanning Tree, such as Rapid Spanning Tree and Multiple Spanning Tree.
• Chapter 4: “Implementing Inter-VLAN Routing”—This chapter shows the different ways to enable inter-VLAN communication—using an external router or using SVIs on a multilayer switch. DHCP and CEF are also covered in this chapter.
• Chapter 5: “Implementing a Highly Available Network”—This chapter covers topics such as network logging and syslog, SNMP managed nodes, and Cisco IOS Service Level Agreements.
• Chapter 6: “Implementing a First Hop Redundancy Protocols Solution”—This chapter provides information needed to ensure you have first hop redundancy— HSRO, VRRP, and GLBP are covered here.
• Chapter 7: “Minimizing Service Loss and Data Theft in a Campus Network”— Security is the focus of this chapter. Topics covered include port security, 802.1x authentication, mitigating VLAN hopping, DHCP snooping, DAI, CDP security issues, LLDP configuration, SSH, restricting access to telnet as web interface sessions with ACLs, how to disable unneeded ports, and securing end-device access ports.
• Chapter 8: “Accommodating Voice and Video in Campus Networks”—This chapter covers topics such as configuring and verifying voice VLANs, Power over Ethernet (POE), High Availability for Voice and Video, and configuring and verifying AutoQoS.
xvi
Did We Miss Anything?
CHAPTER 1
Analyzing Campus
Network Designs
This chapter provides information concerning the following network design requirement topics:
• Cisco Hierarchical Model of Network Design
• Cisco Enterprise Composite Network Model
• Cisco Service-Oriented Network Architecture
• PPDIOO Lifecycle Approach
No commands are associated with this module of the CCNP SWITCH Course Objectives.
Cisco Hierarchical Model of Network Design
Figure 1-1 shows the Cisco Hierarchical Network Model.
Figure 1-1 Cisco Hierarchical Network Model
Local and Remote Workgroup Access Policy-Based Connectivity
High-Speed Switching Core
Distribution
Access
2 Cisco Enterprise Composite Network Model
Cisco Enterprise Composite Network Model
Figure 1-2 shows the Cisco Enterprise Composite Network Model.
Figure 1-2 Cisco Enterprise Composite Network Model
Management
Edge Distribution Campus Backbone
Building Distribution Building Access
Server Farm Enterprise Campus
Campus Infr
astr
ucture Module
E-Commerce Enterprise
Edge
Internet Connectivity
Remote-Access VPN
WAN
V
V
ISP A Service Provider Edge
ISP B
PSTN
Cisco Service-Oriented Network Architecture 3
Cisco Service-Oriented Network Architecture
Figure 1-3 shows the Cisco Service-Oriented Network Architecture (SONA) framework.
Figure 1-3 Cisco Service-Oriented Network Architecture
Application Networking Services
Inter
activ
e
Ser
vices
La
y
er
Adaptiv
e
Management
Ser
vices
Infrastructure Services
Netw
or
k
ed
Infr
astr
ucture
La
y
er
Server Storage Clients
Places in the Network
Application
La
y
er
Collabor
ation
La
y
er
Middleware and Application Platforms
Business Applications
4 PPDIOO Lifecycle Approach
PPDIOO Lifecycle Approach
Figure 1-4 shows the Prepare, Plan, Design, Implement, Operate, and Optimize (PPDIOO) lifecycle.
Figure 1-4 Prepare, Plan, Design, Implement, Operate, and Optimize Lifecycle
PPDIOO Network Lifecycle Approach
Coordinated Planning and Strategy
Make sound financial decisions.
Operational Excellence
Adapt to changing business requirements.
Prepare
Implement the Solution
Integrate without disruption or causing vulnerability.
Implement Optimize
Assess Readiness
Can the network support the proposed system? Plan
Maintain Network Health
Manage, resolve, repair, and replace.
Operate
Design the Solution
CHAPTER 2
Implementing VLANs
in a Campus Network
This chapter provides information and commands concerning the following topics:
Virtual LANs
• Creating static VLANs
— Using VLAN-configuration mode
— Using VLAN Database mode
• Assigning ports to VLANs
• Using the range command
• Dynamic Trunking Protocol (DTP)
• Setting the encapsulation type
• Verifying VLAN information
• Saving VLAN configurations
• Erasing VLAN configurations
• Verifying VLAN trunking
• VLAN Trunking Protocol (VTP)
— Using VLAN Database mode
— Using global configuration mode
• Verifying VTP
Private VLANs
• Configuring private VLANs (PVLAN)
• Configuring PVLAN trunks
• Verifying PVLANs
• Configuring protected ports
EtherChannel
• Configuring interface modes in EtherChannel
— Without Port Aggregation Protocol (PAgP) or Link Aggregation Control Protocol (LACP)
— With PAgP
— With LACP
• Reviewing guidelines for configuring EtherChannel
• Configuring L2 EtherChannel
6 Virtual Local Area Networks
• Configuring EtherChannel load balancing
• Determining the types of EtherChannel load balancing
• Verifying EtherChannel load balancing
Virtual Local Area Networks
This section covers creating static Virtual Local Area Networks (VLAN), assigning ports to VLANs, VLAN commands, DTP, setting the encapsulation type, verifying VLAN information, saving and erasing VLAN configurations, verifying VLAN trunking, and VLAN Trunking Protocol (VTP).
Creating Static VLANs
Static VLANs occur when the network administrator manually assigns a switch port to belong to a VLAN. Each port is associated with a specific VLAN. By default, all ports are originally assigned to VLAN 1. There are two different ways to create VLANs:
• Using the VLAN-configuration mode, which is the recommended method of creating VLANs
• Using the VLAN Database mode (which should not be used but is still available)
Using VLAN-Configuration Mode
NOTE: This method is the only way to configure extended-range VLANs (VLAN IDs from 1006–4094).
NOTE: Regardless of the method used to create VLANs, the VTP revision number is increased by one each time a VLAN is created or changed.
Switch(config)#vvlvvlallanaannn 3333 Creates VLAN 3 and enters VLAN-config mode for further definitions.
Switch(config-vlan)#nnannaaammmmee ee EEEEnnnnggggiiniinenneeeeeeerrirriniinnngggg Assigns a name to the VLAN. The length of the name can be from 1 to 32 characters.
Virtual Local Area Networks 7
Using VLAN Database Mode
CAUTION: The VLAN Database mode has been deprecated and will be removed in some future Cisco IOS release. It is recommended to use only VLAN-configuration mode.
NOTE: You must apply the changes to the VLAN database for the changes to take
effect. You must use either the apply command or the exit command to do so.
Using the exit command applies the VLAN configurations and moves to the global
configuration mode. Using the Ctrl-z command to exit out of the VLAN database does not work in this mode because it will abort all changes made to the VLAN database—you must either use exit or apply and then the exit command.
Assigning Ports to VLANs
NOTE: When the switchport mode access command is used, the port operates as a nontrunking, single VLAN interface that transmits and receives nonencapsu-lated frames.
An access port can belong to only one VLAN.
Switch#vvlvvlllaanaannn ddddaataatttaabaababbaaasssseeee Enters VLAN Database mode.
Switch(vlan)#vvvlvlllaanaan nn 4444 nnnnaamaamemme ee SSSSaalaallleeeessss Creates VLAN 4 and names it Sales. The length of the name can be from 1 to 32 characters.
Switch(vlan)#vvvlvlllaanaan nn 11110000 Creates VLAN 10 and gives it a name of VLAN0010 as a default.
Switch(vlan)#aaaapppppplpplyllyyy Applies changes to the VLAN database and increases the revision number by 1.
Switch(vlan)#eeeexxxxiitiittt Applies changes to the VLAN database, increases the revision number by 1, and exits VLAN Database mode.
Switch(config)#iiniintnnttteeeerrrrffaffaaacccceeee ffaffasaasssttetteteettthhehheeerrnrrnenneeetttt 0
0 0 0////1111
Moves to interface configuration mode
Switch(config-if)#sswsswwiwitiitcttcchchhhppopporoorrrtttt mmommoooddddeeee a
a a accccccecceseesssssss
Sets the port to access mode
Switch(config-if)#sswsswwwiitiitttcchcchhhppopporoortrrtt t aacaacccccecceeessssssss v
v v vllllaanaan nn 11110000
8 Virtual Local Area Networks
Using the
range
Command
Dynamic Trunking Protocol
Switch(config)#iiniintnnttteereerrfrfaffaaaccecceee rrarranaannnggegge ee ff f
faaasastsstetteeetthtthhheereerrrnnenneeett tt 0000//1//1 11 ---- 9999
Enables you to set the same configuration parameters on multiple ports at the same time.
NOTE: There is a space before and after the hyphen in the interface range command.
Switch(config-if-range)#sswsswwwiiiittttcchcchphhpppooroorrrtt tt m
m m
mooododedde ee aaaaccccccecceeessssssss
Sets ports 1–9 as access ports.
Switch(config-if-range)#sswsswwwiiiittttcchcchphhpppooroorrrtt tt a
a a
accccccecceseesssssss vvlvvlllaaaann nn 11110000
Assigns ports 1–9 to VLAN 10.
Switch(config)#iiniintnnttteeeerrrrffaffacaaccceeee ffaffasaassstttteeteethtthehheeerrrrnnenneteettt 0
0 0 0////1111
Moves to interface configuration mode.
Switch(config-if)#sswsswwiwitiitcttcchchhhppopporoorrrtttt mmommoooddddeeee d
d d
dyynyynannamaamimmiiciccc ddddeeseesssiiriirarrabaabbbllelleee
Makes the interface actively attempt to convert the link to a trunk link.
NOTE: With the switchport mode dynamic desirable command set, the interface becomes a trunk link if the neighboring interface is set to trunk,
desirable, or auto.
Switch(config-if)#sswsswwiwitiitcttcchchhhppopporoorrrtttt mmommoooddddeeee d
d d
dyynyynannamaammmiiiicc cc aaaauuuuttttoooo
Enables the interface to convert into a trunk link.
NOTE: With the switchport mode dynamic auto command set, the interface becomes a trunk link if the neighboring interface is set to trunk
ordesirable.
Switch(config-if)#sssswwwwiitiitttcchcchhhppopporoorrrtttt n
n n
noooonnennegeegggootootttiiaiiataattteeee
Prevents the interface from generating DTP frames.
NOTE: Use the switchport mode nonegotiate command only when the interface switchport mode is access or
Virtual Local Area Networks 9
NOTE: The default mode is dependent on the platform. For the 2960, 3560, and the 3760, the default mode is dynamic auto.
Setting the Encapsulation Type
TIP: With the switchport trunk encapsulation negotiate command set, the
preferred trunking method is ISL.
CAUTION: The 2960 series switch supports only Dot1Q trunking.
Switch(config-if)#sswsswwiwitiitcttcchchhhppopporoorrrtttt mmommoooddddeeee t
t t trrrruunuunknnkkk
Puts the interface into permanent trunking mode and negotiates to convert the link into a trunk link.
NOTE: With the switchport mode trunk command set, the interface becomes a trunk link even if the neighboring interface is not a trunk link.
3560Switch(config)#iiiinntnnttteeeerrfrrfaffaaacccceeee f
f f
faasaastsstetteteetththhheereernrrnnneeeett tt 0000////1111
Moves to interface config mode.
3560Switch(config-if)#sssswwwwiitiitttcchcchhhppopporoorrrtttt m
m m
mooooddedde ee ttrttrrruunuunnnkkkk
Puts the interface into permanent trunking mode and negotiates to convert the link into a trunk link.
3560Switch(config-if)#sssswwwwiitiitttcchcchhhppopporoorrrtttt t
t t
trrrurunuunknnkkk eeneencnncccaaaappppssussuluulllaaaattittioiiooonnnn iisiisssllll
Specifies Inter-Switch Link (ISL) encapsulation on the trunk link.
3560Switch(config-if)#sssswwwwiitiitttcchcchhhppopporoorrrtttt t
t t
trrrruunuunknnkkk eeneencnncccaapaapppssussuluulllaaaattittioiiooonn nn ddoddooott1tt111qqqq
Specifies 802.1Q encapsulation on the trunk link.
3560Switch(config-if)#sssswwwwiitiitttcchcchhhppopporoorrrtttt t
t t
trrrruunuunknnkkk eeeenncnncccaaaappsppsussuluulllaataatittioiiooonn nn nnenneeeggoggooottittiaiiaaatttteeee
10 Virtual Local Area Networks
Verifying VLAN Information
Saving VLAN Configurations
The configurations of VLANs 1 through 1005 are always saved in the VLAN database. As long as the apply or exit command is executed in VLAN Database mode, changes are saved. If you are using VLAN-configuration mode, either the exit command or the Ctrl-z key sequence saves the changes to the VLAN database.
If you are using the VLAN database configuration at startup and the startup configuration file contains extended-range VLAN configuration, this information is lost when the system boots.
If you are using VTP transparent mode, the configurations are also saved in the running configuration and can be saved to the startup configuration using the copy running-config startup-config command.
If the VTP mode is transparent in the startup configuration, and the VLAN database and the VTP domain name from the VLAN database matches that in the startup configuration file, the VLAN database is ignored (cleared), and the VTP and VLAN configurations in the startup configuration file are used. The VLAN database revision number remains unchanged in the VLAN database.
Switch#sshsshhhoooowwww vvvvllllaaaannnn Displays VLAN information
Switch#sshsshhhooooww ww vvvvllllaanaan nn bbbbrrirriiieefeefff Displays VLAN information in brief
Switch#sshsshhhoowoowww vvvvllallaaann nn iidiiddd 2222 Displays information of VLAN 2 only
Switch#sshsshhhoooowwww vvvvllallaaann nn nnnnaaaammemme ee mmmmaaaarrkrrkekkeeettttiiniingnnggg Displays information of VLAN named marketing only
Virtual Local Area Networks 11
Erasing VLAN Configurations
NOTE: When you delete a VLAN from a switch that is in VTP server mode, the VLAN is removed from the VLAN database for all switches in the VTP domain. When you delete a VLAN from a switch that is in VTP transparent mode, the VLAN is deleted only on that specific switch.
NOTE: You cannot delete the default VLANs for the different media types: Ethernet VLAN 1 and FDDI or Token Ring VLANs 1002 to 1005.
Switch#ddeddeeelllleeeettetteee ffffllallasaashsshhh::::vvlvvlllaanaannn..d..daddaaatttt Removes the entire VLAN database from flash.
CAUTION: Make sure there is no space between the colon (:) and the characters
vlan.dat. You can potentially erase the entire contents of the flash with this command if the syntax is not correct. Make sure you read the output from the switch. If you need to cancel, press Ctrl-C to escape back to privileged mode:
(Switch#)
Switch#ddddeeeellelleeettetteee fflfflllaaaasshssh:hh:::vvvvllllaanaannn....ddaddataattt
Delete filename [vlan.dat]?
Delete flash:vlan.dat? [confirm]
Switch#
Switch(config)#iiniintnnttteeeerrfrrfaffaaacccceeee f
f f
faasaastsstetteteetththhheereernrrnnneeeett tt 0000////5555
Moves to interface config mode.
Switch(config-if)#nnnonooo sswsswwwiiiittcttccchhhhppoppooorrtrrttt a
a a
accccccecceseesssssss vvlvvlllaaaannnn 5555
Removes port from VLAN 5 and reassigns it to VLAN 1—the default VLAN.
Switch(config-if)#eeeexxxxiitiittt Moves to global config mode.
Switch(config)#nnonno oo vvvvllallanaannn 5555 Removes VLAN 5 from the VLAN database.
or
Switch#vvlvvlllaanaannn ddddaataatttaabaababbaaasssseeee Enters VLAN Database mode.
Switch(vlan)#nnnnoooo vvlvvlallaaannnn 5555 Removes VLAN 5 from the VLAN database.
12 Virtual Local Area Networks
CAUTION: When you delete a VLAN, any ports assigned to that VLAN become inactive. They remain associated with the VLAN (and thus inactive) until you assign them to a new VLAN. Therefore, it is recommended that you reassign ports to a new VLAN or the default VLAN before you delete a VLAN from the VLAN database.
Verifying VLAN Trunking
VLAN Trunking Protocol
VLAN Trunking Protocol (VTP) is a Cisco proprietary protocol that allows for VLAN configuration (addition, deletion, or renaming of VLANS) to be consistently maintained across a common administrative domain.
Using Global Configuration Mode Switch#sshsshhhooooww ww iiiinnnnttettereerfrrfaffaaaccccee ee f
f f
faaaasstsstetteeetttthhehhereerrrnnenneeett tt 00/00///11 11 sswsswwwiiiittcttccchhhhppopporoortrrttt
Displays the administrative and operational status of a trunking port
Switch(config)#vvtvvtpttppp mmmmoodoodddee ee cclcclillieiieeenntnnttt Changes the switch to VTP client mode.
Switch(config)#vvtvvtpttppp mmmmoodoodddee ee ssessereervrrvvveereerrr Changes the switch to VTP server mode.
Switch(config)#vvtvvtpttppp mmommodoodddeeee t
t t
trrrraanaansnnsssppappaaarrerreneennntttt
Changes the switch to VTP transparent mode.
NOTE: By default, all Catalyst switches are in server mode.
Switch(config)#nnonno oo vvvvttttpp pp mmmmooooddeddeee Returns the switch to the default VTP server mode.
Switch(config)#vvtvvtpttppp ddddoomoommmaaaaiiiinn domain-nn name
Configures the VTP domain name. The name can be from 1 to 32 characters long.
NOTE: All switches operating in VTP server or client mode must have the same domain name to ensure communication.
Switch(config)#vvtvvtpttppp ppppaasaassssssswwwwooroordrrddd password
Configures a VTP password. In Cisco IOS Software Release 12.3 and later, the password is an ASCII string from 1 to 32 characters long. If you are using a Cisco IOS release earlier than 12.3, the password length ranges from 8 to 64 characters long.
Virtual Local Area Networks 13
NOTE: Only VLANs included in the pruning-eligible list can be pruned. VLANs 2 through 1001 are pruning eligible by default on trunk ports. Reserved VLANs and extended-range VLANs cannot be pruned. To change which eligible VLANs can be
pruned, use the interface-specific switchport trunk pruning vlan command:
Switch(config-if)#sssswwwwiitiitttcchcchhhppoppooorrrrtt tt ttrttrrruuuunnnnkk kk pppprrrruunuuninniniinnngggg vvvvllllaanaan nn rrrreeeemmmmoovoovveveee 44,44,,, 220220-00-3--3330000
! Removes VLANs 4 and 20-30
Switch(config-if)#sssswwwwiitiitttcchcchhhppoppooorrrrtt tt ttrttrrruuuunnnnkk kk pppprrrruunuuninniiinnnngggg vvlvvlllaaaann nn eeeexxcxxccceepeeppptttt 44044000----55550000
! All VLANs are added to the pruning list except for 40-50
Using VLAN Database Mode
CAUTION: The VLAN Database mode has been deprecated and will be removed in some future Cisco IOS release. Recommended practice dictates using only the VLAN-configuration mode.
Switch(config)#vvtvvtpttppp vvvv22-22---mmmmoodoodeddeee Sets the VTP domain to Version 2. This command is for Cisco IOS Software Release 12.3 and later. If you are using a Cisco IOS release earlier than 12.3, the command is vtp version 2.
NOTE: VTP Versions 1 and 2 are not interoperable. All switches must use the same version. The biggest difference between Versions 1 and 2 is that Version 2 has support for Token Ring VLANs.
Switch(config)#vvtvvtpttppp pppprrurruuunnnniiniingnnggg Enables VTP pruning.
NOTE: By default, VTP pruning is disabled. You need to enable VTP pruning on only one switch in VTP server mode.
Switch#vvlvvlllaanaannn ddddaataatttaabaababbaaasssseeee Enters VLAN Database mode.
Switch(vlan)#vvvvttttpp pp ccccllilliiieeneennntttt Changes the switch to VTP client mode.
Switch(vlan)#vvvvttttpp pp sssseereerrrvvevveeerrrr Changes the switch to VTP server mode.
Switch(vlan)#vvvvttttpp pp ttttrrrraaaannsnnsssppppaaaarrerreneennntttt Changes the switch to VTP transparent mode.
14 Virtual Local Area Networks
Switch(vlan)#vvvtvtttpp pp ddddoomoommmaaiaaiiinnnn domain-name
Configures the VTP domain name. The name can be from 1 to 32 characters long.
NOTE: All switches operating in VTP server or client mode must have the same domain name to ensure communication.
Switch(vlan)#vvtvvtttpp pp ppppaaaasssssswsswwwoooorrrrdd dd password
Configures a VTP password. In Cisco IOS Release 12.3 and later, the password is an ASCII string from 1 to 32 characters long. If you are using a Cisco IOS release earlier than IOS 12.3, the password length ranges from 8 to 64 characters long.
NOTE: All switches must have the same VTP password set to communicate with each other.
Switch(vlan)#vvvvttttpp pp vvvv22-22---mmommodoodddeeee Sets the VTP domain to Version 2. This command is used in VLAN Database configuration mode. If you are configuring VTP version in global configuration mode, use the vtp version 2 command.
NOTE: VTP Versions 1 and 2 are not interoperable. All switches must use the same version. The biggest difference between Versions 1 and 2 is that Version 2 has support for Token Ring VLANs.
Switch(vlan)#vvvvttttpp pp pppprrurruuunninniniinnngggg Enables VTP pruning.
Virtual Local Area Networks 15
Verifying VTP
NOTE: If trunking has been established before VTP is set up, VTP information is propagated throughout the switch fabric almost immediately. However, because VTP information is advertised only every 300 seconds (5 minutes) unless a change has been made to force an update, it can take several minutes for VTP information to be propagated.
NOTE: Only VLANs included in the pruning-eligible list can be pruned. VLANs 2 through 1001 are pruning eligible by default on trunk ports. Reserved VLANs and extended-range VLANs cannot be pruned. To change which eligible VLANs can be pruned, use the interface-specific
switchport trunk pruning vlan command:
Switch(config-if)#sssswwwwiitiitcttccchhhhppopporoorrtrttt ttrttrurruuunnnnkk kk p
p p
prrrruunuuninniiinnnngg gg vvvvllllaanaan nn rrrreemeemommovoovevveee 44,44, ,, 222200-00-3--3330000
! Removes VLANs 4 and 20-30
Switch(config-if)#sssswwwwiitiitcttccchhhhppopporoorrtrttt ttrttrurruuunnnnkk kk p
p p
prrurrunuuninniiinnnngg gg vvvvllallaaann nn eexeexxxcceccepeeppptttt 44044000----55550000
All VLANs are added to the pruning list except for 40 through 50.
Switch(vlan)#eeeexxxxiitiittt Applies changes to VLAN database, increases the revision number by 1, and exits back to privileged mode.
Switch#sshsshhhooooww ww vvvvttttpp pp sstsstttaataatttuusuusss Displays general information about VTP configuration.
16 Virtual Local Area Networks
Configuration Example: VLANs
Figure 2-1 shows the network topology for the configuration that follows, which shows how to configure VLANs using the commands covered in this chapter.
Figure 2-1 Network Topology for VLAN Configuration Example
3560 Switch
Switch>eeneennnaaaabblbblelleee Moves to privileged mode.
Switch#ccoccooonnnnffiffigiiggguuuurrrree ee tttteeeerrrrmmimmiiinnnnaaaallll Moves to global configuration mode.
Switch(config)#hhohhosoosssttnttnnnaamaamemmeee 3353356556660000 Sets the host name.
3560(config)#vvvvttttpp pp mmmmooooddddee ee sssseeeerrvrrvevveeerrrr Changes the switch to VTP server mode. Note that server is the default setting for a 3560 switch.
3560(config)#vvtvvttptp pp ddddoomoommamaiaaiiinnnn ssossouoouuutttthhwhhwewweeesssstttt1111 Configures the VTP domain name to southwest1.
3560(config)#vvtvvtttpp pp ppappaasassssswsswwwooroorrrdd dd ttttoowoowewwereerrr Sets the VTP password to tower.
3560(config)#vvvlvlllaanaan nn 11110000 Creates VLAN 10 and enters VLAN-configuration mode.
n
naaammemee AAdAdmdmmiiinnn
VTP Domain
2960
Engineering VLAN 30
Native VLAN 1
Administration VLAN 10
Accounting VLAN 20
10.1.30.10/24
10.1.1.2/24
Ports: 16-24 10.1.30.0/24
GigabitEthernet0/1 GigabitEthernet0/1
Ports: 9-15 10.1.20.0/24
Ports: 1-8 10.1.10.0/24
10.1.1.0/24
Engineering VLAN 30
Native VLAN 1
Administration VLAN 10
Accounting VLAN 20
Ports: 16-24 10.1.30.0/24
Ports: 9-15 10.1.20.0/24
Ports: 1-8 10.1.10.0/24 10.1.1.0/24
WS1
10.1.30.10/24 WS2
VTP Server
3560
VTP Client
Virtual Local Area Networks 17
3560(config-vlan)#eeeexxxxiitiittt Increases the revision number by 1 and returns to global configuration mode.
3560(config)#vvvlvlllaanaan nn 22220000 Creates VLAN 20 and enters VLAN-configuration mode.
3560(config-vlan)#nnnanaaammemme ee AAAAccccccoccooouuuunntnntittiiinnnngggg Assigns a name to the VLAN.
3560(config-vlan)#vvvlvlllaanaan nn 33330000 Creates VLAN 30 and enters VLAN-configuration mode. Note that you do not have to exit back to global configuration mode to execute this command.
3560(config-vlan)#nnnnaaaammemme ee EEEEnngnngigginiinnneeeeeereerirriiinnnngggg Assigns a name to the VLAN.
3560(config-vlan)#eeeexxxxiitiittt Increases the revision number by 1 and returns to global configuration mode.
3560(config)#iiniinntntettereerrfrfffaaaaccecceee rrrraanaangnngggeeee f
f f
faaaasstssthtthehheeetttthhehheeerrnrrnnneeteet tt 00/00/1//1 11 ---- 8888
Enables you to set the same configuration parameters on multiple ports at the same time.
3560(config-if-range)#sssswwwwiitiitttcchcchhhppopporoorrrtttt m
m m
mooododedde ee aaaaccccccecceeessssssss
Sets ports 1–8 as access ports.
3560(config-if-range)#sssswwwwiitiitttcchcchhhppopporoorrrtttt a
a a
accccccecceseesssssss vvlvvlllaaaann nn 11011000
Assigns ports 1–8 to VLAN 10.
3560(config-if-range)#iiiinnnnttetteeerrfrrfffaacaacecceee r
r r
raanaangnngeggeee ffffaasaassstttteeteethtthehhereernrrnenneteettt 0000//9//999 ---- 11511555
Enables you to set the same configuration parameters on multiple ports at the same time.
3560(config-if-range)#sssswwwwiitiitttcchcchhhppopporoorrrtttt m
m m
mooododedde ee aaaaccccccecceeessssssss
Sets ports 9–15 as access ports.
3560(config-if-range)#sssswwwwiitiitttcchcchhhppopporoorrrtttt a
a a
accccccecceseesssssss vvlvvlllaaaann nn 22022000
Assigns ports 9–15 to VLAN 20.
3560(config-if-range)#iiiinnnnttetteeerrfrrfffaacaacecceee r
r r
raanaangnngeggeee ffffaasaassstttteeeetthtthehhereerrrnnenneteettt 0000//1//1116666 -- -- 22224444
Enables you to set the same configuration parameters on multiple ports at the same time.
3560(config-if-range)#sssswwwwiitiitttcchcchhhppopporoorrrtttt m
m m
mooododedde ee aaaaccccccecceeessssssss
Sets ports 16–24 as access ports.
3560(config-if-range)#sssswwwwiitiitttcchcchhhppopporoorrrtttt a
a a
accccccecceseesssssss vvlvvlllaaaann nn 33033000
Assigns ports 16–24 to VLAN 30.
18 Virtual Local Area Networks
2960 Switch
3560(config)#iiiinnnnttettereerfrrfffaaaaccecceee g
g g
giiigigaggabaabbbiitiittteeteettthhehheerernrrnenneeett tt 00/00///1111
Moves to interface configuration mode.
3560(config-if)#sswsswwwiiiittcttchcchhhppppooroortrrt tt ttttrrurrunuunnnkkkk e
e e
ennncncaccapaapppssussuuullallaaattittiiioonoon nn ddoddotoot1tt111qqqq
Specifies 802.1Q encapsulation on the trunk link.
3560(config-if)#sswsswwiwiiittcttchcchhhppppooroortrrt tt mmommodoodeddeee t
t t trrrruunuunknnkkk
Puts the interface into permanent trunking mode and negotiates to convert the link into a trunk link.
3560(config-if)#eexeexxxiiiitttt Returns to global configuration mode.
3560(config)#eeeexxxxiitiittt Returns to privileged mode.
3560#ccccooooppyppyyy rrrruunuunnnnnnniiniingnng-gg---ccoccooonnfnnfffiigiiggg sstsstattaaarrrrttuttuuupppp--- -c
c c coooonnfnnfiffiiigggg
Saves the configuration in NVRAM.
Switch>eeneennnaaaabblbblelleee Moves to privileged mode.
Switch#ccoccooonnnnffiffigiiggguuuurrrree ee tttteeeerrrrmmimmiiinnnnaaaallll Moves to global configuration mode.
Switch(config)#hhohhosoosssttnttnnnaamaamemmeee 2292296996660000 Sets the host name.
2960(config)#vvvvttttpp pp mmmmooooddddee ee cccclllliieiieneennntttt Changes the switch to VTP client mode.
2960(config)#vvtvvttptp pp ddddoomoommamaiaaiiinnnn ssossouoouuutttthhhhwwewweeesssstttt1111 Configures the VTP domain name to southwest1.
2960(config)#iiniinntntettereerrfrfffaaaaccecceee rrrraanaangnngggeeee f
f f
faaasastsstetteeetthtthhheereerrrnnenneeett tt 0000//1//1 11 ---- 8888
Enables you to set the same configuration parameters on multiple ports at the same time.
2960(config-if-range)#sssswwwwiitiitttcchcchhhppopporoorrrtttt m
m m
mooododedde ee aaaaccccccecceeessssssss
Sets ports 1–8 as access ports.
2960(config-if-range)#sssswwwwiitiitttcchcchhhppopporoorrrtttt a
a a
accccccecceseesssssss vvlvvlllaaaann nn 11011000
Assigns ports 1–8 to VLAN 10.
2960(config-if-range)#iiiinnnnttetteeerrfrrfffaacaacecceee r
r r
raanaangnngeggeee ffffaasaassstttteeteethtthehhereernrrnenneteettt 0000//9//999 ---- 11511555
Enables you to set the same configuration parameters on multiple ports at the same time.
2960(config-if-range)#sssswwwwiitiitttcchcchhhppopporoorrrtttt m
m m
mooododedde ee aaaaccccccecceeessssssss
Sets ports 9–15 as access ports.
2960(config-if-range)#sssswwwwiitiitttcchcchhhppopporoorrrtttt a
a a
accccccecceseesssssss vvlvvlllaaaann nn 22022000
Private Virtual Local Area Networks 19
Private Virtual Local Area Networks
This section covers configuring private VLANs (PVLAN), configuring PVLAN trunks, verifying PVLANs, and configuring protected ports.
Configuring Private VLANs
A problem can potentially exist when an Internet service provider (ISP) has many devices from different customers on a single demilitarized zone (DMZ) segment or VLAN—these devices are not isolated from each other. Some switches can implement PVLANs, which keep some switch ports shared and some isolated, even though all ports are in the same VLAN. This isolation eliminates the need for a separate VLAN and IP subnet per customer.
2960(config-if-range)#iiiinnnnttetteeerrfrrfffaacaacecceee r
r r
raanaangnngeggeee ffffaasaassstttteeeetthtthehhereerrrnnenneteettt 0000//1//1116666 -- -- 22224444
Enables you to set the same configuration parameters on multiple ports at the same time.
2960(config-if-range)#sssswwwwiitiitttcchcchhhppopporoorrrtttt m
m m
mooododedde ee aaaaccccccecceeessssssss
Sets ports 16–24 as access ports.
2960(config-if-range)#sssswwwwiitiitttcchcchhhppopporoorrrtttt a
a a
accccccecceseesssssss vvlvvlllaaaann nn 33033000
Assigns ports 16–24 to VLAN 30.
2960(config-if-range)#eeeexxxxiitiittt Returns to global configuration mode.
2960(config)#iiiinnnnttettereerfrrfffaaaaccecceee g
g g
giiigigaggabaabbbiitiittteeteettthhehheerernrrnenneeett tt 00/00///1111
Moves to interface configuration mode.
2960(config-if)#sswsswwiwiiittcttchcchhhppppooroortrrt tt mmommodoodeddeee t
t t trrrruunuunknnkkk
Puts the interface into permanent trunking mode and negotiates to convert the link into a trunk link.
2960(config-if)#eexeexxxiiiitttt Returns to global configuration mode.
2960(config)#eeeexxxxiitiittt Returns to privileged mode.
2960#ccccooooppyppyyy rrrruunuunnnnnnniiniingnng-gg---ccoccooonnfnnfffiigiiggg sstsstattaaarrrrttuttuuupppp--- -c
c c coooonnfnnfiffiiigggg
20 Private Virtual Local Area Networks
NOTE: Private VLANs are implemented to varying degrees on Catalyst 6500/ 4500/3750/3560 as well as the Metro Ethernet line of switches. All PVLAN configuration commands are not supported on all switch platforms. For more information, see Appendix A, “Private VLAN Catalyst Switch Support Matrix.”
Switch(config)#vvtvvtpttppp mmommodoodddeeee t
t t
trrrraanaansnnsssppappaaarrerreneennntttt
Sets VTP mode to transparent.
Switch(config)#vvlvvlallaaann nn 22022000 Creates VLAN 20 and moves to VLAN-configuration mode.
Switch(config-vlan)#pprpprrriiiivvvvaataatetteee----vvlvvlallanaannn p
p p prrrriimiimammaaarrrryyyy
Creates a private, primary VLAN.
Switch(config-vlan)#vvlvvlllaaaann nn 111100001111 Creates VLAN 101 and moves to VLAN-config mode.
Switch(config-vlan)#pprpprrriiiivvvvaataatetteee----vvlvvlallanaannn i
i i issssooloolallataattteeeedddd
Creates a private, isolated VLAN for VLAN 101.
NOTE: An isolated VLAN can
communicate only with promiscuous ports.
Switch(config-vlan)#eexeexxxiiiitttt Returns to global configuration mode.
Switch(config)#vvlvvlallaaann nn 110110002222 Creates VLAN 102 and moves to VLAN-config mode.
Switch(config-vlan)#pprpprrriiiivvvvaataatetteee----vvlvvlallanaannn c
c c
coooommmmmmummunuunnniiiittyttyyy
Creates a private, community VLAN for VLAN 102.
NOTE: A community VLAN can communicate with all promiscuous ports and with other ports in the same community.
Switch(config-vlan)#eexeexxxiiiitttt Returns to global config mode.
Switch(config)#vvlvvlallaaann nn 110110003333 Creates VLAN 103 and moves to VLAN-config mode.
Switch(config-vlan)#pprpprrriiiivvvvaataatetteee----vvlvvlallanaannn c
c c
coooommmmmmummunuunnniiiittyttyyy
Creates a private, community VLAN for VLAN 103.
Switch(config-vlan)#vvlvvlllaaaann nn 22220000 Returns to VLAN-config mode for VLAN 20.
Switch(config-vlan)#pprpprrriiiivvvvaataatetteee----vvlvvlallanaannn a
a a
assssssossocooccciiaiiaaattittiiioonoonnn 1101100011-11-1--10110003333
Private Virtual Local Area Networks 21
PVLAN Trunk on the Catalyst 3560/3750
NOTE: Only one isolated VLAN can be mapped to a primary VLAN, but more than one community VLAN can be mapped to a primary VLAN.
Switch(config)#iiniintnnttteeeerrfrrfaffaaacccceeee f
f f
faaaasstsstetteteettthhhheereernrrnneneeett tt 00/00///22022000
Moves to interface config mode
Switch(config-if)#sssswwwwiitiitttcchcchhhppopporoorrrtttt m
m m
mooooddedde ee pppprrirriviivvvaaaattttee-ee---vvvvllllaanaan nn hhhhoooosstssttt
Configures the port as a private VLAN host port.
Switch(config-if)#sssswwwwiitiitttcchcchhhppopporoorrrtttt p
p p
prrirriviivavvataatteteee--v--vlvvlllaaaann nn hhhhoosoossstt-tt-a--asaasssssossoococcciiaiiataattitiiioooonn nn 220220 00 1
1 1 100001111
Associates the port with primary private VLAN 20 and secondary private VLAN 101.
Switch(config-if)#eeeexxxxiitiittt Moves to global configuration mode.
Switch(config)#iiniintnnttteeeerrfrrfaffaaacccceeee f
f f
faaaasstsstetteteettthhhheereernrrnneneeett tt 00/00///22122111
Moves to interface config mode.
Switch(config-if)#sssswwwwiitiitttcchcchhhppopporoorrrtttt m
m m
mooooddedde ee pppprrrriiviivvvaaaattette-ee---vvvvllallanaan nn pprpprroromoommmiisiisssccuccuouuooouuuussss
Configures the port as a private VLAN promiscuous port.
Switch(config-if)#sssswwwwiitiitttcchcchhhppopporoorrrtttt p
p p
prrirriviivavvaaatttteeee--v--vlvvlllaaaann nn mmmmaaaappppppippiiinnnngg gg 22220000 110110100111 111100200222 1
1 1 100003333
Maps VLAN 20, 101, 102, and 103 to promiscuous port.
Switch(config)# iiniinnntttteeeerrfrrfffaaaaccccee ee f
f f
faaaasstsstetteteettthhhheereernrrnneneeett tt 00/00///22322333
Moves to interface configuration mode.
Switch(config-if)# sssswwiwwiiittttcchcchphhpppooroorrrtt tt t
t t
trrrruunuunknnkkk eeneencnncccaapaapppssussuluulllaaaattittioiiooonn nn ddoddooott1tt111qqqq
Specifies 802.1Q encapsulation on the trunk link.
Switch(config-if)# sssswwiwwiiittttcchcchphhpppooroorrrtt tt t
t t
trrurrunuunknnkkk nnnanataatttiiiivvevve ee vvvvllllaanaan nn 99999999
Specifies the native VLAN as 99.
Switch(config-if)# sssswwiwwiiittttcchcchphhpppooroorrrtt tt m
m m
mooooddedde ee ttrttrrruunuunnnkkkk
Puts the interface into permanent trunking mode and negotiates to convert the link into a trunk link.
22 Private Virtual Local Area Networks
PVLAN Trunk on the Catalyst 4500
This configuration shows how to configure interface FastEthernet 5/2 as a secondary trunk port.
PVLAN on a 3750 Layer 3 Switch
The Catalyst 3750 can provide private VLANs when operating as a Layer 3 switch. The Switch Virtual Interface (SVI) is the primary VLAN. The secondary VLANs are mapped at the SVI instead of at the promiscuous port. All other configuration, including creating and configuring primary and secondary VLANs and applying those VLANs to switch ports, remains the same.
Switch(config)# iiniinnntttteeeerrfrrfffaaaaccccee ee f
f f
faasaastsstetteteetththhheereernrrnnneeeett tt 5555////2222
Moves to interface configuration mode.
Switch(config-if)# sssswwiwwiiittttcchcchphhpppooroorrrtt tt m
m m
mooooddedde ee pprpprrriiiivvavvataatetteee--v--vvvllallaaann nn ttttrrrruuuunnknnkkk ssesseceecccoooonndnndaddaaarrrryyyy
Specifies that the ports with a valid PVLAN trunk association become active host private VLAN trunk ports.
Switch(config-if)# sssswwiwwiiittttcchcchphhpppooroorrrtt tt p
p p
prrirriviivavvataattteeee--v--vlvvlllaaaann nn tttrtrrruuuunnknnkkk nnnnaataatttiiiivvvvee ee vvvvllllaanaan nn 11110000
Specifies the native VLAN as 10.
Switch(config-if)# sssswwiwwiiittttcchcchphhpppooroorrrtt tt p
p p
prrrriiviivavvaaatttteeee--v--vvvllllaaaann nn ttttrrrruunuunknnkkk aalaallllllloooowwewwedeed dd vvlvvlllaanaannn 1
1 1 10000 3333----4444
Enables the native VLAN 10 and VLANs 3–4 on the trunk.
Switch(config-if)# sssswwiwwiiittttcchcchphhpppooroorrrtt tt p
p p
prrirriviivavvataattteeee--v--vlvvlllaaaann nn aaasasssssssoocooccciiiiaataatittioiiooonn nn ttrttrrruunuunnnkk kk 3333 3
3 3 300001111
Associates the secondary private VLAN 301 to the primary private VLAN 3.
Switch(config)# iiniinnntttteeeerrfrrfffaaaaccccee ee V
V V Vllllaanaan1nn11100000000
Moves to interface configuration mode.
Switch(config-if)# iiipip pp aaaaddddddrddrrreeeessssss ss 1
1 1
1777722.22.2..2220000..1..101100000.00...11 11 2252255555.55.2..222555555.55.2..22255555555..0..000
Specifies an IP address for SVI interface VLAN 1.
Switch(config-if)# pppprrirriiivvvvaaaattette-ee---vvlvvlallanaannn m
m m
maapaapppppippiniinnngggg 110110001111--1--10110002222
Maps the secondary VLANs 101 and 102 to the Layer 3 interface VLAN 1.
Private Virtual Local Area Networks 23
Verifying PVLANs
Configuration Example: PVLAN
Figure 2-2 shows the network topology for the configuration that follows, which shows how to configure PVLANs using the commands covered in this chapter. The following network functionality is required:
• DNS, WWW, and SMTP are in server farm, same subnet.
• WWW and SMTP servers can communicate only with router.
• DNS servers can communicate with each other and with router.
• The servers are attached to two switches.
• One switch is required to route traffic (L3) from the servers.
Figure 2-2 Network Topology for PVLAN Configuration Example Switch#sshsshhhoooowwww vvlvvlllaaaann nn pppprrirriiivvavvaaattttee-ee-v--vlvvlallaaannnn
t t t tyyyyppeppeee
Verifies private VLAN configuration.
Switch#sshsshhhooooww ww iiiinnnnttettereerfrrfaffaaaccccee ee f
f f
faasaastsstetteteettthhhheereerrrnnnneeteet tt 0000//2//20220 00 sswsswwwiitiitcttccchhhhppopporoorrrtttt
Verifies all configuration on fastethernet 0/20, including private VLAN associations.
Internet
fa0/24 fa0/23
fa0/24
802.1q T
runk
fa0/1 fa0/4
fa0/2
fa0/3
fa0/1 fa0/4
fa0/2 fa0/3 Routed Port
Primary VLAN 100
172.20.100.0/24 L2 C3750
L3 C3750
DNS1 Other Server(s) Border
SW1
SW2
DNS2 Other Server(s)
WWW Other Server(s)
Isolated VLAN 101
Isolated VLAN 101 SMTP Other Server(s) Community VLAN 102
24 Private Virtual Local Area Networks
Switch SW1
Switch(config)#hhohhosoosssttttnnnnaamaammmeeee SSWSSW1WW111 Names the switch SW1.
SW1(config)#vvvvttttpppp mmommoooddddeeee ttttrrarraaannsnnspsspppaaraarrreeneennntttt Specifies the VTP device mode as transparent.
SW1(config)#iiiipppp ddhddhchhcpccppp ppoppooooooollll 1
1 1
1777722_22_2__22200_00___110110000000
Creates a DHCP pool named 172_20_100.
SW1(dhcp-config)#nnnneeeettttwwowwooorrrrkkkk 1
1 1
1777722.22.2..2220000..1..101100000.00...00 00 2252255555.55.2..222555555.55.2..22255555555..0..000
Provides IP addresses for DHCP clients in the 172.20.100.0/24 network.
SW1(dhcp-config)#ddddeeeeffaffauaauuulllltt-tt-r--rorrooouutuutettereerrr 1
1 1
1777722.22.2..2220000..1..10110000000....1111
Defines the default gateway for the DHCP clients.
SW1(dhcp-config)#eeeexxxxiiiitttt Exits DHCP configuration mode.
SW1(config)#iipiipp p ddhddhchhccpcppp eexeexcxxccclllluuduudeddeeedddd--- -a
a a
addddddrddrerreeessssssss 1111777722.22.2..2022000....110110000000....1111 1
1 1
1777722.22.2..2220000..1..101100000.00...66366333
Excludes the first 64 IP addresses from the DHCP scope.
SW1(config-vlan)#vvvvllllaaaann nn 111100001111 Creates VLAN 101.
SW1(config-vlan)#pppprrrriiiivvavvaaattetteee--v--vlvvlllaaaann nn i
i i issssooloolallataattteeeedddd
Defines the VLAN 101 as private and having isolated ports.
SW1(config-vlan)#vvvvllllaaaann nn 111100002222 Creates VLAN 102.
SW1(config-vlan)#pppprrrriiiivvavvaaattetteee--v--vlvvlllaaaann nn c
c c
coooommmmmmummunuunnniiiittyttyyy
Defines VLAN 102 as private and having community ports.
SW1(config)#vvvvllllaaaann nn 111100000000 Creates VLAN 100.
SW1(config-vlan)#pppprrrriiiivvavvaaattetteee--v--vlvvlllaaaann nn p
p p prrrriimiimammaaarrrryyyy
Defines VLAN 100 as the primary VLAN for the private VLANs.
SW1(config-vlan)#pppprrrriiiivvavvaaattetteee--v--vlvvlllaaaann nn a
a a
assssssossocooccciiaiiaaattittiiioonoonnn 1101100011-11-1--10110002222
Associates the secondary VLANs to the primary VLAN 100.
SW1(config-vlan)#eeeexxxxiiiitttt Exits VLAN configuration mode.
SW1(config)#iiiinnnntttteereerfrrfffaaaaccccee ee F
F F
FaasaastsstEttEEEtthtthhheereerrrnnenneeett0tt0/00/1//111 -- -- 2222
Moves to interface range configuration mode.
SW1(config-if)#sswsswiwwiiittttcchcchphhpppooroorrrtt tt p
p p
prrirriviivavvaaatttteeee--v--vlvvlllaaaann nn hhhhoooosstsst-tt---aaaassssssossoooccicciiiaataatittiiioooonnnn 1
1 1 1000000 00 110110001111
Defines the switch ports as private and associated with primary VLAN 100 and secondary (isolated) VLAN 101.
SW1(config-if)#sswsswiwwiiittcttcchchphhpppooroorrrtt tt mmommoooddedde ee p
p p
prrrriiviivavvataattteeee--v--vlvvllalaaann nn hhohhooosstssttt
Private Virtual Local Area Networks 25
SW1(config)#iiiinnnntttteereerfrrfffaaaaccccee ee F
F F
FaasaastsstEttEEEtthtthhheereerrrnnenneeett0tt0/00/3//333 –– –– 4444
Moves to interface range configuration mode.
SW1(config-if)#sswsswiwwiiittttcchcchphhpppooroorrrtt