Contents at a Glance
Contents ... v
About the Authors ... x
About the Technical Reviewer ... xi
Acknowledgments ... xii
Introduction ... xiii
■
Chapter 1: Getting Started ... 1
■
Chapter 2: Understanding Core Data ... 27
■
Chapter 3: Storing Data: SQLite and Other Options ... 59
■
Chapter 4: Creating a Data Model ... 111
■
Chapter 5: Working with Data Objects ... 133
■
Chapter 6: Refining Result Sets ... 187
■
Chapter 7: Tuning Performance and Memory Usage ... 209
■
Chapter 8: Versioning and Migrating Data ... 253
■
Chapter 9: Managing Table Views Using a Fetched Results Controller ... 285
■
Chapter 10: Using Core Data in Advanced Applications ... 307
Data Access and Persistence Engine for iPhone, iPad,
and iPod touch
Second Edition
■ ■ ■
Copyright © 2011 by Michael Privat and Robert Warner
All rights reserved. No part of this work may be reproduced or transmitted in any form or by any means, electronic or mechanical, including photocopying, recording, or by any information storage or retrieval system, without the prior written permission of the copyright owner and the publisher.
ISBN-13 (pbk): 978-1-4302-3656-6 ISBN-13 (electronic): 978-1-4302-3567-3
Trademarked names, logos, and images may appear in this book. Rather than use a trademark symbol with every occurrence of a trademarked name, logo, or image we use the names, logos, and images only in an editorial fashion and to the benefit of the trademark owner, with no intention of infringement of the trademark.
The use in this publication of trade names, trademarks, service marks, and similar terms, even if they are not identified as such, is not to be taken as an expression of opinion as to whether or not they are subject to proprietary rights.
President and Publisher: Paul Manning Lead Editor: Steve Anglin
Development Editors: Matthew Moodie and Douglas Pundick Technical Reviewer: Robert Hamilton
Editorial Board: Steve Anglin, Mark Beckner, Ewan Buckingham, Gary Cornell, Morgan Ertel, Jonathan Gennick, Jonathan Hassell, Robert Hutchinson, Michelle Lowman,
James Markham, Matthew Moodie, Jeff Olson, Jeffrey Pepper, Douglas Pundick, Ben Renow-Clarke, Dominic Shakeshaft, Gwenan Spearing, Matt Wade, Tom Welsh Coordinating Editor: Jennifer L. Blackwell
Copy Editor: Mary Behr Compositor: MacPS, LLC Indexer: SPi Global Artist: SPi Global
Cover Designer: Anna Ishchenko
Distributed to the book trade worldwide by Springer Science+Business Media, LLC., 233 Spring Street, 6th Floor, New York, NY 10013. Phone 1-800-SPRINGER, fax (201) 348-4505, e-mail [email protected], or visit www.springeronline.com.
For information on translations, please e-mail [email protected], or visit www.apress.com. Apress and friends of ED books may be purchased in bulk for academic, corporate, or promotional use. eBook versions and licenses are also available for most titles. For more information, reference our Special Bulk Sales–eBook Licensing web page at
www.apress.com/bulk-sales.
The information in this book is distributed on an “as is” basis, without warranty. Although every precaution has been taken in the preparation of this work, neither the author(s) nor Apress shall have any liability to any person or entity with respect to any loss or damage caused or alleged to be caused directly or indirectly by the information contained in this work.
To my beautiful wife, Sherry, and our wonderful children: Tyson, Jacob, Mallory, Camie, and Leila.
Contents
Contents at a Glance ... iv
About the Authors ... x
About the Technical Reviewer ... xi
Acknowledgments ... xii
Introduction ... xiii
■
Chapter 1: Getting Started ... 1
What Is Core Data? ... 1
History of Persistence in iOS ... 2
Creating a Basic Core Data Application ... 3
Understanding the Core Data Components ... 3
Creating a New Project ... 5
Running Your New Project ... 6
Understanding the Application’s Components ... 9
Fetching Results ... 10
Inserting New Objects ... 13
Initializing the Managed Context ... 14
Adding Core Data to an Existing Project ... 16
Adding the Core Data Framework ... 16
Creating the Data Model ... 19
Initializing the Managed Object Context ... 22
Summary ... 25
■
Chapter 2: Understanding Core Data ... 27
Core Data Framework Classes ... 27
The Model Definition Classes ... 30
The Data Access Classes ... 38
Key-Value Observing ... 43
The Query Classes ... 44
How the Classes Interact ... 47
SQLite Primer ... 53
■
Chapter 3: Storing Data: SQLite and Other Options .
...
59
Visualizing the User Interface ... 60
Using SQLite as the Persistent Store ... 63
Configuring the One-to-Many Relationship ... 67
Building the User Interface ... 69
Configuring the Table ... 72
Creating a Team ... 72
The Player User Interface ... 81
Adding, Editing, and Deleting Players ... 84
Seeing the Data in the Persistent Store ... 89
Using an In-Memory Persistent Store ... 92
Creating Your Own Custom Persistent Store ... 94
Initializing the Custom Store ... 95
Mapping Between NSManagedOBject and NSAtomicStoreCacheNode ...98
Serializing the Data ... 101
Using the Custom Store ... 106
What About XML Persistent Stores? ... 107
Summary ... 110
■
Chapter 4: Creating a Data Model .
...
111
Designing Your Database ... 111
Relational Database Normalization ... 112
Using the Xcode Data Modeler ... 113
Viewing and Editing Attribute Details ... 119
Viewing and Editing Relationship Details ... 120
Using Fetched Properties ... 121
Creating Entities ... 123
Creating Attributes ... 125
Creating Relationships ... 127
Name ... 128
Destination and Inverse ... 129
Transient ... 129
Optional ... 129
To-Many Relationship ... 130
Count (Minimum and Maximum) ... 130
Delete Rule ... 130
Summary ... 131
■
Chapter 5: Working with Data Objects .
...
133
Understanding CRUD ... 133
Creating the Shape Application Data Model ... 137
Building the Shape Application User Interface ... 145
Enabling User Interactions with the Shapes Application ... 154
Generating Classes ... 156
Modifying Generated Classes ... 164
Using the Transformable Type ... 169
Validating Data ... 173
Default Values ... 179
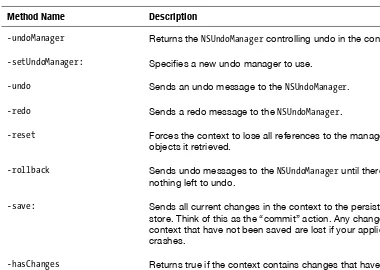
Undoing and Redoing ... 180
Undo Groups ... 181
Limiting the Undo Stack ... 181
Disabling Undo Tracking ... 182
Adding Undo to Shapes ... 182
Summary ... 185
■
Chapter 6: Refining Result Sets ... 187
Building the Test Application ... 187
Creating the Org Chart Data ... 188
Reading and Outputting the Data ... 191
Filtering ... 192
Expressions for a Single Value ... 193
Expressions for a Collection ... 194
Comparison Predicates ... 195
Compound Predicates ... 198
Subqueries ... 200
Aggregating ... 203
Sorting ... 204
Returning Unsorted Data ... 204
Sorting Data on One Criterion ... 205
Sorting on Multiple Criteria ... 206
Summary ... 207
■
Chapter 7: Tuning Performance and Memory Usage ... 209
Building the Application for Testing ... 209
Creating the Core Data Project ... 210
Creating the Data Model and Data ... 213
Creating the Testing View ... 215
Building the Testing Framework ... 218
Adding the Testing Framework to the Application ... 220
Running Your First Test ... 222
Faulting ... 223
Firing Faults ... 224
Faulting and Caching ... 225
Refaulting ... 225
Building the Faulting Test ... 226
Taking Control: Firing Faults on Purpose ... 229
Prefetching ... 231
Caching ... 233
Expiring ... 236
Memory Consumption ... 236
Brute-Force Cache Expiration ... 236
Expiring the Cache Through Faulting ... 237
Uniquing ... 237
Improve Performance with Better Predicates ... 241
Analyzing Performance ... 245
Launching Instruments ... 245
Understanding the Results ... 249
Summary ... 251
■
Chapter 8: Versioning and Migrating Data ... 253
Versioning ... 254
Lightweight M8igrations ... 257
Migrating a Simple Change ... 258
Migrating More Complex Changes ... 259
Renaming Entities and Properties ... 260
Creating a Mapping Model ... 262
Understanding Entity Mappings ... 263
Understanding Property Mappings ... 264
Creating a New Model Version That Requires a Mapping Model ... 266
Creating a Mapping Model ... 270
Migrating Data ... 276
Running Your Migration ... 277
Custom Migrations ... 278
Making Sure Migration Is Needed ... 280
Setting Up the Migration Manager ... 281
Running the Migration ... 282
Summary ... 284
■
Chapter 9: Managing Table Views Using a Fetched Results Controller ... 285
Understanding NSFetchedResultsController ... 285
The Fetch Request ... 286
The Managed Object Context ... 286
The Section Name Key Path ... 286
The Cache Name ... 287
Understanding NSFetchedResultsController Delegates ... 287
Using NSFetchedResultsController ... 288
Implementing NSFetchedResultsController ... 288
Implementing the NSFetchedResultsController ... 293
Implementing the NSFetchedResultsControllerDelegate Protocol ... 298
Indexing Your Table ... 298
Responding to Data Change ... 302
Summary ... 305
■
Chapter 10: Using Core Data in Advanced Applications ... 307
Creating an Application for Note and Password Storage and Encryption ... 307
Setting Up the Data Model ... 309
Setting Up the Tab Bar Controller ... 310
Adding the Tab ... 311
Incorporating NSFetchedResultsController into MyStash ... 316
Creating the Interface for Adding and Editing Notes and Passwords ... 322
Splitting Data Across Multiple Persistent Stores ... 335
Using Model Configurations ... 336
Data Encryption ... 342
Sending Notifications When Data Changes ... 347
Registering an Observer ... 348
Receiving the Notifications ... 349
Seeding Data ... 349
Adding Categories to Passwords ... 350
Creating a New Version of Seeded Data ... 353
Error Handling ... 353
Handling Core Data Operational Errors ... 355
Handling Validation Errors ... 357
Handling Validation Errors in MyStash ... 360
Summary ... 365
About the Authors
Michael Privat is the President and CEO of Majorspot, Inc., developer of the following iPhone and iPad apps:
■ Ghostwriter Notes ■ My Spending ■ iBudget
■ Chess Puzzle Challenge
He is also an expert developer and technical lead for Availity, LLC, based in Jacksonville, Florida. He earned his Master’s degree in Computer Science from the University of Nice in Nice, France. He moved to the United States to develop software in artificial
intelligence at the Massachusetts Institute of Technology. Coauthor of Beginning OS X Lion Apps Development (Apress, 2011), he now lives in Jacksonville, Florida, with his wife, Kelly, and their two children.
About the Technical Reviewer
Robert Hamilton is a seasoned information technology director for Blue Cross Blue Shield of Florida. He is experienced in developing applications for the iPhone and iPad; his most recent project was Ghostwriter Notes.
Before entering his leadership role at BCBSF, Robert excelled as an application developer, having envisioned and created the first claims status application used by their providers through Availity.
Acknowledgments
There is no telling how many books never had a chance to be written because the potential authors had other family obligations to fulfill. I thank my wife, Kelly, and my children, Matthieu and Chloé, for allowing me to focus my time on this book for a few months and accomplish this challenge. Without their unconditional support and encouragement, I would not have been able to contribute to the creation of this book.
Working on this book with Rob Warner has been enlightening. I have learned a lot from him throughout this effort. His dedication to getting the job done correctly carried me when I was tired. His technical skills got me unstuck a few times when I was clueless. His gift for writing so elegantly and his patience have made my engineer jargon sound like nineteenth century prose.
I also thank the friendly and savvy Apress team who made the whole process work like a well-oiled machine. Jennifer Blackwell helped us through the entire project, guiding us through all the tasks that are required of authors. Douglas Pundick shared his editorial wisdom to keep this work readable, well organized and understandable; Steve Anglin, Matthew Moodie, Mary Behr, and the rest of the Apress folks were always around for us to lean on.
Robert Hamilton was once again a reliable watchdog to correct our technical mistakes. I’d also like to thank Brian Kohl for saving us from shaming ourselves at times with overly
complicated code.
Finally, I thank the incredibly talented people of Availity who were supportive of this book from the very first day and make this company a great place to work at. Trent Gavazzi, Ben Van Maanen, Taryn Tresca, Herve Devos, and all the others offered friendship and encouragement. The last bit of thanks goes to Geoff Packwood for calling in regularly to check on the progress.
—Michael Privat What a privilege it’s been to write a second edition of Pro Core Data for iOS! I thank Apress for the opportunity, particularly Steve Anglin, Jennifer Blackwell, Douglas Pundick, Matthew Moodie, Mary Behr, and Robert Hamilton. It’s good to get a second crack at an intriguing topic.
Thanks to everyone who read the first edition, provided feedback, posted reviews, e-mailed thanks and questions, and generally made us feel that all our efforts made a dent. We’ve tried to incorporate your feedback into this edition, and we welcome any praise, criticism, and questions.
I thank my wife, Sherry, and my children (Tyson, Jacob, Mallory, Camie, and Leila) for their support and encouragement. I promise to take some downtime now, at least for awhile.
Working with Michael both enlightened and humbled me. I learned so much, yet was reminded often of how much I have to learn. I thank Michael for his persistence and dedication.
Introduction
Interest in developing apps for Apple’s iOS platform continues to rise, and more great apps appear in Apple’s App Store every day. As people like you join the app-creation party, they usually discover that their apps must store data on iOS devices to be useful. Enter Pro Core Data for iOS, written for developers who have learned the basics of iOS development and are ready to dive deeper into topics surrounding data storage to take their apps from pretty good to great. Core Data, Apple’s technology for data storage and retrieval, is both easy to approach and difficult to master. This book spans the gamut, starting you with the simple and taking you through the advanced. Read each topic, understand what it means, and incorporate it into your own Core Data apps.
Why a Second Edition?
Since the publication of the first edition of Pro Core Data for iOS, Apple has released Xcode 4, a major overhaul of their programming tool. Everything has moved or changed somehow, so the descriptions and tutorials from the first edition of this book, which used Xcode 3, no longer apply. All the descriptions and screenshots have been updated to the new interface.
We didn’t stop at updating the book for Xcode 4, however. We broke the discussion of NSFetchedResultsController into its own chapter, giving it more treatment and coverage. We dug deeper into the tricky topic of migrations. We took a new approach to the section on data
encryption, based on feedback from Brian Kohl. We responded to feedback we’ve received via reviews and e-mail. We think both new readers and people who have already read the first edition will profit from reading this edition.
What You’ll Need
To follow along with this book, you need an Intel Mac running Snow Leopard or Lion, and you need Xcode 4, which is available from the Mac App Store or from developer.apple.com for registered Apple developers. You’ll also do better if you have at least a basic understanding of Objective-C, Cocoa Touch, and iOS development.
What You’ll Find
This book combines theory and code to teach its subject matter. Although you can take the book to your Barcalounger and read it from cover to cover, you’ll find the book is more effective if you’re in front of a computer, typing in and understanding the code it explains. We also hope that, after you read the book and work through its code, you’ll keep it handy as a reference, turning to it often for answers and clarification.
How This Book Is Organized
We’ve tried to arrange the material so that it builds from beginning topics to advanced, at least in a general sense, as the book progresses. The topics tend to build on each other, so you’ll likely benefit most by working through the book front to back, rather than skipping around. If you’re looking for guidance on a specific topic—versioning and migrating data, say, or tuning performance and memory usage—skip ahead to that chapter. Most chapters focus on a single topic, indicated by that chapter’s title. The final chapter covers an array of advanced topics that don’t fit neatly anywhere else.
Source Code and Errata
You can and should download the source code for this book from the Apress web site at www.apress.com. Feel free to use it in your own projects, whether personal or commercial. We’ll post any corrections to code as they’re uncovered. We’ll also post book corrections in the errata section.
How to Contact Us
We’d love to hear from you, whether it’s questions, concerns, better ways of doing things, or triumphant announcements of your Core Data apps landing on the App Store. You can find us here:
Michael Privat
E-mail: [email protected] Twitter: @michaelprivat
Blog: http://michaelprivat.com
Rob Warner
E-mail: [email protected] Twitter: @hoop33
Chapter
Getting Started
If you misread this book’s title, thought it discussed and deciphered core dumps, and hope it will help you debug a nasty application crash, you got the wrong book. Get a debugger, memory tools, and an appointment with the optometrist. Otherwise, you bought, borrowed, burglarized, or acquired this book somehow because you want to better understand and implement Core Data in your iOS applications. You got the right book.
You might read these words from a paper book, stout and sturdy and smelling faintly of binding glue. You might digitally flip through these pages on a nook, iPad, Kindle, Sony Reader, Kobo eReader, or some other electronic book reader. You might stare at a computer screen, whether on laptop, netbook, or monitor, reading a few words at a time while telling yourself to ignore your Twitter feed rolling CNN-like along the screen’s edge. As you read, you know that not only can you stop at any time but that you can resume at any time. Any time you want to read this book, you can pick it up. If you marked the spot where you were last reading, you can even start from where you last stopped. We take this for granted with books.
Users take it for granted with applications.
Users expect to find their data each time they launch their applications. Apple’s Core Data framework helps you ensure that they will. This chapter introduces you to Core Data, explaining what it is, how it came to be, and how to build simple Core Data–based applications for iOS. This book walks through the simplicity and complexities of Core Data. Use the information in the book to create applications that store and retrieve data reliably and efficiently so that users can depend on their data. Code carefully, though— you don’t want to write buggy code and have to deal with nasty application crashes.
What Is Core Data?
When people use computers, they expect to preserve any progress they make toward completing their tasks. Saving progress, essential to office software, code editors, and games involving small plumbers, is what programmers call persistence. Most software requires persistence, or the ability to store and retrieve data, so that users don’t have to
reenter all their data each time they use their applications. Some software can survive without any data storage or retrieval; calculators, carpenter’s levels, and apps that make annoying or obscene sounds spring to mind. Most useful applications, however,
preserve some state, whether configuration-oriented data, progress toward achieving some goal, or mounds of related data that users create and care about. Understanding how to persist data to iDevices is critical to most useful iOS development.
Apple’s Core Data provides a versatile persistence framework. Core Data isn’t the only data storage option, nor is it necessarily the best option in all scenarios, but it fits well with the rest of the Cocoa Touch development framework and maps well to objects. Core Data hides most of the complexities of data storage and allows you to focus on what makes your application fun, unique, or usable.
Although Core Data can store data in a relational database (such as SQLite), it is not a database engine. It doesn’t even have to use a relational database to store its data. Though Core Data provides an entity-relationship diagramming tool, it is not a data modeler. It isn’t a data access layer like Hibernate, though it provides much of the same object-relational mapping functionality. Instead, Core Data wraps the best of all these tools into a data management framework that allows you to work with entities, attributes, and relationships in a way that resembles the object graphs you’re used to working with in normal object-oriented programming.
Early iPhone programmers didn’t have the power of the Core Data framework to store and retrieve data. The next section shows you the history behind persistence in iOS.
History of Persistence in iOS
Core Data evolved from a NeXT technology called Enterprise Objects Framework (EOF) by way of WebObjects, another NeXT technology that still powers parts of Apple’s web site. It debuted in 2005 as part of Mac OS X 10.4 (“Tiger”), but didn’t appear on iPhones until version 3.0 of the SDK, released in June 2009. Before Core Data, iPhone
developers had the following options in terms of persistence:
Use property lists, which contain nested lists of key/value pairs of various data types.
Serialize objects to files using the SDK’s NSCoding protocol. Take advantage of the iPhone’s support for the relational database SQLite.
Persist data to the Internet cloud.
Developers used all these mechanisms for data storage as they built the first wave of applications that flooded Apple’s App Store. Each one of these storage options remains viable, and developers continue to employ them as they build newer applications using newer SDK versions.
ActiveRecord to make dealing with persistence on iOS easier in the pre–Core Data days, developers gratefully leapt to Core Data when it became available.
Although Core Data might not solve all persistence problems best and you might solve some of your persistence scenarios using other means like the options listed earlier, you’ll turn to Core Data more often than not. As you work through this book and learn the problems that Core Data solves and how elegantly it solves them, you’ll likely use Core Data any time you can. As new persistence opportunities arise, you won’t ask yourself, “Should I use Core Data for this?” but rather, “Is there any reason not to use Core Data?”
The next section shows you how to build a basic Core Data application using Xcode’s project templates. Even if you’ve already generated an Xcode Core Data project and know all the buttons and check boxes to click, don’t skip the next section. It explains the Core Data–related sections of code that the templates generate and forms a base of understanding on which the rest of the book builds.
Creating a Basic Core Data Application
The many facets, classes, and nuances of Core Data merit artful analysis and deep discussions to teach you all you need to know to gain mastery of Core Data’s
complexities. Building a practical foundation to support the theory, however, is just as essential to mastery. This section builds a simple Core Data–based application using one of Xcode’s built-in templates and then dissects the most important parts of its Core Data–related code to show what they do and how they interact. At the end of this section, you will understand how this application interacts with Core Data to store and retrieve data.
Understanding the Core Data Components
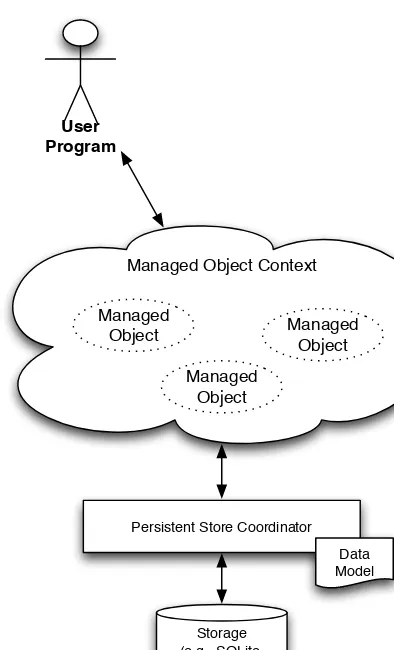
Before building this section’s basic Core Data application, you should have a high-level understanding of the components of Core Data. Figure 1–1 illustrates the key elements of the application you will build in this section. Review this figure for a bird’s-eye view of what this application accomplishes, where all its pieces fit, and why you need them.
it. If you have ever tried to build your own object management framework, you understand all the intricacies of the problem Core Data solves for you.
Figure 1–1. Overview of Core Data’s components
Much like we need a livable environment to subsist, managed objects must live within an environment that’s livable for them, usually referred to as a managed object context, or simply context. The context keeps track of the states of not only the object you are altering but also all the objects that depend on it or that it depends on. The
Creating a New Project
To begin, launch Xcode, and create a new project by selecting File New New Project
from the menu. Note that you can also create a new project by pressing ++N. From
the list of application templates, select the Application item under iOS on the left, and pick Master-Detail Application on the right. Click Next, and on the next screen type
BasicApplication in the Product Name field, book.coredata in the Company Identifier field, uncheck Use Storyboard and check Use Core Data. See Figure 1–2. Click the Next button, choose the parent directory where Xcode will create the BasicApplication directory and project, and click Create. Xcode creates your project, generates the project’s files, and opens its IDE window with all the files it generated, as Figure 1–3 shows.
Figure 1–3. Xcode showing your new project
Running Your New Project
Figure 1–4. The basic application with a blank screen
Understanding the Application’s Components
The anatomy of the application is relatively simple. It has a data model that describes the entities in the data store, a view controller that facilitates interactions between the view and the data store, and an application delegate that helps initialize and launch the application. Figure 1–6 shows the classes involved and how they relate to each other.
Figure 1–6. Classes involved in the BasicApplication example
Note how the MasterViewController class, which is in charge of managing the user interface, has a handle to the managed object context so that it can interact with Core Data. As you go through the code, you’ll see that the MasterViewController class obtains the managed object context from the application delegate. This happens in the controller’s initWithNibName:bundle: method, shown here:
- (id)initWithNibName:(NSString *)nibNameOrNil bundle:(NSBundle *)nibBundleOrNil {
self = [super initWithNibName:nibNameOrNil bundle:nibBundleOrNil]; if (self) {
self.title = NSLocalizedString(@"Master", @"Master"); id delegate = [[UIApplication sharedApplication] delegate]; self.managedObjectContext = [delegate managedObjectContext]; }
return self; }
Figure 1–7. The Xcode-generated data model
The Event entity is of type NSManagedObject, which is the basic type for all entities managed by Core Data. Chapter 2 explains the NSManagedObject type in more detail.
Fetching Results
The next class of interest is the MasterViewController. Opening its header file (MasterViewController.h) reveals two properties:
@property (strong, nonatomic) NSFetchedResultsController *fetchedResultsController; @property (strong, nonatomic) NSManagedObjectContext *managedObjectContext;
The implementation of the MasterViewController, found in MasterViewController.m, shows how to interact with the Core Data framework to store and retrieve data. The MasterViewController implementation provides an explicit getter for the
fetchedResultsController property that preconfigures it to fetch data from the data store.
The first step in creating the fetch controller consists of creating a request that will retrieve Event entities, as shown in this code from the fetchedResultsController accessor:
NSFetchRequest *fetchRequest = [[NSFetchRequest alloc] init];
NSEntityDescription *entity = [NSEntityDescription entityForName:@"Event" inManagedObjectContext:self.managedObjectContext];
[fetchRequest setEntity:entity];
The result of the request can be ordered using the sort descriptor from the Cocoa Foundation framework. The sort descriptor defines the field to use for sorting and whether the sort is ascending or descending. In this case, you sort by descending chronological order, like so:
NSSortDescriptor *sortDescriptor = [[NSSortDescriptor alloc] initWithKey: @"timeStamp" ascending:NO];
NSArray *sortDescriptors = [[NSArray alloc] initWithObjects:sortDescriptor, nil]; [fetchRequest setSortDescriptors:sortDescriptors];
Once you define the request, you can use it to construct the fetch controller. Because the MasterViewController implements NSFetchedResultsControllerDelegate, it can be set as the NSFetchedResultsController’s delegate so that it is automatically notified as the result set changes and so that it updates its view appropriately. You could get the same results by invoking the executeFetchRequest of the managed object context, but you would not benefit from the other advantages that come from using the
NSFetchedResultsController such as the seamless integration with the UITableView, as you’ll see later in this section and in Chapter 9. Here is the code that constructs the fetch controller:
NSFetchedResultsController *aFetchedResultsController = [[NSFetchedResultsController alloc] initWithFetchRequest:fetchRequest managedObjectContext:
self.managedObjectContext sectionNameKeyPath:nil cacheName:@"Master"]; aFetchedResultsController.delegate = self;
self.fetchedResultsController = aFetchedResultsController;
Finally, you tell the controller to execute its query to start retrieving results. To do this, use the performFetch method.
NSError *error = nil;
if (![self.fetchedResultsController performFetch:&error]) { NSLog(@"Unresolved error %@, %@", error, [error userInfo]); abort();
}
You can see the entire getter method for fetchedResultsController in Listing 1–1. Listing 1–1. The Entire Getter Method for fetchedResultsController
- (NSFetchedResultsController *)fetchedResultsController {
if (__fetchedResultsController != nil) {
return __fetchedResultsController; }
/*
Set up the fetched results controller. */
// Create the fetch request for the entity.
NSFetchRequest *fetchRequest = [[NSFetchRequest alloc] init]; // Edit the entity name as appropriate.
NSEntityDescription *entity = [NSEntityDescription entityForName:@"Event" inManagedObjectContext:self.managedObjectContext];
[fetchRequest setEntity:entity];
// Set the batch size to a suitable number. [fetchRequest setFetchBatchSize:20];
// Edit the sort key as appropriate.
NSSortDescriptor *sortDescriptor = [[NSSortDescriptor alloc] initWithKey:@"timeStamp" ascending:NO];
NSArray *sortDescriptors = [[NSArray alloc] initWithObjects:sortDescriptor, nil];
[fetchRequest setSortDescriptors:sortDescriptors];
// Edit the section name key path and cache name if appropriate. // nil for section name key path means "no sections".
NSFetchedResultsController *aFetchedResultsController = [[NSFetchedResultsController alloc] initWithFetchRequest:fetchRequest managedObjectContext:self.managedObjectContext sectionNameKeyPath:nil cacheName:@"Master"];
aFetchedResultsController.delegate = self;
self.fetchedResultsController = aFetchedResultsController;
NSError *error = nil;
if (![self.fetchedResultsController performFetch:&error]) {
/*
Replace this implementation with code to handle the error appropriately.
*/
NSLog(@"Unresolved error %@, %@", error, [error userInfo]); abort();
}
return __fetchedResultsController; }
NSFetchedResultsController behaves as a collection of managed objects, similar to an NSArray, which makes it easy to use. In fact, it exposes a read-only property called fetchedObjects that is of type NSArray to make things even easier to access the objects it fetches. The MasterViewController class, which also extends UITableViewController, demonstrates just how suited the NSFetchedResultsController is to manage the table’s content.
Inserting New Objects
A quick glance at the insertNewObject: method shows how new events (the managed objects) are created and added to the persistent store. Managed objects are defined by the entity description from the data model and can live only within a context. The first step is to get a hold of the current context as well as the entity definition. In this case, instead of explicitly naming the entity, you reuse the entity definitions that are attached to the fetched results controller:
NSManagedObjectContext *context = [self.fetchedResultsController managedObjectContext]; NSEntityDescription *entity = [[self.fetchedResultsController fetchRequest] entity];
Now that you’ve gathered all the elements needed to bring the new managed object to existence, you create the Event object and set its timeStamp value.
NSManagedObject *newManagedObject = [NSEntityDescription
insertNewObjectForEntityForName:[entity name] inManagedObjectContext:context]; [newManagedObject setValue:[NSDate date] forKey:@"timeStamp"];
The last step of the process is to tell Core Data to save changes to its context. The obvious change is the object you just created, but keep in mind that calling the save. method will also affect any other unsaved changes to the context.
NSError *error = nil;
if (![context save:&error]) {
NSLog(@"Unresolved error %@, %@", error, [error userInfo]); abort();
}
The complete method for inserting the new Event object is shown in Listing 1–2. Listing 1–2. The Complete Method for Inserting the New Event Object
- (void)insertNewObject {
// Create a new instance of the entity managed by the fetched results controller. NSManagedObjectContext *context = [self.fetchedResultsController
managedObjectContext];
NSEntityDescription *entity = [[self.fetchedResultsController fetchRequest] entity]; NSManagedObject *newManagedObject = [NSEntityDescription
// If appropriate, configure the new managed object.
// Normally you should use accessor methods, but using KVC here avoids the need to add a custom class to the template.
[newManagedObject setValue:[NSDate date] forKey:@"timeStamp"];
// Save the context. NSError *error = nil;
if (![context save:&error]) {
NSLog(@"Unresolved error %@, %@", error, [error userInfo]); abort();
} }
Initializing the Managed Context
Obviously, none of this can happen without initializing the managed context first. This is the role of the application delegate. In a Core Data–enabled application, the delegate must expose three properties.
@property (readonly, strong, nonatomic) NSManagedObjectContext *managedObjectContext; @property (readonly, strong, nonatomic) NSManagedObjectModel *managedObjectModel; @property (readonly, strong, nonatomic) NSPersistentStoreCoordinator
*persistentStoreCoordinator;
Note that they are all marked as read-only, which prevents any other component in the application from setting them directly. A closer look at BasicApplicationAppDelegate.m shows that all three properties have explicit getter methods.
First, the managed object model is derived from the data model (BasicApplication.xcdatamodel) and loaded.
NSURL *modelURL = [[NSBundle mainBundle] URLForResource:@"BasicApplication" withExtension:@"momd"];
__managedObjectModel = [[NSManagedObjectModel alloc] initWithContentsOfURL:modelURL];
return __managedObjectModel; }
Then a persistent store is created to support the model. In this case, as well as in most Core Data scenarios, the persistent store is backed by a SQLite database. The managed object model is a logical representation of the data store, while the persistent store is the materialization of that data store.
- (NSPersistentStoreCoordinator *)persistentStoreCoordinator { if (__persistentStoreCoordinator != nil) {
return __persistentStoreCoordinator; }
NSURL *storeURL = [[self applicationDocumentsDirectory] URLByAppendingPathComponent:@"BasicApplication.sqlite"];
NSError *error = nil;
__persistentStoreCoordinator = [[NSPersistentStoreCoordinator alloc] initWithManagedObjectModel:[self managedObjectModel]];
if (![__persistentStoreCoordinator addPersistentStoreWithType:NSSQLiteStoreType configuration:nil URL:storeURL options:nil error:&error]) {
NSLog(@"Unresolved error %@, %@", error, [error userInfo]); abort();
}
return __persistentStoreCoordinator; }
Finally, the managed object context is created. - (NSManagedObjectContext *)managedObjectContext { if (__managedObjectContext != nil) {
return __managedObjectContext; }
NSPersistentStoreCoordinator *coordinator = [self persistentStoreCoordinator]; if (coordinator != nil) {
__managedObjectContext = [[NSManagedObjectContext alloc] init]; [__managedObjectContext setPersistentStoreCoordinator:coordinator]; }
return __managedObjectContext; }
The context is used throughout the application as the single interface with the Core Data framework and the persistent store, as Figure 1–8 demonstrates.
Figure 1–8. Core Data initialization sequence
Lastly, everything is put in motion when the application delegate’s application:didFinishLaunchingWithOptions: method is called.
- (BOOL)application:(UIApplication *)application
didFinishLaunchingWithOptions:(NSDictionary *)launchOptions {
self.window = [[UIWindow alloc] initWithFrame:[[UIScreen mainScreen] bounds]]; // Override point for customization after application launch.
MasterViewController *controller = [[MasterViewController alloc] initWithNibName:@"MasterViewController" bundle:nil];
self.navigationController = [[UINavigationController alloc] initWithRootViewController:controller];
self.window.rootViewController = self.navigationController; [self.window makeKeyAndVisible];
Calling the getter for the delegate’s managedObjectContext starts a chain reaction in which
-(NSManagedObjectContext *)managedObjectContext, calls
-(NSPersistentStoreCoordinator *)persistentStoreCoordinator and then in turns calls -(NSManagedObjectModel *)managedObjectModel. The call to managedObjectContext therefore initializes the entire Core Data stack and readies Core Data for use.
If you followed along with Xcode on your machine, you have a basic Core Data–based application, generated from Xcode’s templates, that you can run to create, store, and retrieve event data. What if, however, you have an existing application to which you want to add the power of Core Data? The next section demonstrates how to add Core Data to an existing iOS application.
Adding Core Data to an Existing Project
Creating a new application and selecting the Use Core Data check box, as shown in the previous section, isn’t always possible. Frequently, developers start an application, write a lot of code, and only realize later that they need Core Data in their application. We’ve known developers who have refused to admit that they should just add Core Data by hand to an existing application. Instead, fueled by a desire to prove that they could write their own better persistence layer (rather than try to understand how to use the
framework), they embarked in convoluted programming that led to less than adequate results. They confused persistence with obstinacy. In the spirit of making the jump easier, this section explains the steps involved with retrofitting an application in order to make it aware of and use Core Data.
Enabling an application to leverage Core Data is a three-step process.
1. Add the Core Data framework.
2. Create a data model.
3. Initialize the managed object context.
The next three sections walk you through these three steps so you can add Core Data support to any existing iOS application.
Adding the Core Data Framework
In the Objective-C world, libraries are referred to as frameworks. Expanding the Frameworks groups in the Xcode source tree shows that the project is aware of only a handful of frameworks. Typical iOS applications will at least have UIKit (the user
interface framework for iOS), Foundation, and Core Graphics. The first step to add Core Data to an existing application consists of making the application aware of the Core Data framework by adding it to the project. To do this, perform the following steps:
2. Select the fourth tab, Build Phases, and open the section called Link Binary With Libraries (see Figure 1–10).
3. Click the + button below that section to see a list of frameworks you can add (see Figure 1–11).
4. Select CoreData.framework and click the Add button.
5. (Optional) Drag the CoreData.framework entry in the source list for your project to the Frameworks folder.
Figure 1–10. Viewing Link Binary With Libraries settings
The CoreData.framework is now listed on the left side of Xcode. Now that the
application is aware of the Core Data framework, the classes specific to that framework can be used without creating compilation errors.
Creating the Data Model
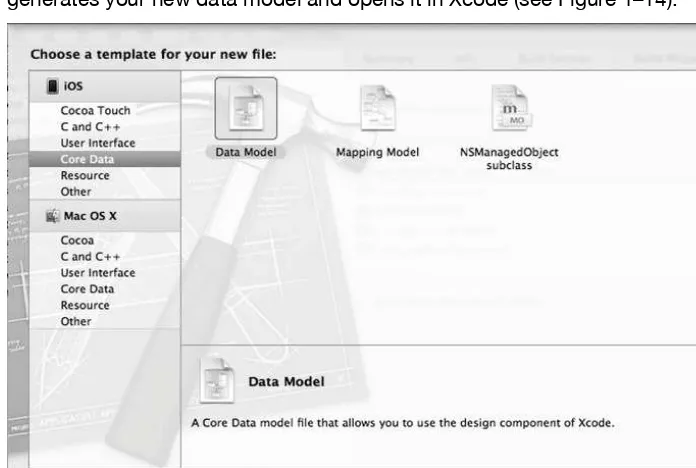
No Core Data application is complete without a data model. The data model describes all the entities that will be managed by the framework. For the sake of simplicity, the model created in this section contains a single class with a single attribute. The data model can be created in Xcode by selecting File New New File in the menu and picking the type Data Model from the iOS Core Data templates, as shown in Figure 1–12. Click Next, name the data model MyModel.xcdatamodeld, as shown in Figure 1–13, and click Save. This generates your new data model and opens it in Xcode (see Figure 1–14).
Figure 1–13. Naming your data model
Figure 1–14. Your new, empty data model
Initializing the Managed Object Context
The last step consists of initializing the managed object context, the persistent data store, and the object model. You can usually add the same code that Xcode would have generated for you if you had elected to use Core Data when you created your project: define these components as properties in the application delegate, declare a
saveContext method, and declare a helper method for getting the application’s document directory in which to store the Core Data database file. Your
DemoAppAppDelegate.h file should look like Listing 1–3.
Listing 1–3. The DemoAppAppDelegate.h file
#import <UIKit/UIKit.h> #import <CoreData/CoreData.h>
@interface DemoAppAppDelegate : UIResponder <UIApplicationDelegate> {
}
@property (strong, nonatomic) UIWindow *window;
@property (strong, nonatomic) UINavigationController *navigationController;
@property (nonatomic, retain, readonly) NSManagedObjectContext *managedObjectContext; @property (nonatomic, retain, readonly) NSManagedObjectModel *managedObjectModel; @property (nonatomic, retain, readonly) NSPersistentStoreCoordinator
*persistentStoreCoordinator;
- (void)saveContext;
- (NSURL *)applicationDocumentsDirectory;
@end
Switch over to the implementation file (DemoAppAppDelegate.m). Start by adding @synthesize lines for your new properties, like this:
@synthesize managedObjectContext=__managedObjectContext; @synthesize managedObjectModel=__managedObjectModel;
@synthesize persistentStoreCoordinator=__persistentStoreCoordinator;
The previous section showed that the context is created from a physical data store, which is in turn created from the data model. The initialization sequence remains the same and starts with loading the object model from the model you just defined.
- (NSManagedObjectModel *)managedObjectModel { if (__managedObjectModel != nil) {
return __managedObjectModel; }
NSURL *modelURL = [[NSBundle mainBundle] URLForResource:@"MyModel" withExtension:@"momd"];
__managedObjectModel = [[NSManagedObjectModel alloc] initWithContentsOfURL:modelURL]; return __managedObjectModel;
Now that you’ve loaded the object model, you can leverage it in order to create the persistent store handler. This example uses NSSQLiteStoreType in order to indicate that the storage mechanism should rely on a SQLite database, as shown here:
- (NSPersistentStoreCoordinator *)persistentStoreCoordinator { if (__persistentStoreCoordinator != nil) {
return __persistentStoreCoordinator; }
NSURL *storeURL = [[self applicationDocumentsDirectory] URLByAppendingPathComponent:@"DemoApp.sqlite"];
NSError *error = nil;
__persistentStoreCoordinator = [[NSPersistentStoreCoordinator alloc] initWithManagedObjectModel:[self managedObjectModel]];
if (![__persistentStoreCoordinator addPersistentStoreWithType:NSSQLiteStoreType configuration:nil URL:storeURL options:nil error:&error]) {
NSLog(@"Unresolved error %@, %@", error, [error userInfo]); abort();
}
return __persistentStoreCoordinator; }
Notice that this code relies on the helper method applicationDocumentsDirectory to determine where to store the SQLite file; you’ll define that method in a moment. Next, initialize the context from the persistent store that you just defined.
- (NSManagedObjectContext *)managedObjectContext { if (__managedObjectContext != nil) {
return __managedObjectContext; }
NSPersistentStoreCoordinator *coordinator = [self persistentStoreCoordinator]; if (coordinator != nil) {
__managedObjectContext = [[NSManagedObjectContext alloc] init]; [__managedObjectContext setPersistentStoreCoordinator:coordinator]; }
return __managedObjectContext; }
To finish preparing Core Data for use in your application, you must implement the applicationDocumentsDirectory: method and the saveContext: method. Again, you can clone what Xcode generates, like this:
- (NSURL *)applicationDocumentsDirectory {
return [[[NSFileManager defaultManager] URLsForDirectory:NSDocumentDirectory inDomains:NSUserDomainMask] lastObject];
}
- (void)saveContext { NSError *error = nil;
NSManagedObjectContext *managedObjectContext = self.managedObjectContext; if (managedObjectContext != nil) {
if ([managedObjectContext hasChanges] && ![managedObjectContext save:&error]) { NSLog(@"Unresolved error %@, %@", error, [error userInfo]);
} }
With Core Data in place, the application can now use the managed object context to store and retrieve entities. Let’s use a simple example in which the application persists and displays the number of times it was launched in order to illustrate this process. In the application delegate implementation file, DemoAppAppDelegate.m, edit the didFinishLaunchingWithOptions: method, and add code to retrieve the previous launches and add a new launch event.
NOTE: Although the managed object context, persistent store coordinator, and managed object model are typically members of the application delegate, code that stores and retrieves data usually goes in controllers corresponding to views of that data. Adding the code to store and retrieve entries directly to the application delegate is only done here for convenience and simplicity. In a real application, this kind of code would most likely belong to a controller.
The code to retrieve the previous launches grabs the context and executes a request to fetch entities of type MyData.
NSManagedObjectContext *context = [self managedObjectContext]; NSFetchRequest *request = [[NSFetchRequest alloc] init];
NSEntityDescription *entity = [NSEntityDescription entityForName:@"MyData" inManagedObjectContext:context];
[request setEntity:entity];
NSArray *results = [context executeFetchRequest:request error:nil];
You can then iterate through the array of results in order to display the previous launches.
for (NSManagedObject *object in results) {
NSLog(@"Found %@", [object valueForKey:@"myAttribute"]); }
NOTE: One way to interact with the managed object’s properties is to use the key/value pair generic accessor methods. [object valueForKey:@"myAttribute"] will retrieve the value of myAttribute, while [object setValue:@"theValue" forKey:@"myAttribute"] will set the value of myAttribute.
Lastly, add a new entry to the context before letting the application continue its normal execution, using the saveContext: method implemented earlier to save the new entry to the persistent store.
NSString *launchTitle = [NSString stringWithFormat:@"launch %d", [results count]]; NSManagedObject *object = [NSEntityDescription insertNewObjectForEntityForName:[entity name] inManagedObjectContext:context];
[object setValue:launchTitle forKey:@"myAttribute"]; [self saveContext];
Launching the application for the first time yields this output: 2011–02-25 05:13:23.783 DemoApp[2299:207] Added: launch 0
And launching it a second time displays the previous launch: 2011–02-25 05:15:48.883 DemoApp[2372:207] Found launch 0 2011–02-25 05:15:48.889 DemoApp[2372:207] Added: launch 1
The complete method from the application delegate implementation file is shown in Listing 1–4.
Listing 1–4. The Complete Method from the Application Delegate Implementation File
- (BOOL)application:(UIApplication *)application
didFinishLaunchingWithOptions:(NSDictionary *)launchOptions { // Fetch the launches from Core Data
NSManagedObjectContext *context = [self managedObjectContext]; NSFetchRequest *request = [[NSFetchRequest alloc] init];
NSEntityDescription *entity = [NSEntityDescription entityForName:@"MyData" inManagedObjectContext:context];
[request setEntity:entity];
NSArray *results = [context executeFetchRequest:request error:nil];
// Iterate through the results and log them for (NSManagedObject *object in results) {
NSLog(@"Found %@", [object valueForKey:@"myAttribute"]); }
// Add a new entry for this launch
NSString *launchTitle = [NSString stringWithFormat:@"launch %d", [results count]]; NSManagedObject *object = [NSEntityDescription insertNewObjectForEntityForName:[entity name] inManagedObjectContext:context];
[object setValue:launchTitle forKey:@"myAttribute"]; [self saveContext];
NSLog(@"Added: %@", launchTitle);
[self.window makeKeyAndVisible]; return YES;
}
The existing application that used to be oblivious to Core Data has been outfitted with the powerful data storage management framework with a minimum amount of work. Follow these steps to add the power of Core Data to any of your existing applications.
Summary
Chapter
Understanding Core Data
Many developers, upon first seeing Core Data, deem Core Data and its classes a
tangled mess of classes that impede, rather than enhance, data access. Perhaps they’re Rails developers, used to making up method names to create dynamic finders and letting convention over configuration take care of the dirty work of data access. Maybe they’re Java developers who have been annotating their Enterprise JavaBeans (EJBs) or hibernating their Plain Old Java Objects (POJOs). Whatever their backgrounds, many developers don’t take naturally to the Core Data framework or its way of dealing with data, just as many developers squirm when first presented with Interface Builder and the live objects it creates when building user interfaces. We counsel you with patience and an open mind and assure you that the Core Data framework is no Rube Goldberg. The classes in the framework work together like Larry Bird’s 1980s Boston Celtics in the half-court set, and when you understand them, you see their beauty and precision. This chapter explains the classes in the Core Data framework, both individually and how they work together. Take the time to read about each class, to trace how they work together, and to type in and understand the examples.
Core Data Framework Classes
Chapter 1 guided you through the simple steps to get an application outfitted with Core Data. You saw bits of code, learned which classes to use, and discovered which methods and parameters to call and pass to make Core Data work. You faithfully, and perhaps somewhat blindly, followed Chapter 1’s advice while perhaps wondering what was behind all the code, classes, methods, and parameters. Most developers reading the previous chapter probably wondered what would happen if they substituted a parameter value for another. A few of them probably even tried it. A small percentage of those who tried got something other than an explosion, and a percentage of them actually got what they thought they would get.
Edward Dijkstra, renowned computer scientist and recipient of the 1972 Turing Award for his work developing programming languages, spoke of elegance as a quality that decides between success and failure instead of being a dispensable luxury. Core Data not only solves the problem of object persistence but solves it elegantly. To achieve
elegance in your code, you should understand Core Data and not just guess at how it works. After reading this chapter, you will understand in detail not only the structure of the Core Data framework but also that the framework solves a complicated problem with only a small set of classes, making the solution simple, clear, and elegant.
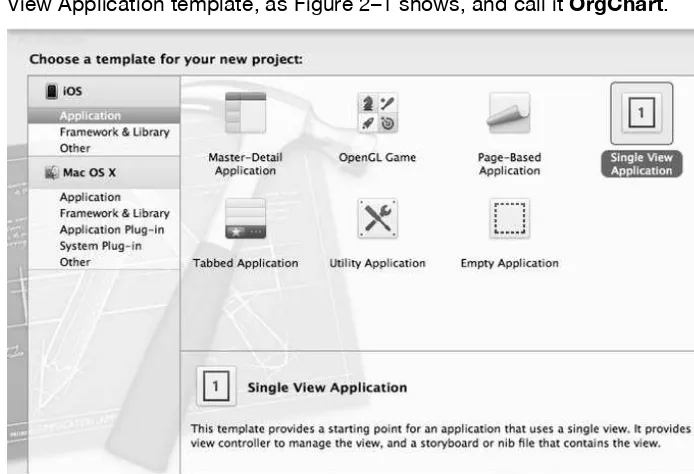
Throughout the chapter, you will build the class diagram that shows the classes involved in the framework and how they interact. You will also see that some classes belong to the Core Data framework and others are imported from other Cocoa frameworks such as the Foundation framework. In parallel with building the class diagram, you will build a small application in Xcode that deals with a fictitious company’s organizational chart. To follow along with this chapter, set up a blank iPhone application using the Single View Application template, as Figure 2–1 shows, and call it OrgChart.
Figure 2–1. Create a new application in Xcode.
Figure 2–2. Xcode with a blank project, with Core Data added
Figure 2–3 depicts the classes of Core Data that you typically interact with. Chapter 1 talked about the managed object context, which is materialized by the
Figure 2–3. High-level overview
Your code stores data by adding managed objects to the context and retrieves data by using fetch requests implemented by the NSFetchRequest class. As shown in Chapter 1, the context is initialized using the persistent store coordinator, implemented by the NSPersistentStoreCoordinator class, and defined by the data model, implemented by the NSManagedObjectModel class. The remainder of this chapter deals with how these classes are created, how they interact, and how to use them.
The Model Definition Classes
As explained in Chapter 1, all Core Data applications require an object model. The model defines the entities to be persisted and their properties. Entities have three kinds of properties:
Attributes Relationships Fetched properties
Table 2–1 shows the different classes and brief descriptions of their roles. Enumerating through the classes to better understand how the mechanics behind model instantiation work is an interesting exercise, but in practice creating the model in Xcode is typically done graphically without having to type a single line of code.
NSFetchRequest
NSManagedObjectContext
NSManagedObjectModel NSPersistentStore
NSManagedObject Typical User
Code
Table 2–1. The Classes Involved in Defining a Model
Class Name Role
NSManagedObjectModel The data model itself
NSEntityDescription An entity in the model
NSPropertyDescription An abstract definition of an entity’s property
NSAttributeDescription An attribute of an entity
NSRelationshipDescription A reference from an entity to another entity
NSFetchedPropertyDescription The definition of a subset of entity instances based on a criteria
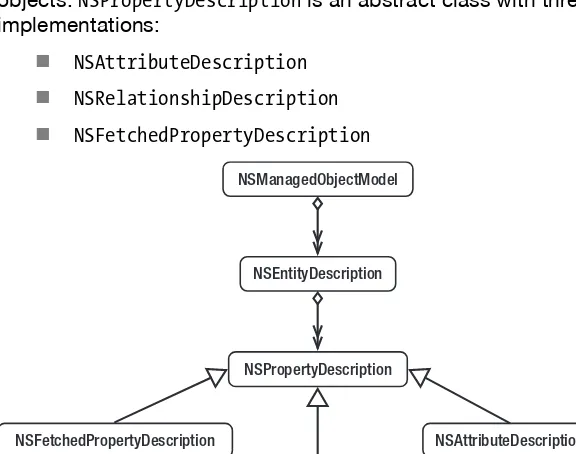
Figure 2–4 shows the relationships among the classes involved in defining a model. NSManagedObjectModel has references to zero or more NSEntityDescription objects. Each NSEntityDescription has references to zero or more NSPropertyDescription objects. NSPropertyDescription is an abstract class with three concrete
implementations:
NSAttributeDescription
NSRelationshipDescription
NSFetchedPropertyDescription
Figure 2–4. The model definition classes
This small set of classes is enough to define any object model you will use when
working on your Core Data projects. As explained in more detail in Chapter 1, you create the data model in Xcode by selecting File New New File in the menu and picking the
NSManagedObjectModel
NSEntityDescription
NSPropertyDescription
NSFetchedPropertyDescription
NSRelationshipDescription
type Data Model from the iOS Core Data templates. In this section, you will create a model that represents a company’s organizational chart. In Xcode, create your model and call it OrgChart. In this data model, an organization has one person as the leader (the chief executive officer, or CEO). That leader has direct reports, which may or may not have direct reports of their own. For simplicity, say that a person has two attributes: a unique employee identifier and a name. You are finally ready to start defining the data model in Xcode.
Open the data model file, and add a new Organization entity. Like a person, an organization is defined by a unique identifier and a name, so add two attributes to the Organization entity. Attributes are scalar properties of an entity, which means that they are simple data holders that can contain a single value. The attribute types are defined in the NSAttributeType structure, and each type enforces certain data constraints over the entity. For instance, if the type of the attribute is integer, an error will occur if you try to put an alphanumeric value in that field. Table 2–2 lists the different types and their meanings.
Table 2–2. Attribute Types
Xcode Attribute Type
Objective-C Attribute Type Objective-C Data Description
Integer 16 NSInteger16AttributeType NSNumber A 16-bit integer
Integer 32 NSInteger32AttributeType NSNumber A 32–bit integer
Integer 64 NSInteger64AttributeType NSNumber A 64-bit integer
Decimal NSDecimalAttributeType NSDecimalNumber A base-10 subclass of NSNumber
Double NSDoubleAttributeType NSNumber An object wrapper for double
Float NSFloatAttributeType NSNumber An object wrapper for float
String NSStringAttributeType NSString A character string
Boolean NSBooleanAttributeType BOOL An object wrapper for a Boolean value
Date NSDateAttributeType NSDate A date and time
value
Binary data NSBinaryDataAttributeType NSData Unstructured binary data
Transformable NSTransformableAttributeType Any nonstandard type
Any type
NOTE: Chapter 5 expands on the Transformable type and how to use it. Transformable attributes are a way to tell Core Data that you want to use a nonsupported data type in your managed object and that you will help Core Data by providing code to transform the attribute data at persist time into a supported type.
Name the first attribute id and the second name. By default, the type of new attributes is set to Undefined, which purposely prevents the code from compiling in order to force you to set the type for each attribute. Organization identifiers are always going to be simple numbers, so use the type Integer 16 for the id attribute. Use the type String for the name attribute. At this point, your project should look like Figure 2–5.
Figure 2–5. The project with the Organization entity
Figure 2–6. The organization model as objects
The graph shows that the managed object model, which is of type NSManagedObjectModel, points to an entity description, represented by an
NSEntityDescription instance named Organization that uses an NSManagedObject for its managedObjectClassName property. This entity description has two attribute descriptions (type NSAttributeDescription). Each attribute description has two properties: name and attributeType. The first attribute description has the values id and
NSInteger16AttributeType for its name and attributeType properties, respectively, while the second has the values name and NSStringAttributeType.
In the same manner that you created the Organization entity, create another entity named Person with two attributes: id and name. You can link the organization to its leader by creating a relationship from the Organization entity to the Person entity and call it leader. Once the two entities exist in Xcode, creating a relationship is as simple as selecting the source entity (Organization), clicking and holding the Add Attribute button until the drop-down menu appears, and selecting Add Relationship. Name the new relationship leader, and set Person as its destination. Now, add a relationship from Person to Person (yes, a relationship from the Person entity back to itself), and call it employees. This defines the relationship from a person to the person’s subordinates. By default, Xcode creates one-to-one relationships, which means that a relationship left at the default links one source to one destination. Since one leader can manage many subordinates, the relationship between Person and Person should be a one-to-many relationship. To correct the relationship in Xcode, first show the attributes for the relationship by displaying Xcode’s utilities panel by clicking the rightmost button above View in the toolbar of Xcode. Then, click to show the Data Model Inspector by clicking the rightmost button at the top of the utilities panel (see Figure 2–7).
NSManagedObjectModel
NSEntityDescription name = 'Organization'
managedObjectClassName = 'NSManagedObject'
NSAttributeDescription name = 'id'
attributeType = NSInteger16AttributeType
NSAttributeDescription name = 'name'
Figure 2–7. Showing the properties of a relationship
Figure 2–8. One-to-many relationship
NOTE: In this chapter, we want to show you how a data model designed using the model editor is interpreted into Core Data classes. We have purposely taken shortcuts when creating the model. For more detailed information on how to create object models, please refer to Chapter 4.
The current data model is illustrated in Figure 2–9, while Figure 2–10 shows how the data model definition would be loaded into live objects by Core Data.
Figure 2–9. The data model
Figure 2–10. The organization model with Person NSManagedObjectModel
NSEntityDescription name = 'Organization'
managedObjectClassName = 'NSManagedObject'
NSEntityDescription name = 'Person'
managedObjectClassName = 'NSManagedObject'
name = 'id'
attributeType = NSInteger16AttributeType NSAttributeDescription name = 'id'
attributeType = NSInteger16AttributeType NSAttributeDescription NSAttributeDescription
name = 'name'
attributeType = NSStringAttributeType
NSAttributeDescription name = 'name'
attributeType = NSStringAttributeType
NSRelationshipDescription name = 'leader'
destinationEntity = 'Person'
NSRelationshipDescription name = 'employees'