6th
EBOOK EXTRAS: v6.0
Downloads, Updates, Feedback$15
iCLOUD
TAKE CONTROL OF
Table of Contents
Read Me First ... 3
Introduction ... 6
iCloud Quick Start ... 8
Catch Up with iCloud Changes ... 10
Get to Know iCloud ... 13
Set Up iCloud ... 27
Use iCloud Family Sharing ... 42
Use iCloud Music Library ... 51
Manage Your Photos ... 56
Keep Documents and App Data in Sync ... 78
Keep Mail, Contacts, and Calendars in Sync ... 99
Sync Other iCloud Data ... 110
Work with iCloud Keychain ... 119
Use the iCloud Website ... 133
Find My Nouns ... 142
Back Up and Restore iOS Data ... 152
Use iCloud on an Apple TV ... 158
Use Back to My Mac ... 163
Manage Your Account ... 165
Manage iCloud Security and Privacy ... 172
About This Book ... 187
Copyright and Fine Print ... 190
Read Me First
Welcome to Take Control of iCloud, Sixth Edition, version 6.0, published in October 2017 by TidBITS Publishing Inc. This book was written by Joe Kissell and edited by Tonya Engst.
iCloud is Apple’s suite of internet services. This book helps you make sense of iCloud, configure it for your needs, and choose the best ways of using each feature.
If you want to share this ebook with a friend, we ask that you do so as you would with a physical book: “lend” it for a quick look, but ask your friend to buy a copy for careful reading or reference. Discounted
classroom and Mac user group copies are available.
Copyright © 2017, alt concepts inc. All rights reserved.
Updates and More
You can access extras related to this book on the web (use the link in
Ebook Extras, near the end; it’s available only to purchasers). On the ebook’s Take Control Extras page, you can:
• Download any available new version of the ebook for free, or buy any subsequent edition at a discount.
• Download various formats, including PDF, EPUB, and Mobipocket. (Learn about reading on mobile devices on our Device Advice page.)
• Read the ebook’s blog. You may find new tips or information, as well as a link to an author interview.
Basics
To review background information that might help you understand this book better, such as finding System Preferences and working with files in the Finder, read Tonya Engst’s free Read Me First: A Take Control Crash Course, available on the web or as a standalone ebook in PDF, EPUB, and the Kindle’s Mobipocket format.
What’s New in the Sixth Edition
This sixth edition covers changes in macOS 10.13 High Sierra and iOS 11, as well as significant feature changes in the iCloud service itself since the last edition of the book was published in late 2016. Numerous topics were added and, in some cases, rearranged or rewritten—and there were hundreds of changes throughout the book. Here are the highlights:
• Explained what’s new in iCloud since the last edition of this book; see iCloud Feature Changes
• Expanded the Major iCloud Features list to include newly added capabilities
• Updated About iCloud Storage and Upgrade Your Storage to reflect the new pricing for the 2 TB tier and the removal of the 1 TB tier
• Added a topic, Share Storage Space, that explains how to share additional (paid) iCloud storage space with your family members
• Updated iCloud Photo Library to mention that it now syncs the People album
• Replaced the discussion of the iCloud Drive app for iOS with cover-age of the new Files app, including how to share files stored in iCloud Drive; see Use the Files App for iOS
• Brought the information in Work with iCloud Keychain up to date with the latest setup and usage instructions, including how to use credentials from iCloud Keychain in apps other than Safari
• Added AirPods to the list of devices you can find with Find My Nouns and mentioned that you can use iCloud to pair them, and then play sound to them, from your Apple TV in Set Up iCloud Account Features
• Updated Use Two-factor Authentication and Use App-specific Passwords to cover recent changes in Apple’s policies for using two-factor authentication
Introduction
Anyone who has been using Apple devices for more than a few years has surely heard of—and most likely uses—iCloud, Apple’s collection of online services. Although iCloud, which launched in October 2011, replaced MobileMe (which, in turn, followed .Mac and iTools), it has morphed into something much different from its predecessors.
The basic concept of iCloud is that your documents, music, TV shows, movies, photos, contacts, calendars, passwords, and other data should propagate to all your devices so immediately and automatically that you never think about where your data is anymore.
But iCloud goes far beyond the concept of syncing. Many features you use on a Mac, iOS device, Apple TV, or Apple Watch want to involve iCloud in some way. You can use your Apple device without an iCloud account, but many common tasks will be more awkward or even impossible. And, from Apple’s point of view, why would you want to use a device without iCloud? Accounts are free, and the iCloud infrastructure makes everything work together much more smoothly.
That’s not to say iCloud always works smoothly! iCloud is great when it works, but it’s so complex that problems are bound to occur, and frequently do. Since Apple has made so much of your experience dependent on iCloud, network outages, software bugs, and server malfunctions can make the simplest tasks frustrating.
Another sore spot is that, although iCloud is pretty good at keeping your own data in sync across your own devices, it’s less good at sharing data between users. Features like iCloud Photo Sharing and Family Sharing are steps in the right direction, and they’re useful as far as they go. But you still can’t easily share a whole address book with your spouse, a folder full of mixed documents with a work group, or a keychain containing usernames and passwords with your family.
There’s also the question of hardware support. A handful of iCloud’s features are available in Windows, and a smaller subset can be used (after a fashion) on Linux and Android devices. But Apple is in the business of selling hardware, so it stands to reason that iCloud works best on Apple devices. Recent-vintage Macs, iOS devices (iPhone, iPad, iPod touch), Apple TVs, and Apple Watches offer the best support for iCloud.
In this thoroughly updated sixth edition of Take Control of iCloud, I focus on what I think of as the interesting parts of iCloud. I show you what iCloud is capable of, how to think about it, and how to put its key features to good use. In the process, I hope to expose you to useful capabilities you never knew existed. But I also tell you how to keep private information secure (even if it reduces iCloud’s utility), point out cases in which iCloud may not be the best tool, and occasionally mention other options you can consider.
iCloud is constantly changing. Therefore, I don’t attempt to give you specific instructions for using every last feature—I’m confident that you can figure out how to send an email message or delete a contact, even if the exact steps change tomorrow. But I do try to help you grasp what iCloud is capable of and decide how best to use it.
For the most part, I assume your operating system(s) are recent— namely, macOS 10.13 High Sierra or later, iOS 11 or later, Windows 10 or later, and Apple TV software version 7.2.1 or later. I also assume that all your iCloud-connected apps (such as iTunes, Photos, and Pages) are up to date. Although I occasionally call attention to
iCloud Quick Start
Although you can skip around freely in this book to learn about the topics that interest you most, I encourage you to read (or at least skim) two early chapters—Get to Know iCloud and Set Up iCloud—before moving on to the rest. Those chapters provide important foundational information, without which much of the material later in the book may not make sense. But if you already read an earlier edition, you can start with Catch Up with iCloud Changes and then skip those foundational chapters.
Get started:
• Discover what’s new in the last year or so—and do a quick Storage Checkup of your iCloud online data storage needs and costs—in
Catch Up with iCloud Changes.
• Learn about iCloud features in Get to Know iCloud.
• Set up your Mac(s), PC(s), iOS device(s), and Apple TV(s) to use iCloud. See Set Up iCloud.
• Get your family set up to share purchases, calendars, location data, and more. See Use iCloud Family Sharing.
Keep your data in sync across devices:
• Apple has two cloud-based music services: Apple Music and iTunes Match. Learn how these services work and interact, and find details about iTunes Match in Use iCloud Music Library.
• Use iCloud Photo Library to sync all your photos between Macs and iOS devices and with the cloud, My Photo Stream to put your recent photos on all your devices, and iCloud Photo Sharing to share
photos with other people. See Manage Your Photos.
• Make sure your major forms of personal data (email, contacts, and calendars) are automatically mirrored across all your devices. See
Keep Mail, Contacts, and Calendars in Sync.
• Learn about syncing data from Safari, Health, Siri, Messages, Re-minders, and Notes. See Sync Other iCloud Data.
• Keep usernames, passwords, and credit card numbers in sync across devices, generate new random passwords, and edit your saved credentials as you Work with iCloud Keychain.
Use the other iCloud features:
• Cut, copy, and paste from one device to another when you Use Universal Clipboard.
• Access web-based versions of the core iCloud apps on nearly any platform. See Use the iCloud Website.
• Locate a wayward Mac or iOS device, or find a friend or family member. See Find My Nouns.
• Learn how iCloud can back up and restore crucial data from your iOS devices in Back Up and Restore iOS Data.
• Apple TV owner? Find out which iCloud features your set-top box can use and how. Read Use iCloud on an Apple TV.
• Access stuff on a faraway Mac. Read Use Back to My Mac.
• Update your iCloud account details. See Manage Your Account.
Catch Up with iCloud
Changes
If you’ve been using iCloud awhile—and especially if you read the previous edition of this book—you may be most interested in the bits that have changed in the past year. This chapter highlights the major changes you’ll want to take advantage of, points you to chapters where I discuss those features in detail, and offers a suggestion about manag-ing your iCloud data storage.
iCloud Feature Changes
With the release of iOS 11 and macOS 10.13 High Sierra in September 2017, Apple added a few significant new capabilities to iCloud:
• Shared storage space: If you use iCloud Family Sharing, you can now share extra storage space at the 200 GB level or above with your family members; see Share Storage Space.
• Syncing People album: iCloud Photo Library now syncs your People album across devices; see iCloud Photo Library.
• Files app: A new app called Files replaces the iCloud Drive app on iOS; see Use the Files App for iOS.
• Messages sync: Although this feature hasn’t yet appeared at publication time, Apple has promised that iCloud will soon sync all your iMessage conversations in the Messages app across devices; see Sync Messages.
• Additional sync options: You can now sync data from additional Apple apps among your devices using iCloud; see Sync Health and Siri.
your iCloud account (such as email and calendars) using a third-party app. See Use Two-factor Authentication and the topics that follow, especially Use App-specific Passwords.
• Check Activation Lock change: Although Apple no longer has a webpage that lets you check the Activation Lock status of any iOS device, there’s still a way to get that information. See Check Activa-tion Lock.
In addition, in June 2017, Apple cut the price of the 2 TB iCloud Drive storage tier in half, to $9.99 per month, while eliminating the 1 TB tier (see About iCloud Storage).
Storage Checkup
Some iCloud features (especially Desktop and Documents folder syncing) eat into your storage quota quickly, but the cost of extra storage is low enough that it shouldn’t be a hardship for most users to store as much data as they want. If you’re still trying to make do with the 5 GB Apple offers for free, my professional advice is to give up! It’s no longer worth the effort to avoid what could be a 99-cent monthly charge. (Even the top, 2 TB tier is now remarkably affordable, and if you have that much space available, you may find interesting uses for it that hadn’t occurred to you before.)
A backup of a single iOS device can easily surpass 5 GB, after all, and by the time you add saved email, files in iCloud Drive, and other
smaller bits of information, you’re in for some frustration if you try to whittle the figure down to avoid paying a dollar a month. With upgrad-ed storage, you can freely back up your iOS devices, add files to iCloud Drive, and so on, without worrying that you’ll bump into your limit.
Note: I talk about what data Apple includes in your iCloud storage
ahead, in About iCloud Storage. I cover how to buy more storage in
Get to Know iCloud
Before you dive in and start setting up and using this mysterious thing called iCloud, you should take a few moments to get your bearings and understand what you’re dealing with.
In addition to explaining what you can and cannot do with iCloud, this chapter discusses what you need to know About iCloud System Requirements, About Your Apple ID, and About iCloud Storage.
What Is iCloud?
While iCloud has a few features in common with other online services such as Dropbox, Google Docs, and Microsoft Office 365, iCloud is designed to achieve different goals, making it more different from these services than alike. In fact, it’s rather hard to put a finger on exactly what iCloud is.
iCloud doesn’t have much…thingness. It’s not a physical object you can touch, and it’s not software you can install. It’s not a website— at least, not entirely. You can’t buy it, although you may pay for extra features. In fact, referring to iCloud as a single entity is misleading. The name iCloud is just an arbitrary label for a collection of features, services, settings, and APIs (application programming interfaces), joined by a thread of relying on communication over the internet between Apple devices (Macs, iOS devices, Apple TVs, and Apple Watches) and Apple’s servers in the cloud.
Perhaps a more interesting question to begin with is “What is iCloud
for?” I have a few answers to that one:
transfer documents to and from certain apps; and to install iOS updates.
With iCloud, your iOS device can operate as a completely stand-alone product. If you don’t have a Mac or PC to connect to, there must be some other repository for your data, and some other mech-anism to get it to and from your device. iCloud serves those purpos-es, letting you transfer data to and from Apple’s servers using either a Wi-Fi or cellular connection.
• iCloud helps your devices integrate with each other. If you have more than one digital device—say, two Macs; or a PC and an iPhone; or an iPhone, an iPad, and an Apple Watch; or an iPad and an Apple TV—it’s only natural to want all your devices to share data.
With iCloud, syncing encompasses many kinds of data and requires less effort than before. In fact, the word “sync” almost becomes an anachronism; for the most part, iCloud pushes new or changed data almost instantly to all your devices. You can switch between devices with impunity, knowing your data is always wherever you need it.
• iCloud replaces (some) local storage with streaming. Related to the last point, iCloud reduces the need to keep all your important media on all your devices. As long as you have a good wireless internet connection, your Mac and iOS devices can now do what the Apple TV has done for many years—fetch the content you want, in near-real time, from the cloud. This makes it practical to get by with less storage space. You no longer have to decide which content to put on which device; in a sense, everything can be every-where, automatically. Yet you can still store local copies of crucial data for times when an internet connection is unavailable.
files, or even permit others to collaborate with you in real time using iWork apps. And Mail Drop lets Apple Mail (on all platforms) send ginormous email attachments without overloading either the sender’s or recipient’s mail server.
• iCloud increases security and convenience. With Find My iPhone, iCloud lets you not only locate a wayward device, but if necessary, also lock it remotely or even erase its data securely. Find My Friends extends this concept to enable you to find other people with iOS devices. With Back to My Mac, you can use file sharing or screen sharing to connect to your Mac from a remote network, giving you one more reason not to worry about syncing files. And even if you find yourself without any Apple device at your disposal (unthinkable!), you can get to your email, contacts, calendars, and more (or find your wayward Mac or iOS device) from nearly any computer with an internet connection and a web browser.
Tip: If you’re curious to know the extent to which Apple encrypts your iCloud data and what other privacy and security measures are in place, read Apple’s article iCloud security and privacy overview.
Major iCloud Features
iCloud is bound to gain and lose features as time goes on, and as
Apple’s hardware and software evolve. But as of October 2017, here are its major features, all of which I discuss later:
• Media syncing: Even without iCloud, you can buy music, apps, or books from Apple on any Mac, PC, or iOS device and have them automatically pushed to all your other devices. You can also re-download previously purchased media (including TV shows and movies) from any of your devices. Apple refers to these two features collectively as “iTunes in the Cloud.”
An optional paid feature, iTunes Match, extends iTunes in the Cloud to work with music from sources other than the iTunes Store.
iTunes Match is separate from Apple Music (if you subscribe to Apple Music, you need not pay separately for iTunes Match), but both use something called iCloud Music Library to sync tracks across your devices. See Use iCloud Music Library.
• Family Sharing: iCloud Family Sharing lets families of up to six people link their individual accounts in a way that gives each person access to media purchased by the others; a shared calendar, reminder list, and photo album; and location information. Family members can use a single credit card for all Apple media purchases, and children can use the Ask to Buy feature to get parental approval for downloads. And if you’ve purchased 200 GB or more of storage for your iCloud account, you can even share that space with other family members. See Use iCloud Family Sharing.
• iCloud Photos: Continuing with the theme of automatically
but it’s otherwise more limited than iCloud Photo Library. iCloud Photo Sharing extends the photo stream concept, allowing you to share albums (containing photos and/or videos) with others and stream photos from iCloud to an Apple TV. See Manage Your Photos.
• Syncing documents and app data: iCloud Drive provides
centralized cloud storage for your documents, synced automatically across your devices, making those documents available from within supported iOS and Mac apps, the Mac’s Finder, and the Files app in iOS. It’s not quite like Dropbox, but it’s in the ballpark. In addition, some Mac and iOS apps that don’t use documents per se can take advantage of iCloud’s infrastructure for storing and syncing other data, such as preferences and database entries. See Keep Docu-ments and App Data in Sync.
• Desktop and Documents folder sync: Starting in 10.12 Sierra and iOS 10, iCloud Drive gained an additional capability: it can sync the Desktop and Documents folders from a Mac running Sierra or later to Apple’s servers, and from there to other Macs (as well as making all that data available on your iOS device and in the iCloud Drive web app on the iCloud website). And, it can optionally delete older files from your Mac’s disk if you start running low on space, while enabling you to download them again later whenever you need them. See Sync Your Desktop and Documents Folders (or Don’t).
• Mail, Contacts, Calendar, Safari browser data, Reminders, and Notes: With this collection of services, iCloud keeps your personal data in sync between your devices, and lets you access the data (except for browser bookmarks, tabs, and Reading List) from any web browser. Mail Drop, a feature in Apple Mail for macOS, iOS, and the Mail web app, uses iCloud to simplify sending large attachments. See Keep Mail, Contacts, and Calendars in Sync and
• Messages in iCloud: Starting with High Sierra and iOS 11, iCloud can now sync all your iMessage conversations from Messages across your devices. See Sync Messages.
• Other app data: macOS High Sierra now lets you sync Siri across your devices, so that what Siri learns about you on one device can inform its responses to you on other devices. And, in iOS 11, you can sync data from the Health app (iPhone only) to other devices.
• Universal Clipboard: Merely by having multiple Macs and iOS devices signed in to the same iCloud account, you can copy or cut something on one device and paste it on another. (Previously, Universal Clipboard worked between a Mac and an iOS device, but not between two Macs; now it works either way.) See Use Universal Clipboard.
Continuity and iCloud
Apple considers Universal Clipboard to be part of Continuity, which also includes Handoff, support for cellular calls and SMS/MMS on Macs and iPads without cellular radios, Instant Hotspot, and Auto Unlock (which lets an Apple Watch unlock a Mac). Although it’s unclear to me whether Apple regards the Continuity features as part of iCloud per se (for example, they’re not mentioned on Apple’s What
is iCloud? page), they all require users to be signed in to the same
iCloud account on the various devices involved. Scholle McFarland covers other Continuity features in Take Control of High Sierra.
• iCloud Keychain: iCloud Keychain is a way of securely keeping passwords, credit card numbers, and account information in sync among devices. iCloud Keychain includes other features, too, such as a random password generator built into Safari. And, as of iOS 11, third-party apps can also be updated to access items in your iCloud Keychain. See Work with iCloud Keychain.
iCloud Drive documents—as well as web-based versions of Pages, Numbers, and Keynote. See Use the iCloud Website.
• Find My Device and Find My Friends: Find My iPhone (or iPad or iPod touch) shows you the exact location of any of your iOS devices, while Find My Mac does the same for your Macs; you can even remotely lock or wipe any of these devices. (I refer to all these services generically as “Find My Device.”) Find My Friends lets you locate friends—via their iOS devices or Series 3 Apple Watches— who have given you permission to follow them. (I use the even-more-generic “Find My Nouns” to refer to all the finding services generally.) See Find My Nouns.
• iCloud Backup: iCloud securely—and automatically—backs up all the personal data from your iOS devices to Apple’s servers and lets you restore it over the air. See Back Up and Restore iOS Data.
• Apple TV: Your Apple TV can access not only the media you pur-chased on your other Apple devices but also your iCloud Music Library, if any; iCloud Photo Library; My Photo Stream; and photo streams shared with you by others. See Use iCloud on an Apple TV.
• Back to My Mac: With Back to My Mac, you can use file sharing and screen sharing on a local Mac with a remote Mac, even if the remote Mac is behind a router or gateway that uses NAT (network address translation). See Use Back to My Mac.
Peer-to-Peer Networking
iCloud has another useful capability that Apple hasn’t publicized much. In the PDF document OS X Mountain Lion Core Technologies
Overview (still relevant for newer operating systems), Apple says:
“iCloud detects when you have multiple devices on the same local network, and it copies the content directly between them rather than going through the cloud. It eventually copies the content to the cloud, as well, to enable remote access and backup.”
About iCloud System Requirements
Since iCloud is a heterogeneous collection of services and capabilities, it doesn’t have a fixed set of system requirements. Some aspects of iCloud require at least iOS 11, 10.13 High Sierra, Windows 10, or a fourth-generation Apple TV or Apple TV 4K with tvOS 11.0 or later; although many services are supported as far back as iOS 5, 10.7.5 Lion, the second-generation Apple TV, or Windows 7. Other parts of iCloud are accessible from nearly any web browser or from any of numerous third-party apps.
Of course, Apple would prefer you to have the latest version of every-thing (and, as I mentioned in the Introduction, this book largely assumes that you do), but the fact that you’re still running 10.6 Snow Leopard, for example, doesn’t mean iCloud will be entirely useless to you. After all, many features are available in a web browser. For full compatibility details, see Apple’s System requirements for iCloud page.
One thing that page doesn’t tell you, however, is what you’ll need to access email, contacts, and calendars using third-party client software. So here are the details:
• Email: Any IMAP client with SSL support, on any platform, should be able to connect with your iCloud email account. The server
addresses may be different from what you expect, however; see the sidebar Access iCloud Mail with Other Email Clients.
• Calendars and Contacts: iCloud uses standard protocols— CalDAV and CardDAV—for calendars and contacts, respectively. However, for reasons that aren’t entirely clear to me, not all CalDAV and CardDAV clients can connect to iCloud accounts.
About Your Apple ID
In order to use iCloud, you need a username called an Apple ID, which identifies you across numerous Apple products and services. You
probably already have one, and if not, it’s easy (and free) to get one.
Although Apple once allowed any unique name to be an Apple ID, today, Apple IDs are email addresses. If you already have an email address ending in @icloud.com, @me.com, or @mac.com, that’s an Apple ID for sure. If you used a different email address when buying something from Apple, registering for an Apple developer program, or using any of several other Apple services, that address is also an Apple ID. If you aren’t sure whether you have an Apple ID or whether a certain address is an Apple ID, you can check at the Apple ID site.
That’s all fairly straightforward, but iCloud’s reliance on Apple IDs has several consequences that may not be apparent—for example, you might have more than one Apple ID and not know which one to use for iCloud, or you might share an Apple ID with someone else. Read on to find out what to do about cases like these.
What If I Have Multiple Apple IDs?
In a perfect world, each person would have exactly one Apple ID, all the person’s data and purchases would be associated with it, and the question of which Apple ID to use where wouldn’t come up. However, for a variety of reasons, a great many people have accumulated more than one personal Apple ID over the years.
Note: People who were members of MobileMe or .Mac may have
me.com, mac.com, and/or icloud.com addresses with the same characters before the @ sign. Apple regards those variants as
identical; use any of them to sign in to iCloud. But read the sidebar
Apple IDs with Multiple Email Addresses, ahead, for qualifications.
email messages, from one account to another, you can’t do the same thing with purchases. Once you’ve made a purchase from Apple with a given Apple ID, the purchase is tied to that ID permanently. You can’t transfer a purchase to a different Apple ID, and you can’t merge two Apple IDs in order to consolidate your purchases into one account.
iCloud Family Sharing (see Use iCloud Family Sharing) mostly erases the irritation of purchases under multiple Apple IDs within a family. Each person signs in with an individual Apple ID, but because they’re all linked (up to six of them), each family member can access purchas-es the others have made.
But if Family Sharing isn’t appropriate for your situation—namely, you need to share purchases with someone who’s not in your family— you can often work around the problem. Although iTunes, the Mac App Store, the iOS App Store, and the iBooks Store can each log in with only one Apple ID at a time, you can switch between IDs without losing any content. In the relevant app, find the Sign Out button or menu command, and then sign back in with the other account. Note that doing so requires you to know (or have someone else enter) the password for the other account.
Some people have multiple personal Apple IDs because they have more than one iCloud account that they need to keep separate—perhaps a home account and a work account, or a personal account and a club account. It is possible to sign in to multiple iCloud accounts on a Mac at the same time, although as I explain ahead shortly, doing so carries a few restrictions.
What If I Share an Apple ID with Someone?
reason for sharing Apple IDs apart from consolidating purchases (for which purpose you should now Use iCloud Family Sharing if possible) is sharing contacts. Because iCloud doesn’t offer any form of contact sharing, some people have an extra iCloud account for the express purpose of adding it to multiple users’ devices in order to achieve the effect of shared contacts without having to share all data.
I explain just ahead how to handle a shared Apple ID. But even if you do have a shared account, you should also have an individual ac-count—partly to keep your personal settings separate from those of other family members and partly to avoid syncing errors and a wide variety of random problems that can occur when a shared accounts is also each person’s primary account. If you have only a shared account, you should create an individual account for yourself when setting up iCloud.
Which Apple ID Should I Use for iCloud?
All that said, which Apple ID should you use when you set up iCloud? Here are my suggestions. If you have…
• A single, personal Apple ID: That’s the one to use—Done!
• A single, shared Apple ID: Create a new Apple ID for yourself. Afterward, you can go to System Preferences > Internet Accounts and add the shared Apple ID as a secondary account (see Work with Multiple iCloud Accounts).
• Multiple individual Apple IDs: Use the Apple ID associated with whichever you consider your primary or personal account— the one that contains most of your data. Later, you can go to System Preferences > Internet Accounts (or, in iOS, Settings > Accounts & Passwords > Add Account) and add one or more secondary iCloud accounts—for example, to sync shared contacts or to provide access to another email account.
Photos (iCloud Photo Library, My Photo Stream, and iCloud Photo Sharing), iCloud Drive, iCloud Keychain, Find My Mac, or Back To My Mac. (I say more about this later, in Use Multiple iCloud Ac-counts on a Mac and Work with Multiple iCloud Accounts.)
So, for example, if you wanted to share iCloud contacts with your spouse, the ideal way to do so would be for each of you to configure an individual iCloud account on your respective devices, which then becomes the primary account for each device—and then set up
another iCloud account, just for contacts, which each of you adds as a secondary account on each device (see Share Your Contacts with Someone Else). You could, in theory, do the same thing with notes, but for any other data type, this sort of sharing either won’t work at all or is highly likely to cause problems.
Note: If you’re the organizer for an iCloud Family Sharing group (see
Use iCloud Family Sharing), you should enter the Apple ID associated
with Family Sharing as your primary iCloud login.
• A personal Apple ID plus a separate Apple ID you’ve used for shared purchases: The best way to handle this is to use only your personal Apple ID, set it up to use your preferred credit card, and add other family members to iCloud Family Sharing. If that won’t work in your situation—for example, if you use a business credit card for purchases—enter your personal Apple ID during iCloud setup. Later, you can open iTunes (and the Mac App Store and iBooks) and sign in with the other Apple ID you use for pur-chases.
Note: Game Center, FaceTime, and iMessage also use Apple IDs, but these services are not part of iCloud, so if you prefer, you can use a different Apple ID for them than you do for iCloud.
will be prompted to provide additional information, such as select-ing an email address in the icloud.com domain.
• No Apple ID: If you have never had an Apple ID at all—unlikely,
I realize, for users of Apple products—you can create one now at the
Apple ID site. (You can use the same URL to change your password or other Apple ID details, should the need arise.)
Apple IDs with Multiple Email Addresses
It has always been possible to associate additional email addresses with any Apple ID. These can serve a number of purposes, but the most important one is that extra addresses give Apple another way to verify your identity and give you access to your account if your main address changes (for example, if you used your work address and you leave your job).
That’s all well and good, but it leads to a subtle yet common problem. If you try to sign up for a new Apple ID using an email address that has already been added as an alternative address to another Apple ID, you’ll get an error message—Apple doesn’t allow this. You must first remove an email address as an alternate from all other Apple IDs before using it for a new one.
The tricky part is that Apple offers no surefire way to determine which Apple ID(s) any given email address is associated with. You can use Apple’s Find Apple ID page to try to determine any existing Apple IDs you may have, and then look through each of those for the email address in question, but in my experience, this process has been hit-or-miss.
About iCloud Storage
Many types of data don’t count against that 5 GB limit. For example, purchases from the iTunes Store—music, TV shows, movies, apps, and books—don’t take up any of your personal space, because Apple already has copies of that data on their servers. Photos in My Photo Stream and those you’ve shared with iCloud Photo Sharing don’t count either, no matter how many you have or what their resolution is,
presumably because that data stays in the cloud only temporarily (I explain this in Manage Your Photos). Email attachments sent with Mail Drop (see Use Mail Drop) also don’t count against your quota.
What does count against your storage quota is documents (including everything kept in iCloud Drive), the contents of your iCloud Photo Library, email (including attachments sent without Mail Drop), and— if you’ve enabled iCloud Backup—each of your iOS devices’ personal settings, app data, locally stored photos, and a few other items that would appear at first glance to occupy little space altogether.
Those backups can require more iCloud storage than you might think. For example, at this moment my iPhone uses 9.4 GB of space for iCloud backups and iPad mini uses 8.9 GB—and remember, that’s for data that isn’t already on Apple’s servers somewhere. A backup
of either of those devices alone puts me well over the 5 GB limit, and I have other data I need to store in iCloud. (iCloud doesn’t require you to back up iOS devices to the cloud; you can back them up to your Mac or PC via iTunes if you prefer).
Set Up iCloud
iCloud setup, in and of itself, is easy and largely self-explanatory—you enter your Apple ID and password, and click a few buttons, on each of your devices. There’s no software to install on a Mac or iOS device (assuming you already have a recent version of the operating system) and only a few options you can turn on or off. You have to go through a few more steps, but only a few, under Windows.
However, you may encounter questions about certain settings, wonder how to handle multiple iCloud accounts, or need help disabling iCloud. So in this chapter I walk you through those topics for Macs and iOS devices. (The Apple TV is covered later, in Use iCloud on an Apple TV. And, for help with the iCloud website, see Use the iCloud Website.)
If you’ve already set up iCloud, you can skim most of this chapter, starting with Set Up iCloud on a Mac—just to make sure you’ve en-abled all the features you may want to use.
Update Your Software
If you want to access all the latest iCloud features, make sure the Apple software that uses iCloud is up to date on each platform you use.
Here’s what you need to do:
• iOS: For any iOS device you haven’t already upgraded to iOS 11 or later, tap Settings > General > Software Update and follow the prompts to install the latest update.
• Mac: Choose Apple > App Store and click Updates. If newer
look for steps in my book Take Control of Upgrading to High Sierra.)
• Windows: Download and install the latest version of iTunes; if you have a previous version installed, you can use Start > Apple Soft-ware Update.
Then download iCloud for Windows and run iCloudSetup.exe; or, if it appears in Apple Software Update (because you had a previous version of the iCloud app installed), install it from there.
• Apple TV: For information on updating the Apple TV software, see Apple’s article Update the software on your Apple TV.
Set Up iCloud on a Mac
Your Mac may already have prompted you to set up iCloud (in which case, just skim this section to make sure everything is configured to your liking). If not, you can set it up manually. The exact sequence of steps depends on your circumstances.
Note: Each user account on a Mac can have its own iCloud account, although only one account per Mac can use Find My Mac at a time. In addition, you can (with some limitations) set up multiple iCloud accounts within a single user account; for more on such configura-tions, see Work with Multiple iCloud Accounts, later in this chapter.
For the sake of illustration, I’ll show you what to do under High Sierra if you ignored any prompts to set up iCloud earlier. What you see under earlier versions of macOS may differ slightly:
1. Go to System Preferences > iCloud.
Figure 1: Before you can use the iCloud preference pane, you must sign in with your Apple ID, or create a new one.
2. The iCloud Terms of Service may appear. If so, agree to them. In some situations, you may also be prompted to enter the password for your Mac’s user account; if so, enter it and click OK.
Your Mac asks (Figure 2) if you want to enable a commonly used set of services (contacts, calendars, reminders, notes, Safari book-marks, iCloud Keychain, documents—not including your Desktop and Documents folders by default—and mail, even though it’s not explicitly mentioned in the list) and, separately, if you want to use Find My Mac.
3. Most people will want to use all of these, so unless you have a particular reason not to, leave both checkboxes selected and click Next. If you’re prompted to enter your password to set up iCloud Keychain, do so. Then, if you selected Use Find My Mac, click Allow to confirm that it can use your Mac’s location.
You may also be asked to take an additional step to enable iCloud Keychain—entering your password and then either entering your iCloud security code or requesting approval from another device (see Enable and Configure iCloud Keychain).
The full iCloud pane opens (Figure 3). If you left both checkboxes selected earlier in this step, all the corresponding categories will already be enabled.
Tip: Back to My Mac and Find My Mac expect Wake for Network Access (or Wake for Wi-Fi Network Access) to be checked in the
Energy Saver pane of System Preferences. To avoid alerts about that, enable Wake for Network Access (or Wake for Wi-Fi Network Access), if you haven’t done so already, before turning on Back to My Mac or Find My Mac.
4. Select or deselect checkboxes to specify the types of data you want to manage with iCloud. (If you stuck with the default selections to this point, you’ll likely find that only Siri and Back to My Mac are now deselected.) Unless you have some special reason to avoid one of these, I suggest selecting them all.
If you never previously set it up, Keychain requires an additional series of steps to set up, beyond merely selecting its checkbox. If you want to set it up now, flip ahead to Work with iCloud Keychain for instructions. Or leave it deselected for the moment and return to it when you’re ready.
5. When you’re satisfied with your settings, close System Preferences.
iCloud is now activated on your Mac, although you must take further steps to use the iTunes-specific features (see Use iCloud Music
The All-purpose iCloud Troubleshooting Procedure
I’ve read countless stories of people having problems of one sort or another with iCloud, and I’ve experienced my share of glitches too. Some problems go away all by themselves, as Apple fixes bugs or corrects server outages. But one theme has emerged consistently: when nothing else works, signing out of iCloud and then signing back in usually does.
You might suppose that if you’re having trouble with, say, iCloud Drive, turning just that one feature off and back on in System Preferences > iCloud might do the trick. It might, but it probably won’t. For whatever reason, even if just one feature is acting up, the most reliable solution seems to be starting over from scratch. Fortunately, that’s pretty quick and easy—not nearly as scary as it sounds:
1. Go to System Preferences > iCloud.
2. Click Sign Out. You’ll have to respond to a long series of prompts asking whether various data should be kept on your Mac or delet-ed. Answer however you like; we’ll be restoring all that data in just a moment, anyway.
3. Restart your Mac. (Really! Don’t skip this step.)
4. Return to System Preferences > iCloud and sign back in.
5. Reenable all the iCloud features you want to use.
In rare cases, you may need to do Steps 1–3 on all your devices, and then sign back in on all of them. It’s a bit of a bother, but it usually takes just a few minutes to get everything back to the way it was, and more often than not (but no guarantees!), the process will solve random iCloud problems.
Set Up iCloud under Windows
The iCloud app may open automatically after you install it. If not, to walk through the whole setup process from the point that the iCloud app is installed, do this:
1. Locate the iCloud app in the Start menu and open it. Enter your Apple ID and password, and click Sign In. If you turned on two-factor authentication or two-step verification (see Use Enhanced Security Features), follow the prompts to verify your login.
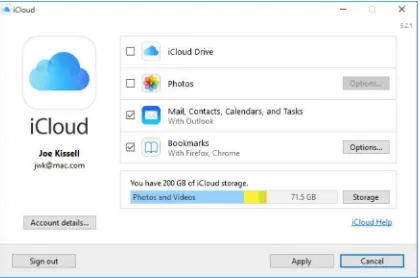
The application should look something like Figure 4 (though the storage indicator may be empty if you haven’t yet migrated any other devices, and other services may be checked or unchecked).
Figure 4: The iCloud app is now ready for your selections.
2. For each service you want to enable—and unless you have a special reason not to, I suggest enabling them all—select the corresponding checkbox. However, note the following:
‣ After turning on Photos, you can click its Options button for
New Photos and Videos from My PC (and select default folders for each). You can also select My Photo Stream (upload and
download just recent photos) and iCloud Photo Sharing (to share photo streams with others and view photo streams others have shared with you), and you can specify a different iCloud Photo Sharing folder, if you don’t want to use the default folder
(C:\Users\your username\Pictures\iCloud Photos\Shared). Click
Done when you’re done.
‣ Mail, Contacts, Calendars, and Tasks can sync only with
Microsoft Outlook 2007 or later. If you don’t have Outlook installed, this item will be disabled (and you’ll see an alert that you need to install Outlook to use them), though you can still access them from a web browser. When you next open Outlook, you may be asked for your iCloud password one or more times.
‣ When you select Bookmarks, an alert appears confirming that
you want to merge your local bookmarks with any bookmarks already in iCloud. Click Merge. If the Bookmarks option is set to Internet Explorer and you prefer Firefox or Google Chrome (or any combination of these), then after turning on Bookmarks, click the Options button next to it, select the desired browser(s), and click OK. You’ll be prompted to install iCloud extensions for Firefox or Google Chrome.
Note: iCloud no longer supports syncing bookmarks with the Windows version of Safari.
3. Click Apply to activate the selected services. Depending on the options you selected, various other windows and processes may open as iCloud completes its setup process and transfers your data. You may have to click Done to dismiss a progress window or two.
4. Click Close to close the iCloud app.
Set Up iCloud on an iOS Device
On an iOS device, proceed with the following tasks:
1. Tap Settings > Sign in to your Device. (After you sign in, you’ll instead see your name in this spot.)
2. Enter your Apple ID and password, and tap Sign In. If you have two-factor authentication enabled, follow the prompts to enter your verification code. You may also be prompted to enter your device’s passcode and, in certain situations, respond to other alerts.
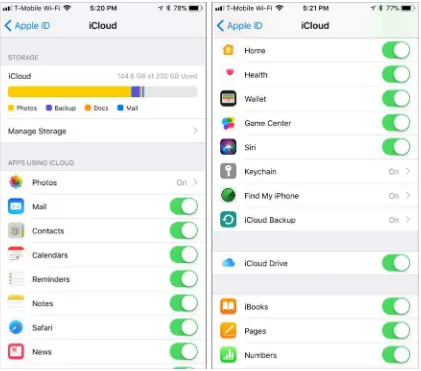
3. Tap iCloud. In the list of services and apps that can sync data with iCloud (Figure 5), most should already be on (shown by a green switch). To toggle any service or app, tap its on/off switch.
Most people will want to have all the apps and services turned on; as the book progresses, I discuss these in more detail, but a few items that you may want to pay attention to now include these:
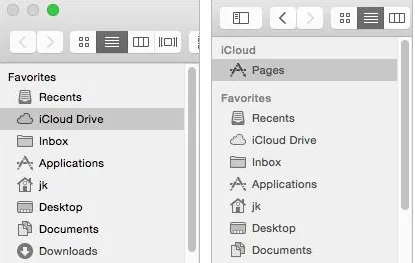
‣ The apps and data types that appear above iCloud Drive in the
list are those that use iCloud, but don’t store their data as files visible in iCloud Drive. To prevent any of these items from sync-ing with iCloud, turn its switch off.
‣ To turn iCloud Drive on or off, tap its on/off switch. You can also enable or disable iCloud Drive syncing for each supported app; apps appear below the iCloud Drive switch.
‣ To turn on or off any iCloud photo syncing service—iCloud Photo Library, Upload to My Photo Stream, or iCloud Photo Sharing— tap Photos (see Manage Your Photos for further details).
‣ The Home switch lets iCloud sync settings from the Home app (for smart home products) across your iOS devices. But Home is not otherwise part of iCloud, so I don’t cover it in this book.
‣ The News switch enables data for the News app (such as favorites, history, and saved stories) to sync among your iOS devices. News itself is not an iCloud feature, however, so I have nothing more to say about it in this book.
‣ The Health switch lets you sync data from the Health app (on an
iPhone only) with the cloud and with other iPhones you own.
‣ The Wallet switch appears only on iPhones and lets you sync wallet items (such as Apple Pay credit cards, loyalty cards, con-cert tickets, and coupons) among multiple iPhones, if you hap-pen to have more than one. Because Wallet isn’t an iCloud fea-ture, I don’t discuss it here.
‣ The Siri switch enables information Siri learns about you on one
‣ The Keychain item, which controls iCloud Keychain, may require
more than just a tap or two to configure. For full instructions, flip ahead to Work with iCloud Keychain.
‣ If you want to back up your iOS device to iCloud from now on rather than via iTunes, set iCloud Backup to On. (I say more about iCloud Backup later, in Understand How iCloud Backup Works.)
4. Your current storage statistics for iCloud Drive appear at the top of the screen. To get more detail about what’s backed up using iCloud Backup, or delete the backed-up data for any app, tap Manage Storage. (See Activate and Configure iCloud Backup for details.)
iCloud is now set up on your iOS device, but to use iTunes Match or any of the other iTunes-related features you must take more steps, as I describe in the next chapter. If you have any other iOS devices, repeat these steps with each one now.
Local Sync for Contacts and Calendars
iTunes also offers the option to sync contacts and calendars directly between an iOS device and a Mac via a USB or Wi-Fi connection— without going through the cloud (whether iCloud or another service).
First, on your iOS device, go to Settings > Your Name > iCloud and turn off Contacts and/or Calendars. Next, in iTunes, select your iOS device, click Info in the left-hand sidebar, select Sync Contacts and/ or Sync Calendars, and select any other desired options. Then click Sync. Just remember, this is a manual process, not automatic push synchronization as with iCloud.
Work with Multiple iCloud Accounts
However, in some situations a person may have more than one active iCloud account, each with its own data (such as email, contacts, and calendars). For example, you may have a personal account and a work account, or an individual work account and a departmental account that you’re in charge of monitoring. In cases such as these, you can set up your Mac or iOS device to access multiple iCloud accounts at once—with some restrictions. (You can also use this technique to share a set of contacts with a family member or friend; see Share Your
Contacts with Someone Else, later.)
Use Multiple iCloud Accounts on a Mac
On a Mac, each user account can be signed in to a different iCloud account and receive the full benefit of that iCloud account, with one important exception: on any given Mac, only one iCloud account at a time can be used for Find My Mac, regardless of how many user
accounts you’ve set up. If you want to enable Find My Mac under a different user’s account, first disable it under the user account where it’s active.
Apart from that, each user account on a Mac can have a primary iCloud account—with full access to all available services—as well as secondary iCloud accounts with more limited access. Once a given user has signed in to an iCloud account, that iCloud account becomes the primary
account for that user—and the only one that can use Safari data sync-ing, iCloud Photos, iCloud Drive, iCloud Keychain, and Back to My Mac. If you then add another iCloud account while logged in to the same user account, your Mac treats the new iCloud account as sec-ondary, which means it can be used only for email, contacts, calendars, reminders, and notes. (And yes, you can have more than one secondary iCloud account.)
To add a secondary iCloud account, go to System Preferences >
Use Multiple iCloud Accounts on an iOS Device
On an iOS device, as on a Mac, you can have more than one iCloud account set up, but only the first one you configure—the primary account—can be used for Safari, iCloud Photos, iCloud Drive,
Keychain, Find My Device, and Backup. In addition, on an iOS device, push email works only with the primary account. Secondary accounts can be used for email, contacts, calendars, reminders, and notes.
To add a secondary iCloud account, go to Settings > Accounts & Passwords > Add Account, tap iCloud, and follow the prompts.
Switch Primary and Secondary Accounts
If you set up a certain iCloud account as a secondary account on a Mac or iOS device and later decide you want the secondary account to be primary (so it’s the one associated with services like iCloud Photo Library and iCloud Drive), you’ll need to delete the secondary account temporarily (see Remove an iCloud Account), sign out of the primary account, and then sign back in with the (formerly secondary and now primary) account.
Disable iCloud
Once you’ve set up an iCloud account, it exists forever. You can manu-ally delete any or all of the information from the account, if you like, or even stop using it permanently, but Apple provides no way to cancel an iCloud account. However, even if you plan to continue using iCloud indefinitely, you may want to disable individual iCloud features,
remove a device from Find My Device, or remove an iCloud account completely from a device.
Disable Individual Features
whether you want to keep the associated data on your device or delete it; but even if you delete it from a given device, it will remain in the cloud, meaning it will download again if you later decide to reenable that feature.
Note: To do this for a secondary iCloud account, go to System
Preferences > Internet Accounts and select that account in the sidebar (on a Mac) or go to Settings > Accounts & Passwords > Account Name (on an iOS device), and uncheck or turn off features you don’t want to use.
Remove a Device from Find My
Device
When you turn on Find My Device on a Mac or iOS device, you can then lock or even wipe the contents of that device remotely if it’s lost. If you buy a used Mac or iOS device and the previous owner hasn’t removed the device from Find My Device, that person—and not you— can then erase your new device at any time! Therefore, if you’re selling a device that was signed in to your iCloud account, be sure to remove it from Find My Device first. And before buying a used device, make sure the previous owner has done so (see Check Activation Lock).
You can remove a device from Find My Device by turning off Find My
Device in System Preferences > iCloud (on a Mac) or in Settings >
Your Name > iCloud (on an iOS device); removing your iCloud account completely (described next); or, on an iOS device, by erasing it (tap Settings > General > Reset > Erase All Content and Settings). For more details, see Apple’s support article iCloud: Remove your device from Find My iPhone.
Remove an iCloud Account
To remove an iCloud account from a device, do one of the following:
• Mac: Go to System Preferences > iCloud and click Sign Out.
• iOS: Tap Settings > Your Name and then, at the bottom of that screen, tap Sign Out.
Then, follow the prompts to specify whether you want any of your iCloud data to remain on the device.
Use iCloud Family Sharing
If you live in a household where multiple family members would like to share the digital media they purchase from Apple (music, movies, TV shows, books, and apps)—and especially if your family includes children who use Apple devices—you’re the target audience for
iCloud’s Family Sharing feature. (If not, there’s nothing to see in this chapter—skip ahead to Use iCloud Music Library.)
Family Sharing requires Yosemite or later, or iOS 8 or later, so I
recommend using it only if all your family’s devices meet these require-ments. If your family fits that profile, here’s what you’ll get for up to six family members:
• All family members’ purchases of media from Apple are charged to the credit card of the person designated as the family organizer. (Family members who have enough credit in their own Apple ID accounts can use that credit to buy something without using the shared card.)
• Kids (who can get special Apple IDs of their own even if they’re under 13) can request media purchases from a parent, who must approve each one individually.
• All family members can access each others’ media, although you can hide particular items of your own that you don’t want to share.
• A shared family photo album, calendar, and reminder list are created.
• Family members can more easily share their locations (with Find My Friends) and locate their devices (with Find My Device). • A family can join Apple Music as a group for $14.99 per month
instead of paying $9.99 per person per month—or $4.99 per college student.
I won’t pretend Family Sharing is perfect—I’m annoyed that it offers no way to share data like contacts, bookmarks, and passwords within a family—but it’s definitely helpful for what it does.
Enable Family Sharing
You can enable Family Sharing on either a Mac or an iOS device. Once it’s enabled on one of your devices, it’s enabled on all of them. I’ll
explain the steps on a Mac here; if you use an iOS device, the process is similar except you go to Settings > Your Name to start. Follow these steps:
1. On a Mac, go to System Preferences > iCloud.
2. Click Set Up Family.
3. Click through several informational screens, confirming that you really want to do this, that the Apple ID shown is the one you want to use as the family organizer, that you want to share your purchas-es (or not), that you agree to the terms and conditions, and that you understand purchases will be charged to the credit card associated with your Apple ID.
4. Choose whether you want to share your location with family mem-bers, and click Continue.
5. On the Family Members pane of the dialog that appears, click Add Family Member to add one or more family members:
‣ For adults (and children with existing Apple IDs): Select
“Enter a family member’s name, email address or Game Center nickname,” enter the name or address, click Continue, and follow the prompts. Each invited family member must either enter their password on your computer or follow the steps in an email
invitation they receive to join the family account.
ahead, for important advice on choosing a password.) You’ll have to select an Apple ID (that is, a string of your choice followed by @icloud.com) for your child; this will also become the child’s email address. If the Apple ID you specify is unavailable, a mes-sage appears below the field, in red, to tell you so.
To add another member, click the plus button and repeat this process.
6. When you’re done, click Done.
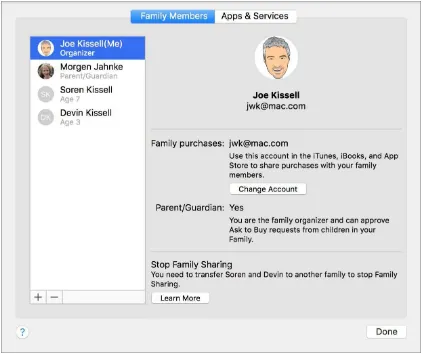
To add or remove people later, go to System Preferences > iCloud and click Manage Family. You can then change family members or adjust their details (Figure 6).
Your Child’s Password
Your child’s account password, like any iCloud account password, must meet Apple’s minimum requirements: “at least 8 characters, a number, an uppercase letter, and a lowercase letter.” In general, I suggest making passwords significantly stronger than this minimum (by using, say, 12 or more random characters).
However, in the case of a password for a very young child—I speak from experience here—consider keeping it on the simpler side. That’s because the child will need to enter the password in order to Use Ask
to Buy—and if your child has to pester you to look up and enter a
long, complex password every time he wants to download a game, that defeats part of the purpose of Ask to Buy in the first place, in that the child can’t complete the process independently of the parent. On the flip side, the presence of Ask to Buy (assuming you have it enabled) reduces the security risk of a weaker password.
Configure Apps and Services
In most cases, the setup process I just described will be all you need to do, but you may want to add or adjust certain settings after the fact. To do this, go to System Preferences > iCloud > Manage Family > My Apps & Services, and select a category on the left:
• Purchase Sharing: Enable or disable purchase sharing within the family generally or for your own purchases specifically, change which iCloud account is used for sharing, or change your payment method.
• Apple Music: View or modify an Apple Music family membership. Depending on the specifics of your situation, you may only be able to see the name of the person sharing an Apple Music family mem-bership with you, or you may be able to click Change Plan to switch to an individual or college student plan.
• Location Sharing: Select which family members, if any, can see your location.
Click Done when you’re finished making changes.
Share Calendar and Reminders
Each participating family member automatically has a Family calendar added to Calendar (on macOS and iOS, and in the Calendar web app) and a Family reminder list added to Reminders. So, any events or reminders you assign to Family will appear for all family members.
But what if you already had a shared family calendar (whether or not it was called “Family”)? That calendar will still exist alongside the new one. If you want to switch over to the new Family calendar without losing all the events in your old family calendar, do this:
1. In Calendar on a Mac, click the Calendars button on the toolbar to see the sidebar and select your old family calendar.
2. Choose File > Export > Export, enter a name and choose a destina-tion, and click Export.
3. Choose File > Import, select the calendar you just exported, and click Import.
4. In the Add Event dialog that appears, choose your new Family calendar. Click OK.
5. After Calendar imports the events into your Family calendar, you’ll have two copies of each one—one each on the old and new family calendars. Skim these to make sure all your events are indeed present on the new calendar.
6. Select your old family calendar, choose Edit > Delete, and click Delete to confirm.
Tip: If you also had a shared family Reminders list, you can follow the same basic steps in Reminders to move those items to the new Family reminders list.
Share Family Photos
Family Sharing creates a new shared photo album called Family on all the family’s devices. Add photos to this album just like any other album, and they’re available to all family members. For more informa-tion on shared photo albums, refer to Use iCloud Photo Sharing.
Use Find My
Noun
Family Sharing makes it easier for family members to use Find My Friends and Find My Device (see Find My Nouns):
• Find My Friends: Turning on Family Sharing automatically adds all family members to each others’ Find My Friends app, so you can find out where each family member is (or, to be more accurate, where each person’s primary iOS device is).
• Find My Device: On any or all of the family’s Macs and iOS
devices, family members can enable Find My Device (Find My Mac, Find My iPhone, etc.) in System Preferences > iCloud (Mac) or in Settings > Your Name > iCloud (iOS).
Share Media
Once Family Sharing is set up, media purchased from Apple by any family member is available to the other family members, and new purchases are charged to the organizer’s credit card. This is similar to how you can re-download your own media.
To see and download another family member’s purchases:
• Mac apps: In the App Store app on your Mac, click Purchased and then choose a family member’s name from the Purchased pop-up menu at the top.
• iOS apps: In the iOS App Store app, tap Updates. Then tap your picture at the top of the screen, followed by Purchased, and tap a family member’s name.
Note: Some apps are not shareable among family members. (This is at the developer’s discretion, though I have no idea why a developer would want to prevent sharing within a family.) Look at an app’s description in the App Store, and if it’s shareable, you’ll see a Family Sharing entry under the “Supports” heading (below “Information”).
• Books: In iBooks for Mac, go to Store > Store Home and click the Purchased link. Then choose a family member’s name from the pop-up menu next to Purchased at the top.
In iBooks for iOS, go to Purchased and tap a family member’s name.
• Music, TV shows, and movies: In iTunes for Mac, choose Account > Family Purchases, and choose a family member’s name from the pop-up menu next to Purchased at the top.
On an iOS device, open the iTunes Store app and then go to More > Purchased (iPhone) or Purchased > My Purchases (iPad) and tap a family member’s name.
Note: If you subscribe to iTunes Match, your matched or uploaded tracks won’t be available via Family Sharing because they weren’t purchased from Apple.
Hide Purchased Apps
To hide an app you’ve purchased from other members of your family, do this:
✦ iOS: Go to App Store > Updates > Your Picture > Purchased > My
Purchases, swipe an app name to the left, and tap Hide.
✦ Mac: Go to App Store > Purchased, right-click (or Control-click) an
app, and choose Hide Purchase from the contextual menu. Click Hide Purchase to confirm.
Use Ask to Buy
If your family includes children, you may want to use Family Sharing’s Ask to Buy feature. Follow these steps:
1. Go to System Preferences > iCloud > Manage Family (Mac) or Settings > Your Name > iCloud > Family Sharing (iOS), select a family member, and turn on Ask to Buy (it’s on by default for new children’s accounts).
2. To designate another adult as a parent or guardian who can approve purchases, go to System Preferences > iCloud > Manage Family, select that person, and select Parent/Guardian.
3. On each child’s device, log in with the child’s Apple ID in both iCloud (System Preferences or Settings) and each media app (iTunes, App Store, iBooks).
4. On each adult’s device, log in with the adult’s Apple ID in all the same places.
password (see Your Child’s Password), an Ask Permission alert ap-pears. When the child clicks or taps the Ask button in that alert, parents get a notification that they can approve or decline.
Share Storage Space
Starting with High Sierra and iOS 11, iCloud users who purchase extra storage at the 200 GB level or above can share that storage space with members of their iCloud Family Sharing group.
To share space as the family organizer:
• Mac: Go to System Preferences > iCloud > Manage Family > My Apps & Services > iCloud Storage and click Start Sharing. Then click Done.
• iOS: Go to Settings > Your Name > Family Sharing > iCloud Storage and tap Share Storage Plan. (If you have another family member who’s already paying for storage, you can optionally tap Send Invitation to invite them to switch to your plan.)
Use iCloud Music Library
Apple has two different services—iTunes Match and Apple Music—that enable you to sync music to the cloud and share it across your devices (among other capabilities). Both of them use online storage that Apple refers to as iCloud Music Library, although Apple describes only one of the services as an iCloud feature—and an optional one, at that.
The two services have some stark differences, but all the capabilities of iTunes Match are incorporated into Apple Music. So if you subscribe to Apple Music, there’s no reason to use iTunes Match too. In this chapter I help you understand what the two services do and decide whether you should use either. I also walk you through setting up and using iTunes Match—but not Apple Music, because Apple Music isn’t part of iCloud (and is large enough and complex enough to warrant its own book).
Understand Apple’s Music Services
Let me begin by listing what iTunes Match and Apple Music have in common. With either service, both of which are optional, you pay a fee to subscribe, and then activate the service on each of your devices. On a Mac, you must also select iCloud Music Library in iTunes > Prefer-ences > General. After that, two things happen:
• iTunes scans the music library on your Mac or PC and compares what you have to Apple’s vast iTunes Store selection—more than 30 million tracks. This process should take just a few minutes (though it can take longer if you have a huge music library).
• Whenever iTunes finds a track in your library that wasn’t purchased from the iTunes Store but matches a track in Apple’s library, it