Clinton W. Brownley
Foundations for Analytics
with Python
Boston
Farnham
Sebastopol
Tokyo
Beijing
Boston
Farnham
Sebastopol
Tokyo
Beijing
For Aisha and Amaya, “Education is the kindling of a flame,
not the filling of a vessel.” —Socrates May you always enjoy stoking the fire.
978-1-491-92253-8 [LSI]
Foundations for Analytics with Python by Clinton W. Brownley
Copyright © 2016 Clinton Brownley. All rights reserved. Printed in the United States of America.
Published by O’Reilly Media, Inc., 1005 Gravenstein Highway North, Sebastopol, CA 95472.
O’Reilly books may be purchased for educational, business, or sales promotional use. Online editions are also available for most titles (http://safaribooksonline.com). For more information, contact our corporate/ institutional sales department: 800-998-9938 or corporate@oreilly.com.
Editors: Laurel Ruma and Tim McGovern Production Editor: Colleen Cole
Copyeditor: Jasmine Kwityn Proofreader: Rachel Head
Indexer: Judith McConville Interior Designer: David Futato Cover Designer: Karen Montgomery Illustrator: Rebecca Demarest
August 2016: First Edition
Revision History for the First Edition 2016-08-10: First Release
See http://oreilly.com/catalog/errata.csp?isbn=9781491922538 for release details.
The O’Reilly logo is a registered trademark of O’Reilly Media, Inc. Foundations for Analytics with Python, the cover image, and related trade dress are trademarks of O’Reilly Media, Inc.
Table of Contents
Preface. . . ix
1.
Python Basics. . . 1
How to Create a Python Script 1
How to Run a Python Script 4
Useful Tips for Interacting with the Command Line 7
Python’s Basic Building Blocks 11
Numbers 12
Strings 14
Regular Expressions and Pattern Matching 19
Dates 22
Lists 25
Tuples 31
Dictionaries 32
Control Flow 37
Reading a Text File 44
Create a Text File 44
Script and Input File in Same Location 47
Modern File-Reading Syntax 47
Reading Multiple Text Files with glob 48
Create Another Text File 49
Writing to a Text File 52
Add Code to first_script.py 53
Writing to a Comma-Separated Values (CSV) File 55
print Statements 57
Chapter Exercises 58
v
2.
Comma-Separated Values (CSV) Files. . . 59
Count Number of Workbooks and Rows and Columns in Each Workbook 134
Insert New Records into a Table 165
Calculate a Statistic for Any Number of Categories from Data in a CSV File 192
Crontab File: One-Time Set-up 271
Adding Cron Jobs to the Crontab File 273
9.
Where to Go from Here. . . 277
Additional Standard Library Modules and Built-in Functions 278
Python Standard Library (PSL): A Few More Standard Modules 278
Built-in Functions 279
Python Package Index (PyPI): Additional Add-in Modules 280
NumPy 280
SciPy 286
Scikit-Learn 290
A Few Additional Add-in Packages 292
Additional Data Structures 293
Stacks 293
Queues 294
Graphs 294
Trees 295
Where to Go from Here 295
A.
Download Instructions. . . 299
B.
Answers to Exercises. . . 311
Bibliography. . . 313
Index. . . 315
Preface
This book is intended for readers who deal with data in spreadsheets on a regular basis, but who have never written a line of code. The opening chapters will get you set up with the Python environment, and teach you how to get the computer to look at data and take simple actions with it. Soon, you’ll learn to do things with data in spreadsheets (CSV files) and databases.
At first this will feel like a step backward, especially if you’re a power user of Excel. Painstakingly telling Python how to loop through every cell in a column when you used to select and paste feels slow and frustrating (especially when you have to go back three times to find a typo). But as you become more proficient, you’ll start to see where Python really shines, especially in automating tasks that you currently do over and over.
This book is written so that you can work through it from beginning to end and feel confident that you can write code that works and does what you expect at the end. It’s probably a good idea to type out the code at first, so that you get accustomed to things like tabs and closing your parentheses and quotes, but all the code is available online and you may wind up referring to those links to copy and paste as you do your own work in the future. That’s fine! Knowing when to cut and paste is part of being an efficient programmer. Reading the book as you go through the examples will teach you why and how the code samples work.
Good luck on your journey to becoming a programmer!
Why Read This Book? Why Learn These Skills?
If you deal with data on a regular basis, then there are a lot of reasons for you to be excited about learning how to program. One benefit is that you can scale your data processing and analysis tasks beyond what would be feasible or practical to do man‐ ually. Perhaps you’ve already come across the problem of needing to process large files that contain so much data that it’s impossible or impractical to open them. Even
if you can open the files, processing them manually is time consuming and error prone, because any modifications you make to the data take a long time to update— and with so much data, it’s easy to miss a row or column that you intended to change. Or perhaps you’ve come across the problem of needing to process a large number of files—so many files that it’s impossible or impractical to process them manually. In some cases, you need to use data from dozens, hundreds, or even thousands of files. As the number of files increases, it becomes increasingly difficult to handle them manually. In both of these situations, writing a Python script to process the files sol‐ ves your problem because Python scripts can process large files and lots of files quickly and efficiently.
Another benefit of learning to program is that you can automate repetitive data manipulation and analysis processes. In many cases, the operations we carry out on data are repetitive and time consuming. For example, a common data management process involves receiving data from a customer or supplier, extracting the data you want to retain, possibly transforming or reformatting the data, and then saving the data in a database or other data repository (this is the process known to data scientists as ETL—extract, transform, load). Similarly, a typical data analysis process involves acquiring the data you want to analyze, preparing the data for analysis, analyzing the data, and reporting the results. In both of these situations, once the process is estab‐ lished, it’s possible to write Python code to carry out the operations. By creating a Python script to carry out the operations, you reduce a time-consuming, repetitive process down to the running of a script and free up your time to work on other impactful tasks.
On top of that, carrying out data processing and analysis operations in a Python script instead of manually reduces the chance of errors. When you process data man‐ ually, it’s always possible to make a copy/paste error or a typo. There are lots of rea‐ sons why this might happen—you might be working so quickly that you miss the mistake, or you might be distracted or tired. Furthermore, the chance of errors increases when you’re processing large files or lots of files, or when you’re carrying out repetitive actions. Conversely, a Python script doesn’t get distracted or tired. Once you debug your script and confirm that it processes the data the way you want it to, it will carry out the operations consistently and tirelessly.
For example, consider the situations I mentioned before, involving large files or lots of files. When you can’t program, these situations are either incredibly time consum‐ ing or simply infeasible. Once you can program, you can tackle both situations rela‐ tively quickly and easily with Python scripts. Being able to carry out data processing and analysis tasks that were once laborious or impossible provides a tremendous rush of positive energy, so much so that you’ll be looking for more opportunities to tackle challenging data processing tasks with Python.
Who Is This Book For?
This book is written for people who deal with data on a regular basis and have little to no programming experience. The examples in this book cover common data sources and formats, including text files, comma-separated values (CSV) files, Excel files, and databases. In some cases, these files contain so much data or there are so many files that it’s impractical or impossible to open them or deal with them manually. In other cases, the process used to extract and use the data in the files is time consuming and error prone. In these situations, without the ability to program, you have to spend a lot of your time searching for the data you need, opening and closing files, and copy‐ ing and pasting data.
Because you may never have run a script before, we’ll start from the very beginning, exploring how to write code in a text file to create a Python script. We’ll then review how to run our Python scripts in a Command Prompt window (for Windows users) and a Terminal window (for macOS users). (If you’ve done a bit of programming, you can skim Chapter 1 and move right into the data analysis parts in Chapter 2.)
Another way I’ve set out to make this book very user-friendly for new programmers is that instead of presenting code snippets that you’d need to figure out how to com‐ bine to carry out useful work, the examples in this book contain all of the Python code you need to accomplish a specific task. You might find that you’re coming back to this book as a reference later on, and having all the code at hand will be really help‐ ful then. Finally, following the adage “a picture is worth a thousand words,” this book uses screenshots of the input files, Python scripts, Command Prompt and Terminal windows, and output files so you can literally see how to create the inputs, code, com‐ mands, and outputs.
I’m going to go into detail to show how things work, as well as giving you some tools that you can put to use. This approach will help you build a solid basis for under‐ standing “what’s going on under the hood”—there will be times when you Google a solution to your problem and find useful code, and having done the exercises in this book, you’ll have a good understanding of how code you find online works. This means you’ll know both how to apply it in your situation and how to fix it if it breaks. As you’ll build working code through these chapters, you may find that you’ll use this book as a reference, or a “cookbook,” with recipes to accomplish specific tasks. But
remember, this is a “learn to cook” book; you’ll be developing skills that you can gen‐ eralize and combine to do all sorts of tasks.
Why Windows?
The majority of examples in this book show how to create and run Python scripts on Microsoft Windows. The focus on Windows is fairly straightforward: I want this book to help as many people as possible, and according to available estimates, the vast majority of desktop and laptop computers—especially in business analytics—run a Windows operating system. For instance, according to Net Applications, as of December 2014, Microsoft Windows occupies approximately 90% of the desktop and laptop operating system market. Because I want this book to appeal to desktop and laptop users, and the vast majority of these computers have a Windows operating sys‐ tem, I concentrate on showing how to create and run Python scripts on Windows.
Despite the book’s emphasis on Windows, I also provide examples of how to create and run Python scripts on macOS, where appropriate. Almost everything that hap‐ pens within Python itself will happen the same way no matter what kind of machine you’re running it on. But where there are differences between operating systems, I’ll give specific instructions for each. For instance, the first example in Chapter 1 illus‐ trates how to create and run a Python script on both Microsoft Windows and macOS. Similarly, the first examples in Chapters 2 and 3 also illustrate how to create and run the scripts on both Windows and macOS. In addition, Chapter 8 covers both operat‐ ing systems by showing how to create scheduled tasks on Windows and cron jobs on macOS. If you are a Mac user, use the first example in each chapter as a template for how to create a Python script, make it executable, and run the script. Then repeat the steps to create and run all of the remaining examples in each chapter.
Why Python?
There are many reasons to choose Python if your aim is to learn how to program in a language that will enable you to scale and automate data processing and analysis tasks. One notable feature of Python is its use of whitespace and indentation to denote line endings and blocks of code, in contrast to many other languages, which use extra characters like semicolons and curly braces for these purposes. This makes it relatively easy to see at first glance how a Python program is put together.
denote blocks of code, people don’t always use indentation to guide your eye around the blocks of code. Without indentation, these blocks of code can look like a jumbled mess.
Python sidesteps these difficulties by using whitespace and indentation, not semico‐ lons and curly braces, to denote blocks of code. As you look through Python code, your eyes focus on the actual lines of code rather than the delimiters between blocks of code, because everything around the code is whitespace. Python code requires blocks of code to be indented, and indentation makes it easy to see where one block of code ends and another begins. Moreover, the Python community emphasizes code readability, so there is a culture of writing code that is comparatively easy to read and understand. All of these features make the learning curve shorter and shallower, which means you can get up and running and processing data with Python relatively quickly compared to many alternatives.
Another notable feature of Python that makes it ideal for data processing and analysis is the number of standard and add-in modules and functions that facilitate common data processing and analysis operations. Built-ins and standard library modules and functions come standard with Python, so when you download and install Python you immediately have access to these built-in modules and functions. You can read about all of the built-ins and standard modules in the Python Standard Library (PSL). Add-ins are other Python modules that you download and Add-install separately so you can use the additional functions they provide. You can peruse many of the add-ins in the Python Package Index (PyPI).
Some of the modules in the standard library provide functions for reading different file types (e.g., text, comma-separated values, JSON, HTML, XML, etc.); manipulat‐ ing numbers, strings, and dates; using regular expression pattern matching; parsing comma-separated values files; calculating basic statistics; and writing data to different output file types and to disk. There are too many useful add-in modules to cover them all, but a few that we’ll use or discuss in this book include the following:
xlrd and xlwt
Provide functions for parsing and writing Microsoft Excel workbooks.
mysqlclient/MySQL-python/MySQLdb
Provide functions for connecting to MySQL databases and executing queries on tables in databases.
pandas
Provides functions for reading different file types; managing, filtering, and trans‐ forming data; aggregating data and calculating basic statistics; and creating differ‐ ent types of plots.
1Wes McKinney is the original developer of the pandas module and his book is an excellent introduction to pandas, NumPy, and IPython (additional add-in modules you’ll want to learn about as you broaden your knowledge of Python for data analysis).
statsmodels
Provides functions for estimating statistical models, including linear regression models, generalized linear models, and classification models.
scikit-learn
Provides functions for estimating statistical machine learning models, including regression, classification, and clustering, as well as carrying out data pre-processing, dimensionality reduction, and cross-validation.
If you’re new to programming and you’re looking for a programming language that will enable you to automate and scale your data processing and analysis tasks, then Python is an ideal choice. Python’s emphasis on whitespace and indentation means the code is easier to read and understand, which makes the learning curve less steep than for other languages. And Python’s built-in and add-in packages facilitate many common data manipulation and analysis operations, which makes it easy to complete all of your data processing and analysis tasks in one place.
Base Python and pandas
Pandas is an add-in module for Python that provides numerous functions for read‐ ing/writing, combining, transforming, and managing data. It also has functions for calculating statistics and creating graphs and plots. All of these functions simplify and reduce the amount of code you need to write to accomplish your data processing tasks. The module has become very popular among data analysts and others who use Python because it offers a lot of helpful functions, it’s fast and powerful, and it simpli‐ fies and reduces the code you have to write to get your job done. Given its power and popularity, I want to introduce you to pandas in this book. To do so, I present pandas versions of the scripts in Chapters 2 and 3, I illustrate how to create graphs and plots with pandas in Chapter 6, and I demonstrate how to calculate various statistics with pandas in Chapter 7. I also encourage you to pick up a copy of Wes McKinney’s book,
Python for Data Analysis (O’Reilly).1
have the functionality you need or isn’t working the way you need it to. In these situa‐ tions, if you don’t have basic programming skills, you’re stuck. Conversely, if you do have these skills you can create the functionality you need and solve the problem on your own. Being able to solve a programming problem on your own is exhilarating and incredibly empowering.
Because this book is for people who are new to programming, the focus is on basic, generally applicable programming skills. For instance, Chapter 1 introduces funda‐ mental concepts such as data types, data containers, control flow, functions, if-else logic, and reading and writing files. In addition, Chapters 2 and 3 present two ver‐ sions of each script: a base Python version and a pandas version. In each case, I present and discuss the base Python version first so you learn how to implement a solution on your own with general code, and then I present the pandas version. My hope is that you will develop fundamental programming skills from the base Python versions so you can use the pandas versions with a firm understanding of the con‐ cepts and operations pandas simplifies for you.
Anaconda Python
When it comes to Python, there are a variety of applications in which you can write your code. For example, if you download Python from Python.org, then your installa‐ tion of Python comes with a graphical user interface (GUI) text editor called Idle. Alternatively, you can download IPython Notebook and write your code in an inter‐ active, web-based environment. If you’re working on macOS or you’ve installed Cyg‐ win on Windows, then you can write your code in a Terminal window using one of the built-in text editors like Nano, Vim, or Emacs. If you’re already familiar with one of these applications, then feel free to use it to follow along with the examples in this book.
However, in this section, I’m going to provide instructions for downloading and installing the free Anaconda Python distribution from Continuum Analytics because it has some advantages over the alternatives for a beginning programmer—and for the advanced programmer, too! The major advantage is that it comes with hundreds of the most popular add-in Python packages preinstalled so you don’t have to experi‐ ence the inevitable headaches of trying to install them and their dependencies on your own. For example, all of the add-in packages we use in this book come preinstal‐ led in Anaconda Python.
Another advantage is that it comes with an integrated development environment, or IDE, called Spyder. Spyder provides a convenient interface for writing, executing, and debugging your code, as well as installing packages and launching IPython Note‐ books. It includes nice features such as links to online documentation, syntax color‐ ing, keyboard shortcuts, and error warnings.
Another nice aspect of Anaconda Python is that it’s cross-platform—there are ver‐ sions for Linux, Mac, and Windows. So if you learn to use it on Windows but need to transition to a Mac at a later point, you’ll still be able to use the same familiar inter‐ face.
One aspect of Anaconda Python to keep in mind while you’re becoming familiar with Python and all of the available add-in packages is the syntax you use to install add-in packages. In Anaconda Python, you use the conda install command. For example, to install the add-in package argparse, you would type conda install argparse. This syntax is different from the usual pip install command you’d use if you’d installed Python from Python.org (if you’d installed Python from Python.org, then you’d install the argparse package with python -m pip install argparse). Ana‐ conda Python also allows you to use the pip install syntax, so you can actually use either method, but it’s helpful to be aware of this slight difference while you’re learn‐ ing to install add-in packages.
Installing Anaconda Python (Windows or Mac)
To install Anaconda Python, follow these steps:1. Go to http://continuum.io/downloads (the website automatically detects your operating system—i.e., Windows or Mac).
2. Select “Windows 64-bit Python 3.5 Graphical Installer” (if you’re using Win‐ dows) or “Mac OS X 64-bit Python 3.5 Graphical Installer” (if you’re on a Mac). 3. Double-click the downloaded .exe (for Windows) or .pkg (for Mac) file.
4. Follow the installer’s instructions.
Text Editors
Although we’ll be using Anaconda Python and Spyder in this book, it’s helpful to be familiar with some text editors that provide features for writing Python code. For instance, if you didn’t want to use Anaconda Python, you could simply install Python from Python.org and then use a text editor like Notepad (for Windows) or TextEdit (for macOS). To use TextEdit to write Python scripts, you need to open TextEdit and change the radio button under TextEdit→Preferences from “Rich text” to “Plain text” so new files open as plain text. Then you’ll be able to save the files with a .py exten‐ sion.
minal window), you’ll be able to get up and running quickly with whatever text editor is available on the computer.
While writing your Python code in a text editor such as Notepad or TextEdit is com‐ pletely acceptable and effective, there are other free text editors you can download that offer additional features, including code highlighting, adjustable tab sizes, and multi-line indenting and dedenting. These features (particularly code highlighting and multi-line indenting and dedenting) are incredibly helpful, especially while you’re learning to write and debug your code.
Here is a noncomprehensive list of some free text editors that offer these features:
• Notepad++ (Windows)
• Sublime Text (Windows and Mac) • jEdit (Windows and Mac)
• TextWrangler (Mac)
Again, I’ll be using Anaconda Python and Spyder in this book, but feel free to use a text editor to follow along with the examples. If you download one of these editors, be sure to search online for the keystroke combination to use to indent and dedent mul‐ tiple lines at a time. It’ll make your life a lot easier when you start experimenting with and debugging blocks of code.
Download Book Materials
All of the Python scripts, input files, and output files presented in this book are avail‐ able online at https://github.com/cbrownley/foundations-for-analytics-with-python. It’s possible to download the whole folder of materials to your computer, but it’s prob‐ ably simpler to just click on the filename and copy/paste the script into your text edi‐ tor. (GitHub is a website for sharing and collaborating on code—it’s very good at keeping track of different versions of a project and managing the collaboration pro‐ cess, but it has a pretty steep learning curve. When you’re ready to start sharing your code and suggesting changes to other people’s code, you might take a look at Chad Thompson’s Learning Git (Infinite Skills).)
Overview of Chapters
Chapter 1, Python Basics
We’ll begin by exploring how to create and run a Python script. This chapter focuses on basic Python syntax and the elements of Python that you need to know for later chapters in the book. For example, we’ll discuss basic data types such as numbers and strings and how you can manipulate them. We’ll also cover
the main data containers (i.e., lists, tuples, and dictionaries) and how you use them to store and manipulate your data, as well as how to deal with dates, as dates often appear in business analysis. This chapter also discusses programming concepts such as control flow, functions, and exceptions, as these are important elements for including business logic in your code and gracefully handling errors. Finally, the chapter explains how to get your computer to read a text file, read multiple text files, and write to a CSV-formatted output file. These are important techniques for accessing input data and retaining specific output data that I expand on in later chapters in the book.
Chapter 2, Comma-Separated Values (CSV) Files
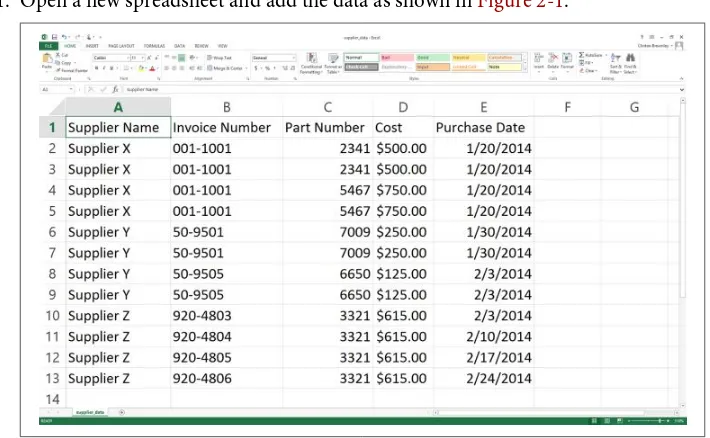
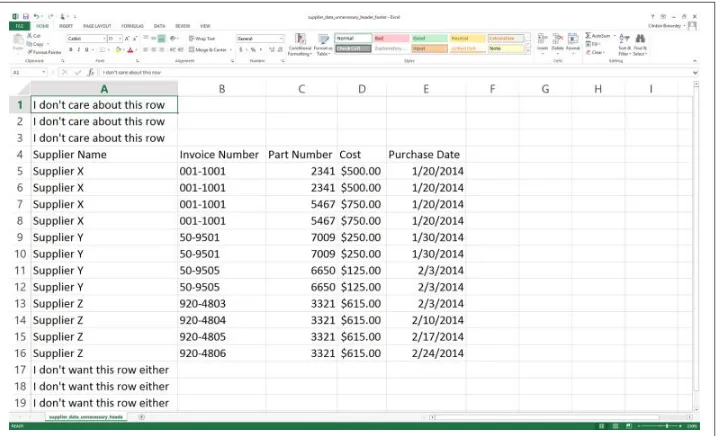
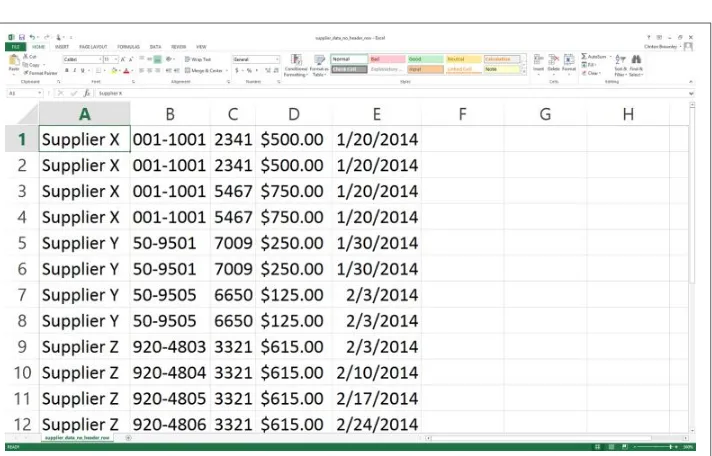
This chapter covers how to read and write CSV files. The chapter starts with an example of parsing a CSV input file “by hand,” without Python’s built-in csv module. It transitions to an illustration of potential problems with this method of parsing and then presents an example of how to avoid these potential problems by parsing a CSV file with Python’s csv module. Next, the chapter discusses how to use three different types of conditional logic to filter for specific rows from the input file and write them to a CSV output file. Then the chapter presents two dif‐ ferent ways to filter for specific columns and write them to the output file. After covering how to read and parse a single CSV input file, we’ll move on to discus‐ sing how to read and process multiple CSV files. The examples in this section include presenting summary information about each of the input files, concate‐ nating data from the input files, and calculating basic statistics for each of the input files. The chapter ends with a couple of examples of less common proce‐ dures, including selecting a set of contiguous rows and adding a header row to the dataset.
Chapter 3, Excel Files
tiple workbooks. The examples in this section include presenting summary infor‐ mation about each of the workbooks, concatenating data from the workbooks, and calculating basic statistics for each of the workbooks. The chapter ends with a couple of examples of less common procedures, including selecting a set of contiguous rows and adding a header row to the dataset.
Chapter 4, Databases
Here, we’ll cover how to carry out basic database operations in Python. The chapter starts with examples that use Python’s built-in sqlite3 module so that you don’t have to install any additional software. The examples illustrate how to carry out some of the most common database operations, including creating a database and table, loading data in a CSV input file into a database table, updat‐ ing records in a table using a CSV input file, and querying a table. When you use the sqlite3 module, the database connection details are slightly different from the ones you would use to connect to other database systems like MySQL, Post‐ greSQL, and Oracle. To show this difference, the second half of the chapter dem‐ onstrates how to interact with a MySQL database system. If you don’t already have MySQL on your computer, the first step is to download and install MySQL. From there, the examples mirror the sqlite3 examples, including creating a database and table, loading data in a CSV input file into a database table, updat‐ ing records in a table using a CSV input file, querying a table, and writing query results to a CSV output file. Together, the examples in the two halves of this chapter provide a solid foundation for carrying out common database operations in Python.
Chapter 5, Applications
This chapter contains three examples that demonstrate how to combine techni‐ ques presented in earlier chapters to tackle three different problems that are rep‐ resentative of some common data processing and analysis tasks. The first application covers how to find specific records in a large collection of Excel and CSV files. As you can imagine, it’s a lot more efficient and fun to have a computer search for the records you need than it is to search for them yourself. Opening, searching in, and closing dozens of files isn’t fun, and the task becomes more and more challenging as the number of files increases. Because the problem involves searching through CSV and Excel files, this example utilizes a lot of the material covered in Chapters 2 and 3.
The second application covers how to group or “bin” data into unique categories and calculate statistics for each of the categories. The specific example is parsing a CSV file of customer service package purchases that shows when customers paid for particular service packages (i.e., Bronze, Silver, or Gold), organizing the data into unique customer names and packages, and adding up the amount of time each customer spent in each package. The example uses two building blocks, creating a function and storing data in a dictionary, which are introduced
in Chapter 1 but aren’t used in Chapters 2, 3, and 4. It also introduces another new technique: keeping track of the previous row you processed and the row you’re currently processing, in order to calculate a statistic based on values in the two rows. These two techniques—grouping or binning data with a dictionary and keeping track of the current row and the previous row—are very powerful capabilities that enable you to handle many common analysis tasks that involve events over time.
The third application covers how to parse a text file, group or bin data into cate‐ gories, and calculate statistics for the categories. The specific example is parsing a MySQL error log file, organizing the data into unique dates and error messages, and counting the number of times each error message appeared on each date. The example reviews how to parse a text file, a technique that briefly appears in Chapter 1. The example also shows how to store information separately in both a list and a dictionary in order to create the header row and the data rows for the output file. This is a reminder that you can parse text files with basic string oper‐ ations and another good example of how to use a nested dictionary to group or bin data into unique categories.
Chapter 6, Figures and Plots
In this chapter, you’ll learn how to create common statistical graphs and plots in Python with four plotting libraries: matplotlib, pandas, ggplot, and seaborn. The chapter begins with matplotlib because it’s a long-standing package with lots of documentation (in fact, pandas and seaborn are built on top of matplot lib). The matplotlib section illustrates how to create histograms and bar, line, scatter, and box plots. The pandas section discusses some of the ways pandas simplifies the syntax you need to create these plots and illustrates how to create them with pandas. The ggplot section notes the library’s historical relationship with R and the Grammar of Graphics and illustrates how to use ggplot to build some common statistical plots. Finally, the seaborn section discusses how to cre‐ ate standard statistical plots as well as plots that would be more cumbersome to code in matplotlib.
Chapter 7, Descriptive Statistics and Modeling
classification models based on data in pandas DataFrames and then use the mod‐ els to predict output values for new input data.
Chapter 8, Scheduling Scripts to Run Automatically
This chapter covers how to schedule your scripts to run automatically on a rou‐ tine basis on both Windows and macOS. Until this chapter, we ran the scripts manually on the command line. Running a script manually on the command line is convenient when you’re debugging the script or running it on an ad hoc basis. However, it can be a nuisance if your script needs to run on a routine basis (e.g., daily, weekly, monthly, or quarterly), or if you need to run lots of scripts on a routine basis. On Windows, you create scheduled tasks to run scripts automati‐ cally on a routine basis. On macOS, you create cron jobs, which perform the same actions. This chapter includes several screenshots to show you how to cre‐ ate and run scheduled tasks and cron jobs. By scheduling your scripts to run on a routine basis, you don’t ever forget to run a script and you can scale beyond what’s possible when you’re running scripts manually on the command line.
Chapter 9, Where to Go from Here
The final chapter covers some additional built-in and add-in Python modules and functions that are important for data processing and analysis tasks, as well as some additional data structures that will enable you to efficiently handle a variety of complex programming problems you may run into as you move beyond the topics covered in this book. Built-ins are bundled into the Python installation, so they are immediately available to you when you install Python. The built-in mod‐ ules discussed in this chapter include collections, random, statistics, iter tools, and operator. The built-in functions include enumerate, filter, reduce, and zip. Add-in modules don’t come with the Python installation, so you have to download and install them separately. The add-in modules discussed in this chapter include NumPy, SciPy, and Scikit-Learn. We also take a look at some additional data structures that can help you store, process, or analyze your data more quickly and efficiently, such as stacks, queues, trees, and graphs.
Conventions Used in This Book
The following typographical conventions are used in this book:
Italic
Indicates new terms, URLs, email addresses, filenames, and file extensions.
Constant width
Used for program listings, as well as within paragraphs to refer to program ele‐ ments such as variable or function names, databases, data types, environment variables, statements, and keywords. Also used for module and package names,
and to show commands or other text that should be typed literally by the user and the output of commands.
Constant width italic
Shows text that should be replaced with user-supplied values or by values deter‐ mined by context.
This element signifies a tip or suggestion.
This element signifies a general note.
This element signifies a warning or caution.
Using Code Examples
Supplemental material (virtual machine, data, scripts, and custom command-line tools, etc.) is available for download at https://github.com/cbrownley/foundations-for-analytics-with-python.
This book is here to help you get your job done. In general, if example code is offered with this book, you may use it in your programs and documentation. You do not need to contact us for permission unless you’re reproducing a significant portion of the code. For example, writing a program that uses several chunks of code from this book does not require permission. Selling or distributing a CD-ROM of examples from O’Reilly books does require permission. Answering a question by citing this book and quoting example code does not require permission. Incorporating a signifi‐ cant amount of example code from this book into your product’s documentation does require permission.
If you feel your use of code examples falls outside fair use or the permission given above, feel free to contact us at permissions@oreilly.com.
Safari® Books Online
Safari Books Online is an on-demand digital library that deliv‐ ers expert content in both book and video form from the world’s leading authors in technology and business.
Technology professionals, software developers, web designers, and business and crea‐ tive professionals use Safari Books Online as their primary resource for research, problem solving, learning, and certification training.
Safari Books Online offers a range of plans and pricing for enterprise, government, education, and individuals.
Members have access to thousands of books, training videos, and prepublication manuscripts in one fully searchable database from publishers like O’Reilly Media, Prentice Hall Professional, Addison-Wesley Professional, Microsoft Press, Sams, Que, Peachpit Press, Focal Press, Cisco Press, John Wiley & Sons, Syngress, Morgan Kauf‐ mann, IBM Redbooks, Packt, Adobe Press, FT Press, Apress, Manning, New Riders, McGraw-Hill, Jones & Bartlett, Course Technology, and hundreds more. For more information about Safari Books Online, please visit us online.
How to Contact Us
Please address comments and questions concerning this book to the publisher:
O’Reilly Media, Inc.
1005 Gravenstein Highway North Sebastopol, CA 95472
800-998-9938 (in the United States or Canada) 707-829-0515 (international or local)
707-829-0104 (fax)
To comment or ask technical questions about this book, send email to bookques‐ tions@oreilly.com.
For more information about our books, courses, conferences, and news, see our web‐ site at http://www.oreilly.com.
Find us on Facebook: http://facebook.com/oreilly
Follow us on Twitter: http://twitter.com/oreillymedia
Watch us on YouTube: http://www.youtube.com/oreillymedia
Follow Clinton on Twitter: @ClintonBrownley
Acknowledgments
I wrote this book to help people with no or little programming experience, people not unlike myself a few years ago, learn some fundamental programming skills so they can feel the exhilaration of being able to tackle data processing and analysis projects that previously would have been prohibitively time consuming or impossible.
I wouldn’t have been able to write this book without the training, guidance, and sup‐ port of many people. First and foremost, I would like to thank my wife, Anushka, who spent countless hours teaching me fundamental programming concepts. She helped me learn how to break down large programming tasks into smaller tasks and organize them with pseudocode; how to use lists, dictionaries, and conditional logic effectively; and how to write generalized, scalable code. At the beginning, she kept me focused on solving the programming task instead of worrying about whether my code was elegant or efficient. Then, after I’d become more proficient, she was always willing to review a script and suggest ways to improve it. Once I started writing the book, she provided similar support. She reviewed all of the scripts and suggested ways to make them shorter, clearer, and more efficient. She also reviewed a lot of the text and suggested where I should add to, chop, or alter the text to make the instructions and explanations easier to read and understand. As if all of this training and advice wasn’t enough, Anushka also provided tremendous assistance and support during the months I spent writing. She took care of our daughters during the nights and week‐ ends I was away writing, and she provided encouragement in the moments when the writing task seemed daunting. This book wouldn’t have been possible without all of the instruction, guidance, critique, support, and love she’s provided over the years.
I’d also like to thank three Python training instructors, Marilyn Davis, Jeremy Osborne, and Jonathan Rocher. Marilyn and Jeremy’s courses covered fundamental programming concepts and how to implement them in Python. Jonathan’s course covered the scientific Python stack, including numpy, scipy, matplotlib and seaborn, pandas, and scikit-learn. I thoroughly enjoyed their courses, and each one enriched and expanded my understanding of fundamental programming concepts and how to implement them in Python.
I’d also like to thank the people at O’Reilly Media who have contributed to this book. Timothy McGovern was a jovial companion through the writing and editing process. He reviewed each of the drafts and offered insightful suggestions on the collection of topics to include in the book and the amount of content to include in each chapter. He also suggested ways to change the text, layout, and format in specific sections to make them easier to read and understand. I’d like to thank his colleagues, Marie Beaugureau and Rita Scordamalgia, for escorting me into the O’Reilly publishing pro‐ cess and providing marketing resources. I’d also like to thank Colleen Cole and Jas‐ mine Kwityn for superbly editing all of the chapters and producing the book. Finally, I’d like to thank Ted Kwartler for reviewing the first draft of the manuscript and pro‐ viding helpful suggestions for improving the book. His review encouraged me to include the visualization and statistical analysis chapters, to accompany each of the base Python scripts with pandas versions, and to remove some of the text and exam‐ ples to reduce repetition and improve readability. The book is richer and more well-rounded because of his thoughtful suggestions.
CHAPTER 1
Python Basics
Many books and online tutorials about Python show you how to execute code in the Python shell. To run Python code in this way, you’ll open a Command Prompt win‐ dow (in Windows) or a Terminal window (in macOS) and type “python” to get a Python prompt (which looks like >>>). Then simply type your commands one at a time; Python will execute them.
Here are two typical examples:
>>> 4 + 5 9
>>> print("I'm excited to learn Python.") I'm excited to learn Python.
This method of executing code is fast and fun, but it doesn’t scale well as the number of lines of code grows. When what you want to accomplish requires many lines of code, it is easier to write all of the code in a text file as a Python script, and then run the script. The following section shows you how to create a Python script.
How to Create a Python Script
To create a Python script:
1. Open the Spyder IDE or a text editor (e.g., Notepad, Notepad++, or Sublime Text on Windows; TextMate, TextWrangler, or Sublime Text on macOS).
2. Write the following two lines of code in the text file: #!/usr/bin/env python3
print("Output #1: I'm excited to learn Python.")
The first line is a special line called the shebang, which you should always include as the very first line in your Python scripts. Notice that the first character is the pound or hash character (#). The # precedes a single-line comment, so the line of code isn’t read or executed on a Windows computer. However, Unix computers use the line to find the version of Python to use to execute the code in the file. Because Windows machines ignore this line and Unix-based systems such as macOS use it, including the line makes the script transferable among the differ‐ ent types of computers.
The second line is a simple print statement. This line will print the text between the double quotes to the Command Prompt (Windows) or a Terminal window (macOS).
3. Open the Save As dialog box.
4. In the location box, navigate to your Desktop so the file will be saved on your Desktop.
5. In the format box, select All Files so that the dialog box doesn’t select a file type. 6. In the Save As box or File Name box, type “first_script.py”. In the past, you’ve
probably saved a text file as a .txt file. However, in this case you want to save it as a .py file to create a Python script.
7. Click Save.
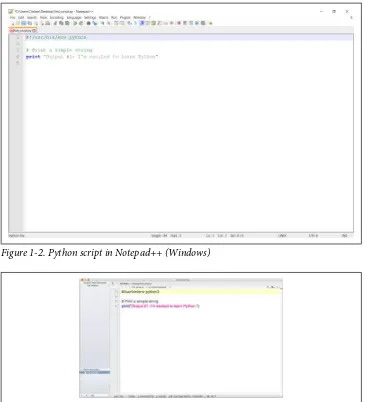
You’ve now created a Python script. Figures 1-1, 1-2, and 1-3 show what it looks like in Anaconda Spyder, Notepad++ (Windows), and TextWrangler (macOS), respec‐ tively.
Figure 1-1. Python script, first_script.py, in Anaconda Spyder
Figure 1-2. Python script in Notepad++ (Windows)
Figure 1-3. Python script in TextWrangler (macOS)
The next section will explain how to run the Python script in the Command Prompt or Terminal window. You’ll see that it’s as easy to run it as it was to create it.
How to Run a Python Script
If you created the file in the Anaconda Spyder IDE, you can run the script by clicking on the green triangle (the Run button) in the upper-lefthand corner of the IDE.
When you click the Run button, you’ll see the output displayed in the Python console in the lower-righthand pane of the IDE. The screenshot displays both the green run button and the output inside red boxes (see Figure 1-4). In this case, the output is “Output #1: I’m excited to learn Python.”
Figure 1-4. Running a Python script, first_script.py, in Anaconda Spyder
Alternatively, you can run the script in a Command Prompt (Windows) or Terminal window (macOS), as described next:
Windows Command Prompt
1. Open a Command Prompt window.
When the window opens the prompt will be in a particular folder, also known as a directory (e.g., C:\Users\Clinton or C:\Users\Clinton\Documents).
2. Navigate to the Desktop (where we saved the Python script). To do so, type the following line and then hit Enter:
cd "C:\Users\[Your Name]\Desktop"
Replace [Your Name] with your computer account name, which is usually your name. For example, on my computer, I’d type:
At this point, the prompt should look like C:\Users\[Your Name]\Desktop, and we are exactly where we need to be, as this is where we saved the Python script. The last step is to run the script.
3. Run the Python script.
To do so, type the following line and then hit Enter: python first_script.py
You should see the following output printed to the Command Prompt window, as in Figure 1-5:
Output #1: I'm excited to learn Python.
Figure 1-5. Running a Python script in a Command Prompt window (Windows)
Terminal (Mac)
1. Open a Terminal window.
When the window opens, the prompt will be in a particular folder, also known as a directory (e.g., /Users/clinton or /Users/clinton/Documents).
2. Navigate to the Desktop, where we saved the Python script. To do so, type the following line and then hit Enter:
cd /Users/[Your Name]/Desktop
Replace [Your Name] with your computer account name, which is usually your name. For example, on my computer I’d type:
cd /Users/clinton/Desktop
At this point, the prompt should look like /Users/[Your Name]/Desktop, and we are exactly where we need to be, as this is where we saved the Python script. The next steps are to make the script executable and then to run the script.
3. Make the Python script executable.
To do so, type the following line and then hit Enter: chmod +x first_script.py
The chmod command is a Unix command that stands for change access mode. The +x specifies that you are adding the execute access mode, as opposed to the read or write access modes, to your access settings so Python can execute the code in the script. You have to run the chmod command once for each Python script you create to make the script executable. Once you’ve run the chmod command on a file, you can run the script as many times as you like without retyping the chmod command.
4. Run the Python script.
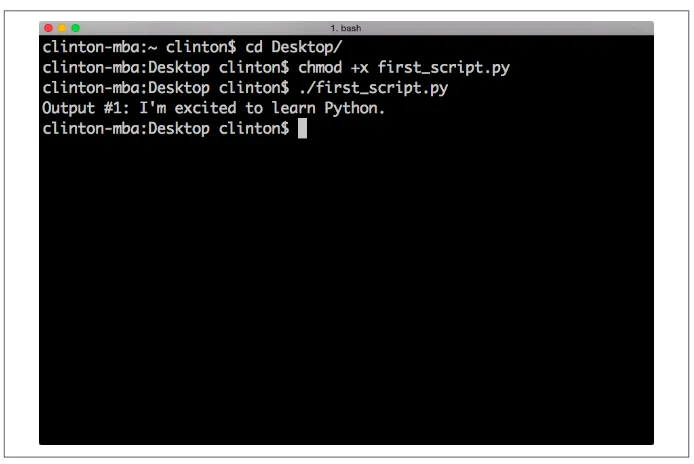
To do so, type the following line and then hit Enter: ./first_script.py
You should see the following output printed to the Terminal window, as in Figure 1-6:
Output #1: I'm excited to learn Python.
Useful Tips for Interacting with the Command Line
Here are some useful tips for interacting with the command line:
Up arrow for previous command
One nice feature of Command Prompt and Terminal windows is that you can press the up arrow to retrieve your previous command. Try pressing the up arrow in your Command Prompt or Terminal window now to retrieve your pre‐ vious command, python first_script.py on Windows or ./first_script.py on Mac.
This feature, which reduces the amount of typing you have to do each time you want to run a Python script, is very convenient, especially when the name of the Python script is long or you’re supplying additional arguments (like the names of input files or output files) on the command line.
Ctrl+c to stop a script
Now that you’ve run a Python script, this is a good time to mention how to inter‐ rupt and stop a Python script. There are quite a few situations in which it behooves you to know how to stop a script. For example, it’s possible to write code that loops endlessly, such that your script will never finish running. In other cases, you may write a script that takes a long time to complete and decide that you want to halt the script prematurely if you’ve included print statements and they show that it’s not going to produce the desired output.
To interrupt and stop a script at any point after you’ve started running it, press Ctrl+c (on Windows) or Control+c (on macOS). This will stop the process that you started with your command. You won’t need to worry too much about the technical details, but a process is a computer’s way of looking at a sequence of commands. You write a script or program and the computer interprets it as a pro‐ cess, or, if it’s more complicated, as a series of processes that may go on sequen‐ tially or at the same time.
Read and search for solutions to error messages
While we’re on the topic of dealing with troublesome scripts, let’s also briefly talk about what to do when you type ./python first_script.py, or attempt to run any Python script, and instead of running it properly your Command Prompt or Terminal window shows you an error message. The first thing to do is relax and
read the error message. In some cases, the error message clearly directs you to the line in your code with the error so you can focus your efforts around that line to debug the error (your text editor or IDE will have a setting to show you line numbers; if it doesn’t do it automatically, poke around in the menus or do a quick search on the Web to figure out how to do this). It’s also important to realize that error messages are a part of programming, so learning to code involves learning how to debug errors effectively.
Moreover, because error messages are common, it’s usually relatively easy to fig‐ ure out how to debug an error. You’re probably not the first person to have encountered the error and looked for solutions online—one of your best options is to copy the entire error message, or at least the generic portion of the message, into your search engine (e.g., Google or Bing) and look through the results to read about how other people have debugged the error.
It’s also helpful to be familiar with Python’s built-in exceptions, so you can recog‐ nize these standard error messages and know how to fix the errors. You can read about Python’s built-in exceptions in the Python Standard Library, but it’s still helpful to search for these error messages online to read about how other people have dealt with them.
Add more code to first_script.py
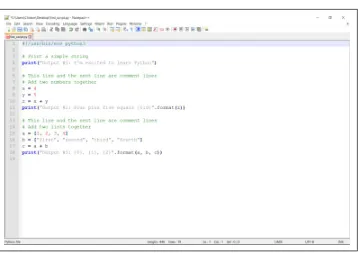
Now, to become more comfortable with writing Python code and running your Python script, try editing first_script.py by adding more lines of code and then rerunning the script. For extended practice, add each of the blocks of code shown in this chapter at the bottom of the script beneath any preceding code, resave the script, and then rerun the script.
For example, add the two blocks of code shown here below the existing print statement, then resave and rerun the script (remember, after you add the lines of code to first_script.py and resave the script, if you’re using a Command Prompt or Terminal window, you can press the up arrow to retrieve the command you use to run the script so you don’t have to type it again):
# Add two numbers together x = 4
y = 5
z = x + y
print("Output #2: Four plus five equals {0:d}.".format(z)) # Add two lists together
a = [1, 2, 3, 4]
b = ["first", "second", "third", "fourth"] c = a + b
print("Output #3: {0}, {1}, {2}".format(a, b, c))
The lines that are preceded by a # are comments, which can be used to annotate the code and describe what it’s intended to do.
print statement, "{0:d}".format(z). The curly braces ({}) are a placeholder for the value that’s going to be passed into the print statement, which in this case comes from the variable z. The 0 points to the first position in the variable z. In this case, z contains a single value, so the 0 points to that value; however, if z were a list or tuple and contained many values, the 0 would specify to only pull in the first value from z.
The colon (:) separates the value to be pulled in from the formatting of that value. The d specifies that the value should be formatted as a digit with no deci‐ mal places. In the next section, you’ll learn how to specify the number of decimal places to show for a floating-point number.
The second example shows how to create lists, add lists together, and print vari‐ ables separated by commas to the screen. The syntax in the print statement, "{0}, {1}, {2}".format(a, b, c), shows how to include multiple values in the print statement. The value a is passed into {0}, the value b is passed into {1}, and the value c is passed into {2}. Because all three of these values are lists, as opposed to numbers, we don’t specify a number format for the values. We’ll dis‐ cuss these procedures and many more in later sections of this chapter.
Why Use .format When Printing?
.format isn’t something you have to use with every print statement, but it’s very powerful and can save you a lot of keystrokes. In the example you just created, note that print("Output #3: {0}, {1}, {2}".format(a, b, c)) gives the contents of your three variables separated by commas. If you wanted to get that result without using .format, you’d need to write: print("Output #3: ",a,", ",b,", ",c), a piece of code that gives you lots of opportunities for typos. We’ll cover other uses of .format later, but in the meantime, get comfortable with it so you have options when you need them.
Figure 1-7 and Figure 1-8 show what it looks like to add the new code in Ana‐ conda Spyder and in Notepad++.
Figure 1-7. Adding code to the first_script.py in Anaconda Spyder
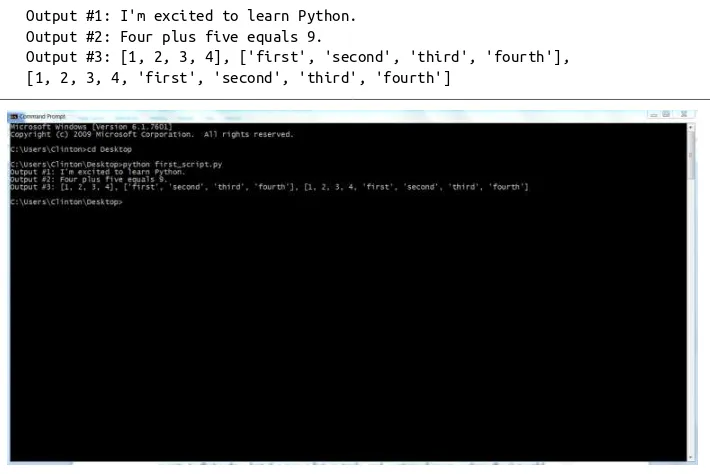
If you add the preceding lines of code to first_script.py, then when you resave and rerun the script you should see the following output printed to the screen (see Figure 1-9:
Output #1: I'm excited to learn Python. Output #2: Four plus five equals 9.
Output #3: [1, 2, 3, 4], ['first', 'second', 'third', 'fourth'], [1, 2, 3, 4, 'first', 'second', 'third', 'fourth']
Figure 1-9. Running first_script.py with the extra code in a Command Prompt window
Python’s Basic Building Blocks
Now that you can create and run Python scripts, you have the basic skills necessary for writing Python scripts that can automate and scale existing manual business pro‐ cesses. Later chapters will go into much more detail about how to use Python scripts to automate and scale these processes, but before moving on it’s important to become more familiar with some of Python’s basic building blocks. By becoming more famil‐ iar with these building blocks, you’ll understand and be much more comfortable with how they’ve been combined in later chapters to accomplish specific data processing tasks. First, we’ll deal with some of the most common data types in Python, and then we’ll work through ways to make your programs make decisions about data with if statements and functions. Next, we’ll work with the practicalities of having Python read and write to files that you can use in other programs or read directly: text and simple table (CSV) files.
Numbers
Python has several built-in numeric types. This is obviously great, as many business applications require analyzing and processing numbers. The four main types of num‐ bers in Python are integer, floating-point, long, and complex numbers. We’ll cover integer and floating-point numbers, as they are the most common in business appli‐ cations. You can add the following examples dealing with integer and floating-point numbers to first_script.py, beneath the existing examples, and rerun the script to see the output printed to the screen.
Integers
Let’s dive straight into a few examples involving integers:
x = 9
print("Output #4: {0}".format(x)) print("Output #5: {0}".format(3**4))
print("Output #6: {0}".format(int(8.3)/int(2.7)))
Output #4 shows how to assign an integer, the number 9, to the variable x and how to print the x variable. Output #5 illustrates how to raise the number 3 to the power of 4 (which equals 81) and print the result. Output #6 demonstrates how to cast numbers as integers and perform division. The numbers are cast as integers with the built-in int function, so the equation becomes 8 divided by 2, which equals 4.0.
Floating-point numbers
Like integers, floating-point numbers—numbers with decimal points—are very important to many business applications. The following are a few examples involving floating-point numbers:
Output #7 is much like Output #6, except we’re keeping the numbers to divide as floating-point numbers, so the equation is 8.3 divided by 2.7: approximately 3.074. The syntax in the print statement in this example, "{0:.3f}".format(float ing_point_number/floating_point_number), shows how to specify the number of decimal places to show in the print statement. In this case, the .3f specifies that the output value should be printed with three decimal places.
dividing the number 8 by the number 3 in two different ways. The result in both, approximately 2.667, is a floating-point number.
The type Function
Python provides a function called type that you can call on anything to find out more information about the way that Python is treating it. If you call it on numeric vari‐ ables, it will tell you if they are ints or floats, but it will also tell you if they are being treated as strings. The syntax is utterly simple: type(variable) will return the type that Python is treating variable as. Furthermore, because Python is an “object-oriented” language, you can call type on just about anything that has a name in Python: not just variables but functions, statements, and much more. If your code is behaving unexpectedly, calling type may help you diagnose it.
An important detail to know about dealing with numbers in Python is that there are several standard library modules and built-in functions and modules you can use to perform common mathematical operations. You’ve already seen two built-in func‐ tions, int and float, for manipulating numbers. Another useful standard module is the math module.
Python’s standard modules are on your computer when you install Python, but when you start up a new script, the computer only loads a very basic set of operations (this is part of why Python is quick to start up). To make a function in the math module available to you, all you have to do is add from math import [function name] at the top of your script, right beneath the shebang. For example, add the following line at the top of first_script.py, below the shebang:
#!/usr/bin/env python3
from math import exp, log, sqrt
Once you’ve added this line to the top of first_script.py, you have three useful mathe‐ matical functions at your disposal. The functions exp, log, and sqrt take the number e to the power of the number in parentheses, the natural log of the number in paren‐ theses, and the square root of the number in parentheses, respectively. The following are a few examples of using these math module functions:
print("Output #11: {0:.4f}".format(exp(3))) print("Output #12: {0:.2f}".format(log(4))) print("Output #13: {0:.1f}".format(sqrt(81)))
The results of these three mathematical expressions are floating-point numbers, approximately 20.0855, 1.39, and 9.0, respectively.
This is just the beginning of what’s available in the math module. There are many more useful mathematical functions and modules built into Python, for business, sci‐
entific, statistical, and other applications, and we’ll discuss quite a few more in this book. For more information about these and other standard modules and built-in functions, you can peruse the Python Standard Library.
Strings
A string is another basic data type in Python; it usually means human-readable text, and that’s a useful way to think about it, but it is more generally a sequence of charac‐ ters that only has meaning when they’re all in that sequence. Strings appear in many business applications, including supplier and customer names and addresses, com‐ ment and feedback data, event logs, and documentation. Some things look like inte‐ gers, but they’re actually strings. Think of zip codes, for example. The zip code 01111 (Springfield, Massachusetts) isn’t the same as the integer 1111—you can’t (meaning‐ fully) add, subtract, multiply, or divide zip codes—and you’d do well to treat zip codes as strings in your code. This section covers some modules, functions, and operations you can use to manage strings.
Strings are delimited by single, double, triple single, or triple double quotation marks. The following are a few examples of strings:
print("Output #14: {0:s}".format('I\'m enjoying learning Python.'))
print("Output #15: {0:s}".format("This is a long string. Without the backslash\
it would run off of the page on the right in the text editor and be very\ difficult to read and edit. By using the backslash you can split the long\ string into smaller strings on separate lines so that the whole string is easy\ to view in the text editor."))
print("Output #16: {0:s}".format('''You can use triple single quotes
for multi-line comment strings.'''))
print("Output #17: {0:s}".format("""You can also use triple double quotes for multi-line comment strings."""))
Output #14 is similar to the one at the beginning of this chapter. It shows a simple string delimited by single quotes. The result of this print statement is "I'm enjoying learning Python.". Remember, if we had used double quotes to delimit the string it wouldn’t have been necessary to include a backslash before the single quote in the contraction "I'm".
you accidentally hit the spacebar so that there is an invisible space after the backslash, your script will throw a syntax error instead of doing what you want it to do. For this reason, it’s prudent to use triple single or triple double quotes to create multi-line strings.
Outputs #16 and #17 show how to use triple single and triple double quotes to create multi-line strings. The output of these examples is:
Output #16: You can use triple single quotes for multi-line comment strings.
Output #17: You can also use triple double quotes for multi-line comment strings.
When you use triple single or double quotes, you do not need to include a backslash at the end of the top line. Also, notice the difference between Output #15 and Out‐ puts #16 and #17 when printed to the screen. The code for Output #15 is split across multiple lines with single backslashes as line endings, making each line of code shorter and easier to read, but it prints to the screen as one long line of text. Con‐ versely, Outputs #16 and #17 use triple single and double quotes to create multi-line strings and they print to the screen on separate lines.
As with numbers, there are many standard modules, built-in functions, and operators you can use to manage strings. A few useful operators and functions include +, *, and len. The following are a few examples of using these operators on strings:
string1 = "This is a "
string2 = "short string."
sentence = string1 + string2
print("Output #18: {0:s}".format(sentence))
print("Output #19: {0:s} {1:s}{2:s}".format("She is", "very "*4, "beautiful.")) m = len(sentence)
print("Output #20: {0:d}".format(m))
Output #18 shows how to add two strings together with the + operator. The result of this print statement is This is a short string—the + operator adds the strings together exactly as they are, so if you want spaces in the resulting string, you have to add spaces in the smaller string segments (e.g., after the letter “a” in Output #18) or between the string segments (e.g., after the word “very” in Output #19).
Output #19 shows how to use the * operator to repeat a string a specific number of times. In this case, the resulting string contains four copies of the string “very ” (i.e., the word “very” followed by a single space).
Output #20 shows how to use the built-in len function to determine the number of characters in the string. The len function also counts spaces and punctuation in the string’s length. Therefore, the string This is a short string. in Output #20 is 23 characters long.
A useful standard library module for dealing with strings is the string module. With the string module, you have access to many functions that are useful for managing strings. The following sections discuss a few examples of using these string functions.
split
The following two examples show how to use the split function to break a string into a list of the substrings that make up the original string. (The list is another built-in data type built-in Python that we’ll discuss later built-in this chapter.) The split function can take up to two additional arguments between the parentheses. The first additional argument indicates the character(s) on which the split should occur. The second additional argument indicates how many splits to perform (e.g., two splits results in three substrings):
string1 = "My deliverable is due in May"
string1_list1 = string1.split() string1_list2 = string1.split(" ",2)
print("Output #21: {0}".format(string1_list1))
print("Output #22: FIRST PIECE:{0} SECOND PIECE:{1} THIRD PIECE:{2}"\
.format(string1_list2[0], string1_list2[1], string1_list2[2])) string2 = "Your,deliverable,is,due,in,June"
string2_list = string2.split(',')
print("Output #23: {0}".format(string2_list))
print("Output #24: {0} {1} {2}".format(string2_list[1], string2_list[5],\ string2_list[-1]))
In Output #21, there are no additional arguments between the parentheses, so the split function splits the string on the space character (the default). Because there are five spaces in this string, the string is split into a list of six substrings. The newly cre‐ ated list is ['My', 'deliverable', 'is', 'due', 'in', 'May'].
In Output #22, we explicitly include both arguments in the split function. The first argument is " ", which indicates that we want to split the string on a single space character. The second argument is 2, which indicates that we only want to split on the first two single space characters. Because we specify two splits, we create a list with three elements. The second argument can come in handy when you’re parsing data. For example, you may be parsing a log file that contains a timestamp, an error code, and an error message separated by spaces. In this case, you may want to split on the first two spaces to parse out the timestamp and error code, but not split on any remaining spaces so the error message remains intact.
join
The next example shows how to use the join function to combine substrings con‐ tained in a list into a single string. The join function takes an argument before the word join, which indicates the character(s) to use between the substrings as they are combined:
print("Output #25: {0}".format(','.join(string2_list)))
In this example, the additional argument—a comma—is included between the paren‐ theses. Therefore, the join function combines the substrings into a single string with commas between the substrings. Because there are six substrings in the list, the sub‐ strings are combined into a single string with five commas between the substrings. The newly created string is Your,deliverable,is,due,in,June.
strip
The next two sets of examples show how to use the strip, lstrip, and rstrip func‐ tions to remove unwanted characters from the ends of a string. All three functions can take an additional argument between the parentheses to specify the character(s) to be removed from the ends of the string.
The first set of examples shows how to use the lstrip, rstrip, and strip functions to remove spaces, tabs, and newline characters from the lefthand side, righthand side, and both sides of the string, respectively:
string3 = " Remove unwanted characters from this string.\t\t \n"
print("Output #26: string3: {0:s}".format(string3)) string3_lstrip = string3.lstrip()
print("Output #27: lstrip: {0:s}".format(string3_lstrip)) string3_rstrip = string3.rstrip()
print("Output #28: rstrip: {0:s}".format(string3_rstrip)) string3_strip = string3.strip()
print("Output #29: strip: {0:s}".format(string3_strip))
The lefthand side of string3 contains several spaces. In addition, on the righthand side, there are tabs (\t), more spaces, and a newline (\n) character. If you haven’t seen the \t and \n characters before, they are the way a computer represents tabs and newlines.
In Output #26, you’ll see leading whitespace before the sentence; you’ll see a blank line below the sentence as a result of the newline character, and you won’t see the tabs and spaces after the sentence, but they are there. Outputs #27, #28, and #29 show you how to remove the spaces, tabs, and newline characters from the lefthand side, right‐ hand side, and both sides of the string, respectively. The s in {0:s} indicates that the value passed into the print statement should be formatted as a string.