•
•
•
•
•
• • The value of visuals — get a complete overview of infographics
and their effectiveness in marketing
• All about the data — explore sourcing data, creating narratives, considering your audience, and much more
• Delightful design — discover how to create great designs for your infographics using wireframes and tools such as Illustrator and Photoshop
• Distribution is key — find out how to distribute your infographics and then promote them to create the greatest impact
• Get trendy — discover infographics trends to follow and future uses of infographics to try today
In
fo
gr
ap
hics
l
Justin Beegel, MBA
with the Infographic World team
•
Choose the best infographic
to showcase your data
•
Build your design using wireframes,
moodboards, and graphic design tools
•
Identify trends and patterns
in the data
IN FULL COLOR!
Learn to:
Infographics
Making Everything E
Start with
FREE
Cheat Sheets
Cheat Sheets include
• Checklists
• Charts
• Common Instructions
• And Other Good Stuff!
Get Smart at Dummies.com
Dummies.com makes your life easier with 1,000s
of answers on everything from removing wallpaper
to using the latest version of Windows.
Check out our
• Videos
• Illustrated Articles
• Step-by-Step Instructions
Plus, each month you can win valuable prizes by entering
our Dummies.com sweepstakes. *
Want a weekly dose of Dummies? Sign up for Newsletters on
• Digital Photography
• Microsoft Windows & Office
• Personal Finance & Investing
• Health & Wellness
• Computing, iPods & Cell Phones
• eBay
• Internet
• Food, Home & Garden
Find out “HOW” at Dummies.com
*Sweepstakes not currently available in all countries; visit Dummies.com for official rules.
To access the Cheat Sheet created specifically for this book, go to
www.dummies.com/cheatsheet/infographics
by Justin Beegel, MBA
Founder & President, Infographic World, Inc.
and the Infographic World Design Team
Published simultaneously in Canada
No part of this publication may be reproduced, stored in a retrieval system or transmitted in any form or by any means, electronic, mechanical, photocopying, recording, scanning or otherwise, except as permitted under Sections 107 or 108 of the 1976 United States Copyright Act, without the prior written permission of the Publisher. Requests to the Publisher for permission should be addressed to the Permissions Department, John Wiley & Sons, Inc., 111 River Street, Hoboken, NJ 07030, (201) 748-6011, fax (201) 748-6008, or online at
http://www.wiley.com/go/permissions.
Trademarks: Wiley, For Dummies, the Dummies Man logo, Dummies.com, Making Everything Easier, and related trade dress are trademarks or registered trademarks of John Wiley & Sons, Inc. and may not be used without written permission. All other trademarks are the property of their respective owners. John Wiley & Sons, Inc. is not associated with any product or vendor mentioned in this book.
LIMIT OF LIABILITY/DISCLAIMER OF WARRANTY: THE PUBLISHER AND THE AUTHOR MAKE NO REPRESENTATIONS OR WARRANTIES WITH RESPECT TO THE ACCURACY OR COMPLETENESS OF THE CONTENTS OF THIS WORK AND SPECIFICALLY DISCLAIM ALL WARRANTIES, INCLUDING WITH-OUT LIMITATION WARRANTIES OF FITNESS FOR A PARTICULAR PURPOSE. NO WARRANTY MAY BE CREATED OR EXTENDED BY SALES OR PROMOTIONAL MATERIALS. THE ADVICE AND STRATEGIES CONTAINED HEREIN MAY NOT BE SUITABLE FOR EVERY SITUATION. THIS WORK IS SOLD WITH THE UNDERSTANDING THAT THE PUBLISHER IS NOT ENGAGED IN RENDERING LEGAL, ACCOUNTING, OR OTHER PROFESSIONAL SERVICES. IF PROFESSIONAL ASSISTANCE IS REQUIRED, THE SERVICES OF A COMPETENT PROFESSIONAL PERSON SHOULD BE SOUGHT. NEITHER THE PUBLISHER NOR THE AUTHOR SHALL BE LIABLE FOR DAMAGES ARISING HEREFROM. THE FACT THAT AN ORGANIZA-TION OR WEBSITE IS REFERRED TO IN THIS WORK AS A CITAORGANIZA-TION AND/OR A POTENTIAL SOURCE OF FURTHER INFORMATION DOES NOT MEAN THAT THE AUTHOR OR THE PUBLISHER ENDORSES THE INFORMATION THE ORGANIZATION OR WEBSITE MAY PROVIDE OR RECOMMENDATIONS IT MAY MAKE. FURTHER, READERS SHOULD BE AWARE THAT INTERNET WEBSITES LISTED IN THIS WORK MAY HAVE CHANGED OR DISAPPEARED BETWEEN WHEN THIS WORK WAS WRITTEN AND WHEN IT IS READ.
For general information on our other products and services, please contact our Customer Care Department within the U.S. at 877-762-2974, outside the U.S. at 317-572-3993, or fax 317-572-4002. For technical support, please visit www.wiley.com/techsupport.
Wiley publishes in a variety of print and electronic formats and by print-on-demand. Some material included with standard print versions of this book may not be included in e-books or in print-on-demand. If this book refers to media such as a CD or DVD that is not included in the version you purchased, you may download this material at http://booksupport.wiley.com. For more information about Wiley products, visit www.wiley.com.
Library of Congress Control Number: 2013954217
ISBN 978-1-118-79238-4 (pbk); ISBN 978-1-118-79227-8 (ebk); ISBN 978-1-118-79239-1 (ebk) Manufactured in the United States of America
Introduction ... 1
Part I: Getting Started with Infographics ... 5
Chapter 1: Unlocking the Power of Infographics ... 7
Chapter 2: Exploring Infographics ... 19
Chapter 3: Designing Your Approach to Infographics ... 35
Part II: Starting with Data ... 57
Chapter 4: Informing Yourself ... 59
Chapter 5: Gathering Your Data ... 77
Chapter 6: Discovering the Story ... 93
Part III: Depicting with Delightful Design... 115
Chapter 7: Creating Wireframes and Managing Mood Boards ... 117
Chapter 8: Designing Around a Theme ... 135
Chapter 9: Designing Infographics in Adobe Illustrator ... 153
Chapter 10: Designing Infographics in Photoshop ... 193
Chapter 11: Expanding Your Tools and Techniques ... 225
Part IV: Ready to Distribute ... 241
Chapter 12: Launching Your Infographic ... 243
Chapter 13: Promoting Your Infographic... 255
Part V: The Part of Tens ... 273
Chapter 14: Ten Infographics Trends to Follow ... 275
Chapter 15: Ten Future Infographic Uses to Try Today ... 283
Introduction ... 1
About This Book ... 1
Foolish Assumptions ... 2
Conventions and Icons Used in This Book ... 2
Beyond the Book ... 3
Where to Go from Here ... 3
Part I: Getting Started with Infographics ... 5
Chapter 1: Unlocking the Power of Infographics . . . .7
Recognizing the Value of Visuals ... 8
So You Want to Be an Infographic Designer ... 11
Filling Your Toolbox ... 11
Assembling Your Team ... 12
Using internal resources ... 12
Going with the professionals ... 15
Working with Decision Makers ... 16
Chapter 2: Exploring Infographics . . . .19
Establishing Your Voice ... 19
Promoting with brand infographics ... 20
Educating with informational editorial infographics ... 22
Working with Infographics ... 23
Identifying what makes an infographic ... 24
Sticking with what works ... 24
Become a subject matter expert ... 24
Considering possibilities beyond the static infographic ... 25
Predicting the Lifecycle of Infographics ... 26
Timely: Sharing breaking news ... 26
Related: Telling a relevant tale ... 28
Evergreen: Letting things build ... 29
Engaging Viewers with Animation and Motion ... 30
Bringing infographics to life with motion and sound ... 30
Chapter 3: Designing Your Approach to Infographics . . . .35
Establishing a Work Process ... 35
Deciding on your eventual output ... 37
Gathering data ... 38
Create narrative and flow ... 39
Develop and refine your visual plan ... 39
Build artwork and visuals ... 42
Refine artwork and ensure accuracy ... 42
Getting your project approved ... 43
Sharing your creation with your audience ... 43
Assembling the Tools of the Trade ... 44
Lining up your technology tools ... 44
Gathering a work force ... 46
Building professional relationships ... 46
Developing Design Principles ... 47
Balance ... 47
Respecting Brand Guidelines ... 52
Using recommended fonts ... 53
Working with logos ... 53
Working with colors ... 53
Using copy guidelines ... 54
Outlining the Approval Process ... 54
Part II: Starting with Data ... 57
Chapter 4: Informing Yourself . . . .59
Determining Your Infographic’s Thesis ... 60
Thinking of the infographic’s main points ... 61
Calling out a call-to-action ... 65
Appealing to the Target Audience ... 68
Complexity ... 69
Chapter 5: Gathering Your Data . . . .77
Searching Online ... 77
Doing simple Google searches ... 78
Refining your Google searches ... 80
Finding Additional Sources ... 83
Discovering government databases ... 84
Using company resources ... 87
Reading company reports ... 88
Reaching out to experts ... 90
Placing It All Together ... 90
Getting back to your thesis ... 91
Citing your sources... 91
Chapter 6: Discovering the Story . . . .93
Analyzing and Organizing Your Information ... 93
Looking for trends ... 93
Employing comparisons ... 96
Thinking about history ... 99
Finding the outliers ... 101
Recognizing patterns ... 103
Thinking of a Narrative ... 104
Creating a flow ... 105
Writing copy ... 111
Part III: Depicting with Delightful Design ... 115
Chapter 7: Creating Wireframes and Managing Mood Boards . . . . .117
Outlining Your Wireframe ... 118
The title: Creating the viewer’s first impression ... 119
The introduction: Presenting your most important data ... 121
The body: Building the content of your infographic ... 122
The call-to-action: Drawing a strong conclusion ... 123
Editing Your Story ... 124
Clarifying the “big idea” ... 124
Conceptualizing an overall layout ... 126
Visualizing transitions ... 128
Mapping your illustrations ... 129
Blocking: Creating a visual roadmap ... 129
Working with Fonts ... 130
Choosing text styles ... 130
Following the three-font rule ... 131
Putting Your Mood Board to Work ... 133
Chapter 8: Designing Around a Theme . . . .135
Matching Visuals to Your Topic ... 136
Following Brand Guidelines ... 138
Using guidelines for logos, color, and font ... 139
Working with your client’s specifications ... 141
Designing a Custom Style ... 142
Creating color palettes ... 142
Feeling out the right fonts... 146
Including illustrations ... 148
Testing out textures and patterns ... 149
Finding Inspiration ... 151
Chapter 9: Designing Infographics in Adobe Illustrator . . . .153
Setting Up Illustrator ... 153
Navigating the workspace... 154
Working with toolbars and palettes ... 154
Determining the essentials ... 154
Mastering Illustrator Basics ... 159
Using the Selection and Direct Selection tools ... 159
Maximizing the Pen tool ... 159
Placing a text box ... 163
Changing fonts with the Type tool ... 163
Using the Direct Selection tool ... 165
Grouping objects... 166
Discovering the beauty of the Brush tool ... 167
Getting geometric with the Shape tool ... 168
Making charts and graphs with the Graph tool ... 171
Using the Eyedropper tool ... 173
Adding icons with the Symbols tool ... 175
Using the Pathfinder tool to create shapes ... 178
Editing paths with the Eraser tool ... 179
Experimenting with Illustrator Effects ... 182
Gaining contrast with a gradient ... 182
Building depth with the Blend tool... 184
Creating dynamic graphics with a warp ... 186
Joining objects with a compound path ... 187
Cropping illustrations with clipping masks ... 189
Importing sketches into Illustrator to use as a template ... 191
Chapter 10: Designing Infographics in Photoshop . . . .193
Getting Started with Photoshop ... 194
Labeling layers ... 194
Using folders and groups ... 195
Learning the Basic Photoshop Tools ... 198
Selection tools ... 198
Drawing tools ... 198
Type tools ... 200
Photographic tools ... 200
Changing Fonts with Character Styles ... 200
Creating Boundaries with Layer Masks and Clipping Paths ... 203
Building a layer mask by cropping ... 204
Using layer masks to hide or reveal selected parts of an image ... 205
Creating a clipping path ... 207
Making Your Graphics Pop ... 208
Creating depth with blend modes ... 208
Changing colors with a color overlay ... 212
Giving graphics depth: gradients, bevels, and satin ... 213
Showcasing elements with shadows ... 220
Managing Your Workflow ... 222
Copying style effects from one layer to another ... 222
Using effects sparingly ... 223
Chapter 11: Expanding Your Tools and Techniques . . . .225
Starting Your Project with Illustrator ... 225
Opening Photoshop Files in Illustrator ... 227
Using Illustrator Graphics in Photoshop ... 229
Scaling between Programs ... 230
Discovering the Benefits of a Smart Object ... 233
Working with Smart Filters ... 234
Determining which Program Works Best for Your Needs ... 235
Graphing... 235
Detailed icons ... 236
Patterns ... 236
Type manipulation ... 236
Working with Other Design Tools ... 237
Microsoft programs ... 237
Infogr.am ... 238
Easel.ly ... 238
Creative Market ... 240
Part IV: Ready to Distribute ... 241
Chapter 12: Launching Your Infographic . . . .243
Deciding Where to Publish ... 244
Publishing Infographics on the Web ... 245
Determining the right size ... 246
Creating filenames that generate traffic ... 247
Using appropriate keywords ... 248
Introducing readers to the infographic ... 249
Sharing Your Work ... 251
Providing social share buttons on the page ... 251
Giving out an embed code ... 253
Chapter 13: Promoting Your Infographic . . . .255
Collecting Influencers ... 256
Getting prepared to go viral ... 256
Building a list of influencers ... 257
Organizing your list of influencers ... 265
Putting Your Plan in Place ... 266
Building relationships ... 267
Offering exclusives ... 268
Using social media ... 268
Determining When to Pitch ... 270
Targeting influencers at the best time ... 270
Timing your social media shares ... 271
Part V: The Part of Tens ... 273
Chapter 14: Ten Infographics Trends to Follow . . . .275
Adding Interactive Features to Your Graphics ... 275
Placing information on different pages ... 276
Letting the reader choose ... 276
Using Video or Animation in Graphics ... 276
Designing for Tablets ... 277
Using Data to Drive Your Project ... 277
Developing Graphics for Market Research ... 278
Using Graphics to Bridge Cultures ... 278
The DIY Graphics Movement ... 279
Infographics for Presentations ... 281
Make a List, Check It Twice ... 281
Keeping It Small ... 281
Chapter 15: Ten Future Infographic Uses to Try Today . . . .283
Immersive Interactive Graphics ... 287
Print Media ... 288
Presentation Tools ... 288
R
ight at the intersection of art and journalism, technology and storytelling, lies the infographic. Ranging in size and scope from a three-inch pie chart to a multipage, full-color spread, infographics add visual appeal and detail to virtually any story. This is an interesting time for infographics. On one hand, print media that routinely featured charts, graphs, diagrams, and graphic illustrations has diminished. On the other hand, we humans are connected to media all day, every day, through our computers, tablets, and phones. We crave information and entertainment, and in a world that’s crowded with data, an attractive visual presentation can help your story stand out. When print media was king, most graphics were static — designed only for reading and impossible to change after publication. In the Internet age, though, graphics are going live, with interactive features that reel in readers and make informa-tion incredibly relevant, fun, and personal.So, as you decide what data you want to illustrate with an infographic — your
story — we’ll help you figure that out, along with our advice for combining smart research, design, and technical skills to turn your story into a great infographic. We’ll also teach you how to find the biggest and best audience for your work.
About This Book
This book is a collaborative, collective effort from the folks of Infographic World. We’re a visual communications agency focused on (you guessed it!) infographics, designing for corporations, sports leagues, television networks, media outlets, universities, and nonprofit entities (like hospitals and charities). These diverse clients all have one thing in common: the need to share their stories and messages in a compelling manner. We help them do that by telling their stories visually.
Our goal here is to lead you through every stage of infographic design and development. We begin by showing you the power of visual images, and how you can and should use them to make your message stand out. We show you how to develop your own style, while still working within guidelines of poten-tial clients. We show you some of the best ways to use design software to add visual interest to your work.
And finally, because an infographic isn’t much use if it doesn’t have an audi-ence, we show you how to attract readers and perhaps even how to get your graphic to go viral.
Foolish Assumptions
Yeah, it’s wrong to assume, but we had to make a few guesses about you, anyway:
✓ You want to or need to create infographics, whether for your job or a personal interest, like blogging.
✓ You have a computer (Mac or PC) and know how to use word-processing functions, navigate the Internet, and maybe even have some simple design program experience.
✓ You pay attention to the news and have some ideas of what topics inter-est today’s readers.
✓ You’re savvy enough with social media that we don’t need to tell you what Facebook is.
Conventions and Icons Used in This Book
The whole point of an infographic is to communicate clearly. So, to avoid any misunderstandings, here are a few things you should know:
✓ We use the words “infographic” and “graphic” interchangeably.
✓ Although many infographic designers prefer to work on Mac computers, PCs are acceptable. So in cases where a keyboard command or a menu path is different for a Mac than on a PC, we specify what to do for each (Mac is always first) like this: ⌘+V/Ctrl+V.
✓ Web addresses and Photoshop layer names appear in monofont like
this so they stand out from regular text.
✓ When we want you to follow a menu path, it looks like this: Choose
Like all Dummies books, this one uses a few simple icons to help highlight some important information. (Graphic symbols in a book about infographics? Nice synergy, huh?)
The Tip symbol calls attention to some important tips, tricks, and shortcuts. Some of these are of a technical nature, while others focus on the content of your infographic or ways to work efficiently.
The Remember icon highlights information that you may come back to time and again as you’re working with infographics. We may also use this symbol to remind you of information mentioned earlier in the book.
Don’t worry, we use this icon sparingly. The Warning icon points out some potential pitfalls as you work with your graphics. Some of the warnings may seem intuitive, like when we remind you to save your work, but they’re all worth noting.
Beyond the Book
We’ve provided additional information about infographics online to help you on your way:
✓ Cheat Sheet: Check out www.dummies.com/cheatsheet/ infographics.
✓ Online articles: On several of the pages that open each of this book’s parts, you’ll find links to what the folks at For Dummies call Web Extras, which expand on some concept we’ve discussed in that particular
sec-tion. You’ll find them at www.dummies.com/extras/infographics.
Where to Go from Here
Okay, it’s time to design. Take a look at the Table of Contents to determine where you’d like to begin. If you want a little theory behind your work, start at the beginning. If you’re wondering where to go to get the statistics that drive many an infographic, skip to Part II, where we talk about gathering data. Or, if you’ve been designing simple infographics already and are ready to apply some technical flourishes, you may want to head straight to Part III. Remember, the way you use this book is entirely up to you.
Or maybe you’re wondering how to market your work to social media. You can skip to Chapter 13, which details how and when to share your infograph-ics. You can always backtrack to the earlier chapters for some deeper reading when you have time.
Getting Started with
Infographics
✓ You’ll learn how visual information excites and informs readers.
✓ We’ll help you marshal your resources for creating infographics.
✓ You’ll learn the differences between infographics for editorial and advertising purposes, as well as the differences between static and interactive infographics.
1
Unlocking the Power
of Infographics
In This Chapter
▶ Seeing the value of infographics
▶ Defining an infographic designer
▶ Building your tools and techniques
▶ Using your internal resources
▶ Working with an outside professional
▶ Dealing with the decision makers
H
umans are incredibly visual creatures. Thousands of years ago, cave-dwellers used visual images to track time, to depict their prey, and to record their celebrations. Later, civilizations created hieroglyphics and visual symbols for letters and numbers, providing a code to organize their communi-cation. Visual communication can bridge cultures — travelers on any continent can find a pharmacy, a hospital, and the correct restroom thanks to the power of simple graphic images.Flash back to the 1970s for a moment. Most Americans read a newspaper or two. The New York Times was so heavy with text that it was dubbed “The Old Gray Lady.” Most households had a TV. News was broadcast three times a day, on the three major networks. Corporate reports were very dense, with pages full of text and little more than the occasional headline to break them up. The Internet as we know it today was but a dream.
Recognizing the Value of Visuals
Speaking of the advent of the Internet. . . . No news flash here, but we live in an ever-increasing electronic and digital age. Most folks are barraged all day by some sort of media clamoring for attention. Most people have Internet access at their fingertips via smartphone, tablet, or computer. All that “Hey, look at me!” can make a person weary, and the overload of messaging and devices has taken a toll on the human attention span.
Those folks who deliver content — be it via television news, print journal-ism, a corporate report, website — realize that they have a short window of opportunity to grab a viewer’s attention. And with only about eight seconds to do that, enter the increasing use of infographics, which are meaty mor-sels of lots and lots of content in attractive, digestable, informative chunks, whether online or in print.
An increasingly multimedia and online technology climate shift has fostered an explosion of infographics within all forms of communication. The old way of communicating messages in a text-heavy manner is simply not effective anymore. There is simply too much research and science behind the power of visual storytelling to ignore. Companies and organizations cannot afford to be out of date. It’s time to embrace the power of visualization, and find a way to incorporate it into what you and your company do every day.
If we haven’t convinced you by now, plenty of research backs up this idea that visual communication can provide quicker, clearer comprehension of complex topics. Here are a few statistics:
✓ More than 80 percent of the learning we do takes place visually.
www.hp.com/large/ipg/assets/bus-solutions/power-of-visual-communication.pdf
✓ The average person retains only 20 percent of what’s read when it’s delivered in text-only format.
www.hp.com/large/ipg/assets/bus-solutions/power-of-visual-communication.pdf
Print isn’t dead
The New York Times produces some of the best, smartest infographics in the world. Corporate reports feature charts, graphs, and illustra-tions to highlight information. Nonprofit orga-nizations rely on infographics to spur potential donors and volunteers to action. Magazines
✓ Images are liked on Facebook 200 percent more than text.
www.jeffbullas.com/2012/08/27/the-facts-and-figures-about-the-power-of-visual-content-infographic
✓ On average, websites register a 12-percent increase in traffic after pub-lishing an infographic.
www.wpvirtuoso.com/a-guide-to-content-management-marketing
✓ The Wharton School of Business determined that when listening to presentations, 67 percent of the audience were persuaded by the verbal presentations that had accompanying visuals compared with 50 percent of the audience when it was verbal only.
www.macrovu.com/VTVCInterEffectiveness.html
The same Wharton study found that visual language shortens meeting time by 24 percent. That’s some serious added productivity.
A great infographic leads readers on a visual journey, telling them a story along the way. Powerful infographics are able to capture people’s attention in the first few seconds with a strong title and visual image, and then reel them in to digest the entire message. Infographics have become an effective way to speak for the creator, conveying information and image simultaneously.
Here’s a hypothetical example to demonstrate this idea. You just completed detailed and accurate market research for your company, looking into all sorts of pinpointed information about your target demographic. The purpose of this market research is to help your sales and marketing teams better understand your customer. The results — hundreds (or thousands) of stats compiled in an Excel document — are then written up and presented in a PDF document using nothing but words.
Seeing is believing
In 2011, molecular biologist John Medinapub-lished Brain Rules, a fascinating account of how the brain processes information. It’s a great book all around, but two rules are par-ticularly interesting.
Rule #4: We don’t pay attention to boring things .
Returning to The New York Times and the cor-porate reports examples, we know today that readers simply do not stick with material that is too dense. Medina’s book suggests that humans need a spark every ten minutes or so to entice us to pay attention. Infographics can provide that spark.
Rule #10: Vision trumps all other senses .
Medina’s research led him to determine that a person who hears information will remember ten percent of that information three days later. If pictures are added to that information, the subject remembers 65 percent of the informa-tion three days later.
This shouldn’t be a problem, right? The results are so compelling that people will be willing to read 50 pages of findings, right? Sorry. They won’t. You can have the greatest data in the world, but if you don’t have the proper way to communicate this data effectively, you won’t get anywhere.
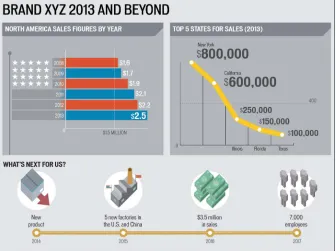
The solution? Create a visual to showcase the market research findings in a way that people will actually digest. For the average Joe, choosing between wading through a 50-page text-heavy PDF or perusing a visual like the info-graphic presented in Figure 1-1 is an obvious choice.
Figure 1-1: Concise, informative graphic that’s easy to consume.
The power of infographics is that it keeps things short and sweet. Instead of some 50-page tome, you could present three or four pages of infographics, with a few pointed sentences, to communicate your key data points.
attention at any given moment. It’s far too easy for someone to come to your website, lose interest and be gone all within a few seconds. It’s often said that you have four to six seconds to grab someone’s attention when they come to your website. Are you going to accomplish this by having a lot of text and a couple of charts or by having a stunning visualization front and center?
So You Want to Be an Infographic Designer
When you were a kid, and some well-meaning adult asked you what you wanted to be when you grew up, what did you say? A professional athlete? A doctor? Dancer? Firefighter?We’ve never met a soul who set out to be an infographic designer — but we certainly know some great ones. A few followed logical paths toward infographic design, and a few more wound crazily through other careers and professional skills before coming to infographic design. Many professional infographic designers are artists or writers. Some are graphic designers, whose primary work responsibilities involve page layout and creation of art elements.
But this is a DIY world, and you can indeed teach yourself the art of the info-graphic. Stick with us as we talk about everything you’ll need to do so, from research skills to technical tools.
Filling Your Toolbox
We spend a lot of time discussing specific creation (software) tools and tech-niques later in the book, particularly in Chapter 3 (designing your approach to infographics), Chapter 9 (Adobe Illustrator), and Chapter 10 (Adobe Photoshop).
Assuming you’re just starting out with infographics, though, start with a good foundation. Our first recommendation is to be a voracious reader. Whether you prefer print or an online version, take a look at a few newspapers every day. Read something national in scope (The New York Times, The Wall Street Journal) and a local newspaper, too. Because infographics distill data — sometimes, lots of data — consider yourself as a journalist who not only reports (without bias) but does research as well. Sure, graphics play a major role (go figure) in info-graphics, but so does the data underlying your presentation.
As for more tangible tools you’ll need, make sure that your computer is in good working order and can support the design software you’ll need. It’s a designer’s worst nightmare to have repeated computer crashes as deadline looms. You’ll obviously need an online connection as well as basic office productivity apps, Adobe Acrobat, some sort of photo management app, and Adobe Creative Suite. Can’t forget about the behind-the-scenes code creation if you’re going to post online (and you should). Some folks like to create animated or interactive infographics (or add sound or movie files) program in Flash, but that can cause problems (we talk about that later). Probably the safest bet is to use HTML5 and CSS3 and JavaScript.
We’re pretty proud of the information we present later in the book, but if you’d like some face-to-face tutorials, keep an eye out for classes in programs like Illustrator and Photoshop. Continuing education programs at local colleges and high schools often provide excellent ways to learn the basics of new com-puter software.
Good planning before your project gets rolling can save you from a lot of stress later.
Assembling Your Team
In this section, we assume that you’re not working alone. Perhaps you work for a company looking to expand its marketing efforts by placing infograph-ics on social media. Maybe you’re a writer for an online news site, and you’re hoping to generate more infographics. Or maybe you’re a university researcher, and it’s dawned on you that your research could use some graphic presentation to make sure people are reading and understanding your work.
Bottom line: You need to assemble some internal resources and work closely with the people who will make your plans come to fruition.
Using internal resources
When a company decides to use its own employees to create infographics, they are choosing to work with people who know the brand and the messag-ing and feel of the company better than anyone outside the company ever will. Gut-checks like this are definitely very important when an infographic needs to align with a company’s brand.
If you’re going to build your infographic in-house, you’ll need to make sure you have people dedicated to the following tasks/roles:
✓ Brainstorming the idea for the infographic.
✓ Researching data to support the infographic and help tell the story.
✓ Fact-checking the data.
Fact-checking should definitely be done by someone other than the person who did the research.
✓ Writing the copy.
✓ Editing the copy.
Again, have this done by someone other than the copy writer.
✓ Coming up with the infographic concept and design ideas.
✓ Designing the infographic.
✓ Reviewing the entire infographic.
✓ Implementing any changes requested by supervisors.
This is not to say you need a different person for each task, but whoever you put in charge of the infographic should be mindful of all those duties. Depending upon the size and scope of your project, anywhere from one person to a team of three or four or more could take it on.
Having a tech person or two in the loop and on your side is a good idea. In today’s digital world, you want to make sure that all your work is compatible with the website, blog, or document that will eventually showcase your work.
In a larger company, the person you have in mind to work on infographics may have many other responsibilities as well. Your graphic may or may not take precedence. Depending upon your project’s priority level, you may have to wait before a request is handled. If your deadline is going to be tight, we recommend making sure that the artist can complete your work in the time-line that you set. Sometimes you can help an artist clear a little time in his schedule by asking various department heads to be mindful of your project.
Working with your online team
Your online team is the group of people who handle all the content that goes onto a website. At this point, virtually every company has one although it might be outsourced. The online team is likely to include coders, web design-ers, and any number of technical support staffers.
Space on websites is measured in pixels. When you’re preparing to place your infographic, there may be other permanent items on the page, like advertise-ments, or links to other areas of your website. This being the case, you need to know how many pixels your infographic should be to fit on the page prop-erly and co-exist with other permanent content on the page.
The online team will also coordinate with you about the file formats you need to deliver to them, how long it will take to get the infographic onto the site (as with other teams at your company, they will likely be getting pulled in many different directions with requests), and other important tasks to launch the infographic.
Getting your social media team ready
The social media team will need to be prepared in advance of you launching the infographic. Given the importance of social media in the marketing and promotion of the infographic, everyone needs to be on the same page.
Your company’s social media experts (which may include marketing staffers, the webmaster, social media strategists, among others) will help you deter-mine the best day and time to release your infographic and begin marketing and promoting it. (More on this is discussed in Chapter 13.) Bear in mind that the social media team will be balancing other requests to have material tweeted or posted to the company’s Facebook page. So again, collaboration is key: The more notice you give people about your project, the more smoothly things will go.
Speaking of professionals . . .
The obvious pro to hiring an infographic agencyis very simple: They do nothing but create info-graphics, every single day. Some obvious bias here. Justin is, after all, the CEO of Infographic World. Here is a brief list of projects that Fortune 500 companies have hired us (at Infographic World), to do:
✓ Help build more engaging PowerPoint pre-sentations that don’t leave audiences with glazed eyes.
✓ Create website content to help establish a client as a thought leader within its industry and drive more traffic to its website.
✓ Improve SEO ranks by creating and placing infographics online, with the goal of getting other websites to link to them.
✓ Create a visually stunning annual report or investor report.
✓ Communicate market research.
✓ Release content on social media channels to entice readers and encourage readers to share that content.
Working with the social media team can also help you set the tone for your project. Depending on the content of the infographic and the target audience, you can set a tone that’s serious or snarky, news-oriented or feature-focused. This can help guarantee that you get the readers you want.
Working with a marketing team
These days, one of the primary goals for creators of infographics is to have them go viral. This generates traffic and links back to your website, which will help promote your work, your blog, or the company you’re working for.
If you’re creating a graphic for a company with a marketing team, taking advan-tage of the marketing team’s insight and expertise early on will pay dividends in the end. The staff members most likely to handle these duties may fall under the labels “marketing,” “public relations,” or “communications.” These folks
✓ Prepare campaigns to get exposure for the infographic by building lists of websites to place the infographic, finding the best contact people, and determining how and when to pitch your infographic.
✓ Know what sorts of topics, statistics, and angles will be most effective in getting the infographic out to the masses and how content appeals to various audiences.
✓ Put more pairs of eyes on the infographic, finding things in the approach that might be misguided or a poor fit for your target audience, and share their take on how content appeals to various audiences.
Going with the professionals
The alternative to building an infographic in-house is to hire an infographic agency to build it for you. Like with the internal route, there are pros and cons for either path. You first need to determine whether you have the budget. Depending upon the company, the cost to get an infographic built by someone skilled can range from $700 to $6,000, depending on the size of the graphic and the scope of the content you want displayed, not to mention the quality of the infographic agency you want to hire.
Working with Decision Makers
Whether you’re working solo or as part of a team, the first and most impor-tant thing to do is keep the decision makers within your company or organi-zation in the loop the entire time. Unless you’re the owner of the company (and even then, there might be investors who could qualify), you’ll have someone (or several “someones”) who needs to approve the infographic before it’s put onto your client’s website or into company marketing and sales materials. Here are a couple real-world examples you might encounter:
✓ If you’re working for a corporate client — say, designing charts and graphs for an annual report — you will probably work with everyone from the company’s art director to the CEO before getting sign off on your work.
✓ If you’re working with a team of journalists on a big event — say, cover-ing the Olympics for Associated Press — your infographics will have to pass muster with sports editors, news editors, top managers, and ulti-mately newspaper editors all around the world.
Real-world disclaimer: Our firm has had instances where all the work took place before the decision makers entered the process — never a good idea.
The last thing you want is to go through the entire process of building an infographic — whether done internally or by hiring an infographic agency — only to have the decision makers see it after it’s fully complete. You’re just tempting fate that the decision makers will want major changes or disagree entirely with how the vision of the infographic was brought to life.
You should work with decision makers — not around them or against them — to make sure the final infographic project meets everyone’s needs. Here’s how things can go awry and how they could have been avoided.
1. You get a great assignment to create an infographic for a large corpo-rate client. Congratulations!
2. Your contact person is a midlevel marketing manager.
Wrong: You assume that she is the only person who will approve your work.
Right: You immediately find out whether anyone else will be signing off on your project.
3. You begin creating and revising your infographic. This stage can take weeks or months, depending on your client’s needs and deadlines.
Wrong: You continue to work exclusively with your initial contact person. You’re incorporating her suggestions, unaware that other decision makers haven’t seen your work.
4. You start to look for buy-in and approval.
Wrong: The marketing manager signs off on your work. Trouble is, his boss hates it — and only now do you realize that the marketing man-ager wasn’t the top decision maker. So, you begin revising your work. Then you find out that the boss’s boss loved your original product. The decision makers begin revising their vision of your work. Your previous weeks of work are down the drain. After another couple of weeks of revisions, the company signs off on your project. The job is finally done, but it wasn’t the wisest use of time and resources.
Right: You make corrections and changes according to the whole team’s specifications. Your infographic gets final approval and is published. Well done!
2
Exploring Infographics
In This Chapter
▶ Determining your voice
▶ Opting to use a static infographic
▶ Predicting the life span of your infographic
▶ Engaging viewers with motion, animation, and interactivity
I
nfographics may seem to be a modern means of communication, but their roots go way back to the eighteenth century. In 1786, the marvelously named William Playfair published The Commercial and Political Atlas, which used graphics to illustrate facts about the English economy. Playfair is generally accepted to be the inventor of the line graph, the bar chart, and the pie chart.Infographics have come a long way since then. Today, the applications of infographics for information and marketing purposes are virtually limitless. Before you jump into the process of creating your own infographics, take the time to nail down the ultimate purpose of your work. Whether your goal is to inform, entertain, or convince, that goal will determine how you research, plan, design, and publish your information graphic.
Establishing Your Voice
Infographics generally fall into one of two categories: promotional or informa-tional. And although you can certainly have a bit of both elements within one infographic, you almost always will have one or the other as your primary focus.
Your infographic voice doesn’t always have to stay the same and certainly should change over time. As you develop and gain practice at creating info-graphics, you may find your original way of doing things doesn’t work. Never stop growing and learning.
Promoting with brand infographics
Most infographics are marketing materials in one way or another; some advertising messages are just hidden better than others. Brand infographics can be appropriate for
✓ Promoting or explaining services and products
✓ Explaining sales or internal survey data
✓ Establishing your company as a thought leader
Most brand infographics will use corporate or campaign branding to help viewers identify them as part of a particular brand. At a minimum, brand info-graphics should carry a corporate logo.
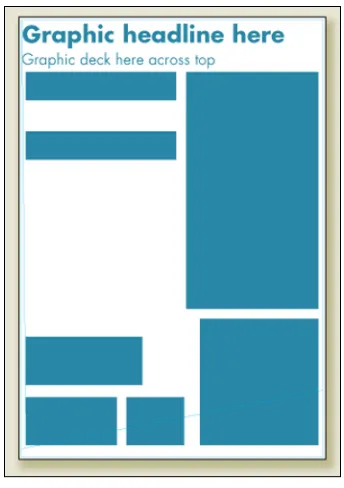
The most unobtrusive location for a logo is toward the bottom of the info-graphic, as shown in Figure 2-1. We recommend resisting the urge to place your logo at the top of your infographic, as readers may be immediately turned off by what they view as a clear advertisement.
In certain cases, a blatant advertising message is okay. (See Figure 2-2.) If you’re creating an infographic to be viewed by people within your own company or those you’re hoping will become clients, there’s very little need to be shy or coy about promoting your products or services. In these cases, your audience knows that they’re seeing an advertising or a marketing message, and they’re fine with it. So take advantage of the opportunity to promote your service or product in a clever, inventive way.
Figure 2-2: Clearly identify your marketing pieces as such.
Infographics like this can be appropriate for
✓ Trade shows
✓ Sales department leave-behinds
✓ Brochures
✓ Posters
This type of graphic will most likely have an authoritative tone, but the desired tone varies depending upon the company. For example, an infographic for a snowboard manufacturer may incorporate the loose, fun vibe that has become associated with the sport.
Educating with informational editorial infographics
Editorial graphics are akin to news articles in that their primary purpose is to transmit information. Under the umbrella of editorial graphics, there are several different types, with different balances of bias versus objectivity. Here is a look at a few:✓ A blizzard hit your town. The local newspaper creates a graphic that shows snowfall over the past 20 years, maps out the weather front that brought the blizzard, and shows which roads are designated as snow emergency routes. The graphic is purely informational, without any obvious bias.
✓ You come upon a graphic called “50 Incredible Facts About Skin.” The graphic is nicely researched, beautifully designed, and appears to be a simple collection of interesting tidbits about skin. But, wait! At the bottom of the graphic, you discover that it was created by a company that sells and delivers beauty products. Infographics like this straddle the line between informing and promoting. It’s up to the reader to discern the difference.
✓ It’s flu season, and in a parenting magazine, you see a cool infographic showing how the flu spreads. Sources are doctors. There’s no mention of any particular company or product. It’s probably pure editorial content.
In a different magazine, you see a similar graphic on the flu. However, the copy recommends disinfecting your house with SuperClean wipes. Hmm. At the bottom of the page, in small type, you find that the content was sponsored by SuperClean Corp. This infographic is an ad although it is informational as well.
✓ You read a lively, engaging infographic on beers of the world. The tone might vary considerably depending upon who created it. If a journal-ist created it for a men’s magazine, it probably has some attitude, with language targeted to appeal to a young male demographic. If a brewery created the infographic, it’s probably designed to inform and may have a more serious tone.
Editorial infographics can have myriad purposes, including:
✓ Stating facts or explaining processes
✓ Exploring the history of a person or topic
✓ Comparing companies, countries, educational institutions, teams, and so on
✓ Supporting a political ideology
These educational approaches will typically follow a somewhat standard flow:
1.Establish a problem/topic/proposal.
What is the issue you’re going to be discussing or addressing in the info-graphic? Think of this like a lede in a newspaper or a thesis statement of a term paper. You need to clearly state what the infographic is about. For instance, imagine that you’re going to create an infographic exploring the ways how everyday Internet users put their personal information at risk.
A lede is the introduction to a story or graphic. It’s a journalistic term that may have gotten its funky spelling to differentiate it from lead, as in the metal type that was formerly used to print newspapers and books.
2. Offer statistics as evidence.
This is where the bulk of your research (read more about that in Chapter 5) comes in. Here, you offer data, facts, and analysis about the topic you just introduced. For example, you might offer statistics about identity theft, hacking, malware, passwords, and mobile security.
3. Conclude with a “So what?” statement.
The most effective infographics will take some sort of stand even if it seems obvious. Readers will expect a destination at the end of the road; they won’t be happy if the pavement just stops. Continuing our example, your conclusion could offer some analysis on which anti-malware pro-grams are the best, or what readers can expect to spend for the best protection.
Working with Infographics
Most infographics today are static: that is, without interactivity or animation. They are generally the least expensive to produce and post online (in terms of bandwidth), and the easiest for viewers to see/download, which makes them the go-to option for companies that want to communicate an idea through infographics.
Identifying what makes an infographic
You might not realize this, but you’ve been encountering infographics for most of your life. Have you ever seen a transit map? Then you’ve seen an infographic. Sure, you could read the list of the public transit lines in your city, but you’d only get a partial understanding of the scope of options. You wouldn’t see how the various lines intersect. The map takes the basic information and translates it into a better venue for your brain to process.
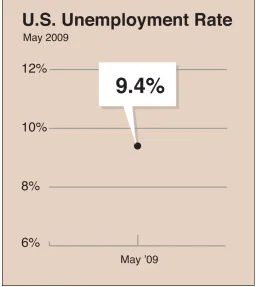
At its most basic, an infographic translates information into an image. This could mean taking U.S. unemployment data for the past ten years and creat-ing a line chart to help people visualize the instability of the economy. Or it could mean taking that same data and creating a map so viewers can see which areas of the United States are struggling the most.
Every infographic should have the same basic components:
✓ Accurate, compelling data
✓ Clever, well-crafted (and limited) writing
✓ Creative data visualizations
✓ Consistent visual style
In a well-made infographic, those parts will feel seamless and organic — everything will seem as though it was meant to go together.
Sticking with what works
Most infographics are now optimized for use on the Internet. There’s a big benefit here in terms of content. Given that the Internet is a repository for, well, everything, there’s almost certainly an audience out there for what you have to say.
Technically speaking, working with an online format means that after you get the hang of designing infographics, you can use the same basic approach and format over and over again, provided you can come up with fresh content.
The typical static infographic is tall and vertical, allowing users to scroll to read all the information. This lends itself very easily to storytelling because readers are compelled to scroll to see the next bit of information. The flow is quite natural. Sticking with that format is a good idea.
Become a subject matter expert
business, learn to read annual SEC reports or stock information. If you want to develop infographics about professional sports, read box scores and learn about the teams and players. And after you become an expert, exploit those topics. Create infographics that are variations on a theme. For example, say you want to specialize in infographics related to social media: You could explore topics like these:
✓ General social media use
✓ Social media and relationships
✓ Workplace limitations on social media
✓ The technology of social media
✓ Social media evolution
✓ Social media and sports
✓ TV and social media
The point is to get really good at infographics in a few areas by exploring as many subtopics within those areas as you can. That not only gives you expe-rience at creating different kinds of infographics, but it also allows you to position yourself as an expert and thought leader in the space.
Considering possibilities beyond
the static infographic
Static infographics may be the most commonly produced type of infographic today, but they are far from the only kind. And for some topics, static storytell-ing may have limitations that would damage a reader’s understandstorytell-ing of the topic.
In later sections, we’ll explore in more detail other types of infographics. Interactive and animated infographics are a growing field in infographic design and development. They take far longer to produce and are more expensive to produce, but an effective interactive or animated design can do things static infographics simply cannot.
Predicting the Lifecycle of Infographics
Some infographics will see a huge amount of traffic right after they’re launched; others take more time to spread around the Internet. Which pattern is best is debatable and depends largely on the topic at hand, but in general, an info-graphic should fall into one of three categories:
✓ Timely: Timely infographics are related to topics that take place only once and have a relatively brief window in the public consciousness. Major news events such celebrity deaths, corporate bankruptcies, and elections fall into this category. Holidays, anniversaries of major events, and other notable dates also fall into this category. An infographic about the career timeline of Michael Jackson, for instance, would apply.
✓ Related: Related infographics are inspired by news events, holidays, or notable dates but don’t deal directly with the event. Continuing our example, a graphic related to Michael Jackson could show the top-selling albums of all time (which includes Jackson’s iconic Thriller). It’s not a direct tie, but a related one.
✓ Evergreen: Evergreen infographics aren’t related to any event or person in the news. They have no seasonal component, and they’re not tied to anything timely. Sticking with our music theme, an infographic about how CDs are made would apply because it’s music-related but not spe-cific to any artist or genre.
The follow sections explore the three general areas in more depth.
Timely: Sharing breaking news
Although your infographic is unlikely to be the sole source of breaking news, it can help readers’ understanding of a breaking news event. For instance, many people learned on Twitter in October, 2011 that Apple co-founder Steve Jobs had died. An infographic wasn’t going to be the first anybody heard of it.
But at Infographic World, we created an infographic looking back on his life and his accomplishments (we called it Farewell to a Genius), in a way to show-case a visual story that had not been told yet. (See Figure 2-3.) So in that sense, the infographic was breaking news. This graphic ended up being a viral sensa-tion, getting featured on Mashable for several weeks, and then getting picked up by tens of thousands of other websites across the world over time.
Figure 2-3: Telling a visual story can illuminate breaking news.
For instance, did you know that more Americans are in prison than are active-duty members of the military? After some research, you learn that in 2011, there were more than two million incarcerated offenders in the United States. In 2013, there were slightly less than 1.5 million active-duty members of the military.
By comparing the figures graphically, you’re taking existing data and looking at it and presenting it in a new way to tell an original story. Figure 2-4 shows how you could compare the two numbers in an infographic.
Figure 2-4: Using data to tell a surprising element of a story.
Related: Telling a relevant tale
When choosing these tangentially related topics, explore potentially unseen or previously unconsidered aspects of an event. Use the news event as a point of departure, allowing your topic to have a life of its own while still retaining a sense of timeliness.
In other words, don’t take on the news event directly. Take a different view of it. Broad ideas in this vein include
✓ The business of <fill in the blank>
✓ <fill in the blank> around the world
✓ The evolution of <fill in the blank>
• By state
• And kids
• And elderly people
✓ The future of <fill in the blank>
Approaches like this allow you to take advantage of the built-in popularity of current events while expanding the overall lifespan of your infographic. You’ll get the best of both worlds, giving your infographic a ready-made audience in the short term and allowing the audience to continue building even after the immediate interest fades.
You don’t have to even mention the news event in your infographic in many cases. Otherwise, you run the risk of the piece immediately becoming out-dated in the case of rapidly developing news. The ideal approach is to make the infographic appear as though it were planned all along and is simply ben-efitting from fortuitous timing.
Evergreen: Letting things build
The final approach to infographics is to completely ignore current events and explore ideas at your own pace. These evergreen pieces will have a virtu-ally limitless shelf life (depending on the topic), so it’s wise to have a mix of timely and evergreen pieces.
Infographics of this type may not have a huge audience at first, but they can build viewers over time if the topic has interest year-round. These pieces often are the most appealing because they allow the data to take you wher-ever it goes and craft a design that’s completely organic and springs totally from the content.
in a given field. This strategy gives you the best chance of knowing what will interest the audience. If you have some knowledge and expertise in sci-ence, for example, you could craft an infographic on the lifecycle of the frog. If you’re an Internet expert, you could design an infographic showing how a search engine works.
Engaging Viewers with Animation and Motion
Traditional static infographics are powerful and certainly have their place, but some stories can’t be told through static imagery and charts alone. Some demand more bells and whistles, including motion, sound, and interactivity.Although these techniques are relatively new, they are becoming extremely popular with readers who have come to crave constant entertainment and engagement. As you build your skills as an infographic designer, you’ll defi-nitely want to add some of these design skills to your roster.
Bringing infographics to life with motion and sound
Animated and video-based infographics (we are using those terms inter-changeably) give you the opportunity to present stories in ways that pro-vide more depth and perspective than static infographics. Such stories can include highly complex processes, mechanical illustrations, or long stories.How do you know when opting for an animated infographic is the best idea? That will most likely depend on the amount of information you have or the complexity of the story you need to tell. But mostly, the question you need to answer is deciding the best format to explain the information at hand.
As we discuss throughout the book, people are visual, and motion speaks to people in a way that static imagery simply can’t. To be sure, a static info-graphic can have a similar effect, but it’s not nearly as powerful.
For example, infographics that include motion can help explain how the gears of a watch work by truly showing the viewer.
Motion infographics also allow you to tell the story in the exact order you want and be sure that viewers are consuming it as you intended. After all, with a static infographic, you can never really be sure whether viewers read the piece as you intended. If you’ve created the piece effectively, you have a good idea that they have, but you can never be totally sure. With a motion infographic, though, that concern isn’t present. After all, nobody is going to start a video in the middle.
a combination of all three. Sound gives you just another tool to help clearly, cleverly, and effectively explain the topic at hand. Sound is important in motion graphics for
✓ Establishing a mood
✓ Creating a sense of authority
✓ Connecting viewers
✓ Providing emotional depth
We’ve seen a narrated infographic on discovering celestial objects that used an outer-space backdrop, spinning asteroids, and mystical music to accom-plish all of these effects.
Motion infographics are much more complex and expensive to produce than static infographics, but they give you such a unique method for storytelling that it’s critical not to overlook them as important tools.
Creating an interactive infographic experience
Much like motion graphics, interactive infographics provide you with another powerful way to involve your viewers in the topic. Interactive infographics include features that allow the readers to explore the infographic in their own ways. This customized view can come about in a number of different ways — whether by clicking on a part of the graphic to view data or by moving components of the graphic to access more information. Like motion graph-ics, interactive graphics have their own unique benefits and reasons why you might choose them. A few include
✓ An abundance of data
✓ Overly complex processes or explanations
✓ Large, detailed maps
✓ Lengthy text
✓ Data that will affect different readers in different ways
Perhaps the most compelling reason to explore using an interactive solution to your topic is when you have a huge amount of data. Say you have data comparing every single state in the United States in a variety of categories. You could do this with a static approach, but you’d be asking your readers to stay tuned for a very long infographic. It’s difficult to hold interest that long.
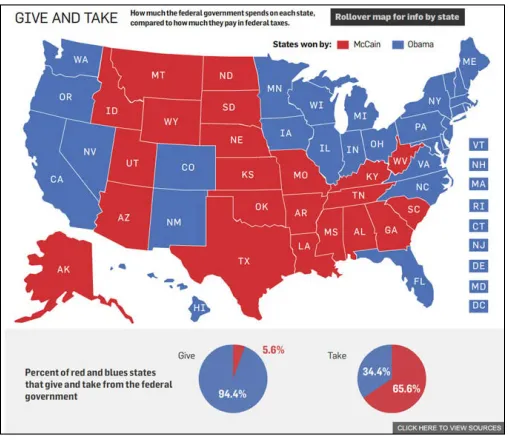
One of our earlier interactive projects features a state-by-state comparison of a number of lifestyle factors, such as education, church attendance, obesity rates, crime rates, and more. We compiled the data for all 50 states and then created an interactive format allowing readers to see data for whatever states they want, in whichever categories they choose.
We then color-coded the states red or blue to show whether each state’s voters had chosen John McCain or Barack Obama in the 2008 presidential election. (See Figure 2-5.) We drew very few explicit conclusions about the data and the states’ political character. By letting the readers use the data in their own manner, we really left it up to them.
Figure 2-5: Using interactive features to let readers explore data.
A few elements that all effective interactives should have include
✓ Intuitive experience
✓ Clear organization
✓ Wise user control (let them do what they want, within reason)
Choosing to create an interactive infographic isn’t the end of the discussion. In addition to the research, writing, and design aspects of interactives, you must decide which coding language to use to build your interactive.
You have two main options: Flash and HTML5. Using Flash allows you to create a, well, “flashier” experience in a shorter timeframe because you need to create less code on your own. The biggest drawback to using Flash is that it can’t be viewed on iOS devices and older Internet browsers with compat-ibility issues. HTML5’s biggest drawback is that it takes a great deal of time because the coding process is long and complex. You’d be wise to develop talent in both options; you may encounter projects that call for either one.
Knowing when an interactive infographic
is too much
Just because you have a ton of data doesn’t mean you should create an interactive info-graphic. If you’re in the midst of coming up with the story and flow of your interactive, and it feels rather sparse and superfluous, that’s a good sign that you may not need to create an interactive after all. A static or even an animated infographic may work better for your purposes. Consider paring down the information to only the most critical. What are the five pieces of
data people need to know to understand the story you’re trying to tell? Trim what you’ve gathered only to that information.
3
Designing Your Approach
to Infographics
In This Chapter
▶ Establishing a process for your work
▶ Matching your tools to your needs
▶ Adopting solid design principles
▶ Respecting brand guidelines
▶ Getting your work approved
A
s you’re setting your course as an infographic designer, you’ll want to spend some time thinking about your philosophy. You’ll find many differ-ent philosophical approaches to conceptualizing, building, and refining info-graphics. There is no one-size-fits-all approach, and your path will undoubtedly be influenced by your own taste and creative leanings.For example, you may prefer simple infographics focused on charts and graphs. Or you may prefer to take charts and graphs and reinterpret them into a more complex visual scheme. Maybe you prefer visuals that are icon-based, or you want more elevated artwork.
The good news is that a market and audience exist for virtually any idea you can come up with as long you have the building blocks of good information and good design. In this chapter, we show you why it’s so important to develop a process for gathering information, deciding on a visual game plan, creating a design, refining the design, getting a project approved, and then releasing your completed infographic to your target audience.
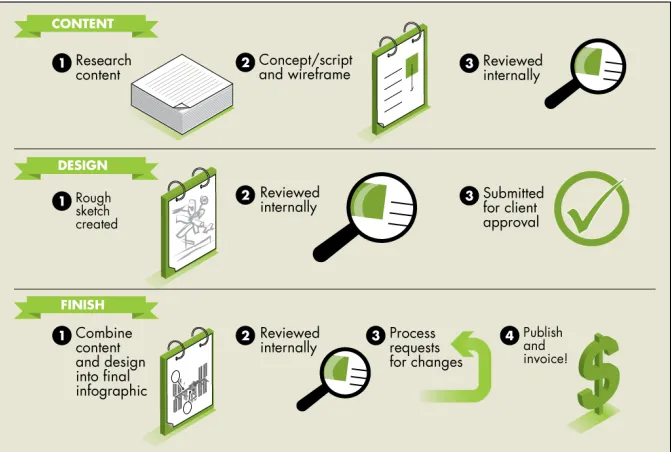
Establishing a Work Process
approach that you repeat with every single project will mean that you can focus on the important things. Why do you think basketball players practice shooting for hours? When it’s time to launch their shot, they don’t have to think about how they make their hands and legs do what they need to do. It’s muscle memory.
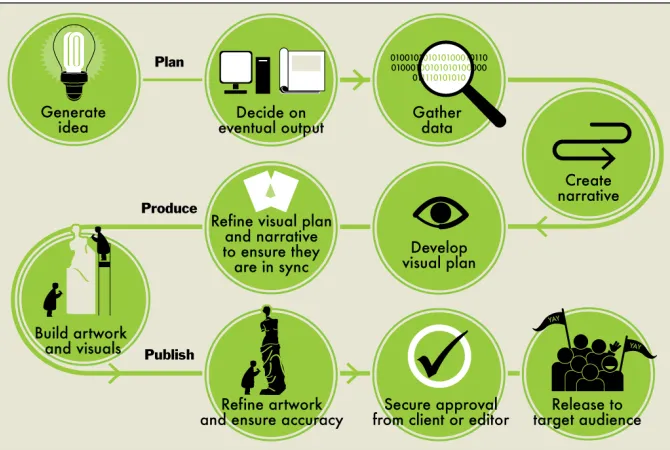
Your process may look something like Figure 3-1.
Figure 3-1: Develop your own creative process.
Process: Not one-size-fits-all
Although there is no single answer for everyinfographic producer when it comes to how the work gets done, what’s important is that you find a process that works for you — and stick to it. Also, don’t fear making changes to that process when something clearly isn’t working. Maybe getting approvals from your internal edi-tors is taking too long. If so, address the issue, put a new policy in place, and move on.
Remember: Creating a standard approach for