Beginning NFC
by Tom Igoe, Don Coleman, and Brian Jepson
Copyright © 2014 Tom Igoe, Don Coleman, and Brian Jepson. All rights reserved.
Printed in the United States of America.
Published by O’Reilly Media, Inc., 1005 Gravenstein Highway North, Sebastopol, CA 95472.
O’Reilly books may be purchased for educational, business, or sales promotional use. Online editions are also available for most titles (http://my.safaribooksonline.com). For more information, contact our corporate/ institutional sales department: 800-998-9938 or [email protected].
Editors: Rachel Roumeliotis and Allyson MacDonald Production Editor: Nicole Shelby
Copyeditor: Jasmine Kwityn Proofreader: Kiel Van Horn
Indexer: WordCo Indexing Services Cover Designer: Randy Comer Interior Designer: David Futato Illustrator: Rebecca Demarest January 2014: First Edition
Revision History for the First Edition: 2013-01-13: First release
See http://oreilly.com/catalog/errata.csp?isbn=9781449372064 for release details.
Nutshell Handbook, the Nutshell Handbook logo, and the O’Reilly logo are registered trademarks of O’Reilly Media, Inc. Beginning NFC, the image of a Central American squirrel monkey, and related trade dress are trademarks of O’Reilly Media, Inc.
Many of the designations used by manufacturers and sellers to distinguish their products are claimed as trademarks. Where those designations appear in this book, and O’Reilly Media, Inc., was aware of a trade‐ mark claim, the designations have been printed in caps or initial caps.
While every precaution has been taken in the preparation of this book, the publisher and authors assume no responsibility for errors or omissions, or for damages resulting from the use of the information contained herein.
ISBN: 978-1-449-37206-4
Table of Contents
1. Introduction. . . 1
Who This Book Is For 2
Recommended Reading 2
What’s Covered in This Book 3
What You’ll Need 4
Hardware 4
Software 6
Other Useful NFC Apps 7
Conventions Used in This Book 7
Using Code Examples 8
Safari® Books Online 8
How to Contact Us 9
Acknowledgments 9
2. NFC and RFID. . . 11
What’s RFID? 11
What’s NFC? 12
How RFID Operates 13
RFID Standards 13
How NFC Operates 14
NFC Data Exchange Format (NDEF) 14
The Architecture of NFC 15
NFC Tag Types 17
Where to Get Tags 18
Device-to-Tag Type Matching 19
What You Can Do with NFC 20
Conclusion 21
3. Getting Started with PhoneGap and the PhoneGap-NFC Library. . . 23
Handover 185
Static Handover 186
Sending Handover Messages in PhoneGap 186
Peer-to-Peer Using Arduino 192
Card Emulation 193
Conclusion 194
9. NFC on Embedded Systems. . . 195
Introduction to Embedded Linux Devices and Package Managers 196
Network, USB, and NFC 196
NFC on Embedded Linux: The Overview 199
Housekeeping Details 200
Get Comfortable with Your Editing Workflow 200
Know Your Package Manager 200
Set the Date and Time 201
Make a Downloads Directory 202
BeagleBone Peculiarities 202
Raspberry Pi Peculiarities 202
Installing the Tools for NFC 203
Installing the Libusb Compatibility Library 204
Installing libnfc 204
Testing the Installation on Raspberry Pi or BeagleBone 205
Installing libfreefare 205
Libnfc and Libfreefare Command Line Tools 206
NDEF Reading and Writing in Node.js 208
Web Interface for Tag Writer 212
Tags Controlling Physical Output 214
BeagleBone Version 214
Raspberry Pi Version 217
Conclusion 221
A. NFC Specification Codes. . . 223
CHAPTER 1
Introduction
This book started life innocently enough in an email from Brian to Tom in March 2011. Brian thought it would be a good idea to add a couple of lines to the second edition of
another book about near field communication, Making Things Talk, which we were
working on at the time. There was already a chapter on radio frequency identification (RFID) in the book, so how hard could it be? Two and a half years later, we’ve learned a lot about NFC along the way and picked up an excellent and knowledgeable collabo‐ rator, Don Coleman, author of the NFC plug-in for PhoneGap.
Even though NFC has a lot of potential, most of the material written about it so far hasn’t been written for the casual programmer. Everything out there assumed that if you wanted to know about NFC, you were prepared to do it from the silicon up. You had to understand the details of the various RFID specs involved, and you had to be prepared to write code that interpreted the byte stream from an NFC reader one byte at a time. While it’s useful to understand that, we figured NFC would see wider use if programmers could concentrate on what they were using it for, rather than the low-level details. Don’s PhoneGap library was the best tool we found to do just that. It lets you design NFC exchanges in the way we imagine the NFC forum designers intended: you think about the messages being exchanged and don’t worry about the rest.
Most of this book is written in that spirit. You’ll learn about the basics of the NFC Data Exchange Format (NDEF) by reading and writing messages from device to tag and from device to device. You’ll see a few sample applications—some written for PhoneGap, some for Arduino, and some for Node.js—running on embedded devices like the Rasp‐ berry Pi and the BeagleBone Black. You’ll learn some of the use patterns of NDEF, and you’ll get a taste of how you might think about the physical interaction of NFC-driven applications.
The state of the art varies from platform to platform, however. Not everything that the NFC Forum specifications describe is accessible to the casual programmer on every platform yet. We’ve attempted to give you a roadmap in this book, particularly in the
later chapters, as to what the current state of development is, and where there is still room for usability improvement.
We hope that this book will help the casual programmer get a sense of what can be done using NFC, and that it will inspire more professional developers to create simple-to-use tools to help spread its use.
Who This Book Is For
You don’t have to be a trained professional programmer to read this book. We tried to write it for programming enthusiasts—people who’ve picked up some knowledge along the way, but maybe not in a formal learning setting. You won’t learn to write enterprise-level code here, but you will get a practical introduction to what near field communi‐ cation is and how to program applications using it on Android, Arduino, and embedded Linux.
We assume you have some familiarity with programming, however. You will want to be familiar with JavaScript and HTML for most of the examples in the book. You’ll get introduced to a little C in the Arduino projects, but if you’re familiar with JavaScript or Java, it will look familiar enough. For those latter projects, you should be a little familiar with electronics, but you don’t have to be.
Recommended Reading
“What? I have to read other books in order to read this book?” No, but there are a few books that we found helpful in writing this one. We thought you might find them useful as well.
If you’re new to JavaScript, read Douglas Crockford’s JavaScript: The Good Parts. Come
to think of it, read it if you’re an old hand at JavaScript. It’ll make you a better pro‐ grammer. He explains the theoretical underpinnings of the language and the best use patterns clearly and definitively.
For PhoneGap and Android, the online Getting Started Guides are the most up-to-date references; see the PhoneGap developer portal and the Android developer site. For more
in-depth introductions to Android, see Professional Android 4 Application Develop‐
ment or Android Programming: The Big Nerd Ranch Guide.
If you’re new to Arduino, Massimo Banzi’s Getting Started with Arduino is an excellent
starting place. Tom Igoe’s Making Things Talk, 2nd Edition is a good book for experi‐
enced programmers to learn about connecting Arduino projects to networks. Michael
Margolis’ Arduino Cookbook has some handy recipes for Arduino programs as well.
For an introduction to Node.js, which pops up later in this book, Brett McLaughlin’s
What is Node? is a nice essay-length introduction with no code. Manuel Kiessling’s The Node Beginner Book and Pedro Teixeira’s Hands-On Node.js are helpful and short guides to getting started with the actual code.
For a good introduction to the Raspberry Pi or the BeagleBone Black, which you’ll encounter in Chapter 9, you can find material for getting started on Adafruit’s tutori‐ als. The books Getting Started with Raspberry Pi by Matt Richardson and Shawn Wallace and Getting Started with BeagleBone by Matt Richardson are also good introductions.
What’s Covered in This Book
Chapter 2 gives you an introduction to near field communication (NFC) by comparing it to radio frequency identification (RFID). Simply put, NFC is a superset of RFID. It can do most things short-range RFID can do, and more. You’ll get a preview of the most important terms, a look at the architecture of an NFC system, and learn what tools you need and where to get them.
Chapter 3 introduces you to PhoneGap and the NFC plug-in for PhoneGap. You’ll install the tools necessary to develop PhoneGap applications for Android and build and run your first couple of applications. By the end of this chapter, you’ll have read your first NFC tag using an Android device.
Chapter 4 is an in-depth overview of the NFC Data Exchange Format (NDEF). You’ll learn how it’s structured and see it in practice by writing an application that performs the same basic task using different types of NDEF records, to see how each record type affects user interaction on Android.
Chapter 5 covers how to listen for NDEF messages on Android. You’ll learn how to filter for different types of tags and messages, and how the Android Tag Dispatch system can be used to your advantage when developing NFC apps.
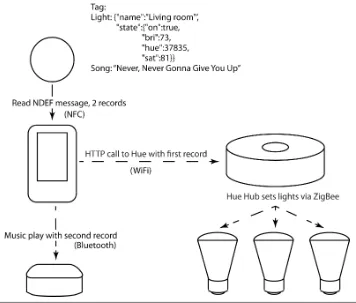
In Chapter 6, you’ll build a full NFC application on Android that features a full user interface, audio playback, and control of web-connected lighting, all mediated by NFC tags. The goal of this chapter is to show you how to plan the interaction design and data formatting of an application to best take advantage of NFC.
Chapter 7 brings another platform into play: the Arduino microcontroller development platform. You’ll learn how to read and write NDEF messages using the Arduino NDEF library. You’ll also develop another full application using Arduino and Node.js.
Chapter 8 introduces you to peer-to-peer exchanges using NFC on Android. You’ll learn how the record types you’re exchanging through peer-to-peer affect the receiving device, and you’ll learn about how NFC can negotiate the handoff of larger exchanges to alter‐ nate carriers like Bluetooth and WiFi.
Chapter 9 gives you the state of the art on NFC development on embedded Linux plat‐ forms using the Raspberry Pi and BeagleBone as examples. You’ll get an understanding of what’s possible on embedded Linux, and see a few sample applications in Node.js. There’s still a lot of room for usability improvements in this context, so be warned that this chapter is not for the technically timid. You’ll want some familiarity with the Linux command-line interface to get the most out of this chapter. This is where some of the most exciting possibilities for NFC use lie, though, so it’s good territory to know.
What You’ll Need
To do the exercises in this book, you’ll need some hardware and software. All of the software is free, fortunately. The most expensive piece of hardware used here is an NFC-enabled Android device. The following sections list what you’ll be using.
Hardware
To follow along with the book overall, you’ll need the following hardware:
• An Android NFC-enabled device
• Several NFC-compatible tags (check compatibility with your devices; “Device-to-Tag Type Matching” on page 19 includes a chart showing which devices work with which tag types)
For Chapter 6, you’ll need:
• A Philips Hue lighting system
• A Bluetooth Music Receiver (e.g., Belkin Bluetooth Music Receiver or HomeSpot’s NFC-enabled Bluetooth Audio Receiver)
For Chapter 7, you’ll need:
• An Arduino Uno microcontroller, available from many outlets, including Ardui‐ no, Adafruit, Seeed Studio, RadioShack and others
• An NFC Shield (you can use Adafruit’s PN532 NFC/RFID Controller Shield for Arduino or Seeed Studio’s NFC Shield or NFC Shield v2.0)
• A solenoid-driven door lock, 12V or less. We used an Amico 0837L DC 12V 8W open frame type solenoid for electric door lock bought on Amazon, but you can also get solenoids from other retailers. Adafruit sells a similar lock-style solenoid and Seeed Studio sells several models, so if you’re ordering a shield from them, you can get a solenoid from them as well.
• A TIP120 Darlington transistor
• A 12V, 1000mA power supply, with 2.1mm ID, 5.5mm OD, center-positive con‐ nector to power the solenoid circuit
• Jumper wires or 22AWG solid-core wire
• Two LEDs (one red, one green). These are available from any electronics retailer, but for reference, check out Adafruit’s red LED pack or green LED pack.
• Two 220Ω resistors for the LEDs
For Chapter 9, you’ll need:
• A BeagleBone Black or Raspberry Pi embedded Linux microcontroller • 1 amp or greater power supply for your board
• An SLC3711 Contactless USB Smart Card Reader • Optional but useful:
— A USB WiFi adapter for your board (Adafruit’s Miniature WiFi (802.11b/g/n) Module works well)
— A USB A-to-A extender for your NFC adapter — A USB to TTL serial cable—debug/console cable
Table 1-1 lists the electronics components for this book with part numbers from some of the electronics distributors we use regularly, in case you want alternatives to those listed previously.
Table 1-1. Electronic components used in this book
Part MakerShed Jameco Digikey SparkFun Adafruit Farnell Arduino Seeed
220Ω resistor 690700 220QBK-ND 9337792 Solderless
breadboard
Part MakerShed Jameco Digikey SparkFun Adafruit Farnell Arduino Seeed
To follow along with the book overall, you’ll need the following software:
• The Android software development kit (see “Setting Up the Development Envi‐ ronment” on page 24)
• The Cordova CLI, your toolbox for PhoneGap (see “Install Cordova CLI for Pho‐ neGap” on page 28)
• Node.js and the Node Package Manager (npm)
• A text editor (we like Sublime Text 2 as a cross-platform GUI editor, but you can use anything that can generate a plain-text file)
For Chapter 6, you’ll need:
• The Zepto jQuery library, available from Zepto.js
For Chapter 7, you’ll need:
• The Seeed-Studio PN532 library
• The Arduino NDEF library, available from Don Coleman’s GitHub repository • The Time library for Arduino by Michael Margolis
Don’t worry about setting all this up right now; we’ll let you know when you need to install a piece of software.
Other Useful NFC Apps
The following will be useful throughout the course of the book:
• NFC TagInfo by NXP allows you to read any NFC or Mifare tag and examine the NDEF record on it.
• NFC TagWriter by NXP allows you to do many of the same things as TagInfo. It can also write tags, and unformat tags, which is really handy.
• NFC Research Lab’s NFC TagInfo will show you all the info about a given tag. It’s more advanced than NXP’s TagInfo, in that it will also allow you to see a memory dump from the tag. It’s invaluable for troubleshooting your applications.
For Chapter 4, you’ll need:
• Trigger by TagStand
• NFC Writer, also by TagStand
• TecTiles by Samsung (functional in the United States and Canada only) • App Lancher NFC Tag Writer [sic] by vvakame
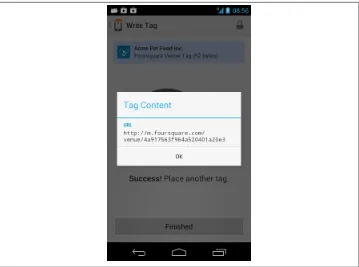
• A Foursquare account if you don’t have one already, and Foursquare for Android
Conventions Used in This Book
The following typographical conventions are used in this book: Italic
Indicates new terms, URLs, email addresses, filenames, and file extensions.
Constant width
Used for program listings, as well as within paragraphs to refer to program elements such as variable or function names, databases, data types, environment variables, statements, and keywords.
This icon signifies a tip, suggestion, or general note.
This icon indicates a warning or caution.
Using Code Examples
Supplemental material (code examples, exercises, etc.) is available for download at
https://github.com/tigoe/beginningnfc.
This book is here to help you get your job done. In general, if example code is offered with this book, you may use it in your programs and documentation. You do not need to contact us for permission unless you’re reproducing a significant portion of the code. For example, writing a program that uses several chunks of code from this book does not require permission. Selling or distributing a CD-ROM of examples from O’Reilly books does require permission. Answering a question by citing this book and quoting example code does not require permission. Incorporating a significant amount of ex‐ ample code from this book into your product’s documentation does require permission. We appreciate, but do not require, attribution. An attribution usually includes the title,
author, publisher, and ISBN. For example: “Beginning NFC: Near Field Communication
with Arduino, Android, and PhoneGap, by Tom Igoe, Don Coleman, and Brian Jepson. Copyright Tom Igoe, Don Coleman, and Brian Jepson 2014 978-1-4493-6307-9.” If you feel your use of code examples falls outside fair use or the permission given above,
feel free to contact us at [email protected].
Safari® Books Online
Safari Books Online is an on-demand digital library that
delivers expert content in both book and video form from the world’s leading authors in technology and business.
Safari Books Online offers a range of product mixes and pricing programs for organi‐ zations, government agencies, and individuals. Subscribers have access to thousands of books, training videos, and prepublication manuscripts in one fully searchable database from publishers like O’Reilly Media, Prentice Hall Professional, Addison-Wesley Pro‐ fessional, Microsoft Press, Sams, Que, Peachpit Press, Focal Press, Cisco Press, John Wiley & Sons, Syngress, Morgan Kaufmann, IBM Redbooks, Packt, Adobe Press, FT Press, Apress, Manning, New Riders, McGraw-Hill, Jones & Bartlett, Course Technol‐ ogy, and dozens more. For more information about Safari Books Online, please visit us online.
How to Contact Us
Please address comments and questions concerning this book to the publisher:
O’Reilly Media, Inc.
1005 Gravenstein Highway North Sebastopol, CA 95472
800-998-9938 (in the United States or Canada) 707-829-0515 (international or local)
707-829-0104 (fax)
We have a web page for this book, where we list errata, examples, and any additional
information. You can access this page at http://oreil.ly/beginning-nfc.
To comment or ask technical questions about this book, send email to bookques
For more information about our books, courses, conferences, and news, see our website at http://www.oreilly.com.
Find us on Facebook: http://facebook.com/oreilly
Follow us on Twitter: http://twitter.com/oreillymedia
Watch us on YouTube: http://www.youtube.com/oreillymedia
Acknowledgments
We’ve received generous assistance from many people and organizations during the writing of this book. The PhoneGap-NFC plug-in was Kevin Griffin’s brainchild; he and Don wrote the first version of it and presented it at PhoneGap Day 2011. Kevin Town‐ send of Adafruit has been an invaluable resource for his in-depth knowledge of NXP’s software and hardware. Yihui Xiong of Seeed Studio and author of the Seeed Arduino NDEF library, was crucial to the success of Chapter 7. Philippe Teuwen made fast patches to libfreefare, clearing roadblocks in Chapter 9. Derek Molloy’s pages on the BeagleBone
Black were a handy resource. The images in this book are better thanks to Jody Culkin and Fritzing.org. Early readers Ben Light, Sae Huh, Gabrielle Levine, Alex Kauffmann, Fil Maj, and Dominick Gruntz offered valuable feedback.
CHAPTER 2
NFC and RFID
Radio frequency identification (RFID) is becoming commonplace in everyday life these days. From tap-and-go payment cards and transit passes to E-ZPass devices used on toll roads to the tags stuck on and sewn into consumer goods to manage inventory and deter theft, most of us encounter RFID tags at least a few times a week and never think about what can be done with this technology.
In the past few years, a new term has started to bubble up in connection with RFID: near field communication (NFC). Ask your average techie what it is and you’ll probably hear “Oh, it’s like RFID, only different.” Great, but how is it different? RFID and NFC are often conflated, but they’re not the same thing. Though NFC readers can read from and write to some RFID tags, NFC has more capabilities than RFID, and enables a greater range of uses. You can think of NFC as an extension of RFID, building on a few of the many RFID standards to create a wider data exchange platform.
This book aims to introduce you to NFC and its capabilities in a hands-on way. Fol‐ lowing the exercises in these chapters, you’ll build a few NFC applications for an NFC-enabled Android device and for an Arduino microcontroller. You’ll learn where RFID and NFC overlap, and what you can do with NFC.
What’s RFID?
Imagine you’re sitting on your porch at night. You turn on the porch light, and you can see your neighbor as he passes close to your house because the light reflects off him back to your eyes. That’s passive RFID. The radio signal from a passive RFID reader reaches a tag, the tag absorbs the energy and “reflects” back its identity.
Now imagine you turn on your porch light, and your neighbor in his home sees it and flicks on his porch light so that you can see him waving hello from his porch. That’s active RFID. It can carry a longer range, because the receiver has its own power source,
and can therefore generate its own radio signal rather than relying on the energy it absorbs from the sender.
RFID is a lot like those two porches. You and your neighbor know each other’s faces, but you don’t really learn a lot about each other that way. You don’t exchange any mean‐ ingful messages. RFID is not a communications technology; rather, it’s designed for identification. RFID tags can hold a small amount of data, and you can read and write to them from RFID readers, but the amount of data we’re talking about is trivial, a thousand bytes or less.
What’s NFC?
Now imagine another neighbor passes close, and when you see her, you invite her on to the porch for a chat. She accepts your invitation, and you sit together, exchange pleasantries about your lives, and develop more of a relationship. You talk with each other and you listen to each other for a few minutes. That’s NFC.
NFC is designed to build on RFID by enabling more complex exchanges between par‐ ticipants. You can still read passive RFID tags with an NFC reader, and you can write to their limited amount of memory. NFC also allows you to write data to certain types of RFID tags using a standard format, independent of tag type. You can also commu‐ nicate with other NFC devices in a two-way, or duplex, exchange. NFC devices can exchange information about each other’s capabilities, swap records, and initiate longer term communications through other means.
For example, you might tap your NFC-enabled phone to an NFC-enabled stereo so that they can identify each other, learn that they both have WiFi capability, and exchange credentials for communication over WiFi. After that, the phone will start to stream audio over WiFi to the stereo. Why doesn’t the phone stream its audio over the NFC connection? Two reasons: first, the NFC connection is intentionally short range, gen‐ erally 10cm or less. That allows it to be low-power, and to avoid interference with other radios built into devices using it. Second, it’s relatively low-speed compared to WiFi, Bluetooth, and other communications protocols. NFC is not designed to manage ex‐ tended high-speed communications. It’s for short messages, exchanging credentials, and initiating relationships. Think back to the front porch for a moment. NFC is the ex‐ change you have to open the conversation. If you want to talk at length, you invite your neighbor inside for tea. That’s WiFi, Bluetooth, and other extended communications protocols.
can just tap your phones together. When you want to pay with your Google Wallet, you can just tap as you would an RFID-enabled credit card.
When you’re using NFC, your device doesn’t give the other device to which it’s speaking access to its whole memory—it just gives it the basics needed for exchange. You control what it can send and what it can’t, and to whom.
How RFID Operates
An RFID exchange involves two actors: a target and an initiator. The initiator, a tag
reader or reader/writer device, starts the exchange by generating a radio field and lis‐ tening for responses from any target in the field. The target, a tag, responds when it
picks up a transmission from an initiator. It will respond with a unique identifier num‐
ber (UID). RFID has two communication modes: active and passive. Passive RFID ex‐
changes involve a reader/writer and a tag that has no power source on board. The tags get their power from the energy of the radio field itself. It’s generally a very small amount,
just enough to send a signal back to the reader. Active RFID exchanges involve a target
that’s an independently powered device. Because the target is powered, its reply to the reader can travel a much greater distance. E-ZPass and other traffic ID systems use active RFID.
RFID tags have a small amount of memory on board, usually less than 1 kilobyte. An initiator device can read this data, and if it’s a reader/writer device, it can write to the tag as well. This allows you to store small amounts of information associated with the card. For example, it’s sometimes used in transit systems that use RFID, to keep track of how much value is left on the card. However, since RFID systems generally are net‐ worked to a database, it’s more common to store a data record indexed by the tag’s UID in a remote database, and store all information about the tag in that remote database.
RFID Standards
Contrary to popular belief, there is no single universally interoperable RFID protocol or technology. There are dozens. RFID standards are developed by the International Standards Organization (ISO), in conjunction with major participants in the RFID market. ISO works as a mediating body to help competitors in many different industries develop interoperable standards so that even when they compete, their technologies can sometimes work together. The various RFID standards define the radio frequencies used, the data transfer rates, the data formats, and more. Some of these standards define layers of a single interoperable stack, as you’ll see with NFC. Other standards define a whole different class of applications. For example, the ISO-11784 standard was origi‐ nally developed for animal tracking. It operates in frequencies between 129 and 139.4kHz, and its data format features fields suited to describing the animals to be tracked. You can also find EM4100 procotol readers and tags that operate in the 125kHz range. These are often used as proximity cards, and feature very limited information in
their data protocol, usually just a UID. The ISO-14443 standards were developed for use with payment systems and smart cards. They operate at 13.56MHz. They include features in their data format for incrementing and decrementing values and for en‐ crypting data, for example. Within the 14443 family, there are several different formats including Philips and NXP Mifare tags, Sony FeliCa tags, and NXP DESFire. ISO-14443A tags are compatible with NFC, so you’ll see a lot of them in the pages that follow.
How NFC Operates
NFC can be thought of as an extension of RFID. NFC exchanges also involve an initiator and a target like RFID. However, it can do more than just exchange UIDs and read or write data to the target. The most interesting difference between RFID and NFC is that NFC targets are often programmable devices, like mobile phones. This means that rather than just delivering static data from memory, an NFC target could actually generate unique content for each exchange and deliver it back to the initiator. For example, if you’re using NFC to exchange address data between two phones, the NFC target device could be programmed to only provide limited information if it’s never seen this partic‐ ular initiator before.
NFC devices have two communications modes. If the initiator always supplies the RF
energy and the target gets powered by the initiator’s field, they’re said to be engaging in passive communication mode. If both target and initiator have their own energy sources,
they’re in active communication mode. These modes are the same as regular RFID
communication modes.
NFC devices have three operating modes. They can be reader/writers that read data from
a target and write to it. They can be card emulators, acting like RFID tags when they’re
in the field of another NFC or RFID device. Or they can operate in peer-to-peer mode,
in which they exchange data in both directions.
NFC Data Exchange Format (NDEF)
Data exchanged between NFC devices and tags is formatted using the NFC Data Ex‐
Simple text records
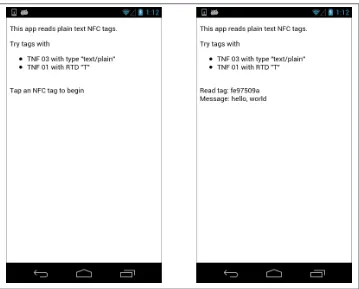
These contain whatever text string you want to send. Text messages generally don’t contain instructions for the target device. They also include metadata indicating the language and encoding scheme (e.g., UTF-8).
URIs
These contain network addresses. An NDEF target device that receives a URI record is expected to pass that record to an application that can display it, such as a web browser.
Smart Posters
These contain data you might attach to a poster to give it more information. This can include URIs, but might also contain other data, like a text message to be sent about the poster, telling your friends about it. A target device that receives a Smart Poster record might open a browser, SMS, or email application, depending on the message’s content.
Signatures
These provide a way to give trustworthy information about the origins of data con‐ tained in an NDEF record.
You can mix and match records in an NDEF message, or you can send only one record per message, as you choose.
NDEF is one of the important technical differences between RFID and NFC. Both NFC and many of the RFID protocols operate on 13.56MHz, but RFID tags do not have to format their data in NDEF format. The various RFID protocols do not share a common data format.
Think of NDEF messages like paragraphs and records like sentences: a paragraph is a discrete chunk of information that contains one or more sentences. A sentence is a smaller chunk of information that contains just one idea. For example, you might write a paragraph that indicates that you’re having a birthday party, and gives the address. The NDEF message equivalent might contain a simple text record to describe the event, a Smart Poster record containing the physical address, and a URI for more information on the Web.
The Architecture of NFC
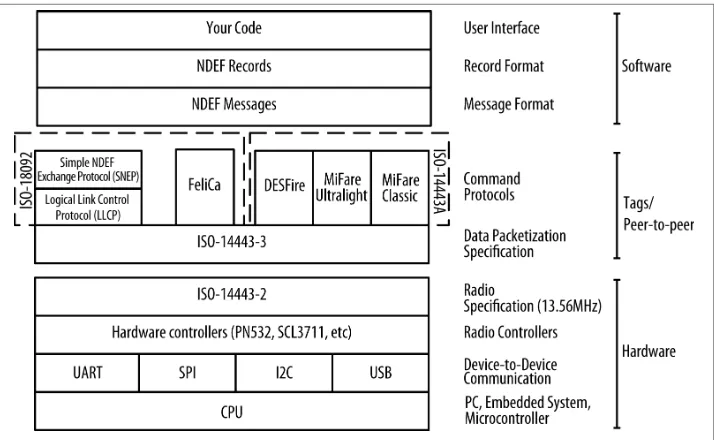
In order to understand NFC in depth, it helps to have a mental model of the architecture. There are several layers to consider. The lowest layer is the physical, namely your CPU and the radios that are doing the communication. In the middle, there are data packe‐ tization and transport layers, then data format layers, and finally, your application code. Figure 2-1 shows the various layers of the NFC stack.
Figure 2-1. The NFC protocol stack
At the physical layer, NFC works on an RFID radio specification, ISO-14443-2, that describes low-power radios operating at 13.56MHz. Next comes a layer that describes the framing of data bytes sent over the radio, ISO-14443-3. Any of the radios you might use are separate hardware components, either inside your phone or tablet, or attach‐ ments to your microcontroller or personal computer. They communicate with the main processor of your device using one or more standard inter-device serial protocols: universal asynchronous receive-transmit (UART), serial peripheral interface (SPI), inter-integrated circuit communication (I2C), or universal serial bus (USB). If you’re a hard‐ ware enthusiast, you probably know the first three, but if your focus is software, you may only know USB.
Above that are several RFID command protocols, based on two specifications. The original RFID control specification that NFC tag reading and writing is built on is ISO-14443A. The Philips/NXP Semiconductors Mifare Classic and Mifare Ultralight and NXP DESFire protocols are compatible with ISO-14443A. The NFC peer-to-peer exchange is built on the ISO-18092 control protocol. Sony FeliCa RFID cards and tags, mostly available in Japan, are based on this standard as well. You can read from and write to tags using these standards and still not be using NFC, however.
manage peer-to-peer exchanges. These are shown in the stack alongside the control protocols, since they operate on the same standard as one of them.
The second major difference between RFID and NFC, the NFC Data Exchange Format (NDEF), sits atop these control protocols. NDEF defines a data exchange in messages, which are composed of NDEF records. There are several different record types, which you’ll learn more about in Chapter 4. NDEF makes it possible for your application code to deal with data from NFC tag reading and writing, peer-to-peer exchanges, and card emulation all the same way.
Most of this book focuses on the use of NDEF messaging. Although we’ll discuss the lower layers so that you understand them, we think that the advantage to NDEF is that it frees you from thinking about them.
NFC Tag Types
There are four types of tags defined by the NFC forum, all based on the RFID control protocols described previously. There’s a fifth that’s compatible, but not strictly part of the NFC specification. Types 1, 2, and 4 are all based on ISO-14443A, and type 3 is based on ISO-18092. You can get tags from many vendors, and you’ve probably run across them in everyday life without knowing it. Their details are as follows:
Type 1
• Based on ISO-14443A specification. • Can be read-only, or read/write capable. • 96 bytes to 2 kilobytes of memory. • Communication speed 106Kb. • No data collision protection.
• Examples: Innovision Topaz, Broadcom BCM20203.
Type 2
• Similar to type 1 tags, type 2 tags are based on NXP/Philips Mifare Ultralight tag (ISO-14443A) specification.
• Can be read-only, or read/write capable. • 96 bytes to 2 kilobytes of memory. • Communication speed 106Kb. • Anti-collision support.
• Example: NXP Mifare Ultralight.
Type 3
• These are based on the Sony FeliCa tags (ISO-18092 and JIS-X-6319-4), without the encryption and authentication support that FeliCa affords.
• Configured by factory to be read-only, or read/write capable. • Variable memory, up to 1MB per exchange.
• Two communication speeds, 212 or 424Kbps. • Anti-collision support.
• Example: Sony FeliCa.
Type 4
• Similar to type 1 tags, type 4 tags are based on NXP DESFire tag (ISO-14443A) specification.
• Configured by factory to be read-only, or read/write capable. • 2, 4, or 8KB of memory.
• Variable memory, up to 32KB per exchange.
• Three communication speeds: 106, 212, or 424Kbps. • Anti-collision support.
• Example: NXP DESFire, SmartMX-JCOP.
A fifth type, proprietary to NXP Semiconductors, is probably the most common in NFC use today:
Mifare Classic tag (ISO–14443A)
• Memory options: 192, 768, or 3,584 bytes. • Communication speed 106Kbps
• Anti-collision support.
• Examples: NXP Mifare Classic 1K, Mifare Classic 4K, Mifare Classic Mini.
Where to Get Tags
Mifare and NFC tags are increasingly easy to get. To make the most of this book, you should have some NFC Forum tags and some Mifare Classic tags as well.
If you want tags in different form factors, Adafruit has a wide variety in their NFC category. SparkFun and Seeed Studio also have plenty of Mifare tags; search for “NFC” or “Mifare” and you’ll find plenty.
You can also get tags from TagAge, but shipping can be slow from Finland, depending on your location. Customer service has been excellent for us, however.
Identive NFC can deliver tags overnight. They are a bit more expensive, but they arrive quickly and they have a cool android on them.
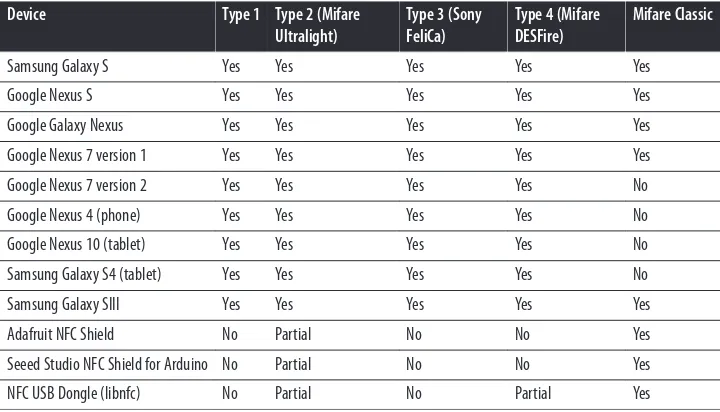
Device-to-Tag Type Matching
Not all NFC-compatible tags work with all NFC devices. In the course of working on this book, we’ve tested many different devices and tags, and have found some combi‐ nations work, and some don’t. Though Table 2-1 isn’t an exhaustive table, it’s intended to give you enough information to choose your devices and tags appropriately. The most common issue you’ll run into is that some devices will read Mifare Classic tags, while others won’t. Mifare Classic is not actually an NFC Forum standard tag type, and recently, major hardware vendors like Broadcom and Samsung have started to drop support for it on their devices. You’re likely to get unpredictable results when you try to read Mifare Classic tags with some of these newer tags. For example, the Nexus 4 will read Mifare Classic as a generic tag, but the Samsung S4 (Google Edition) displays an error saying it can’t handle the tag. When possible, we recommend going with one of the official NFC Forum tag types. In the chapters ahead, we’ll make more specific rec‐ ommendations where appropriate.
If you’re coming to NFC because you’re interested in using it for embedded hardware projects on the Arduino, Raspberry Pi, or BeagleBone Black (which you’ll learn more about in Chapter 7 and Chapter 9), you should make sure you have both NFC tags and Mifare Classic tags. The libraries for those platforms were developed starting with Mi‐ fare Classic support, and as of this writing, they don’t handle all the NFC Forum types. We’ve added Mifare Ultralight (NFC type 2) read support for the Arduino NDEF library (which Don wrote), and there is partial Ultralight and DESFire support (NFC types 2 and 4) in libfreefare, one of the libraries we’ll show you in Chapter 9.
While we hope to see additions to those libraries to support all of the NFC Forum tag types, it’s not there yet. Growing pains like these are common with emerging technol‐ ogies, but so far, signs point to the industry moving toward a standardized set of tag types.
Table 2-1. Device-to-tag compatibility
Samsung Galaxy S Yes Yes Yes Yes Yes Google Nexus S Yes Yes Yes Yes Yes Google Galaxy Nexus Yes Yes Yes Yes Yes Google Nexus 7 version 1 Yes Yes Yes Yes Yes Google Nexus 7 version 2 Yes Yes Yes Yes No Google Nexus 4 (phone) Yes Yes Yes Yes No Google Nexus 10 (tablet) Yes Yes Yes Yes No Samsung Galaxy S4 (tablet) Yes Yes Yes Yes No Samsung Galaxy SIII Yes Yes Yes Yes Yes Adafruit NFC Shield No Partial No No Yes Seeed Studio NFC Shield for Arduino No Partial No No Yes NFC USB Dongle (libnfc) No Partial No Partial Yes
What You Can Do with NFC
There are many possible applications for NFC. Its tag emulation functionality is showing up in monetary transactions like Google Wallet, and in payment and ticketing systems for public transport. There are several mobile phone apps that allow you to save con‐ figuration data for your phone to a tag, and use the tag to automatically change the context of your phone (e.g., set the quiet settings for meetings, turn on WiFi and con‐ figure for a given network by tapping a tag). Home audio equipment is coming on the market that allows you to automatically pair your phone or tablet with your audio player or TV, to use the former as a remote control for the latter. Healthcare systems have implemented patient ID and record linking using NFC, and the NFC Forum recently released a Personal Health Device Communication (PHDC) technical specification to aid in that development. Inventory management can be improved by using NDEF re‐ cords written to the goods being shipped, about their journey, shipping times, and so forth. Fleet tracking can also be enhanced using NFC tags and readers by storing route information, travel times, mileage, maintenance, and fuel information on tags, or trans‐ ferring it from vehicle to mobile device through peer-to-peer.
The combination of peer-to-peer messaging between devices with minimal negotiation, and a common data format between device and tag messages makes NFC a potentially powerful tool for data-intensive applications in the physical world.
Conclusion
Near field communication adds some promising new functionality to RFID technolo‐ gies. Most notable of these is the NFC Data Exchange Format, NDEF, which provides a common data format across the four different NFC tag technologies. NDEF can be used for both tag-to-device data exchange and for device-to-device data exchange. This distinguishes NFC as more than just an identification technology; it is also a useful technology for short data exchanges. The method by which NFC devices and tags in‐ teract—by means of a single tap—affords a spontaneity of interaction between users. There are four physical NFC tag types. These are based on existing RFID standards; three of the tag types are based on the ISO-14443A standard, and the fourth is based on the ISO-18092 standard. This makes NFC tags at least partially compatible with many existing Mifare and FeliCa RFID systems. Although these older systems do not support NDEF, they can still identify those NFC Tags that are compatible with them. An RFID reader that can read Mifare Ultralight tags, for example, would still be able to read the UID of an NFC type 2 tag, even though it couldn’t read any NDEF data encoded on the tag.
In its current state, there are some incompatibilities between some NFC devices and older Mifare Classic tags. Some NFC radios support Mifare Classic as an unofficial fifth tag type, while others don’t. As NFC matures and more devices come on the market, these incompatibilities will hopefully come to affect users less. For now, however, it’s best to check the compatibility between the readers and tags you plan to use in a given application.
CHAPTER 3
Getting Started with PhoneGap and the
PhoneGap-NFC Library
PhoneGap is a development framework that allows you to build apps for iOS, Android, BlackBerry, Windows Phone 7 and 8, Symbian, and Bada all using (mostly) HTML5 and JavaScript. The folks at PhoneGap have created what is essentially a basic browser application, but with no interface. You implement the interface in HTML5 and Java‐ Script, then compile the app for your given platform. They’ve also developed a system for plug-ins so that developers can extend the basic browser application using native features of the various platforms. It’s handy because it means you don’t have to know the native application frameworks for the various mobile platforms in order to write applications that can run on them all.
For this book, you’ll be using PhoneGap to write apps for Android and a plug-in that allows you to access the NFC hardware that’s built into many Android phones. The code you write to listen for tags and to interact with the user will be written in JavaScript and the interface will be laid out in HTML5. The application shell is written in Java, as is the NFC plug-in, but you won’t have to change any of the shell code for the projects in this book.
Why Android?
PhoneGap-NFC also supports Windows Phone 8, BlackBerry 7, and BlackBerry 10. We chose Android for this book because it has the largest market share and the most NFC phones, and most users of the PhoneGap-NFC plug-in have been Android users. If you have a Windows Phone or BlackBerry, you should be able to modify some of the ex‐ amples to follow along. However, there are some limitations. Windows Phone 8 can read, write, and share NFC tags, but only has access to the NDEF data. It can’t see tag type, tag UIDs, or any other tag metadata. BlackBerry 10 has similar restrictions: it can read and share NFC tags, but currently cannot write them.
PhoneGap-NFC for BlackBerry 7 supports more NFC features than BlackBerry 10, but you’ll need to use older releases to make it work since PhoneGap 3.0 dropped support for BlackBerry 7.
You can use any text editor you want to write your code, but you’ll use the Android software development kit (SDK) and its associated tools to compile your code and de‐ ploy it to your device. You’ll also get to know the Cordova command-line interface (CLI), which is a set of tools for compiling PhoneGap applications using the Android SDK. You’ll need a little familiarity with the command-line interface of your computer as well.
The instructions assume you’re working in a command-line interface, such as the Ter‐ minal on any Linux machine or OS X. For Windows users at the Command Prompt, there are some slight differences that we’ll call out.
Hello, World! Your First PhoneGap App
For the projects in this chapter, you need:• A text editor (if you don’t have a favorite text editor, we recommend Sublime Text 2, as it’s a good cross-platform code editor)
• An NFC-enabled Android phone (see Table 2-1 for a list of usable phones) • A few NFC tags (for best results across multiple devices, stick with the NFC Forum
types; see “Device-to-Tag Type Matching” on page 19 for more on which tags work with which devices)
• The Android software development kit
• The Cordova CLI, your toolbox for PhoneGap (“Install Cordova CLI for Phone‐ Gap” on page 28)
• Node.js and the Node Package Manager (npm); you’ll use this to download the Cordova CLI (see “Install Node.js and npm” on page 27)
Setting Up the Development Environment
On OS X or Linux
Extract the Android SDK and put it somewhere on your computer where you know you can find it again. For example, if you put it in your Applications folder on OS
X, the path to it would be /Applications/android-sdk-macosx.
On Windows
You’ll need to install a Java Development Kit (JDK) first by downloading it from the “Java SE” link on the Oracle website. After you install Java, you can run the Android SDK installer.
You’ll need one more thing on Windows: Apache Ant, which manages the build process for Android programs. Download the Ant ZIP file from the Apache Ant website, extract the file to the C:\ drive, and rename the top-level folder (such as apache-ant-1.9.1-bin) to Ant. If you did this correctly, you should find subdirecto‐
ries such as C:\Ant\bin and C:\Ant\lib.
On Windows, the Android SDK installer will default to a hidden directory in your home directory: C:\Users\Username\AppData\ Local\Android\android-sdk, which will make it hard to find later. We suggest you change this to C:\Users\Username\Android\ android-sdk.
Install the Android Platform Tools
On OS X or LinuxOpen up a Terminal window and change directories to the SDK directory (i.e., use
cd /Applications/android-sdk-macosx). The SDK doesn’t come with a version
of the Android platform tools, so you need to install them by typing the following: $ tools/android update sdk --no-ui
On Windows
If the Android SDK installer can’t find your Java installation (a common problem
on 64-bit Windows), quit the installer, and set your JAVA_HOME environment vari‐
able as directed later in this section. Try the installer again and it should find your Java installation.
You’ll be given the opportunity to install the tools when the installer is finished. Leave the checkbox labeled “Start SDK Manager” checked and click “Finish.” When
the SDK manager appears, click “Install n Packages” (where n is whatever number
of packages happen to be offered by default). If you accidentally unchecked the checkbox before clicking “Finish,” open a Command Prompt, change directory to
the SDK location (i.e., cd Android\android-sdk) and run the following command:
C:\Users\Username\Android\android-sdk>tools\android update sdk --no-ui
This will update the Android SDK and install the latest versions of the platform tools. You may be asked to accept some software licenses before you proceed. This will take a while, so you may want to take a minute to stretch and get some re‐ freshment while it’s installing.
Next you need to change the PATH variable for your environment to include the Android
SDK tools. The tools directory covers most of the tools for compiling, uploading, and running your app on your device, and in platform tools, you’ll find an important tool
called adb that you’ll use for debugging purposes later.
In the examples that follow, if you put the tools in a location other than the one shown, change the paths as needed. Also note that you are creating two paths: one for the tools subdirectory and one for platform tools.
On OS X or Linux
Change directories to your home directory and edit the .bash_profile or .profile. If
the file doesn’t exist, you can just create it. Add the following lines to that file: export ANDROID_HOME=/Applications/android-sdk-macosx
export PATH=$PATH:$ANDROID_HOME/tools:$ANDROID_HOME/platform-tools
Change the ANDROID_HOME path if you stored the SDK somewhere other than the
Applications directory, of course. Then save your profile file, and log out of the Terminal
and log back in to reset the PATH variable.
On Windows
You have to find your way to the “System Properties Advanced” dialog box: Windows XP
Open the Start Menu, then right-click on “My Computer” and choose “Prop‐ erties,” then go to the “Advanced” tab.
Windows 7 or Vista
Open the Start Menu and right-click on “Computer.” Choose “Properties,” then choose “Advanced System Settings” from the list on the left.
Windows 8.1
From the desktop, right-click or tap and hold on the Start Menu, then choose “System.” Select “Advanced System Settings” from the list on the left.
Click the button at the bottom labeled “Environment Variables.” Find the PATH entry
under “User Variables” (not “System Variables”) and click “Edit.” If there is no PATH
Append all three of the following to the end of the path with no space between them (the last two entries let you run Java and Ant from the command line):
;%ANDROID_HOME%\tools
;%ANDROID_HOME%\platform-tools ;%JAVA_HOME%\bin
;C:\Ant\bin
Be sure to include the ; separator as shown (if you had to create a new PATH variable, you can skip the leading ;). Don’t change any‐ thing that’s already there: you must add this to the end. If you make a mistake, click “Cancel” and try again. Stay out of the “System Variables.” If you make a mistake in the system PATH setting, you can cause serious problems for Windows.
While you’re on this screen, you must also set your ANDROID_HOME and JAVA_HOME
environment variables:
1. Click “OK” to dismiss the PATH dialog, then click “New” under “User Variables.”
2. Set the name to JAVA_HOME and the value to C:\Program Files\Java
\jdk1.7.0_25 (or whatever the installation directory of your JDK is).
3. Click “OK” to dismiss the PATH dialog, then click “New” again.
4. Set the name to ANDROID_HOME and the value to C:\Users\%USERNAME%\Android
\android-sdk.
If you installed Java or the Android SDK in a different location, change the variables as necessary.
Finally, click “OK” until all the dialogs are gone.
Install Node.js and npm
Node.js is a platform for developing network applications in JavaScript. It also has a great system for installing packages (such as PhoneGap). Node’s package manager (npm) is the fastest way to install the Cordova CLI for PhoneGap. You’ll also see Node used in projects in Chapters 7 and 9.
To install Node.js: Windows
Download and install Node.js.
If you have any trouble running Node from the command line in Windows after you install it, you may need to log out and log in again for its PATH changes to take effect.
Linux
Install Node.js using your package manager. If npm is in a separate package from
Node.js, install it as well. For example, on Ubuntu, you’d run the command sudo
apt-get install nodejs npm.
Mac OS X
You can either use the Node.js installer on the website, or install it with a package manager such as Homebrew. If the installer doesn’t add the npm module binary directory to your PATH, you may need to add it to your PATH by putting something
like this in your .bash_profile or .profile and then open a new Terminal window:
export PATH=/usr/local/share/npm/bin:$PATH
You’ll also need Git installed. It’s installed by default on OS X and most Linux distribu‐ tions. If not, install it with your package manager. You can get command-line Git for Windows, and the Git installer will ask if you want to install Git into the system PATH environment variable. We suggest that you do so, because this will let you run Git from the Command Prompt.
Install Cordova CLI for PhoneGap
Open a Terminal or Command Prompt and install the Cordova package (this gives you the PhoneGap framework).
On OS X or Linux
Run the following command at a Terminal prompt: $ npm install -g cordova
On Windows
Run the following command in a Command Prompt window: > npm install -g cordova
The -g option installs the Cordova command-line utility to a location in your PATH.
You can now create a PhoneGap project just by typing the following: cordova create project-location package-name app-name
In the command, project-location is the path to your new Cordova Android project,
package-name is the package name for the app you’ll create, using reverse domain-style
You’ll then need to cd into the project directory and add the Android platform: cd /path/to/project-location
cordova platform add android
You’ll see these steps frequently in the chapters that follow. For most of this book, we’ll
refer to the preceding steps simply by saying “use the cordova create command to
create a project.”
Now you’re all ready to make your first PhoneGap project!
PhoneGap or Cordova?
What’s the difference between PhoneGap and Cordova? PhoneGap was originally de‐ veloped by Nitobi, which was later bought by Adobe. Before Nitobi was purchased, they donated the PhoneGap codebase to the Apache Software Foundation to ensure good open source stewardship of the code. As part of the transition from Nitobi to Apache, the project name was changed from PhoneGap to Cordova. PhoneGap is now Adobe’s distribution of Cordova.
Historically, PhoneGap and Cordova, the open source project behind PhoneGap, were almost identical. This has changed with the release of 3.0. Now, the Cordova distribution provides the core functionality to embed a webview (browser) into a native application. Cordova is distributed without any of the plug-ins installed. This allows you to only install the functionality you need, simplifies your code base, and reduces the amount of code in your app.
PhoneGap is a distribution of Cordova, similar to how Safari and Chrome are based on WebKit. The PhoneGap distribution of Cordova comes with all of the core plug-ins installed. Additionally, the PhoneGap command line adds features like PhoneGap Build support. If you don’t have a native SDK installed, the compiling of the project can be delegated to PhoneGap Build.
In this book, we use the terms PhoneGap and Cordova interchangeably. For code sam‐ ples, we use the open source Cordova version.
Creating a PhoneGap Project
Change directories to whatever directory you like to keep projects in (perhaps your
Documents directory) and use the cordova create command to create a project:
$ cordova create ~/Hello com.example.hello Hello
There is no output from create if it succeeds, but it will create a new directory. This
command will create a directory in your working directory called Hello. Change direc‐
tories to it and list the files:
$ cd ~/Hello
$ cordova platform add android $ ls
If Cordova requests that you install a specific Android target (other than the ones that were installed by default), type android to start the SDK manager, then install the SDK that Cordova requested. The version numbers of the SDK may not always match up (e.g., Cordo‐ va may ask for the Android 4.2 SDK, but the SDK manager only offers you 4.2.2), but the Android target that Cordova asks for (e.g., target 17) will match the API number listed in the SDK manager, as in Android 4.2.2 (API 17). After you install the Android target, try run‐ ning the cordova create command again.
On Windows, the commands will be a little different. Open a Command Prompt (by
default, it will place you in your home directory, usually C:\Users\username), but to be
sure, you might want to change directory to it first with cd /D %userprofile% (in most
configurations, the %USERPROFILE% environment variable contains your home directo‐
ry). You can, of course, run these commands in another working directory:
> cd /D %userprofile%
> cordova create Hello com.example.hello Hello
> cd Hello
> cordova platform add android
> dir
On all three platforms, the directory will contain the following structure: www
The content files for the project: images, HTML, and so on. This is what you’ll work with most.
platforms
Support files for various platforms, such as Android.
plug-ins
Any plug-ins you’ve installed.
merges
Platform-specific web assets merged during the prepare phase. The platforms/android directory contains the following:
AndroidManifest.xml
The manifest file describing the app’s structure, permissions, and so on.
ant.properties
assets
A copy of the main www directory for the project.
bin
Any binary files that are built in the compiling process.
build.xml
The details needed by the compiler to build the project.
cordova
A directory containing the various scripts that Cordova uses to automate the build process.
gen
Files generated during the compile.
libs
Any additional PhoneGap libraries needed, such as the PhoneGap-NFC library.
local.properties
Properties of your development environment on your computer.
proguard-project.txt
Properties for a tool for shrinking and obfuscating your code.
project.properties
The project properties file.
res
Resources used to build the project. You’ll modify some files in this directory later.
src
The Java source files for the app. You won’t bother with these.
On Windows, you may need to install a USB driver for your device. When you updated the SDK earlier, you got USB drivers for many devices. However, even flagship devices like the Nexus 7 may require a separate driver installation. For example, you can down‐ load the Nexus 7 driver from ASUS. See Android’s USB Drivers page for instructions on installing drivers that are included with the Android SDK.
You’ve got everything you need here to run a very basic app that does nothing but display a splash screen. To compile and install it on your device, connect the device over USB and run the following command if you are on OS X or Linux:
$ cordova run
If you’re on Windows, run this command:
> cordova run
When everything’s ready, you’ll be running your app directly on your Android phone or tablet.
Can’t find developer options on Android version 4.2 or later? Open “Settings” and scroll down to “About Device” (it’s “About Tablet” on the Nexus 7). Tap the “Build” number seven times. This will enable developer options. Then return to the previous screen to find “De‐ veloper Options” and turn it on. In particular, you want to enable “Stay Awake” while charging and “USB Debugging.” If you have a password set for your device, you may want to disable it while you’re coding, as it removes the need to unlock your device every time you upload a new version of your app.
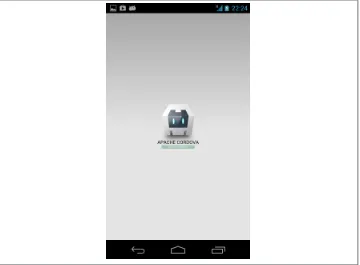
Finally, open the phone and launch the Hello Application. You should see a screen like that in Figure 3-1. Once you’ve got the basic “Hello, World!” application running, try
modifying the index.html to make it more fancy. It lives in the www directory. Add
buttons, images, and all the other things you’d add to an HTML page. Then save your files, run it again, and see how it changes on your phone.
The Important Files
There are two files you’ll work with frequently in your PhoneGap projects: the in‐
dex.html in the www directory, and the index.js file in the www/js directory. You can add other HTML and JavaScript files, but by convention, these will be the root of your application. These are the files you’ll modify to make your app do what you want. The index.html page will include the graphic layout of your application, just as it would
for any website. The index.js contains event handlers, like onDeviceReady(), initial
ize(), and so forth. Later on you’ll add some functions to it, like onNfc() for when a tag is read.
You can always get an unmodified version of the default file structure by creating a new project.
There are a few other JavaScript files that affect your application that you’ll likely never
see: the cordova.js file, the cordova_plugins.js file, and its companion, the cordova_plu‐
gins.json file. The cordova.js file is the main PhoneGap library. The cordova_plugins.js and cordova_plugins.json files initialize the plug-ins you install, giving you access to the
PhoneGap-NFC library and the NFC hardware. These show up in platforms/android/
assets/www when you install plug-ins and run your app.
A Word on JavaScript Idioms
The default coding idiom, or pattern of programming, for PhoneGap may look strange to you if you’re still new to JavaScript. In many JavaScript programs, you’ll see functions initialized like this:
function toggleCompass() {
}
function init() {
}
If you’ve programmed in C or Java, this pattern probably looks familiar to you. These functions are global to your application, and can be called from anywhere like this:
toggleCompass()
In the default Cordova index.js file, on the other hand, you’ll see that all functions are
created inside one giant variable called app. In JavaScript, variables can contain func‐
tions, and you can pass functions as parameters of functions. Since they’re elements of the app object, they’re written as an object literal, like so:
var app = {
initialize: function() {
},
bindEvents: function() {
},
onDeviceReady: function() {
} }
An object literal is a pair of curly braces surrounding name/value pairs, which are sep‐
arated by commas inside the braces. If you’ve seen JavaScript Object Notation (JSON),
you’ve seen this before. JSON is the syntax for writing object literals. These are still functions, just in a different notation. To call these functions, which are local to the app
object, you do it like so: app.initialize(); app.bindEvents(); app.onDeviceReady();
Writing all your functions inside the app object means that you know they’re all local
and you won’t accidentally overwrite functions from other JavaScript libraries with the same names you may choose to use in more complex apps.
For more on JavaScript, check out Douglas Crockford’s JavaScript: The Good Parts. It
does a nice job of describing how JavaScript is structured and how it works.
A Simple Locator App
Since the “Hello, World” template is such a handy reference, keep it intact and make a new project for your first custom app. This project will contain the bare minimum you need in your HTML and JavaScript files to get things running. To make it interesting, you’ll make an app that starts and stops tracking your latitude and longitude on a click.
In the following examples, OS X and Linux (indicated by a leading $) and Windows (indicated by a leading >) variants of the commands are shown one after another. On Windows, we’re using %userprofile %, which points to your home directory in most Windows installa‐ tions, but you can use another location if you wish.
In future chapters, unless the commands are radically different, we’ll only show the OS X and Linux version, and Windows users should assume the commands are differentiated as shown here.
Make a new project called Locator just as you did before. Use cordova create again:
Windows users should type %userprofile%\Locator instead of ~/Locator.
Then add the Android platform and the geolocation plug-in to the project. Plug-ins for PhoneGap/Cordova extend the framework’s functionality. Plug-in authors register their plug-ins’ URLs with the Cordova project so they can be added to the plug-in database. Many plug-ins add access to a device’s hardware, like this one, which gives you access to a device’s geolocation system. The NFC plug-in, which you’ll see shortly, gives you access to the NFC radio. You’ll see how plug-ins fit into the file structure a bit later, but for now, here’s how to install the geolocation plug-in:
$ cd ~/Locator
$ cordova platform add android $ cordova plugin add \
https://git-wip-us.apache.org/repos/asf/cordova-plugin-geolocation.git
Windows users should type /d %userprofile%\Locator instead of ~/Nfc
ReaderLocator.
\ is the line continuation character in Linux, OS X, and other POSIX systems.
Now change directories to the project’s www directory. Edit the index.html file and delete
everything. The following is a minimal HTML file that includes only the basics you’ll
use for most apps. There’s a main div element called app where all the action will take
place. You’ll see it and its subelements modified quite a bit in the index.js file. At the end
of the file, include the cordova.js script and your application’s index.js script. Finally, call the initialize() function from index.js to run the app:
<!DOCTYPE html>
<html> <head>
<title>Locator</title> </head>
<body style="font-size: 1.4em;"> <div class="app">
<div id="messageDiv"></div> </div>
<script type="text/javascript" src="cordova.js"></script> <script type="text/javascript" src="js/index.js"></script> <script type="text/javascript">
app.initialize();
</script> </body> </html>
Edit the index.js file and delete everything. You’ll replace it with the following script.
All the functions and variables in this script are local to an object called app, by
convention. Start out by initializing a variable called app:
var app = {
};
Next, add a few functions you need for initialization, to set up listeners for startup events, button touches, and the like. Replace the code you just added with this:
var app = {
bind any events that are required on startup to listeners: */
bindEvents: function() {
document.addEventListener('deviceready', this.onDeviceReady, false);
},
/*
this runs when the device is ready for user interaction: */
onDeviceReady: function() {
app.display("Locating...");
app.watchLocation();
},
console is defined by your browser. Every modern browser features a JavaScript
console viewer in its interface.
document is defined by your browser and the HTML document that you’re
viewing.
Next, add a function to get the device’s location. This function has two callbacks, one for success and one for failure. If it succeeds, it displays the device’s coordinates using
a function called display(). If it fails, it displays a failure message:
/*
}
Finally, you need to connect these functions to the user interface. The functions that
follow, display() and clear(), write to an HTML div element in index.html. You’ll
see these same two functions in many apps in this book: /*
The full source listing for this application can be found on GitHub.
Save the files you edited, then cd to the project root, and run the app on your phone
with the following commands: $ cd Locator
$ cordova run
> cd /d %userprofile%\Locator
> cordova run
When you run the app on the phone, you’ll get a screen as shown in Figure 3-2.