LEGO MINDST
ORMS EV3
Mark Rollins
•
•
•
•
•
TECHNOLOGY IN ACTION
™Beginning
LEGO MINDSTORMS
EV3
DISCOVER ALL YOU CAN DO WITH THE
NEW EV3 PROGRAMMABLE BRICK,
MOTORS, AND SENSORS
For your convenience Apress has placed some of the front
matter material after the index. Please use the Bookmarks
and Contents at a Glance links to access them.
v
Contents at a Glance
About the Author ...
xiii
About the Technical Reviewer ...
xv
Acknowledgments ...
xvii
Introduction ...
xix
Chapter 1: What’s New with LEGO MINDSTORMS EV3
■
...
1
Chapter 2: Programming with the EV3 Language
■
...
29
Chapter 3: Creating a LEGO MINDSTORMS EV3 Vehicle
■
...
85
Chapter 4: Creating Visuals, Making Sounds, and Using Data on the EV3 Brick
■
...
109
Chapter 5: Data Logging and Advanced Programming Blocks
■
...
141
Chapter 6: Special Construction Projects and Macros
■
...
159
Chapter 7: The LEGO MINDSTORMS EV3 Robot Arm
■
...
199
Chapter 8: Thinking like a LEGO MINDSTORMS Creator and the Walking Robot
■
...
225
Index ...
249
xix
Introduction
Have you ever looked at some new toy and thought: “I wish this had been around when I was a kid?” LEGO MINDSTORMS are that to me, and much more. As someone who has been playing with LEGO since the first grade, I would have gladly made programmable LEGO blocks my new favorite toy if they had come out in the early 1980s.
In case you haven’t figured it out, I am one of those guys that never really stopped playing with LEGO. I realize that there are a lot like me out there, but hopefully you understand that I don’t greet someone I have never met before with this fact about myself right away. If you think that adults that play with LEGO are people who need to grow up, then you should take a look at what they can create.
That’s all I will say about that. I believe that the motivation to play with LEGO at any age comes from a desire to create. Considering most of us don’t have the budget or materials to build an automobile in our backyard, it is comforting to know that LEGO has given us the capacity to construct a mechanical marvel in our own living room, on a smaller scale.
Why a book on LEGO MINDSTORMS EV3
The LEGO MINDSTORMS collection, first introduced in 1998, is one of LEGO’s top best-selling sets/series. The reason for its success is the same as the reason for LEGO’s success before its release: the chance to kick your creativity up a notch.
If you are like most avid LEGO enthusiasts, you don’t just purchase a LEGO set, build what is on the instructions, and consider yourself done. If anything, you see the set as something to add to your collection. I’m not talking about a room with shelves full of completed LEGO sets/models; I am talking about several boxes of LEGO pieces, with a creator who is waiting for a brand new idea.
LEGO used to advertise in its catalog that just one set was capable of building all kinds of toys. Merging sets creates infinite possibilities of creations. LEGO began offering special types of bricks so that creators could make their creations automated, but even the later types of automated bricks (such as the Technic Power Functions) were still rather limited with what you could do.
The problem is that LEGO Power Functions are all stop or go. For example, you can make a LEGO car that could ride across the floor, but it could only go at one speed and then stop. You could even take control of it and make it steer, but this also has limitations. Depending on what method of steering you use, you sometimes have to deliberately jam the motors in order to make it work.
LEGO MINDSTORMS takes automation a step further by making these programmable parts. With MINDSTORMS, you can make a model car go at different speeds, stop where you want it to, and turn where you want, all with a simple program. In short, the MINDSTORMS series turned what was once a mere electronic toy for amusement and turned them into programmable machines.
In this book, you will learn how to make many machines. As someone who has written two books about LEGO Technic, Practical LEGO Technics and LEGO Technic Robotics, I can teach you how to build vehicles like cars as well as other robotic machines. I will also teach you how to program these creations.
■ INTRODUCTION
xx
The History of LEGO MINDSTORMS
In order to understand LEGO MINDSTORMS, one should know the history of these technical LEGO creations. By 1984, LEGO was already a household name, thanks to its unique blocks whose success can be seen by their number of imitators. In October of 1984, then president and CEO of LEGO, Kjeld Kirk Kristiansen, saw a television broadcast of children using Seymour Papert’s LOGO programming language to make robot turtles. Fascinated with the idea of programmable LEGO toys, Kristiansen sent a team to the MIT Media Lab in Boston.
Two years later, in 1986, both LEGO Education and MIT produces LEGO TC LOGO, which allows users to control models built from LEGO pieces. They create a special version of the LOGO computer language to program the software. As for the hardware, it uses an interface box to send signals to LEGO motors and receive information from sensors. In that same year, the product development department, LEGO Futura Boston Branch, works with the MIT Media Lab to create the first working prototype of a programmable brick.
The first MINDSTORMS kit did not arrive to the market until 1998. You might be wondering why it took so long (12 years) from the concept of a programmable brick to an actual product. This was because fewer homes had PCs back in 1986, and the price of the electrical components was high. With the advent of the Internet and computers being a requirement for most homes, the time was finally at hand for the first MINDSTORMS kit to hit the market.
The 1998 Kit introduced LEGO users to the RCX, a LEGO microcomputer that was the heart of the first MINDSTORMS system.
The RCX code ran on Microsoft Windows (and eventually on Mac) and had ROBOLAB, LEGO MINDSTORMS for schools, based on software from National Instruments LabVIEW, developed by Professor Chris Rogers of Tufts University.
One year later, in 1999, the LEGO Group partners with FIRST (For Inspiration and Recognition of Science and Technology) in order to create on the LEGO League. The LEGO League still goes strong until this day, and maintains its goals of inspiring young people’s interests in science and technology through engaging, hands-on, and minds-on experiences. Every year there are tournaments with different challenges, and LEGO MINDSTORMS are used to overcome those challenges.
The success of the first generation of LEGO MINDSTORMS eventually leads to version 2, released in 2006. This LEGO MINDSTORMS: NXT has new and improved software, wireless Bluetooth technology, expanded sensor capabilities, and more challenges to encourage its users, especially the young ones, to create original ideas.
The software with NXT is also powered by National Instruments LabVIEW, but this program is very visual, with icons representing different commands that a robot can perform.
The NXT 2.0 sets are also a hit, and Carnegie Mellon creates 18-week curriculums for it, with an emphasis on programming basics as well as STEM (Science, Technology, Engineering, and Math).
In 2013, LEGO MINDSTORMS unveils the EV3, or third generation (the EV3 stands for “evolution”). With the new version comes a more intelligent brick, new motors and sensors, and an improved icon-based programming.
Books from Apress about LEGO MINDSTORMS
Since LEGO MINDSTORMS was such a hit, there is no shortage of books from this publishing house. I wanted to take some time to point them out, as I believe they will come in handy to the LEGO MINDSTORMS creator who is in need of a few new innovations, or simply to compare the older versions of the programming language with the new.
Extreme MINDSTORMS An Advanced Guide to LEGO MINDSTORMS
• By Michael Gasperi,
Ralph Hempel, Luis Villa, Dave Baum (Apress 2000). This is a book on how to build projects for MINDSTORMS version 1. I have no idea how well it will work with EV3 models.
Dave Baum’s Definitive Guide To LEGO MINDSTORMS 2nd Edition
• By Dave Baum
(Apress 2002). This is another book that deals with the first version of MINDSTORMS, but it might give you ideas for future MINDSTORMS EV3 projects.
■ INTRODUCTION
xxi
Competitive MINDSTORMS A Complete Guide to Robotic Sumo using LEGO MINDSTORMS
• By
David J. Perdue (Apress 2004). This book was written back when BattleBots was popular, and it shows how to build robots with LEGO MINDSTORMS version 1.
Advanced NXT The Da Vinci Inventions Book
• By Matthias Paul Scholz (Apress 2007). Even though this book is made for NXT era, it is quite creative as it shows how to make some of Leonardo Da Vinci’s greatest inventions with MINDSTORMS pieces.
Creating Cool MINDSTORMS NXT Robots
• By Daniele Benedettelli (Apress 2008). The world’s most respected NXT robot builders shows how to build and program robots from scratch.
LEGO MINDSTORMS NXT The Mayan Adventure
• By James Floyd Kelly (Apress 2009). This is
another book with some serious robotics NXT 2.0 challenges as well as an engaging adventure. You’ll learn how to program robotics to solve adventures, and it might be able to use EV3 products.
Extreme NXT: Extending the LEGO MINDSTORMS NXT to the Next Level, Second Edition
• By
Michael Gasperi and Philippe Hurbain (Apress 2009). This book really breaks MINDSTORMS out of the box with about 45 projects with easy-to-follow, step-by-step directions. These might be able to be ported to EV3.
LEGO MINDSTORMS NXT 2.0 The King’s Treasure
• By James Floyd Kelly (Apress 2009). This is
another book with some serious robotics NXT 2.0 challenges as well as an engaging adventure. You’ll learn how to program robotics to solve adventures, and it might be able to be used on EV3 products.
Winning Design: LEGO MINDSTORMS NXT Design Patterns for Fun and Competition
• by
James Jeffrey Trobaugh (Apress 2010) This book is written by an experienced coach and leader for the FIRST LEGO League, and he uses his experience in design techniques to show how to create some excellent models with LEGO MINDSTORMS. He also shows how to make the model run and how to navigate it using NXT sensors. There are a lot of things in this book that can easily apply to EV3.
Winning LEGO MINDSTORMS Programming
• by James J. Trobaugh and Mannie Lowe
(Apress 2010)This book focuses on NXT-G, the programming language of MINDSTORMS 2.0. Even though EV3 uses an entirely different programming language, you should not ignore the basic concepts laid down in this book as it deals with programming tips and tricks, code management, and other relevant programming information.
LEGO MINDSTORMS NXT-G Programming Guide 2nd Edition
• By James Floyd Kelly (Apress
2010) This is another guide to LEGO MINDSTORMS NXT 2.0, intended to cover all of the features and parts.
LEGO MINDSTORMS NXT: Mars Base Command
• By James Floyd Kelly (Apress 2011) There
is a lot of creativity in James Floyd Kelly’s book, including eight challenges for MINDSTORMS teams to complete. It reads like a science-fiction novel at the beginning, and they might work for EV3 projects.
■ INTRODUCTION
xxii
How to Use this Book
This book is constructed in such a way so that it is pretty step-by-step structure. You will note that I begin with a basic assumption that you may not know anything about EV3, or LEGO MINDSTORMS at all. The models in this book range from basic to advanced, so you might not want to skim over sections too much.
1. What’s New with MINDSTORMS EV3. Before we start building, I will discuss the new bricks added to the EV3 collection, as well as the basic Technic pieces you will need to create advanced models.
2. Programming with the EV3 Language. Programming the EV3 Brick, the microcomputer for the LEGO MINDSTORMS EV3, is as important as building a LEGO MINDSTORMS creation. This chapter lays the foundation for programming in EV3, and will continue in later chapters.
3. Creating a LEGO MINDSTORMS Vehicle. This chapter is about creating a vehicle that you can move and can steer, and will follow exactly what you want it to. It will detail how to program the motors and sensors to operate as your programming commands.
4. Creating Sight, Sound, and other Data on the EV3 Brick. In addition to being able to take controlling motors and sensors, the EV3 Brick allows for creating graphics on the display, making sounds, and even controlling the status light.
5. Data Logging and Advanced Programming Bricks. In addition to being able to program the EV3 Brick, you can also analyze data captured by the motors and sensors, and graph the results. This chapter shows how to set up the EV3 Brick for this.
6. Special Construction Projects and Macros. This chapter will show you how to create vehicles like forklifts, cranes, scissorlifts, and other types of vehicles found on a construction site.
7. The LEGO MINDSTORMS EV3 Robot Arm. This chapter describes how to create a robotic arm that will flex, grip, and work like a real arm.
8. Thinking like a LEGO MINDSTORMS Creator and the Walking Robot. This is the answer to a problem that baffled me for years: how to make a creation walk. I also give some advice on how to build further LEGO MINDSTORMS projects.
1
CHAPTER 1
What’s New with LEGO
MINDSTORMS EV3
It is always difficult to determine what audience this book will find its hands in, and I am going to assume that most readers have at least heard of LEGO MINDSTORMS. LEGO offers many instructions with their LEGO MINDSTORMS kits, but this book is really about how to get the most out of LEGO MINDSTORMS. In short, my desire is that you use the concepts and precepts in this book to make just about anything with LEGO MINDSTORMS EV3 parts.
Since EV3 is the new version, I’m going to structure this book as if EV3 was the first, and not even address aspects of versions 1 and 2, such as programming, parts, and so forth unless it becomes absolutely necessary. Yes, we are wiping the slate clean, which means that those new to LEGO MINDSTORMS and those who built with previous versions are now on an equal playing field. Of course, this means that you will need to get started in some manner.
Getting Started with LEGO MINDSTORMS EV3
I’m going to assume that you probably have purchased some kind of LEGO MINDSTORMS EV3 set. If you go to the LEGO main website and click on “Products”, you will find Set 31313, a set that was made for the holiday season of 2013. This set is good for an introductory user, and contains many of the sensors and motors that will be discussed in this section.
Much of what I discuss in this book can be constructed from the EV3 Core Set (45544), the EV3 Expansion Set (45560), and the EV3 Software. The Core Set comes with several Lego pieces as well as the EV3 Brick and all the sensors and motors that I will list below. The Expansion Set comes with a lot more Lego pieces, but assumes that you already have the intelligent EV3 pieces. The EV3 Software package is excellent for programming Lego EV3 projects, and we will go into more detail on it in Chapter 2.
The New Sensors and Motors of EV3
The previously mentioned sets contain numerous Technic LEGO pieces. I will discuss the non-motorized ones later. For now, I want to address the sensors and motors that you will discover while working with EV3. The number that you see after the heading in parenthesis is the Element Number, which is a system that LEGO uses to catalog their pieces.
CHAPTER 1 ■ WHAT’S NEW WITH LEGO MINDSTORMS EV3
2
The EV3 Brick (6009996)
This particular brick is the computerized and interactive brick. There is an iteration of it in every LEGO
MINDSTORMS version, and this is what the LEGO team spent years of research to attain: the programmable brick. Think of this brick as the “brain” of your creation. You will tell this brick what to do through the programming language of EV3, and it will carry out its specific functions, provided you programmed it correctly. Note the clause at the end of that last sentence, as you will discover that many of your LEGO MINDSTORMS creations will not work because you didn’t get the programming right.
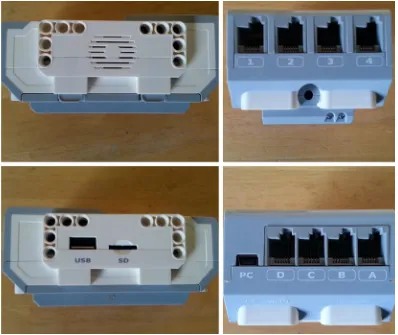
I will cover how to program this EV3 Brick in Chapter 2. For now, I want you to get to know it. Figure 1-1 shows various views of the EV3 Brick, and there are several things worth noting.
You can see on the front is the screen. If it were turned on, you will see a basic menu screen with four tabs. I will discuss what these tabs do in the next chapter on programming. Sadly, this screen is not a touchscreen (maybe next version), but control is possible with the buttons below it.
As you will soon discover, the buttons in the north, west, south, and east positions are the controls for up, left, down, and right, respectively. The key in the center works as an “enter” key, and the key directly under the left side of the screen is the “back” button. If you have the EV3 Brick, then you have noticed that the buttons are not numbered as shown in Figure 1-1. These numbers will become more important in later chapters, such as Chapters 2 and 3.
I’ll go ahead and say something quickly about the rechargeable battery pack (6012820), shown on the right side of Figure 1-1. It comes with the Core Set and takes the place of 6 AA batteries, which have been known to lose their juice in a hurry. The battery pack is very easy to install and can charge via AC outlet with the included cord.
You will notice on the “north” and “south” sides of this brick are four ports on each side. These will become very useful in creations as you will use cables of various lengths to connect to other special bricks that we will discuss later (see Figure 1-2).
Figure 1-1. Front and back views of the EV3 Brick. The back is the 10V battery
CHAPTER 1 ■ WHAT’S NEW WITH LEGO MINDSTORMS EV3
3
These ports have specific purposes which I will describe in the next chapter. For now, I’ll summarize it by saying that input ports 1-4, located on the north side, are used to connect the sensors, while the output ports labeled A-D, located on the south side, are made for the motors. You will notice that every motor and sensor has a port on it, and you are meant to use connector cables to attach it to these inputs.
You will also notice that there is a (micro) USB port labeled “PC”. In the Core Set, you will get a USB cable that you can connect to this. The USB Cable then attaches to your computer, which allows you to program the EV3 Brick from your PC or Mac. Unfortunately, the set-up kit does not include the software, which must be purchased separately. I will discuss this more in Chapter 2.
As for the east and west sides, you will see a speaker on one, and a USB Host Port labeled “USB” and SD Card Port labeled “SD” on the other. The USB port can be used as a USB Wi-Fi dongle for connecting to a wireless network, or daisy chaining three other EV3 bricks to it. The SD card port increases the available memory for the EV3 Brick with an SD card with a maximum of 32 GB. This comes in handy for when you want to program something on an SD card and then put it on your EV3 Brick.
Figure 1-2. The other sides of the EV3 Brick
CHAPTER 1 ■ WHAT’S NEW WITH LEGO MINDSTORMS EV3
4
Large Motor (6009430)
I wrote a lot about motors in my LEGO Technic books, and the LEGO MINDSTORMS Large Motors operate on the same basic principle. That is, you insert an Axle or cross-shaped part into one end, and power the motor up to make it spin. However, the user can stick the axle all the way through the circular area on the Large Motor (see Figure 1-3), and it will spin when prompted by the EV3 brick; this is different to the Technics motor which has one axle hole or cross-shaped hole at one end like the Medium Motor (see separate description).
Another difference between the Large Motor and a LEGO Technic motor is that EV3 software allows you much more precision. LEGO Technic motors can only go and stop, but the Large Motor has a built-in rotation sensor with one-degree resolution for precise control. This means that you can tell the Large Motor how fast to spin, and for how long.
Another added bonus is that two Large Motors can be programmed to be completely in sync with each other. This is really good for vehicles. I will discuss how to put them in sync in Chapter 2.
Medium Motor (6008577)
This particular motor is also made for spinning, but in a different way. It works more like a LEGO Technic motor, in that the axle part is stuck in the middle instead of through the side like the Large Motor (See Figure 1-4 for a view of the Medium Motor).
Figure 1-3. Two views of the Large Motor
CHAPTER 1 ■ WHAT’S NEW WITH LEGO MINDSTORMS EV3
5
The Medium Motor contains the built-in rotation sensor with the one-degree resolution, but it is much lighter and can respond faster than the Large Motor.
Ultrasonic Sensor (6008924)
This particular part looks like a pair of eyes, and it works like a bat “sees”. A bat sends out high-frequency sound waves that reflect or echo off objects, and they process that information to discover how far an object is away (see Figure 1-5).
In the same manner, this LEGO MINDSTORMS piece allows for seeing that there is an obstruction directly ahead of it. This comes in handy when you create a LEGO MINDSTORMS creation that must stop at a wall or other obstacles. You will notice that there is a steady light around the Ultrasonic Sensor’s eyes, which means that it is in measure mode. If the light is blinking, this is when it is in Presence Mode. Presence mode allows the Ultrasonic Sensor to detect another Ultrasonic Sensor operating nearby. This means it is detecting other sound signals, but it is not sending them.
Figure 1-4. Front and back views of the LEGO MINDSTORMS EV3 Medium Motor
Figure 1-5. Two views of the Ultrasonic Sensor
CHAPTER 1 ■ WHAT’S NEW WITH LEGO MINDSTORMS EV3
6
Gyro Sensor (6008916)
This part can often be confused with the other sensors at first glance, except for the telltale arrows on the top of it. These arrows mark its rotational motion on a single axis, and it can, when properly powered, know when it is moving, how fast it is moving, and what angle it is facing (see Figure 1-6).
This sensor can measure a maximum rate of spin of 440 degrees per second, and can even keep track of the total rotation angle in degrees. This means that it can keep track of steering, and it also knows what rate it is travelling at as well. We will definitely come back to this helpful brick in Chapter 3.
Color Sensor (6008919)
The Color Sensor (see Figure 1-7) is an interesting brick that can not only recognize seven colors, but it can also detect the amount of reflected light as well as the intensity of ambient light. What does that mean? I’ll have programming examples in later chapters, but let me briefly go over each of its separate features individually.
Figure 1-7. Front and back views of the Color Sensor
Figure 1-6. Front and back view of the Gyro Sensor
CHAPTER 1 ■ WHAT’S NEW WITH LEGO MINDSTORMS EV3
7
Color mode gives the Color Sensor the ability to scan seven colors that include the three primary (red, blue, and yellow), one secondary of green, plus black, white, and brown. It can also detect no color, which means it can be programmed to act (or not act) when none of the seven colors are scanned. With the proper use of the Color Sensor, your LEGO MINDSTORMS creation can actually “see” what color an object is. You can even program the robot to perform a certain action when it scans a certain color. We will discuss this much more in separate chapters.
The Color Sensor can also measure reflected light on a scale of 0–100, with 0 representing very dark and 100 representing very light. How will this help you? The Color Sensor can be taught to stop at a black line on a white floor. There is an example of this in the instructions of The Core Set.
As for the ambient light detector, it can be programmed to know the difference between the brightest day and the darkest night. This is useful in situations where a LEGO MINDSTORMS creation must do something different in the dark than when in the light.
Touch Sensor (6008472)
This part has a red button on it that knows when it is pressed and released. It can be programmed to do something when pressed, which comes in handy for stopping or starting actions (see Figure 1-8).
This button can also be set up for doing actions when the button is released as well as pressed. Another set-up can include something on when the action is “bumped”. That is, quickly pressed and released. I will discuss the particulars in later chapters like Chapter 3.
Infrared Sensor (6009811) and Infrared Beacon (6014051)
The sensor and beacon are designed to work together, and they can do many things. The Infrared Beacon (IR Beacon) sends out a signal of infrared light, the same kind of signals that most TV remote controls use. Pressing the button marked “9” in Figure 1-9 allows this signal to be sent out, and there is an indicator light showing that the signal is being broadcast. The other buttons are labeled 1–4, and I will explain the numbering in the next chapter. The IR Beacon has four channels, which allow its Infrared Sensor to detect four kinds of signal.
Figure 1-8. The front and back view of a Touch Sensor
CHAPTER 1 ■ WHAT’S NEW WITH LEGO MINDSTORMS EV3
8
The Infrared Sensor detects the beacon, and it can sense its proximity of its beacon. It also allows the IR Beacon to be used as a wireless remote, which comes in handy for taking control of projects. The Infrared Sensor can also sense when some object is in front of it, but is less sensitive than the Ultrasonic Sensor.
Connector Cables
In order to get the sensors or motors to work, they need to be properly powered. You need to use the connector cables for that, and they connect like landline telephone cords; you can see some in Figure 1-10.
Figure 1-10. The three sizes of connector cables
Figure 1-9. The EV3 Infrared Sensor (left) and Infrared Beacon (right). (Photo credit: The LEGO Group)
CHAPTER 1 ■ WHAT’S NEW WITH LEGO MINDSTORMS EV3
9
As you can see, the connector cables come in three sizes. The small (6024581) measures in at 10 inches/25 centimeters, the medium (6024583) measures at 14 inches/35 centimeters, and the large (6024585) measures at 20 inches/50 centimeters.
A Basic Introduction to LEGO Technic Pieces
You will notice that LEGO MINDSTORMS sets come with LEGO pieces. If you are not familiar with sets like LEGO in general you might find that these pieces look different than the traditional set with bricks and plates (the flat LEGO pieces). The pieces in a MINDSTORMS set are more associated with a series of LEGO sets known as LEGO Technic. If you aren’t familiar with LEGO Technic, it is a specific type of LEGO set which is made for older children in the tween age range. I have written two books for Apress on the subject with Practical LEGO Technics and LEGO Technic Robotics. These are books that talk about what you can do with LEGO Technic pieces, as well as the Power Functions motors. Believe me, you can do a lot with LEGO Technic, but LEGO MINDSTORMS really kicks it up a notch, maybe even a few notches.
I would have to say that pieces provided with the LEGO MINDSTORMS kits are a good example of what is available in the Technic series, but you might find that you want more of them to make bigger or more elaborate models. I wish I could say that there is an “ultimate set” of Technic. The current selection on their catalog is for individual models, and you may have many of one piece but not so many of another piece. As someone who isn’t interested in spending too much of their budget on LEGO pieces, you sort of learn to adapt to the pieces that you have.
Most LEGO enthusiasts simply build from whatever pieces they have based on the particular sets they have bought in the past. I highly suggest that you find a way to keep your pieces organized, as you will lose a lot of time rummaging through a pile looking for that piece that you need so you can move on to the next step.
As much as I like to hear the sound of LEGO bricks being scraped together, to keep your pieces in order, I recommend buying some kind of tackle box, as the little drawers and storage containers are good at keeping pieces separate from each other. Another way to organize is to purchase some kind of tool box in your hardware store that has drawers or other compartments for storing individual pieces. Of course, you may not want this type of organization, and that is fine. The important thing is that you are having fun with this.
Much of this next section may seem elementary to most LEGO builders. I already covered this in my first book on LEGO Technic, but I felt it necessary to really distinguish one LEGO Technic piece from another, as I will constantly refer to them in this book. Please keep in mind that the numbers within the illustration are for the figure only, made for labeling purposes in this book and are not an official LEGO number.
I put the official Element number in parentheses so you can find it on Pick a Brick or Brickfactory, online sites that help you purchase specific LEGO pieces. I will go more into detail on those types of sites later in this chapter. In my past LEGO Technic books, I have used the Design number, but the Element number is longer and actually designates the color of the piece.
This next section is not meant to be an exhaustive list of what LEGO Technic parts are available to LEGO builders. LEGO creates new parts every year, and there are some parts that I didn’t list here, as they were not used on models in this book. What you will see here are the parts that come with the Core Set and the Expansion Set.
Beams
When LEGO introduced the “Expert Sets” back in the late 1970s (they changed the name to Technic in the mid-1980s), they introduced a new kind of brick. In addition to having the traditional studs (the round shaped things on the top), these bricks had holes or through-holes on the sides for connector pegs and axles (see individual descriptions below). Sometime around 2000, LEGO Technic began to emphasize beams rather than traditional studded pieces. Most LEGO Technic sets shun these old-style Technic brick pieces now, and generally are completely studless.
In other words, recent LEGO Technic sets have been less about traditional LEGO pieces like bricks and are now about studless beams. As you can see in Figure 1-10, organizing them is simple by length. The number of through-holes on the beam is equal to the length. All beams tend to have an odd number of holes except for the ones that are 2M length.
CHAPTER 1 ■ WHAT’S NEW WITH LEGO MINDSTORMS EV3
10
You will note the beams on the left side of Figure 1-11 have bends in them. Some of them are at a right angle (90 degrees), while others are at a 53.13 degree angle, with the exception of the double angular beam.
Referring to Figure 1-11, the numbered beams are as follows:
1. Technic Angular Beam 4 x 2 (Red 4141270, Gray 4211610). This is the merging of two Technic beams to form a 4 x 2 beam at a perfect right angle. This works well when creating square or rectangular creations. You will notice that one of the holes is cross-shaped, perfect for an axle.
2. Technic Angular Beam 5 x 3 (Gray 4211651, White 4585040). Like the 4 x 2 angular beam, this is another 90-degree angular beam that is slightly larger at 5 x 3. Unlike the 4 x 2 angular beam, there is no cross-shaped hole on one end.
3. Technic Angular Beam 4 x 4 (4509912). This angular beam is at an angle of 53.1 degrees. Note the cross holes at each end.
4. Technic Angular Beam 4 x 6 (4112282). This angular beam is like the 4 x 4 as it is at the same angle at 53.1 degrees, but it measures at 4 x 6.
5. Technic Angular Beam 3 x 7 (4211624). This angular beam has the same angle at 53.1 degrees, but measures at 3 x 7.
6. Technic Double Angular Beam 3 x 7 (White 4495412, Gray 4234240). This particular beam has two 45-degree angles, so it is essentially a 90-degree angle with a good curve to it.
Figure 1-11. A sectioned area from the LEGO MINDSTORMS Expansion set, filled with LEGO beams
CHAPTER 1 ■ WHAT’S NEW WITH LEGO MINDSTORMS EV3
11
7. Technic 5M Beam (4211651).
8. Technic 2M Beam (4211655). As I have stated before, most beams are odd-numbered in their measurement. This 2M one is the only exception, save for the cross and hole beam in the next compartment.
9. Technic Beam 1 x 2 Beam with Cross and Hole (Black 6006140). Also known as a cross and hole beam, this has the unique ability to have a hole for a connector peg or axle, and a cross-shaped one made specifically for an axle.
10. Technic 7M Beam (4495930).
11. Technic 3M Beam (Red 4153718, Black 4142822, Blue 4509376, Yellow 4153707, Green 6007973, Gray 4211655). This is the lowest in number of the odd-numbered beams.
12. Technic T-Beam 3 x 3 (4552347). This is essentially two 3M beams fused together into a T shape, and you will find that angled beam pieces help on a lot of creations.
13. Technic 9M Beam (4211866).
14. Technic 11M Beam (4611705).
15. Technic 13M Beam (4522934).
16. Technic 15M Beam (4542578). This is the longest length of beam in the LEGO Technic and/or LEGO MINDSTORMS sets.
Axles
Like the beams, the axles can be easily organized by length (see Figure 1-12). Axles are like screws in the LEGO Technic world. You can use them to link just about anything, and their cross shape ensures that they fit on cross holes securely.
Figure 1-12. A collection of LEGO axles
CHAPTER 1 ■ WHAT’S NEW WITH LEGO MINDSTORMS EV3
12
Referring to Figure 1-11, the numbered axles are as follows:
17. Technic Catch with Cross Hole (4107081). This is essentially two cross holes, put at 90 degrees to each other.
18. Universal Joint (4525904). This allows an axle to go at any angle provided it is below 90 degrees. This is especially helpful when creating vehicles with spinning axles that need to bend.
19. Technic Tube 2M (4526985). This is a way to put a hard plastic tube over 2M of an axle for increased stability, and you can also join a connector peg to each of its sides.
20. Technic Axle 3M with Knob (6031821). Unlike ordinary 3M axles, these have a bump on the end that can serve as a perfectly good LEGO stud.
21. Axle with Positioning Stop (4666999). This particular axle has a “stop” in the middle that is not cross-shaped in any way. This allows for some interesting creations.
22. Technic Cross Axle Extension (4513174). This is a type of cross axle extension, which allows you to join two axles together.
23. Technic Axle 5M (4211639). Like the 3M axles, there are a few black 5M axles, but these are usually gray.
24. Technic Axle 4M (370526). This is the beginning of the axles that are usually black.
25. Technic Axle 3M (4211815). Generally, most axles with an odd-numbered measurement are gray, and this one is the lowest odd number.
26. Technic Cross Axle Extension, Ribbed (4207456). This is another way to join two axles together, and these are ribbed on the side, making them easy to pull off.
27. Technic Axle 7M (4211805).
28. Technic Axle 6M (370626).
29. Technic Axle 2M (4142865). Usually 2M axles are red, and they are also notched. I’m not certain why that is, but perhaps it is to make it easier for the LEGO builder to pry out.
30. Technic Axle 4M with Stop (4560177). Like the 3M axle with knob, the 4M with Stop has something that will make certain the axle can only go so far. While the stop is not a LEGO stud, I found these useful in a lot of projects.
31. Technic Axle 5.5M with 1M Stop (4508553). This piece is really 5.5 M in length, and the stop is not placed at the end, but 1M from the end on one point. This is good for situations with wheel axles and other projects.
32. Technic Axle 8M (370726).
33. Technic Axle 9M (4535768).
34. Technic Axle 8M with Stop (4499858). This is just like the 4M axle with stop, but twice as long.
35. Technic Axle 10M (373726).
36. Technic Axle 12M (370826).
37. Corrugated Pipe 152mm (4631648). This is another part that can be placed over an axle, but this is longer than a regular axle.
38. Flex Hose 19M (6044636). This is a very long flexible part that can be bent in all kinds of directions, and its small ends can fit into a cross hole.
CHAPTER 1 ■ WHAT’S NEW WITH LEGO MINDSTORMS EV3
13
Connector Pegs and Bushes
The connector pegs (sometimes called pins) are the rivets of the LEGO Technic world. You can use them to link beams and levers together, and they come in many forms. As for the bushes, this is a very common part in LEGO Technic, and they slide very easily on an axle and are made for holding them in place. Like the other aforementioned parts, you will accrue a lot of these.
Some of the connector pegs have “friction” which means that they do not spin as easily as the ones that do not. You will discover that there are some times when you want a piece to spin freely and easily, so you will want the pieces that do not have friction. Then there are times where you want a construction to lock securely in place, so using a piece with friction is your best course of action. Figure 1-13 shows how these pieces can be organized.
Referring to Figure 1-13, the numbered pieces are as follows:
39. Technic Friction Snap with Cross Hole (4140806). The connector peg that you see here has some friction on it so you can lock two things together securely, and they will not spin very freely. The cross hole section on the end forms an interesting peg-like appendage.
40. Technic Connector Peg 3M with Friction (4514553). This connector peg can hold two 1M pieces on one side, so it can join 3 beams together so they cannot freely spin. You will notice the ring that divides it with 2M of peg on one side and 1M on the other.
41. Technic Connector Peg with Friction and Cross-Axle (4206482). This is the connector peg/cross axle with some friction, so it spins somewhat freely.
Figure 1-13. A collection of LEGO connector pegs and bushes
CHAPTER 1 ■ WHAT’S NEW WITH LEGO MINDSTORMS EV3
14
42. Technic Beam 3M with Four Snaps (4225033). Sometimes this can be called a wide H due to its shape. It is probably the best way to describe this piece, but it has four connector pegs, with round holes on another, and a hole in between the connector pegs.
43. Technic Connector Peg with Cross-Axle (4666579). One side is a connector peg, the other side a 1M axle. This piece can link up a part with a round hole and a part with a cross hole very securely, and still allow for some spinning.
44. Technic Connector Peg 3M (4514554). This connector peg can hold two 1M pieces on one side, so it can join 3 beams together so they can freely spin.
45. Angular Beam 90 Degrees with 4 Snaps (4296059). Also known as a wide L, this particular connector allows for snapping in place with a beam or other piece at a 90-degree angle from it.
46. Technic Module Bush (4119589). Also known as a narrow H, this is similar to the 3M beam with four snaps. It has two connector pegs on each side, and you can insert an axle in the middle.
47. Double Bush 3M (4560175). This is essentially a 3M connector peg with a round hole in the middle.
48. Technic 1 1/2 Connecting Bush (6013938). This piece is 3/4 the size of a connector peg, with a bump half the size on one side.
49. Ball with Cross Axle (4211375). This is a ball with 1M of an axle on one end for attaching to cross-holes. This ball fits into a lot of handy pieces.
50. Ball with Friction Snap (4184169). Sometimes referred to as a trailer hitch, this is similar to the ball with cross axle, this piece has a connector peg on one side with a ball on the other.
51. Technic Steering Knuckle Arm 2 x 1 x 3 (4563044). Also known as a lift arm, this is like a lever with half a connector peg on one side and a cross hole notch on the other. I believe it is called a steering knuckle arm because it comes in handy for steering.
52. Technic Connector Peg (4211807). This piece is designed to snap into a round hole, and the other will snap into another hole. It allows for a lot of free spinning on each side.
53. Technic Half Bush (4239601). The half bush is only 1/2 M in length, and does the same function as the Technic bush.
54. Technic Bush (4211622). This piece is about 1 M in length, and fits snug on an axle. It is made to hold an axle in place, and many other uses described within this book.
55. Technic Connector Peg with Friction (4121715). Like the other type of connector peg, this has some friction. I would have to say that I use this part, along with the bushes, the most with LEGO Technic and MINDSTORMS creations, as it is the easiest way to link two parts with round holes together.
Cross Blocks and Angle Elements
As you are building, you are going to find it necessary to link beams together in a perpendicular manner. In other words, you are going to have a part with holes facing one direction, but you want to make it so holes also face 90 degrees in the other direction. You can shift angles in many creative ways using the nine types of cross blocks that you can see here in Figure 1-13. As for the angle elements, you can see six examples of them in Figure 1-14, and these pieces are designed to link axles together so they fit at certain angles.
CHAPTER 1 ■ WHAT’S NEW WITH LEGO MINDSTORMS EV3
15
Referring to Figure 1-14, the numbered pieces are as follows:
56. Technic Cross Block 90 Degrees (4211775). This is a part with a round hole in one direction and a cross hole facing 90 degrees the other way.
57. Technic Cross Block 3 x 2 (4538007). This is like having a 3M beam, and then gluing a bush on the top, and turning it 90 degrees.
58. Angular Block with axles, 90 Degrees (6008527). This part is two 1M axles that intersect at a round hole.
59. Technic Double Cross Block (4121667). I found this piece to be very useful to join together some pieces. It has two cross holes on each side, with a round hole on the other side.
60. Technic 180 Degree Angle Element #2 (4107783). Used for joining two axles together in a straight line, with a hole in the middle that can also be used for other uses.
61. Technic 90 Degree Angle Element #6 (4107767). Used for joining two axles together at a 90 degree angle, with a through-hole in the middle.
62. Technic Cross Block 3M (4210857). This is a 3M beam with two round holes and a cross hole on 90 degrees on the other side.
63. Technic 112.5 Degree Angle Element #5 (4107084).
64. Technic 157.5 Degree Angle Element #3 (4107082). This angle element and the three others here are made to join two axles together, with the hole in the middle for more uses.
65. Three-Spoke Angular Block, 3x120 Female (6005755). This is a lot like the other three-spoke angular block, but with “female” axle ends.
Figure 1-14. A collection of LEGO Cross Blocks and Angle Elements
CHAPTER 1 ■ WHAT’S NEW WITH LEGO MINDSTORMS EV3
16
66. Beam 1M W. 2 Cross Axles 90°(6005331). Take two 1M axles, join them together on a ring that is a through-hole, and you have this part.
67. Three-Spoke Angular Block, 3x120 (4502595). This is a part with three axles pointing 120 degrees from the center, which also has an axle hole.
68. Technic Zero Degree Angle Element #1 (4107085). Used for capping off an axle with a round hole at 90 degrees.
69. Technic Cross Block 2 x 3 (4652234). This piece is interesting with two round holes in one direction and three round holes below it at 90 degrees and centered.
70. Technic Cross Block/Fork 2 x 2 (4162857). This part is two round holes and then a cross hole on each side, at 90 degrees below it.
71. Technic Cross Block 2 x 2 (4211714). This piece is a lot like the cross block 2 x 3, but it has two holes at a 90-degree angle instead of three.
72. Technic Cross Block 1 x 2 (4162857). This is a lot like the cross block 3 x 2, but it is a bush mounted 90 degrees on a 2M beam instead of a 3M beam.
Gears
These pieces are designed to spin, and the teeth are designed to mesh together so one spins and the other spins in turn. They come in various sizes, and they can often turn in perpendicular fashion with one gear placed at a 90-degree angle to the other. Figure 1-15 shows them in storage.
Figure 1-15. A way of organizing gears for building your LEGO MINDSTORMS projects
CHAPTER 1 ■ WHAT’S NEW WITH LEGO MINDSTORMS EV3
17
Referring to Figure 1-15, the numbered gears are as follows:
73. Technic Gear Wheel (16 Teeth) Special (4237267). Instead of having a cross hole in the center, this has a round hole. It is helpful for situations where you need another gear, such as shifting gears on a LEGO Technic vehicle.
74. Technic Cone Wheel (4558690). I think this gear gets its name from being slightly conical in shape as the area about its round hole (not a cross hole) extends a bit.
75. Technic Gear Wheel 16 Teeth (4640536). This gear is slightly similar to the other 16-tooth gear that I just mentioned, with a single cross hole in the middle.
76. Technic Gear Wheel 8 Teeth (6012451). This is one of the smallest gear pieces, and has a cross hole in the middle.
77. Technic Conical Wheel Z12 (4565452). This gear is flat with 12 teeth, and it can spin in a perpendicular fashion with another Wheel.
78. Technic Double Conical Wheel 12 Teeth (4177431). Like the conical wheels, these can spin in a perpendicular fashion, but they are also thicker.
79. Technic Gear Wheel 24 Teeth (4514558). This is similar to the other gears, but it has three cross holes and four round holes.
80. Technic Double Conical Wheel 20 Teeth (6031962). This is like the previously mentioned double conical wheel, but slightly bigger.
81. Technic Bevel Gear Z20 (4177430). Similar to the conical wheel Z12, this gear is slightly larger at 20 teeth and can also spin in a perpendicular fashion.
82. Technic Differential 3M (4525184). This is similar to the other differential gear casing, with an extra gear on it.
83. Technic Rack 13M (4540906). Like the 7M rack, it has the round holes for connector pegs and the axle holes on the side.
84. Technic Worm Gear (4211510). This gear is designed to mesh with another round gear above it. By turning this worm gear, the gear connected to it will turn.
85. Technic Angular Wheel (4248204). I found that these angular wheels mesh together and spin well in a perpendicular fashion.
86. Double Conical Wheel Z36. (4255563). This is a double beveled gear that is quite thick.
87. Technic Gear Wheel 40 Teeth (4285634). This is quite a huge LEGO piece, and it has twelve round holes and five cross holes.
88. Turntable Z28 (Gray 4652235 and Black 4542236). These are two pieces that fit perfectly together and are designed to mount something. Another gear beside it can turn it perfectly.
89. Large Turntable 4.85 (4624645). This is like the Z28 turntable, but larger.
Levers
Levers are essentially half the width of a beam, and stacking two of them equals one beam. Like the beams, they often have axle holes on the ends of them. Figure 1-16 shows levers in storage.
CHAPTER 1 ■ WHAT’S NEW WITH LEGO MINDSTORMS EV3
18
Referring to Figure 1-16, the numbered levers are as follows:
90. Technic Comb Wheel (4210759). This is not really a wheel in shape, but this lever is slightly round. I am guessing that it is called a comb wheel because it looks slightly like a comb, and it is good for securing bricks with axle holes.
91. Beam 3M W. Fork (4558692). Picture a 3M beam with levers on the end, and you have the basic idea of this piece.
92. Technic 2M Lever (Black 4164133, Gray 4211741). This lever has two cross shaped holes and is 2M in length, very helpful for securing axles in place.
93. Damper 2M (4198367). This piece is essentially 2M levers stacked together, with two axle holes. It is completely made of rubber.
94. Technic Triangle (6009019). This piece has an odd shape with five round holes and two cross-shaped holes.
95. Technic 3M Lever (4211566). This type of lever has two cross-shaped holes on each end, and a round hole in the middle.
96. Technic 4M Lever (4142236). This type of lever is larger than the 3M, with two round holes in its middle.
97. Technic 5M Lever (6030286). This type of lever is larger than the 4M, with three round holes in its middle.
Figure 1-16. Various LEGO Technic levers
CHAPTER 1 ■ WHAT’S NEW WITH LEGO MINDSTORMS EV3
19
98. Hub (4211758). This is a round piece that has a round hole in the middle.
99. Pointer (White 417941, Red 4185661). This part allows for connecting to an axle, and it good for all kinds of things, particularly showing direction.
100. Steering Wheel Axle (4629920). Many Lego sets use this piece for steering, and the ends fit perfectly over pieces with that have the ball shape on them.
101. Technic Catch (4210665). This is essentially an axle with a bush placed 90 degrees of it.
102. Brick 2 x 2 Round (Blue Transparent 4178398, Yellow Transparent 611649) This is one brick that I consider a part of “mainstream” Lego. This is round instead of square, and has a center of a cross-hole.
103. Technic Change-over Catch (4270473). This is a way to perfect shifting on a Technic creation, and it has other uses as well.
104. CVC Ball Joint (4268659). This piece is has a through-hole on one end, and a ball joint that fits into the cup joint.
105. CVC Cup Joint (4610374). This piece fits in perfectly with the previous piece.
106. Weapon Barrel (4654432). I am assuming that this piece is named because it looks like a Gatling-gun barrel, and it is full of round-holes and cross-holes.
107. Driving Ring (4278957). Like the change-over catch, it is also helpful in situations with shifting of gears and such.
108. Half Spike Ball (6027626). This is a very unusual piece whose shape I cannot really describe in simple words. It does have a cross-hole in the middle.
Wings and Panels
Most of these pieces have a wing shape, which is where their name derives. You will notice that each of the wings has a designated left side and right side. As for the panels, they are more rectangular and good for structure. Figure 1-17
shows them in storage.
CHAPTER 1 ■ WHAT’S NEW WITH LEGO MINDSTORMS EV3
20
Referring to Figure 1-17, the numbered wings and panels are as follows:
109. Bowed Panel 3 x 11 x 2 (6031916). This piece is full of through-holes and can fit in many places.
110. Right Panel 5 x 11 (4543490). One of the larger wing pieces.
111. Left Panel 5 x 11 (4541326). Also one of the larger wing pieces, made for the left.
112. Left Panel 3 x 7 (4541924).
113. Left Panel 2 x 5 (6022752).
114. Left Panel 3 x 5 (4566251).
115. Right Panel 3 x 7 (4541325).
116. Right Panel 2 x 5 (6022750).
117. Right Panel 3 x 5 (4566249).
118. Left Panel 5 x 7 (4558775).
119. Right Panel 5 x 7 (4558740).
120. Left Panel 3 x 11 (4558774).
121. Right Panel 3 x 11 (4558731).
Figure 1-17. A collection of some Wings and Panels from LEGO MINDSTORMS
CHAPTER 1 ■ WHAT’S NEW WITH LEGO MINDSTORMS EV3
21
122. Beam Frame 5 x 7 (4539880). This particular frame is terrific for when you need to fit things at right angles with each other. It has a lot of through holes.
123. Beam Frame 5 x 11 (4540797). Similar to the 5 x 7, it also has a bunch of through-holes.
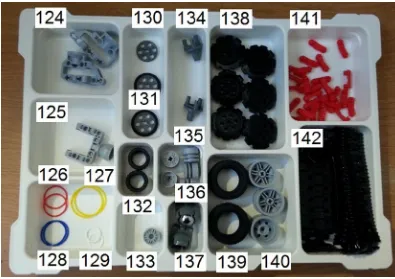
Wheels and Treads
I will discuss a lot of wheeled creations in this book, so I will briefly introduce the wheels here (see Figure 1-18). I also include tank treads, rubberbands, and various other pieces associated with wheels.
Referring to Figure 1-18, the numbered wheels and treads are as follows:
124. Gear Block 3.5 x 6.5 x 3 (4610377). This is a very good joint section for a wheel.
125. Power Joint Ballpart (4610379). Also another good joint for a wheel.
126. V-Belt 24 Red Rubberband (4544143). Rubberbands are often used in Lego creations, and their size does matter depending on what you would like to do with them.
127. V-Belt 33 Yellow Rubberband (4544151).
128. V-Belt 26 Blue Rubberband (4544147).
129. V-Belt 15 White Rubberband (4544140).
130. Wedge-Belt Wheel (4587275). This piece has six through holes that are ½ M thick.
Figure 1-18. A collection of Wheels and Treads, as well as Rubberbands for LEGO creations
CHAPTER 1 ■ WHAT’S NEW WITH LEGO MINDSTORMS EV3
22
131. Tire for Wedge-Belt Wheel (6028041). This piece goes right on the wedge-belt wheel and turns it into something like a bike tire.
132. Tire Low Wide 24 x 14 (4639695).
133. Rim Narrow 18 x 7 W Hole (6044729).
134. 3 Snap Gearblock (4610378). This is very good for mounting a wheel, especially with the rims in this set.
135. Rim Wide 18/14 W. Cross (4490127).
136. Ball, Metal (6023956). This ball forms a kind of spherical wheel for a Lego MINDSTORMS creation. More about this later.
137. Power Joint (4610380). This is made to mount the metal ball.
138. Sprocket (4582792). These are good for holding the tank tread.
139. Tire, Normal Wide 43, 2 x 22 (4184286).
140. Rim Wide W. Cross 30/20 (4297210).
141. Rubber Attachment for Track Element (6036424). This is an excellent cushion for the tank tread.
142. Track Element, 5 x 1, 5 (6014648). If you want to make a tank tread, this is what you will use.
Figure 1-19 shows some more samples of rims and tires you might want to use.
Figure 1-19. Other types of wheels for LEGO creations
CHAPTER 1 ■ WHAT’S NEW WITH LEGO MINDSTORMS EV3
23
Referring to Figure 1-19, the numbered wheels are as follows:
143. Tire, Low Wide 56 x 28 (6035364).
144. Rim Wide 43, 2 x 25 w/6 Hol. (4634091).
145. Tire Low Wide 8 x 36 (4614801).
146. Rim 56 x 34 (4211845).
Where to Begin with your LEGO MINDSTORMS Kit
Now that I got all that out of the way, I’m sure that you are anxious to get your hands on some LEGO Technic pieces and start building some robots. If you have been working with LEGO for a while, then you have a collection of all kinds of pieces from various sets. I am going to assume that is the case, but perhaps you are the reader who wants to start a LEGO Technic collection. If you flipped through this book before purchase, you will see a lot of instructions. If you want to try to build them yourself, you will need to get some of the pieces. There are several places online to do that.
LEGO Pick a Brick
First of all, you could go to the official LEGO site and head to their Pick a Brick section at http://shop.lego.com/PAB. The Pick a Brick website has a place for “Category”, and you can search for the LEGO piece that you are looking for under “Technic”.
I know that some of you LEGO builders are sticklers for color, and demand that your creation conform to a certain color scheme. You don’t have that freedom if your LEGO collection is an amalgamation of many LEGO Technic sets over the years. You can also search by color or its item number, which is specific number that LEGO gives its part. If you are ever looking for a specific brick, you can do an Advanced Search in the column on the left using the brick name, which is the formal name for the brick. I will have to admit that this will produce mixed results, unless you know exactly what you are looking for.
When you are ready to purchase the part that you are looking for, you can hit the “Add To Bag” link and your individual pieces will appear at “Brick Bag” column. When you have selected all the parts you need, just hit the “Update Bag” and add the part to your personal Shopping Cart. Yes, you will need an account with LEGO to have your items sent to you.
BrickLink
If you are looking for another place to find LEGO Technic pieces, then I also suggest looking at BrickLink
(http://www.bricklink.com). BrickLink is an unofficial LEGO marketplace, and it is often referred to as the “eBay of LEGO.” If you want to buy or sell LEGO sets, new and used, this is the online place to shop (see Figure 1-20).
CHAPTER 1 ■ WHAT’S NEW WITH LEGO MINDSTORMS EV3
24
If you click on “Buy”, you will have the option of purchasing several items including sets, books, gear, catalogs, and parts. As of this writing, there are over 116 million parts available for purchase. Selecting “Parts” will result in a category tree that branches out into several types of pieces, and there are 16 sub-categories for Technic including:
Axle: Anything that is an axle or has an axle attachment (see Figure
• 1-12).
Brick: I did not show some of the Technic bricks, but they do exist. •
Connector: This is an umbrella term that refers to angle elements and cross blocks (see •
Figure 1-14).
Disk: These are disk-shaped pieces that I did not describe above. I don’t really have them on •
any of the models in this book, and I don’t really see them on more recent sets.
Figure Accessory: At one point in time, Technic had figures that were to the scale of the •
Technic vehicles. They don’t make them anymore, but here is a place where you can find the accessories like helmets and feet.
Flex Cable: Some Technic sets have flexible cable that helps to create a more curvaceous •
shape. If that is what you are interested in, here is a place to find it.
Gear: Parts as we listed in Figure
• 1-15.
Liftarm: This refers to pieces like beams and levers, and all of their variations in •
Figures 1-11 and 1-16.
Liftarm Decorated: This refers to pieces that have stickers or printed graphics on them. •
Link: A good example of a piece for steering. •
Figure 1-20. The BrickLink site, a place to find LEGO bricks, both new and used
CHAPTER 1 ■ WHAT’S NEW WITH LEGO MINDSTORMS EV3
25
Panel: These are very big pieces that take up a lot of space. •
Panel, Decorated. Also like the pieces in Figure
• 1-17, but these often have stickers or some type of graphics on them.
Pin: This is where you would find various types of connector pegs. •
Plate: These are flat bricks with Technic holes in them. I didn’t discuss them at all and don’t •
really have any models in this book that use them.
Shock Absorber: These are some LEGO Technic pieces that I discuss in my LEGO Technic •
Robotics book.
Steering: This is various parts used for steering, which will includes many previously •
mentioned categories.
Please note that the descriptions of parts that BrickLink uses might not be exactly the same names that I have given to the parts above. I used the official names that LEGO designates their parts, which can be different than what BrickLink calls them.
If you are looking for buying many LEGO Technic pieces, BrickLink is very similar to Pick a Brick in that you can assemble your parts in a shopping cart and then checkout when you are ready. I found that their catalog is a little more extensive and easier to search through if you are looking for a specific piece, and you might be able to get a deal on pieces if you buy them in bulk. If you are looking to build one of the models in this book, and want to purchase every piece for it, this is one place to go.
In addition to having parts, some of you might be interested in purchasing the actual sets.
Websites for LEGO Instructions
Some of you might want to build a LEGO Technic set that you may remember being made several years ago, but LEGO changes their models every year. You might be able to find the actual set with instructions on BrickLink, and the more recent ones on LEGO.com, but if you have all the pieces, all you really need are the instructions. I highly recommend looking at these sites below, just to generate ideas for LEGO Technic robots.
The LEGO Official Site
Oddly enough, every model that is available on the official LEGO Technic site has a place where you can click and download instructions, as a PDF file that can be saved on your computer. I have noticed that more recent LEGO instructions have a parts list in them, and this is a good place where you can order them on Pick a Brick or BrickLink. Keep in mind that LEGO likes to introduce new pieces as often as it produces new models. You may find that some of the newer pieces are harder to find, and you might have to figure out how to build it in some simple or complex workaround.
Peeron
If you are interested in building Technic LEGO sets from over the years, then I highly recommend that you go to a site that contains both LEGO catalogs and instructions. Peeron (www.peeron.com) is especially helpful with its database of LEGO sets and catalogs (see Figure 1-21). Peeron’s inventory only goes up to the 2008 collections (as of this writing), and they often take very long to load.
CHAPTER 1 ■ WHAT’S NEW WITH LEGO MINDSTORMS EV3
26
Brickfactory
I also found Brickfactory (www.brickfactory.com) to be helpful, and it does have some of the more recent collections; Figure 1-22 shows the main page. Generally, LEGO Technic sets are given a number that is in the 8000 range or higher, with the exception of the 900 series when it first began in 1977. You will notice that several model series like Bionicle are filed under the same umbrella with advanced Technic sets.
Figure 1-21. A shot of Peeron website, a place to find out instructions for LEGO sets
Figure 1-22. The Brickfactory.com, a place to find all kinds of LEGO instructions
CHAPTER 1 ■ WHAT’S NEW WITH LEGO MINDSTORMS EV3
27
You may discover that a lot of the models in Peeron and BrickFactory have most of their pieces available on Pick a Brick. Peeron is especially good at cataloging the individual pieces of a set, and you will find that a search for any set will reveal the individual pieces, including their individual Element ID. For example, you can see Technic set 8002 from the year 2000 with a complete list of all of its parts. Unfortunately, you might discover that the Element ID on Peeron, BrickLink, or whatever site is a perfect match for the Element ID on Pick a Brick.
Summary
The LEGO MINDSTORMS EV3 series uses all new pieces including the EV3 Brick, Large Motor, Medium Motor, Ultrasonic Sensor, Gyro Sensor, Color Sensor, and the Touch Sensor. In addition to these pieces, a LEGO MINDSTORMS builder should equip him or herself with a haul of Technic pieces. You can purchase bricks that you may not own from BrickLink, and you can find instructions for older models on Peeron, Brickfactory, and the LEGO site itself.
29
CHAPTER 2
Programming with the EV3 Language
Now that you have been introduced to the pieces that you will need for building excellent LEGO MINDSTORMS EV3 models, let’s talk about how to do one of the most important things: programming the EV3 Brick. One of the challenges in building with LEGO MINDSTORMS is that “building is only half the battle.” Once you get your motors and sensors properly constructed on your MINDSTORMS machine, you are going to have to tell it what to do. This will require programming skills, and the EV3 Brick is your microcomputer of choice.
Just to let you know, it is entirely possible to program your EV3 Brick using the six buttons on the EV3 Brick, which I only briefly introduced you to in Chapter 1. I’m not going to show you how to specifically program the EV3 Brick for every program that you will see in this book. For me, I found it was easier for me to create EV3 programs with the use of my computer. I did this for three reasons: 1) It is a lot easier for me to get a screenshot from my computer than the EV3 Brick, 2) it is easier for me to upload the code that you can download off the Apress website, and 3) you will probably be programming from your computer rather than directly on the EV3 Brick anyway.
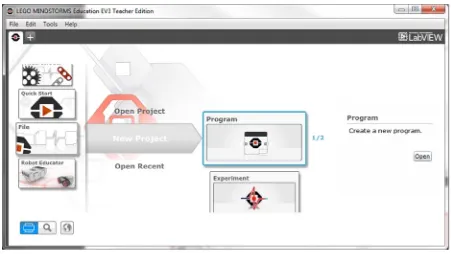
The Four Basic Screens of the EV3 Brick
If you hold down the center key, the EV3 Brick will come on. You will then see a screen with four tabs, and the following explains what each tag signifies after Figure 2-1.
CHAPTER 2 ■ PROGRAMMING WITH THE EV3 LANGUAGE
30
Run Recent
You will find that this screen is blank unless you downloaded and ran specific programs. Those programs that you have most recently ran will be on this screen, the one at the top being the most recently run program. I’ll discuss how to download programs at a later time, but when the programs are visible, you can select one with the buttons and press center to execute.
File Navigation
Here is where you can access and manage all files on the EV3 Brick. This includes any files stored on an SD card. You will note that all these files are located in project folders and they include the sounds and/or images used in each project. You can use sounds and/or images on the EV3 Brick display for your LEGO MINDSTORMS project, and I will detail how to do that in the chapter on Sight and Sound in Chapter 4.
Figure 2-1. The four basic tabs on the EV3 Brick display
CHAPTER 2 ■ PROGRAMMING WITH THE EV3 LANGUAGE
31
Brick Apps
If I may steal a phrase from Apple, “there’s an app for that.” In working with EV3, you will find many apps which will be helpful when working with EV3 programs. The EV3 Brick comes with four apps pre-installed (three of which are shown in Figure 2-2).
Figure 2-2. Three of the four pre-installed programs for the Brick apps
It is possible to make apps of your own. For now, I will discuss each app from left to right.
Port View
As I stated in Chapter 1, the sensors and/or motors must be attached to the EV3 Brick via connector cables in order to function. You will discover that certain projects occupy many ports, and it is often difficult to keep track of what sensors and motors go with what ports. Port View will give you a quick view about what is attached, as well as their specific ports.
Motor Control
In this app, you can control the movement of the motors at a touch of an EV3 Brick button. You can control motors connected to Port A using the up and down buttons and to Port D using the Left and Right buttons. You can also toggle into a different mode by hitting the center key, which will allow you to control a motor at Port B with the Up and Down keys and a motor at Port C using the left and right buttons.
IR Control
This particular app requires that the Remote Infrared Beacon acts as the remote control and the Infrared Sensor is the receiver. This allows for all types of wireless motor controls, and you should consult the User Guide for more information.
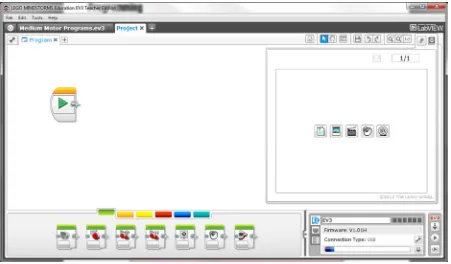
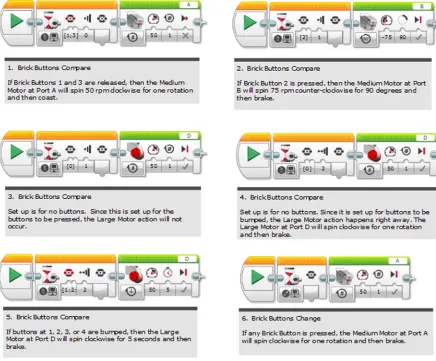
Brick Program
This is the place where you can create programs on the EV3 Brick (no computer required). I’m not going to spend a lot of time talking about this section, but I wanted to let all those new to LEGO MINDSTORMS EV3 know that it exists.
CHAPTER 2 ■ PROGRAMMING WITH THE EV3 LANGUAGE
32
You can see in Figure 2-3 that you can set up a program. All that is required is to click the middle button in the middle of the two posts that you can see in the Brick Button main screen.
Figure 2-3. Various screens on the Brick Program app on the EV3 Brick
From there, you can take command of the motors, sensors, displays, and sounds. You can open an individual program and adjust the speed of a motor and other such parameters that I will explain later.
The Brick Program app is where you can look at programming blocks, and the Instruction Manual for the basic set has a few activities that you can try out to show how they work. I recommend spending some time playing around here just to get used to how these work, but I will go more into detail about the programming blocks when I discuss the software later in this chapter. In fact, you might find it easier to program from your computer and then just download it straight to the EV3 Brick itself.