V I S U A L
Q U I C K S T A R T
G U I D E
Adobe
Premiere Pro
CC
Visual QuickStart Guide
Adobe Premiere Pro CC: Visual QuickStart Guide
Jan Ozer Peachpit Press www.peachpit.com
To report errors, please send a note to [email protected] Peachpit Press is a division of Pearson Education
Copyright © 2013 by Jan Ozer Project Editor: Nancy Peterson
Development Editor: Stephen Nathans-Kelly Contributing Writer: Shawn Lam
Production Editor and Compositor: Danielle Foster Technical Editor: Pamela Berry, Luisa Winters Copyeditor: Scout Festa
Indexer: Jack Lewis
Interior Design: Peachpit Press
Cover Design: RHDG / Riezebos Holzbaur, Peachpit Press Logo Design: MINE™ www.minesf.com
Notice of Rights
All rights reserved. No part of this book may be reproduced or transmitted in any form by any means, electronic, mechanical, photocopying, recording, or otherwise, without the prior written permission of the publisher. For information on getting permission for reprints and excerpts, contact [email protected]. Photograph of author courtesy Gary McLennan
Notice of Liability
The information in this book is distributed on an “As Is” basis without warranty. While every precaution has been taken in the preparation of the book, neither the author nor Peachpit Press shall have any liability to any person or entity with respect to any loss or damage caused or alleged to be caused directly or indirectly by the instructions contained in this book or by the computer software and hardware products described in it.
Trademarks
Visual QuickStart Guide is a registered trademark of Peachpit Press, a division of Pearson Education. All other trademarks are the property of their respective owners.
Dedication
Contributing Author
Shawn Lam is a professionally accredited and multi-award-winning video producer and technical director. He has written over 50 articles for StreamingMediaProducer.com and its predecessor EventDV
Magazine. His company, Shawn Lam Video Inc., specializes in corporate and event video production, including online video, video switching, webcasting, and video SEO. In addition to serving 5 terms as the
Table of Contents
Chapter 1 Welcome to Adobe Premiere Pro. . . 1
Touring the Interface . . . 2
The Premiere Pro Workflow . . . 4
Choosing Your Workspace . . . 9
About Your Workspace . . . 11
Customizing Your Workspace . . . 13
Setting Preferences . . . 17
Working with Keyboard Shortcuts . . . 22
Chapter 2 Setting Up Projects. . . .25
Working with Projects. . . 26
Working with Missing and Offline Files . . . 31
Chapter 3 Importing Media. . . .35
Import Options . . . 36
Ingesting File-based Content in the Media Browser . . . 37
Importing from Tape-based Devices: Hardware . . . 41
Importing from Tape-based Devices: Software . . . 45
Using Playback Controls in the Capture Panel . . . 49
Working with Adobe Photoshop Files . . . 53
Importing Files from Your Hard Disk . . . 60
Importing Content from Premiere Pro Projects . . . . . 62
Generating Media with Adobe Premiere Pro . . . 65
Working with Dynamic Link. . . 66
Chapter 4 Organizing and Viewing Clips . . . .69
Working in the Project Panel . . . 70
Project Panel Basics. . . 72
Clip Management in the Project Panel . . . 74
Viewing Clips in the Source Monitor . . . 98
Controlling Playback in the Source Monitor . . . .100
Configuring the Source Monitor . . . 102
Working with Clips in the Source Monitor . . . .108
Working with Subclips . . . 116
Choosing Display Modes . . . 118
Working with Metadata . . . 122
Working with Sequences . . . 126
Storyboard Editing in the Project Panel. . . 133
Chapter 5 Working with the Timeline . . . .135
Customizing the Timeline. . . 136
Adding and Deleting Tracks . . . 143
Choosing the Timecode Display Format . . . 147
Navigating in the Timeline . . . 149
Monitoring Audio and Video . . . 153
Sync Lock and Track Lock . . . 155
Getting Clips to the Timeline . . . 158
Insert and Overwrite Edits . . . 162
Three- and Four-Point Edits . . . 168
Playing Clips in the Program Monitor . . . 172
Chapter 6 Editing in the Timeline. . . .175
Selecting Clips on the Timeline . . . 176
Grouping and Ungrouping Clips . . . .180
Working with Snapping . . . 182
Dragging Clips in the Timeline . . . 183
Moving Clips via Keyboard Controls and the Keypad . . . 188
Moving Clips from Track to Track . . . .190
Working with Track Targeting . . . 192
Cut, Copy, Paste, and Paste Insert. . . 194
Deleting Clips on the Timeline . . . 198
Finding and Deleting Gaps in the Timeline . . . 200
Performing Lift and Extract Edits . . . 203
Replacing a Clip on the Timeline . . . 205
Splitting Clips . . . 208
Trimming with Keyboard Controls . . . 241
Producing Split Edits . . . 244
Changing Clip Speed . . . 245
Working with Nested Clips . . . 248
Finding Stuff . . . 253
Chapter 8 Adding Motion to Clips . . . .255
Working with Premiere Pro’s Motion Controls . . . 256
Adjusting Effects in the Timeline . . . 265
Working with Keyframes . . . 267
Working with Keyframes in the Effect Controls Panel. . . 269
Customizing Keyframes. . . 273
Time Remapping via Keyframes . . . 277
Chapter 9 Working with Video Effects . . . .279
About Premiere Pro Effects . . . 280
The Effects Workflow . . . . 283
Animate an Effect with Keyframes. . . 288
Applying Effects to Multiple Clips . . . 290
Keying and Greenscreen Basics . . . 297
Applying and Configuring the Ultra Key Effect. . . 298
Cleaning Up Edges with Garbage Mattes . . . 304
Chapter 10 Working with Transitions . . . .307
About Transitions . . . 308
Working with Transitions . . . 312
Customizing Transitions . . . 317
Fading In from and Out to Black . . . 320
Audio Transitions . . . 323
Adding the Default Transitions to Multiple Clips . . . . 326
Chapter 11 Color and Brightness Correction . . . .327
Working in Color Correction Mode . . . 328
Using the Waveform Monitor . . . 331
Color-Correcting Your Video . . . 337
Accessing the Multi-Camera Source Sequence
in the Timeline . . . . 354
The Nested Sequence Method . . . 358
Producing Multi-Camera Edits . . . 362
A Few Additional Audio Notes . . . . 365
Chapter 13 Working with Titles . . . .367
About Titles . . . 368
Working with the Titler . . . 369
Working with Premiere Pro’s Title Templates . . . 371
Working with Text . . . . 373
Setting Text and Shape Properties . . . 377
Working with Styles . . . 382
Creating Shapes . . . 384
Arranging Shapes and Text . . . 385
Centering, Aligning, and Distributing Objects . . . 386
Working with Logos . . . 388
Creating Rolls and Crawls . . . 389
Chapter 14 Working with Audio . . . .391
Adjusting Volume in the Effect Controls Panel . . . . . 392
Adjusting Volume on the Timeline . . . . 396
Working with Gain . . . . 398
Sending Audio to Adobe Audition . . . . 402
Entering the Audio Workspace . . . . 403
Working with Audio Effects . . . . 406
Chapter 15 Publishing Your Video . . . . 413
Exporting Still Images . . . 414
Exporting Media from Premiere Pro . . . 415
About Adobe Media Encoder . . . 424
Watch Folders . . . 430
Workflows . . . 431
Index . . . 435
1
Welcome to
Adobe Premiere Pro
Adobe Premiere Pro is the hub of the Adobe Creative Suite. It is an application through which input from After Effects, Illustrator, Photoshop, Prelude, Story, and other programs is integrated into a video production that can be shown anywhere from a mobile phone to a 3D theater metroplex. Lofty visions, but first you have to get comfortable with the program and learn where to find all the critical panels and controls. That’s what you’ll accomplish in this chapter.
You’ll start with a quick tour of the inter-face and then an overview of Premiere Pro’s non-linear editing workflow. Then you’ll learn how to choose and customize Premiere Pro’s workspaces and choose the most relevant preferences. The chapter concludes with a look at how to choose and customize keyboard shortcuts to streamline repetitive editing functions.
In This Chapter
Touring the Interface 2
The Premiere Pro Workflow 4
Choosing Your Workspace 9
About Your Workspace 11
Customizing Your Workspace 13
Setting Preferences 17
On the bottom left are the building blocks that you’ll use to build your movies. The figure shows the Project panel, which contains all source clips and sequences. Tabbed panels behind the Project panel include the Media Browser, where you can add clips to your project; the Info panel, which details the specs of each piece of content; the Effects panel, where you’ll find transitions and effects; the Markers panel, which contains all markers added to the project; and the History panel, which dis-plays a history of the last 32 edits made to the project. It’s helpful to make the History panel visible when you need to accurately undo some edits.
On the bottom right is the Timeline, where you’ll assemble the various audio, video, and still-image components of your project. On the top right is the Program Monitor, where you’ll preview what you’ve pro-duced in the Timeline. If you look closely at the bottom left of the Program Monitor, you’ll see the timecode 00:00:27:16. You’ll learn more about timecode later; what’s critical here is that the timecode matches the time shown at the top left of the Timeline. This reinforces the point that the Program Monitor shows you what’s being produced in the Timeline.
The Premiere
Pro Workflow
Premiere Pro is a non-linear editor. By way of background, video editing originally occurred on tape, and the only way to make a change in minute 29 of a 30-minute production was to start at the beginning, roll tape until that point, and make the change. With Premiere Pro, you simply fix the problem at minute 29 on the timeline and you’re done.
Like all non-linear editors, Premiere Pro is non-destructive. You’ll start most projects by capturing (from analog source media) or ingesting (from digital source media) lots of content. Then you’ll cut the content into pieces, trimming frames here, splitting clips there, adding multiple filters and effects. Through all your edits, Premiere Pro never changes the original source footage— hence the non-destructive label.
Let’s take a look at the various panels that you’ll use to build projects in Premiere Pro.
■ Content ingest. You’ll start by ingesting content into the project. The interface will differ depending upon whether your media is on tape or on fixed media. You’ll learn both techniques in Chap-ter 3, “Importing Media.” In the figure, you see an AVCHD video file already copied to a hard drive and in the pro-cess of being imported into the project from the Media Browser, which you can access via the keyboard shortcut Shift+8
A
.■ View content. Once the content is imported, it appears in the Project panel (Shift+1). Double-clicking the content will load it in the Source Monitor (Shift+2) for a larger display
B
. In this panel, you can start the editing process by marking In points and Out points before adding the content to the Timeline. You’ll learn all about this in Chapter 4, “Organizing and Viewing Clips.”■ Add clip to the timeline. You can add clips to the Timeline (Shift+3) from the Source Monitor or Project panel via keyboard shortcuts or by dragging, as shown
C
. You’ll learn how to get clips to the timeline in Chapter 5, “Working With the Timeline.” Then you’ll learn how to edit your clips in the Timeline in Chapter 6, “Editing in the Timeline,” and Chapter 7, “Advanced Timeline Techniques.”continues on next page
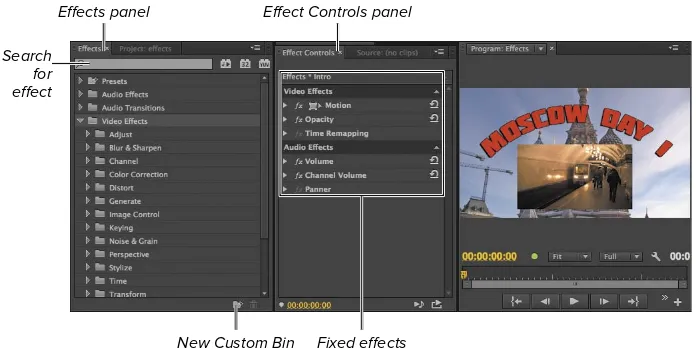
■ Add effects, transitions, and Lumetri. Once on the Timeline, some clips will need color or brightness correction or other effects. You also may want to add transitions between clips or add Lumetri movie looks to your project. You access all of these elements in the Effects panel (Shift+7)
D
. You’ll learn how to add and customize these elements in Chapter 9, “Working with Video Effects,” Chapter 10, “Working With Transitions,” and Chapter 11, “Color and Brightness Correction.”■ Customize effects and add motion-related effects in the Effect Controls panel (Shift+5)
E
. After you apply an effect, you can customize parameters in the Effect Controls panel. This panel also contains fixed effects applied to all video clips for motion (including position, scale, and rotation), opac-ity, and time remapping, as well as volume, channel volume, and panner adjustments for audio. You don’t have to apply these fixed effects to custom-ize these elements; you just have to customize the values. You’ll learn how to adjust motion in Chapter 8, “Adding Motion to Clips.”■ Add titles. Titles are a critical compo-nent of any production, and Premiere Pro’s Titler
F
offers a great mix of presets and text and design-primitive customization options. You’ll learn how to create and customize titles in Chap-ter 14, “Working with Titles.”D
The Effects panel contains multiple elements that help polish your content.E
The Effect Controls panel is where you’ll customize and apply audio and video effects.■ Render your project. Once you’ve fin-ished work on the Timeline, you’ll ren-der your project for sharing with others. You’ll use the Export Settings dialog
G
to render clips either directly from Premiere Pro or through the Adobe Media Encoder, which comes bundled with Premiere Pro and includes a range of useful presets, extensive customiza-tion opcustomiza-tions, and highly efficient parallel encoding. You’ll learn how to use the Adobe Media Encoder in Chapter 16, “Publishing Your Video.”
These are the basic workflow components common to most video projects. Other projects will employ features discussed in other chapters, such as Chapter 12, “Multi-Camera Editing,” and Chapter 13, “Keying and Compositing.”
Here are some other panels and interface components that you should know about.
■ Tools panel. Tools in this panel
H
con-trol how you select content in the Time-line, the types of edits you’ll perform in the Timeline, and other useful functions. For example, the Razor tool (C) makes it easy to split clips on the timeline, while the Track Selection tool (A) enables you to select all content on a track, which is useful when you need to shift it one way or the other in the Timeline. In Chapter 7, “Advanced Timeline Tech-niques,” you’ll learn about ripple, rolling, and slip edits.continues on next page
G
The Export Settings dialog, which you’ll use to render projects.Selection tool (V)
Track Selection tool (A)
Ripple Edit tool (B)
Rolling Edit tool (N)
Rate Stretch tool (X)
Razor tool (C)
Slip tool (Y)
Slide tool (U)
Pen tool (P)
■ The Info panel and Properties panel
I
reveal complementary bits of informa-tion about a selected clip. The Info panel identifies some basic file informa-tion and the locainforma-tion of the clip in the project. The Properties panel, accessed by right-clicking the clip and choosing Properties, identifies format, total dura-tion, and pixel aspect ratio. Probably most important is the file path to the clip, useful when you’re trying to find the clip on your hard drive.■ The History panel
J
is a useful tool for precisely identifying the edits you’d like to undo. As you click each item in the list, Premiere Pro shows you the action that will be undone (plus all subsequent edits), a nice complement to the familiar keyboard shortcuts Command/Ctrl+Z for Undo and Command/Ctrl+Y for Redo, which Premiere Pro also supports. The History panel contains a configurable number of edits. The default is 32, and you can change this by right-clicking in the panel and choosing Settings.Ingest isn’t just a fancy word for capture. Back when digital video editors first appeared, all video was analog and had to be converted to digital for editing. That analog-to-digital conversion was commonly known as capture. Now, virtually all video is shot in digital formats, so no conversion is necessary. Instead, the video is imported from the camera-based media to your hard drive, which is known as ingest. (The one exception is DV/HDV. Both are digital formats, so it’s a digital-to-digital transfer, but because they’re tape-based, the process is called capture.)
Info panel Properties panel
I
The Info panel and Properties panel are convenient for finding out useful details about your clips, including location.Choosing Your
Workspace
Editing involves many discrete functions and tasks, and Premiere Pro makes it simple to optimize the panels and windows in the user interface for these activities. Each custom arrangement is called a Workspace, and Premiere Pro comes with seven preset workspaces, which you can customize. You can also reset any workspace back to the factory original (so to speak) or create additional custom workspaces.
To choose a workspace:
Choose Window > Workspace, and select the desired workspace
A
.If you’ve been using Premiere Pro 5.5 or Final Cut Pro 7, the Editing (CS5.5) workspace will make you feel right at home; you’ll find project content and effects on the upper left, just where you’d expect to see them.
To reset a workspace:
1. Choose Window > Workspace, and select the workspace to reset
A
.2. Choose Window > Workspace > Reset Current Workspace
B
.3. Click Yes in the Reset Workspace dialog
C
.A
Choosing a different workspace.B
Here’s how you reset your workspace to its original layout.To save a custom workspace:
1. Arrange your workspace as desired.
2. Choose Window > Workspace > New Workspace
D
. The New Workspace dialog opens.3. Type the desired name in the Name field and click OK
E
.Import Workspace from Projects
A
works in this manner: If you want Premiere Pro to use the workspace saved with the project (and change the existing workspace when you load the project), make sure that Import Work-space from Projects is selected. If you want to keep the existing layout when you load an existing project, deselect Import Workspace from Projects.If you find yourself switching workspaces frequently, you can either use the keyboard shortcuts next to each workspace in the menu to load them, or choose Window > Options to open the Options window, which lets you eas-ily switch between workspaces.
Note the Delete Workspace option in the Window > Workspace menu. That’s how you delete any workspaces that you’ve created.
D
Choose New Workspace to save a new workspace.About Your Workspace
Premiere Pro’s interface is made up of multiple elements and is infinitely configu-rable. If you want to work within the four major frames, you can; if you’d prefer to have dozens of windows or panels open simultaneously, you can do that as well. Three concepts are essential to arranging your work: frames and panels; the compo-nents of a tab; and drop zones. Let’s take a closer look.The Premiere Pro interface is built around the concepts of frames and panels
A
. A frame is essentially a separate window in the interface, which can have one or more panels. In the default interface, there are four frames, but you can create as many frames as you would like, both within and outside the Premiere Pro interface.A
Premiere Pro’s interface is made up of panels and frames.Panels
The panel tabs themselves have sev-eral subtle but powerful controls. On the extreme left is a textured “grab” area
B
. To move the panel, you have to grab that small textured area in the tab and drag the panel to the desired location.Some panels, like the Source Monitor, can contain multiple elements. When there are multiple elements available, a menu will appear so you can choose among them. When you select a panel, an x appears on the right of the tab, and you can click it to close the panel.
If there are too many panels to display within the frame, a small scroll bar appears above the tabs; use the scroll bar to access hidden panels.
The final concept that you need to under-stand is drop zones. When you drag a panel into an existing frame, six faint drop zones appear around the selected frame.
C
shows what happens when you drop the frame at the various locations. You can also drag the frame above the existing panel, which will create a window above all frames on that level.If you experiment enough, you’ll throw the interface completely out of whack. Just choose Window > Workspace > Reset Cur-rent Workspace to restore the workspace to its factory setting.
Note that you can’t undo interface adjustments, only actual edits to a project.
Grab area Menu
Close panel Scroll bar
Panels
B
The various components of the panel tabs.A
B
F
D E
C
C
Drop zones control panel and frame placement. A The panel will be added to the existing panelsin the frame, with the tab located at the pointer location.
B The panel will open a frame above the selected frame.
C The panel will open a frame to the left of the selected frame.
D The panel will be added to the existing panels in the frame, positioned as the last tab on the right.
E The panel will open a frame to the right of the selected frame.
Customizing Your
Workspace
With these basics, you should be able to make short work of these next few tasks.
To choose a different
panel in a frame:
1. If the target panel isn’t showing, drag the scroll bar
A
above the tabs to reveal it.2. Click the panel tab to open the panel in the frame
B
.To close a panel:
1. Click the panel that you wish to close
B
.2. Click the Close icon on the right of the tab
C
.A
Drag the scroll bar to reveal hidden panels in a frame.B
Click the tab to open the panel in the frame.To make a panel larger or smaller:
1. Hover your pointer over the edge that you’d like to adjust. Your pointer will convert to the double-arrow pointer
D
.2. Drag the edge in the desired direction
E
.To open a closed panel:
Choose Window in the Premiere Pro menu, and select the desired panel
F
.D
The double-arrow pointer lets you adjust frame height and width.To maximize any frame:
1. Hover your pointer over the panel you wish to maximize
G
.2. Press the accent key ( ` ), which is to the left of the 1 key and directly above the Tab key on most keyboards. Premiere Pro maximizes the frame
H
.3. To return the frame to its original posi-tion, press the accent key again.
You can also maximize frames by choos-ing Window > Maximize Frame in the Premiere Pro menu.
G
Hover your pointer over a frame and then press the accent key ( ` ) to maximize the frame.H
The maximized frame. Press the accent key ( ` ) again to return the frame to its former position.Panel Menus
J
Click the + button to open the Button Editor.K
The Button Editor’s helpful tool tips identify button functions.L
Drag the button into the transport control area.M
Drag any buttons that you don’t want back into the Button Editor.N
You’ve added the Closed Captioning Display button and removed the Lift and Extract buttons.To customize the buttons in the
Source Monitor or Program Monitor:
1. Click the + button at the lower right of the Source Monitor or Program Moni-tor
J
. The Button Editor opens.2. Hover your pointer over any button to identify its function
K
.3. To add a button to the interface, drag it down to the desired location in the transport control area
L
.4. To remove buttons that you don’t want, drag them upwards into the Button Edi-tor and release the pointer
M
.5 Click OK
M
to close the Button Editor. Premiere Pro saves the new configura-tionN
.To reset the buttons to their default state, click the Reset Layout button.
Setting Preferences
As you know from working with ences in other programs, program prefer-ences let you control key functions and operations within the program. While there are dozens of preferences, here you’ll learn the most important ones, specifically those that relate to imported content and applied effects (General preferences), how frequently Premiere Pro saves backup cop-ies of your project (Auto Save), where you store cached media associated with your projects (Media), and memory management (Memory). You’ll learn about more-specific preferences in the editing-related sections. All preferences are applied to future edits rather than prior ones. If you have a transi-tion in a project that’s 30 frames long and you then change the default transition duration to 15 frames, this doesn’t change the duration of that 30-frame transition (or any other transitions already included in a project).To open the preferences panel:
Choose Edit > Preferences (Windows) or Premiere Pro > Preferences (Mac OS). The Preferences panel opens, with the General tab selected.To set General preferences:
1. To set the At Startup option, do one of the following:
> Choose Show Welcome Screen
A
to show the Welcome screen upon program startup.
> Choose Open Most Recent to open
A
This preference lets you control what happens upon program startup.3. Enter the default duration for audio transitions in seconds
B
.4. Enter the default duration for still images (including titles) in frames
B
.A 1-second transition duration is good for general-purpose projects. When producing for the Internet, where long transitions might pro-duce artifacts, you may want to shorten this to five to seven frames. Ditto for multi-camera projects, where transitions are typically used to smooth the switch from one camera to another rather than to produce a noticeable transition effect.
To set Auto Save preferences:
1. To access the Auto Save preferences, do one of the following:
> If the Preferences window is open, click the Auto Save tab.
> If the Preferences window is not open, choose Edit > Preferences > Auto Save (Windows) or Premiere Pro > Preferences > Auto Save (Mac OS).
The Preferences window opens to the Auto Save preferences
C
.2. Enter how frequently Premiere Pro should auto-save your projects
C
.3. Enter how many project versions Pre-miere Pro should retain
C
.Managing the Inevitable Crash
All programs crash, usually at the least opportune times. Since a lot can happen in 15 minutes —which is Premiere Pro’s default auto save duration—and because it’s absolutely heartbreaking to have to re-create these edits, I recommend a default auto save duration of five minutes
C
. I also recommend saving each time you see the Auto Save message flit across the screen, just to be safe.Premiere Pro stores the auto-saved projects in a subfolder, labeled Adobe Premiere Pro Auto-Save, that’s located in the folder where you stored your project file
D
. Premiere Pro will store as many versions as you’ve set in your preferencesC
.Let’s review what happens when you crash. Premiere Pro will try to save your work in a recovered project, which you should save using a different name. Exit Premiere Pro (if necessary), reboot your system, run Premiere Pro again, and review the recovered project. If everything looks normal, it’s probably OK to treat it as a normal project and carry on. I’ve never had a problem with a recovered project, though that doesn’t mean you won’t.
If the project looks corrupt in some way or you don’t want to chance working with a recovered proj-ect, check the file creation times on the most recent auto-saved project and on the original project file. Open the most recent project and resume editing.
If you open an auto-saved project, it’s best to save the project back into the original project folder. I typically don’t overwrite the original project file, and then I name the auto-saved file something like Project-1.
To set Media preferences:
1. To access the Media preferences, do one of the following:
> If the Preferences window is open, click the Media tab.
> If the Preferences window is not open, choose Edit > Preferences > Media (Windows) or Adobe Premiere Pro > Preferences > Media (Mac OS). The Preferences window opens to the Media preferences
E
.E
These preferences control where media files and their associated databases are stored.Media Management 101
Even with the largest hard drives, media management can become a problem. If you’re editing on a notebook, media management is absolutely essential.
There are four types of files associated with each project:
. Original media. This is the original media that you import into the project. Original media files almost always consume the most disk space of the four types of files, so it’s important to know where they’re stored so they can be easily deleted. I recommend creating a separate folder for each project, however large or small.
. Media cache files. When Premiere Pro imports video and audio in some formats, it creates unique versions of these files for faster preview and rendering. In particular, Premiere Pro creates .cfa auto files for most audio imported into a project. These files can be quite large—more than 1 GB for the audio associated with a one-hour HDV capture. You control the location of these files with the top preference in the Media preferences. I recommend locating these files in the same folder as your project so you can easily delete them when you’re done with that project.
. Media cache database. When creating media cache files, Premiere Pro creates a database with links to the cached media files that it shares with Adobe Media Encoder, After Effects, and Encore, so that those programs can read from the same set of cached media files. These files are much smaller than the media cache files, and there’s a convenient Clean button to remove them, so I recommend leaving them at the default location. Note that you can’t remove these database files until after you delete the original media and media cache files.
2. Make sure the Save Media Cache files check box is unselected
E
.3. Change the location of the media cache files by clicking the Browse button and navigating to the folder where your proj-ect files are stored
E
. Do not change the Media Cache Database setting.4. After completing a project and delet-ing all original media and media cache files, click the Clean button to remove the database files associated with those media files.
To set Memory preferences:
1. To access the Memory preferences, do one of the following:
> If the Preferences window is open, click the Memory tab.
> If the Preferences window is not open, choose Edit > Preferences > Memory (Windows) or Adobe Pre-miere Pro > Preferences > Memory (Mac OS).
The Preferences window opens to the Memory preferences
F
.2. If desired, increase or decrease the amount of RAM reserved for other applications
F
.3. If you see a Low Memory warning, change the Optimize Rendering For preference to Memory
F
. Otherwise, use the default preference, which is to optimize rendering for performance.Premiere Pro is a RAM-hungry program that works fastest and most reliably with lots of RAM. I recommend using the default When you’re working with high-resolution
source files (either video or still image), Pre-miere Pro may run out of memory during
Working with
Keyboard Shortcuts
As you get more experienced with editing with Premiere Pro, you’ll start to use key-board shortcuts like the spacebar to start and stop playback, or the backslash key (\) to show the entire project on the timeline. These keyboard shortcuts are much faster than the mouse-related equivalent, which is why Premiere Pro has shortcuts for most critical editing functions, allowing you to increase your editing speed.Premiere Pro identifies the keyboard shortcuts via tool tips
A
over most buttons and by showing them in menusB
. If you pay attention while editing, you’ll quickly learn the shortcuts for your most common editing functions.If you’re coming to Premiere Pro from Final Cut Pro or Avid Media Composer, you can select a set of shortcuts used by those pro-grams. This will help you feel right at home and become productive more quickly. You can change Premiere Pro’s keyboard shortcuts, or add shortcuts for editing activities for which Premiere Pro doesn’t have an assigned shortcut. In this section, you’ll learn how to choose and customize Premiere Pro’s keyboard shortcuts.
To choose your keyboard
shortcuts layout:
1. Choose Edit > Keyboard Shortcuts (Windows) or Adobe Premiere Pro > Keyboard Shortcuts (Mac OS). The
Key-A
Premiere Pro shows the keyboard shortcuts for most buttons in a tool tip. Playing and pausing video with the spacebar is one you’ll use all the time.B
Premiere Pro also shows keyboard shortcuts on menus. Here, you see that pressing Enter (Windows) or Return (Mac OS) renders the Timeline.To customize an existing
keyboard shortcut:
1. With the Keyboard Shortcuts window open, click the command you wish to modify.
2. Double-click its Shortcut field, or click the Edit button in the lower-right corner of the Keyboard Shortcuts window
D
. The Shortcut field turns white.3. Enter the new keyboard combination. If it conflicts with an existing combination, you’ll see a warning message
E
.4. Do one of the following:
> To revert to the old shortcut and restore the shortcut to the previous command, click Undo and repeat step 2 until you find a combination that doesn’t conflict or that you wish to replace.
> To save the new preset layout, click Save As
F
. The Keyboard Layout Set dialog opens.5. Type the name of the new preset in the Keyboard Layout Preset Name field
G
.6. Click Save to save the new keyboard layout.
D
Click the shortcut and then click Edit.E
This warning appears when the combination that you entered conflicts with an existing shortcut.Managing Roaming Settings
If you frequently operate on multiple comput-ers and like to customize your preferences and keyboard settings, you’re going to love Premiere Pro’s new Sync Settings feature. Note that to take advantage of this feature you’ll need an Adobe Creative Cloud account (basic membership is free).
It works like this: In the User Profile prefer-ences
H
, choose which types of prefer-ences to upload to Creative Cloud, including preferences/settings, workspace layouts, and keyboard shortcuts. After choosing your pref-erences, upload them to your Creative Cloud account. When you start work on a different computer, log in to your account, and choose File > User Profile > Download from Cloud to download the user profile to that computerI
. When I looked at this feature in the beta soft-ware, the Mac and Windows versions were completely different. On the Mac, the menu option was Sync Settings, not User Profile. I’m guessing that the interfaces will be aligned before ship date, but I can’t guaran-tee that it will look like what you’re seeing on this page if you’re editing on a Mac. While the workflow should be very similar, the name of the setting might be different. I apologize in advance for any confusion.H
Choosing which settings to store in Adobe Creative Cloud.2
Setting Up Projects
Every time you produce a video in Premiere Pro, you’ll produce it within a project file. However, project files do not contain the media that you import into the project; that would be too cumbersome. Rather, a project file is more like a file that points to your source files with instructions about which frames to include and exclude in the video that you’re producing, which effects to apply, and where to apply them. If you copy a project file from your office workstation to your notebook for some weekend edit-ing, you won’t be able to get much done, because the content won’t be there to edit. Each project file has high-level settings for video capture, file storage, and perfor-mance. In this chapter, you’ll learn how to create, save, and open project files, and adjust project settings. You’ll also learn the proper way to move a project from one editing station to another so you can get that weekend editing done.
In This Chapter
Working with Projects 26
Working with Projects
I was on a Southwest Airlines flight a few years ago, and the flight attendant started the safety chat about seatbelts with the line, “For those of you who haven’t been in a car for the last 40 years, here’s how you fasten a seatbelt.” Well, for those of you who haven’t created, saved, or opened a file on a Mac or Windows computer in the last 15 years, here’s how you create, save, and open Premiere Pro project files (which have a .prproj extension, by the way). Actually, it’s not an exact parallel, because there are some important project settings that you’ll want to set along the way—the kind of things that don’t come up in most other applications. So, I’ll try to speed through the stuff you know and focus on the aspects of project creation and management unique to Premiere Pro. Pay attention to the first exercise after this intro because I’ll be walking through the critical project settings. You can change them later, but like anything else, it’s better to get them right the first time.To create a new project:
1. Do one of the following:
> In the Premiere Pro Welcome screen that appears when you start the appli-cation, choose New Project
A
.> With Premiere Pro running, choose File > New > Project
B
.The New Project window opens
C
. Here’s where you’ll select all project preferences. Note the two tabs near theA
Creating a new project from the Welcome screen.B
Creating a new project in the Premiere Pro menu.2. Type the name of the new project in the Name field
C
.3. Click the Browse button, and choose the storage location for the new project file
C
.4. Make sure you’ve selected the General tab, then click the Renderer menu
D
under Video Rendering and Playback, and, if it’s available, choose Mercury Playback Engine GPU Acceleration (CUDA) (Windows) or Mercury Playback Engine GPU Acceleration (OpenCL) (Mac OS). See the sidebar “About the Mercury Playback Engine” for more details. If it’s not available, you’ll have to stay with Mercury Playback Engine Software Only.
5. Click the Video Display Format menu
E
and choose the desired format. For most projects, Timecode is the best option.
6. Click the Audio Display Format menu
F
and choose the desired format. For most projects, Audio Samples is the best option.
7. Click the Capture Format menu
G
and choose the desired format. Don’t worry if you’ll be using both DV and HDV, or neither; you can change this option when setting up for capture.8. Click the Scratch Disks tab
H
to open those settings. Note that Premiere Pro shows the available disk space for each selected location.continues on next page
D
Always choose GPU acceleration when it’s available.E
Most projects will use the normal timecode.F
Most projects will use audio samples.9. I recommend storing all content types in the same folder as the project file, which is the default
H
.10.Click OK on the bottom right of the New Project window to close the window and open your new project.
If you’re editing on a workstation, I recommend having a separate drive for your video projects, and saving each new project in a discrete folder off the root of that drive. Whenever you’re working on a system with more than one drive, I recommend that you do
not store your project files and content on the system drive.
About the Mercury Playback Engine
The Mercury Playback Engine is the collective name for the components in Premiere Pro that render and display previews from the Timeline. Briefly, the term preview refers to the ability to see how your effects look without actually rendering a file. As you would guess, the faster the preview, the more fluid the editing.
There are three components to the Mercury Playback Engine: 64-bit software, efficient multi-threading, and GPU acceleration. We’ll discuss each in turn.
All versions of Premiere Pro CS7 are 64-bit programs, which can address much more memory than 32-bit applications. This is especially important when working with large source files. Of course, a 64-bit program can access more memory only if the memory exists in the system, and you should pack as much RAM into your editing station as you can afford.
The second component is efficient multi-threading, which means that Premiere Pro can access and use as many CPUs and CPU cores as are available on your computer. So you’ll see a notice-able performance boost if you choose a 6-core CPU rather than a 2- or 4-core. If you edit on a dual-core notebook, you could be in for some significant delays.
To save a project:
1. Do one of the following:
> Choose File > Close Project
I
(Control+Shift+W [Windows] or Command+Shift+W [Mac OS]). If you’ve made unsaved changes, Pre-miere Pro will ask if you want to save them. Whatever your answer, Pre-miere Pro will then close the project and open the Welcome screen.
> Choose File > Save
I
(Control+S [Windows] or Command+S [Mac OS]). Premiere Pro saves the project, and you can resume editing. This is a good keyboard shortcut to remem-ber; whenever I see the Auto Save message flit across the screen, I save the project.> Choose File > Save As
I
(Control+Shift+S [Windows] or Command+Shift+S [Mac OS]) to save the project under a different name andstart editing the new project. Pre-miere Pro will open the Save Project dialog, where you can enter the name and storage location
J
(see step 2).> Choose File > Save a Copy
I
(Control+Alt+S [Windows] or Command+Option+S [Mac OS]) to save the project under a differ-ent name and resume editing the original project, which is useful if you want to create an archival copy of the project. Premiere Pro will open the Save Project dialog, where you can choose the name and storage loca-tion for the project copy (see step 2).2. If the Save Project dialog has opened
J
,I
Choose one of the options to save the project file.J
You know the drill: Type the name, choose the storage location, and click Save.If you choose File > Close, Premiere Pro closes whichever panel is open in the upper-left frame. Strange, but true.
To open a project:
1. Do one of the following:
> In the Premiere Pro Welcome screen, click the target project
K
. Premiere Pro opens the project.> Choose File > Open Project
L
(Control+O [Windows] or
Command+O [Mac OS]). Premiere Pro opens a dialog in which you can navi-gate to, select, or open your project file (see step 2).
> Choose File > Open Recent
M
and choose the target project. Premiere Pro opens the project.2. If the Open Project dialog has opened
N
, navigate to and select the project and click Open. Premiere Pro opens the project.K
Click the project in the Welcome screen to open it.L
Choose File > Open Project, then navigate to and open the project.M
A fast way to open a project you’ve recently edited.Working with Missing
and Offline Files
As mentioned at the start of the chapter, a project file is like a database charged with keeping track of all the content files and edits made in a project. If you move, delete, or change the name of a file that’s been imported into Premiere Pro, Premiere Pro alerts you by opening the Link Media dialog
A
. The Link Media dialog also appears when you move, delete, or change the name of a file while editing, as well as when you move, delete, or change the name of a file imported into a project and later open that project.How you respond to the dialog depends on what happened to the file and what your plans are for it. There are three sce-narios covered in the following exercises. You can do any of the following:
■ Locate the file right away, incorporating it back into the project and making the error message go away forever more.
■ Treat the files as offline. Premiere Pro will create placeholders for the file (where it was used in the project) and post a big red “Media Offline” message in the Program Monitor and Timeline. You’re free to either delete the files from the project or to later relink the placeholder to the actual media file. However, Premiere Pro will no longer prompt you with the Link Media dialog when you open the project. You know that the content is offline, and so does Premiere Pro.
■ Procrastinate. You can put off a decision regarding the missing files. Premiere Pro will again create placeholders for the file (where it was used in the proj-ect) and post a big red “Media Offline” message in the Program Monitor. How-ever, it will also prompt you with the Link Media dialog whenever you reload the project.
To immediately relink available files:
1. In the Link Media dialog
A
, choose the file to link and click the Locate button. The Link Media To dialog opensB
.2. Do one of the following:
> If the file has been moved (and the name has not changed), select the Display Only Exact Name Matches check box at the bottom of the Link Media To dialog. This makes the file easier to find.
> If the name of the file has changed, make sure the Display Only Exact Name Matches check box is unselected.
3. Navigate to and select the missing media file, and click Open. A check mark appears next to the file in the Link Media dialog
C
, and the file selection bar drops to the next missing file. If you left the “Relink others automatically” check box selected in the Link Media dialog, Premiere Pro will recover all missing files at the same location.4. Repeat as necessary to relink all avail-able files.
If you prefer to use Premiere Pro’s Media Browser to locate the missing file, select that check box in the Link Media dialog. I prefer the Link Media To dialog.
B
The dialog you’ll use to navigate to and select the missing files.To treat one or more files as offline:
1. In the Link Media dialog, do one of the following:
> Click Offline All
D
to treat all files as offline. Premiere Pro will close the dialog, and all files will be shown as offline in Premiere Pro’sE
Project panel, Timeline, and Program Monitor.> Choose a single file, and click Offline to make that file offline.
2. Either relink all subsequent files or treat them as offline. After you finish manag-ing the last file in the Link Media dialog, Premiere Pro will close the dialog and open the project.
Once the project is open, you can relink missing clips within the Project panel by right-clicking the missing clip and choosing Link Media
E
, which opens the Link Media dialog.To close the dialog and
open the project:
In the Link Media dialog, click the Cancel button. The Link Media dialog closes, and all files appear as offline within the project. The next time you open the project, the Link Media dialog will reappear.
3
Importing Media
Premiere Pro can import an exceptionally wide range of audio, video, and still-image content in myriad ways. When doing so, there are three concepts to keep in mind. First, importing content into a project doesn’t import it into the project file; you’ll have to organize and manage your content independently from the project file.
Second, if you’re working with file-based content, like footage from a DSLR or AVCHD camcorder, importing content into Premiere Pro doesn’t transfer the file to your computer—Premiere Pro can edit content from any location without actually copying the content to your hard drive. So, the first step of working with file-based content is to copy it to your hard drive. Finally, organization is key. When you’re doing the copying, I recommend creating separate folders for the content within the same folder that you’ve stored your project file in. This makes the content easy to find
In This Chapter
Import Options 36
Ingesting File-based Content in
the Media Browser 37
Importing from Tape-based Devices:
Hardware 41
Importing from Tape-based Devices:
Software 45
Using Playback Controls in
the Capture Panel 49
Working with Adobe Photoshop Files 53 Importing Files from Your Hard Disk 60 Importing Content from Premiere Pro
Projects 62
Generating Media with Adobe
Premiere Pro 65
Import Options
Let’s start with a quick list of the ways you can import content into your projects, some of which I’ll detail later in the chapter, some of which I won’t.
■ Media Browser. Importing content from the Media Browser is great for file-based content that you’d like to preview before importing.
■ Capture panel. Used when capturing video from a DV or HDV camcorder.
■ Dynamic Link. Useful when integrating content from Adobe After Effects into your project.
■ Adobe Prelude. A very useful utility when working with file-based video content, since it can copy content from your camcorder or camcorder media to your hard drive, and even transcode your media to a different format.
■ Adobe Bridge. If you’re used to Bridge from using it with other Creative Suite programs, you can also use it with Pre-miere Pro.
■ File > Import. The old standby, useful for importing all types of content when you know exactly what you’re looking for (that is, without previewing it) and where to find it.
■ Drag and drop. You can drag any sup-ported content type directly into the Project panel or Timeline from Windows Explorer (Windows) or File Manager (Mac OS) or from either operating sys-tem’s Desktop.
When working with any of these tech-niques, keep in mind the concepts dis-cussed in the intro: You’re in charge of organizing your content for efficient use, archiving, and later deletion, which usually means making sure that all content is cop-ied into the same folder that houses the project file, or a subfolder therein.
Premiere Pro can import an exceptionally broad range of native camera formats, from standard sources like DV, HDV, AVCHD, DSLR, MFX, and GFX to exotic formats like RED and ARRI ALEXA—which is a wonderful change if you’re coming over from Apple Final Cut Pro 7 or X. So if you’re concerned about whether Premiere Pro supports your camera, don’t visit the website and check the specs—just try to import your content and see what happens. 99.9 percent of the time, Premiere Pro will import it without a problem.
Ingesting File-based
Content in the
Media Browser
When working with file-based content, like video shot with an AVCHD camcorder or a DSLR, the so-called tapeless workflow has two components: copying the files from the original media onto your hard drive, and importing the files into Premiere Pro. Sometimes you can just copy the media files themselves. However, with many media formats, particularly those that span a longer clip over multiple files, Premiere Pro relies on the metadata captured with video to properly import the files. With these formats, it’s critical to copy all the metadata and content files into the folder structure that Premiere Pro expects, which varies from format to format.
For example, here you see a properly pre-served content folder viewed in the Media Browser
A
, which shows a single video file and the associated metadata. The next imageB
shows the same content in File Manager, where you can see that it’s actu-ally made up of seven discrete files. Unless you copy all those files in the proper struc-ture, Premiere Pro won’t be able to properly identify and import the necessary files. To simplify this task, Adobe has created a number of workflow guides for different camera formats, which you can access at http://tinyurl.com/workflowguides. I recom-mend checking this out before copying over your media in preparation for starting the editing process.A
What a properly preserved content folder looks like in the Media Browser.To import file-based clips
using the Media Browser:
1. Click the Media Browser tab to open the Media Browser (Shift+8)
C
.2. If you wish to maximize the Media Browser, press the accent key ( ` ) on the keyboard (to the left of the 1 key and directly above the Tab key).
3. Navigate to the folder that contains the content to import.
Navigation controls
Thumbnail view slider
File types displayed Directory viewers
List view
Thumbnail view
4. To narrow the focus of your search, do one or more of the following:
> When importing file-based camcorder input copied to your hard drive, click the Directory Viewer
D
icon to make sure that the proper viewer is selected. If you’re not getting a proper preview, check this setting.> When importing general-purpose content, narrow your search by click-ing the File Types Displayed
E
icon and choosing the desired format. Note that this option is available only when the Directory Viewer setting is set to File Directory.> To search by filename, change the Media Browser to List view
C
. To search visually, choose Thumbnail view and drag the resize slider to the desired thumbnail size.5. To preview the content, double-click a clip to play it in the Source Monitor, or click a clip and do one or more of the following:
> Press the L key to play the clip (or press L multiple times to fast-forward at faster speeds).
> Press the K key to stop playback.
> Press the J key to play the clip back-wards (or press J multiple times to rewind at faster speeds).
> Drag the slider control beneath the selected clip to drag through the clip
F
.For any clip that’s not selected in the folder, hover your pointer over the video and, without clicking, drag through the clip
G
(called hover scrubD
Choose the proper directory viewer for the content (or choose File Directory for general-purpose content).E
Narrowing the search by file type (available only when File Directory is the viewer type).F
Dragging through the clip with the slider control.6. Select the clips to import using normal operating system conventions.
7. To import the clips, do one of the following:
> Right-click any selected clip and choose File > Import
H
.> In the Premiere Pro menu, choose File > Import from Media Browser
I
.> Drag the clips onto the Project tab and then down into the Project window
J
. This one is a bit hard to follow, but it works.> Drag the clips into the Timeline. Premiere Pro imports the clips into the Project Window.
8. If you maximized the Media Browser in step 2, press the accent key ( ` ) to minimize the Media Browser into its original frame.
Note that Premiere Pro maximizes which-ever panel your pointer is hovering over, not the selected panel.
If you find hover scrub irritating, you can disable it in the Media Browser’s panel menu, available by clicking the panel menu icon in the upper-right corner.
H
Right-click and choose Import to import the selected clips.I
Or use the File > Import from Media Browser menu command.Importing from
Tape-based Devices:
Hardware
Many producers still shoot with HDV and DV camcorders, and in this section and the next, you’ll learn how to connect an HDV/ DV camcorder to your computer, config-ure Premiere Pro for captconfig-ure, and captconfig-ure video from these devices.
With the appropriate hardware, you can capture many different tape-based formats within the Premiere Pro capture interface. Unfortunately, the sheer number of camera and device permutations makes it impos-sible to document them all in this book. Once you install the hardware and connect the camera, however, the actual capture procedure should be very similar to the steps discussed here.
One of the reasons that DV and, later, HDV camcorders became so popular was that the IEEE 1394 interface required to transfer video from camcorder to computer came pre-installed on many computers, or could be added with a PCI card that cost under $20. For the purposes of this discussion, I’m assuming that you have an IEEE 1394 port (also known as FireWire) on your computer.
IEEE 1394 ports
There are multiple types of IEEE 1394 ports
A
. The initial IEEE 1394 standard had a maximum speed of 400 megabits per sec-ond (Mbps), and was known as IEEE 1394 400. This standard was used for years by Windows and Mac computers alike, as well 4-pin IEEE 1394 4006-pin IEEE 1394 400
IEEE 1394 800
Virtually all prosumer camcorders used the 4-pin connector, so any cable used for video acquisition had to have at least one 4-pin connector. Most desktop computers and workstations use 6-pin connectors, and most video producers worked on this class of machine, so the typical cable used by video producers was the 4-pin to 6-pin type
B
. Though you can pay $20 or more for such a cable, if you shop wisely you can find them for under $5.As notebook computers became more powerful, many editors started producing on them as well. In the Windows world, your notebook probably has a 4-pin IEEE 1394 connector; if so, you need a 4-pin to 4-pin IEEE 1394 connector to capture HDV/DV video. They are less common, but you can still find them for under $12 if you shop around.
In 2002, IEEE 1394 800 was introduced, which ran at 800 Mbps. The target for this standard was primarily computer periph-erals, and few, if any, camcorder vendors adopted it. However, in 2009, Apple started including IEEE 1394 800 ports on their Mac computers, which used a 9-pin connector
A
. IEEE 1394 is backward-compatible with slower connections, so this caused no serious compatibility issues, but traditional 4-pin and 6-pin cables no longer worked.If you have a Mac with an IEEE 1394 con-nector, you have two options. You can buy a custom cable with a 9-pin 800 connec-tor on one end and the required 4-pin or 6-pin 400 connector on the other. Or you can buy an adapter
C
that has a 6-pin 400B
The typical 4-pin to 6-pin IEEE 1394 cable.Verifying the connection
Though connecting your camcorder to your computer and getting it recognized by Premiere Pro should be simple, it’s often more complicated than you would expect. For this reason, it’s useful to verify the hardware connection so you know that any problems are software-related.
Once you connect your camcorder and computer via the appropriate IEEE 1394 cable, you should see some indication in the camcorder screen
D
. If you don’t see an indication like this, you’ve got a hard-ware issue, most likely a bad cable. You can also check the connection on the computer side. On Windows 7, choose Start > Devices and Printers, and if the computer sees the camcorder, it will appear in that panelE
. To see a similar confirmation on a Mac, click the Apple logo in the upper left, then choose About This Mac > More Info > System Report > FireWireF
.D
It’s a good sign when your camcorder sees the connection.To connect your camcorder
to your computer:
1. With computer and camcorder turned off, connect the IEEE 1394 cable to both computer and camcorder.
2. Turn on your computer.
3. Once your computer is fully booted, turn on your camcorder and set it to playback mode, which is often labeled VCR or Play mode.
4. Verify that your camcorder sees the connection by looking for “HDV/DV In” or an equivalent message on the screen
D
. (If the camcorder doesn’t see the connection, you’ll likely find a solution in the sidebar “Debugging Hardware Issues.”)5. Verify that your computer sees the connection. On Windows 7, choose Start > Devices and Printers, and see if the camcorder appears in the Devices panel
E
. On a Mac, click the Apple logo in the upper left, then choose About This Mac > More Info > System Report > FireWireF
. (If the computer doesn’t see the connection, see the sidebar “Debugging Hardware Issues.”)99.99 percent of the time, it’s OK to connect your camcorder to your computer when both are on and running. But when both devices are running, there is a very small chance that power coming from the computer can damage the camcorder, which happened to me in 2005.
Debugging Hardware Issues
If the hardware connection cannot be verified by the camcorder, the com-puter, or both, it could be one or more of these issues:. Faulty or improperly connected cable. Make sure the cable is firmly seated in both connections. If you have a spare cable, give it a try.
. Disabled IEEE 1394 connection. Make sure you haven’t disabled your IEEE 1394 connection in the system BIOS.
. No card. Make sure that you have an IEEE 1394 card installed in your com-puter. Some computers come with the port but no adapter, which you have to buy and connect to the card.
. Bad card. If you have a spare IEEE 1394 card, try swapping it out.
Importing from
Tape-based Devices:
Software
Once you get the hardware connected, the software side should be pretty straightfor-ward. There are a couple of features that you may not be aware of, so let’s touch on those.
First is device control. The IEEE 1394 cable that transfers video from cam-corder to computer can also carry play-back commands from the computer to the camcorder, allowing you to control the camcorder from the Premiere Pro capture interface—a nice convenience, and it enables advanced features like batch capture.
The second feature is scene detection. When you shoot either DV or HDV video, the camcorder records timecode on the tape, which includes time and date information. By analyzing the incoming timecode data, Premiere Pro can identify all the individual clips on the tape. If you enable Scene Detect in the Capture panel menu during capture
A
, Premiere Pro will capture each clip separately, which saves a lot of time over capturing all your shots in a single file and having to manually separate them.We’ll start our capture tutorial by establish-ing device control over the HDV camcorder connected to the computer. Then we’ll step through the process of capturing HDV video and enabling scene detection.
To establish device control:
1. To open the Capture panel, choose File > Capture, or press F5. The Capture panel opens
B
.2. In the upper-right corner of the Capture panel, click the Settings tab
C
.3. Below the Capture Settings window, click the Edit button to open the Cap-ture Settings dialog
C
.4. From the Capture Format menu, choose the format that you’re capturing
C
.5. Click OK to close the Capture Settings dialog
C
.6. On the bottom right of the Capture dia-log, in the Device Control section, click the Device menu
D
and make sure that DV/HDV Device Control is selected.7. On the bottom right of the Capture dialog, click the Options button
E
. The DV/HDV Device Control Settings dialog opens. If the dialog shows Online next to the Check Status button, you’ve established device control; click OK to close the dialog, and skip to the next section. Otherwise, proceed to step 8 (or see the sidebar “Debugging Soft-ware Issues”).B
Premiere Pro’s Capture dialog.C
Choosing the appropriate capture format.8. In the DV/HDV Device Control Settings dialog, check that the proper video standard is selected
F
(NTSC for North America and Japan, PAL everywhere else). Click the Check Status button. If the camera shows as Online, you’re done; if it shows as Offline, continue to the next step.9. In the DV/HDV Device Control Settings dialog, check that the proper device brand is selected
G
. If your brand isn’t listed, choose Generic. Click the Check Status button. If the camera shows as Online, you’re done; if it shows as Offline, continue to the next step.10.In the DV/HDV Device Control Set-tings dialog, check that the proper device type is selected
H
. If your type isn’t listed, choose Standard. Click the Check Status button. If the camera shows as Online, you’re done; if it shows as Offline, continue to the next step.continues on next page