Edit
digital video
Foreword by Bruce Bowman, Dynamic Media Evangelist, Adobe Systems, Inc. ®
Adobe
®Premiere
®Adobe
®Premiere
®6 Bible
Adele Droblas and Seth Greenberg
Hungry Minds, Inc.
New York, NY 10022 www.hungryminds.com
Copyright © 2001 Hungry Minds, Inc. All rights reserved. No part of this book, including interior design, cover design, and icons, may be reproduced or transmitted in any form, by any means (electronic, photocopying, recording, or otherwise) without the prior written permission of the publisher.
Library of Congress Control Number: 2001089356 ISBN: 0-7645-3456-4
Printed in the United States of America 10 9 8 7 6 5 4 3 2 1
1B/RR/QV/QR/IN
Distributed in the United States by Hungry Minds, Inc. Distributed by CDG Books Canada Inc. for Canada; by Transworld Publishers Limited in the United Kingdom; by IDG Norge Books for Norway; by IDG Sweden Books for Sweden; by IDG Books Australia Publishing Corporation Pty. Ltd. for Australia and New Zealand; by TransQuest Publishers Pte Ltd. for Singapore, Malaysia, Thailand, Indonesia, and Hong Kong; by Gotop Information Inc. for Taiwan; by ICG Muse, Inc. for Japan; by Intersoft for South Africa; by Eyrolles for France; by International Thomson Publishing for Germany, Austria, and Switzerland; by Distribuidora Cuspide for Argentina; by LR
International for Brazil; by Galileo Libros for Chile; by Ediciones ZETA S.C.R. Ltda. for Peru; by WS
Computer Publishing Corporation, Inc., for the Philippines; by Contemporanea de Ediciones for Venezuela; by Express Computer Distributors for the Caribbean and West Indies; by Micronesia Media Distributor, Inc. for Micronesia; by Chips
Computadoras S.A. de C.V. for Mexico; by Editorial Norma de Panama S.A. for Panama; by American Bookshops for Finland.
For sales inquiries and reseller information, including discounts, premium and bulk quantity sales, and foreign-language translations, please contact our Customer Care department at 800-434-3422, fax 317-572-4002 or write to Hungry Minds, Inc., Attn: Customer Care Department, 10475 Crosspoint Boulevard, Indianapolis, IN 46256.
For information on licensing foreign or domestic rights, please contact our Sub-Rights Customer Care department at 212-884-5000.
For information on using Hungry Minds’ products and services in the classroom or for ordering examination copies, please contact our Educational Sales department at 800-434-2086 or fax 317-572-4005. For press review copies, author interviews, or other publicity information, please contact our Public Relations department at 317-572-3168 or fax 317-572-4168.
For authorization to photocopy items for corporate, personal, or educational use, please contact Copyright Clearance Center, 222 Rosewood Drive, Danvers, MA 01923, or fax 978-750-4470.
LIMIT OF LIABILITY/DISCLAIMER OF WARRANTY: THE PUBLISHER AND AUTHOR HAVE USED THEIR BEST EFFORTS IN PREPARING THIS BOOK. THE PUBLISHER AND AUTHOR MAKE NO REPRESENTATIONS OR WARRANTIES WITH RESPECT TO THE ACCURACY OR COMPLETENESS OF THE CONTENTS OF THIS BOOK AND SPECIFICALLY DISCLAIM ANY IMPLIED WARRANTIES OF MERCHANTABILITY OR FITNESS FOR A PARTICULAR PURPOSE. THERE ARE NO WARRANTIES WHICH EXTEND BEYOND THE DESCRIPTIONS CONTAINED IN THIS PARAGRAPH. NO WARRANTY MAY BE CREATED OR EXTENDED BY SALES REPRESENTATIVES OR WRITTEN SALES MATERIALS. THE ACCURACY AND COMPLETENESS OF THE INFORMATION PROVIDED HEREIN AND THE OPINIONS STATED HEREIN ARE NOT GUARANTEED OR WARRANTED TO PRODUCE ANY PARTICULAR RESULTS, AND THE ADVICE AND STRATEGIES CONTAINED HEREIN MAY NOT BE SUITABLE FOR EVERY INDIVIDUAL. NEITHER THE PUBLISHER NOR AUTHOR SHALL BE LIABLE FOR ANY LOSS OF PROFIT OR ANY OTHER COMMERCIAL DAMAGES, INCLUDING BUT NOT LIMITED TO SPECIAL, INCIDENTAL, CONSEQUENTIAL, OR OTHER DAMAGES.
Trademarks:Adobe and Premiere are registered trademarks of Adobe Systems, Inc. All other trademarks are the property of their respective owners. Hungry Minds, Inc., is not associated with any product or vendor mentioned in this book.
About the Authors
Adele Droblas is an artist, writer, and computer consultant. She has produced digi-tal video clips that appear on the Web for her clients.
Foreword
T
hese times are very exciting for those of us who are involved with desktop dig-ital video. We’re in the midst of a digdig-ital video revolution, much like the desk-top publishing revolution that took the world by storm in the 1980s. Look at the evidence. Today’s digital cameras are as good as BetaCam at about one-fifth the price. Computer CPUs are fast enough to handle the demands of desktop video. Non-linear editing software (NLE) is robust and has professional features. RAM and fast storage are cheap, and operating systems are more reliable. And modern video subsystem technologies (DirectX, QuickTime) have the required professional fea-tures. These factors combine to make creating broadcast quality video on the desk-top or lapdesk-top feasible. Not only is it feasible, but it is even affordable for hobbyists. I’m proud to say that with Adobe Premiere 6, our customers and journalists are telling us that we have brought Premiere up to the level expected of Adobe-caliber applications. Many new features help make this statement true, but the improved stability and performance are probably the most significant. You’ll also come to love the new Audio Mixer, Storyboard window, After Effects plug-in support, and such innovative new features as the Settings Viewer and Automate to Timeline. These new features and an improved workflow make editing in Premiere 6 a joy. We’ve worked hard to design Premiere to integrate well with the other Adobe appli-cations. In Adobe Premiere 6, integration is excellent with Adobe After Effects, Photoshop, Illustrator, and GoLive. Seamlessly and efficiently working with the other Adobe applications is Premiere’s single greatest competitive advantage. The integration is so good and so important in the video production workflow that instead of directly comparing Premiere to a competitor NLE, you must consider the entire suite of Adobe applications.Here are a few examples of how these applications work together: You can use Photoshop plug-ins in Premiere, After Effects, and Illustrator. You can import files from Photoshop and Illustrator into Premiere and After Effects with their layers intact. (Layer name, position, visibility, even Adjustment Layers and blending modes are preserved.) Additionally, you can open Premiere projects in After Effects for fur-ther compositing work. In After Effects, you can paste in Illustrator or Photoshop paths to be used as masks — or even keyframe data for position or visual effects. Premiere supports After Effects plug-ins. Premiere and After Effects’ Edit Original command (Edit ➪Edit Original) enables you to open files in the application that cre-ated them. After you save the files, they’re updcre-ated in Premiere or After Effects. Finally, Premiere and After Effects can save QuickTime movies with URLs, Chapter points, and even frame target references that you can use in Adobe GoLive.
ix
Forewordsharing common keyboard shortcuts and tabbed palettes. This design translates to comfort and familiarity for new Premiere users who have used other Adobe applica-tions, resulting in a gentler learning curve.
The variety and capabilities of Nonlinear Editing systems have never been greater. The versatility and popularity of Adobe Premiere have enabled it to grow to the point where it offers more choices for hardware, third party effects software, and training materials than any other NLE. Premiere has been designed to work on video content for CD, DVD, Web, and broadcast, including HDTV.
From day one, Premiere has processed video by using filters and transitions and has provided the ability to superimpose titles. Just like applying a filter to a still image in Photoshop, this involves the computer doing a lot of math, crunching numbers for a while before it gives you the final result. We call this rendering, and thanks to today’s faster CPUs, it takes less time than ever. Real-time editing is now available, affordable, and gives instant gratification. No rendering time is needed on these systems, so editors have more time to experiment and be creative. In the last two years, the prices for real-time NLE systems have dropped from over $50,000 to under $1,000! Premiere editors have been working in real-time with MJPEG, DV, MPEG2, and uncompressed video since the fall of 1998 on the Windows platform, and in the spring of 2001, Premiere’s Mac users can also experience this bliss. The CPUs are so fast in today’s computer systems that new hardware is being designed so that much of the processing of digital video is being done on the CPU instead of on a dedicated video card. What’s so exciting about this is that the pro-cessors are going to keep getting faster, which means the speed of video processing will scale each time the CPU is upgraded (with no necessary changes to the soft-ware). The best video cards on the market today use a combination of software and hardware codecs to most efficiently process the video. We will see real-time video processing done by software codecs very soon!
The Web enables us to easily communicate, to share ideas, and seek our fortune on a global basis. Motion and sound make Web sites more exciting, memorable, and dynamic. In today’s fiercely competitive environment, businesses with an online presence are looking to interactive animations and streaming audio and video con-tent to help them build compelling sites. Not long ago, we had low frame rate, postage stamp sized video that took ages to download. Today, with better stream-ing technology and the increased bandwidth in the home and workplace, Web video is very compelling. We’ll see more events being streamed live and archived for on-demand viewing. Streaming Video Hosting services, previously only accessible by big companies due to the cost, are beginning to offer affordable rates to individual people. The Adobe suite of applications offers you everything you need to develop, deploy, and manage high-impact Web sites so that you can take advantage of these exciting times.
devices supported for frame accurate device control; DV transmitting when render-scrubbing and full quality playback. For the Web, Adobe has partnered with RealNetworks, Microsoft, Apple, and Terran to deliver excellent streaming Web video export capabilities in Premiere 6. Video compression is a complex process, and wrong choices along the way can cause less-desirable results and waste pre-cious time. In Premiere 6, we’ve provided simple wizard interfaces that walk you through the process and guarantee good results with little or no knowledge of video compression. For advanced users, the details are just below the surface and easily revealed if desired, allowing experimentation and fine-tuning. With Premiere 6, it has never been easier to go from shooting digital video to delivering it on the Web. Welcome to Adobe Premiere and the world of digital video. Here, we live on the bleeding edge, constantly pushing our gear and software to their limits. This makes for a thrilling, but at times bumpy, ride. I’d like to invite you to join our community and help shape the future of Premiere.
✦If you think of a great idea for how Premiere can be improved, we would love to hear from you. Please include lots of detail and send us an e-mail: [email protected]. Our interface designers, product managers, and engineers do read these, but please do not expect a personal response. ✦Try the Adobe User to User Forums at www.adobe.com/motion/
fourms/main.html where you can lurk or actively participate in discussions about digital video, creative solutions to problems, special techniques, and so on. Forums are offered for each Adobe application and by platform.
✦If you need to hire some help or are ready to offer your services, Adobe’s ePortfolio should be your first stop at www.adobe.com/ePortfolio. ✦Finally, after you have created some work that you are proud of, we’d
love to see it! You can even submit it to us at www.adobe.com/motion/ firstperson/demoreel.html for possible inclusion on our prestigious customer demo reel to be used at industry trade shows and events.
Adele, Seth, and Hungry Minds have done an amazing job with the Adobe Premiere 6 Bibleby taking a very deep and powerful program and breaking it into logical sec-tions that show you what you need to know. Adobe Premiere 6 Bibleis a powerful reference tool that also encourages browsing to learn new techniques. The Adobe Premiere 6 Biblenot only covers how to use Premiere in detail, but also teaches you how to get the most out of the Adobe suite of products.
Bruce Bowman
Preface
As you read these words, a revolution in desktop video is taking place. One of the main causes of the revolution is the advent of the digital video camera, which digi-tizes high-quality video directly in the camera. After the signal has been digitized, it can be transferred directly over a cable to a personal computer. After your com-puter gets hold of the video, you need Adobe Premiere to help you creatively shape it into a compelling desktop video production.
Adobe Premiere combines power and ease of use to provide a complete authoring environment for producing desktop digital video productions. By using Premiere, you can capture video directly from your camcorder into Premiere’s capture win-dow. After you’ve captured or imported video and sound, you can assemble your clips into a production by simply clicking and dragging a video clip from one win-dow to another. Placing clips and reassembling them is almost as easy as snapping together the cars in a child’s toy railroad train set. Creating transitions that dis-solve one scene into another or wipe one scene away to reveal another is simply a matter of dragging an icon representing the transition between the two clips. To fine-tune your work, Premiere provides numerous digital editing tools — some similar to those available in professional editing studios; others only possible through digital magic. After you’ve finished editing, you can output your digital movie with settings for the Web, videotape, or CD-ROM. If you’ve ever tried creating a video production by using traditional videotape hardware, Adobe Premiere will revolutionize the way that you work.
Who Should Read This Book
How This Book Is Organized
If you read the Adobe Premiere 6 Bible’s chapters in order, you’ll gradually become an expert at using Adobe Premiere. However, we expect that most readers will jump in and out of chapters as needed or as their interest moves from subject to subject. Throughout the book, we’ve included numerous step-by-step tutorials to guide you through the process of creating video sequences by using many Adobe Premiere features. As you work, you’ll find numerous clips on the CD-ROM that will aid you in quickly and efficiently creating short examples that illustrate and help explain chapter topics.
For updated information on digital video, check out these Web sites: www. addesigngraphics.comand www.bonitavida.com.
The Adobe Premiere 6 Bibleis broken down into seven main parts, each described in the following sections.
Part I: Getting Started with Premiere
Part I provides an introduction to as well as an overview of Adobe Premiere. Chapter 1 includes a getting-started tutorial that introduces you to the basics of creating a desktop video production by using Adobe Premiere. Chapter 2 provides an overview of the Premiere interface: its menus, palettes, and tools. Chapter 3 introduces you to the Premiere program’s basic project settings, and Chapter 4 shows you how to capture video directly into Premiere from a digital video camcorder or an analog camcorder.
Part II: Editing with Premiere
Part II provides a thorough look at the basics of putting together a digital video production. Chapter 5 shows you how to use the Premiere Timeline to assemble a video production. Chapter 6 continues editing essentials, providing a look at the Premiere audio features. Chapter 7 rounds out this part with a discussion of how to use the Premiere program’s transitions to smooth changes from one clip to another.
Part III: Working with Type and Graphics
Part III is dedicated to type and graphics. This part shows you how to use the Premiere Title window and titling tools. You’ll learn how to create rolling and scrolling credits as well as how to create titles with drop shadows . You’ll also learn how to create graphics by using the Premiere Title window and Adobe Illustrator and Adobe Photoshop. Chapters 8 and 9 cover creating type and graphic effects. Chapter 8 also provides several examples of using transparency effects with static and moving text.
xiii
PrefacePart IV: Advanced Techniques and Special Effects
Part IV covers advanced editing techniques and special effects. Chapter 10 covers the sophisticated editing features in Premiere, such as three- and four-point edits. It also provides a discussion of using the Premiere program’s Rolling Edit and Ripple Edit tools as well as using its Slip and Slide editing tools. Chapter 10 also covers precise frame-by-frame editing by using the Trim view of the monitor window. Chapter 11 reviews every effect in the Premiere Video Effects palette, while Chapter 12 covers all the Premiere program’s transparency effects, and Chapter 13 covers color mattes and backdrops. If you wish to create motion effects in Premiere, check out Chapter 14, which provides a thorough look at the Motion dialog box. Chapter 15 will take you on a guided tour and show you how to enhance your video by using both Adobe Premiere and Adobe Photoshop.Part V: Outputting Digital Video from Premiere
After you’ve learned how to create a digital video production in Premiere, your next concern is how to output your work in the best possible manner. This part covers all the bases. Chapter 16 reviews the Premiere settings for exporting QuickTime and AVI movies. Chapters 17 and 18 describe how to obtain the best possible quality when outputting a movie to the Web. Chapter 19 provides a discussion of outputting to videotape; while Chapter 20 covers outputting to CD-ROM as well as using Premiere with Macromedia Director.
Part VI: Premiere and Beyond
The chapters in this section (Chapters 21, 22, 23, 24, 25, and 26) provide a look at using Premiere with different software packages, such as Adobe Photoshop, Adobe Illustrator, and Adobe After Effects. Chapter 21 provides a look at how you can use Adobe After Effects to edit Premiere projects. Chapter 22 shows you how to create alpha channels in Photoshop that can be used in Premiere; it also shows you how to edit Premiere Filmstrip files in Photoshop and export them back into Premiere. Chapter 23 shows how to create graphics and text by using Adobe Illustrator. These graphics and texts are then imported and used in Adobe Premiere, many times as masks. Chapters 24 and 25 deal with working with Adobe After Effects. In Chapter 24, you learn how to import a Premiere project into After Effects and create sophis-ticated masks by using After Effects. In Chapter 25, you also learn how to use the After Effects powerful motion paths and how to create composite video clips. The last chapter in this part, Chapter 26, provides a look at third-party plug-ins, which add to Premiere’s special effects generating power.
Appendixes
Apple Computer. If you are going to distribute a Premiere movie on a CD-ROM as a QuickTime movie, you’ll probably want to include QuickTime; therefore, you’ll need to obtain a software license from Apple Computer. The hardware overview
appendix provides a look at computer systems and IEEE1394/FireWire ports, and it also provides a short guide to DV camcorders and audio. The resource appendix provides a Web guide for digital video and sound equipment as well as the Web addresses for magazines and publishers specializing in video, audio, and lighting.
Things to Note
The Adobe Premiere 6 Bibleis a cross-platform book. When keyboard instruction for Mac and Windows differ, Macintosh keyboard commands are provided first;
Windows keyboard command are given next. For instance: To save your file, press Command-S (Ctrl-Z). Here are some other conventions in this book that you should note.
Key combinations
When keyboard instructions call for pressing several keys simultaneously, the keys are separated by a plus sign. For example: To deselect all clips in the Timeline, press Command+Shift+A (Ctrl+Shift+A).
Mouse instructions
When the text specifies to click an item, move the mouse pointer over the item and click once. Windows users should always click the left mouse button unless
instructed otherwise. If the text specifies double-click, click the mouse button twice without moving the mouse.
Menu commands
Acknowledgments
Thanks to Adobe Systems for creating products that allow us to express our cre-ative visions. Thanks also to Steve Jobs, whose vision it was to make a computer that allows us to be creative by allowing us to combine type, artwork, photographs, sound, and video into a masterpiece.
A special thanks to Matt Douglas, Kristen Chang, Patty Stoop, Wendy Shobloom, Barabara Rice, Eric Lundblade, and Amacker Bullwinkle at Adobe Systems for their help.
Thanks to everyone at Hungry Minds, Inc., especially Mike Roney who helped get the Premiere Bible off the ground and kept us on schedule. Thanks to John Kilcullen for believing in us. Thanks also to Chandani Thapa and Julie Campbell Moss for doing such a careful and meticulous job. Thanks, too, to the art people and every-one who helped put the CD together – Brock Bigard, Marisa Pearman, and Laura Moss. Thanks to Rev Mengle for helping put all the loose ends together.
Thanks to John Washburn for his job in tech editing the Adobe Premiere 6 Bible. Thanks to Rachel Branch at Sony for lending us a Sony digital camcorder, which we used throughout the book. Thanks also to Lisa Lorik at Eastman Kodak for the use of a digital camera, which we also used to capture images for the book.
Thanks to Midnight Sun Music for letting us videotape them while they were performing. A glimpse of their performance can be found in Chapter 12 and on the CD-ROM. Thanks to Kevin Totoilan for his musical input. Thanks to all the people (family, friends, especially our musician and computer friends, the children of today, who are the future, and to all those people we have met that radiate peace and happiness for all) who have touched our lives and inspired us to want to cap-ture those wonderful moments that life has to offer. For links to some inspiring sites, go to bonitavida.com. Hopefully, Adobe Premiere 6 Biblewill help you capture those special moments in your life and allow you to share them with friends and loved ones. We hope you enjoy Adobe Premiere 6 Bible.
Don’t save anything for a special occasion. Everyday that you live is a special day. . . I have learned that life should be filled with experiences to enjoy, not just to live by. Today I save nothing . . . The words, some day and one of these day are desappearing from my vocabulary. If it is worth seeing it, listening to it or doing it, I want to see it, listen to it and do it . . . Tommorrow we all take for granted . . . It is the small things that one does not do, the ones that make me mad . . . And everyday I say to myself, this day is a special day. Everyday hour, every minute is special . . . Don’t be too lazy or too busy to take a few moments to touch some-one’s life, talk to a friend, tell a loved one you love them or to busy to do something special to help this world be a brighter, happier, kinder place . . . If you think, one of these days, then one of these days may be far away or one of these days may never happen.
Contents at a Glance
Foreword. . . viii
Preface. . . xi
Acknowledgments . . . xv
Part I: Getting Started with Premiere . . . 1
Chapter 1: Premiere Quickstart . . . 3
Chapter 2: Premiere Basics . . . 25
Chapter 3: Introduction to Premiere Digital Video Project Settings . . . 47
Chapter 4: Capturing Video . . . 59
Part II: Editing with Premiere . . . 81
Chapter 5: Basic Editing in Premiere . . . 83
Chapter 6: Audio Editing . . . 105
Chapter 7: Creating Transitions . . . 137
Part III: Working with Type and Graphics . . . 185
Chapter 8: Creating Titles and Graphics in the Title Window . . . 187
Chapter 9: Creating Type and Graphic Effects . . . 217
Part IV: Advanced Techniques and Special Effects . . . 241
Chapter 10: Advanced Editing Techniques . . . 243
Chapter 11: Using Video Effects . . . 269
Chapter 12: Superimposing . . . 311
Chapter 13: Using Color Mattes and Backdrops . . . 339
Chapter 14: Creating Motion Effects in Premiere . . . 359
Chapter 15: Enhancing Video . . . 387
Part V: Outputting Digital Video from Premiere. . . 413
Chapter 16: Exporting QuickTime and AVI Movies . . . 415
Chapter 17: Outputting to the Web and Intranets . . . 427
Chapter 18: Exporting Video to the Web . . . 447
Chapter 19: Exporting to Videotape and Edit Decision Lists . . . 457
Part VI: Premiere and Beyond . . . 487
Chapter 21: Trimming Clips in After Effects . . . 489
Chapter 22: The Photoshop Connection . . . 501
Chapter 23: Using Adobe Premiere and Adobe Illustrator . . . 517
Chapter 24: Working with Masks in Adobe After Effects . . . 541
Chapter 25: Adding Special Effects in Adobe After Effects . . . 553
Chapter 26: Third-Party Special Effects Software . . . 573
Appendix A: What’s on the CD . . . 583
Appendix B: Places to Visit on the Web . . . 585
Appendix C: Licensing QuickTime . . . 591
Appendix D: The Digital Video Recording Studio . . . 593
Index . . . 601
Hungry Minds, Inc. End-User License Agreement . . . 617
Contents
Foreword. . . viii
Preface. . . xi
Acknowledgments . . . xv
Premiere’s Floating Palettes . . . 31
xxi
ContentsPart II: Editing with Premiere
81
Chapter 7: Creating Transitions . . . 137
Part III: Working with Type and Graphics
185
xxiii
Premiere technique: Creating an openingtitle with the Title window . . . 213 Premiere technique: Creating a logo . . . 215
Chapter 9: Creating Type and Graphic Effects . . . 217
Creating and Importing Graphics from Adobe Photoshop . . . 217 Creating a digital movie using Adobe Photoshop and
Adobe ImageReady . . . 218 Creating a digital movie of warped text using
Photoshop and ImageReady . . . 222 Creating the Time Flies project . . . 224 Creating Semitransparent Text . . . 227 Creating beveled text in Photoshop . . . 227 Creating the Zoo project . . . 228 Using Video Effects to Animate Adobe Illustrator Type and Graphics . . . 230 Creating curved text in Adobe Illustrator . . . 231 Creating a graphic in Adobe Illustrator . . . 232 Creating the Hurricane Season project . . . 233 Animating Titles over Graphics by Using Motion and
Reverse Alpha Channel Key . . . 235
Part IV: Advanced Techniques and Special Effects
241
xxv
Creating Backgrounds and QuickTime Movies with Painter . . . 354Using Photoshop’s Image Adjust Commands . . . 402
Part V: Outputting Digital Video from Premiere
413
Chapter 16: Exporting QuickTime and AVI Movies . . . 415
xxvii
Chapter 20: Outputting to CD-ROM and Using Macromedia Director 471
Exporting Premiere Movies to CD-ROM . . . 472
Part VI: Premiere and Beyond
487
Chapter 23: Using Adobe Premiere and Adobe Illustrator . . . 517
Editing an Oval/Rectangle Mask withGetting Started
with Premiere
✦ ✦ ✦ ✦In This Part
Chapter 1 Premiere Quickstart
Chapter 2 Premiere Basics
Chapter 3 Introduction to Premiere Digital Video Project Settings
Chapter 4 Capturing Video
✦ ✦ ✦ ✦
P A R T
Premiere
Quickstart
W
elcome to the world of Adobe Premiere and digital video.For both experts and beginners alike, Adobe Premiere 6 packs the power you need to create sophisticated digital video pro-ductions. You can create digital movies, documentaries, sales presentations, and rock videos directly from your desktop computer or your laptop. Your digital video production can be output to videotape or the Web or can be integrated into pro-jects in other programs, such as Adobe After Effects, Adobe Live Motion, Macromedia Director, and Macromedia Flash. This chapter introduces you to the basics of Adobe Premiere: understanding what it is and what you can do with it. This chapter also provides a simple Quickstart project to get you acquainted with the Adobe Premiere production process. You’ll see how easy it is to load digital video clips and graph-ics into an Adobe Premiere project and to edit them into a short presentation. After you’ve completed the editing pro-cess, you’ll export the movie into a QuickTime digital video movie so that it can be used in other programs or outputted on the Web.
Here’s a short list of some of the production tasks that you can accomplish with Premiere:
✦Edit digital video clips into a complete digital video production. ✦Capture video from a digital camcorder or videotape recorder. ✦Capture audio from a microphone or audio recording device. ✦Load stock digital graphics, video, and audio clips.
✦Create titles and animated title effects, such as scrolling or rolling titles. ✦Integrate files from different sources into your production. Premiere loads
digital video and audio files. It also loads graphics created in Photoshop and Illustrator, as well as reading JPEG and TIFF files.
✦Create special effects, such as distortions, blurring, and pinching.
✦Create motion effects in which logos or graphics move or bounce across the screen.
✦Create transparency effects. You can superimpose titles over backgrounds, or use color, such as blue or green to mask the background from one image so that you can superimpose a new background.
✦Edit sound. Premiere enables you to cut and assemble audio clips, as well as create sophisticated audio effects, such as cross-fades and pans.
✦Create transitions. Premiere can create simple dissolves from one scene to another, as well as a host of sophisticated transition effects, such as page curl and curtain wipes.
✦Output files in a variety of digital formats. Premiere can output QuickTime and Video for Windows files. These files can be viewed in other programs, as well as on the Web. Premiere also features Web-specific file formats, such as ani-mated GIF. You can also use Premiere’s Advanced RealMedia Export command to export your clips to RealVideo format for the Web.
✦Output files to videotape.
✦Output Edit Decision Lists. Edit Decision Lists can be used by professional production houses to re-create your digital production on videotape.
How Premiere Works
5
Chapter 1 ✦ Premiere QuickstartIn traditional video production, all production elements are transferred to videotape. During the editing process, the final production is electronically edited onto one final or program videotape. Even though computers are used while editing, the lin-ear or analog nature of videotape makes the process very time-consuming — during the actual production-editing session, tapes must be loaded and unloaded from tape or cassette machines. Time is wasted as producers simply wait for videotape machines to reach the correct editing point. The production is usually assembled sequentially. If you want to go back to a previous scene and replace it with one that is shorter or longer, all subsequent scenes must be rerecorded to the program reel. Programs such as Premiere have revolutionized the entire process of video editing. Digital video and Adobe Premiere eliminate many of the time-consuming production chores of traditional editing. When using Premiere, you don’t need to hunt for tapes or load and remove them from tape machines. When producers use Premiere, all production elements are digitized to disk. Each element in a production, whether it is a video clip, a sound clip, or a still image, is represented by an icon in Premiere’s Project window. The final production is represented by icons in a window called the Timeline. When you need to use a video clip, sound clip, or still image, you simply click on it in the Project window, and drag it into the Timeline window. You can place the items of your production down sequentially, or drag them anywhere to different tracks in the Timeline window. As you work, you can access any portion of your production by clicking on the desired portion in the Timeline window with the mouse. You can also use the mouse to click on either the beginning or end of a clip and to shorten or extend the clip duration.
To fine-tune your edits, you can view and edit the clips frame-by-frame in the Timeline window. You can also set in and out points in the Clip or Monitor window. Setting an In point affects where a clip starts playing, and setting an Out point affects where a clip stops playing. Because all clips are digitized (and no videotape is involved), Premiere can quickly adjust the final production as you edit.
Here’s a quick summary of some of the digital-editing magic that you can perform in Premiere by simply dragging clips in the Timeline. (Chapters 5 and 10 both provide in-depth discussions of Premiere’s editing techniques.)
✦Rolling edit —as you click and drag to add frames to the clip in the Timeline, Premiere automatically subtracts from the frames in the next clip. As you click and drag to remove frames, Premiere automatically adds back frames from the next clip in the Timeline.
✦Slip edit —As you drag a clip left or right, its In and Out points automatically change, but the program duration remains the same.
✦Slide edit —As you drag a clip left or right, its duration is kept intact, but Premiere changes the In or Out points of the preceding or succeeding clip. As you work, you can easily preview edits, special effects, and transitions. Changing edits and effects is often a simple matter of changing in and out points. There’s no hunting down the right videotape or waiting for the production to be reassembled on tape. (You do need to wait for a Preview to be created, however. Creating a pre-view is simple; just choose Timeline➪Preview. The speed of the preview depends upon how fast your computer is, and how big your hard drive is. If you have a fast external hard disk with a large capacity, you can set Premiere to use that drive to create temporary preview files. To do so, choose Edit➪Preferences➪Scratch Disks & Device Control). When all of your editing is completed, you can export the file to videotape or to a digital file format. You can export it as many times as you want, in as many different file formats as you want.
Your First Video Production
The following sections provide a Quickstart tutorial that shows the basics of what it takes to create a video production in Adobe Premiere.
In this project, you’ll create a video production called “Welcome to America.” Figure 1-1 shows frames of the production in Premiere’s Timeline window. The production begins with a highway scene. After a few seconds, a curtain wipe transitions to the scene of a waving American flag. (The curtain wipe transition is found in the Transitions palette. For more information on working with transitions, turn to Chapter 7.) Soon the American flag dissolves into a sky. The sky then transitions into an image of the Statue of Liberty. Finally the word America gradually fades in over a graphic of the Statue of Liberty.
Starting a Premiere Project
7
Chapter 1 ✦ Premiere QuickstartPremiere, the program automatically assumes that you wish to create a new project.
Figure 1-1: Frames from the Welcome to America video clip
If Premiere is already loaded and you already have a project onscreen, you need to close that project because you can only have one project open at a time.
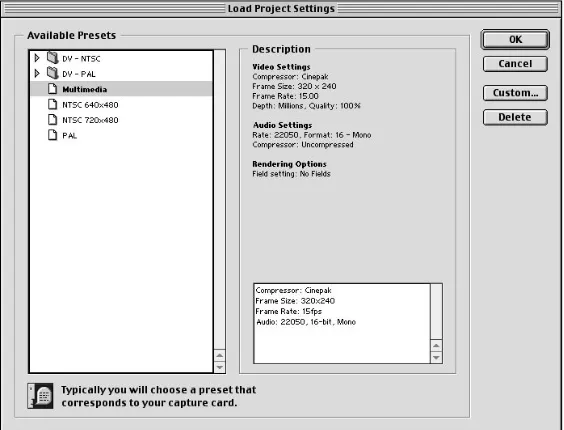
Before you can start importing files and editing, you must choose your project settings in the Load Project Settings dialog box, which is shown in Figure 1-2. The dialog box opens whenever a new project is created. Its primary purpose is to enable you to quickly use predetermined video and audio settings. The most impor-tant project settings determine the frames per second and the frame size (viewing area) of your project, as well as how the digital video will be compressed. For a detailed description of project settings, see Chapter 3.
Figure 1-2: Use the Load Project Settings dialog box to pick project presets.
For this sample production, click the Multimedia (Mac) or the Multimedia
QuickTime (Windows) choice. These settings should work well for a video produc-tion that would be viewed on a computer. As you can see from the Load Project Settings dialog box, QuickTime multimedia provides a frame size of 320 ×240 at 15 video frames per second (fps). The Cinepak compressor provides good quality for Web and multimedia. Unfortunately, you may need to wait several minutes for your project to build previews while the compression is taking place. Note that the compression and frame size can easily be changed. For instance, you might wish to make the frame size smaller for Web output.
9
Chapter 1 ✦ Premiere QuickstartAfter you select the Multimedia QuickTime preset, click OK to create the new project.
Importing production elements
After you’ve chosen your project settings, Premiere opens the Project, Timeline, and Monitor windows, along with two palette groups.
Once the Premiere windows are open onscreen, you’re ready to import the various graphic and sound elements that will comprise your digital video production. All the items that you import are stored in the Project window, which is shown in Figure 1-3. Each item is stored as an icon. Next to the icon, Premiere displays whether the item is a video clip, an audio clip, or a graphic.
Choosing a Workspace
When you start Premiere for the first time, a dialog box opens in which you must choose your default workspace. After you make your choice, Premiere sets up windows and palettes geared to your specific needs. You must choose between A/B Editing or Single-Track Editing.
If you are new to Premiere or don’t have any editing experience, your best bet is to choose Edit: A/B workspace. This workspace assumes that you will be editing by using the mouse to drag clips to the Timeline. The A/B workspace also enables you to easily edit clips by set-ting In and Out points in the Clip window (the Clip window opens when you double-click on a clip). In this workspace, Video Track 1A and Video Track 1B visually show you how clips overlap when transitions are created. This is how the workspace is set up for this chapter.
Figure 1-3: The Project palette with the items needed to create the Welcome to America video clip
Premiere enables you to import the two most popular digital video formats: QuickTime and AVI (video for Windows). Premiere can also import AIFF and WAV sound files. It also reads graphic files stored in TIF, JPEG, BMP, and Photoshop formats.
When importing into Premiere, you can choose whether to import one file, multiple files (by pressing and holding the Shift key), or an entire folder. If desired, you can even import one project into another, using the File➪Import➪Project command. Here’s how to load the production elements for the Welcome to America project:
1.Choose File➪Import➪Folder.
2.Open the Chapters folder on the CD-ROM that comes with this book. Select the Chapter 1 folder and then click OK.
You should now see the Chapter 1 folder in the Projects window. To view all the files, double-click on the Chapter 1 folder. Figure 1-3 shows the Project palette with items needed to create the Welcome to America clip.
Here is a list of the files needed to create the Welcome to America clip:
✦A scanned image of the Statue of Liberty that was manipulated in Photoshop. ✦A scanned picture of clouds.
11
Chapter 1 ✦ Premiere Quickstart✦A video clip of a highway shot with a Sony digital camcorder and captured in Premiere.
✦A video clip of a waving flag shot with a Sony digital camcorder and captured in Premiere.
✦A title file created in Premiere. (Creating titles in Premiere is discussed in Chapter 8.)
✦A sound clip.
Viewing clips in the Project window
Before you begin assembling your production, you may wish to view a clip or graphic, or listen to an audio track. You can obtain a thumbnail preview of any of the clips in the Project window by clicking the clip. The preview appears at the upper-left corner of the Project window. If you are previewing a video or audio clip, a small triangle (Play button) appears below the preview. Click the Play button to see a preview of a video clip, or to hear an audio clip. If you prefer, you can click and drag on the slider next to the Play button to gradually view the clip.
By default, if you are using the A/B workspace, double-clicking the clip in the Project window opens the clip in the Clip window. You can preview the clip here by clicking Play (black triangle). If you are using the Single workspace, double-clicking the clip in the Project window opens the clip in the Monitor window. To open the clip in the Clip window, in Single Track workspace, Mac users press Option (PC users press Alt) while double-clicking on the clip in the Project window.
Using a storyboard
Before diving headfirst into a video production, it’s a good idea to plan your pro-duction first by creating a storyboard. A storyboard is a simple visual representa-tion of your producrepresenta-tion, often resembling a series of cartoons with descriprepresenta-tions underneath the visuals.
Note
Obtaining Production Clips
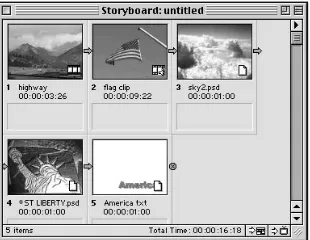
Premiere’s storyboard feature allows you to import clips into a storyboard window or to drag clips into a storyboard window to help you in your pre-production plan-ning. Figure 1-4 shows a simple storyboard we created for our Welcome to America project. Viewing it should give you an idea of how the production will be edited.
Figure 1-4: Using a Storyboard can help in your pre-production planning.
Here’s how to create your own storyboard: 1.Choose File➪New➪Storyboard.
2.Drag clips from the Project window into the Storyboard window. (If clips haven’t been loaded yet, you can load them directly into the storyboard window by choosing File➪Import File or File➪Import Folder.)
3.To add descriptive text to the storyboard, double-click in the white rectangu-lar area below each image.
4.At any point, click and drag in the Storyboard window to rearrange the graphics.
5.To save your storyboard, choose File➪Save from the Storyboard window. You can have Premiere automatically place the items from the Storyboard window to the Timeline window by choosing Automate to Timeline from the Storyboard pop-up menu.
Creating the Project
13
Chapter 1 ✦ Premiere QuickstartHere’s how to move an item from the Project window to the Timeline window: ✦Click a production element in the Project window, and drag it to a video track
in the Timeline window. The item will appear in the Timeline as an icon. The duration of the clip or graphic is represented by the length of the clip in the Timeline.
✦After an item is in the Timeline, you can select and move a clip by clicking in the middle of the icon representing the clip.
✦To select multiple clips in the Timeline, select the Range Select tool, then click and drag over the clips that you wish to select; or select the Range Select tool, and then press Shift as you select multiple clips. For more information on using the Range Select tool, turn to Chapter 5.
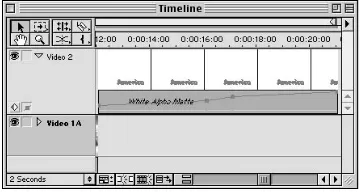
Figure 1-5 displays the Timeline window for the Welcome to America project. The Highway video clip appears in Video Track 1A. Notice the next clip (the Flag clip) appears in Video Track 1B. Two tracks are used to help show transitions that include elements from the Video Track 1A and Video Track 1B. Between the two tracks is a transition track to which transitions are dragged from the Transitions palette.
Figure 1-5: The Timeline window with the items for the Welcome to America video clip
Here are the steps for adding the first two clips to the Timeline window:
1.Start by dragging the Highway clip from the Project window into Video Track 1A.
2.Next, drag the Flag clip into Video Track 1B. For the time being, position the clip at the point in the Timeline at which the Highway clip ends.
3.Save your work by choosing File➪Save.
If you don’t see Video Track 1A and Video Track 1B, your workspace is probably set to Single Track Editing. To view Video Tracks 1A and 1B, choose Window➪ Workspace➪A/B Editing.
Changing the time zoom level
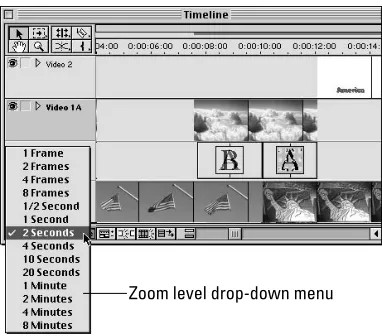
Most Premiere users create their video projects at 15 or 30 frames per second. Viewing all of these frames on the Timeline quickly consumes Timeline space. As you work, you’ll probably want to switch time intervals back and forth between viewing individual frames and viewing frames by seconds.
To switch time intervals on the Timeline, click the Timeline Zoom level drop-down menu at the lower left of the Timeline. Figure 1-6 shows the Timeline Zoom level pop-up menu. To see each frame in the production as an individual unit on the Timeline, click 1 Frame in the drop-down menu. To switch time intervals to view one-second intervals, choose 1 Second in the drop-down menu. Choosing 1 Second will give you a good sense of how long each clip is and how long transitions will be.
Figure 1-6: The Timeline window with the Zoom level drop-down menu
15
Chapter 1 ✦ Premiere QuickstartIf you don’t see the individual divisions for seconds or frames in the clip in the Timeline, then your Timeline window is probably set to display filenames. Change the settings by choosing Window Options➪Timeline Window Options. In the Timeline Window Options dialog box, choose the first setting in the Track format area.
You can also use the Navigator palette to change the Timeline Zoom level. The Navigator palette is discussed in Chapter 2.
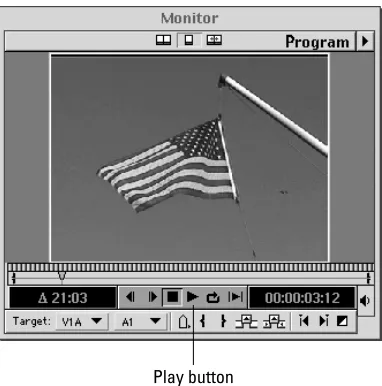
Previewing in the Monitor window
Let’s look at the video production so far. Before previewing, make sure that the Monitor window is open by choosing Window➪Show Monitor (see Figure 1-7).
Figure 1-7: The Monitor window with the Play button
Click the Play button at the bottom of the Monitor window. As soon as you click Play, the video clip begins playing in the window. To stop the clip, press the space-bar or click the Stop button. To replay the clip continuously, click the Loop button.
Using the Timeline window to trim clips
Video and film directors typically shoot more footage than they need. Editing a video clip is a very important part of producing good video footage. Before you trim a clip, it’s a good idea to view it.
Play button Tip
To view a video clip, do one of the following:
✦Double-click the video clip in the Project window. When the Clip window appears, click the Play button to view the clip.
✦Double-click the video clip in the Timeline window. In the Clip window, click the Play button to view the clip.
You can edit a clip in several ways. Here we’ll use the In and Out points in the Clip window. To learn about the different ways to edit a video clip, see Chapters 5, 6, and 10.
The Highway clip was taken from a moving car. The clip is bumpy and ends with a jerky camera movement at about 10 seconds into the clip. Here’s how to edit the clip:
1.Double-click on the clip in the Timeline window.
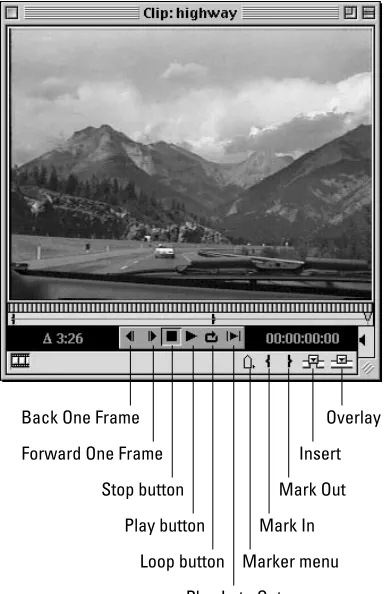
2.This opens the clip in the Clip window, shown in Figure 1-8.
Figure 1-8: You can use the Clip window to edit clips. Back One Frame
Forward One Frame
Stop button
Marker menu Overlay
Insert
Mark Out
Mark In
17
Chapter 1 ✦ Premiere Quickstart3.Play the clip by clicking the Play button.
Notice that the camera shakes at the beginning of the clip and that the video turns static at the end of the clip. Before you edit the In and Out points of the clip, you need to go to the precise frame that you want to edit.
4.To move to specific areas in the clip, click in the tread area below the video window. Once you click, the Scrub tool (Triangle icon) moves to the point that you clicked. To gradually move through the frames with the mouse, click and drag on the Scrub tool, or click and drag in the tread area. To move forward or backward frame-by-frame, click either of the two arrow buttons to the left of the Stop button.
5.The camera jerks 17 frames after the clip starts. Notice that the time sequence at the right of the screen reads 00:00:00:17. Set this as your In point, by click-ing the Mark In button (shown in Figure 1-8).
6.Now click and drag in the tread area, or drag the Scrub tool to the right to move toward the end of the clip.
7.At 3 seconds and 24 frames, another distracting camera movement occurs. Move to the precise frame that you wish to choose as the Out point, and then click the Mark Out button (shown in Figure 1-8).
8.To edit the clip, click the Apply button. On the PC, the Apply button appears at the top of the window; on the Mac it appears at the bottom of the window. After you click, you’ll see the length of the clip change in the Timeline window. Although you edited the clip in the Timeline, the original clip in the Project win-dow remains the same. At any point in time, you can re-edit the clip to return the missing parts.
There is now a gap between the Flag clip and the Highway clip. Adjust the Flag clip by using the Timeline Selection tool to click and drag it to the left — so that it over-laps the end of the Highway clip, as shown in Figure 1-5.
To clear an In or Out point, press Alt (Option), while clicking on the In or Out point.
Editing the flag
Now try editing the flag, using the same technique that you used for the highway scene:
1.In the Timeline, double-click the flag clip with the Selection tool to display the Clip window.
2.First pick an In point and Out point for the clip. Click and drag in the scrub-bing area (the area below the preview and above the Play button) to choose a frame about one second into the clip. Click the Mark In button.
3.To complete the edit, click the Apply button.
4.Next pick the Out point. Click and drag in the scrubbing area to find a point about four seconds into the clip. Watch the time readout at the bottom-right of the window to pick the frame. When you have found the frame you want, click the Mark Out button, as shown in Figure 1-8.
Creating a Transition
Now look at your production by previewing it in the Monitor window. To start the preview from the beginning of the Timeline, click the Loop button in the Monitor window. As you watch the preview, notice that the jump from the Highway clip to the Flag clip is quite abrupt. To smooth the flow of the production, you can add a transition between the two tracks. Here’s how to add a “curtain” transition to your project:
1.Open the Transitions options by choosing Window➪Show Transitions palette, if it is not already open.
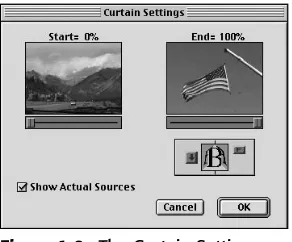
2.In the Transitions palette, open the 3D Motion folder by double-clicking it. 3.Preview the Curtain effect by double-clicking it. This opens the Curtain
Settings dialog box, which is shown in Figure 1-9. An animated preview is shown in the lower-right corner. You can also create your own preview by clicking and dragging the slider beneath the Start Preview area. Click Cancel to close the dialog box.
Figure 1-9: The Curtain Settings dialog box previews the curtain effect.
19
Chapter 1 ✦ Premiere QuickstartPreviewing the transition
You can create a manual preview of the transition effect by double-clicking the Transition icon. In the Curtain Settings dialog box, select the Show Actual Sources checkbox. When the Show Actual Sources checkbox is selected, the Highway clip appears at the left side of the dialog box. Click the slider beneath the Highway clip, and you’ll see the curtain transition to the Flag clip.
To preview the transition as part of the project, Premiere must create a preview file. Transitions and special effects cannot be viewed until the preview file is created. To have Premiere create the preview file, choose Timeline➪Preview or press Enter on the keyboard. After you execute the Preview command, Premiere creates a preview of the entire project. Premiere previews according to the area designated by the yellow bar at the top of the Timeline. Later in the project, you’ll learn how to change the preview area.
After the preview file is created, Premiere automatically plays the preview in the Monitor window.
Previews are created using the current project settings. The current project settings are for QuickTime Cinepak, which compresses the digital video. If your preview is very slow, you can change the setting so that the production is not compressed. To do this, choose Project➪Project Settings➪Video, and in the Compressor pop-up menu choose None. Turning off compression, however, results in larger preview files. If you turn off compression, you may run out of scratch disk space. You can save hard disk space by making the frame size of your project smaller. If preview-ing is slow and you’re low on hard disk space, change the frame size from 640 × 480 to either 240 ×180 or 160 ×120. You can edit the frame size by choosing Project➪Project Settings➪Video.
Editing a clip in the Timeline
Your next step is to add the cloud graphic to the Timeline, and then to trim it. To make this simple edit, you can trim the clip directly in the Timeline window. To aid you in determining the length of the selected clip, open the Info palette by choosing Window➪Show Info:
1.Drag the Cloud graphic to the Timeline window. Even though this is a still-frame graphic, Premiere automatically makes the graphic 30 still-frames long. You can change the default length of still graphics by choosing Edit➪ Preferences➪General & Still Images.
2.Now click the Cloud clip in the Timeline. The Info palette displays the dura-tion of the clip. The starting and end points of the clip are shown at the bottom of the palette.
3.To edit the clip in the Timeline, move the pointer directly to the edge of the end of the Cloud clip, and the cursor changes to an arrow pointing left and right. When the arrow pointer appears, click and drag to the left until the duration at the top of the Info palette reads three seconds. The Cloud clip should appear above the Flag clip, as seen in Figure 1-5.
Adding a dissolve
Now create another transition — this time between the Flag clip and the Cloud clip: 1.Open the Dissolve folder in the Transition palette.
2.Drag the cross-dissolve transition into the Transition channel between Video Track 1A and Video Track 1B, as seen in Figure 1-5.
3.Use the Selection tool to tighten the edits so that about one second of the flag appears during the beginning of the dissolve, and one second of the cloud appears at the end of the dissolve. If desired, you can stretch the length of the dissolve by clicking and dragging on either edge of the Dissolve Clip icon.
Adding another graphic and transition
At this point, you should be getting the hang of how to create basic edits and transi-tions in Premiere. Try dragging the Statue of Liberty graphic from the Project win-dow into Video Track 1B. Use the same technique that you used to edit the cloud to extend the duration of the Statue of Liberty clip to 11 seconds. Then create a transi-tion between the Cloud clip and the Statue of Liberty clip (as seen in Figure 1-5). For an interesting effect, try out the multispin transition. You can find the multispin transition in the Slide folder in the Transition palette.
Fading in the title
Your last step is to fade the title into Video Track 2:
1.Start by dragging the title image from the Project window to Video Track 2. Position the Title clip so that it begins after two seconds in the Timeline of the Statue of Liberty image in Video Track 1B.
You can see the Statue of Liberty behind the Title in Video Track 1A, because the title was created with a clear background. Premiere’s titling features are discussed in Chapter 8.
2.Use the Selection tool to extend the Title clip, so that it ends at the same point as the Statue of Liberty clip.
3.To create the fade-in effect, move the mouse pointer to the Display Opacity Rubber Bands icon (the tiny red-square at the bottom far-left of Track 2 in the Timeline window). Click and you’ll see a red line directly under the Title clip. The rubber band controls the opacity of the clip. Drag the front part of the rubber band down so that it is positioned as shown in Figure 1-10.
21
Chapter 1 ✦ Premiere QuickstartFigure 1-10: The Display Opacity Rubber Bands icon beneath Video Track 2 controls title fade in.
4.To obtain better control of the rubber band opacity line, click at two or three points in the line to create anchor points. Then drag to manipulate the line from one anchor point to the next.
Previewing the fade in
Now, you only need to preview the fade-in effect, without previewing the entire production. As mentioned earlier, the yellow bar above the Timeline indicates just which area will be previewed. As you work, you can preview just the new effects that you wish to see.
Here’s how to change the production area that is viewed in the preview:
1.Scroll in the Timeline so that only the title area appears in the middle of the window.
2.Double-click in the Timeline preview area — the yellow area above the Timeline. After you double-click, the yellow Timeline preview area shrinks to the width of the current window.
3.Using the mouse, drag the left end of the Timeline preview to the left so that it begins just before the Title clip appears in the Timeline. Next, drag the right end of the Timeline preview so that it ends just after the end of the Title sequence.
4.Start the Preview by pressing Enter, or by choosing Timeline➪Preview.
Adding and fading in the audio track
1.First listen to the Intro Music clip by double-clicking it in the Project window. After the clip opens in the Monitor window, click the Play button. As the music plays, notice that the music starts abruptly. After you add the music to the Timeline, you’ll edit the sound to create a fade-in.
2.Drag the Intro Music clip from the Project window to the Timeline window in Audio Track 1. Place the audio track at the middle of the video project. 3.To create a fade-in for the music, you first need to expand Audio Track 1. Do
this by clicking the Triangle icon at the far left of the track. Turn on the Rubber Band icon by clicking the Display Volume Rubberbands icon (the red square).
4.To create the fade-in, click and drag the front of the red rubber band down, so that it gradually moves in an upward direction.
5.Now play the Preview to hear the fade-in. If you wish to fine-tune the effect, use the mouse to edit the Rubber Band icon beneath the audio track. See Chapter 6 to learn more about Premiere’s audio features.
Exporting Your First Movie
After you’ve completed editing your movie, you can export it to the QuickTime movie format, a format that can be read by both PCs and Macs. The export format was already set when you created your project. However, as you’ll soon see, you can change the export settings before you create the final movie.
To export your movie follow these steps:
1.Choose File➪Export Timeline➪Export Movie. The export settings are shown in the dialog box. If you are placing the video on a Web page, you may wish to make the dimensions smaller. To make the dimensions smaller, continue to Step 2; otherwise skip to Step 3.
2.Click the Settings button in the Save dialog box. Click the pop-up menu at the top of the screen and switch from General Settings to Video Settings. In the Video Settings dialog box, change the horizontal settings from 320 to either 240 or 160. The vertical setting changes automatically, to keep the 4:3 aspect ratio intact.
23
Chapter 1 ✦ Premiere QuickstartExporting your movie to the Web
Undoubtedly, many future Premiere productions are destined to be viewed on the World Wide Web. Fortunately, Premiere 6 features several important features specif-ically designed for outputting movies to the Web. Although you could take the QuickTime movie created in the previous section and load it onto a Web page, you can obtain better results if you output using Premiere’s Export Timeline➪Save for Web command, or Export Timeline➪Advanced RealMedia export. These com-mands are discussed in Chapter 18. To create a QuickTime movie optimized for different bandwidths, follow these steps:
1.With the Welcome to America project onscreen, choose File➪Export
Timeline➪Save for Web. The dialog box that opens allows you to use Terran’s Cleaner 5 EZ, which features many commands for Web optimization.
2.In the Settings pop-up menu, choose QuickTime Progressive Download, as shown in Figure 1-11. Pick one of the alternates. The alternates settings create different versions of your file optimized for different bandwidths. These set-tings create a high-quality version for viewing with high-bandwidth equip-ment, and a lower quality for slower equipequip-ment, such as modems. After you click Start, you’ll be prompted to name your file. In the Export pop-up menu, leave the default set to Entire Project. Click the Start button to begin the procedure.
Figure 1-11: In the Settings dialog box, choose QuickTime Progressive Download and pick an option that best suits your needs.
Summary
This chapter gave you a chance to experiment with the basic concepts of editing in Premiere. You learned how to do the following:
✦Create a project
✦Add clips to the Timeline
✦Edit clips in the Clip window and in the Timeline ✦Create transitions
✦Preview your production
✦Export your production as a QuickTime movie
Premiere Basics
A
dobe Premiere’s user interface is a combination of a video-editing studio and an electronic image-editing studio. If you’re familiar with film, video editing, or audio edit-ing, you’ll feel right at home working within Premiere’s Project, Monitor, and Audio windows. If you’ve worked with programs such as Adobe After Effects, Adobe Live Motion, Macromedia Flash, or Macromedia Director, Premiere’s Timeline, digital tools and palettes will seem familiar. If you’re completely new to video editing and computers, don’t worry; Premiere’s palettes, windows, and menus are efficiently designed to get you up and running quickly.To help get you started, this chapter provides an overview of the Premiere’s windows, menus, and palettes. It should serve as a thorough introduction to the program’s workspace, and as a handy reference for planning and producing your own digital video productions.
Premiere’s Windows
When you first load Premiere, several windows automatically load onscreen, each vying for your attention. Why do you need more than one window open at once? A video produc-tion is a multifaceted undertaking. In one producproduc-tion, you may need to capture video, edit video, and create titles, transi-tions, and special effects. Premiere’s windows help keep these tasks separated and organized for you.
This section provides an overview of the windows that enable you to create the various elements of your digital video pro-ject: the Project, Timeline, and Audio windows. Because the History, Navigator, Video/Audio Effects, and Transitions win-dows float above all other winwin-dows, they are treated sepa-rately in the section about Premiere palettes.
Manipulating Premiere’s windows
Although Premiere’s primary windows open automatically onscreen from time to time, you may wish to close one of them. To close a window, simply click on its close box (Windows users: click on the close window Xicon). If you try to close the
Project window, Premiere assumes that you want to close the entire project, and prompts you to save your work before closing. If you wish to open the Timeline, or Monitor or Audio Mixer windows, open the Window menu, then click on the Window Name.
The size and elements that actually appear in the Project, Timeline, and Monitor windows can be changed to suit your specific production needs. For instance, you can choose to show filenames instead of icons in the Timeline. To change default settings, choose Window➪Window Options. Then choose whether you wish to change options for the Project, Timeline, Monitor, or Audio windows.
If you have your windows and palettes set up in specific positions at specific sizes, you can save this configuration by choosing Window➪Workspace Save. After you name your workspace and save it, the name of the workspace appears in the Window➪Workspace submenu. Any time you wish to use that workspace, simply click its name.
The Project window
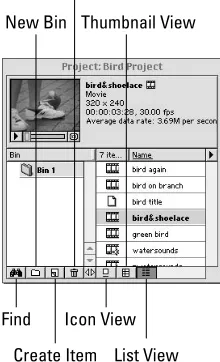
If you’ve ever worked on a project with many clips and production elements, you’ll soon appreciate Premiere’s Project window, which is shown in Figure 2-1. The Project window provides a quick bird’s-eye view of your production elements, and enables you to preview a clip right from the project window.
Figure 2-1: Premiere’s Project window stores production elements. Thumbnail View
Delete Selected Item
New Bin
List View Icon View
27
Chapter 2 ✦ Premiere Basics
As you work, Premiere automatically loads items into the Project window. (The clips shown later in Figure 2-2 are shown on the CD at the back of this book.) When you import a file, the video and audio clips are automatically loaded into a Project window bin (a folder in the Project palette). If you import a folder of clips, Premiere creates a new bin for the clips, using the folder name as the bin name. When you capture sound or video, you can quickly add the captured media to a Project window bin before closing the clip. If you expand the Project window, you can add comments and labels to help easily identify bin elements. This is particu-larly helpful when the filename of the clip is not descriptive enough or if you wish to rate the quality of different elements.
To keep your production materials well organized, you can create bins to store sim-ilar elements. For instance, you might create a bin for all sound elements, or a bin for all interview clips. If the bin gets stuffed, you can see more elements at one time by switching from the default thumbnail view to list view, which lists each item, but doesn’t show a thumbnail image.
Timeline window
The Timeline shown in Figure 2-2 is the foundation of your video production. It pro-vides a graphic and temporal overview of your entire project. Fortunately, the Timeline is not for viewing only — it’s interactive. Using your mouse, you can quickly begin building your production by dragging video and audio clips, graphics, and titles from the Project window to the Timeline. By using Timeline tools, you can rearrange the clips, cut them, and extend them. By clicking and dragging on the work area markers at either end of the work area bar — the yellow bar at the top of the Timeline — you can control what area of the Timeline Premiere previews or exports. The thin, colored bar beneath the work area bar indicates whether a pre-view file for the project exists: red indicates no prepre-view exists; green indicates a video preview has been created. If an audio preview exists, a thinner, light-green bar appears.
The Timeline also includes icons for hiding or viewing tracks. Click the Eye icon to hide a track while you preview your production; click it again to make the track visi-ble. Clicking the Speaker icon turns audio tracks on and off. The icons in the top-left corner are editing tools that you can use to quickly edit scenes. For instance, you can click the Razor Blade tool over a video or audio segment to cut it, and then click the Selection tool to select and move the segments apart.
At the bottom of the window, the Time Zoom Level pop-up menu enables you to change the time interval that appears on the Timeline. For example, if you choose one frame as the zoom level, each video frame of your clip appears as a block in the clip. If you want your production to consume less Timeline space, choose to view the Timeline in seconds or minutes.
The other icons — Track Options Dialog button, Toggle Snap to Edges button, Toggle Edge Viewing button, Toggle Shift Tracks Options button, and Toggle Sync Mode button — at the bottom left of the window, enable you to change options for syncing tracks and for making edges snap together. These options are discussed in detail in Chapters 5 and 6. Finally, there’s more to the Timeline than meets the eye. Clicking the Timeline Menu icon (right triangle) in the upper-right corner of the win-dow, opens the Timeline menu, which enables you to add video and audio tracks, as well as to make clip edges snap together.
Figure 2-2: The Timeline window provides an overview of your project and enables you to edit clips.
Timeline Menu option Toggle Shift Tracks options Toggle Edge viewing
Razor tool Rolling Edit tool Track Select tool Selection tool
Toggle Sync Mode
Toggle Snap to Edges
Track Options Dialog
In Point tool
Cross Fade tool
Zoom tool
29
Chapter 2 ✦ Premiere Basics
Monitor window
The Monitor window, shown in Figure 2-3, is primarily used to preview your produc-tion as you work. When previewing your work, click the Play button to play the clips in the Timeline, and click the Loop button to start from frame one.
Figure 2-3: Use the Monitor window to set in and out points of clips while you edit.
Loop