800 East 96th Street, Indianapolis, Indiana, 46240 USA
Sams
Teach Yourself
24
in
Hours
Microsoft
®
Expression
™
Web
4
Second Edition
All rights reserved. No part of this book shall be reproduced, stored in a retrieval system, or transmitted by any means, electronic, mechanical, photocopying, recording, or otherwise, without written permission from the publisher. No patent liability is assumed with respect to the use of the information contained herein. Although every precaution has been taken in the preparation of this book, the publisher and author assume no responsibility for errors or omissions. Nor is any liability assumed for damages resulting from the use of the information contained herein. ISBN-13: 978-0-672-33590-7
ISBN-10: 0-672-33590-5
Library of Congress Cataloging-in-Publication Data
Rand-Hendriksen, Morten.
Sams teach yourself Microsoft Expression web 4 in 24 hours / Morten Rand-Hendriksen. p. cm.
“Updated for Service Pack 2, HTML5, CSS3, jQuery.” ISBN 978-0-672-33590-7
1. Microsoft Expression Web. 2. Web site development. 3. Web sites—Design—Computer pro-grams. 4. Web sites—Authoring propro-grams. I. Title.
TK5105.8885.M525R36 2012 006.7’8—dc23
2012003376 Printed in the United States of America
First Printing April 2012
Trademarks
All terms mentioned in this book that are known to be trademarks or service marks have been appropriately capitalized. Sams Publishing cannot attest to the accuracy of this information. Use of a term in this book should not be regarded as affecting the validity of any trademark or service mark.
Warning and Disclaimer
Every effort has been made to make this book as complete and as accurate as possible, but no warranty or fitness is implied. The information provided is on an “as is” basis. The author and the publisher shall have neither liability nor responsibility to any person or entity with respect to any loss or damages arising from the information contained in this book or from the use of programs accompanying it.
Bulk Sales
Sams Publishing offers excellent discounts on this book when ordered in quantity for bulk pur-chases or special sales. For more information, please contact
U.S. Corporate and Government Sales 1-800-382-3419
[email protected] For sales outside of the U.S., please contact
Introduction. . . .xiii
HOUR 1 Getting to Know Microsoft Expression Web 4 Service Pack 2. . . .1
2
Beginning at the End: A Walkthrough of the Finished Project. . . .233 A Website Is Really Just Text: Build One in 5 Minutes. . . .39
4 Building a Home Page: A Look Behind the Curtain. . . .53
5 Getting Connected with (Hyper)Links: The Cornerstone of the World Wide Web. . . .65
6 Getting Visual, Part 1: Adding Images and Graphics. . . .81
7 Getting Visual, Part 2: Advanced Image Editing, Thumbnails, and Hotspots. . . .95
8 Cracking the Code: Working in Code View. . . .109
9 Getting Boxed In, Part 1: Using Tables for Tabular Content. . . .127
10 Bringing Style to Substance with Cascading Style Sheets. . . .143
11 Getting Boxed In, Part 2: Knee Deep in CSS. . . .163
12 Styling with Code: Fully Immersed in CSS. . . .183
13 Getting Visual, Part 3: Images as Design Elements with CSS. . . .203
14 Harnessing the Power of CSS Layouts. . . .221
15 Buttons, Buttons, Buttons. . . .243
16 Using Code Snippets. . . .257
17 Building a Functional Menu. . . .275
18 Dynamic Web Templates. . . .297
19 Getting Interactive with Forms. . . .317
20 Working with Flash and Other Embeddable Content. . . .337
21 Beyond the Basics, Part 1: PHP in Expression Web 4. . . .353
22 Test Twice, Publish Once: Professional Cross-Browser Testing with SuperPreview. . . .373
23 Beyond the Basics, Part 2: Get Noticed with the New Search Engine Optimization (SEO) Checker. . . .401
24 Publishing Your Website. . . .411
Introduction
xiii
HOUR 1:
Getting to Know Microsoft Expression Web 4 Service Pack 2
1
Introducing Expression Web 4 . . . .1
Getting and Installing Expression Web 4 . . . .3
Getting and Installing Service Pack 2. . . .4
Getting Acquainted with the Workspace. . . .5
Changing and Customizing the Workspace. . . .13
HOUR
2:
Beginning at the End: A Walkthrough of the Finished Project
23
Working with a Completed Website. . . .24Previewing the Site in Your Browser. . . .27
Exploring the Website in Expression Web 4. . . .32
Keeping Your Pages Functional. . . .34
HOUR 3:
A Website Is Really Just Text: Build One in 5 Minutes
39
Creating a New Website. . . .39Creating Your First Web Page . . . .42
Testing Your Web Page in Multiple Browsers . . . .47
SuperPreview: A Sneak Preview. . . .49
HOUR 4:
Building a Home Page: A Look Behind the Curtain
53
Opening and Editing an Existing File Using Code View. . . .53Importing Styled Text from a Document. . . .57
Advanced Tag Editing. . . .59
HOUR 5:
Getting Connected with (Hyper)Links: The Cornerstone of the
World Wide Web
65
Import a New Page and Create an Internal Hyperlink . . . .66Creating External Links and New Windows. . . .72
HOUR 6:
Getting Visual, Part 1: Adding Images and Graphics
81
Images on the Web: Three File Types for Three Uses . . . .82
Importing and Inserting an Image . . . .83
Using Picture Properties to Change the Appearance of an Image. . . .87
HOUR 7:
Getting Visual, Part 2: Advanced Image Editing, Thumbnails,
and Hotspots
95
Exploring the Pictures Toolbar. . . .96Using the Pictures Toolbar to Add and Change an Image . . . .98
Creating Hotspots. . . .104
HOUR 8:
Cracking the Code: Working in Code View
109
HTML5, CSS3, and the Brave New World of Web Code . . . .110Tools in Code View . . . .110
Using Code View as a Learning Tool. . . .115
HOUR 9:
Getting Boxed In, Part 1: Using Tables for Tabular Content
127
One-Minute History of Tables in Web Pages. . . .128Creating a Table from Scratch. . . .129
Changing the Appearance of a Table. . . .130
HOUR 10:
Bringing Style to Substance with Cascading Style Sheets
143
CSS3: The New Style of the Web. . . .145CSS Sans Code . . . .145
Setting the Font Family for the Entire Document . . . .151
CSS Tools in Expression Web 4. . . .155
HOUR 11:
Getting Boxed In, Part 2: Knee Deep in CSS
163
CSS Classes—Because Not All Content Should Be Treated Equally. . . .164Introducing ID—Class’s Almost Identical Twin. . . .169
Classes Within Classes: Micromanaging the Content . . . .173
Pseudoclasses. . . .174
Understanding the Box Model. . . .176
HOUR 12:
Styling with Code: Fully Immersed in CSS
183
Introducing CSS: The Code Version. . . .184
Applying Classes to Tags in Code View. . . .189
Creating External Style Sheets. . . .193
HOUR 13:
Getting Visual, Part 3: Images as Design Elements with CSS
203
Images as Backgrounds: A Crash Course. . . .204Using Images as List Bullets . . . .213
Importing Adobe Photoshop Files . . . .215
HOUR 14:
Harnessing the Power of CSS Layouts
221
Starting with Pen and Paper. . . .222Building the Framework from Boxed Parts. . . .223
Styling the Layout Boxes . . . .225
Understanding Positioning. . . .229
Applying the Framework to Existing Pages . . . .232
Applying the New Framework to the Page. . . .234
HOUR 15:
Buttons, Buttons, Buttons
243
Buttons: A Brief Definition . . . .244Creating Buttons from Scratch Using CSS . . . .244
HOUR 16:
Using Code Snippets
257
Snippets: An Introduction. . . .258The Default Snippets. . . .261
Using the jQuery UI Widgets Snippets. . . .266
Creating and Editing Snippets. . . .270
HOUR 17:
Building a Functional Menu
275
Making the Basic Vertical Menu Exciting . . . .276The Horizontal Menu—Laying a List on Its Side. . . .279
HOUR 18:
Dynamic Web Templates
297
Dynamic Web Templates . . . .298
Understanding Dynamic Web Templates. . . .306
HOUR 19:
Getting Interactive with Forms
317
Creating Forms in Expression Web 4 . . . .318Making Use of Form Results . . . .325
Other Uses for Form Results . . . .331
Forms in Code View. . . .331
HOUR 20:
Working with Flash and Other Embeddable Content
337
Flash: An Introduction. . . .338Adding the <embed> Tag for Full Cross-Browser Compatibility. . . .344
Embedding YouTube and Other HTML5 Content . . . .345
Bonus: Making the Flash Gallery Your Own. . . .348
HOUR 21:
Beyond the Basics, Part 1: PHP in Expression Web 4
353
PHP: An Introduction. . . .354Installing PHP on Your Computer to Test PHP Scripts. . . .355
Creating an Email Form Using PHP . . . .360
HOUR 22:
Test Twice, Publish Once: Professional Cross-Browser
Testing with SuperPreview
373
Snapshot: Instant Browser Previews Inside Expression Web 4 . . . .375Using SuperPreview for Cross-Browser Testing . . . .378
The Tools of SuperPreview. . . .380
Setting Up and Using SuperPreview Online Service. . . .387
SuperPreview Online Service Options. . . .389
Identifying, Diagnosing, and Solving Cross-Browser Issues with SuperPreview . . . .390
HOUR 23:
Beyond the Basics, Part 2: Get Noticed with the New
Search Engine Optimization (SEO) Checker
401
What Is a Search Engine, Anyway? . . . .402
Search Engine Optimization in Expression Web 4. . . .403
HOUR 24:
Publishing Your Website
411
A Word on Domains and Web Hosting. . . .412Six Different Publishing Options . . . .413
Example: Publishing Content Using SFTP . . . .420
Publishing Open Files Without the Publishing Panel. . . .423
Advanced Publishing Settings. . . .425
Morten Rand-Hendriksenis the owner and creative director of Pink & Yellow Media, a boutique-style design company providing digital media consulting and creations for indi-viduals, businesses, and broadcast television. He was awarded the Microsoft MVP (Most Valuable Professional) Award for his work with Microsoft Expression in 2008, 2009, 2010 and 2011.
In addition to Microsoft Expression Web, Morten is considered an expert on the publishing platform WordPress and he has published numerous articles and videos and done public speaking engagements on both topics.
Sams Teach Yourself Microsoft Expression Web 4 in 24 Hoursis Morten’s fourth published book. He is a regular contributor to the official Microsoft Expression newsletter and has been pub-lished in international design magazines. You can find more tutorials, articles, and other design-related musings on Morten’s blog at www.designisphilosophy.com, and you can fol-low his rants on Twitter under the name @mor10. Also, you might run into him in different forums and newsgroups throughout the Web, usually using the same handle.
recipients over the years:
Kathleen Anderson
Steve Easton
Tina Clarke
Chris Leeds
Ron Symonds
Ian Haynes
Yoshie Kohama
Patricia Geary
Minal Agarwal
Cheryl D. Wise
…and a special thank you to Steven Guttman—the man who made it all possible.
Acknowledgments
On the shelf next to me sit three volumes of my Sams Teach Yourself Microsoft Expression Web in 24 Hoursseries: the original, the rewrite, and the update. And here I am, once again on my couch with my trusted laptop on my lap, putting the final touches on the fourth edition. You’d think this would be superfluous; four versions of the same book about the same software, and the last one a rewrite for a mere service pack no less. But no. The fact that four editions were warranted is a testament to the work done by the Expression Web development team to take the application from its meager beginners as a reboot of Microsoft’s venture in the front-end web development market to a state-of-the-art, future-friendly application with more tricks up its sleeve than a seasoned magician at Hollywood’s Magic Castle.
You may have noticed that I chose to dedicate this volume to my fellow Expression Web MVPs. I did so for a reason. Were it not for this eclectic group of people of which I am hon-ored to be counted as a member, the Expression Web you see before you today would not have been the same. The Expression Web team at Microsoft lead by Steven Guttman made an early decision to involve the community through the Expression Web MVPs at every level of the design and development process of the application. This meant the application was built around real-life usage scenarios, and bugs and features were reported, requested, and included on a running basis. There are several features in the application, and espe-cially in the new Service Pack 2, that members of the Expression Web MVP group can point to and say “I came up with that” or “That was my suggestion.” And it was the same group that beta-tested the application in real life and helped shape the application into what it is today.
Don’t misunderstand me: I am not saying we built the application. The honor and respect for that should go to Steven and his amazing team of developers. What I am saying is that this application is the fruit of an unprecedented interaction and collaboration between the development team and the people who use the application the most. And for that, everyone involved deserves a tip of the hat. So to my dear friends who label themselves xWeb MVPs, I salute you.
I can’t wrap this up without expressing a big thanks to the people who made this book pos-sible. For the second time in a row I was lucky enough to have my fellow Expression Web MVP Kathleen Anderson sign on as technical editor ensuring that everything I wrote actual-ly made practical sense so that I wouldn’t lead you astray. On the development and editing side, Betsy Harris, Todd Brakke and Bart Reed have to be credited for making my sometimes archaic language and run-on sentences make sense.
On the practical side, a big thanks goes out to the Expression Web development team, and in particular to Steven Guttman, for providing unrestricted access to and influence on the application months before it was in its final version. I also want to thank my friends Paul LaBerge and Simran Chaudry from Microsoft Canada for their continuing support and assistance and for supporting my fourth Expression Web MVP Award nomination. Receiving the award four years in a row was an honor, and I can only hope I am living up to it.
your opinion and want to know what we’re doing right, what we could do better, what areas you’d like to see us publish in, and any other words of wisdom you’re willing to pass our way.
You can email or write me directly to let me know what you did or didn’t like about this book—as well as what we can do to make our books stronger.
Please note that I cannot help you with technical problems related to the topic of this book, and that due to the high volume of mail I receive, I might not be able to reply to every message.
When you write, please be sure to include this book’s title and author as well as your name and phone number or email address. I will carefully review your comments and share them with the author and editors who worked on the book.
E-mail: [email protected]
Mail: Greg Wiegand Editor-in-Chief Sams Publishing 800 East 96th Street Indianapolis, IN 46240 USA
Reader Services
About This Book
Because you have opened this book and started reading the Introduction, I assume that you are interested in learning how to create websites using Microsoft Expression Web 4. If so, I congratulate you: By choosing this application as your platform, you are already well on your way to creating functional and well-designed sites based on web standards. In other words, unlike me, you are putting the proverbial horse before the cart and starting at the beginning rather than learning things the hard way.
Expression Web 4 is the fourth version of a web design and development platform that sees Microsoft take a whole new approach to the concept of web standards. The application you work with throughout this book produces standards-based websites right out of the box with-out requiring any tweaking or custom coding. In fact, using Expression Web 4, you can cre-ate advanced standards-based websites with lots of fancy interactive features without ever writing a line of code. And with that, the threshold for learning, understanding, and creat-ing websites that look and behave the same across all browsers and platforms is lowered to a level anyone can manage.
This book is the fourth revision of my first book, Sams Teach Yourself Microsoft Expression Web 2 in 24 Hours. Well, actually, it’s an update of rather than a revision of the third edition,
Sams Teach Yourself Microsoft Expression Web 4 in 24 Hours. This new edition covers the many enhancements introduced by the Service Pack 2 update, including a new Code Snippets panel and full support for HTML5, CSS3 and jQuery among other things.
Since the publication of the first book, I have received a lot of feedback from readers, and I’ve taken all of it into account.
the tools and know-how to build your own websites using Hypertext Markup Language (HTML), Cascading Style Sheets (CSS), and the many other functions that Expression Web 4 offers. You will also have a basic understanding of how the application deals with more advanced coding languages, such as PHP, and you’ll learn how to embed external content like YouTube videos.
Accompanying this book is a small website that contains information about the book itself along with the lesson files for each hour and, in time, a wiki or a forum for you to get more information and showcase your work. The website is located at http://expression.pinkandyellow.com.
Who This Book Is For
Opening this book, you are probably wondering, “Is this the right book for me?” So, I guess I should tell you who this book was written for. The answer, though it might sound silly, is that I wrote this book for myself—or rather myself 15 years ago.
When I started building websites in the 1990s, I really had no clue what I was doing other than a vision of what I wanted to create. And when I looked around for help in the form of books or tutorials, I couldn’t find anything that spoke to me. What was available was either too technical or too superficial. No matter where I looked, I could find only basic algorithms on how to perform simple tasks, never detailed explanations of how to get from point A to point B. As a result, I ended up teaching myself how to do things. Needless to say, I learned the true meaning of the term “taking the long way around.”
So, when I signed up to write this book, I had one main goal in mind: to write the book I was looking for and really needed when I started out—a book that took me all the way from a basic sketch on a napkin to a fully working website and taught me how to use the applica-tion at the same time.
As a result, this book is written with the novice designer in mind. No, let me rephrase that: As a result, this book is written in a way that I think a novice designer can understand and learn from. I make this distinction because, even if you are a seasoned designer or developer, I am certain you can find lots of useful information inside these covers.
understanding how to use them in real-world scenarios can almost certainly make your work with CSS more efficient and productive, regardless of whether this is the first time you’ve encountered the term style sheetsor you are a seasoned professional with years of experience.
So, without further ado, I wish you a pleasant journey and hope you come out on the other side with the skills, understanding, and confidence to take on the wild and exciting world of web design.
Lykke til!
HOUR 1
Getting to Know Microsoft
Expression Web 4 Service
Pack 2
What You’ll Learn in This Hour:
.
What Expression Web 4 is and what you can use it for
.
How to navigate and customize the workspace layout
.
How to open and close toolbars and panels
.
How to reset the workspace to the default settings
After opening this book, you probably want to jump right in and start creating web-sites. However, before you start, it’s a good idea to familiarize yourself with the pro-gram. Whether you are a first-time user or a seasoned web designer, Expression Web 4 has something new to offer you. And because you’ll be spending a lot of time with the program, learning it before you start working on projects can save you both time and frustration. If you are impatient, you can always jump ahead to Hour 3, “A Website Is Really Just Text: Build One in 5 Minutes,” and come back here later. But, as my father always told me, “If you want to bottle an elephant, you better read the manual first.” Getting to know your tools before you use them makes your life easier in the long run.
Introducing Expression Web 4
Expression Web 4 is a complete web-publishing suite bundled into one program. It’s an HTML editor, a WYSIWYG editor, an authoring tool, a code debugger, a
Whether you are a designer with no previous code experience, a developer with no previous design experience, or somewhere between the two, Expression Web 4 can help you work faster and more effectively.
By the
Way
WYSIWYG (What You See Is What You Get) is an acronym used for visual web-editing applications in which the user can view and edit the page as it appears ina browser rather than simply viewing and editing code.
As you will see when working with web design, this name is a bit misleading: The fact that a web page looks a certain way in a WYSIWYG editor doesn’t necessarily mean it will look the same when viewed through an actual web browser. Also, dif-ferent kinds of content cannot be displayed in WYSIWYG editors, such as Silverlight applications and dynamic web content. You will be introduced to these components and learn how to deal with this problem later in the book. In spite of this, the WYSIWYG editor is a powerful tool that gives you a fairly accurate picture of what your design will look like on the Web.
Expression Web 4 is a new link in a long chain of web-authoring tools. What makes it unique is that it gives the user the ability to create 100% standards-based sites even without knowing what the term standards basedmeans. Expression Web 4 is, in many ways, a shortcut that opens the world of standards-based code, previously accessible only to the web developer elite, to anyone using it. And because creating standards-based sites is (or should be) the ultimate goal of any web designer, Expression Web 4 gives you a huge advantage. Of course, that doesn’t mean your sites will be perfect, but you will spend far less time picking at finicky code and solv-ing browser incompatibilities.
With Expression Web 4, you can create new pages and sites from scratch or from templates; view, edit, and alter existing pages and sites; and build new server-based applications with ASP.NET (Active Server Pages .NET) and PHP (PHP: Hypertext Preprocessor; its name is recursive). In short, Expression Web 4 is a complete pack-age for creating and publishing websites whether on a local computer, a network, or the Web.
By the
Way
technical specifications set out by the World Wide Web Consortium (W3C) toThe terms standards basedandweb standardsrefer to the formal standards andGetting and Installing Expression
Web 4
Expression Web 4 was launched in June 2010, and it is available through most soft-ware retailers or through the Microsoft Expression website (www.microsoft.com/ expression). The application comes bundled in the Expression Studio 4 Ultimate and Expression Studio 4 Web Professional packages. If you are a web developer and you are not going to dive into Silverlight and Windows 8 HTML5 applications, the Expression Studio 4 Web Professional package is the right option for you. If you haven’t already, consider purchasing the software as a download from Microsoft rather than through a retailer. Not only is it much quicker than going to a store or ordering from an online retailer, but you save the planet from all the unnecessary waste created in the production and shipping of the product. Just remember to back up the software installation and save your activation code in case something goes wrong somewhere down the road.
If you are new to the field and unsure of whether you want to use this program, from the same site you can download a fully functional trial version that gives you 60 days to make up your mind.
Expression Web 4 is designed for the Microsoft Windows platform and works on Microsoft Windows XP Service Pack 2 and 3, Windows Vista, and Windows 7, as well as on Windows Server 2003 and 2008. It also works on a Mac running the afore-mentioned Windows operating systems either as a dual boot via Bootcamp or in vir-tualization software such as VMWare Fusion or Parallels.
Installing the software, whether it’s from a download or from a DVD, is straightfor-ward. If you purchased the software in a box from a vendor, your activation key is inside the box. If you purchased the software from the Microsoft Expression website, you received your activation code during the purchase. If you are using a trial ver-sion, select the Trial option the first time you run the software.
Did you
Know?
If you have any problems with the installation or the program doesn’t work after you install it, troubleshooting tips, FAQs, and forums on the Microsoft Expression website can walk you through the troubleshooting process and get you up and run-ning. There is also a known issue in which licensing and activation occasionally don’t work. If you run into this problem, you can find a fix at
Getting and Installing Service Pack 2
Since its release in the summer of 2010, Expression Web 4 has seen the release of two Service Packs, aptly titled Service Pack 1 and Service Pack 2 (referred to as “SP2” from here onward). More than general software updates, these service packs intro-duced support for new and updated code languages, new features and functionali-ties, as well as user interface upgrades. The difference between the application itself when shipped and the application with SP2 installed is so different that we decided to release this update to the book to cover all the changes. These changes will be addressed throughout the book.
To take full advantage of all the features in Expression Web 4, you need to install SP2. After installing Expression Web 4 itself, go to the Web 4 Service Packs and Add-Ins page on the Microsoft Expression website (http://www.microsoft.com/expression/ service-packs/Web.aspx) and find and click the Download Web 4 SP2 button. This takes you to the Microsoft Expression Web 4 Service Pack 2 (SP2) page in the Microsoft Download Center. From here, follow the instructions to download and install Service Pack 2.
After installation is complete, open Expression Web 4, click the Help option on the far right of the main menu, and select About Microsoft Expression Web from the drop-down menu. This opens the application dialog for Expression Web 4, which shows among other things the version number and licensing information. If SP2 was installed correctly, the first line should read “Microsoft Expression Web Version 4.0.1303.0 SP2,” as shown in Figure 1.1.
FIGURE 1.1
Getting Acquainted with the Workspace
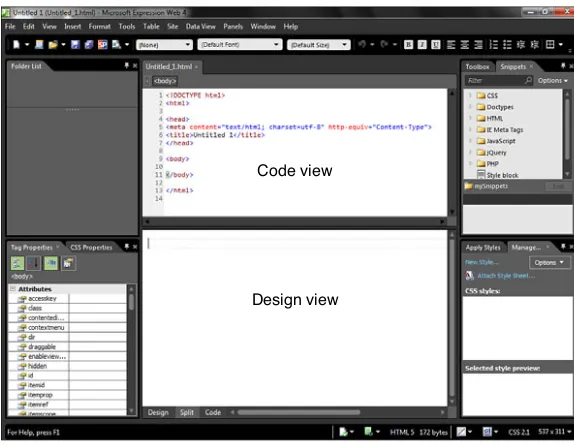
When you open Expression Web 4 for the first time, it presents several views, panels, and toolbars containing tools and information (see Figure 1.2). In the middle, the Code view and the Design view show you the current page. Together, these panels and toolbars give you a complete picture of the project you are working on and multiple ways of working with and editing that project.
FIGURE 1.2
Expression Web 4 as it appears when first opened.
Design view Design view Code view Code view
The Program Bar
The address and name of the current file you are working with appear at the top of the workspace. In Figure 1.2, this is “Untitled 1 (Untitled_1.html).” When you open the program for the first time, it displays this default empty web page. Later, you learn how to decide what the program displays when it opens.
The Menu Bar
▼
Try It Yourself
Use the Menu Bar to Close and Open Design View and Code
View
If you have never used a web design application such as Expression Web 4 before, the window with all its menus and panels and views might seem intimidating. However, when you understand how to use and manipulate them, you will see that they are there for one reason only: to help you get your job done faster and more efficiently.
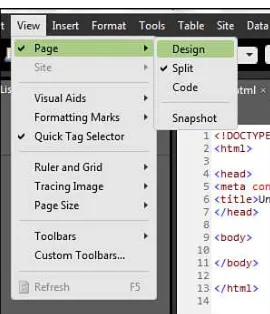
At the center of the page is the View panel. By default, it is split in half horizontally with the Code view on the top and the Design view on the bottom. These views will be explained later, but for now let’s look at how you can use the View menu shown in Figure 1.3 to change them to see only what you want.
FIGURE 1.3
The View menu with the Page submenu open.
1. View the Page item and then hover the mouse pointer over it.
2. Select Design in the submenu that opens to the right (see Figure 1.3).
3. Notice that the middle of the workspace now shows only Design view.
4. Repeat step 1 and click Code in the submenu. You now see only Code view.
5. Repeat step 1 and click Split. Notice that doing so restores the workspace to what it was when you started.
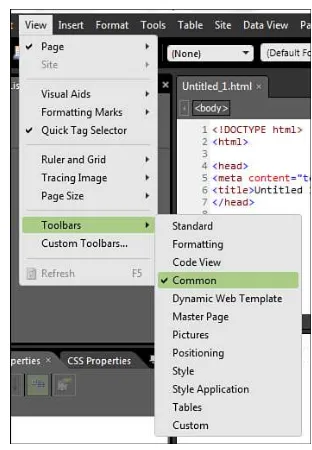
Common and Other Toolbars
The Common toolbar is under the menu bar (see Figure 1.4). This toolbar contains the most commonly used functions in the program, such as New, Open, Save, Font, Alignment, and so on. In addition to being an excellent tool for quick access to
frequently used functions, the Common toolbar also displays information about
In addition to the Common toolbar are numerous other toolbars that serve different functions (see Figure 1.5). You can activate these toolbars by clicking View on the main menu and selecting Toolbars or by right-clicking in the empty area to the right in the Common toolbar and selecting the new toolbar from the pop-up menu. When you open a new toolbar, it docks directly under the Common toolbar (or whatever is the lowest visible toolbar).
Code, Design, and Split View
As you work on your pages, you need to switch back and forth between the different views. To make this as easy as possible, the View panel comes equipped with three buttons to toggle the different views on and off, as shown in Figure 1.6.
FIGURE 1.6
As its name suggests, Code view displays the code (or backend) of the file in which you are working. In reality, all web pages are just code documents, and Code view gives you a behind-the-scenes look at the inner workings of your page. Code view has many features to help you in your work—from color coding and line numbering to IntelliSense and snippets. You use this view not only to inspect the code
Expression Web 4 created for you, but also to make alterations and add your own code. If you work with a strict code file (.css, .php, .js, and so on), this is the only view available.
When you open a page in your web browser, you are actually looking at the brows-er’s interpretation of the code in the file. Web pages are written in a markup code language that, when interpreted, turns into what you see in your browser. What you don’t see is that many of these pages actually consist of several different files, and some of these contain only programming code. These are what I refer to as “strict code files,” and they are an important part of functional web design. By placing code in a strict code file, you can use this one file as the code source for multiple pages and thus make sweeping changes to all the related files by editing just one. In this book, you learn how to use one such strict code file, known as a Cascading Style Sheet (CSS), to control the look and feel of multiple pages at the same time.
Design view is the WYSIWYG editor. This view emulates a web browser and (at least in theory) displays your files as they will appear in a web browser. This is probably where you will do most of your work. In Design view, you can visually edit HTML and other markup files by dragging and dropping content, editing text, and moving borders in much the same way you would work in word-processing software such as Microsoft Word. It also features visual aids to help you see how the page functions. Design view provides a much less intimidating approach to web design, and people just starting out often prefer it to Code view.
Did you
Split view gives you the best of both worlds: Code view on the top and Design view on the bottom. In Split view, you can see, in real time, how changes in one view affect the other. For a beginner, working in Split view can greatly enhance the learn-ing process, whether you come from a codlearn-ing background or a design background.
Left and Right Panels
On the left and right sides of the workspace are four panels, described in the follow-ing sections. These panels contain tools, information, and content you can use in the design process.
Folder List (Top Left)
The Folder List panel shows the folder and file tree in the project or site you are working within (see Figure 1.7). New in SP2, the folder or filename, file size, and associated application are shown in the top of the panel. In the case of PDF files, the first page of the file is previewed.
FIGURE 1.7
The Folder List panel with a HTML file high-lighted. The browser default is set to Chrome.
Tag Properties and CSS Properties (Bottom Left)
Snippets (Top Right)
The Snippets panel, shown in Figure 1.10, is a new feature introduced with SP2. It enhances the code snippets function in Expression Web 4 and provides an easy way to insert code in a variety of languages and even create your own custom snippets. The Snippets panel is further explored in the new Hour 16, “Using Code Snippets.” FIGURE 1.8
Tag Properties panel.
FIGURE 1.9
Toolbox (Top Right)
The Toolbox panel contains code segments and tags frequently used while editing in Code view (see Figure 1.11). The Toolbox panel is made up of two main sections, HTML and ASP.NET Controls, and each section has multiple subcategories. By click-ing the arrow icons, you can explode and collapse the categories to see what they contain.
FIGURE 1.10
The new Snippets panel.
FIGURE 1.11
Toolbox panel.
Apply Styles and Manage Styles (Bottom Right)
All the panels are intelligent; they learn from how you use the program. If you use a particular item often, it moves higher on the list to become more accessible. A rarely used item moves down on the list. The panels also help you by turning cur-rently unavailable functions gray so that you don’t waste time trying to do some-thing impossible.
FIGURE 1.12
Apply Styles panel.
Status Bar
The status bar appears at the bottom of the workspace (see Figure 1.14). It provides information about the program itself as well as general information for the page you are working on, such as file size and overall settings (the code format you are using, for example). In addition, the status bar has tools that warn you if there is invalid or incompatible code in your page. If you want to close the status bar (not something I recommend), click Tools, Application Options and then uncheck Show Status Bar under General.
FIGURE 1.13
▼
Changing and Customizing the
Workspace
Depending on what you are doing, you might want to have a certain panel or menu more prominently featured, or you might want to open a new panel with more functions. In response to user feedback, the service packs introduced new and powerful features to the Expression Web 4 user interface, making it possible to create and save a custom toolbar and custom workspaces. As a result, you can now cus-tomize your workspace to fit any working scenario and change it at any time.
Using the Custom Toolbar
In addition to the predefined toolbars in Expression Web 4, of which there are many, you can now create your own custom toolbar that contains the features and func-tions you use the most. This was a much requested feature from users like myself, who only use a small number of functions on the default toolbars and want more focus on frequently used tools. You can create as many custom toolbars as you like.
Try It Yourself
Add and Configure Your Own Custom Toolbar
A custom toolbar can contain any of the elements found in the other toolbars in Expression Web 4. That means you can consolidate the features you use the most into one toolbar and hide the rest for when you need them.
To use the custom toolbar, you first have to activate it.
1. On the main menu, go to View, hover over Toolbars, and select Custom from the bottom of the pop-out menu. This adds a new toolbar to the top of the workspace with the text “Edit…” (see Figure 1.15).
FIGURE 1.14
The status bar appears at the bottom of the workspace and gives you con-stant and cur-rent informa-tion about the file you are working on.
2. To add a new button to the custom toolbar, click Edit. This opens the Custom Toolbars dialog (see Figure 1.16).
▼
FIGURE 1.15
When activat-ed, the custom toolbar appears as an empty area with an Edit button below the Common toolbar.
FIGURE 1.16
The Custom Toolbars dia-log, from which you can create your own cus-tom toolbars.
3. Click New to open the New Toolbar dialog. Here, you can give your custom toolbar a descriptive name (see Figure 1.17). Note that the name has to be a single word with no spaces.
FIGURE 1.17
Custom tool-bars can be given custom names.
4. To add a new item to the toolbar, select the item in the left panel and click the Add button. This moves the item to the right panel (see Figure 1.18).
5. To remove an item from the toolbar, select the item on the right side and click the Remove button.
6. When you are done adding buttons to the custom toolbar, click OK and the buttons appear.
Once a custom toolbar is created, you can toggle it on and off using the Toolbars menu found under View, Toolbars.
Using Default Workspaces
One of the core user experience features in Expression Web has always been the flexible workspace. To accommodate the different needs of different types of develop-ers, Expression Web’s workspace is modular with panels that can be sized, docked, and moved around to fit most needs. Even so, users were asking for more flexibility. Most importantly, users had only one workspace to work with, and the only function was to reset it to the default. What was needed was the ability to configure and save custom workspaces. And with the release of SP2, that feature was included.
The workspaces can be configured and switched from the Panels option on the main menu (see Figure 1.19).
FIGURE 1.18
New toolbar buttons are added from left to right.
▼
By default, Expression Web 4 SP2 ships with four preconfigured workspaces: Designer (default), Developer (Toolbox, Manage Styles, and Snippets pinned to the left side), Developer (a Snapshot panel is added to the bottom of the view panel), and Reporting (a panel with the five reporting options is added to the bottom of the View panel). In addition, you can create your own custom workspaces.
Modifying the Workspace
To accommodate modifying the workspace, the workspace is now completely cus-tomizable: You can grab any horizontal and vertical border within the workspace to make a panel smaller or larger. You can also grab panels and move them around both by repositioning them within the workspace and by undocking and floating them on top of or outside the window (see Figure 1.20). This technique is particular-ly useful if you use a dual-monitor setup because you can dedicate the main win-dow to Code view and Design view and leave all the tools on the other screen.
As you saw previously, each panel can contain several subpanels. Each subpanel becomes accessible through tabs. Expression Web 4 groups related subpanels togeth-er for convenience, but you are free to move them around in any way you like.
The Panels menu on the menu bar controls the panels (see Figure 1.21). From here, you can select what panels are active (indicated by a check mark). If you click one not currently featured in the workspace, the program adds it to the relevant panel. You can remove a panel from view by clicking the small X in its upper-right corner.
Expression Web 3 introduced the ability to pin the panels to the sides of the work-space. This feature allows you to keep the panels handy in the workspace without them taking up much-needed real estate. To pin a panel to the side of the work-space, simply click the pin icon at the top-right corner of the panel (see Figure 1.22). FIGURE 1.19
When a panel has been pinned, the panel name is written vertically down the side of the workspace. To access the panel, simply hover your mouse over the name of the desired panel, and it “pops” out to cover your workspace (see Figure 1.23).
FIGURE 1.20
The Snippets panel floating outside the workspace.
FIGURE 1.21
To unpin the panels and place them back in their normal configuration, simply click the horizontal pin in the top-right corner of the currently active pinned panel (refer to Figure 1.23). If you want to quickly pin all the panels in your workspace, go to Panels on the main menu and select Hide Panels. To unpin them again, go back to the menu and uncheck the same function.
FIGURE 1.22
You can pin any panel to the side of the workspace by clicking the pin icon in the top-right corner of the panel.
Pin icon
FIGURE 1.23
The pinned panel pops out to cover the workspace when you hover your mouse over the name.
▼
Try It Yourself
Create and Save a New Workspace
As you perform different tasks while working on a page or website, your needs will change in terms of what tools and information should be prominently displayed and what can be hidden. For this reason, Expression Web 4 gives you complete con-trol over what panels are available and where they are positioned at any time.
1. Hover your mouse over the vertical line that separates the Code and Design views from the right panels.
2. Click and drag the separator to the left to create more space for the panels.
3. Use the pin icon in the Folder List panel to pin the folder list to the left side of the workspace. When the Folder List is pinned, the Tag and CSS
Properties panel shifts up to fill out the space.
4. Pin the Tag and CSS Properties panel to the side to free up space for the View panel (see Figure 1.24).
FIGURE 1.24
You can cus-tomize the look of Expression Web 4 to suit your specific needs.
5. When you are happy with the look of the workspace, go to Panels on the main menu, hover over Workspaces, and select Save as New Workspace
6. This opens the Save as New Workspace dialog. From here, give your new workspace a descriptive name (see Figure 1.26). Note that the name can have spaces but cannot end with a space or a period).
▼
FIGURE 1.25
Saving the cur-rent workspace as a new work-space from the main menu.
FIGURE 1.26
Setting a name for the new workspace.
7. Click OK, and the new workspace is saved and appears on the Workspaces pop-out menu (see Figure 1.27).
FIGURE 1.27
The new work-space appears on the Workspaces menu.
Following this exercise, you can see that creating new workspaces is easy, and there is no “right” or “wrong” in terms of workspace layout: Whatever works for you is the right layout.
But what if your workspace gets too “messy,” or you accidentally close a panel or lose it altogether? To simplify the process of cleaning up your workspace, click the Panels button on the menu bar and select Reset Current Workspace to restore the current workspace to its original configuration.
Summary
In this hour, you learned how Expression Web 4 works and how you can customize it to suit your needs. To some readers, this information might seem rudimentary or even redundant. However, as you progress through the next 23 hours, you will see that having a solid understanding of the program makes a world of difference when you encounter new challenges. By knowing the basics, you’ll find it easier to under-stand the more advanced issues. And because you’ll be spending a lot of time with this program, it’s worth your time to get to know it properly first.
For convenience, this book uses the default workspace and panel layout. However, now that you know how to customize them, feel free to organize their layout any way you see fit.
Q&A
Q.
The Common toolbar looks a lot like the Formatting toolbar in Microsoft
Word. Does that mean that it works the same way?
A. Yes and no. The Common toolbar has many of the same functions as Microsoft Word’s Formatting toolbar, but when you click a button on the Common toolbar, a change happens through the addition or modification of a snippet in the code or hypertext rather than in the text. (The program refers to these code snippets as styles.) So yes, they look similar, but no, what happens when you click a button is different.
Q.
If I accidentally close a panel or a toolbar, will I be able to open it again?
A. All the panels are accessible from the Panels button on the main menu. If you accidentally close a panel, you can always open it again from there. Furthermore, you can always reset the original layout of the panels by clicking Panels, Reset Workspace Layout. All the toolbars are accessible by clicking View and selecting Toolbars.
Workshop
Quiz
1. What is the proper way to create a web page?
A. Using only Code view
B. Using only Design view
C. Using Split view
D. None of the above
2. How many panels can you have open at one time?
A. 8
B. 14
C. As many as you like
Answers
1. D.None of the above. There is no right or wrong when it comes to how you create a web page. Some people create spectacular sites using only
Notepad, whereas others create just as spectacular sites without ever seeing a line of code. To get the most out of this book, use Split view as much as possible. That way, you get to see what happens in Code view when you make changes in Design view, and vice versa. In the end, though, what works best is up to the individual user.
HOUR 2
Beginning at the End: A
Walkthrough of the Finished
Project
What You’ll Learn in This Hour:
.
How to import and work with a completed website in Expression Web 4
.
How to preview a site in your browser
.
How this book is laid out
.
How to use the different tools in Expression Web 4 to explore a website
and learn how it works
When I start to read a book like this, I always want to see the end result of all the les-sons before I start so that I know what I’m getting myself into. So, rather than mak-ing you go through all the tutorials to see what you can build in just a few hours with Expression Web 4, I start at the very end by showing you the site you will build throughout these lessons and use it to showcase some of the many features available in this application.
Because websites consist of many different files linked together, it is important to keep everything organized. But, to do this, you first need to understand what the dif-ferent elements are and how they work and relate to each other. By looking at a completed website and using the tools available in Expression Web 4, you can get a firmer grip on how everything comes together.
▼
Working with a Completed Website
To work efficiently in Expression Web 4 (or any web design application, for that mat-ter), it is important to understand how the application handles files and file relation-ships. By working with a completed website, you can experiment and learn how Expression Web 4 works with you to keep everything functioning properly as you edit and reorganize the different elements. That way, you get an early start developing techniques and understanding that usually comes only much later in the learning process.
The Import Site Wizard is a helpful tool that saves you a lot of time when you need to work on a website built in a different application or by a different designer. There-fore, you will probably use it frequently.
Try It Yourself
Importing a Completed Website
A website is actually just a folder with a group of files linked together. What makes it awebsiteis that the files within that folder can be viewed using a web browser. You get a more thorough explanation of this idea later in this book. By creating a new website in Expression Web 4, you tell the application that the main (root) folder is the bottom line or foundation and that everything in it relates back to this folder. When you publish your website, the domain name replaces the root folder.
To start, use the Import Site Wizard to import the finished project into the application as a new website. You can use it to import sites from your local computer or network and from external web servers or even directly from the websites themselves.
1. Go to this book’s website at http://expression.pinkandyellow.com and down-load the lesson files for this hour to a central location on your computer.
2. Unzip the lesson files using your operating system’s native file-extracting func-tion or an applicafunc-tion such as 7-zip. Place the lesson files in a central locafunc-tion on your computer (for example, on your desktop).
3. Open Expression Web 4.
4. Go to Site, Import, and then select Import Site Wizard. This opens the Import Site Wizard dialog, as shown in Figure 2.1.
5. Select the File System option and use the Browse button to navigate to the loca-tion where you placed the unzipped lesson files for this hour. Select the folder called MyKippleFinal. With the address set, click Next.
6. On the next page (see Figure 2.2), you are asked to define where the local copy of the site should be created. You need to select a folder different from the one the files are in right now. It is always a good idea to keep all of your website projects in one location on your computer so that they are easy to find. Many people use the My Web Sites folder under Documents. Browse to the location you want the new website to be created in, create a new folder called MyKippleFinal, and select it. Click Next.
7. Expression Web 4 will most likely flash two warning messages at this point: The first one tells you that there is no site at the location you defined in step 4, and the second message asks you if you want to set up a site in that location. Click OK to both. The final page of the Import Site Wizard tells you that the website has been set up and that you can now start importing files. Click Finish.
FIGURE 2.1
The Import Site Wizard dialog lets you import an existing site from a multitude of different sources both on your computer and on the Web.
FIGURE 2.2
The second page of the Import Site Wizard lets you define where you want the new website project placed on your computer.
▼
Local website address Remote website address
FIGURE 2.3
The second page of the Import Site Wizard lets you define where you want the new website proj-ect placed on your computer.
Now that you have defined a location for the new website, Expression Web 4 opens in Site view, and you see all the files in the remote location (the folder you down-loaded the lesson files to) on the right and your new site location on the left. To begin with, the left side is blank. To populate your new site with the files from the finished project, select all the folders and files on the right side and click the blue left-pointing arrow between the two views. This button publishes the existing files to your new site. This might seem odd, but if you consider a scenario in which you were down-loading files off a web server, it makes sense.
When the transfer is complete, you see a view like the one shown in Figure 2.3. This view shows you the local website on the left and the remote website on the right. This is your site management window from which you can synchronize two locations or move files and folders between the local and remote locations either one by one or in groups. Expression Web 4 keeps tabs on what files have been moved and what files have been modified in the program, and whenever you come back to this view, it tells you what files need to be updated on either the local or remote location.
You have successfully imported the new website when you can see that the local and remote websites are identical in terms of files and folders and that the Folder View panel shows all the files and folders. You can now click the disconnect button (a power plug with a red bar next to it) to sever the connection.
▼
By the
Way
Don’t Be Confused by the Names “Local” and “Remote”
As you saw in the preceding lesson, Expression Web 4 separates the website you are working with from the one you are publishing to by referring to them as local websiteandremote website, respectively. However, these names can easily be confusing. In the example you just saw, it can be argued that bothwebsites are local.Expression Web 4 considers the website you open in the application as the local website and the one you are publishing the files you have worked on to as the remote website, regardless of the actual location of either. This can lead to some interesting and confusing results: If you want to, you can set up a website so that the files you are working on are on a web server (technically, a remotelocation) and publish these files to a hard drive on your computer (technically, a local loca-tion). In that case, the web server would be considered the localwebsite and placed on the left, whereas the folder on your hard drive would be considered the remote website and placed on the right.
If you are ever confused about which location is defined as remote or local, you can always check the address bars at the top of each folder tree in Site view (refer to Figure 2.3).
Previewing the Site in Your Browser
Now that you have set up the MyKipple website in Expression Web 4, look at how the site works in real life. One of the most important habits you need to establish when working with web design is to constantly test what you are doing in one browser (or preferably several browsers) to see that everything is working as it should. For this reason, you have the ability to preview a page in your browser from anywhere inside the application.
To see the new site as it would appear for any visitor when it is on the Web, go to the Folder List panel, right-click the default.html file, and select the current preview browser (prefixed by a browser icon) from the pop-up menu (see Figure 2.4).
FIGURE 2.4
You can preview any page in your website by selecting a browser from the right-click menu. In this case, the default browser is Internet Explorer 9.
The website itself serves as a good introduction to the different sections of this book. The following sections describe the different functionalities and when you will learn them.
Setting Up a Website and Building Pages
All websites consist of a group of web pages. These pages can contain anything from text to images to interactive elements such as Flash movies or Silverlight applica-tions. In Hour 3, “A Website Is Really Just Text: Build One in 5 Minutes,” and Hour 4, “Building a Home Page: A Look Behind the Curtain,” you learn how to set up a new site and build simple pages.
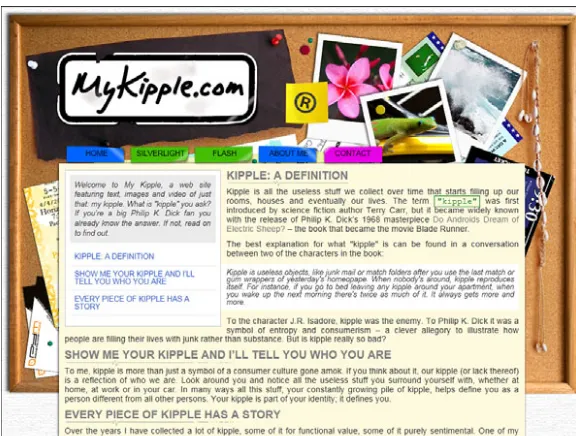
Hyperlinks
On the MyKipple website, you can see that several segments of text are highlighted in blue. These are hyperlinks that point the browser to different pages either within the website or in external websites. You learn how to create and manage hyperlinks in Hour 5, “Getting Connected with (Hyper)Links: The Cornerstone of the World Wide Web.”
Images
FIGURE 2.5
The home page of the MyKipple website features many different text styles defined by CSS.
such as the camera image; as functional elements, such as buttons; or even as design elements. You learn how to insert and manage images in Hour 6, “Getting Visual, Part 1: Adding Images and Graphics,” and Hour 7, “Getting Visual, Part 2: Advanced Image Editing, Thumbnails, and Hotspots.”
Tables
At the bottom of the camera page, you find a standard HTML table. In the past, tables were heavily used as design elements to structure the contents of web pages. However, this was never an ideal situation, and it caused a lot of problems for designers and the people visiting their sites. As a result, designers are moving away from using tables as design elements and now use them only for their intended pur-pose: to display tabular data. Because the focus of this book is to learn how to design standards-based websites with Expression Web 4, you learn how to use tables to dis-play only tabular data. Tables are covered in Hour 9, “Getting Boxed In, Part 1: Using Tables for Tabular Content.”
Styling the Content
and so on. If you were working in a word-processing application, you would have applied these different looks or styles to each of the sections. But in standards-based web design, you create an external set of styles that define how the different elements look and behave. These styles are created with a code language called Cascading Style Sheets (CSS), and Expression Web 4 is an excellent tool for both learning and working with this language. In Hour 10, “Bringing Style to Substance with Cascading Style Sheets,” you learn how to create and manage these CSS styles to give your con-tent more identity.
Page Layout
As you just learned, designers used to use tables to create page layouts, but this prac-tice is on the way out. In its place, designers are now turning to CSS as their primary layout tool. In addition to changing the look and feel of text and other content, CSS can build containers or boxes that wrap the content. Using this technique, you can group different elements together and create styles and substyles to define how these different elements should look and behave. With the proper use of CSS, you can cre-ate visually stunning and easily approachable web layouts that look the same across all browsers and platforms. Hour 11, “Getting Boxed In, Part 2: Knee Deep in CSS,” and Hour 14, “Harnessing the Power of CSS Layouts,” show you how to create, mod-ify, and apply styles using the built in CSS functionalities of Expression Web 4 and by editing code directly. In these hours, you learn how to use CSS to create advanced layouts for your sites and how external style sheets can control the look and feel of multiple pages from one central location.
Buttons
Buttons are a subgenre of the common hyperlink in which the hyperlink is attached to a visual element, such as an image or a text box. Because there are many differ-ent types of buttons, there are many differdiffer-ent ways to make them, and each serves its own purpose. In Hour 15, “Buttons, Buttons, Buttons,” you learn how to create sev-eral different types of buttons and when to use them.
The Main Menu
Aside from the content itself, I would argue that the navigation is the most
exciting navigational tools you can put on your website is the image-based menu. As with everything else, there are several different ways you can make such menus, and each has advantages and drawbacks. In Hour 17, “Building a Functional Menu,” you learn how to create several different CSS-based menus, including a drop-down menu. All these menus are highly functional and are used heavily throughout the Web.
Contact Forms
The Internet allows for a two-way conversation between the website owner and the visitor. To facilitate this type of communication, a large group of tools, known as forms, is built in to the main code language of the Internet, HTML. Using forms, you can create anything from a simple email form to advanced forum, blog, and even e-commerce functionalities. If you click the Contact button on the main menu, you are taken to a page with a contact form. In this book, you learn how to make this con-tact form work using two different server-based technologies: FrontPage Server Exten-sions (FPSE) and PHP. In Hour 19, “Getting Interactive with Forms,” you learn how to build and configure web forms and use the built-in functionality in Expression Web 4 to create a contact form based on FrontPage Server Extensions. However, this form works only if your web server has FrontPage Server Extensions installed. As an alter-native, you learn how to build an identical email form using a different code lan-guage, called PHP, in Hour 21, “Beyond the Basics, Part 1: PHP in Expression Web 4.”
The Email Forms Don’t Work!
If you try to use the email form, you immediately notice that it doesn’t actually work. This is not because there is something wrong with the forms or you have done anything wrong on your end. Both FPSE and PHP forms useserver-side scriptsto generate emails. And, as the name suggests, server-side scripts need to run on a server to work. When you preview your pages in your browser from Expression Web 4, you are not using a web server, but just looking at your local files.
In Hours 20 and 22, you will be introduced to an application known as Expres-sion Development Server and learn how to use it to preview the functionality of the email forms. If you want to see a fully working version of the email forms right now, go to www.mykipple.com.
Watch
Flash and Other Embeddable Content
On the main menu is a button named Flash. In Hour 20, “Working with Flash and Other Embeddable Content,” you’ll learn how to include Flash movies and other embeddable content in your pages. Flash movies are created using a dedicated appli-cation, and you can use Expression Web 4 only to insert them into your pages and configure their data files. In that hour, you get a glimpse into the world of Flash and how that technology works and interacts with your website. You also learn how to insert, or “embed,” advanced HTML5 and Flash content from sites such as YouTube in your site.
Exploring the Website in Expression
Web 4
Back in Expression Web 4, you can use the different features to explore the website and understand how it works. The application comes equipped with a set of tools to help you get a quick overview of the different elements the site is made up of and how everything is put together to work.
On the bottom of the Web Site view, you have four tabs: Folders, Publishing, Reports, and Hyperlinks. These are four different ways to view your website:
.
Folders gives you a regular browser view of the files and folders in your website. In other words, it works the same way as the Folder List panel..
Publishing gives you a view of the local and remote websites side by side and lets you transfer files between the two locations either one at a time or in groups. This is where you actually publish your site to the Web. (Publishing your site is covered in Hour 24.)contains, and how many files are unlinked—meaning they can’t be accessed by the visitor.
.
Hyperlinks creates a visual map that looks a lot like a mindmap, showing your files and how they relate to each other through hyperlinks. This tool makes it easy to understand how the site is organized.Click the Reports button to see the stats of the new website you imported. Expression Web 4 produces a list of all the different assets grouped in specific categories, as shown in Figure 2.6.
FIGURE 2.6
Reports gives you a complete overview of all the assets on your website and how they relate to each other.
Two of the most important items on this list are Slow Pages and Broken Hyperlinks. The Slow Pages report gives you a list of all the pages estimated to take more than 30 seconds to load on a 56Kbps connection. This report is important if you expect a lot of visitors with slower connections and shows you whether any of your pages is unneces-sarily large or heavy to load. You can change the default connection speed the report tests for by going to Tools, Application Options and then selecting the Reports View tab.
▼
FIGURE 2.7
You can fix bro-ken hyperlinks from the Reports view without opening the pages them-selves.
Try It Yourself
Fix a Broken Hyperlink
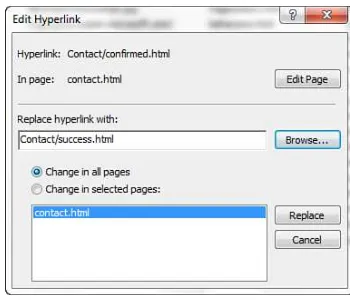
After running the report, you should see one broken hyperlink pointing to a file called Contact/confirmed.html. You can fix broken hyperlinks right from the report without even opening the page itself.
1. Right-click the broken hyperlink and select Edit Hyperlink. This opens the Edit Hyperlink dialog (see Figure 2.7).
2. From here, use the Browse button to find the correct file. It is under the Contact folder, and it is called success.html.
3. Click the Replace button and the hyperlink is automatically updated in all the pages where it is featured.
Keeping Your Pages Functional
As you previously learned, a website consists of a group of files and folders that are linked together. That means for the individual pages of the site to work, all the links between them have to be correct and up to date. One of the many important features of Expression Web 4 is that it keeps tabs on your files for you, making the necessary changes throughout all of your files when something is changed.
As long as you make the changes to your pages, files, and folders inside Expression Web 4, the application makes all the necessary changes to the links within related files to make everything run smoothly. Therefore, if you want to move a file or folder into or out of another folder, always use either the Folder List panel or the Folder view, and the links to your files and folders will be updated automatically. A short example puts this into context.
Right now, the root folder (main folder) of the website contains two files:
kippleStyles.css and layout.css. These two files (known as style sheets) contain all the CSS or styling code for all the pages of the site, and as a result, every page has a link to them. To make the style sheets easier to find, you want to put them in their own folder called Styles:
1. Switch to Folders view and click the folder icon in the upper-right corner to cre-ate a new folder. Give it the name Styles.
2. Drag and drop the kippleStyles.css and layout.css files into the new Styles folder.
3. A dialog briefly appears, telling you that the files are being renamed. This means that all the links that point to these two files from all the pages are being updated to reflect the change in location. When the dialog disappears, preview the default.html page in your browser again to make sure nothing changed.
When you preview the pages in your browser, it appears as if nothing has changed, but in fact, the links to the external style sheets have been changed in every page. If Expression Web 4 hadn’t changed all the links to the two files you moved, all the pages would have appeared as regular text without the backgrounds and different styles. By using this drag-and-drop technique, you can move any and all files inside your site and be certain that Expression Web 4 updates the links that point to them so that everything keeps working as it should.
Never Move Your Files Outside of Expression Web 4
A common mistake of new web designers is moving files or folders by using the regular browser window in their operating system rather than inside Expression Web 4. If you move a file or folder that way, the hyperlinks that tell the browser where these files are when the pages are displayed will not be updated, and as a result, you end up with a page that doesn’t work properly. If you want to move a file from one folder to another, always use the Folder List panel or Folders view to ensure that all your hyperlinks are updated accordingly.
Watch
Summary
Expression Web 4 is a powerful web design and management tool that lets you easily build and publish advanced websites based on web standards. In this hour, you explored the final product that you will end up with after following all the tutorials in this book and used it to learn how Expression Web 4 works to help you manage your website.
The ability to import an existing website gives you a quick-and-easy way to pick up an old project or take over an existing project from someone else. In this hour, you learned how to import an existing website and move the necessary files from a remote location to your website’s folder. You also learned how to use the Reports view to manage the files and folders in your website and track any problems or errors that are present. Expression Web 4 is set up in such a way that you can find and fix prob-lems, such as broken hyperlinks, without actually having to open the pages and make changes there. This ability is a huge timesaver and gives you intimate control of the site even without knowing or understanding exactly how it works.
Finally, you learned how to use the Folder List and Folders view to rearrange the files within your website without breaking the many links between them by letting Expression Web 4 handle all the details for you.
What you saw in this hour is just the beginning. In the coming hours, you learn how to build the MyKipple website from scratch and, through that, learn how to get the most out of Expression Web 4.
Q&A
Q.