Microsoft
®
Word 2013
Microsoft
®
Word 2013
BiBle
Microsoft® Word 2013 Bible
Copyright © 2013 by John Wiley & Sons, Inc., Indianapolis, Indiana Published simultaneously in Canada
ISBN: 978-1-118-48812-6 ISBN: 978-1-118-65771-3 (ebk) ISBN: 978-1-118-68436-8 (ebk) ISBN: 978-1-118-65764-5 (ebk)
Manufactured in the United States of America 10 9 8 7 6 5 4 3 2 1
No part of this publication may be reproduced, stored in a retrieval system or transmitted in any form or by any means, electronic, mechanical, photocopying, recording, scanning or otherwise, except as permitted under Sections 107 or 108 of the 1976 United States Copyright Act, without either the prior written permission of the Publisher, or authorization through payment of the appropriate per-copy fee to the Copyright Clearance Center, 222 Rosewood Drive, Danvers, MA 01923, (978) 750-8400, fax (978) 646-8600. Requests to the Publisher for permission should be addressed to the Permissions Department, John Wiley & Sons, Inc., 111 River Street, Hoboken, NJ 07030, (201) 748-6011, fax (201) 748-6008, or online at http://www.wiley.com/go/permissions.
LIMIt of LIaBILIty/DIScLaIMer of Warranty: the puBLISher anD the author Make no repreSentatIonS or WarrantIeS WIth reSpect to the accuracy or coMpLeteneSS of the contentS of thIS Work anD SpecIfIcaLLy DIScLaIM aLL WarrantIeS, IncLuDIng WIthout LIMItatIon WarrantIeS of fItneSS for a partIcuLar purpoSe. no Warranty May Be createD or extenDeD By SaLeS or proMotIonaL MaterIaLS. the aDvIce anD StrategIeS contaIneD hereIn May not Be SuItaBLe for every SItuatIon. thIS Work IS SoLD WIth the unDerStanDIng that the puBLISher IS not engageD In renDerIng LegaL, accountIng, or other profeSSIonaL ServIceS. If profeSSIonaL aSSIStance IS requIreD, the ServIceS of a coMpetent profeSSIonaL perSon ShouLD Be Sought. neIther the puBLISher nor the author ShaLL Be LIaBLe for DaMageS arISIng herefroM. the fact that an organIzatIon or WeB SIte IS referreD to In thIS Work aS a cItatIon anD/or a potentIaL Source of further InforMatIon DoeS not Mean that the author or the puBLISher enDorSeS the InforMatIon the organIzatIon or WeBSIte May provIDe or recoMMenDatIonS It May Make. further, reaDerS ShouLD Be aWare that Internet WeBSIteS LISteD In thIS Work May have changeD or DISappeareD BetWeen When thIS Work WaS WrItten anD When It IS reaD.
For general information on our other products and services please contact our Customer Care Department within the United States at (877) 762-2974, outside the United States at (317) 572-3993 or fax (317) 572-4002.
Wiley publishes in a variety of print and electronic formats and by print-on-demand. Some material included with standard print versions of this book may not be included in e-books or in print-on-demand. If this book refers to media such as a CD or DVD that is not included in the version you purchased, you may download this material at
http://booksupport.wiley.com. For more information about Wiley products, visit www.wiley.com. Library of Congress Control Number: 2012956414
About the Author
acquisitions editor
vice president and executive group publisher
e
very book project of this magnitude relies on a team of professionals to transport it from concept to reality. Many thanks to Jim Minatel and to Carol Long, who kept me in their contact lists as a potential resource for this project and others. My deep appreciation extends to Mariann Barsolo and Pete Gaughan, who managed the work both at the 10,000-ft. level and the 100-ft. level, and kept me on track during the challenging patches.Special thanks go to Kelly Talbot, the development editor who lent his thoughtful commen-tary about improvements, and technical editor, Dave Johnson, whose careful checks of my work helped find flaws that otherwise might have fallen through the cracks. Editorial team members Rebecca Anderson and Liz Welch played an essential role in enforcing consistency and accelerating the schedule to bring a readable book to you in the fastest timeframe possible.
Acknowledgments ... xi
Introduction ... xli
Part i: Welcome to a New Word . . . 1
Chapter 1: Taking Your First Steps with Word ... 3
Chapter 2: Diving Into Document Creation ...41
Chapter 3: Working Smarter, Not Harder, in Word ... 93
Chapter 4: Zapping Word’s Top Annoyances ...123
Part ii: Working with Document Style and Content . . . 143
Chapter 5: Font/Character Formatting ...145
Chapter 6: Paragraph Formatting ... 171
Chapter 7: Using Styles to Create a Great Looking Document ...197
Chapter 8: Cutting, Copying, and Pasting Using the Clipboard ...221
Chapter 9: Find, Replace, and Go To ... 241
PART iii: improving Document Content and Consistency . . . 273
Chapter 10: Reviewing a Document with Language Tools ...275
Chapter 11: Cleaning Up with AutoCorrect and AutoFormat ...303
Chapter 12: Getting Smart with Text: Building Blocks, Quick Parts, Actions (Tags), and More ...327
Part iV: illustrating Your Story with Graphics . . . 367
Chapter 13: Building Tables, Charts, and SmartArt to Show Data and Process ...369
Chapter 14: Adding Pictures and WordArt to Highlight Information ...423
Chapter 15: Adding Drop Caps, Text Boxes, Shapes, Symbols, and Equations ...461
Part V: improving Document Setup and look . . . 493
Chapter 16: Setting Up the Document with Sections, Headers/Footers, and Columns ...495
Chapter 17: Changing Other Page Features ...531
Chapter 18: Saving Time with Templates, Themes, and Master Documents ...549
Part Vi: enhancing Documents with Reference Features . . . 577
Chapter 19: Enhancing Navigation with Bookmarks, Hyperlinks, and Cross References ...579
Chapter 20: Identifying the Contents and Terms in Your Document: TOCs, Captions, and Indexing ...603
Part Vii: Making Documents Work for You . . . 669
Chapter 22: Data Documents and Mail Merge ...671
Chapter 23: Automating Document Content with Fields ...713
Chapter 24: Creating Custom Forms ... 741
Part Viii: Publishing, Collaboration, and the Cloud . . . 769
Chapter 25: Sharing and Publishing Documents ...771
Chapter 26: Managing Document Security, Comments, and Tracked Changes ...795
Chapter 27: Collaborating in the Cloud with SkyDrive ...827
Chapter 28: Integration with Other Office Applications ...845
Part iX: Power and Customization . . . 863
Chapter 29: Keyboard Customization ...865
Chapter 30: Customizing the Quick Access Toolbar and Ribbon ...879
Chapter 31: Word Options and Settings ...899
Chapter 32: Macros: Recording, Editing, and Using Them ...947
Appendix: Command-Line Switches for Controlling Word Startup ...971
Contents
Acknowledgments . . . . xi
introduction . . . xli
Part i: Welcome to a New Word
1
Chapter 1: Taking Your First Steps with Word . . . . 3
Starting Word ... 4
Start screen or Start menu ... 4
Pinning Word to the taskbar ... 5
Creating a desktop shortcut and shortcut key ... 6
Starting Word from File Explorer ... 8
Launching Word and a document via the Web ... 8
Using the Windows 7 Start menu Search box ... 9
Safe Mode ... 9
The Office Look ... 10
Your Interface to Faster Document Creation and Design ... 12
Using the Word Start Screen ... 13
Touring the Word Screen ... 14
Title bar... 14
Ribbon ... 15
Ribbon groups ... 17
Contextual tabs ... 17
Command keyboard shortcuts or KeyTips ... 18
Quick Access Toolbar ... 19
Galleries and Live Preview ... 21
The MiniBar or Mini Toolbar ... 23
Shortcut menus and contextual command buttons ... 24
Enhanced ScreenTips ... 26
Dialog boxes and launchers ... 26
Task panes or panes ... 27
Status bar ... 28
Exploring the File Tab ... 30
Displaying and closing the tab ... 30
Finding recent documents and pinning ... 32
Contents
Setting Word Options ... 33
Finding the option you want ... 34
Advanced…versus not advanced? ... 35
Switching Accounts ... 36
Getting Help ... 37
Exiting Word ... 38
Summary ... 39
Chapter 2: Diving into Document Creation . . . 41
Creating a First Document ...41
Creating and saving a new letter and envelope ... 42
Filling in the envelope ... 45
Filling in the letter... 46
Formatting, saving, and printing the letter ... 48
Printing the envelope ... 50
Creating a Blank File ... 50
Typing text ...51
Using word wrap ... 52
Inserting versus overtyping ... 52
Using default tabs ... 54
Making a new paragraph ... 54
Creating a File from a Template ... 55
Reviewing available document templates ... 56
Blank document and pinned templates ... 57
Online templates ... 57
Creating the file from the template ... 58
Working with template content ... 59
Opening an Existing File ... 60
Saving and File Formats ... 62
Saving as a Word file ... 63
Converting to another format ... 64
Converting a file from an earlier Word version ... 64
Using Save As ... 65
Using Export ... 66
Compatibility with Previous Versions of Word ... 67
Understanding .docx ... 68
Using the Compatibility Checker ... 68
Choosing between .doc and .docx ... 69
Persistent Save As ... 70
Microsoft Office Compatibility Pack... 71
Converting a .docx file into a .docm file ... 71
Contents
Navigation and Selection Tips and Tricks ...74
Selecting text ...74
Using the Navigation pane ... 77
Keyboard shortcuts ... 79
Creating a list of built-in keyboard shortcuts ... 79
Office 2003 menu keystrokes ... 80
Custom keystrokes ... 80
Choosing the Right Word View for the Task at Hand ... 81
Print Layout ... 81
Draft view... 82
Read Mode and Object Zoom ... 84
Web Layout ... 86
Outline (Master Document tools) ... 86
Resume Reading ... 87
Controlling the Ribbon display ... 88
Showing and hiding rulers ... 88
Splitting the view ... 88
Printing a Document ... 90
Summary ... 91
Chapter 3: Working Smarter, Not Harder, in Word. . . . 93
Achieving Attractive Documents with Styles ... 93
Styles versus direct formatting ... 94
Types of styles ... 96
Constructing Documents Faster with Outlining ... 96
Organizing content via outlining ... 97
Creating custom levels for non-heading styles ...100
Outlining versus browsing headings in the Navigation pane ...101
Cleaning Up Content with AutoCorrect ...103
How AutoCorrect works ...103
AutoCorrect options ...103
Removing built-in AutoCorrect entries ...105
Adding an AutoCorrect entry...105
Adding and Reviewing Properties ...107
Viewing properties on the Info screen ...107
Using the Document Panel ...108
Contents
Enabling AutoRecover and backup saving ... 116
Don’t save only to removable media ...118
Open and Repair ... 119
Last ditch salvage ...120
Sorting paragraphs that aren’t in a table ...121
Moving paragraphs easily ...121
Summary ...121
Chapter 4: Zapping Word’s Top Annoyances . . . . 123
Dealing with Graphics Annoyances ...123
Formatting control covers up Live Preview ...131
Clearing formatting ...133
Mouse selection ...136
Cut and paste sentence and word behavior ...136
Tackling View Annoyances ...137
Nonprinting indicators/formatting marks ...137
Missing Ribbon tabs ...138
Dealing with Online versus Local Help Content ...138
Activation Blues ...139
Automatic Annoyances ...140
Bullets, numbers, boxes, and borders ...140
Capitalization ... 141
Summary ...142
Part ii: Working with Document Style and Content
143
Chapter 5: Font/Character Formatting . . . . 145
Reviewing the Ways You Can Format Text in Word ...145
Contents
Using the Font group on the Home tab ...153
Font ...155
Font Size ...155
Working with text color ...156
Change Case ...160
Language ... 161
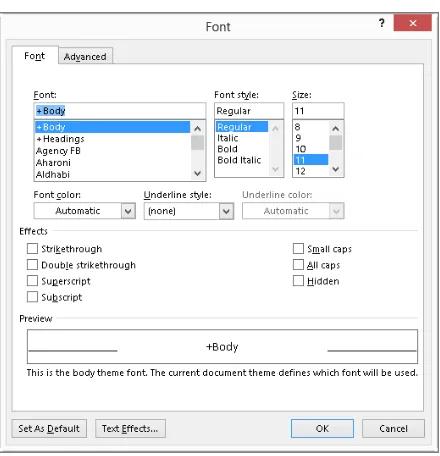
Formatting via the Font dialog box ...163
Understanding OpenType features ...166
Choosing Between Styles and Paragraph Formatting ... 171
Finding Paragraph Formatting Tools ...172
Paragraph formatting attributes ...175
Paragraph formatting techniques ...177
Structuring Text with Paragraph Formatting ...177
Adding indentation ...178
Setting tabs in a dialog box ...184
Working with tab leaders ...186
Setting tabs with the ruler ...187
Setting Off Text with Paragraph Decoration ...187
Numbering or bulleting lists of text ...188
Line and page break controls ...189
Shading paragraphs ...191
Borders and boxes ...193
Caveats for printing and viewing ...195
Contents
Contents
Contents
PART iii: improving Document Content and Consistency
273
Contents
Auto tips and techniques ...320 Tricks with quotes ...320 What about the other fractions? ...320 Handling Hyphenation ...323 Turning on automatic hyphenation ...323 Using manual hyphenation ...324 Adding a manual or nonbreaking hyphen ...325 Summary ...326
Chapter 12: Getting Smart with Text: Building Blocks, Quick Parts,
Contents
Adding electronic postage and e-postage properties ...361 Adding the envelope to the current document ... 361 Creating Labels ...361 Choosing a label type ...362 Choosing how many to print...364 Printing or creating a new label document ...364 Summary ...365Part iV: illustrating Your Story with Graphics
367
Contents
Contents
Contents
Inserting a Shape... 474 Sizing and moving a shape ... 474 Working with smart shape features ... 475 Formatting a shape ... 476 Adding text to a shape ... 476 Adding a Basic Symbol ...477 Inserting a Symbol from the Symbol Dialog Box ...478 Finding a character’s code ...480 Finding other marks on the Special Characters tab ...480 Adding an Equation to Your Document ...480 Inserting an equation from the gallery ...482 Creating an equation from scratch ...483 Saving equations to the gallery ...483 Working with equations ...483 Linear versus Professional ...484 Math AutoCorrect ...484 Inserting text before or after an equation ...486 Inserting normal text inside an equation content control ...486 Working with structures ...486 Choosing equation options ...486 Numbering equations ...488 A semiautomatic way to number equations ...488 Summary ...491
Part V: improving Document Setup and look
493
Contents
Contents
Contents
Part Vi: enhancing Documents with Reference Features
577
Chapter 19: enhancing Navigation with Bookmarks, Hyperlinks,
and Cross-References . . . . 579
Copying and pasting bookmarked text ...584 Navigating bookmarks ...585 Link to Existing File or Web Page ...591 Link to Place in This Document ...592 Link to Create New Document ...593 Link to Email Address ...594Chapter 20: identifying the Contents and Terms in Your Document:
Contents
Contents
Editing Citations ...654 Deleting sources ...654 Acquiring external sources ...655 Compiling the Citations into a Bibliography ...656 Inserting a bibliography ...657 Updating a bibliography ...658 Deleting a bibliography ...658 Converting a bibliography into static text ...658 Save Selection to Bibliography Gallery ...660 Understanding a Table of Authorities ...660 Creating Citations for a Table of Authorities ...661 Marking citations ...661 Removing citations ...663 Citation fields ...663 Inserting the Table of Authorities ...663 Category ...664 Use passim ...665 Formatting ...665 Updating a table of authorities ...667 Removing page numbers ...667 Summary ...667
Part Vii: Making Documents Work for You
669
Contents
Contents
Part Viii: Publishing, Collaboration, and the Cloud
769
Contents
Contents
Part iX: Power and Customization
863
Contents
Contents
introduction
W
elcome to the Microsoft Word 2013 Bible. Like all books in the Bible series, you can expect to find both hands-on tutorials and real-world practical application information, as well as reference and background information that provides a context for what you are learning. This book is a comprehensive resource on Word 2013 (also known as Word 15). By the time you have completed the Microsoft Word 2013 Bible, you will be well prepared to take full advantage of the numerous enhancements in Word 2013.The update to Word 2013 is evolutionary rather than revolutionary. Nice touches, like the move to contextual buttons beside selected objects so you can more easily apply layout and formatting changes, provide even more and better ways to work with document content. Word 2013 also pro-vides more ways to collaborate and share, including ways to make your work environment more portable by sharing to your SkyDrive in the cloud so you spend less time copying files to and from thumb drives and more time working.
Who Should Read This Book
The Microsoft Word 2013 Bible is a reference and tutorial for Word users of all levels. For the user who is completely new to Word, the early parts of this book will tell you everything you need both to quickly start using Word 2013 and to get the most out of the features it offers. Word 2013 is a full-service word processing program that can do just about anything you need it to do. Often, there are multiple ways to accomplish a given task. This book will show you the quickest and easi-est ways to accomplish your mission, while at the same time pointing out the longer-term advan-tages of using methods better suited to extensibility and repurposing your work.
introduction
How This Book is Organized
The Word 2013 Bible is organized in a way that reflects both the way users tend to learn Word as well as the relative timing when particular kinds of information and techniques are needed. This book is organized into nine parts. The first four parts are designed to get you up-and-running as quickly as possible, covering things you need to know to start using Word immediately. However, the early parts of the book not only show you the basics, but also offer tips and strategies that will enable you to become an effective Word user. Topics and techniques covered in the early chapters are revisited throughout the Microsoft Word 2013 Bible. You’ll quickly gain an understanding of how some concepts—such as Heading styles— give you incredible leverage and easy access to sophisticated word processing techniques and features.
Part i: Welcome to a New Word
Part I begins with things you need to know in order to become comfortable and fully pro-ficient with Word 2013. The mission of this collection of chapters is to get you over any initial stumbling blocks so you can begin to take advantage of Word 2013’s power and enhancements. Part I offers a quick-start chapter especially useful for newbies. For Word veterans, there’s a chapter explaining how to find features that otherwise appear to be missing in action. To prepare you to be the kind of power user the Microsoft Word 2013 Bible knows you can be, Part 1 offers chapters on making Word work for you, understanding Word’s new file format, and learning how to tame and control Word’s automatic features.
Part ii: Working with Document Style and Content
Part II focuses on the baseline skills that every Word user uses and needs. The chapters here cover essentials such as font and character formatting; paragraph formatting; using styles; cutting, copying, and pasting; finding and replacing text; and using Go To to navi-gate in a document.
Part iii: improving Document Content and Consistency
Part III focuses on aspects of Word that can make your word processing life proceed more smoothly. In Part III, you’ll learn how to use Word’s cadre of tools for cleaning up your doc-uments, including checking spelling and grammar, Quick Parts, AutoCorrect, AutoFormat, and more.
Part iV: illustrating Your Story with Graphics
introduction
Part V: improving Document Setup and look
Part V focuses on how documents are put together, as well as special considerations that depend on the ultimate destination of the document. You’ll learn what you need in order to turn out professional reports, newsletters, and brochures—and other specialized document formats. Part V covers page setup, sections, headers, footers, column formatting, page back-ground formatting, templates, themes, and master documents.
Part Vi: enhancing Documents with Reference Features
Part VI covers those elements typically used in what people call long documents. It ventures into the wonderful worlds of bookmarks, indexing, hyperlinks, tables of contents (and other tables), footnotes, endnotes, citations, and Word’s bibliography feature. If you’ve used infor-mation in one place, this chapter will show you how to reuse that inforinfor-mation elsewhere in a variety of purposeful and powerful ways.
Part Vii: Making Documents Work for You
Part VII deals with the mail merge feature’s ability to create personalized documents, such as envelopes, labels, form letters, catalogs, and directories. You learn to set up or and create data source files and merge their contents with the standard information in the main docu-ment. This part also explains how to use fields to automate document content and create forms to prompt appropriate user input.
Part Viii: Publishing, Collaboration, and the Cloud
In Part VIII, you’ll learn about Word’s and Office’s collaboration tools, comments, change tracking, and merging changes from different sources. You also learn about how Word now integrates with your SkyDrive storage in the cloud, or with respect to Office 365 and its SharePoint capabilities. Also covered in this part is integration with other Office applica-tions, such as Outlook, Excel, and PowerPoint.
Part iX: Power and Customization
Part IX concludes the book with the kinds of customizations you can make to Word’s interface—not just the keyboard and the QAT (Quick Access Toolbar), but also the Ribbon. Part IX shows you the many ways in which you can hone Word’s options and settings to match your own style of working. You’ll also learn how to write basic macros to automate repetitive chores.
Conventions and Features
introduction
The text uses command shortcuts such as Insert d Header & Footer d Header. These Ribbon tab name d group d command sequences help you navigate through the Ribbon to find and choose the appropriate command. When referencing contextual tabs, where the first part of the tab name appears on an upper row and the subtab name appears on the lower row along with the normal tabs, an arrow will also appear between the upper part of the contextual tab name and the subtab, as in Picture Tools d Format. After the first men-tion in a chapter, the text may refer to the contextual tab by its subtab name only, that is, Format rather than Picture Tools d Format.
Tips, Notes, and Cautions
Whenever I want to bring something important to your attention the information will appear in a Tip, Note, or Caution.
Tips generally are used to provide information that can make your work easier—special shortcuts or methods for accomplishing something easier than the norm.
Notes provide additional, ancillary information that is helpful, but somewhat outside of the current presentation of information.
Cautions provide information about things to watch out for, whether simply inconvenient or potentially hazardous to your data or systems.
Windows Versions
introduction
Where to Go from Here
Of course, no book can possibly tell you everything you’re ever likely to need to know about any one computer program. With tens of millions of users around the world using Word 2013, there are going to be things that even the Microsoft Word 2013 Bible can’t anticipate. Even Word’s Help feature may not provide the answers you need. When you come up against a prob-lem that stops you in your tracks, there are places you can go and resources you can tap. Some of the most useful resources are Microsoft public communities or newsgroups. These communities are visited by millions of users and are frequented by thousands of experts with many combined years of experience in using Microsoft Office and solving problems in ways that are efficient, effective, creative, and often novel. To tap this vast free resource, begin here:
http://answers.microsoft.com/en-us
Other tremendous free online resources are the many FAQs and articles created by Microsoft’s huge corps of volunteer technical experts known as Most Valuable Professionals. To learn more about Microsoft’s MVP program, visit:
http://mvp.support.microsoft.com
A wealth of helpful content has been assembled by these volunteers in a website that is independent of Microsoft and maintained by MVPs. To begin utilizing the Word-specific offerings, visit:
http://word.mvps.org/
If you have comments or suggestions for improving the Microsoft Word 2013 Bible, please don’t hesitate to contact Wiley at:
Part I
Welcome to a New Word
l
ike the other members of the Office 2013 suite, Word 2013 has been upgraded to take advantage of new aspects of the Windows 8 operating system, such as user accounts and direct integration with the cloud. Even if you are upgrading from a recent Word version, you will find that Word 2013 includes some surprises along with familiar tools.Part I begins with things you need to know and want to know about Word 2013. Chapter 1 explains how to get started in Word in both Windows 8 and Windows 7, and introduces the Word 2013 interface. Chapter 2 offers a quick start example how to create and print a document, and from there covers basics such as opening and saving files, making selections, and using views. Chapter 3 advises you how to get the most out of Word by using styles and tak-ing advantage of “power user” techniques that are in fact easily employed by anyone. Finally, Chapter 4 shows you how to tame or take advantage of Word’s behaviors that you might consider annoying.
iN THiS PART
Chapter 1
Taking Your First Steps with Word
Chapter 2
Diving Into Document Creation
Chapter 3
Working Smarter, Not Harder, in Word
Chapter 4
C H A P T e R
1
Taking Your First Steps
with Word
iN THiS CHAPTeR
learning Word’s startup methods
Taking a look at the new Word
locating and using Word’s tools
Understanding the File tab and its purpose
Reviewing Word option settings
Finding Help in Word
Shutting down Word when you’ve finished working
W
ord 2013 and its companion Office programs have been retooled and updated to help you get things done faster. Underneath its streamlined new look, Word integrates smoothly with the new features built into the Windows 8 operating system and Windows 8 devices, though you can use Word on a Windows 7 system, too. (It also runs on Windows Server 2008 R2 and Windows Server 2012, but this book limits coverage to using Word on the end-user versions of Windows.)Part i: Welcome to a New Word
Starting Word
Your work in Word 2013 begins with starting the program, and there are multiple ways to get that done. This book assumes that you’re using Windows 8 in its default configuration. If you’re using Windows 7, some actions won’t apply, and the text will point them out along the way. Office 2013 applications no longer run on Windows XP or Vista, and although Word 2013 does run on Windows Server 2008 R2 and Windows Server 2012, this book pri-marily limits coverage to using Word on Windows 8, with some coverage of differences when using it with Windows 7.
Start screen or Start menu
When you install Word 2013 in Windows 8, a tile for the program automatically appears on the Windows 8 Start screen. The Start screen appears after you start your computer and sign in to your user account, and it is the central location for accessing applications like Word. The fastest way to return to the Start screen at any time is to press the Windows logo key on the keyboard. You also can point to the lower-left corner of the Windows desktop— which retains the much the same appearance in Windows 8 that it had in Windows 7—until a Start tile appears, and then click it. Here’s how to start Word 2013 from the Windows 8 Start screen:
1. If needed, press the Windows logo key to go to the Start screen.
2. Depending on your screen resolution, you may need to point to the bottom of the screen to display a scroll bar and then scroll right to display the Word 2013 tile.
Figure 1.1 shows the Word 2013 tile.
Figure 1.1
The Word 2013 tile appears on the Start screen.
3. click the Word 2013 tile. Word opens on the Windows desktop.
Chapter 1: Taking Your First Steps with Word
1
creating the account online.) If you want to take full advantage of Word’s online, social,and collaboration features, sign on to Windows with a Microsoft account. Then, the first time you start Word, it will use your Microsoft account as your Word account and you should enter that account’s information if prompted to activate the program.
if your Start screen is too cluttered and you want to remove the Word 2013 tile and use another method for start-ing Word, you can unpin Word from the Start screen. Press the Windows logo key, scroll right to display the tile, and right-click it. in the commands that appear along the bottom of the screen, click Unpin from Start.
If you’re still using Windows 7, you can start Word via the Start menu. To do this, you choose Start d All Programs d Microsoft Office 2013 d Word 2013. Perhaps even easier, you can choose Start, and then type word into the search box. When Word 2013 is high-lighted under Programs in the results list, press Enter.
in Windows 8, you also can use the Search charm to start Word from the desktop (or the Start screen, if you’ve removed the Word 2013 tile). Move the mouse pointer to the upper- or lower-right corner of the screen to display the charms. Click the Search charm, which is the top charm. Move the mouse pointer off the Search pane that appears, over the scroll bar at the bottom of the screen. Scroll right until you see the Word 2013 tile under Microsoft Office 2013, and click the tile.
Pinning Word to the taskbar
You can place a shortcut for starting up Word 2013 onto the Windows 7 or 8 taskbar. This makes a lot of sense in Windows 8, in particular, because you use File Explorer from the desktop to manage your files. Pinning Word 2013 to the desktop in Windows 8 is a quick process:
1. go to the Start screen if needed by pressing the Windows logo key or pointing
to the lower-left corner of the screen and clicking the Start tile.
2. Scroll right to display the Word 2013 tile, if needed.
3. right-click the tile, and then click pin to taskbar in the commands that appear along the bottom of the screen.
4. click the Desktop tile on the Start screen, or if you were previously working
Part i: Welcome to a New Word
To pin Word 2013 to the taskbar in Windows 7, first start the program from the Start menu. Then right-click the program’s taskbar button, and click Pin this program to taskbar in the jump list.
Once you’ve pinned Word to the taskbar in either version of Windows, simply click the Word 2013 button to start the program.
If you no longer want the taskbar shortcut, right-click the taskbar button and click Unpin this program from taskbar.
Creating a desktop shortcut and shortcut key
You also can start Word from a shortcut icon that you create on the desktop. To create a shortcut in Windows 8 you need to find the program startup file (WINWORD.EXE) for Word 2013. This process works in a similar way in Windows 7, which offers another way to create a less flexible type of shortcut that you’ll learn about later.
Although locations vary (depending on user and network settings, for example), the usual default location for Word 2013 in both Windows 8 and Windows 7 is C:\Program Files\ Microsoft Office\Office15\WINWORD.EXE for the 64-bit version or C:\Program Files (x86)\Microsoft Office\Office15\WINWORD.EXE for the 32-bit version. Working from the desktop, open File Explorer and navigate to WINWORD.EXE following the path just noted. When you find it, right-click it and choose Send To d Desktop (create shortcut). Close the File Explorer window. On the desktop, locate WINWORD - Shortcut. Double-click the new shortcut icon to start Word at any time.
To improve the shortcut, right-click it and choose Properties. As shown in Figure 1.2, the Target text box shows the path to the program startup file. You can add a program startup switch to this Target entry to customize Word startup; Appendix A covers the available switches. The Properties dialog box also includes a Change Icon button, which enables you to choose a new icon for this shortcut. The dialog box also offers the Shortcut key text box, where you can specify a keyboard combination that you can press to launch Word quickly from the desktop.
Chapter 1: Taking Your First Steps with Word
1
Figure 1.2The properties for the desktop shortcut enable you to change icons, add a shortcut key, or add a startup switch.
Desktop shortcut for Word 2013
Properties for the Word shortcut
Enter a shortcut key combination here
To select a desktop shortcut, display the desktop, click anywhere on it, and press the first character of the shortcut’s name on the keyboard, such as W for winword. Repeatedly pressing that key cycles among all shortcuts that begin with that character. Press enter to launch the program or file associated with the selected shortcut.
if you have multiple desktop shortcuts that begin with the same character, repeatedly pressing the same key still might be tedious. The solution is to rename the shortcut icon. To do this, select the shortcut icon as just described and press the F2 key. Type a new name starting with a different letter to replace the highlighted text, and then press enter to finish renaming.
Part i: Welcome to a New Word
A shortcut created by this method lacks flexibility, because you can’t add a startup switch to the target or change the shortcut icon. However, you can add a shortcut key combination.
Windows 8 enables you to access a folder that seems to be a legacy version of the Start menu from prior Windows versions. You can copy shortcuts from there to the desktop. Word’s Windows 8 “Start Menu” shortcut is found at C:\ProgramData\Microsoft\Windows\Start Menu\Programs\Microsoft Office 2013\. You can go directly to this folder from the Start screen (or after selecting the Search charm) by right-clicking the Word 2013 tile and clicking Open file location in the commands that appear at the bottom of the screen. The Word shortcut to copy and paste is Word 2013. You could add a shortcut to the Microsoft Office 2013 folder to the desktop to give you quick access to the startup shortcuts for all the Office apps.
Starting Word from File explorer
Yet another way to start Word is by double-clicking the icon for a document created in Word 2013 or an earlier version in a File Explorer window on the desktop. Simply click the File Explorer taskbar button, navigate to the desired document, and double-click it. Alternatively, you can select it and press Enter, or right-click it and choose Open.
in fact, you can open multiple Word files this way—at the same time. Select the first one you want to open, and then Ctrl+click on each additional file you want to open. Then press enter. This also works in Word’s own Open dialog box.
File explorer in Windows 8 is basically the same as Windows explorer in Windows 7, just updated and given a new name. This book primarily uses File explorer to keep things simple, but if you are using Word in Windows 7, you can assume that “File explorer” means “Windows explorer” in any instructions.
launching Word and a document via the Web
Chapter 1: Taking Your First Steps with Word
1
Even more important, however, Word files can carry computer viruses, so unless you have a virus protection program that scans files as they download, you risk infecting your system. You can reduce the potential risks and problems by right-clicking the document link in question, clicking Save Target As (or your browser’s equivalent), and saving the file to a local folder (a folder on your hard disk). Although most (but not all) popular antivirus pro-grams monitor files you open from links, better safe than sorry. After you’ve saved a file to your hard drive, you can scan it with your antivirus program to remove viruses before proceeding to open the file.Any time you open a Word file of uncertain origin, hold down the Shift key as you open the file. This prevents any automatic macros from running. inspect it for suspicious macros, and once you’re sure it’s safe, proceed—but cautiously. in theory, this is less necessary in Word 2010 and 2013 than in previous versions of Word, however. When Word detects that a file has come from an outside source (internet, email attachment, etc.), it can open it in Protected View. if you trust the source of the file, you can click enable editing to work with it.
Saving the file also gives you the opportunity to store it somewhere other than with your temporary Internet files. That way, if you need it again later, you won’t have to download it again.
Using the Windows 7 Start menu Search box
If you’re running Word 2013 from Windows 7, you also can use the Start menu’s Search pro-grams and files text box to find and run the program. Click the Start button and type word
(or winword if you need additional parameters or switches) into the Search programs and files text box, and then click the entry for Word under Programs.
Safe Mode
Any time you start Word, you have the option of starting it in safe mode. You might want to do this for a variety of reasons, including the following:
u Word experienced problems and you’re trying to diagnose them.
u You need to observe Word’s default behavior to help someone else.
u You need to suppress a Word add-in, for whatever reason.
u You’re curious about something (my own personal favorite).
Part i: Welcome to a New Word
Figure 1.3
Hold down the Ctrl key to start Word in safe mode.
Starting Word in safe mode suppresses a number of Word options and Windows registry set-tings. Word also does not load add-ins or user settings stored in the default document tem-plate Normal.dotm. The idea is to prevent user and other customizations from interfering with Word’s default behavior. This can be useful in circumstances from diagnosing problems to writing books and articles about Word in which you don’t want to confuse your own cus-tomizations with Word’s normal built-in defaults.
When you are in safe mode, (Safe Mode) appears in the program title bar. To leave safe mode, exit Word as described in the final section of this chapter, and then restart Word normally.
Starting Word in safe mode is not the same as starting Word using the /a command-line switch. More on this in Appendix A.
The Office look
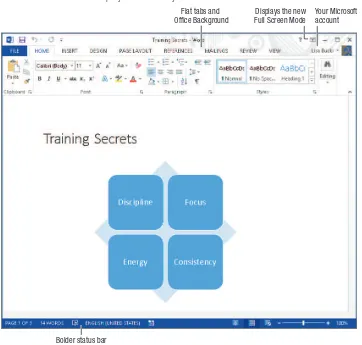
In redesigning Windows 8, Microsoft incorporated a sleeker look that would be at home on either tablets or PCs, greater integration with cloud-based features such as SkyDrive, and even more social media functionality. You don’t have to spend much time working in the new Word to find that it follows the lead of Windows 8:
u Sleeker look: As shown in Figure 1.4, Word’s title bar has eliminated the previous
Chapter 1: Taking Your First Steps with Word
1
Figure 1.4Word’s sleek new look helps you focus on your documents.
Bolder status bar
Your Microsoft account Displays the new Full Screen Mode Flat tabs and
Office Background
u cloud integration: The upper-right corner of Figure 1.4 also illustrates that the Microsoft account (or other applicable account type) you use to sign in to Word appears, along with any picture assigned to the account. This means you can save and open documents directly to and from the account’s SkyDrive, a feature you’ll learn more about in Chapter 2 and Chapter 27, “Collaborating in the Cloud with SkyDrive.” Other new features tie into the cloud independent of your account. For example, the new Insert Online Pictures feature enables you to find and add images from Office.com Clip Art, Bing Image Search, or your SkyDrive to a document. Chapter 14, “Adding Pictures and WordArt to Highlight Information,” covers the details of this more flexible way to find document images.
Part i: Welcome to a New Word
make the connection when prompted, and pictures you’ve shared to Flickr will be available for use in Word documents. And you can more easily share a document saved to your SkyDrive and present a document online, making collaboration with your contacts a seamless and productive experience. Chapters 14 and 27 delve into these social and collaboration features.
Your interface to Faster Document Creation and Design
If you’re like most users, when you begin a letter or a report, the first thing you do is check whether you’ve ever created a similar letter or report. If you have written and formatted a similar document, then you very likely will open it and use it as a starting point.However, even if you have a document to use as a starting point, you are only recycling the same look and feel you’ve used before. Instead, you could take advantage of an existing tem-plate in Microsoft Word’s ever-expanding repertoire. You can either select one of the more popular templates or search for a template using a description such as letter, resume, brochure, or event planner. Chapter 2 explains how you can find and use a template to create a document that has a professional appearance, even if you don’t have a document design background. If you also do not want to use a template, you can start with the clean slate of a blank document. Even with that starting point, Word provides a collection of designs and tools to save time and guesswork. Word includes built-in galleries of already formatted options. For example, if you create a table, rather than formatting the text, borders, and fills sepa-rately, you can apply a single table style to format all the table elements with an attractive combination of settings. Most galleries work with the Live Preview feature. Simply move the mouse pointer over a choice in a gallery, and the selected text or object temporarily morphs in the document to show you how the gallery choice would look when applied. You can either click that choice to select it or move the mouse pointer along to preview other gal-lery choices. Some galleries even present special elements you can add to a document page. For example, when you insert a text box into a document, you have the option of inserting a box formatted as a pull quote or sidebar to add design interest to your document. You’ll learn about the numerous galleries throughout later chapters in the book.
Chapter 1: Taking Your First Steps with Word
1
Figure 1.5The Format contextual tab or subtab presents picture formatting options, including a gallery of styles.
Mouse pointer over a gallery choice
Live Preview of the gallery choice
Contextual tab for the selected object
Using the Word Start Screen
Part i: Welcome to a New Word
if you want to turn the Start screen off, click the File tab on the Ribbon, and then click Options. leave the General tab selected in the list at the left, and under Start up options, click to remove the check beside Show the Start screen when this application starts. Click OK to apply the change.
Touring the Word Screen
This chapter has already pointed out a few elements of the Word screen that you’ll use to create and enhance your documents. Now it’s time to review all the tools available via the Word screen, several of which are identified in Figure 1.6. Word 2013 retains many of the same elements of the 2007 and 2010 versions of the programs. If you’re new to Word, this section presents the essential roadmap to help you around the screen. Users of all levels can have an Aha! moment or two via the tips and notes found in the next few pages.
Title bar
The title bar at the top of the Word window shows the name of the current document and the program, as in Figure 1.6. In addition to identifying the working document, the title bar enables you to control the size of the Word window. Double-clicking the title bar toggles Word between maximized (full screen) and restored (less than full screen) states. If you’ve set your screen to a fairly high resolution and have used the Windows Snap feature to snap a screen to full size or half-screen size, double-clicking the title bar also returns the window to its prior size. The three application control buttons at the far-right end of the title bar also enable you to work with the window size. The left one, Minimize, col-lapses the current Word window down to a button on the Windows desktop taskbar. The middle button toggles between being a Maximize and Restore Down button, and works just like double-clicking the title bar. Finally, the Close button at the far right closes the cur-rent document and shuts down Word if that’s the only open document. Pressing Alt+F4 also closes the document window. You also can right-click the title bar to see commands for siz-ing the window. And, if the window is less than full-screen size, draggsiz-ing a window border resizes the window.
Chapter 1: Taking Your First Steps with Word
1
Figure 1.6Word screen elements
Quick Access Toolbar (QAT)
Application window control buttons
Ribbon
Title bar
Status Bar
The far-left button at the right end of the title bar is the Help button, with the question mark on it. Clicking it opens Word’s Help function, which you’ll learn more about at the end of the chapter.
Ribbon
Part i: Welcome to a New Word
Groups help you drill down to the command you need more rapidly, so you can click and move on to the next task.
Exactly what you see in any given Ribbon tab is determined by a number of factors, includ-ing your screen resolution, the orientation of your monitor, the size of the current Word window, and whether you’re using Windows’ display settings to accommodate low vision. Hence, what you see might not always be what is pictured in this book. If your screen is set to a fairly high resolution, you will see the entirety of the Home tab of the Ribbon, shown in the top of Figure 1.7. The bottom image shows the Ribbon at the lower 1024n768 resolu-tion used for the screen shots in this book. You’ll notice in the top image that the Home tab shows the Format Painter label in the Clipboard group and more styles in the Styles gal-lery. At an even higher resolution and/or with Word stretched across multiple monitors, the Home tab would show even more labels and styles.
Figure 1.7
At a high resolution, Word’s Ribbon displays additional gallery options and text labels (top) not seen at lower resolutions (bottom).
You can press Ctrl+F1 or click the arrow button at the lower-right corner of the Ribbon to collapse and expand the Ribbon. You also can double-click a Ribbon tab to collapse and re-expand it. At times the Ribbon might seem large or distracting when you’re simply reading a document or when you’re trying to see a graphic and write about it at the same time. And if you are fluent in the keystrokes you need to perform basic formatting, you don’t necessarily need the Ribbon onscreen at all times. When the Ribbon is collapsed, you can click any tab once to turn it back on temporarily. in that case, you’ll see a pin button at lower-right where the arrow previously appeared. Clicking the pin button expands the Ribbon so that it stays onscreen. You’ll learn more about controlling the Ribbon in “Controlling the Ribbon display” in Chapter 2.
Chapter 1: Taking Your First Steps with Word
1
To see what any individual control or command on a Ribbon tab does, simply move themouse pointer over it. A ScreenTip pops up with a description of the tool. Move the mouse pointer away from the button to hide the ScreenTip.
Ribbon groups
At the bottom of the Home tab shown in Figure 1.7, note the names Clipboard, Font, and Paragraph. These labels identify the command groups. Each contains individual tools or controls. You can customize the groups that appear on any Ribbon tab. For example, you might want to add a group that collects all of your most-used commands in a single loca-tion. You’ll also learn more about this level of customization in Chapter 30.
Throughout this book, you may see command shortcuts such as insert d Header & Footer d Header. These Ribbon tab name d group d command sequences help you navigate through the Ribbon to find and choose the appropri-ate command. When referencing contextual tabs, an arrow will also appear between the upper part of the contextual tab name and the subtab, as in Picture Tools d Format. After the first mention in a chapter, the text may refer to the contextual tab by its subtab name only, that is, Format rather than Picture Tools d Format.
Contextual tabs
Along with the default set of seven main tabs, additional context-sensitive or contextual tabs or subtabs appear depending on what you are working on in the document. For example, if you change to Outline view, the Outlining toolbar, with commands for changing outline levels and more, automatically appears to the left of the Home tab. In other instances, a contextual tab might appear when you select part of a document or an object such as a table. For example, if you choose Insert d Header & Footer d Header and insert a header from the Header gallery, the Header & Footer Tools d Design contextual tab appears, as shown in Figure 1.8.
Figure 1.8
Part i: Welcome to a New Word
Notice that the right end of the contextual tab in Figure 1.8 has a Close group with a but-ton for closing the tab. Some contextual tabs have such a butbut-ton, and you have to use it to close the contextual tab. In the case of the Design subtab in Figure 1.8 and many other contextual tabs related to a selected object, you also can deselect or click outside the object, which closes the contextual tab automatically.
In some cases, multiple contextual tabs might appear. For example, when you select a table in a document, the Table Tools appear, with Design and Layout subtabs, as shown in Figure 1.9. In this instance, click a subtab to display its tools. For example, click the Design contextual tab to find the table design choices, or click the Layout contextual tab to find commands for changing the table’s layout.
Figure 1.9
Selecting some objects, such as tables, displays multiple contextual tabs.
Command keyboard shortcuts or KeyTips
While many users can move fluidly between using the mouse or the keyboard, for the best typists, doing so can actually be a hindrance that slows them down. For such users, short-cut key combinations provide a way to handle formatting tasks and select commands with-out taking their hands off the keyboard.
In Word 2013 the command shortcut keys are called KeyTips, and some users also refer to key-board shortcuts as hot keys. The keykey-board shortcuts remain hidden until you need them. Press the Alt key on the keyboard to reveal them. As shown in Figure 1.10, when you press Alt the letters for selecting the Ribbon tabs and Quick Access Toolbar (QAT) commands appear. From there, you would press the keyboard key for the Ribbon tab you want to display. For example, pressing Alt+H displays the Home tab, Alt+N displays the Insert tab, and so on. The choices on the QAT are numbered rather than lettered, so you would press Alt+1 to select the first button there, Alt+2 the second one, and so on. Note that if you add more choices to the QAT as described later in the book, Word will automatically assign a keyboard shortcut. Notice that Figure 1.10 also shows the Table Tools d Design and Layout contextual tabs. Each has a two-letter shortcut key. To display the Design contextual tab, you would need to press Alt+J,T. Pressing Alt+J,L displays the Layout contextual tab.
Chapter 1: Taking Your First Steps with Word
1
After you press Alt and then a letter to select a Ribbon tab, you can press Tab and Shift+Tab to move forward andbackward between the commands on that tab. When you’ve highlighted the command you want to use, press either the Spacebar or enter key.
Figure 1.10
Press the Alt key to display Word’s command keyboard shortcuts.
Figure 1.11
After you press Alt + a letter to select a Ribbon tab, press the next shortcut keys to select a command.
If you decide not to use a shortcut after you’ve displayed the keys onscreen, no problem. Just press Alt again, click a blank area with the mouse, or press the Esc key once or twice to remove them from the screen.
Word also includes an extensive collection of keyboard shortcuts for selecting document text and navigating in a document. You’ll learn about these in Chapter 2.
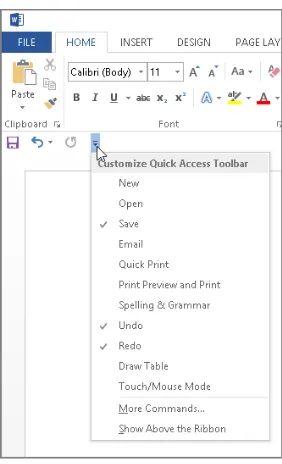
Quick Access Toolbar
Part i: Welcome to a New Word
By default, the QAT has buttons for three commands: Save, Undo, and Redo. In Figure 1.12, I’ve moved the QAT below the Ribbon, so you can see these default buttons from left to right respectively. Note that the Redo button is unavailable (grayed out) until you perform an action that Word can repeat. Also, if you move the mouse pointer over the Undo and Redo buttons to see a ScreenTip, the ScreenTip name of each of those buttons changes depending on your last action. For example, the Redo button ScreenTip might read “Repeat Typing.” As shown in Figure 1.12, clicking the Customize Quick Access Toolbar button at the right end of the QAT opens a menu of options for setting up the QAT. You can use the choices above the line on the menu to toggle commands on and off, choose More Commands to access all of the Word commands, or determine whether the QAT appears above or below the Ribbon.
Figure 1.12
The Quick Access Toolbar (QAT) always appears, no matter which Ribbon tab you’ve selected.
Chapter 1: Taking Your First Steps with Word
1
You can add any item from the Ribbon—individual tools, groups, and even dialog boxlaunchers—to the QAT without opening the Customize Quick Access Toolbar menu. For example, right-click Bold in the Font group of the Home tab and choose Add to Quick Access Toolbar. If you add a command such as Bold to the QAT and want to remove it later, right-click it and right-click Remove from Quick Access Toolbar.
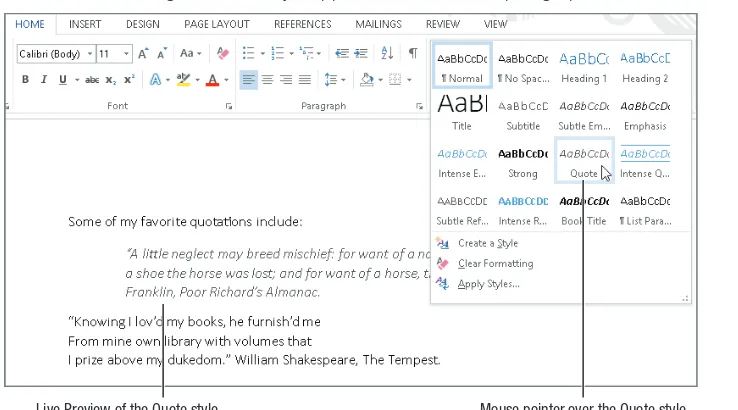
Galleries and live Preview
In Word and the other Office applications, a gallery is a set of formatting results or preformat-ted document parts. Virtually every set of formatting results or document parts in Word 2013 (indeed, in all of Office 2013) might be called a gallery, although Word itself does not use the word gallery to refer to every feature set. Some, such as the list of bullets, are called libraries instead, and the drop-down galleries for selecting colors also may be called color pickers. Word includes galleries for text styles, themes, headers, footers, page colors, tables, WordArt, equations, symbols, and more. In most cases, you click a button or drop-down arrow to open a gallery, and then click the gallery choice to apply to the selected text or object. Galleries often work hand in hand with the Live Preview feature.
Live Preview temporarily applies the highlighted gallery choice to the current document selection, enabling you to instantly see the results without actually having to apply that formatting, as shown in Figure 1.13. Move the mouse pointer over the different gallery options to display the formatting on the document selection instantly.
Figure 1.13
Live Preview showing the Quote style applied to the selected paragraph
Part i: Welcome to a New Word
Note that not all galleries and formatting options have Live Preview enabled. For example, on the Page Layout tab, none of the Page Setup items produce live previews, nor do its Paragraph group settings. Another time you won’t see Live Preview is when working with dialog boxes, such as the Paragraph dialog box. Many of those offer internal Preview areas but do not take advantage of Office 2013’s Live Preview capability.
A gotcha in all this newfangled functionality is that sometimes the gallery itself covers up all or part of the Live Preview. This gets old quickly and can negate much of Live Preview’s functionality, unless you’re blessed with lots of screen real estate.
Fortunately, some galleries and controls have draggable borders that enable you to see more of what you’re trying to preview, as shown in Figure 1.14. A handle with four dots indicates when you can resize a control’s border by dragging up. If a gallery has three dots in the lower-right corner, that means you resize both its height and width by dragging diagonally. Once you’ve determined through Live Preview that you want to apply particular formatting, click the choice in the gallery. If necessary, you can always use the venerable Ctrl+Z (Undo) if you don’t like the result.
Figure 1.14
Chapter 1: Taking Your First Steps with Word
1
When using live Preview, it’s easy to forget to click the desired gallery or formatting command when you come to it.Particularly in extensive lists (such as lists of fonts, colors, or styles), it’s possible to get exactly the right effect with-out noticing what it’s called. in the case of colors, you usually don’t even have a name to use as a guide. Sometimes, the hand really is quicker than the eye. Once you move your mouse away from your selection, it’s lost. You might have to re-inspect that entire list to find exactly what you already found, so once you find what you’re looking for, don’t forget to click! Ctrl+Z is your friend!
The MiniBar or Mini Toolbar
Another feature in Word 2013 is the MiniBar, more formally known as the Mini Toolbar. The MiniBar is a set of formatting tools that appears when you first select text. It is not context-sensitive, and it always contains an identical set of formatting tools. There is no MiniBar for graphics and other nontext objects.
When you first select text, the MiniBar appears above and to the right of the mouse pointer, as shown in Figure 1.15. If you move the mouse pointer off the selection, the MiniBar disappears.
Figure 1.15
The MiniBar appears when text is first selected.
Once the MiniBar disappears, you cannot redisplay it by hovering the mouse over the selection. You can, however, redisplay the MiniBar and a shortcut menu for the selection by right-clicking the selection. Note also that only the mouse triggers the MiniBar. if you display the pop-up context menu by pressing Shift+F10 or by tapping the Menu button on a Windows keyboard, the MiniBar will not appear.
Part i: Welcome to a New Word
mouse less than an inch or so to move the pointer to the command you need. For those with repetitive motion injuries, this can save a lot of wear and tear on the wrist. If you decide that the MiniBar gets in the way, you can turn it off. Even when it is turned off, however, you can still summon it by right-clicking the current selection. If you want to turn the Mini Toolbar off, click the File tab on the Ribbon, and then click Options. Leave the General tab selected in the list at the left, and under User Interface options, click to remove the check beside Show Mini Toolbar on Selection. Click OK to apply the change.
Unlike many Ribbon tools, the MiniBar tools do not produce live Previews of formatting and other effects. if you need to see a live Preview, use the Ribbon instead.
Shortcut menus and contextual command buttons
If navigating through all the Ribbon tabs still seems like a lot of work to you, Word’s short-cut menus, also called contextual or pop-up menus, remain. To display a shortcut menu, just select text or an object such as a picture in the document, and right-click or press the menu key on your keyboard. As shown in Figure 1.16, the shortcut menu offers the com-mands you’re most likely to use next for the selected item.
Figure 1.16
Chapter 1: Taking Your First Steps with Word
1
Word 2013 adds a new form of contextual tools to speed your work with some documentobjects, particularly on a touch-enabled system. When you select some types of objects, such as a chart, one or more contextual buttons will appear to the right of the object. Clicking some of these buttons opens a flyout gallery or formatting options for the selec-tion, as shown in Figure 1.17. Clicking other buttons opens a flyout list of choices that you can click to toggle on and off, as shown in Figure 1.18. Simply click the desired choice in either type of flyout, or deselect the object to hide the buttons.
Figure 1.17
New contextual command buttons appear when you select certain objects, such as a chart.
Flyout gallery
Figure 1.18
Part i: Welcome to a New Word
Some of the Office 2013 apps more optimized for touch also include compact radial menus that you can tap to expose the commands you need.
enhanced ScreenTips
Word 2013 includes the enhanced ScreenTips feature. By default, the ScreenTips for the Ribbon tools and many other screen elements include not just the item name but also a fea-ture description. Enhanced ScreenTips help you find the right tool more quickly and reduce the need to search for help.
A ScreenTip appears when you hover the mouse pointer over a Ribbon command or other choice on the Word interface. Figure 1.19 shows an example. Notice that the ScreenTip includes a shortcut key combination for choosing the specified item. You can customize the ScreenTips by turning off the shortcut key display, turning off the feature description for smaller ScreenTips, or turning off ScreenTips altogether. Chapter 31, “Word Options and Settings,” covers setting these and other options throughout Word.
Figure 1.19
Enhanced ScreenTips include the name and description for a command or other tool.
Dialog boxes and launchers
Chapter 1: Taking Your First Steps with Word
1
Clicking the dialog box launcher shown in Figure 1.19 opens the Font dialog box shownin Figure 1.20. Dialog boxes offer scrolling lists, drop-down lists, text boxes, check boxes, option buttons, command buttons, and other controls familiar to most computer users. You can click Cancel to close a dialog box without applying settings, or OK to finalize and apply your choices.
Figure 1.20
Dialog boxes enable you to refine formatting and other commands using familiar controls.
Task panes or panes
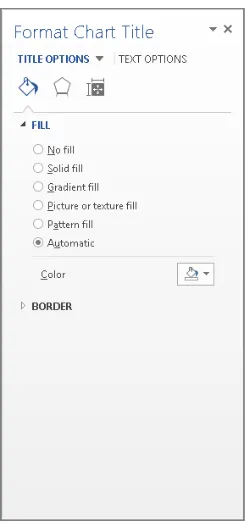
Similar to dialog boxes, task panes (now in Word 2013 more often simply referred to as panes) appear onscreen to help you navigate, perform research, apply formatting, and more. Think of them as dialog boxes that enable you to type while they’re onscreen. Some of the panes open when you select a particular command such as the Thesaurus, while you toggle others such as the Navigation pane on and off as you work in Word. Still others appear when you select certain items for formatting, such as when you double-click a chart title. Figure 1.21 shows the Format Chart Title pane.
Part i: Welcome to a New Word
display and size multiple task panes onscreen at any time. To close a pane, you can click its Close (X) button at the upper right, or in some cases reselect the command you used to toggle it on.
Other Word features that manifest as task panes include the Navigation pane, the Mail Merge Wizard, Restrict Editing, Dictionary, the Clipboard, and the Reviewing Pane, among others. Later chapters of the book introduce the various panes and when they come into action.
Figure 1.21
Word’s task panes make commands available while still enabling you to type and make selec-tions in the document.
Status bar
Chapter 1: Taking Your First Steps with Word
1
Do you need to keep track of the word count? Not only does Word update the word countcontinuously, but if you select text, it tells you how many words are selected, with one of the indicators near the left end of the status bar changing to read 39 OF 69 WORDS or some-thing similar.
To display the configuration choices shown in Figure 1.22, right-click the status bar. At the top and bottom of the shortcut menu, you can choose options to specify what indica-tors appear at the left and what view controls appear at the right. In between, it presents choices for turning features such as Track Changes or Overtype on and off. Then close the menu to apply your changes by clicking in the document or pressing Esc.
Figure 1.22
Customize the status bar and control several features with the status bar shortcut menu.