Developing Enterprise iOS
Applications
James Turner
Developing Enterprise iOS Applications
by James Turner
Copyright © 2012 James Turner. All rights reserved. Printed in the United States of America.
Published by O’Reilly Media, Inc., 1005 Gravenstein Highway North, Sebastopol, CA 95472. O’Reilly books may be purchased for educational, business, or sales promotional use. Online editions are also available for most titles (http://my.safaribooksonline.com). For more information, contact our corporate/institutional sales department: (800) 998-9938 or [email protected].
Editor: Brian Jepson
Production Editor: Kristen Borg
Proofreader: O’Reilly Production Services
Cover Designer: Karen Montgomery
Interior Designer: David Futato
Illustrator: Robert Romano
Revision History for the First Edition:
2011-12-13 First release
See http://oreilly.com/catalog/errata.csp?isbn=9781449311483 for release details.
Nutshell Handbook, the Nutshell Handbook logo, and the O’Reilly logo are registered trademarks of O’Reilly Media, Inc. Developing Enterprise iOS Applications, the image of a white wagtail, and related trade dress are trademarks of O’Reilly Media, Inc.
Many of the designations used by manufacturers and sellers to distinguish their products are claimed as trademarks. Where those designations appear in this book, and O’Reilly Media, Inc., was aware of a trademark claim, the designations have been printed in caps or initial caps.
While every precaution has been taken in the preparation of this book, the publisher and authors assume no responsibility for errors or omissions, or for damages resulting from the use of the information con-tained herein.
Table of Contents
Preface . . . vii
1. Enterprise iOS Applications . . . 1
Apple Developers—An Army of One 1
Build Automation Is a Bit of a Challenge 2 Objective-C Doesn’t Play Well with Others 2
Code Coverage Is for Weenies 3
iTunes Connect Is a Great Way to Keep Your Legal Staff Employed 3 You Can Have Any Style of Distribution, as Long as it’s iTunes 3
The Road Is Long and Winding 4
A Few Caveats 4
2. Concurrent Development with iOS . . . 7
A Little Ditty ‘bout Tom and Diane 7
More Merge Mayhem 11
Workspaces and Static Libraries 12
Make Sure All Dependent Projects Do Their Own Unit Testing 16 You Need to Plan Out Common Resource Issues 16 You Can Still End Up Stepping on Each Other’s Feet 17
Let’s Be Careful Out There 18
3. Automating iOS Builds . . . 19
Introducing Hudson 19
Breaking the News to Your IT Department 20
Provisioning Your Build Machine 20
Installing Hudson 21
Creating the Build Job 23
The Main Configuration Screen 24
Source Code Management with Hudson 25
Trying Your First Build 27
Creating an Ant Build File 27
Testing xcodebuild 28 Integrating xcodebuild into an Ant Script 29
Calling the Ant Script from Hudson 30
Getting Fancy with Hudson 32
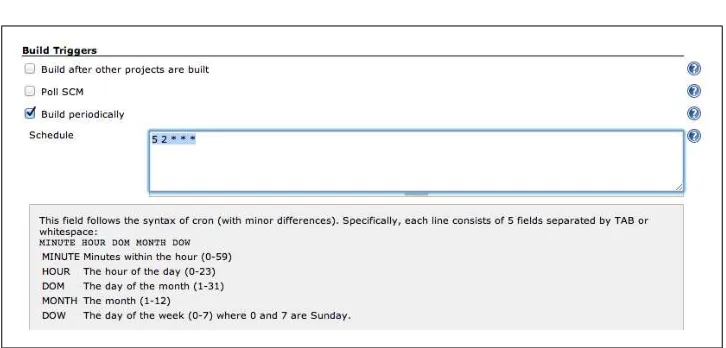
Running a Nightly Build 32
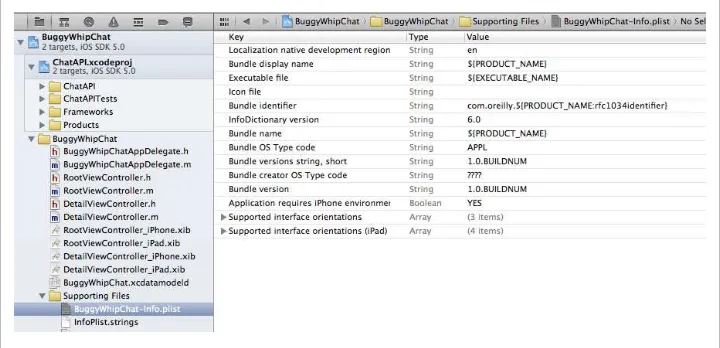
Include the Build Number Directly into the Application Version 33
Parameterize the Build Script 34
4. Integrating iOS Applications into Enterprise Services . . . 37
The Rules of the Road 37
Rule 1: Insist on Contract-Driven Development 38
Rule 2: Be Neither Chunky Nor Chatty 38
First Things First: Getting a Connection 39 Using NSURLConnection—The BuggyWhip News Network 40 Something a Little More Practical—Parsing XML Response 44 Generating XML for Submission to Services 50
Once More, with JSON 53
Creating UI Tests (The Old and Painful Way) 70
UI Testing Using OCUnit 74
6. Enterprises and the iTunes App Store . . . 77
Things to Start Worrying About Immediately 77
Legal Considerations 77
Marketing Considerations 78
Production Considerations 79
Bonus Considerations 80
Things to Worry About a Month Before Launch 80
Get a Binary into Review 80
Double-Check App Store Readiness 81
Have a Chat With Your Support Group About Bug Reports 81 Things to Worry About Two Weeks Before Launch 81 Upload the Final Version to iTunes Connect 82 Things to Worry About One Week Before Launch 82
When to Pull the Trigger 82
Things to Worry About in the Month After Launch 83
7. Distributing Enterprise iOS Applications . . . 85
Testing Applications with Ad Hoc Profiles 85 A Better Mousetrap for Ad Hoc Infrastructure 89
Advanced Testflight-Fu 91
Enterprise Distribution 91
A Gotcha With Enterprise-Based Development 92
The Long Haul 94
8. Long Term Maintenance of iOS Enterprise Applications . . . 95
Option 1: The Perpetually Compatible Application 96 (Non-)Option 2: The Perpetually Compatible Server 96
Option 3: App Store Version Roulette 97
Option 4: Exotic Distribution Methods 97
Option 5: The Swiss Army App 98
Welcome to the Club, We Have Jackets 98
Preface
Hello, and welcome to the exciting, frustrating, confusing, complex—and ultimately rewarding—world of Enterprise iOS development. This book attempts to distill the lessons learned from more than a year of on-the-ground experience, moving an Enter-prise iOS application from first concept to shipping product. Hopefully, I can help you avoid some of the hidden coral reefs that lie beneath the Sea of Apple, and help you find the fair winds to keep your sails full.
The relationship between businesses and Apple has always been a complex one, par-tially due to Microsoft’s traditional death-grip on the corporate market, and Apple’s sometimes ambivalent attitude toward corporate users. iOS has done a lot to change this, as it brought many new Apple users in through the mobile back door. The reality is that iOS is something to be taken seriously by corporate IT departments, and the old “Blackberry or Bust” mentality is all but dead. This presents a huge opportunity for developers versed in both the Apple and Fortune 500 philosophies.
Who This Book Is For
First things first: if you’ve never touched Objective-C or Cocoa before, you need to backfill some knowledge before you jump into Enterprise iOS. There are any number of good books out there to get you started with the basic Apple development tools such as Xcode. One good place to start is Learning iPhone Programming by Alasdair Allan, also published by O’Reilly. Apple also provides a number of good resources to members of their developer community.
I’m also going to make the assumption in this book that you, the reader, are familiar with the ins and outs of Enterprise software development, including concepts such as SOAP, XML, REST, source control, continuous integration and regression, unit testing and code coverage, etc.
So, in short, this book is aimed at someone who expects to be (or already is) developing iOS software for use in Enterprise environments, and needs to know how to make the Apple development and deployment universe work smoothly with the requirements of corporate software methodologies. But many of the techniques laid out in this book
may prove useful to you, even if you aren’t in a large company or trying to sell appli-cations to Enterprise customers.
How This Book Is Organized
To get you on your way, we’ll start with a basic overview of the challenges that face Enterprise developers working with iOS. We will then, in turn, address each one of this issues, starting with collaborative development problems, and finishing up with long term support issues for Enterprise apps.
Along the way, we’ll look at a number of the more important topics you may run into, including testing and distributing apps, integrating apps with backend systems, and a handy check-list of things you need to remember to think about as the ship date for your app approaches.
Each chapter stands more or less alone, so if you only want to see how to call a SOAP service from an iPhone app, you can jump right to that chapter without having to wade through all the other stuff.
Conventions Used in This Book
The following typographical conventions are used in this book:
Italic
Indicates new terms, URLs, email addresses, filenames, and file extensions.
Constant width
Used for program listings, as well as within paragraphs to refer to program elements such as variable or function names, databases, data types, environment variables, statements, and keywords.
Constant width bold
Shows commands or other text that should be typed literally by the user.
Constant width italic
Shows text that should be replaced with user-supplied values or by values deter-mined by context.
This icon signifies a tip, suggestion, or general note.
Using Code Examples
This book is here to help you get your job done. In general, you may use the code in this book in your programs and documentation. You do not need to contact us for permission unless you’re reproducing a significant portion of the code. For example, writing a program that uses several chunks of code from this book does not require permission. Selling or distributing a CD-ROM of examples from O’Reilly books does require permission. Answering a question by citing this book and quoting example code does not require permission. Incorporating a significant amount of example code from this book into your product’s documentation does require permission.
We appreciate, but do not require, attribution. An attribution usually includes the title, author, publisher, and ISBN. For example: “Developing Enterprise iOS Applications by James Turner (O’Reilly). Copyright 2012 James Turner, 978-1-4493-1148-3.” If you feel your use of code examples falls outside fair use or the permission given above, feel free to contact us at [email protected].
Safari® Books Online
Safari Books Online is an on-demand digital library that lets you easily search over 7,500 technology and creative reference books and videos to find the answers you need quickly.
With a subscription, you can read any page and watch any video from our library online. Read books on your cell phone and mobile devices. Access new titles before they are available for print, and get exclusive access to manuscripts in development and post feedback for the authors. Copy and paste code samples, organize your favorites, down-load chapters, bookmark key sections, create notes, print out pages, and benefit from tons of other time-saving features.
O’Reilly Media has uploaded this book to the Safari Books Online service. To have full digital access to this book and others on similar topics from O’Reilly and other pub-lishers, sign up for free at http://my.safaribooksonline.com.
How to Contact Us
Please address comments and questions concerning this book to the publisher: O’Reilly Media, Inc.
1005 Gravenstein Highway North Sebastopol, CA 95472
800-998-9938 (in the United States or Canada) 707-829-0515 (international or local)
707-829-0104 (fax)
We have a web page for this book, where we list errata, examples, and any additional information. You can access this page at:
http://shop.oreilly.com/product/0636920021759.do
In addition, there is a github repository that contains all the code and tools used in this book, organized by chapter. You can check a read-only copy out of github by using the repository address:
git://github.com/blackbear/enterprise-ios-applications.git
To comment or ask technical questions about this book, send email to:
For more information about our books, courses, conferences, and news, see our website at http://www.oreilly.com.
Find us on Facebook: http://facebook.com/oreilly
Follow us on Twitter: http://twitter.com/oreillymedia
Watch us on YouTube: http://www.youtube.com/oreillymedia
Acknowledgments
I have been privileged to have had the opportunity to spend the last year and more developing a challenging enterprise application for a major company, and I wish that I could publicly recognize them for giving it to me. Alas, because of the realities of corporate PR policies and liabilities, I cannot. So I will have to instead recognize some of the people who have helped me on the way.
Firstly, I need to thank Jeff Delaney, who took a chance letting an inexperienced iOS developer drive an entire platform to delivery. I will be eternally grateful to him for giving me the chance.
I would have gotten nowhere without the rest of the mobile team: Anand Kolukula, Anton Spaans, Ashish Patel, Dan Nottingham, Eric Kampf, Girish Bhardwaj, Peter Floss, Sushil Kulkarni, and Vijay Hanumolu. Much of the section of build automation is there thanks to things I learned from Jill Warnshuis. Carl Belanger and Robert Boisse took over an efficiently operating group on short notice, and had the wisdom to let Manny be Manny. Thanks also to Dan and Girish for agreeing to review the book internally, and to Bill Bartow and Susan Rossnick for saying yes when they could have just as easily said no.
Both Daniel Steinberg and Alasdair Allan took time out of their busy schedules to take a look at a draft of the book and make suggestions (and make sure I didn’t come off as a total raving maniac...). My deep appreciation to both of them.
I have to give a shout out to Apple, for creating such a wonderful environment to develop on. I give you guys a hard time, I know, but it’s because I love your stuff and want it to be even better.
Finally, as always, my love and thanks to my wife Bonnie, and son Daniel. Without them, I wouldn’t have the reason to get up in the morning and try to figure out how to make the UIAutomation Framework run.
CHAPTER 1
Enterprise iOS Applications
Enterprise application development is never a particularly fun endeavor. You tend to end up in large teams. There’s lots of process to follow and layers of management all eager to make sure things are proceeding on course. There are lawyers who have to get involved with every piece of paperwork that you need signed. And, of course, you’re frequently stuck having to slap a fresh coat of paint onto aging legacy software that can be fragile and difficult to interface with.
By contrast, the entire Apple development universe is about making thing fun and easy to use and producing eye-popping user interfaces that do incredible things. Unfortu-nately, when these two worlds collide, one or the other of the philosophies tends to end up on the losing end of the stick. Either you abandon all the practices that your management chain places such value in, and hope they can be understanding about it, or you have to sacrifice speed and functionality to appease the Gods of Process. But there is a middle ground! Over the last year, I’ve been involved in a pioneering mobile application at a large, established software vendor. It’s the first mobile product the company ever created, the first use of Apple technology by the company, and the first time Objective-C has ever found its way into the source control system. And in spite of the steep learning curve that was required to get the processes and people up to speed on the Way of Apple, we shipped on time and with a full feature set.
This book is an attempt to distill some of the lessons learned and best practices that we developed over that year (and continue to evolve as we head toward our 2.0 release). But before we jump in to the nuts and bolts of iOS development in an enterprise envi-ronment, it’s worth noting some of the reasons that it can be such a difficult effort.
Apple Developers—An Army of One
To start with, the Apple model of development, as embodied by Xcode, strongly favors a single developer model. That isn’t to say that it is impossible to create applications using concurrent development, and in fact, recent versions of Xcode have drastically improved support for source control and merging. But the project-central nature of
Xcode makes it easy for people working on the same project to get out of sync with each other, and some resources such as translation files are almost impossible to jointly develop, for reasons that you’ll see in the next chapter, on concurrent development. There are tricks you can use, involving the new Workspace features that were intro-duced in Xcode 4, as well as splitting out code with static libraries, that can make your code more modular and amenable to simultaneous development by more than one coder. We’ll talk about those in depth in Chapter 2.
Build Automation Is a Bit of a Challenge
Apple has a very specific view of how applications should be developed, at least if you take Xcode as a guidepost to their philosophy. While Java developers, for example, have spent years using tools such as Hudson and Ant to automate the compilation, unit testing and deployment of their applications, Xcode puts it all under one roof. This is great if you’re flying solo: you can compile, test and archive your code with a push of a button. But if you want to employ continuous regression testing, you need to really work at it. The same goes for building and packaging Ad Hoc builds for testers. In most big companies, handing out binaries that you compiled on your development machine won’t win you many friends.
There are ways that you can compile and test from the command line, and even integrate Xcode builds into integration tools such as Hudson. Some of them are even officially supported! In Chapter 3, you’ll see how you can create a reliable continuous integration system, and learn what you can and can’t do with it.
Objective-C Doesn’t Play Well with Others
Enterprises love SOAP. It has built in support through frameworks such as CXF and JAX-WS for Java, and .NET developers can leverage the rich support for SOAP in modern versions of Visual Studio.
The iPhone and its cousins support it not a whit. Unless you want to construct your XML by hand, there is no native support for SOAP in iOS. Even the XML support in iOS is a pure pull parser model, when what you frequently want is a DOM parser. Thankfully, iOS has finally introduced support for JSON in iOS 5!
Code Coverage Is for Weenies
Does your company use Coverity to measure code complexity? Super, but Objective-C isn’t supported! What do you do when your manager asks you for code coverage figures on your OCUnit tests, something that was broken for most of iOS 4 and just came back to life in iOS 5? Smiling and offering chocolate chip cookies is only going to get you so far.
Xcode and Objective-C are often the odd man out in enterprise development. Outside of the Xcode tool chain, there’s little to no commercial support for the language. And the tools built into Xcode have a habit of breaking between releases. UIAutomation broke for a while in early Xcode 4 builds, and there are features still limping along in it, a year later.
By picking and choosing (and with a little elbow grease), you can get most of the metrics that your company might demand of you. Chapter 5 takes you through code coverage, CCN metrics, and other associated issues with testing.
iTunes Connect Is a Great Way to Keep Your Legal Staff
Employed
Ever had to run a contract through your legal department? Are you still waiting to get it back? Before you can do anything with products in iTunes, there’s a passel of paper-work you’ll need to wade through, especially if you plan to charge for your app. There are also ongoing issues that you should think about and discuss with your management before embarking on an iOS development project.
Beyond that, there are questions you’ll need to think about in regards to internation-alization, product messaging (at which point marketing will get involved), how to demonstrate the product, and a host of other issues to consider. Chapter 6, although by no means a comprehensive checklist, does try to hit the high points on what to watch out for as you move your product into the store.
You Can Have Any Style of Distribution, as Long as it’s iTunes
Now we come to the most interesting issue, as far as enterprise distribution goes. Apple, unlike the other mobile platforms, has a “my way or the highway” approach to appli-cation distribution. You can put your app in the store, distribute it in-house with major restrictions, create an Ad Hoc build for up to 100 devices, distributing it inside your own company using an Enterprise license, and…well, that’s it. Significantly, there’s no way for a developer to create an application for a diverse population of customers that they can install directly, without downloading it directly from the App Store.
For companies used to shipping code and managing stock, the iTunes ways of life is going to come as a bit of a shock. Getting a product up and released through the store is a delicate dance that needs to be well planned, especially if you need to hit a launch date precisely. Because of the “only ever one version in the store” reality, you need to think carefully about how to manage client-server version mismatches. If you’re going to use Ad Hoc provisioning for your testers, you can end up spending half your life managing the UDID list in iTunes, so that the app can be tested on a new device. Enterprise licenses can relieve a lot of this headache, but they come with their own complications, including having to juggle keychains to create your builds.
There’s only so far that technology can help with these problems; strategy may prove a better ally. Chapter 7 talks about how to provision and distribute your application without going insane, and the hard decisions you may have to end up making.
The Road Is Long and Winding
Just because you have your first release out doesn’t mean your headaches are over. When dealing with client-server architectures, it’s important that the client and server stay in sync, and that’s hard when iTunes insists that you can only have one version of your software available for sale at any one time.
Chapter 8 deals with the travails of maintaining iOS applications over the long haul, and offers some strategies for how to attack the problem.
A Few Caveats
Given the glacial pace of the Java Community Process, you can write about Java de-velopment without much fear the language is going to slip out from under you over-night. Objective-C is much more…dynamic.
It is almost a sure thing that something (or several somethings) discussed in this book will be overtaken by changes to the development environment. It’s as up to date as I can make it, especially in reference to the recent release of iOS 5. Note that because people are still discovering how some things have changed (for the good or not) in iOS 5, it’s possible that there will be information that will need to be updated in the errata (see http://shop.oreilly.com/product/0636920021759.do) or future reprints as things move forward. Honestly, iOS is always a moving target, both from a development and licensing standpoint.
Finally, this is not a general book on Objective-C and iOS best practices. In particular, I’m going to be doing the bare minimum as far as UI treatments go. There are a ton of good books on how to make beautiful iOS applications, and this book isn’t about that. It’s about the messy backend and logistical stuff that makes Enterprise applications work. Doing a lot of cavorting with UIViewContainers would only clutter up the
pro-gram listings, and distract from the code and concepts I’m trying to highlight. For the same reason, you won’t see me running a lot of strings through localization, and I may even (gasp) forget to do the right thing with retain and release on occasion (not that this will matter any more, once people have cut over to the automatic reference count compiler!) I’m going to assume you know how to do both, and I’m going to try to emphasize code clarity rather than pristine correctness.
Now that you know all the reasons that iOS enterprise development can drive you nuts, let’s go through each of the problems, chapter by chapter, and see what we can’t do to improve things.
CHAPTER 2
Concurrent Development with iOS
Enterprise application development at most companies is usually about teams, often large teams. The Agile movement has done little to change this tendency, and in fact embraces the idea of team development, with a backlog of stories that are apportioned out to the pool of developers on the team on a sprint by sprint basis.
So what does this mean for iOS applications development? Well, if you’re a Java pro-grammer working in Eclipse, you can split up development pretty easily. Eclipse is largely directory based, and the Eclipse project file is fairly stable. Xcode…not so much. Xcode is the obsessive-compulsive poster child of IDEs. It wants to manage every single file at a micromanager level, and it’s not enough to drop new files into a directory, you need to tell Xcode to use them in specific build targets, and all of that info is stored in a single xcodeproj file.
If you’re not very careful when creating new files in Xcode, you tend to end up with everything in one flat directory. Using groups can give structure to the project view inside Xcode, but it does nothing to organize the physical file system layout. And as you may have already discovered, trying to go in after the fact and move files around on disk is messy, because there’s no way to notify Xcode that you’re doing it. The best I’ve ever done is to delete the references (which turn red when you move the files), then re-add them and hope that you haven’t screwed up your build manifests in the process.
A Little Ditty ‘bout Tom and Diane
Let’s look at a very small project with two developers, and see how things can get messy very quickly. We’ll be developing a social networking tool throughout the book, and our two developers (Tom and Diane) are going to start with the login screen. Tom is in charge of UI, and Diane with backend integration. Unfortunately, Tom and Diane work for BuggyWhipCo, which is still using (shudder) CVS as the source management platform, which isn’t supported natively by Xcode. As of this writing, Xcode only sup-ports git and Subversion natively in the UI, so our intrepid pair is going to have to check their code in manually on the command line. This is not at all uncommon—git is
extremely rare in corporate settings, although SVN is becoming more popular. Many companies are using proprietary tools from companies such as IBM. The source control system at the company I spend my days coding for uses a source control system used by so few companies that telling you the name of the tool would literally let you figure out where my day job is.
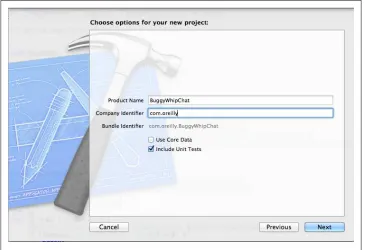
Tom begins by creating an CVS repository for the project, and then fires up Xcode, and creates a new project using the Xcode project wizard, specifying a master-detail style application (see Figure 2-1).
Figure 2-1. Creating the BuggyWhipChat project
Before he does anything else, he checks in the project by importing it into CVS:
Tom$ cvs import buggywhipchat buggywhipco v1-0
. . .
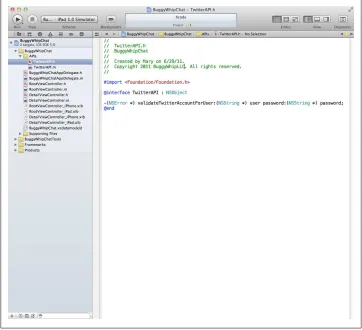
Tom gives Diane the location of the new repository, and she checks out the project to start adding some backend server integration. She starts by creating an stub class that she plans to check in immediately, so that Tom can start coding against the interface, even before Diane has implemented it. She uses Xcode to create some Twitter API methods (don’t panic, we’re not going to try to implement a real Twitter interface in this book; it would take up the whole thing!) Figure 2-2 shows what her Xcode envi-ronment looks like after creating a class, in a new group called APIs.
Figure 2-2. The project view after adding Diane’s new files
Meanwhile, unbeknownst to Diane, Tom has begun working on his UI design. In sup-port of it, he has created a splash screen using an XIB file. His project view is shown in
Figure 2-3.
Figure 2-3. Tom’s project with the new XIB file
At this point, everything is in place for hilarious hijinks to ensue. Let’s say that Diane checks her new code into CVS first:
Diane$ cvs add BuggyWhipChat/BuggyWhipChat/TwitterAPI.*
cvs add: scheduling file `BuggyWhipChat/BuggyWhipChat/TwitterAPI.h' for addition cvs add: scheduling file `BuggyWhipChat/BuggyWhipChat/TwitterAPI.m' for addition cvs add: use `cvs commit' to add these files permanently
This isn’t the whole story though, because if Diane commits now, she’ll be also com-mitting changes to a local file that got silently modified when she added those class files to Xcode. A cvs status invocation tells the whole story:
cvs status: Examining BuggyWhipChat/BuggyWhipChat.xcodeproj =========================================================== File: project.pbxproj Status: Locally Modified
That pesky project file has also been modified, since it keeps track of which files are associated with which targets in the project. If Diane did not commit the changes to the file, anyone else checking out the project won’t see the new class in their project view, even though the files will physically be on the disk.
Let’s say that Diane has done this enough times that she remembers to commit the project file. We’re not out of the woods yet! What’s going to happen when Tom wants to commit his new XIB file? Being an experienced CVS user, he’s going to start by doing a cvs update:
cvs update: Updating buggywhipchat/BuggyWhipChat/BuggyWhipChat.xcodeproj 1.1.1.1
retrieving revision 1.2
Merging differences between 1.1.1.1 and 1.2 into project.pbxproj rcs merge: warning: conflicts during merge
crash Xcode if you happen to have the project open at the time you do the merge). Opening the file reveals the conflicts, which will occur in several sections. Here’s an example (the lines have been truncated for readability):
<<<<<<< project.pbxproj
1A05AE0613BB5F880080AAD4 /* SplashScreen.xib */ = ... =======
1A05AE1213BB63210080AAD4 /* TwitterAPI.h */ = ... 1A05AE1313BB63210080AAD4 /* TwitterAPI.m */ = ... >>>>>>> 1.2
So, Tom is going to get to edit his project.pbxproj file by hand, looking for the conflicts and resolving them. In this case, it’s pretty simple, because he can just take the changes made from both sides, ending up with the project view shown in Figure 2-4.
Figure 2-4. The merged project view
More Merge Mayhem
“OK,” you may be saying to yourself, “It’s messy, but I can deal with doing some merging every time someone adds new files to the project.” But adding files is just the beginning of your troubles. The project file is changed whenever you change the build target in Xcode. It gets changed if you update your provisioning profile. Adding a group, moving files between groups—you name it, and it somehow is going to mess with the project file.
You can end up with all sorts of disasters if you merge the project file incorrectly, from broken builds to projects that won’t open at all inside Xcode. They are far from human-readable, although once you’ve had to deal with enough merge issues, you start to get the lay of the land a bit.
This isn’t some abstract peril. Because of the way my company uses Agile development, I may be working on multiple headlines at the same time, and I’m not allowed to promote the code associated with a headline to the QA branch until the headline is complete. As a result, I frequently have multiple sub-branches of the project living in separate checked out copies of the workspace on my desktop, and promote and merge as appropriate. If I had a dollar for every time that I broke the parent build by mis-merging the project files, I could buy myself a nice dinner.
But at least there’s a chance that you can merge project files, since they’re vanilla XML. Let’s talk about a real nightmare: language translation files. The espoused best practice when doing iPhone development is to use NSLocalizedString to do all your string look-ups, and then let genstrings autogenerate the translation resource files (which are all bundled together under the Localizable.strings file in your Xcode project). As experi-enced iOS developers learn, genstrings overwrites the old translations every time you use it, so there are a number of publicly available tools that will do a more graceful regeneration and merge. My tool of choice is the Python script localize.py, available at
http://github.com/joaomoreno/Green-Apples/raw/master/localize.py.
As long as you only have a single person dealing with this file, you’re OK. But once you have multiple people all adding strings, or even multiple branches (as in my situation with multiple branches for different headlines), you’re sunk! The big problem you’re going to run into is that the translation files are UTF-16 files, and most source control systems blithely look at them, and say “Oh, that’s a binary file; I have no idea how to merge it.” So if you have multiple people messing around with your translation strings, you can end up with a very painful manual merge (or have to use a tool such as File-Merge, which knows how to handle UTF-16 files).
In general, any machine-generated iOS file (XIB files, core data schemas, etc.) is going to be a headache to merge if you have more than one person mucking with them at the same time, and the cost of doing it wrong can be very high. So how do you handle multiple engineer development without going prematurely grey?
Workspaces and Static Libraries
One of the major advancements that Xcode 4 brought with it was the concept of a workspace. You can think of workspaces as a project composed of projects, and one of the big benefits of this approach is that each project tracks its files and other settings separately. What this means is that Diane can add classes to her API project, and Tom can merrily design UI, without stepping on each other’s projects.
You can create a new workspace-based project by simply selecting File→New→
Work-space, but assuming that you’ve already got a project underway, you can turn your existing project into a workspace-based project by doing File→Save as Workspace... Once you have saved your project as a workspace, you can open it by selecting the
As I mentioned, the big advantage of using workspaces is that you can create multiple projects under the workspace, and have the main project set dependencies on the “child” projects, so that they are automatically built and linked in to the main project. But because they use independent project files, developers can work on them individ-ually without creating merge issues.
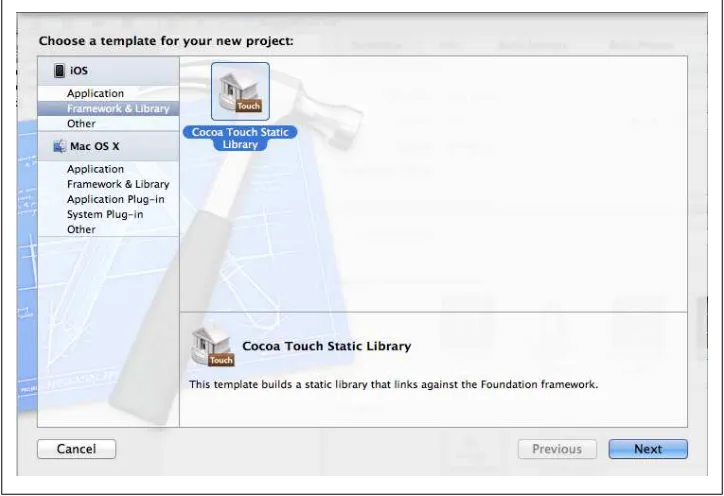
Let’s assume that Diane did just that, and turned her project into a workspace. In addition, she created a new project inside the workspace called ChatAPI. To do that, all she needed to do is to choose File→New→Project, and once she was at the new project wizard, select a Cocoa Static Touch Library under the iOS Framework & Library sec-tion. She named it ChatAPI, and placed the project directory at the same level as the main BuggyWhipChat workspace file (see Figure 2-5).
Figure 2-5. Creating a project inside a workspace
When she’s done, she ends up with a project navigator view that looks something like the one in Figure 2-6.
Figure 2-6. The project view of a workspace with a subproject
What this looks like on the file system, in an abbreviated form, is this:
./BuggyWhipChat
./BuggyWhipChat/BuggyWhipChat
./BuggyWhipChat/BuggyWhipChat/DetailViewController.h ./BuggyWhipChat/BuggyWhipChat/DetailViewController.m ./BuggyWhipChat/BuggyWhipChat/RootViewController.h ./BuggyWhipChat/BuggyWhipChat/RootViewController.m ./BuggyWhipChat/BuggyWhipChat/TwitterAPI.h ./BuggyWhipChat/BuggyWhipChat/TwitterAPI.m ./BuggyWhipChat/BuggyWhipChat.xcodeproj ./ChatAPI
./ChatAPI/ChatAPI
./ChatAPI/ChatAPI.xcodeproj
./ChatAPI/ChatAPI.xcodeproj/project.pbxproj
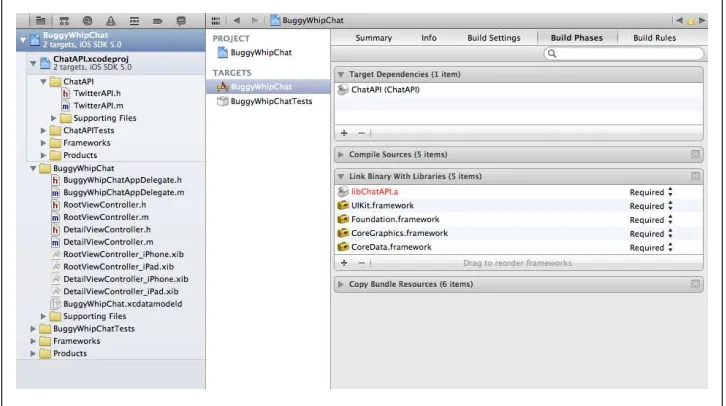
Diane also needs to make the main project depend on the new ChatAPI project. There are a few ways to do this, but probably the easiest is to select the BuggyWhipChat project, go to the Build Phases view, and add ChatAPI as a target dependency. Xcode is supposed to figure this out automatically, but I’ve had hit-or-miss luck with it, so I prefer to do it explicitly. While she’s there, she also has to add the library archive from the subproject as a linked library for the main project (see Figure 2-7).
Also, somewhat annoyingly, Diane has to manually add a relative path to the ChatAPI directory to the Header Search Paths build setting for the parent project, so that the
parent can reference any new header files that Diane creates after the split. Or, alter-natively, she can copy the header files into the main project, although this will get you back into the scenario of having two people modifying the same project file.
Diane can then check her new workspace and project into CVS by adding all the new files and commit the other ones. Tom does a CVS update, and importantly, reopens the project using the workspace file. Now both Tom and Diane are working inside a common workspace, but on different project files.
So what happens if Tom and Diane both independently create new files now? As an example, suppose that Diane adds a new Objective-C class called GoogleTalkAPI, while
Tom creates a new UIViewController-based class called ChatChooser, complete with an
XIB file. This time, Tom is the first one to add and commit his new files. When Diane does a CVS update, here’s what she sees (in abridged form):
Dianescvs Diane$ cvs update buggywhipchat
cvs update: Updating buggywhipchat/BuggyWhipChat/BuggyWhipChat U buggywhipchat/BuggyWhipChat/BuggyWhipChat/ChatChooser.h U buggywhipchat/BuggyWhipChat/BuggyWhipChat/ChatChooser.m U buggywhipchat/BuggyWhipChat/BuggyWhipChat/ChatChooser.xib
cvs update: Updating buggywhipchat/BuggyWhipChat/BuggyWhipChat.xcodeproj U buggywhipchat/BuggyWhipChat/BuggyWhipChat.xcodeproj/project.pbxproj
The files that Tom modified (the project file, when he added new classes) and the new class files and XIB have shown up. Notice that even though Diane has added new files to her project as well, there’s no conflict, because those files were added to the project file for the ChatAPI project. In fact, once she adds and commits her files, Tom will get a similar experience the next time he updates:
buggywhipchat Tom$ cvs update cvs update: Updating ChatAPI cvs update: Updating ChatAPI/ChatAPI U ChatAPI/ChatAPI/GoogleTalkAPI.h U ChatAPI/ChatAPI/GoogleTalkAPI.m
Figure 2-7. Making the main project depend on the subproject
cvs update: Updating ChatAPI/ChatAPI.xcodeproj U ChatAPI/ChatAPI.xcodeproj/project.pbxproj
No muss, no fuss, no broken project files. This strategy works well for dividing up work, with a few caveats.
Make Sure All Dependent Projects Do Their Own Unit Testing
Xcode will offer to create a Unit Test target for a library, when you create it. You should take Xcode up on the offer. By its nature, a dependent library needs to be able to stand alone, and that includes testing.
This is pretty straightforward if all your library does is implement business logic, or something else divorced from the UI. It becomes more troublesome if you are going to try, for example, to divide up the UI responsibilities for the applications into various subprojects, and then integrate them all up into a main project. In iOS 5, you can do business level testing by injecting your unit tests into the running application, but in this case, you need to have an operating UIApplicationDelegate. Where are your
sub-projects going to get it? Are you going to have a dummy main.m in each of your sub-projects that fires up the application just far enough to test the UI code? These are the kinds of issues you need to consider when you start dividing up your project.
Also, as mentioned in the next section, XIBs and other resources can’t live in libraries, so the ability to divide up UI work into multiple developers is fairly limited to begin with.
You Need to Plan Out Common Resource Issues
Unfortunately, breaking projects up into subprojects doesn’t solve all your problems. In fact, it doesn’t solve many of them. For example, there’s no way in a static library to include bundle information, such as localizable strings and images. You need a framework to do that, and at the moment, Apple doesn’t allow custom frameworks for the iOS family of products. Maybe sometime in the future, this will be available, but for the moment, you’re fairly much screwed if you want to keep your localizations close to the library.
This doesn’t mean that you can’t take advantage of NSLocalizedString in your
add strings such as “OK” and “Cancel.” It is, however, a thankless job, so it’s probably a good idea to rotate the work around to the various members of the team.
The biggest problem you’re going to face is that you can’t put XIB files in your libraries, because only framework libraries can hold this kind of data, and Apple reserves to itself the ability to create frameworks in iOS.
Libraries Aren’t Entirely Useless!
So what are static libraries good for? As it turns out, quite a lot! For example, in the application I developed, there is a lot of code around parsing XML returned from the server, and the code that handles the network communications themselves. It is all abstracted away from the UI, so it could easily by placed into a separate static library that other iOS applications could use, and I could maintain it without stepping on (for example) someone developing a new iPad application. You need to think out how you want to divide up your application to avoid circular libraries dependencies, although the @class hack can be used to handle class references between libraries, if you must. This involves putting an @class annotation at the top of a header file to inform the compiler that a class is defined in another file, without actually including that file. It’s the same way you avoid circular references to classes in header files.
The other advantage of static libraries is that it allows you to treat them differently, from a build perspective. When might this be useful? Well, I recently converted our application over to the automatic reference count compiler added in iOS 5. However, I depend on several third-party packages that are problematic to convert over because of the way they directly manipulate low-level system objects. I could have tried to puzzle it out, but because of the licenses involved, I would have had to involve our legal de-partment because I would have been required to contribute the changes back to the open source projects involved. While I don’t have a philosophical objection to doing that, it was more hassle than I had time to deal with at the moment.
However, by putting each of the third-party libraries into their own static library, I was able to choose at ARC conversion time whether or not I wanted each of the libraries to be converted. By saying no, I was able to convert the main application without having to modify the libraries.
There are other times when you might need different build settings for a library, such as compiler optimization levels, additional compiler flags, etc. Static libraries let you easily segregate portions of your application so that you can do just these kinds of things.
You Can Still End Up Stepping on Each Other’s Feet
The other headache you can run into is that, at the end of the day, there are still some code paths that everyone is going to end up going through. For example, a main menu that leads to the various subfunctions of the application will need to be modified by each developer working on a subfunction, to enable access to that function. But this is
not nearly as bad a problem as adding and removing files, because if you’re only editing a class file, you’re not modifying the project file, so you’re left with an ordinary merge, just like in any other language under source control.
However, it’s also possible to modify your project file without meaning to. Many ac-tivities that take place on the project view edit the project file under the table. For example, if you set NSZombieEnable, you’ve just tweaked the project file. If you check it in, you’re going to end up in merge mayhem. So, a general rule of thumb is, don’t check in your project file on a commit, unless you’ve added or removed files (or made some change to the project that needs to be permanent, such as adding a framework). Luckily, a lot of the things you can change (such as the current build target) are stored in the user project file, not the project-wide file. These files live in the xcuserdata
directory inside of xcodeproj. There’s a separate data directory for each user ( Di-ane.xcuserdatad, for example), so you would be unlikely to create a conflict even if the files did get checked into source control, but there’s no reason they should be checked in at all, so don’t. In fact, if you’re lucky enough to be able to use XCode’s integrated SVN or git support, it won’t even offer to check these files in unless you force it to.
Let’s Be Careful Out There
Best practices are great, but they never take the place of diligence and planning. As hard as you try, if you have multiple people working on the sample iOS project, files will get broken, builds will fail, and work may get lost.
To some extent, these are the rules of the road when working on iOS. You don’t have Frameworks to let you cleanly divide up work, Xcode is highly dependent on machine-generated files to manage the project, and none of it was designed to facilitate team-based application development.
However, going in to the project knowing where the pitfalls are likely to occur is a big first step toward preventing problems. Nothing, however, takes the place of good com-munications between team members. Leverage those agile practices, mention during your standup if you plan to mess around with a frequently touched file. If there are geographic issues with your team, make sure you have procedures in place for good hand-offs, so your current state follows the sun as well as your code.
CHAPTER 3
Automating iOS Builds
One of the constants of the Enterprise universe is that, almost before you have your first line of code written, someone will be asking you to set up automated nightly builds with regression testing. And I’m not disagreeing with the practice, because nothing will get a project in trouble faster than the “it worked on my desktop” syndrome. Automated builds are a good way to keep developers honest, and they also can provide a single place for your testing team to get builds to bang on.
And the good news is, with a little bit of finesse, you can get your iOS builds automated, and never have to worry about it again. Apple doesn’t make it easy to do, not so much because the tools aren’t there, but that it can be a scavenger hunt through forums, sparse documentation, and third-party web-sites to find out exactly how to make it tick. What we’ll do in this chapter is to go through the entire process from start to end, so that hopefully you can do it without having to dive into all the research.
Introducing Hudson
There are no lack of build automation systems available these days, and any attempt to cover them all would be far outside the scope of this book. Instead, we’ll look at one popular, open-source build system, called Hudson. Java developers are probably fa-miliar with Hudson, since it is one of the leading tools for build automation in that space. But Hudson can be used for just about any type of build, and if you haven’t already chosen a system, I’d make a strong recommendation for Hudson. But regardless of what build system you plan to use, the tips about how to execute builds from the command line (which is the heart of automating an iOS build) should be valid. Hudson was pioneered at Sun, and was acquired by Oracle as part of their purchase of Sun. Due to some political turmoil between Oracle and the Hudson developer community, a forked version of Hudson called Jenkins was created, which is (for the moment) entirely compatible with Hudson. In the summer of 2011, Oracle donated Hudson to the Eclipse Foundation—whether this will allow a reconciliation with the Jenkins crowd is yet to be seen.
Hudson is written in Java, and although it isn’t required, prefers to use the Ant build tool as the method to execute builds. Since Ant can do just about anything, including running command line scripts, it is a totally reasonable choice for automating iOS builds.
Breaking the News to Your IT Department
Maybe you’re one of the lucky few, and your company has fully embraced the Apple work, with Mac Pros and Macbooks as far as the eye can see. More likely, you’re living in la vida Microsoft, with a purchasing department used to buying low-priced Wintel boxes whenever anyone needs a development machine, and perhaps a Dell or HP server when you need a heavy-duty build machine.
If you’ve started doing iOS development inside your company, and you’re not using personal equipment, you’ve probably already had to break the news to them that you can only really develop iOS applications on Apple hardware (we’ll ignore the world of the Hackintosh, as that’s even less likely to meet with approval from IT than true Apple gear).
Well, now you get to go back to them and explain that if they want automated builds, they’re going to have to go back to their piggy-bank and pony up the funds for another Mac of some variety, because you can’t build iOS applications on anything but a Mac either. Unless you’re doing an absurdly large amount of builds, you don’t need much of one though. At my day job, we do just fine with a mid-range iMac, reserving the heavy-duty Mac Pros for developers. In fact, this one machine is now running not only our iOS builds (for about 10 different code branches), but also our Android, Blackberry and J2ME feature phone builds!
There are rumblings that there may be ways soon to run Mac OS X Server in a virtual environment on non-Apple hardware, so that’s something to keep an eye out for, but at the moment, you should start getting the hardware for a dedicated build machine in the purchasing pipeline if you expect to do automated builds. For the same reason that having developers produce builds is a bad idea, running automated builds on a machine that is also used for development is a bad idea.
Provisioning Your Build Machine
A quick note about version compatibility of Xcode is worth mentioning here. At one point, Apple had Xcode 3.2, Xcode 4.0 and a beta of Xcode 4.1 all available for down-load at the same time from the developer site. It is easy to imagine that you could end up with situations where developers were using one version of Xcode, while the build machine was running a different version.
By and large, this is not an issue. While you never want to have your build machine running a beta version of Xcode (you can’t upload apps built with it to the App Store, for one thing), I’ve generally found that Xcode has been fairly forgiving of mix and match Xcode versions dealing with the same project files. The big (and nasty) exception is that if you use features that are only available in the beta, and then try to open the project in an older version, anything could happen. But, for example, at the moment I am developing at home using the latest Xcode beta, checking in my files and having them work without a hitch in Xcode 4.1 on our build machine. The one big gotcha is that you may want to start building using the GM version a week or so before the new version of iOS is released, so you can have a version in the store at launch time. If you bought your copy of XCode via the Mac App store, rather than downloading it from the developer portal, you won’t be able to update it until the new version of XCode is formally released.
The other (and unpleasant) things you’ll need to keep in sync between development and build machines are the provisioning profiles and certificates. There are a number of reasons that these can go out of sync. For one, every time you add someone to your Ad Hoc profile (which will be discussed in more detail in Chapter 7), you end up with a new profile, which you need to reference in your project file. If your build machine doesn’t have a copy of this profile (or the backing certificate) in the keychain, the build will fail. We’ll discuss this later in this chapter in more detail. If you’re doing both an Enterprise and Ad Hoc/App Store build, things can get very, very complicated, because of keychain conflicts. This is also discussed in Chapter 7.
Installing Hudson
Once you have Xcode installed and running (a good test is to check out your project as a logged in user on the build machine, and make sure that you can build and run the app), it’s time to install the build automation tool (in this case, Hudson).
Although I haven’t said it explicitly, the requirement that you must build iOS apps on Mac hardware means that your build automation tool must be able to deal with Mac OS X. In the case of Hudson, this isn’t an issue, since it’s a pure Java tool. Other proprietary tools may work with Macs, or may have client plug-ins that let your re-motely run a build on a Mac. If your tool can’t communicate with a Mac in any way, you’re kinda out of luck, and may have to sell your build automation group on letting you use a tool such as Hudson instead.
All the tools in this section require Java. Java used to be installed as part of the Mac OS X install, but starting with Lion, it needs to be installed explicitly, you can download the latest version of Java for Lion from Apple.
Begin by downloading Hudson from http://hudson-ci.org/. They have native packages for Linux systems but not, alas, MacOS. What they have is a WAR file, which is a Java Web Application Archive, meant to be dropped into a Java web server such as Tomcat. Tomcat doesn’t have an installer for Mac OS X either, so you need to download the “core” Tomcat zip file from http://tomcat.apache.org/. You can probably download the most recent shipping version safely, but if in doubt, the Hudson site should list the compatible versions of Tomcat.
Once you’ve unzipped the Tomcat archive, you should end up with a directory hier-archy that looks something like this:
Place the Hudson WAR file in the Tomcat webapps directory, and then change direc-tories to the Tomcat bin directory, and run startup.sh. You should see terminal output that looks like this: Using CLASSPATH: /Volumes/Homes/Tom/tomcat/bin/bootstrap.jar
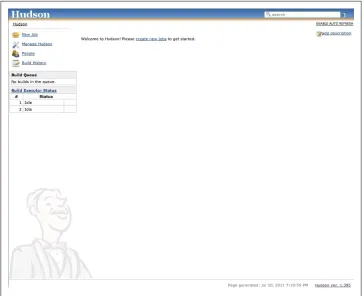
Give Tomcat and Hudson a few minutes to start up, and then you should be able to browse to http://localhost:8080/hudson, and get a screen resembling the one in Fig-ure 3-1.
Creating the Build Job
For the remainder of this chapter, we’re going to assume that you have an Xcode project checked into a source control system, as outlined in the last chapter. Since the entire point of automating your builds is to take the most recent version of your project under source control and create a build of the app from it, it is obviously a prerequisite. I’ve set up a repository on github that has all the examples in this book, as well as the tools and utilities mentioned. You can check a read-only copy out of git by using the repository URL:
git://github.com/blackbear/enterprise-ios-applications.git
With Hudson up and running, we can start implementing our automated build. Help-fully, Hudson places a link to what we want to do right at the upper left hand corner,
New Job. If you click on that link, you’re brought to an intermediate page that asks you to name your job, and select what type of build it is (see Figure 3-2). For the purposes of this walk-through, we won’t look into these options in detail, just give the build a name (BuggyWhipBuild) and set it up as a freestyle project.
Figure 3-1. The Hudson screen on first time startup
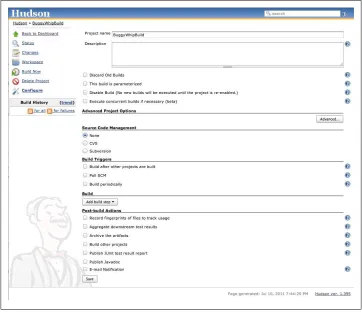
The Main Configuration Screen
Once that page is submitted, you’re brought to a longer page where you will configure the build (Figure 3-3). Especially when you are first starting out with Hudson, it is a good idea to take things step by step, rather than try to get it all working at once, so that’s the approach we’ll take. The first section of the configuration has four check-boxes, which we can discuss briefly.
Discard old builds
If you leave this box unchecked, Hudson will keep every build ever made until you run out of disk space. Usually, you only want a few builds available (perhaps as many as a month’s worth, but probably not more). By checking this box, you will be given the option to select the number of days back or number of builds to keep. You can also choose (using the advanced checkbox) to select a different number of days to keep artifacts (the finished output products) of builds, which in the case of an iOS build would be things such as test results and IPA files.
This build is parameterized
This is an option you will almost never use with automated builds, because it will cause the build to prompt the user for parameters that will be passed into the build process. Obviously, this isn’t practical for builds designed to run unattended.
Disable build
This item is self-explanatory. If it is checked, scheduled builds will not occur.
Execute concurrent builds
Again, not an option you are likely to need—it allows Hudson to run multiple builds simultaneously, if the resources have been configured to allow for it. If you wish to do it, there shouldn’t be an issue doing this with Xcode builds.
Advanced options
In general, a stand-alone iOS build project should not need to set these options. They deal with cross-build dependencies, how often to retry failed builds, and what directory to perform the build in. You can ignore them for the moment.
Source Code Management with Hudson
The next section of the configuration screen deals with source code management. Specifically, it deals with how to check out the project so that a build can be performed on it. On the Hudson website, there is a long list of SCM systems that can be integrated
Figure 3-3. The main build configuration screen
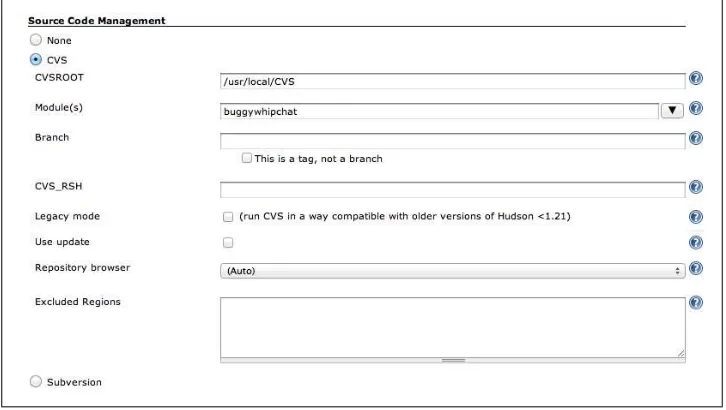
into Hudson using plug-ins, including git, Mercurial, Visual SourceSafe, MKS, and many others. For the purposes of this example, we’ll stick with our existing CVS project that we used in the previous chapter. If you click on the CVS radio button, a new section expands out (Figure 3-4).
Figure 3-4. Configuring CVS in Hudson
To make this work, all we need to do is set the CVSROOT to the appropriate directory,
the module to the module name of our project (BuggyWhipChat), and optionally decide
which branch we wish to check out (if none is provided, the main trunk is checked out for CVS).
Obviously, depending on which source control system you use, you will end up pro-viding different parameters to this section, but the idea remains the same: you will end up with a copy of your Xcode project checked out and ready to be built.
Before we go any further, let’s make sure that the piece we’ve done so far is working correctly. With the SCM section filled out, you have enough done to try running the project. At the bottom of the page, press the Save button, which will return you to a view of your build (Figure 3-5).
Trying Your First Build
To try out the build, all you need to do is click on the Build Now link in the left-hand side list of links, A progress bar will appear under the Build History heading, and a few seconds later, the build will be complete and a link to the finished build will appear in the history. If you click on the link, and then click on Console Output link on the next page, you can see what happened under the covers.
Started by user anonymous
[BuggyWhipBuild] $ cvs -Q -z0 -d /usr/local/CVS co -P \
-d workspace -D "Monday, July 11, 2011 12:40:39 AM UTC" buggywhipchat $ no changes detected
Finished: SUCCESS
Since all the job did was to check the sources out of CVS, there wasn’t much excitement to be seen. If you look in your home directory, you will see a hidden directory called .hudson. Walking down the directories to .hudson/jobs/BuggyWhipBuild/work-space, you’ll see a copy of your project checked out and waiting for you to build it. So now we’re set to actually start playing with Xcode and making some apps!
Creating an Ant Build File
As has been previously mentioned, Hudson prefers to use Ant as the build tool to build projects. That’s not to say that this is your only choice: you could almost as easily use GnuMake or any other tool that can be executed from the command line. But really, there’s no reason not to use Ant, unless you’re violently opposed to it for some reason. As opposed to gmake, which tends to be finicky on random characters in the file and can be a bit arcane to understand, Ant uses XML files that can be edited and validated in any standard XML editor. It will also make all your Java friends happy, because Ant is the build tool of choice for Java.
Ant build files can get quite complex, but they don’t need to. All you really need is a single file called build.xml, and that’s the file we’re about to create. Example 3-1 shows a very simple build.xml file that does absolutely nothing.
Example 3-1. A simple build file
<?xml version="1.0" encoding="utf-8"?>
<project name="Buggy Whip Builder" default="debugbuild" basedir="."> <target name="debugbuild">
<echo message="Debug Build Will Go Here"/> </target>
</project>
Let’s break the file down line by line. The first line is a standard XML header. The next line, which uses the project tag, defines the name of the project that is associated with this build file, the default target (debugbuild) that the file builds if given no arguments,
and the base directory that all commands will be executed relative to.
With this file placed in the root of the CVS project (which, you may remember, has the BuggyWhipChat and ChatAPI directories as subdirectories), we can run Ant from the command line and see the build script work:
tom Tom:buggywhipchat$ ant
I know it seems like we’ve spent a lot of time discussing non-Xcode stuff, but now that we’ve assured ourselves that the basic Ant script is working, we can start to actually wire up Xcode to the build. Making command-line builds work comes down to un-derstanding a few basic commands that are included in the developer SDK. The star of the show is xcodebuild, which you can find in the /Developer/usr/bin directory. The basic format of the command is:
xcodebuild [-project projectname] [-target targetname] ... [-configuration configurationname] [buildaction] ...
There is an alternate format that is used if you are dealing with workspaces:
xcodebuild [-workspace workspacename] [-scheme schemename] ... [-configuration configurationname] [buildaction] ...
The major difference is that the workspace version replaces the project and target spec-ifications with the more “modern” workspace and scheme ones.
Since we’re working with a workspace-based project, we’ll be using the second form of the command. Before trying to integrate it into our build system, we should make sure that we can run the command correctly, directly from the command line:
buggywhipchat Diane$ /Developer/usr/bin/xcodebuild -workspace \
BuggyWhipChat.xcworkspace -scheme BuggyWhipChat build
=== BUILD NATIVE TARGET ChatAPI OF PROJECT ChatAPI WITH CONFIGURATION Debug === Check dependencies
. . .
=== BUILD NATIVE TARGET BuggyWhipChat OF PROJECT BuggyWhipChat WITH CONFIGURATION Debug ===
Check dependencies .
. .
So, the first good news is that the build worked. But what exactly happened? We can start by looking at the command we executed. We specified the workspace we wanted to use (which is in the current directory, the same one that has the build.xml file in it. The scheme we asked for is the BuggyWhipChat scheme, which is the standard scheme that builds a debug build. Finally, we asked for a build action of build (which, by the
way, is the default). We’ll look at some of the other build actions later on—there are also a number of other arguments that you can pass to xcodebuild that will allow you to tweak the build settings that you normally set via the Xcode project inspector. If you’re interested, running man xcodebuild from the command line will give you the information in detail.
Integrating xcodebuild into an Ant Script
The next step is to take the xcodebuild command that worked so well on the command line, and make it work from inside Ant. The key to this is the exec task of Ant, which lets you fire off any command line you desire from inside Ant. In our case, we’re going to modify our build.xml to look like Example 3-2.
Example 3-2. build.xml with the xcodebuild
<?xml version="1.0" encoding="utf-8"?>
<project name="Buggy Whip Builder" default="debugbuild" basedir="."> <target name="debugbuild">
<echo message="Building debug build of BuggyWhipChat"/> <exec executable="/Developer/usr/bin/xcodebuild" os="Mac OS X"> <arg value="-workspace"/>
<arg value="BuggyWhipChat.xcworkspace"/> <arg value="-scheme"/>
This is fairly straightforward: we’ve added an exec task that runs the xcodebuild com-mand, passing in the arguments that we’ve already determined will work. The os pa-rameter of the exec task ensures that we don’t try to run this script on a non-Mac, but to be thorough, we should really use an if task and print an error message if the we’re not on a Mac. With this in place, we can try running Ant from the command line, and see what we get:
buggywhipchat Diane$ ant
Buildfile: /Volumes/Homes/James/Dropbox/Dianescvs/buggywhipchat/build.xml
debugbuild:
[echo] Building debug build of BuggyWhipChat
[exec] === BUILD NATIVE TARGET ChatAPI OF PROJECT ChatAPI WITH CONFIGURATION Debug === .
.
.
[exec]
[exec] ** BUILD SUCCEEDED ** [exec]
Houston, we have a build! But we’re not quite done yet.
Calling the Ant Script from Hudson
The whole purpose of this exercise was to get our builds hooked up into Hudson. Now that we have a good Ant script, we can tell Hudson to use it. But before we forget, we need to add the build script to our CVS repository.
buggywhipchat Diane$ cvs add build.xml
cvs add: scheduling file `build.xml' for addition cvs add: use `cvs commit' to add this file permanently buggywhipchat Diane$ cvs commit
Now we can go back to our Hudson configuration, and make a few changes. To begin, let’s make sure that we start with an empty directory before we check our project out from CVS, you do this by making sure that the “Use Update” option in the advanced portion of the Source Control Management section of the configuration is turned off, as shown in Figure 3-6. This will cause Hudson to start with a clean slate every time, which can be especially important if you end up with work products in your build directory. This also saves you the hassle of having to run an xcodebuild clean action
before doing your build.
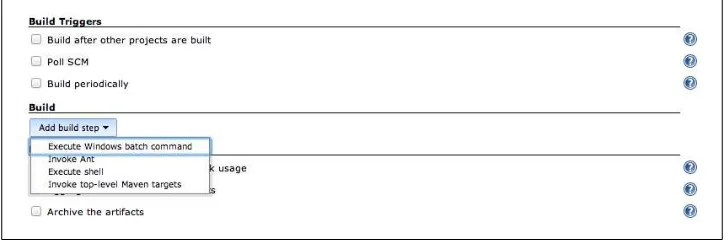
The other step required is to add a build step, which is done by going down to the Build section of the configuration, and clicking on the Add Build Step pulldown ( Fig-ure 3-7). From this menu, we want to use Invoke Ant.
Figure 3-7. Adding an Ant task to Hudson
Selecting this choice gives use a single parameter to fill out: the targets to build. In this case, we want to use the debugbuild target, so we fill that in (Figure 3-8) and save the configuration. Now we’re ready to rumble!
Figure 3-8. Setting up the Ant target
If we go back to the main Hudson window and hit the play button for the build, which tells Hudson to start running the build, we should (if everything went according to plan) end up with a good build. Going into the new build, we can look at the console output, and see everything worked as expected:
Started by user anonymous
[BuggyWhipBuild] $ cvs -Q -z0 -d /usr/local/CVS co -P \
-d workspace -D "Friday, July 15, 2011 3:41:38 PM UTC" buggywhipchat $ computing changelog
[workspace] $ ant debugbuild
Buildfile: /Volumes/Homes/James/.hudson/jobs/BuggyWhipBuild/workspace/build.xml debugbuild:
[echo] Building debug build of BuggyWhipChat
[exec] === BUILD NATIVE TARGET ChatAPI OF PROJECT ChatAPI WITH CONFIGURATION Debug ===
. .