BEGINNING
VISUAL STUDIO® LIGHTSWITCH DEVELOPMENT
INTRODUCTION . . . .xxv
⊲ PART I
AN INTRODUCTION TO VISUAL STUDIO
LIGHTSWITCH
CHAPTER 1 Prototyping and Rapid Application Development . . . 3CHAPTER 2 Getting Started with Visual Studio LightSwitch . . . .19
CHAPTER 3 Technologies behind a LightSwitch Application . . . 45
CHAPTER 4 Customizing LightSwitch Applications . . . 77
⊲ PART II
CREATING APPLICATIONS WITH VISUAL
STUDIO LIGHTSWITCH
CHAPTER 5 Preparing to Develop a LightSwitch Application . . . 105CHAPTER 6 Working with Simple Data Screens . . . .127
CHAPTER 7 Working with Master-Detail Data Screens . . . 157
CHAPTER 8 Using Existing SQL Server Data . . . 195
CHAPTER 9 Building and Customizing Screens . . . 227
CHAPTER 10 Validation and Business Rules . . . 279
CHAPTER 11 Authentication and Access Control . . . 309
CHAPTER 12 Microsoft Offi ce Integration . . . 329
⊲ PART III ADVANCED LIGHTSWITCH APPLICATION
DEVELOPMENT
CHAPTER 13 Deploying LightSwitch Applications . . . 349CHAPTER 14 Using SharePoint 2010 Lists . . . 377
⊲ PART IV APPENDIX
APPENDIX Answers to Exercises . . . 401BEGINNING
Visual Studio
®
LightSwitch
BEGINNING
Visual Studio
®
LightSwitch
Development
Indianapolis, IN 46256
www.wiley.com
Copyright © 2011 by Wiley Publishing, Inc., Indianapolis, Indiana
Published simultaneously in Canada
ISBN: 978-1-118-02195-8 ISBN: 978-1-118-14851-8 (ebk.) ISBN: 978-1-118-14850-1 (ebk.) ISBN: 978-1-118-14854-9 (ebk.)
Manufactured in the United States of America
10 9 8 7 6 5 4 3 2 1
No part of this publication may be reproduced, stored in a retrieval system or transmitted in any form or by any means, electronic, mechanical, photocopying, recording, scanning or otherwise, except as permitted under Sections 107 or 108 of the 1976 United States Copyright Act, without either the prior written permission of the Publisher, or authorization through payment of the appropriate per-copy fee to the Copyright Clearance Center, 222 Rosewood Drive, Danvers, MA 01923, (978) 750-8400, fax (978) 646-8600. Requests to the Publisher for permission should be addressed to the Permissions Department, John Wiley & Sons, Inc., 111 River Street, Hoboken, NJ 07030, (201) 748-6011, fax (201) 748-6008, or online at http://www.wiley.com/go/permissions.
Limit of Liability/Disclaimer of Warranty: The publisher and the author make no representations or warranties with respect to the accuracy or completeness of the contents of this work and specifi cally disclaim all warranties, including without limitation warranties of fi tness for a particular purpose. No warranty may be created or extended by sales or promotional materials. The advice and strategies contained herein may not be suitable for every situation. This work is sold with the understanding that the publisher is not engaged in rendering legal, accounting, or other professional services. If professional assistance is required, the services of a competent professional person should be sought. Neither the publisher nor the author shall be liable for damages arising herefrom. The fact that an organization or Web site is referred to in this work as a citation and/or a potential source of further information does not mean that the author or the publisher endorses the information the organization or Web site may provide or recommendations it may make. Further, readers should be aware that Internet Web sites listed in this work may have changed or disappeared between when this work was written and when it is read.
For general information on our other products and services please contact our Customer Care Department within the United States at (877) 762-2974, outside the United States at (317) 572-3993 or fax (317) 572-4002.
Wiley also publishes its books in a variety of electronic formats. Some content that appears in print may not be available in electronic books.
Library of Congress Control Number: 2011930875
ABOUT THE AUTHOR
ABOUT THE TECHNICAL EDITORS
RITA RUBAN is a writer of educational material in computing (specifi cally, Visual Basic, Visual Basic for Applications, HTML, Excel, and various art software applications), mathematics, and biology, having been a teacher/lecturer for these subjects. She is also an artist and designer. Visit her page on LinkedIn for further information and web links, or e-mail her at [email protected].
ACKNOWLEDGMENTS
I REALLY ENJOYED WRITING THIS BOOK. The idea started at the beginning of August, 2010 when Microsoft announced Visual Studio LightSwitch. A few weeks later, after trying the fi rst Beta, I imagined an idea about how this great product could be evangelized. I’m happy that Acquisitions Editor Paul Reese supported my idea and helped to form this book.
In addition to my readers, I owe a lot to other great people who helped me with the writing of this book and ensured that my imagination became reality.
First of all, I’d like to thank Kevin Shafer for his amazing editorial work. This is my second book working together with Kevin, and I really appreciated how he carried the whole book writing process on his shoulders, and ironed my sentences. I hope I can meet Kevin personally in the near future, and shake his hand.
I’d also like to thank Luann Rouff for thoroughly reading the manuscript and translating my originally complex paragraphs to simple and tangle-free sentences. Dianne Siebold and Rita Ruban, the Technical Editors, raked over my submitted chapters and suggested many changes that made this writing much more accurate than it was before their reviews. I’m very grateful for their help.
The Hungarian Silverlight User Group and the Hungarian Windows Azure User Group provided me with several opportunities to speak about LightSwitch. They also gave me valuable feedback about positioning the product. Thanks for their support.
CONTENTS
INTRODUCTION xxv
PART I: AN INTRODUCTION TO VISUAL STUDIO LIGHTSWITCH
CHAPTER 1: PROTOTYPING AND RAPID APPLICATION DEVELOPMENT 3
Line-of-Business Software Development Challenges
4
LOB Software Development 5
Changing Project Environment 5
Creating a Requirements Specifi cation 5
Feedback Frequency 7
Application Prototyping
8
Wireframe Models 8
Proof-of-Concept Models 10
Low-Fidelity Prototypes 10
High-Fidelity Prototypes 11
Rapid Application Development
11
RAD Tools 12
Visual Studio LightSwitch and RAD 15
Summary 15
CHAPTER 2: GETTING STARTED WITH VISUAL STUDIO LIGHTSWITCH 19
Getting to Know Visual Studio
19
A Short History of Visual Studio 20
Roots 20
Other Visual Languages and Tools 21
Integrating Languages into Visual Studio 21
Moving to .NET 22
Visual Studio Editions 23
Visual Studio 2010 23
Getting to Know Visual Studio LightSwitch
23
Business Code versus Plumbing Code 24
LOB Applications and LightSwitch 24
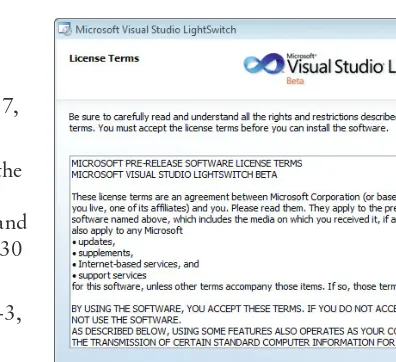
Installing Visual Studio LightSwitch
26
Types of Installation 26
xviii
Creating Your First LightSwitch Application
30
Creating a Project 31
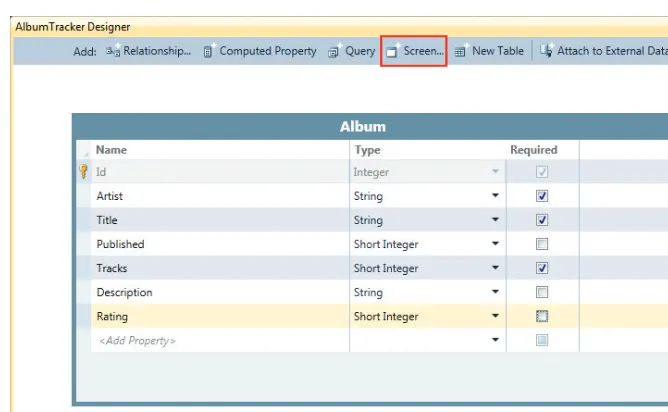
Creating a Table 33
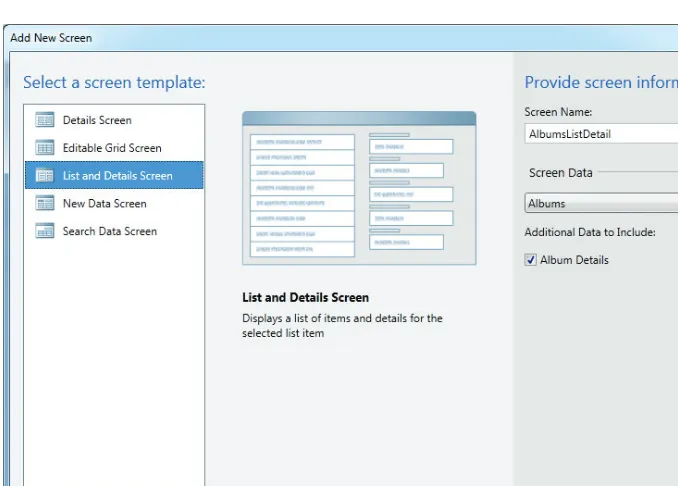
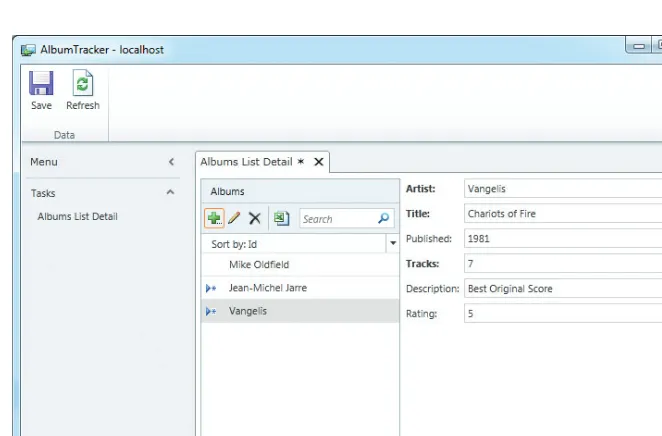
Creating a Screen to List Album Information 35
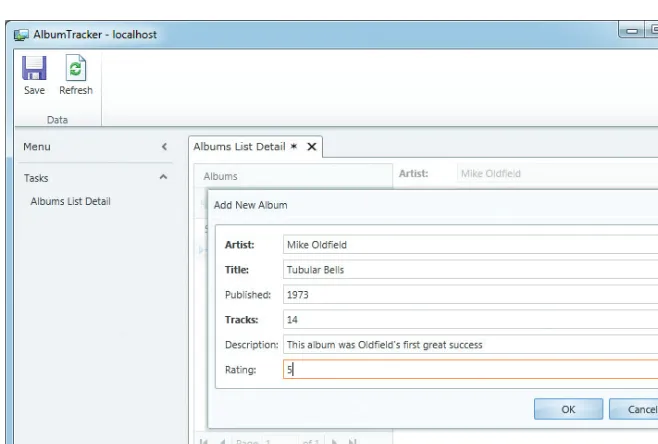
Making Runtime Customizations 40
Summary 42
CHAPTER 3: TECHNOLOGIES BEHIND A LIGHTSWITCH APPLICATION 45
The Three-Tier Application Architecture Pattern
45
The Presentation Tier 47
The Logic Tier 47
The Data Tier 48
LightSwitch and the Three-Tier Architecture Pattern 48
The .NET Framework
51
The .NET Runtime 51
.NET Languages 52
.NET Framework and LightSwitch 53
Sources for More Information about the .NET Framework 54
Silverlight 4
54
A New UI Concept 55
Layout 55
Data Binding 56
Styles and Templates 57
Sources for More Information about Silverlight 4 59
SQL Server 2008
59
SQL Server Features 59
SQL Server 2008 Express 61
Sources for More Information about SQL Server 64
SharePoint 2010
64
SharePoint 2010 Features 64
SharePoint 2010 Lists and LightSwitch 65
Microsoft Offi
ce
66
Microsoft Offi ce Application Features 67
Exporting Information to Microsoft Excel 68
Windows Azure
69
Dynamic Resource Allocation 70
Application Development with Windows Azure 71
Windows Azure and LightSwitch 71
xix CONTENTS
CHAPTER 4: CUSTOMIZING LIGHTSWITCH APPLICATIONS 77
Customizing Data
78
Creating the Aquarium Database 78
Connecting to an Existing Database 80
Changing Names and Types in the Existing Table 83
Creating the Cart Table 84
Customizing Screens
87
Creating a Creature Catalog 87
Changing the Grid Layout 88
Creating a Shopping Cart Screen 91
Writing Code
93
Setting a Default Property Value in Code 94
Setting the Startup Screen 95
Managing Price Information 96
Other Points Where Code Is Used 99
Summary 99
PART II: CREATING APPLICATIONS WITH VISUAL STUDIO LIGHTSWITCH
CHAPTER 5: PREPARING TO DEVELOP A LIGHTSWITCH
APPLICATION 105
The ProjectTrek Sample
105
The Functionality of ProjectTrek 106
The ProjectTrek Application Database 108
LightSwitch Application Development Life cycle
115
The Iterative Model 115
Construction: Design and Implementation 116
Testing 117 Deployment 118
Extending a LightSwitch Application 119
Team Foundation Server Support 120
A Short Tour of the LightSwitch IDE
120
The Workbench and the Start Page 120
Window Management 124
Summary 125
CHAPTER 6: WORKING WITH SIMPLE DATA SCREENS 127
Creating New Tables
127
Creating the ProjectTrek Project 128
Designing the TimeCategory Table 130
xx
Creating Screens
141
The Add New Screen Dialog 142
Predefi ned Screen Types 142
The Layout Structure of a Screen 145
Inserting, Editing, and Deleting Data
146
Creating a Details Screen 147
Understanding How the Detail Screen Works
148
Creating a New Data Screen 149
Creating an Editable Grid Screen 150
Deleting a Record 152
Polishing 153
Finalizing the EditableTimeCategeory Screen 153
Implementing the ProjectRoleType Entity 154
Summary 155
CHAPTER 7: WORKING WITH MASTER-DETAIL DATA SCREENS 157
Creating Detail Tables
158
Relationships 158
The Add New Relationship Dialog 161
Creating Master-Detail Screens
170
Understanding Master-Detail Screens 170
Using the Add New Screen Dialog to Create Master-Detail Screens 171
The Structure of Master-Detail Screens 173
Queries 175
Understanding Queries 175
Editing Queries 176
Creating New Queries 178
Query Parameters 179
Binding Query Parameters with Screen Data 180
Adding Details to Screens
182
Adding Project Details to ListProjects 183
Adding ProjectTask and AdditionalCost Details 184
Aggregations 186
Polishing 189
Summary 191
CHAPTER 8: USING EXISTING SQL SERVER DATA 195
Connecting to SQL Server Databases
196
Using Server Explorer 197
xxi CONTENTS
Customizing Data in Existing Databases
210
Renaming Tables and Fields 211
Mapping and Changing Field Types 213
Using Computed Properties to Extend Attached Tables 216
Server-Side Computed Fields 218
Managing Data Relationships
218
Using Existing Relationships 218
Creating New Relationships between a LightSwitch Table and
an External Table 219
Summary 223
CHAPTER 9: BUILDING AND CUSTOMIZING SCREENS 227
Understanding the Screen Layout Structure
228
Data Items 229
Features and Restrictions in Customization Mode 243
The Data Grid and the List Controls
243
Working with the Data Grid Control 244
Data Grid Properties 247
Working with the List Control 247
Using Simple Controls and Value Pickers
249
Working with Simple Controls 251
Control Sizing 253
Picking Up Values 253
Methods, Buttons, and Command Bars
257
Adding Methods and Buttons to a Screen 257
Enabling and Disabling Methods 260
Adding Buttons to the Screen’s Command Bar 262
Adding Methods and Buttons to Controls 264
Removing Buttons and Methods 266
Tasks and Navigation
267
Understanding the Screen Navigation Structure 267
xxii
Extending the UI with Shells, Themes, and Custom Controls
270
Applying Shells and Themes 271
Custom Controls 272
Summary 274
CHAPTER 10: VALIDATION AND BUSINESS RULES 279
Validation and Business Logic Architecture of LightSwitch
280
Validation Steps 280
Defi ning Business Rules 282
The Save Pipeline 283
Adding Validation Rules
285
Declaring Simple Field Validation Rules 285
Declaring Custom Field Validation Rules 287
Validation through Navigation Properties 289
Validating Entities 292
Validation Messages in the UI 296
Implementing Business Rules
298
Intercepting the Save Pipeline 298
Save Pipeline Event-Handling Methods 300
Query Event-Handling Methods 302
Auditing Data Modifi cations 303
Summary 307
CHAPTER 11: AUTHENTICATION AND ACCESS CONTROL 309
Authentication and Access Control Concepts
309
Authentication 311
Access Control 312
Permissions 312
Roles and Users 313
Access Control Methods 313
Using Access Control in LightSwitch Applications
314
Defi ning and Checking Permissions 314
Available Access Control Methods 316
Managing Users, Roles, and Permissions
320
Authentication in LightSwitch 320
Using Windows Authentication 321
Using Forms Authentication 323
Managing Roles and Permissions 323
Managing Users 325
xxiii CONTENTS
CHAPTER 12: MICROSOFT OFFICE INTEGRATION 329
Exporting Data to Microsoft Excel
329
Understanding and Using Offi
ce Automation
331
Using the Microsoft Offi ce Automation Model from
LightSwitch Applications 332
Exporting to Excel Using the Automation Model 332
Exploring the Automation Model 340
Exporting a Project List to Word 342
Summary 344
PART III: ADVANCED LIGHTSWITCH APPLICATION DEVELOPMENT
CHAPTER 13: DEPLOYING LIGHTSWITCH APPLICATIONS 349
Deployment Options
349
Thin Client and Thick Client 350
Client and Application Server Topologies 351
Restrictions 352
Thick Client Deployment
353
Creating a Desktop Client Installation Kit 353
Using the Installation Kit 358
Removing the Desktop Client 359
Managing the Database Deployment
359
Deploying with IIS
362
Three-Tier Deployment 362
LightSwitch and Three-Tier Deployment 363
Publishing the Application Server to IIS 364
Windows Azure Deployment
365
Prerequisites for Windows Azure Deployment 366
Using the Publish Application Wizard for Windows Azure Deployment 367
Starting the Application in Windows Azure 372
Summary 374
CHAPTER 14: USING SHAREPOINT 2010 LISTS 377
Creating a Sample SharePoint Site
378
Using Your Company’s SharePoint Server 378
Installing SharePoint Foundation 2010 378
Preparing a Custom SharePoint List 380
Using SharePoint 2010 Lists
384
Attaching to SharePoint Lists 384
xxiv
Data Type Mapping between SharePoint and LightSwitch 391
Customizing List Data 393
Creating Relationships with SharePoint 2010 Lists
393
Editing Existing SharePoint Relationships 393
Creating Relationships between SharePoint Lists
and LightSwitch Tables 394
Summary 397
PART IV: APPENDIX
APPENDIX: ANSWERS TO EXERCISES 401
Chapter 1 Exercise Answers
401
Chapter 2 Exercise Answers
402
Chapter 3 Exercise Answers
404
Chapter 4 Exercise Answers
405
Chapter 5 Exercise Answers
406
Chapter 6 Exercise Answers
407
Chapter 7 Exercise Answers
407
Chapter 8 Exercise Answers
409
Chapter 9 Exercise Answers
410
Chapter 10 Exercise Answers
411
Chapter 11 Exercise Answers
412
Chapter 12 Exercise Answers
412
Chapter 13 Exercise Answers
413
Chapter 14 Exercise Answers
414
INTRODUCTION
TO THOSE OF US WHO PAY ATTENTION to such things, the world of software development has changed a lot in the last few years. In the .NET world, Microsoft’s Visual Studio 2010 is undoubtedly the most successful development environment. Since the release of the fi rst .NET version in February 2002, this product has undergone dramatic changes. Currently, it encapsulates three languages (Visual Basic, C#, and F#) and many tools that support the entire life cycle of software development.
It provides great freedom for developers to create virtually any type of application for many devices, including desktops, portable devices, and phones; and now it supports cloud applications. Given the globalization of business and rapid changes in the world economy, the importance of fast time-to-market requirements continuously affects how software products — and especially line-of-business (LOB) applications — are developed.
While Visual Studio supports development teams, it still requires jumping over a relatively high entry barrier. Writing versatile business applications with this tool defi nitely requires deep software development knowledge — in exchange for the freedom it offers.
Visual Studio LightSwitch is a new member of the Visual Studio family. It was designed and developed with rapid data-centric LOB application development in mind. It targets primarily consultants and business analysts who are far removed from everyday programming — and not just experienced developers.
This book serves as a foundation for learning the basics of creating useful business applications with LightSwitch — using only minimal coding.
WHO THIS BOOK IS FOR
This book was written with IT consultants and business analysts in mind — those who have a deep understanding of business processes, and have specifi c business domain experience. With LightSwitch, they can independently materialize their LOB application prototype ideas — and implement productive applications — without the continuous help of developers and other IT experts. The book also helps those developers, consultants, and experts who want to rapidly achieve success in defi ning requirements and functional prototypes to accelerate the specifi cation phase of their business application development projects.
xxvi
WHAT THIS BOOK COVERS
This book focuses on the features of Visual Studio LightSwitch, which enable you to write data-centric LOB applications in a very short time. Rather than going into subtle feature details in an attempt to teach you everything about LightSwitch, this book explains and demonstrates how to utilize this great product in business application development.
Most of the chapters follow the creation of a new project-tracking application (ProjectTrek) for a
fi ctitious IT consulting company, ConsulArt. The discussions address not only LightSwitch, but also the context of ProjectTrek. Thus, you will learn how LightSwitch answers the challenges of LOB
application development.
Of course, this book cannot show you every aspect of business application development; it just scratches the surface of things you can do with LightSwitch. Although it treats all important features, and provides you with a few recipes, there are many tasks it does not show you exactly.
This book is full of exercises that guide you through certain tasks. Rather than rushing through the exercise steps, try to do something a bit different (such as selecting an option other than the one suggested, changing a setting, adding a few more elements to a screen, and so on) and see the effect. This is the best way to discover many small details about LightSwitch that are not explicitly treated in this book.
HOW THIS BOOK IS STRUCTURED
This book is divided into three sections that will help you understand the concepts behind LightSwitch and become familiar with this great tool. The fi rst part provides a quick overview that establishes the context of business application development, which will help you understand how LightSwitch responds to real-world challenges.
In the second part, the numerous hands-on exercises will enable you to learn the main concepts as you create the sample application, while the third part introduces a few advanced topics that are also important parts of the LightSwitch application development.
Most chapters fi rst establish a context and treat the most important concepts, and then you learn how to use them through exercises. Each exercise concludes with a “How it Works” section that explains how (including all important details) the exercise achieves its objective.
Part I: An Introduction to Visual Studio LightSwitch
This section provides a context for Visual Studio LightSwitch and its approach to LOB application development — what it is and why it is an important addition to the Visual Studio family. It also provides an overview of the technologies that enable you to build a LightSwitch application.
➤ Chapter 1: “Prototyping and Rapid Application Development” — This chapter provides an
xxvii INTRODUCTION
Here you will learn how these techniques can answer LOB software development challenges, and learn how Visual Studio LightSwitch does it.
➤ Chapter 2: “Getting Started with Visual Studio LightSwitch” — This hands-on chapter enables you to form your fi rst impressions of Visual Studio LightSwitch. By the time you fi nish this chapter, you will have installed LightSwitch and created your very fi rst application with it — all without writing a single line of code.
➤ Chapter 3: “Technologies behind a LightSwitch Application” — This chapter provides an
overview of the foundational technologies behind a LightSwitch application. It will help you understand the main concepts of the technologies, as well as the roles they play in LightSwitch applications.
➤ Chapter 4: “Customizing LightSwitch Applications” — The architectural and technological
constraints provided by LightSwitch may seem too rigid. However, they actually help you to be productive, because the template-driven framework enables you to focus on your solutions, rather than the underlying design pattern. In addition, LightSwitch provides a full-featured set of customization features, which this chapter describes and demonstrates through examples.
Part II: Creating Applications with Visual Studio LightSwitch
The second section of the book treats the most important aspects of creating a fully functional LightSwitch application from scratch. Using the fi ctitious ConsulArt Company, you build a business application that helps the company control its projects.➤ Chapter 5: “Preparing to Develop a LightSwitch Application” — To understand the
functionality of the LightSwitch integrated development environment (IDE) and its
development approach, you will create a new sample application from scratch. This chapter describes the application and prepares you for implementing it.
➤ Chapter 6: “Working with Simple Data Screens” — In this chapter, you will learn about the basics of creating tables and screens. Although you start with very simple tasks, they will help you understand LightSwitch’s fl exible and extensible approach, and the useful tools that it provides.
➤ Chapter 7: “Working with Master-Detail Data Screens” — Real applications contain
data tables that have relationships between them. In this chapter, you will learn how to manage tables with relationships, and how you can build master-detail screens with them.
➤ Chapter 8: “Using Existing SQL Server Data” — When you develop LOB applications,
you often must access and use data stored in existing back-end systems. Visual Studio LightSwitch has been designed with this functionality in mind. In this chapter, you learn how to use data stored in existing SQL Server databases.
➤ Chapter 9: “Building and Customizing Screens” — There are many opportunities in
xxviii
concepts and the basic architecture of screens. The step-by-step exercises will give you a clear understanding of each important element used to build and customize your screens.
➤ Chapter 10: “Validation and Business Rules” — All LOB applications must have associated rules that characterize the business. In this chapter, you will learn about the concept of data validation, and learn about the tools LightSwitch provides for creating compound business operations.
➤ Chapter 11: “Authentication and Access Control” — A real LOB application includes the
capability of authenticating users and restricting them to using only functions they are permitted to carry out. In this chapter, you will learn the authentication and access control concepts of LightSwitch, and, of course, how to use them in your applications.
➤ Chapter 12: “Microsoft Offi ce Integration” — Visual Studio LightSwitch has been designed
with Microsoft Offi ce integration in mind. The automation features of Offi ce applications make it easy to use Word, Excel, Outlook, or even PowerPoint from LightSwitch, as you learn in this chapter.
Part III: Advanced LightSwitch Application Development
The last portion of the book is dedicated to two advanced topics. It helps you understand the options LightSwitch offers for deploying an application, and teaches you about information stored in SharePoint 2010 lists.
➤ Chapter 13: “Deploying LightSwitch Applications” — In general, application deployment is
easy, but occasionally it can be a nightmare because of diffi culties that result from creating setup kits and installation manuals. With LightSwitch, the whole process is straightforward. In this chapter, you learn about the options provided by the LightSwitch IDE, and you are guided through several deployment types.
➤ Chapter 14: “Using SharePoint 2010 Lists” — LightSwitch enables you to utilize the information stored in SharePoint 2010. In this chapter, you learn how to access SharePoint 2010 lists and use them in your applications — with the same ease that you experience while building SQL Server–based solutions.
WHAT YOU NEED TO USE THIS BOOK
This book assumes you have a system that meets the following requirements:
➤ You are running Windows Vista or Windows 7 (both require at least the Home Premium
edition), or one of the Windows Server 2008 (or Windows Server 2008 R2) editions.
➤ You have at least 8GB of free hard disk space to install Visual Studio LightSwitch and use
the samples with their databases.
xxix INTRODUCTION
installation media among their downloadable items. A free trial version of Visual Studio LightSwitch is also available through the www.microsoft.com/visualstudio/lightswitch web page.
To go through the exercises in Chapter 14, you also must create a SharePoint site. You must access an existing SharePoint 2010 server. Chapter 14 describes all the required steps to prepare the environment required for the exercises.
CONVENTIONS
To help you get the most from the text and keep track of what’s happening, we’ve used a number of conventions throughout the book.
TRY IT OUT
The Try It Out section is an exercise you should work through, following the text in the book. Some exercises use prepared samples. When you need to start with a prepared sample, you’ll always be instructed where you can fi nd the related fi les in the online source code that accompanies this book.
1.
The exercises consist of a set of steps.2.
Each step has a number.3.
Follow the steps.How It Works
After each Try It Out, the steps you’ve executed and the code you’ve typed are explained in detail.
WARNING Boxes with a warning icon like this one hold important, not-to-be-forgotten information that is directly relevant to the surrounding text.
NOTE The pencil icon indicates notes, tips, hints, tricks, or asides to the current discussion.
As for styles in the text:
➤ We highlight new terms and important words when we introduce them.
xxx
➤ We show fi lenames, URLs, and code within the text like so: Application.User .HasPermission.
➤ We present code in two different ways:
We use a monofont type with no highlighting for most code examples.
We use bold to emphasize code that is particularly important in the present context or to show changes from a previous code snippet.
Also, Visual Studio’s Code Editor provides a rich color scheme to indicate various parts of code syntax. That’s a great tool to help you learn language features in the editor, and to help prevent mistakes as you code. To reinforce Visual Studio’s colors, the code listings in this book are colorized using colors similar to what you would see on screen in Visual Studio working with the book’s code. In order to optimize print clarity, some colors have a slightly different hue in print than what you see on screen; but all the colors for the code in this book should be close enough to the default Visual Studio colors to give you an accurate representation.
SOURCE CODE
As you work through the examples in this book, you may choose either to type in all the code
manually, or to use the source code fi les that accompany the book. All source code samples used in this book are available for download at www.wrox.com. When at the site, simply locate the book’s title (use
the Search box or one of the title lists) and click the Download Code link on the book’s detail page to obtain the source code for the book.
NOTE Because many books have similar titles, you may fi nd it easiest to search by ISBN; this book’s ISBN is 978-1-118-02195-8.
Once you download the code, just decompress it with your favorite compression tool. Alternately, you can go to the main Wrox code download page at www.wrox.com/dynamic/books/download .aspx to see the code available for this book and all other Wrox books.
This book contains code samples both in Visual Basic and in C#, available as separate downloads. Both downloads use the same two-level folder structure to help you locate the source code for a specifi c exercise. The fi rst-level folder refers to the chapter, such as Chapter 2, Chapter 4, and
so on. Within these folders are subfolders representing a specifi c phase of the application you will complete in the corresponding chapter.
xxxi INTRODUCTION
need to open it. Exercises that complete a series of tasks also name the folder where you can fi nd the completed sample code.
ERRATA
We make every effort to ensure that there are no errors in the text or in the code. However, no one is perfect, and mistakes do occur. If you fi nd an error in one of our books, such as a spelling mistake or a faulty piece of code, we would be very grateful for your feedback. By sending in errata, you may save another reader hours of frustration, and at the same time you will be helping us provide even higher quality information.
To fi nd the errata page for this book, go to www.wrox.com and locate the title using the Search box
or one of the title lists. Then, on the book details page, click the Book Errata link. On this page, you can view all errata that has been submitted for this book and posted by Wrox editors.
NOTE A complete book list, including links to each book’s errata, is also available at www.wrox.com/misc-pages/booklist.shtml.
If you don’t spot “your” error on the Book Errata page, go to www.wrox.com/contact/techsupport .shtml and complete the form there to send us the error you have found. We’ll check the information
and, if appropriate, post a message to the book’s errata page and fi x the problem in subsequent editions of the book.
P2P.WROX.COM
For author and peer discussion, join the P2P forums at p2p.wrox.com. The forums are a web-based
system for you to post messages relating to Wrox books and related technologies, and interact with other readers and technology users. The forums offer a subscription feature to e-mail you topics of interest of your choosing when new posts are made to the forums. Wrox authors, editors, other industry experts, and your fellow readers are present on these forums.
At p2p.wrox.com, you will fi nd a number of different forums that will help you, not only as you
read this book, but also as you develop your own applications. To join the forums, just follow these steps:
1.
Go to p2p.wrox.com and click the Register link.2.
Read the terms of use and click Agree.3.
Complete the required information to join, as well as any optional information you wish to provide, and click Submit.xxxii
Once you join, you can post new messages and respond to messages other users post. You can read messages at any time on the web. If you would like to have new messages from a particular forum e-mailed to you, click the “Subscribe to this Forum” icon by the forum name in the forum listing.
For more information about how to use the Wrox P2P, be sure to read the P2P FAQs for answers to questions about how the forum software works, as well as many common questions specifi c to P2P and Wrox books. To read the FAQs, click the FAQ link on any P2P page.
PART I
An Introduction to Visual Studio
LightSwitch
⊲
CHAPTER 1:
Prototyping and Rapid Application Development
⊲
CHAPTER 2:
Getting Started with Visual Studio LightSwitch
⊲
CHAPTER 3:
Technologies behind a LightSwitch Application
Prototyping and Rapid
Application Development
WHAT YOU WILL LEARN IN THIS CHAPTER
➤ Coping with the main challenges of line-of-business software development
➤ Understanding how application prototyping can help you cope with those challenges
➤ Understanding rapid application development, and how it is related to Visual Studio LightSwitch
Microsoft is known as a company delivering great development tools. To create data-centric applications, for a long time, Microsoft has been offering only two tools that target separate audiences:
➤ Visual Studio is to be used by a wide range of developers from students and hobbyists,
to enterprise developers and architects.
➤ Microsoft Access (a part of the Offi ce Plus bundle) provides an easy-to-use approach to
create data-centric applications for users with very basic development skills.
With Visual Studio, a wide range of applications can be created from the smallest console utilities to highly scalable web applications. The price of this freedom and scalability is that developers must invest a relatively high amount of work to create their applications. Although Visual Studio provides a number of productivity enhancement functions to create data-centric applications, using them requires advanced programming knowledge.
In contrast to Visual Studio, Microsoft Access requires only basic development skills. The simplicity of Access allows users without strong development backgrounds to create
their database tables, forms, and reports. However, the price of this simplicity is that Microsoft Access has strong architecture limitations — it supports only monolith or traditional client-server application architectures. Creating a bit more complex user interface (UI) logic or data validation with Access than the default one requires advanced programming skills.
As a member of the Visual Studio family, Visual Studio LightSwitch is a great new development tool. Microsoft developed this product especially to support rapid application development (RAD) techniques in line-of-business (LOB) application development.
LightSwitch is the golden mean between the simplicity of Access and the fl exibility of Visual Studio. With LightSwitch, you can easily create data-centric applications by simply designing data structure and the related UI. To create your own data validation or UI logic requires writing only a few lines of code — and most importantly, you not need to have advanced programming skills. Without any change in your application’s structure, you can deploy it either as a desktop application or a scalable web application in the cloud.
When you need to extend an existing LightSwitch application, you can load it into the Professional, Premium, or Ultimate editions of Visual Studio 2010, and extend it with pretty complex business logic, UI behavior, or integrate it with your own back-end systems. Of course, it requires advanced software development knowledge. But you can use the existing LightSwitch application as a springboard, and do not have to create a new one from scratch.
This chapter provides overview about application prototyping and RAD techniques. Here you will learn how these techniques can answer LOB software development challenges, and also understand how Visual Studio LightSwitch does it.
LINE-OF-BUSINESS SOFTWARE DEVELOPMENT CHALLENGES
Today, most companies cannot survive without IT infrastructure supporting their operations. For a long time, infrastructure meant only hardware, operating system, and database management systems. Later, other services such as e-mail, collaboration platforms, and systems management services became standard parts of the IT infrastructure. Today, enterprise resource planning (ERP) and customer relationship management (CRM) systems are also part of the IT infrastructure in small and medium businesses.
Although many companies use almost the same IT infrastructure in terms of operating system, database and communication platforms, ERP, CRM, and so on, they still work in different ways with those systems. They all have some unique factors that differentiate them — and their businesses — from competitors on the same market segment. To be unique in this sense, they often need specifi c software tailored to their requirements and imaginations.
Line-of-Business Software Development Challenges
❘
5LOB Software Development
There are many reasons why companies may need to develop LOB software, including the following:
➤ To create an application that meets business needs not currently met by existing systems
➤ To develop satellite applications to support existing systems
➤ To establish an ergonomic user interface (UI) for a legacy system
Traditionally, software development projects involve team members and stakeholders both from the business side and from the IT side. Generally, the business side is responsible for defi ning the business context and the issues (tasks) to be solved by the LOB application. Also, the business side undertakes managing user acceptance tests — and related quality tests — that validate the solution. The IT side is generally responsible for implementation of the LOB application, including system design, infrastructure, coding, testing, and deployment.
For some activities this division of labor is not so clear-cut. For example, in some companies web design is controlled by business stakeholders, while other companies delegate it to the IT side.
Developing LOB applications is a challenging task. Some of these challenges arise from technical or functional complexity, but the toughest ones refl ect the different mindsets of the people involved. In this chapter, you will learn ways to meet many of these challenges.
NOTE It would be far beyond the scope of one chapter, and indeed one book, to treat all of the LOB application development challenges. This chapter addresses the most signifi cant ones you are likely to experience when working within a LOB application development team — representing either the business side or the IT side.
Changing Project Environment
The traditional software development life cycle known as the waterfall model — whereby the design, implementation, test, and deployment phases follow each other without overlapping — does not work well in today’s LOB application projects. Any project that takes more than one day — and most projects (if not all) belong in this category — must meet the challenges of the continuously changing environment surrounding the project. Accordingly, the original requirements, goals, and (at the end of the day) application features change, too. These changes can be legal, political, economic, technological, human, and so on. LOB applications are similarly affected by such changes, because the business environment also undergoes continual, and often rapid, change.
Creating a Requirements Specifi cation
New LOB applications, or functional extensions of existing LOB systems, generally begin
(what the system is expected to do) and all quality requirements (performance, service level, UI, robustness, security, and so on), which form the basis for the detailed system specifi cation or system design.
NOTE Many software development methodologies and frameworks do not use the term requirement specifi cation. However, each has some artifact that outlines and describes what the sponsors and users want — whatever that artifact is called. What they share in common is the translation of a “wish list” into a detailed document or prioritized list of required features as agreed upon by members of the project team.
Creating a clear requirements specifi cation is an integral part of developing a LOB application. If this specifi cation fails to mirror the real-world expectations and uses of the application to be implemented, the result may be a poor or even useless system. In some cases, it may conform to the specifi cation but key users won’t like it. Keep in mind that stakeholders from both sides of the aisle (business and IT) generally speak separate languages. Whereas some people quickly grasp a few simple sentences, others process information using screenshots and storyboards, and still others prefer formal descriptions, such as Universal Modeling Language (UML) use cases or activity diagrams.
NOTE Unifi ed Modeling Language (UML) is a general-purpose modeling language that uses a visual model to describe a system. This model is built up from several types of diagrams that defi ne the structure and the behavior of the system. For example, the use case diagram describes the functionality (called use cases in UML) of the system by means of how users (called actors in UML) interact with them. UML was elaborated by James Rumbaugh, Grady Booch, and Ivar Jacobson. It was standardized in 1997 by the Object Management Group (OMG) consortium, and is still managed by this group.
Line-of-Business Software Development Challenges
❘
7Feedback Frequency
While a LOB application is under development, feedback from key users and business stakeholders about the burgeoning system is critical. If users see the new system only at the very end of the implementation phase, any issues or problems that are found can be time-consuming and expensive to fi x, in some cases requiring expenditures that exceed the planned budget. Conversely, if key users want to see the new system’s progress every day, that can cause a lot of overhead for development and support.
NOTE Not the range, but the content of a requirement specifi cation makes it useful or useless. A good specifi cation describes both functional requirements (what functions the system has) and quality requirements (how the function should work by means of performance, reliability, user friendliness, and so on). Defi ning requirements with measurable expectations (“. . . this function must retrieve the results in 2 seconds . . .”) and using prioritization to separate critical functionality from nice-to-have also adds value to the specifi cation.
NOTE Problems found after the implementation phases of a project often refl ect an ambiguous requirements specifi cation and/or false assumptions regarding the application’s usability.
NOTE Don’t underestimate the importance of fi nding the right feedback frequency, which can be a lifesaver. Especially for long and complex projects, using Visual Studio LightSwitch can signifi cantly help you to communicate your ideas and understanding of LOB application requirements — as you will see after completing Part I of this book.
Finding the right balance for feedback frequency is a challenge whose solution will vary according to the project. For some projects, three days or a week might be fi ne, whereas several weeks might be optimal for others.
You can even vary how often you provide feedback to your users. At the beginning (during the conception phase or while designing the application), it might be appropriate to communicate progress every few days. In some cases, you can even carry out a feedback cycle within one day.
For example, in a morning meeting, you might ask key users for feedback about a new screen issued the previous day. In the afternoon, you could present how you plan to address that feedback. Later, after implementing the desired feature(s), you could ease the initial frequency. When you are about to prepare for a pilot deployment or the production deployment, feedback frequency should again be increased.
APPLICATION PROTOTYPING
There are many ways to manage the challenges mentioned previously and mitigate the risks
associated with them. The goal is to prevent risks that result from wrong information or insuffi cient information. For example, if an order management process is not entirely clear because you do not know the CRM system that stores customer information, the lack of this information is a risk. Similarly, not knowing all the attributes that should be entered for a new order is also a risk.
Application prototyping is a tool for managing such situations — and many challenges related to the human factor — as well as mitigating associated risks. While it is not the only tool, it is one of the best.
Prototyping, and the resulting application prototype, is defi ned in various ways. The essence of prototyping is the creation of a functional, and perhaps somewhat limited, model of the fi nal application. Unlike specifi cation and design documents that use literal or formal descriptions, this working model can be readily understood by key users.
For example, try to explain a UML user activity diagram to key users! Even if they understand it, they cannot truly appreciate how it will be implemented. Conversely, if you create a prototype of the activity, such as an order process, using a storyboard that represents the same UML diagram, users will have a greater level of confi dence that the fi nal product will be the right one.
You can also use application prototyping to obtain required information from users in an indirect way. If users are unable to clearly explain exactly what they want — which is not uncommon — you can create a prototype that implements an incomplete, or even obviously inferior, model. When you present such a prototype to key users, they can usually tell you what’s wrong with it immediately, or what’s missing.
The rest of this section describes the various kinds of prototypes you can use. Depending on your goals — that is, what you want to communicate — you might use one or more on a single LOB project.
Wireframe Models
Application Prototyping
❘
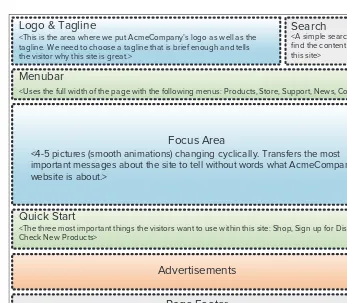
9Note the simplicity of this wireframe. It does not contain a high-level, sophisticated design because its aim is not to present the graphical look of the home page but rather to enable key users to focus on its structure and elements. The colors used in this wireframe are just for separating layout segments visually; they are not the real colors to be used in the fi nal design.
You may be wondering why it is useful to create a wireframe instead of a model that more closely resembles the fi nal state of the home page. Wireframe models offer a few advantages over more detailed prototypes, including the following:
➤ They are relatively cheap to create. Even a whiteboard can be used to create them. Using
wireframes, you can save time and the expense of creating possible unsuitable UI models.
➤ You can give a wireframe to key users and they will quickly have a basic understanding of
your intention. If something is wrong, it can be corrected instantly.
➤ When you present a graphically designed home page prototype to users, their attention is
focused on the style of the page — the logo used, the font type, and so on — instead of the structure of the page. Of course, later you must present them with the graphical design. But fi rst the structure should be grabbed.
Advertisements Logo & Tagline
<This is the area where we put AcmeCompany’s logo as well as the tagline. We need to choose a tagline that is brief enough and tells the visitor why this site is great.>
Search
<A simple search box to find the content within this site>
Menubar
<Uses the full width of the page with the following menus: Products, Store, Support, News, Company>
Focus Area
<4-5 pictures (smooth animations) changing cyclically. Transfers the most important messages about the site to tell without words what AcmeCompany’s website is about.>
Quick Start
<The three most important things the visitors want to use within this site: Shop, Sign up for Discount, Check New Products>
Page Footer
<Disclaimer, copyright, contact, and other “compulsory dances”>
➤ A wireframe is also a good start for the fi nal web design, because it relays a lot of
information about the intentions of key users that is useful to the experts who create the graphical design.
Proof-of-Concept Models
For any project, any piece of information you are lacking is a source of risk. If you are unsure how to carry out any of the tasks in your to-do list, then that is also a source of risk. In situations where you know what you are expected to do, but not how you do it, you need to do some research.
A great method for performing this research is to use a prototyping technique called proof-of-concept modeling. Instead of thinking and making plans about how to solve a specifi c issue, you build a very simplifi ed working model to prove the feasibility of your idea. If that is usable, you can use this model later, of course, with the necessary modifi cations. This model is called “proof-of-concept” because it can either confi rm that your hypothetical solution works or disprove its viability.
NOTE Let’s assume you need to implement rapid search functionality for customers. Instead of the traditional approach whereby users type a part of the customer name and click a button to retrieve a list of matching customers, you need the capability to repeatedly reduce the number of matching names as users enter additional letters in the search box. You may assume you can do this but you cannot be completely sure. However, building a simple proof-of-concept model may help you. This precludes guessing whether you can meet this challenge, and it provides the information you need to plan how you’ll implement the fi nal function.
Low-Fidelity Prototypes
In some situations, you cannot avoid implementing parts of the growing application in order to communicate how they work and what they do. Wireframes can indicate the layout of a particular UI, and proof-of-concept models implement a very simple (and probably only technical) aspect of the same UI.
If key users need more information to understand the solution you plan to provide them, you may need to create working prototypes that can be used to demonstrate and test your ideas. These working parts are not simple models, but real applications. In many cases, you can create a low-fi delity prototype that is sketchy and incomplete but represents the main characteristics of the target function.
Rapid Application Development
❘
11Because this prototype focuses on the process, you can create only a sketchy UI with a very basic design and a draft layout. Moreover, it does not have to deal with authentication, business logic parameterization, or any other things that are not closely related to the workfl ow.
High-Fidelity Prototypes
In some situations, you must create a high-fi delity prototype that provides much more detail about the intended functionality, and serves as evidence that the functionality can be carried out in the outlined way.
Returning to the low-fi delity order entry example, you may be asked to demonstrate this function in more detail. In this case, your prototype should not only mimic accessing the back-end systems, but also use them to retrieve and check customers from the CRM, and return the entered order to the queue of the ERP system. In addition, the sales department would like to ensure that the UI of the workfl ow is intuitive and provides a great user experience.
In this case, you could implement a high-fi delity prototype that is very close to the fi nal solution.
NOTE With the help of Visual Studio LightSwitch, you can create both low-fi delity and high-low-fi delity models easily.
NOTE This book does not cover individual software development methodologies, so if you want more details about these RAD technologies, use your search engine of choice to search online for more information.
RAPID APPLICATION DEVELOPMENT
Rapid application development (RAD) is a software development methodology that uses minimal planning and rapid prototyping, rather than thorough application design and waterfall-like models. The planning of the software using the RAD approach is generally interleaved with the coding — or implementation — phase of the software. This approach is very useful, because it enables software to be developed much faster — and makes it easier to accommodate the continuously changing project environment than waterfall-like models do.
The term “rapid application development” was introduced in 1991 by James Martin, who used it to describe a software development process that emphasizes an iterative approach to the whole construction phase, and handles prototypes as fi rst-class citizens of the implementation process.
The main strength of the RAD approach is that you can avoid a vast amount of rework in your software development projects. Rework most often occurs in the following two cases:
➤ You implement a piece of software in a wrong way, or with poor quality. In this case, you
must spend resources to fi x development issues.
➤ You implement a wrong piece of software — not the one expected by its key users, but
something else. In this case, you must recreate the particular piece from the beginning.
Of course, RAD and other agile software development methodologies do not prevent you from making poor quality (or buggy) software. However, they can help you mitigate the risk of constructing a wrong piece of software. By building a prototype, you can verify that you are building the right functionality according to the right quality expectations — in other words, the product your key users want. While some rework may be required when you need to prepare a new prototype to replace a faulty one, this rework still costs less than recreating from scratch a software module that is intended to be a fi nal product.
In some situations the RAD approach of making prototypes does not add much value to your development process. When your specifi cation is very detailed, and you do not have signifi cant technology risks (because you can handle them routinely), you can start implementing fi nal products instead of prototypes.
RAD Tools
Today, practically all development tools and environments support the RAD approach. All tools promise to provide functions that help you to be agile and productive. Some of them add new visual design features to enhance manual code writing. Others use code libraries that dramatically reduce the length of source code. Several tools use wizards that lead you through a complex process. As technology evolves, developers expect increasingly sophisticated features from a RAD tool. While today the expectations are very high, this has not always been the case.
The following sections look at a few tools that are good examples of how RAD was implemented a few years ago.
Visual Basic
Visual Basic 1.0 (released in May 1991) was the fi rst RAD tool for the Windows platform. For a long time, Windows development was a fi eld on which only C and C++ programmers could play. The smallest “Hello, World” program for Windows was about 100 lines of code, whereas the statements to actually print out the “Hello, World” text required only about a dozen lines.
Visual Basic 1.0 took the development community by storm, and totally changed the programming model from code-oriented development to UI-oriented development. Whereas C and C++ programmers used resource fi les to describe the UI, Visual Basic invented the concepts of forms, controls, and visual GUI construction. The reusability and extensibility of forms and controls was a main design goal in Visual Basic. Developers could create their own custom controls using generic — or, conversely, application specifi c — properties and methods.
From a developer’s point of view, Visual Basic was a real RAD tool. Developers could drag
Rapid Application Development
❘
13position. The behavior of controls could be changed by setting up the properties of visual elements. Forms and their controls had events represented by methods, with which programmers could code the logic of the application.
Visual Basic has evolved a lot since then, but using current development tools (such as Visual Studio), you can recognize that the elements of the integrated development environment (IDE) still resemble those used in the old versions. Figure 1-2 shows a screenshot from an old Visual Basic version running under Windows 95.
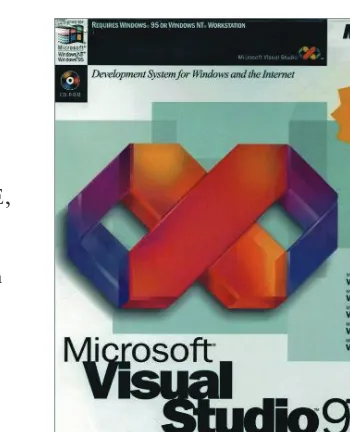
Microsoft Access
Microsoft Access 1.0 was released in November 1992. It offered a relational database management system (RDBMS) for desktop applications — combined with a graphical user interface (GUI) and great visual tools. Developers could easily design database schemas, enter data with simple forms, and create reports. They could use the Visual Basic programming language (VBA, which was included with the product) to add code and create real applications for end-users.
Figure 1-3 shows the database window of the Northwind sample application in Microsoft Access 97.
Originally, Access used its own database engine — called Microsoft Jet Database Engine — but after the release of version 2.0, it could use external database tables. Microsoft Access 2000 allowed developers to work directly with SQL Server databases.
Access was — and still is — a great RAD tool. It lowered the entry barrier to relational database programming. While creating applications for most RDBMSs required a set of applications using several tools and programming languages, with Access it was much simpler and quicker.
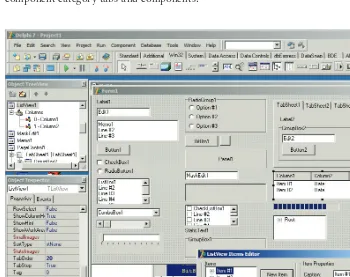
Delphi
Delphi was originally developed by Borland, and its fi rst version was released in 1995. This tool had an IDE that was very similar to the Visual Basic IDE. Delphi was designed to be a RAD tool that supported developing database applications, including simple ones and even enterprise applications.
FIGURE 1-2: An old Visual Basic IDE running under Windows 95
It used the Object Pascal language — a successor of Turbo Pascal — which provided full object-oriented programming (OOP) capabilities, in contrast to Visual Basic.
The product evolved very fast with fi ve versions released in the fi rst fi ve years of its life. Delphi was the fi rst RAD tool capable of compiling 32-bit applications for Windows. It became very popular among enterprise developers because of its RAD features. It provided more than 100 components (elements of the Delphi Visual Component Library) that developers could immediately drop onto the Designer surface. In addition, developers could easily create their own visual components, and add them to the existing library.
NOTE At the time, Visual Basic also provided a separate control development SDK that made it possible to create additional components called custom controls. However, Delphi off ered a very intuitive and much faster way to develop controls, because the IDE was designed with component reusability in mind.
Figure 1-4 shows the Delphi 7 IDE. The largest part of the toolbar at the top of the IDE contains component category tabs and components.
Summary
❘
15Visual Studio LightSwitch and RAD
Visual Studio LightSwitch is the newest member of the Visual Studio family. Like Visual Basic, Microsoft Access, and Delphi, it is a RAD tool; but as its name suggests, it aims to make the development of LOB applications as easy as fl ipping a switch.
Most RAD tools are development environments made for programmers, and they provide productivity tools that enable the faster creation of applications. Visual Basic and Delphi are defi nitely such tools. Microsoft Access is a bit different in that it is not a generic development tool, but rather is intended for creating database applications for the desktop.
Visual Studio LightSwitch is a RAD tool that makes data-centric LOB application development available not only for developers, but also for business analysts, consultants, and IT experts working on business projects. As suggested earlier, “LightSwitch” in the name of the new product symbolizes how easy it is to create LOB applications.
In contrast to RAD tools like Visual Studio or Delphi, LightSwitch is designed to support prototyping with a minimal amount of coding — or no coding at all. Compared to the data-centric RAD style offered by Microsoft Access, which supports the traditional client-server separation of application layers, LightSwitch provides a clean and very sophisticated three-tier application architecture, and takes care of all the plumbing that binds the layers into a working application. With Visual Studio LightSwitch, you can create complete LOB applications, as well as low-fi delity or high-fi delity application prototypes.
In the following three chapters, you will learn about the fundamentals of LightSwitch and get a taste of this great tool. Chapter 2 focuses on the fi rst steps to getting started with the product, while Chapter 3 treats the key technologies behind LightSwitch. You have several ways to customize your prototypes built with LightSwitch, as Chapter 4 demonstrates.
SUMMARY
Writing LOB applications has many challenges — mostly related to specifi cations and
communication among the members of the development team. Projects that cannot meet these challenges can easily fail.
One of the main development challenges is addressing the often unclear or unspoken expectations of key users. Key users can rarely tell you their exact expectations, either because they are unable to communicate exactly what kind of functionality they expect or they are unsure how to use a certain business function.
Prototyping (that is, developing a working model to test ideas and feasibility) is a great technique to overcome these situations. Depending on your particular scenario, you can use several kinds of prototypes, including wireframes, low-fi delity and high-fi delity prototypes, or proof-of-concept models, to bridge the sea of missing information or clear communication between key users and the software construction team.
In Chapter 2, you’ll extend your knowledge about the role of LightSwitch among the members of the Visual Studio family. You will learn both how to install LightSwitch and how to create your fi rst application — without writing any lines of code.
EXERCISES
1.
Enumerate and explain a few challenges of LOB application development with regard to the human factor.2.
Explain what a wireframe is.3.
Explain what a proof-of-concept model is.4.
What is the fundamental principle of rapid application development (RAD)?5.
List a few methodologies that are based on the RAD principle.Summary
❘
17⊲ WHAT YOU LEARNED IN THIS CHAPTER
TOPIC KEY CONCEPTS
Line-of-business (LOB) application
A LOB application participates in managing the business processes of an organization.
Challenge of changing project environment
The environment of a project (one with the duration of several weeks, months, or even years) changes. Project planning must be undertaken with possible changes (legal, political, economic, human, technological, and so on) kept in mind.
Challenge of feedback frequency
Both developers and key users need feedback from each other during a LOB development project to mutually confi rm that the right functionality is about to be implemented in the right way. Finding the optimal frequency for this feedback is essential to the project’s success.
Wireframe A wireframe is a prototype that depicts the layout of the fundamental elements in the user interface (UI). It emphasizes structure over graphical design.
Proof-of-concept model A proof-of-concept model is a working prototype that can be used to check the feasibility of an idea. It focuses on the technical details to be checked, without implementing other application details.
Rapid application development (RAD)
Rapid application development (RAD) is a software development