Early Praise for
Mac Kung Fu, Second Edition
Keir Thomas has compiled one of the most useful and interesting assembly of Mac tips and tricks available today. Packed with how-to insights and easy-to-follow steps, Mac Kung Fu, Second Edition is a knowledgeable guide to have by your side every step of the way.
➤ Mike Riley
Advanced technologist and author of Programming Your Home
Mac Kung Fu, Second Edition contains a plethora of excellent Mac advice. It is accessible to new users, and even experienced Mac enthusiasts will find ways to make their lives simpler and more efficient.
➤ Loren Sands-Ramshaw
Orglist
All levels of Mac users will enjoy this book. I particularly like the types of tips that the book offers that boost productivity, customize the working environment, and just make using a Mac more fun!
➤ Fred Daoud
Mac Kung Fu
Over 400 Tips, Tricks,
Hints, and Hacks
for Apple OS X
Keir Thomas
Many of the designations used by manufacturers and sellers to distinguish their products are claimed as trademarks. Where those designations appear in this book, and The Pragmatic Programmers, LLC was aware of a trademark claim, the designations have been printed in initial capital letters or in all capitals. The Pragmatic Starter Kit, The Pragmatic Programmer, Pragmatic Programming, Pragmatic Bookshelf, PragProg and the linking g device are trade-marks of The Pragmatic Programmers, LLC.
Every precaution was taken in the preparation of this book. However, the publisher assumes no responsibility for errors or omissions, or for damages that may result from the use of information (including program listings) contained herein.
Our Pragmatic courses, workshops, and other products can help you and your team create better software and have more fun. For more information, as well as the latest Pragmatic titles, please visit us at http://pragprog.com.
The team that produced this book includes:
Jackie Carter (editor)
Potomac Indexing, LLC (indexer) Kim Wimpsett (copyeditor) David J Kelly (typesetter) Janet Furlow (producer) Juliet Benda (rights) Ellie Callahan (support)
Copyright © 2012 The Pragmatic Programmers, LLC. All rights reserved.
No part of this publication may be reproduced, stored in a retrieval system, or transmitted, in any form, or by any means, electronic, mechanical, photocopying, recording, or otherwise, without the prior consent of the publisher.
Printed in the United States of America. ISBN-13: 978-1-937785-07-9
Contents
Acknowledgments . . . xvii
Preface . . . xix
1. Getting the Most from the Tips . . . 1
Activating Secret Settings via Typed Commands 1
1.1
1.2 Using the Apple and Application Menus 2
1.3 Making a Time Machine Backup 2
1.4 Using the Mouse or Trackpad 2
1.5 Having an Admin Account 3
1.6 Logging Out and Back In 3
1.7 Using Program Windows 3
1.8 Using the Mac Keyboard and Shortcuts 5
2. The Tips . . . 9
Tip 1. Make Launchpad Bigger (or Smaller) 9
Tip 2. Turn Off Irritating “Rubber-Band” Scrolling 11
Tip 3. Stop Scrollbars from Disappearing 12
Tip 4. Make Your Mac Speak with Siri’s Voice 13
Tip 5. Supertip: Dictate Like a Pro 14
Tip 6. Get Rid of Files—Securely 16
Tip 7. Auto-answer FaceTime Calls 20
Tip 8. Instantly Add Movies and Music to iTunes 21
Tip 9. Be a Messages App Keyboard Wizard 22
Tip 10. Store Absolutely Any File in iCloud 23
Tip 11. Use a Secret, Alternative Cut and Paste 24
Tip 12. Correct Misspellings or Typos Without the Mouse 25
Tip 13. Create iCloud Folders 25
Tip 14. See What Folders You’ve Accessed Recently 26
Tip 15. See Bluetooth Signal Strength 26
Tip 17. Create Reminders Ultra-Quickly 29
Tip 18. Right-Click to Share Anything 32
Tip 19. View Safari’s Google History 32
Tip 20. Open a Link Displayed in Terminal 33
Tip 21. Get Back “Save As” 33
Tip 22. Quickly Navigate Launchpad 35
Tip 23. Turn Off Notifications with a Single Click 36
Tip 24. Increase Settings in Micro-Increments 36
Tip 25. Access (and Back Up) All iCloud Documents 36
Tip 26. Sleep Your Mac with a Remote 38
Tip 27. Restart a Jammed Finder 39
Tip 28. Quickly Get Documents into (and out of) iCloud 39
Tip 29. Master Quick Look’s Full-Screen Feature 40
Tip 30. Put Notes and Sticky Notes on Top 41
Tip 31. Don’t Delete Files When Copying 42
Tip 32. Add Your Choice of Search Engine 42
Tip 33. Forward Only a Mail’s Attachment 44
Tip 34. Quickly Add to Safari’s Reading List 45
Tip 35. Get Complex Multiple-Display Setups 45
Tip 36. Turn a Movie Into a TV Show 46
Tip 37. See Where You’re Browsing in Terminal 46
Tip 38. Ultra-Quickly See an App’s Open Files 47
Tip 39. Use Half-Star Ratings in iTunes 47
Tip 40. Switch Locations in Terminal via Drag and Drop 49
Tip 41. Timestamp Zip Filenames 49
Tip 42. Copy Better in Mail 50
Tip 43. Instantly Rename Safari Bookmarks 50
Tip 44. Spruce Up Terminal 51
Tip 45. Turn Off Trash Sound Effects 51
Tip 46. Get Handy When Formatting Text 52
Tip 47. Get Photo Stream Pictures via Finder 53
Tip 48. Avoid Notifications 54
Tip 49. Use Fancy Text in Mail Signatures 55
Tip 50. Install Any App Without Being Blocked 55
Tip 51. Browse Back via the Keyboard in Safari 56
Tip 52. Quickly Switch Audio Output (Including AirPlay) 57
Tip 53. Stop Apps from Auto-Quitting 58
Tip 54. Turn Off “Smooth Scrolling” 58
Tip 55. Save Safari Tabs When Quitting 59
Tip 56. Jump to the Top of Your Emails 60
Tip 57. Type Weird Characters Ultra-Quickly 60
Tip 58. Turn Your Mac Into a Surveillance Camera 63
Tip 59. Modify Messages’ Look and Feel 65
Tip 60. Use Your Own Choice of Notes Font 65
Tip 61. Duplicate a File with One Click 68
Tip 62. Share Google Links 68
Tip 63. Master Notification Center 69
Tip 64. Switch Time Machine Disks 70
Tip 65. Share Reminders and Calendars 71
Tip 66. Update Your Profile Pic 74
Tip 67. See Your Mac’s Serial Number 74
Tip 68. Use a VIP Mailbox 75
Tip 69. Supertip: Get the Most from Reminders 76
Tip 70. Turn Off Java 80
Tip 71. Notify from the Command Line 80
Tip 72. Stop the Dock from Getting Broken 81
Tip 73. Control QuickTime Player Using Keys 81
Tip 74. Let OS X Create Passwords 82
Tip 75. Prefer Plain-Text Emails 83
Tip 76. See a Big Long List of Your Contacts 84
Tip 77. Type into PDFs 85
Tip 78. Play Ripped DVD Backups 85
Tip 79. Link to Emails in Notes/Stickies/Docs 86
Tip 80. When Did I Make That Sticky? 86
Tip 81. Use Facebook Chat 87
Tip 82. Preview Widgets 88
Tip 83. Create a “Drives” Stack 89
Tip 84. Calculate All File Sizes 90
Tip 85. Quickly Switch Calculator Modes 90
Tip 86. Add Your Contacts’ Websites to Safari 91
Tip 87. Import Twitter or Facebook Contacts 91
Tip 88. Email Web Pages in a Simple Layout 92
Tip 89. Quickly Send Files to an iPhone or iPad 93
Tip 90. Use Time Machine with iCloud 94
Tip 91. Find Docs by Zooming 95
Tip 92. Share via Twitter or Facebook with a Keystroke 96
Tip 93. Stop iCloud from Being the Default 97
Tip 94. Export in More Formats via Preview 98
Tip 95. Supertip: Get the Most from QuickTime Player 98
Tip 97. Turn Off Annoying Special Effects 101
Tip 98. Start Apps Without the Mouse 104
Tip 99. Select Text In Quick Look 105
Tip 100. Resize Windows Easily 106
Tip 101. Get to the Dock in a Full-Screen App 107
Tip 102. Play Sounds When Certain Mail Arrives 108
Tip 103. Migrate from Outlook to Calendar 109
Tip 104. Stop iTunes from Adding Track Numbers 109
Tip 105. Switch Desktop Space Ultra-Quickly 110
Tip 106. Protect USB Memory Sticks 111
Tip 107. Find Out Where Your Wallpaper Lives 115
Tip 108. Summarize Any Document 115
Tip 109. Activate Stacks and Mission Control by a Gesture 116
Tip 110. Quickly Create a List of Files 117
Tip 111. Supertip: Take Control of Scrolling 117
Tip 112. Turn a Small Keyboard into a Big One 120
Tip 113. Fix Ugly Fonts 120
Tip 114. Type Symbols and Diacritical Characters 121
Tip 115. Rename Hundreds of Photos 124
Tip 116. Personalize Every Icon 127
Tip 117. Bring Widgets to the Desktop 128
Tip 118. Discover Software Version Numbers 130
Tip 119. Use a Screensaver as a Desktop Background 130
Tip 120. Add Folders of Wallpaper Images 131
Tip 121. Put Notebooks in Deep Sleep 132
Tip 122. Fix a Slow Boot 133
Tip 123. Know Exactly Where You Are 134
Tip 124. Tweak Launchpad Visual Effects 135
Tip 125. Create “Crazy” Emails 136
Tip 126. Secure All Your Files Against Hackers 137
Tip 127. See Every Wi-Fi Detail 140
Tip 128. Make Launchpad a Personalized App Launcher 142
Tip 129. Supertip: Get the Most from Spotlight 144
Tip 130. View a Quick Calendar 147
Tip 131. Add Magical Links for Email, Messages, Web, and
More 148
Tip 132. Stop Notes from Being Yellow 150
Tip 133. Simulate an iPhone or iPad 152
Tip 134. Control Start-up Apps 153
Tip 135. Watch CPU Load and Activity 154
Tip 136. Create Doc Templates and Boilerplate Text 155
Tip 137. Create an Event from an Email or Web Page 156
Tip 138. Keep Your Mac Wide Awake 158
Tip 139. Stress Test Your Mac’s Memory 158
Tip 140. Create an Install and Recovery Stick 160
Tip 141. Recover Crashes and Lock-Ups 165
Tip 142. Share Your Contacts with Others 165
Tip 143. Set Your IM Status—Even If Messages Isn’t Running 166
Tip 144. Change Fonts Used in Finder 167
Tip 145. Stress Test Your Mac’s CPU 168
Tip 146. Find Files by Tagging Them 170
Tip 147. Bring Back the Library 171
Tip 148. Add Cool Visual Effects to Stacks 172
Tip 149. Always See File Info 174
Tip 150. Create One-Click Shortcuts 174
Tip 151. Quickly Move Toolbar Icons 175
Tip 152. Delete iCloud Files (Without Going Insane) 175
Tip 153. Shrink PDF Files 176
Tip 154. Turn On Key Repeat 176
Tip 155. Save Text Snippets 177
Tip 156. Hide Files 178
Tip 157. Supertip: Make Better Screenshots 180
Tip 158. Set Movie Thumbnails 182
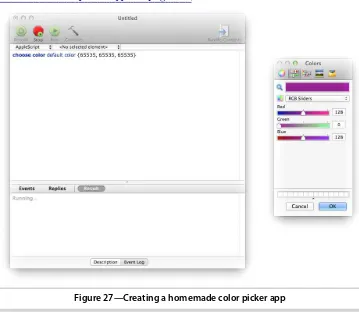
Tip 159. Create a Clever Color Picker 182
Tip 160. Back Up Without a Time Machine Disk 185
Tip 161. Make the Dock Really, Really Small 186
Tip 162. Get a Better Stack List 187
Tip 163. Supertip: Make Finder Your Hub 189
Tip 164. Hide Every Single Window 190
Tip 165. Work Better with Column View 190
Tip 166. Maximize iTunes Windows 191
Tip 167. See All Your Mac Knows About Somebody 192
Tip 168. Print Wall Calendars 192
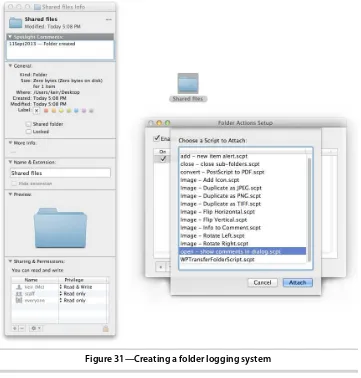
Tip 169. Keep a Folder Update Log 193
Tip 170. Start Terminal in an Instant 195
Tip 171. Enable Apache and PHP 195
Tip 172. Change Preview Markup Colors 197
Tip 173. Download Files Fuss-Free 197
Tip 174. Hide a File from Spotlight 198
Tip 176. Calm a Bouncing Dock Icon 199
Tip 177. Spawn New Finder Windows 200
Tip 178. Pool Printers for Quick Printing 200
Tip 179. View Photo or Movie’s Hidden Info 201
Tip 180. Supertip: Be a Quick Look Power User 202
Tip 181. Print via Drag and Drop 205
Tip 182. Be Ultra-Accurate with Spotlight 206
Tip 183. Jump Between Views in Finder 209
Tip 184. Reset Hardware Settings 209
Tip 185. Force-Open a Document 210
Tip 186. See What Free Disk Space There Is 212
Tip 187. Find Forgotten Passwords 212
Tip 188. Get the Size of Multiple Files 213
Tip 189. Manage Projects with Colors 213
Tip 190. Make Movies, Screencasts, and Podcasts 214
Tip 191. Print from Finder 216
Tip 192. Add an Eject Button 216
Tip 193. Access Hidden Menu Options 217
Tip 194. Instantly Search Google 218
Tip 195. Enhance Your Login Picture with Visual Effects 218
Tip 196. Make the Mouse Cursor Big 220
Tip 197. View a Cover Flow of Calendar Events 220
Tip 198. Supertip: Application Switching 221
Tip 199. Lock Files for Safety 222
Tip 200. Correct Your Mac’s Dictionary 224
Tip 201. Make the Volume Ultra-Quiet 225
Tip 202. View Application Icons Close-Up 225
Tip 203. Hack Dashboard/Mission Control Backgrounds 227
Tip 204. View Tech Info When Logging In 229
Tip 205. Send Somebody a Listing of your Forthcoming
Events 230
Tip 206. Boot via an Apple Remote 231
Tip 207. Organize Mail by Color Schemes 231
Tip 208. Stop Automatic File Opening 232
Tip 209. Create Encrypted Archives for All Computers 234
Tip 210. Look Up Words Instantly 237
Tip 211. Turn Off Download “Quarantining” 238
Tip 212. Where Does This File Live? 240
Tip 213. Cut Rather Than Copy Files 240
Tip 214. Avoid the Spring-Load Wait 241
Tip 215. Print Envelopes 242
Tip 216. Turn Off Drag and Drop 242
Tip 217. Quickly Upload Files Using Safari 243
Tip 218. Map an Address You’ve Been Sent 243
Tip 219. Install Apps on All Your Macs 244
Tip 220. Move the Cursor When Using Page Up/Page Down 244
Tip 221. Jump Around Open/Save Dialog Boxes 245
Tip 222. Regain Control of a Crashed Mac 245
Tip 223. Turn a Clipboard Image into a File 246
Tip 224. Leap Around the Desktop via the Keyboard 247
Tip 225. Make Email Desktop Shortcuts 247
Tip 226. Check Your Mac’s Warranty 248
Tip 227. Secure Your Mac by Locking It 249
Tip 228. Switch Which App Edits a File You’re Working On 250
Tip 229. Supertip: Take Control of PDFs 252
Tip 230. Edit Movies 255
Tip 231. Eject a Stuck CD/DVD Disc 257
Tip 232. Cue Through Movies Using Your Fingertips 257
Tip 233. Take a Picture of the Screen 258
Tip 234. Ignore a Software Update 259
Tip 235. Generate Font Samples 260
Tip 236. Send iMessages from Within Contacts 262
Tip 237. Instantly View a Command’s Man Page 262
Tip 238. Autocomplete Words 262
Tip 239. Make the Dock Show Only Running Programs 264
Tip 240. Create a “Recent Items” Stack 265
Tip 241. Personalize the Mission Control Highlight 266
Tip 242. Fix Broken Passwords 267
Tip 243. Turn Off the Desktop 268
Tip 244. Get Quick Access to System Preferences 270
Tip 245. Temporarily Toggle Dock Magnification 271
Tip 246. Remove System Preferences Icons 271
Tip 247. Speed Up Slow PDFs 272
Tip 248. Turn Off Mail Sounds 273
Tip 249. Supertip: Take Control of Zip Files 274
Tip 250. Take Better Snapshots 277
Tip 251. Select Text like a Pro 277
Tip 252. Create Cool Dock Stacks 278
Tip 253. Clean Caches for Smooth Running 280
Tip 255. Open a Terminal Window Where You’re Browsing 282
Tip 256. See Mini-Calendars in the Calendar App 283
Tip 257. Install Only Printer Drivers and Not Their Add-Ins 283
Tip 258. Reveal the Desktop 284
Tip 259. Avoid Trackpad Confusion When a Mouse Is Used 284
Tip 260. Send Somebody an App Link 285
Tip 261. Copy Calculator Results 285
Tip 262. Bookmark Images and PDFs 286
Tip 263. Manually Manage Software Updates 287
Tip 264. Add Blank Spaces to the Dock 288
Tip 265. Work with Background Windows 289
Tip 266. Find Files Created Today or Yesterday (and More) 290
Tip 267. Download Any File via Safari 291
Tip 268. View Two Weeks of Appointments 291
Tip 269. Scrap the Mac Start-up Chime 292
Tip 270. Supertip: Be a Mission Control Power User 294
Tip 271. Switch Between App Windows 296
Tip 272. Zoom Into the Desktop 296
Tip 273. Quickly Rename a File 297
Tip 274. Sleep Hard Disks Sooner 297
Tip 275. Force a File to be Found via Spotlight 298
Tip 276. Turn Off New Time Machine Disk Requests 299
Tip 277. Add Your Own System Sounds 299
Tip 278. Bulk Shrink, Rotate, or Flip Pictures in Preview 302
Tip 279. Know When It’s Read-Only 303
Tip 280. Quickly Email Text or Pics 304
Tip 281. Quickly Create a New Sticky Note 304
Tip 282. Open Finder When Saving or Opening Files 305
Tip 283. Rename Sidebar Folders 305
Tip 284. Choose Music—Via a Screensaver 306
Tip 285. Know Whether a PDF Is Multipage at a Glance 306
Tip 286. Grab Photos and Movies from Your iPhone/iPad 306
Tip 287. Copy Web Pages to Disk 307
Tip 288. Recycle Your Apple Hardware (and Get Paid!) 308
Tip 289. Make Calendar Appointment Times Shorter 309
Tip 290. Make Your Mac Speak 310
Tip 291. Get the Most from the Mac Dictionary App 311
Tip 292. Scroll Finder Windows Better 312
Tip 293. See Numbers in Huge Type for Easy Jotting 312
Tip 294. Always See Expanded Save Dialogs 313
Tip 295. Check Your Grammar as You Type 314
Tip 296. Cancel Dialog Boxes Instantly 316
Tip 297. Supertip: Tweak the Dock’s Look and Feel 316
Tip 298. Add Sketches to PDFs 318
Tip 299. Prune the Right-Click Menu 318
Tip 300. Quit Finder 319
Tip 301. Undo File Operations 320
Tip 302. Make a New Folder from Some Files 320
Tip 303. Align Desktop Icons When Dragging 320
Tip 304. See OS X Animations in Slow Motion 321
Tip 305. Know Which Apps Are Hidden in the Dock 321
Tip 306. Cancel Drag and Drop Mid-Move 322
Tip 307. Make Time Machine Forget a File 322
Tip 308. Use Multiple Twitter Accounts 324
Tip 309. Connect to Stubborn Shared Folders or Servers 324
Tip 310. View Another Country’s App Store 325
Tip 311. Record Your Terminal Work 326
Tip 312. Avoid Cluttering Network Shares with .DS_store Files 326
Tip 313. Access a Secret Dock Visual Effect 327
Tip 314. Get Better Trackpad Right-Clicking 328
Tip 315. Convert Images into a PDF 329
Tip 316. Make Only One Program Window Visible at a Time 329
Tip 317. Add the Trash to Finder 330
Tip 318. Save a Movie’s Audio 331
Tip 319. Save PDFs Automatically to a Folder 331
Tip 320. Copy and Paste Without the Formatting 333
Tip 321. Create Secure Notes 333
Tip 322. Make Use of Boot-Time Options 335
Tip 323. Make a “Quit All” App 336
Tip 324. Upgrade RAM 337
Tip 325. Start GUI Apps from the Command Line 338
Tip 326. Quickly Turn Emails into Docs 339
Tip 327. Search Spotlight from Terminal 340
Tip 328. Enable the Root User 340
Tip 329. Wake Your MacBook If the Power Is Attached 342
Tip 330. Pass Command-Line Output to GUI Apps 342
Tip 331. Supertip: Turn Off OS X Features 344
Tip 332. Use Option or Command for Shortcuts 348
Tip 333. Use a Gesture to See App Windows 348
Tip 335. Re-create the Dock from Scratch 349
Tip 336. Reorder the “Menulets” 349
Tip 337. Wake Troublesome Macs 350
Tip 338. View the True Size of an Image 350
Tip 339. Convert Audio and Video Files 351
Tip 340. Extend Quick Look’s File Knowledge 352
Tip 341. Use a Hidden Stacks Animation 352
Tip 342. Google Highlighted Text 353
Tip 343. Use a Secret Gesture to Switch Spaces 353
Tip 344. Find Out Where a File Came From 354
Tip 345. Create a Login Message 354
Tip 346. Use the “Linen” Background on the Desktop 356
Tip 347. Start Time Machine at the Command Line 356
Tip 348. Repair Disk Problems 357
Tip 349. Tear Off Tabs 359
Tip 350. Move Time Machine to a Larger Disk 359
Tip 351. Let Spotlight Search More Files 361
Tip 352. Supertip: Optimize Screen Sharing 362
Tip 353. Diagnose Network Problems 367
Tip 354. Create Font Families 368
Tip 355. Speed Up Making SSH/SFTP/FTP Connections 369
Tip 356. Add Your Signature to Docs 370
Tip 357. Speed Up Mail 372
Tip 358. Search for System Files 372
Tip 359. Set the Default Operating System 374
Tip 360. Dump a Snapshot of Your Mac 374
Tip 361. Search for Carriage Returns and Tabs 375
Tip 362. Work Better in Sunlight 375
Tip 363. Be Clever in Open/Save Dialog Boxes 376
Tip 364. Make Terminal Delete Words Like Other OS X Apps 376
Tip 365. Whiz Around Save As Dialogs 377
Tip 366. Accessing iCloud Without a Mac 378
Tip 367. Browse Old Time Machine Disks 378
Tip 368. Explore Within a Website Using Safari 379
Tip 369. Reorder Finder Sidebar Headings 380
Tip 370. Switch Tabs Quickly 380
Tip 371. Quickly Adjust Preferences for Any App 381
Tip 372. Grab Files from Your Mac While Miles Away 381
Tip 373. Move Back and Forward in Apps 383
Tip 374. Play Games 383
Tip 375. Run X11 (XQuartz) Apps Full-Screen 384
Tip 376. Get Cool Wallpapers from Screensaver Packages 385
Tip 377. See What Disk Space Is Taken Up by Media 386
Tip 378. Switch Dashboard Back to Overlay Mode 387
Tip 379. Tweak iTunes Visualizations 388
Tip 380. Add Finder to Launchpad 388
Tip 381. Create an Instant Wired Network Between Macs 389
Tip 382. Use Full-Color Emoticons 389
Tip 383. Supertip: Be a TextEdit Power User 391
Tip 384. Migrate from Windows to Mac Without Losing Data 396
Tip 385. Shrink and Expand Fonts in Docs and Emails 397
Tip 386. Use Safari While Booted to the Recovery System 397
Tip 387. Expand QuickTime Player’s Knowledge of File Types 398
Tip 388. Read Apple Manuals for Your Products 399
Tip 389. Use a Non-Apple Keyboard with Your Mac 399
Tip 390. Connect to Network Shares at Login 400
Tip 391. Invert a Selection of Files 401
Tip 392. Open Duplicates of Dashboard Widgets 402
Tip 393. Cue Second-by-Second in Movies 402
Tip 394. Turn a Website into an App 403
Tip 395. Use Quick Look to Skim Sites 404
Tip 396. Create a New Folder Anywhere 405
Tip 397. Grab Files from FTP Servers Using Finder 405
Tip 398. Turn Off the Caps Lock Key 406
Tip 399. Make Keyboard Lighting Work 406
Tip 400. See the Condition of Your Battery at a Glance 407
Tip 401. Magnify Sections of Photos or PDFs Easily 407
Tip 402. Tell Your Mac to Do Things 408
Tip 403. Use Three Fingers and Revolutionize Your Mac Use 409
Tip 404. Use AirDrop Even on Incompatible Macs 410
Tip 405. Supertip: Get Some Must-Have Mac Apps 412
Acknowledgments
Many thanks to those who reviewed Mac Kung Fu, Second Edition prior to
publication: Daniel Bretoi, Ed Burnette, Trevor Burnham, Fred Daoud, Ian Dees, Isaac Dudney, Mike Riley, and Loren Sands-Ramshaw. Their comments, corrections, and suggestions made this an infinitely stronger book.
Thanks to Jonathan Wood for the loan of his Apple remote control, and my apologies for not returning it sooner!
Thanks to Jacquelyn Carter for expertly guiding me through my third book with Pragmatic Bookshelf, and, of course, thanks to all those switched-on individuals at Pragmatic who run perhaps the most extraordinary and amazing publishing outfit I’ve had the privilege of working with.
Preface
Welcome to the second edition of Mac Kung Fu, a book that is to Mac OS X
what the power juicer is to citrus fruit. Mac Kung Fu squeezes from Apple’s
operating system every possible tip, trick, hint, and hack there is—and then squeezes some more to reveal a substantial number of hidden and secret tips.
The first edition of Mac Kung Fu was hugely successful, and this second edition
has been thoroughly expanded and updated for OS X Mountain Lion.
No other book has the same drive to help you boost productivity, save time, and simply do things the best way possible when using a Mac—all while having fun.
The 400+ tips in this book fulfill one or more of the following criteria:
• They had to be genuinely useful for Mac newcomers and old hands alike (even Mac experts will find lots to enjoy here).
• They had to substantially improve the way you use your Mac.
• They had to show the amazing things that can be done with a Mac com-puter and OS X.
Many of the tips are blockbusters, but not all of them. Some point out very subtle tricks. But even these will change the way you work.
How to Read This Book
In a nutshell, Mac Kung Fu is a big book of tips. As such, I don’t recommend
any particular way of reading it. You don’t need to be sitting in front of your
computer to do so. The whole point of Mac Kung Fu is that you can jump in
anywhere. Start at the beginning, or start in the middle. You could even start at the end and work your way to the front. Just start reading. If you find a tip you like, then try it!
then skip that particular tip and perhaps return to it later when you feel more confident.
The tips were written for Mountain Lion and newer releases of OS X. That isn’t to say many won’t work on previous releases of OS X. However, I’ve tested the tips only against Mountain Lion, and some terminology changed in this release. If you do intend to use the book with an older release, some common sense will go a long way.
For All Macs—No Add-Ons Required!
All this book requires is a Mac computer running OS X. Nothing else. You might own a MacBook, MacBook Pro, MacBook Air, iMac, Mac Mini, or Mac Pro. It doesn’t matter, although a handful of tips talk about getting the most from portable Macs.
No tip requires you to buy more software. All the tips enhance, harness, or tweak built-in functionality. A small fraction of the tips discuss downloading some add-in software to add vital functionality that’s missing from OS X, but the software mentioned is nearly always free of charge.
Sharing
If you’d like to share some of the tips from this book on your blog, then feel free. It’s unlikely my publisher will be too happy if you take liberties, but sharing a couple of tips you’ve found useful can only be a good thing. If you do, it would be great if you could mention the book and provide a link to the book’s official web page—see below.
Online Resources
You can find this book’s official web page at
http://pragprog.com/book/ktmack2/mac-kung-fu. There you can report any errata in the book as well as make sugges-tions for future edisugges-tions. You can also get involved in a discussion with other readers in the book’s official forum and ask me questions. We’d love to see you there!
Keir Thomas
November 2012
Getting the Most from the Tips
This book contains more than 400 tips, and you can jump in anywhere. They’re in no particular order, and you don’t have to start at the beginning! If you’re looking for tips on a particular topic or function of OS X, use the index at the back of the book.
Mixed in with the tips are sidebars that concisely explain features of OS X you might have overlooked. The goal is to introduce you to key productivity features of OS X.
There are also a handful of “supertips” scattered throughout the book, which are collections of many smaller tips under a single heading, covering a partic-ular app or technology. The aim is to provide a one-stop destination for learning about secret or hidden features.
Whichever path you choose when reading, here are some notes to help you get the most from the tips.
1.1
Activating Secret Settings via Typed Commands
Some tips involve typing configuration commands within a Terminal window in order to activate secret or experimental settings. Unfortunately, there’s no way to avoid this, but don’t worry—it’s not as difficult as it might sound, and it definitely isn’t dangerous.
Using the command line is surprisingly straightforward. Just type what you
see on the page, and then hit Return. Make sure you type the command
exactly as it appears, and read through a second time to check. Of course, if
you’re reading Mac Kung Fu as an ebook on your Mac,1 you can simply copy
Most of these commands make changes only to your user account. Other users won’t be affected. Tips that affect the entire system are clearly marked!
After hitting Return when you are typing commands, you won’t see anything
like “Command completed!” or “OK.” If you see no feedback, that’s a good sign—it means everything worked. If there’s an error, it probably means you’ve mistyped. OS X is usually clever enough not to make any changes should that happen. Just try again.
Sometimes commands are too long to fit on one line of the book—an inherent limitation of both printed and electronic books. In such a case, the remainder of the line is indented beneath it, and you should type the entire line, hitting
Return only at the end of the last line. You should usually type a space after the end of each line that overflows to the next, but it’s always clear when you shouldn’t. Using your common sense will once again provide dividends.
Usually you’ll be shown the command that activates the secret feature dis-cussed in the tip, followed by the command that turns it off again should you want to do so.
1.2
Using the Apple and Application Menus
Some tips refer to the Apple menu. Other tips refer to the application menu.
The Apple menu is the menu at the top left of the screen, signified appropri-ately enough by the Apple logo.
The application menu is the menu to the right of this, usually named after the application in question and in bold text.
The main menu simply refers to the entire menu bar along the top of the screen.
1.3
Making a Time Machine Backup
It’s generally good advice to make use of the Time Machine backup utility, if you aren’t already doing so. Even better advice is to have Time Machine per-form a backup before undertaking some tips in this book that tweak system files. To do so, click the Time Machine icon at the top right of the screen, and select Back Up Now from the menu that appears.
1.4
Using the Mouse or Trackpad
Some tips require you to right-click to access special, context-sensitive menus. If you’re using a standard PC mouse with two (or more) buttons, you’ll find the right mouse button works fine. If you’re using an Apple-manufactured mouse or trackpad, there are a variety of ways to right-click, as follows:
• Hold down Control and left-click in the usual way.
• If you’re using a trackpad, bunch two fingers together and click (or tap if you’ve enabled tap-to-click in System Preferences).
• If you’re using an Apple Magic Mouse, open System Preferences (Apple
menu→System Preferences), click the Mouse icon, and then check
Sec-ondary Click. From then on, you can press the top-right side of the mouse to right-click.
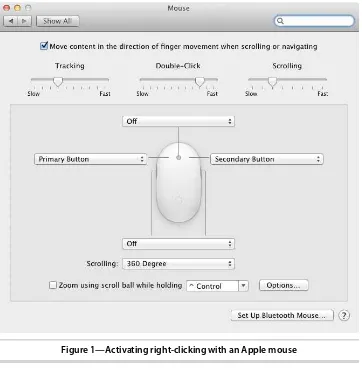
• If you’re using an Apple mouse (formerly called the Apple Mighty Mouse),
open System Preferences (Apple menu→System Preferences), click the
Mouse icon, and change the drop-down menu pointing to the top right of
the mouse to read Secondary Button. See Figure 1, Activating right-clicking
with an Apple mouse, on page 4.
Several tips in this book make reference to trackpad gestures. In nearly all cases, these gestures require a multitouch trackpad, such as the stand-alone Magic Trackpad or the glass “buttonless” trackpads that have been featured in the MacBook series since late 2008.
1.5
Having an Admin Account
Most tips presented here assume you will be using an admin account. This is the standard type of account created when you first set up your Mac. If you share your Mac with somebody else, the other user might have created a standard account or even one managed with parental controls for you to use. You’ll need to speak with this person about getting a full admin account before proceeding with the tips.
1.6
Logging Out and Back In
Sometimes you’ll have to log out and then back in again to make the changes active. To do this, save all your files, click the Apple menu, and then choose the Log Out option. On the main login screen that subsequently appears, click the icon representing your user account, and enter your password when prompted.
1.7
Using Program Windows
In this book I make frequent reference to common program window elements. Most are obvious, but to avoid confusion and get more details, see the following
list (and check out Figure 2, Program window controls referenced in this book,
Figure 1—Activating right-clicking with an Apple mouse
1. Tabs: Clicking each tab button takes you to a different sheet with a differ-ent page of options. The currdiffer-ently selected tab button is darkened.
2. Checkboxes: Clicking puts a check in the box, activating that particular feature. Clicking again removes the check, deactivating that feature. Multiple checkboxes can be selected.
3. Radio buttons: Like checkboxes, clicking in the circle activates that feature. The difference is that with radio buttons, you can select only one choice within the options offered.
4. Drop-down lists: Clicking a drop-down list shows a menu from which you can select an option.
5. Padlock: When the padlock is locked in a System Preferences window, only trivial options can be edited. Clicking the padlock will prompt you for your login password and only then allow access to all other options.
Figure 2—Program window controls referenced in this book
1.8
Using the Mac Keyboard and Shortcuts
Lastly, a word about the Mac keyboard. Over the years, the various Mac modifier keys have been renamed a few times, leading to some confusion. Further confusion is caused by the fact that different countries refer to the keys in different ways.
Throughout this book I simply refer to the keys by the names that appear on
modern American English Mac keyboards—Command or Option, for example.
If you see something like Command+Space, that’s an instruction to hold down
the Command key and then hit Space. Another example is Option+Command+D,
which is an instruction to hold down Option and Command before hitting the D
For reference purposes, you might find the following table useful. It explains the location and alternative names of the Mac’s various function keys.
Description Key
The key immediately to the left and right of Space on most Mac
keyboards. Sometimes this is labeled with the word Cmd instead.
Command
This is the Mac’s primary modifier key. It features the D symbol,
and on older keyboards it also uses the M symbol. Because of
this, it’s sometimes referred to in the wider world as the Apple
key.
The key on the second left (and second right) of Space on most
Mac keyboards, also sometimes labeled Alt. It features the E
symbol on older Mac keyboards.
Option
The key at the bottom left of most Mac keyboards (and sometimes duplicated at the bottom right of the main keyboard, depending
Control
on the model of keyboard). It’s sometimes labeled Ctrl and
indicat-ed by the C symbol in Mac programs.
The Function key, at the bottom left of MacBook keyboards and also the Apple wireless keyboard; at the left of the home key
Fn
cluster on full-sized aluminum keyboards. It switches the hotkeys that do things like adjust screen brightness so that they operate like traditional F1, F2, F3, and so on, buttons. It also modifies various other keys.
The Shift keys, on the first-from-bottom row of the keyboard, at
the left and right. The keys sometimes feature the B symbol.
Shift
The Tab key, located to the left of the main QWERTY row of keys.
It sometimes has the symbol A.
Tab
The Return/Enter key, used to end a line of text and begin a new one, as well as to complete typed commands. It sometimes has
the symbol F.
Return
The Delete key, used to erase a character behind the cursor and located at the top right of the main keyboard beneath the Eject
Delete
key. On PC keyboards this is often called Backspace, but in the
world of Apple computers (and this book) it’s referred to as Delete.
(This key is also different from the forward delete key, indicated
by Delete J, and found on full-sized Mac keyboards within the
home key cluster.)
The Eject key, located at the top right of the main keyboard on some MacBook computers and featuring the standard eject symbol
Eject
Description Key
(MacBook Air and MacBook Pro Retina computers, which lack an optical drive, have the power button in this location). It is used to eject CDs/DVDs from the CD/DVD-ROM drive.
The cursor keys (indicated by arrow symbols like ←, →, ↑, and ↓)
are located at the bottom right of MacBook keyboards and Apple wireless keyboards and in the right third of wired keyboards. Cursor
keys
Several tips in this book refer to default OS X keyboard shortcuts for Mission Control. You might find the shortcuts you use are slightly different. To switch
to the defaults, open System Preferences (Apple menu→System Preferences),
CHAPTER
2
The Tips
Tip 1
Make Launchpad Bigger (or Smaller)
By default, Launchpad displays your app icons in a grid that’s usually 5x8 icons in size.
By reducing or increasing the size of this grid, which can be achieved by adjusting a few secret settings, the icons will increase or decrease in size to fill the space, allowing you to fit more of them in (or fewer!).
However, if the icons increase in size, this will mean more pages of icons within Launchpad because fewer app icons will now be able to fit on each page. Accordingly, decreasing the size of icon grid will mean more can fit on a page.
There’s another side effect too—the number of apps icons that can fit within a Launchpad folder is defined by the grid size setting. So, if you have fewer icons on-screen, folders will also contain fewer icons. If you already have a
folder packed full of app icons in Launchpad (such as the Other folder), OS X
automatically fixes things by creating additional folders as overflow for the
remaining app icons (usually with numbers affixed to the end, such as Other
1, Other 2, and so on).
Enlarging the Icons
Let’s say you want to change the grid size to four rows by four columns of
app icons (see Figure 3, Enlarging the icons within Launchpad), which will
make for significantly bigger icons. Open a Terminal window (open Finder, select the Applications list, and then in the list of applications double-click
Terminal within the Utilities folder), and type the following two lines, the first
of which refers to the number of icon rows and the second of which refers to the number of icon columns:
defaults write com.apple.dock springboard-rows -int 4
defaults write com.apple.dock springboard-columns -int 4;killall Dock
Then activate Launchpad to see the changes.
Figure 3—Enlarging the icons within Launchpad
Shrinking the Icons
To make the icons smaller, we simply increase the grid size. Increasing the grid size to 10x10 icons will shrink the icons significantly into a compact layout but still leave them usable. It can be done as follows by typing these two lines into a Terminal window:
defaults write com.apple.dock springboard-rows -int 10
defaults write com.apple.dock springboard-columns -int 10;killall Dock
reducing the number of app icons in each Launchpad folder and possibly creating overflow folders.
Restoring Default Icon Sizes
To restore the default grid size in Launchpad, again open a Terminal window, and type the following two lines:
defaults delete com.apple.dock springboard-rows
defaults delete com.apple.dock springboard-columns;killall Dock
Once you do this, you might notice that all your icons are spread out across various pages within Launchpad. This is a side effect caused by making icons bigger. You can either drag and drop them back into place or simply issue the following command in a Terminal window, which will reset Launchpad to the default values (although also deleting any Launchpad folders you’ve created):
defaults write com.apple.dock ResetLaunchPad -bool TRUE;killall Dock
Tip 2
Turn Off Irritating “Rubber-Band” Scrolling
You might have noticed that if you scroll to the top or bottom of a document or web page within some OS X apps like TextEdit, the page continues to scroll
a little into a boundary area, before springing back. This is known as
rubber-band scrolling and, depending on your point of view, can be rather annoying.
Deactivating Rubber-Band Scrolling in Most OS X Apps
To turn it off in most applications, all you need to do is open a Terminal window (open Finder, select the Applications list, and then in the list of
applications double-click Terminal within the Utilities folder), and type the
fol-lowing, before logging out and back in again:
defaults write -g NSScrollViewRubberbanding -int 0
To reactivate rubber-band scrolling, should you ever want to, again open a Terminal window, and type the following:
defaults delete -g NSScrollViewRubberbanding
Log back out and in again for the changes to take effect.
Deactivating for iTunes
The previous method works for most OS X apps, although Safari and iTunes are two exceptions. It appears it’s impossible to turn it off in Safari, but you can disable rubber-band scrolling iTunes by quitting the iTunes if it’s open and then opening Terminal and typing the following:
defaults write com.apple.iTunes disable-elastic-scroll -bool YES
Should you decide you’d like to reactivate rubber-band scrolling in iTunes, you should quit the app and then use the following command within Terminal:
defaults delete com.apple.iTunes disable-elastic-scroll
Tip 3
Stop Scrollbars from Disappearing
In recent versions of OS X, the once reliable notion of scrollbars appearing at the right and (sometimes) bottom of the screen has seen some attention from Apple’s software engineers.
In OS X Mountain Lion the scrollbars are invisible unless you scroll the doc-ument or simply place two fingers on the trackpad. This leaves those who like to click and grab the scroller in the lurch, because if you move the mouse cursor to where the scrollbar usually is, there’s nothing there—both the ver-tical and horizontal scrollbars (if the window has one) remain invisible!
Within System Preferences (Apple menu→System Preferences), you can opt
to always have the scrollbar always visible—click the General icon, and select Show Scroll Bars. This is certainly a solution but not an elegant one.
Viewing Scrollbars When the Cursor Hovers Over Them
Luckily there’s a secret setting that allows the best of both worlds—it will cause the scrollbars to appear when your mouse cursor hovers over the edge of the window (or bottom, if the document you’re viewing scrolls horizontally). Otherwise, the scrollbars be invisible unless you’re scrolling through the document, as mentioned earlier.
To activate the secret setting, open Terminal, and type the following:
Then log out and back in again for the changes to take effect. Note that if this doesn’t seem to work and you’re using a standard PC mouse, you might also have to switch the Show Scroll Bars setting in System Preferences, as men-tioned earlier, to When Scrolling.
Deactivating Scrollbars-on-Hover
To deactivate the new feature, again open a Terminal window, and type the following:
defaults delete -g NSOverlayScrollerShowOnMouseOver
Then log out and back in again for the changes to take effect.
Tip 4
Make Your Mac Speak with Siri’s Voice
At the time of this writing, the iPhone tool Siri hasn’t yet been integrated with OS X (although OS X has a dictation tool that you can activate via the Dicta-tion & Speech component of System Preferences). However, you can install Siri’s voice files to OS X Mountain Lion and use its built-in speech tools to have the Siri voice talk to you upon request, such as reading aloud highlighted text.
Activating the Siri Voice Files
Here are the steps needed to switch to the Siri voice files:
1. Open System Preferences (Apple menu→System Preferences), and click
the Dictation & Speech icon.
2. When the Dictation & Speech pane appears, click the Text to Speech tab.
3. Click the System Voice drop-down list, and select Customize.
4. In the drop-down dialog box, scroll down and select Samantha, which will be under the English (United States) heading. Then click OK. (If you’re British, you might want to select the Daniel voice under the English [United Kingdom] heading to get the default British Siri voice; Australian users should select Karen under the English [Australia] heading.)
5. You’ll be asked if you want to download and install a new voice. Agree to do so.
6. The voice will now be downloaded and installed, although be aware that it’s almost half a gigabyte in size so might take some time to come down the line. Once it’s finished, select it within the System Voice drop-down list within System Preferences.
Testing the New Voice
You can test the new voice within Safari or TextEdit by highlighting a
para-graph of text and then clicking Edit→Speech→Start Speaking. Note that it
takes a few seconds for Speech to start the first time you use it, and you might have to quit and restart the app in question for the new voice to start
working. See also Tip 290, Make Your Mac Speak, on page 310.
Under the Dictation & Speech heading of System Preferences, you can activate other spoken helpers, such as speaking dialog boxes when they appear. These are primarily designed to help the partially sighted or blind, but they can be fun to play around with!
If you get tired of the Siri voice, you can switch to any of the other voices using the System Voice drop-down list, as described earlier. The default voice is Alex.
Tip 5
Supertip: Dictate Like a Pro
OS X Mountain Lion includes speech recognition, which you can activate by
opening System Preferences (Apple menu→System Preferences), selecting
Dictation & Speech, and clicking the On radio button on the Dictation tab.
Using it is very simple—just tap the Fn key twice (or one of the Control keys if
you’re using a full-sized external keyboard) and then speak. Double-tap the key again when you’ve finished.
Specifying Capital Letters, Spacing, and Line Breaks
Here’s how to specify capitalization when dictating:
• Capitalizing a word: Say “cap” before the word you to capitalize. For example, to enter the phrase “We should all read the good Book,” you
• Using title case (capitalizing the start of each word): Say “caps on” before the words you want in title case and then say “caps off” after. For example,
for the phrase “The Town of Bath is Lovely in Spring,” you’d say “caps on
the town of bath is lovely in spring caps off.”
• Block capitals: To capitalize an entire word (the equivalent of using Caps Lock when typing), say “all caps.” For the phrase “I need the report RIGHT NOW,” you’d dictate “I need the report all caps on right now all caps off.” An individ-ual word can be put in capitals by just saying “all caps” before it: “I need the report all caps now and not later” produces “I need the report NOW and not later.”
• All lowercase: To dictate words without any capitalization whatsoever, use “no caps” in the same way as described for “all caps.” Dictating “I
want to live in no caps on new york no caps off” produces “I want to live
in new york.”
• Prevent hyphenation: OS X’s Dictation feature is clever enough to hyphenate words that need it, but you can stop it from doing so by saying
“spacebar”: “This is a low spacebar budget enterprise” will produce “This
is a low budget enterprise.”
• Force hyphenation: Should you say something you think should be hy-phenated but OS X’s Dictation doesn’t realize, you can simply say “hyphen”
—“He was a no hyphen good man” will type “He was a no-good man.”
• Remove spaces altogether: To create a sentence or series of words without
spaces between them (compounding words), use “no space.” As with the
dictation terms earlier, it can be used singularly to indicate two words should be joined, or it can be turned “on” and “off” before and after a series of words: “We are best no space friends” will type “We are
best-friends”; saying “We are no space on best friends forever no space off” will
type “We are bestfriendsforever.”
• Inserting line breaks: To insert a line break, just say “new line.” To insert a paragraph break (that is, an empty line before the following sentence), just say “new para.”
Specifying Punctuation, Symbols, and Numerals
In most cases, inserting punctuation is intuitive and obvious. Saying “full stop” or “period” will insert that symbol, for example. Saying “copyright sign” will insert a copyright symbol, and saying “at sign” will insert @. Saying “inverted question mark” will produce the ¿ symbol.
OS X will automatically insert “curly quotes” but if you specifically want a noncurly quotation mark, say “backquote.”
Currency symbols, including the dollar, must be followed by “sign” if not used with numbers: to say “$31” you can simply say “thirty-one dollars” but to
type “We need more $,” you would have to say “We need more dollar sign.”
You can also insert a long dash by saying “em dash.” To insert ellipsis (…), say either “dot dot dot” or “ellipsis.”
Should you want to use Roman numerals, just say them as you would
nor-mally preceded by numeral: “The year of my birth was numeral MCMLXXII.”
Similarly to inserting an actual number rather than the word for the number (that is, “5” rather than “five”), say “numeral” beforehand: “He reported there
were numeral five of them" will type “There were 5 of them.”
Inserting Emoticons
What if you want to indicate your vague emotional state via clever use of punctuation? Apple has thought of that. Simply saying “smiley face,” “winky face,” and “frowny face” will insert :-), ;-), and :-(, respectively.
Navigating Around Text
Although navigating the cursor through text is best done via the keyboard or mouse, the dictation tool offers two commands to move the cursor: “next line” will move the cursor to the next line of text, while “next paragraph” will move it to the next paragraph.
Tip 6
Get Rid of Files—Securely
Whenever you empty the trash, the files are deleted in the standard way; that is, the OS X filesystem makes the space they occupied available for another use. However, the actual content of the files sticks around on the disk until it’s overwritten, and it can be recovered using one of the many third-party file recovery tools available.
crime lab), but bear in mind that the files might still exist in your Time
Machine backup (see Tip 307, Make Time Machine Forget a File, on page 322).
Note that if your Mac has a solid-state hard disk (SSD), such as those fitted to MacBook Air and Retina MacBook Pro computers, securely erasing files or the trash in the ways described next is ineffective and likely unnecessary
because SSDs employ TRIM to clean up old data.1 The best method of
protect-ing an SSD (or any kind of storage disk) from data snoops is to encrypt its
contents—see Exploring OS X: FileVault, on page 232.
Securely Emptying the Trash
To securely empty the trash, simply click and hold the trash icon in the Dock until the context menu appears (or right-click the Dock icon). Let go of the
mouse button and then hold down the Command key. The menu will change
to read Secure Empty Trash. Click to do so. You can also open a Finder win-dow and click the Secure Empty Trash entry on the Application menu.
Be aware that deleting files securely takes significantly longer than deleting unsecurely. With a very full trash can, it might take hours. The work of securely emptying the trash will take place in the background, however.
Always Emptying the Trash Securely
To always securely empty the trash, open a Finder window and click the Application menu and then Preferences. Then click the Advanced tab, and check Empty Trash Securely.
Wiping Individual Files
While there’s no built-in method of securely obliterating individual files on the desktop, short of moving them to the trash and then selecting to securely
empty it, you can use the command-line tool srm to delete files and then
overwrite the space with random data. srm is perhaps one of the most
danger-ous commands available on your Mac, however, so use it carefully!
Next I explain how to use it at the command line, before explaining how it can be used to create a simple Automator service for use in Finder windows and on the desktop.
1. See http://arstechnica.com/security/2011/03/ask-ars-how-can-i-safely-erase-the-data-from-my-ssd-drive/, although if you’ve fitted a third-party SSD to your Mac, see also http://www.groths.org/
Using srm at the Command Line
Open Terminal (open Finder, select the Applications list, and then double-click Terminal in the Utilities folder), and at the command prompt type srm. Then drag and drop from a Finder window onto the Terminal window the file you’d like to eradicate. For example, if I wanted to delete file.txt from my desktop, after I’d dragged and dropped it onto the Terminal window, I’d see the following:
srm /Users/keir/Desktop/file.txt
Then hit Return to complete the command and eradicate the file. As with all
Terminal commands, if you see no output, then everything has worked fine. Depending on the size of the file, deletion should take no more than a few seconds.
The srm command is intended to be a secure version of the basic rm Unix command. Therefore, securely deleting a directory and its files can be achieved
with srm -rf followed by the directory name and path. However, when deleting
many files in this way, it’s useful to add the -v (verbose) switch so you get a
progress display and can confirm when each file is deleted. In other words,
the command for deleting a directory would be srm -rfv.
Creating a GUI Secure Delete Tool
Using Automator you can create a service that appears on the menu that appears whenever you right-click a file and offers a secure delete function
powered by srm. Here’s how to set it up:
1. Start Automator, which you’ll find near the top of the Applications listing within Finder. When it starts, click the Service icon within the Choose a File Type For Your Document dialog box, and then click the Choose button.
If this dialog box doesn’t appear, click File→New.
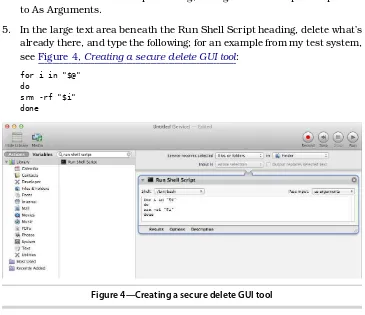
2. In the Automator program window, click in the search field above the second column from the left, and type Run Shell Script. This will filter the list beneath to one item, which you should drag to the right side of the pro-gram window, dropping it over the area containing the text Drag Actions or Files Here to Build Your Workflow.
4. Under the Run Shell Script heading, change the Pass Input drop-down to As Arguments.
5. In the large text area beneath the Run Shell Script heading, delete what’s already there, and type the following; for an example from my test system, see Figure 4, Creating a secure delete GUI tool:
for i in "$@" do
srm -rf "$i" done
Figure 4—Creating a secure delete GUI tool
6. Click File→Save. Because this is a service, there’s no need to specify a
destination for the file. However, you will need to type a filename. This is what will appear in the menu when you right-click files, so something illustrative like Secure Delete will do. Click the Save button in the dialog when you’re done.
7. Once the service has been saved, you can quit Automator.
You can now test your new service—right-click a file/folder (or a selection of them), and select Secure Delete from the menu. Alternatively, you may have
to click Services→Secure Delete. After a few seconds, the file or folder will
simply disappear and will be gone forever (it won’t go to the trash!).
Bear in mind two things: first, there’s no status update when deleting files this way, and second, large files or large collections of files might take some time to be deleted. Deleting will take place in the background, so, once started, you can get on with other things.
Also bear in mind as mentioned earlier that there’s no way to undo file/folder deletion that’s done this way—it’s an extremely thorough way of eradicating data!
To remove your Secure Delete service, open a Finder window, and hit
Shift+Command+G. In the dialog box that appears, type ~/Library/Services. Then drag the Secure Delete service file to the trash. Then log out and back in again.
Tip 7
Auto-answer FaceTime Calls
Here’s a neat tip that enables the FaceTime app to automatically answer incoming calls from contacts you specify. You can use it if you’re happy having calls from specified colleagues, friends, or family automatically answered, although be careful because there’ll be nothing stopping these incoming callers from instantly seeing what’s happening in front of your computer!
Enabling Auto-answer on FaceTime
Here are the steps required to enable automatic answering of calls on Face-Time:
1. Start by opening FaceTime if it isn’t already open, and log in. Then look for the contact details of the individual(s) you’d like to enable auto-answering for. This will be listed in your Contacts or Favorites list and will probably be an email address. Write the details down, and then quit FaceTime.
2. Open a Terminal window (open Finder, select the Applications list, and then in the list of applications double-click Terminal within the Utilities
folder), and type the following line:
defaults write com.apple.FaceTime AutoAcceptInvites -bool TRUE
3. Then type the following line, and at the end type the FaceBook ID of the individual or device you want to auto-answer when they call. For example,
if the contact FaceTime ID is [email protected], you’d type the following:
If the FaceTime ID is a cell phone number, you need to type it after the command without any spaces. For example, if the FaceTime ID was the
cell phone number +1 555 123 1234, you’d type the following:
defaults write com.apple.FaceTime AutoAcceptInvitesFrom -array-add +15551231234
Restart FaceTime, and you should find calls from the FaceTime IDs you added are automatically answered!
You can repeat step 3 and add more FaceTime IDs to the list.
Removing Auto-answer Entries
To remove a FaceTime ID from the auto-answer list, you can use the following
command, but unfortunately this removes all of the entries you might have
added using the previous commands.
Quit FaceTime, open a Terminal window, and type the following two lines:
defaults delete com.apple.FaceTime AutoAcceptInvites defaults delete com.apple.FaceTime AutoAcceptInvitesFrom
If you have Xcode installed and are competent using its Plist editor, you can manually remove individual auto-answer entries from the FaceTime prefer-ences file, which is found in the ~/Library/Preferences/com.apple.FaceTime.plist file.
Tip 8
Instantly Add Movies and Music to iTunes
If you use third-party software to download music and movies to your com-puter, you’ll be familiar with the rather lengthy process needed to add them to your iTunes library—you have to start iTunes, then ensure the correct music or movie list is visible, and finally drag and drop the files onto the program window….
However, there’s a hidden folder you can use to import music and movies straight into iTunes. All you need to do is configure any app you use to download files straight into this folder, and they will be instantly imported— even if iTunes isn’t running at the time.
To find the folder, open Finder, hit Shift+Command+G, and then type
Add to iTunes. As its name suggests, any files copied into this folder will be added to iTunes automatically. Assuming you have kept the default preferences setting of iTunes organizing your media folders, any files placed there will be
moved out of the folder and automatically filed within the Music folder whenever
iTunes is running, so it should appear empty most of the time.
You can create a desktop alias of the folder by clicking and dragging it to the
desktop, before pressing Option+Command and releasing the mouse button. You
can then simply drag and drop files onto the alias instead.
Tip 9
Be a Messages App Keyboard Wizard
Because the Messages app is all about typing and because reaching for the mouse or trackpad can be a distraction, keyboard shortcuts are essential. Here are some of the more useful:
Description Shortcut
Set your status as available (A), invisible (I), away (W), or offline (O).
Control+Command+A/I/O/W
Show buddies list.
Command+1
Move between conversations listed on the left of the Messages window (if two or more conversations are listed).
Control+Tab
Cycle through things you’ve already typed and sent —useful if you need to repeat something said
ear-Option+Up/Down
lier in the conversation. Hit Return to resend the
message.
Show the entry within Contacts of the person you’re chatting to; if they have no entry within your address book, you’ll instantly create a new one.
Option+Command+B
Show profile details of the person you’re chatting to, and set audio alerts/bounce the Messages icon
Shift+Command+I
Description Shortcut
Compose a new email to the individual in Mail, provided an email address is associated with the individual’s IM chat account.
Option+Command+E
Show a list of recent and ongoing file transfers (to transfer a file, drag and drop it onto the
conversa-Option+Command+L
tion within the Messages window, or hit
Option+Command+F to open a dialog box where you can select a file).
Add a timestamp to the conversation, similar to that which appears when you initially go online
Shift+Command+K
and start chatting with somebody—useful if you want to record when something was said. Permanently delete conversation—cannot be undone.
Option+Command+K
Open video effects window so you can apply special effects to any video conversation (click the camera
Shift+Command+E
icon at the top right of the chat window to start video conversation; note that Messages doesn’t support video calls on all chat protocols).
Tip 10
Store Absolutely Any File in iCloud
The built-in Preview app lets you add images and PDFs to its iCloud store
(click File→Open to add files), which are what the app usually displays on
most Macs, but that’s not all it’ll accept for upload. It’ll also store (and let you view!) Microsoft Office documents, such as Word, Excel, and PowerPoint files. Strangely, however, it won’t accept more primitive office document formats
such as rich-text files (those with an .rtf extension) or comma-separated value
spreadsheets (those with a .csv extension).
It’s worth bearing in mind that, just like with Finder windows, you can hold
down Option to copy a file to iCloud, rather than moving it there, which is the
default behavior.
Note that the range of image files Preview will accept for upload to iCloud is
very broad—you can save Photoshop (.psd) documents there, for example, and
view them within Preview.
TextEdit accepts any kind of file for upload to its iCloud storage area—from MP3 files and movies to images—even though it can’t open them (attempting to open, say, a movie will produce a screen full of seemingly random charac-ters, although you can still watch the movie in Quick Look by selecting it in
the iCloud listing and hitting Space).
TextEdit’s egalitarian approach to iCloud makes it an ideal way of transferring files from one Mac to another via iCloud, provided they’re both logged in to the same iCloud ID—just drag and drop the file onto the TextEdit window of the first computer, and then drag and drop it from TextEdit’s iCloud listing to a Finder window on the other Mac.
Tip 11
Use a Secret, Alternative Cut and Paste
Ever had something important held in the clipboard, like a picture, yet wanted to quickly cut and paste some text within a document? OS X actually contains two clipboards, although the second is much more primitive than the main one and will cut and paste only text. You won’t find it on any menus, either, and it is available only via two keyboard shortcuts. You can use it in
the usual way by highlighting some text, using Control+K to cut the text, and
pressing Control+Y to paste the content in the new position. (Note that’s Control
and not Command; longtime Unix/Linux users will, of course, recognize this
secondary clipboard as an implementation of the kill and yank tools found in the likes of Emacs.)
There’s no “copy” option, unfortunately, although you can emulate this by
cutting the text with Control+K and then immediately pasting it back in with
Control+Y, before moving to the new position where you’d like the text to be
inserted and again pasting with Control+Y.
—in my testing, each app seemed to have its own private secondary clipboard. However, the only way to find out for sure is to give it a try!
Tip 12
Correct Misspellings or Typos Without the Mouse
Although in many OS X apps you can right-click a misspelled or mistyped word to see suggested replacements (that is, words that are underlined in red or blue), you can also simply move the cursor to the end of the word using the cursor keys and then wait a second until a list of suggested replacements appears beneath. Hit the Down cursor key and then the Left/Right cursor keys to select a replacement, before hitting Return to select the one you’re
happy with (or hit Esc to quit the replacements menu). If no list appears, it’s
probably the case that OS X has no suggestions for that particular misspelling or typo.
Tip 13
Create iCloud Folders
Here’s a tip that will be obvious to anybody who owns an iPad or iPhone but possibly a revelation to anybody else.
Apps that let you save files within iCloud, such as TextEdit and Preview, allow you to create folders within iCloud to help organize documents. But there’s no New Folder button. Instead, you can create a new folder by dropping one file on top of another (provided either file isn’t locked). You’ll immediately be prompted to enter a name for the new folder. Simple!
You can add new items to the folder by dragging and dropping them on top, just like in Finder. Note that you can also elastic-band select many files at once.
To delete the folder, you’ll need to empty it of all its contents by either dragging the files out or deleting them. Then the folder will vanish.
Note that there are a couple of caveats. First, iCloud folders aren’t like those on your hard disk because you can’t create another folder within them. All each folder can contain are files. Second, note that any file that’s locked (see Tip 199, Lock Files for Safety, on page 222) can’t be added to an iCloud folder until it’s unlocked.
Tip 14
See What Folders You’ve Accessed Recently
Want to see a list of folders or places you’ve recently accessed in Finder? Just click and hold the back button at the top left of the Finder window. In the list that appears, you can click any of the folders to jump straight to that location.
You can also click and hold the forward button to select one of the folders or
places later in your history—in other words, that you previously visited after
visiting that folder! (Note: This also works in most web browsers, where clicking and holding back or forward will show a list of your most recently accessed websites.)
Tip 15
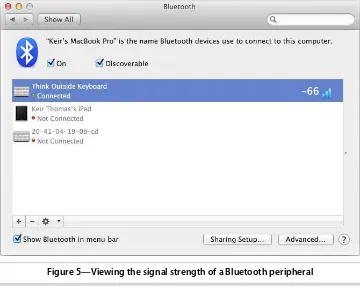
See Bluetooth Signal Strength
If you use any Bluetooth devices with your Mac, such as a keyboard or mouse, there are a variety of ways you can view the strength of the signal between your Mac and the device(s).
Using System Preferences to View Signal Strength
To get the most information, you can use System Preferences (Apple menu→
System Preferences). Once it’s open, click the Bluetooth icon, and then select
the Bluetooth device in the list while holding down Option—see Figure 5,