Fedora Linux
Servers
with
systemd:
third edition
To Aleina and Larisa in sync again
Fedora Linux Servers with systemd: third edition Richard Petersen
Surfing Turtle Press Alameda, CA
www.surfingturtlepress.com
Please send inquiries to: [email protected]
ISBN: ISBN-13:
Copyright Richard Petersen, 2018 All rights reserved
Copyright 2018 by Richard Petersen. All rights reserved. Printed in the United States of America.
Except as permitted under the Copyright Act of 1976, no part of this publication may be
reproduced or distributed in any form or by any means, or stored in a database or retrieval system, without the prior written permission of the publisher, with the exception that the program listings may be entered, stored, and executed in a computer system, but they may not be reproduced for
publication.
Press, the author Richard Petersen, or others, Surfing Turtle Press does not guarantee the accuracy, adequacy, or completeness of any information and is not responsible for any errors or omissions or the results obtained from use of such information.
Limit of Liability and Disclaimer of Warranty: The publisher and the author make no
representation or warranties with respect to the accuracy or completeness of the contents of this work and specifically disclaim all warranties, including without limitation warranties of fitness for a
particular purpose. The information and code in this book are provided on "as is" basis. No warranty may be created or extended by sales or promotional materials. The advice and strategies contained herein may not be suitable for every situation. This work is sold with the understanding that the
publisher is not engaged in rendering legal, accounting, or other professional services. Surfing Turtle Press and anyone else who has been involved in the creation or production of the included code cannot and do not warrant the performance or results that may be obtained by using the code. Trademark Acknowledgements
UNIX is a trademark of The Open Group
Microsoft and MS-DOS are registered trademarks of Microsoft Corporation
IBM and PC are registered trademarks of the International Business Machines Corporation Red Hat and Fedora are trademarks of Red Hat, Inc.
and are trademarks of Red Hat, Inc
Fedora and the Infinity design logo are trademarks of Red Hat, Inc See www.fedoraproject.org/wiki/Logo/ for more information
Preface
This book is designed as a server reference for Fedora Linux with systemd. This second edition is based on Fedora Linux 28. Administration tools are covered as well as the underlying configuration files and system implementations. The emphasis is on what administrators will need to know to perform key networking and server tasks. Topics covered include the systemd service
manager, the systemd service and target files for each server, server roles, and the FirewallD
firewall. Key servers are examined, including Web, FTP, CUPS printing, NFS, and Samba (Windows shares). Network support servers and applications covered include the Squid proxy server, the
Domain Name System server, and DHCP.
The book is organized into five parts: system tools, Internet servers, shared resources, network support, and administration topics.
Part 1 focuses on system tools such as the systemd service manager, the FirewallD firewall, and shell scripts. A Getting Started chapter covers the basics of the GNOME desktop, software
management, and desktop terminals.
Part 2 examines Internet servers. Configuration and implementation of the Postfix and
Sendmail mail server, the vsftpd and ProFTPD FTP servers, and the Apache Web server are covered in detail.
Part 3 deals with servers that provide shared resources on a local network or the Internet. Services examined include the Cups printing server, NFS network file server, the Samba Windows file and printing server, and the GFS distributed file system.
Part 4 covers servers that provide network support such as the Squid proxy server, the Bind Domain Name System (DNS) servers, IPv6 auto-configuration, and DHCP servers.
Overview
Preface
Overview
Contents
Part 1: System Tools
1. Fedora Linux Introduction
2. Getting Started
3. systemd: unit files and server management
4. Firewalls
5. Shell Variables and Scripts
Part 2: Internet Servers
6. Mail Servers
7. FTP
8. Web Servers
9. News and Database Services
Part 3: Shared Resources
10. Print Services
11. Network File Systems and Network Information Service: NFS and NIS
12. Samba
Part 4: Network Support
14. Proxy Servers: Squid
15. Domain Name System: BIND 9
16. Network Autoconfiguration with IPv6, DHCP 4
Part 5: Administration Topics
17. Basic System Administration
18. Shell Configuration
19. Administering TCP/IP Networks
Table Listing
Figure Listing
Index
Contents
Preface
Overview
Contents
Part 1: System Tools
1. Fedora Linux Introduction
Fedora Linux
Fedora Documentation Fedora Servers
Getting Fedora Linux
2. Getting Started
Fedora Server startup
Using the Command Line Interface Changing the hostname: hostnamectl Application Documentation
The Man Pages The Info Pages
Accessing USB drives from the Command line Interface on a Server. Setting the date and time
Editing files with the command line interface: text editors Fedora Desktop
Network Connections
Network Information: Dynamic and Static NetworkManager
Managing Network Connections with nmcli
Desktop Network Configuration using GNOME Settings Wi-Fi and Network tabs Configuring a network with systemd-networkd
Predictable and unpredictable network device names Network device path names
Renaming network device names with udev rules
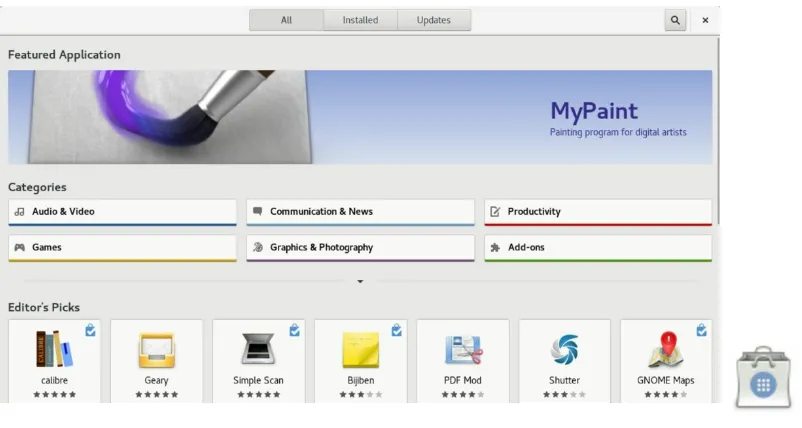
Managing Software with DNF GNOME Software (Software) PackageKit
Updating Fedora
Update with the dnf command
Automatic DNF Updates with dnf-automatic. Server Roles and rolekit
Terminal Window
Controlled Administrative Access: sudo and su
Running Desktop Applications with Administrative Access Logging In to the Root User Account Directly
sudo su su
Root User Password sudo Configuration
3. systemd: unit files and server management
systemd
systemd basic configuration files units
unit file syntax special targets
Modifying unit files: /etc/systemd/system Drop in files: .d directories
/etc/systemd/system
Execution Environment Options service unit files
On Demand and Standalone Services (socket) Path units
Template unit files
Runlevels and Special Targets
systemd and automatically mounting file systems: /etc/fstab systemd slice and scope units
System V: /etc/rc.d/init.d Shutdown and Poweroff Managing Services
Cockpit
The service Command
Extended Internet Services Daemon (xinetd)
4. Firewalls
Dynamic and Static Firewalls: FirewallD and the iptables command Dynamic Firewall with FirewallD
firewall-config firewall-cmd
Firewall Rules: Netfilter, NAT, mangle Modules
Packet Filtering Chains
Targets
Firewall and NAT Chains Adding and Changing Rules IPtables Options
Accepting and Denying Packets: DROP and ACCEPT User-Defined Chains
ICMP Packets
Controlling Port Access
Packet States: Connection Tracking
Specialized Connection Tracking: ftp, irc, Amanda, tftp. Network Address Translation (NAT)
Adding NAT Rules Nat Targets and Chains
Nat Redirection: Transparent Proxies Packet Mangling: the Mangle Table Static Firewall Commands
ip6tables arptables ebtables xtables
Static Firewall using iptables
Configuring Static IPtables with system-config-firewall Saving IPtables rules
IPtables Scripts
Drop Policy IP Spoofing Server Access
Firewall Outside Access
Blocking Outside Initiated Access Local Network Access
Listing Rules
User-Defined Rules
Masquerading Local Networks Controlling ICMP Packets Simple LAN Configuration
LAN Configuration with Internet Services on the Firewall System IP Masquerading
Masquerading Local Networks Masquerading NAT Rules Masquerading Selected Hosts
5. Shell Variables and Scripts
Shell Variables
Definition and Evaluation of Variables: =, $, set, unset Variable Values: Strings
Quoting Strings: Double Quotes, Single Quotes, and Backslashes Quoting Commands: Single Quotes
Values from Linux Commands: Back Quotes Shell Scripts: User-Defined Commands
Executing Scripts Script Arguments Environment Variables
Shell Environment Variables Control Structures
Test Operations
Conditional Control Structures Loop Control Structures
Part 2: Internet Servers
6. Mail Servers
Postfix Commands
Postfix Configuration: main.cf Network Parameters
Local Networks Direct Connections Masquerading
Virtual Domains and Virtual Accounts Postfix Greylisting Policy Server
Controlling User and Host Access Header and Body Checks
Controlling Client, Senders, and Recipients Sendmail
Aliases and LDAP Sendmail Configuration Sendmail Masquerading
Configuring Mail Servers and Mail Clients
Configuring Sendmail for a Simple Network Configuration Configuring Sendmail for a Centralized Mail Server
Configuring a Workstation with Direct ISP Connection The Mailer Table
Virtual Domains: virtusertable Security
Dovecot
Spam: SpamAssassin
Mail Filtering: Amavisd-new
7. FTP
FTP Servers
Available Servers FTP Users
Anonymous FTP: vsftpd
The FTP User Account: anonymous FTP Group
Creating New FTP Users
Anonymous FTP Server Directories Anonymous FTP Files
Firewall access Configuring vsftpd
Enabling Standalone Access Enabling Login Access Local User Permissions
Anonymous User Permissions Logging
Connection Time Limits Messages
vsftpd Access Controls Denying Access User Access User Restrictions User Authentication Command Access vsftpd Virtual Hosts vsftpd Virtual Users
Professional FTP Daemon: ProFTPD install and startup
proftpd.config and .ftpaccess Authentication
Anonymous Access Virtual FTP Servers ProFTPD Server Tools
ftpshut
ftpwho and ftpcount Using FTP with rsync
Accessing FTP Sites with rsync Configuring an rsync Server rsync Mirroring
8. Web Servers
Lighttpd Web Server Apache Web Server Linux Apache Installation
Apache Configuration with system-config-httpd Apache Configuration Directives
Global Configuration
Multi-Processing Modules (MPM) Server Configuration
Access Controls
Directory-level Configuration URL Pathnames
CGI Directory Mime Types
Automatic Directory Indexing Authentication
User Web sub-sites in user home directories: UserDir Log Files
Webalizer
Error log and warning level Formatting Logs
Generating and Managing Log Files Virtual Hosting on Apache
IP based virtual hosting Name-Based Virtual Hosting Dynamic Virtual Hosting
Interpolated Strings Logs for Virtual Hosts Apache Instances
Server Side Includes PHP
Web Server Security: SSL NGINX Web Server
9. News and Database Services
News Servers Database Servers
Relational Database Structure MariaDB (MySQL)
MariaDB Configuration
MariaDB Tools
MariaDB Management with mysql and mysqladmin PostgreSQL
Part 3: Shared Resources
10. Print Services
Printer Services: CUPS Driverless Printing
Printer Devices and Configuration Printer Device Files
Spool Directories Server script
Printer Install and Configuration Automatic printer detection
Printer URI (Universal Resource Identifier) GNOME Printers: GNOME Settings system-config-printer: Printing
CUPS Web Configuration Interface Remote Printers
Configuring Remote Printers with system-config-printer
Configuring Remote Printers with CUPS Web-based Configuration Configuring remote printers manually
CUPS Configuration files cupsd.conf
Location Directives
Default Operation Policy: Limit Directives cupsctl
printers.conf subscriptions.conf cups-files.conf cups-browsed.conf
CUPS Command Line Print Clients lpr
lpc
lpq and lpstat lprm
lpoptions
cupsenable and cupsdisable accept and reject
lpinfo
11. Network File Systems and Network Information Service: NFS and NIS
Portmapper and RPC Services Network File System: NFS
NFS Daemons
NFS Configuration: /etc/exports NFS Host Entries
NFS Options
NFS User-Level Access NFS /etc/exports Example Applying Changes
Manually Exporting File Systems NFSv4
NFS File and Directory Security with NFS4 Access Lists Controlling Accessing to NFS Servers
/etc/hosts.allow and /etc/hosts.deny Portmapper Service
Netfilter Rules
Mounting NFS File Systems: NFS Clients Mounting NFS Automatically: /etc/fstab Mounting NFS Manually: mount
Mounting NFS on Demand: autofs Network Information Service: NIS
NIS Servers
Defining NIS Domain Setting NIS Server Options Specifying Shared Files Creating the NIS Database Controlling Access
Netgroups NIS Clients
Specifying the NIS Domain and Server Accessing the Server
12. Samba
Samba Applications Setting Up Samba
Configuring Samba Access from Windows Accessing Samba Shares from Windows User Level Security
smbpasswd pdbedit
The Samba smb.conf Configuration File Global Section
Network related options Logging Options
Standalone Server Options Domain Members Options Name Resolution
Printing Options File System Options Homes Section
The printer and print$ Sections Shares
Printers
Variable Substitutions
Testing the Samba Configuration
Samba Public Domain Controller: Samba PDC Microsoft Domain Security
Essential Samba PDC configuration options Basic configuration
Domain Logon configuration Master Browser configuration
Accessing Samba Services with Clients
Accessing Windows Samba Shares from GNOME smbclient
mount.cifs: mount -t cifs
13. Distributed Network File Systems
Corosync Cluster Engine Pacemaker
Part 4: Network Support
14. Proxy Servers: Squid
Configuring Client Browsers Squid server configuration files The squid.conf File
Proxy Security Proxy Caches Logs
15. Domain Name System: BIND 9
DNS Address Translations
Fully Qualified Domain Names IPv4 Addressing
IPv6 Addressing
Manual Translations: /etc/hosts DNS Servers
DNS Operation
DNS Clients: Resolvers Local Area Network Addressing
IPv4 Private Networks IPv6 Private Networks
Local Network Address Example Using IPv4 BIND
BIND 9
Stopping and Starting the BIND 9 server Domain Name System Configuration DNS Zones
DNS Servers Types
Location of Bind 9 Server Files and BIND chroot named.conf (BIND 9)
The zone Statement Configuration Statements The options Statement The directory Option The forwarders Option The notify Option
The view clause
BIND 9 Caching-Only Server Resource Records for Zone Files
Resource Record Types
Time To Live Directive and Field: $TTL Start of Authority: SOA
Name Server: NS
Address Record: A, A6, and AAAA Mail Exchanger: MX
Aliases: CNAME Pointer Record: PTR
Host Information: HINFO, RP, MINFO, and TXT Zone Files
Zone Files for Internet Zones Directives
SOA Record
Nameserver Record Address Record
Mail Exchanger Record
Address Record with Host Name Inherited Names
Alias Records
IPv6 Zone File Example
BIND 9 Reverse Mapping File
IPv4 in-addr.arpa Reverse Mapping Format IPv6 IP6.ARPA Reverse Mapping Format IPv6 IP6.INT Reverse Mapping Format
RFC 1912 private address management: localhost Localhost zone file: named.localhost
Localhost Reverse Mapping: named.loopback BIND 9 Subdomains and Slaves
Subdomain Zones Subdomain Records Slave Servers
Slave Zones Slave Records
Controlling Transfers
IP Virtual Domains BIND 9 Cache File
Dynamic Update: DHCP and Journal Files TSIG Signatures and Updates
Manual Updates: nsupdate
DNS Security: Access Control Lists, TSIG, and DNSSEC Access Control Lists
Secret Keys DNSSEC Zone Keys
DNSSEC Resource Records Signing Keys
DNSSEC Validation
Dynamic Trust Anchor Management TSIG Keys
Generating TSIG keys The Key Statement Split DNS
Internal and External Split DNS
Configuring Views for separate servers
Split View on a single DNS server using view clauses Response Policy Zones (DNS RPZ): DNS Firewall
16. Network Autoconfiguration with IPv6, DHCP 4
IPv6 Stateless Autoconfiguration Generating the Local Address
Generating the Full Address: Router Advertisements Router Renumbering
DHCP for IPv6 addressing Linux as an IPv6 Router: radvd DHCP
DHCP 4
Configuring DHCP Client Hosts
Configuring DHCP for IPv4 and IPv6 addressing
DHCP 4 IPv4 server configuration: /etc/dhcp/dhcpd.conf Dynamic IPv4 Addresses for DHCP 4
DHCP 4 IPv4 Subnetworks DHCP 4 IPv4 Fixed Addresses
Part 5: Administration Topics
17. Basic System Administration
Fedora Administration Tools System Directories
Program Directories
Configuration Directories and Files Configuration Files: /etc
/etc/sysconfig
System Logs, journals, and journald
Performance Analysis Tools and Processes Glances
vmstat, free, top, iostat, dstat, and Xload Frysk
GNOME System Monitor Ending Processes
Scheduling Tasks: systemd.timers and cron The crontab Command
Organizing Scheduled Tasks Running cron Directory Scripts Anacron
Grand Unified Bootloader (GRUB2) Referencing the kernel
Dracut options (initramfs RAM file system) Rescue
Re-installing the boot loader Network Time Protocol, Chrony
The Chrony server
The chrony.conf configuration file cronyc
18. Shell Configuration
Shell Initialization and Configuration Files Configuration Directories and Files
Aliases
Aliasing Commands and Arguments Aliasing Commands
Controlling Shell Operations
Environment Variables and Subshells: export Configuring Your Shell with Shell Parameters
Shell Parameter Variables Using Initialization Files
Your Home Directory: HOME Command Locations: PATH
Specifying the BASH Environment: BASH_ENV Configuring the Shell Prompt
Specifying Your News Server
Configuring Your Login Shell: .bash_profile Exporting Variables
Variable Assignments
Editing Your BASH Profile Script
Manually Re-executing the .bash_profile Script System Shell Profile Script
Configuring the BASH Shell: .bashrc The User .bashrc BASH Script
The System /etc/bashrc BASH Script The BASH Shell Logout File: .bash_logout
19. Administering TCP/IP Networks
TCP/IP Protocol Suite
Zero Configuration Networking: Avahi and Link Local Addressing IPv4 and IPv6
TCP/IP Network Addresses IPv4 Network Addresses Class-Based IP Addressing Netmask
Classless Interdomain Routing (CIDR) IPv4 CIDR Addressing
IPv6 CIDR Addressing Obtaining an IP Address
IPv4 Reserved Addresses Broadcast Addresses
Name Server Addresses IPv6 Addressing
IPv6 Address Format IPv6 Interface Identifiers IPv6 Address types
IPv6 Unicast Global Addresses
IPv6 Unicast Local Use Addresses: Link-Local and Unique-Local Addresses IPv6 Multicast Addresses
IPv6 and IPv4 Coexistence Methods TCP/IP Configuration Files
Identifying Hostnames: /etc/hosts /etc/resolv.conf
/etc/sysconfig/network-scripts /etc/services
/etc/protocols
/etc/sysconfig/network
/etc/hostname and hostnamectl Domain Name System (DNS)
host.conf
/etc/nsswitch.conf: Name Service Switch and authselect Network Interfaces and Routes: ifconfig and route
Network systemd unit file: network.target
Interface Configuration Scripts: /etc/sysconfig/network-scripts ifconfig
Routing IP Aliasing
Monitoring Your Network: ping, netstat, tcpdump, EtherApe, Ettercap, Wireshark, and Nagios GNOME Network Tools: gnome-nettool
Network Information: ping, finger, traceroute, and host ping
finger and who host
traceroute Ettercap Wireshark
netstat Nagios
Table Listing
Figure Listing
Index
Part 1: System Tools
1. Fedora Linux Introduction
2. Getting Started
3. systemd: unit files and server management
4. Firewalls
1. Fedora Linux Introduction
Linux consists of the operating system program, referred to as the kernel, originally developed by Linus Torvalds. It has always been distributed with a massive number of software applications, ranging from network servers and security programs to office applications and development tools. Linux has evolved as part of the open source software movement, in which independent programmers joined together to provide free quality software to any user. Linux has become the premier platform for open source software, much of it developed by the Free Software Foundation’s GNU project. Many of these applications are bundled as part of standard Linux
Fedora Linux
The Fedora release is maintained and developed by the Fedora Project and consists entirely of open source software. Development is carried out using contributions from Linux developers, allowing them free rein to promote enhancements and new features. The project is designed to work much like other open source projects, with releases keeping pace with the course of rapid
development. The Fedora project features detailed documentation of certain topics like installation and desktop user guides at https://doc.fedoraproject.org (see Table 1-1).
The Fedora logo depicts an f encased in a blue circle. On the desktop's top panel the blue Fedora logo is the icon for the Applications menu. The logo has its own package, fedora-logos. The logo is designed to represent three features of the Linux community and development: freedom, communication, and infinite possibilities - the f for freedom, which melds into the Infinity symbol, both encased in a speech bubble evoking communication (voice). Free and open software with infinite possibilities developed through global communication. The idea is to evoke the spirit and purpose of Linux development as one of infinite freedom given a voice. The logo incorporates the four basic ideals of Fedora: open, free, innovative, and forward looking. See
https://fedoraproject.org/wiki/Logo for more details.
The Fedora versions of Linux are entirely free. You can download the most current version, including betas, from https://getfedora.org/ or https://download.fedoraproject.org. The
Fedora Documentation
Documentation for Fedora can be found at https://docs.fedoraproject.org (see Table 1-1). The Fedora installation guide provides a detailed description of all your install procedures. The Fedora desktop users guide covers basic desktop operations like logging in, using office applications, and accessing the Web. Several dedicated Fedora support sites are available that provide helpful information. The https://fedoraforum.org site is a Fedora Project–sponsored forum for end-user support. Here you can post questions and check responses for common problems. The
https://ask.fedoraproject.org site provides HowTo for common questions arranged by category such as how much space to reserve for an installation (install solutions), how iptables works for your firewall (server solutions), and how to install Skype (multimedia solutions).
Web Site Name
https://fedoraproject.org Fedora Project
https://getfedora.org Fedora download page
https://download.fedoraproject.org Fedora repository, mirror link https://admin.fedoraproject.org/mirrormanager/ Fedora mirrors list
https://docs.fedoraproject.org Documentation and support tutorials for Fedora releases. https://docs.fedoraproject.org/f28/install-guide/index.html Fedora Installation guide
https://fedoraproject.org/wiki/Fedora_Project_Wiki Latest Fedora news and events posted by Fedora developers. https://www.linuxfoundation.org The Linux Foundation, Official Linux development.
https://kernel.org Latest Linux kernels.
https://www.redhat.com The Red Hat Web site
Table 1-1: Fedora sites
On Fedora, the Firefox Browser is configured with a Fedora Project menu on the bookmark bar for accessing popular documentation and support sites. These include the Fedora Project home page, the Fedora Weekly News, community support from Fedora forums, and Planet Fedora.
Fedora maintains detailed specialized documentation, like information on understanding how udev in implemented or how SELinux is configured. For much of the documentation, you will have to rely on installed documentation in /usr/share/doc or the Man and info pages, as well as the context help button for different applications running on your desktop. Web sites for software like those for GNOME, KDE, and LibreOffice.org will provide extensive applicable documentation.
Fedora Servers
The Fedora distribution of Linux is available online at numerous FTP sites. The primary download site is https://getfedora.org/. The Web page https://download.fedoraproject.org links to an available mirror for you. Changes and latest features are listed in the official Fedora Release notes, where you can download the current release of Fedora Linux, as well as updates and additional software. The Fedora release notes are located at:
https://docs.fedoraproject.org/f28/release-notes/index.html
Choose your current version and then click on the release notes link. See the Fedora change set for a detailed presentation of new features.
Several key Fedora features are listed here:
Fedora has three versions: workstation, server, and cloud. The server version is optimized for dedicated servers and does not install a desktop interface. You can also install servers on the workstation, but the workstation is not optimized for servers.
The Cockpit management console provides a Web interface for managing both system administration and internet servers on your network.
The DNF package manager replaces YUM. Use the dnf command in place of yum. Options remain much the same.
systemd replaces SysVinit and Upstart as the system and session manager. systemd uses unit files located in the /lib/systemd/system and /etc/systemd/system directories to manage service, filesystems, and device. You can use the systemctl or cockpit to run services.
Getting Fedora Linux
The Fedora Linux distribution installs a professional-level and very stable Linux system along with the KDE and GNOME GUI interfaces, flexible and easy-to-use system configuration tools, an extensive set of Internet servers, a variety of different multimedia applications, and thousands of Linux applications of all kinds. You can find recent information about the Fedora Project at
https://fedoraproject.org.
Fedora now releases three versions: workstation, server, and cloud. You can install them using a Web browser at https://getfedora.org/.
Instead of using the Web browser for a direct download, you can use a direct download location with another client, like an FTP client. The Fedora DVDs resides within the Fedora subdirectory, under the respective version (Server, Workstation, and Cloud), and then under architecture types (i386 or x86_64), in an iso directory (Fedora/Server/x86_64/iso).
You can directly access a Fedora mirror site by entering the following URL. You would then need to navigate through the releases and 23 directories to find the Fedora directories where the
Fedora Sever and Workstation iso images are kept. https://download.fedoraproject.org
You can also access a specific mirror at the following URL. Here will be listed the current Fedora mirror and their addresses,
https://admin.fedoraproject.org/mirrormanager/mirrors/Fedora/28/x86_64.
The installation procedure is much the same as for the Fedora Workstation. See the Installation Guide at:
https://docs.fedoraproject.org/f28/install-guide/index.html
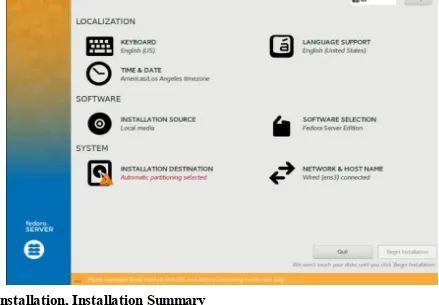
Figure 1-1: Installation, Installation Summary
Figure 1-2: Installation, Software Selection
There is also a Configuration screen where you set up your password and create a user (see
Figure 1-3: Installation, Configuration
The server version installs Fedora without the Fedora GNOME desktop. You are presented only with a command line interface, removing the overhead of your server hardware running the graphical desktop. You could still use the Fedora workstation as a server if you want, installing
server software packages. This approach has the advantage of letting you use the server configuration desktop tools available for many servers, such as the system-config-httpd for the Apache Web server. But for dedicated servers with high demands, you would use the server version.
To install the Fedora servers on the Fedora desktop (workstation), you can first install the Fedora Workstation DVD, and then use dnf to download and install the servers you want.
You can also install desktops on the Fedora server, but the system remains optimized for servers. To install a desktop on the Fedora server version use the dnf group install command with the name of the desktop in quotes, such as "Fedora Workstation" (or a smaller desktop like "Xfce Desktop", the "Cinnamon Desktop", or even the "MATE Desktop"). Use the dnf group list | more command to list available desktops. To boot to the desktop set the default.target to the
graphical.target using the systemctl set-default command. You will need administrative access with the sudo command.
sudo dnf group install "Fedora Workstation" sudo systemctl set-default graphical.target
To go back to using the command line interface instead of the desktop on the next restart, open a terminal window set the default to the multi-user.target.
2. Getting Started
Using Linux has become an almost intuitive process, with easy-to-use interfaces, including graphical logins and desktops like GNOME and KDE. Even the standard Linux command line
Fedora Server startup
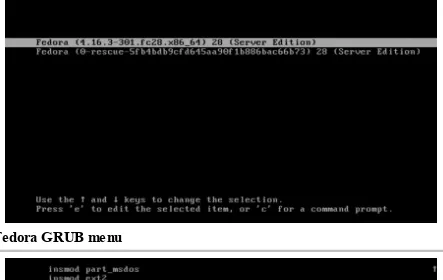
At startup, the GRUB menu is displayed for several seconds at startup, before loading the default operating system automatically. Press an arrow key to have GRUB wait until you have made a selection. Your GRUB menu is displayed as shown in Figure 2-1.
The GRUB menu lists Fedora and the Fedora rescue option, as well as any other operating systems installed on your hard drive. Use the arrow keys to move to the entry you want, and press
ENTER. Press the e key to edit a GRUB entry (see Figure 2-2).
Figure 2-1: Fedora GRUB menu
Figure 2-2: Editing a GRUB menu item
To change a particular line, use the arrow keys to move to the line. You can use the arrow keys to move along the line. The Backspace key will delete characters, and simply typing will insert characters. All changes are temporary. Permanent changes can only be made by directly editing the GURB configuration files: the /etc/default/grub file and those in the /etc/grub.d directory, and then running the sudo update-grub command.
typing commands from your keyboard on a command line.
When you start up, a command line interface is presented. The startup procedure uses tty1, the terminal one device, presenting a command line interface. Fedora uses the systemd login manager, logind, to manage logins and sessions. You can configure login manager options with the
/etc/systemd/logind.conf file. You can set options such as the number of terminals (default is 6), the idle action, and hardware key operations, such as the power key. Check the logind.conf man page for details.
The login prompt prompts you to enter your username. This is the username you set up during installation (see Figure 2-3).
Figure 2-3: Server login
After you enter your username, you will be prompted to enter the password. Once logged in, you can then run commands (see Figure 2-3). Your command line prompt is displayed, waiting for you to enter a command. The command line prompt is a dollar sign ($). In Fedora, your prompt is preceded by the user and the hostname. Both are bounded by a set of brackets.
[richard@localhost]$
To end your session, issue the logout or exit command. This returns you to the login prompt,
and Linux waits for another user to log in.
[richard@localhost]$ logout
To, instead, shut down your system from the command line, you enter the poweroff command.
This command will log you out and shut down the system. It requires administrative access.
$ sudo poweroff
To perform a reboot from the command line, you can use the reboot command.
sudo reboot
From the login prompt, you can reboot your system with the Ctrl-Alt-Del keys.
Using the Command Line Interface
When using the command line interface, you are given a simple prompt at which you type in a command. Even when you are using a desktop like GNOME, you sometimes need to execute
commands on a command line. You can do so in a terminal window, which is accessed from the desktop’s dash’s Accessories category as Terminal.
Linux commands make extensive use of options and arguments. Be careful to place your arguments and options in their correct order on the command line. The format for a Linux command is the command name followed by options, and then by arguments, as shown here:
$ command-name options arguments
action the command takes. Options and arguments may or may not be optional, depending on the command. For example, the ls command can take an option, -s . The ls command displays a listing of
files in your directory, and the -s option adds the size of each file in blocks. You enter the command
and its option on the command line as follows:
$ ls -s
If you are uncertain what format and options a command uses, you can check the command syntax quickly by displaying its man page. Most commands have a man page. Just enter the man command with the command name as an argument.
An argument is data the command may need to execute its task. In many cases, this is a filename. An argument is entered as a word on the command line that appears after any options. For example, to display the contents of a file, you can use the more command with the file’s name as its
argument. The less or more command used with the filename mydata would be entered on the
command line as follows:
$ less mydata
The command line is actually a buffer of text you can edit. Before you press ENTER to execute
the command, you can edit the command on the command line. The editing capabilities provide a way to correct mistakes you may make when typing a command and its options. The BACKSPACE key lets you
erase the character you just typed (the one to the left of the cursor) and the DEL key lets you erase one character to the right of the cursor. With this character-erasing capability, you can BACKSPACE over the
entire line if you want, erasing what you entered. CTRL-U erases the whole command line and lets you
start over again at the prompt.
You can use the UP-ARROW key to redisplay your last-executed command. You can then
re-execute that command, or you can edit it and re-execute the modified command. This is helpful when you have to repeat certain operations, such as editing the same file. This is also helpful when you have already executed a command you entered incorrectly.
Changing the hostname: hostnamectl
You can use the hostnamectl command to display your current hostname and all information pertaining to it such as the machine ID, the kernel used, the architecture, chassis (type of computer), and the operating system (you can add the status option if you want).
To change the hostname use the set-hostname option and the name you want to give the system.
sudo hostnamectl set-hostname myserver
The name of the system is then displayed as part of the prompt (see Figure 2-4), such as:
[richard@myserver ~]$
Application Documentation
On your system, the /usr/share/doc directory contains documentation files installed by each application. Within each directory, you can usually find HOW-TO, README, and INSTALL
documents for that application. Some documentation will include detailed manuals. Many
applications have separate documentation packages, usually with the -doc suffix, like bind9-doc. Such documentation may be located under their package name, instead of their application name, like /usr/share/doc/bind9-doc for the DNS server documentation.
The Man Pages
You can also access the Man pages, which are manuals for Linux commands available from the command line interface, using the man command. Enter man with the command on which you want
information. The following example asks for information on the ls command:
$ man ls
Pressing the SPACEBAR key advances you to the next page. Pressing the b key moves you back a
page. When you finish, press the q key to quit the Man utility and return to the command line. You activate a search by pressing either the slash (/) or question mark (?). The / searches forward, and the ? searches backward. When you press the /, a line opens at the bottom of your screen, and you then enter a word to search for. Press ENTER to activate the search. You can repeat the same search by
pressing the N key. You needn’t reenter the pattern.
The Info Pages
Online documentation for GNU applications, such as the gcc compiler and the Emacs editor, also exist as info pages. You can also access this documentation by entering the command info. This
brings up a special screen listing different GNU applications. The info interface has its own set of commands. You can learn more about it by entering info info at the command prompt. Typing m opens
a line at the bottom of the screen where you can enter the first few letters of the application. Pressing
ENTER brings up the info file on that application.
Accessing USB drives from the Command line Interface on a Server.
When you attach a USB drive it is detected automatically, but not mounted. A message will be displayed indicating the device name for the drive. If you have one hard drive, which would be labeled device sda, then the USB device would be sdb. USB drives are normally formatted as vfat file systems. Your file system would be located on the first file system on the USB drive, which would be sdb1 in this example. Use the lsblk command to find out the device name of the USB drive.
To access the USB drive you have to create a directory on which to mount it. Then use the mount command to mount the file system. You only create the directory once. Use the mkdir command to create the directory.
lsblk
mkdir myusb
To mount a USB drive to that directory, enter a mount command with the vfat type, mounting the /dev/sdb1 device to the myusb directory. You have to have administrative access, so you need to use the sudo command.
You can then access the USB drive by accessing the myusb directory.
$ cd myusb $ ls
Write operations would still have to be run with administrative access.
sudo cp mydata myusb
To write whole directories and their subdirectories, you need to add the -R option to cp.
sudo cp -R mydatadir myusb
Once finished with the USB drive, be sure to first unmount it before removing it.
sudo umount /dev/sdb1
The USB drive's directory cannot be your working directory.
Setting the date and time
You can set the system date and time either manually or by referencing an Internet time server. You could also use your local hardware clock. To set the system time manually, you use the date command. The date command has several options for adjusting both displaying and setting the date and time. Check the date man page for a detailed list, man date. You can set the time with the --set option and a string specifying the date. You use human readable terms for the time string, such as Mon or Monday for the day and Jul or July for the month. Hour, minute, and second can be
represented by numbers separated by colons. The following sets the date to July 9, 8:15 AM 2018.
sudo date --set='Monday July 9 08:15 2018'
To just set the time you would enter something like:
sudo date --set='12:15:43'
To access the hardware clock, you use the hwclock command. The command itself will display the hardware clock time.
sudo hwclock
The hctosys option will set the system clock using the hardware clock's time, and the --systohc option resets the hardware clock using the system time. Use the --set and --date options to set the hardware clock to a certain time.
sudo hwclock --systohc
Editing files with the command line interface: text editors
If you are using the command line interface only, you will often have to edit configuration files directly to configure your system and servers. You will have to use a command-line based editor to perform your editing tasks. Most command line editors provide a screen-based interface that makes displaying and editing a file fairly simple. Two standard command line editors are installed by
default on your system, vi and nano. Several common command line text editors are listed in Table 2-1. The commands you use to start the editors are also the editor names, in lower case, like vi for the Vi editor, nano and emacs for Emacs.
vi, you may want to use nano instead.
The nano editor is a simple screen-based editor that lets you visually edit your file, using arrow and page keys to move around the file. You use control keys to perform actions. Ctrl-x will exit and prompt you to save the file, Ctrl-o will save it.
Editor Description
vi The Vi editor, difficult to use, considered the standard editor on Linux ad UNIX system, installed by default
nano Easy to use screen-based editor, installed by default
emacs Powerful and complex screen-based editor, though easier to use than Vi
joe Simple screen-based editor similar to Emacs, Universe repository
Table 2-1: Command line interface text editors
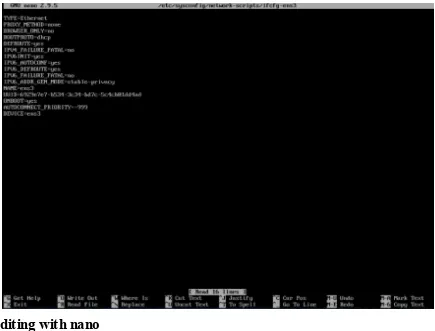
Start nano with the nano command. To edit a configuration file, you will need administrative access. You would start nano with the sudo command. Figure 2-5 shows the nano editor being used to edit the /etc/sysconfig/network-scripts/ifcfg-ens3 file. To edit a configuration file like
/etc/sysconfig/network-scripts/ifcfg-ens3 you would enter the following.
sudo nano /etc/sysconfig/network-scripts/ifcfg-ens3
More powerful editors you may find helpful are vim and emacs. You will have to first install them. The vim editor provides a slightly easier interface for vi. Emacs provides an interface similar to nano, but much more complex.
Fedora Desktop
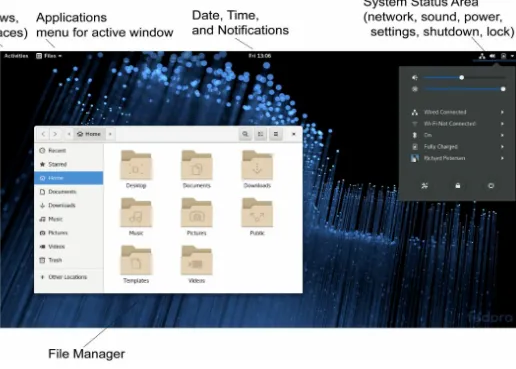
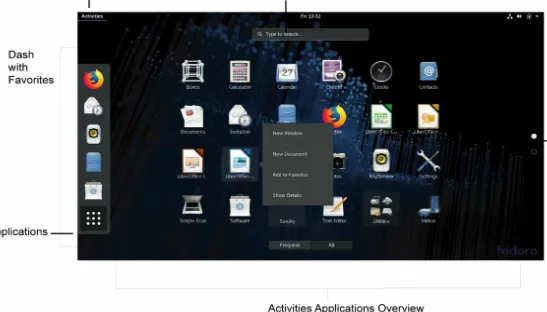
The Fedora desktop uses GNOME as the default user interface, though Fedora also supports KDE (see Figure 2-6). GNOME uses an overview, accessible from the Activities button (left side of the top bar) to access windows, favorite applications, and workspaces (see Figure 2-7). Favorite applications are accessible from the dash on the overview (left side). The last favorite opens the applications overview, listing all you applications. You can search for applications and file from the overview's search box (top, center).
You can access administration tools from the Applications overview. You can also use the GNOME administration tools. On the GNOME desktop top panel, click on the system area menu (top bar, right side) and select System Settings.
You can access your home folder from Files icon on the dash. A file manager window opens showing your home folder (see Figure 2-8). Your home folder will already have default directories created for commonly used files. These include Pictures, Documents, Music, Videos, and Downloads. Your office applications will automatically save files to the Documents folder by default. Image and photo applications place image files in the Pictures directory. The Desktop folder will hold all files and directories saved to your desktop. When you download a file, it is placed in the Downloads directory.
Figure 2-7: GNOME 3 Activities Applications Overview Mode
Network Connections
You configure your network connections using network managers. You are two major network managers to choose from: NetworkManager and systemd-networkd. NetworkManager had both a desktop version and a command line version (nmcli). By default, the older NetworkManager is activated at installation. The systemd-networkd network manager is a new simple manager using systemd configuration files. It requires editing configuration files directly.
Network configuration differs depending on whether you are connected to a local area network (LAN) with an Ethernet card or are using a DSL or ISDN modem, a wireless connection, or a dial-up modem connection. Table 2-2 lists several different network configuration tools.
Network Configuration
App Description
NetworkManager Configures wireless and wired network connections. GNOME Settings (Network
and Wi-Fi tabs) GNOME3 Network tool to configure network connections, wired and wireless. Replaces the oldernetwork connections editor (nm-connections-editor). cockpit Starts and stops servers, including network servers (smb for Samba, httpd for Web, bind for DNS, and
nfs for NFS).
system-config-firewall Sets up a network firewall using FirewallD. wvdial PPP modem connection, enter on a command line. wconfig Wireless connection, enter on a command line.
Table 2-2: Fedora Network Configuration Tools
Network Information: Dynamic and Static
If you are on a network, you may need to obtain certain information to configure your interface. Most networks now support dynamic configuration using either the older Dynamic Host Configuration Protocol (DHCP) or the new IPv6 Protocol and its automatic address configuration. In this case, you need only check the DHCP entry in most network configuration tools. For IPv6, you would check the Enable IPv6 configuration entry in the system-config-network device configuration window.
If your network does not support DHCP or IPv6 automatic addressing, you must provide detailed information about your connection. Such connections are known as static connections,
whereas DCHP and IPv6 connections are dynamic. In a static connection, you need to manually enter your connection information such as your IP address and DNS servers, whereas in a dynamic
connection this information is automatically provided to your system by a DHCP server or generated by IPv6 when you connect to the network. For DHCP, a DHCP client on each host will obtain the information from a DHCP server serving that network. IPv6 generates its addresses directly from the device and router information such as the device hardware MAC address.
In addition, if you are using a DSL dynamic, ISDN, or modem connection, you will also have to supply provider, log in, and password information, whether your system is dynamic or static. You may also need to supply specialized information such as DSL or modem compression methods, dialup number, or wireless channels to select.
from your ISP (Internet service provider). You would need the following information:
The device name for your network interface For LAN and wireless connections, this is network device name, which you can find using the ifconfig or ip l commands. For a modem, DSL, or ISDN connection, this is a PPP device named ppp0 (ippp0 for ISDN). Virtual private network (VPN) connections are also supported.
Hostname Your computer will be identified by this name on the Internet. Do not use localhost; that name is reserved for special use by your system.
Domain name This is the name of your network.
The Internet Protocol (IP) address assigned to your machine This is needed only for static Internet connections. Dynamic connections use the DHCP protocol to automatically assign an IP address to you. Every host on the Internet is assigned an IP address. Traditionally, this address used an IPv4 format consisting of a set of four numbers, separated by periods, which uniquely identifies a single location on the Internet, allowing information from other locations to reach that computer. Networks are now converting to the new IP protocol version 6, IPv6, which uses a new format with a much more complex numbering sequence.
Your network IP address Static connections only. This address is usually similar to the IP address, but with one or more zeros at the end.
The netmask Static connections only. This is usually 255.255.255.0 for most networks. If, however, you are part of a large network, check with your network administrator or ISP. The broadcast address for your network, if available (optional) Static connections only.
Usually, your broadcast address is the same as your IP address with the number 255 added at the end.
The IP address of your network’s gateway computer Static connections only. This is the computer that connects your local network to a larger one like the Internet.
Name servers Static connections only. The IP address of the name servers your network uses. These enable the use of URLs.
NIS domain and IP address for an NIS server Necessary if your network uses an NIS server (optional).
User login and password information Needed for dynamic DSL, ISDN, and modem connections.
NetworkManager
Network Manager will automatically detect your network connections, both wired and wireless. It is the default method for managing your network connections. Network Manager makes use the automatic device detection capabilities of udev to configure your connections. Should you instead need to configure your network connections manually, you would use GNOME Network, available from wired and wireless entries on the System Status Area menu.
Network Manager can configure any network connection. This includes wired, wireless, and all manual connections. Network Interface Connection (NIC cards) hardware is detected using udev. Information provided by Network Manager is made available to other applications over D-Bus.
With multiple wireless access points for Internet connections, a system could have several different network connections to choose from, instead of a single-line connection like DSL or cable. This is particularly true for notebook computers that could access different wireless connections at different locations. Instead of manually configuring a new connection each time one is encountered, the Network Manager tool can automatically configure and select a connection to use.
By default, an Ethernet connection will be preferred if available. For wireless connections, you will need to choose the one you want.
Network Manager is designed to work in the background, providing status information for your connection and switching from one configured connection to another as needed. For initial configuration, it detects as much information as possible about the new connection.
Network Manager operates as a daemon with the name NetworkManager. If no Ethernet connection is available, Network Manager will scan for wireless connections, checking for Extended Service Set Identifiers (ESSIDs). If an ESSID identifies a previously used connection, then it is
automatically selected. If several are found, then the most recently used one is chosen. If only a new connection is available, then Network Manager waits for the user to choose one. A connection is selected only if the user is logged in. If an Ethernet connection is later made, then Network Manager will switch to it from wireless.
The Network Manager daemon can be turned on or off using the systemctl command with administrative access (sudo).
sudo systemctl start NetworkManager sudo systemctl start NetworkManager sudo systemctl restart NetworkManager
Managing Network Connections with nmcli
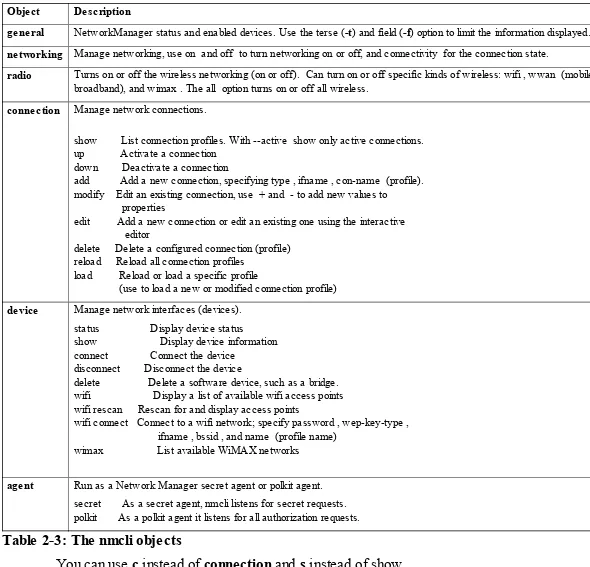
The nmcli command is NetworkManager Command Line Interface command. Most network configuration tasks can be performed by nmcli. The nmcli command manages NetworkManager through a set of objects: general (g), networking (n), radio (r), connection (c), device (d), and agent (a). Each can be referenced using the full name or a unique prefix, such as con for connection or dev for device. The unique prefix can be as short as a single character, such as g for general, c for
connections, or d for device. See Table 2-3 for a list of the objects and commonly used options. The nmcli man page provides a complete listing with examples.
The general object shows the current status of NetworkManager and what kind of devices are enabled. You can limit the information displayed using the -t (terse) and -f (field) options. The STATE field show the connection status, and the CONNECTIVITY field the connection.
$ nmcli general
STATE CONNECTIVITY WIFI-HW WIFI WWAN-HW WWAN connected full enabled enabled enabled enabled
$ nmcli -t -f STATE general
connected
information. The following example displays your current connection.
nmcli connection show
Object Description
general NetworkManager status and enabled devices. Use the terse (-t) and field (-f) option to limit the information displayed.
networking Manage networking, use on and off to turn networking on or off, and connectivity for the connection state.
radio Turns on or off the wireless networking (on or off). Can turn on or off specific kinds of wireless: wifi , wwan (mobile broadband), and wimax . The all option turns on or off all wireless.
connection Manage network connections.
show List connection profiles. With --active show only active connections. up Activate a connection
delete Delete a configured connection (profile) reload Reload all connection profiles
load Reload or load a specific profile wifi rescan Rescan for and display access points
wifi connect Connect to a wifi network; specify password , wep-key-type , ifname , bssid , and name (profile name)
wimax List available WiMAX networks
agent Run as a Network Manager secret agent or polkit agent. secret As a secret agent, nmcli listens for secret requests. polkit As a polkit agent it listens for all authorization requests.
Table 2-3: The nmcli objects
You can use c instead of connection and s instead of show.
$ nmcli c s
NAME UUID TYPE DEVICE
enp7s0 f7202f6d-fc66-4b81-8962-69b71202efc0 802-3-ethernet enp7s0 AT&T LTE 1 65913b39-789a-488c-9559-28ea6341d9e1 gsm --
As with the general object, you can limit the fields displayed using the -f option. The following only list the name and type fields
$ nmcli -f name, type c s
Adding the --active option will only show active connections.
nmcli c s --active
To start and stop a connection (like ifconfig does), use the up and down options.
nmcli con up enp7s0.
Use the device object to manage your network devices. The show and status options provide information about your devices. To check the status of all your network devices use the device object and status options:
nmcli device status
DEVICE TYPE STATE CONNECTION enp7s0 ethernet connected enp7s0
wlp6s0 wifi disconnected -- lo loopback unmanaged
--You can abbreviate device and status to d and s.
nmcli d s
You also use the device object to connect and disconnect devices. Use the connect or disconnect options with the interface name (ifname) of the device, in this example, enp7s0. With the delete option, you can remove a device.
nmcli device disconnect enp7s0 nmcli device connect enp7s0
To turn networking on or off you use the networking object and the on and off options. Use the connectivity option to check network connectivity. The networking object alone tells you if it is enabled or not.
$ nmcli networking
enabled
$ nmcli networking on
$ nmcli networking connectivity
full
Should you want to just turn on or off the Wifi connection, you would use the radio object. Use wifi, wwan, and wimax for a specific type of wifi connection and the all option for all of them. The radio object alone shows wifi status of all your wifi connection types.
$ nmcli radio
WIFI-HW WIFI WWAN-HW WWAN enabled enabled enabled enabled
$ nmcli radio wifi on
$ nmcli radio all off
nmcli Wired Connections
type, such as ethernet. For a static connection you would add the IP address (ipv4 or ipv6), and the gateway address (gw4 or gw6). For a DHCP connection simply do not list the IP address and
gateway options. The profile name can be any name. You could have several profile names for the same network device. For example, for your wireless device, you could have several wireless connection profiles, depending on the different networks you want to connect to. Should you connect your Ethernet device to a different network, you would simply use a different connection profile that you have already set up, instead of manually reconfiguring the connection. If you do not specify a connection name, one is generated and assigned to you. The connection name can be the same as the device name as shown here, but keep in mind that the connection name refers to the profile and the device name refers to the actual device.
$ nmcli c s
NAME UUID TYPE DEVICE
enp7s0 f7202f6d-fc66-4b81-8962-69b71202efc0 802-3-ethernet enp7s0
For a DHCP connection, specify the profile name, connection type, and ifname. The following example creates an Ethernet connection with the profile name "my-wired."
nmcli con add con-name my-wired type ethernet ifname enp7s0
For a static connection add the IP (ip4 or ip6) and gateway (gw4 or gw6) options with their addresses.
nmcli con add con-name my-wired-static ifname enp7s0 type ethernet ip4 192.168.1.0/24 gw4 192.168.1.1
In most cases, the type is Ethernet (wired) or wifi (wireless). Check the nmcli man page for a list of other types, such as gsm, infiniband, vpn, vlan, wimax, and bridge.
You can also add a connection using the interactive editor. Use the edit instead of the add option, and specify the con-name (profile) and connection type.
nmcli con edit type ethernet con-name my-wired
To modify an existing connection, use the modify option. For an IP connection, the property that is changed is referenced as part of the IP settings, in this example, ip4. The IP properties include addresses, gateway, and method (ip4.addresses, ip4.gateway, and ip4.method).
nmcli con mod my-wired ip4.gateway 192.168.1.2
To add or remove a value for a property use the + and - signs as a prefix. To add a DNS server address you would use +ip4.dns. To remove one use -ip4.dns.
nmcli con mod my-wired +ip4.dns 192.168.1.5
You can also modify a connection using the interactive editor. Use the edit instead of the modify option with the connection name.
nmcli con edit enp7s0
You are then placed in the interactive editor with an nmcli> prompt and the settings you can change are listed. The help command lists available commands. Use the describe command to show property descriptions.
Use print to show the current value of a property and set to change its value. To see all the properties for a setting, use the print command and the setting name. Once you have made changes, use the save command to effect the changes.
print ipv4.dns print connection
set ipv4.address 192.168.0.1
The connection edit command can also reference a profile using the id option. The Name field in the connection profile information is the same as the ID. Also, each profile is given a unique system UUID, which can also be used to reference the profile.
Once you are finished editing the connection, enter the quit command to leave the editor.
nmcli Wireless Connections
To see a list of all the available wifi connections in your area, you use the wifi option with the device object. You can further qualify it by interface (if you have more than one) by adding the ifname option, and by BSSID adding the bssid option.
nmcli device wifi
To connect to a new Wifi network, use the wifi connect option and the SSID. You can further specify a password, wep-key-type, key, ifname, bssid, name (profile name), and if it is private. If you do not provide a name (profile name), nmcli will generate one for you.
nmcli dev wifi connect surfturtle password mypass wep-key-type wpa ifname wlp6s0 name my-wireless1
To reconnect to a Wifi network for which you have previously set up a connection, use the connection object with the up command and the id option to specify the profile name.
nmcli connection up id my-wireless1
You can also add a new wireless connection using the connection object and the wifi type with the ssid option.
nmcli con add con-name my-wireless2 ifname wlp6s0 type wifi ssid ssidname
Then, to set the encryption type use the modify command to set the sec.key-mgmt property, and for the passphrase set the wifi-sec.psk property.
nmcli con mod my-wirless2 wifi-sec.key-mgmt wpa-psk nmcli con modify my-wireless2 wifi-sec.psk mypassword
Desktop Network Configuration using GNOME Settings Wi-Fi and Network
tabs
On the GNOME Settings dialog there is a Wi-Fi tab for wireless configuration and a
Network tab for wired, VPN, and proxy configurations. For Wi-Fi, choose the Choose Wi-Fi Settings from the expanded Wi-Fi entries in the System Status Area, or click the Wi-Fi tab in the Settings dialog, to open the Wi-Fi tab (see Figure 2-9).
Figure 2-9: Network (System Settings)
On the Wi-Fi tab, an Airplane Mode switch and a list of visible wireless connections are listed to the right. The currently active connection will have a checkmark next to its name. On the top right bar is a switch for turning wireless on and off. A menu to the right of the switch list entries for connections to hidden networks, turning your computer's Wi-Fi hotspot capability, and listing
previously accessed Wi-Fi Networks.
Your current active connection will have a checkmark next to it and a gear button to the right. Click the gear button to display a dialog with tabs for managing the connection with tabs for Details, Security, Identity, Ipv4, Ipv6, and Reset. The Details tab show strength, speed, security methods, IP and hardware addresses, routes, and the DNS server IP address. Security tab displays a menu from which you can choose a security method and a password (see Figure 2-10). On the Identity tab you can specify the SSID name, choose a firewall zone, choose to connect automatically when you log in, and whether to make the connection system wide (available to other users).
Figure 2-10: Wireless configuration
For a wired connection, click the Network tab on GNOME Settings to display lists for Wired, VPN, and Network Proxy. The Wired list shows your current wired connections with on and off switched for each. A plus button at the top right of the Wired list lets you add more wired
connections. Next to a connection's switch a gear button is displayed. Clicking the gear button opens a configuration dialog with tabs for Details, Identity, IPv4, IPv6, and Security.
Figure 2-11: Wired Configuration
On the IPv tabs you can configure the wired connection using sections for the Addresses, DNS servers, and Routes. DNS and Routs have a switch for automatic (see Figure 2-11). Turing the switch off allows you to manually enter a DNS server address or routing information. From the
Configuring a network with systemd-networkd
The systemd based network manager called systemd-networkd can currently be used for basic operations. You would use it as a small, fast, and simple alternative to a larger manager such as NetworkManager. systemd is described in detail in Chapter 5. The service, target, and socket files for systemd-networkd are located in the /lib/systemd/system: systemd-networkd.service, systemd-networkd.target, and systemd-networkd.socket. Network resolvconf operations are handled with systemd-resolved.service. User configuration files for systemd-networkd are located in
/etc/systemd/network.
In the systemd-networkd.service file several security features are enabled. A capability bounding set (CapabilityBoundingSet) lets you limit kernel capabilities to those specified. The man page for capabilities list the available capabilities. The CAP_NET capabilities limit the networkd service to network operations such as interface configuration, firewall administration, multicasting, sockets, broadcasting, and proxies. The CAP_SET capabilities allow for file and process GID and UIDs. The CAP_CHOWN, CAP_DAC_OVERRIDE, and CAP_FOWNER capabilities deal with bypassing permission checks for files. The CAP_SYS capabilities that provide system administrative capabilities are not included. In addition, the ProtectSystem option (systemd.exec) prevents the service from making any changes to the system (/usr, /boot, and /etc directories are read only for this service). The ProtectHome option makes the /home, /root, and /run/user directories inaccessible. WatchdogSec sets the watchdog timeout for the service. Check the systemd.directives man page for a list of all systemd directives.
# systemd-udevd.service can be dropped once tuntap is moved to netlink
RestrictAddressFamilies=AF_UNIX AF_NETLINK AF_INET AF_INET6 AF_PACKET
SystemCallFilter=~@clock @cpu-emulation @debug @keyring @module @mount @obsolete @raw-io @reboot @swap SystemCallArchitectures=native
The systemd-networkd.socket file sets systemd.socket options for buffer size
(ReceiveBuffer), network link (ListenNetlink), passing credentials (PassCredentials). As a condition for starting the service, the CAP_NET_ADMIN capability needs to be set in the capability bounding set (ConditionCapability).
ExecStart=!!/usr/lib/systemd/systemd-resolved
SystemCallFilter=~@clock @cpu-emulation @debug @keyring @module @mount @obsolete @raw-io @reboot @swap SystemCallArchitectures=native
In addition, the systemd-networkd-wait-online.service delays activation of other services until systemd-networkd service comes online.
You configure a network connection for networkd using .network files in the
/etc/systemd/network directory. Prefix the filename with a number denoting priority. The 10-my-dhcp.network example sets up a DCHP network connection. The Match section matches on a network device and the Network section configures that connection. You can use Name, Path, or
MacAddress Keys to reference the device. Use ifconfig or ip l to find the name of the device. Use this name for the Name entry. You can also specify the Host, or check for Virtualization or the system Architecture. In the Network section, the DHCP key enables DHCP support. You can further specify IPv4 (ipv4) or IPv6 (ipv6) support.
The following example configures a wired (ethernet) device for DHCP. The name of the device as used in the Name entry was found using ifconfig. In the Network section, the DHCP key is set to yes, turning on DCHP support.
10-my-dhcp.network
[Match] Name=enp7s0
[Network] DHCP=yes
You can use the glob * matching character to reference all devices of a certain kind. The en* string will match on all Ethernet (wired) devices. Should your device name change, your .network file will still work on it.
10-my-dhcp.network
![Table 3-6: systemd service options [Service] (systemd.service)](https://thumb-ap.123doks.com/thumbv2/123dok/3935577.1878997/83.612.8.392.559.786/table-systemd-service-options-service-systemd-service.webp)
