About the Author
Tony Bove loves the iLife and provides free tips on his Web site (www. tonybove.com). He has written more than two dozen books on comput-ing, desktop publishcomput-ing, and multimedia, including iPod touch For Dummies,
iPod & iTunes For Dummies,The GarageBand Book,The iLife Book (all from Wiley), Just Say No to Microsoft (No Starch Press), The Art of Desktop Publishing (Bantam), and a series of books about Macromedia Director, Adobe Illustrator, and PageMaker. In addition to developing an iPhone application (Tony’s Tips for iPhone Users), he founded Desktop Publishing/ Publish magazine and the Inside Report on New Media newsletter, and wrote the weekly Macintosh column for Computer Currents for a decade, as well as articles for NeXTWORLD, the Chicago Tribune Sunday Technology Section, and NewMedia. Tracing the personal computer revolution back to the 1960s counterculture, Tony produced a CD-ROM interactive documentary in 1996,
Dedication
This book is dedicated to my sons, and my nieces, nephews, their cousins, and all their children . . . the iLife generation.
Author’s Acknowledgments
I want to thank my Wiley project editor, Rebecca Huehls, for having the patience of a saint while pulling this project through the process on time. I also thank Wiley copy editor Rebecca Whitney for work that made my job so much easier. Many thanks to my technical editor Dennis Cohen for helping to make this book useful and more accurate. I also thank Rich Tennant for his sidesplitting cartoons. A book of this size places a considerable burden on a publisher’s production team, and I thank Production crew at Wiley for dili-gence beyond the call of reason.
I owe thanks and a happy hour or two to Carole Jelen at Waterside, my agent. And I have editors Bob Woerner and Kyle Looper at Wiley to thank for coming up with the idea for this book and helping me to become a profes-sional dummy — that is, a For Dummies author.
Finally, my heartfelt thanks to Jay Blakesberg for his photos, Kathy
Publisher’s Acknowledgments
We’re proud of this book; please send us your comments at http://dummies.custhelp.com. For other comments, please contact our Customer Care Department within the U.S. at 877-762-2974, outside the U.S. at 317-572-3993, or fax 317-572-4002.
Some of the people who helped bring this book to market include the following:
Acquisitions and Editorial
Project Editor: Rebecca Huehls
Acquisitions Editor: Kyle Looper
Copy Editor: Rebecca Whitney
Technical Editor: Dennis Cohen
Editorial Manager: Leah P. Cameron
Editorial Assistant: Amanda Graham
Sr. Editorial Assistant: Cherie Case
Cartoons: Rich Tennant (www.the5thwave.com)
Composition Services
Project Coordinator: Sheree Montgomery
Layout and Graphics: Timothy C. Detrick
Proofreader: The Well-Chosen Word
Indexer: Sharon Shock
Special Art: Corbis Digital Stock, page 419
Publishing and Editorial for Technology Dummies
Richard Swadley, Vice President and Executive Group Publisher
Andy Cummings, Vice President and Publisher
Mary Bednarek, Executive Acquisitions Director
Mary C. Corder, Editorial Director
Publishing for Consumer Dummies
Diane Graves Steele, Vice President and Publisher
Composition Services
viii
iLife ’11 For Dummies
Browsing Faces ... 36
Saving a face you can’t forget ... 36
Matching faces in your library ... 39
Browsing Places ... 41
Finding pictures by their locations ... 41
Adding locations to events and pictures ... 43
Browsing and Searching Photos ... 45
Sorting the entire library ... 46
Searching for pictures ... 46
Viewing Pictures ... 47
Modifying Picture Information ... 48
Editing titles and descriptions ... 49
Adding keywords ... 51
Rating photos with stars ... 53
Flagging pictures for processing ... 53
Chapter 3: Organizing Your Pictures. . . .55
Photo Albums for All Occasions ... 56
Creating albums and adding pictures ... 56
Arranging pictures in albums ... 58
Removing photos from albums ... 59
Using an album for your desktop and screen saver ... 60
Creating and editing a smart album ... 61
Maintaining a Photo Archive ... 62
Backing up your library ... 63
Burning a CD or DVD ... 63
Chapter 4: Improving Photos . . . .65
Editing Images ... 66
Rotating and straightening ... 67
Cropping ... 69
Fine-Tuning Photos ... 72
Removing red-eye and red tint ... 72
Retouching and enhancing photos ... 74
Adjusting exposure, contrast, and saturation... 75
Adding effects ... 77
Trimming Video Clips ... 77
Chapter 5: Enjoying Slideshows . . . .79
Creating and Playing a Slideshow ... 79
Setting Up Slideshow Features ... 82
Assembling pictures for an exhibition ... 82
ix
Table of Contents
Chapter 6: Sharing Pictures Online. . . .93
Attaching Pictures to E-Mail ... 94
Sharing with Facebook ... 96
Sharing with Flickr ... 100
Sharing with MobileMe ... 103
Publishing to Your iWeb Site ... 106
Exporting Pictures to Files ... 107
Exporting to your hard drive... 107
Exporting pictures as a Web page ... 109
Chapter 7: Making Prints and Photo Books. . . .111
Printing Photos and Images Yourself ... 112
Picking a desktop printer and paper ... 112
Setting up pages for your printer... 113
Customizing the printed photos ... 114
Printing to a printer or a PDF fi le ... 116
Ordering Prints ... 117
Making Photo Books ... 119
Part II: Winning an Oscar with iMovie ... 123
Chapter 8: Gathering All Your Videos. . . .125
What You Can Do with iMovie ... 126
What You Need for iMovie ... 127
Exploring the iMovie Window ... 128
Importing Source Video Clips ... 129
Choosing import options for HD video, stabilization, and people ... 130
Importing video fi les and previous projects ... 132
Using video already imported into iPhoto ... 133
Recording directly into iMovie... 133
Importing from a random-access video camera ... 136
Importing from DV tape or cassette ... 138
Chapter 9: Organizing and Improving Video Clips . . . .141
It Happened One Night: Grouping Clips by Event ... 142
Selecting and Playing Clips ... 144
Skimming and watching clips at full-screen size... 144
Selecting a video frame range ... 146
Sorting and Deleting Clips ... 147
Marking frame ranges as favorites or rejects ... 147
2
iLife ’11 For Dummies
I didn’t have enough pages to cover every detail of every function, and I intentionally left out some detail so that you won’t be befuddled with techno-speak when it isn’t necessary. I wrote brief but comprehensive descriptions and included lots of cool tips on how to get the best results from iLife. At the time I wrote this book, I covered the latest version of each iLife appli-cation. Although I did my best to keep up for this print edition, Apple occa-sionally slips in a new version between book editions. If your version of the iLife applications looks a little different, be sure to check out the book’s com-panion Web site for updates on the latest releases from Apple, as well as the Tips section of my Web site (www.tonybove.com) for free tips.
Conventions Used in This Book
Like any book about computers, this book uses certain conventions. When I write “Choose iPhoto➪Preferences,” you should open the iPhoto menu from the toolbar (in iPhoto) and then select the Preferences menu item. Some menus have selections that are submenus with more choices. Okay, that’s fairly simple, but some commands are long and complicated, such as View➪Sort Photos➪By Keyword. If I wrote out every command, this book would be much longer. In an effort to save paper, ink, and your money, I use the command arrows.
It’s a relief that we’re mostly beyond having to type commands into a computer, even if we have to use some kind of pointing device that may be rodent-like in appearance as well as in name. You can use a one-button mouse or touchpad to do just about everything on a Mac. When I write “Click the Edit tool on the toolbar,” you should move the pointer on the screen to the Edit icon on the toolbar and click the button.
Clicking once isn’t the only way to use a pointing device such as a mouse or touchpad. When I write “Drag the photo over the name of the album,” you move the pointer over the photo, hold down the mouse or touchpad button, and drag the pointer over to the name of the album before lifting your finger off the button.
3
Introduction
Foolish Assumptions
Contrary to popular belief (and rumors circulated by the Blue Meanies), you
don’t need the following to use any of the applications (or this book):
✓ A pile of cash for extra equipment and software: Yes, you need a digi-tal camera for iPhoto, a digidigi-tal camcorder for iMovie, and a DVD-R drive for iDVD, but you can get all of this, including an iMac with a SuperDrive for DVD-R, for less than $1,200, which is about one-twentieth of what it cost to do the same in 1999. And you don’t need any extra software — every important piece of software we describe in this book is either already on your Mac or available for free from the Apple Web site, www. apple.com.
✓ A better education: Courses in film, photography, and music can’t hurt, but iLife is designed for the rest of us air-guitar players who barely know the difference between a video clip and a still image. You don’t need any specialized knowledge to have a lot of fun with this software while build-ing your digital assets.
✓ A tech support hotline: Never do I feel the need to contact the Apple technical support team. Everything works as it should. I pinch myself daily for this apparent miracle. I never have to wade through inscru-table documentation, either — the built-in help is informative and useful (which you certainly don’t need if you have this book).
The iLife software is free, supplied with every Mac. That’s really all the soft-ware you need.
However, I do make some honest assumptions about your computer skills:
✓ How to use the Mac Finder: You should already know how to use the Finder to locate files and folders, and how to copy files and folders from one disk to another.
✓ How to select menus and applications on a Mac: You should already know how to choose an option from a Mac menu, how to find the Dock to launch a Dock application, and how to launch an application in the Application folder.
4
iLife ’11 For Dummies
How This Book Is Organized
This book is organized into five parts, with each part covering a different application: iPhoto, iMovie, iDVD, iWeb, or GarageBand. Here’s a quick pre-view of what you can find in each part.
Part I: Getting to Know iPhoto
This part provides all you need to know about transferring pictures from a digital camera or iPhone, browsing your pictures, and organizing them to pro-duce prints, photo albums, calendars, cards, and even professional-looking photo books. It shows you how to improve and retouch digital photos, create slideshows, and share photos online and by e-mail.
Part II: Winning an Oscar with iMovie
This part introduces digital video and tells you everything you need to know about using digital camcorders with your Mac to create videos of all kinds, even professional videos. It shows you how to manage video clips, create movies with photos and clips, and even edit soundtracks and special effects. It also covers sharing movies online and saving movies in profes-sional formats.
Part III: Burning Your Releases with iDVD
This part describes how to bring all your digital assets together to create exciting DVD discs that can play in DVD players as well as in computers. You find out how to create interactive menus and buttons and special effects, such as video backgrounds. Burn DVDs like the pros and save all your pre-cious digital assets — photos, music, movies, slideshows — at their highest quality on DVD.
Part IV: Getting Out-a-Site with iWeb
6
iLife ’11 For Dummies
Where to Go from Here
10
Part I: Getting to Know iPhoto
Photography in the Digital World
Everything about digital photography is easier and costs less than tradi-tional film photography. Digital photography is truly instant gratification — you see the results immediately and can then take more pictures based on what happened an instant earlier. Delete bad shots and reshoot them instantly. Copy what you like, delete what you don’t like, and above all, keep on shooting.
But the features of digital cameras can be intimidating. Camera buffs speak a different language of f-stops, optical zoom, and fish-eye lenses. If you’re an amateur photographer (like I am), you probably don’t need to be picky about which camera to buy. You can get excellent results from just about any digi-tal camera, or from the built-in camera of an iPhone or iPod touch. You may want one that also captures video clips — you can bring those video clips right into iPhoto.
Connecting a camera to your Mac
To connect a digital camera to your Mac, the camera must be compatible with the Mac USB (Universal Serial Bus) or FireWire (IEEE 1394) connec-tors. For example, both my Canon PowerShot SD550 (I know, a relic) and my iPhone connect to USB.
USB is used to connect hundreds of nifty devices to your computer, such as keyboards, pointing devices, external hard drives, keychain-size flash drives, printers, scanners, iPods, and iPhones. USB connectors are plug-and-play: You can plug them in at any time while your computer is on or off. Many of these devices get their power directly from the Mac, through the USB connection.
Like USB, FireWire also supplies power to a device, such as a camera, through the same cable that connects it to the computer. FireWire devices are also plug-and-play.
12
Part I: Getting to Know iPhoto
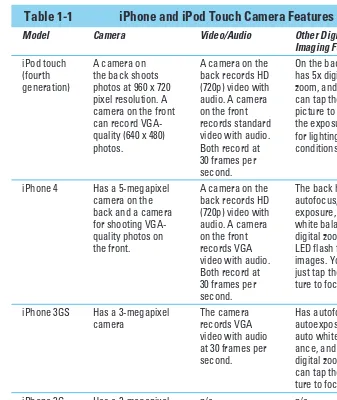
Got an iPhone or iPod touch? You can shoot photos and videos with a fourth-generation iPod touch, an iPhone 3GS, or an iPhone 4, and you can shoot photos with older iPhone models. You can shoot in portrait or landscape orientation, and the results are suitable for sharing by e-mail or YouTube. See Table 1-1 for details.
Table 1-1
iPhone and iPod Touch Camera Features
Model Camera Video/Audio Other Digital Imaging Features camera on the front can record
VGA-iPhone 4 Has a 5-megapixel camera on the LED flash for still images. You can just tap the pic-ture to focus.
iPhone 3GS Has a 3-megapixel camera
14
Part I: Getting to Know iPhoto
The iPhoto photo library holds any number of photos, images, and video clips — limited only by how much space you have on your hard drive. Even if you store thousands and thousands of pictures in your library, you can find the one you want quickly and easily.
Even better, you can organize your pictures by combining sets into photo albums to make them easier to find. In each album, you can arrange the pic-tures exactly in the sequence you want for slideshows and photo books. iPhoto even offers “smart” albums that, like the “smart” playlists in iTunes, update themselves with new pictures automatically based on the criteria that you set. Even with professional photographers, the chances that your pictures come out perfect every time are quite slim. Some pictures may not be as vivid as you first thought. That almost postcard-perfect view from the highway may show a bit of road litter and guardrail that you want to remove. Or maybe the light was too bright or too dim or the camera’s flash put red spots in your subject’s eyes (the dreaded red-eye effect).
Fixing these problems is easy in iPhoto, which offers a number of ways to improve and enhance your photos, such as
✓ You can instantly correct any photo that’s too dark or overexposed.
iPhoto provides editing tools for automatically correcting these prob-lems as well as the red-eye effect.
✓ You can crop any image.Cropping is the process in which you draw a smaller rectangle inside the image and omit everything outside the rect-angle. You can improve a postcard-perfect view of a scenic stop along a highway by removing, for example, the road litter and guardrail from the bottom edge of the photo.
✓ You can change color photos to black-and-white (or, more accurately, grayscale) or sepia tone. Changing the color to grayscale is handy for printing in books, newspapers, newsletters, or documents that don’t use color. You can also change a color photo to sepia tone to make the pic-ture look old-timey.
✓ You can make blemishes disappear like magic. You can enhance the entire image, retouch portions of the image, and adjust the colors and saturation levels to make anyone look better.
You don’t have to load any special software to make the kind of
improvements to your pictures that make them more effective as photo-graphs. Chapter 4 explains how to make improvements.
port-17
Chapter 1: Gathering All Your Shots
Full screen Search
Slideshow
Toolbar
Information pane Viewer pane
Source pane Zoom slider
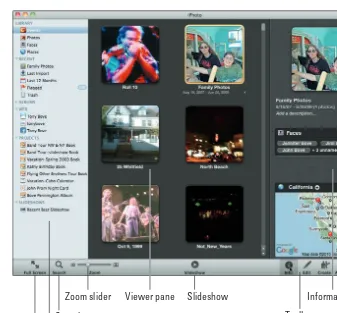
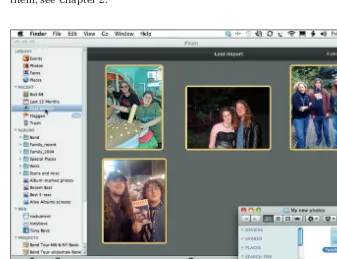
Figure 1-1: The iPhoto window.
✓ The Source pane: The entire library, the most recent pictures imported from cameras, and the list of photo albums and other sources of images appear in a pane on the left side of the window. You use the Source pane to select the source of your pictures for viewing or other operations — for example, you select a photo album in the Source pane to do something with that photo album (play a slideshow or make a book, for example). The Source pane is divided into these sections:
•Library: Browse your entire library by event, photos, face, or place, as I show in Chapter 2.
18
Part I: Getting to Know iPhoto
•Albums: Browse your photo albums — see Chapter 3 for details on creating and using photo albums.
•Web: Browse your online Facebook, Flickr, and MobileMe photo albums, add to them, and manage them — see Chapter 6 for more info.
•Projects: Browse projects you’ve created in iPhoto, such as photo books, calendars, or cards. I cover all those items in Chapter 6.
• Slideshows: Browse slideshows you created with your photos, which I describe in Chapter 5.
✓ The toolbar: The toolbar offers one-click access to the iPhoto tools:
•Full Screen: Show full-screen iPhoto and pictures.
•Search: Search pictures by title, description, keyword, or rating — see Chapter 2 for details.
•Zoom slider: Increase or decrease the size of thumbnail images or zoom into or out of pictures, as I describe in Chapter 2.
• Slideshow: Start a slideshow, as I show in Chapter 5.
• Info: Make the Info pane appear or disappear.
• Edit: Edit a picture, as I describe in Chapter 4.
• Create: Start a new photo album, book, card, calendar, or slide-show and add it to the Source pane.
• Add To: Add selected photos to a photo album, book, card, calen-dar, or slideshow.
• Share: Order prints of selected photos as I describe in Chapter 7, or post them to Facebook, Flickr, or MobileMe albums as I show in Chapter 6.
When you start iPhoto, the item you selected in the Source pane the last time you used iPhoto appears again. For example, if you selected Events the last time (to browse by event), Events is selected again when you start iPhoto again. If you have a MobileMe account, it shows up in the Source pane in the Web section — the icon with the cloud next to my name (refer to Figure 1-1). You can select it to view and share the pictures in your MobileMe albums, as I describe in Chapter 6. The Web section also shows your Flickr and Facebook accounts after you’ve logged in to them (see Chapter 6).
19
Chapter 1: Gathering All Your Shots
the entire screen with the iPhoto window, as shown in Figure 1-2. The entire toolbar is still available along the bottom of the Viewer pane. To make the iPhoto window smaller, click the Full Screen button on the toolbar.
To make the window invisible but accessible from the Dock, choose Window➪
Minimize. (If you do this and then can’t find iPhoto, click either the iPhoto icon or the newly created minimized document icon in the Dock, and the window reappears.) iPhoto works like all the other “i-applications” in Mac OS X.
Figure 1-2: The iPhoto Viewer pane, set to full-screen.
Importing Pictures
20
Part I: Getting to Know iPhoto
You can use a scanner to scan photographic prints, or you can send your film rolls to a photo service that can convert your film to digital images on a CD or the Web. (Odds are good that the photo service you already use offers this service. Next time you’re there, ask about it.) iPhoto has no problem import-ing images from a CD or hard drive.
Importing picture files from your hard drive
If you already have picture files on your hard drive (such as scanned images or files from a digital photo service), you can drag the files directly over the Viewer pane of the iPhoto window after starting iPhoto to add them to your iPhoto library, as shown in Figure 1-3. You can also drag an entire folder of picture files, or even a folder that contains folders of picture files.
Don’t want to drag? Choose File➪Import to Library, browse your hard drive to select the folder or files you want to import, and then click the Import button.
21
Chapter 1: Gathering All Your Shots
The files are imported into the iPhoto library, leaving the original files intact. You can see the imported files by selecting Last Import in the Source pane, as shown in Figure 1-4 — which is already selected if you just dragged the fold-ers or files.
Because iPhoto copies your photos into its own library file, you don’t need the original copies any more — you can delete the original files from your hard drive to free up space.
If you drag a folder that contains picture files, iPhoto adds event titles to the pictures using the folder name. iPhoto also adds a date to the pictures according to when you imported them. To change the event title, click inside the title and then retype its title, as shown in Figure 1-5.
For details about browsing your imported pictures and adding information to them, see Chapter 2.
24
Part I: Getting to Know iPhoto
Figure 1-6: Thumbnails appear for the pictures to import.
5. Click the Import All button to import all pictures, or select thumbnails of pictures to import, and click the Import Selected button.
You can import either all pictures or selected pictures. After you click either Import All or Import Selected, the import operation begins and the button changes to Stop Import. Click Stop Import if you want to stop the import operation. After the importing finishes, a dialog appears, asking whether you want to delete the photos in your camera, iPad, iPhone, or iPod touch.
6. Click Delete Photos to delete the photos in your camera, iPhone, or iPod touch.
You can either delete the photos in your camera, iPad, iPhone, or iPod touch to make room for more or keep them to use for another purpose (such as transferring them to another computer or uploading them from your iPhone to Facebook).
25
Chapter 1: Gathering All Your Shots
Control-click or right-click the device name in the Devices section of the Source pane, as shown in Figure 1-7, and choose Unmount. You can then disconnect the iPad, iPhone, or iPod touch or turn off the digital cam-era’s power and disconnect it.
The photos from the device are imported into the iPhoto library. You can see them by selecting Last Import in the Source pane.
Figure 1-7: Right-click to unmount the camera, iPad, iPhone, or iPod touch before disconnecting it.
Importing from memory card readers
31
Chapter 2: Every Picture Tells a Story
title, choose View➪Sort Events➪By Title, and then choose View➪Sort Events➪Ascending for normal alphabetical order or View➪Sort Events➪
Descending for reverse alphabetical order. You can also choose to sort the tiles manually by dragging them — choose View➪Sort Events➪
Manually, and then drag the tiles to different positions.
✓ Scroll the Viewer pane: Use the Viewer pane scroll bar to move up and down the event tiles. If you’re sorting event tiles by date or title, the scroll bar guide appears in the middle of the window as you scroll, showing you the date or the first letter of the title of each event.
✓ Open an event’s pictures: To open all pictures for an event, double-click the event tile. Thumbnail versions of the event’s pictures appear in the Viewer pane, as shown in Figure 2-2. You can scroll the Viewer pane to see all thumbnails for the event. You can then double-click a thumbnail to see an enlarged version of the picture. (See “Viewing Pictures,” later in this chapter, for details.)
Zoom slider
32
Part I: Getting to Know iPhoto
Figure 2-2: Thumbnails of the pictures for an event.
✓ Use the picture’s pop-up menu: Click the pop-up menu for a picture (refer to Figure 2-2) to
• Rotate: Click Rotate once to rotate the picture 90 degrees; click it again to continue rotating the picture.
•Hide: Click Hide to hide a picture in an event; choose View➪Hidden Photos and then click Show in the picture’s pop-up menu to show it again.
•Trash: Delete the picture.
•Rating stars: Give the picture a rating by dragging across the stars.
34
Part I: Getting to Know iPhoto
Merging events
Merging two events is easy: Simply drag one event’s tile over the other, as shown in Figure 2-3. A message appears, as shown in Figure 2-4, asking whether you want to merge them. Click Merge to merge the events into one, or click Cancel.
Figure 2-3: Drag one event tile over another to merge them.
37
Chapter 2: Every Picture Tells a Story
4. Click inside the label to add a name for a face.
As you type the name, suggestions from your Address Book entries appear below, and you can select one to complete entering the name.
5. (Optional) To add a face, click Add a facein the Faces information, and adjust the face rectangle. Then repeat Step 4.
After you click Add a face in the Faces information, a rectangle appears in the picture. You can then drag the rectangle into position on a face and drag the corners of the rectangle to adjust its size. After adjusting the rectangle, repeat Step 4 (add a name for the face).
Figure 2-6: Open the Faces info to see faces marked with labels.
38
Part I: Getting to Know iPhoto
39
Chapter 2: Every Picture Tells a Story
Of course, iPhoto isn’t intelligent enough to find all pictures that contain versions of a particular face. You have to help it along, as you see in the next section.
Matching faces in your library
To match other pictures in your library with a face and name in the Faces browser, follow these steps:
1. Select Faces in the Source pane.
A corkboard image fills the Viewer pane with any faces you have already named.
2. Double-click a named face to see more pictures that contain the same face.
The Viewer pane shows the pictures you identified as having that face, as shown in Figure 2-9. If iPhoto found more pictures that may also con-tain the same person, it displays a message at the bottom of the Viewer pane along with the Confirm Additional Faces button. If there are no additional pictures to confirm, you need to define more versions of the face. (See the earlier section “Saving a face you can’t forget.”)
3. Click the Confirm Additional Faces button.
This button probably should be named Confirm Additional Pictures — it lets you confirm pictures that contain the same face. It displays confirmed pictures in the Viewer pane on top (with a green bar along the bottom) and unconfirmed pictures with the same (or similar) face below, as shown in Figure 2-10.
4. Click a face to confirm it, or Option-click the face to reject it (refer to Figure 2-10).
To confirm that a face is correct, click the face — the banner underneath the face changes to include the person’s name. If the match isn’t correct, Option-click the face — the banner turns red and says that it isn’t the person. This feedback gives iPhoto some information to search more pictures for the face and not include pictures that obviously are incor-rect matches.
You can also click a previously confirmed picture to reject it.
5. Click Done when finished confirming and rejecting faces.
40
Part I: Getting to Know iPhoto
Figure 2-9: Double-click a named face to see more pictures with that face; click Confirm Additional Faces to confirm.
43
Chapter 2: Every Picture Tells a Story
Figure 2-13: View the pictures at these places.
Adding locations to events and pictures
In iPhoto, the entire world is at your command, whether or not your camera is GPS-enabled. You can add the name of any location quickly and easily to one picture or to a set of pictures, such as an event.
To add a location to a selected picture or event, follow these steps:
1. Browse your library by event, photo, or face, and select the picture’s thumbnail.
2. Click the Info button to show the Info pane.
The Info pane appears, as shown in Figure 2-14.
3. Click the Assign a Place button and then start typing the name of the location, and iPhoto displays a list of suggestions on a pop-up menu as you type. You can continue typing the location or choose a selection by clicking it.
45
Chapter 2: Every Picture Tells a Story
Browsing and Searching Photos
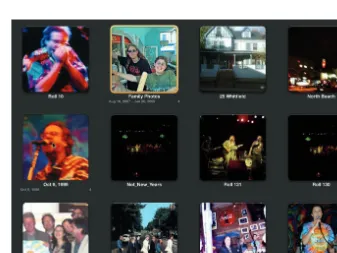
For a basic view of thumbnails of all pictures in your iPhoto library, click Photos in the Source pane. Thumbnails appear for all pictures (photos, images, and video clips) in your library, sorted by date in ascending order (earliest date first), as shown in Figure 2-16. You can scroll the Viewer pane to see all thumbnails, and open and close events by clicking the triangle next to the event title. (For example, I just opened the North Beach event shown in Figure 2-16.)
Figure 2-16: Thumbnails of every picture in your iPhoto library.
46
Part I: Getting to Know iPhoto
Sorting the entire library
The Photos view helps you easily sort all your photos at one time. To sort your library by date in descending order (latest date first), choose View➪
Sort Photos➪Descending. To set your library back to ascending order, choose View➪Sort Photos➪Ascending.
To sort all your pictures by keyword or by rating, choose View➪Sort Photos➪
By Keyword or View➪Sort Photos➪By Rating. You can also sort by title by choosing View➪Sort Photos➪By Title. To see how to add titles, keywords, and ratings, see “Modifying Picture Information,” later in this chapter.
Searching for pictures
You can zip to the photo you’re looking for by using one of several search methods in iPhoto:
✓ To use the search field: Click the Search button (with a Magnifying Glass icon) on the left side of the toolbar at the bottom of the Viewer pane (refer to Figure 2-16). The button changes into a Search field — you can enter characters in this field to search for pictures. iPhoto looks for the characters in titles, descriptions, and keywords. iPhoto assembles the thumbnails of located pictures in the Viewer pane as you enter char-acters. To delete the entry in the Search field, click the circled x on the right side of the Search field.
✓ To search for a date: Click the Magnifying Glass icon within the Search field to see a pop-up menu, and choose Date. A pop-up dialog appears with buttons for each month of the earliest year for which you have pictures — just click a month name to see the pictures for that month. To switch to Calendar view in the pop-up dialog, click the circled right arrow in the upper left corner; you can then click a specific date. To switch years, click the right (forward) or left (backward) arrows in the upper right corner of the pop-up dialog. To clear the search, click out-side the pop-up menu and then click the circled x on the right side of the search field.
47
Chapter 2: Every Picture Tells a Story
kids on vacation, you can search for either Vacation or Kids to locate pictures including the ones you’re looking for or quickly narrow your search by clicking Vacation and Kids so that only pictures of the kids on vacation show up.
✓ To search by rating: Click the Magnifying Glass icon for the pop-up menu and choose Ratings. (To see how to add ratings to pictures, see “Adding keywords,” later in this chapter.) Click inside the Search field, which now offers stars for ratings — you can click or drag to refine the number of stars. iPhoto searches for pictures that are rated as high (or higher) than the number of stars you specify.
Viewing Pictures
To look at a single picture, browse by any method I describe in this chapter (events, places, faces, or photos). Then double-click the thumbnail. The picture fills the Viewer pane. Double-click the picture again to return to the thumbnails.
If the picture is a video clip, after double-clicking it the video-player controls (Previous/Rewind, Play/Pause, and Next/Fast-Forward) appear, as shown in Figure 2-17, and you can drag the scrubber bar under the controls to move to any part of the video. You can also drag the Volume slider under the controls to set the audio volume, and click the gear icon to display the Actions pop-up menu that offers the Actual Size or Fit in Window options. Actual Size dis-plays the video in its actual size (which may cut off the sides of an HD video), and Fit in Window displays the entire video picture inside the window. Whether you’re viewing still photos or video clips, the Viewer pane shows along the bottom a row of thumbnails of other pictures you’re browsing. Move the pointer over the row to make the thumbnails larger, and click any thumbnail to move directly to that picture.
To return to the thumbnails of pictures, click Photos in the upper left corner of the Viewer pane.
To fill the screen with your picture or to browse pictures at full-screen size, click the Full Screen button in the left corner of the toolbar at the bottom of the iPhoto window, or choose View➪Full Screen.
48
Part I: Getting to Know iPhoto
Figure 2-17: Video controls for viewing video clips in your library.
Modifying Picture Information
After taking lots and lots of pictures, you will want iPhoto to help you keep track of them. iPhoto already knows the date the pictures were taken (if the camera records that information) or the date they were imported into the iPhoto library. iPhoto may already know the location of the shots, if you cap-tured them with a camera that offers GPS (such as an iPhone). See “Browsing Places,” earlier in this chapter, to find out and to see how to add location information.
53
Chapter 2: Every Picture Tells a Story
After you assign a keyword to a picture, iPhoto remembers the keyword so that as you move on to another picture and start entering keywords, a pop-up menu appears with previously entered keywords. You can then select the exact keyword you used before — and cut down on keyword typing mis-takes and variations that would slow down searches.
To delete a keyword, click it. The keyword appears encapsulated; simply click it and press the Delete key (or choose Edit➪Cut). You can also copy a set of keywords by clicking the first keyword and Shift-clicking the last in a sequence, choosing Edit➪Copy, clicking in the keywords field of another pic-ture to add keywords, and choosing Edit➪Paste.
Rating photos with stars
The Ratings feature lets you assign a value judgment to a picture so that you can quickly find all five-star shots, all four-star shots, and so on. To assign a rating, select the thumbnail for the picture, choose Photos➪My Rating, and pick the appropriate number of stars (or None). You can also assign a rating by dragging across the Rating field next to the title in the Info pane (refer to Figure 2-18).
Flagging pictures for processing
Back in the old days of commercial photography, if you were ordering wed-ding pictures, the photographer gave you a contact sheet — a quick print of photos in thumbnail size — and a magic marker or felt-tip pen. You, the customer, would then mark up the photos you wanted developed. That’s the basic idea behind flagging pictures: You mark them for processing.
To flag a picture for processing, select its thumbnail while browsing and click the flag icon in the upper left corner of the thumbnail. You can flag a bunch of pictures by selecting them and then choosing Photos➪Flag Photos. A red flag appears over the upper left corner of the frame of each flagged thumbnail image. (The flag doesn’t change the picture in any way — it appears only on the thumbnails.) To browse only your flagged pictures, click Flagged in the Recent section of the Source pane.
60
Part I: Getting to Know iPhoto
In all cases, if you delete something you didn’t want to delete, you can usu-ally undo the operation by choosing Edit➪Undo. If you perform operations after deleting the picture, you may have to choose Edit➪Undo several times and undo all subsequent operations before you can undo the deletion.
Using an album for your desktop and screen saver
One sure way to demonstrate your skills with a Mac is to personalize your Desktop to show your own pictures. The Desktop is the background image behind the Finder. To set your Desktop to a photo or an album, select the photo’s thumbnail or select the album name in the Albums section of the Source pane and choose Share➪Set Desktop.
You can also use any iPhoto photo album as a screen saver. The Desktop & Screen Saver preferences (choose System Preferences in Mac OS X and click Desktop & Screen Saver) let you choose not only pictures for your desktop but also animation to display when your Mac is inactive. To protect your dis-play, you can set the Screen Saver setting to display animation if your com-puter hasn’t been used for several minutes. Apple provides a set of animated effects, but you can use a photo album from your iPhoto library as your screen saver — the pictures appear one after the other, like a slideshow. Scroll the list of Screen Savers until you find your iPhoto photo albums. After clicking a photo album, click the Options button to display these options:
✓ Present Slides in Random Order: When you turn on this setting, the images appear in random order rather than in the sequence you arranged for the photo album in iPhoto.
✓ Cross-Fade between Slides: A cross-fade is a smooth transition from one image to another.
✓ Zoom Back and Forth: The screen effect zooms into the image to show more detail, and zooms out to show the entire picture.
✓ Crop Slides to Fit on Screen: Draw a smaller rectangle inside the image and cut away everything outside the rectangle, in order to fit the image onscreen. This option is useful for working with photos whose aspect ratios are different from the typical 16:10 ratio of the Mac screen.
61
Chapter 3: Organizing Your Pictures
Creating and editing a smart album
In the Albums section of the Source pane, you can find smart albums, which are indicated by the gear-in-a-folder icon. iPhoto comes with a few sample smart albums, such as Best 5-Star and Recent Best, and you can create your own. Smart albums add pictures to themselves based on prearranged cri-teria, or conditions. For example, when you add ratings to your pictures, as I describe in Chapter 2, the Best 5-Star and Recent Best albums change to reflect your new ratings. You don’t have to set up anything because those smart albums are already defined for you.
To create a new smart album, follow these steps:
1. Choose File➪New➪ Smart Album (or press Command+Option+N).
The Smart Album dialog appears, as shown in Figure 3-3.
Figure 3-3: Set the first condition for a smart album.
2. Enter a new name (a title) for the smart album in the Smart Album Name field at the top.
3. Choose a category of information from the Match the Following Condition pop-up menu.
62
Part I: Getting to Know iPhoto
4. From the second pop-up menu (refer to Figure 3-3), choose an opera-tor, such as Is, Contains, or Starts with.
The selections you make from these two pop-up menus combine to create a condition, such as Date is after 10/6/2009, Any Text contains Jimi, or Keyword contains holiday.
5. To add multiple conditions, click the plus-sign (+) button (on the right), as shown in Figure 3-4.
You can then decide whether to match all or any of these conditions, as explained in Steps 3 and 4. The Match xx of the Following Conditions option is enabled by default when you set one or more conditions.
Figure 3-4: Set multiple conditions for a smart album.
6. After setting one or more conditions for the smart album, click OK to create it (or Cancel to cancel it).
The smart album appears in the Albums section of the Source pane and goes to work immediately.
To edit a smart album, select it from the Albums section of the Source pane and choose File➪Edit Smart Album. The Smart Album dialog appears with the criteria for the smart album.
Maintaining a Photo Archive
64
Part I: Getting to Know iPhoto
To burn a CD or DVD for use with iPhoto, follow these steps:
1. Browse and select pictures, or choose a photo album.
You can browse and select an event or a location or select a photo album, or individual pictures, before choosing to burn to a disc. You can fit numerous pictures on a DVD, so you may want to select your entire iPhoto library for a DVD burn operation to use up the entire DVD space.
2. Choose Share➪Burn.
The Insert Disc dialog box appears, prompting you to insert a blank disc.
3. Insert a blank disc and click OK.
The burn disc pane appears at the bottom of the Viewer pane. A disc icon appears on the panel — the green area on the disc icon represents the amount of disc space that your pictures require.
4. Click the Burn button in the Burn Disc pane (or Cancel).
The burn operation starts. It may take several minutes to burn the disc; when it’s done, you hear a chime and the disc automatically ejects. You can cancel the burn by clicking the Cancel button next to the progress bar, but if you’re using a CD-R disc, you may not be able to use the CD after canceling.
You can show pictures you burned to a CD or a DVD while using your current iPhoto library. You can’t modify the pictures on the CD or DVD, but you can view and copy any pictures and albums they contain.
To open a CD or a DVD you burned in iPhoto, insert the CD or DVD disc into your Mac. An icon for the disc appears in the Source pane. Click the disc icon in the Source pane to display the pictures and albums on the disc. Click the triangle next to the disc icon to see the photo albums on the disc. You can copy them to your current iPhoto library to work on them.
66
Part I: Getting to Know iPhoto
Editing Images
The obvious advantage that digital images have over prints is that you can change a digital image instantly. You can also make copies quickly and easily, and make changes to the copies without affecting the originals.
To edit a photo or an image, browse your iPhoto library and select its thumb-nail, and then click the Edit tool on the toolbar. The photo or image appears in the Viewer pane, as shown in Figure 4-1, with editing buttons in the Quick Fixes pane along the right side and the Zoom slider in the lower left corner for zooming in and out. You click the Quick Fixes, Effects, and Adjust buttons in the upper left corner to switch panes from Quick Fixes to Effects or Adjust. A row of thumbnails at the bottom of the Viewer pane shows all the pictures you’re browsing — click any thumbnail to edit its image.
69
Chapter 4: Improving Photos
By combining rotation and straightening, iPhoto offers great flexibility for setting the image at an angle, either for special effect or to correct the perspective.
Cropping
The professionals who knew how to trim photos on a light table wielded precision knives with wild abandon and, most important, knew how to cut in straight lines. They used words such as crop to describe cutting away the outer edges of a photo, bringing the center of the photo to the forefront. You can crop an image to frame it better and show only what you want it to show, and combine cropping, straightening, and rotating to show only part of an image at the proper angle. And, you don’t need to be able to draw or cut a straight line.
Cropping enables you to keep only a rectangular portion of the photo and remove its outer edge. Cropping is often better than stretching or resizing a photo, because the pixels within the cropped area don’t change. You can use cropping to
✓ Get rid of areas you don’t want. You can eliminate the outer portions of a photo to remove wasted space, crop out an ex-boyfriend who shouldn’t be in the picture, or remove the fuzzy outline of a car window in a photo shot from a car.
✓ Focus on the subject. By cropping a photo, you can adjust where your subject appears in the frame of the picture, drawing more attention to your subject and improving its overall composition. Professional photographers, for example, may crop tightly around a person’s face, removing most of the background.
✓ Constrain the photo to fit a specific proportion. You can use the Constrain feature to crop an image to a specific proportion. You may want to adjust the proportions of your photo to fit sizes for book layout or prints — by constraining the cropping selection, you produce better results because the picture is framed properly for the size of the print or book layout. Using the preset choices from the Constrain menu guaran-tees that the cropped image fits nicely in the format you need.
To crop an image, follow these steps:
1. Browse your iPhoto library and select the thumbnail for the image, and then click the Edit tool on the toolbar.
71
Chapter 4: Improving Photos
Figure 4-3: Drag the cropping rectangle into position.
Solving printing problems with cropped images
Problems can crop up, if you’ll forgive the pun,when you try to print images that have been cropped or resized. The Constrain feature is useful because prints typically come in spe-cific sizes such as 4 (width) x 6 (height), 5 x 7, and 8 x 10 inches. However, photos from some digital cameras can be sized at proportions of 4 x 3 or even 16 x 9, which may be fine for com-puter displays, DVDs, and iPhoto book layouts, but not the right proportion for typical prints. If you pay no attention to the Constrain feature, you may find that some photos have unintended white margins at the sides of the finished prints.
Use the Constrain feature if you’re cropping for a print.
72
Part I: Getting to Know iPhoto
Fine-Tuning Photos
Your vacation is over and you’re looking over your photos. The beach shots look washed-out from way too much sunlight, and the forest shots look as dark as inside a cathedral. And, your youngest son is in the gift shop imper-sonating a red-eyed Martian.
You can work magic with the iPhoto Quick Fixes, Effects, and Adjust tools, improving photos that would otherwise be fuzzy, too dark, or too bright. Poor lighting is often the biggest problem with photos. But the Fix Red-Eye button in the Quick Fixes pane can remove the red spots that a flash creates in your subject’s eyes. (It can also reduce the amount of red in any selected area of a photo.) You can also remove anomalies and blemishes by using the Retouch button in the Quick Fixes pane and enhance the colors in a photo with the Enhance button. The Adjust pane lets you adjust the exposure, con-trast, and saturation, and the Effects pane lets you combine effects to pro-duce professional-looking results.
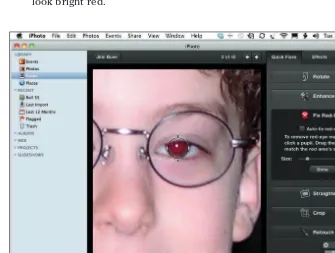
Removing red-eye and red tint
Red-eye is light from the camera’s flash, reflected back. Red-eye happens fre-quently with humans because red is the color of the eye’s retinal tissue. (You get green-eye or even blue- or yellow-eye when taking pictures of some dogs and cats, whose retinal tissues aren’t red.) Red-eye can be more prominent in photos shot in dim rooms, because the eye’s pupils are dilated and exposing more retina.
The red-eye effect is a common problem in flash photography — so common that many digital cameras come with built-in red-eye reduction. But my shots prove that my digital camera still zaps people’s eyes with red even with this reduction feature — either that or it proves that I don’t know how to use the camera’s reduction feature.
It doesn’t matter. You have a magic wand in iPhoto that zaps red-eye. Follow these steps:
1. Browse your iPhoto library and select the thumbnail for the image, and then click the Edit tool on the toolbar.
After you click Edit, the selected image fills the Viewer pane and the Quick Fixes pane appears (refer to Figure 4-1).
2. Zoom into the photo.
73
Chapter 4: Improving Photos
3. Click the Fix Red-Eye button in the Quick Fixes pane.
A circle with four handles then appears over the image as you move your pointer, as shown in Figure 4-4. The circle defines the area that will be changed.
4. Do one of the following:
•Click the Auto-Fix Red-Eye option. This option looks for the obvious red eyes in the image and reduces the red tint in them. However, it may not do the job the way you want — which is why you have a second choice.
•Adjust the red-eye area size with the Size slider, and then click on the area to change. You can click your own areas to reduce the red tint — as close as possible to the actual red part of the eye — so that you don’t change any other part of the face.
5. To apply the change, click Done.
74
Part I: Getting to Know iPhoto
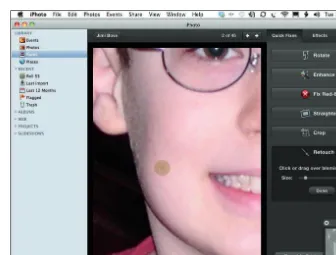
Retouching and enhancing photos
When you begin retouching and enhancing photos, photos can begin to depart from reality. (Removing red-eye is, after all, just removing an effect that the camera put there.) You can literally alter the photo with iPhoto in such a way that even a judge and jury couldn’t tell the difference. You can remove anomalies and blemishes by using the Retouch button and enhance the colors in a photo by using the Enhance button.
To retouch a photo, follow these steps:
1. Browse your iPhoto library and select the thumbnail for the image, and then click the Edit tool on the toolbar.
The selected image fills the Viewer pane and the Quick Fixes pane appears (refer to Figure 4-1).
2. Zoom in to the photo.
Use the Zoom slider to zoom into the area to retouch.
3. Click the Retouch button in the Quick Fixes pane.
The Retouch tool displays a circle over the image as you move your pointer, as shown in Figure 4-5. The circle defines the area that will be changed. You can adjust the size of this circle by dragging the Size slider under the Retouch button.
4. Click the circle on the image or drag over the circle.
Click once to retouch evenly within the circled area, or drag over the circled area as though you’re using a brush. The circled area blends into the surrounding pixels, removing (or at least blurring) the blemish or spot. Life would be so much easier if getting rid of real blemishes were this easy.
5. To apply the change, click Done.
The Retouch feature clones neighboring pixels and uses them to replace the pixels in the circled area, blending them by manipulating color values. (And you thought cloning was for sheep!)
75
Chapter 4: Improving Photos
Figure 4-5: Retouch a photo.
To enhance a photo, select the picture’s thumbnail and click the Edit tool, and then click the Enhance button in the Quick Fixes pane. The essential effect of Enhance is to make the colors, and the overall photo, more vivid.
Adjusting exposure, contrast, and saturation
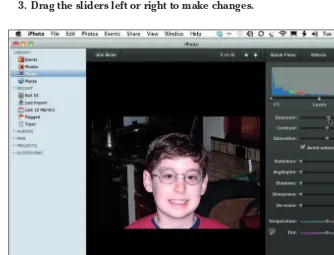
76
Part I: Getting to Know iPhoto
Whatever the lighting conditions are when you take your photos, you can regain some of the detail lost in the darkness by using the Adjust pane and then adjusting the Exposure, Contrast, and Saturation sliders. These sliders show the effects of changes immediately.
To adjust these settings for a photo, follow these steps:
1. Browse your iPhoto library and select the thumbnail for the image, and then click the Edit tool on the toolbar.
The selected image fills the Viewer pane and the Quick Fixes pane appears (refer to Figure 4-1).
2. Click the Adjust tab to show the Adjust pane.
The Adjust pane appears to the right of the Viewer pane, as shown in Figure 4-6.
3. Drag the sliders left or right to make changes.
77
Chapter 4: Improving Photos
You can bring out details in photos taken in poor lighting conditions by adjusting the Exposure and Contrast sliders. The sliders allow you to make incremental adjustments — drag each slider gradually until you create the effect you want, or click anywhere along the slider bar to jump directly to a setting.
4. If you don’t like the last change you made, you can click the Revert to Previous button at the bottom of the Adjust pane to reset the sliders to their previous settings.
You can also continue to undo changes by clicking the Undo button next to the Revert to Previous button or choosing Edit➪Undo.
Adding effects
Some scenes just look better with faded color, and others (especially his-toric scenes) look better in a sepia tone. Antique-looking images can evoke a moody atmosphere. The vignette effect can be effective for portraits to create an enhanced starkness around the face, and black-and-white can be useful for trying to achieve the Ansel Adams look.
You can add one or more of these effects to your image by selecting the pic-ture’s thumbnail in the Viewer pane, clicking the Edit tool, and then clicking the Effects tab in the upper right corner to show the Effects pane. The Effects pane appears to the right of the Viewer pane.
Some effects, such as B & W (black and white), can be turned on or off by clicking the effect tile once in the Effects pane. Others, such as Vignette, have levels you can set by clicking the left or right arrow inside the effect tile in the Effects pane. You can combine effects by clicking one tile and then another. Click the Revert to Original button at the bottom of the Effects pane to remove all effects, or click Undo to undo the last change.
Trimming Video Clips
78
Part I: Getting to Know iPhoto
Figure 4-7: Drag the ends of the frame viewer and then click Trim.
To trim the beginning or ending of the clip, drag either the beginning or the end of the frame viewer to a new position. For example, you can drag the right end of the frame viewer (the end of the clip) to the left, and the left end of the frame viewer (the beginning of the clip) to the right, to trim both the beginning and end of the clip (refer to Figure 4-7).
80
Part I: Getting to Know iPhoto
1. Select the pictures to use for the slideshow.
You can browse and select thumbnails in the Viewer pane while brows-ing or select one or more events in Events, one or more locations in Places, or one or more faces in Faces, as described in Chapter 2. Or, you can select the most recently browsed event, Last Import, or Flagged in the Recent section of the Source pane, or any photo album, any MobileMe, Flickr, or Facebook album, or any project. The section “Assembling pictures for an exhibition,” later in this chapter, offers more details about selecting photos.
2. Click the Slideshow tool in the toolbar.
The Slideshow tool looks like a CD player Play button. After you click Slideshow, the first image fills the screen and the Themes, Music, and Settings browser appears on top, as shown in Figure 5-1.
3. (Optional) Choose a theme and some music for the slideshow, and change its settings.
81
Chapter 5: Enjoying Slideshows
The first time you play a slideshow of the selected album or pictures, the Themes, Music, and Settings browser appears (refer to Figure 5-1). See the later section “Choosing a theme and music” for details on choosing themes and music and see “Changing playback settings” for changing settings.
4. Click the Play button in the slideshow settings (or Cancel).
After you click Play, the slideshow starts. iPhoto remembers the theme, music, and settings so that you don’t have to choose them the next time you click Slideshow.
5. Control playback with the slideshow controls.
88
Part I: Getting to Know iPhoto
1. After playing a slideshow, leave the thumbnails selected in the Viewer pane. If you selected a photo album, leave the photo album selected.
2. Click the Create tool on the toolbar and choose Slideshow from the pop-up menu that appears.
3. Enter a name for the slideshow in the Name field (or use the name supplied) and click Create.
iPhoto creates a new section of the Source pane (if it hasn’t been cre-ated already) named Slideshows and saves the selected pictures as a permanent slideshow.
Select the slideshow’s name in the Slideshows section of the Source pane. You can then click the Play or Preview buttons to view the saved slideshow, click Themes to change its theme, click Music to change its music, or click Text Slide to add a text slide, such as a title slide or credits. Click Settings to open the Slideshow Settings pane, shown in Figure 5-5.
89
Chapter 5: Enjoying Slideshows
In the Slideshow Settings pane, click All Slides at the top to make changes to all slides at one time, or click This Slide to make changes to settings for only this slide. Using this powerful feature, you can edit your slideshow to your heart’s content, by changing the duration, transition, and other settings for each slide.
Exporting Slideshows
A slideshow on your computer is wonderful for those who can pull up a seat and watch. If you have a laptop, iPad, iPod, or iPhone, you no doubt already appreciate the slideshows you can show others on the spot. But to reach a larger audience, or different audiences at different times, you have some options:
✓ Share your slideshow online.
The entire slideshow can be made available online (in the Gallery sec-tion of your MobileMe account) for others to view. See Chapter 6 for details.
✓ Export your slideshow in a format suitable for an iPad, iPod, or iPhone or for Apple TV.
You can export the slideshow in format sizes that work well with these devices.
✓ Export your slideshow to a QuickTime movie.
You can post a QuickTime movie on a Web page and include it with other scenes in an iMovie presentation.
✓ Import your slideshow into iDVD to make a DVD.
You can use your slideshow, including music, with iDVD, which gives you tools to improve the slideshow and burn a DVD disc. I describe how to import slideshows into iDVD in Chapter 12.
In addition, you can share individual pictures with others via e-mail, Flickr, or Facebook and publish individual pictures on a Web page. I describe how to do all these tasks in Chapter 6.
Exporting to an iPad, iPod, or iPhone, or to Apple TV
90
Part I: Getting to Know iPhoto
you expect in a DVD player are on the screen at the touch of a finger. You can also view slideshows on an iPod classic.
Or, you can just sit back on your couch and let Apple TV offer up your slide-shows. Apple TV is sort of a large iPod that wirelessly streams content from one or more iTunes libraries to play on your high-definition (HD) television and audio system.
To export your slideshows for these devices, follow these steps:
1. Save the slideshow as I describe in “Saving and Editing a Slideshow,” earlier in this chapter.
2. Select the slideshow in the Slideshows section of the Source pane and click the Export button in the middle of the toolbar, along the bottom of the iPhoto window (refer to Figure 5-5).
The Export dialog appears, as shown in Figure 5-6.
Figure 5-6: Export a slideshow in several formats at a time.
3. Choose one or more format sizes for your exported slideshow.
If you choose more than one, multiple slideshow files are created and transferred to iTunes for synchronizing with these devices.
4. Select the Automatically Send Slideshow to iTunes option to send the slideshow to iTunes in one step.
91
Chapter 5: Enjoying Slideshows
Exporting a QuickTime movie file
QuickTime is sort of a container for multimedia built into every Mac and available to any PC user intelligent enough to use iTunes — it’s installed with every Windows version of iTunes.
When you create a QuickTime movie file, even those dudes with Dells and geeks with Gateways can play it. You send it to them on a CD or DVD, or you can also publish a QuickTime file on a Web site for anyone to play.
To put your slideshow into a QuickTime file, follow these steps:
1. Save the slideshow.
See the section “Saving and Editing a Slideshow,” earlier in this chapter, for specific instructions.
2. Click Export.
The Export dialog appears (refer to Figure 5-6).
The QuickTime resolution for slideshows
You have some choices to make about howyou plan to use a slideshow before exporting a QuickTime movie. You can make a movie as large as your display (which is how iPhoto typi-cally plays slideshows). However, pixel resolu-tion affects file size dramatically, and you need to make a movie that everyone can play. If you specify 1024 x 768 pixels (the typical lowest display setting for slideshows on an iMac), the resulting movie may still be too large to send as an e-mail attachment — if that’s what you want to do with it. Your movie’s screen size may also be too large for other people’s displays.
Although you can type any number you want as a pixel dimension, you should maintain the 4:3 aspect ratio that digital cameras and displays use. You can, however, reverse the ratio and specify 480 x 640 pixels, if all photos in the slide-show are vertically oriented.
A resolution of 800 x 600 is okay for just about all computer displays, but 640 x 480, the suggested resolution, is by far the most commonly used. With 640 x 480 pixels, the resulting file size is small and easy to handle by e-mail or another means (such as publishing on a Web page). For example, a slideshow of ten photos, at a 640 x 480 pixel image size, creates a QuickTime file that is 1MB; the same slideshow at 800 x 600 pixels creates a 1.5MB file, and at 1024 x 768 pixels, a 2.3MB file.

![Wiley Publishing OpenOffice org for Dummies [2004]](data:image/gif;base64,R0lGODlhAQABAIAAAP///wAAACH5BAEAAAAALAAAAAABAAEAAAICRAEAOw==)