Windows
®
XP
Timesaving
Techniques
™
FOR
DUMmIES
‰2
ND EDITION
by Woody Leonhard
Author of Windows® XP All-in-One Desk Reference For Dummies®
Windows
®
XP
Timesaving
Techniques
™
FOR
DUMmIES
‰2
ND EDITION
by Woody Leonhard
Author of Windows® XP All-in-One Desk Reference For Dummies®
Hoboken, NJ 07030-5774
Copyright © 2005 by Wiley Publishing, Inc., Indianapolis, Indiana
Published by Wiley Publishing, Inc., Indianapolis, Indiana
Published simultaneously in Canada
No part of this publication may be reproduced, stored in a retrieval system or transmitted in any form or by any means, electronic, mechanical, photocopying, recording, scanning or otherwise, except as permitted under Sections 107 or 108 of the 1976 United States Copyright Act, without either the prior written permission of the Publisher, or authorization through payment of the appropriate per-copy fee to the Copyright Clearance Center, 222 Rosewood Drive, Danvers, MA 01923, (978) 750-8400, fax (978) 646-8600. Requests to the Publisher for per-mission should be addressed to the Legal Department, Wiley Publishing, Inc., 10475 Crosspoint Blvd., Indianapolis, IN 46256, (317) 572-3447, fax (317) 572-4355, e-mail: [email protected].
Trademarks:Wiley, the Wiley Publishing logo, For Dummies, the Dummies Man logo, A Reference for the Rest of Us!, The Dummies Way, Dummies Daily, The Fun and Easy Way, Dummies.com, Timesaving Techniques, and related trade dress are trademarks or registered trademarks of John Wiley & Sons, Inc. and/or its affiliates in the United States and other countries, and may not be used without written permission. Windows is a registered trademark of Microsoft Corporation in the United States and/or other countries. All other trademarks are the property of their respective owners. Wiley Publishing, Inc., is not associated with any product or vendor men-tioned in this book.
LIMIT OF LIABILITY/DISCLAIMER OF WARRANTY: THE PUBLISHER AND THE AUTHOR MAKE NO REPRESENTA-TIONS OR WARRANTIES WITH RESPECT TO THE ACCURACY OR COMPLETENESS OF THE CONTENTS OF THIS WORK AND SPECIFICALLY DISCLAIM ALL WARRANTIES, INCLUDING WITHOUT LIMITATION WARRANTIES OF FIT-NESS FOR A PARTICULAR PURPOSE. NO WARRANTY MAY BE CREATED OR EXTENDED BY SALES OR PROMO-TIONAL MATERIALS. THE ADVICE AND STRATEGIES CONTAINED HEREIN MAY NOT BE SUITABLE FOR EVERY SITUATION. THIS WORK IS SOLD WITH THE UNDERSTANDING THAT THE PUBLISHER IS NOT ENGAGED IN REN-DERING LEGAL, ACCOUNTING, OR OTHER PROFESSIONAL SERVICES. IF PROFESSIONAL ASSISTANCE IS REQUIRED, THE SERVICES OF A COMPETENT PROFESSIONAL PERSON SHOULD BE SOUGHT. NEITHER THE PUB-LISHER NOR THE AUTHOR SHALL BE LIABLE FOR DAMAGES ARISING HEREFROM. THE FACT THAT AN ORGANI-ZATION OR WEBSITE IS REFERRED TO IN THIS WORK AS A CITATION AND/OR A POTENTIAL SOURCE OF FURTHER INFORMATION DOES NOT MEAN THAT THE AUTHOR OR THE PUBLISHER ENDORSES THE INFORMA-TION THE ORGANIZAINFORMA-TION OR WEBSITE MAY PROVIDE OR RECOMMENDAINFORMA-TIONS IT MAY MAKE. FURTHER, READ-ERS SHOULD BE AWARE THAT INTERNET WEBSITES LISTED IN THIS WORK MAY HAVE CHANGED OR DISAPPEARED BETWEEN WHEN THIS WORK WAS WRITTEN AND WHEN IT IS READ.
For general information on our other products and services, please contact our Customer Care Department within the U.S. at 800-762-2974, outside the U.S. at 317-572-3993, or fax 317-572-4002.
For technical support, please visit www.wiley.com/techsupport.
Wiley also publishes its books in a variety of electronic formats. Some content that appears in print may not be available in electronic books.
Library of Congress Control Number: 2004116452
ISBN: 0-7645-7883-9
Manufactured in the United States of America
10 9 8 7 6 5 4 3 2 1
About the Authors
Woody Leonhard: Curmudgeon, critic, and perennial “Windows Victim,” Woody Leonhard runs a fiercely independent Web site devoted to delivering the truth about Windows and Office, whether Microsoft likes it or not. With up-to-the-nanosecond news, observations, tips and help, AskWoody.comhas become the premiere source of unbiased information for people who actually use the products.
In the past decade, Woody has written more than two dozen books, drawing an unprece-dented six Computer Press Association awards and two American Business Press awards. Woody was one of the first Microsoft Consulting Partners and is a charter member of the Microsoft Solutions Provider organization. He’s widely quoted — and reviled — on the Redmond campus.
Dedication
To Duangkhae Tongthueng (better known as “Add”), a truly amazing lady, who has helped me in so many ways.
Author’s Acknowledgments
I would like to thank Phakdee Noosri, my researcher (better known as “Lek”), Web mas-ter, and assistant extraordinaire. Lek was born in Nakhorn Si Thammarat, in southern Thailand. He recently graduated with a degree in Computer Science at Prince of Songkla University, Phuket Campus. Lek is an avid photographer, camper, and swimmer. You can frequently find him swimming around Lampsing Beach — one of the most beautiful beaches in the world. You can see his handiwork at AskWoody.com.
I would also like to thank my wondrous agents, Claudette Moore and Debbie McKenna; Becky Huehls, who got all the hard work, including the nail-biting task of ensuring this book made it out on time; Steven Hayes, who approached me with a fascinating idea that ultimately turned into the first edition of this book; Rebecca Senninger for yeoman’s work on the editing, and all the composition services people who have done an out-standing job with the unique layout that makes this book so easy to use.
Composition Services
Senior Project Coordinator: Nancee Reeves
Layout and Graphics: Amanda Carter, Lauren Goddard, Denny Hager, Stephanie D. Jumper, Melanee Prendergast, Jacque Roth, Heather Ryan
Proofreaders: Leeann Harney, Joe Niesen, Carl William Pierce, Christine Pingleton
Indexer: Rebecca R. Plunkett
Acquisitions, Editorial, and Media Development
Project Editor:Rebecca Huehls
Senior Acquisitions Editor:Steve Hayes
Copy Editor:Rebecca Senninger
Technical Editor:Lee Musick
Editorial Manager:Leah P. Cameron
Media Development Manager:Laura VanWinkle
Media Development Supervisor:Richard Graves
Editorial Assistant:Amanda Foxworth
Cartoons:Rich Tennant (www.the5thwave.com)
tration form located at www.dummies.com/register/.
Some of the people who helped bring this book to market include the following:
Publishing and Editorial for Technology Dummies
Richard Swadley,Vice President and Executive Group Publisher
Andy Cummings,Vice President and Publisher
Mary Bednarek,Executive Acquisitions Director
Mary C. Corder,Editorial Director
Publishing for Consumer Dummies
Diane Graves Steele,Vice President and Publisher
Joyce Pepple,Acquisitions Director
Composition Services
Gerry Fahey,Vice President of Production Services
Contents at a Glance
Introduction
1
Part I: No-Bull Installation and Setup
7
Technique 1: Getting the Latest Version ofWindows 9
Technique 2: Running the Activation Gauntlet 25
Technique 3: Retrieving Your Product Key 31
Technique 4: Installing a Legal Copy of
Windows XP over a Bootleg 36
Part II: Making Windows Lean and
Clean
41
Technique 5: Making Windows Work Faster 43
Technique 6: Shut Down, Restart, and Switch
Users Quickly 57
Technique 7: Saving Time (And Your Eyes)
On-Screen 61
Technique 8: Stopping a Thief with Your
Welcome Screen 72
Technique 9: Rapid Power Passwords 80
Technique 10: Windows Power Management 89
Technique 11: Keeping Programs from
Starting Automatically 94
Technique 12: Removing and Reinstalling
Programs 102
Part III: Convincing Windows
to Work Your Way
111
Technique 13: Streamlining the Start Menu 113
Technique 14: Building a Power Desktop 126
Technique 15: Tricking Out the Taskbar 140
Technique 16: Launching Your Most-Used
Programs Quickly 147
Technique 17: Making Programs Run Your
Way 153
Technique 18: Using Built-In Keyboard
Shortcuts 158
Technique 19: Making Your Own Keyboard
Shortcuts 163
Technique 20: Exploring Effectively 175
Technique 21: Finding the Files You Want
Fast 189
Technique 22: Listing Files Quickly 199
Part IV: Making the Most of Internet
and E-Mail
209
Technique 23: Customizing Internet Explorer 211
Technique 24: Saving Time with Google 229
Technique 25: Locating and Sharing Files
on the Internet 239
Technique 26: Keeping Messenger in Line 246
Technique 27: Polyglot IMing with Trillian 254
Technique 28: Streamlining Outlook Express 258
Technique 29: Zapping Junk Mail 268
Technique 30: Protecting Your Kids 277
Part V: Optimizing Your Musical
Entertainment
281
Technique 31: Using Windows Media Player 283
Technique 32: No-Nonsense Music Gathering 289
Technique 33: Buying Music on the Web 296
Technique 34: Tuning In the Radio 299
Technique 35: Creating Your Own Music CDs 302
Technique 36: Transferring Music to MP3
Own Terms 435
Technique 56: Running Disk Chores While
You Sleep 442
Technique 57: Keeping Your Hard Drive in
Shape 451
Technique 58: Updating Drivers Safely 458
Technique 59: Running Periodic Maintenance 466
Technique 60: Making Backups — Fast 473
Technique 61: Requesting Remote Assistance 482
Technique 62: Getting Help Fast 487
Part X: Fast (Nearly Painless) Disaster
Recovery
493
Technique 63: Getting Your PC to Boot When
It Doesn’t Want To 495
Technique 64: Restoring Your System after
Calamitous Change 505
Technique 65: Recovering a Lost Password 510
Technique 66: Surviving the Blue Screen of
Death 516
Technique 67: Creating a Startup Disk 521
Part XI: The Scary (Or Fun!) Stuff
527
Technique 68: Changing the Registrywithout Getting Burned 529
Technique 69: Updating Windows’
Registered Owner 536
Technique 70: Speeding Up Scanning for
Squishable Files 539
Technique 71: Using Program Compatibility
Modes 542
Technique 72: Fast, Easy, and Safe Online
Shopping 547
Index
555
Technique 37: Taking Snapshots with a
Webcam 311
Technique 38: Recording Video with a
Webcam 315
Technique 39: Editing Your Home Movies 319
Technique 40: Managing Pictures from a
Digital Camera 326
Technique 41: Doing More with Your Pics 333
Technique 42: Decreasing Picture Download
Times 341
Technique 43: Printing and Posting Pictures 345
Technique 44: Using a Scanner Effectively 350
Part VII: Ensuring Peak Network
Performance
355
Technique 45: Installing a Small Network 357
Technique 46: Securing Your Wireless
Network 367
Technique 47: Adding and Configuring
a New User 371
Technique 48: Sharing Drives and Folders 383
Part VIII: Fast Security Techniques
391
Technique 49: Protecting Your PC fromViruses While You Sleep 393
Technique 50: Plugging and Unplugging
Windows Firewall 401
Technique 51: Building a Better Firewall 409
Technique 52: Zapping Scumware 417
Technique 53: Canning Adware and
Obnoxious Cookies 420
Technique 54: Checking Your Security
Table of Contents
Introduction
1
About This Book 1 Foolish Assumptions 2 What’s in This Book 2 Conventions Used in This Book 4 Icons Used in This Book 5 Where to Go from Here 5
Part I: No-Bull Installation and Setup
7
Technique 1: Getting the Latest Version of
Windows
9
Installing Service Pack 2 10 Setting Up Service Pack 2 12 Recovering from SP2 Problems 13 Choosing Between XP Home and XP Professional 13 Upgrading Quickly 15
In-place upgrades in a snap 16 Breezing through clean installs 17
Transferring Files and Settings 21
Understanding what gets transferred 21 Choosing storage media for transferring
your files 22
Transferring files and settings on a clean install 22 Breezing through a transfer 23
Technique 2: Running the Activation
Gauntlet
25
Understanding Activation, Registration,
and Passport 25 Activating Windows XP the Right Way 26
Understanding your activation options 26 Installing an old copy of Windows XP
on a new computer 27
Registering for Fun and Profit 28 Signing Up for Passport (And Hotmail) 28 Staying on Top of Privacy Issues 30
Technique 3: Retrieving Your Product Key
31
Unlocking the Secrets of the Windows XP
Product Key 32 Locating the Key 32
Reconstructing the Product Key 33 Verifying Your Product Key 33
Technique 4: Installing a Legal Copy of
Windows XP over a Bootleg
36
Nailing Pirate Product Keys 36 Updating Your Key the Easy Way 38 Toughing It Out the Hard Way 39
Part II: Making Windows Lean and
Clean
41
Technique 5: Making Windows Work
Faster
43
Bypassing the Logon Screen 43 Monitoring System Performance 45 Eliminating the #1 Bottleneck: Memory Drain 46 No-Nonsense Tweaking 48
Using Windows’ built-in tweaking tools 48 Disabling automatic error reporting 50 Cleaning and defragging your hard drive 50 Special-purpose tweaks 52 Fine-tuning Intel systems 54
Technique 6: Shut Down, Restart, and
Switch Users Quickly
57
Creating a Fast Shut Down Icon 58 Creating an Icon to Abort a Fast Shut Down 59 Creating an Icon to Restart Your Computer
Quickly 59 Using Shut Down and Restart Options 59 Creating an Icon to Switch Users 60
Technique 7: Saving Time (And Your Eyes)
On-Screen
61
Applying Basic, Vision-Saving Tactics 61 Understanding How Characters Appear
On-Screen 62 Screen Resolution and Zoom on CRTs 63
Part III: Convincing Windows to
Work Your Way
111
Technique 13: Streamlining the Start
Menu
113
Navigating the Start Menu 114 Pinning and Unpinning 114
Unpinning Internet Explorer and Outlook
from the Start menu 114 Pinning what you like to the Start menu 116 Creating more room for pinned items 117
Reining In the All Programs Submenu 118
Where All Programs comes from 118 Rearranging the All Programs submenu 120
Cascading to Save Time 122
Technique 14: Building a Power Desktop
126
Desktop Brevity: The Soul of Wit 127
Cleaning up old icons 127 Exploring unused desktop shortcuts 128
Aligning icons 129
Moving icons so you have more room on the
desktop 130
Adding Other Icons — Maybe 131 Avoiding Active Content 131 Trimming the New Right-Click Menu 132 Generating One-Click E-Mail 134
Setting up the e-mail 134 Improving one-click e-mail 135
Starting Multiple Programs at Once 136 Arranging Multiple Windows Side-by-Side 138
Technique 15: Tricking Out the Taskbar
140
Customizing the Taskbar 140 Grouping Windows 142 Blitzing the Address Bar 144 Navigating from the Taskbar 145
Technique 16: Launching Your Most-Used
Programs Quickly
147
Using the Quick Launch Toolbar 147 Making the Quick Launch Toolbar Appear 148 Adding Programs to the Quick Launch Toolbar 148 Fine-Tuning ClearType 68
Setting Up Multiple Monitors 69
Technique 8: Stopping a Thief with Your
Welcome Screen
72
Choosing a Branding Approach 72 Building a Pre-Logon Screen 73
Bringing the pre-logon screen to life 74 Adding line breaks to your pre-logon screen 75
Modifying the Windows Welcome Screen 77
Technique 9: Rapid Power Passwords
80
Understanding Password Limitations 80 Requiring a Password to Log On 81 Looking at Passwords from a Cracker’s Point
of View 82 Choosing a Quick, Strong Password 84 Changing and Deleting Passwords 85 Keeping Your Password Alive 87
Technique 10: Windows Power
Management
89
Understanding the Standards 89 Using Stand By and Hibernate 90 Forcing Power Off on Shut Down 91 Timesaving Settings for Power Users 91
Technique 11: Keeping Programs from
Starting Automatically
94
Recognizing You Have a Problem 94 Finding and Eliminating Auto-Starting Programs 95 Preventing New Auto-Starters 100
Technique 12: Removing and Reinstalling
Programs
102
Removing Programs Thoroughly 102 Updating the Add or Remove Programs List 105 Cleaning Up before a Reinstall 105 Adding Windows Components 106 Using Non-Microsoft Replacements 107 Nixing Windows Messenger (And Other Hidden
Table of Contents
xi
Making Room for More Programs on the Quick Launch Toolbar 149 Auto-Hiding the Taskbar 149 Changing Quick Launch Screen Tips 149 Opening Documents Quickly 151 Opening Web Pages Quickly 151 Adding a Blank E-Mail Message to the Quick
Launch Toolbar 152 Creating New, Template-Based Documents
Quickly 152
Technique 17: Making Programs Run Your
Way
153
Running a Program when Windows Starts 153 Allowing Other Users to Run Your Programs 154 Bringing Back Word’s Last Document 155
Technique 18: Using Built-In Keyboard
Shortcuts
158
Shortcuts Everybody Needs 159 Important Windows Key Combinations 160 A Grab-Bag of Application Shortcuts 160 Odds ’n’ (Sometimes Useful) Ends 161
Technique 19: Making Your Own Keyboard
Shortcuts
163
Putting Custom Hot Keys to Work for You 163 Knowing What You Can’t Do with Hot Keys 164 Creating and Organizing Hot Keys 164
Starting a program with a hot key 165 Opening a folder with a hot key 166 Surfing to a Web site with a hot key 168 Sending e-mail with a hot key 169 Opening a file with a hot key 170 Creating new documents with a hot key 171 Running presentations with a hot key 172
Undoing Hot Keys 173 Using ActiveWords for Expanded Hot Keys 174
Technique 20: Exploring Effectively
175
Making Windows Show Filename Extensions 175 Customizing Explorer for Speed 177
Seeing all your files and folders 177 Seeing pathnames in Explorer’s title bar 178
Choosing the Right View 179
Working with Details view 181 Returning crucial folders to their original views 182 Sorting files by group 183
Setting Folders’ Behavior 184 Copying Files Quickly 185 Changing Filename Associations 186 Renaming Files En Masse 187 Customizing the Open and Save As Dialog Boxes 188
Technique 21: Finding the Files You Want
Fast
189
Speeding Up Searches 190
Starting with advanced searches 190
Nixing the mutt 191
Engaging Your Brain Before the Search 191 Running a Simple Advanced Search 192 Searching for Contents and Metadata 193 Employing Wildcards 194 Saving and Reusing Searches 195 Finding Files That Got Lost 195
First, don’t panic 196
Second, get determined 196
Advanced Searching with Copernic 197
Technique 22: Listing Files Quickly
199
Getting Started by Fixing a Windows Bug 200 Showing Directory Listings 201
Writing a program to show directory listings 202 Adding the program to the right-click menu 203
Listing Files by Filename Extension 204 Printing a File List Automatically 206 Getting Rid of Listing Entries 208
Part IV: Making the Most of
Internet and E-Mail
209
Technique 23: Customizing Internet
Explorer
211
Speeding Up IE 211
Technique 28: Streamlining Outlook
Express
258
Arranging Your OE Desktop 258 Disabling Windows Messenger Automatic
Sign-In 260 Making OE Wait to Send and Receive 260 Dealing with Read Receipts 261 Reducing Clutter in Your Contacts List 262 Using Signatures the Smart Way 262 Using a Business Card 263 Organizing Contacts in Folders 264 Setting Up Outlook Express for More Than One
User 264
Bringing old Identities into the fold 265 Importing existing messages for a new user 266
Dealing with E-Mail Attachment Security 266 Removing the “You Have Messages” Notice 267
Technique 29: Zapping Junk Mail
268
Understanding Spam 268 Phishing Phor Phun and Prophit 270 Avoiding Spammeisters and Phishers 270
Lurking in Web Beacons 271 Crawling and trawling 272 Unsubscribing — Not! 273
Fighting Back 273
Taking spam action 273
Biting the phishers 274 Filtering out junk e-mail 274
Technique 30: Protecting Your Kids
277
Evaluating Parental Control Software 277 Going Beyond Parental Control Software 279 Settling on a Workable Plan 279
Part V: Optimizing Your Musical
Entertainment
281
Technique 31: Using Windows Media
Player
283
Installing WMP 10 283 Tweaking WMP 285 Running WMP 286
Controlling WMP from the keyboard 288
Finding Uncommon Methods for Common Tasks 218
Using important IE keyboard shortcuts 218 Unhijacking the Back button 218 Creating custom shortcuts from the Address
bar 219
Controlling Favorites — Directly 221 Keeping IE under Control 222
Removing “saved” passwords and user
names 222
Untrusting trusted publishers 224 Checking for add-ons and parasites 225 Configuring security zones 226 Riding herd on pop-ups 227 Overriding the double download inanity 227
Technique 24: Saving Time with Google
229
Using the Google Toolbar 230
Installing the Toolbar 230 Getting around the Toolbar 231 Getting the most out of the Toolbar 232
Using Google Effectively 234
Saving time with search terms 234 Using Advanced Search 235
Viewing the news 236
Scanning newsgroups 236 Using the Directory the timesaving way 237
Technique 25: Locating and Sharing Files
on the Internet
239
Deciding What Files Are Worth Sharing 239 Understanding How File Sharing Works 240 Downloading and Installing Shareaza 242 Finding the Good Stuff 245
Technique 26: Keeping Messenger in Line
246
Saving or Shooting the Messenger? 246 Getting the Skinny on User IDs 248 Setting Up Your Messenger Account 249 Making Contact 252 Using the Fancier Features 253
Technique 27: Polyglot IMing with Trillian
254
Table of Contents
xiii
Technique 32: No-Nonsense Music
Gathering
289
Adding Music to the Media Library 289
Making WMP search for music on your hard
drive 289
Adding new songs to the Library 290
Ripping CDs You Own 291
Ripping ethics 291
Choosing a file format and sampling rate 292
Ripping A to Z 293
Technique 33: Buying Music on the Web
296
What’s Going On Here? 296 Sorting through the Stores 297 So It “Plays for Sure”? 298
Technique 34: Tuning In the Radio
299
Tuning In a Station 299
Technique 35: Creating Your Own
Music CDs
302
Choosing the Type of CD to Burn 302 Picking Songs to Go on the CD 303 Burning the CD or DVD 304 Dealing with Hard Drive Space Issues 305
Technique 36: Transferring Music to MP3
Players 306
Choosing an MP3 Player 306 Copying Files to an MP3 Player 307 Keeping Backups 308
Part VI: Having Fun and Saving
Time with Visual Media
309
Technique 37: Taking Snapshots with a
Webcam
311
Taking the Shot 311 Setting Up the Shot — F/11 and Be There 313 Using Time Delay 313
Technique 38: Recording Video with a
Webcam
315
Installing Windows Movie Maker 2 315 Setting Up and Recording a Video 316 Recovering from a WMM 2 Freeze 318
Technique 39: Editing Your Home Movies
319
Understanding the Limitations of WMM 320 Importing and Combining Clips 320 Trimming Clips 322 Using Transitions and Effects 323 Adding Titles and Credits 324 Saving the Movie 324
Technique 40: Managing Pictures from a
Digital Camera
326
Transferring Pictures to Your PC Automatically 326 Transferring Pictures with Windows Explorer 329 Using a Camera’s Memory Card as a Storage
Device on Your PC 330
Technique 41: Doing More with Your Pics
333
Putting Your Pic on the Desktop 333 Using Your Pictures for a Screen Saver
Slideshow 334 Burning Pictures on a CD 335 Burning a Slideshow on a CD 337 Recovering Deleted Pictures on Your Camera 338
Technique 42: Decreasing Picture
Download Times
341
Understanding Digital Pic File Sizes 341 Changing the Resolution of Pictures 343
Technique 43: Printing and Posting
Pictures
345
Using the Photo Printing Wizard 345 Posting Pics on the Web 348
Technique 44: Using a Scanner Effectively
350
Part VIII: Fast Security Techniques
391
Technique 49: Protecting Your PC from
Viruses While You Sleep
393
Understanding Viruses 393
Dissecting a virus 394
Discerning whether your PC’s infected 396
What to do next 397
Protecting Yourself — Quickly 398 Avoiding Hoaxes 399
Technique 50: Plugging and Unplugging
Windows Firewall
401
Coping with Windows Firewall 402 Changing Firewall Settings 404 Constructing a Firewall Lockdown Icon 406
Technique 51: Building a Better Firewall
409
Understanding Firewalls 409 What to Look for in a Software Firewall 411 Using Windows Firewall 411 Installing ZoneAlarm 413 Honing ZoneAlarm 414 Checking the Logs 415
Technique 52: Zapping Scumware
417
What Is Scum? 417 Knowing When You’ve Been Slimed 418 Running Spybot-S&D 418 Going Beyond Spybot 419
Technique 53: Canning Adware and
Obnoxious Cookies
420
Understanding Cookies 420
Gathering information with cookies 421 Passing information with spy cookies 422 Combining information with spy cookies 423 Looking for spy cookies on your PC 423
Zapping Advertising Junk with Ad-Aware 424 Using Internet Explorer’s Built-In Cookie
Catchers 426
Understanding P3P 426
Setting Internet Explorer’s cookie policy 427
Part VII: Ensuring Peak Network
Performance
355
Technique 45: Installing a Small Network
357
Putting the Pieces Together 357
Choosing the right hardware 358 Pulling cable through your office or house 359 Locating the hardware 359
Preparing for the Network Setup Wizard 359 Running the Network Setup Wizard 360 Checking the Pieces 363 Understanding Addresses 364
IP addresses on the Internet 364 IP addresses on your local network 364 Assigning local IP addresses 365
Technique 46: Securing Your Wireless
Network
367
Running the Wireless Network Setup Wizard 367 Making Manual Changes 369
Technique 47: Adding and Configuring a
New User
371
Grasping User Accounts 371
Recognizing account types 372 Working with account types 373 Increasing security with passwords 374 Using simple, common-sense protection 375
Creating a New Account 376 Modifying an Account 377 Using the Hidden Administrator Account 379 Hobbling the Guest Account 380
Technique 48: Sharing Drives and Folders
383
Keeping File Sharing Simple 383 Using the Four Levels of Protection 385
Making a folder Private 387 Making a folder Administrators Here Only 388 Making a folder or drive Read Only on the
Network 388
Table of Contents
xv
Technique 54: Checking Your Security
Perimeter
428
Approaching Your Security Perimeter 428 Running Steve Gibson’s ShieldsUp! 429 Running Microsoft’s Baseline Security
Analyzer 430
Part IX: Keeping Your PC Alive
433
Technique 55: Updating Windows on
Your Own Terms
435
Reining In Windows Update 436 Downloading the Big Updates 438 Checking for Small Updates 440 Retrieving and Installing a Declined Update 441
Technique 56: Running Disk Chores While
You Sleep
442
Setting Up an Account for Scheduler 442
Creating a new Scheduler account 443 Ensuring that your password doesn’t expire
in Windows XP Professional 444 Ensuring that your password doesn’t expire
in Windows XP Home 445 Hiding your dummy Scheduler account 446
Running Disk Cleanup Manually 446 Scheduling Automatic Cleanups 448
Technique 57: Keeping Your Hard Drive in
Shape
451
Scanning Your Hard Drive 451 Running Check Disk Automatically 453 Running Defrag Automatically 456
Technique 58: Updating Drivers Safely
458
Understanding Drivers 458 Choosing Your Drivers Wisely 459
Reasons (Some good, some bad) for
changing drivers 459
Evaluating driver reliability 460
Updating a Driver 462 Rolling Back a Bad Driver 463
Technique 59: Running Periodic
Maintenance
466
Making Your Maintenance Shopping List 466 Weekly Cleaning 467
Vacuuming strategies 467
Dusting tips 467
Cleaning screens 468
Ungunking the mouse 468 Checking the floppy drive 469
Monthly Cleaning 469 Fixing Components As Needed 470
Cleaning CDs 470
Recovering from spilled coffee or soda 470 Pulling out a stuck diskette 471 Pulling out a stuck CD 472
Technique 60: Making Backups — Fast
473
Understanding XP Home’s Backup Limitations 473
Automated System Recovery 474 What to do about backup limitations 474 Manually installing the backup program 474
Creating a Backup 475 Scheduling Backups 478 Restoring a Backup 480 Alternatives to Windows Backup 480
Technique 61: Requesting Remote
Assistance
482
Using Remote Assistance Wisely — Quickly 482 Coping with Remote Assistance Limitations 483 Requesting Remote Assistance 484 Sending a Remote Assistance SOS Using IM 484 Fine-Tuning Remote Assistance 486
Technique 62: Getting Help Fast
487
Part XI: The Scary (Or Fun!) Stuff
527
Technique 68: Changing the Registry
without Getting Burned
529
Don’t Mess with This? 529 Understanding the Registry 530 Backing Up Data the Registry Way 532 Making Changes Safely 533 Running My Favorite Quick Registry Tweak 533
Technique 69: Updating Windows’
Registered Owner
536
Seeing Who Owns Your PC 536 Changing the Owner and Organization 537
Technique 70: Speeding Up Scanning for
Squishable Files
539
Scanning for Squishers 539 Speeding Up the Scan 540
Technique 71: Using Program
Compatibility Modes
542
Scanning for Program Compatibility 542 Setting Compatibility Modes 545 Installing the Retro Way 546
Technique 72: Fast, Easy, and Safe Online
Shopping
547
Searching Reliable E-Tailers 547 Paying It Safe 549
Choosing a payment method 549 Getting what you pay for 549 Using reputable Web sites 550 Handling credit card fraud 551 Keeping private information private 552
Complaining Effectively 553 Mastering eBay 553
Index
555
Part X: Fast (Nearly Painless)
Disaster Recovery
493
Technique 63: Getting Your PC to Boot
When It Doesn’t Want To
495
Running the System File Checker 496 Falling Back to Safe Mode 497
Using Safe Mode of your own volition 498 Using System Restore in Safe Mode 500 Using Help and Support in Safe Mode 501 Using smart techniques to keep the system
running at minimal levels 501 Using the Registry in Safe Mode 501
Using Recovery Console 501
Technique 64: Restoring Your System after
Calamitous Change
505
Understanding System Restore’s Limitations 505 Creating a Restore Point 506 Restoring to a Restore Point — Quickly 507
If Windows isn’t running and won’t start 508
If Windows runs 508
Technique 65: Recovering a Lost
Password
510
Creating a Password Reset Disk 510 Using Your Password Reset Disk 512 Getting Around Your Own Password 513
Technique 66: Surviving the Blue Screen
of Death
516
Encountering a Blue Screen of Death 517 Starting with Common-Sense Approaches 518 Digging into Specific Errors 519
Technique 67: Creating a Startup Disk
521
Introduction
T
ell me if you’ve heard this one before: You’re supposed to be at your son’s school play in two hours. You’re typing away on the computer, putting the finishing touches on a rush report, and all of a sudden Windows XP freezes tighter than a drum, taking your work along with it.Blecch.
Whatever happened to the old-fashioned notion that PCs are supposed to save time, not waste it by the bushelful? What can average people do to make Windows work for them, not againstthem?
That’s where this book comes in. This book isn’t limited to dry “click this, press that” tips: Windows XP Timesaving Techniques For Dummies
goes outside the traditional computer box to solve real-world problems that Windows XP users encounter every day.
About This Book
Microsoft says that Windows XP contains 50,000,000 lines of program-ming code. 400,000,000 PCs run Windows. Half of them use Windows XP, and roughly half of themrun Service Pack 2. Heaven only knows how many people have used Windows. Nobody — absolutely nobody — understands more than a tiny part of Windows XP. Yet everybody — everybody outside of an ashram, anyway — has to come to grips with it. Not an easy task, eh?
You should assume that I’m not going to waste your time. I don’t dillydally around, explaining why you may want to do something. Everything here has a common theme: Use these techniques to save time.
What’s in This Book
To save you time, I organized this book into
techniques — groups of related tasks that make you or your computer (or possibly both!) more efficient and effective. Some techniques are short ’n’ sweet, tackle one specific topic, and get you in and out of the machine in record time. Other techniques are more involved and explore the pros and cons of vari-ous options.
Wherever an important ancillary topic, shorter tip, or loosely related timesaver may be of use, I include it. Watch for the icons. They can save you gobs of time. And don’t be surprised if you bump into a tip or two that urges you to change the way you work, as opposed to simply making changes to your computer.
This book is laid out in a unique, easy-to-read two-column format full of figures and other visual cues that make it easier for you to scan and jump into a technique at the point most appropriate for your cir-cumstances. Linear thinking is good. Nonlinear scan-ning is better.
Lay the book flat so you can see exactly what you’re doing without flipping a bunch of pages (and tearing your hair out in the process).
You can read the book from front to back, or you can dive right into the technique of your choice. Either way works just fine. Anytime a concept is mentioned that isn’t covered in depth in that technique, you’ll find a cross-reference to another technique to find out more. If you’re looking for something specific, check out either the table of contents or the index.
Foolish Assumptions
I assume that you know how to use a computer and you can navigate Windows XP without fretting or asking a lot of questions. In fact, that’s the first way this book saves you time: I don’t cover old ground. I assume that you’re not scared to get under the hood, monkey around, and make changes to
Windows XP — especially if those changes are going to make your computing life easier, more productive, and more hassle free in the long run.
I assume you’re using Windows XP, and most of the techniques in this book apply to any version, partic-ularly if you’ve installed Service Pack 2 or later (the security and wireless networking techniques assume that you use SP2). There are a few exceptions — some techniques apply only to Windows XP Home Edition or only Windows XP Professional Edition. When a given technique only applies to a specific version of Windows XP, I’ll be sure to give you some advanced warning. But you should be aware of the fact that a great schism is lurking here. Some people think that there’s a big difference between Windows XP Home Edition and Windows XP Professional Edition, but the greatest gulf is the difference between running a peer-to-peer network (what Microsoft calls a workgroup) and a client-server net-work (a domainin Microsoft parlance).
When there’s a difference in Windows XP between the way it acts in a peer-to-peer setting and the way it acts on a Big Corporate Network, I usually stick with the peer-to-peer approach, simply because that’s usually the only configuration you have con-trol over. If you have to wrestle with your network administrator, don’t use this book as a blunt instru-ment, though. You can say, instead, “Hey, it says here that I can do that in piddling little Windows XP Home Edition; why can’t I do it with Windows XP
What’s in This Book
3
The Cheat Sheet at the beginning of the book lists my choices as the most important timesaving tech-niques. Tear it out, tape it to your monitor, pass it around to other folks at the office, and be sure to tell ’em Woody shares their pain.
All Gaul may have been divided into three parts, but this book needs eleven (a particularly, uh, galling admission). Here’s what you’ll find.
Part I: No-Bull Installation and Setup
If you haven’t yet set up Windows XP, or if you’re still in the process of getting adjusted to Service Pack 2, this is the place to start. In addition to advice that gets you up and running in no time, I cover the rarely discussed aspects of product registration, retrieving your product key, and installing a legiti-mate copy of Windows over the top of a pirate copy — without losing all your settings or wiping out your hard drive.
Part II: Making Windows Lean and Clean
Fine-tune Windows so that it helps you work faster. Here you can decide which desktop settings really make a difference and which ones don’t. I also show you how to train Windows to respond to your needs. You find out how to transfer your old settings to a new PC, activate Passport without divulging your personal information, set up (or avoid) ClearType, “brand” your laptop computer to deter theft and identify you as its owner if it somehow gets lost, make your PC turn itself off when you shut down Windows, and how to switch users in the blink of an eye.
Part III: Convincing Windows to Work Your Way
You discover how to launch your most frequently used programs quickly — both on the Windows taskbar and by using hot keys, including hot keys that you build yourself.
I also show you how to take good care of your data. Discover quick file management techniques, such as renaming a group of files en masse, finding files quickly and effectively (and getting rid of Rover the Search Companion in the bargain), printing a list of files in a folder with a click, and much more.
Part IV: Making the Most of Internet and E-Mail
Take back control of the World Wide Timesink. You can find out about configuring and customizing Internet Explorer (including zapping up, pop-over, and pop-under ads for good), controlling cook-ies to reduce spam, taking control of Windows/MSN Messenger so everybody and their brothers don’t bother you when you’re online, and keeping Outlook Express running like a dream. I help you set up Trillian, so you can run instant messaging with any-one, anytime. I also show you how to make the most of Google. And if you’ve got kids, this is the part where I show you how to protect them online.
Part V: Optimizing Your Musical Entertainment
A surprising number of pitfalls await the unfortu-nate. Here’s how to avoid them. Get no-nonsense, person-to-person music gathering techniques; rec-ommendations for buying music; and inside tips on ripping and burning. Customize Windows Media Player 10 and manipulate playlists, create your own music CDs, transfer music to players and other PCs, and tune in to WMP radio. Yes, the free radio is still there, if you know where to find it.
Part VI: Having Fun and Saving Time
with Visual Media
And what about keeping Windows up to date? I show you why I don’t trust Microsoft to update my PCs automatically. Decide which updates are critical and which ones can wait, get Remote Assistance and other forms of help, and make backups without a problem.
Part X: Fast (Nearly Painless) Disaster Recovery
Has Windows gone to Hades in a handbasket?
Again?Here are the tricks you need to try in down-to-earth language. Find out how to survive (and per-manently stop)the dreaded Blue Screen of Death. Find out how to get your PC to boot when it doesn’t want to, restore your system to its pre-calamitous condition, and recover lost passwords. It ain’t pretty, but sometimes you have to take the Windows bull by the horns.
Part XI: The Scary (Or Fun!) Stuff
Most of the techniques in the first ten parts are pretty straightforward. In Part XI, I take you deep into the belly of Windows XP. Find out how to make changes to the Registry without getting burned, and go through three of my favorite Registry tweaks that aren’t covered by Microsoft’s programs. I also show you how to use Program Compatibility Mode when you absolutely, positively have to get an old program to work.
Conventions Used in This Book
I try to keep the typographical conventions to a minimum:
⻬ The first time a buzzword or concept appears in text, I italicize it and define it immediately so that you can easily find it again if you need to re-read the definition.
⻬ When you see an arrow (➪) in text, it means you should click, click, click to success. For example, “Choose Start➪Control Panel➪Add or Remove
deleted from your camera? The answer’s here. You can also find techniques for printing pictures and using your scanner effectively.
Part VII: Ensuring Peak Network Performance
These days, everyone’s networked, or so it seems. But how efficient is your network? Here you can find out how to get the most out of your peer-to-peer net-work, get home and small office network installation tips, find out the best way to share one Internet nection among several machines, and add (and con-figure) new network users.
If you’re looking for help installing a wireless net-work, look no further. I take you through the fastest way to set up your network — and, far more impor-tantly, secure it.
I also tell you the whole story — the realstory — behind Windows XP Simple File Sharing. It isn’t as simple (or as secure) as you think.
Part VIII: Fast Security Techniques
This part contains full behind-the-scenes coverage of the Windows Security Center, new in Service Pack 2. It gives you common-sense approaches to solving the rabidly hyped problem of computer security. Protect your PC from real viruses; conduct fast, easy, and safe online shopping transactions; and thwart intruders with a firewall. Best of all, I show you how to put an icon on your desktop that will “lock down” your system in a split-second. If you need to set up and monitor your security perimeter, look no further.
Part IX: Keeping Your PC Alive
Where to Go from Here
5
Programs” means you should click Start, then click Control Panel, and then click Add or Remove Programs. Rocket science.
⻬ When I want you to type something, I put the let-ters in bold. For example: Type myfirstfilename1. docto name your new file.
⻬ I set off Web addresses and e-mail IDs in mono-space. For example, my e-mail address is [email protected](true fact), and my Web page is at www.AskWoody.com(another true fact).
⻬ All filenames, paths, and just about anything you see on-screen are shown in monospace font, as well. For example, this bad boy, found in the Windows Registry, is set off like this: HKEY_ LOCAL_MACHINE\SOFTWARE\Microsoft\ Windows NT\Current Version\WinLogons
⻬ I always, absolutely, adamantly include the file-name extension — those letters (like .docor .vbsor .exe) at the end of a filename — when talking about a specific file. Yeah, I know that Windows XP hides filename extensions unless you go into the program and change it (which I recommend in Technique 20).
Icons Used in This Book
While perusing this book, you’ll notice some icons in the margins screaming for your attention. Each one has a purpose.
Here’s how I call out the inside story — pointed facts that Microsoft might find embar-rassing, school-of-hard-knocks advice, the kind of straight (sometimes politically incorrect) talk that shows you what’s reallyhappening. Hit
my Web site, AskWoody.com, for the latest.
When time is of the essence, this icon empha-sizes the point. More than a tip, but not quite a full technique, this icon points out a quick trick that can save you time — either now or later.
You don’t need to memorize the stuff marked with this icon, but you should try to remember that this icon indicates something special that you need to know in future Windows XP endeavors.
When I’m jumping up and down on one foot with an idea so absolutely cool that I can’t stand it any more — that’s when I stick in a Tip icon. You can browse through any chapter and hit the very highest points by jumping from Tip to Tip.
Achtung! ¡Cuidado! Anyplace you see a Warning icon, you can be sure that I’ve been burnt — badly — in the past. Mind your fin-gers. These are really, really mean suckers.
Where to Go from Here
If you want your voice to be heard, you can contact the publisher of the For Dummiesbooks by clicking the Contact Us link on the publisher’s Web site at
www.dummies.comor by sending snail mail to Wiley Publishing, Inc., 10475 Crosspoint Boulevard, Indianapolis, IN 46256.
You can contact Woody or Justin at woody@Ask Woody.com. I can’t answer all the questions I get — man, there ain’t enough hours in the day! — but I take some of the best and post them on
AskWoody.com frequently.
Speaking of AskWoody.com, drop by! I bet you’ll be pleasantly surprised by the straight story, and cov-erage of important news items that you can’t find anywhere else.
Confused about where to go next? Well, you can flip the page. Or you can flip a coin. Or you could hire a hundred monkeys and have them sit down at a hun-dred PCs and see how long it takes them to come up with the first technique.
Part I
1
Getting the Latest
Version of Windows
A
ppearances to the contrary, Windows XP hasn’t taken over the earth. Three years after Microsoft unleashed Windows XP on an unsuspecting world, only half of the roughly 400,000,000 Windows machines alive were running XP. The other 200,000,000 were still chug-ging along with Windows 2000, or even <shudder>98 or Me.With the advent of Service Pack 2 and its considerable improvements in dozens of different areas, Microsoft is betting that more people will buy new computers, thereby acquiring Windows XP. If the Softies are lucky, many folks who just said “No” to the original Windows XP may be con-vinced to part with their hard-earned clams to upgrade their current machines to the “reloaded” Windows XP SP2.
If you’re struggling with the question of whether to get Windows XP Home or part with the extra hundred bucks and go straight for Windows XP Professional, the first part of this technique pays for the book several times over — and saves you a bunch of time in the process.
If you have a new PC, or you’ve just installed Windows XP on an older PC, you need to wade through the arcana of Service Pack 2, and make a few key decisions with precious little unbiased advice. This technique points the way.
If you’re faced with the chore of upgrading an older version of Windows to Windows XP, this technique includes a handful of school-of-hard-knocks recommendations that can save you hours (days!) of hassle. When is it safe to stick in the upgrade CD and let it have its way with your machine? When do you need to reformat the whole ^%$#@! hard drive before installing XP? Find the straight answers here.
Finally, in this technique, I take you behind the scenes with the Files and Settings Transfer Wizard, a remarkable Wizard if ever a Wiz there Wuz. Bet you didn’t know that you can use it to transfer files when you switch computers at the office — even if you’re moving to a computer that’s been around forever — and save yourself a headache in the process.
Technique
Save Time By
⻬Getting the right version of Windows XP — the first time
⻬Updating Windows to the latest version
⻬Making the best installa-tion decisions
If you see the phrase “Service Pack 2” (or any-thing later — perhaps “Service Pack 3”), you already have SP2 and can skip this section completely.
• Figure 1-1:Service Pack 2 identifies itself on the System Properties dialog box.
2.
Check your hardware manufacturer’s Web site to make sure that your BIOS is up to date. While you’re there, search the site for any spe-cific recommendations about installing Windows XP Service Pack 2.The BIOS is a small, crucial program that lets your computer communicate with the outside world. If you have an older edition of your com-puter’s BIOS, it may work fine with the version of Windows that you’re using now — and die when confronted with Service Pack 2.
Installing Service Pack 2
Windows XP Service Pack 2 may sound like a patch — it’s called a Service Pack, after all —
but in reality SP2 embodies a massive upgrade for Windows XP. No doubt you’ve heard lots of horror stories about upgrading to SP2, or buying a new machine with SP2 installed. Some of the horror stories are true — but most of them, fortunately, are way overblown, and there are ways (which I discuss in this technique) to minimize your chances of turning your PC into SP2 Road Kill. If you don’t have SP2, you should get it, right now.
You gotta ask yourself one question...Do I feel lucky? Well, do ya, punk?
Oops. Wrong movie.
If you decide to upgrade to Service Pack 2, seriously consider wiping out your entire hard drive, reinstalling Windows XP, applying Service Pack 2, and then bringing back all your programs, data, and settings. It’s a Herculean task, but your system runs better for it. If you’re willing to install from scratch, and you have a day or two to spare, jump in this technique to the section called “Breezing through clean installs.” Back up your data, install Windows XP, install SP2, and then fol-low along here in the section called “Setting up Service Pack 2”. Then bring your programs and data back. Your PC will thank you for it.
If you just unpacked a new computer with Windows XP, or if you’re brave enough to ignore the hype and upgrade to Windows XP Service Pack 2 in spite of your brother-in-law’s podiatrist’s secretary’s nail stylist’s recommendation, here’s the best way to proceed:
Installing Service Pack 2
11
Installing a new BIOS is almost always quick and painless, it’s frequently free or almost free, and the latest BIOS may well make your PC run better. You should update your BIOS every couple of years anyway. Just be sure to follow your computer manufacturer’s instruc-tions precisely. If you’ve never updated a BIOS, or need a refresher course, check out www.howstuffworks.com/bios.htm.
3.
If you can’t get the latest BIOS, at the very least you must protect yourself from a well-known bug in the SP2 installer that causes PCs to com-pletely freeze in the middle of installation. If you can’t get the BIOS, download and install the so-called Prescott C-0 Stepping Patch at support.microsoft.com/?kbid=885626.Microsoft screwed this one up big time. They discovered the bug after Service Pack 2 shipped. Instead of spending millions of dollars to reissue Service Pack 2, they decided to release a patch that has to be run beforeyou
install SP2.
4.
Follow Technique 52 to install and run Spybot-Search & Destroy. Then follow Technique 53 to install and run Ad-Aware.Both of these steps are necessary to clean garbage out of your system before you install Service Pack 2. There’s one specific piece of software — a, uh, “permission-based contextual marketing network” program called T.V. Media that throws the SP2 installer for loops.
5.
Follow Technique 60 and perform a complete backup of your system.If you can run Norton Ghost, or some other pro-gram that makes a full mirror image of your hard drive, all the better.
6.
Make sure you’re the only one logged on to your computer, and shut down all running programs.If you have Fast User Switching enabled (see Technique 8), make sure all other users are logged off.
7.
Make sure you have Service Pack 2 ready.Got the update CD? Great. That’s all you need. If you can’t find the CD at your local computer shoppe and don’t want to order it from Microsoft (www.microsoft.com/athome/security/
protect/cd/confirm.aspx; allow four to six weeks), it’s easy to find online. If you have a fast Internet connection, go to www.microsoft.com/ technet/prodtechnol/winxppro/maintain/ winxpsp2.mspx, click the Download and Deploy Service Pack 2 to Multiple Computers link, and download the SP2 installation file — all 270MB of it. If you’re limping along with a slow connection, or you want to follow the Microsoft Party Line, you can use Windows Update (see the next step).
Depending on which patches you already have installed, Windows Update may only down-load a portion of the full SP2 package. If there’s any chance that you might want to re-run the SP2 installer, or if you want to have a copy of SP2 to give to a friend or co-worker, avoid Windows Update.
8.
Run the update.Stick the CD in the drive and follow the instruc-tions on-screen. Or double-click the Windows XP-KB835935-SP2-ENU.exefile and run it. Or, choose Start➪All Programs➪Windows Update, and wade through a zillion questions to get SP2 Express Update going.
9.
When the installer finishes, restart your computer.This may be the most controversial recom-mendation in the entire book, but I believe it’s in your best interests to control when (or, indeed, if) patches are installed, simply because Microsoft’s record with botched patches has been so abysmal. You can do so by clicking the Automatic Updates icon at the bottom of the Security Center, and then selecting one of the two middle buttons in the Automatic Updates dialog box (see Figure 1-3). See Technique 55 for the gory details.
• Figure 1-3:I tell Windows Update to notify me about updates, but leave the driving to me.
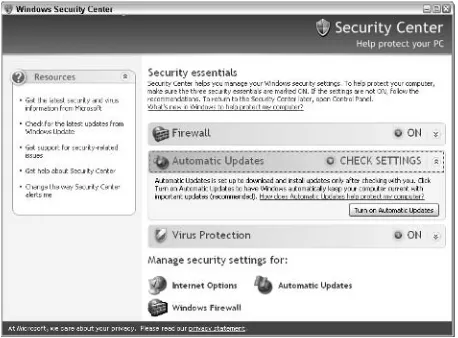
⻬ Virus Protection:May not show anything at all: Windows Security Center is notorious for not correctly identifying the status of antivirus pro-tection. Regardless of what the Security Center says, you need to have one of the major antivirus packages installed, and update it daily.
When setup is complete, some of your programs may not work. See the next section for details.
Setting Up Service Pack 2
Immediately upon installing Service Pack 2, or unpacking and plugging in a new computer with Service Pack 2, Windows XP demands answers to a few key security questions. Depending on your route to enlightenment... er, depending on the way you received Service Pack 2, the physical appearance of the questions may vary. But in the end, Windows XP only wants to know how to handle its Security Center settings (see Figure 1-2).
• Figure 1-2:You establish key security settings during SP2 setup.
If you’ve already gone through the initial setup and you want to rethink your answers to the key ques-tions, you can bring up the Security Center by choosing Start➪Control Panel and double-clicking Security Center.
My strong recommendations for the three Security Center settings:
⻬ Firewall:Set to ON, signifying that Windows Firewall is turned on, unless you have a third-party firewall (such as Zone Alarm, which I cover in Technique 51).
Choosing Between XP Home and XP Professional
13
Recovering from SP2 Problems
Most Service Pack 2 problems that I encounter fall into two broad categories:
⻬ Hardware that doesn’t work because new drivers are needed.
⻬ Programs that don’t work because of Windows Firewall settings.
Immediately after you install Service Pack 2, run through Technique 58 and make sure that all your drivers are up to date. If you have a program that doesn’t work, look at Technique 50 for detailed information on poking through Windows Firewall.
With a bit of luck, you’ll have Service Pack 2 up and running in no time.
Choosing Between XP Home and
XP Professional
Everybody knows that Windows XP Professional is “better” than Windows XP Home, right? That’s why XP Professional costs a hundred bucks more. But the simple fact is that most individual Windows users (that is, people who aren’t connected to a Big Corporate Network) are better off with Windows XP Home.
There are some exceptions, however. Aren’t there always?
Chances are very good that the company you bought your computer from advertises that it “recommends Windows XP Professional”. You know why? Because Microsoft forced PC man-ufacturers to boldly post that phrase, as part of their licensing agreement: If Frodo Computer Co wanted to sell Windows XP, Frodo had
to say “Frodo recommends Windows XP Professional”, conspicuously, whether anybody at Frodo Inc gave two cat’s whiskers about XP Pro or not. As this book went to press, Microsoft’s, uh, creative marketing require-ment was being contested in court.
Here are the cases when you must choose XP Professional:
⻬ You’re connected to a Big Corporate Network (a domainin Microsoft-speak).Your network administrator will almost undoubtedly insist that you use Windows XP Professional Edition. And you mustn’t anger the network administrator. Besides, he or she has good reasons, mostly revolving around security. End of discussion.
⻬ You currently run Windows 2000 or NT 4, and you want to upgrade to XP without wiping out your hard drive.You can install XP Home on a PC that currently runs Windows 2000 or NT, but you have to reformat the hard drive in the process. (See the next section for details.) With the Professional Edition, you can skip that step.
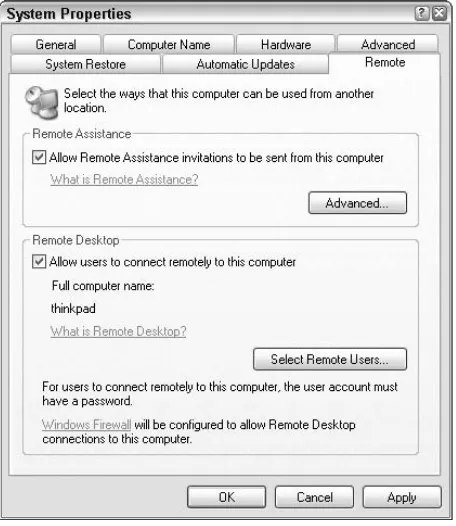
⻬ You want to set up a slave machine to use with the Remote Desktop feature. The Remote Desktopfeature (see Figure 1-4) allows XP Professional machines to act as slaves. You can take control over your slave PC using just about any computer that can connect to the slave over a network, and the slave behaves as if you were sitting right in front of it. This setup is great for retrieving files you left at home or printing a docu-ment at the office while you’re on the road. Two important details
䊳 XP Professional must be running on the slave machine, but you can have any version of Windows on the master machine.
⻬ You want to clump together two or more hard drives so that they look like a single hard drive (what the big-time geeks call dynamic disks), or to set up a mini-Web site.XP Professional also supports a very secure form of file encryp-tion, so that you can password-protect all your files.
⻬ You want to have Windows handle all your backups and restores.
Microsoft really bungled this one. XP Home has a handy Backup capability, but restoring those backups is, ahem, less than dependable. (See Technique 60.) XP Professional contains a very versatile — but quite complex — backup/ restore feature called ASR. If you’re willing to do your own backups, possibly with a third-party utility, such as Norton Ghost for making full disk mirror copies (www.symantec.com), or
ZipBackup (www.zipbackup.com) for backing up individual files or folders, XP Home is fine.
⻬ If you’re using XP on a portable, and you want to automatically synchronize network files when you unplug the portable from the net-work, you probably want XP Professional.For most people struggling with the idea of spending an extra hundred dollars on XP Professional, it boils down to one question: whether Offline Files (in XP Professional only and shown in Figure 1-5) works better than the older Briefcase (which is available in XP Home). The timesaving answer: If you have a lot of files that you frequently need to synchronize between your laptop and the net-work, XP Professional is worth the money.
Figure out where you stand with those seven issues, and you’ll quickly discover whether you need to spend the extra money on XP Professional.
• Figure 1-4:XP Professional’s Remote Desktop lets you take over and operate a PC from anywhere.
If you want to be able to access your PC as a slave, and someone will always be around the slave machine to click a few times when you make the connection, XP Home (with Remote Assistance) works just as well as XP
Professional (with Remote Desktop).
⻬ You want to use specific kinds of exotic hard-ware, a handful of special-purpose softhard-ware, or you need the extra security of NTFS file encryp-tion.Only XP Professional supports dual proces-sor systems, or the 64-bit Itanium procesproces-sor (in yer dreams). XP Home doesn’t include the settings to run more than one monitor simultane-ously, which is great for gamers and people with
Upgrading Quickly
15
• Figure 1-5:Offline Files synchronize themselves automatically.
Upgrading Quickly
If you’re installing Windows XP on a machine that has another version of Windows running, the most important decision you make is whether to upgrade Windows on top of the current version or wipe out the hard drive entirely, reformat it, and start all over from scratch.
Make the wrong decision, and you’ll regret it for months or years to come.
In my experience, people who have done a clean install— where they completely wipe out the hard drive and install Windows XP from scratch — have many fewer problems down the road than those who upgrade in-place.
The problem: A clean install takes more time now, but results in a much more stable copy of Windows. An in-place upgrade goes much faster now, but the resulting system may be less stable over the long term.
Even upgrading to Service Pack 2 goes much more cleanly and works far better if you wipe out the old copy of Windows prior to installing SP2.
You need to also make sure that any peripherals you own will work with Windows XP: You’re in for a rude awakening if you have an old CD burner, for example, that doesn’t coexist with Windows XP. Check the manufacturer’s Web site for XP-specific drivers.
Get the upgrade?
If you’re upgrading Windows from an earlier version, Microsoft gives you a price break. In fact, most of the boxes you see on store shelves are for the upgrade version of Windows XP. You don’t need to have an older version of Windows running on the machine in question in order to take advantage of the upgrade. If no older version of Windows is hanging around — perhaps you deleted it in order to perform a clean install of Windows XP — all you need to do is insert an old Windows CD (Windows 95, 98, 98SE, Me, NT 4, or 2000) for a moment at one specific point early in the installation process. There’s no check to see if the old version of Windows is registered properly — on this or any other machine. All the upgrade requires is that old CD.
Microsoft says that Windows 95 does not qualify for an upgrade to Windows XP, and you can’t upgrade a Windows 95 PC to Windows XP, leaving all your files in place. But if you’re willing to reformat the hard drive, the Windows 95 CD works just fine for verification during the installation.
Multiboot systems
If you have two hard drives, or a lot of extra space in a sec-ond partition of one hard drive, you might want to consider installing two (or more) versions of Windows on the same machine. Windows XP works well in multiboot configura-tions: Every time you reboot the system, you have to pick which version of Windows you want to run. In some cases,