by Greg Harvey
Media Creator
FOR
Hoboken, NJ 07030-5774
Copyright © 2004 by Wiley Publishing, Inc., Indianapolis, Indiana Published by Wiley Publishing, Inc., Indianapolis, Indiana Published simultaneously in Canada
No part of this publication may be reproduced, stored in a retrieval system or transmitted in any form or by any means, electronic, mechanical, photocopying, recording, scanning or otherwise, except as per-mitted under Sections 107 or 108 of the 1976 United States Copyright Act, without either the prior written permission of the Publisher, or authorization through payment of the appropriate per-copy fee to the Copyright Clearance Center, 222 Rosewood Drive, Danvers, MA 01923, (978) 750-8400, fax (978) 646-8600. Requests to the Publisher for permission should be addressed to the Legal Department, Wiley Publishing, Inc., 10475 Crosspoint Blvd., Indianapolis, IN 46256, (317) 572-3447, fax (317) 572-4355, e-mail:
Trademarks:Wiley, the Wiley Publishing logo, For Dummies, the Dummies Man logo, A Reference for the Rest of Us!, The Dummies Way, Dummies Daily, The Fun and Easy Way, Dummies.com, and related trade dress are trademarks or registered trademarks of John Wiley & Sons, Inc. and/or its affiliates in the United States and other countries, and may not be used without written permission. Roxio and Easy Media Creator are trademarks or registered trademarks of Roxio, Inc. All other trademarks are the property of their respective owners. Wiley Publishing, Inc., is not associated with any product or vendor mentioned in this book.
LIMIT OF LIABILITY/DISCLAIMER OF WARRANTY: THE PUBLISHER AND THE AUTHOR MAKE NO REP-RESENTATIONS OR WARRANTIES WITH RESPECT TO THE ACCURACY OR COMPLETENESS OF THE CONTENTS OF THIS WORK AND SPECIFICALLY DISCLAIM ALL WARRANTIES, INCLUDING WITHOUT LIMITATION WARRANTIES OF FITNESS FOR A PARTICULAR PURPOSE. NO WARRANTY MAY BE CRE-ATED OR EXTENDED BY SALES OR PROMOTIONAL MATERIALS. THE ADVICE AND STRATEGIES CON-TAINED HEREIN MAY NOT BE SUITABLE FOR EVERY SITUATION. THIS WORK IS SOLD WITH THE UNDERSTANDING THAT THE PUBLISHER IS NOT ENGAGED IN RENDERING LEGAL, ACCOUNTING, OR OTHER PROFESSIONAL SERVICES. IF PROFESSIONAL ASSISTANCE IS REQUIRED, THE SERVICES OF A COMPETENT PROFESSIONAL PERSON SHOULD BE SOUGHT. NEITHER THE PUBLISHER NOR THE AUTHOR SHALL BE LIABLE FOR DAMAGES ARISING HEREFROM. THE FACT THAT AN ORGANIZATION OR WEBSITE IS REFERRED TO IN THIS WORK AS A CITATION AND/OR A POTENTIAL SOURCE OF FUR-THER INFORMATION DOES NOT MEAN THAT THE AUTHOR OR THE PUBLISHER ENDORSES THE INFORMATION THE ORGANIZATION OR WEBSITE MAY PROVIDE OR RECOMMENDATIONS IT MAY MAKE. FURTHER, READERS SHOULD BE AWARE THAT INTERNET WEBSITES LISTED IN THIS WORK MAY HAVE CHANGED OR DISAPPEARED BETWEEN WHEN THIS WORK WAS WRITTEN AND WHEN IT IS READ. FULFILLMENT OF EACH COUPON OFFER IS THE SOLE RESPONSIBILITY OF THE OFFEROR.
For general information on our other products and services or to obtain technical support, please contact our Customer Care Department within the U.S. at 800-762-2974, outside the U.S. at 317-572-3993, or fax 317-572-4002.
Wiley also publishes its books in a variety of electronic formats. Some content that appears in print may not be available in electronic books.
Library of Congress Control Number: 2004102601 ISBN: 0-7645-7131-1
Manufactured in the United States of America 10 9 8 7 6 5 4 3 2 1
Greg Harveyhas authored tons of computer books, the most recent being
Excel 2003 For Dummiesand Adobe Acrobat 6 PDF For Dummies. He started out training business users on how to use IBM personal computers and their attendant computer software in the rough and tumble days of DOS, WordStar, and Lotus 1-2-3 in the mid-80s of the last century. After working for a number of independent training firms, he went on to teach semester-long courses in spreadsheet and database management software at Golden Gate University in San Francisco.
His love of teaching has translated into an equal love of writing. For Dummies
To Chris — my partner and helpmate in all aspects of my life
Author’s Acknowledgments
I’m always very grateful to the many people who work so hard to bring my book projects into being, and this one is no exception. This time, preliminary thanks are in order to Andy Cummings and Tiffany Franklin for giving me this opportunity to write about Roxio’s great new suite of media creation programs.
Next, I want to express great thanks to my project editor, Christine Berman (a better person to work with you’ll never find), and to my partner in crime, Christopher Aiken (I really appreciate all your editing, additions, and com-ments on this one). Thanks also go to Mark Chambers for the great technical edit, Adrienne Martinez for coordinating its production, and everybody at Wiley Publishing and TECHBOOKS Production Services for proofreading and indexing.
Some of the people who helped bring this book to market include the following:
Acquisitions, Editorial, and Media Development
Project Editor: Christine Berman
Acquisitions Editor:Tiffany Franklin
Copy Editor:Christine Berman
Technical Editor:Mark Chambers
Editorial Manager:Carol Sheehan
Media Development Manager:
Laura VanWinkle
Media Development Supervisor:
Richard Graves
Editorial Assistant:Amanda Foxworth
Cartoons:Rich Tennant (www.the5thwave.com)
Production
Project Coordinator: Adrienne Martinez
Layout and Graphics: Amanda Carter,
Andrea Dahl, Lynsey Osborn, Heather Ryan
Proofreaders:David Faust, Andy Hollandbeck, Carl William Pierce, TECHBOOKS
Production Services
Indexer:TECHBOOKS Production Services
Special Help
Melanee Prendergast
Publishing and Editorial for Technology Dummies
Richard Swadley,Vice President and Executive Group Publisher
Andy Cummings,Vice President and Publisher
Mary C. Corder,Editorial Director
Publishing for Consumer Dummies
Diane Graves Steele,Vice President and Publisher
Joyce Pepple,Acquisitions Director
Composition Services
Gerry Fahey,Vice President of Production Services
Foreword...xv
Introduction ...1
Part I: A Bit about Easy Media Creator
and Digital Media...7
Chapter 1: Getting Acquainted with Easy Media Creator 7...9
Chapter 2: The Ins and Outs of Digital Media and Gear ...33
Part II: Creating Data Discs ...49
Chapter 3: Backing Up and Copying Data Files ...51
Chapter 4: Organizing Media Files with the Media Manager ...91
Part III: Creating Audio CDs and Photo Projects...113
Chapter 5: Recording and Editing Audio with Sound Editor ...115
Chapter 6: Managing Digital Photos...133
Chapter 7: Burning Audio CDs and MP3 Discs ...179
Chapter 8: Creating Disc Labels and Case Inserts...201
Part IV: Creating Projects for DVDs...223
Chapter 9: Acquiring Digital Media ...225
Chapter 10: Creating and Editing Video Productions ...251
Chapter 11: Building and Burning DVDs...301
Part V: The Part of Tens ...327
Chapter 12: Top Ten Components of Easy Media Creator 7 ...329
Chapter 13: Ten Coolest Features in Easy Media Creator 7 ...337
Foreword...xv
Introduction...1
About This Book...1
Foolish Assumptions ...2
How This Book Is Organized...2
Part I: A Bit about Easy Media Creator and Digital Media...3
Part II: Creating Data Discs...3
Part III: Creating Audio CDs and Photo Projects ...4
Part IV: Creating Projects for DVDs...4
Part V: The Part of Tens...4
Icons Used in This Book...5
Where to Go from Here...5
Part I: A Bit about Easy Media Creator
and Digital Media ...7
Chapter 1: Getting Acquainted with Easy Media Creator 7 . . . .9
Welcome to the Easy Media Creator Home ...10
Attending to the Tasks at Hand ...12
Acclimating to the Many Applications ...12
Copying discs with Disc Copier...13
The comforts of Creator Classic...14
Picture it in PhotoSuite...15
Easy multimedia projects thanks to DVD Builder ...16
Riding the VideoWave ...17
Instant data copying thanks to Drag-to-Disc...19
Listening to the rap on Napster...20
Tools for Every Need ...22
Media Manager at your service ...22
Catching up with Capture...23
Lauding the Label Creator...24
Saying Hello to Sound Editor ...25
Playback with the Roxio Player ...26
Help is on the way! ...28
Chapter 2: The Ins and Outs of Digital Media and Gear . . . .33
Feeling at Home in the Digital Media Menagerie...34
Let’s hear it for the Video and Super Video CD formats ...36
Ripping through those pesky audio formats ...37
Make Mine Digital! ...39
Why digital rules...40
Converting analog media to digital ...41
Sorting Out Your Digital Recording Gear ...43
When It’s “Playback” Time ...44
Delving into the world of DVD players ...44
I want my MP3!...45
The Care and Handling of CD and DVD Discs...47
Part II: Creating Data Discs ...49
Chapter 3: Backing Up and Copying Data Files . . . .51
Drag-and-Drop Magic ...52
Launching Drag-to-Disc on startup ...53
Customizing other Drag-to-Disc settings...55
Manually formatting a blank disc ...58
Editing a data disc ...60
Repairing discs with ScanDisc...64
Turning to Creator Classic for Your Backups ...65
Opening a new disc project...66
Changing the Data Disc Project Settings ...68
Titling the disc project ...71
Adding data files to a disc project...71
Encrypting the data disc ...73
Making a bootable data disc ...75
Saving the disc project and burning the disc ...77
Adding files to an existing CD or DVD disc ...80
Creating a Backup project ...81
Getting the Lowdown on a Disc...84
Recovering Data with Roxio Retrieve ...85
Disc Copies in a Jiffy ...88
Chapter 4: Organizing Media Files with the Media Manager . . . .91
Making the Most of Media Manager...92
Browsing your folders...92
Browsing your collections...96
Scanning your computer for media files ...97
Working that Workspace ...99
Creating Media File Collections...102
Saving Workspace files as a Collection...103
Filtering the files in a Collection...105
Tag, You’re It! ...105
Adding keywords to Collection files ...106
Adding comments to Collection files...107
Adding sound tags to Collection files ...107
Finding Wayward Media Files ...108
Backing Up Media Files on Disc...111
Part III: Creating Audio CDs and Photo Projects ...113
Chapter 5: Recording and Editing Audio with Sound Editor . . . .115
Getting Cozy with Sound Editor ...116
Zoom, zoom, zoom . . . ...117
Playing with the playback and recording controls ...118
Recording Audio...119
Removing silences from a recording...122
Inserting silences into a recording...123
Adding track breaks to a recording...124
Selecting the Audio to Edit ...125
Enhancing Audio Files ...126
Choosing Audio Format and Compression Settings ...129
Chapter 6: Managing Digital Photos . . . .133
Launching PhotoSuite Your Way ...133
Getting Familiar with PhotoSuite 7 ...134
PhotoSuite’s Supported File Formats ...136
Fixing, Editing, and Enhancing Photos ...137
Fix me up ...138
Transform me...143
Achieving that perfect photo effect ...151
Superimposing one photo on another...161
Playing with PhotoSuite Project Templates...164
Bring on the Borders ...165
Stitching It All Together...166
Group Editing...169
Printing and Sharing Your Photos...170
Printing your own photos ...170
E-mailing your photos...172
Chapter 7: Burning Audio CDs and MP3 Discs . . . .179
Creating an Audio CD Project ...180
Adding audio tracks to your project...181
Accessing the online music database...183
Listening to tracks before you add them ...183
Rearranging tracks ...184
Renaming tracks ...185
Merging different tracks into one ...185
Adding audio transitions between tracks ...187
Changing the Project and Track Settings ...189
Burning the CD...190
Creating an MP3 Disc Project ...192
Creating an Enhanced CD...195
Creating a Mixed-CD ...197
Copying an Audio CD...198
Chapter 8: Creating Disc Labels and Case Inserts . . . .201
Getting Familiar with the Label Creator Window...202
The Edit Layout palette ...203
The Add Object palette ...203
The Tools palette...205
The Properties palette ...206
Instant Disc Labels and Case Inserts ...207
Editing Elements of the Label Project ...210
Displaying the layout you want to edit...211
Editing the text objects in your layouts ...211
Editing the image and graphic objects in your layouts...213
Printing Disc Labels and Case Inserts ...215
Applying Labels to Discs ...221
Part IV: Creating Projects for DVDs ...223
Chapter 9: Acquiring Digital Media . . . .225
Using the Capture Tool...225
Connecting digital devices to use in Capture ...227
Customizing the Capture options...228
Acquiring Digital Photos ...229
Scanning images into Capture ...229
Copying photos directly from your camera...232
Acquiring Digital Video...234
Capturing recorded video with SmartScan Capture ...236
Capturing recorded video with Manual Capture...239
Acquiring Audio Files ...241
Capturing live audio...241
Copying tracks from an audio CD...243
Copying DVD Movie Titles ...245
Moving and Copying Files to New Collections ...247
Chapter 10: Creating and Editing Video Productions . . . .251
Getting Cozy with VideoWave...252
The Production Preview pane ...252
The Media Selector pane...254
The Production Editor pane...258
Instant Music Videos with CineMagic...258
Instant Themed Videos with StoryBuilder...264
Video Editing in the Production Editor ...269
Working in Storyline mode...269
Working in Timeline mode ...291
Outputting the Video Production...296
Burning the Video Production to Disc...299
Chapter 11: Building and Burning DVDs . . . .301
Launching DVD Builder and Selecting Your DVD Project ...302
Getting Cozy with the DVD Builder Window ...303
The Edit Task pane...304
The Menu Editor pane ...306
The Production Editor pane...307
Building Your DVD Project ...308
Selecting the project theme ...308
Modifying the name of the first main menu screen ...310
Adding titles to your DVD project...311
Previewing the finished DVD project ...318
Burning DVD Projects to Disc...320
Plug & Burn: From tape to disc in one step ...323
Editing a rewritable DVD disc ...326
Part V: The Part of Tens ...327
Chapter 12: Top Ten Components of Easy Media Creator 7 . . . .329
Roxio Disc Copier...329
Audio and Data Discs Thanks to Creator Classic...330
Getting the Media You Need with Capture...331
Audio Recording and Editing with Sound Editor ...332
Disc Labeling with Label Creator ...332
Enhancing and Organizing Digital Photos with PhotoSuite...333
Easy Video Editing with VideoWave ...334
Creating and Burning DVD Projects with DVD Builder ...335
Copying Files on the Fly with Drag-to-Disc ...336
Chapter 13: Ten Coolest Features in Easy Media Creator 7 . . . .337
Home Is Where Access to Every Easy Media Creator Component Is...337
Napster at Your Service...338
Videos, Slideshows, and Playlists to Go with QuickShow ...339
Simple to Create Music and Themed Videos...339
More Complex Video Editing in Timeline Mode...340
Scene Stealing with SmartScan...340
Direct from Tape to Disc with Plug & Burn...341
Easy DVD Disc Copies...341
Direct Editing of Your DVD Discs ...342
W
ith Roxio Easy Media Creator For Dummies, Greg Harvey has put together a comprehensive overview of our software. In true For Dummies style, the book is written in plain language, logically arranged, and has an upbeat, entertaining tone that I believe you will enjoy.Maybe you bought Creator 7 to accompany your new DVD burner, digital camera, or DV camcorder. Or perhaps you picked it up because you have a special project to complete such as archiving treasured family photos to CD, creating an engaging slideshow of your daughter’s wedding, or producing an MP3 disc of your favorite Liberace tunes. Regardless of your endeavor, what you will quickly discover — if you haven’t already — is that Creator 7 can perform, and perform well, any and all media tasks you throw at it.
What you’ve purchased represents the realization of Roxio’s vision to bring together its complete line of next generation, uncompromised photo, video, music, burning, and authoring applications to deliver the first and only com-prehensive, integrated digital media suite for the PC. Seamlessly combining the improved burning suite of Easy CD & DVD Creator, with best-of-breed PhotoSuite®7 Platinum, VideoWave®7 Professional, and online music service Napster®, Roxio Easy Media Creator 7 will enable you to take full command of your digital life.
On behalf of the staff of Roxio who worked so diligently to deliver Easy Media Creator 7, I’d like to wish you well as you begin to fully explore the wonderful world of digital media.
Chris Taylor
T
he good news is that Roxio Easy Media Creator 7 really lives up to its name by being genuinely easy to use. The bad news, if there is any, is that because of its nature as a collection or suite of different applications and tools, you may initially find it a bit confusing as to which part to turn to get a particular job done. This is where Roxio Easy Media Creator For Dummiescomes in. This book is designed to make you familiar with Roxio Easy Media Creator’s many capabilities and get you up and running and comfortable with its many features as quickly as possible.
If I had to choose just one word to characterize Easy Media Creator 7, it would have to be versatility because this baby can do almost anything you might want to do with the audio, photo, and video media that you collect. With Easy Media Creator, you can go from capturing original digital media to editing it and then using it in a wide array of different projects that you can then output to disc in a very short time. Because the program’s emphasis is always on making these processes as easy as can be, you don’t have to worry if you don’t have any background in working with digital media and have lim-ited or even no experience with multimedia editing and design.
I just hope that you find using Easy Media Creator to design, build, and burn your own media projects half as much fun I found writing about them in this book. I want to congratulate the Roxio engineers for providing all of us with a truly outstanding set of tools with which to transform the sounds and images of the world around us into memories that we can share with friends and family alike.
About This Book
Whenever I could, I have also tried to make the topics within each chapter stand on their own as well. When there’s just no way around relying upon some information that’s discussed elsewhere, I include a cross-reference that gives you the chapter and verse (actually the chapter and section) for where you can find that related information if you’re of a mind to.
Use the Contents at a Glance along with the full Table of Contents and Index to look up the topic of the hour and find out exactly where it is in this compi-lation of Easy Media Creator information. You’ll find that although most topics are introduced in a conversational manner, I don’t waste much time cutting to the chase by laying down the main principles at work (usually in bulleted form) followed by the hard reality of how you do the deed (as num-bered steps).
Foolish Assumptions
I’m going to make only one foolish assumption about you and that is that you have the means to acquire some sort of digital media (be that audio, photos, or video) and you now want to be able to something with that media (be that burn the audio into CDs, use the photos in collages, or create video produc-tions that you can view in your DVD player). I’m not assuming that you have any experience in creating any of the kinds of projects you’d like to create with your digital media, so you don’t have to be concerned about your level of multimedia expertise (or the lack thereof).
As far as your computer hardware and software goes, I’m assuming only that you have a computer that is robust enough to meet the rather stringent memory and storage requirements for Easy Media Creator 7and that this machine is running Windows 2000 or XP and is equipped with a CD-recordable or, hopefully, a DVD-recordable drive. I am not, however, assuming that you have access to the other peripherals such as a digital still camera, camcorder, scanner, DVD recorder, and the like that I describe in the text. If you do have all these goodies, so much the better, as this enables you to use all of Easy Media Creator’s wonderful features. If not, you can still use the parts of the program that pertain to kind of system you have.
How This Book Is Organized
central topic (getting to know Easy Media Creator and digital media, making data backup discs, audio discs and photo projects, DVD projects, and the like). All the chapters in each part are then related to some aspect of per-forming the central task. In case you’re the least bit curious, here’s the low-down on each of the parts and their chapters and what you can expect to find there.
Part I: A Bit about Easy Media Creator
and Digital Media
This part provides you with an orientation to Easy Media Creator 7’s compo-nents and capabilities, along with an introduction to the sometimes confusing world of digital media.
Chapter 1 is your place to go to find out just what exactly is included in the Easy Media Creator suite. It also introduces you to the Easy Media Creator Home, the central bridge from which you can access all the other applica-tions and tools in the suite.
Chapter 2 is not to be missed, even by those of you who do not consider yourselves beginners by any stretch of the imagination. This chapter covers the world of digital media, including the essential difference between analog and digital media, the many different types of CD and DVD media and media formats out there, as well as the different types of digital gear that Easy Media Creator supports. The chapter ends with Greg’s advice on the proper treatment of CD and DVD discs.
Part II: Creating Data Discs
Part II focuses on the important tasks of backing up and organizing your media files. Chapter 3 takes up the call on how to use the Creator Classic module to compile and burn data backup discs. This chapter also includes information on how to use Creator Classic to schedule backups so that you’re never at risk for losing invaluable data due to some computer malfunction.
Part III: Creating Audio CDs
and Photo Projects
This part takes an in-depth look at two of the most popular types of digital media out there: digital audio and photos. Chapter 5 covers recording and editing digital audio with Easy Media Creator’s powerful Sound Editor.
Chapter 6 turns to the subject of digital photos and how you can use the PhotoSuite module not only to fix, edit, and enhance them but also to use them in all sorts of great photo projects including slideshows, photo collages, calendars, and the like. It concludes by giving you the lowdown on printing your digital photos as well as sharing them electronically with friends and family.
Chapters 7 and 8 give you the blow-by-blow for compiling and burning audio CDs and MP3 discs with Creator Classic and then using Label Creator to design and print labels for the discs and inserts for their jewel cases.
Part IV: Creating Projects for DVDs
Part IV is devoted to the subject of DVD projects. Chapter 9 concentrates on how to use the Capture tool to acquire all the types of digital media (audio, photo, and video) that you need for your DVD projects.
Chapter 10 then covers the use of Easy Media Creator’s powerful VideoWave module to design video productions to be used as titles for your DVD pro-jects. Chapter 11 fills out the part by giving you the lowdown on using the DVD Builder module to construct the titles for your DVD project complete with interactive menus and then burn the finished project to CD or DVD disc.
Part V: The Part of Tens
Chapter 13 highlights what I consider to be the top ten coolest features in the entire Easy Media Creator suite (and, of course, that’s saying a lot when you have as many features to choose from as you do with this baby).
Icons Used in This Book
The following icons are strategically placed in the margins throughout all the chapters in this book. Their purpose is to get your attention and each has its own way of doing that.
This icon denotes some really cool information (in my humble opinion) that if you pay particular attention to will pay off by making your work just a lot more enjoyable or productive (or both).
This icon denotes a tidbit that you ought to pay extra attention to; otherwise, you may end up taking a detour that wastes valuable time.
This icon denotes a tidbit that you ought to pay extra attention to; otherwise, you’ll be sorry.
This icon denotes a tidbit that makes free use of (oh no!) technical jargon. You may want to skip these sections (or, at least, read them when no one else is around).
Where to Go from Here
A Bit about Easy
Media Creator and
Getting Acquainted with
Easy Media Creator 7
In This Chapter
䊳Getting familiar with the Easy Media Creator Home
䊳Overview of the Applications you can launch from Home
䊳A quick look at the Tools you can use at Home
䊳Exploring the Utilities available to you from Home
F
irst things first: Before you can use your newly installed Roxio Easy Media Creator 7 to go off and create a copy of your favorite Norah Jones audio CD or to burn a DVD of the family’s most recent outing in the Adirondacks, you’re going to need to know your way around the program. As you’re about to discover, there’s very little that Roxio Easy Media Creator 7 can’t do when it comes to dealing with all the many types of digital media that are apt to come your way.Better yet, not only is this baby versatile but it’s as good as its name. The Roxio Easy Media Creator 7 offers you consistently easy ways to complete all of your media projects — from ripping, arranging, and burning your own copies of your favorite CDs to finally organizing and tagging those gazillions of digital photos you’ve dumped into nondescript folders all over your com-puter’s hard disk.
Welcome to the Easy Media
Creator Home
At the time you install the Roxio Easy Media Creator 7 on your computer’s hard disk, the Windows Installer automatically puts a Roxio Easy Media Creator Home shortcut on the Windows desktop. To open the Easy Media Creator Home, you simply locate this shortcut icon (shown in the left margin of this paragraph) and double-click it.
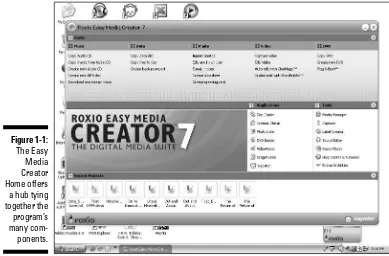
Figure 1-1 shows the Easy Media Creator Home window that appears after you double-click this desktop shortcut. As you can see in this figure, the Home window that forms the hub of the Roxio Easy Media Creator 7 is divided into four distinct areas, each of which is labeled. Here’s the lowdown on each of these areas:
⻬Tasks:This area, divided into the subsections: Music, Data, Photo, Video, and DVD, enables you to launch a particular Easy Media Creator program or tool by clicking the task you want to accomplish such as Copy Audio CD or Capture Video
⻬Applications:Lists all the programs that you can launch to accomplish the many things listed in the Tasks section
⻬Tools:Lists all the special tools and utilities that are available to you in the Easy Media Creator 7 suite
⻬Recent Projects:Contains a chronological list of any of the audio or video projects that you’ve been working on (this area is blank when you first open the Easy Media Creator Home window)
Note that you can condense parts of the Easy Media Creator Home window by hiding the display of any of its three horizontal bands (the Applications and Tools sections are lumped together as part of the horizontal band that contains the full product name: Roxio Easy Media Creator 7, The Digital Media Suite). You do this by clicking the any of the three buttons with the two upward-pointing arrowheads (one on top of the other) that appear at the far right of each band. When you click one of these buttons, the detailed information beneath its band is hidden and the button changes to one with two downward-pointing arrowheads (which you can click to expand the sec-tion and redisplay its details).
If you’re like me and are apt to become a really serious user of Easy Media Creator, you may also want to fix the Easy Media Creator Home option on the Windows Start menu. To do this, you follow these steps:
1. Double-click the Easy Media Creator Home shortcut on the desktop.
If you don’t have an Easy Media Creator Home shortcut on your desk-top, you can click the Start button on the Windows taskbar, mouse over the All Programs option on the Start menu, the Roxio option on the All Programs menu, and then click Roxio Easy Media Creator Home option on the Roxio submenu.
The Roxio Easy Media Creator 7 Home shown in Figure 1-1 then opens.
2. Click the Start button on the Windows taskbar to open the Start menu.
The Roxio Easy Media Creator Home option now appears on the left side of the Windows Start menu.
3. Right-click the Roxio Easy Media Creator Home option to open its short-cut menu and then click the Pin to Start Menu option on this menu.
As soon as you click the Pin to Start Menu option, Windows moves the Roxio Easy Media Creator Home option to the upper area of the left side of the Start
Figure 1-1:
menu (under such Start menu stalwarts as the Internet Explorer and Outlook Express). If you later decide that you don’t need this option to be a perma-nent part of the Start menu, you can remove it by right-clicking the option and then clicking the Unpin from Start Menu option on its shortcut menu.
Attending to the Tasks at Hand
The Tasks section at the top of the Roxio Easy Media Creator Home window (see Figure 1-1) divides the many things that you routinely want to accomplish with the program into five distinct task areas: Music, Data, Photo, Video, and DVD. Each task area contains a list of the most common tasks associated with that area and each task listing is a hyperlink (just on a Web page).
Clicking the link associated with a particular task opens the appropriate application for accomplishing that task. The beauty of the Tasks section in the Home window is that you don’t have to give a second thought as to which Easy Media Creator application to use in order to get done the project you have in mind.
The only problem is that the tasks displayed in each of the five task areas represent only the most common things that you can do with Roxio Easy Media Creator 7. Although you can rely on the Tasks section for most of your media projects, be aware that not everything that you may need to do with the program is listed here. Therefore, you will not want to ignore totally the options listed in the Application and Tools areas.
My suggestion is that when you first start using the program, concentrate on using the items listed in the Tasks section of the Easy Media Creator Home window to get your work done. That way, as your experience with the pro-gram grows, you’ll naturally become familiar with which applications are associated with which types of media tasks. In no time at all, especially with the help of the information in this book, you’ll pick up on which application or tool to launch in order to complete a particular media project.
Acclimating to the Many Applications
the user to create certain types of documents saved in individual file for-mats), you will find that the program and documentation also refers to these guys as “components” because they are just parts of the whole Media Suite. A good example of this is when you click an Applications link such as Creator Classic, an alert box appears with the following message: “Please wait . . . Loading component.”
The following seven sections give you a brief introduction to each of the com-ponents that you can load by clicking its Applications link in the Easy Media Creator Home. Use this information to get a quick overview of the capabilities and functions of each of Roxio Easy Media Creator 7 applications.
Copying discs with Disc Copier
As the name says, Disc Copier is the application you use when you need to make a copy of an unprotected CD or DVD. When you click the Disc Copier link in the Applications area in the Easy Media Creator Home window, the program opens the window shown in Figure 1-2. Or, I should say, this window opens after you dismiss an alert dialog box reminding you that you should use the Disc Copier component only to make copies of digital media for which you have the clear legal right to make copies. Knowing that none of you would ever do anything like that, you can click the Don’t Show Me This Again check box before you click OK to close this alert dialog box (for once and all).
You can use Disc Copier to copy an audio or data CD or DVD (usually one that you’ve created with Roxio’s DVD Builder, since almost every single com-mercial movie on DVD that you rent or purchase is copy-protected and can’t be copied with Disc Copier). As you can see in Figure 1-2, all you need to do to copy one of these discs is to specify the source and destination drive. The great thing is, if your situation is like mine and you have only one CD or DVD drive on your computer system, you can still use Disc Copier to copy your audio, data, or video discs (refer to Chapters 3 and 5 for steps with concrete examples of how you use Disc Copier to copy audio and data CDs).
Figure 1-2:
The comforts of Creator Classic
Creator Classic is the application you use primarily to assemble and burn your audio and data CDs. Figure 1-3 shows you the window that opens when you click the Creator Classic link in the Applications area of the Easy Media Creator Home. As you can see in this figure, the Creator Classic window is divided into three major areas:
⻬Taskswhere you select the type of disc to burn to CD (Data Disc, Audio, or MP3 Disc) and where you can indicate what type of CD to create (Enhanced, Mixed-Mode, or Bootable)
⻬Select Sourcewhere you locate and select the files you want to copy to data or audio CD
⻬Data Disc Projectwhich displays the name of your project as well as all the files you’ve added for burning onto the CD
Whereas you can use Disc Copier to make a copy of an existing audio or data CD or DVD, you use Creator Classic to actually put together and burn your own audio CDs or data CDs or DVDs. You use Creator Classic when you want to make backups or archive data files on your disk. You can also use Creator Classic to burn audio CDs that you can play in your computer’s CD or DVD drive or in any standard CD player that you have handy. If you have audio tracks saved on your hard disk in the more-and-more popular MP3 audio file format, you can also burn them as an MP3 disc that you can play in most CD computer drives. See Chapters 3, 5, and 6 for specific information and exam-ples on using Creator Classic to assemble and burn audio and data CDs.
Figure 1-3:
Picture it in PhotoSuite
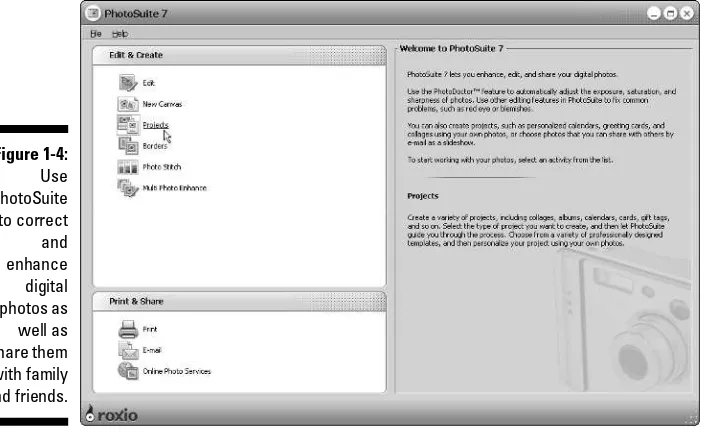
PhotoSuite is the application that you use to organize, edit, and share the digital photos that you take. You can use this component to enhance the photos, organize them into albums, use them in creating projects like greet-ing cards and calendars, as well as easily share them with friends and family. Figure 1-4 shows you the basic PhotoSuite window that appears when you click the PhotoSuite link in Applications area in the Easy Media Creator Home.
As you can see in this figure, the startup window for PhotoSuite is divided into two panes on the left: Edit & Create and Print & Share. The upper Edit & Create pane contains the common options for editing your digital photos and starting new photo projects. The lower Print & Share pane contains a Print option for printing digital photos that you’ve saved on your hard disk, an E-mail option for sending photos either as an attachment to an e-mail or right inside the body of the e-mail message. The last option in this pane, Online Photo Services, enables you to post your digital photos to a Web site where others can view them with their Web browsers or to have them printed by a professional photo finisher.
Note that the pane on the right side of the initial PhotoSuite window gives you general information about PhotoSuite 7. This area can also give you a quick description of any option in the Edit & Create and Print & Share panes that you might want to select. To display this descriptive information in the pane on the right, simply position the mouse pointer somewhere over option
Figure 1-4:
in the panes on the left (when you do, not only does this descriptive informa-tion appear on the right, but the opinforma-tion becomes underlined, indicating that it contains a link). To initiate a particular option, you simply click its link. When you do so, the layout and menu options in the PhotoSuite window change to suit the task you’ve selected. See Chapter 8 for detailed informa-tion on using all the PhotoSuite opinforma-tions.
Easy multimedia projects
thanks to DVD Builder
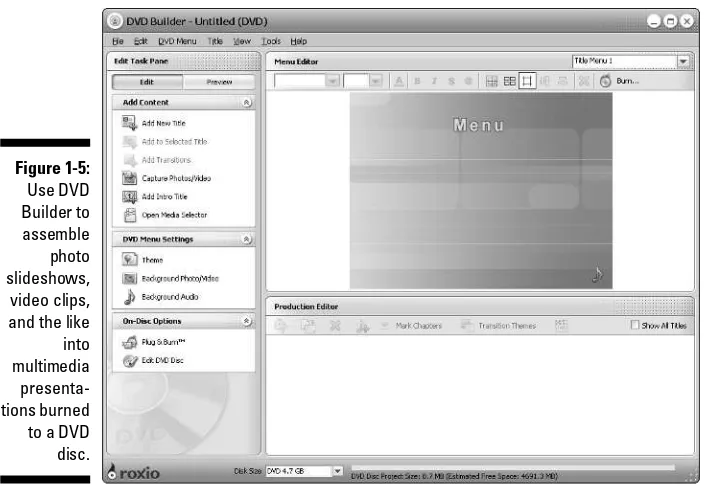
The DVD Builder is the application that you use to assemble and burn multi-media projects on DVD. Multimulti-media projects are those that can combine more than one type of media, including video clips, still photo images, text, and audio tracks. You can use DVD Builder to quickly and easily convert your digital home movies into menu-driven productions that you can play on a computer DVD drive or a standalone DVD player attached to your TV. You can also use DVD Builder to assemble your digital photo collections into slideshows that once burned onto a DVD disc can be played in the selfsame computer DVD drives or standalone DVD players.
Figure 1-5 shows the DVD Builder window that first opens after you click the DVD Builder link in the Applications area in the Easy Media Creator Home (and have indicated what type of DVD project to create). The DVD Builder window is the most complicated of those that you’ll run into in Roxio Easy Media Creator 7. As you can see in Figure 1-5, this window is divided into five panes:
⻬Add Contentwhere you capture video for your DVD project from a video camera attached to your computer or import it from clips or col-lections already stored on your hard disk
⻬DVD Menu Settingswhere you can specify a visual theme for the project’s menu screens (including layout and labeling of the menu but-tons), select a photo or video to use as the background of all menu screens, or add music or sound effects to play whenever the project’s menu screens are displayed on the screen
⻬On-Disc Optionswhere you can choose to burn your DVD project onto disc or to edit a multimedia presentation previously saved on a DVD disc
⻬Menu Editorwhere you can customize the menu buttons or background graphic
DVD Builder is possibly the most versatile application in the entire Easy Media Creator suite. Because you can combine all types of media (video, still images, text, and audio) as you want, this is the place where you can be really creative. In no time, you’ll be creating personalized and professional-looking multimedia projects that you can share with all your friends and family who have access to either a DVD drive in their computers or a standalone DVD player. See Chapters 9, 10, and 11 for details on using the DVD Builder to create your own DVD projects.
Riding the VideoWave
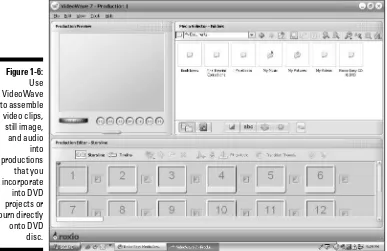
VideoWave is the application that you use to assemble and edit video projects (referred to in the Roxio documentation as productions) that can include video clips, still images, and audio. After assembling and editing a production in VideoWave, you can either add it to a DVD project that you’re making in DVD Builder or use DVD Builder to burn it onto a DVD disc (see “Easy multimedia projects thanks to DVD Builder” that immediately precedes this section).
Figure 1-6 shows you the VideoWave 7 window that appears when you click the VideoWave link in the Applications list in the Easy Media Creator Home. When you first open the VideoWave window, it is divided into the three major panes shown in this figure:
Figure 1-5:
⻬Production Previewwhere you can preview how your production will play as you create and edit it
⻬Media Selector - Foldersdisplaying file folders on your hard disk or network with the media files (audio, video, or still) that you want to add to the production (this pane can also display preassembled media col-lections, transitions, text styles, overlays, or effects that you can add to a production)
⻬Production Editor - Storylinedisplaying a storyboard view of the video production, showing all the individual video clips and stills with any in-between transitions in the order in which they will play in the final production (this pane can also display the production in a Timeline view which shows the timing of each element in the production along with any audio or narration track that you’ve added)
Personally, I find that VideoWave interface is one of the easiest and most straightforward for editing video that I’ve run across. I’m sure that with just a little experience using this beauty, you’re going to lovevideo editing. If, however, you’re a complete newbie to video editing and are the least bit intimidated about producing your own videos, you’ll be glad to know that VideoWave includes two new components designed to make video editing nearly foolproof:
Figure 1-6:
⻬CineMagicwhich automatically edits your video production by trim-ming your video clips and adjusting the tempo of the audio to fit the flow and transitions you use (perfect for making MTV-type videos)
⻬StoryBuilderwhich uses a Wizard-type interface, providing step-by-step guidance through assembling the various elements in your video production
Starting your video-editing career with CineMagic and StoryBuilder is a per-fect way to become familiar with the VideoWave interface and its capabilities. From there, you can quickly move on to video editing on your own right using the Storyline and Timeline views. See Chapter 11 for complete details on using all aspects of VideoWave.
You launch VideoWave from the Easy Media Creator Home to create new video productions. You also launch VideoWave directly from within the DVD Builder application when you need to do some advanced editing on a video production created earlier with VideoWave that you’ve imported into the Video Project you’re currently working on or to do similar editing to the contents of a new title that you added to DVD project. Suffice it to say that knowing how to use VideoWave goes a long way in mastering the video end of the Easy Media Creator suite.
Instant data copying thanks
to Drag-to-Disc
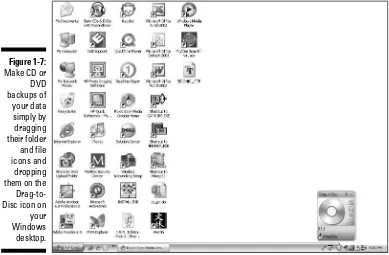
Drag-to-Disc is one of the neatest yet simplest applications in the Easy Media Creator suite. You can use this nifty program to make CD or DVD backups or archives of data files on your hard disk or network simply by dragging their folder or file icons on the Windows desktop and dropping them on the Drag-to-Disc icon (shown in Figure 1-7). The Drag-Drag-to-Disc application is great because it automatically does any formatting for the data CD or DVD as needed to accommodate the files that you add.
Listening to the rap on Napster
Napster renown as theplace to go on the Internet to download some cool tracks is back, this time as one of the most complete online music stores available. Napster enables you to search for, organize, and sample music tracks in seem-ingly all genres of music, from Pop, Rock, Jazz, Metal, Hip-Hop, R&B, Soul, Classical, Opera, to my personal favorite, Disco. Once you’ve found the album or track you can’t live without, you can purchase it (99 cents a track and $9.95 for an entire album — much less than half the price you’d pay for the album in a typical music store). You can then burn the tracks you’ve purchased to an audio CD for playback in computer CD or DVD drive or standalone CD player or trans-fer them directly to a standalone MP3 player (such as the Samsung - Napster 20 GB Digital Audio Player so prominently advertised on the Napster Home page).
The Easy Media Creator Home window contains two Napster buttons, one at the bottom of the Applications area with a link labeled Napster and the other in the lower-right corner of the Easy Media Creator Home window labeled
napster (in lowercase italic letters). You need Internet access in order to use either one of these buttons. If you’ve never installed Napster on your com-puter, you click the napsterbutton at the bottom of the Easy Media Creator Home window and sign up. After you’ve installed Napster on your computer, you can click the Napster link at the bottom of the Applications area to launch Napster (which, in turn, connects you to the Napster Web site).
Figure 1-7:
Figure 1-8 shows you the Napster window as it opens when I click the Napster link at the bottom of the Applications area on the Easy Media Creator Home window (your Napster window won’t be quite as elaborate until you’ve started using it to find and sample the music that turns you on). As you can see from this figure, the main pane in the Napster window contains three buttons (Home, Browse, and Library) with the Home button automatically selected. You can also see that Home area contains four tabs (Music, Radio, Magazine, and Message Boards) with Music automatically selected and its options displayed in the main viewing area below. To the immediate right of the main pane with the Music tab information displayed is a Now Playing pane (your Napster window will lack this pane until you start playing around with the Napster radio).
The Napster Home screen enables you to quickly display all sorts of artists and albums for different music presets (Alternative, Classical, Country, Dance, Hip-Hop, and so on) when the Music tab is selected, play a whole playlist of tunes assembled into “radio” stations when the Radio tab is selected, peruse issues of an online music magazine when the Magazine tab is selected, and participate in online threaded chats about various music-related subjects.
You must subscribe to the Napster Premium service in order to have access to the Radio, Magazine, and Message Boards tabs on the Napster Home screen. This subscription service costs $9.99 a month and also entitles you to completely sample and download most of the music available on the entire Napster sites (some artists insist that you purchase their music before you can play their entire track). Just be aware that if you don’t opt for joining this Premium service, all of your music sampling on Napster is restricted to 30 seconds of any track!
Figure 1-8:
The Napster Browse screen (displayed by clicking the Browse button at the top of the Napster window) enables you to browse through the Napster cata-log for the artists and albums that you want to sample and potentially pur-chase. The Napster Library button (displayed by clicking the Library button) organizes the music that you sample and purchase into convenient folders. From this screen, you can play a track, send it to someone by e-mail, or even burn it directly to an audio CD.
Tools for Every Need
The Tools area of the Easy Media Creator Home window (see Figure 1-1) contains a list of links to five tools (Media Manager, Capture, Label Creator, Sound Editor, and Roxio Player), along with a link to the entire suite’s Help Center and Tutorials. At the bottom of the this list, you find a pop-up button labeled Extras & Utilities, which when clicked displays a menu of seven serv-ices and utilities that you can access in using Roxio Easy Media Creator 7.
Clicking any of the five tool links launches a smaller program that performs a specialized function that helps in creating various CD and DVD projects with the applications discussed earlier in this chapter. The Help Center & Tutorial link opens a Help Center window that you can access when you need guidance in using any of the Easy Media Creator Applications and Tools. The remaining sections of this chapter acquaint you with the primary function of each of the program’s Tools, the Help Center, and the services and utilities collected on the Extras & Utilities pop-up menu.
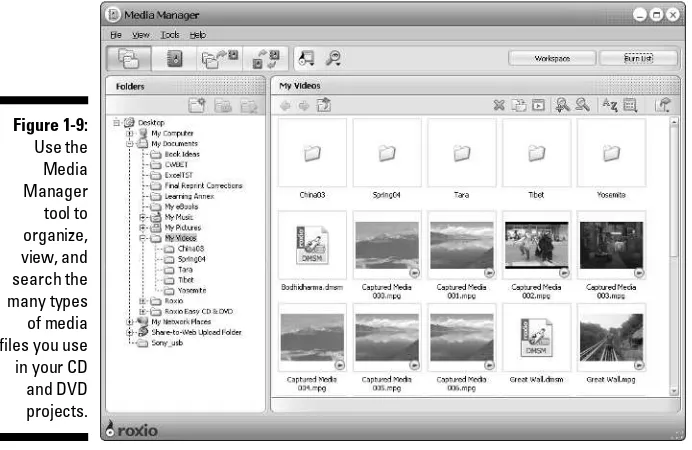
Media Manager at your service
You use the Media Manager to organize the many types of media files (video clips, still images, audio, and video projects) that you use in the CD and DVD projects you create. This handy-dandy little program enables you to keep tabs on particular media files through the use of collections, special Easy Media Creator files that associate selected media files together regardless of where these files are actually physically located on your computer system. Because collections reference to the media files you want to associate as a group, you don’t have to go through all the trouble of copying or moving the files into a single folder. You can also use the Media Manager to peruse your media files, tag them with keywords for easy searching, as well as backing these files up by burning them onto CD or DVD discs.
a pane named Folders on the left that enables you to select any drive or folder on your system and a pane with the name of the selected drive or folder on the right that displays all the folders and files that that drive or folder con-tains. You do the rest of the organizing magic with the buttons at both the top of the Media Manager window and these panes (see Chapter 4 for details).
Catching up with Capture
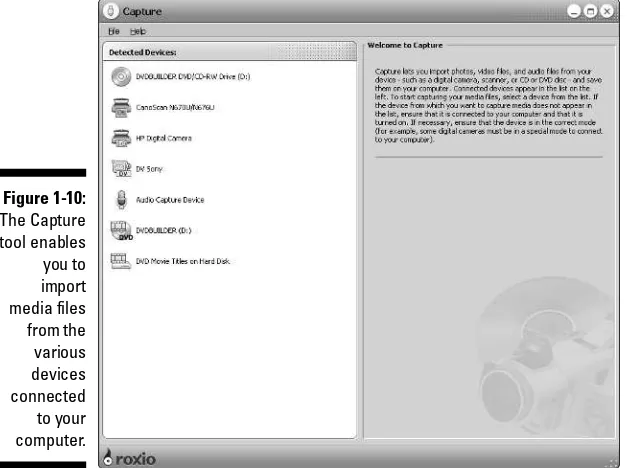
As the name suggests, you use the Capture utility to import media files from various devices such as a digital photo camera, video camera, scanner, and microphone that’s connected to your computer system. You can also use Capture to import media files from CD or DVD discs (which aren’t copy pro-tected and to which you have the right to make copies) loaded into the CD or DVD drive built into your computer.
Figure 1-10 shows the Capture window as it appears when I click the Capture link in the Tools area of the Easy Media Creator Home window (your Capture window may differ depending upon the actual devices you have connected to your computer). As you can see, this window shows you all the devices from which you can import media that are currently connected to your computer system in the Detected Devices pane on the left. It then displays descriptive general help information at the top of the Welcome to Capture pane on the right, along with specific help about any of the connected devices when you position the mouse pointer on its link in the Detected Devices pane.
Figure 1-9:
To import media from any of the devices connected to your computer system, you simply click the link associated with the device link in the Detected Devices pane. The layout and the options in the Capture window then change to suit the type of device and the type of media file it supports (see Chapter 10 for details on using Capture to import various types of media files).
Lauding the Label Creator
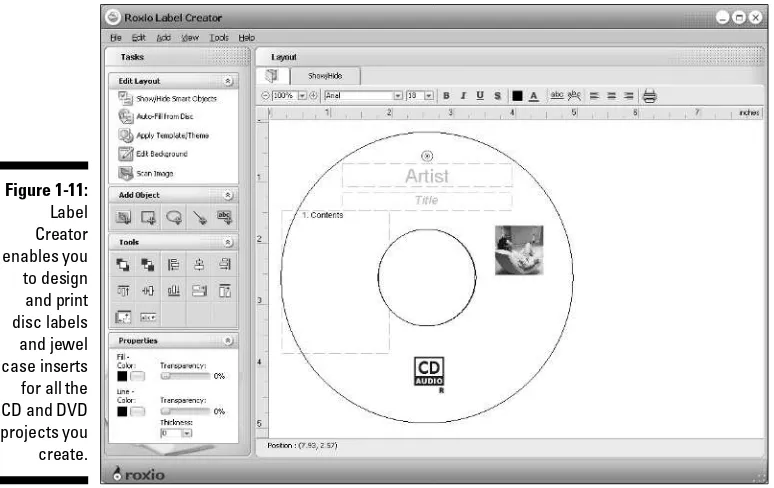
You use the Label Creator tool to design and print labels for the CD and DVD discs that you burn with the other Roxio Easy Media Creator applications. The Label Creator makes quick work of designing both disc labels and the inserts for their jewel cases. Figure 1-11 shows the Roxio Label Creator window as it first opens. Note that you open this window not only by clicking the Label Creator link in the Tools area of the Easy Media Creator Home window but also by clicking a Create Label button in the final dialog box when burning CD and DVD discs (see Chapters 5 and 12 for details).
The Label Creator window is divided into two panes: Tasks on the left and Layout on the Right. The Tasks pane contains all of the tools you commonly need to do the layout and add the content for your disc labels and jewel case inserts. The Layout pane previews the contents of your disc label or jewel
Figure 1-10:
case insert (the front and back printed cards that go inside the clear plastic case that holds the disc), while at the same time enabling you to edit these contents. For detailed information on using the Roxio Label Creator to design and print labels for any of your CD or DVD discs, see Chapter 9.
Saying Hello to Sound Editor
You can use the Sound Editor tool to record audio from audio devices con-nected to your computer (including analog sources such as cassettes and LP records). You can then use its features to edit or enhance the audio recording and convert to any of the supported digital audio file formats, including MP3, WAV, OGG, and WMA (see Chapter 2 to find out what in the world all these acronyms stand for).
Figure 1-12 shows you the Sound Editor window that appears when you click the Sound Editor link in the Tools area of the Easy Media Creator Home window after opening an MP3 audio file for editing. As you can see in this figure, the Sound Editor interface represents the audio file graphically with a sort of waveform readout (reminiscent of a snapshot of an oscilloscope dis-play). This waveform displays the relative amplitude of the sound for the left and right channels (marked L and R) of the audio file.
Figure 1-11:
You can then use the controls at the bottom of the Sound Editor to playback all of or any part of the audio track. You can also use the zoom controls located immediately above the waveform display to magnify portions of the audio’s waveform display or zoom out on it so that more of the entire track is shown in the Sound Editor. See Chapter 5 for details on using the Sound Editor to record and edit the audio files that you burn to CD or use in your DVD projects.
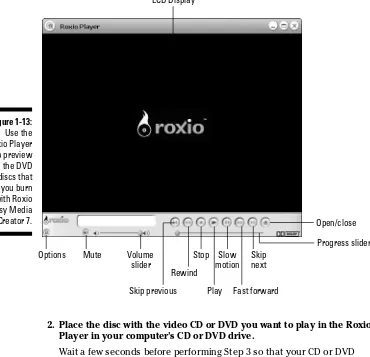
Playback with the Roxio Player
You can use the Roxio Player to playback video CDs or DVDs discs that you create with the Roxio Easy Media Creator suite or video projects that you’ve saved on your hard disk. This tool is particularly useful for previewing a video CD or DVD disc that you’ve burned with your equipment before distributing it to others for viewing on their equipment.
Figure 1-13 shows you the Roxio Player window after launching it by clicking the Roxio Player link in the Tools area of the Easy Media Creator Home window and loading a DVD movie that I created with the Roxio DVD Builder applica-tion. Note that this simple window is composed of two parts: a display area above where the video plays and a band at the bottom that contains all the controls for playing the video.
To play a video CD or DVD that you’ve created, you follow these steps:
1. Start the Roxio Player by clicking the Start button on the Windows taskbar, positioning the mouse pointer over All Programs on the Start menu, then over Roxio on the All Programs Menu, and then click Roxio Player on the Roxio submenu.
You can also start the Roxio Player from the Easy Media Creator Home window by clicking the Roxio Player link in the Tools area.
Figure 1-12:
2. Place the disc with the video CD or DVD you want to play in the Roxio Player in your computer’s CD or DVD drive.
Wait a few seconds before performing Step 3 so that your CD or DVD drive can wind up and the Roxio Player can find the disc.
3. Click the Play button in the middle of the Player controls at the bottom of the Roxio Player window (see Figure 1-13).
If your computer is equipped with both a CD and DVD drive, you may have to specify which drive contains the disc you want to play. To do this, click the Options button in the lower-left corner of the Roxio Player window and then click Change Selected Drive. Use the drop-down Drive Letter menu in the Change Selected Drive dialog box to select the cor-rect drive before you click OK.
As soon as you click the Play button in the Player controls, the video CD or DVD begins playing. If you’re playing a DVD and it has an Intro title, this intro-duction title begins playing. If your video CD or DVD has an opening menu screen, this screen appears, waiting for you to select the menu option for the title you want to play.
Progress slider Open/close LCD Display
Rewind
Skip next Stop Slow
motion
Skip previous Options Mute
Play Fast forward Volume
slider
Figure 1-13:
If the menu screen offers several titles, each represented by its own menu button, each of the titles is represented by a labeled button. You can play a particular title by positioning the mouse pointer over the button to highlight it and then clicking its button (when playing the disc in a standalone DVD player, you would do this by pressing the arrow keys on the DVD controller to highlight the button for the title you want to view and then pressing the controller’s Enter key).
When playing a video CD or DVD, you can toggle back and forth between full-screen video viewing and viewing the video within your normal Roxio Player window by pressing the “F” key on your keyboard or double-clicking the video display area. If you need access to the video controls after switching to full screen, click the screen (it doesn’t matter where the mouse pointer is when you do this). To make the video controls disappear, just click the screen another time.
If after viewing part of a particular DVD title, you want to return to the main menu screen to select another title to view, click the Menu button on the Player controls. If the title you’re viewing in the Roxio player has chapters (specific jump points in the video), you can jump to the next chapter by click-ing the Skip Next button. If you want to jump to an earlier chapter in the title, you click the Skip Previous button instead.
To pause the playing of a video CD or DVD, click the Pause button in the Player controls. When you finish playing the disc, you can either stop the play by clicking the Stop button or simply eject the disc from its CD or DVD drive by clicking the Eject button in the Player controls.
You can’t use the Roxio Player to play DVDs that you haven’t created and burned with the Roxio Easy Media Creator suite such as commercial DVD movies that you’ve rented or purchased. To play these DVDs on your com-puter, you need to use another player capable of playing DVDs such as the Windows Media Player.
Help is on the way!
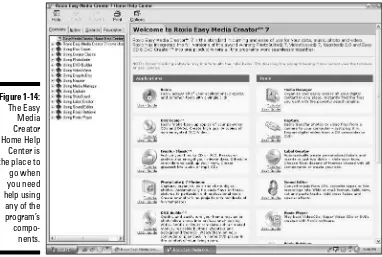
The Help Center & Tutorials link near the very bottom of the Tools area of the Easy Media Creator window is your ticket to complete online help with using any and all aspects of the Roxio Easy Media Creator 7 suite. Figure 1-14 shows you the Easy Media Creator Home Help Center window that opens when you click this link in the Home window.
(this pane presents its help topics on the standard tabs in the manner common to all Windows programs).
To get application- or tool-specific help, locate the name of the application or tool in the larger Welcome to Roxio Easy Media Creator 7 pane on the right side of the Home Help Center window. For a great many of the applications and tools shown in this pane, you can choose between seeing an animated tutorial and perusing the user guide for that application or tool.
If you’ve never opened a particular application or tool and are curious about what it can do, you should definitely start by clicking the application’s or tool’s Tutorial link. When you do this, the Help Center opens a separate window in which the tutorial plays. Each animated tutorial has a sound track and subtitles that explain the screens and animated actions shown in each scene in the tutorial. To pause the playing of a tutorial, click the Pause button (the second button) in the controls at the very bottom of the Tutorial
window. To resume playing the tutorial, click the Play button (the very first control). To advance to a particular scene in the tutorial, drag the slider button in the slider at the bottom or click the Skip Next (the button with the two arrowheads pointing to the right) or the Skip Previous (the button with the two arrowheads pointing to the left). When you finish playing the tutorial, click its window’s Close box (the upper-right corner of the window) to close the window.
Figure 1-14:
Open an application’s or tool’s user guide when you need a printed copy of the guide for using that particular application or tool. When you click the User Guide link for an application or tool, the Help Center launches your Web browser and Adobe Acrobat Reader (which appears inside the browser). The opening page of the user guide (which is saved as PDF file) then appears in browser window along with the Adobe Reader controls.
To print a copy of the entire user guide, click the Print button on the very first toolbar displayed at the top of your browser’s window and then click OK in the Print dialog box. To print a particular help topic, use the bookmarks in the Bookmarks Navigation pane on the left to determine its page numbers; then click the Print button and fill in the appropriate start and stop page numbers in the Pages From and To text boxes in the Print dialog box before you click OK.
To copy a particular help topic or step-by-step instructions into a document in another Windows program, click the Select Text Tool (labeled Select Text); then use the I-beam pointer to drag through and select all the text you want to copy. Then press Ctrl+C to copy the selected text to the Windows Clipboard, switch to the document in the other program, click the insertion point at the place where you want the help text copied, and then press Ctrl+V to insert the help text into the document at the insertion point.
When perusing the help information in an application or tool user guide, you can use the Zoom controls or the Actual Size, Fit Page, and Fit Width buttons to resize the text in the Document pane on the right side of the browser window. Click Fit Page to resize the text so that each page is fully displayed in Document pane. Click Fit Width to resize the text so that it fills out the width of the Document pane. Click Actual Size to resize the text with the 100% set-ting so that it represents more-or-less the size at which the text prints.
You can also use the Zoom Out and Zoom In buttons to decrease and
increase the magnification of the text in set increments. To select a particular magnification, click the Magnification drop-down button and click a preset or click the Insertion Point in the Magnification text box and replace the current setting with one of your own (by selecting the current setting and then typing in a new one). When you finish printing or viewing the help information in the user guide, you can close it, Adobe Acrobat Reader, and your Internet Browser by clicking the Browser window’s Close button in its upper-right corner.
Because each of the application and tool user guides are saved in the Adobe PDF file format, you must have the Adobe Acrobat Reader (simply called the Adobe Reader in version 6) or a full-fledged version of Adobe Acrobat installed on your computer in order to view and print these guides. If you don’t yet have Adobe Reader installed on your computer, you can download and install a free copy by going on the Internet and visiting the following Web page:
Exploring the Extras and Utilities
The last item in the Tools area of the Easy Media Creator Home window is an Extras & Utilities pop-up button. When you click this button, a pop-up menu with the following options appears:
⻬Disc and Device Utilityto display a Disc and Device Utility dialog box where you can view all of the drives and external devices that are con-nected to your computer system
⻬Roxio Retrieveto open the Roxio Retrieve utility that enables you to get files from multi-disc data discs, backup data discs, and encrypted data discs that you created with the Creator Classic application (see Chapter 3 for information on using Roxio Retrieve to restore media files stored across multiple CD or DVD discs)
⻬Roxio Updaterto go online to the Roxio Web site to check for updates to your Roxio Easy Media Creator 7 suite that you can download and install
⻬Audible Managerto go online to the Audible.com Web site where you can register and purchase audio books for playing on your computer or your MP3 player (see Chapter 6)
⻬Digital Media Servicesto go online to the Roxio.com Web site where you get information about all the online services available for processing the digital media you use in your CD and DVD projects
⻬Roxio Registrationto register your copy of the Roxio Easy Media Creator 7 suite online at the Roxio.com Web site (you have to do this only if you didn’t register the program when you installed it)
⻬About Roxio Easy Media Creator 7to display the About Roxio Easy Media Creator 7 dialog box that contains a bunch of technical and legal information (spread out on four tabs: General, Details, Legal, and System Information) about your copy of Roxio Easy Media Creator 7 and your computer system
To open a particular utility dialog box or window on this menu, you simply click its name in the pop-up menu. Remember, however, that you must have Internet access in order to use the Roxio Updater, Audible Manager, Digital Media Services, and Roxio Registration options.
The Ins and Outs of Digital
Media and Gear
In This Chapter
䊳Getting familiar with the wide range of digital media file formats
䊳Converting analog media to digital
䊳Selecting your digital camera and camcorder
䊳Selecting your DVD and MP3 player
䊳The proper care and handling of your CD and DVD discs
T
he many tools the Roxio Easy Media Creator 7 suite puts at your disposal certainly make it easy to create your own audio and video projects. This ease of use, however, is not quite matched when it comes to making heads or tails of the many and sundry media formats and equipment you can use in recording and saving these projects.To help dispel potential confusion over your choices of media formats for the particular audio and video gear you’re using, this chapter begins by examin-ing the relationship of media formats to digital recordexamin-ing and playback equip-ment. It then goes on to introduce you to the essential difference between analog and digital media, why you want to get on the digital bandwagon, and some of the devices you can use to convert your analog media to digital for use with the Easy Media Creator.
Feeling at Home in the Digital
Media Menagerie
Before I can clear up any perplexity that you might have about the different types of media that are available to you as you start working with the Easy Media Creator, you need to be clear about the relationship between the digi-tal media formats and the kinds of recorders and playback gear you have.
The standard media formats for both CD and DVD discs come in several fla-vors (see the sidebar that follows for the essential difference between CD and DVD discs). As you see in Table 2-1, by and large these formats differ accord-ing to how much data they hold, their recordaccord-ing speed, and whether or not they enable you to record data on them only once or erase and rerecord data multiple times (referred to by the term rewritable).
Table 2-1
Digital Media and Data Capacity
Media Types Maximum Capacity Record Once Rewritable
CD-R 210 MB, 650 MB, or 700 MB ✓
CD-RW 210 MB, 650 MB, or 700 MB ✓
DVD-R, DVD+R 4.7 GB ✓
DVD-RW, DVD+RW 4.7 GB ✓
DVD-RAM from 2.6 GB up to 9.4 GB ✓
When shopping for discs to use for your various Easy Media Creator projects, you need to match the capacities of your recording and playback hardware with the proper media. Be sure to check the boxes of media for the following pieces of information:
⻬CD or DVD indicating whether the discs are formatted for recording and playback of CDs or DVDs
⻬Maximum data capacity expressed in megabytes (MB) or gigabytes (GB)
⻬Recording speed, anywhere from 1x (times) up to about 8x for DVDs and anywhere up 52x for CDs