by Brian Underdahl
Author of iPAQ For Dummies
Access
Forms
& Reports
FOR
Hoboken, NJ 07030-5774
www.wiley.com
Copyright © 2006 by Wiley Publishing, Inc., Indianapolis, Indiana Published by Wiley Publishing, Inc., Indianapolis, Indiana
Published simultaneously in Canada
No part of this publication may be reproduced, stored in a retrieval system or transmitted in any form or by any means, electronic, mechanical, photocopying, recording, scanning or otherwise, except as permit-ted under Sections 107 or 108 of the 1976 Unipermit-ted States Copyright Act, without either the prior written permission of the Publisher, or authorization through payment of the appropriate per-ycopy fee to the Copyright Clearance Center, 222 Rosewood Drive, Danvers, MA 01923, (978) 750-8400, fax (978) 646-8600. Requests to the Publisher for permission should be addressed to the Legal Department, Wiley Publishing, Inc., 10475 Crosspoint Blvd., Indianapolis, IN 46256, (317) 572-3447, fax (317) 572-4355, or online at http://www.wiley.com/go/permissions.
Trademarks:Wiley, the Wiley Publishing logo, For Dummies, the Dummies Man logo, A Reference for the Rest of Us!, The Dummies Way, Dummies Daily, The Fun and Easy Way, Dummies.com, and related trade dress are trademarks or registered trademarks of John Wiley & Sons, Inc. and/or its affiliates in the United States and other countries, and may not be used without written permission. [Insert third party trade-marks from book title or included logos here.] All other tradetrade-marks are the property of their respective owners. Wiley Publishing, Inc., is not associated with any product or vendor mentioned in this book.
LIMIT OF LIABILITY/DISCLAIMER OF WARRANTY: THE PUBLISHER AND THE AUTHOR MAKE NO REP-RESENTATIONS OR WARRANTIES WITH RESPECT TO THE ACCURACY OR COMPLETENESS OF THE CONTENTS OF THIS WORK AND SPECIFICALLY DISCLAIM ALL WARRANTIES, INCLUDING WITHOUT LIMITATION WARRANTIES OF FITNESS FOR A PARTICULAR PURPOSE. NO WARRANTY MAY BE CRE-ATED OR EXTENDED BY SALES OR PROMOTIONAL MATERIALS. THE ADVICE AND STRATEGIES CON-TAINED HEREIN MAY NOT BE SUITABLE FOR EVERY SITUATION. THIS WORK IS SOLD WITH THE UNDERSTANDING THAT THE PUBLISHER IS NOT ENGAGED IN RENDERING LEGAL, ACCOUNTING, OR OTHER PROFESSIONAL SERVICES. IF PROFESSIONAL ASSISTANCE IS REQUIRED, THE SERVICES OF A COMPETENT PROFESSIONAL PERSON SHOULD BE SOUGHT. NEITHER THE PUBLISHER NOR THE AUTHOR SHALL BE LIABLE FOR DAMAGES ARISING HEREFROM. THE FACT THAT AN ORGANIZATION OR WEBSITE IS REFERRED TO IN THIS WORK AS A CITATION AND/OR A POTENTIAL SOURCE OF FUR-THER INFORMATION DOES NOT MEAN THAT THE AUTHOR OR THE PUBLISHER ENDORSES THE INFORMATION THE ORGANIZATION OR WEBSITE MAY PROVIDE OR RECOMMENDATIONS IT MAY MAKE. FURTHER, READERS SHOULD BE AWARE THAT INTERNET WEBSITES LISTED IN THIS WORK MAY HAVE CHANGED OR DISAPPEARED BETWEEN WHEN THIS WORK WAS WRITTEN AND WHEN IT IS READ.
For general information on our other products and services, please contact our Customer Care Department within the U.S. at 800-762-2974, outside the U.S. at 317-572-3993, or fax 317-572-4002. For technical support, please visit www.wiley.com/techsupport.
Wiley also publishes its books in a variety of electronic formats. Some content that appears in print may not be available in electronic books.
Library of Congress Control Number: 2005927725 ISBN-13: 978-0-7645-9965-1
ISBN-10: 0-7645-9965-8
Manufactured in the United States of America
10 9 8 7 6 5 4 3 2 1
Brian Underdahl is the well-known, best selling author of over 70 computer books on a broad range of subjects. He has appeared on a number of TV shows, including the Computer Chronicles, and several TechTV programs, and is the subject of an hour-long interview on the syndicated Computer Outlook
radio program. One of his titles was recently recommended to viewers by Scott Gurvey, Bureau Chief, on the Nightly Business Reporton PBS, and his books have won awards including an Award of Merit from the Northern California Technical Communications Competition and the Referenceware Excellence Award for best title in the Graphic Design and Multimedia category.
Brian has been involved in personal computers from their beginning and has a background in electrical engineering. His last “real” job was as a Senior Programmer/Analyst for a large company, where he worked hard to bring the power and freedom of PCs to the desktops.
Brian figures that it’s the author who should do the work so that readers can get their money’s worth. That’s why his books are different — he takes the time to explain what’s going on so that readers can understand the subjects easily.
Author’s Acknowledgments
No book is the product of one person, even if one person has the title of author and gets to have his or her name on the cover. I’m very lucky to have a lot of people I can thank for all the hard work and effort they put into this book. They include Terri Varveris, Nicole Haims, and Virginia Andersen. I’d also like to thank the many people who provided me with the wonderful Access tools and add-ons so that I could give you an idea about how you can get even more from Access. Please do check out the Web sites I list for these great products — you owe it to yourself to see how much more productive you can be.
Some of the people who helped bring this book to market include the following:
Acquisitions, Editorial, and Media Development
Project Editor:Nicole Haims
Acquisitions Editor:Terri Varveris
Technical Editor:Virginia Andersen
Editorial Manager:Carol Sheehan
Media Development Manager:
Laura VanWinkle
Media Development Supervisor:
Richard Graves
Editorial Assistant:Amanda Foxworth
Cartoons:Rich Tennant (www.the5thwave.com)
Composition Services
Project Coordinator: Maridee Ennis
Layout and Graphics: Claudia Bell, Andrea Dahl, Lauren Goddard, Denny Hager, Joyce Haughey, Stephanie D. Jumper, Barry Offringa, Heather Ryan
Proofreaders:David Faust, Leeann Harney, Carl William Pierce, TECHBOOKS Production Services
Indexer: Sherry Massey
Publishing and Editorial for Technology Dummies
Richard Swadley,Vice President and Executive Group Publisher
Andy Cummings,Vice President and Publisher
Mary Bednarek,Executive Acquisitions Director
Mary C. Corder,Editorial Director
Publishing for Consumer Dummies
Diane Graves Steele,Vice President and Publisher
Joyce Pepple,Acquisitions Director
Composition Services
Gerry Fahey,Vice President of Production Services
Introduction ...1
Part I: Accessing Both Ends: Getting Data In
and Info Out...7
Chapter 1: Getting to Know Forms and Reports ...9
Chapter 2: Getting Started with Queries ...25
Chapter 3: Creating Simple Forms ...45
Chapter 4: Building Basic Reports ...67
Part II: Creating Effective Queries ...93
Chapter 5: Creating Multi-Table Queries ...95
Chapter 6: Modifying Data with Queries ...113
Chapter 7: Expanding Queries with SQL ...133
Chapter 8: Dealing with Quarrelsome Queries ...151
Part III: Building Really Useful Forms ...169
Chapter 9: Building Better Forms by Using Controls ...171
Chapter 10: Using Multiple Tables in Forms ...191
Chapter 11: Fixing Form Faults ...205
Part IV: Designing Great Reports ...219
Chapter 12: Adding Fancy Touches to Reports ...221
Chapter 13: Creating Reports that Summarize Data ...241
Chapter 14: When Reports Go Wrong . . . ...257
Part V: Way Cool Advanced Queries,
Forms, and Reports ...267
Chapter 15: Tricks for Finding Data with Queries ...269
Chapter 16: Tricks for Updating with Queries ...283
Chapter 17: Killer Ways to Improve Forms ...295
Chapter 18: Expert Methods for Sharing Reports ...315
Chapter 19: Making Reports Look Better ...331
Chapter 22: Ten Things to Know About Queries
(That Also Help You with Forms and Reports) ...371
Introduction ...1
About This Book ...1
Conventions Used in This Book ...2
What You Don’t Have to Read ...2
Icons Used in This Book ...3
Foolish Assumptions ...3
How This Book Is Organized ...4
Part I: Accessing Both Ends: Getting Data In and Info Out ...4
Part II: Creating Effective Queries ...4
Part III: Building Really Useful Forms ...4
Part IV: Designing Great Reports ...5
Part V: Way Cool Advanced Queries, Forms, and Reports ...5
Part VI: The Part of Tens ...5
Part I: Accessing Both Ends: Getting
Data In and Info Out ...7
Chapter 1: Getting to Know Forms and Reports . . . .9
Finding a Fascination with Forms ...10
Using forms to streamline data input ...11
Entering data with the Form Wizard ...12
Editing information with forms ...14
Viewing data by using forms ...15
Recognizing Why Reports Rock ...15
Using reports to show results ...15
Using reports to present data in a professional format ...16
Using reports to show data analysis ...17
Using reports to preserve the moment ...18
Seeing Why Both Forms and Reports Have a Place ...18
Understanding the Value of Queries ...19
Introducing the query concept ...20
Using queries to enhance forms and reports ...21
Queries, Forms, and Reports Basics You Must Endure ...21
Chapter 2: Getting Started with Queries . . . .25
Understanding the Types of Queries ...25
Introducing select queries ...26
Getting to know crosstab queries ...28
Make-table queries ...29
Using update queries ...30
Introducing append queries ...31
Getting to know delete queries ...32
Creating Queries by Using a Wizard ...33
Why you should be off to see the wizards ...33
Understanding the limitations of the wizards ...34
Creating your first query with a wizard ...34
Creating Queries in Design View ...38
Getting to know the Design view ...38
Creating an example query in Design view ...40
Modifying Queries for Better Results ...42
Deleting a query ...43
Modifying an existing query ...43
Rearranging and deleting fields in a query ...44
Chapter 3: Creating Simple Forms . . . .45
Creating Forms with the Help of a Wizard ...45
Meeting (And avoiding) the AutoForm Wizards ...46
Making friends with the Form Wizard ...48
Knowing what the wizard can’t do ...51
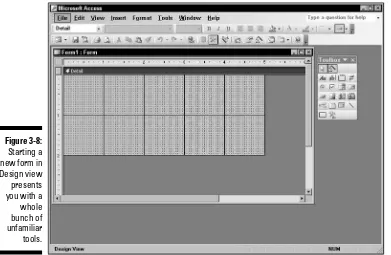
Building Forms the Hard Way: Using Design View ...52
Introducing Design view tools ...53
Starting a form in Design view ...55
Associating a table to your form in Design view ...56
Adding fields to the form ...58
Modifying Forms You’ve Created ...59
Aligning objects on a form ...60
Setting consistent sizes ...62
Spacing horizontally and vertically ...63
Shrinking a big form down to size ...64
Chapter 4: Building Basic Reports . . . .67
Getting to Know the Types of Access Reports ...67
Introducing simple reports ...68
Using reports that group data ...69
Using reports to summarize information ...69
Creating Reports by Using a Wizard ...70
Using the Report Wizard ...70
Designing Reports from Scratch ...75
Understanding the report bands ...76
Setting up the report page ...78
Choosing your tables ...82
Selecting the fields ...83
Modifying Report Layouts ...84
Deciding what needs to be done ...84
Moving and formatting those pesky labels ...85
Pulling the layout together to save paper ...87
Adding Data from External Linked Tables ...88
Choosing a method for accessing external data ...89
Importing or linking external data ...90
Part II: Creating Effective Queries ...93
Chapter 5: Creating Multi-Table Queries . . . .95
Understanding Multi-Table Queries ...95
Understanding the benefits of multiple tables ...96
Establishing relationships between multiple tables ...97
Adding Multiple Tables to Queries ...98
Selecting multiple tables upfront ...98
Adding the tables you forgot about to your query ...100
Choosing the fields to use ...101
Making Access use the correct table ...102
Linking to External Databases in Your Queries ...103
Understanding the types of external data you can use ...103
Linking to tables in another foreign database format ...104
Knowing what you can and can’t do with a linked external database ...106
Understanding Relationships in Queries ...106
Getting to know how tables are related ...107
Making sure that you choose the right relationships ...108
Setting up table relationships ...108
Chapter 6: Modifying Data with Queries . . . .113
Understanding What You Can Modify with a Query ...113
Knowing what you can modify ...114
Knowing what you can’t modify ...115
Being Called to Action: Data-Modifying Queries ...115
Creating New Tables with Queries ...117
Why you would want to create new tables ...117
Creating your first table with a make-table query ...118
Updating Data by Using Queries ...121
Creating an update query example ...121
Deleting Data with Queries ...125
Adding New Data with Queries ...127
Using an append query ...127
Combining make-table and append queries ...131
Chapter 7: Expanding Queries with SQL . . . .133
Getting the Scoop on SQL ...133
Understanding the “S” in SQL ...134
Putting SQL in its place (at the heart of all Access queries) ...135
Understanding How SQL Can Help ...136
Going beyond the automated query functions ...136
Creating an indexed table with SQL ...137
Modifying a table with SQL ...138
Viewing the SQL You’ve Already Created and Didn’t Know About ...139
Switching to Design view ...139
Changing to SQL view ...140
Seeing the results in Datasheet view ...141
Going back to Design view ...142
Getting Your Feet Wet with Simple SQL Statements ...143
Making Useful SQL Statements ...145
Updating records with SQL ...145
Creating and filling tables using SQL ...146
Summarizing values using SQL ...147
Deleting records using SQL ...147
A Nod to VBA Programmers ...148
Chapter 8: Dealing with Quarrelsome Queries . . . .151
Troubleshooting Queries That Don’t Quite Work ...151
Understanding the clues Access gives you ...152
Locating the problem ...152
Using Datasheet view as a troubleshooting tool ...155
Troubleshooting Sassy SQL ...157
Figuring out what went wrong ...157
Trying Design view ...158
Things to watch out for in SQL queries ...158
Simplifying your SQL to find the problem ...159
Avoiding Improper Relationships ...160
Understanding how bad relationships can mess you up ...160
Making sure your relationships make sense ...162
Correcting relationships that don’t work ...162
Junking Joins That Don’t Join ...163
Understanding why default joins may not work ...163
Steering Around Empty Query Results ...165
Understanding some of the causes of empty query results ...165
Correcting a query that doesn’t return any data ...165
Preventing Data Destruction ...166
Beginning by backing up ...166
Avoiding destructive query results ...166
What to do if your database seems to be kaput ...167
Part III: Building Really Useful Forms ...169
Chapter 9: Building Better Forms by Using Controls . . . .171
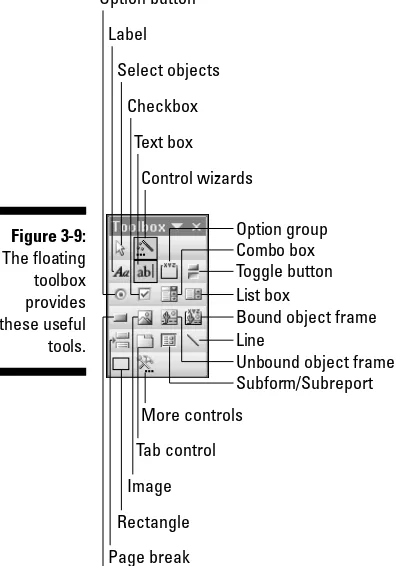
Getting to Know the Controls ...171
Common Controls You Can Use ...172
List box controls ...173
Option button controls ...174
Check box controls ...174
Adding Controls to Your Forms ...174
Adding list boxes to your forms ...176
Adding option groups ...179
Using check boxes on forms ...181
Adding labels to toggle buttons ...182
Incorporating ActiveX Controls ...183
Modifying the Characteristics of Controls ...186
An example of setting default values ...186
Blocking access to certain controls ...188
Improving controls by using tab order ...188
Chapter 10: Using Multiple Tables in Forms . . . .191
Understanding Forms and Subforms ...191
Understanding the needs subforms fill ...192
Getting to know the subform place ...192
Adding Fields from Multiple Tables to Your Forms ...193
Verifying relationships and adding fields ...194
Adding subforms with the Form Wizard ...195
Adding a subform after the fact ...197
Choosing the Best Subform View ...197
Making the switch from Datasheet view to another subform view ...197
Introducing your subform view options ...199
Adding Multiple Subforms ...201
Navigating Records in Multi-Table Forms ...202
Choosing the right navigator bar ...202
Chapter 11: Fixing Form Faults . . . .205
Preventing Invalid Data with Input Masks ...205
Setting up an input mask with the wizard ...206
Making an input mask from scratch ...207
Limiting a User to Specific Values with Validation Rules ...209
Setting up your own validation rules ...209
Remembering Access validation rules ...211
Quick validation rules you can use ...212
Preventing Users from Changing Records ...213
Looking Out for Poorly Formatted Data ...214
Knowing what not to do ...214
Formatting data on forms ...216
Part IV: Designing Great Reports...219
Chapter 12: Adding Fancy Touches to Reports . . . .221
Adding Descriptive Titles to Your Reports ...221
Getting title basics down ...222
Modifying existing titles ...223
Formatting your report titles ...224
Getting Dynamic with Your Titles ...224
Understanding how to use expressions in your titles ...225
Using expressions to create dynamic titles ...226
Using properties to control your expressions ...227
Getting rid of the .mdb document extension ...228
Coming up with Page Title Ideas ...228
Adding Dates and Page Numbers ...230
Choosing the right place for dates and numbers ...230
Getting fancy with date displays ...230
Discovering some neat page number tricks ...232
Making Records Easier to Read with Alternating Bands of Color ...232
Step 1: Picking colors and translating them to hex ...233
Step 2: Writing code to apply your color bands ...235
Making Records Stand Out ...237
Chapter 13: Creating Reports that Summarize Data . . . .241
Discovering How to Group Records ...241
Understanding your record-grouping options ...242
Creating your first report grouping ...243
Making sure you get the right groups ...246
Adding Subtotals and Totals ...249
Understanding how subtotals and totals work ...249
Adding totals to groups and reports ...250
Using Some Advanced Summarizing Methods ...251
Going beyond simple math ...252
Finding the largest, smallest, and average values ...255
Trimming off extra spaces ...255
Rounding numbers ...256
Chapter 14: When Reports Go Wrong . . . . . . .257
Troubleshooting Reports ...257
Figuring out whether the report is really wrong ...258
Figuring out what’s wrong with the report ...258
Avoiding Bad Report Layouts ...260
Considering the purpose of your report ...260
Avoiding text box data overflow ...261
Avoiding page overflow ...262
Formatting data in reports ...263
Eliminating Unnecessary Labels for Tighter Reports ...264
Deciding whether you really need all those labels ...264
Deleting labels ...265
Moving labels to headers ...265
Part V: Way Cool Advanced Queries,
Forms, and Reports...267
Chapter 15: Tricks for Finding Data with Queries . . . .269
Finding Just the Data You Need ...270
Getting to know the operators ...270
Selecting a range of records ...271
Finding data that’s close but not exact ...275
Creating Queries That Ask What to Find ...277
Understanding parameter queries ...277
Building your very own parameter query ...278
Excluding Data You Don’t Want ...279
Eliminating duplicates from results ...280
Finding duplicates with SQL queries ...280
Modifying join properties to get the results you want ...281
Chapter 16: Tricks for Updating with Queries . . . .283
Creating New Fields with a Query ...283
Deciding whether using a query to add fields is worth it ...284
Adding your first field with a query ...284
Adding Default Values by Using a Query ...286
Getting to know what you can add ...286
Adding default values to your very first field ...286
Making sure you don’t override real data ...287
Performing Calculations ...288
Determining whether to use a query for your calculations ...288
Updating Records by Using Data from Another Table ...290
Choosing the right type of query for your updates ...291
Updating data in one table with data from another without any conditions ...291
Making sure the right data is updated ...294
Chapter 17: Killer Ways to Improve Forms . . . .295
Prequalifying the Data Entered ...295
Creating lookup lists ...296
Setting default values ...301
Crafting Forms That Are Easier to Use ...302
Making data appear in a logical order ...303
Controlling the order for displaying records ...303
Adding command buttons for common tasks ...304
Creating a switchboard for better usability ...309
Creating your own switchboard ...309
Presenting data for information only ...311
Making read-only fields ...312
Giving users help with text prompts ...312
Chapter 18: Expert Methods for Sharing Reports . . . .315
Sharing Report Data with Microsoft Excel ...315
Laying out reports so that they work in Excel ...316
Exporting your report data to Excel ...318
Sending Reports to Microsoft Word ...320
Sending report data to Word ...320
Using the Word Mail Merge feature with Access ...321
Using OLE Objects in Reports ...323
Understanding OLE objects ...323
Linking versus embedding ...323
Adding your first OLE object to your Access database ...325
Troubleshooting OLE objects so that they actually work ...328
Chapter 19: Making Reports Look Better . . . .331
Enhancing the Appearance of Important Information ...331
Sorting report data for clarity ...332
Making data seem to jump out ...334
Printing on Standard Labels ...337
Keeping Related Data Together ...339
Understanding why Access splits records ...340
Tricks you can use to avoid splitting grouped records ...340
Tricks you can use to avoid splitting sorted records ...341
Chapter 20: Adding Efficiency with Great Tools . . . .345
Using Cool Tools to Document Everything ...346
Comparing Access databases with CompareWiz ...346
Comparing the data in Access databases with CompareDataWiz ...347
Checking out your queries with Query Tree Editor ...348
Fixing database corruption with AccessFIX ...350
Souping Up Your Database ...351
Optimizing your Access database with SSW Performance Pro! ...351
Enhancing your Access forms with Selector ...353
Creating better forms with ShrinkerStretcher ...353
Creating forms from existing forms with OmniForm ...354
Using Software to Share Stuff ...355
Using Snapshot Viewer for Access to send a report to non-Access users ...355
Linking Access and PowerPoint by using Take-Off DATAPOINT ...356
Sending data to QuickBooks with accessBooks Updater ...357
Bringing QuickBooks data to Access with Digital Cows Deluxe Exporter ...358
Bringing data from Excel with Excel Import Assistant ...359
Merging data with Word by using Word Link for Access ...361
Part VI: The Part of Tens...363
Chapter 21: Ten Great Access Sites Online . . . .365
Access Database Tips ...366
Access Monster ...366
Easy Access Database Directory ...366
Jamie’s Software ...367
Lebans.com ...367
Microsoft Access Database Solutions ...367
Microsoft Office Online Access ...368
MSDN — Microsoft Developer Network ...368
MSDN Access code samples ...369
MSDN Access site ...369
Office Solutions Development ...369
Roger’s Access Library ...369
Chapter 22: Ten Things to Know About Queries
(That Also Help You with Forms and Reports) . . . .371
Queries Act Like Tables ...371
Select Queries Are Always Safe ...372
All Queries Are SQL Queries ...372
Action Queries Can Harm Your Data ...372
You Need Joins to Use Multiple Tables in Queries ...372
Queries Select All Records Unless You Specify Criteria ...373
Datasheet View Shows Results without Running the Query ...373
Make-Table Queries Always Begin with an Empty Table ...373
Queries Need a Record Source ...373
Delete Queries Are Forever ...374
M
icrosoft Access can be an incredibly useful application, but it can also be very frustrating if you don’t know how to make it do what you want it to do. In a perfect world, you’d have a guru around, 24/7 — someone who knows Access inside and out and is willing to guide you along the way, show-ing you handy little tricks and useful techniques that help you to get the results you need.Well, I may not be there with you, but this book is the next best thing. I’ve gathered the really useful pieces of information that you need to create pow-erful queries, very easy-to-use forms, and reports that actually tell the story of what is going on inside your data. Along the way, I make sure to show you the special tricks and techniques that I use.
About This Book
Access Forms & Reports For Dummiesis a hands-on guide that uses real-world examples to show you just what you need to know about Access and why you need to know it. You won’t find a bunch of buzzwords and jargon. Rather, you do find the solid information you really need and can’t find elsewhere about creating queries, forms, and reports. Yes, I do give you good, solid informa-tion about queries in addiinforma-tion to forms and reports because queries are an essential element that will help you create better forms and reports.
Access Forms & Reports For Dummiesis also a reference that you can use as you like. If you have a specific problem you need to solve right now, you can jump directly to the related topic and skip around as much as you want. But if you really want to make Access work for you, I suggest that you read through the entire book because you will discover many things you don’t already know.
Conventions Used in This Book
We’ve used a few conventions in this book to make it easier for you to spot special information. Here are those conventions:
⻬New terms are identified by using italic.
⻬Web sites addresses (URLs) are designated by using a monospacefont.
⻬Any command you enter at a command prompt is shown in bold and usually set on a separate line. Setoff text in italic represents a place-holder. For example, the text might read:
Enter the following expression, using your own name and dynamic report title:
= “Report title”&[CurrentProject].[Name]
⻬Command arrows, which are typeset as ➪, are used in a list of menus and options. For example, Tools➪Options means to choose the Tools menu and then choose the Options command.
⻬Key combinations are shown with a plus sign, such as Ctrl+F2. This means you should hold down the Ctrl key while you press the F2 key.
⻬All Access properties and fields are set apart in monospacefont, as well, like this: Use the Input Maskproperty of the Data tab to create an input mask.
⻬Wherever I instruct you to use a snippet of code, I set it apart like this:
INSERT INTO LIVEWINBID SELECT [Auction 67].* FROM [Auction 67];
What You Don’t Have to Read
Icons Used in This Book
Access Forms & Reports For Dummiesincludes icons that point out special information. Here are the icons I use and what they mean:
This icon makes you seem like a real Access expert in no time. It highlights special tricks and shortcuts that make using Access even easier. Don’t miss any of these!
This icon reminds you of important information that can be far too easy to forget and which can cause a lot of frustration when you do forget.
Be careful when you see this icon. It points out an area where you’ll want to be extra cautious so that you don’t cause yourself problems. It also tells you how to avoid the problems.
Technical Stuff is information for folks who want to know all the geeky details.
Real World Examples tell you about actual ways to apply your new Access techniques. Don’t miss any of these because they’re sure to give you a lot of ideas you can adapt and use.
From time to time I may direct you to another book that can be a good resource for you as you become a master of all things Access. This icon high-lights those moments.
Foolish Assumptions
Making assumptions is always a gamble because assumptions can quickly come back to haunt you. That said, in writing this book I made some assump-tions about you. This book is for you if:
⻬You have Access and want to know how to use it more effectively.
⻬You have a bunch of data that you want to turn into useful information.
⻬You want to see how you can create more efficient Access reports and quit wasting so many trees.
⻬You would like to know how to use data from an external database with-out having to get down on your knees to beg permission every time you need to run a report.
⻬You have finally realized that you are a 5th Wavecartoon addict and simply can’t pass up the chance to see what is hidden in these pages.
How This Book Is Organized
Access Forms & Reports For Dummieshas six parts. Each part is self-contained, but all the content is somewhat interconnected. That way you’ll see the most useful information without a lot of boring repetition.
Part I: Accessing Both Ends:
Getting Data in and Info Out
This part shows you the basics of queries, forms, and reports. You see how these pieces fit together and I make sure that you have the fundamentals down pat so that you have a good foundation for the rest of the topics.
Part II: Creating Effective Queries
Queries enable you to work with sets of data instead of simply dumping everything into the pot. This part shows you how to create effective queries that enable you to pick and choose what shows up in your forms and reports. You even see how you can step beyond simple queries by having a look underneath the fancy face that Access throws onto your queries.
Part III: Building Really Useful Forms
Part IV: Designing Great Reports
With Access reports you can turn data into useful information. This part shows you how to create great reports that look good and that provide a wealth of understandable information.
Part V: Way Cool Advanced Queries,
Forms, and Reports
Ordinary techniques are for ordinary people. This part takes you well beyond the ordinary and shows you how to get so much more from your queries, forms, and reports. This part also shows you some great tools you can use to make Access into an even more powerful partner for your database needs.
Part VI: The Part of Tens
Accessing Both
Ends: Getting Data
Getting to Know Forms
and Reports
In This Chapter
䊳Introducing forms䊳Understanding reports
䊳Using forms and reports together
䊳Introducing queries to your forms and reports
䊳Looking for extra add-ons
W
ithout forms and reports an Access database is just a jumble of hard-to-use information. But with really good forms and reports that same database becomes both informative and a joy to use. Well-designed forms and reports make your Access databases into something that’s far beyond the ordinary in utility, ease of use, and flexibility.If you’ve been playing around with Access for a while, you have probably at least tried to create some forms and reports. Maybe some of your efforts didn’t seem too bad, but you’ve probably had your share of frustration, too. Creating forms and reports that really do what you want them to do can be an awfully exasperating experience.
Finding a Fascination with Forms
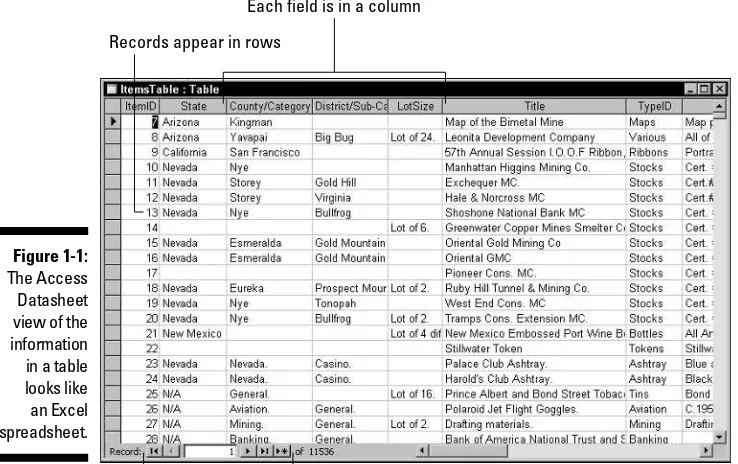
In order to understand the importance of forms in an Access database, begin by looking at the alternative. Figure 1-1 shows the Datasheet viewof a typical Access table (a table is the structure where Access stores information in your database). The Datasheet view looks an awful lot like an Excel worksheet. You are likely pretty familiar with this view of a database because it seems as though almost everyone’s first attempt at a database is to just create a list in a spreadsheet. Welcome to the “if the only tool you have is a hammer, every-thing looks like a nail” club!
In Datasheet view each record is displayed in a single row with columns for each of the database fields. Even though this view of the data is probably pretty familiar, it’s not very convenient. For one thing, unless you’re only keeping track of a little information about each item, it’s really hard to see an entire record in Datasheet view because everything has to fit into one row; that means you have to scroll back and forth to see all the fields. Depending on the length of each field, sometimes you can’t even see all the entire con-tents of a single field on-screen. And don’t even think about seeing a single record wrap around and take up multiple rows — making everything fit on-screen simply is not an option.
Records appear in rows
Record navigation tools
Each field is in a column
Figure 1-1:
There are, of course, some other factors that make the Datasheet view pretty inconvenient for most purposes. Can you imagine how little fun it would be to scroll through screen after screen trying to locate a specific record in Datasheet view? Now imagine that instead of finding a single record you want to find a dozen or so related records in a table containing 10,000 or more records. It’s almost enough to make you want to go and live on a desert island where there aren’t any computers, isn’t it?
Fortunately, there’s a good solution at hand in the guise of forms.Access forms provide a much more convenient way for you to interact with your database. Finding how to create great forms is certainly going to be a lot easier than packing up your stuff for that move to a desert island. The following sections give you a look at some of the ways forms can help you.
Using forms to streamline data input
No database has much value until it contains information. You wouldn’t be able to get any useful data from an empty database, so a very important task in creating a database is inputting your data. Sure, you might have some existing data that you can import, but even that data required input at some point.
Entering data into a table by using the Datasheet view really isn’t much fun. You first have to open the table and then locate the record where you want to enter your data. Maybe you’re adding to an existing record or perhaps you’re adding a new record right after the last existing one in the datasheet. When you’ve selected the correct record, you have to move the insertion point to each field in turn and type in the information. It’s easy, of course, to acciden-tally start typing into the wrong field — especially if the layout of the table doesn’t quite match the layout of the information you’re entering (and when have you seen data on paper that did match the layout of the table?). Forms can make inputting data much easier in several ways:
⻬Forms typically have labels that make seeing exactly which field you’re filling in far easier.
⻬Forms can have drop-down lists so that you simply choose the proper information from the list without worrying about mistyping the data.
⻬You can easily create forms for special purposes such as entering data in specific sets of fields. In this case, the form might not need to include all the fields; when you only use what you need, you end up with a simpler, less confusing form.
⻬Forms don’t have to be laid out by using the same field order as the table. This is an especially handy feature if you’re inputting data that is laid out quite differently than your table.
⻬You can set up forms to validate the data so that users can’t mess up your database by entering bogus information.
Even if some of these form features seem a little bit beyond your interests or immediate needs right now, don’t worry — you’ll find out about all of them and get many more great ideas in the chapters that follow.
Entering data with the Form Wizard
Entering data into an Access database by using a form is much easier than entering data directly into a table in Datasheet view. Figure 1-2 shows a simple form you might create, using the Form Wizard in Access. In this case the form was not optimized in any way — it’s simply the way the wizard created it.
Field labels
Use these controls to navigate between records. Enter data in the fields.
Use drop-down list boxes to choose from a list.
Figure 1-2:
If you compare the form shown in Figure 1-2 with the Datasheet view shown in Figure 1-1, it’s pretty easy to see how much more convenient the form is for entering data. Each of the fields is clearly labeled (even if the Form Wizard didn’t quite figure out the proper size of a couple of the labels). Here are a couple of ways that the Form Wizard is easy to use:
⻬Easy movement between fields: You can move between the fields by clicking the field you want or by pressing the Tab key. Because the fields are labeled, you can easily to move to specific fields and skip the fields you don’t want to use for now.
⻬Easy movement between records: You can use the navigation controls at the bottom of the form to navigate between records. In forms, press-ing Page Down moves you to the next record and Page Up moves you to the previous record. In Datasheet view, Page Down and Page Up move you to a new screen page of records. (The number of records you jump depends on how many records are visible on the screen, and this can change depending on how you display the Datasheet window. Don’t you just love the inconsistency?)
In Datasheet view you can use the Up Arrow and Down Arrow to move a single record at a time, but in a form the arrow keys move the insertion point between fields.
⻬Customizable drop-down lists: Because you can modify the underlying table with lookup fields (fields that enable a user to select from a list of predefined values — see Chapter 17),you can make certain that the fields contain specific values that are found in related tables. For exam-ple, in Figure 1-2, the TypeID, OwnerID, and AuctionID fields can only contain specific values that are found in some related tables; the form includes three drop-down list boxes. Instead of typing an entry in these fields (and risking errors due to mistyping), you simply choose a value from the drop-down list.
⻬Larger input areas:To make entering longer values easier, the wizard provides larger input areas (in this case the Titleand Description
fields). In fact, if you type more information than can fit into the on-screen display of one of these fields, Access even automatically adds a scroll bar along the right side of the field so that you can view the entire value. How’s that for handy?
Editing information with forms
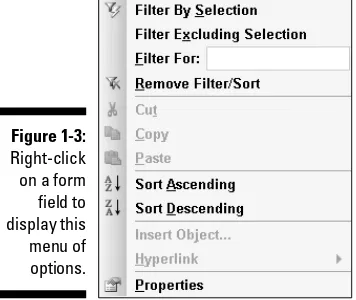
Forms are also much handier than the Datasheet view for editing existing database information. When you’re editing information, forms retain all the advantages they offer when you’re first entering data, of course, but there are some additional features that are especially useful for editing. As Figure 1-3 shows, if you right-click on a form field, Access pops up a very handy context menu that provides some really cool options.
For editing purposes, six of the pop-up menu commands are extremely helpful:
⻬Filter By Selection:This option limits the records that are displayed in the form to those with the same value in the selected field as the current record. For example, if you right-click on the Statefield and the current record shows Nevada, only records with Nevada in the Statefield are displayed as you move from record to record making your edits.
⻬Filter Excluding Selection:This option works in reverse compared to the first option. Only records that don’t contain the currently selected value are displayed.
⻬Filter For:This option enables you to enter the value for the filter. You use this option to locate specific records that may be buried deep within your database and are therefore difficult to locate simply by scrolling through the records.
⻬Remove Filter/Sort:You use this option to reset the form so that all records are displayed in the default sort order that is used in the database.
Figure 1-3:
⻬Sort Ascending:Choose this option to sort the records of a selected field in ascending alphabetical or numerical order. For example, if you choose to view the records in the Statefield and opt to sort the results in ascending alphabetical order, Alabama appears first. This and the next option are best used in a secondary field after you have applied a filter because they won’t have any effect in a filtered field (unless you chose the Filter Excluding Selection option).
⻬Sort Descending: Choose this option to sort the records in descending order.
Be sure to use the Remove Filter/Sort command when you finish editing records. Otherwise you may find yourself confused later when the form doesn’t display all the records that you know should be in your database.
Viewing data by using forms
You can use a form when you simply want to view the data without entering new information or editing existing records. You know that pop-up menu that appears when you right-click on a form field? Well, that same menu that makes forms so handy for editing data is just as handy when you simply want to view the records, too.
Recognizing Why Reports Rock
Okay, so forms are great, but what about reports? The following sections look at some of the ways that you can use reports; they’re well worth the effort it takes to create them.
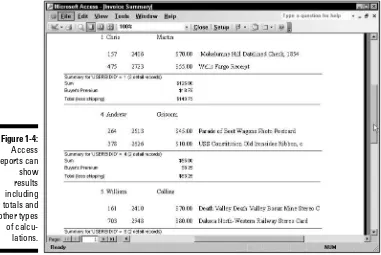
Using reports to show results
The report shown in Figure 1-4 provides a good example of how a report can provide information that simply doesn’t appear on its own in an Access table. Tables don’t summarize the data from a collection of records, so unless you want to sit down with a calculator to figure out such details, you should create reports to get this kind of information from your database.
Using reports to present data
in a professional format
Sometimes you may not need as much information as the report in Figure 1-4 includes. You may, for example, simply want a list that provides a snapshot of what’s in your database. This is especially true if you want to distill complex information quickly and efficiently for your boss or client. If you just want to check things over for yourself, choose File➪Print. If you want to show off your data for others, going to the extra effort of creating a report makes sense for several good reasons:
Figure 1-4:
⻬Providing a professional layout: Unless you are printing the data from a very small and simple table, the results of printing directly from a table’s Datasheet view probably won’t fit the width of your paper. Good luck trying to make sense of the resulting printout!
⻬Easing report navigation: You can easily include page numbers and dates on your reports — in fact, the Access Report Wizard adds this information automatically. Keeping track of a report that has dates and page numbers printed on it is much easier — especially if you have a limited amount of time to orally guide others through your exhaustive 100-page report.
⻬Presenting data in a logical format: You can use as much or as little room as necessary for the fields on a report to accommodate the amount of data that’s in each record. Compared to the single line for each record on a printout of a table’s Datasheet view, this feature alone is worth the effort.
⻬Adding a title: Including a title on a report is easy. With a title, you’ll be able to remember the purpose of the report early on a Monday morning before your first cup of coffee kicks in.
Using reports to show data analysis
Of course, you can summarize data in an Access report, but that’s just the tip of the iceberg in terms of the types of data analysis you can do. Here are just a few examples of some other ways you can use a report to analyze the infor-mation in an Access database:
⻬Compare similar results: You can produce a report that shows how each sales person’s results compares to the average of all of your com-pany’s representatives.
⻬Compare data over time: You can use a report to determine which ice cream flavors to stock at each of your stands based on historical sales data.
⻬Use data for prediction purposes: You can use a report to show how temperature patterns affect the populations of various types of pests and use this information to predict the best time to send out flyers for your extermination business.
Using reports to preserve the moment
In most cases, an Access database is constantly changing as new data is entered, existing data is edited, or old data is deleted. Sometimes, though, you may have good reasons to preserve a record of exactly how things were at a particular moment in time. Consider these possibilities:
⻬If you keep the membership list for the local branch of your favorite club, you know that sometimes members can be a bit slow about renew-ing their memberships. I’ve seen instances where members have come back after several years away. Keeping all the past members in the data-base may not always be reasonable, but having an end-of-year member-ship report stored away is a useful way to keep the data in case you need it again in the future.
⻬If you run a small business, you probably want to keep track of your exact inventory at various times of the year. A dated report of your inventory stored offsite could be extremely valuable if you ever need to file an insurance claim after an untimely disaster.
⻬If you go into business with someone else, an Access report showing exactly which items you contributed to the business could save some arguments in the event you later split up. Sure, you both know now that the Babe Ruth baseball card is yours, but wouldn’t it be nice to be able to prove it when your former partner tries to sell it for $10,000? Even if you do keep the printouts, keeping backup copies of your database is always a good idea in case of an emergency. But be very careful. If you do need to open your old file, don’t accidentally overwrite your current data-base file with the old copy. You can easily destroy months, or even years, of work if you’re careless.
Seeing Why Both Forms and
Reports Have a Place
Even though forms and reports share some characteristics, they do have important differences, and your databases will lack a little something if you use one (and not both) of these tools.
Here’s a list of things you should know about reports and forms:
⻬If you want to add, remove, or change data in a table, use forms. Sure, you can filter the data that appears in a report so that it appears as though some of the data has been removed from the database, but that’s not the same as actually deleting data.
⻬Use reports to view data in more than one record in a more perma-nent format. In general, forms only display a single record at a time. In addition, because reports typically are meant to be printed and they often include the date, reports provide a somewhat permanent record of the information.
It’s not strictly true that forms can only display a single record at a time. As you will discover in later chapters (such as Chapter 10), some forms that are based on multiple tables can include a section called a subform
that can display multiple records from the second table by using the Datasheet view.
⻬Both forms and reports depend on a table (or a query as discussed in the next section) to provide the information that they display. You can’t create a form or a report unless you first have a table (or query) to use as a basis for the form or report. One important result of this fact is that Access forms and reports can only exist within an Access database file.
Access forms and reports are usually tied to an Access table. When you create a form or a report, the name of the table is saved along with the form or report. If you (or someone else) delete the table you can’t open the form or report associated with it unless you have associated the form or report with a different table.
Understanding the Value of Queries
Introducing the query concept
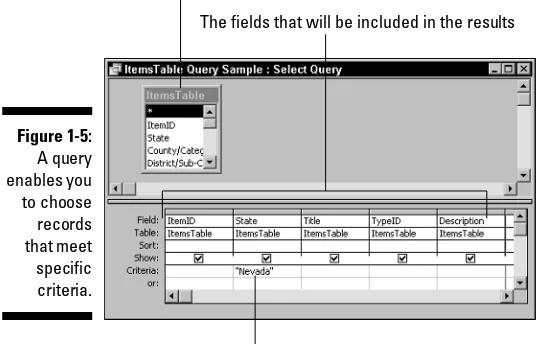
So just what is a query? In its simplest form, a query acts like a filter; you can use a query to choose specific information that you want to see from a table. Figure 1-5 shows an example of this type of query, known as a select query.
When you run a query, Access displays the results in a Datasheet view, as shown in Figure 1-6. In the example I set the criteria value in the Statefield to Nevada, and this is reflected in the results shown in Figure 1-6.
Figure 1-6:
Running a query results in a filtered display that matches the specified criteria.
The table that is the source of the data
The criteria used to filter the results
The fields that will be included in the results
Figure 1-5:
A query enables you to choose records that meet
The query results in Figure 1-6 are shown in a Datasheet view that looks almost identical to the Datasheet view of an ordinary Access table, with only the title bar as a tip-off. You can, indeed, use a query as a substitute for a table as the basis for a form or a report.
Using queries to enhance
forms and reports
Because you can use a query as the basis for an Access form or report, you now have a powerful tool that enables you to do otherwise impossible things with those forms and reports. Consider these possibilities:
⻬You can create a form that’s based on a query that selects records that fall within specific date ranges. For example, say you want to follow up with customers who placed an order last year but who haven’t ordered in several months. Use a query.
⻬You can create queries that combine data from several tables to produce information that is a composite of the information from those tables. You may want to use this data to create form letters that include new product information for products similar to those ordered in the past by specific customers.
⻬You can easily create a query that includes only the orders placed by a specific customer. This is a great tool if the customer wants a record of all its orders in the last several months or years.
Because queries are so important, you find information about them through-out the book. In fact, Chapter 2 digs right in to give you a solid basis in queries so that when you create forms or reports you know what your options are.
Queries, Forms, and Reports
Basics You Must Endure
In Access, all of your data is stored in tables. You can create tables that are completely self-contained or you can create tables that are related. Databases that work from a single, self-contained table are often called flat file data-bases. Databases that have two or more related tables are called relational
As I mention earlier in this chapter, forms and reports are usually based on either a table or on a query. Queries can be based on tables or even on other queries — although queries based on queries can be kind of confusing to work with at times.
Access provides two primary methods of creating queries, forms, and reports. You can start with a wizard, shown in Figure 1-7, or you can create the query, form, or report from scratch using design mode.
Whether you start with a wizard or in design mode, you begin the process of creating a query, form, or report by choosing the table (or tables) you want to use and then you choose which fields to include. Remember that you can also choose an existing query in place of a table.
In most cases, you can choose as many or as few fields as you like. You are likely to find some fields in a table (or query) that are simply unnecessary. For example, you might want to create a report that summarizes the values of the items in your collection and you have no need to include the field that tracks when you received each item.
After you have selected the fields you want to use, the next step depends on which task you’re performing. If you’re creating a query, you may want to specify criteria or a sort order. If you’re creating a form or a report, specify the layout of the form or report. If you’re using a wizard to create the form or the report, you simply choose from a set of predefined layouts. If you’re working in design mode, you need to manually place the fields where you want them.
Figure 1-7:
When your query, form, or report is finished, you name and save the final layout. If necessary, you can always return to the query, form, or report in design mode to make additional changes.
It’s easy to become confused when you save objects in Access. Even though you use the standard File➪Save command to save queries, forms, and reports, you aren’t saving those items outside of Access. The objects are all saved within the Access database file and you can only view those objects from within Access.
Access Add-Ons and Extra Cool Tools
You may not realize this, but there are quite a few add-ons and extras that are available to help you work with Access. These tools aren’t built into Access, but they do offer an awful lot of help when you’re developing an Access data-base. Most of these add-ons come from third-party developers, although Microsoft does offer a few, too.
Just what can you do with these add-on tools? Here’s a sampling:
⻬Easily document the various objects in your Access database so that you can maintain and correct the database with great ease.
⻬Compare Access databases to see how they differ. You’ll find this oppor-tunity invaluable when people building your database have used more than one computer.
⻬Repair database corruption so that you can recover from the problems that always seem to occur just before you plan on doing your backup.
⻬Locate and correct problems that are making your database run slower than you’d like.
⻬Create better forms by using options that you can automatically add to the forms without a bunch of programming.
⻬Turn existing paper forms into electronic ones that you can use to enter data into an Access database without having to master a whole new way of working.
⻬Share Access reports with someone who doesn’t have Access installed on his or her PC.
⻬Send Access data to a PowerPoint slideshow.
Getting Started with Queries
In This Chapter
䊳Knowing the different query types
䊳Using the Query Wizard
䊳Using Design view
䊳Making changes to queries
U
nderstatement alert: Queries are important facets of forms and reports. In fact, queries are so important that we originally had a debate about whether to include them in the title of this book. Suffice it to say that they are important keys that can help you create the types of forms and reports that you want.You use a query to control how Access actually functions. For example, you can specify which records will be displayed in a form or report, or which records will be modified by an actionquery. Queries put an awful lot of truly awesome power into your hands!
You can use several different types of queries in Access. The selectquery is by far the simplest and most common type of query, but Access also has many others. In this chapter, I explain each of these query types so that you can begin to utilize each of them in your databases. In addition, I show you how to create queries both by using a wizard and from scratch. Finally, you see how to modify queries so that you get even better results from them.
Understanding the Types of Queries
When you get beyond the basics with Access, you will want to get a little more sophisticated; that’s where things can seem about as clear as mud. Well, don’t worry. In the next few pages you can gain a far better understand-ing of what the various types of queries do and how you can use them. Here’s a list of the commonly used queries:
⻬Crosstab queries
⻬Make-table queries
⻬Update queries
⻬Append queries
⻬Delete queries
⻬Parameter queries
⻬SQL queries
A parameter query is actually just a normal query that is set up so that it asks for the criteria used in the query before the query is executed. Chapter 15 shows you how to create parameter queries. A SQL query is a query that you form by using Structured Query Language— SQL. Chapter 7 introduces you to SQL queries.
Introducing select queries
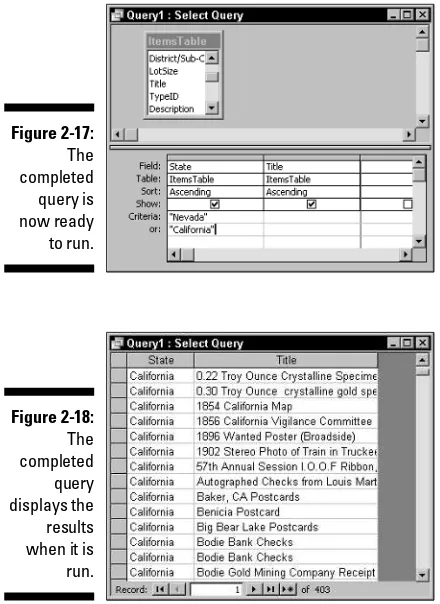
Select queries are the most basic and common type of query. A select query uses the criteria that you specify to choose a subset of the records to display in a Datasheet view. Figure 2-1 shows an example of a simple select query as it appears in the Query editor.
Although you can use the Query Wizard to create queries, you use the Query editor to edit any existing queries — even those created with the Query Wizard. You can also use the Query editor to create queries from scratch. Whenever you open a query in Design view, you’re actually opening the Query editor.
the datasheet after the query is run. In this case, the results will be sorted in ascending order according to the values in the ItemIDfield because I selected the Ascending option in that field’s Sort row. Records with different values in the Statefield will not be included in the results. Figure 2-2 shows the result of running the query.
Figure 2-2:
This select query returns the records that match the specified criteria.
Tables in a query are listed here.
The query parameters are listed here.
Figure 2-1:
In addition to simply returning a set of records, shown in Figure 2-2, you can also use the select query to provide additional information. You can set up a select query to group the records by using the values in the first field of the query, and then you can find the sum, average, minimum, maximum, or count of the records in each group.
To use any of the grouping options in a select query, it’s very important to make sure that you set the field that you want to use for the grouping as the first field in the query, because Access uses the first field as the primary grouping field.
Getting to know crosstab queries
Crosstab queries are probably the least understood of all the query types. A crosstab query groups data by using two types of information. One type of information is shown down the rows of the Datasheet view and the other type of information is viewed across the columns. Each intersecting row and column cell then displays a sum, an average, a count, or a similar type of analysis based on the values in the rows and columns.
This explanation actually sounds a lot more complicated than it is, and this is a case in which a picture really is worth a thousand words. Figure 2-3 shows an example of a crosstab query.
Figure 2-3:
The first column in Figure 2-3 (Owner) lists the owners for items in an auction database. The second column lists the total value of all items for each owner (Total of ID). The remaining columns to the right list the values of the items by bid amount. So, for example, Owner Number 3 has a total of $546,172 worth of items listed for auction. Of that amount, $372,276 has not yet had a bid. Moving farther to the right, $19,450 in bids was in the 0 to $5 category; and $16,986 in bids was in the $5 to $10 category. In the $10 to $15 category, Owner Number 3 has received $20,710 in bids.
Make-table queries
As the name implies, make-table queries create new tables by using data from one or more existing tables. The new table typically contains a specially selected set of information that matches criteria that you specify. For exam-ple, you might want to create a table that you use to create a catalog of items that will be included in a specific sale. Figure 2-4 shows an example of this type of query.
When you create a make-table query, you specify a name for the new table that Access creates when the query is executed. It’s very important to make sure that the name you specify is actually a new table name and not the name of an existing table. If you don’t create a unique name, Access will delete the original table when you run the make-table query and replace it with the new table you created. Access does warn you, as shown in Figure 2-5, but it’s very easy to click that Yes button and do a lot of damage without giving much thought to what you’re doing.
Figure 2-4:
A make-table query creates
Even though make-table queries are useful for creating new tables, they’re not very handy if you want to change information in an existing table or add new information to a table. See the following sections on update queries and append queries if you want query tools that will help you perform such tasks.
Using update queries
An update query modifies the values in an existing table. You specify how to modify the records by using expressions. These expressions are similar to the formulas you create in a spreadsheet and can consist of mathematical expres-sions, string manipulation expresexpres-sions, or even specific values — depending on the field type. Figure 2-6 shows an example of an update query that increases the value in the LowEstfield by 25 percent.
Figure 2-6:
Use an update query to modify existing values.
Figure 2-5:
When you create an update query, it’s important to understand which table the query will modify. Unlike a make-table query, an update query makes changes in the existing table — the one that is shown in the query. This can be a little confusing because a make-table query uses the records from the listed table (or tables) to create a new table, while an update query actually modifies the listed table.
When you create an update query you only need to include fields that you want to update and any fields that you use to select the records to update. In Figure 2-6 this meant that only two fields were required in the query. The
LowEstfield is the field that is updated and the AuctionIDfield is the field used to limit the update to records for Auction 35.
Introducing append queries
Append queries add new records to the end of an existing table. They’re pretty similar to make-table queries because both types of queries add records to tables; the difference is that an append query doesn’t delete the existing table before adding the records — those changes are made to the original table. Figure 2-7 shows an example of an append query. In this case, I added the items that were slated for Auction 36 to Auction 35, so the append query is set up to select records where the AuctionIDvalue is 36 and then to add those records to the existing Auction 35 table. As such, append queries are aptly named.
If you look carefully at Figure 2-7, you may notice a subtle difference between the append query and the make-table query shown in Figure 2-4. The append query doesn’t give you the option to include fields in the query that won’t be included in the results of the query. The reason for this is simple but it might throw you for a loop until you understand it — only those fields that already exist in the destination table can actually be used when the query is run. If you include fields that aren’t in the destination table, Access simply ignores those fields when it adds the records to the table.
Using the asterisk to add fields without a fuss
To include all the fields from the source table in the query, you can choose the asterisk (*) at the top of the field list. This shortcut works with any query type, but is probably most useful for
Getting to know delete queries
Delete queries remove selected records from an existing table. They are most helpful when you use them to trim out records you no longer need in the table. Figure 2-8 shows an example of a delete query that reverses the effect of the append query shown in Figure 2-7. In this case, I decided that I didn’t want to include the Auction 36 items in Auction 35 after all.
Figure 2-7:
You use an append query to add records to an existing table.
Backing up your records just in case
If you’re nervous about the permanence of the delete query, you might want to create a make-table query that uses the same criteria you intend to use for your delete query. Run the make-table query before you run your delete query. By doing so, you create a copy of the records that you’re going to delete so that you can restore those records in case you later real-ize that you messed up in deleting the records and needed them all along.
Creating Queries by Using a Wizard
There are two methods you can use to create queries. In this section you see how to use the Query Wizard to build a query. Later in this chapter, I show you how to start from scratch and create a query in Design view.
You can save yourself a lot of grief by creating a copy of your favorite Access database and using the copy to practice creating and running queries. By using the copy you can get as wild as you want in experimenting with differ-ent types of queries without worrying about destroying any live data. You might want to add something like practice copyto the filename of the
copied file just to be sure you don’t get confused.
Why you should be off to see the wizards
Access includes quite a broad range of wizards to help you with various tasks. If you’re one of those macho users who thinks, “I don’t need any stink-ing wizards,” you’re welcome to skip over this section, but be forewarned — even the experts sometimes find that the wizards can cut down on the drudgery of common Access operations. Letting a wizard do some of the work enables you to get more done with less effort (and fewer mistakes). Some people always seem to have the answers right at their fingertips. Ask one of those people how to do something that he or she is expert on and you’ll instantly hear the whole process rattled off to you. Most of us, though, have too many different interests to make it worth our time to become experts on everything. That’s one reason why the Access query experts, or
wizards,are so useful. When you create a query with a wizard, the wizard
Figure 2-8:
steps you through the process so that you don’t have to remember every-thing upfront. As each new piece of information is required, you can depend on the wizard to ask for it. And, if along the way you need to change some-thing, you can also back the process up, effectively telling the wizard, “Wait. I need to check something a few steps back.”
Used correctly, a wizard is a useful learning tool. For example, when you create a query with a wizard, the wizard builds the query in the same Query editor you use to create a query in design view. So if you watch what the wizard does, you can easily create your own queries from scratch.
Understanding the limitations
of the wizards
The Access Query wizards may be awfully handy, but they can’t do every-thing. Access doesn’t include wizards to build every type of query, so if you want to create a make-table query, an update query, an append query, or a delete query, you’ll have to do at least part of the work yourself in Design view.
If you already know what you’re doing, using a wizard to create a query can take a bit more time than creating the query manually. In real-world terms the difference is pretty small, but then some people just prefer to do things for themselves.
Creating your first query with a wizard
Creating a query with a wizard is pretty easy stuff. You simply answer a few prompts and in a very few moments you have a new query that’s ready to use.
To create a query by using a wizard, follow these steps:
1. Open the Access database in which you want to create a new query.
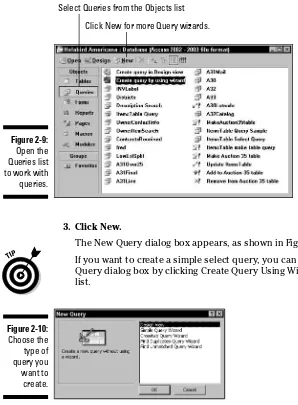
2. Click Queries in the Objects list.
The Objects list is along the left side of the database window. A list of queries appears, as shown in Figure 2-9.


![Wiley Publishing Crystal Reports 10 For Dummies [2004]](data:image/gif;base64,R0lGODlhAQABAIAAAP///wAAACH5BAEAAAAALAAAAAABAAEAAAICRAEAOw==)