9
IN
1
BOOKS
BOOKS
• Photoshop Fundamentals
• Image Essentials
• Selections
• Painting, Drawing, and Typing
• Working with Layers
• Channels and Masks
• Filters and Distortions
• Retouching and Restoration
• Photoshop and Print
IN FULL COLOR!
Photoshop
®
CS5
A L L - I N - O
N E
Making Everythi
ng Easier!
Start with
FREE
Cheat Sheets
Cheat Sheets include
•
Checklists
•
Charts
• Common Instructions
• And Other Good Stuff!
Get Smart at Dummies.com
Dummies.com makes your life easier with 1,000s
of answers on everything from removing wallpaper
to using the latest version of Windows.
Check out our
•
Videos
• Illustrated Articles
• Step-by-Step Instructions
Plus, each month you can win valuable prizes by entering
our Dummies.com sweepstakes. *
Want a weekly dose of Dummies? Sign up for Newsletters on
• Digital Photography
• Microsoft Windows & Office
• Personal Finance & Investing
• Health & Wellness
• Computing, iPods & Cell Phones
•
eBay
•
Internet
• Food, Home & Garden
Find out “HOW” at Dummies.com
Get More and Do More at Dummies.com
®
To access the Cheat Sheet created specifically for this book, go to
by Barbara Obermeier
Photoshop
®
CS5
A L L - I N - O N E
FOR
Photoshop® CS5 All-in-One For Dummies®
Copyright © 2010 by Wiley Publishing, Inc., Indianapolis, Indiana Published by Wiley Publishing, Inc., Indianapolis, Indiana Published simultaneously in Canada
No part of this publication may be reproduced, stored in a retrieval system or transmitted in any form or by any means, electronic, mechanical, photocopying, recording, scanning or otherwise, except as permit-ted under Sections 107 or 108 of the 1976 Unipermit-ted States Copyright Act, without either the prior written permission of the Publisher, or authorization through payment of the appropriate per-copy fee to the Copyright Clearance Center, 222 Rosewood Drive, Danvers, MA 01923, (978) 750-8400, fax (978) 646-8600. Requests to the Publisher for permission should be addressed to the Permissions Department, John Wiley & Sons, Inc., 111 River Street, Hoboken, NJ 07030, (201) 748-6011, fax (201) 748-6008, or online at http:// www.wiley.com/go/permissions.
Trademarks: Wiley, the Wiley Publishing logo, For Dummies, the Dummies Man logo, A Reference for the Rest of Us!, The Dummies Way, Dummies Daily, The Fun and Easy Way, Dummies.com, Making Everything Easier, and related trade dress are trademarks or registered trademarks of John Wiley & Sons, Inc. and/or its affi liates in the United States and other countries, and may not be used without written permission. Photoshop is a registered trademark of Adobe Systems, Inc. All other trademarks are the property of their respective owners. Wiley Publishing, Inc., is not associated with any product or vendor mentioned in this book.
LIMIT OF LIABILITY/DISCLAIMER OF WARRANTY: THE PUBLISHER AND THE AUTHOR MAKE NO REPRESENTATIONS OR WARRANTIES WITH RESPECT TO THE ACCURACY OR COMPLETENESS OF THE CONTENTS OF THIS WORK AND SPECIFICALLY DISCLAIM ALL WARRANTIES, INCLUDING WITH-OUT LIMITATION WARRANTIES OF FITNESS FOR A PARTICULAR PURPOSE. NO WARRANTY MAY BE CREATED OR EXTENDED BY SALES OR PROMOTIONAL MATERIALS. THE ADVICE AND STRATEGIES CONTAINED HEREIN MAY NOT BE SUITABLE FOR EVERY SITUATION. THIS WORK IS SOLD WITH THE UNDERSTANDING THAT THE PUBLISHER IS NOT ENGAGED IN RENDERING LEGAL, ACCOUNTING, OR OTHER PROFESSIONAL SERVICES. IF PROFESSIONAL ASSISTANCE IS REQUIRED, THE SERVICES OF A COMPETENT PROFESSIONAL PERSON SHOULD BE SOUGHT. NEITHER THE PUBLISHER NOR THE AUTHOR SHALL BE LIABLE FOR DAMAGES ARISING HEREFROM. THE FACT THAT AN ORGANIZATION OR WEBSITE IS REFERRED TO IN THIS WORK AS A CITATION AND/OR A POTENTIAL SOURCE OF FUR-THER INFORMATION DOES NOT MEAN THAT THE AUTHOR OR THE PUBLISHER ENDORSES THE INFOR-MATION THE ORGANIZATION OR WEBSITE MAY PROVIDE OR RECOMMENDATIONS IT MAY MAKE. FURTHER, READERS SHOULD BE AWARE THAT INTERNET WEBSITES LISTED IN THIS WORK MAY HAVE CHANGED OR DISAPPEARED BETWEEN WHEN THIS WORK WAS WRITTEN AND WHEN IT IS READ.
For general information on our other products and services, please contact our Customer Care Department within the U.S. at 877-762-2974, outside the U.S. at 317-572-3993, or fax 317-572-4002. For technical support, please visit www.wiley.com/techsupport.
Wiley also publishes its books in a variety of electronic formats. Some content that appears in print may not be available in electronic books.
Library of Congress Control Number: 2010925703 ISBN: 978-0-470-60821-0
About the Author
Barbara Obermeier is principal of Obermeier Design, a graphic design studio in Ventura, California. She’s the author or co-author of over 19 publications, including Photoshop Elements 8 For Dummies,How-to-Wow with Illustrator, and Digital Photography Just the Steps For Dummies, 2nd Edition. Barb also teaches graphic design at Brooks Institute.
Dedication
I would like to dedicate this book to Gary, Kylie, and Lucky, who constantly remind me of what’s really important in life.
Author’s Acknowledgments
Publisher’s Acknowledgments
We’re proud of this book; please send us your comments at http://dummies.custhelp.com. For other comments, please contact our Customer Care Department within the U.S. at 877-762-2974, outside the U.S. at 317-572-3993, or fax 317-572-4002.
Some of the people who helped bring this book to market include the following:
Acquisitions, Editorial, and Media Development
Project Editor: Nicole Sholly
Executive Editor: Bob Woerner
Copy Editors: Heidi Unger, Brian Walls
Technical Editor: Dennis R. Cohen
Editorial Manager: Kevin Kirschner
Media Development Project Manager:
Laura Moss-Hollister
Media Development Assistant Project Manager: Jenny Swisher
Media Development Associate Producers:
Josh Frank, Marilyn Hummel, Douglas Kuhn, Shawn Patrick
Editorial Assistant: Amanda Graham
Sr. Editorial Assistant: Cherie Case
Cartoons: Rich Tennant (www.the5thwave.com)
Composition Services
Project Coordinator: Katherine Crocker
Layout and Graphics: Claudia Bell, Samantha Cherolis, Joyce Haughey, Erin Zeltner
Proofreader: Melissa D. Buddendeck
Indexer: Sherry Massey
Publishing and Editorial for Technology Dummies
Richard Swadley, Vice President and Executive Group Publisher
Andy Cummings, Vice President and Publisher
Mary Bednarek, Executive Acquisitions Director
Mary C. Corder, Editorial Director
Publishing for Consumer Dummies
Diane Graves Steele, Vice President and Publisher
Composition Services
Contents at a Glance
Introduction ... 1
Book I: Photoshop Fundamentals ... 7
Chapter 1: Examining the Photoshop Environment ... 9
Chapter 2: Getting to Know the Tools Panel ... 27
Chapter 3: Starting, Finishing, and Getting It on Paper ... 39
Chapter 4: Viewing and Navigating Images ... 57
Chapter 5: Customizing Your Workspace and Preferences ... 97
Book II: Image Essentials ... 123
Chapter 1: Specifying Size and Resolution ... 125
Chapter 2: Choosing Color Modes and File Formats ... 141
Chapter 3: Using and Managing Color ... 165
Chapter 4: Time Travel — Undoing in Photoshop ... 193
Chapter 5: Creating Actions for Productivity and Fun ... 207
Book III: Selections ... 219
Chapter 1: Making Selections ... 221
Chapter 2: Creating and Working with Paths ... 241
Chapter 3: Modifying and Transforming Selections and Paths... 265
Book IV: Painting, Drawing, and Typing ... 285
Chapter 1: Painting and Drawing with Photoshop ... 287
Chapter 2: Filling and Stroking ... 311
Chapter 3: Creating and Editing Type ... 329
Book V: Working with Layers ... 357
Chapter 1: Creating Layers ... 359
Chapter 2: Managing Layers ... 389
Chapter 3: Playing with Opacity and Blend Modes ... 407
Chapter 4: Getting Jazzy with Layer Styles and Clipping Groups ... 423
Book VI: Channels and Masks ... 457
Chapter 1: Using Channels ... 459
Chapter 2: Quick-and-Dirty Masking ... 477
Chapter 3: Getting Exact with Advanced Masking Techniques ... 489
Book VII: Filters and Distortions ... 507
Chapter 1: Making Corrections with Daily Filters ... 509
Chapter 2: Applying Filters for Special Occasions ... 529
Chapter 3: Distorting with the Liquify Command ... 555
Book VIII: Retouching and Restoration ... 569
Chapter 1: Enhancing Images with Adjustments ... 571
Chapter 2: Repairing with Focus and Toning Tools ... 617
Chapter 3: Fixing Flaws and Removing What’s Not Wanted... 627
Book IX: Photoshop and Print ... 647
Chapter 1: Prepping Graphics for Print ... 649
Chapter 2: Using Photomerge and Merge to HDR Pro ... 665
Table of Contents
Introduction ... 1
About This Book ... 1
What’s in This Book ... 2
Book I: Photoshop Fundamentals ... 2
Book II: Image Essentials ... 3
Book III: Selections ... 3
Book IV: Painting, Drawing, and Typing ... 3
Book V: Working with Layers ... 3
Book VI: Channels and Masks ... 4
Book VII: Filters and Distortions ... 4
Book VIII: Retouching and Restoration ... 4
Book IX: Photoshop and Print ... 5
About the Web Site ... 5
Conventions Used in This Book ... 5
Icons Used in This Book ... 6
Book I: Photoshop Fundamentals ... 7
Chapter 1: Examining the Photoshop Environment . . . .9
Launching Photoshop and Customizing the Desktop ... 9
Setting display settings with the Window menu ... 11
Setting up the status bar ... 12
Playing with Panels ... 14
Working with Your First Photoshop File ... 16
Opening, printing, and saving fi les ... 17
Making selections ... 17
Making simple image edits ... 17
Adjusting size, color, and contrast ... 18
Creating layers ... 19
Applying fi lters ... 20
Unifying with the Application bar ... 21
Simplifying your edits with the Options bar ... 22
Viewing and navigating the image ... 24
Introducing Adobe ConnectNow... 25
Chapter 2: Getting to Know the Tools Panel . . . .27
Turning On the Tools Panel ... 27
Selecting tools ... 27
Photoshop CS5 All-in-One For Dummies
viii
Introducing the Photoshop Tools ... 30
Using selection tools ... 30
Creating and modifying paths ... 30
Using painting tools ... 32
Using tools for cloning and healing ... 32
Creating effects with typographical tools... 33
Using focus and toning tools ... 34
Creating shapes ... 34
Viewing, navigating, sampling, and annotating tools ... 35
Using tools for the Web ... 36
Saving Time with Tool Presets ... 36
Creating custom tool presets ... 36
Managing your presets ... 37
Chapter 3: Starting, Finishing, and Getting It on Paper . . . .39
Browsing for Files ... 39
Opening an Image ... 40
Opening special fi les ... 42
Opening as a Smart Object ... 43
Placing Files ... 43
Creating a New Image ... 45
Saving a File ... 48
Closing and Quitting ... 50
Getting It on Paper ... 51
Taking a look at printers ... 51
Printing an image ... 52
Setting printing options ... 53
Chapter 4: Viewing and Navigating Images . . . .57
Looking at the Image Window ... 57
Zooming In and Out of Image Windows ... 60
Zooming with keyboard shortcuts ... 60
Using the Zoom tool ... 60
Other ways to zoom ... 62
Handling the Hand tool ... 63
Rotating with the Rotate View tool ... 64
Cruising with the Navigator Panel ... 65
Choosing a Screen Mode ... 66
Getting Precise Layout Results ... 67
Creating guides ... 68
Using guides ... 69
Using grids ... 70
Measuring Onscreen ... 71
Measuring an object ... 71
Table of Contents
ix
Using the Info Panel ... 72
Working with Extras ... 75
Managing Images with Adobe Bridge ... 75
Brief anatomy of Bridge ... 77
Confi guring the Bridge window ... 80
Using the Menu bar and buttons ... 81
Using keywords ... 88
Creating PDF Presentations ... 89
Creating a Web Gallery ... 92
Introducing Mini Bridge ... 94
Chapter 5: Customizing Your Workspace and Preferences . . . .97
Creating Workspace Presets ... 97
Creating and Deleting Workspace Presets ... 99
Customizing Keyboard Shortcuts ... 99
Customizing Menus ... 101
Setting Your Preferences ... 102
Setting general preferences ... 103
Customizing the interface ... 107
Deciding how you want fi les handled... 108
Handling performance options ... 111
Adjusting your cursors ... 114
Adjusting transparency and gamut ... 115
Setting measurement preferences ... 117
Setting up guides, grids, and slices ... 118
Adding plug-ins ... 119
Specifying type options ... 121
Using the Preset Manager ... 122
Book II: Image Essentials ... 123
Chapter 1: Specifying Size and Resolution . . . .125
Putting Images under the Microscope ... 126
Vector images ... 126
Raster images ... 127
Viewing Raster Images Onscreen ... 128
Using the Image Size Command ... 129
Resampling Images ... 131
Adding pixels to an image ... 132
Taking pixels out of an image ... 133
Changing the Canvas Size ... 135
Cropping an Image ... 136
Using the Crop tool ... 138
Cropping with the Marquee tool ... 139
Using the Trim command ... 139
x
Photoshop CS5 All-in-One For Dummies
Chapter 2: Choosing Color Modes and File Formats . . . .141
Selecting a Color Mode ... 141
RGB Color... 142
CMYK Color ... 143
Grayscale ... 144
Monotone, Duotone, Tritone, and Quadtone ... 144
Indexed Color ... 145
Lab Color ... 146
Bitmap ... 147
Multichannel ... 148
Converting to a Different Color Mode ... 148
Converting from RGB to CMYK ... 149
Converting to grayscale ... 149
Using the Conditional Mode Change command ... 151
Choosing the Right File Format ... 152
TIFF ... 152
JPEG ... 154
JPEG 2000 ... 155
GIF ... 156
EPS ... 156
PDF: The universal donor ... 157
Photoshop... 159
Photoshop Raw ... 160
Camera Raw ... 160
BMP ... 162
Large Document Format (PSB)... 163
Other fi le formats ... 163
Chapter 3: Using and Managing Color . . . .165
Dealing with Foreground and Background Colors ... 165
Defi ning Color ... 166
Poking around Color Picker ... 167
Mixing with the Color panel ... 169
Grabbing color from the Swatches panel ... 171
Lifting and sampling color ... 172
Using the Color Sampler tool to measure color ... 173
Finding and Sharing Color Themes with Kuler ... 175
Color Management Essentials ... 176
Setting up your work environment ... 178
Calibrating your monitor ... 178
Establishing Your Settings ... 180
Handling Photoshop’s predefi ned settings ... 180
Indicating your working spaces ... 182
Working with your newly defi ned settings ... 185
Setting color-management policies ... 186
Getting Consistent Color among Adobe Applications ... 189
Table of Contents
xi
Chapter 4: Time Travel — Undoing in Photoshop . . . .193
Undoing What’s Done with the Undo Command ... 193
Reverting to What’s Saved ... 194
Working with the Almighty History Panel ... 194
Understanding states and snapshots ... 195
Introducing History panel options and tools ... 195
Viewing an Image’s Various States ... 196
Going back to a particular state ... 197
Reviewing your image at different states... 197
Purging and clearing all states ... 197
Navigating the history list... 197
Looking at the History Options Dialog Box ... 198
Taking Snapshots ... 199
Restoring Part of an Image ... 201
Using the Eraser with the Erase to History option ... 201
Using the History Brush tool ... 203
Using the Fill with History feature ... 203
Using the Art History Brush tool ... 204
Chapter 5: Creating Actions for Productivity and Fun . . . .207
Using the Actions Panel ... 207
Introducing Preset Actions ... 209
Loading preset actions ... 209
Playing a preset action ... 210
Creating a New Action ... 211
Editing and Managing Actions ... 212
Rerecording an action ... 213
Editing an action ... 213
Creating and Saving Actions Sets ... 215
Batch Processing Actions ... 215
Creating Droplets ... 218
Book III: Selections ... 219
Chapter 1: Making Selections . . . .221
Defi ning Selections ... 221
Marqueeing When You Can ... 222
Using the Rectangular Marquee tool ... 222
Using the Elliptical Marquee tool... 223
Using the Single Column and Single Row Marquee tools... 224
Using the Marquee options ... 224
Lassoing (When You Can’t Marquee) ... 229
Selecting straight sides with the Polygonal Lasso tool ... 232
Attracting with the Magnetic Lasso tool ... 234
Photoshop CS5 All-in-One For Dummies
xii
Performing Wand Wizardry ... 236
Selecting with the Magic Wand tool ... 236
Setting your tolerance ... 237
Using the Magic Wand Options bar ... 238
Saving Time with the Quick Selection Tool ... 239
Chapter 2: Creating and Working with Paths . . . .241
Introducing Paths ... 241
Creating a Path with the Pen Tool ... 243
Knowing your Pen tool options... 243
Creating your fi rst work path ... 243
Drawing curves ... 246
Connecting a straight segment to a curve segment ... 248
Connecting curve segments with cusp points ... 248
Closing a path ... 249
Creating subpaths ... 249
Working with the Paths Panel ... 250
Creating a path ... 251
Creating a new path ... 251
Saving a work path... 251
Deleting, duplicating, and renaming a path ... 251
Stroking a path ... 252
Filling a path ... 253
Loading Paths as Selections ... 254
Turning a Selection into a Path ... 255
Using the Kinder Freeform Pen ... 256
Curve Fit ... 257
Magnetic ... 258
Width, Contrast, Frequency, and Pen Pressure ... 258
Creating Paths without the Pen ... 258
Editing Paths ... 260
Using the Options Bar ... 263
Chapter 3: Modifying and Transforming Selections and Paths . . . . .265
Achieving Selection Perfection ... 265
Adding to a selection ... 266
Subtracting from a selection ... 267
Intersecting two selections ... 268
Getting the Keys to Behave ... 268
Using the Select Menu ... 269
Selecting all or nothing ... 270
Reselecting a selection ... 270
Swapping a selection ... 270
Feathering a selection ... 271
Using the other Modify commands ... 272
Table of Contents
xiii
Moving and Cloning Selections ... 274
Cloning ... 274
Moving the selection outline, but not the pixels ... 275
Transforming Pixels ... 275
Transforming Selection Marquees ... 278
Using Content-Aware Scaling ... 279
Transforming Paths ... 280
Book IV: Painting, Drawing, and Typing ... 285
Chapter 1: Painting and Drawing with Photoshop. . . .287
Introducing the Pencil and Brush Tools ... 287
Finding out what the Pencil tool does ... 288
Using the Pencil tool ... 289
Painting with the Brush tool ... 290
Blending with the Mixer Brush tool... 291
Working with the Brush panel... 293
Choosing a brush-tip shape ... 294
Using the preset brushes ... 297
Viewing preset brushes... 298
Drawing with Vector Shapes ... 302
Drawing a preset shape ... 303
Drawing multiple shapes in a shape layer ... 305
Setting Geometry options ... 306
Creating your own custom shape ... 309
Using vector masks ... 309
Manipulating shapes ... 310
Chapter 2: Filling and Stroking . . . .311
Filling a Selection with a Solid Color ... 311
Fill Options and Tips ... 312
Pouring with the Paint Bucket Tool ... 314
Stroking a Selection ... 315
Working with Gradients ... 317
Applying a preset gradient to a selection ... 318
Customizing and editing gradients ... 320
Adding transparency to a gradient ... 323
Managing and Saving Gradients ... 325
Working with Patterns ... 326
Applying a preset pattern ... 326
Creating a new pattern ... 327
Chapter 3: Creating and Editing Type . . . .329
Selecting a Type Mode ... 329
Understanding Different Kinds of Type ... 330
Photoshop CS5 All-in-One For Dummies
xiv
Entering Text in Point Type Mode ... 332
Entering Text in Paragraph Type Mode ... 333
Creating Type on or in a Path ... 334
Using the Options Bar ... 335
Working with the Character Panel ... 337
Leading ... 337
Tracking ... 338
Kerning ... 338
Vertical and Horizontal Scale ... 339
Baseline shift and text attributes ... 339
Working with the Paragraph Panel ... 341
Changing paragraph alignment ... 341
Changing paragraph justifi cation... 342
Changing paragraph indentation ... 342
Changing spacing between paragraphs ... 342
Breaking long words across two lines... 342
Editing Text ... 343
Finding and replacing text ... 343
Checking your spelling ... 344
Masking, Shaping, and Warping Type ... 345
Playing with type layer opacity ... 345
Creating fade effects ... 346
Creating type outlines ... 349
Rasterizing your type layer ... 350
Transforming type into vector shapes and paths ... 351
Wreaking havoc on your type ... 352
Book V: Working with Layers ... 357
Chapter 1: Creating Layers . . . .359
Getting to Know the Layers Panel ... 359
Looking at the Background and Layers ... 362
Introducing Different Types of Layers ... 364
Using plain vanilla layers ... 364
Using adjustment layers... 365
Taking advantage of fi ll layers ... 368
Making use of shape layers... 370
Using type layers... 370
Making Layers ... 372
Creating a new layer ... 372
Using Layer via Copy and Layer via Cut ... 373
Duplicating layers ... 374
Compositing with Multiple Images ... 374
Copying and pasting images ... 374
Dragging and dropping layers ... 375
Table of Contents
xv
Transforming Layers ... 378
Using Puppet Warp ... 379
Auto-Align Layers ... 380
Auto-Blend Layers ... 383
Chapter 2: Managing Layers. . . .389
Rearranging Layers ... 390
Moving Layer Elements ... 391
Aligning and Distributing Layers ... 394
Linking Layers ... 396
Locking Layers ... 397
Color-Coding Layers ... 398
Creating Layer Groups ... 399
Flattening and Merging Layers ... 400
Merging layers ... 401
Flattening layers ... 402
Working with the Layer Comps Panel ... 404
Chapter 3: Playing with Opacity and Blend Modes . . . .407
Adjusting Layer Opacity ... 407
Adjusting the Fill Opacity ... 409
Creating Effects with Blend Modes ... 409
General blend modes... 410
Blend modes that darken ... 410
Blend modes that lighten ... 412
Lighting blend modes ... 413
Blend modes that invert ... 415
HSL color model blend modes ... 416
Working with the Advanced Blending Options ... 417
Advanced options to blend with ... 417
Blend If options ... 420
Chapter 4: Getting Jazzy with Layer Styles and Clipping Groups . . . .423
Layer Styles Basics ... 423
Introducing the Many Layer Styles ... 424
Applying a Layer Effect ... 426
Managing and Editing Layer Styles ... 427
Managing layer styles ... 428
Editing drop shadow or inner shadow effects ... 428
Changing default inner and outer glow effects ... 430
Editing Bevel and Emboss Effects ... 431
Structure ... 431
Shading ... 432
Texture ... 432
Photoshop CS5 All-in-One For Dummies
xvi
Editing Satin Effects ... 433
Changing Overlay Effects ... 433
Changing Stroke Effects ... 434
Playing with Contours ... 434
Adjusting contour settings ... 436
Modifying contours with the Contour Editor ... 436
Applying and Modifying Preset Styles ... 437
Managing preset styles ... 439
Saving your own style ... 440
Clipping Layers into Masks ... 441
Chapter 5: Working with Smart Objects . . . .447
Introducing Smart Objects ... 447
Creating Smart Objects ... 448
Placing artwork ... 448
Copying and pasting ... 450
Converting a layer into a Smart Object and vice versa... 451
Creating one Smart Object from another ... 452
Editing Smart Objects ... 453
Replacing contents ... 454
Exporting contents ... 455
Book VI: Channels and Masks ... 457
Chapter 1: Using Channels . . . .459
Understanding Channels ... 459
Working with Channels ... 461
Viewing channels without a remote ... 462
Changing the default channel view ... 462
Duplicating and deleting channels ... 463
Rearranging and renaming channels ... 465
Splitting channels ... 465
Merging channels ... 466
Using Painting and Editing Tools with Channels ... 467
Introducing Alpha Channels ... 468
Saving a selection as an alpha channel ... 469
Loading an alpha channel ... 470
Using the Channel Mixer ... 471
Chapter 2: Quick-and-Dirty Masking . . . .477
Working with Quick Masks ... 478
Using the Color Range Command ... 480
Starting with Color Range basics ... 480
Table of Contents
xvii
Selective Erasing with the Eraser Tools ... 483
Erasing to the background or transparency ... 483
Selecting and erasing by color ... 485
Removing an image’s background ... 486
Chapter 3: Getting Exact with Advanced Masking Techniques. . . .489
Working with the Masks Panel ... 489
Working with Layer Masks ... 491
Creating layer masks ... 492
Using the Gradient and Brush tools on a layer mask ... 492
Managing layer masks ... 494
Creating and Editing Vector Masks ... 497
Adding a vector mask to a layer ... 498
Managing vector masks... 499
Creating Channel Masks ... 499
Book VII: Filters and Distortions ... 507
Chapter 1: Making Corrections with Daily Filters . . . .509
You Say You Want a Convolution? ... 509
Corrective and destructive fi lters ... 510
Filter basics ... 510
Introducing Smart Filters ... 511
Sharpening What’s Soft ... 515
Sharpen ... 516
Sharpen More ... 516
Sharpen Edges ... 517
Smart Sharpen ... 517
Unsharp Mask ... 519
Blurring What’s Sharp ... 519
Smoothing with the Facet and Median Filters ... 521
The Facet fi lter ... 522
The Median fi lter ... 523
Applying a Filter Again ... 524
Fading a Filter ... 525
Selectively Applying a Filter ... 525
Chapter 2: Applying Filters for Special Occasions . . . .529
Working in the Filter Gallery ... 530
Getting Artsy ... 532
Stroking Your Image with Filters ... 534
Distorting for Fun ... 536
Pumping Up the Noise ... 540
Pumping Down the Noise ... 541
Photoshop CS5 All-in-One For Dummies
xviii
Rendering ... 543
Using the Clouds fi lter ... 543
Creating fi bers ... 544
Using other rendering fi lters ... 544
Getting Organic with the Sketch Filters ... 547
Adding Texture ... 551
Looking at the Other Filters ... 552
Chapter 3: Distorting with the Liquify Command . . . .555
Exploring the Liquify Window ... 555
The painting tools ... 556
The other tools ... 558
The Options Areas ... 559
Transforming an Image ... 561
Mastering Freezing and Thawing ... 564
Reconstructing an Image ... 565
Extending and Cloning Distortions ... 566
Reconstruct modes ... 566
More Reconstruct modes ... 567
Using Displace, Amplitwist, and Affi ne ... 567
Book VIII: Retouching and Restoration ... 569
Chapter 1: Enhancing Images with Adjustments . . . .571
Introducing the Histogram Panel ... 571
Choosing Automatic Color Correctors ... 575
Auto Tone ... 576
Auto Color ... 577
Auto Contrast ... 577
Setting Auto Color Correction Options ... 578
Using Simple Color Correctors ... 580
Applying Brightness/Contrast ... 580
Tweaking with the Color Balance controls ... 580
Fixing lighting with Shadows/Highlights ... 582
Adjusting exposure ... 585
Using HDR Toning ... 587
Correcting colorcast with Variations ... 588
Washing out color with Desaturate ... 588
Working with Professional Color Correctors ... 592
Leveling for better contrast ... 592
Setting black and white points manually ... 594
Adjusting curves for hard-to-correct photos ... 596
Converting to Black & White ... 600
Getting colorful with Hue/Saturation ... 601
Using the Colorize option ... 602
Table of Contents
xix
Matching Color between Documents ... 605
Switching Colors with Replace Color ... 608
Increasing and Decreasing Color ... 610
Using the Selective Color command ... 610
Using gradient maps ... 610
Adding color with photo fi lters ... 611
Playing with the color mappers ... 612
Chapter 2: Repairing with Focus and Toning Tools . . . .617
Lightening and Darkening with Dodge and Burn Tools ... 617
Turning Down the Color with the Sponge Tool ... 620
Smoothing with the Smudge Tool ... 621
Softening with the Blur Tool ... 623
Cranking Up the Focus with the Sharpen Tool ... 624
Chapter 3: Fixing Flaws and Removing What’s Not Wanted . . . .627
Cloning with the Clone Stamp Tool ... 627
Using the Clone Stamp tool ... 628
Tips for excellent cloning results ... 632
Digital Bandaging with the Healing Brush Tool ... 632
Patching without Seams ... 635
Zeroing In with the Spot Healing Brush ... 636
Colorizing with the Color Replacement Tool ... 638
Getting Rid of Dreaded Red-Eye ... 640
Working with Vanishing Point ... 641
Book IX: Photoshop and Print ... 647
Chapter 1: Prepping Graphics for Print . . . .649
Getting the Right Resolution, Mode, and Format ... 649
Resolution and modes ... 649
Screen frequencies ... 650
File formats ... 651
Working with a Service Bureau ... 651
Getting the ball rolling... 652
Using a prepress checklist ... 652
Saving and Printing Vector Data in a Raster File ... 654
Choosing Color Management Print Options ... 654
Getting Four-Color Separations ... 657
Creating Spot Color Separations ... 660
Creating a spot channel ... 661
Editing a spot channel ... 663
Chapter 2: Using Photomerge and Merge to HDR Pro . . . .665
Using the Photomerge Command ... 665
Photoshop CS5 All-in-One For Dummies
xx
Bonus Chapters ... On the Web
Bonus Chapter 1: Prepping Web Graphics . . . BC1
Understanding Basic Web Optimization ... BC2 Choosing the Right File Format ... BC4 Using a Web-Safe Panel and Hexadecimal Colors ... BC13 Keeping Color Consistent in Web Images ... BC15 Making Type Look Good Onscreen ... BC15 Optimizing Images with Save for Web & Devices ... BC18Bonus Chapter 2: Slicing Web Images. . . BC31
Why Slice? ... BC31 Slicing Up Images ... BC32 Selecting and Modifying Slices ... BC36 Setting Slice Options ... BC39 Saving Your Slices ... BC40Bonus Chapter 3: Other Sources of Information . . . BC47
Applying Notes ... BC47 Working with Metadata ... BC50 Accessing Help When You Need It ... BC52Introduction
T
here’s a reason why Photoshop is the world’s industry standard in image-editing software. The depth and breadth of the program is unpar-alleled. Photoshop immediately sucks you in with its easy-to-use interface and powerful tools and commands. It’s so feature rich that you soon begin to lose track of time and start blowing off your commitments just to try one more thing. And just when you think you’ve finally explored every nook and cranny and mastered the program, you suddenly read a tip in a book or magazine that enlightens you about something you didn’t know. Or even more likely, you stumble upon some great effect while working on a late-night project. That’s the beauty of Photoshop. It’s the program that just keeps giving.The depth and breadth of Photoshop has downsides, too, of course. You must make a major time commitment and invest much effort to master it — hence the large number of books written on the program. Walk into your neighborhood bookstore or type Photoshop in the Search field at any online bookseller’s site, and you see a barrage of choices. Some books are general reference books, some are targeted toward the novice user, and oth-ers focus on a specific mission, such as color management or restoration and retouching.
About This Book
This book is written for the person who has a good grasp of using a com-puter and navigating the operating system and at least a cursory knowledge of Photoshop. It is intended to be a comprehensive reference book that you can read cover to cover or reach for when you’re looking for specific infor-mation about a particular task.
Wherever I can, I sneak in a useful tip or an interesting technique to help you put Photoshop to work for your project needs.
2
What’s in This Book
Just check out the Putting It Together sections in Books III through IX. These sections present info in easy-to-follow numbered steps, in a hands-on style, building on what’s presented in the chapter so that you can go to the next level, put concepts to work, and move on to the next task.
You can find images that appear within the Putting It Together sections on this book’s companion Web site (www.dummies.com/go/photoshopcs5 aiofd), so you can follow along precisely with the steps.
What’s in This Book
This book is broken into minibooks, each covering a general topic. Each minibook contains several chapters, each covering a more specific topic under the general one. Each chapter is then divided into sections, and some of those sections have subsections. I’m sure you get the picture.
You can read the book from front to back, or you can dive right into the minibook or chapter of your choice. Either way works just fine. Anytime a concept is mentioned that isn’t covered in depth in that chapter, you find a cross-reference to another book and chapter where you find all the details. If you’re looking for something specific, check out either the Table of Contents or the Index.
The Cheat Sheet at Dummies.com (find more information inside the front cover) helps you remember all the shortcuts you’ll use most often. Print it, tape it to your monitor, and glance over it when you need to.
And finally, I have pictures. Lots of them. In full, living color. Many of these pictures have callouts that point to specific steps or identify important con-cepts, buttons, tools, or options. With a program like Photoshop, an image often speaks louder than words.
This book contains nine minibooks. The following sections offer a quick syn-opsis of what each book contains.
Book I: Photoshop Fundamentals
Ready to get your feet wet with the basics of Photoshop? Head to Book I. Here’s where you get familiar with the Photoshop environment — the desk-top, menus, and panels. I also briefly introduce the key tools and explain what each one does.
3
What’s in This Book
In this book, I cover how to get started on Photoshop and how to view and navigate your image window. Here’s also where I give you all the important details about the o’mighty Adobe Bridge, and the new Mini Bridge, and how to customize your workspace and preference settings.
Finally, I go into the bare basics of printing, and then how to save files and close Photoshop.
Book II: Image Essentials
This book covers all those nitpicky — but critical — details about images, such as size, resolution, pixel dimension, image mode, and file format. Turn to this book to find out how to safely resize your image without causing undue damage.
You can also find out how to crop images and increase their canvas size. In addition, I breeze through basic color theory and get you started using and managing color.
But wait — there’s more. I give you the lowdown on the History panel and brushing and erasing to history. And, if that’s not enough, I throw in a chap-ter on using and creating actions for enhanced productivity.
Book III: Selections
This important book gives you all the juicy details and techniques on creat-ing and modifycreat-ing selections and paths. You find out about each of the selec-tion tools and also the powerful — albeit sometimes unruly — Pen tool and its accompanying Paths panel.
Book IV: Painting, Drawing, and Typing
If you want to know about the drawing and painting tools, this book is for you. Here I cover the Brush and Pencil tools, including the new Mixer Brush tool, along with the multifaceted Brush panel and new Brush Preset Picker panel. I also show you how to create vector shapes by using the shape tools, and how to fill and stroke selections.
Head to this book to find out how to create both gradients and patterns and, last but not least, become familiar with the type tools and how to use them to create and edit standard type, type on and in a path, and type with special effects.
Book V: Working with Layers
4
What’s in This Book
image. You find out various ways to manage layers for maximum efficiency, including using the Layer Comps panel. I also show you how to enhance layers by applying different blend modes, opacity settings, layer styles, and styles. I round out the minibook by covering Smart Objects. And finally, I introduce you to working with the Auto Align and Auto Blend features.
Book VI: Channels and Masks
This book gives you all the how-tos you need to work with channels and masks. I show you how to save and edit selections as alpha channels so that you can reload them later. And I show you how to work with the various kinds of masks — quick masks, clipping masks, layer masks, and channel masks — and how you can use each to select difficult elements. I also cover other masking techniques, such as erasing and using the Color Range command. Finally, I introduce you to the Masks panel, a powerful ally to the masking arsenal.
Book VII: Filters and Distortions
I filled this book with tons of handy tips and techniques on using filters to correct your images to make them sharper, blurrier, cleaner, and smoother — whatever fits your fancy. I give you the scoop on the Smart Filters feature, which enables you to apply filters nondestructively. You also find out how to use filters to give your image a certain special effect, such as a deckled edge or water droplets. Finally, I introduce the Liquify command so that you can see the wonder of its distortion tools — and how they can turn your image into digital taffy.
Book VIII: Retouching and Restoration
You find everything you need to know about color correction or color enhancement in Book VIII — getting rid of colorcasts, improving contrast and saturation, remapping, and replacing colors.
5
Conventions Used in This Book
Book IX: Photoshop and Print
This book gives you the lowdown on preparing your images for print. You find details on how to get the right resolution, image mode, and file format. You also discover how to set up both process and spot color separations for those offset print jobs.
About the Web Site
For those Web graphics enthusiasts, you find lots of great bonus chapter material on this book’s companion Web site (www.dummies.com/go/ photoshopcs5aiofd). Find out how to optimize your images for maximum quality and quick download times. You also find information on slicing and animating your images and creating a photo gallery that you can easily post on the Web.
Conventions Used in This Book
You’ll find that this book is cross-platform. Windows commands are given first, followed by Mac commands in parentheses, like this:
Press Enter (or Return on the Mac) to begin a new line.
And occasionally, text is specific to one platform or another. You’ll find that figures are divided into both platforms as well.
Often, the commands given involve using the keyboard along with the mouse. For example, “Press Shift while dragging with the Rectangular Marquee tool to create a square,” or “Alt-click (Option-click) on the eyeball to redisplay all layers.”
When you see a command arrow (➪) in the text, it indicates that you should select a command from the menu bar. For example, “choose Edit➪Define Custom Shape” means to click the Edit menu and then choose the Define Custom Shape command.
6
Icons Used in This Book
Speaking of new features, when writing this book, it wasn’t exactly crystal clear what new CS5 features Adobe would be including in the Standard ver-sus Extended versions of Photoshop. So if I’ve included (or not) a particular tool or command that you don’t have, my apologies in advance.
Icons Used in This Book
While perusing this book, you’ll notice some icons beckoning you for your attention. Don’t ignore them; embrace them! These icons point out fun, useful, and memorable tidbits about Photoshop, plus facts you’d be unwise to ignore.
Seasoned users will appreciate this icon, which kindly points out new fea-tures introduced in Photoshop CS5.
This icon indicates information that makes your Photoshop experience easier. It also gives you an icebreaker at your next cocktail party. Whipping out, “Did you know that pressing the bracket keys enlarges or shrinks your brush tip?” is bound to make you the center of conversation.
This icon is a reminder of things that I already mentioned and want to gently re-emphasize. Or I might be pointing out things that I want you to take note of in your future Photoshop excursions.
The little bomb icon is a red flag. Heed these warnings, or else Photoshop may show its ugly side.
This icon marks eggheady graphics or Photoshop info that goes beyond the basics.
Book I
D
on’t know where to start? Well, unless you have a burning question on something very specific, this is a great place to dive in. And I promise you won’t flounder. There’s nothing like a general overview to get you feeling confident enough to tackle more sophisticated features.Chapter 1: Examining the
Photoshop Environment
In This Chapter
✓ Starting Photoshop
✓ Examining the Photoshop desktop ✓ Working with panels
✓ Discovering the Application bar
✓ Investigating the Menu bar and the Options bar
A
s environments go, the Photoshop working environment is pretty cool: as inviting as a landscaped backyard and not nearly as likely to work you into a sweat. Each of Photoshop’s many tools — with more options than a Swiss Army knife — is custom-designed for a specific chore. When you’re familiar with your surroundings, you’ll be eager to make like Monet in his garden, surrounded by panels, brushes, buckets of paint, and swatches of color, ready to tackle the canvas in front of you.Launching Photoshop and Customizing
the Desktop
10
Launching Photoshop and Customizing the Desktop
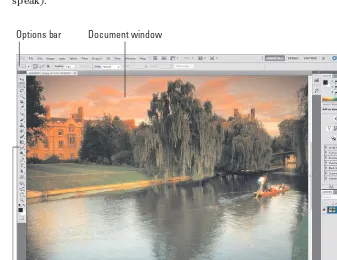
When you launch Photoshop, the workspace, shown in Figure 1-1, appears. Like the real-world desktop where your keyboard and monitor reside, the Photoshop desktop is a place for you to put all the images you’re working with.
Within the Photoshop application window, you see a variety of other win-dows and boxes, such as the image window that enables you to view and edit images. The application window contains the stuff you’re probably used to seeing in other programs — a title bar at the top of the window, a status bar at the bottom (unless you have it turned off) if you’re a Windows user, and menus to help you execute commands and get important information about your image files. However, the arrangement of controls may be a little unfamiliar to you. Photoshop arranges controls into groups, or panels.
Your virtual desktop can become as cluttered as the real thing, but Adobe has built in some special features (located on the Options bar, which I dis-cuss later in this chapter) that let you keep stuff close at hand but tuck things away so they’re not constantly underfoot (or under-mouse, so to speak).
Options bar Document window
Status bar
Tools panel Panels
Dock
11
Launching Photoshop and Customizing the Desktop
After you arrange your Photoshop desktop the way you like it for a specific project, you can even save the desktop and reuse it whenever you work on that project (see Book I, Chapter 5 for details).
Every image you work on appears within the con-fines of the image window. However, you can move some components, such as the various pan-els and the Options bar, both inside and outside the Photoshop application window.
The following sections show you how to custom-ize the workspace so you can get to work.
Setting display settings
with the Window menu
The Window menu, shown in Figure 1-2, controls the display of panels and some other elements of the Photoshop workspace. (Find out more about maneuvering panels in the section “Playing with Panels,” later in this chapter.)
The top two entries on the Window menu enable you to control the display arrangement of your open documents and manage your workspaces.
On the Window➪Arrange submenu, you can tell Photoshop to cascade (stack) or tile (butt edge to edge) all open documents. Your images must be floating in their windows to enable this option (Window➪Arrange➪Float All in Windows).
Photoshop also sports what’s referred to as an application frame. Open documents are tabbed together neatly, one stacked behind the other. If you yearn for the old days and want your images to float within the application, choose Float in Window (for the currently selected image only) and Float All in Windows (for all your images) commands in the Arrange submenu.
Table 1-1 gives you the lowdown about the other options on the Window➪Arrange submenu.
The remaining bulk of the Window menu contains a list of panels (in alpha-betical order) and currently open documents.
12
Launching Photoshop and Customizing the Desktop
Table 1-1
The Window
➪Arrange Submenu
Menu Command What It Does
Consolidate All to Tabs
Takes your open floating documents and tabs them together under the Options bar.
Match Zoom Takes your open documents and matches the magnification percentage of your active document.
Match Location Takes your open documents and matches the location of your active document. For example, if you’re viewing the lower-left corner of your active document and choose Match Location, all your open documents display from the lower-left corner.
Match Rotation Takes your open documents and matches the canvas rotation of your active document.
Match All Employs all Match commands simultaneously.
New Window Opens another view of the same image, allowing you to work on a close-up part of the image while viewing results on the entire image.
Minimize (Mac only)
Hides the image while placing the image’s thumbnail on the Dock. Click the thumbnail to restore the image in Photoshop. Bring All to Front
(Mac only)
If you have multiple applications launched, thus multiple document windows open, this command brings all Photoshop documents to the front, ahead of any document windows from other open applications.
Setting up the status bar
Each Photoshop image window comes equipped with a status bar. Many people tend to associate status with wealth, so I think there’s a good reason to accept the free wealth of information that the status bar offers:
✓ On the far left of the bar is a box that displays an active image’s current zoom level (such as 33.33%). Incidentally, the title bar of the document itself also shows the zoom level.
If you installed Photoshop to a networked computer and you activate the workgroup features, which enable file sharing and other perks, you see the icon for the Workgroup Services pop-up menu just to the right of the zoom-info box.
13
Book I Chapter 1
Examining the
Photoshop
Environment
Launching Photoshop and Customizing the Desktop
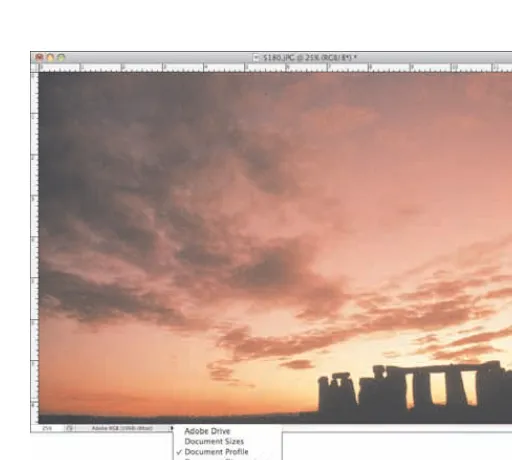
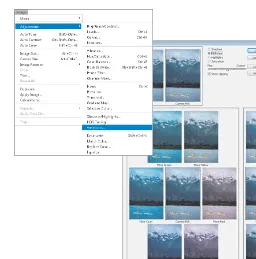
To display other types of information, click the right arrow in the status bar, choose Show, and select one of the following options from the menu that appears (as shown in Figure 1-3):
✓ Adobe Drive: If you’re a Version Cue user, you can select this option, which enables you to connect to Version Cue servers. When you con-nect via Adobe Drive, you can open and save Version Cue files. Adobe has decided to discontinue Version Cue, so the future of the Adobe Drive feature is unknown.
PhotoDisc Figure 1-3: The status bar provides a wealth of vital information about your image.
✓ Document Sizes: When you select this option, Photoshop displays two numbers to approximate the size of the image. The first number shows you the size of the file if you were to flatten (combine) all the layers into one and save it to your hard drive in the native Photoshop file format. The number on the right shows the size of the file, including layers, channels, and other components, and how much data Photoshop has to juggle while you’re working on the file. You want this option active when you need to keep track of how large your image is.
14
Playing with Panels
to know the profiles of all the open documents while making complex color corrections. (You can find more information about profiles in Book II, Chapter 3.)
✓ Document Dimensions: When you select this option, the status bar shows you the size of the image by using the default measurement incre-ment you’ve set in Photoshop’s Preferences (pixels, inches, picas, and so on). You might need this information to reference the physical dimen-sions of your open files. For information on setting preferences in Photoshop, see Book I, Chapter 5.
✓ Measurement Scale: Displays the scale of the document. For example, 1 pixel=1.0000 pixels.
✓ Scratch Sizes: Scratch space is the virtual memory set aside on your hard drive to simulate RAM and make editing large files easier. Enabling this option shows two measurements for an active image. On the left, you see the amount of real memory and virtual memory that all open images are using. On the right, you see the total amount of RAM avail-able for working with images. Photoshop needs a lot more memory and disk space to work on an image while that image is open, shown by the Scratch Sizes display, as opposed to the Document Size display that shows only the file size of the document.
✓ Efficiency: This indicator helps you gauge whether you really have enough RAM to perform a task. It shows the percentage of time Photoshop spends actually working on an operation, compared to the time it must spend reading or writing image information to or from your hard disk. If the value dips below 100 percent most of the time, you need to allocate more memory to Photoshop (if you’re using a Windows PC). For more information on parceling out RAM, see Book I, Chapter 5.
✓ Timing: This number shows you how long it took you to complete your most recent incredible feat.
✓ Current Tool: This option shows you the name of the tool currently in use.
✓ 32-Bit Exposure: This option is for adjusting the preview image for view-ing 32-bit High Dynamic Range (HDR) images. The slider control is avail-able only if you have an HDR image open. Book IX, Chapter 2 covers HDR.
Playing with Panels
15
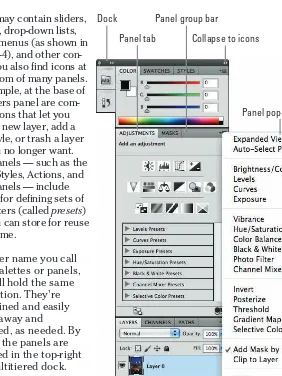
Panels may contain sliders, buttons, drop-down lists, pop-up menus (as shown in Figure 1-4), and other con-trols. You also find icons at the bottom of many panels. For example, at the base of the Layers panel are com-mand icons that let you create a new layer, add a layer style, or trash a layer that you no longer want. Many panels — such as the Brush, Styles, Actions, and Color panels — include options for defining sets of parameters (called presets) that you can store for reuse at any time.
Whatever name you call them, palettes or panels, they still hold the same information. They’re streamlined and easily tucked away and
expanded, as needed. By default, the panels are anchored in the top-right by a multitiered dock.
Here’s how to open, close, and otherwise manipulate a panel group, which can be accessed easily from the Window menu:
✓ To expand a panel: Panels are represented by icons when collapsed. To expand a panel, simply click its icon. You can also select a panel by choosing it in the Window menu.
✓ To bring a panel to the front of its group: When the panel group is expanded, the visible panel is the panel that has a check mark next to it on the Window menu. In this mode, you can select only one panel in any group because only one tab in a group can be on top at one time. When you select a panel from the Window menu, you have no way of knowing which panels are grouped together because Adobe lists panels alphabet-ically, rather than by groups. To bring a specific panel to the front, click its tab (when expanded) or icon (when collapsed).
Dock
Panel tab Collapse to icons
Panel pop-up menu Panel group bar
16
Working with Your First Photoshop File
✓ To move a panel out of its group: Grab the panel’s tab with your mouse and drag it to its new location, such as another group, the panel dock, or the Photoshop desktop. If you move the panels out of their groups or drag them onto the desktop so they stand alone, any of them can be selected in the Window menu.
✓ To collapse a panel: Click the gray area next to the tab.
✓ To close a panel: Select a check-marked panel in the Window menu. The whole panel group closes. You can also select Close or Close Tab Group from the panel’s pop-up menu.
Here are some more panel-manipulation tips:
✓ Expand or collapse the dock. To do so, click on the double triangles at the top of the dock.
✓ Reduce a panel to its icon. Drag the panel by its tab and position it below the existing column of icons. Release your mouse button to make the panel collapse to its corresponding icon.
✓ Save space by keeping panels in groups. You can move all the panels in a group by dragging the gray area to the right of the group’s tab. Access an individual panel by clicking its tab to bring it to the front. As a result, several panels occupy the screen space required by only one.
✓ Use the Window menu if you can’t find a panel. On the Window menu, select the panel’s name to make it visible or to bring it to the top of its group.
✓ Customize, customize, customize. After you use Photoshop for a while, creating your own custom panel groups based on the panels you most often use can be a real timesaver. For example, if you don’t use the Paths panel very often but can’t live without the Actions panel, you can drag the Paths panel to another group or to the panel dock area, and put the Actions panel in the same group as the mission-critical Layers and Channels panels.
✓ Restore default panel locations, when desired. If you decide you don’t like the way you’ve arranged your panels, you can choose Window➪ Workspace➪Essentials (Default) to return them to the default configura-tion (the way they were when Photoshop was installed).
Many panels (for example, the Swatches and Character panels) allow you to reset the settings back to their defaults. To do so, select Reset from the pan-el’s pop-up menu located in the top-right corner.
Working with Your First Photoshop File
17
Working with Your First Photoshop File
approximately 8,192 different menu selections for you to choose from. In truth, Photoshop has only about 500-plus separate menu items, including some duplicates. That figure doesn’t count the 100 or so entries for filter plug-ins (which can expand alarmingly when you add third-party goodies). However, even 500-plus menu items are considerably more than you find in the most ambitious restaurants. Basically, if you want to do something in Photoshop, you need to use the Menu bar (or its equivalent command snug-gled within a panel menu). If you’re using the Mac OS, the Photoshop Menu bar may share space with Finder components (such as the Apple menu).
The following sections offer a summary of what you can find and where you can find it.
Photoshop also helps you by providing efficient context menus, which change their listings depending on what you’re doing. You don’t see options you don’t need; you see options appropriate to what you’re working on. Right-click (Right-click or Control-click on the Mac) to bring up the menu.
Opening, printing, and saving files
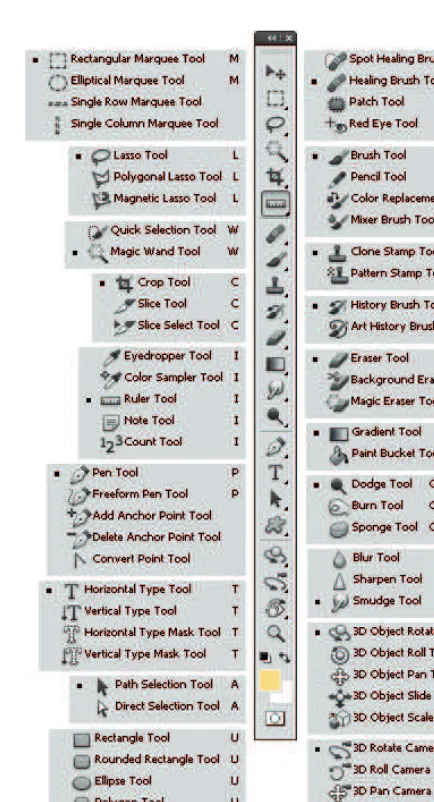
The File menu offers a cornucopia of file options, from opening new images and opening saved files to browsing existing files, closing files, and saving files. You’ll find automate, scripts, and print commands, too. To open a file, choose File➪Open and navigate to the folder containing the file you want to open. Select the file and click Open. For detailed instructions on the many ways you can open files, see Book I, Chapter 3.
Making selections
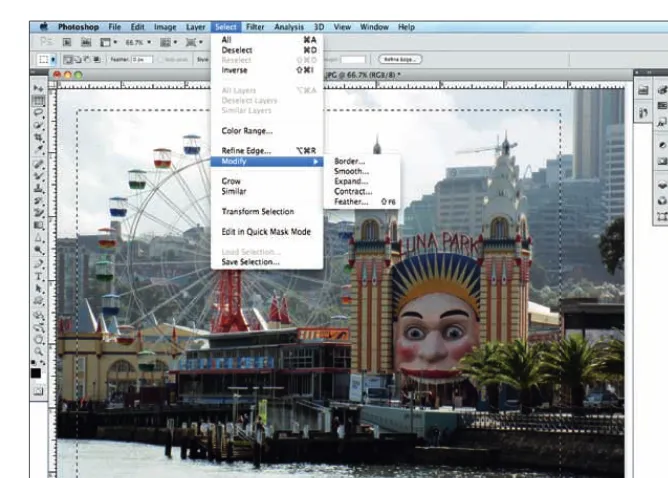
Selections let you work with only part of an image. You can select an entire layer or only portions of a layer with one of the selection tools, such as the Marquee or Magic Wand tool. The Select menu offers several commands to modify your selection — from capturing more pixels to softening the edges of the selection. The Select menu (shown in Figure 1-5) is short and sweet, but the capability and control that the menu unleashes is nothing short of an image-editing miracle.
Understanding selections is such an important cornerstone to your Photoshop knowledge that I devote an entire minibook (Book III) to showing you how to use them.
Making simple image edits
18
Working with Your First Photoshop File
Purestock Figure 1-5: The Select menu offers commands for making, modifying, saving, and loading your selections.
Adjusting size, color, and contrast
You’d think the Image menu (shown in Figure 1-6) might have something to do with making changes to an entire image document, wouldn’t you? In prac-tice, some of the entries you find here do apply to the whole document, but others can apply to only particular layers or selections.
For example, the Mode menu item allows you to change an entire image from color to grayscale. The Image Size, Canvas Size, Image Rotation, Crop, and Trim selections all change the whole document in some way. On the other hand, you can only apply the changes wrought from the Adjustments sub-menu to an entire image if the document consists of only a background and has no layers. If the document has more than one layer, then adjustments such as Color Balance, Hue/Saturation, or Levels work only with a single layer or a selection on that layer.
19
Book I Chapter 1
Examining the
Photoshop
Environment
Working with Your First Photoshop File
Alaska Stock Images Figure 1-6: The Image menu is where you find commands for adjusting the size, color, and contrast of your image.
You’ll find yourself turning to the Image menu more often than many of the other menus, partially because it’s so useful and partially because, for some reason, many of the options don’t have keyboard shortcuts that let you bypass the menu.
Creating layers
Layers give you a way of stacking portions of an image — like sheets of acetate — on top of one another so that you can work on individual pieces separately. Then, when you’re satisfied with your changes, you can either combine the changes into a final image or leave them in layers for maximum editing flexibility.
20
Working with Your First Photoshop File
to the front or top of the stack, and so on) and grouping layers. Figure 1-7 shows an image that has three layers: The first layer is the symphony image, the second layer is the instrument, and the third layer contains the type.
You also can merge layers down, combine them with all other visible layers, or flatten them into one single-layer image (or background). Although con-solidating your layers makes the file smaller, flattening is irreversible after you close the file. Storing an unflattened version of a file is always a good idea in case you want to make more changes later on.
Applying filters
A filter is an effect that changes an entire layer, channel, or selection. Some common filters include the Blur and Sharpen filters, as well as the Distort fil-ters, such as Spherize. The Filter menu, shown in Figure 1-8, consists almost entirely of cascading categories of image-transmogrifying plug-ins. You can wade through this menu to find the perfect effect to apply to an image or selection. Book VII has everything you need to know about filters.
21
Working with Your First Photoshop File
After you apply a filter, Photoshop copies the filter command to the top of the Filter menu for easy accessibility, in case you want to reapply the filter with the exact same settings.
The Filter Gallery command allows you to apply several filters simultaneously in one neat editing window.
Liquify and Vanishing Point are more like mini-programs than filters. The rest of the Filter menu consists of 14 filter categories, each containing from two to more than a dozen options:
✓ Single-step filters, such as Blur, Facet, and Clouds, are simple to use but make a huge impact on an image. Just select each filter to apply it; it has no options to specify.
✓ Dialog box-based filters let you select options galore. These filters
utilize preview windows, buttons, slider controls, and menus to distort, pixelate, sharpen, stylize, apply textures, and perform other functions.
✓ The Filter menu also provides an opportunity to convert for Smart Filters. If you convert your layer to a Smart Object, you can then apply a Smart Filter. A Smart Filter is smart because it doesn’t alter your image pixels, but merely hovers above them, thereby allowing you to re-edit, or even remove, the filter if necessary. For the scoop on this cool (and very useful) feature, see Book VII, Chapter 1.
If you install additional filters from third parties, Photoshop lists them at the very bottom of the Filter menu. You can find third-party filters at such Web sites as www.alienskin.com, www.andromeda.com, and www.autofx.com.
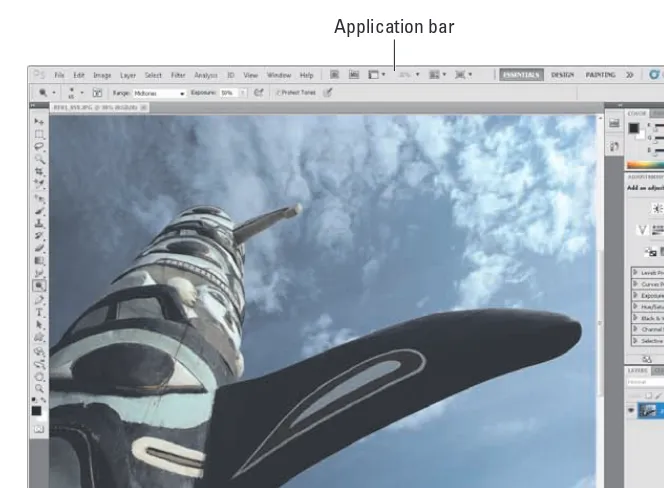
Unifying with the Application bar
The Application bar, shown in Figure 1-9, located at the far end of the main menu in Windows and directly below the main menu on the Mac, consoli-dates commands and features previously found, or also found, elsewhere in the application. For more details on most of these commands, check out Book I, Chapter 4. Here’s what you can find on this bar:
✓ Application icon: The Photoshop icon is displayed to simply identify the application. In Windows, clicking the icon displays the standard system menu.
22
Working with Your First Photoshop File
✓ Launch Bridge: This button allows you to access the image-management application, Bridge, with a mere click.
✓ View Extras: Click this icon to select whether to show guides, the grid, or rulers from the drop-down list. For more on these items, see Book I, Chapter 4.
✓ Magnification Percentage: Displays the current magnification percent-age. Click the down arrow to select from preset percentages of 25%, 50%, 100%, and 200%. Or enter your desired magnification percentage in the text field.
✓ Hand and Zoom tools: Select these tools from the Application bar or Tools panel — your choice. Use the Hand tool to move around your image window and the Zoom tool to zoom in and out. For more on these two tools, see Book I, Chapter 4.
✓ Rotate View tool: Select this tool from either the Application bar or Tools panel. This tool actually rotates your entire image window, not just the image within the boundaries of the window.
✓ Arrange Documents tool: Click the down arrow to select various view-ing configurations. Dependview-ing on the number of open images you have, various configurations will be available. You can also choose to float, rather than tab, your open images; create a new window; and display actual pixels or fit your entire image onscreen. See explanations of the Match commands in the earlier “Setting display settings with the Window menu” section in this chapter.
✓ Screen Mode Switcher: Click the down arrow to select from standard, full screen with Menu bar, and full screen modes.
✓ Workspace Switcher: Click the down arrow to select a different work-space. Selecting the Essentials workspace resets all your panels and menus to the default settings.
If you’re a Mac user and don’t care for this bar, hide it by choosing Window➪Application Bar to deselect it. Also, if you use other CS5 appli-cations, you may find a similar Application bar.
Simplifying your edits with the Options bar
23
Book I Chapter 1
Examining the
Photoshop
Environment
Working with Your First Photoshop File
Application bar
Figure 1-9: The Application bar unifies commonly used features in one centralized location.
Options bar
24
Working with Your First Photoshop File
Because the Options bar changes its appearance with each active tool, I can’t explain all the components you might find there, but all Options bars do have some common characteristics:
✓ Gripper bar: Grab this little bar, on the far left, with the mouse and drag to undock or dock the Options bar. You can let the Options bar float anywhere in the workspace.
✓ Tool Presets/Options pop-up menu: This box displays the icon of the cur-rently active tool. Click the down arrow to access a drop-down list that includes a selection of brush tips (for painting and erasing tools); a flyout menu that lets you select presets (saved settings) for various tools; and additional options to set, such as the size of the icons used to represent brush tips. You may also reset a particular tool — or all tools — to the Photoshop default values.
✓ Bar options: Additional options, such as mode, opacity, feather, type styles, and fonts are arrayed on the rest of the Options bar.
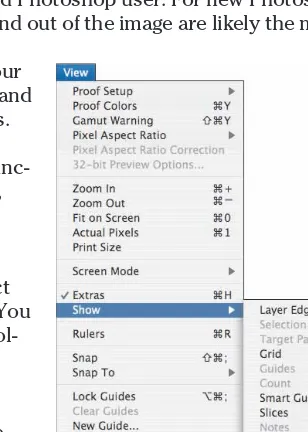
Viewing and navigating the image
A hodgepodge of functions is sprinkled throughout the View menu. Some of them, such as Proof Setup, Proof Colors, and Gamut Warning, won’t trouble you until you’ve become a fairly advanced Photoshop user. For new Photoshop users, the commands to zoom into and out of the image are likely the most familiar. You can also choose your
screen mode, which lets you view your image full-screen with the Menu bar and panels, or full-screen with just panels.
You’re better off accessing some func-tions, especially the zoom features, through keyboard shortcuts. See Book I, Chapter 5 for details.
From the View menu, you can select which extras Photoshop displays. You can choose to show (or hide) the fol-lowing, as shown in Figure 1-11:
✓ Layer Edges: Displays a blue-stroked box that surrounds the boundaries of the content of the selected layer.
✓ Selection Edges: Moving lines that define the boundary of a selection, which are very useful for obvious reasons.